the aga khan university online admissions · 2016-05-12 · page 2 of 14 navigating the aku online...
TRANSCRIPT

Page 1 of 14
The Aga Khan University
Online Admissions

Page 2 of 14
Navigating the AKU Online Application Form
A step-by-step User‟s Guide
Dear Applicant,
This User‟s Guide has been designed to help you complete the Online Application Form.
Admissions Office staff are also available if you need to talk to us. Please call us at +922 13486-
4410/4412 or email [email protected] and we will get back to you within three
working days of your request.
Some advice
1. To open our Online Application Form, we recommend that you may use Internet
Explorer or Firefox browsers.
2. You must follow the instructions and hints on each page before going to the next. Doing
this will ensure that the information required on a page is complete in all respects.
3. We recommend that you review the relevant admission requirements for the programme
for which you are applying before you complete the online application.
4. The information provided with this bell signifies must read information.
Step 1:
1. Login to the Online Application Form website: www.aku.edu/apply-online
2. This will take you to the Login page as shown in Figure 1:
Figure 1

Page 3 of 14
3. Click on “New User” link on the right-hand side of the screen. You will go to Figure 2
4 Enter your Personal information as required.
5 Create your account by entering your personal email address and password as requested.
NOTE: The personal email address should be the one you will use throughout the
admission process.
6. Your password must have at least 7 characters including one special character (@, #, $,
%) and one number: (e.g. Karachi.12);
7. When you click “Register” you will receive a registration confirmation email at the email
address you have provided. If you do not receive a confirmation email, check your Junk
email.
Figure 2

Page 4 of 14
Note:
You may apply for multiple programmes using the same account.
Create only one account using only one email address.
Only one account can be created per each CNIC, Passport Number, B-Form etc.
Step 2 Creating your Personal Page
1. Go to your confirmation email and click on the link provided. This will take you to the
login screen (Figure 1).
2. Enter your email address and password – the same email address and password that you
created in Figure 2. Click “Login”.
3. The following pages (Figures 2a and 2b ) will open:
4. Verify the information provided at the time of registration and complete the additional
required details on the page to create an application.
For Figure 2b, the Correspondence Address: please provide the complete address to
where we will courier your Admit Card.
Figure 2a

Page 5 of 14
If the name of the City in which you live does not appear on drop down list when you
look-up , please click “Other City” and type the name of your city in the space
provided.
When you click “Save” you will move on to the next page.
Figure 2b

Page 6 of 14
The header of this page will be “New Application. ” See Figure 3a. This page allows you
to select the programme/programmes for which you are applying, including the country
where the programme will be offered.
After choosing your programme and you have clicked the “Create new Application”
button, the system will give you a prompt warning. See Figure 3b
Only if you are sure about your choice, click “Yes” to continue.
An application once created cannot be deleted.
Figure 3a
Figure 3b

Page 7 of 14
If you wish to apply for more than one programme, you must complete all the online
application requirements for one programme first. Then go to “New Application” again
and complete the application requirements for another programme.
Following completion of the New Application information, the system will take you to the next
set of screens where you will be required to enter programme-related information.
Step I: Academics
On this page (Figure 4), you must enter all academic qualifications, one at a time. For example:
Start with Grade 10 (e.g. Secondary School Certificate (SSC), O-Level etc.) in the section
where it reads Certificate/degree.
Enter the name of the Institution from where you obtained this qualification. If the
specific Institution Name is not found in the lookup field, please type the complete
name of the Institution in the space provided.
Enter the name of the Board of Education [Sindh Board, Aga Khan University
Examination Board etc.] and if this is not available, the name of the country in which this
qualification was completed.
Enter the year of completion.
Enter the grade type: this may be indicated as a GPA (Grade Point
Average)/Grade/Division/Percentage; reflected on your transcript for this qualification.
Total Marks as provided in your mark-sheet and marks obtained.
If you are awaiting final grades, you must click the “Results Awaited” box.
After you complete a „qualification‟, if you have further qualifications to input, click on
„Save & Add New.‟ When you do this, a grid will appear at the bottom of the page. You
must check the grid at the bottom to ensure accuracy of your information.
When you have completed adding all of your qualifications, click on „Save & Finish.‟
The system will take you to the next screen automatically.

Page 8 of 14
Step II: Other Tests
This screen (Figure 5) is applicable for candidates applying for the MBBS (Bachelor of
Medicine, Bachelor of Surgery) programme only. Specifically, this screen applies to candidates
who are eligible to write the MCAT (Medical College Admission Test) or SAT I (Scholastic
Aptitude Test -1) and, according to eligibility requirements, the SAT II (Scholastic Aptitude Test
- II).
Figure 4
Figure 5
Page 9 of 14
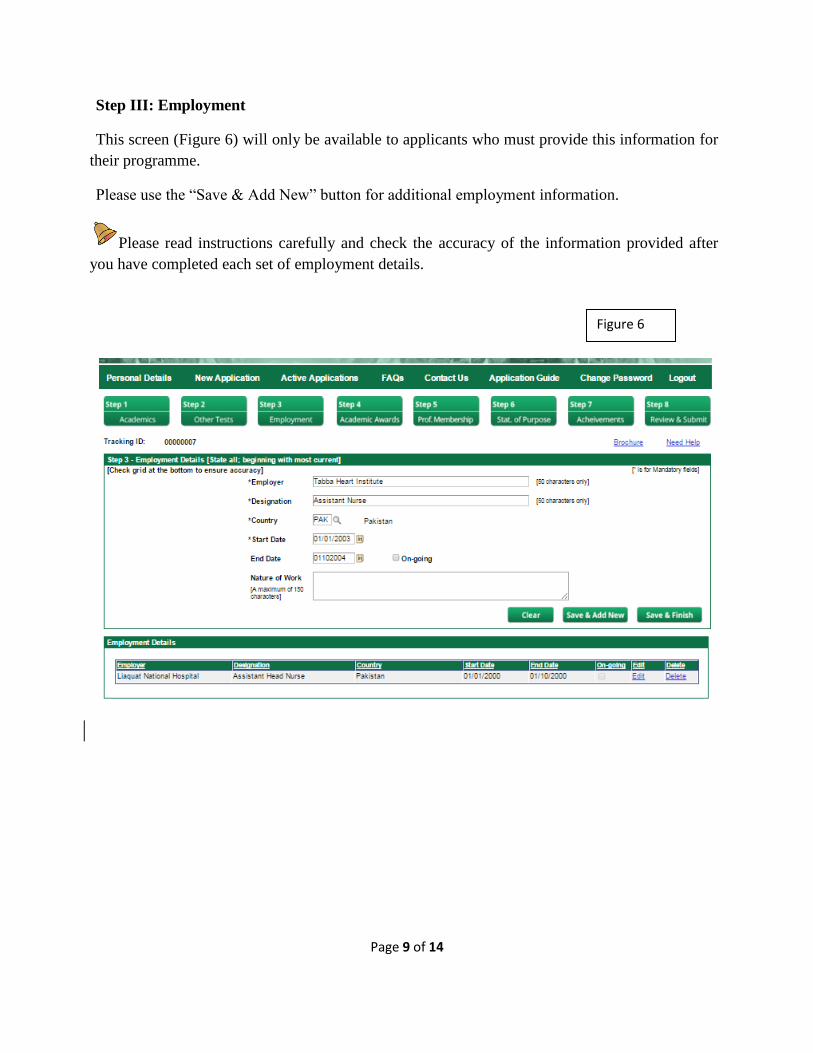
Step III: Employment
This screen (Figure 6) will only be available to applicants who must provide this information for
their programme.
Please use the “Save & Add New” button for additional employment information.
Please read instructions carefully and check the accuracy of the information provided after
you have completed each set of employment details.
Figure 6

Page 10 of 14
Step 6: Statement of Purpose
This screen (Figure 7) will only be available to applicants who must provide this information for
their programme.
Figure 7

Page 11 of 14
Step 8: Review and Submit
In addition to providing the information about your Test and Interview Centre and proof of
payment (Figure 8), this section requires that you review the data already provided in the earlier
pages, to submit the application and to print a copy of your application.
1. To provide information about your chosen Test Centre and Proof of Payment.
For Test and Interview Centre:
View available Test Centre‟s from the lookup and select one.
If the Interview Centre is not found in the lookup, please enter your preferred choice
in the space provided as “Other Interview Centre”.
For Application Fee:
The application fee is non-refundable. Please be sure you are eligible to apply to the
chosen programme.
You must enter the following payment details:
Accurate transaction number,
Mode of Payment,
Bank name and
Date of payment as given on the receipt.
2. Before „Submitting‟ your application, please review all of the information that has
been entered in the earlier pages. Then Submit.
You must review all the entered information and then click and save information on this
page.
Before final submission of the form, information can be amended on this page,
incase changes are required or additional information is to be added.
To Submit and be able to get to a copy of the Application:
After reviewing all the information, click “Save”.
The submit button will become active.
Click the “Submit” button.
A PDF application form will come up on the screen.
Click “Save”
You may now print a copy of this application form.
NOTE: The online system will not allow you to submit the application if any
mandatory information in the form is missing.

Page 12 of 14
The system will not allow any changes in the application form after the form is
submitted.
PLEASE REMEMBER:
This application form must be sent with all supporting documents to the
address provided in the check list. The application form will not be accepted
without supporting documents and the application fee.
Figure 8

Page 13 of 14

Page 14 of 14