the adobe® framemaker® 7.0 xml cookbook · xml, html, and sgml publishing software. framemaker...
TRANSCRIPT

The Adobe® FrameMaker® 7.0 XML Cookbook
The Adobe® FrameMaker® 7.0 XML Cookbook 1

Welcome
Welcome
Welcome to Adobe FrameMaker 7.0, the premier desktop authoring, page-layout, andXML, HTML, and SGML publishing software. FrameMaker 7.0 advances the ease ofpublishing to paper, PDF, and common markup languages for Web display and dataexchange (HTML, XML, SGML). FrameMaker combines easy-to-use word-processing,page-layout, large file, and book handling features and provides a powerful authoring andpublishing platform for small and large projects. Structured FrameMaker adds StructuredAuthoring—today’s popular method of structuring and organizing information—so thatcontent and organization can be tightly controlled and, therefore, easily integrated withcontent management and publishing systems.
Many new and enhanced features in FrameMaker 7.0 increase the value of FrameMaker asyour content authoring and publishing application. The XML Cookbook highlights manyof these important capabilities in Structured FrameMaker including:
• Structured Authoring• XML Importing and Exporting• Read/Write Mapping Rules• CSS and XSL• SVG• Tagged PDF.
FrameMaker 7.0 also includes two important XML-related enhancements:
• XHTML support• Updated DocBook 4 for XML.
2 The Adobe® FrameMaker® 7.0 XML Cookbook

Overview
Overview
About this Document
The XML Cookbook is intended to give you a jump-start at implementing a StructuredAuthoring system for your documentation. You will be guided through the development,authoring, and publishing stages—from creating a structured authoring template toimporting and exporting XML. This document contains examples, illustrations, and mini-tutorials to help build your skills with Structured FrameMaker 7.0 and intended for usewith the English version of FrameMaker.
The XML Cookbook is divided into ten sections to help you learn, study, and review eachaspect of setting up Structured FrameMaker for XML authoring, importing, and exporting:
• Cookbook Setup: Setting up your computer for the XML Cookbook exercises.
• Application Setup:Setting up Structured FrameMaker for Importing and Exporting XML.
• Creating Read/Write Rules:Creating the rules that Structured FrameMaker uses to import and export XML,including rules for mapping names, applying formatting, and managing multiple filesand books.
• Enabling Namespaces:Defining how Structured FrameMaker handles XML Namespaces when import orexporting XML.
• Document Schemas:Generating a Structured FrameMaker Element Definition Document (EDD) from anXML DTD and adding formatting controls.
• Reading XML Documents:Opening and rendering an XML document as a Structured FrameMaker document.
• Reading XML Fragments:Importing an XML fragment into a Structured FrameMaker document.
• Structured Authoring:Using “Guided Editing” to easily edit and validate a Structured FrameMakerdocument.
• Writing an XML Instance:Exporting an XML instance from a Structured FrameMaker document.
• XSL Stylesheets and CSS Stylesheets (CSS):Defining the behavior of Structured FrameMaker for creating a CSS or forreferencing a CSS or XSL when exporting XML documents.
The Adobe® FrameMaker® 7.0 XML Cookbook 3

Overview
About Structured and Unstructured FrameMaker 7.0FrameMaker 7.0 comes with two user interface environments: Structured andUnstructured. You choose which environment you want work in when you launchFrameMaker 7.0, and you can change the environment at any time. Your decision to usethe structured environment versus the unstructured environment will generally depend onthe type of documents you produce and your publishing and distribution plans. Bothenvironments provide an ideal authoring and publishing solution for individuals, smallgroups, and the enterprise. With its integrated authoring and publishing capabilities, aflexible and easy-to-use interface, and a wide range of input and output options,FrameMaker 7.0 can handle the whole job—from content creation, to composition andpagination, to distribution in multiple formats.
Structured FrameMaker 7.0 extends the basic FrameMaker interface to enable you toeasily structure your content so that it is similar to the structure that is applied to XML orSGML, enabling smooth incorporation of XML into your publishing process.
The key benefits of Structured FrameMaker 7.0 include:
• A user-friendly interface that hides the technicalities of markup such as HTML, XML, and SGML.
• Automation of many of the difficult aspects of markup, such as ID, entity, and Namespace management.
• Integrated authoring and publishing components enabling you to handle the entire writing and publishing job with a single tool.
• Powerful hypertext authoring and cross-referencing tools for creating online documents efficiently.
• Support for Japanese and Roman text to facilitate creating content for audiences worldwide.
• Robust composition and pagination, including color support.• Built-in conversion to PDF, XML, SGML, and HTML, including the preservation of
hyperlinks.• A complete set of tools for creating and maintaining XML and SGML publishing
applications.
Unstructured FrameMaker 7.0 is the perfect tool for basic word processing and authoringthat have paper and PDF publishing requirements.
Structured and Unstructured DocumentsYou can author and publish XML from both Structured and Unstructured FrameMaker 7.0documents. The steps to generate XML will be different depending on the document type.
Structured FrameMaker DocumentsIt is easy to create XML from your Structured FrameMaker 7.0 documents. Severalsupport files control the authoring, importing, and exporting behaviors of your project. Tostart Structured Authoring, all you need is a Structured Template. Before you save yourfirst XML document to XML markup, you will set up your XML Application File,reference your XML DTD, and create your XML Read/Write rules.
4 The Adobe® FrameMaker® 7.0 XML Cookbook

Overview
Unstructured FrameMaker DocumentsTo create XML from your Unstructured FrameMaker 7.0 documents, you will useQuadralay WebWorks. For information on using Quadralay WebWorks see the AdobeFrameMaker 7.0 User Guide and also the WebWorks Publisher StandardEdition Getting Started guide.
About Structured AuthoringStructured authoring assembles, or wraps, text into elements, that are in turn contained, orwrapped, within other elements. This assembly of elements, or structure, allows for adocument construction that describes content in terms of a hierarchy. Beyond the visualformatting of paragraphs, structured elements provide additional information; theirplacement within the structure can imply importance and meaning. Elements may containattributes, also known as meta-data (information about information).
In 1986, Standard Generalized Markup Language (SGML) became in internationalstandard (ISO 8879). Its goal: to provide a standardized method of describing and creatingstructured documents independent of any hardware, software, formats, or operatingsystem. Since SGML documents conform to an international standard, they are portableand can be easily exchanged with other users.
More recently, Extensible Markup Language (XML) has been adopted by the World WideWeb Consortium (W3C), an international organization made up of software industryleaders including Adobe, Intel, and Microsoft, as well as numerous other representativesfrom the software/hardware industry and academia. Now, with FrameMaker 7.0, authorscan create structured documents using either markup language—SGML or XML.
Why FrameMaker 7.0 for Structured Authoring
The XML syntax is comprehensive and can take a long time to master. Most text editorsfor XML are not user-friendly and vary greatly from one operating system to another.
FrameMaker 7.0 hides the markup syntax from the author and provides a powerfulgraphical user interface that is easy to learn and use. The Structured View enables you tolook at the hierarchy of your structure. The Element catalog guides you easily through themost complex structures, helping you to make decisions about valid elements at anylocation in the document. The Validation tool quickly locates invalid elements and assistsyou in correcting the errors.
Although FrameMaker 7.0 documents are not XML documents, they can be easilyexported to XML as well as SGML, XHTML, and HTML. FrameMaker can easily importXML and SGML as well as add structure to unstructured documents through the use of aconversion table.
Structure Features: Structured FrameMaker 7.0 is a complete structured publishingsystem providing:
The Adobe® FrameMaker® 7.0 XML Cookbook 5

Overview
• Elements to organize content• Attributes to add element information• Validation to delete invalid structure• Conversion tables to add structure• Structure Window to view elements• Catalog to organize element use.
6 The Adobe® FrameMaker® 7.0 XML Cookbook
XML Cookbook Setup
XML Cookbook Setup
Your Practice FolderThe XML Cookbook requires that you create a practice folder for your project files. Youwill copy XML Cookbook files from the XML Cookbook CD or Web site to your projectfolder.
1. Create your practice folder.• On your computer, create a new folder and name it “Practice”.
2. Copy the folders and files from the XML Cookbook disk or Web site into the “Practice” folder.• Copy the “App” and “ART” folders to the “Practice” folder.• Copy the “ColorDoc.xml”, “ColorSection1.xml”, and “ColorSection2.xml”
files to the “Practice” folder.3. Create a folder to hold the XML files that you will create.
• In the “Practice” folder, create a folder and name it “XML”.
The Adobe® FrameMaker® 7.0 XML Cookbook 7

Application Setup
Application Setup
Components of a Structured FrameMaker XML ApplicationThe XML Cookbook comes complete with all the files you need to author and createXML documents:
• Structured Template—A blank FrameMaker document that contains element and attribute definitions, which are rules that define when and where those elements and attributes can be used in a Structured FrameMaker document.
• XML DTD—The XML rules document that defines the elements and attributes that can be used when creating an XML document.
• Read/Write Rules—A document containing mapping rules that control how XML is imported into Structured FrameMaker documents and exported from Structured FrameMaker documents.
• CSS—A stylesheet used to format structured content in a Web browser.• XSL—A stylesheet used to format structured content in a Web browser; similar to a
CSS but with more control over the formatting and positioning of elements.• SVG and TIFF Graphics—Two types of graphics that can be imported into
FrameMaker documents.• XML document instances—XML documents that contain well-formed XML
structure. “Well-formed XML” means that the XML document has one root element and that all other elements are properly nested.
Setting up the XML ApplicationIn order for FrameMaker to import and export XML, you need to identify to FrameMakerthe locations of all the necessary files and define the preferences. This is called “creatingan application” and is accomplished using a specific type of FrameMaker file (a structuredapplication definition document) with the filename of structapps.fm.
Getting StartedTip Typically, the Structured Template designer creates and edits the XML applications to be used by the Structured FrameMaker authors.
To create a Structured XML application you can either edit the default structapps.fmthat is installed with Structured FrameMaker or make a copy for you own use.
You will include references to the following files in your XML Cookbookstructapps.fm file:
• XML DTD—XML rules document• ChapterTemplate.fm—Structured FrameMaker template• ChapterReadWriteRules.fm—Read/Write mapping rules document.
You will also set the following preferences in your XML Cookbook structapps.fmapplication:
8 The Adobe® FrameMaker® 7.0 XML Cookbook

Application Setup
Tip The structapps.fm file is used to manage applications for both XML and SGML import and export.
• Namespaces—Enabled to preserve Namespaces on XML import and export• Stylesheet—CSS and XSL references to tell your exported XML how to reference a
stylesheet.
The following graphic shows a sample Application created to import and export DocBookXML.
Notice that the Application above is comprised of file references and application settings.Preparing an application is similar to setting parser and application settings in a Web orXML environment.
The first step in setting up your XML Application in the structapps.fm file is to identifyall the files that are needed for XML import and/or export. Structured FrameMakerprovides a default structapps.fm document that you will open and save into yourpractice folder for use with your XML Cookbook lessons.
The Adobe® FrameMaker® 7.0 XML Cookbook 9

Application Setup
1. Start FrameMaker, and check to see if you are currently running Structured FrameMaker.• Start FrameMaker 7.0.• Choose the File>Preferences>General command (Windows and Macintosh)
or the keyboard shortcut !fP (Unix).• Check the value in the Product Interface drop-down menu.
• If the Product Interface is not “Structured FrameMaker”, change the optionto “Structured FrameMaker”, click the Set button, and restart FrameMaker.
10 The Adobe® FrameMaker® 7.0 XML Cookbook

Application Setup
2. Open the structapps.fm file.Tip The default structapps.fm file is located in the “Structured” folder in the FrameMaker folder. You can open it using the File>StructureTools> Edit Application Definitions command or by using the File>Open command to locate and open it.
If you do not see the File>StructureTools menu, you are currently running unstructured FrameMaker and not Structured FrameMaker. To change to Structured FrameMaker, choose the File>Preferences> General command, change the Product Interface to Structured FrameMaker, click the Set button, and restart FrameMaker.
• Choose the File>Structure Tools>Edit Application Definitions command(Windows and Macintosh) or use the keyboard shortcut !fTA (Unix).
Or use the following procedure:
• Choose the File>Open command (Windows and Macintosh) or use thekeyboard shortcut !fo (Unix).
The Adobe® FrameMaker® 7.0 XML Cookbook 11

Application Setup
• Locate and open the structapps.fm document in the Structured folder inthe FrameMaker folder. For Macintosh users, ensure that the “Show AllFiles” button is selected. For Unix users, open the file: $FMHOME/fminit/usenglish/structure/structapps.fm.
Tip You will work in your own copy of structapps.fm for the XML Cookbook. You do this by opening FrameMaker’s default structapps.fm file and then saving it to a new location on your computer.
3. Save the structapps.fm file into your “App” folder.• Choose the File>Save As command.• Navigate to the “App” folder in your“Practice” folder.• Click the Save button.
Tip The default application file installed with Structured FrameMaker contains applications for several XML and SGML publishing projects including DocBook, XDocBook, and XHTML.
4. Take a moment to review the contents of structapps.fm. You will edit structapps.fm to define an application for your XML Cookbook.Notice that structapps.fm is a structured document. For ease of navigation andediting, you will add your XML Application to structapps.fm with elementboundaries turned on and the Element Catalog and Structure View open.
Element Boundaries identify the beginning and ending of elements in your document.You can view the elements with square brackets or as Tags by choosing theappropriate command from the View menu.
12 The Adobe® FrameMaker® 7.0 XML Cookbook

Application Setup
• Choose the View>Element Boundaries command to turn ElementBoundaries on.
The Element Boundaries guide you through the document’s structure
The Adobe® FrameMaker® 7.0 XML Cookbook 13

Application Setup
• Choose the Element>Element Catalog command or click on the ElementCatalog icon to open the Element Catalog.
• Click the Structure View icon, located in the top right-hand corner of thedocument window, to open the Structure View.
Tip Structapps.fm on Unix does not include the XDocBook and DocBook applications.
The Element Catalog guides you through the process of inserting elements
The Element Catalog helps you insert valid elements.
The Structure View is a hierarchical view of the document’s structure.
14 The Adobe® FrameMaker® 7.0 XML Cookbook

Application Setup
• In the Structure View, click above the first “SGMLApplication” element toplace your insertion point.
The Element Catalog displays valid elements. Notice that XMLApplication is one ofyour valid choices. The Element Catalog display can be set to display more than validelements. To set the Element Catalog display, click the Options button in the ElementCatalog.
Tip Although XML and SGML applications in Structured FrameMaker are very similar, one difference to note is that an SGML application can include an SGML Declaration document and an XML application does not.
5. Begin defining your XML Application by inserting the “XMLApplication” element.• In the Element Catalog, select the “XMLApplication” element.
Insertion point
The Adobe® FrameMaker® 7.0 XML Cookbook 15

Application Setup
• Click the Insert button to insert the “XMLApplication” element.
The XMLApplication element and its first child, ApplicationName, are inserted.
16 The Adobe® FrameMaker® 7.0 XML Cookbook

Application Setup
6. Enter the name of your XML application.Tip When you import XML, you will need to select an application to process the XML from a list of the application names residing in structapps.fm. To avoid confusion, use application names in structapps.fm that are clear and meaningful.
• Type TechPubs
Tip An XML DTD can be thought of as rules file that defines what elements can be used in a document or sub-document (document fragment) including how many times it can occur and what type of content it can contain. The equivalent file in Structured FrameMaker is the Element Definition Document (EDD). You can use the File>Structure Tools>Open DTD to turn a DTD into an EDD, or use the File>Structure Tools>Save as DTD to turn an EDD into a DTD.
Structured FrameMaker needs several files in order to import and export XML. Thesefiles are referenced in a special structure called an “Application” in structapps.fm.For your XML Cookbook project you will reference the XML DTD, the StructuredFrameMaker template, and the Read/Write Rules document. You will also set theXML DOCTYPE so that Structured FrameMaker can automatically recognize theXML document type on import. Many of these settings will also be important forXML export.
• In the Structure View, click after the “ApplicationName” element.
The Name of the Application appears in the Document Window and the Structure View.
Insertion point
The Adobe® FrameMaker® 7.0 XML Cookbook 17

Application Setup
• From the Element Catalog, insert the “DTD” element.
Tip When including folder paths in your applications, take care to use the correct syntax for the platform on which your application will be used. For Windows, use the backslash “\” character to delineate folders, for Unix, use the forward-slash "/" character to delineate folders, and for Macintosh, use the colon “:” character. Also remember that file folder and file names are case sensitive on the Unix platform.
• Type App\Chapter.dtd (Windows),App/Chapter.dtd (Unix),or :App:Chapter.dtd (Macintosh).
You have just created a reference to one of the application-related files you copiedinto the “App” folder in your “Practice” folder at the beginning of this lesson.Because the “App” folder is nested within the “Practice” folder, you need to includethe folder name with the file name.
• In the Structure View, place the insertion point after the “DTD” element.
Insertion point
18 The Adobe® FrameMaker® 7.0 XML Cookbook

Application Setup
• From the Element Catalog, insert the “ReadWriteRules” element.
• Type App\ChapterReadWriteRules.fm (Windows), App/ChapterReadWriteRules.fm (Unix), or :App:ChapterReadWriteRules.fm (Macintosh).
• In the Structure View, place the insertion point after the “ReadWriteRules”element.
Insertion point
The Adobe® FrameMaker® 7.0 XML Cookbook 19

Application Setup
• From the Element Catalog, insert the “Template” element.
• Type App\ChapterTemplate.fm (Windows),App/ChapterTemplate.fm (Unix),or:App:ChapterTemplate.fm (Macintosh).
7. Identify the XML DOCTYPES that you want your XML Application to recognize when importing or exporting XML. For your XML Cookbook project you will include Chapter and Section DOCTYPES.• In the Structure View, click after the “Template” element.
Insertion point
20 The Adobe® FrameMaker® 7.0 XML Cookbook

Application Setup
• From the Element Catalog, insert the “DOCTYPE” element.
• Type Chapter
• In the Structure View, click after the “DOCTYPE” element.
Insertion point
The Adobe® FrameMaker® 7.0 XML Cookbook 21

Application Setup
• From the Element Catalog, insert the “DOCTYPE” element.
• Type Section
22 The Adobe® FrameMaker® 7.0 XML Cookbook

Application Setup
8. Save your structapps.fm file.Tip You can leave the structapps.fm file open as you develop your XML application and during your XML import and export testing.
• Choose the File>Save command.
Leave structapps.fm open while you are developing your XML project.
The Adobe® FrameMaker® 7.0 XML Cookbook 23
Application Setup
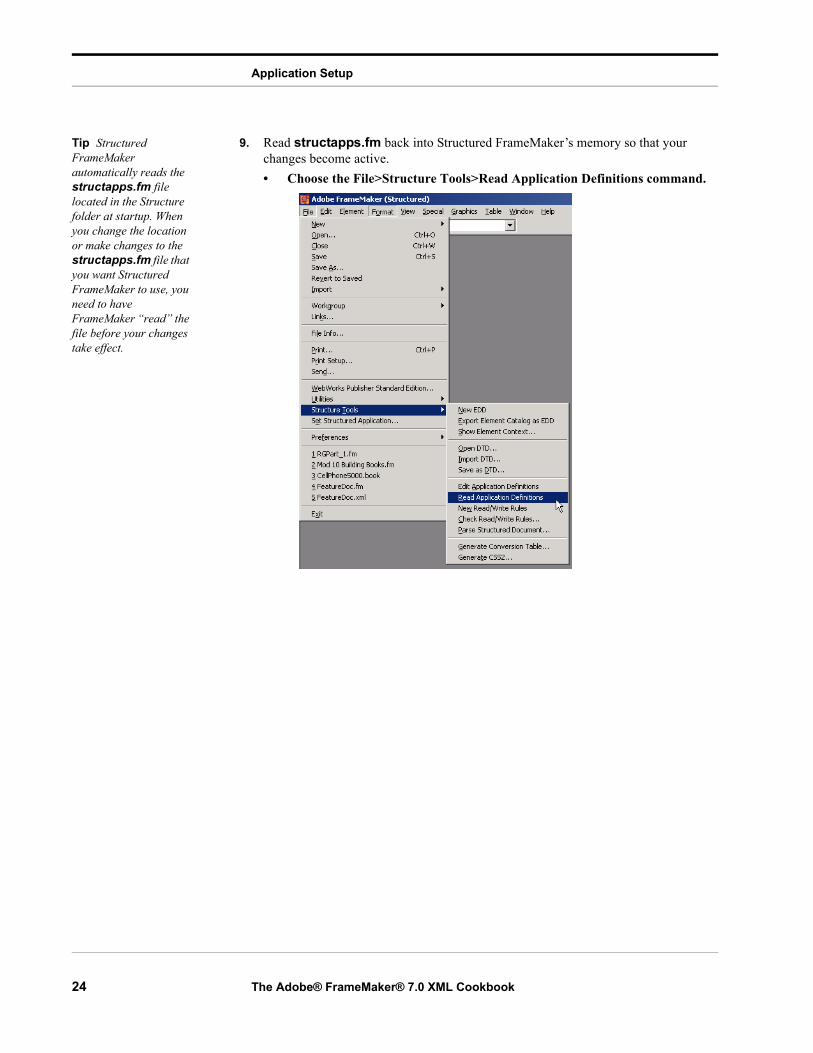
Tip Structured FrameMaker automatically reads the structapps.fm file located in the Structure folder at startup. When you change the location or make changes to the structapps.fm file that you want Structured FrameMaker to use, you need to have FrameMaker “read” the file before your changes take effect.
9. Read structapps.fm back into Structured FrameMaker’s memory so that your changes become active.• Choose the File>Structure Tools>Read Application Definitions command.
24 The Adobe® FrameMaker® 7.0 XML Cookbook

Creating XML Read/Write Rules
Creating XML Read/Write Rules
Tip A DTD does not contain any information on how elements are to be formatted. The DTD rules only define how and where the elements can be used and what they can or must contain. In Structured FrameMaker, the formatting of elements is managed by formatting rules in the structured template.
When XML is imported into a Structured FrameMaker document, your XML Applicationread/write rules define how elements such as tables, cross-references, or graphics areconverted. Read/write rules can be used to:
• Assign a new name to an element or attribute.• Delete an element or attribute.• Map XML attributes to Structured FrameMaker object properties (for tables and
graphics).• Map entities to Structured FrameMaker variables.
Before creating read/write rules, examine your DTD and EDD to determine whichelements need rules. Graphic elements will need rules, as will cross-references, markers,tables, and footnotes.
Tip You can open an ASCII file using an ASCII text editor or Structured FrameMaker. If you use Structured FrameMaker, you must use a modifier key (as described in step 1) when opening the file or Structured FrameMaker will attempt to convert the file into a Structured FrameMaker binary file.
1. Open Chapter.dtd• Using an ASCII text editor (not Structured FrameMaker), open
Chapter.dtd.Or, use the following procedure to use Structured FrameMaker as the editingapplication:
• From Structured FrameMaker, choose the File>Open command.• Locate and highlight Chapter.dtd but do not double-click the mouse or
single-click the mouse and click the Open button. For Macintosh users,ensure that the “Show All Files” button is selected.
• Hold down the Shift key (Unix and Windows) or hold down the Option key(Macintosh) and click the Open button.
The use of the modifier key (Shift or Option) tells Structured FrameMaker not toconvert the XML file but open it as text instead.
• Click the Convert button.• Click the Read button.
The Adobe® FrameMaker® 7.0 XML Cookbook 25

Creating XML Read/Write Rules
2. Take a moment to look at Chapter.dtd.• Locate and review the element and attribute definitions for the “graphic”
element.
• Locate and review the element and attribute definitions for the “table”element.
• Locate and review the element and attribute definitions for the “topicxref”element.
These elements and attributes will require read/write rules to control their behaviorduring XML import and export.
• Close the DTD without saving.
26 The Adobe® FrameMaker® 7.0 XML Cookbook
Creating XML Read/Write Rules
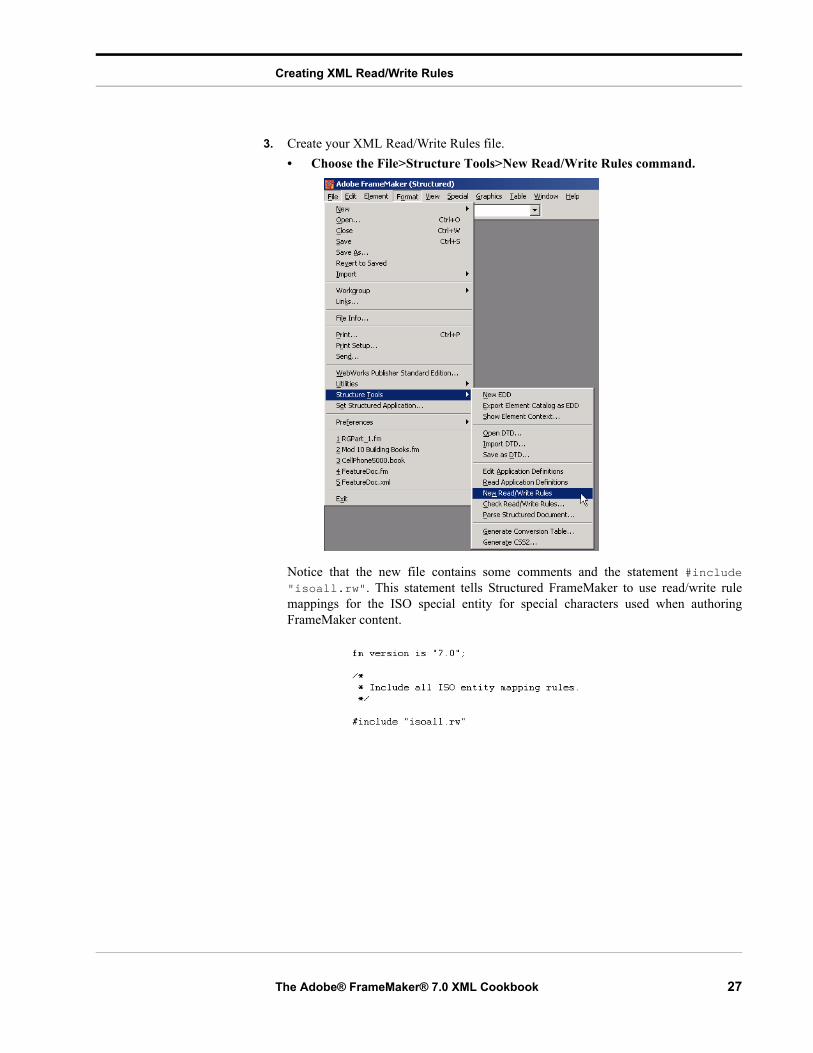
3. Create your XML Read/Write Rules file.• Choose the File>Structure Tools>New Read/Write Rules command.
Notice that the new file contains some comments and the statement #include"isoall.rw". This statement tells Structured FrameMaker to use read/write rulemappings for the ISO special entity for special characters used when authoringFrameMaker content.
The Adobe® FrameMaker® 7.0 XML Cookbook 27

Creating XML Read/Write Rules
Tip In Structured FrameMaker you can create your read/write rules as a FrameMaker document (not structured), as a Structured FrameMaker document (structured), or as an ASCII file. You select the file type according to the requirements of your project.
• Save the new Read/Write Rules file as “ChapterReadWriteRules.fm” intoyour “App” folder in your “Practice” folder.
Most rules in the Read/Write Rules document are expressed from the XMLperspective. For example, a rule like
element "pname" is fm element "ProductName";
equates the XML generic identifier “pname” with the Structured FrameMakerelement tag “ProductName”. The rule is written from the XML viewpoint, and itapplies equally to both import and export. A few rules pertain to StructuredFrameMaker constructs that have no XML counterparts, and these rules are expressedfrom the Structured FrameMaker perspective. For example, a rule might specifydropping the Structured FrameMaker element “IndexMarker” on export as:
fm element "IndexMarker" drop;
Tip Although read/write rules appear to be written for XML import, unless you make specific use of the “Read” or “Write” syntax, the rules apply equally to both import and export.
4. Enter read/write rules to map names between XML and Structured FrameMaker.• Place the insertion point at the end of the Read/Write Rules document.
Insertion point
28 The Adobe® FrameMaker® 7.0 XML Cookbook

Creating XML Read/Write Rules
Tip Elements names in XML should be human-readable. If a user were to look at the XML markup, they should be able to understand the name and meaning of each element.
• Type the following read/write rule to map the “Section” element:element "section" is fm element "Section";
Tip For more information on creating read/write rules to map element names, see Chapter 15, “Translating Elements and Their Attributes,” in Structure_Dev_Guide.pdf, located in the FrameMaker Online Manuals folder.
• Type the following read/write rule to map the “Para” element:
• Type the following read/write rule to map the “TopicsList” element:element "tplist" is fm element "TopicsList";
This one rule maps the XML element “tplist” to “TopicsList” on import and“TopicsList” to “tplist” on export. The quotation marks around the element names arerequired. This type of read/write rule is always terminated with a semicolon.
• On the next line, type the following rule to map the “TopicHead” element:element "tphead" is fm element "TopicHead";
• On the next line, type the following rule to map the “TopicPara” element:element "tppara" is fm element "TopicPara";
• On the next line, type the following rule to map the “FirstUse” element:element "firstuse" is fm element "FirstUse";
Tip For more information on creating read/write rules to map table elements, see Chapter 17, “Translating Tables,” in Structure_Dev_Guide.pdf, located in the FrameMaker Online Manuals folder.
5. Continue to type read/write rules to map names and element types between XML and Structured FrameMaker as follows:• On the next line, type the following rule:
element "tbody" is fm table body element "TableBody";
• On the next line, type the following rule: element "thead" is fm table heading element "TableHead";
• On the next line, type the following rule: element "tfoot" is fm table footing element "TableFoot";
• On the next line, type the following rule: element "trow" is fm table row element "TableRow";
• On the next line, type the following rule: element "tentry" is fm table cell element "TableCell";
6. Enter a read/write rule to map an element, its attributes, and its attribute values between XML and Structured FrameMaker. The attribute value rules are nested in
Read/Write rule
Read/Write rule
The Adobe® FrameMaker® 7.0 XML Cookbook 29

Creating XML Read/Write Rules
subrules. No semicolon is used with the main rule when a subrule follows. Subrules are begun with an open curly brace “{” and ended with a close curly brace “}”.
Tip For more information on creating read/write subrules, see Chapter 13, “Rule syntax,” in Structure_Dev_Guide.pdf, located in the FrameMaker Online Manuals folder.
• On the next lines, type the following rules for the “Head” element and its “Id”attribute:element "head"
{
is fm element "Head";
attribute "id" is fm attribute "Id";
}
7. Enter a read/write rule to map an element, its attributes, and attribute values between XML and Structured FrameMaker. This read/write requires subrules.• On the next lines, type the following rules for the “Chapter” element, the
“AuthorName” attribute, and the “Version” attribute values:element "chapter"
{
is fm element "Chapter";
attribute "names" is fm attribute "AuthorName";
attribute "version"
{
is fm attribute "Version";
value "1" is fm value "1st Draft";
value "2" is fm value "2nd Draft";
value "3" is fm value "3rd Draft";
value "4" is fm value "Final";
}
}
read/write rules that contain more than one action require that the rule be broken intosubrules as indicated in the “Chapter” rules.
8. Enter a read/write rule to map a cross-reference element between XML and Structured FrameMaker. FrameMaker properties, which are used to map FrameMaker property values to attributes, are not quoted like element and attribute names.
Tip For more information on creating read/write rules to map cross-reference elements, see Chapter 19, “Translating Cross-References,” in Structure_Dev_Guide.pdf, located in the FrameMaker Online Manuals folder.
• On the next lines, type the following rules for the “TopicXRef” element andits attributes:element "tpxref"
{
is fm cross-reference element "TopicXRef";
attribute "format" is fm property cross-reference format;
attribute "refid" is fm attribute "IdReference";
}
9. Enter a read/write rule to map the “Figure” element between XML and Structured FrameMaker.• On the next lines, type the following rules for the “Figure” element:
element "figure" is fm element "Figure";
30 The Adobe® FrameMaker® 7.0 XML Cookbook

Creating XML Read/Write Rules
10. Continue to create read/write rules following the remaining steps in this section, or close your current ChapterReadWriteRules.fm, and replace it with the completed version located in the “Completed” folder.
11. Enter a read/write rule to map a graphic element between XML and Structured FrameMaker. This rule will include mappings for TIFF and SVG graphic export (facet writer rules).
Tip For more information on creating read/write rules to map graphic elements, see Chapter 18, “Translating Graphics and Equations,” in Structure_Dev_Guide.pdf, located in the FrameMaker Online Manuals folder.
• On the next lines, type the following rules for the “Graphic” element and itsattributes:element "graphic"
{
is fm graphic element "Graphic";
attribute "type"
{
is fm attribute "Type";
value "byreference" is fm value "ByReference";
value "bycopy" is fm value "ByCopy";
}
attribute "format" is fm attribute "Format";
attribute "entityref" is fm property entity;
attribute "fileref" drop;
attribute "filename" drop;
attribute "entity" drop;
writer facet "TIFF"
{
specify size in pt;
export to file "$(entity).jpg" as "JPEG";
convert referenced graphics;
}
writer facet "SVG"
{
specify size in pt;
export to file "$(docname).svg" as "SVG";
}
}
12. Enter a read/write rule to map a table element and its attributes between XML and Structured FrameMaker.
Tip For more information on creating read/write rules to map table elements and attributes, see Chapter 17, “Translating Tables,” in Structure_Dev_Guide.pdf, located in the FrameMaker Online Manuals folder.
• On the next lines, type the following rule for the “Table” element and itsattributes. The rule specifies that the name of the FrameMaker table stylewill be preserved as the attribute “Tablestyle” in the XML document:element "table"
{
is fm table element "Table";
attribute "colsep" is fm property column ruling;;
attribute "rowsep" is fm property row ruling;
attribute "tablestyle" is fm property table format;
}
The Adobe® FrameMaker® 7.0 XML Cookbook 31
Creating XML Read/Write Rules
13. Enter a read/write rule to map an index marker between XML and Structured FrameMaker.
Tip For more information on creating read/write rules to map markers, see Chapter 21, “Translating Markers,” in Structure_Dev_Guide.pdf, located in the FrameMaker Online Manuals folder.
• On the next lines, type the following rule for the “Index” element. The rulespecifies that the index marker text will be treated as an attribute in the XMLdocument:element "indexentry"
{
is fm marker element "IndexEntry";
marker text is attribute;
}
14. Enter a read/write rule to map the “Caption” element.• On the next lines, type the following rule for the “Caption” element:
element "caption" is fm element "Caption";
15. Enter a read/write rule to map a cross-reference marker between XML and Structured FrameMaker.• On the next lines, type the following rule for the “CrossReference” element:
element "crossreference"
{
is fm cross-reference element "CrossReference";
attribute "referenceId" is fm property cross-reference
id;
}
16. Enter a read/write rule to tell Structured FrameMaker how to reference the XML DTD in the XML instance when it is created.
Tip For more information on creating read/write rules to manage the import and export process, see Chapter 16, “Translating Entities and Processing Instructions,” in Structure_Dev_Guide.pdf located in the FrameMaker Online Manuals folder.
• On the next lines, type the following rule for referencing the dtd whenexporting XML from Structured FrameMaker:writer external dtd is system "Chapter.dtd";
17. Save ChapterReadWriteRules.fm.• Choose the File>Save command.Leave ChapterReadWriteRules.fm open.
32 The Adobe® FrameMaker® 7.0 XML Cookbook

Enabling Namespaces
Enabling Namespaces
What Namespaces are and why they are usefulIf you work with XML DTDs long enough, you'll probably find you sometimes want towork within one main DTD but also use XML objects from another DTD or Schema.When that happens, you'll want to use Namespaces.
XML uses Namespaces to differentiate between XML coming from different DTDs orSchemas. A Namespace qualifies element names with a Namespace prefix, for example,ns:element.
So, for example, if you have a table element in both a furniture catalog and an XHTMLfile, you could use the qualified elements furniture:table and xhtml:table in yourdocument, so you would know from which DTD or schema each arose. In this way,Namespaces prevent names from “colliding.” More importantly they identify anddifferentiate XML applications such as XSLT, SVG, VoiceXML, and any XMLapplications that you create yourself.
Namespaces are defined by the W3C Namespaces specification at http://www.w3.org/TR/REC-xml-names/.
How FrameMaker 7.0 handles NamespacesStructured FrameMaker 7.0 can be set to preserve Namespaces when importing and/orexporting XML. You can allow, create, and apply Namespaces to elements while workingin your structured documents.
Enabling Namespaces in structapps.fmTo enable the proper handling of Namespaces when importing or exporting XML, add theNamespace element and its Enable child element to your structapps.fm file.
The Adobe® FrameMaker® 7.0 XML Cookbook 33

Enabling Namespaces
1. Open your structapps.fm file if it is not already open.2. Add the “Namespace” element to your “TechPubs XML” application.
• In the Structure View, locate the “TechPubs XML” application and clickbelow the Template element.
• From the Element Catalog, insert a “Namespace” element.
• From the Element Catalog, insert an “Enable” element.
Insertion point
34 The Adobe® FrameMaker® 7.0 XML Cookbook

Enabling Namespaces
The Namespace structure in structapps.fm should look like this:
This setting in the structapps.fm file is to prepare Structured FrameMaker for XMLimport and export. An upcoming lesson in the XML Cookbook will take you throughthe steps to assign a Namespace to a Structured FrameMaker element.
• Save structapps.fm and read it into Structured FrameMaker’s memoryusing the File>StructureTools>Read Application Definitions command.
Namespace enabled
The Adobe® FrameMaker® 7.0 XML Cookbook 35

Enabling Namespaces
36 The Adobe® FrameMaker® 7.0 XML Cookbook

Document Schemas
Document Schemas
The Element Definition Document—better known as the EDD—controls the order anduse of the elements in your structured documents. The EDD is like an XML DTD orSchema, or an SGML DTD, but it is expressed in Structured FrameMaker using elements.EDDs contain element and attribute definitions similar to those in a DTD, but it can alsoinclude formatting rules.
Creating an EDD from a DTDAn EDD can be created from scratch or it can be created by converting an existing DTD.In this lesson, you will convert Chapter.dtd into an EDD, edit the EDD for correctness,and add formatting rules.
Importing a DTD into Structured FrameMaker1. Copy Chapter.dtd located in your “App” folder to your “Practice” folder.
Typically the DTD you need to convert is not in the folder where your content XMLfiles are located. This creates a problem when you want to open a DTD in StructuredFrameMaker because your XML application specifies that the read/write rules filethat will be used to create the EDD is in a folder named “App” nested in a folder inthe current folder containing the DTD.
There are two easy ways to fix this file location problem: 1) Create a separate XMLapplication to be used only when opening DTDs; or 2) Place a copy of the DTD in afolder that is appropriate for your XML application. For the XML Cookbook you willmake a copy of the DTD and place it in the “Practice” folder.
For Windows:
• Navigate to the “App” folder.• Select the Chapter.dtd file.• Choose the Edit>Copy command.• In the File Manager, navigate to the “Practice” folder.• Choose the Edit>Paste command.For Macintosh:
• In the Finder, open the “Practice” folder.• Double-click the “App” folder to open it.• With the Option key down, click and drag the Chapter.dtd file to the window
banner of the “Practice” folder and release.For Unix:
• Use Unix commands to copy Chapter.dtd from the “App” directory to the“Practice” directory.
37

Document Schemas
2. From the “Practice” folder, open Chapter.dtd as a DTD in Structured FrameMaker.• Choose the File>Structure Tools>Open DTD command.
• Navigate to the “Practice” folder and select Chapter.dtd.
Make sure that you choose Chapter.dtd in the “Practice” folder and not the “App”folder. If you do choose the wrong copy of the DTD, Structured FrameMaker willgenerate an error saying that it can not locate the ChapterReadWriteRules.fm file.This is because the Structured FrameMaker structapps.fm application rule for
38

Document Schemas
locating the read/write rules file refers to the “App” folder at the same level as the filethat is being opened or imported.
• Click the Open button.The Set Application dialog window appears.
Tip If you do not see the “TechPubs” application in the “User Structured Application” drop-down menu, it is because Structured FrameMaker has not “read” your structapps.fm file. Open the structapps.fm file that contains the “TechPubs” XML application, and “read” it into memory using the File>Structure Tools>Read Application Definitions.
• Choose “TechPubs” from the Use Structured Application drop-down menu,and click the Continue button.
The “TechPubs” item in the list is a reference to the “TechPubs” application youcreated in structapps.fm. Structured FrameMaker added it to the Applications listwhen you read structapps.fm into memory. Choosing the “TechPubs” applicationtells Structured FrameMaker to use the “TechPubs” settings when converting theDTD. Errors will appear if the DTD is invalid, if a read/write rule has a syntax error,or if there are any missing files referenced in structapps.fm.
• Correct any errors and repeat Step 1.
The following example of an error log provides you with information about the error and,in many cases, a link to the file and location of the error.
Hypertext link to error
39

Document Schemas
If you have trouble opening the DTD and would like to skip to the next section of theXML Cookbook, you can use the completed EDD located in the Completed folder.Copy ChapterEDD.fm from the “Completed” folder to the “App” folder.
The new EDD appears.
Structured FrameMaker includes your application name at the beginning of the EDD.
Notice that the EDD elements and attributes reflect the mappings that you created inyour read/write rules document.
• Locate the “StructuredApplication” element.
Notice that the name of the application has been set to “TechPubs.”
When you export a Structured FrameMaker document to XML, StructuredFrameMaker will automatically choose the “TechPubs” application because of thisreference in the EDD.
3. Save the EDD as ChapterEDD.fm.• Choose the File>Save As command.• Navigate to the “App” folder in your “Practice” folder.
Application name
40

Document Schemas
• Type ChapterEDD.fm in the file name field.• Click the Save button.
Finishing the DTD ConversionTo finish the EDD development process, you have several steps to complete. You will nowadd formatting rules to your element definitions.
Collapsing and expanding elements: Collapsing elements in the Structure View helpskeep the Structure View compact. You can expand elements as you need to work withthem, and collapse them when are finished with them.
Collapsing elements makes it easier to scroll through longer, complex structures. When anelement is collapsed, all of its children are hidden, and the image in the Structure Viewchanges to indicate that the element is collapsed.
Collapsed element
Expanded element
41

Document Schemas
• To expand elements, in the element’s bubble, to the left of the element name, click once on the plus (+) symbol to expand and once on the minus (-) symbol to collapse an element.
Tip For information on adding formatting rules to an EDD, see Chapter 9, “Text Format Rules for Containers, Tables, and Footnotes,” in Structure_Dev_Guide.pdf, located in the FrameMaker Online Manuals folder.
Working with the Element CatalogThe Element Catalog is an intelligent, context-sensitive list of the elements in a document.The elements displayed in the scroll list change according to the location of the insertionpoint or current selection. The Element Catalog also contains commands to insert, wrap,and change elements.
The process of using the Element Catalog to insert elements is called Guided Editingbecause the Element Catalog guides the writer by helping them choose only validelements. A valid element will have a special symbol next to its name in the ElementCatalog.
Expand symbol
Collapse symbol
TABLE 1.
Symbol Meaning
This element is Valid at the current location
This element is an inclusion and is valid anywhere in the parent element
This element is valid in the current element but will be incomplete
This element is valid in the current element, however inserting it will make ele-ments after it invalid
No symbol This element is not valid at the current location
42

Document Schemas
Defining Highest-level ElementsAn XML document has a root element that is defined in the DTD declaration. StructuredFrameMaker requires that you declare at least one element as a root element but alsoallows you to declare any number of elements as root elements. This capability makes iteasy to work with document fragments.
The EDD is a structured document. You will edit it with the document’s elementboundaries turned on and the Element Catalog and Structure View open.
1. Turn on Element Boundaries and open the Element Catalog and Structure View.• Choose the View>Element Boundaries command.• Choose the Element>Element Catalog command.• Click the Structure View icon located in the top right-hand corner of the
document window.When Structured FrameMaker converts a DTD, the first element encountered in theDTD is assumed to be the root element. In the EDD, notice that the “Chapter”element has already been defined as “Valid at Highest Level.”
2. Define the “Section” element to be “Valid at Highest Level.”• In the Structure View, locate the “Section” element.• Click above the “GeneralRule” element.• Insert a “ValidHighestLevel” element.
3. Save your changes.• Choose the File>Save command.
Changing Element DefinitionsAs you look through the EDD, you will notice that the read/write rules were applied to theelement definitions. For example, the “Graphic” element is a graphic element type ratherthan a container element type.
You can modify the EDD to correct any conversion errors or to change elements for whichyou did not create read/write rules. For example, the “IndexEntry” element in your EDDneeds to have its marker type identified.
1. Edit the “IndexEntry” element definition to add an index marker type.Tip For information on defining markers in an EDD, see Chapter 11, “Setting a marker type,” in Structure_Dev_Guide.pdf, located in the FrameMaker Online Manuals folder.
• Locate the “IndexEntry” element.
• Click to the right of the “Marker” element.
Insertion point
43

Document Schemas
• Insert an “InitialObjectFormat” element.
• Insert an “AllContextsRule” element.
• Insert a “MarkerType” element.
• Insert an “Index” element.
The “IndexEntry” element will use the “Index” marker type.
44

Document Schemas
2. Edit the “FirstUse” element to define it as a text range element. For this exercise, you will use the “AllContextsRule” element that will be defined later.
Tip For information on defining All Context Rules and specific Context Rules in an EDD, see Chapter 9, “All-context Rules and Context-specific rules,” in Structure_Dev_Guide.pdf, located in the FrameMaker Online Manuals folder.
• Locate the “FirstUse” element.
• Click after the “GeneralRule” element.
• Insert a “TextFormatRules” element.
• Insert an “AllContextRule” element.
Insertion point
45

Document Schemas
• Insert a “TextRangeFormatting” element.
Notice that Structured FrameMaker has inserted a “TextRange” element.
3. Save your changes.• Choose the File>Save command.
Adding Auto-InsertionsStructured FrameMaker elements can have their first child element automatically inserted.Structured FrameMaker allows you to define as many levels of insertion for childelements as you need. This saves the step of the author having to select the child elementfrom the element catalog—the child element and the insertion point will automaticallyappear when the parent element is inserted.
Tip For information on defining auto-insertion rules in an EDD, see Chapter 8, “Inserting descendants automatically in containers,” in Structure_Dev_Guide.pdf, located in the FrameMaker Online Manuals folder.
In this exercise you will define auto-insertions for the “Chapter”, “TopicPara”, “Section”,and “Figure” elements.
46

Document Schemas
1. Define auto-insertion for the “Chapter” element.• Locate the “Chapter” element in the Structure View.
• Collapse the ValidHighestLevel element and the Attribute List element tomake the structure easier to read.
47

Document Schemas
• Click at the end of the “Container” element (after the “GeneralRule” and“AttributeList” elements.
• Insert an “AutoInsertions” element.
The “Insert Child” element is inserted for you.
• Type Head
2. Define auto-insertion for the “TopicPara” element.• Locate the “TopicPara” element in the Structure View.• Click at the end of the “Container” element.• Insert an “AutoInsertions” element.• Type TopicXRef
Insertion point
48

Document Schemas
3. Define auto-insertion for the “Section” element.• Locate the “Section” element in the Structure View.• Click at the end of the “Container” element.• Insert an “AutoInsertions” element.• Type Head
4. Define auto-insertion for the “Figure” element.• Locate the “Figure” element in the Structure View.• Click at the end of the “Container” element.• Insert an “AutoInsertions” element.• Type Graphic
5. Save your changes.• Choose the File>Save command.
Adding Format RulesThe majority of work in the EDD involves defining element format rules. Formats may beapplied to elements unconditionally (in all cases); or conditionally depending on anelement’s context and/or attribute values. If the latter, you must specify context rules.
There are several methods you can use to specify formatting characteristics for elements:
• Reference paragraph and character styles in the document’s template.• Specify one or more formatting characteristics in the EDD.• Define an arbitrary group of formatting characteristics, give it a name, and reference
it.Tip Elements inherit formats from their parent elements except where the element references a paragraph or character style; therefore, it may not be necessary to define formatting for all elements. To realize the greatest benefit of format inheritance, try to associate paragraph formats only to the higher level elements.
For information on defining element paragraph format rules in an EDD, see Chapter 9, “Paragraph formatting,” in Structure_Dev_Guide.pdf, located in the FrameMaker Online Manuals folder.
Element Paragraph Formatting: Paragraph formats (styles) can be assigned to elements.When the element is inserted by the author, it is automatically formatted with theparagraph tag.
1. Associate the “TopicHead” paragraph format with the “TopicHead” element.• Locate the “TopicHead” element.
• Click after the “GeneralRule” element.
Insertion point
49

Document Schemas
• Insert a “TextFormatRules” element.
• Insert a “ElementPgfFormatTag” element.
• Type TopicHead
2. Associate the “TopicPara” paragraph format with the “TopicPara” element.• Locate the “TopicPara” element.• Click after the “AutoInsertions” element.• Insert a “TextFormatRules” element.• Insert an “ElementPgfFormatTag” element.• Type TopicPara
3. Associate the “FigurePara” paragraph format with the “Figure” element.• Locate the “Figure” element.• Click after the “AutoInsertions” element.• Insert a “TextFormatRules” element.• Insert an “ElementPgfFormatTag” element.• Type FigurePara
50

Document Schemas
4. Associate the “Caption” paragraph format with the “Caption” element.• Locate the “Caption” element.• Click after the “GeneralRule” element.• Insert a “TextFormatRules” element.• Insert an “ElementPgfFormatTag” element.• Type Caption
5. Save your changes.• Choose the File>Save command.
Element Character Formatting: Character formats can be assigned to text rangeelements. When the element is inserted by the author, it is automatically formatted withthe character tag.
Tip For information on defining element range format rules in an EDD, see Chapter 9, “Text Range formatting,” in Structure_Dev_Guide.pdf, located in the FrameMaker Online Manuals folder.
1. Associate the “FirstUse” character format with the “FirstUse” element in all contexts.• Locate the “FirstUse” element.
51

Document Schemas
• Click after the “TextRange” element.
• Insert a “CharacterFormatTag” element.
Insertion point
52

Document Schemas
• Type FirstUse
2. Save your changes.• Choose the File>Save command.
All Context Formatting: All Context Formatting rules apply to an element regardless ofits context. Formatting can be applied by either associating a paragraph format or bysupplying specific property values.
1. Define an “AllContextsRule” for the “Head” element.• Locate the “Head” element.
53

Document Schemas
• Collapse the “AttributeList” element.
• Click after the “AttributeList” element.
• Insert a “TextFormatRules” element.
• Insert an “AllContextsRule” element.
Collapsed element
Insertion point
54

Document Schemas
• Insert a “ParagraphFormatting” element.
• Insert a “PropertiesFont” element.
55

Document Schemas
• Insert a “Family” element.
• Type Times New Roman
56

Document Schemas
• Click after the “Family” element.
• Insert a “Color” element.
57

Document Schemas
• Type HeadingColor
2. Define an “AllContextsRule” for the “Para” element.• Locate the “Para” element.• Click after the “GeneralRule” element.• Insert a “TextFormatRules” element.• Insert an “AllContextsRule” element.• Insert a “ParagraphFormatting” element.Set the Font Properties.
• Insert a “PropertiesFont” element.• Insert a “Family” element.• Type Arial• Click after the “Family” element.• Insert a “Size” element.• Type 9pt• Click after the “PropertiesFont” element.Set the Basic Properties.
• Insert a “PropertiesBasic” element.• Insert an “Indents” element.• Insert a “FirstIndent” element.• Type 10pt• Click after the “Indents” element.• Insert a “ParagraphSpacing” element.• Insert a “SpaceAbove” element.
58

Document Schemas
• Type 5pt• Click after the “ParagraphSpacing” element.• Insert a “LineSpacing” element.• Insert a “Height” element.• Type 13pt
3. Save your changes.• Choose the File>Save command.
Context Formatting: Context Formatting Rules apply formatting to an element when itfalls in a specific context in the element hierarchy. Formatting can be applied by eitherassociating a paragraph format or defining specific property values.
1. Define a context rule for the “Para” element so that the first paragraphs of a “Chapter” are italicized.• Locate the “Para” element.
• Collapse the “AllContextsRule” element.
Collapsed element
59

Document Schemas
• Click after the “AllContextsRule” element.
• Insert a “ContextRule” element.
Notice that the “Specification” element is automatically inserted.
• Type Chapter• Click below the “Specification” element.• Insert a “ParagraphFormatting” element.• Insert a “PropertiesFont” element.• Insert an “Angle” element.The “Italic” element is automatically inserted.
2. Save your changes.• Choose the File>Save command.
Level Formatting: Formatting rules can be applied according to the level or nesting ofelements.
Insertion point
60

Document Schemas
Tip For information on defining level format rules in an EDD, see Chapter 9, “Level rules,” in Structure_Dev_Guide.pdf, located in the FrameMaker Online Manuals folder.
1. Define context rules for four levels of the “Head” element.• Locate the “Head” element.
• Collapse the “AllContextsRule” element.
• Click after the “AllContextsRule” element.
Collapsedelement
Insertion point
61

Document Schemas
• Insert a “LevelRule” element.
Notice that the “Count Ancestors” element is automatically inserted.
• Type Chapter | Section
62

Document Schemas
• Click after the “CountAncestors” element.
• Insert an “If” element.
Notice that the “Specification” element is automatically inserted.
Insertion point
63

Document Schemas
• Type 1
• Click after the “Specification” element.
Insertion point
64

Document Schemas
Tip Context Labels are useful for identifying elements to be used in a cross-reference or when generating a table of contents.
• Insert a “ContextLabel” element.
• Type Level1
65

Document Schemas
• Click after the “ContextLabel” element.
• Insert a “ParagraphFormatting” element.
Set the Pagination Properties.
• Insert a “PropertiesPagination” element.• Insert a “Placement” element.• Insert an “AcrossAllColumnsAndSideHeads” element.• Click after the “Placement” element.• Insert a “StartPosition” element.• Insert a “TopOfRightPage” element.• Click after the “PropertiesPagination” element.
Insertion point
66

Document Schemas
Set the Font Properties.
• Insert a “PropertiesFont” element.• Insert a “Size” element.• Type 30pt• Click after the “Size” element.• Insert a “Weight” element.• Insert a “Bold” element.• Click after the “PropertiesFont” element.Set the Basic Properties.
• Insert a “PropertiesBasic” element.• Insert a “ParagraphSpacing” element.• Insert a “SpaceBelow” element.• Type 18pt• Click after the “SpaceBelow” element.• Insert a “SpaceAbove” element.• Type 17pt• Click after the “ParagraphSpacing” element.• Insert a “LineSpacing” element.• Insert a “Height” element.• Type 30pt• Click after the “PropertiesBasic” element.Set the Numbering Properties.
• Insert a “PropertiesNumbering” element.• Insert an “AutonumberFormat” element.• Type C:Chapter <n+>: • Collapse the “If” element to help make the structure easier to navigate.• Click after the “If” element.Create the Level 2 context rule.
• Insert an “ElseIf” element.• Type 2• Click after the “Specification” element.• Insert a “ContextLabel” element.• Type Level2• Click after the “ContextLabel” element.• Insert a “ParagraphFormatting” element.Set the Pagination Properties.
• Insert a “PropertiesPagination” element.• Insert a “Placement” element.
67

Document Schemas
• Insert an “AcrossAllColumnsAndSideHeads” element.• Click after the “PropertiesPagination” element.• Insert a “PropertiesFont” element.• Insert a “Size” element.• Type 20pt• Click after the “PropertiesFont” element.Set the Basic Properties.
• Insert a “PropertiesBasic” element.• Insert a “ParagraphSpacing” element.• Insert a “SpaceBelow” element.• Type 0pt• Click after the “SpaceBelow” element.• Insert a “SpaceAbove” element.• Type 20pt• Click after the “ParagraphSpacing” element.• Insert a “LineSpacing” element.• Insert a “Height” element.• Type 20pt• Collapse the “ElseIf” element to make the structure easier to navigate.• Click after the “ElseIf” element.Create the Level 3 context rule.
• Insert an “ElseIf” element.• Type 3• Click after the “Specification” element.• Insert a “ContextLabel” element.• Type Level3• Click below the “ContextLabel” element.• Insert a “ParagraphFormatting” element.Set the Pagination Properties.
• Insert a “PropertiesPagination” element.• Insert a “Placement” element.• Insert a “SideHead” element.• Insert an “Alignment” element.• Insert a “FirstBaseline” element.• Click after the “PropertiesPagination” element.• Insert a “PropertiesFont” element.• Insert a “Size” element.• Type 10pt• Click after the “Size” element.
68

Document Schemas
• Insert a “Family” element.• Type Arial• Click after the “Family” element.• Insert a “Weight” element.• Insert a “Bold” element.• Click after the “PropertiesFont” element.Set the Basic Properties.
• Insert a “PropertiesBasic” element.• Insert a “ParagraphSpacing” element.• Insert a “SpaceBelow” element.• Type 0pt• Click after the “SpaceBelow” element.• Insert a “SpaceAbove” element.• Type 20pt• Click after the “ParagraphSpacing” element.• Insert a “LineSpacing” element.• Insert a “Height” element.• Type 12pt• Collapse the “ElseIf” element.• Click after the “ElseIf” element.Create the Level 4 context rule.
• Insert an “ElseIf” element.• Type 4• Click after the “Specification” element.• Insert a “ContextLabel” element.• Type Level4• Click after the “ContextLabel” element.• Insert a “ParagraphFormatting” element.Set the Pagination Properties.
• Insert a “PropertiesPagination” element.• Insert a “Placement” element.• Insert a “RunInHead” element.• Insert a “DefaultPunctuation” element.• Type .• Click after the “PropetiesPagination” element.• Insert a “PropertiesFont” element.• Insert a “Size” element.• Type 9pt• Click after the “Size” element.
69

Document Schemas
• Insert a “Family” element.• Type Arial• Click after the “Family” element.• Insert a “Weight” element.• Insert a “Bold” element.• Click after the “Weight” element.• Insert a “Color” element.• Type Black• Click after the “Color” element.• Insert a “Spread” element.• Type 5%• Click after the “PropertiesFont” element.Set the Basic Properties.
• Insert a “PropertiesBasic” element.• Insert a “ParagraphSpacing” element.• Insert a “SpaceAbove” element.• Type 5pt• Click after the “ParagraphSpacing” element.• Insert a “LineSpacing” element.• Insert a “Height” element.• Type 13pt• Click after the “Height” element.• Insert a “Fixed” element.
2. Save your changes.• Choose the File>Save command.
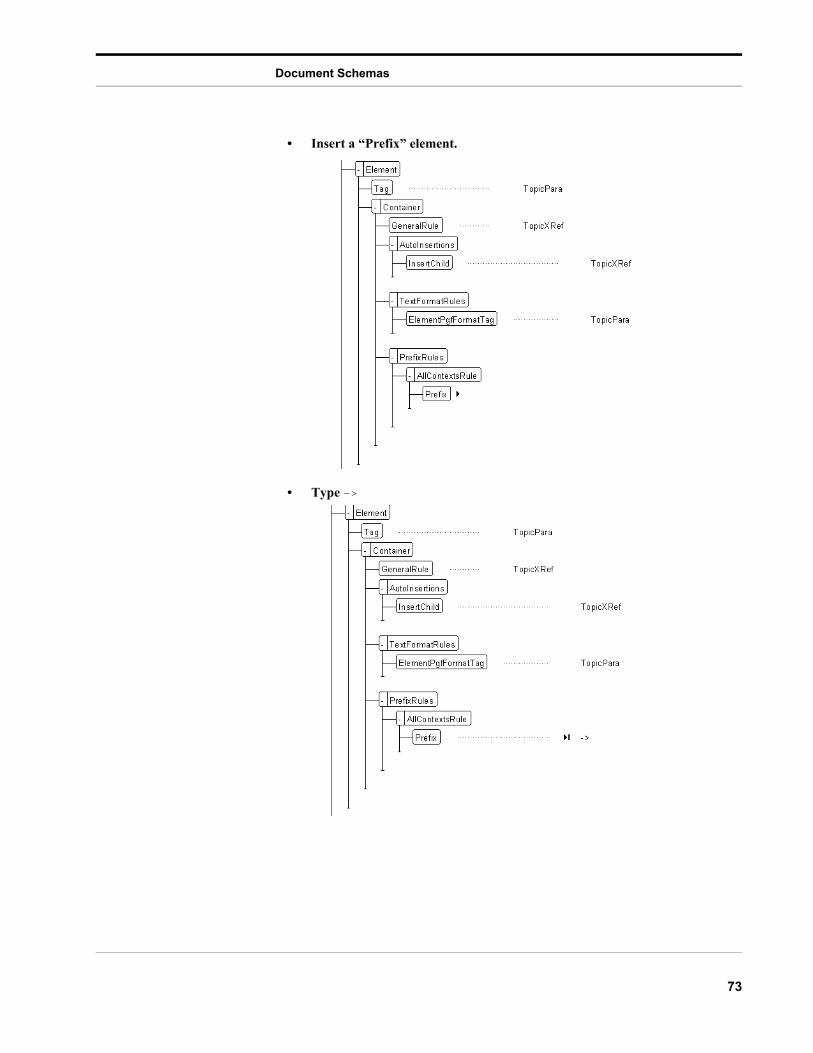
Prefix and Suffix Formatting: Formatting rules can be defined to specify prefix andsuffix text for an element.
70

Document Schemas
Tip For information on defining prefix and suffix formatting rules in an EDD, see Chapter 9, “Defining prefixes and suffixes,” in Structure_Dev_Guide.pdf, located in the FrameMaker Online Manuals folder.
1. Modify the “TopicPara” element to include the prefix characters “->”• Locate the “TopicPara” element.
• Click after the “TextFormatRules” element.
Insertion poin
71

Document Schemas
• Insert a “PrefixRules” element.
• Insert an “AllContextsRule” element.
72
Document Schemas
• Insert a “Prefix” element.
• Type ->
73

Document Schemas
• Click after the “Prefix” element.
• Insert a “TextRangeFormatting” element.
2. Save your changes.• Choose the File>Save command.
74

Document Schemas
First and Last Paragraph Formatting: Formatting rules can be defined to specifyformatting to the first and last paragraph contained in an element.
Tip For information on defining first and last formatting rules in an EDD, see Chapter 9, “Writing first and last formatting rules,” in Structure_Dev_Guide.pdf, located in the FrameMaker Online Manuals folder.
1. Modify the “TopicList” element to add extra space above the first, and below the last paragraphs in list.• Locate the “TopicsList” element.• Click after the “GeneralRule” element.• Insert a “FirstParagraphRules” element.• Insert an “AllContextsRule” element.Set the Basic Properties.
• Insert a “ParagraphFormatting” element.• Insert a “PropertiesBasic” element.• Insert a “ParagraphSpacing” element.• Insert a “SpaceAbove” element.• Type 12pt• Click after the “FirstParagraphRules” element.• Insert a “LastParagraphRules” element.• Insert an “AllContextsRule” element.• Insert a “ParagraphFormatting” element.Set the Basic Properties.
• Insert a “PropertiesBasic” element.• Insert a “ParagraphSpacing” element.• Insert a “SpaceBelow” element.• Type 24pt
2. Save your changes.• Choose the File>Save command.
Object Formatting: Initial Object Formatting can be defined for Structured FrameMakerobjects such as markers, cross-references, and graphics. The Initial Object Format defineshow the object is inserted into the document.
Tip For information on object formatting rules in an EDD, see Chapter 11, “Object Format Rules,” in Structure_Dev_Guide.pdf, located in the FrameMaker Online Manuals folder.
1. Define the Initial Object Format for the “TopicXRef” cross-reference element. When a “TopicXRef” element is inserted, it will be formatted with the “TopicXRef” cross-reference format.• Locate the “TopicXRef” element.• Insert an “InitialObjectFormat” element.• Insert an “AllContextsRule” element.• Insert a “CrossReferenceFormat” element.• Type TopicXRef
2. Save your changes.• Choose the File>Save command.
Context Rules using Attribute Values: In a context rule, you can check for a specificattribute value and apply formatting based on the value. The formatting can be associated
75

Document Schemas
with text or objects and can control certain behaviors of Structured FrameMaker. Forexample, a graphic element can be pasted or imported into an anchored frame, and anattribute value can control how Structured FrameMaker prompts the user to either import agraphic or to create an anchored frame.
Tip For information on defining context formatting rules that use attribute values in an EDD, see Chapter 9, “Writing context-dependent format rules,” in Structure_Dev_Guide.pdf, located in the FrameMaker Online Manuals folder.
1. Modify the “Graphic” element to either display the Import Graphic dialog box or the Anchored Frame dialog box according to which attribute value the user selects.• Locate the “Graphic” element.• Click after the “AttributesList” element.• Insert an “InitialObjectFormat” element.• Insert a “AllContextsRule” element.• Insert an “AnchoredFrame” element.
2. Save your changes.• Choose the File>Save command.
Importing the EDD into a Structured FrameMaker templateMost FrameMaker users have created FrameMaker templates that conform to theirorganization’s style guide for the use of logos, backgrounds, fonts, page size, adornment,etc. ChapterTemplate.fm has been prepared for you. It contains master pages, referencepages, paragraph and character formats, etc. You will import ChapterEDD.fm intoChapterTemplate.fm using Structured FrameMaker to create a structured template thatwill validate the structured document’s content against the business rules established firstin the DTD, and then modified in the EDD.
1. Open ChapterTemplate.fm.• Choose the File>Open command.• Navigate to the “App” folder in the “Practice” folder, and highlight
ChapterTemplate.fm. For Macintosh users, ensure that the “Show AllFiles” button is selected.
• Click the Open button.The template contains only formatting.
2. Import ChapterEDD.fm into ChapterTemplate.fm• From ChapterTemplate.fm, choose the File>Import>ElementDefinitions
command.Be sure that you are starting from ChapterTemplate.fm.
• Select ChapterEDD.fm from the “Import From Document” drop-downmenu.
Import from Document drop-down menu
76

Document Schemas
• Click the Import button3. If no errors occur, an alert will appear indicating that the Element Definitions have
been imported successfully from the EDD.
4. If errors occur, review them in the Element Catalog Manager Report and correct them in the EDD. Repeat Step 2 to import the EDD into the template.
Your template is now structured.
5. Save ChapterTemplate.fm.• Choose the File>Save command.
6. Close ChapterTemplate.fm.• Choose the File>Close command.
77

Document Schemas
78

Reading an XML Instance
Reading an XML Instance
So far we have referenced all of the components necessary to open or import an XMLinstance. Your structapps.fm file should now have the following file references:
• ChapterTemplate.fm—Structured FrameMaker template• ChapterWriteRules.fm—FrameMaker read/write rules• Chapter.dtd—XML DTD.
We have set all of the properties necessary to open an XML instance. Yourstructapps.fm file should now have the following application settings:
• Namespace—Enabled• DOCTYPE—for Chapter and Section.
To open an XML instance, use Structured FrameMaker’s Open command.
1. Open ColorDoc.xml• Choose the File>Open command.• Navigate to the “Practice” folder and select ColorDoc.xml.• Click the Open button.
Tip The Use Structured Application dialog appears when opening or importing an XML document if Structured FrameMaker cannot determine which XML Application to use. This can happen when Structured FrameMaker cannot match the DOCTYPE of the XML document to a DOCTYPE in an XML Application or when the same DOCTYPE appears in more than one XML Application.
The “Use Structured Application” dialog box appears.
• Select “TechPubs” from the “Use Structured Application” drop-down menu,and click the Continue button.
The formatted Structured FrameMaker document appears.
2. Save the document as ColorDoc.fm in your “Practice” folder.• Choose the File>Save As command.• Type ColorDoc.fm in the file name field.• Click the Save button.
79

Reading an XML Fragment
Reading an XML Fragment
Importing an XML Fragment into a Structured FrameMaker is as easy as importing anytype of file into a document.
To import an XML fragment, use Structured FrameMaker’s Import File command.
1. Open ColorDoc.fm if it is not already open.2. In the Structure View, place your insertion point after the last “Section” element.
3. Import the XML fragment ColorSection1.xml into ColorDoc.fm.• Choose the File>Import>File command.• For Macintosh users, in the Import File dialog, select XML from the Format:
drop-down menu.Tip When importing text or graphics into a FrameMaker or Structured FrameMaker document, choose Import By Reference if you want to keep a link to the external final or Copy Into Document if you want to import a copy. A referenced object cannot be edited in the FrameMaker or Structured FrameMaker document.
• Navigate to your “Practice” folder, select ColorSection1.xml, turn on Copyinto Document, and click Import.
Insertion point
Copy into document
80

Reading an XML Fragment
• For Windows and Unix, in the Unknown File Type dialog box, select XML,and click the Convert button.
The XML fragment is imported into the Structured FrameMaker document.
• Save the document.• In the Structure View, take a look at the structured content that has been
imported. Notice that the new content is a section.
81

Reading an XML Fragment
Notice that the “Section” element has an asterisk at the end of its name. This indicatesthat this element has a namespace associate with it.
• In the Structure View, select the “Section” element with the Namespacereference.
• Choose the Element>Namespaces command.
Namespace indicator
82

Reading an XML Fragment
The Namespaces Dialog window appears.
• Review the settings for the Section Namespace.The Declared Namespace is “RefDB” and the path is “ColorInfoDB”. These settingscould indicate that the content is referenced from a database named “ColorInfoDB”.
• Close the Namespaces window.4. Import the second XML fragment ColorSection2.xml.
• In the Structure View, place your insertion point after the last “Section”element.
• Import the XML fragment ColorSection2.xml into Color.fm.• Choose the File>Import>File command.• For Macintosh users, in the Import File dialog, select XML from the Format:
drop-down menu.
83

Reading an XML Fragment
Tip When importing text or graphics into a FrameMaker or Structured FrameMaker document, choose Import By Reference if you want to keep a link to the external file or Copy Into Document if you want to import a copy. A referenced object cannot be edited in the FrameMaker or Structured FrameMaker document.
• Navigate to your “Practice” folder, select ColorSection2.xml, turn on Copyinto Document, and click Import.
• For Windows and Unix, in the Unknown File Type dialog box, select XML,and click the Convert button.
The XML fragment is imported into the Structured FrameMaker document.
• Save the document.
Copy into document
84

Structured Authoring
Structured Authoring
Structured FrameMaker provides you with a full set of authoring and editing features tocreate simple and complex technical and business documents. The skills you’ve developedso far in setting up your XML Application are the same skills you will use to author andedit content.
Editing DocumentsWhen creating and editing content in Structured FrameMaker, you use the Structure Viewto help navigate and manage the structure of your document, and you use the ElementCatalog to guide you when inserting or moving elements as you work.
1. Open ColorDoc.fm if it is not already open.2. Open the Element Catalog and Structure View. You may optionally turn on element
boundaries.
Editing AttributesThe Chapter element has an “AuthorName” attribute, which is required but has not yetbeen entered. Editing attributes is easy with the Attribute Editor.
1. Enter your name in the “AuthorName” attribute.• In the Structure View, click on the “Chapter” element.
• Click on the Attributes Editor icon located at the top right corner of thedocument window.
Attribute Editor
85

Structured Authoring
• Select the “AuthorName” attribute in the Attribute scroll list.
• Delete the contents from the Attibute Value field.
• Type your name.
• Click the Set Value button.
Notice that the new value has appeared next to the “AuthorName” attribute in theStructure View.
Attribute Value field
86

Structured Authoring
• Close the Attributes dialog window.
Invalid and missing elementsWhenever an element does not conform to the document’s element definitions asdetermined by the template designer, the Structure View identifies the error for you. Threetypes of errors can occur: a missing element, an undefined element, or a misplacedelement.
In the Structure View, these elements are represented with special symbols.
A square hole appears if a required element is missing. Use the Element Catalog todetermine the valid elements that can be inserted.
A vertical dotted line appears from the location of the misplaced element. Move theinvalid element to a new position or insert elements around the element to correct theerror.
Adding new content
Text: Structured FrameMaker’s Guided Editing interface helps you to follow the rules ofyour Schema, thus building a valid document.
Missing element
Beginning of misplaced element
87

Structured Authoring
1. In the Structure View, set the insert point before the first “Section” element.
Tip The Element Catalog view can be customized using the Options button. Initially, the displayed elements are strictly valid.
Notice that the Element Catalog immediately refreshes to display the next set of validelements and that “Section” is valid in this location.
Insertion point
Valid elements
88

Structured Authoring
2. In the Element Catalog select “Section” and click the insert button.
Notice that the Head element is automatically inserted.
Also notice that the Structure View indicates missing elements with a red square hole.
Head element is automatically inserted
Missing elements
89

Structured Authoring
3. Type “This is a new section”.4. In the Structure View, set the insert point after the Head element. 5. Insert a Para element.
Tip You can insert an element from the Element Catalog by simply double-clicking on it. You can also insert elements using quick keys. Type CTRL 1 to go into insert mode. Notice that the status box at the bottom of the window shows I: (for insert mode). Type the first letter of the element you want to select and that element will appear in the status box. Press Enter to select the element.
6. Type “This is a new paragraph.”7. Press the Enter key.
Since Para is repeatable, Structured FrameMaker automatically inserts another Paraelement.
Inserting invalid elements: There are times when you want to insert an element out ofcontext. This can be accomplished by changing the display options in the element catalog.
1. Click on Options in the Element Catalog.2. Click on All Elements and Set.3. Notice that additional elements are showing. Structured FrameMaker indicates the
valid ones with a check mark; however, it is now possible to insert out-of-context elements as well.
4. If you insert an out-of-context element, you can move it to a valid location in the Structure View.
Adding graphics: Structured FrameMaker supports many graphic types. You will importseveral SVG and TIFF images into your XML Cookbook document.
1. Import the SVG graphic addcolor.svg into your document.• In the document window, locate the paragraph that begins with “If you
combine 100% of red, green, and blue... ”. Use the Edit>Find/Changecommand to help you locate this text.
• Place the insertion point after this “Para” element.• From the Element Catalog, insert a “Figure” element.
90

Structured Authoring
The Anchored Frame dialog window appears.
• Enter the following values and choices in the Anchored Frame dialogwindow:Element Tag: GraphicAnchoring Position: Below Current LineAlignment: LeftCropped: OffFloating: OffSize: Width: 246 pt.Size: Height: 94 pt.
• Click the New Frame button.An anchored frame is inserted.
• With the anchored frame still selected, choose the File>Import>Filecommand.
• For Macintosh users, ensure that the “Show All Files” check box is selected.• Navigate to the “ART” folder in the “Practice” folder and select
AddColor.svg.• Select the Import By Reference option.• Click the Import button.
91

Structured Authoring
• For Windows, in the Unknown File Type dialog, select SVG.
• For Windows, click the Convert button.
Tip Scalable Vector Graphics (SVG) are imported and rasterized for view, PDF, and printing from FrameMaker. FrameMaker also stores the SVG XML markup with the graphic so that the graphic can be exported to XML in the original SVG format.
• In the Import SVG dialog, click the Set button.
The SVG graphic is imported into the anchored frame.
92

Structured Authoring
2. Set the attributes of the Graphic element.• In the Structure View, double-click on the “Format” attribute.
• From the drop-down menu, select “SVG”.
Double-click on Format attribute to edit it
Attribute Value drop-down menu
SVG format
Attribute value entered
93

Structured Authoring
• Click the Set Value button.
• In the Attribute Edit dialog, click the “Type” attribute.
• From the Attribute Value drop-down menu, select “ByReference”.
Set Value
Type attribute selected
ByReference attribute value
94

Structured Authoring
• Click the Set Value button.
• Click the Done button.
3. Add a “Caption” element.• In the Structure View, click below the “Graphic” element.
• From the Element Catalog, insert a “Caption” element.
Set Value
Done button
95

Structured Authoring
• In the “Caption” element, type the following caption text:Additive Color Model
4. Import the SVG graphic Subcolor.svg into your document.• In the document window, locate the paragraph that begins with “If you
subtract red, green, or blue from white light... ”• Place the insertion point after this “Para” element.• From the Element Catalog, insert a “Figure” element.The Anchored Frame window appears.
• Enter the following values and choices in the Anchored Frame dialogwindow:Element Tag: GraphicAnchoring Position: Below Current LineAlignment: LeftCropped: OffFloating: OffSize: Width: 246 pt.Size: Height: 94 pt.
• Click the New Frame button.An anchored frame is inserted.
• With the anchored frame still selected, choose the File>Import>Filecommand.
• For Macintosh users, ensure that the “Show All Files” check box is selected.• Navigate to the “ART” folder in the “Practice” folder, and select
Subcolor.svg.• Select the Import By Reference option.• Click the Import button.• For Windows, in the Unknown File Type dialog, select SVG.• For Windows, click the Convert button.• In the Import SVG dialog, click the Set button.
96

Structured Authoring
The SVG graphic is imported into the anchored frame.
5. Set the attributes of the “Graphic” element.• In the Structure View, double-click on the “Format” attribute.• From the drop-down menu, select “SVG”.• Click the Set Value button.• In the Attribute Edit dialog, click the “Type” attribute.• From the Attribute Value drop-down menu, select “ByReference”.• Click the Set Value button.• Click the Done button.
6. Add a “Caption” element.• In the Structure View, click below the “Graphic” element.• From the Element Catalog, insert a “Caption” element.• In the “Caption” element, type the following caption text:
Subtractive Color Model
7. Import the TIFF graphic Dotgain.tif into your document.• In the document window, locate the paragraph that begins with “When
printed, small halftone dots make up lighter areas of an image... ”• Place the insertion point after this “Para” element.• From the Element Catalog, insert a “Figure” element.The Anchored Frame window appears.
• Enter the following values and choices in the Anchored Frame dialogwindow:Element Tag: GraphicAnchoring Position: Below Current LineAlignment: LeftCropped: OffFloating: OffSize: Width: 246 pt.Size: Height: 94 pt.
• Click the New Frame button.An anchored frame is inserted.
• With the anchored frame selected, choose the File>Import>File command.• Navigate to the “ART” folder in the “Practice” folder, and select Dotgain.tif.
97

Structured Authoring
• Select the Copy Into Document option.• Click the Import button.• In the Imported Graphic Scaling dialog, click the Set button.
The TIF graphic is imported into the anchored frame.
8. Set the attributes of the “Graphic” element.• In the Structure View, double-click on the “Format” attribute.• From the drop-down menu, select “TIF”.• Click the Set Value button.• In the Attribute Edit dialog, click the “Type” attribute.• From the Attribute Value drop-down menu, select “ByCopy”.• Click the Set Value button.• Click the Done button.
9. Add a “Caption” element.• In the Structure View, click below the “Graphic” element.• From the Element Catalog, insert a “Caption” element.• In the “Caption” element, type the following caption text:
Process screens at different angles
10. Import the TIFF graphic Seps.tif to your document.• In the document window, locate the paragraph that begins with “To print
color art on a commercial printing press... ”• Place the insertion point after this “Para” element.• From the Element Catalog, insert a “Figure” element.
Set button
98

Structured Authoring
The Anchored Frame window appears.
• Enter the following values and choices in the Anchored Frame dialogwindow:Element Tag: GraphicAnchoring Position: Below Current LineAlignment: LeftCropped: OffFloating: OffSize: Width: 246 pt.Size: Height: 94 pt.
• Click the New Frame button.An anchored frame is inserted.
• With the anchored frame selected, choose the File>Import>File command.• Navigate to the “ART” folder in the “Practice” folder, and select Seps.tif.• Select the Copy Into Document option.• Click the Import button.• In the Imported Graphic Scaling dialog, click the Set button.The TIF graphic is imported into the anchored frame.
11. Set the attributes of the “Graphic” element.• In the Structure View, double-click on the “Format” attribute.• From the drop-down menu, select “TIF”.• Click the Set Value button.• In the Attribute Edit dialog, click the “Type” attribute.• From the Attribute Value drop-down menu, select “ByCopy”.• Click the Set Value button.• Click the Done button.
12. Add a “Caption” element.• In the Structure View, click below the “Graphic” element.• From the Element Catalog, insert a “Caption” element.• In the “Caption” element, type the following caption text:
Composite print and file separations
99

Structured Authoring
13. Import the TIFF graphic Chalf.tif into your document.• In the document window, locate the paragraph that begins with “Many
variables—from photomechanical processes... ”• Place the insertion point after this “Para” element.• From the Element Catalog, insert a “Figure” element.The Anchored Frame window appears.
• Enter the following values and choices in the Anchored Frame dialogwindow:Element Tag: GraphicAnchoring Position: Below Current LineAlignment: LeftCropped: OffFloating: OffSize: Width: 246 pt.Size: Height: 94 pt.
• Click the New Frame button.An anchored frame is inserted.
• With the anchored frame selected, choose the File>Import>File command.• Navigate to the “ART” folder in the “Practice” folder and select Chalf.tif.• Select the Copy Into Document option.• Click the Import button.• In the Imported Graphic Scaling dialog, click the Set button.The TIF graphic is imported into the anchored frame.
14. Set the attributes of the “Graphic” element.• In the Structure View, double-click on the “Format” attribute.• From the drop-down menu, select “TIF”.• Click the Set Value button.• In the Attribute Edit dialog, click the “Type” attribute.• From the Attribute Value drop-down menu, select “ByCopy”.• Click the Set Value button.• Click the Done button.
15. Add a “Caption” element.• In the Structure View, click below the “Graphic” element.
100

Structured Authoring
• From the Element Catalog, Insert a “Caption” element.• In the “Caption” element, type the following caption text:
Halftone dots in a color proof after printing
16. Import the SVG graphic Resolution.svg to your document.• In the document window, locate the paragraph that begins with “A pixel is
the smallest... ”• Place the insertion point after this “Para” element.• From the Element Catalog, insert a “Figure” element.The Anchored Frame window appears.
• Enter the following values and choices in the Anchored Frame dialogwindow:Element Tag: GraphicAnchoring Position: Below Current LineAlignment: LeftCropped: OffFloating: OffSize: Width: 246 pt.Size: Height: 94 pt.
• Click the New Frame button.An anchored frame is inserted.
• With the anchored frame selected, choose the File>Import>File command.• For Macintosh users, ensure that the “Show All Files” check box is selected.• Navigate to the “ART” folder in the “Practice” folder and select
Resolution.svg.• Select the Import By Reference option.• Click the Import button.• For Windows, in the Unknown File Type dialog, select SVG.• For Windows, click the Convert button.• In the Import SVG dialog, click the Set button.The SVG graphic is imported into the anchored frame.
17. Set the attributes of the “Graphic” element.• In the Structure View, double-click on the “Format” attribute.• From the drop-down menu, select “SVG”.
101

Structured Authoring
• Click the Set Value button.• In the Attribute Edit dialog, click the “Type” attribute.• From the Attribute Value drop-down menu, select “ByReference”.• Click the Set Value button.• Click the Done button.
18. Add a “Caption” element.• In the Structure View, click below the “Graphic” element.• From the Element Catalog, insert a “Caption” element.• In the “Caption” element, type the following caption text:
Image resolutions at 72 ppi and 300 ppi
19. Save your document.Inserting Cross-References: FrameMaker’s cross-reference feature enables theautomatic updating of reference text. You will add cross-references to your Cookbooksection headings in order to build a mini-table of contents at the beginning of yourdocument.
1. Insert a “Contents” element near the beginning of ColorDoc.fm.• In the Structure View, scroll to the beginning of the element structure.• Click above the “Section” element.
• From the Element Catalog, insert a “TopicsList’ element.
Insertion point
102

Structured Authoring
• From the Element Catalog, insert a “TopicHead” element.• Enter the text Contents• In the Structure View, click below the “TopicHead” element.
• From the Element Catalog, insert a “TopicPara” element.• In the Cross-Reference dialog window, select “Head(Level2)” in the Element
Tags list.
• In the Cross-Reference dialog window, select “The properties of color” in theElements (in Document Order) list.
Insertion point
Element Tags list
Elements (in Document Order) list
103

Structured Authoring
• In the Cross-Reference dialog window, click the Insert button.
FrameMaker inserts the cross-reference and insets a cross-reference attribute valuelinking to the referenced “Head” element.
• In the Structure View, click below the last “TopicPara” element.
• From the Element Catalog, insert a “TopicPara” element.• In the Cross-Reference dialog window, select “Head(Level2)” in the Element
Tags list.• In the Cross-Reference dialog window, select “Printing terminology” in the
Elements (in Document Order) list.• In the Cross-Reference dialog window, click the Insert button.• In the Structure View, click below the last “TopicPara” element.• From the Element Catalog, insert a “TopicPara” element.
Insert button
Cross-reference attribute value
Insertion point
104

Structured Authoring
• In the Cross-Reference dialog window, select “Head(Level2)” in the ElementTags list.
• In the Cross-Reference dialog window, select “Computer graphics” in theElements (in Document Order) list.
• In the Cross-Reference dialog window, click the Insert button.• In the Structure View, click below the last “TopicPara” element.• From the Element Catalog, insert a ‘TopicPara” element.• In the Cross-Reference dialog window, select “Head(Level2)” in the Element
Tags list.• In the Cross-Reference dialog window, select “Common printing problems”
in the Elements (in Document Order) list.• In the Cross-Reference dialog window, click the Insert button.• In the Structure View, click below the last “TopicPara” element.• From the Element Catalog, insert a TopicPara” element.• In the Cross-Reference dialog window, select “Head(Level2)” in the Element
Tags list.• In the Cross-Reference dialog window, select “Bitmap image and output
resolution” in the Elements (in Document Order) list.• In the Cross-Reference dialog window, click the Insert button.• Save your document.
105

Structured Authoring
106

Writing an XML Instance
Writing an XML Instance
To export an XML instance, use Structured FrameMaker’s Save As command.
1. Save ColorDoc.fm as XML.• Open ColorDoc.fm if it is not already open.• Choose the File>Save As command.• Enter ColorDoc.xml in the file name field.• Choose “XML” from the “Save As Type” or “Format” drop-down menu.• Click the Save button.The XML file is created. The “Use Application” dialog box did not appear becausethe application name “TechPubs” had been specified in the EDD.
2. Copy your SVG images to the XML folder.• Locate the “ART” folder, and copy all of its contents to the XML folder.
3. Copy your DTD to the XML folder.• Locate the App folder and copy “Chapter.dtd”, “Chapter.xsl”, and
“Chapter.css” to the “XML” folder.4. Open ColorDoc.xml and review its contents.
• Using an ASCII text editor (not Structured FrameMaker), choose theFile>Open command.
• Locate and highlight ColorDoc.xml• Click the Open button.or,
• Using Structured FrameMaker as your editor, choose the File>Opencommand.
• Locate and highlight ColorDoc.xml• Hold down the Shift key (Windows and Unix) or the Option key (Macintosh)
and click the Open button.
107

Writing XML with a CSS2 Stylesheet
Writing XML with a CSS2 Stylesheet
When you export your XML from Structured FrameMaker it is possible to generate aCSS2 stylesheet and have your XML reference it. This option is set in the structapps.fmfile in the XML application you have defined.
1. Open your structapps.fm document if it is not already open.2. Locate your “TechPubs” XML Application.3. Click after the “Namespace” element.4. Insert a “StyleSheets” element.5. Insert a “GenerateCSS2” element.6. Insert an “Enable” element.7. Read structapps.fm.8. Save ColorDoc.fm as XML.9. Open ColorDoc.xml in an ASCII editor and notice the stylesheet reference.10. Open ColorDoc.xml in Internet Explorer version 6 or greater, Netscape 6, or Opera
5 or greater.Notice that the xml is formatted using the CSS2 stylesheet.
108

Writing XML with an XSL Stylesheet
Writing XML with an XSL Stylesheet
When you export your XML from Structured FrameMaker you can have your XMLreference an XSL stylesheet. This option is set in the structapps.fm file in the XMLapplication you have defined.
1. Open your structapps.fm document if it is not already open.2. Locate your “TechPubs” XML Application.3. Delete the “CSSPreferences” element.4. Within the “StyleSheets” element, insert an “XMLStyleSheets” element.
The “xmlstylesheet” child element is automatically inserted.
5. Insert a “StyleSheetType” element.6. Type “XSL”.7. Click after the “StyleSheetType” element.8. Inset a “StyleSheetURI” element.9. Type “Chapter.xsl”.10. Read structapps.fm.11. Save ColorDoc.fm as XML.12. Open ColorDoc.xml in an ASCII editor and notice the stylesheet reference.13. Open ColorDoc.xml in Internet Explorer version 6 or greater, Netscape 6, or Opera
5 or greater.Notice that the XML is formatted using the XSL stylesheet.
109

Writing XML with an XSL Stylesheet
110
Adobe, the Adobe logo, and FrameMaker are either registered trademarks or trademarks of Adobe Systems Incorporated in the United Statesand/or other countries. Windows is either a registered trademark or trademark of Microsoft Corporation in the United States and/or other countries.Macintosh is a trademark of Apple Computer, Inc., registered in the United States and other countries. UNIX is a registered trademark ofThe Open Group. © 2002 Adobe Systems Incorporated. All rights reserved.