classroom in a book -...
TRANSCRIPT


Classroom in a Book
®
www.adobe.com/adobepress
L00fr.fm Page i Saturday, July 6, 2002 11:00 AM

© 2003 Adobe Systems Incorporated. All rights reserved.
Adobe ® FrameMaker 7.0 Classroom in a Book ® for Windows ®, Macintosh, and UNIX
This manual, as well as the software described in it, is furnished under license and may be used or copied only in accordance with the terms of such license. The content of this manual is furnished for informational use only, is subject to change without notice, and should not be construed as a commitment by Adobe Systems Incorporated. Adobe Systems Incorporated assumes no responsibility or liability for any errors or inaccuracies that may appear in this documentation.
Except as permitted by such license, no part of this publication may be reproduced, stored in a retrieval system, or transmitted, in any form or by any means, electronic, mechanical, recording, or otherwise, without the prior written permission of Adobe Systems Incorporated.
Please remember that existing artwork or images that you may want to include in your project may be protected under copyright law. The unauthorized incorporation of such material into your new work could be a violation of the rights of the copyright owner. Please be sure to obtain any permission required from the copyright owner.
Any references to company names in sample templates are for demonstration purposes only and are not intended to refer to any actual organization.
Adobe, the Adobe logo, the Adobe Press logo, Adobe Type Manager, ATM, Acrobat, the Acrobat logo, Acrobat Capture, Acrobat Catalog, Acrobat Distiller, Acrobat Exchange, Acrobat Reader, Classroom in a Book, FrameMaker, Illustrator, PageMaker, and PostScript are either registered trademarks or trademarks of Adobe Systems Incorporated in the United States and/or other countries. Microsoft, and Windows are either registered trademarks or trademarks of Microsoft Corporation in the United States and/or other countries. Apple, Mac, Macintosh Power Macintosh, QuickTime, and TrueType are trademarks of Apple Computer, Inc., registered in the United States and other countries. Solaris is a trademark of Sun Microsystems, Inc. Indy is a trademark of Silicon Graphics, Inc. UNIX is a registered trademark in the United States and other countries, licensed exclusively through X/Open Company, Ltd. Pentium is a registered trademark of Intel Corporation. All other trademarks are the property of their respective owners.
Adobe Systems Incorporated, 345 Park Avenue, San Jose, California 95110, USA.
Adobe Press books are published by Peachpit Press, Berkeley, CA.To report errors, please send a note to [email protected].
Notice to U.S. Government End Users. The Software and Documentation are “Commercial Items,” as that term is defined at 48 C.F.R. §2.101, consisting of “Commercial Computer Software” and “Commercial Computer Software Documentation,” as such terms are used in 48 C.F.R. §12.212 or 48 C.F.R. §227.7202, as applicable. Consistent with 48 C.F.R. §12.212 or 48 C.F.R. §§227.7202-1 through 227.7202-4, as applicable, the Commercial Computer Software and Commercial Computer Software Documentation are being licensed to U.S. Government end users (a) only as Commercial Items and (b) with only those rights as are granted to all other end users pursuant to the terms and conditions herein. Unpublished-rights reserved under the copyright laws of the United States. Adobe Systems Incorporated, 345 Park Avenue, San Jose, CA 95110-2704, USA. For U.S. Government EndUsers, Adobe agrees to comply with all applicable equal opportunity laws including, if appropriate, the provisions of ExecutiveOrder 11246, as amended, Section 402 of the Vietnam Era Veterans Readjustment Assistance Act of 1974 (38 USC 4212), andSection 503 of the Rehabilitation Act of 1973, as amended, and the regulations at 41 CFR Parts 60-1 through 60-60, 60-250, and60-741. The affirmative action clause and regulations contained in the preceding sentence shall be incorporated by reference inthis Agreement.
ISBN 0-321-13168-1
Printed in the U.S.A.
9 8 7 6 5 4 3 2 1
L00fr.fm Page ii Saturday, July 6, 2002 11:00 AM

iii
Contents
Part One Adobe FrameMaker 7.0
Getting Started The power and flexibility of FrameMaker 7.0. . . . . .1
About Classroom in a Book . . . . . . . . . . . . . . . . . . . . . .1
Prerequisites . . . . . . . . . . . . . . . . . . . . . . . . . . . . . . . . . . .2
Installing the FrameMaker 7.0 program . . . . . . . . . .2
Installing WebWorks and XML Cookbook. . . . . . . . .3
Installing the Classroom in a Book fonts . . . . . . . . . .3
Copying the Classroom in a Book files . . . . . . . . . . . .4
Starting the FrameMaker 7.0 program. . . . . . . . . . . .5
Unstructured and Structured FrameMaker 7.0 . . . .6
Additional Resources. . . . . . . . . . . . . . . . . . . . . . . . . . . .7
Adobe Certification . . . . . . . . . . . . . . . . . . . . . . . . . . . . .8
Lesson 1
Working with FrameMaker 7.0 Documents
Getting started . . . . . . . . . . . . . . . . . . . . . . . . . . . . . . . 12
Exploring the document window . . . . . . . . . . . . . . 14
Applying predefined paragraph formats . . . . . . . 24
Applying predefined character formats . . . . . . . . 27
Writing a short memo . . . . . . . . . . . . . . . . . . . . . . . . . 29
Moving on. . . . . . . . . . . . . . . . . . . . . . . . . . . . . . . . . . . . 34
Review questions . . . . . . . . . . . . . . . . . . . . . . . . . . . . . 34
Answers . . . . . . . . . . . . . . . . . . . . . . . . . . . . . . . . . . . . . . 35
Lesson 2
Defining Paragraph Formats
Creating a custom document . . . . . . . . . . . . . . . . . . 40
Copying text. . . . . . . . . . . . . . . . . . . . . . . . . . . . . . . . . . 43
Setting up rulers and the grid. . . . . . . . . . . . . . . . . . 44
Creating a side-head area . . . . . . . . . . . . . . . . . . . . . 45
Displaying the Paragraph Designer . . . . . . . . . . . . 47
Formatting headings. . . . . . . . . . . . . . . . . . . . . . . . . . 48
Formatting body text . . . . . . . . . . . . . . . . . . . . . . . . . 52
FM7 CIBTOC.fm Page iii Saturday, July 6, 2002 11:03 AM

CONTENTS
iv
Formatting numbered lists . . . . . . . . . . . . . . . . . . . . 53
Formatting bulleted lists . . . . . . . . . . . . . . . . . . . . . . 59
Creating a chapter title . . . . . . . . . . . . . . . . . . . . . . . . 62
Deleting formats. . . . . . . . . . . . . . . . . . . . . . . . . . . . . . 64
Moving on. . . . . . . . . . . . . . . . . . . . . . . . . . . . . . . . . . . . 65
Review questions . . . . . . . . . . . . . . . . . . . . . . . . . . . . . 65
Answers . . . . . . . . . . . . . . . . . . . . . . . . . . . . . . . . . . . . . . 65
Lesson 3
Defining Colors and Character Formats
Defining custom colors and tints. . . . . . . . . . . . . . . 70
Adding color to paragraph formats . . . . . . . . . . . . 74
Adding color to autonumbers . . . . . . . . . . . . . . . . . 75
Emphasizing words and phrases . . . . . . . . . . . . . . . 78
Moving on. . . . . . . . . . . . . . . . . . . . . . . . . . . . . . . . . . . . 81
Review questions . . . . . . . . . . . . . . . . . . . . . . . . . . . . . 81
Answers . . . . . . . . . . . . . . . . . . . . . . . . . . . . . . . . . . . . . . 81
Lesson 4
Page Layout
Changing column layout . . . . . . . . . . . . . . . . . . . . . . 86
Displaying master pages . . . . . . . . . . . . . . . . . . . . . . 87
Numbering pages. . . . . . . . . . . . . . . . . . . . . . . . . . . . . 90
Creating a running footer . . . . . . . . . . . . . . . . . . . . . 92
Finishing the footers . . . . . . . . . . . . . . . . . . . . . . . . . . 94
Custom master pages . . . . . . . . . . . . . . . . . . . . . . . . . 95
Assigning master pages to paragraph tags . . . . 102
Create a new paragraph format. . . . . . . . . . . . . . . 106
Moving on. . . . . . . . . . . . . . . . . . . . . . . . . . . . . . . . . . . 110
Review questions . . . . . . . . . . . . . . . . . . . . . . . . . . . . 110
Answers . . . . . . . . . . . . . . . . . . . . . . . . . . . . . . . . . . . . . 111
Lesson 5
Graphics
Adjusting header and footer framesfor graphics . . . . . . . . . . . . . . . . . . . . . . . . . . . . . . . . . 117
Importing a graphic . . . . . . . . . . . . . . . . . . . . . . . . . . 122
Masking part of a graphic . . . . . . . . . . . . . . . . . . . . 125
Copying the graphics . . . . . . . . . . . . . . . . . . . . . . . . 128
Drawing lines and rectangles . . . . . . . . . . . . . . . . . 130
FM7 CIBTOC.fm Page iv Saturday, July 6, 2002 11:03 AM

v
ADOBE FRAMEMAKER 7.0
Classroom in a Book
Aligning and distributing objects . . . . . . . . . . . . . 132
Copying the graphics . . . . . . . . . . . . . . . . . . . . . . . . 134
Moving on. . . . . . . . . . . . . . . . . . . . . . . . . . . . . . . . . . . 135
Review questions . . . . . . . . . . . . . . . . . . . . . . . . . . . . 135
Answers . . . . . . . . . . . . . . . . . . . . . . . . . . . . . . . . . . . . . 136
Lesson 6
Document Editing
Viewing the document . . . . . . . . . . . . . . . . . . . . . . . 140
Turning off the display of graphics . . . . . . . . . . . . 141
Defining a user variable . . . . . . . . . . . . . . . . . . . . . . 142
Inserting variables . . . . . . . . . . . . . . . . . . . . . . . . . . . 143
Finding and changing text . . . . . . . . . . . . . . . . . . . 144
Changing a variable definition. . . . . . . . . . . . . . . . 146
Using the Thesaurus . . . . . . . . . . . . . . . . . . . . . . . . . 147
Checking spelling . . . . . . . . . . . . . . . . . . . . . . . . . . . . 150
Viewing the finished article with graphics . . . . . 153
Moving on. . . . . . . . . . . . . . . . . . . . . . . . . . . . . . . . . . . 153
Review questions . . . . . . . . . . . . . . . . . . . . . . . . . . . . 153
Answers . . . . . . . . . . . . . . . . . . . . . . . . . . . . . . . . . . . . . 154
Lesson 7
Tables
Inserting a table . . . . . . . . . . . . . . . . . . . . . . . . . . . . . 158
Filling in the table. . . . . . . . . . . . . . . . . . . . . . . . . . . . 161
Adding rows and columns. . . . . . . . . . . . . . . . . . . . 162
Rearranging information . . . . . . . . . . . . . . . . . . . . . 164
Formatting text in table cells . . . . . . . . . . . . . . . . . 167
Resizing columns . . . . . . . . . . . . . . . . . . . . . . . . . . . . 171
Changing the table format . . . . . . . . . . . . . . . . . . . 173
Straddling table cells . . . . . . . . . . . . . . . . . . . . . . . . . 179
Reusing a table format . . . . . . . . . . . . . . . . . . . . . . . 179
Moving on. . . . . . . . . . . . . . . . . . . . . . . . . . . . . . . . . . . 180
Review questions . . . . . . . . . . . . . . . . . . . . . . . . . . . . 180
Answers . . . . . . . . . . . . . . . . . . . . . . . . . . . . . . . . . . . . . 180
FM7 CIBTOC.fm Page v Saturday, July 6, 2002 11:03 AM

CONTENTS
vi
Lesson 8
Customizing Tables
Viewing a sample table. . . . . . . . . . . . . . . . . . . . . . . 184
Importing text into a table . . . . . . . . . . . . . . . . . . . 185
Formatting body cells . . . . . . . . . . . . . . . . . . . . . . . . 191
Formatting the table title. . . . . . . . . . . . . . . . . . . . . 194
Setting basic table properties. . . . . . . . . . . . . . . . . 195
Resizing columns . . . . . . . . . . . . . . . . . . . . . . . . . . . . 196
Using tabs in table cells . . . . . . . . . . . . . . . . . . . . . . 198
Defining ruling styles . . . . . . . . . . . . . . . . . . . . . . . . 199
Setting table ruling . . . . . . . . . . . . . . . . . . . . . . . . . . 200
Using custom ruling and shading . . . . . . . . . . . . . 202
Moving on. . . . . . . . . . . . . . . . . . . . . . . . . . . . . . . . . . . 205
Review questions . . . . . . . . . . . . . . . . . . . . . . . . . . . . 206
Answers . . . . . . . . . . . . . . . . . . . . . . . . . . . . . . . . . . . . . 206
Lesson 9
Anchored Frames and Graphics
Editing text containing anchored frames . . . . . . 210
Importing a graphic . . . . . . . . . . . . . . . . . . . . . . . . . . 211
Importing a second graphic . . . . . . . . . . . . . . . . . . 216
Anchoring graphics in the column . . . . . . . . . . . . 217
Using art in the margin . . . . . . . . . . . . . . . . . . . . . . . 219
Copying anchored frames . . . . . . . . . . . . . . . . . . . . 221
Using inline graphics . . . . . . . . . . . . . . . . . . . . . . . . . 222
Reusing anchored frames . . . . . . . . . . . . . . . . . . . . 224
Using run-in art . . . . . . . . . . . . . . . . . . . . . . . . . . . . . . 226
Creating a drop cap . . . . . . . . . . . . . . . . . . . . . . . . . . 228
Importing movies into documents . . . . . . . . . . . . 230
Moving on. . . . . . . . . . . . . . . . . . . . . . . . . . . . . . . . . . . 233
Review questions . . . . . . . . . . . . . . . . . . . . . . . . . . . . 233
Answers . . . . . . . . . . . . . . . . . . . . . . . . . . . . . . . . . . . . . 234
Lesson 10
Cross-References and Footnotes
Inserting a paragraph cross-reference . . . . . . . . . 238
Displaying the source of a cross-reference. . . . . 241
Inserting an external cross-reference. . . . . . . . . . 242
Creating a cross-reference format. . . . . . . . . . . . . 243
FM7 CIBTOC.fm Page vi Saturday, July 6, 2002 11:03 AM

vii
ADOBE FRAMEMAKER 7.0
Classroom in a Book
Using the new cross-reference format. . . . . . . . . 246
Inserting a spot cross-reference. . . . . . . . . . . . . . . 247
Resolving cross-references . . . . . . . . . . . . . . . . . . . 249
Inserting footnotes . . . . . . . . . . . . . . . . . . . . . . . . . . 252
Changing how footnotes look . . . . . . . . . . . . . . . . 253
Moving on. . . . . . . . . . . . . . . . . . . . . . . . . . . . . . . . . . . 257
Review questions . . . . . . . . . . . . . . . . . . . . . . . . . . . . 257
Answers . . . . . . . . . . . . . . . . . . . . . . . . . . . . . . . . . . . . . 258
Lesson 11
Books
Viewing the finished book file . . . . . . . . . . . . . . . . 262
Creating a book file . . . . . . . . . . . . . . . . . . . . . . . . . . 263
Adding documents to the book. . . . . . . . . . . . . . . 265
Opening files from the book window . . . . . . . . . 266
Adding a table of contents . . . . . . . . . . . . . . . . . . . 267
Generating the table of contents . . . . . . . . . . . . . 269
Setting up chapter numbering. . . . . . . . . . . . . . . . 271
Fixing the pagination . . . . . . . . . . . . . . . . . . . . . . . . 272
Changing the layout . . . . . . . . . . . . . . . . . . . . . . . . . 275
Adding a title . . . . . . . . . . . . . . . . . . . . . . . . . . . . . . . . 276
Formatting the entries . . . . . . . . . . . . . . . . . . . . . . . 279
Changing the contents of entries . . . . . . . . . . . . . 283
Finishing the Preface.fm file . . . . . . . . . . . . . . . . . . 285
Moving on. . . . . . . . . . . . . . . . . . . . . . . . . . . . . . . . . . . 285
Review questions . . . . . . . . . . . . . . . . . . . . . . . . . . . . 286
Answers . . . . . . . . . . . . . . . . . . . . . . . . . . . . . . . . . . . . . 286
Lesson 12
Indexes
Adding an index to the book . . . . . . . . . . . . . . . . . 290
Changing the layout . . . . . . . . . . . . . . . . . . . . . . . . . 293
Adding a title . . . . . . . . . . . . . . . . . . . . . . . . . . . . . . . . 295
Updating the page footer . . . . . . . . . . . . . . . . . . . . 297
Formatting the entries . . . . . . . . . . . . . . . . . . . . . . . 299
Formatting page numbers. . . . . . . . . . . . . . . . . . . . 302
Fixing bad line breaks . . . . . . . . . . . . . . . . . . . . . . . . 303
Adding index entries . . . . . . . . . . . . . . . . . . . . . . . . . 307
FM7 CIBTOC.fm Page vii Saturday, July 6, 2002 11:03 AM

CONTENTS
viii
Editing index entries . . . . . . . . . . . . . . . . . . . . . . . . . 309
Moving on. . . . . . . . . . . . . . . . . . . . . . . . . . . . . . . . . . . 315
Review questions . . . . . . . . . . . . . . . . . . . . . . . . . . . . 315
Answers . . . . . . . . . . . . . . . . . . . . . . . . . . . . . . . . . . . . . 315
Lesson 13
Conditional Text
Viewing conditional text . . . . . . . . . . . . . . . . . . . . . 320
Setting up your document . . . . . . . . . . . . . . . . . . . 323
Creating condition tags . . . . . . . . . . . . . . . . . . . . . . 324
Adding conditional text . . . . . . . . . . . . . . . . . . . . . . 326
Tagging text as you type . . . . . . . . . . . . . . . . . . . . . 332
Adding a conditional graphic . . . . . . . . . . . . . . . . . 333
Adding conditional table rows. . . . . . . . . . . . . . . . 338
Saving versions of a conditional document . . . . 340
Moving on. . . . . . . . . . . . . . . . . . . . . . . . . . . . . . . . . . . 341
Review questions . . . . . . . . . . . . . . . . . . . . . . . . . . . . 341
Answers . . . . . . . . . . . . . . . . . . . . . . . . . . . . . . . . . . . . . 342
Lesson 14
Hypertext and PDF
Creating a hypertext TOC and index . . . . . . . . . . 346
Using cross-references as hypertext links . . . . . . 349
Testing hypertext links . . . . . . . . . . . . . . . . . . . . . . . 353
Adding navigation buttons . . . . . . . . . . . . . . . . . . . 355
Saving as Hypertext, HTML . . . . . . . . . . . . . . . . . . . 361
Saving as PDF. . . . . . . . . . . . . . . . . . . . . . . . . . . . . . . . 362
Moving on. . . . . . . . . . . . . . . . . . . . . . . . . . . . . . . . . . . 365
Review questions . . . . . . . . . . . . . . . . . . . . . . . . . . . . 365
Answers . . . . . . . . . . . . . . . . . . . . . . . . . . . . . . . . . . . . . 366
Lesson 15
HTML and Web Publishing
Viewing the finished document. . . . . . . . . . . . . . . 370
Saving as HTML . . . . . . . . . . . . . . . . . . . . . . . . . . . . . . 372
Viewing the results in a Web browser . . . . . . . . . 374
Refining the mappings . . . . . . . . . . . . . . . . . . . . . . . 376
Specifying a graphic format . . . . . . . . . . . . . . . . . . 380
Adding hypertext links . . . . . . . . . . . . . . . . . . . . . . . 380
FM7 CIBTOC.fm Page viii Saturday, July 6, 2002 11:03 AM

ix
ADOBE FRAMEMAKER 7.0
Classroom in a Book
Splitting the document into multipleWeb pages . . . . . . . . . . . . . . . . . . . . . . . . . . . . . . . . . . 384
Seeing the results in HTML . . . . . . . . . . . . . . . . . . . 385
Advanced topics . . . . . . . . . . . . . . . . . . . . . . . . . . . . . 388
Moving on. . . . . . . . . . . . . . . . . . . . . . . . . . . . . . . . . . . 395
Review questions . . . . . . . . . . . . . . . . . . . . . . . . . . . . 395
Answers . . . . . . . . . . . . . . . . . . . . . . . . . . . . . . . . . . . . . 395
Part Two Structured Adobe FrameMaker 7.0
Getting Started with Structure XML integrated into FrameMaker 7.0. . . . . . . . . . 399
Why XML is useful. . . . . . . . . . . . . . . . . . . . . . . . . . . . 401
Understanding the principle behindstructure . . . . . . . . . . . . . . . . . . . . . . . . . . . . . . . . . . . . 403
Lesson 16
Structured Documents
FrameMaker 7.0 for structured authoring. . . . . . 408
Structured features . . . . . . . . . . . . . . . . . . . . . . . . . . 408
Structured FrameMaker 7.0 windowand menu . . . . . . . . . . . . . . . . . . . . . . . . . . . . . . . . . . . 409
Setting up Structured FrameMaker 7.0work space . . . . . . . . . . . . . . . . . . . . . . . . . . . . . . . . . . 409
Working in the Structure window . . . . . . . . . . . . . 411
Collapsing and expanding elements . . . . . . . . . . 415
Viewing attributes . . . . . . . . . . . . . . . . . . . . . . . . . . . 417
Using the Element Catalog . . . . . . . . . . . . . . . . . . . 418
Display options . . . . . . . . . . . . . . . . . . . . . . . . . . . . . . 418
Changing display options . . . . . . . . . . . . . . . . . . . . 420
Creating a custom element list . . . . . . . . . . . . . . . 422
Moving on. . . . . . . . . . . . . . . . . . . . . . . . . . . . . . . . . . . 425
Review questions . . . . . . . . . . . . . . . . . . . . . . . . . . . . 425
Answers . . . . . . . . . . . . . . . . . . . . . . . . . . . . . . . . . . . . . 426
Lesson 17
Authoring XML
FrameMaker 7.0 for structured authoring. . . . . . 430
A brief XML tutorial . . . . . . . . . . . . . . . . . . . . . . . . . . 431
CIBColorDoc1.fm to CIBColorFinal.fm . . . . . . . . . 433
FM7 CIBTOC.fm Page ix Saturday, July 6, 2002 11:03 AM

CONTENTS
x
Moving on. . . . . . . . . . . . . . . . . . . . . . . . . . . . . . . . . . . 451
Review questions . . . . . . . . . . . . . . . . . . . . . . . . . . . . 451
Answers . . . . . . . . . . . . . . . . . . . . . . . . . . . . . . . . . . . . . 452
Lesson 18
Exporting and Importing Structured Files
Exporting to XML . . . . . . . . . . . . . . . . . . . . . . . . . . . . 456
Exporting to PDF. . . . . . . . . . . . . . . . . . . . . . . . . . . . . 457
Viewing the XML file in a browser . . . . . . . . . . . . . 459
Viewing the PDF file in Adobe Acrobat . . . . . . . . 461
The XML Round trip . . . . . . . . . . . . . . . . . . . . . . . . . . 462
WebWorks Publisher . . . . . . . . . . . . . . . . . . . . . . . . . 463
Creating a WWP project file for HTMLconversion . . . . . . . . . . . . . . . . . . . . . . . . . . . . . . . . . . 464
Moving on. . . . . . . . . . . . . . . . . . . . . . . . . . . . . . . . . . . 469
Review questions . . . . . . . . . . . . . . . . . . . . . . . . . . . . 469
Answers . . . . . . . . . . . . . . . . . . . . . . . . . . . . . . . . . . . . . 469
Appendix A
Glossary of Structured Terms
. . . . . . . . . . . 473
Appendix B Importing Microsoft Word® into
FrameMaker 7.0. . . . . . . . . . . . . . . . . . . . . . . . . . . . . . 475
Appendix C Keyboard Shortcuts . . . . . . . . . . . . . . . . . . . . . . . . . . 477
Appendix D Copying the Sample Files (UNIX) . . . . . . . . . . . . . . 479
Index
. . . . . . . . . . . . . . . . . . . . . . . . . . . . . . . . . . . . . . 483
FM7 CIBTOC.fm Page x Saturday, July 6, 2002 11:03 AM

This page intentionally left blank

Lesson 4


4
Page Layout
#
Running H/F 1: Running H/F 2
Page layouts for FrameMaker 7.0
documents are stored on special master
pages
—
one master page for each layout
used in a document. The master pages
define column layouts for text and the
contents and placement of headers and
footers. The master pages also may
contain background text or graphics that
appear on the corresponding body pages.
L04.fm Page 85 Saturday, July 6, 2002 11:34 AM

LESSON 4
86
Page Layout
In this lesson, you’ll learn how to do the following:
•
Change the column layout.
•
Display master pages.
•
Create and position page headers and footers.
•
Use system variables for numbering pages and for creating running headers and footers.
•
Create custom master pages
Changing column layout
To learn how page design works in FrameMaker 7.0, you’ll set up the page layout for the
chapters of a small book. The sample document already contains the paragraph and
character formats that you’ll use for document text.
You’ll begin by narrowing the page margins so more text will fit on each page.
1
If necessary, copy the Lesson04 folder from the
FrameMaker 7.0 Classroom in a Book
CD and start FrameMaker 7.0.
2
If FrameMaker 7.0 is not in standard mode, choose File > Preferences > General, and
then select FrameMaker from the Product Interface pop-up menu. You’ll be prompted to
restart the application.
3
Open Layout.fm in the Lesson04 folder.
4
Choose File > Save As, enter the filename
Layout1.fm
, and click Save.
5
Choose Format > Page Layout > Column Layout.
L04.fm Page 86 Saturday, July 6, 2002 11:34 AM
87
ADOBE FRAMEMAKER 7.0
Classroom in a Book
6
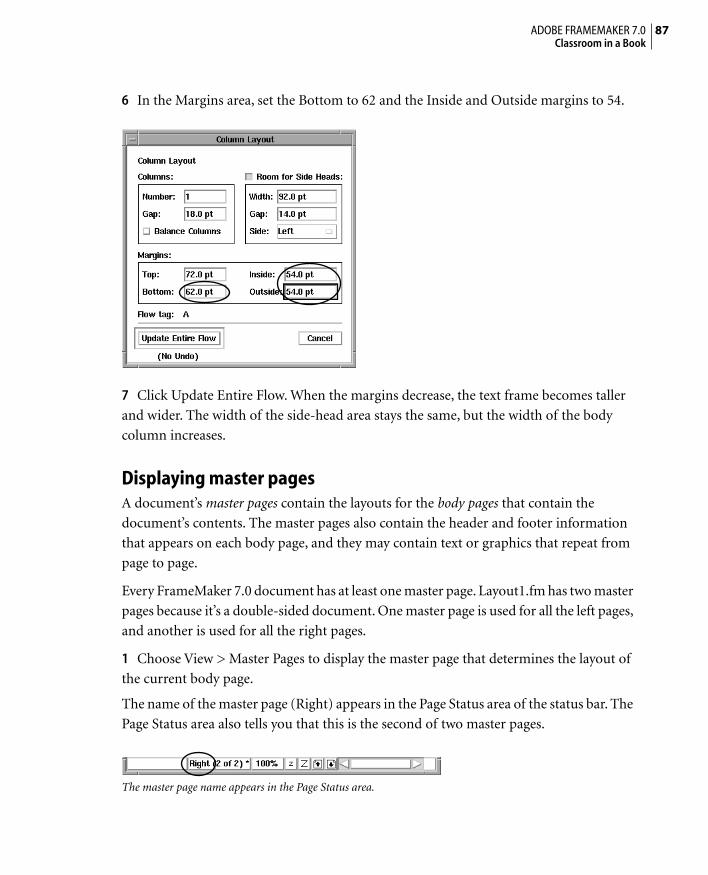
In the Margins area, set the Bottom to 62 and the Inside and Outside margins to 54.
7
Click Update Entire Flow. When the margins decrease, the text frame becomes taller
and wider. The width of the side-head area stays the same, but the width of the body
column increases.
Displaying master pages
A document’s
master pages
contain the layouts for the
body pages
that contain the
document’s contents. The master pages also contain the header and footer information
that appears on each body page, and they may contain text or graphics that repeat from
page to page.
Every FrameMaker 7.0 document has at least one master page. Layout1.fm has two master
pages because it’s a double-sided document. One master page is used for all the left pages,
and another is used for all the right pages.
1
Choose View > Master Pages to display the master page that determines the layout of
the current body page.
The name of the master page (Right) appears in the Page Status area of the status bar. The
Page Status area also tells you that this is the second of two master pages.
The master page name appears in the Page Status area.
L04.fm Page 87 Saturday, July 6, 2002 11:34 AM

LESSON 4
88
Page Layout
The Right master page contains three text frames.
A.
Template text frame
B.
Background text frames
2
Click in the large text frame. This is a
template text frame,
which provides the layout for
the text frames in which you type on body pages.
The left side of the Tag area in the status bar shows you the
flow tag
—the name of the text
flow that the text frame belongs to.
The flow tag is A.
Most documents contain one main text flow that runs from the first page to the last. The
flow is usually tagged A. When text fills a body page, FrameMaker 7.0 adds a page
automatically, copies the template text frame to the body page from the appropriate
master page, and continues the text on the new page.
3
Click in the small text frame at the top of the page. This text frame and the small text frame
at the bottom of the page are used for the headers and footers that appear on body pages.
The status bar doesn’t contain a flow tag, indicating that the text flow for this text frame
is
untagged
.
B
A
B
L04.fm Page 88 Saturday, July 6, 2002 11:34 AM

89
ADOBE FRAMEMAKER 7.0
Classroom in a Book
As you’ll see, the contents of untagged text frames appear on body pages as
background
text
—text that can only be edited on the master pages. Background text frames aren’t
copied to the body pages.
4
Type your name in the header text frame at the top of the page. If your name appears
as a gray bar, click the Zoom In button ( ) in the status bar until your name appears.
5
Choose View > Body Pages to display the body page. Your name appears at the top of
the page, but the background text frame’s borders are not displayed.
Background text appears without a text frame border.
6
Click on your name. The pointer doesn’t change to an I-beam ( ) as it usually does
over text, and no insertion point appears, because the text isn’t editable on the body page.
The pointer remains an arrow.
7
Click the Next Page button ( ) in the status bar to display page 2. Your name doesn’t
appear at the top of page 2 because this is a left-hand page. It uses the Left master page,
whose untagged text frames are still empty.
8
Click the Next Page button ( ) again. Your name appears on page 3 because it’s a
right-hand page and, like page 1, it gets its page design from the Right master page.
Marie Curie
Chapter 1: Planning for Commercial Printing
Every commercial printing job requires that you con-sider a complex set of variables ranging from what your �budget and schedule allow to how the paper stock and �printing press affect your final output. The earlier you �think about these variables, the more control you’ll have �over the quality, cost, and schedule of your project.
L04.fm Page 89 Saturday, July 6, 2002 11:34 AM

LESSON 4
90
Page Layout
9
Choose View > Master Pages to display the Right master page again.
10
Select your name in the header text frame and press Delete.
Numbering pages
You’ll add the page number at the top of every page. This number will appear on the left
side of left-hand pages and on the right side of right-hand pages.
You make page numbers appear on the pages of your document by inserting a
page number
system variable
on the master pages. System variables are placeholders for
system information such as the page number, page count, date, and filename.
The paragraphs in the header and footer text frames are tagged Header and Footer. The
Header and Footer formats aren’t stored in the Paragraph Catalog because you usually
don’t need to apply these formats to any other paragraphs.
Note:
The asterisk in the status bar indicates that the Header paragraph format doesn’t
match a format in the catalog.
The paragraph format for the paragraph in the header text frame contains center-aligned
and right-aligned tab stops (shown in the top ruler).
Now you’ll change the font used in the header paragraph. The Header paragraph format
is used on the Left and Right master pages, so you can update both header paragraphs at
the same time.
1
Choose Format > Paragraphs > Designer to display the Paragraph Designer.
2
Choose Default Font from the Properties pop-up menu. (In Windows, you can just
click the Default Font tab at the top of the designer.)
L04.fm Page 90 Saturday, July 6, 2002 11:34 AM

91
ADOBE FRAMEMAKER 7.0
Classroom in a Book
3
Choose Myriad-Roman (Windows) or Myriad (Mac OS and Unix) from the Family
pop-up menu and Bold from the Weight pop-up menu, and click Update All. You won’t
see any change, because the text frame doesn’t contain any text yet. But when you add a
variable to the text frame, the variable will appear in Myriad Bold.
4
Close the Paragraph Designer.
You’ll set up page numbering so that the numbers appear on the right side of right-hand
pages and on the left side of left-hand pages. You’re on the Right master page now, so
you’ll use the right-aligned tab stop to right-align the page numbers.
5
Press Tab twice. The insertion point moves to the far right of the header text frame.
Next, you’ll insert a variable representing the current page number.
6
Choose Format > Headers & Footers > Insert Page #.
A number sign (#) appears at the right side of the header text frame. It will be replaced by
the page number on the body pages.
Next, you’ll insert the page number variable in the header of the Left master page.
7
Click the Previous Page button ( ) in the status bar to display the Left master page.
The name of the master page appears in the Page Status area of the status bar.
8
Click in the header text frame and choose Format > Headers & Footers > Insert Page #.
The number sign appears at the left margin. This is where you want page numbers to
appear on left-hand pages.
#
L04.fm Page 91 Saturday, July 6, 2002 11:34 AM

LESSON 4
92
Page Layout
9
Choose View > Body Pages to display the body pages again. The page number now
appears on each page. If you want, scroll through the document to see how the page
number alternates between the left and right sides.
Page number displayed
10
Save the document.
Creating a running footer
If you want the same text to appear in the footer of every page, you can simply type the
text in the footer text frames on the master pages. However, for this document you’ll
create a
running footer
—a footer whose text depends on the contents of the page.
For example, a running footer based on Heading1 paragraphs contains the text of the first
Heading1 paragraph on the page. If the page doesn’t contain a Heading1 paragraph, the
footer contains the text of the most recent Heading1 paragraph on preceding pages. (You
can also create
running headers
with text that changes depending on the contents of the
page.)
Like a page number, a running header or footer is created by inserting a system variable
on a master page rather than by typing text. The running footers for this document will
contain the chapter title and a first-level heading.
1
Choose View > Master Pages to display a master page.
2
Check the Page Status area of the status bar for the name of the current master page. If
you are on the Left master page, click the Next Page button ( ) to display the Right
master page.
3
Click in the footer text frame. (You may need to scroll down to see this text frame.)
The footer will appear on the right side of right-hand pages and on the left side of left-
hand pages. You’re on the Right master page, so you’ll use a tab stop to right-align the
footer.
4
Press Tab. The insertion point moves to the right margin of the footer text frame.
Next, you’ll insert a variable that displays the chapter title.
3
Making informed decisions in the planning stages builds a solid foundation for your project.
L04.fm Page 92 Saturday, July 6, 2002 11:34 AM

93
ADOBE FRAMEMAKER 7.0
Classroom in a Book
5
Choose Format > Headers & Footers > Insert Other.
6
Scroll the Variables scroll list until you see
Running H/F 1
in the list. This is one of
twelve system variables provided especially for running headers and footers.
7
Select Running H/F 1. The definition of the variable appears under the scroll list.
The definition uses the <$paratext>
building block,
which tells FrameMaker 7.0 to use the
text of a paragraph with the tag that follows in square brackets. The definition specifies
the Title paragraph format. Your chapter title uses the ChapterTitle format, so you’ll
change the definition.
8
Click Edit Definition.
9
Enter
Chapter
in front of
Title
in the Definition text box and click Edit. The variable
definition is now <$paratext[ChapterTitle]>. (Capitalization is significant, so be sure to
match the capitalization style of the paragraph tag you’re using, as shown here.)
10
Click Insert.
Running H/F 1
appears in the footer, but the actual chapter title will
appear on body pages.
You’ll separate the chapter title from the text of the first-level heading with a colon and an
en space (a wide space).
Running H/F 1
L04.fm Page 93 Saturday, July 6, 2002 11:34 AM

LESSON 4
94
Page Layout
11
Type a colon (:) in the footer at the insertion point.
12
To type an en space, press and release the Escape key, then the spacebar, and then the
lowercase letter
n
.
Now you’ll add another running footer variable, to display the text of first-level headings.
13
Choose Format > Headers & Footers > Insert Other.
14
Select Running H/F 2 in the Variables scroll list. The variable is defined to display the
text of a paragraph with the tag Heading1. This is the definition you want; your first-level
headings use the Heading1 format.
15
Click Insert.
Finishing the footers
To finish the footers, you’ll change their paragraph format and then copy the footer
variables to the left master page.
1
Choose Format > Paragraphs > Designer to display the Paragraph Designer.
2
In the Default Font properties, change the Family to Myriad-Roman (Windows) or
Myriad (Mac OS and Unix), the Size to 8 (points), the Weight to Bold, and the Spread to 10.
Running H/F 1: Running H/F 2
L04.fm Page 94 Saturday, July 6, 2002 11:34 AM

95
ADOBE FRAMEMAKER 7.0
Classroom in a Book
3
Click Update All and close the Paragraph Designer.
Now you’ll copy the footer variables to the left master page.
4
Click Running H/F 1 in the footer once to select it. (If you double-click it by mistake,
the Variables dialog box appears. Click Cancel and try again.)
5
Shift-click Running H/F 2 in the footer to extend the selection.
6
Choose Edit > Copy.
7
Click the Previous Page button ( ) in the status bar to display the Left master page.
8
Click in the footer text frame and choose Edit > Paste. (You may need to scroll down
to see the footer text frame.) Because you did not press Tab, the variables appear at the left
side of the text frame.
9
Choose View > Body Pages to display the body pages again, and scroll through the
document. The running footer now appears on each page.
10
Save the document.
Note:
FrameMaker 7.0 allows you to define and use as many as twelve different running
headers and footers in a document. This can be very useful if you want different headers and
footers on different page layouts, such as the first page of a document.
Custom master pages
Many types of documents can be created using custom master pages as well as left and
right master pages. For instance, the first page of each lesson in
Adobe FrameMaker 7.0
Classroom in a Book
uses a custom master page.
Note:
Although a FrameMaker document can contain up to 100 different master pages, most
often you’ll use only a few.
Creating a custom master page
1
Go to page 1 of Layout1.fm and click anywhere inside the text frame.
2
Choose View > Master Page to display the master page currently applied to page 1.
L04.fm Page 95 Saturday, July 6, 2002 11:34 AM

LESSON 4
96
Page Layout
3
Choose Special > Add Master Page and enter
Start in the Name text box.
4 Select Right from the Copy from Master Page pop-up menu and click Add.
The final exercise in this lesson will address the Start master page. Now you’ll create a
second custom master page that won’t be based on the Right or Left master pages.
1 Choose Special > Add Master Page and enter Last in the Name text box.
2 In the Initial Page Layout area, select Empty and click Add.
3 Save the document.
Modifying a custom master page
You can define different headers and footers, change margins, and change the column
layout in custom master pages.
1 Go to the master page called Start.
2 Click the Display the Tools Palette button ( ) at the upper right corner of the
document window to access the Tools palette.
L04.fm Page 96 Saturday, July 6, 2002 11:34 AM

97ADOBE FRAMEMAKER 7.0Classroom in a Book
The Tools palette appears.
A. Selection tools B. Drawing toolsC. Drawing properties
3 Select the Select Object cursor ( )from the top right corner of the Tools palette. You
will discover more contents of the Tools palette in Lesson 5.
4 Click anywhere in the header of the Start master page to select its background text
frame.
5 Delete the header text frame by pressing Delete.
6 Delete the footer in the same way. You’ll modify this master page more later.
Now you’ll customize the Last master page by creating a second text frame in which you
can type your own notes separately from the rest of the document text flow.
7 Go to the master page called Last.
8 Select the Place a Text Frame tool ( )from the Tools palette to add a new text frame.
A
B
C
L04.fm Page 97 Saturday, July 6, 2002 11:34 AM

LESSON 498Page Layout
9 Draw a moderate size box as shown below.
10 After you’ve finished drawing the box, the Add New Text Frame dialog box appears.
Choose Template for Body Page Text Frame and Flow Tag A. Click Add.
L04.fm Page 98 Saturday, July 6, 2002 11:34 AM
99ADOBE FRAMEMAKER 7.0Classroom in a Book
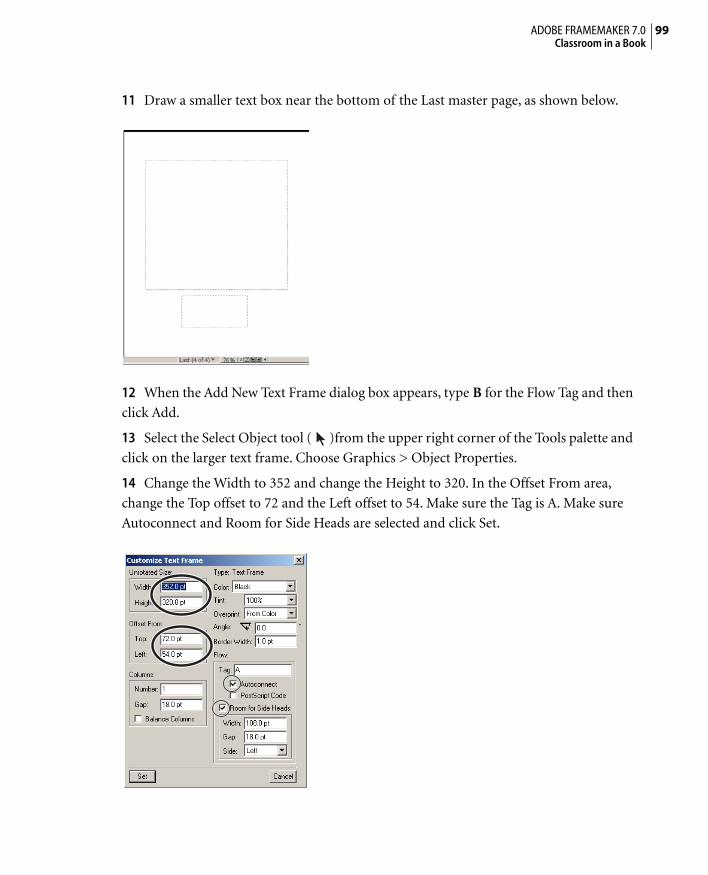
11 Draw a smaller text box near the bottom of the Last master page, as shown below.
12 When the Add New Text Frame dialog box appears, type B for the Flow Tag and then
click Add.
13 Select the Select Object tool ( )from the upper right corner of the Tools palette and
click on the larger text frame. Choose Graphics > Object Properties.
14 Change the Width to 352 and change the Height to 320. In the Offset From area,
change the Top offset to 72 and the Left offset to 54. Make sure the Tag is A. Make sure
Autoconnect and Room for Side Heads are selected and click Set.
L04.fm Page 99 Saturday, July 6, 2002 11:34 AM

LESSON 4100Page Layout
15 Make sure the Select Object tool ( ) is still selected from the Tools palette and click
on the smaller text frame.
16 Choose Graphics > Object Properties.
17 Change the Width to 162 and change the Height to 78. In the Offset From area,
change the Top offset to 408 and the Left offset to144.
18 Make sure B is entered in the Tag area and deselect Room for Side Heads. Click Set.
19 Select the Smart Select tool ( ) from the top left of the tool bar.
Assigning a different master page to a body page
Once you have created a custom master page, you then assign it to one or more body
pages in your document. Assigning the custom master page to a body page changes the
layout of the body page to the layout that you customized in the master page.
1 Choose View > Body Pages.
2 Go to the first page of Layout1.fm and click inside the text frame.
3 Choose Format > Page Layout > Master Page Usage.
4 In the Use Master Page area, choose Start from the Custom pop-up menu.
5 In the Apply area of the dialog box, make sure Current is selected to apply the changes
to the body page you have currently selected.
L04.fm Page 100 Saturday, July 6, 2002 11:34 AM

101ADOBE FRAMEMAKER 7.0Classroom in a Book
6 Click Apply. Notice that the first page of Layout1.fm no longer has a footer or page
number in the header.
7 Go to the last page of Layout1.fm and click inside the text frame.
8 Choose Format > Page Layout > Master Page Usage.
9 In the Use Master Page area, choose Last from the Custom pop-up menu.
10 In the Apply area of the dialog box, make sure Current is selected to apply the changes
to the body page you have currently selected.
11 Click Apply. Notice that the last page of Layout1.fm contains a small text frame. This
is a convenient way to add your own notes to a newsletter or any other document that
requires multiple text flows.
12 Click on the smaller text frame and type Notes:. You can experiment by typing more
text into the text frame. Notice how the text in this text frame is disconnected from the
rest of the text flow.
L04.fm Page 101 Saturday, July 6, 2002 11:34 AM

LESSON 4102Page Layout
Reordering custom master pages
When you are in the master page view of the document, the Left and Right master pages
always occur on pages one and two in the list of master pages. The custom master pages
you create can occur in any sequence after the Left and Right master pages. You can
reorder the custom master pages. This is useful if you have created many master pages.
Since you have only created two custom master pages you won’t need to reorder them, but
you’ll see how it’s done.
1 Choose View > Master Pages from any page in Layout1.fm.
2 Choose Format > Page Layout > Reorder Custom Master Pages.
3 Select a master page in the Custom Master Pages list and click Move Up or Move Down
to move the page accordingly.
4 Repeat step 3 as often as necessary to obtain the order you want.
5 Click Set to reorder the pages and close the dialog box.
6 Save the document.
You may find it convenient to order the custom master pages alphabetically or by the
sequence in which they will be used in the document.
Note: If you create multiple custom pages and do not reorder them, FrameMaker simply adds
the most recent to the end of the sequence.
Assigning master pages to paragraph tagsYou can assign master pages to body pages containing specified paragraph tags. In this
exercise, you’ll set the HighlightText paragraph tag to be assigned the custom master page
called Start.
L04.fm Page 102 Saturday, July 6, 2002 11:34 AM

103ADOBE FRAMEMAKER 7.0Classroom in a Book
Modify the master page to be assigned
Begin by reconstructing the master page called Start. In similar fashion to that of the
master page called Last, you’ll resize the main text frame, but all resulting frames will be
kept in “Flow Tag A.”
1 You’ll still be in the master page layouts. Go to the master page called Start.
2 Redesign the Start page further, by resizing the text frame. Using the Select Object tool
( ) to make the frame active, choose Graphics > Object Properties.
3 Change the height to 136.
4 Click Set.
5 Choose > Edit > Copy, then Edit > Paste.
6 When the Add New text Frame appears this time, leave it in Flow Tag A and click Add.
A message appears telling you it has been accepted. Click OK.
7 Choose > Graphics > Object Properties.
8 Change the Top to 220.5 and change the Left to 54. Click Set.
9 Copy and paste again, and, after accepting Flow Tag A Again, change the third frame’s
Object Properties to Top 370 and Left 54. Click Set.
10 Save the document.
L04.fm Page 103 Saturday, July 6, 2002 11:34 AM

LESSON 4104Page Layout
You now have divided Start into three equally sized frames.
Map the master page to be applied
You’ll map a paragraph tag to the master pages using a mapping table found in the
Reference Pages. When you choose the Apply Master Pages command, the master page
will be applied to the body page or body pages on which the referenced paragraph tag
appears. If more than one referenced paragraph tag appears on a body page, the first
referenced paragraph tag on the page determines which master page is applied.
To assign a master page to body pages on which a paragraph tag appears:
1 Choose View > Reference Pages.
2 Click the Next Page button until the five-column UnstructMasterPageMaps page
appears. In your file it should be reference page 2.
L04.FM_page104.pm Page 104 Friday, March 11, 2005 2:47 PM

105ADOBE FRAMEMAKER 7.0Classroom in a Book
3 Edit the mapping table. Under the Paragraph Tag Name column heading, type
HighlightText, which is the name of the paragraph tag to which you want the master page
to be applied. You’ll create the HighlightText paragraph format later, but be sure to use
the same capitalization as shown above (capital H and T, all one word).
4 Under the Right-Handed Master Page column heading, type Start, which is the name
of the master page you want to apply. The specified master page will be applied to all body
pages, including left-handed pages in double-sided documents, on which the
HighlightText paragraph tag appears, unless you specify a different master page under the
Left-Handed Master Page column.
5 Under the Left-Handed Master Page column heading, type Start, which is the name of
the master page that you want to apply to the left-handed body pages on which the
paragraph tag HighlightText appears in double-sided documents.
6 Under the Range Indicator heading, type Single to apply the master page only to the
body page on which each paragraph tag appears. If this cell is blank, master pages are
applied to single pages.
7 Under the Comments heading, type Show good work.
8 Save the document.
For a more complete knowledge of this and other features of applying master pages, see
Chapter 12, “Page Layouts,” in the Adobe FrameMaker 7.0 User Guide.
L04.fm Page 105 Saturday, July 6, 2002 11:34 AM

LESSON 4106Page Layout
Create a new paragraph formatNow you’ll complete the steps necessary to assign the Start master page to the
HighlightText paragraph tag.
1 Choose > View > Body Pages of Layout1.fm.
2 Go to the last page in the file and insert the cursor in a new paragraph below the last
bulleted line of text.
3 Type Beautiful Printing Results! and press return.
4 In the second new paragraph, type More Great Examples.
In order to link up the Start master page and a format called HighlightText through the
reference page table of assignments, you’ll create the new paragraph tag.
1 Select both of these new paragraphs at the end of the document.
2 Choose > Format > Paragraphs > Designer. In the Properties pop-up menu choose
Basic.
3 Assign the Paragraph Tag as Body. Click apply. The bullets are removed from the two
lines of text.
4 In the Paragraph Designer, choose Commands > New Format.
L04.fm Page 106 Saturday, July 6, 2002 11:34 AM

107ADOBE FRAMEMAKER 7.0Classroom in a Book
5 Name the new format HighlightText. Be sure both check boxes are selected and press
Create.
6 In the Paragraph Designer, press Update All.
The two new lines of text are tagged with the paragraph format HighlightText.
7 In the Paragraph Designer Properties > Basic, make the Alignment Center.
8 In the Paragraph Designer, press Update All.
9 In the Paragraph Designer, choose Properties > Default Font.
10 In the Family pop-up menu, select:
• (Windows) AGaramond-SemiboldItalic, Weight Regular.
• (Mac OS and UNIX) Adobe Garamond, Weight Semibold, Angle Italic.
L04.fm Page 107 Saturday, July 6, 2002 11:34 AM
LESSON 4108Page Layout
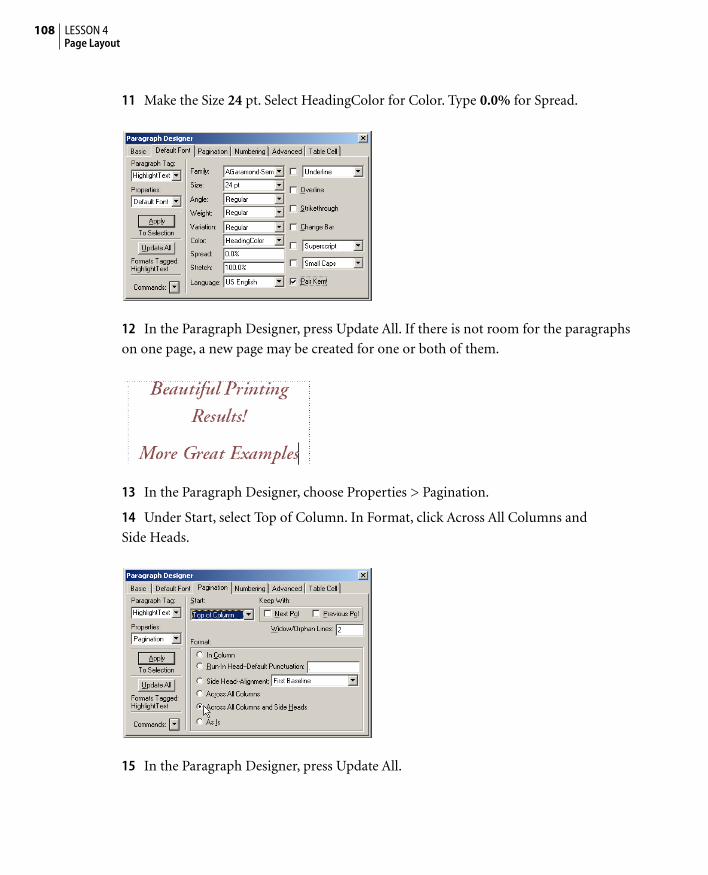
11 Make the Size 24 pt. Select HeadingColor for Color. Type 0.0% for Spread.
12 In the Paragraph Designer, press Update All. If there is not room for the paragraphs
on one page, a new page may be created for one or both of them.
13 In the Paragraph Designer, choose Properties > Pagination.
14 Under Start, select Top of Column. In Format, click Across All Columns and
Side Heads.
15 In the Paragraph Designer, press Update All.
L04.fm Page 108 Saturday, July 6, 2002 11:34 AM

109ADOBE FRAMEMAKER 7.0Classroom in a Book
The two HighlightText paragraphs are now centered at the top of two new pages.
16 Save the document and click anywhere in the document to begin the final steps.
Assign the master page to a paragraph tag
The goal of these exercises is to produce a page of samples of good printing, using the Start
master page layout. Each Frame from the Start master page layout has been set up to have
samples imported into them while maintaining Flow Tag A.
1 In the main menu title bar, choose Format > Page Layout > Apply Master Pages. A
FrameMaker interface box will appear.
2 Click OK.
First new page generated
Second new page generated
L04.fm Page 109 Saturday, July 6, 2002 11:34 AM

LESSON 4110Page Layout
The two HighlightText paragraphs are now at the top of the first two boxes of the first
added new page.
The master page usage for it has been changed to Start through the Apply Master Pages
command.
3 Save and close the document.
You have completed the lesson on page layout, working with some of the powerful tools
of Adobe FrameMaker 7.0.
Moving onYou’ve completed this lesson. For in-depth information about variables, page layout, and
templates see Chapter 8, “Variables,” Chapter 12, “Page Layout,” and Chapter 13,
“Templates,” in the Adobe FrameMaker 7.0 User Guide.
Review questions1 How do you change the page margins of a document?
2 What are master pages?
3 What are the main differences between the template text frames and background
text frames that appear on master pages?
L04.fm Page 110 Saturday, July 6, 2002 11:34 AM

111ADOBE FRAMEMAKER 7.0Classroom in a Book
4 How do you insert a page number in a header or footer?
5 What is a running header or footer?
6 How do you create a running header or footer?
7 When is it useful to define multiple running headers and footers?
8 What are the benefits of tying a master page layout to a specific paragraph format?
Answers1 Choose Format > Page Layout > Column Layout, specify new margins, and click
Update Entire Flow.
2 Master pages are pages that contain layouts for body pages. Master pages also contain
header and footer information, and they may contain background text or graphics that
appear on the corresponding body pages.
3 Template text frames provide layouts for the text frames on body pages. The template
text frames have flow tags and are copied to body pages. Background text frames, such as
those for headers and footers, have no flow tags and are not copied to body pages. The
contents of background text frames appear on body pages, but the contents can be edited
only on master pages.
4 To insert a page number go to a master page, click in a header or footer text frame and
choose Format > Headers & Footers > Insert Page #. The actual page number will appear
on the body pages that use that master page.
5 A running header or footer contains information that depends on the contents of the
page (for example, the text of the first Heading1 paragraph on the page).
6 On a master page, click in a header or footer text frame and choose Format > Headers
& Footers > Insert Other. Select one of the four variables for running headers and footers,
change its definition if necessary, and click Insert.
7 When you have a complex document with many different master pages, and you want
different content in their headers and footers.
8 Tying a master page layout to a paragraph format saves time and assures consistency of
layout in a complex document.
L04.fm Page 111 Saturday, July 6, 2002 11:34 AM

This page intentionally left blank

Lesson 5

483
Index
A
ACE, 7Acrobat.
See
PDF documentsactive areas in hypertext
documents, 356ACTP, 7add master page, 96Add New Text Frame dialog
box, 98adding elements, 448adding Topic elements, 448adding Topic paragraphs, 449Adobe Certified Expert
program, 7Adobe Training and
Certification Programs, 7aligning objects, 133Allow Line Breaks After text
box, 305anchor symbol (q), 160anchored frame graphics to
GIF format, 373anchored frames, 209–230
conditional, 333copying, 221, 224editing, 215moving, 221Outside Column
positioning, 220run-in, 226shrinkwrapping, 217
application creating for XML, 432
apply master pages, 100Apply Master Pages
command, 104applying character
formats, 27–29applying paragraph
formats, 26
arranging elements in Show list, 425
As Is property, 79assign master pages to
paragraph tag, 102, 109asterisk (*) in the status
bar, 90Attribute Value menu, 444attributes
Display Options box, 418hide, 418optional, 418required, 418
attributes and elements defined, 430
Attributes box, 443attributes for
Resolution.svg, 444attributes of elements, 417automatic hyperlinks, 402autonumbering
adding color to, 75for bulleted lists, 60character formats in, 77in HTML, 390for numbered lists, 55
B
background of XML, 399background text frames, 89backslash sequences
for en dashes, 306for quotation marks and
nonbreaking spaces, 352body pages, 89book files, 261–285
adding files to, 265chapter numbers in, 271creating, 263
generating a table of contents, 270
indexes for, 290opening files in, 266paginating correctly, 272tables of contents in, 267
bookmarks, 363bookmarks in PDF
documents, 363bookmarks in structured
documents, 457Borders, 42boundaries and boundaries (as
tags), 411browser similarities and
differences between XML and FrameMaker, 460
browser view without stylesheet, 375
browser viewing of XML, 459building blocks
<$nextsubdoc>, 393<$pagenum>, 283, 303<$paratext>, 93, 283<$parentdoc>, 392<$prevsubdoc>, 393autonumber, 56cross-reference, 243indexes, 309
bulleted lists, 59–62button for Element
Catalog, 419button for structured
view, 410
C
changing, by pasting, 145Character Catalog, 27, 80Character Designer, 76character formats, 27–29
INDEX
484
As Is property used in, 79in autonumbering, 77defining, 75emphasizing words
using, 78used in HTML links, 381
CIBColorDoc1.fm to CIBColorFinal.xml, 433
CIBColorFinal.fm file, 456collapsing and expanding
elements in structure view, 415
colon (:) in index markers, 308color libraries, 71ColorDoc1 file, 433ColorFinal file, 433colors, defining, 70–74Column Layout
changing, 86columns, 162
table, resizing, 171, 196text, balancing, 293
communicating with XML, 402
condition indicators, 322conditional text, 319–341
deleting, 340graphics, 333keyboard shortcuts, 332markers, 328showing and hiding, 320table rows, 338tags, 324
content management systems, 402
context menutables, 159
context menus, 18Book, 272documentwide, 18view only, 354
conversion to XML, 433convert
text to table, 186converting XML section to
text, 437copying
anchored frames, 221graphics, 134text, 43
Create Hypertext Links setting, 291
creating a new documentcustom, 40template-based, 29
creating custom element list, 422
cropping graphics, 218cross hair pointer (+)., 126Cross-Ref marker, 247cross-reference
dialog box, 243Cross-Reference dialog
box, 239, 449edit, 243
cross-references, 238–252displaying sources of, 241external, 242formats for, 243hypertext linked, 350inserting, to
paragraphs, 238inserting, to specific spots
within paragraphs, 247internal, 238mapping to HTML, 379resolving, 249spot, 247unresolved, alert
message, 238unresolved, fixing, 249
css file stylesheet, 374custom element list, 422custom master pages, 95custom ruling in tables, 202custom shading in tables, 204
D
data tagged, 400default mapping for cross-
references, 380default properties
tables, 160default units
document, 40ruler, 44
deletingcondition tags, 325paragraph formats, 64
dialog box units, 40dialog boxes
inserting text into, 244spell checker, 244typing text into, 244
dictionaries, 150dictionary
document, 150main, 150personal, 150
differences between XML and FrameMaker files in browser, 460
differences in Structured FrameMaker window or menu, 409
display optionschanging for Element
Catalog, 420Set Available Elements
command, 420display options for Element
Catalog, 418display refresh, 51displaying elements, 420displaying graphics, 153displaying master pages, 87displaying valid elements, 419Document Type Definitions
(DTDs), 6document view

485
ADOBE FRAMEMAKER 7.0
Classroom in a Book
moving the insertion point, 413
document window, 14document window with
structured window, 412double-sided documents, 87dpi (dots per inch) graphic
setting, 213dragging to select text, 21drawing properties, 126drawing tools, 125drop caps, 228DTD. See DTDsDTDs, 6
E
EDD, 6, 432Edit Cross-Reference dialog
box, 243edit special reference tables for
HTML, 378editable text from XML
section, 437editing tools, 139Element Boundaries and
Element Boundaries (as Tags), 411
Element Catalogall elements available, 422arranging elements in
Show list, 425button, 419changing display
options, 420custom element list, 422display options, 418elements available in
document, 422elements sorted into
groups, 422guided editing, 418Set Available Elements
command, 420Show list, 424
using, 418Element Catalog shows new
elements, 439, 440Element Definition Document
or EDD, 6element list customized, 422element symbols, 418Element Validation box, 442,
444element validation issues, 442elements and attributes
defined, 430elements arranged in Show
list, 425elements available in
document, 422elements in Show list, 424elements shown as square
brackets, 434elements sorted into
groups, 422elements to display, 420elements valid at insertion
point, 419en dashes, backslash sequence
for, 306encodings, 186end-of-flow symbol (§), 42EndOfSubDoc (HTML system
macro), 392enterprise
divergent requirements, 400
use of structure, 400error-free structured
document, 442Excel®
compatibility with FrameMaker, 6
importing, 6expanding and collapsing
elements in structure view, 415
exporting to PDF, 457
exporting to XML, 456Extended Markup Language
(XML), 1external cross-references, 242
F
features of HTML finished document, 371
Figure element, 438File menu commands (book
and document), 264finding
text, 144finish authoring XML
document, 448finished document
features, 371Fit Window to Page
command, 18, 27Fit Window to Text Frame
command, 23fixed line spacing, 220Flip Left/Right command, 129flow tags, 88fm to xml conversion, 433font properties, 27fonts
installing, 3footers, running, 92
adjusting, 117, 297footnotes, 252–257
multiple references to, 253
properties for, 253separator lines, 255spanning columns, 256straddling, 256
formatscross-reference, 243deleting paragraph, 64table, 159
Formatting Bar, 44formatting bar, 17formatting text

INDEX
486
in table cells, 167using character
formats, 27–29using paragraph
formats, 24–27FrameMaker
starting, 12Structured, 5Unstructured, 5
FrameMaker file to XML file, 433
framesanchored.
See
anchored frames
reference, 255text, 19text, moving, 119text, selecting, 118
framework, 401
G
gaming community and XML, 403
generated files, 267formatting entries in, 279,
299templates for, 271titles for, 276, 295
GIF format for anchored frame graphics, 373
Go to page, 59Go to Page dialog box, 23gotolink, 384graphic formats for
HTML, 380graphics, 115–135
aligning, 133anchored.
See
anchored frames
conditional, 333copying, 134cropped, 218dpi setting, 213flipping, 129
grouping, 128, 360HTML image maps, 382importing, 122–124in-line, 222in margin, 219masking parts of, 125moving with the
keyboard, 132run into paragraphs, 226scaling, 227turning off display of, 141
graphics file formats, 213Graphics menu, 118greeked text, 20, 117grids, snap, 44, 130group titles in indexes, 301grouping graphics, 128guided editing with the
Element Catalog, 418
H
H1 HTML element, 385hanging indents, 53headers, running, 117heads
keeping with next paragraph, 48
side heads, 45, 51straddling across
columns, 49hide attributes, 418hiding
conditional text, 320graphics, 141
HTML, 369–395anchors, 383autonumbering in, 390back button, 394conversion macros, 388EndOfSubDoc (HTML
system macro), 392files created by
FrameMaker 7.0, 386graphic formats, 380
image maps, 382Java applets, 388linking to a URL, 381mapping table, 390mapping to cross-
references, 379mapping to paragraph
formats, 377mappings, 376navigation buttons, 393parent document, 392previous and next
subdocument, 393reference page
settings, 388reference pages, 389saving as, 372setup in File >
Utilities, 385splitting documents into
linked Web pages, 384table of contents in, 391table of contents look, 385viewing with and without
a stylesheet, 376Web display, 400
hyperlinks for PDF, HTML, XML, 402
hypertext, 346–361activating links, 348active areas, 356buttons added to
documents, 355commands in HTML
image maps, 383commands, inserting, 359cross-references used
as, 350in indexes, 347navigation in view-only
documents, 354in tables of contents, 346testing, 353view-only documents, 353

487
ADOBE FRAMEMAKER 7.0
Classroom in a Book
hypertext markers to text frames, 383
I
image mapscommands, 383
image maps in HTML documents, 382
import Resolution.svg file, 441
Import Structured Text by Reference box, 436
importingby copying and by
reference, 122graphics, 211text into a table, 185
importing movies into documents, 230
importing SVG graphic into Figure element, 438
importing XML section, 435indents, hanging, 53indexes, 289–315
adding entries, 307adding to a book file, 290building blocks, 309colons (:) in markers, 308editing, 309fixing bad line breaks, 303fixing inconsistencies, 310fixing spelling errors, 311formatting, 293formatting entries in, 299formatting page
numbers, 302group titles, 301hypertext links in, 346main entries, 299page numbering, 294page ranges in, 305pagination properties, 300removing a page
reference, 313
separators for page numbers, 304
subentries, 300templates, 293titles for, 295widow/orphan
settings, 300in-line graphics, 222insert text into table cells, 446inserting
conditional text, 326hypertext commands, 359tables, 158variables, 143–144
inserting a Table element, 445insertion point
moving in document view, 413
moving in Structure View, 415
valid elements, 419installing
Classroom in a Book fonts, 3
lesson files, 3Webworks®, 3XML Cookbook, 3
interactive Topic Paragraph elements, 448
internal cross-references, 238IX suffix, 296, 299
J
Johnson example of structure, 403
Jump to Named Destination, 384
K
keyboard shortcuts, 43activating hypertext
links, 348adding conditional
text, 332
inserting variables, 144locking and unlocking
documents, 356
L
large documents use FrameMaker, 400
layout of pages, 85–95Level1IX (main entries in
indexes), 299Level2IX (subentries in
indexes), 300line spacing, fixed, 220Line tool, 130line width, 131links to a Web site, 381links to headings, 383lists
bulleted, 59numbered, 53
locked documents.
See
hypertext
locking and unlocking documents, 356
M
Mac OSmedia files, 232
Make Editable button, 356Make View-Only button, 353Make View-Only to lock
document, 361map a paragraph tag to master
pages, 104mapping table for HTML, 390mappings for HTML, 372margin art, 219margins, changing, 86Marker dialog box, 308marker symbol (r), 241marker text
inserting text, 248typing, 248
Marker Text box, 248

INDEX
488
inserting text, 248markers
conditional text, 328Cross-Ref, 247destination, 383Index, 308newlink, 383
markers to text frames, 383markup dialects, 399markup languages
Chemical, Mathematical, Web Interface, Synchronized Multimedia, 399
master pages, 87measurement units
document, 40ruler, 44
media filesMac OS, 232Windows, 230
memo template, 29menu for Structured
FrameMaker, 409Microsoft®
Excel®, 6See Excel®.See Word®.Word®, 6
missing fontsadding to system, 3
modifying custom master pages, 96
moviesin documents, 230QuickTime®, 232, 234Windows .avi, 230
movingobjects, 132table rows and
columns, 164text frames, 119
moving insertion point in Structure View, 415
multiple references to footnotes, 253
N
navigation buttonsadding, 393back button, 394
nested elements, 402nesting tags, 401new elements available, 439new elements in Element
Catalog, 440nextpage hypertext
command, 360<$nextsubdoc> building block
in HTML reference pages, 393
nonbreaking space, typing, 304
number sign (#) in footers, 91numbered lists, 53–58numbering
indexes, 294numbering styles for
footnotes, 253
O
object propertiesgraphics, 100, 124lines, 131offset, 124rectangle, 127text frames, 122
objectsaligning, 133moving by the
keyboard, 119Online Manuals location, 432opening a document, 14options for attributes, 418options for structured
view, 411Outside Column positioning
for anchored frames, 220
overview of XML, 399
P
Page # system variable, 90page layout, 85–95page numbers, 90page ranges in indexes, 305<$pagenum> building block
in IX reference page, 303in TOC reference
pages, 283PANTONE color library, 71Paragraph Catalog, 24, 42paragraph cross-
reference, 239Paragraph Designer, 47
adding color in, 74paragraph formats
adding color to, 74applying, 24–27defining, 39–64deleting, 64mapping to HTML, 377table of contents, 270
paragraph symbol (¶), 16, 239, 327
Paragraph Text Symbol to select, 448
paragraph, definition, 239<$paratext> building block
in running footers, 93in TOC reference
pages, 283<$parentdoc> building block
in HTML reference pages, 392
PDF documents, 362–365bookmarks in, 363
PDF exporting, 457PDF saving, 362PNG and SVG graphics
files, 433PNG Portable Network
Graphic, 433
489
ADOBE FRAMEMAKER 7.0
Classroom in a Book
Portable Document Format.
See
PDF documentsPrevious Page button, 23previouslink hypertext
command, 360previouspage hypertext
command, 360<$prevsubdoc> building
block in HTML reference pages, 393
Product Interface, 35, 40properties
footnote, 253paragraph, 24table, 173
Q
Quadralay WebWorks Publisher, 401
Quadralay® CorporationWebworks®, 3
QuickAccess bar, 17, 163QuickTime® movies, 232, 234quotation marks
backslash sequence for, 244
smart, 42
R
Rectangle tool, 126, 132redisplaying pages, 32redraw display, 221redrawing the screen, 32reference pages
HTML, 389IX (index), 302mapping table, 104reference frames on, 255table of assignments, 106TOC, 283
reference pages for HTML mapping, 388
reference tables for specific HTML, 378
refresh display, 51regular ruling in tables, 200remap to improve HTML
headings, 378reordering custom master
pages, 102resize graphics frame, 227, 234resizing columns, 171Resolution.svg attributes, 444Resolution.svg file to
import, 441resolving cross-references, 249resolving element validation
issues, 442Right (master page), 87round trip, 431, 451, 456, 462rows in tables, 162ruler units, 44ruling, 175
custom in tables, 202regular in tables, 200separators in table
ruling, 200styles, 199
running footers, 92adjusting, 117, 297
Running H/F 1 system variable, 93
S
Save Book As command, 264saving, 15
as HTML, 372as PDF, 362
scaling graphics, 227schema, 401scrolling, automatic, 22section importing for
XML, 435selecting
single table cell, 167, 189table cells, 167text by dragging, 21text by Shift-clicking, 29
text frames, 118selecting elements in
structured view, 411selection tools, 125separator lines for
footnotes, 255separators
table ruling, 200series labels, 55Set Available Elements
command, 420setting
drawing properties, 132setting bookmarks in
structured documents, 457Setting up
work area, 13setting up
Classroom in a Book files, 3
Classroom in a Book fonts, 3
SGML, 1shading in tables, 177
custom, 204Show list for elements, 424Show/Hide command, 321Show/Hide conditional
text, 321shrinkwrapping anchored
frames, 217Side Closer to Page Edge
(anchored frame position), 221
side heads.
See
headssimilarities of XML and
FrameMaker files in browser, 460
single document, multiple uses for XML, 400
Smart Quotes, 42Smart Spaces, 42Snap, 45snap grid, 44, 118, 130

INDEX
490
spaces, smart, 42spanning columns
footnotes, 256spell-checking, 150–153
allow in document, 151correct, 151learn, 152
splitting documents into linked Web pages, 384
spot cross-references, 247square brackets for
elements, 434Standard Generalized Markup
Language (SGML), 1standard templates, 29starting FrameMaker, 12status bar, 17
Tag area, 25straddle
table cells, 197straddles
footnotes, 256heads, 49table cells, 179
structapps.fm file, 432, 433structure
hierarchy, 401implicit, 401
structure example of Johnson, 403
structure viewbutton, 410collapsing elements, 415document view
beside, 412expanding elements, 415options, 411selecting elements, 411selecting List element, 412working in the
window, 411workspace, 410
Structure View window, 401Structured, 5
Tools palette, 358structured authoring
background, 408Structured FrameMaker, 5
menu, 409setting up workspace, 409window, 409workspace, 409
Structured Text by Reference box, 436
styles.
See
character formats, paragraph formats, table formats
stylesheet css file, 374stylesheets in HTML, 376SVG and PNG graphics
files, 433SVG graphic importing, 438SVG Scalable Vector
Graphic, 433symbols for elements, 418System Macros table HTML
(HTML conversion), 390system variables, 142
T
tab leaders dots in tables of contents, 281
tab stops, 55tab-delimited text, 187table
selecting single cell, 189title position, 174
Table Catalog, 159table cells, 446Table Designer, 173Table element inserting, 445table formats, 159
basic, 195changing, 173using, 179
table of contents in HTML, 385
tables, 157–205
adding rows and columns, 162
anchor symbol, 160basic properties, 195body cell formatting, 191conditional rows, 338context menu, 159Continuation
variable, 194convert text to, 186custom ruling, 202custom shading, 204customizing, 183–205default properties, 160filling in, 161formatting text in
cells, 167headings, 188importing text into, 185inserting, 158moving rows and
columns, 164properties, 173regular ruling, 175, 200resizing columns, 171, 196ruling styles, 199select single cell, 167shading, 177straddle cells, 197straddled cells in, 179tabs in cells, 198titles, 194
tables of contents, 267changing the contents
of, 283formatting entries in, 279generating, 270HTML, 391hypertext links in, 346paginating, 272setting up, 268tab leader dots in, 281titles for, 276
tabs in table cells, 198

491
ADOBE FRAMEMAKER 7.0
Classroom in a Book
Tag area of the status bar, 25tagged data, 400tagging text, 26tags
character tag in status bar, 28
conditional text, 324nesting, 401paragraph, 24paragraph tag in status
bar, 25pinpoint searches, 404searches, 404text flow, 88
TechDocs XML application file, 433
template text frames, 88templates
for generated files, 271standard, 29
Templates folder, 30text
conditional, 319–341copying, 43definition of a
paragraph, 239drop caps, 228encodings, 186importing into a
table, 185text columns, balanced, 293text flows, 21, 88text formatting.
See
formatting text
text frames, 19background, 89moving, 119properties, 122selecting, 118template, 88
text line tool, 228Text Options, 42Text Symbols, 42text symbols, 16
Thesaurus, 147–150TIF images changed to GIF
files, 375tints, defining, 73–74titles for generated files, 276,
295titles in tables, 194TOC suffix, 269tool for large documents, 400Tools palette, 97, 125
Structured, 358Topic elements, 448Topic paragraph adding, 449Topic Paragraph
elements, 448Topics as cross-
references, 448two basic steps to start
conversion, 433typing
marker text, 248
U
uniform resource locator (URL), 381
Unknown File Type box, 436UnstrucMasterPageMaps, 104Unstructured and Structured
FrameMaker, 5untagged text frames, 89update Book, 314Update References, 250updating
book files, 273books, 273
user variables, 142using the Element
Catalog, 418
V
valid elements, 419valid XML document
defined, 431validate a document, 442
validating defined, 432validation box, 442variables
creating, 142editing definitions, 146inserting, 143–144inserting with the
keyboard, 144system, 93, 142Table Continuation, 194user, 142
versions of conditional documents, 340
view options, setting, 44viewing attributes of
elements, 417viewing XML in a
browser, 459view-only documents.
See
hypertext
W
Web page without stylesheet, 375
WebWorks Publisher, 401WebWorks®, 3well-formed XML, 402window for Structured
FrameMaker, 409window.
See
document window
Windowsmedia files, 230
Windows .avi movies, 230Word®
compatibility with FrameMaker, 6
importing, 6workspace for Structured
FrameMaker, 409WWP project file, 464www.adobe.com (Adobe Web
site)linking to, 381
INDEX
492
X
XML, 1background, 399communications, 402differences from
FrameMaker in browser, 460
for data, 400
games, 403integrated into
FrameMaker 7.0, 399news publications, 403newsletters, 403useful, 401Web sites, 403well-formed, 402
XML application, 432XML Cookbook, 3, 431XML exporting, 456XML round trip, 462XML tutorial, 431
Z
Zoom pop-up menu, 18