thank you for purchasing e.l. moore window & door.... 5-minute epoxy, super glue or ca...
TRANSCRIPT

Thank you for purchasing E.L. Moore Window & Door.
Instructions Version 4.28.15
I’ve named this kit after one of the greatest modelers I’ve ever
known, the late Elliot Moore Jr. Rest in peace my friend.
Special thanks to: Doug Foscale for the drawing. Robert Seckler
for building our pilot and sales display model. Mark Panzera for
taking the time to build the 2nd model and photograph every step
for these instructions.
Download more assembly pictures! The .zip file is HERE
Please read through these instructions before beginning construction. Then, follow along, step-by-step, as you build the kit.
Some steps may have parts in them you chose to skip. For instance, in Step 5, we use a sponge to create a weathered “peeling
paint” effect. You may want your building to look brandy new and “just painted.” Other steps may be totally optional because you
don’t have the required tools, such as in Step 8, you may not have a pounce wheel or don’t like the “nail hole” look.
I’m assuming you have all the necessary tools and supplies to build this kit. Here are a few suggestions for the craftsman kit
builders toolbox. Some of these are used in the instructions…
Hobby knife(s)
#11 blades
Chisel blades
Sprue cutter
Glues: Formula 560 Canopy Glue, Elmer’s or white glue, Yellow wood glue, 5-Minute Epoxy, Super Glue or CA
(Cyanoacrylate Adhesive)
Paints & brushes (various colors & sizes)
Alcohol & India ink mix (A&I Stain)
NWSL Chopper tool
Pounce wheel set
Clamps (various sizes)
Sandpaper and files
Fine tooth saw
Metal scale ruler
90 cͦorner square
Weights
Tape: painters tape or masking tape, 3M #465 Transfer Tape

1. We’ll begin by cutting all the doors and windows off the sprues. Clean up any remaining burrs left. Use a nice sharp blade
and/or sandpaper to clean up the castings.
2. Attach the door & window castings to blue painters tape. We’ll be spray painting them as this is the fastest method and
yields the best results. Spray several light coats, allowing time to dry in-between! Set these aside. If you’re using Canopy
Glue or Gallery Glass to simulate your window glass, do that after they’ve been painted and dried, otherwise you can use
the clear Acetate we include in this kit. (That will be done in Step 10.)
3. Prepare the wood walls. Carefully cut away each piece using a new, sharp blade. Clean up any remaining burrs. Brace
them according to the included bracing diagram. The bracing is done with 5/32 stripwood. Pay close attention to the
locations and measurements. Some walls need careful placement of the bracing or the kit will not go together correctly.
Use the wall as shown below* to mark the bracing for the rearmost wall. To space the bracing 5/32” in from the edge,
simply use a piece of the bracing to mark the measurement, then glue the bracing to the right or left of that line!
Note how we are marking the location of the bracing on the rear wall in the bottom row of the pictures!

Continued Step 3. We used
yellow wood glue to brace the
walls. Use weights to hold them
down flat while the glue dries.
Because the glue is water based,
the wood may still warp if
nothing holds them flat! We
chopped our stripwood using a
NWSL Chopper tool.
4. OPTIONAL. To add “grain” to the stripwood, we scrape it with a fine tooth saw. We stained the walls and stripwood with
A&I Stain as a base. You can also use a brand like Hunterline as shown below.
5. We applied a light coating of gray acrylic paint to the clapboard walls. Then using a fine sponge, we dabbed on various
earth tones to create a weathered and peeling paint effect. After dipping the sponge into the paint, you’ll want to remove
most of it by first dabbing it onto a paper towel. The sponge should have almost nothing left before applying it. You’re
actually “dry painting” in this step. Less paint = better results. The effect needs to be subtle. You should also do this step
to the 1/16” square corner boards before you attach them in Step 7.
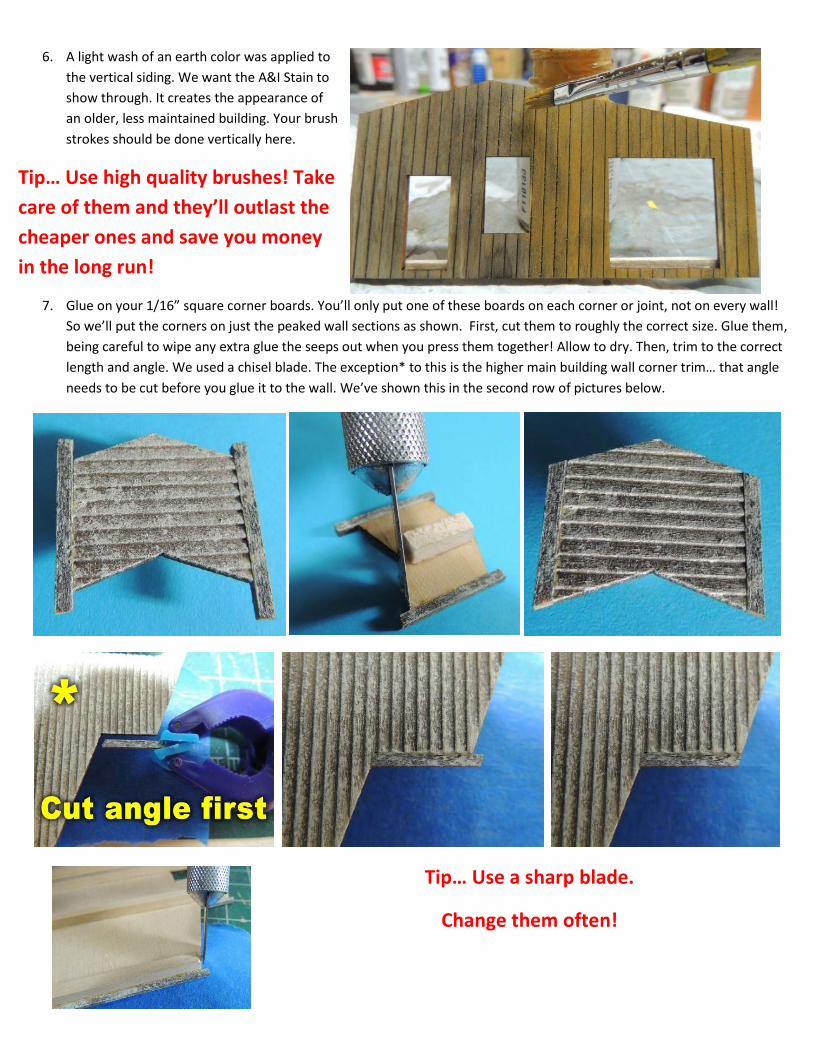
6. A light wash of an earth color was applied to
the vertical siding. We want the A&I Stain to
show through. It creates the appearance of
an older, less maintained building. Your brush
strokes should be done vertically here.
Tip… Use high quality brushes! Take
care of them and they’ll outlast the
cheaper ones and save you money
in the long run!
7. Glue on your 1/16” square corner boards. You’ll only put one of these boards on each corner or joint, not on every wall!
So we’ll put the corners on just the peaked wall sections as shown. First, cut them to roughly the correct size. Glue them,
being careful to wipe any extra glue the seeps out when you press them together! Allow to dry. Then, trim to the correct
length and angle. We used a chisel blade. The exception* to this is the higher main building wall corner trim… that angle
needs to be cut before you glue it to the wall. We’ve shown this in the second row of pictures below.
Tip… Use a sharp blade.
Change them often!

8. OPTIONAL. Measure the distance you’ll want for spacing of the “nail holes” using a scale ruler. Scale inches, 16” on center,
or even 24”. Lightly mark the walls with a pencil, and then using a metal straight edge, run your pounce tool along it. The
third picture below shows this effect and how it should appear after you’re done.
9. Glue in the windows on the clapboard walls. Using Canopy Glue, and a #11 blade as our “precision applicator” we put in all
the doors and windows. Wipe off any excess glue that seeps through. Then, allow them to dry in place before handling the
walls again.

10. If you are using Acetate for the window “glass” cut and glue it onto them now. If you’re using Canopy Glue or Gallery Glass
to simulate your window glass, do that after they’ve been painted and dried. (Step 2) ( See why we told you to read the
instructions all the way through before you build the kit!)
11. Assemble the main building walls. Do one corner at a time. Use a square to keep the corners at 90 ͦand allow the glue to
dry before moving on to the next wall. We used yellow wood glue.
12. Assemble the front freight door bump-out and the cupola. Allow each corner to dry before you move on to the next. Use a
square as shown to keep everything plumb and 90 ͦ.
13. Attach the freight door bump-out to the main building. We used yellow wood glue.

14. Add on the higher walls of the main building.
15. Assemble the vertical wood rear addition.
16. Cut out the roof cards and glue them onto the building. We added extra pieces of wood to act as supports for the roof
cards. We also painted the edges and undersides. Use clamps, elastics or tape to hold down the chipboard while it dries.

17. Prepare the roofs for shingles. You may want to draw lines to keep the
roof shingles straight. This is highly recommended. The roof is the most
often seen part of your building. The time you take on the next steps will
make-or-break how the final building looks. We use 3M #465 Transfer
Tape. We marked the location of the cupola and painted it black so
looking in through the windows you wouldn’t see the brown raw
chipboard. If you are using glue to hold the shingles, then proceed the
next step after you’ve painted the location of the cupola.
18. Shingle the main building roof. Remove the tape protector one section at a time. Keep the courses straight as an arrow!
Stagger the seams of the “3-tab” roofing material as shown below. If gluing them, apply just a small amount of glue for
each row as you reach it. Don’t apply all the glue at once! Use the narrow rectangular paper to “cap” the roof ridges.
19. Apply the shingles to the cupola using the above step and glue it onto the building. Allow it to dry before the next step.
20. Attach the vertical wood rear addition to the main building and allow it to dry thoroughly before handling it further.
Repeat Step 16 and Step 17 in preparation for applying the corrugated roofing.

21. There are 2 types of corrugated roofing included in various versions of this kit. One is actual metal, and another is paper.
You can finish them similarly. You’ll most likely want them to look old and rusty. First paint the entire strip light grey or
spray with a light grey primer - not the regular darker grey primer. You could do one of two things here - cut the strips into
individual panels or rust up entire strips and cut afterwards, but we prefer to weather each individual piece after we've cut
them (We cut them into scale 4’x8’ sections. ) Use the photo’s below for reference. Dab on burnt sienna (oil but you could
use acrylic) so it repeats on each panel. Then add - not in a pattern - yellow ocher (oil) in dabs here and there. Then apply
a wash of mineral spirits so it can all bleed together a bit. Dab it on, don't brush. Once dry add orange rust color powder
here and there. Once it's all dry, we dry brush with the same light grey paint.
22. Attach or glue the corrugated sheets to the roofing surface of the freight bump-out and the vertical siding rear addition. If
you aren’t able to use the 3M #465 Transfer Tape we recommend, then an AC or epoxy would work best on the actual
metal corrugated roofing. Any water based glue is fine if your kit has the paper corrugated.
23. Begin building the front loading dock. Refer
to the pictures and the included diagram for
reference. You’ll need to attach supports to
the building as shown in the first two
pictures shown here. The follow page has
more pictures to guide you. Yellow wood
glue is best formulated for this. Allow the
sub-section pieces to dry before you try to
attach them to the other sub-sections.
Patience is a virtue here!

Continued 23. We assembled the framing, then carefully stained it. Be sure to us very little stain as it may loosen the glue!
« You can cut the deck boards even along the edges or stagger the lengths as shown here.

24. Finishing up the details. Paint the castings. We painted the chimney brown and then painted it again with a white. Wipe
the white coat away while it is still wet and the remaining white resembles mortar. Assemble the billboard as shown.
The basement entrance has a diagram for assembly. The included pictures below hopefully will illustrate the process as well.

Continued 24… We have included various extra window & door details to be used as clutter on the docks and around the building.
Also included are water slide decals and paper signs. You can glue these on wherever you see fit. To apply the water slide decals,
cut them apart. One at a time, soak them in water until they begin to curl. Then carefully slide the decal off the carrier. They are
very fragile so be extra careful. Position the wet decal onto the building and lightly dab it, removing any remaining water or air
bubbles.
Thank you for your purchase of E.L. Moore Window & Door.