test procedures manual - american radio relay league manual... · revision history: initial...
TRANSCRIPT
1
Test Procedures Manual
By Bob Allison, WB1GCM, ARRL Test Engineer
Michael Tracy, KC1SX, ARRL Technical Advisor
Mike Gruber, W1MG, ARRL EMC/RFI Engineer
Revision history:
Initial document: September 1990
Revision A, October 1992, updates and corrections
Revision B, January 1996, major revision, additional tests added
Revision C, April 1997, updates and corrections
Revision D, November 1997, new graphics, updates and corrections
Revision E, August 1998, expanded test information added
Revision F, June 2000, BER test box changes added
Revision G, January 2002, new schematics added to Appendix A
Revision H, June 2004, updates for new test equipment added
Revision I, January 2009, major revision, additional tests added
Revision J, June 2009, updates and corrections
Revision K, January 2010 updates and corrections
American Radio Relay League, Inc., 1990-2010

2
TABLE OF CONTENTS
I. PURPOSE AND SCOPE 3 II. LIST OF FIGURES 4 III. LIST OF REQUIRED TEST INSTRUMENTS 5 IV. TRANSMITTER TESTS 6 4.1 OUTPUT POWER TEST 7 4.2 TRANSMIT FREQUENCY RANGE TEST 9 4.3 CW TRANSMIT-FREQUENCY ACCURACY TEST 11 4.4 SPECTRAL PURITY TEST 13 4.5 TWO-TONE TRANSMIT IMD TEST 16 4.6 SSB CARRIER AND UNWANTED SIDEBAND SUPPRESSION AT 14.250 MHz 18 4.7 CW KEYING WAVEFORM TEST 21 4.8 PTT TO SSB/FM RF OUTPUT TEST 23 4.9 TRANSMIT/RECEIVE TURN-AROUND TEST 27 4.10 KEYER SPEED AND SIDETONE FREQUENCY TEST 30 4.11 COMPOSITE NOISE TEST 32 V. RECEIVER TESTS 35 5.1 NOISE FLOOR TEST 36 5.2 AM RECEIVE SENSITIVITY TEST 39 5.3 FM SINAD AND QUIETING TEST 41 5.4 RECEIVE FREQUENCY RANGE TEST 44 5.5 FIRST IF AND IMAGE REJECTION TEST 46 5.6 ANTENNA PORT ISOLATION TEST 49 5.7 BLOCKING GAIN COMPRESSION 51 5.7A RECIPROCAL MIXING 54 5.8 TWO-TONE 2ND AND 3RD ORDER DYNAMIC RANGE TEST 57 5.9 FM ADJACENT-CHANNEL SELECTIVITY TEST 61 5.10 FM TWO-TONE 3RD ORDER DYNAMIC RANGE TEST 64 5.11 AUDIO POWER OUTPUT TEST 68 5.12 AUDIO AND IF FREQUENCY RESPONSE TEST 70 5.13 SQUELCH SENSITIVITY TEST 73 5.14 S METER TEST 75 5.15 IN BAND IMD TEST 77 5.16 NOTCH FILTER TEST 80 5.17 DSP NOISE REDUCTION TEST 86 5.18 EQUIVALENT RECTANGULAR BANDWIDTH TEST 89 5.19 NOISE FIGURE CALCULATION 89 VI. NON-STANDARD AND SPECIAL PURPOSE TESTS 90 6.1 LOW VOLTAGE AND TEMPERATURE CHAMBER TEST 90 6.3 RECEIVER BIT-ERROR RATE TEST 93 6.4 TRANSMITTER BIT-ERROR RATE TEST 95 6.6 POWER METER TEST 98 DATA SHEETS 103 6.7 HF LINEAR AMPLIFIER TEST 129 6.7B LINEAR AMPLIFIER IMD TEST 131 LINEAR AMPLIFIER DATA SHEET 135 ABOUT THE LINEAR AMPLIFIER IMD TEST FIXTURE 136 VII. APPENDIX A: ARRL CUSTOM TEST CIRCUITS 137 VIII. APPENDIX B: FORMULAS FOR QST PRODUCT REVIEW CALCULATIONS 163

3
PURPOSE AND SCOPE
1.1 PURPOSE
The purpose of this manual is to ensure that all ARRL testing of HF transceivers, transmitters, and receivers will be conducted in a
consistent and well-defined manner. The procedures used for this testing have been broken down into clear, step-by-step
instructions. All testing should be "done by the book" in order to guarantee that all equipment is evaluated to the same standards.
This manual contains three major sections: Transmitter tests (Chapter 4), Receiver tests (Chapter 5) and Data Sheets (Chapter 6).
The data sheets are arranged to allow test results to be recorded in the same order that measurements are taken.
1.2 SCOPE
This manual is designed to cover a wide range of amateur HF equipment. It is not intended to replace common sense or the
expertise of an experienced test engineer. It is important, therefore, for the test engineer to be familiar with the Lab test equipment
and the Device Under Test (DUT). The manufacturer's manual for the DUT should be completely read and understood before any
testing is performed. At no time should any equipment be operated in a manner that is inconsistent with the manufacturer's
recommended procedures or published limits. Failure to understand the unit under test could result in test error or, even worse,
damage to the equipment, or worst of all, damage to the test engineer.

4
II. LIST OF FIGURES
Figure Description
4-1 Power Output Test Hook-Up
4-2 Transmit Frequency Range Test Hook-Up (no changes from 4-1)
4-3 CW Transmit Accuracy Test Hook-Up
4-4 Spectral Purity Test Hook-Up
4-4A Example Spectral Purity Plot
4-5 Two-Tone Transmit IMD Test Hook-Up
4-6 SSB Carrier and Unwanted Sideband Suppression Test Hook-Up (no changes from 4-5)
4-7 CW Keying Waveform Test Hook-Up
4-7A Example Scope Trace of RF Output CW Keying Waveform
4-8 PTT SSB/FM RF Output Test Hook-Up
4-9 Transmit/Receive Turn-Around Time Test Hook-Up
4-10 Keyer Speed and Side-tone Frequency Test Hook-Up
4-11 Composite Noise Test Hook-Up
5-1 CW Minimum Discernible Signal (MDS) Test Hook-Up
5-2 AM Receive Sensitivity Test Hook-Up
5-3 FM SINAD and Quieting Test Hook-Up
5-4 Receive Frequency Range Test Hook-Up
5-5 First IF and Image Rejection Test Hook-Up
5-6 Antenna Port Isolation Test Hook-Up
5-7 Blocking Gain Compression Test Hook-Up
5-7A Reciprocal Mixing Test Hook-Up
5-8 Two-Tone, 3rd Order Dynamic Range Test Hook-Up
5-9 FM Adjacent Channel Selectivity Test Hook-Up
5-10 FM Two-Tone, 3rd Order Dynamic Range Test Hook-Up
5-11 Audio Power Output Test Hook-Up
5-12 Audio and IF Frequency Response Test Hook-Up
5-13 Squelch Sensitivity Test Hook-Up
5-14 S-Meter Test Hook-Up
5-15 In-Band IMD Test Hook-Up
5-16 Notch Filter Test Hook-Up
5-17 Equivalent Rectangular Bandwidth Test Hook-Up
6-1 Low Voltage and Temperature Chamber Test Hook-Up
6-2 DSP Noise Reduction Test Hook-Up
6-3 Receiver Bit-Error-Rate (BER) Test Hook-Up
6-4 Transmitter Bit-Error-Rate (BER) Test Hook-Up
6-5 Receiver Phase-Noise Test Hook-Up

5
II. LIST OF REQUIRED TEST INSTRUMENTS
Instrument (or equivalent) Manufacturer Model Qty.
Spectrum Analyzer HP HP8563E 1
Distortion/Audio Meter HP 339A 1
RF Signal Generator IFR 2041 1
RF Signal Generator Marconi 2041 1
In-line RF Wattmeter BIRD 4381 1
RF Signal Generator Rhode&Schwarz CMT 54 1
Digital Phosphor Oscilloscope Tektronix 3052B 1
Two-Tone Audio Generator ARRL N/A 1
Power Attenuator BIRD 8329 1
Keying-Test Generator ARRL N/A 1
Adjustable RF Attenuators HP 355C/D 1
Hybrid Combiner Ten-Tec 651 (2-60 MHz) 1
Voltmeter Bench N/A 1
Ammeter Bench N/A 1
Phase-Noise Mixer ARRL N/A 1
14.025 MHz Low-Noise Osc. ARRL N/A 1
Power Supply HP 6268B 1
Telegraph Key Any N/A 1
Attenuators BIRD 8340-100 or similar As R'qd
HI-Z Audio Monitor Amp ARRL N/A 1
Wideband Noise Generator Elecraft N-gen 1

6
IV. TRANSMITTER TESTS
4.0.1 As shown in the Table of Contents, there are 11 transmitter tests outlined in this chapter. They have been
arranged to minimize the required number of hook-up changes and modifications. However, each hook-up is shown
complete, with all changes from the previous test clearly indicated. A block diagram accompanies each hook-up and
any changes from the previous test are shown within a dotted rectangle. This affords the flexibility to easily start
anywhere within the test plan and to perform these tests in any desired order.
4.0.2 Before any transmitter testing is performed, it is essential for the test engineer to be completely familiar with the
Device Under Test (DUT) and the test equipment that will be used. The transmitter output power must not exceed the
limitations of any test equipment used or the manufacturer's specifications for the DUT – including duty cycle or time.
The transmitter must be operated in a manner exactly as specified and be properly tuned. Any test in this manual that
would cause a piece of equipment to be operated in a manner inconsistent with its manual must be accordingly
modified as required by the test engineer.
4.0.2.1 Other considerations are as follows:
Spectrum Analyzer/Frequency Counter
The input to the spectrum analyzer or frequency counter should not exceed the range of –5 dBm to 0 dBm.
Therefore, it is necessary to attenuate the output of transmitters or amplifiers down to this level. For example,
if a particular transmitter is rated at 100 watts output, it will be necessary to use 50 dB of attenuation to obtain
a level of 0 dBm.
RF Power Meter
The necessary element for the inline RF-power meter must be selected for the expected power and frequency.
There are also multiplier switches on the wattmeter. Select the combination of switches that equals the power
rating of the element.
RF Power and Step Attenuators
RF power attenuators have an INPUT and an OUTPUT. Make sure that the RF source is connected to the
INPUT of the power attenuator. Connecting RF power to the OUTPUT of the attenuator will result in damage
to the attenuator or to the transceiver. The attenuators have a power rating, which must be observed. It is
always best to be conservative.

7
4.1 OUTPUT POWER TEST
4.1.1 The purpose of the Transmitter Output Power Test is to measure the RF output power of the DUT across each
band in each of its available modes. A two-tone audio input, at a level within the manufacturer's microphone-input
specifications, will be used for the SSB mode. No modulation will be used in the AM and FM modes. DC current
consumption at the manufacturer's specified supply voltage is also measured, if applicable.
4.1.2 Test hook-up (See Fig. 4-1)
4.1.2.1 With all test equipment and DUT power switches in the OFF position and the transceiver in the receive mode,
connect the following:
Connection Connectors Cable Type
DUT RF OUTPUT to Wattmeter INPUT As Required to Type N 50-Ohm Coax
Wattmeter OUTPUT to RF Power Attenuator Type N to Type N 50-Ohm Coax
Two-Tone Audio Generator to Banana or BNC Coax
DUT Microphone INPUT to As Required
Telegraph Key to DUT KEY INPUT As Required As Required
AC power Only/AC Source to As Supplied with DUT As Supplied with DUT
DUT Power Input
DC Power Only As Required As Required
1) Power supply to AC source.
2) Power supply OUT to voltmeter and ammeter.
3) Set power supply to specified voltage and connect to DUT.
CAUTION!: Power must only be applied to the
attenuator input! Do not reverse input and output
terminals of the Bird 8329.
RF Power
Attenuator &
Dummy Load
Bird 8329100 WATTS
TYPICAL
100 WATTS
TYPICAL
RF WATTMETER
BIRD 4381
TWO-TONE
AUDIO
GENERATOR
DC ONLY
AC ONLY
PTT SWITCH
TELEGRAPH KEY
DUT
TRANSMITTER
POWER
SUPPLY
Fig. 4-1 Power Output Test Hook-Up

8
4.1.3 Test Procedure
4.1.3.1 Turn the DUT and RF wattmeter power switches to ON and set the following controls:
Instrument Control Position
Two-Tone Audio Generator TONE A OFF
TONE B OFF
HI-Z/LO-Z As Required
BALANCE Center
LEVEL Full CCW
Attenuator –30 dB
RF Wattmeter Mode Select Button FWD PEP
Element As Required
Forward Element Range As Required
DUT Mode CW
BAND Selector Lowest Available
XMIT/RCV Receive
DRIVE or RF LEVEL Minimum
4.1.3.2 Allow all equipment at least 10 minutes warm-up time before proceeding to step 4.1.3.3
4.1.3.3 Tune the DUT per the operator’s manual. Put the DUT in the CW transmit mode at minimum DRIVE/RF
LEVEL.
NOTE: The following three paragraphs, 4.1.3.4 , 4.1.3.5 and 4.1.3.6 apply only to transceivers with a DC
power supply. Skip these paragraphs if testing an ac-powered DUT and make a note of the power type on
Data Sheet.
4.1.3.4 Depress telegraph key. Observe that some minimum level of RF power is shown by the DUT Power Output
Meter and Bird Wattmeter. Increase the RF DRIVE/LEVEL control if necessary. Record the power-supply ammeter
and voltmeter values in 4.1.3.4 of the data sheet.
4.1.3.5 Increase RF DRIVE/LEVEL control to the maximum allowed by the manufacturer. Again, depress the
telegraph key and record the power-supply meter readings in 4.1.3.5 of the data sheet. Decrease the RF DRIVE
control to minimum. Release the telegraph key.
4.1.3.6 Increase the DUT AF gain control to maximum. (There should be no input signal.) Any light or display
illumination should be in the default position. Measure and record the power supply readings as in the previous step.
4.1.3.7 Depress the key and observe the DUT power output meter and wattmeter indications. Slowly tune the DUT to
the upper band edge while observing these meters. Release the key and record the maximum value observed on the
wattmeter in 4.1.3.7 of the data sheet.
4.1.3.8 Increase the DRIVE/RF LEVEL control to the maximum allowed. Depress the telegraph key. Slowly tune
the DUT down to the lower band edge while observing both the DUT power output meter and wattmeter as in the
previous step. Release the telegraph key and record the minimum wattmeter values observed in 4.1.3.8 of the data
sheet. Return the DRIVE/RF LEVEL control to minimum.
4.1.3.9 Set the DUT for the lower edge of the 80-meter band and retune as necessary. Repeat steps 4.1.3.7 and
4.1.3.8. Record all values in 4.1.3.9 of the data sheet. Repeat this procedure for all the remaining bands. Record both
the DUT power output meter and wattmeter indications for the 20-meter band. Note any significant deviations in the
DUT meter indication observed between bands.

9
4.1.3.10 Return the transmitter to the lower edge of the 20-meter band and retune as necessary. Set the two-tone audio
generator power switch to ON. Adjust for proper balance between both tones by setting the BALANCE control to the
position so indicated. Adjust the generator LEVEL control for maximum specified ALC. Set the RF wattmeter to
FWD PEP. Place the DUT in the USB mode and tune as required with the DUT mic gain control set about half-way.
Adjust the audio generator for maximum audio as specified by the manufacturer's manual with the DUT mic gain
control set about half-way.
4.1.3.11 Repeat steps 4.1.3.7 and 4.1.3.8 and using the PTT switch to key the transmitter. Verify similar power
output performance with the DUT in the LSB mode. Note any significant deviation from the USB mode. Record
DUT power output meter and wattmeter indications in 4.1.3.11 of the Data Sheets.
4.1.3.12 Set the RF Wattmeter to FWD CW and the two-tone generator power switch to OFF. Return the transmitter
to the lower edge of the 80-meter band. Place the DUT in the AM mode. Repeat steps 4.1.3.7 and 4.1.3.8 using the
PTT switch to key the transmitter. Be sure not to exceed the maximum power output specified by the manufacturer for
this mode. Record DUT power output meter and wattmeter indications in 4.1.3.12 of the Data Sheets.
4.1.3.13 Return the transmitter to the lower edge of the 10-meter band. Place the DUT in the FM mode. Repeat steps
4.1.3.7 and 4.1.3.8 for this mode. Be sure not to exceed the maximum power output specified by the manufacturer for
this mode.
NOTE: Proceed to the following step only if the DUT has a transverter output.
4.1.3.14 Put the DUT into the CW mode and activate the transverter function.. Set to the 15 meter band. Connect the
HP-437 microwatt meter and any needed attenuation to the transverter output. (Input to the microwatt meter must not
exceed +20 dBm.) Repeat steps 4.1.3.7 and 4.1.3.8. Record on Data Sheet. Also observe and record any RF output
that may appear at the normal antenna output.
4.2 TRANSMIT FREQUENCY RANGE TEST
4.2.1 The purpose of the Transmit Frequency Range Test is to determine the range of frequencies, including those
outside amateur bands, for which the transmitter may be used.
4.2.2 Test Hook-up (See Fig. 4-2)
NOTE: No further hook-up changes are required if proceeding directly from the previous Power Output Test.
This hook-up procedure, therefore, does not apply in this case and you may now proceed to step 4.2.3.1.
4.2.2.1 Connect the following with all power switches in the OFF position and the transceiver in the receive mode:
Connection Connectors Cable Type
DUT RF OUTPUT to Wattmeter INPUT As Required to Type N 50-Ohm Coax
Wattmeter OUTPUT to RF Power Attenuator Type N to Type N 50-Ohm Coax
Telegraph Key to DUT KEY INPUT As Required As Required
AC power Only/AC Source to DUT Power Input As Supplied with DUT As Supplied with DUT
DC Power Only As Required As Required
1) Power supply to AC source.
2) Power supply OUT to voltmeter and ammeter.

10
3) Set power supply to specified voltage and connect to DUT.
4.2.3 Test Procedure
4.2.3.1 Turn the DUT and RF wattmeter power switches to ON and set the following controls:
Instrument Control Position
RF Wattmeter Mode select button FWD CW
Element As Required
Power Range As Required
DUT Mode CW
Band Selector Lowest available band
XMIT/RCV RECEIVE
DRIVE/RF OUT Minimum
4.2.3.2 Allow all equipment at least 10 minutes warm up time.
4.2.3.3 Tune the DUT per the operator’s manual for the lowest available band. Return the DRIVE/RF OUTPUT
control to minimum. (The DUT should still be in the CW mode.)
4.2.3.4 Tune down near the low end of the band. Depress the telegraph key. Observe some minimum RF indication
on the wattmeter. Slowly tune down until the RF drops out or the manufacturer's specified limit is achieved. Release
the key and record this frequency, as indicated by the DUT display in 4.1.3.4 of the data sheet.
4.2.3.5 Tune to the upper limit of the band. Again, depress the telegraph key and slowly tune up until the RF drops
out. Release the key and record this frequency in 4.1.3.5 of the data sheet.
4.2.3.6 Repeat steps 4.1.3.3 to 4.1.3.5 for all remaining available bands on the DUT.
CAUTION!: Power must only be applied to
the attenuator input! Do not reverse input
and output terminals of the Bird 8329.
RF Power
Attenuator &
Dummy Load
Bird 8329100 WATTS
TYPICAL
100 WATTS
TYPICAL
RF WATTMETER
BIRD 4381
TWO-TONE
AUDIO
GENERATOR
TELEGRAPH KEY
DUT
TRANSMITTER
POWER SOURCE
Fig. 4-2 ── Transmit Frequency Range Test Hook-up

11
4.3 CW TRANSMIT-FREQUENCY ACCURACY TEST
4.3.1 The purpose of the CW Transmit-Frequency Accuracy Test is to measure and compare the actual output
frequency of the DUT with its display adjusted for 14.000 MHz down to the least significant available digit.
4.3.2 TEST HOOK-UP (See Fig. 4-3)
NOTE: If proceeding directly from the previous Transmit Frequency Range Test, you need only modify the
existing hook-up. Proceed to the steps indicated with a dotted line.
4.3.2.1 With all power switches in the OFF position and the transceiver in the receive mode, connect the following:
Connection Connectors Cable Type
DUT RF OUTPUT to wattmeter INPUT As Required to type N 50-Ohm coax
Wattmeter OUTPUT to Power Attn INPUT Type N to type N 50-Ohm coax
----------------------------------------------------------------------------------------------------------------------
Pwr Attn OUT to 10-dB step INPUT Type N to BNC 50-Ohm coax
10-dB step Attn OUT to 1-dB step IN BNC to BNC 50-Ohm coax
1-dB step ATTN OUT to Freq Counter IN BNC to BNC 50-Ohm coax
----------------------------------------------------------------------------------------------------------------------
Telegraph key to DUT KEY INPUT As Required As Required
AC or DC power to DUT As Required As Required
CAUTION!: Power must only be applied
to the attenuator input! Do not reverse
input and output terminals of the Bird
8329. RF Power
Attenuator &
Dummy Load
Bird 8329 100 WATTS
TYPICAL
100 WATTS
TYPICAL
RF WATTMETER
BIRD 4381 TWO-TONE
AUDIO
GENERATOR
TELEGRAPH KEY
DUT
TRANSMITTER
POWER SOURCE
10 dB STEP
ATTENUATOR
HP 355D
1 dB STEP
ATTENUATOR
HP 355C
FREQUENCY
COUNTER
HP-5351B
DO NOT
EXCEED
0 dBm!
Fig. 4-3 ── CW Transmit Accuracy Test Hook-up

12
4.3.3 Test Procedure
4.3.3.1 Turn the DUT, RF wattmeter and frequency counter power switches to ON. Set the following controls:
Instrument Control Position
DUT Mode CW
Band Selector 20 Meters
Frequency 14.000 00 MHz
XMIT/RCV RECEIVE
DRIVE/RF OUT Minimum
RF Wattmeter Mode Select Button FWD CW
Element As Required
Power Range As Required
10-dB Step Attn Attenuator 40 dB
1-dB Step Attn Attenuator Any
Frequency Counter 50 Ohm 50 Ohm (Depress)
4.3.3.2 Key the transmitter. Observe the minimum output power on the RF wattmeter and unkey the transmitter. Set
the step attenuators to provide –5 to 0 dBm input to the frequency counter.
Do not exceed the maximum input limitation to the Frequency Counter.
4.3.3.3 Check and readjust, if necessary, the DUT for 14.000 00 MHz as indicated by its display. Record this value if
the DUT has a digital type display, or, as best as possible with an analog display.
4.3.3.4 Key the transmitter and note the frequency as indicated by both the DUT and the frequency counter. Place a
check mark in 4.3.3.4 of the data sheet if there is any significant deviation from 14.000 00 MHz
4.3.3.5 Increase the step attenuators to 40 dB. Set the transmitter power to the maximum allowed. Key the transmitter
and observe the RF output power as shown by the wattmeter. Set the attenuators to provide –5 to 0 dBm input to the
counter.
4.3.3.6 Key the transmitter. Record the DUT and Frequency Counter indications in 4.3.3.6 of the Data Sheet. Unkey
the transmitter.
4.3.3.7 Reduce the voltage to 12 V dc (if using a DC supply). Again key the transmitter and note the frequency
displayed on the DUT and frequency counter. Place a check mark in 4.3.3.7 of the data sheet if there is any significant
deviation from initial data.

13
4.4 SPECTRAL PURITY TEST
4.4.1 The purpose of the Spectral Purity Test is to determine and measure the content of any spurious emissions in the
output of the transmitter. Full-power carriers will be examined and minimum power checked on all available bands.
4.4.2 Test hook-up (See Fig. 4-4)
NOTE: If proceeding from the previous Transmit Frequency Accuracy Test, skip to the steps indicated with a
dotted line.
4.4.2.1 With all power switches in the OFF position and the transceiver in the receive mode, connect the following:
Connection Connectors Cable Type
DUT RF OUTPUT to wattmeter INPUT As Required to type N 50-Ohm coax
Wattmeter OUTPUT to Power Attn INPUT Type N to type N 50-Ohm coax
Power Attn OUT to 10-dB step INPUT Type N to BNC 50-Ohm coax
10-dB step Attn OUT to 1-dB step IN BNC to BNC 50-Ohm coax
--------------------------------------------------------------------------------------------------------------------------
1-dB step Attn OUT to Spec Analyzer IN BNC to BNC 50-Ohm coax
--------------------------------------------------------------------------------------------------------------------------
Telegraph key to DUT KEY INPUT As Required As Required
AC or DC power to DUT As Required As Required
CAUTION!: Power must only be applied to
the attenuator input! Do not reverse input
and output terminals of the Bird 8329.
RF Power
Attenuator &
Dummy Load
Bird 8329100 WATTS
TYPICAL
100 WATTS
TYPICAL
RF WATTMETER
BIRD 4381
TWO-TONE
AUDIO
GENERATOR
TELEGRAPH KEY
DUT
TRANSMITTER
POWER SOURCE
10 dB STEP
ATTENUATOR
HP 355D
1 dB STEP
ATTENUATOR
HP 3555C
SPECTRUM
ANALYZER
HP 8563E
DO NOT
EXCEED
0 dBm
Fig. 4-4 ── Spectral Purity Test Hook-up

14
Fig. 4-4A ── Example Spectral Purity Plot
4.4.3 Test Procedure
4.4.3.1 Turn the DUT, RF wattmeter and spectrum analyzer power switches to ON and set the following controls:
Instrument Control Position
DUT Mode CW
Band Selector Lowest available
XMIT/RCV Receive
DRIVE/RF LEVEL Minimum
RF Wattmeter Push Button Mode Select FWD CW
Element As Required
Forward Element Range As Required
10-dB Step Attn Attenuator 40 dB
1-dB Step Attn Attenuator Any
Spectrum Analyzer START FREQ - STOP FREQ 0 – 50 MHz
REF LEV (AMPLITUDE) –10 dBm
ATTEN (AMPLITUDE) 20 dB
RES BW (BW) 10 kHz
VIDEO BW (BW) 30 kHz
THRESHOLD (DISPLAY) –80 dBm
SWP TIME (SWEEP) AUTO
4.4.3.2 NOTE: If proceeding directly from the previous CW Transmit Frequency Accuracy Test, skip this paragraph.
Receiver hiss should be heard; adjust volume to desired level. Allow all equipment at least 10 minutes warm-up time
before proceeding to step 4.4.3.3.
4.4.3.3 Tune the DUT per the operator's manual at the low end of the band. Put the DUT in the CW transmit mode at
maximum DRIVE/RF LEVEL.

15
4.4.3.4 Depress the telegraph key and observe the power output shown by the Bird wattmeter. Release the key and set
the step attenuators for –10 dBm input to the spectrum analyzer. CAUTION: The input to the spectrum analyzer at no
time should exceed +10 dBm. Damage to this instrument will occur at an input level of +30 dBm or greater.1
4.4.3.5 Key the transmitter. The largest pip to the right of 0 MHz should be the fundamental. (This may be verified
by use of the PEAK SEARCH button. With the marker to be at the top of the pip, the indicated marker frequency
should be very close to the transmitted frequency.)
4.4.3.6 Adjust the REF LEV control on the spectrum analyzer so that the peak of the fundamental pip is at the Log
Ref (0 dB) line on top of the display graticule. (To optimize the display, the FREQ START-FREQ STOP may be set
for 0-10 MHz and the RES BW may be set for 30 kHz on the 160-meter band.)
4.4.3.7 The spectrum analyzer is now calibrated. The smaller pips are harmonics or spurs. The level of each spur, in
dB below the fundamental, can be read directly from the display graticule. Each horizontal division represents 5 MHz
each in the case of a 0-50 MHz frequency range. The frequency range may be adjusted for the specific display being
considered, or as deemed appropriate by the test engineer. Each vertical division represents 10 dB.
4.4.3.8 Turn on the crystal calibrator, if the DUT has one, and observe any spurious emissions created by the
calibrator. Record in notes section of data sheet and turn off the calibrator.
4.4.3.9 Slowly tune up the band while observing the analyzer display. Retune as necessary if the transmitter is not a
broadband type. Note the worst case observed. Record on data sheet.
4.4.3.10 Reduce the transmitter power output to minimum. Again, observe the analyzer display while tuning down to
the lower band edge. Note the worst case observed and record on data sheet.
4.4.3.11 Repeat steps 4.4.3.9 and 4.4.3.11 for all remaining available bands on the DUT. The Frequency Range
settings for each band are as follows:
1.8 MHz 0-50 MHz
14 MHz 0-100 MHz
28 MHz 0-200 MHz
50 MHz 0-500 MHz
144 MHz 0-1000 MHz
222 MHz 0-1000 MHz
432 MHz: 0-2000 MHz
4.4.3.12 Return the transmitter to the worst case on the worst band. With the all significant spurs visible on the
screen, take a single sweep by depressing the SGL SWP button. (Typically, this will be the second or third harmonic,
although it is possible for VHF parasitic to be present.) The START FREQ, STOP FREQ and RES BW may be varied
as required. Record all information on data sheet and save the plot to an appropriately named file.
1
"Woe be unto he who breaks this thing." ── Edward F. Hare, W1RFI

16
4.5 TWO-TONE TRANSMIT IMD TEST
4.5.1 The purpose of the Two-Tone Transmit Test is to measure the intermodulation-distortion (IMD) products
present in the RF output of the DUT transmitter. The transmitter will be operated in the SSB mode at 3.900 MHz and
14.250 MHz initially and then on all other available bands subsequently. A two-tone audio input at frequencies of 700
and 1900 Hz, within the manufacturer's amplitude specifications, will be used.
4.5.2 Test hook-up (See Fig. 4-5)
NOTE: If proceeding in the test series, only the two-tone generator, shown within the dotted line, must be added
to the previous Spectral Purity Test hook-up for the IMD Test.
4.5.2.1 With all power switches in the OFF position and the transceiver in the receive mode, connect the following:
Connection Connectors Cable Type
DUT RF OUT To Wattmeter IN As Required To Type N 50-Ohm Coax
Wattmeter OUT To PWR Attn IN Type N To Type N 50-Ohm Coax
PWR Attn OUT To 10-dB Step IN Type N To BNC 50-Ohm Coax
10-dB Step OUT To 1-dB Step IN BNC To BNC 50-Ohm
Coax
Connection Connectors Cable Type
1-dB Step OUT To Spectrum Analyzer IN BNC To BNC 50 Ohm Coax
--------------------------------------------------------------------------------------------------------------------------
Two-Tone Generator OUT To DUT MIC IN BNC To As Required Coax
--------------------------------------------------------------------------------------------------------------------------
Power to DUT As Required As Required
4.5.3 Test Procedure
4.5.3.1 Turn on the DUT, RF wattmeter and spectrum analyzer and set the following controls:
Instrument Control Position
DUT Mode LSB
Band Selector 80 Meters
CAUTION!: Power must only be applied to
the attenuator input! Do not reverse input
and output terminals of the Bird 8329.
RF Power
Attenuator &
Dummy Load
Bird 8329100 WATTS
TYPICAL
100 WATTS
TYPICAL
RF WATTMETER
BIRD 4381
TWO-TONE
AUDIO
GENERATOR
TELEGRAPH KEY
DUT
TRANSMITTER
POWER SOURCE
10 dB STEP
ATTENUATOR
HP 355D
1 dB STEP
ATTENUATOR
HP 3555C
SPECTRUM
ANALYZER
HP 8563E
DO NOT
EXCEED
0 dBm
Fig. 4-5 ── Two-Tone Transmit IMD Test Hook-up

17
Frequency 3.900 00 MHz
XMIT/RCV RECEIVE
DRIVE or RF LEVEL Minimum
Microphone Minimum
Two-Tone Generator TONE A (700 Hz) OFF
TONE B (1900 Hz) OFF
HI-Z/LO-Z As Required
BALANCE Center
LEVEL Full CCW
Attenuator –30 dB
RF Wattmeter Push Button Mode Select FWD PEP
Element As Required
Forward Element Range As Required
10-dB Step Attn Attenuator –40 dB
1-dB Step Attn Attenuator Any
Spectrum Analyzer CENTER FREQ (FREQUENCY) 3.89870 MHz
(Menu in Parentheses) SPAN (SPAN) 20 kHz
REF LEV (AMPLITUDE) –40 dBm
ATTEN (AMPLITUDE) 20 dB
RES BW (BW) 100 Hz
VIDEO BW (BW) 10 kHz
THRESHOLD (DISPLAY) –110 dBm
SWP TIME (SWEEP) AUTO
4.5.3.2 NOTE: If proceeding from the previous tests, this paragraph may be skipped.
Receiver hiss should be heard; adjust the volume to the desired level. Allow all equipment at least 10 minutes
warm-up time before proceeding to step 4.5.3.3.
4.5.3.3 Tune the DUT per the operator's manual for the test frequency of 3.900 MHz. Turn on the two-tone generator
and set both tone switches to ON. With the DUT in the LSB mode, set the generator LEVEL and ATTENUATOR
controls for the maximum audio input as specified by the manufacturer. If the manufacturer does not list a
specification for this figure, adjust the 2-tone generator’s amplitude for maximum rated RF output of the transmitter
with the transmitter’s microphone gain near maximum. Observe the transmitter power as shown by the wattmeter.
Ensure that the output power of the DUT is not greater than the manufacture's maximum power output rating. Unkey
the transmitter and set the step attenuators for approximately -46 dBm input to the spectrum analyzer.
CAUTION: The input to the spectrum analyzer at no time should exceed +10 dBm.
4.5.3.4 Place the DUT in the VOX mode and verify operation with the signal generator. Note on data sheet if VOX
does not function correctly. Return the DUT to the PTT mode and key the transmitter. Set the BALANCE control on
the generator for equal tone amplitude as shown on the display. Adjust the CENTER FREQ, if necessary, so that the
display center is half-way between the two pips. The IMD-distortion products should now be visible.
4.5.3.5 Adjust the REF LEVEL control (and step attenuators, if necessary) for the peak of the two pips to be at –6 dB.
The spectrum analyzer is now calibrated. The amplitude of each IMD distortion product may now be read in dB PEP
(dB below the peak envelope power) directly from the display.

18
4.5.3.6 Manipulate, if necessary, the two-tone generator audio LEVEL and the transmitter audio gain and drive
control to obtain the lowest possible IMD products. If this is done, the spectrum analyzer REF LEVEL control (and
possibly the step attenuators) may need to be reset for tone pips of –6 dB.
4.5.3.7 Set the SWP TIME (in the SWEEP menu) for 6 seconds. Take a single sweep by depressing the SGL SWEEP
button. Record all info on data sheet. Print and save to an appropriate file name.
4.5.3.8 Set and tune the transmitter for USB at a frequency of 14.250 MHz. Set the CENTER FREQ for 14.25130
MHz. and return the SWP TIME back to AUTO. Repeat paragraphs 4.5.3.3 to 4.5.3.7 for this frequency.
4.5.3.9 Repeat step 4.5.3.8 for the following frequencies (if applicable to the DUT): 1.850 MHz, 7.250 MHz, 10.120
MHz, 18.120 MHz, 21.250 MHz, 24.950 MHz, 28.350 MHz, 50.200 MHz, 144.200 MHz and
432.200 MHz.
4.6 SSB CARRIER AND UNWANTED SIDEBAND SUPPRESSION AT 14.250 MHz
4.6.1 The purpose of the SSB Carrier and Unwanted-Sideband Suppression Test is to determine the level of
suppression of the unwanted sideband and carrier relative to Peak Envelope Power (PEP). The transmitter output is
observed on the spectrum analyzer and the unwanted components are compared to the desired sideband.
4.6.2 Test hook-up (See Fig. 4-6)
NOTE: No changes in hook-up are required if proceeding directly from the previous Two-Tone Transmit IMD Test,
proceed now, in this case, to paragraph 4.6.3.
4.6.2.1 With all power switches in the OFF position and the transceiver in the receive mode, connect the following:
Connection Connectors Cable Type
DUT RF OUT To Wattmeter IN As Required To Type N 50-Ohm Coax
Wattmeter OUT To PWR Attn IN Type N To Type N 50-Ohm Coax
PWR Attn OUT To 10-dB Step IN Type N To BNC 50-Ohm Coax
10-dB Step OUT To 1-dB Step IN BNC to BNC 50-Ohm Coax
1-dB Step OUT To Spec Analyzer IN BNC To BNC 50-Ohm Coax
Two-Tone Generator OUT to DUT MIC IN BNC to As Required Coax

19
4.6.3 Test Procedure
4.6.3.1 Turn the DUT, RF wattmeter and spectrum analyzer power switches to ON and set the following controls:
Instrument Control Position
DUT Mode USB
Band Selector 20 Meters
Frequency 14.250 MHz
XMIT/RCV Receive
DRIVE or RF LEVEL Minimum
Microphone Minimum
Instrument Control Position
Two-Tone Generator TONE A (700 Hz) OFF
TONE B (1900 Hz) OFF
HI-Z/LO-Z As Required
BALANCE Center
LEVEL Full CCW
Attenuator –30 dB
RF Wattmeter Push Button Mode Select FWD PEP
Element As Required
Forward Element Range As Required
10-dB Step Attn Attenuator –40 dB
1-dB Step Attn Attenuator Any
Spectrum Analyzer CENTER FREQ (FREQUENCY) 14.25130 MHz
SPAN (SPAN) 20 kHz
REF LEV (AMPLITUDE) –40 dBm
ATTEN (AMPLITUDE) 20 dB
RES BW (BW) 100 Hz
VIDEO BW (BW) 10 kHz
THRESHOLD (DISPLAY) OFF
SWP TIME (SWEEP) AUTO
4.6.3.2 NOTE: If proceeding from the previous tests, this paragraph may be skipped.
CAUTION!: Power must only be applied to
the attenuator input! Do not reverse input
and output terminals of the Bird 8329.
RF Power
Attenuator &
Dummy Load
Bird 8329100 WATTS
TYPICAL
100 WATTS
TYPICAL
RF WATTMETER
BIRD 4381
TWO-TONE
AUDIO
GENERATOR
TELEGRAPH KEY
DUT
TRANSMITTER
POWER SOURCE
10 dB STEP
ATTENUATOR
HP 355D
1 dB STEP
ATTENUATOR
HP 3555C
SPECTRUM
ANALYZER
HP 8563E
DO NOT
EXCEED
0 dBm
Fig. 4-6 ── SSB Carrier and Unwanted Sideband Suppression Test Hook-up

20
Receiver hiss should be heard; adjust the volume to the desired level. Allow all equipment at least 10 minutes
warm-up time before proceeding to step 4.6.3.3.
4.6.3.3 Tune the DUT per the operator's manual for the test frequency of 14.250 MHz. Turn on the two-tone
generator and set the TONE B switch to ON. With the DUT in the USB mode, adjust the MIC gain and set the
generator LEVEL and ATTENUATOR controls for the maximum audio input as specified by the manufacturer.
Observe the transmitter output power as shown by the wattmeter. Unkey the transmitter and set the step attenuators for
-40 dBm input to the spectrum analyzer.
CAUTION: The input to the spectrum analyzer at no time should exceed +10 dBm. Damage to the instrument
will occur at an input level of +30 dBm or greater.
4.6.3.4 Key the transmitter. Adjust the DUT USB signal frequency to 14.2532 MHz on the spectrum analyzer
display.
4.6.3.5 A tiny low level pip may appear 1900 Hz to the left of the USB signal at the center of the spectrum analyzer
display. This is the suppressed carrier. Another pip, if visible 3800 Hz to the left of the USB (at 14.2494 MHz) is the
unwanted Lower Sideband (LSB). This may be verified by keying the transmitter off and on again. All pips from the
DUT will disappear. If necessary, adjust the CENTER FREQ control so that the USB pip is centered (or nearly
centered) on the display graticule.
4.6.3.6 Adjust the REF LEV control (and step attenuators if required) so that the peak of the USB pip is at 0 dB. The
spectrum analyzer is now calibrated. Press the SGL SWEEP button for a single trace. The amplitude of the unwanted
sideband and carrier may now be read in dB below Peak Envelope Power (PEP) directly from the display.
4.6.3.7 Record the value of both the suppressed carrier and the unwanted sideband in 4.6.3.7 of the Data Sheet.
4.6.3.8 Set the transmitter mode switch for LSB. Return the SWP TIME to AUTO. Repeat paragraphs 4.6.3.4 to
4.6.3.7 for the lower sideband at 14.2494 MHz (the suppressed carrier and unwanted upper sideband now appear to the
right of the lower sideband at 14.2513 and 14.2532 MHz, respectively). If the pip is lost when the mode is changed, it
may also be necessary reset the CENTER FREQ control. Record results in 4.6.3.8 of the data sheet.
4.6.3.9 If the DUT also has any VHF or UHF outputs, set the DUT to approximately 200 kHz above the bottom of
each band and repeat paragraphs 4.6.3.3 to 4.6.3.8, adjusting the spectrum analyzer center frequency as appropriate
(Examples: for 6M, use a center frequency of 50.2013; the USB signal will appear at 50.2032 and the LSB signal at
50.1994; for 2M, use a center frequency of 144.2013; the USB signal will appear at 144.2032 and the LSB signal at
144.1994).

21
4.7 CW KEYING WAVEFORM TEST
4.7.1 The purpose of the CW Keying Waveform Test is to photograph the first and second dit in a series of dits with
the DUT in the VOX and QSK modes. The keying rate is 20 ms on and 20 ms off, a rate that corresponds to 60 WPM
using the PARIS standard. A picture will also be taken of any other test conditions that result in any wave shape that is
significantly different from the others (more than 10% difference, spikes, etc.).
4.7.2 Test hook-up (See Fig. 4-7)
NOTE: If proceeding from the previous SSB Carrier and Unwanted Sideband Test, only the hook-up
modifications indicated with a dotted line need to be implemented for this test.
4.7.2.1 With all power switches in the OFF position and the transceiver in the receive mode, connect the following:
Connection Connectors Cable Type
DUT RF OUTPUT to wattmeter INPUT AS Required to type N 50-Ohm coax
Wattmeter OUTPUT to Power Attn INPUT Type N to type N 50-Ohm coax
Power Attn OUT to 10-dB step INPUT Type N to BNC 50-Ohm coax
10-dB step Attn OUT to 1-dB step IN BNC to BNC 50-Ohm coax
1-dB step Attn OUT to CH2 Scope IN BNC to BNC 50-Ohm coax
-------------------------------------------------------------------------------------------------------------------------
Key Test Gen OUT to Scope EXT TRIG IN BNC to BNC 50-Ohm coax
Key Test Gen KEY OUT to DUT KEY IN BNC to As Required 50-Ohm coax
XMTR Key Line to Scope CH1 INPUT Probe clip to BNC 10X Probe
Scope GND to XMTR GND As Required As Required
-------------------------------------------------------------------------------------------------------------------------
Power to DUT As Required As Required
CAUTION!: Power must only be applied
to the attenuator input! Do not reverse
input and output terminals of the Bird
8329.
RF Power
Attenuator &
Dummy Load
Bird 8329 100 WATTS
TYPICAL
100 WATTS
TYPICAL
RF WATTMETER
BIRD 4381 KEYING
TEST
GENERATOR DUT
TRANSMITTER
POWER SOURCE
10 dB STEP
ATTENUATOR
HP 355D
1 dB STEP
ATTENUATOR
HP 3555C
DUAL-TRACE
OSCILLOSCOPE
TEKTRONIX
3052B
CH 2
CH 1
EXT
TRIG
KEY OUT
SCOPE OUT
Fig. 4-7 ── CW Keying Waveform Test Hook-up
22
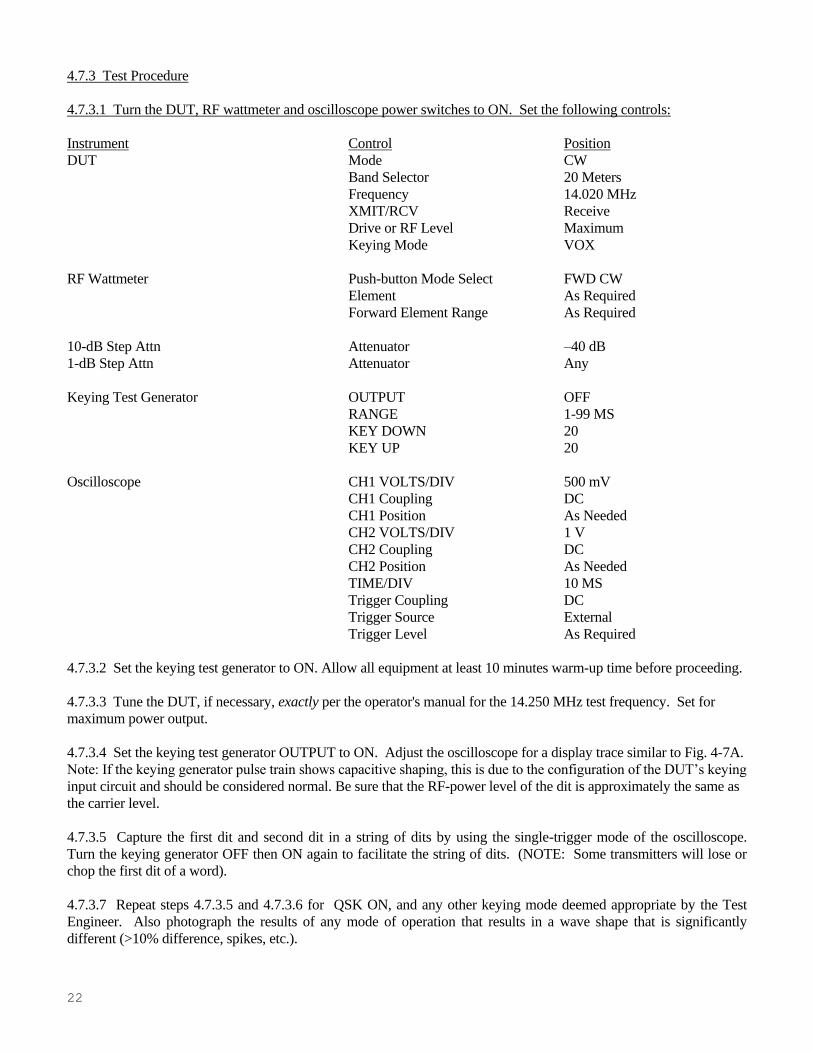
4.7.3 Test Procedure
4.7.3.1 Turn the DUT, RF wattmeter and oscilloscope power switches to ON. Set the following controls:
Instrument Control Position
DUT Mode CW
Band Selector 20 Meters
Frequency 14.020 MHz
XMIT/RCV Receive
Drive or RF Level Maximum
Keying Mode VOX
RF Wattmeter Push-button Mode Select FWD CW
Element As Required
Forward Element Range As Required
10-dB Step Attn Attenuator –40 dB
1-dB Step Attn Attenuator Any
Keying Test Generator OUTPUT OFF
RANGE 1-99 MS
KEY DOWN 20
KEY UP 20
Oscilloscope CH1 VOLTS/DIV 500 mV
CH1 Coupling DC
CH1 Position As Needed
CH2 VOLTS/DIV 1 V
CH2 Coupling DC
CH2 Position As Needed
TIME/DIV 10 MS
Trigger Coupling DC
Trigger Source External
Trigger Level As Required
4.7.3.2 Set the keying test generator to ON. Allow all equipment at least 10 minutes warm-up time before proceeding.
4.7.3.3 Tune the DUT, if necessary, exactly per the operator's manual for the 14.250 MHz test frequency. Set for
maximum power output.
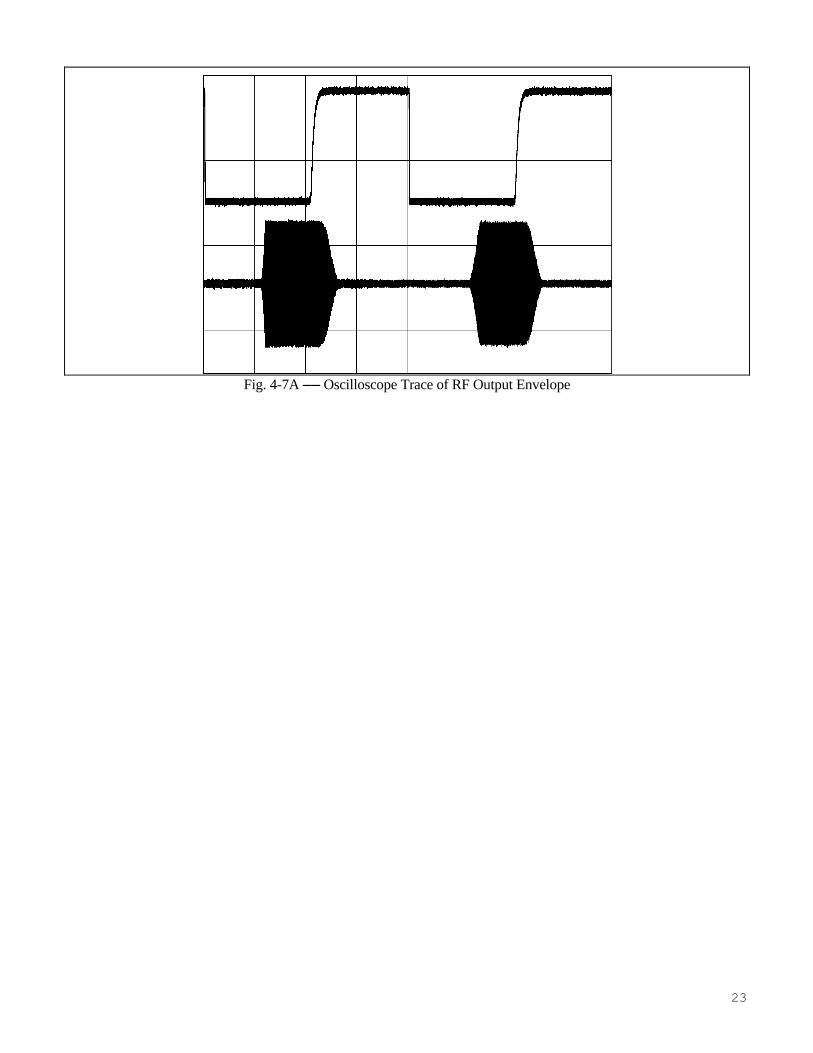
4.7.3.4 Set the keying test generator OUTPUT to ON. Adjust the oscilloscope for a display trace similar to Fig. 4-7A.
Note: If the keying generator pulse train shows capacitive shaping, this is due to the configuration of the DUT’s keying
input circuit and should be considered normal. Be sure that the RF-power level of the dit is approximately the same as
the carrier level.
4.7.3.5 Capture the first dit and second dit in a string of dits by using the single-trigger mode of the oscilloscope.
Turn the keying generator OFF then ON again to facilitate the string of dits. (NOTE: Some transmitters will lose or
chop the first dit of a word).
4.7.3.7 Repeat steps 4.7.3.5 and 4.7.3.6 for QSK ON, and any other keying mode deemed appropriate by the Test
Engineer. Also photograph the results of any mode of operation that results in a wave shape that is significantly
different (>10% difference, spikes, etc.).
23
Fig. 4-7A ── Oscilloscope Trace of RF Output Envelope
24
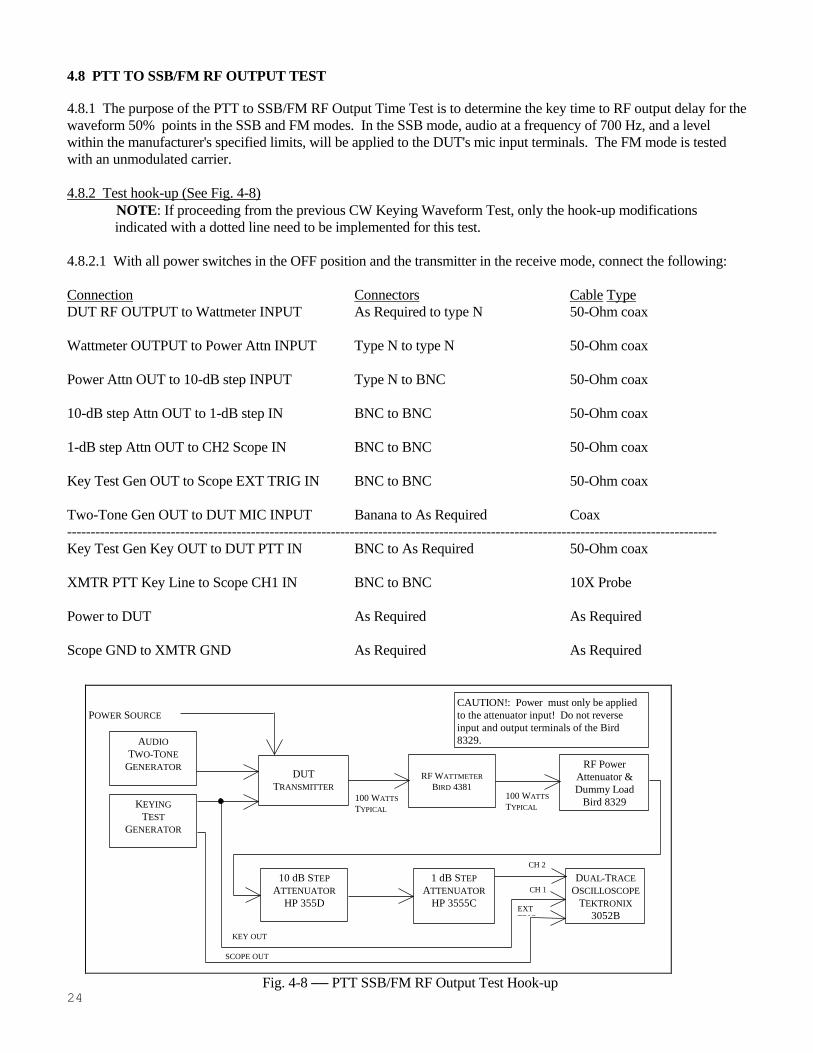
4.8 PTT TO SSB/FM RF OUTPUT TEST
4.8.1 The purpose of the PTT to SSB/FM RF Output Time Test is to determine the key time to RF output delay for the
waveform 50% points in the SSB and FM modes. In the SSB mode, audio at a frequency of 700 Hz, and a level
within the manufacturer's specified limits, will be applied to the DUT's mic input terminals. The FM mode is tested
with an unmodulated carrier.
4.8.2 Test hook-up (See Fig. 4-8)
NOTE: If proceeding from the previous CW Keying Waveform Test, only the hook-up modifications
indicated with a dotted line need to be implemented for this test.
4.8.2.1 With all power switches in the OFF position and the transmitter in the receive mode, connect the following:
Connection Connectors Cable Type
DUT RF OUTPUT to Wattmeter INPUT As Required to type N 50-Ohm coax
Wattmeter OUTPUT to Power Attn INPUT Type N to type N 50-Ohm coax
Power Attn OUT to 10-dB step INPUT Type N to BNC 50-Ohm coax
10-dB step Attn OUT to 1-dB step IN BNC to BNC 50-Ohm coax
1-dB step Attn OUT to CH2 Scope IN BNC to BNC 50-Ohm coax
Key Test Gen OUT to Scope EXT TRIG IN BNC to BNC 50-Ohm coax
Two-Tone Gen OUT to DUT MIC INPUT Banana to As Required Coax
------------------------------------------------------------------------------------------------------------------------------------------
Key Test Gen Key OUT to DUT PTT IN BNC to As Required 50-Ohm coax
XMTR PTT Key Line to Scope CH1 IN BNC to BNC 10X Probe
Power to DUT As Required As Required
Scope GND to XMTR GND As Required As Required
CAUTION!: Power must only be applied
to the attenuator input! Do not reverse
input and output terminals of the Bird
8329.
RF Power
Attenuator &
Dummy Load
Bird 8329 100 WATTS
TYPICAL
100 WATTS
TYPICAL
RF WATTMETER
BIRD 4381 KEYING
TEST
GENERATOR
DUT
TRANSMITTER
POWER SOURCE
10 dB STEP
ATTENUATOR
HP 355D
1 dB STEP
ATTENUATOR
HP 3555C
DUAL-TRACE
OSCILLOSCOPE
TEKTRONIX
3052B
CH 2
CH 1
EXT
TRIG
KEY OUT
SCOPE OUT
AUDIO
TWO-TONE
GENERATOR
Fig. 4-8 ── PTT SSB/FM RF Output Test Hook-up

25
4.8.3 Test procedure
4.8.3.1 Turn the DUT, RF wattmeter and oscilloscope power switches to ON. Set the following controls:
Instrument Control Position
DUT Mode USB
Band Selector 20 Meters
Frequency 14.250 MHz
XMIT/RCV Receive
DRIVE or RF LEVEL Minimum
VOX Off
RF Wattmeter Mode Select Button FWD PEP
Element As Required
Forward Element Range As Required
10-dB Step Attn Attenuator –40 dB
1-dB Step Attn Attenuator Any
Keying Test Generator OUTPUT OFF
RANGE 1-99 MS
KEY DOWN 20
KEY UP 20
Two-Tone Generator TONE A ON
TONE B OFF
HI-Z/LO-Z As Required
BALANCE N/A
LEVEL Full CCW
ATTENUATOR –30 dB
Oscilloscope CH1 VOLTS/DIV 500 mV
CH1 Coupling DC
CH1 Position As Needed
CH2 VOLTS/DIV 1 V
CH2 Coupling DC
CH2 Position As Needed
TIME/DIV 5 MS
Trigger Mode AUTO
Trigger Coupling DC
Trigger Source EXT
Trigger Level As Required
4.8.3.2 Set the Two-Tone and Keying Test Generator power switches to ON. Receiver hiss should be heard; adjust
volume to desired level. Allow all equipment at least 10 minutes warm-up time before proceeding to step 4.8.3.3
4.8.3.3 Tune the DUT transmitter, if necessary, exactly per the operator's manual for the 14.250 MHz test frequency.
Adjust the two-tone generator OUTPUT level to the manufacturer's specified limit. Set the DUT for maximum rated
power output.

26
4.8.3.4 Turn the keying test generator OUTPUT to
ON. Adjust the oscilloscope for a display trace
similar to Fig. 4-8A. It may be necessary to reduce
the generator keying speed. Be sure that the RF
power level of the Dit is approximately the same as
the carrier level.
4.8.3.5 Measure the ON and OFF delay times
between the 50% points of the keying pulse and the
RF output pulse. Take a single sweep. Adjust the
oscilloscope’s sweep rate and horizontal position for
optimum display results. It is often best to determine
the on and off delay times from two different traces.
The Trigger Level adjustment can be used to facilitate
an easy transition between ON and off delay traces.
Record both values in 4.8.3.5 of the data sheet. Turn
off the two-tone and keying test generator outputs.
4.8.3.6 Place the DUT in the FM mode. Repeat paragraphs 4.8.3.3, 4.8.3.4 and 4.8.3.5 for this mode at a test
frequency of 29.000 MHz . Record the results in 4.8.3.6 of the data sheet.
4.8.3.7 Repeat step 4.8.3.6 for test frequencies of 52.000 MHz, 146.000 MHz and 440.000 MHz, as appropriate.
Fig. 4-8A ── Oscilloscope Trace of RF Envelope

27
4.9 TRANSMIT/RECEIVE TURN-AROUND TIME TEST
(Transceivers Only)
4.9.1 The purpose of the Transmit/Receive Turn-Around Time Test is to measure the time delay required for a
transceiver to switch from transmit to the receive mode.
4.9.2 Test hook-up (See Fig. 4-9)
4.9.2.1 With all power switches in the OFF position and the transceiver in the receive mode, connect the following:
Connection Connectors Cable Type
DUT RF OUTPUT to wattmeter INPUT As Required to type N 50-Ohm coax
Wattmeter OUTPUT to Power Attn INPUT Type N to type N 50-Ohm coax
Power Attn OUT to 10-dB step INPUT Type N to BNC 50-Ohm coax
10-dB step Attn OUT to 1-dB step IN BNC to BNC 50-Ohm coax
---------------------------------------------------------------------------------------------------------------------------
1-dB step Attn IN to Signal Gen RF OUT BNC to Type N 50-Ohm coax
DUT Audio OUT to Scope CH2 INPUT As Required 10X or 1X Probe
------------------------------------------------------------------------------------------------------------------------------
Key Gen Scope OUT to Scope EXT TRIG IN BNC to BNC 50-Ohm coax
Key Test Gen Key OUT to PTT Key IN BNC to As Req 50-Ohm coax
XMTR PTT Line to Scope CH1 INPUT Probe clip to BNC 10X Probe
Connection Connectors Cable Type
Two-Tone Gen OUT to DUT MIC INPUT Banana to As Required Coax
Power to DUT As Required As Required
Scope GND to XMTR GND As Required As Required
CAUTION!: Power must only be applied
to the attenuator input! Do not reverse
input and output terminals of the Bird
8329.
RF Power
Attenuator &
Dummy Load
Bird 8329 100 WATTS
TYPICAL
100 WATTS
TYPICAL
RF WATTMETER
BIRD 4381 KEYING
TEST
GENERATOR
DUT
TRANSMITTER
POWER SOURCE
10 dB STEP
ATTENUATOR
HP 355D
1 dB STEP
ATTENUATOR
HP 3555C
DUAL-TRACE
OSCILLOSCOPE
TEKTRONIX
3052B CH 2
CH 1
EXT
TRIG
KEY OUT
SCOPE
OUT
AUDIO
TWO-TONE
GENERATOR
SIGNAL
GENERATOR
MARCONI 2041
AUDIO
OUT
DO NOT
EXCEED
-40 dBm!
Fig. 4-9 ── Transmit/Receive Turnaround Time Test Hook-up

28
4.9.3 Test procedure
4.9.3.1 Turn the DUT, RF wattmeter and oscilloscope power switches to ON. Set the following controls:
Instrument Control Position
DUT Mode USB
Frequency 14.250 MHz
XMIT/RCV Receive
AGC ON (Fastest available)
Squelch OFF
RF Wattmeter Push-button Mode Select FWD PEP
Element As Required
Forward Element Range As Required
10-dB Step Attn Attenuator 120 dB
1-dB Step Attn Attenuator 0 dB
Keying Test Generator OUTPUT EN OFF
RANGE 1-99 ms
KEY DOWN 50 ms
KEY UP 50 ms
Oscilloscope CH1 VOLTS/DIV 0.5 V
CH1 Coupling DC
CH2 VOLTS/DIV 1 V
CH2 Coupling DC
TIME/DIV 5 ms
Trigger Coupling DC
Trigger Source EXT
Two-Tone Generator TONE A ON
TONE B OFF
HI-Z/LO-Z As Required
BALANCE N/A
LEVEL FULL CCW
ATTENUATOR –30 dB
RF Generator FREQUENCY TUNE 14.250 MHz
OUT LEVEL +10 dBm
RF ON
AM OFF
FM OFF
4.9.3.2 (If proceeding from the previous PTT to SSB RF Output Time Test, this paragraph may be skipped). Set the
Two-Tone and Keying Test Generator power switches to ON. Receiver hiss should be heard; adjust the volume to the
desired level. Allow all equipment at least 10 minutes warm-up time before proceeding to step 4.9.3.3.
CAUTION: Reverse power to the RF signal generator at no time should exceed -40 dBm (approx. 2 Vrms).
Shut-down of the instrument may result.
29
4.9.3.3 Reduce the step attenuators until the signal is heard and a deflection can be observed on the S meter. Tune the
receiver for maximum S meter indication. Reduce the RF step attenuators until the receiver S meter indicates an S9
signal. If the DUT does not have an S Meter, then set for a 50 V input to the DUT.
4.9.3.4 Tune the transmitter, if necessary, exactly per the operator’s manual for the 14.250 MHz test frequency. Turn
on the two-tone generator and set the A tone switch to ON. With the DUT in the USB mode, set the generator LEVEL
and ATTENUATOR controls for the maximum audio input level as specified by the DUT manufacturer.
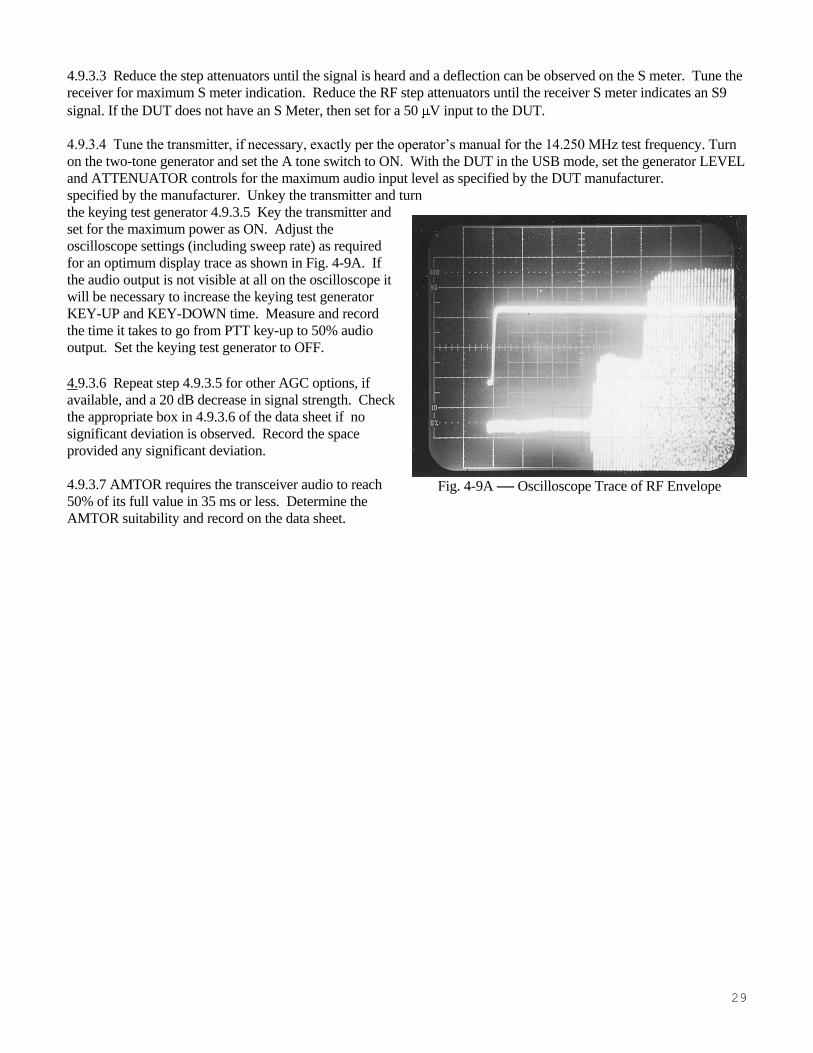
specified by the manufacturer. Unkey the transmitter and turn
the keying test generator 4.9.3.5 Key the transmitter and
set for the maximum power as ON. Adjust the
oscilloscope settings (including sweep rate) as required
for an optimum display trace as shown in Fig. 4-9A. If
the audio output is not visible at all on the oscilloscope it
will be necessary to increase the keying test generator
KEY-UP and KEY-DOWN time. Measure and record
the time it takes to go from PTT key-up to 50% audio
output. Set the keying test generator to OFF.
4.9.3.6 Repeat step 4.9.3.5 for other AGC options, if
available, and a 20 dB decrease in signal strength. Check
the appropriate box in 4.9.3.6 of the data sheet if no
significant deviation is observed. Record the space
provided any significant deviation.
4.9.3.7 AMTOR requires the transceiver audio to reach
50% of its full value in 35 ms or less. Determine the
AMTOR suitability and record on the data sheet.
Fig. 4-9A ── Oscilloscope Trace of RF Envelope

30
4.10 KEYER SPEED AND SIDETONE FREQUENCY TEST
(For units having an internal keyer.)
4.10.1 The purpose of this test is to measure the transmitter’s internal keyer speed range and sidetone frequency range.
4.10.2 Test hook-up (See Fig. 4-10)
4.10.2.1 With all power switches in the OFF position and the transceiver in the receive mode, connect the following:
Connection Connectors Cable Type
DUT RF OUTPUT to wattmeter INPUT As Required to type N 50-Ohm coax
Wattmeter OUTPUT to Power Attn INPUT Type N to type N 50-Ohm coax
Power Attn OUT to Scope CH1 INPUT BNC to Type N 50-Ohm coax
DUT Audio OUT to Scope CH2 INPUT As Required 50-Ohm coax
DUT Audio OUT to 10 dB step Attn IN As Required to BNC 50-Ohm coax
(10W or greater power rating)
10 dB step Attn OUT to Freq Counter IN BNC to BNC 50-Ohm coax
DUT Audio OUT to HI-Z Amp / 8 Ohm load As Required to BNC 50-Ohm coax
XMTR Key Input to Telegraph Key As Required to Test Clips Any
Power to DUT As Required As Required
4.10.3 Test procedure
4.10.3.1 Turn the DUT, RF wattmeter and oscilloscope power switches to ON. Set the following controls:
Instrument Control Position
CAUTION!: Power must only be applied
to the attenuator input! Do not reverse
input and output terminals of the Bird
8329.
RF Power
Attenuator &
Dummy Load
Bird 8329 100 WATTS
TYPICAL
100 WATTS
TYPICAL
RF WATTMETER
BIRD 4381
TELEGRAPH
KEY DUT
TRANSMITTER
POWER
SOURCE
10 dB STEP
ATTENUATOR
TEKTRONICS
FREQUENCY
COUNTER
HP-5351B
DO NOT
EXCEED
0 dBm!
DUAL-TRACE
OSCILLOSCOPE
TEKTRONIX
3052B AUDIO
OUT
CH 1
CH 2
HI-Z
MONITOR AMP
Fig. 4-10 ── Keyer Speed and Sidetone Frequency Test Hook-up

31
DUT Mode USB
Frequency 14.250 MHz
XMIT/RCV Receive
AGC N/A
Squelch OFF
RF Wattmeter Push-button Mode Select FWD PEP
Element As Required
Forward Element Range As Required
10-dB Step Attn Attenuator –40 dB
1-dB Step Attn Attenuator 0 dB
Oscilloscope CH1 VOLTS/DIV 0.5 V
CH1 Coupling DC
CH1 Position As Needed
CH2 VOLTS/DIV 1 V
CH2 Coupling DC
CH2 Position As Needed
TIME/DIV 5 ms
Trigger Coupling DC
Trigger Source CH1
Trigger Level As Required
4.10.3.2 (If proceeding from the previous Turnaround Time Test, this paragraph may be skipped). Receiver hiss
should be heard; adjust the volume to the desired level. Allow all equipment at least 10 minutes warm-up time before
proceeding to step 4.10.3.3.
4.10.3.3 Key the transmitter. Set the sidetone level for comfortable listening level. Adjust the step attenuators and
oscilloscope controls for optimum display. Send a series of dits and then a series of dashes. Verify the dashes are three
times longer in duration than the dits. Measure and record any significant deviation from the standard 3 to 1 ratio.
4.10.3.4 With keyer speed still set to minimum, send a series of dits and take a trace in the storage mode. Measure the
time duration from the leading edge of a dit to the leading edge of the next. This duration is equivalent to two dits (one
dit plus a dit space). Adjust the oscilloscope controls as required to obtain an optimum trace. Divide the measured
time by (in ms) into 2400 to obtain the equivalent code speed (in WPM):
Code Speed in WPM = 1200 / Duration of Single Dit in ms Record on Data Sheet.
4.10.3.5 Set keyer speed to maximum and repeat step 4.10.3.4.
4.10.3.6 Set keyer speed to center or the default position and repeat step 4.10.3.4.
4.10.3.7 Adjust the Frequency Counter Step Attenuators for minimum positive indication. Measure the initial default
sidetone frequency . Reduce the sidetone for minimum frequency and measure again. Increase to maximum sidetone
frequency and repeat. Record both all three frequencies on Data Sheet.

32
4.11 COMPOSITE NOISE TEST
4.11.1 The purpose of the Composite-Noise Test is to observe and measure the phase and amplitude noise, as well as
any spurious signals generated by the DUT transmitter. Since phase noise is the primary noise component in any
well-designed transmitter, it can be assumed, therefore, that almost all the noise observed during this test is phase
noise.
4.11.1.1 This measurement is accomplished with the use of an integrated HP model 11848A phase noise test set that
consists of a control box (phase discriminator, phase shift network, DC tuning voltage control, and analyzer outputs),
HP 3561A FFT-based dynamic signal analyzer, HP 3563E (or 3562A) microwave spectrum analyzer, and as needed,
an oscilloscope (for assistance in establishing zero beat). Measurements are accomplished by computer software run on
the 486 computer. Additionally, an appropriate low-noise reference oscillator that can be tuned via DC is also
necessary.
4.11.2 Test Hook-up (See Fig. 4-11).
4.11.2.1 With all power switches in the OFF position and the transceiver in the receive mode, connect the following:
Connection Connectors Cable Type*
DUT RF OUTPUT to wattmeter INPUT As Required to type N 50-Ohm coax
Wattmeter OUTPUT to Power Attn INPUT Type N to type N 50-Ohm coax
Power Attn OUT to 10-dB step INPUT Type N to BNC 50-Ohm coax
10-dB step Attn OUT to 1-dB step IN BNC to BNC 50-Ohm coax
1-dB step Attn OUT to HP-11848A to BNC to BNC 50-Ohm coax
“Right” Phase Detector IN
Ref. Oscillator OUT to HP-11848A BNC to BNC 50-Ohm coax
“Left” Phase Detector IN
HP-11848A Tuning voltage to Test BNC to BNC or clip leads As Required
HP-11848A Phase Detector Output to BNC to BNC 50-Ohm coax
HP-3561A FFT Signal Analyzer
HP-11848 Spectrum Analyzer OUT to BNC to BNC 50-Ohm coax
HP-8563 E Spectrum Analyzer
Power to DUT As Required As Required
HP-11848A Aux Monitor OUT to BNC to BNC 50-Ohm coax
TDS-3052B Oscilloscope CH 1 IN
*NOTE: Composite noise setup is very sensitive to environment noise. Use of common-mode ferrite
chokes may be required if test fixture problems are encountered as described in the procedure for this
test.

33
4.11.3 Test procedure
4.11.3.1 Turn the DUT, RF wattmeter, test system, spectrum analyzer power, and reference oscillator switches to ON.
Set the following controls:
Instrument Control Position
DUT Mode CW
Band Selector 20 Meters
Frequency 14.025 MHz
Output Power 30-50 %
RF Wattmeter Push-button Mode Select FWD CW
Element As Required
Forward Element Range As Required
10-dB Step Attn Attenuator As required for +15 dBm
1-dB Step Attn Attenuator Any
Reference Oscillator FREQUENCY 14.025 MHz
4.11.3.2 Allow all equipment, including the test oscillator, at least 15 minutes warm-up time before proceeding.
TURN OFF all non essential test equipment and overhead fluorescent lights. Use the incandescent lighting.
4.11.3.3 Check the manufacturer’s specification of the transmitting duty cycle. If not stated, set the power output to 30
watts for a 100 watt maximum transmitter, or 50 watts for a 200 watt maximum transmitter. The test will take about 15
minutes; do not exceed manufacturer’s duty cycle
4.11.3.4 Turn on the control computer, allow it to complete the boot and program start processes, then step through
the menu system to set the initial test frequency and VFO tune ranges. On the menu, the test frequency has a scientific
format; example: 14.025E+6 (14.025 x 10 to the 6th power). For the Wenzel crystal oscillators, use 14.025 MHz, a
VCO tune center voltage of approximately 5 and a tune voltage range of +/-5 V. For the Marconi/IFR 1041 signal
generators, set the tune center voltage to 0 and a tuning range +/-5V. All other parameters should be ok at their initial
values.
RF POWER
ATTENUATOR
BIRD 8329
10 dB STEP
ATTENUATOR
HP 355D
1 dB STEP
ATTENUATOR
HP 355C
RF
WATTMETER
BIRD 4381
PHASE DET. /
SYSTEM
CONTROLLER
HP 3561A
FFT
ANALYZER
HP 8563E
SPECTRUM
ANALYZER
TRANSMITTER
PHASE NOISE TEST SET
LOW NOISE
VARIABLE
CRYSTAL OSC
TEST
CONTROL
COMPUTER
Fig. 4-11 ── Composite Noise Test Hook-up

34
4.11.3.5 Key the transmitter and adjust the frequency of the DUT to be approximately 1 Hz or less from the frequency
of the reference oscillator. Use an oscilloscope , if necessary, to remove any undulating shape on the screen of the
noise output. The two frequencies must not be equal or a phenomenon known as phase roll may result, and, if much
greater than 2 Hz apart, the software will not run and will show an error message. The tuning voltage of the test
oscillator may be adjusted slightly in the software if the transmitter tuning cannot be brought less than 1 Hz. The idea
is to get as close as possible, without being identical. The signal should be unreadable and only the noise clearly visible
on the analyzer display before proceeding to the next step. Un-key the transmitter.
4.11.3.6 To measure the Phase Noise, key the transmitter and run the program. After about three minutes, you should
see a graph of the composite noise forming on the PC screen. After 15 minutes or so, the process will be complete and
the file is saved as a type .PCX file. Before saving the file, press “M” and omit the spurs (red lines on the graph). Copy
the file to disc.
4.11.3.7 Repeat steps 4.11.3.4 through 4.11.3.6 with a test frequency of 50.020 MHz. With this test, you will replace
the Test Oscillator with the IFR 2041 Signal Generator in the “Low Noise” mode. Set the following controls on the
IFR2041:
External 1 to “DC Coupling”
Deviation to 3 kHz, MODULATION ENABLED
RF Level to +13 dBm
Frequency to 50.020
RF Output to “Left” Phase Detector Input
External 1 to Tune Voltage Output
Be sure to change the following on the software menu:
Frequency to 50.020E+6
Detector Frequency is + 6 volts
Center Tune Volts is 0.0 volts
Tune Range is 6 volts.
Near zero beat using the scope and run the program. Save file to disc.

35
V. RECEIVER TESTS
5.0.1 As shown in the Table of Contents, there are 17 Receiver tests outlined in this chapter. They have been
arranged, just as in the previous transmitter tests, to minimize the required level and frequency of hook-up changes and
modifications. Each hook-up, however, is shown complete with all changes from the previous test clearly indicated.
A block diagram accompanies each hook-up and any changes from the previous test are shown within a dotted
rectangle. This affords the flexibility to easily start anywhere and perform these tests in any desired order.
5.0.2 Before performing any receiver testing, it is essential for the test engineer to be completely familiar with the
Device Under Test (DUT) and the test equipment that will be used. The RF output of a transceiver will damage the
test equipment and therefore, it is essential never to accidentally key the transmitter while performing these tests!
Completely disable the transmitter if at all possible and set all RF output controls to minimum, reduce drive,
disconnect the telegraph key, etc. The receiver must be operated in a manner exactly as specified by the manufacturer.
Any test that would cause equipment to be operated in a manner inconsistent with its operating manual must be
modified accordingly.
5.0.2.1 Other considerations are as follows:
1) The RF Generator output must not exceed –14 dBm when using the Hybrid Combiner. This restriction is
an effort to minimize intermodulation in the combiner and signal generators.
2) The level of input to the receiver should not exceed +10 dBm or the manufacturer's specification,
whichever is less.
3) Read and understand all pertinent manuals before operating any laboratory instrument or the DUT
receiver.
4) The testing should be conducted in a relatively RF free environment. If an RF source is in close proximity
to the testing site, an RF screen room should be used.
5) If a preamp is available, each test must be performed with each level of the preamp and without the
preamp.
6) If the audio output impedance is not 8 Ohms, select the appropriate load resistance on the HI-Z Audio
Amplifier.
36
5.1 NOISE FLOOR TEST
5.1.1 The purpose of the Noise Floor Test (also known as “Minimum Discernible Signal” or MDS) is to determine the
level of signal input to the receiver that will produce an audio output where the power in the signal is equal to the
power in the noise (S + N = N + 3 dB). The test is conducted with the receiver in the CW mode using the 500 Hz, or
closest available IF filter (or audio filters where IF filters are not available. For receivers that have appropriate IF
filters, all audio filtering is disabled.) Set the AGC to the OFF position if possible. The test is performed frequencies
of 1.020 MHz, 3.520 MHz, 14.020 MHz, 50.020 MHz, 144.020 MHz and 432.020 MHz. For the expanded set of tests,
this test is performed on all available amateur bands, 20 kHz above the lower band edge.
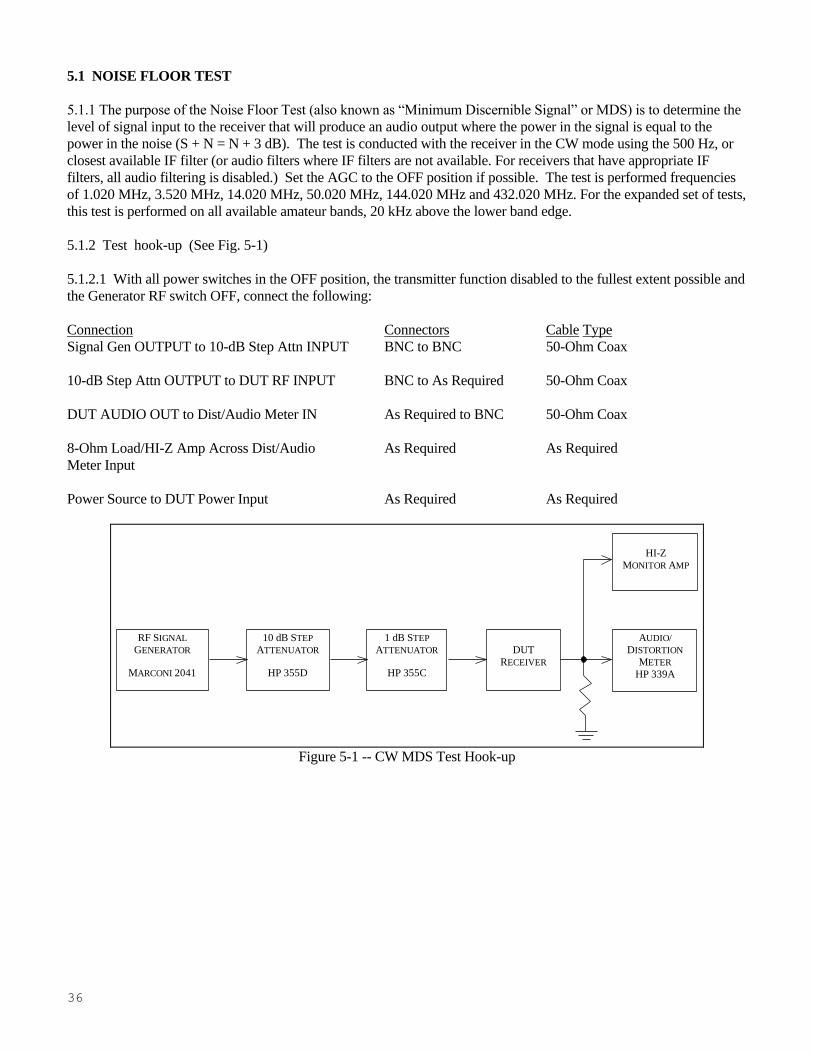
5.1.2 Test hook-up (See Fig. 5-1)
5.1.2.1 With all power switches in the OFF position, the transmitter function disabled to the fullest extent possible and
the Generator RF switch OFF, connect the following:
Connection Connectors Cable Type
Signal Gen OUTPUT to 10-dB Step Attn INPUT BNC to BNC 50-Ohm Coax
10-dB Step Attn OUTPUT to DUT RF INPUT BNC to As Required 50-Ohm Coax
DUT AUDIO OUT to Dist/Audio Meter IN As Required to BNC 50-Ohm Coax
8-Ohm Load/HI-Z Amp Across Dist/Audio As Required As Required
Meter Input
Power Source to DUT Power Input As Required As Required
RF SIGNAL
GENERATOR
MARCONI 2041
10 dB STEP
ATTENUATOR
HP 355D
1 dB STEP
ATTENUATOR
HP 355C
DUT
RECEIVER
AUDIO/
DISTORTION
METER
HP 339A
HI-Z
MONITOR AMP
Figure 5-1 -- CW MDS Test Hook-up

37
5.1.3 Test Procedure
5.1.3.1 Turn the DUT and all test equipment power switches to ON. If the DUT does not cover 1.020 MHz, proceed
directly to the second test frequency of 3.520 MHz. Set the following controls:
Instrument Control Position
DUT Mode CW
Band Selector As Required for 1.020 MHz
Frequency 1.020 MHz
XMIT/RCV RCV
DRIVE or RF LEVEL Minimum
IF Filters 500 Hz or Closest Available
AGC OFF
Preamplifier OFF
10 dB Step Attn Attenuator 0 dB
RF Generator CARRIER FREQ 1.020 MHz
RF LEVEL –110 dBm
NOISE MODE (UTIL) LOW NOISE
Audio/Distortion Meter FUNCTION REL LEVEL
RELATIVE ADJUST Center Rotation
FILTERS All Off (Out)
INPUT RANGE 30 V
INPUT/GND SELECT DIS (Center)
METER RESPONSE NORM
5.1.3.2 Receiver hiss should be heard. Adjust the volume of the DUT and HI-Z monitor amp to the desired level.
Allow all equipment at least 10 minutes warm-up time before proceeding to step 5.1.3.3.
5.1.3.3 Verify the RF Generator Output frequency has remained at 1.020 MHz. Reset if necessary.
5.1.3.4 Tune the receiver for 1.020 MHz. Adjust the INPUT RANGE and RELATIVE ADJUST controls as required
to maintain approximately a mid-scale meter indication while carefully tuning the receiver for peak signal response.
(Rotate the Generator OUTPUT LEVEL control as required until the signal is just heard in the receiver.)
5.1.3.5 Set the RF Generator RF switch to OFF. Decrease the Audio Meter INPUT RANGE until the meter indication
is near mid-scale and the two lights above this control are out. Adjust the audio meter RELATIVE ADJUST control
until the audio meter reads –6 dB on the upper scale. (Adjust the INPUT RANGE control one step in either direction
if necessary.)
5.1.3.6 Set the RF Generator RF switch to ON. Rotate the generator OUTPUT LEVEL control to produce an audio
meter reading of –3 dB. Ensure that the DUT is tuned for peak response.
5.1.3.7 Check to ensure that the Generator frequency is still at 1.020 MHz. Set the RF Generator RF to OFF. The
audio meter should return to –6 dB. Turn the RF back on and the meter should again indicate –3 dB.
5.1.3.8 Determine the noise floor (MDS) of the receiver by computing the sum of the RF generator output in dBm and
the 10 dB step attenuator. (NOTE: Be sure to include any additional attenuation you may have included in the line
between the generator and the DUT.) Record on the Data Sheet.

38
Example: a) The RF generator is set for –128.6 dBm output.
b) The step attenuators are set for –10 dB.
c) The receiver MDS, therefore, is:
–128.6 – 10 = –138.6 dBm
5.1.3.9 Repeat steps 5.1.3.4 to 5.1.3.8 with DUT preamplifier set to ON.
5.1.3.10 Re-set the generator output level to –110 dBm. Repeat paragraphs 5.1.3.3 to 5.1.3.9 for a test frequency of
3.520 MHz.
5.1.3.11 Repeat step 5.1.3.10 for a test frequency of 14.020 MHz.
5.1.3.12 Repeat step 5.1.3.10 for test frequencies of 50.020 MHz, 144.020 MHz and 432.020 MHz, as applicable to
the DUT.
5.1.3.13 For an expanded set of tests, repeat step 5.1.3.10 for all remaining amateur bands.

39
5.2 AM RECEIVE SENSITIVITY TEST
5.2.1 The purpose of the AM receive Sensitivity Test is to determine the level of an AM signal, 30% modulated at 1
kHz, that will produce a tone 10 dB above the noise level (MDS) of the DUT. Two frequencies, 1.020 MHz and 3.800
MHz are used for this test.
5.2.2 Test hook-up (See Fig. 5-2)
NOTE: If proceeding from the MDS Test, no hook-up changes are required. Proceed to step 5.2.3.
5.2.2.1 With all power switches in the OFF position and the transmitter function disabled to the fullest extent possible,
connect the following:
Connection Connectors Cable Type
Signal Gen OUTPUT to 10-dB Step Attn INPUT BNC to BNC 50-Ohm Coax
10-dB Step Attn OUTPUT to DUT RF INPUT BNC to As Required 50-Ohm Coax
DUT Audio OUTPUT to Dist/Audio Meter As Required to BNC 50-Ohm Coax
INPUT
8 Ohm Load/HI-Z Amp Across Dist/Audio As Required As Required
Meter INPUT
Power Source to DUT Power Input As Required As Required
RF SIGNAL
GENERATOR
MARCONI 2041
10 dB STEP
ATTENUATOR
HP 355D
1 dB STEP
ATTENUATOR
HP 355C
DUT
RECEIVER
AUDIO/
DISTORTION
METER
HP 339A
HI-Z
MONITOR AMP
Fig. 5-2. AM Receive Sensitivity Test Hook-Up
5.2.3 Test Procedure
5.2.3.1 Turn the DUT and all test equipment power switches to ON. If the DUT does not cover 1.020 MHz, proceed
directly to the second test frequency of 3.800 MHz. Set the following controls:
Instrument Control Position
DUT Mode AM
Band Selector As Required for 1.020 MHz
Frequency 1.020 MHz
XMIT/RCV RCV
DRIVE or RF LEVEL Minimum
IF Filters AM (Approx. 6 kHz)
AGC OFF

40
Preamplifier OFF
DUT Audio Filter(s) Disabled
10-dB Step Attn Attenuator 0 dB
RF Generator CARRIER FREQ 1.020 MHz
RF LEVEL –110 dBm
CARR ON-OFF ON
AM ON
AM DEPTH 30%
Modulation Frequency 1000 Hz
FM OFF
NOISE MODE LOW NOISE MODE
Audio/Distortion Meter FUNCTION REL. LEVEL
RELATIVE ADJUST Center Rotation
FILTERS All OFF (Out)
INPUT RANGE 30 V
INPUT/GND SELECT DIS (Center)
METER RESPONSE NORM
5.2.3.2 Receiver hiss should be heard. Adjust the DUT and HI-Z monitor amp volume to the desired level. Allow all
equipment at least 10 minutes warm-up time before proceeding to step 5.2.3.3.
5.2.3.3 Tune the receiver for 1.020 MHz. Adjust the Audio Meter INPUT RANGE control as required to maintain
approximately a mid-scale meter indication while carefully tuning the receiver for peak signal response. (If necessary,
adjust the Generator OUTPUT LEVEL as required until the signal is just heard in the receiver.)
5.2.3.4 Set the RF Generator modulation control switch to OFF. Decrease the Audio Meter INPUT RANGE until the
meter indication is near mid-scale and the two lights above this control are out. Adjust the audio meter RELATIVE
ADJUST control until the audio meter reads –11 dB on the upper scale. (Adjust the INPUT RANGE control one step
in either direction if necessary.)
5.2.3.5 Set the RF Generator RF switch to ON. Adjust the setting of the generator RF OUTPUT LEVEL to produce
an audio meter reading of –1 dB +/-.5 dB. Recheck for peak response using the audio meter.
5.2.3.6 Check to ensure that the Generator frequency is still at 1.020 MHz. Set the RF Generator modulation to OFF.
The audio meter should return to –11 dB. Turn the modulation back on and the meter should again indicate
–1 dB.
NOTE: The following measurement method is often better, especially in cases where the DUT AGC cannot be
disabled. The Audio Meter settings are the same as for the FM SINAD Test except the DISTORTION RANGE is set
for 0-100% distortion. Adjust the signal generator output level for the following equivalent distortion level as required:
10 dB (S+N)/N = 31.6%
5.2.3.7 Determine the AM 10 dB sensitivity of the receiver by computing the sum of the output level of the RF
generator, as read from the OUTPUT LEVEL switch and meter, and any additional attenuation in the line between the
generator and the DUT. Record on the Data Sheet.
Example: a) The RF generator is set for –113 dBm output.
b) The step attenuators are set for 10 dB.
c) The receiver AM sensitivity is:
–113 - 10 = –123 dBm

41
5.2.3.8 Set the DUT preamplifier to ON and repeat steps 5.2.3.3 to 5.2.3.7.
5.2.3.9 Return the RF generator OUTPUT LEVEL control to –110 dBm and set for 3.800 MHz. Repeat paragraphs
5.2.3.3 to 5.2.3.8 for this test frequency.
5.3 FM SINAD AND QUIETING TEST
5.3.1 The purpose of the FM SINAD and Quieting Test is to determine the 12 dB SINAD value.
SINAD is an acronym for "Signal plus Noise and Distortion" and is a measure of signal quality.
The exact expression for SINAD is:
SINAD = Signal + Noise + Distortion (expressed in dB)
Noise + Distortion
If we consider distortion to be merely another form of noise, (distortion, like noise, is something unwanted added to
the signal), we can further reduce the equation for SINAD to:
SINAD = Signal + Noise (expressed in dB)
Noise
If we now consider a practical circuit in which the signal is much greater than the noise, the value of the SIGNAL +
NOISE can be approximated by the level of the SIGNAL alone. The SINAD equation then becomes the
signal to noise ratio and can be approximated by:
SINAD = Signal (expressed in dB)
Noise
For 25% level of distortion, SINAD can be calculated as: SINAD = 20 log (1/25%) = 20 log 4 = 12 dB
5.3.2 Test hook-up (See Fig. 5-3)
NOTE: If proceeding from the previous AM Receive Sensitivity Test, no hook-up changes are required. Proceed
directly to step 5.3.3.
5.3.2.1 With all power switches in the OFF position and the transmitter function disabled to the fullest extent possible,
connect the following:

42
Connection Connectors Cable Type
Signal Gen OUTPUT to 10-dB Step Atten INPUT BNC to BNC 50-Ohm Coax
10-dB Step Attn OUTPUT to DUT RF INPUT BNC to As Required 50-Ohm Coax
DUT AUDIO OUTPUT to Dist/Audio Meter IN As Required to BNC 50-Ohm Coax
8 Ohm Load/HI-Z Amp Across Dist/Audio As Required As Required
Meter INPUT
Power Source to DUT Power Input As Required As Required
5.3.3 Test Procedure
5.3.3.1 Turn the DUT and all test equipment power switches to ON. Set the following controls:
Instrument Control Position
DUT Mode FM
Frequency 29.000 MHz
XMIT/RCV RCV
DRIVE or RF LEVEL Minimum
RF Gain Maximum
IF Filters FM (Aprx.15 kHz)
AGC OFF
Preamplifier OFF
10-dB Step Attn Attenuator 0 dB
RF Generator CARRIER FREQUENCY 29.000 MHz
RF LEVEL –110 dBm
CARR ON-OFF ON
NOISE MODE NORMAL1
FM On
AM Off
FM DEVN 3 kHz
Modulation Frequency 1000 HZ
RF SIGNAL
GENERATOR
MARCONI 2041
10 dB STEP
ATTENUATOR
HP 355D
1 dB STEP
ATTENUATOR
HP 355C
DUT
RECEIVER
AUDIO/
DISTORTION
METER
HP 339A
HI-Z
MONITOR AMP
Fig. 5-3 FM SINAD and Quieting Test Hook-Up

43
Audio/Distortion Meter FUNCTION DISTORTION
RELATIVE ADJUST Any
METER –10/30
FREQUENCY CONTROLS 1.0 X 1 kHz
FILTERS Low Pass On
INPUT RANGE 30 V
INPUT/GND SELECT DIS (Center)
METER RESPONSE NORM
5.3.3.2 Receiver hiss should be heard. Adjust the volume to the desired level. Allow all equipment at least 10 minutes
warm-up time before proceeding to step 5.3.3.3.
5.3.3.3 Turn the DUT’s preamp on and tune the receiver for 29.000 MHz. Rotate the Generator OUTPUT LEVEL
control as required until the signal is just heard in the receiver. Set the DUT volume control for a normal listening
level, and carefully tune the receiver for minimum distortion. (This control should be set roughly between 1/4 and 3/4
of the maximum limit.)
5.3.3.4 Gradually increase the Signal Generator output until the Distortion Meter indicates 25% distortion. (The step
Attenuator may also be used, if necessary, to help achieve the reading.)
5.3.3.5 Measure the level of the input signal to the DUT receiver and record in 5.3.3.5 of the Data sheet. Be sure to
account for any attenuation in the line from the step attenuators or hybrid combiner.
Example: a) The RF generator is set for –112.4 dBm output
b) The step attenuator is set for 10 dB
c) The FM SINAD is:
–112.4 - 10 = –122.4 dBm
5.3.3.6 Repeat steps 5.3.3.3 to 5.3.3.5 with the DUT preamp off.
5.3.3.7 Reduce the Generator Output to –110 dBm. Repeat paragraphs 5.3.3.4 and 5.3.3.5 for any other applicable
FM filters.
NOTE: The following tests are only performed if quieting is specified by the manufacturer. Repeat these tests for all
applicable bandwidths and preamp settings.
10 dB Quieting
5.3.3.8 Reduce the Generator Output to -110 dBm and reset the step attenuators if necessary to 0 dB. Set the
Audio/Distortion meter to REL LEVEL and the RF Generator FM modulation button to OFF.
5.3.3.9 Set the Generator RF button to OFF. Adjust the INPUT RANGE and the RELATIVE ADJUST controls for a
reading of -3 dB on the audio meter. Rotate the INPUT RANGE control 1 detent CCW. Gradually increase the output
of the RF generator until the audio meter again indicates -3 dB (or a 10 dB decrease). The step attenuators may be
used as necessary to help achieve this reading.
5.3.3.10 Set the RF button to OFF and the INPUT RANGE control 1 detent CW. The meter should return to -3 dB.
Return the RF switch to ON and rotate the INPUT RANGE control 1 detent CCW. The meter should again indicate -3
dB. Record the input level to the DUT in 5.3.3.10 of the Data Sheet.
20 dB Quieting

44
5.3.3.11 Set the RF button to OFF. Adjust the INPUT RANGE and the RELATIVE ADJUST controls for a reading of
-3 dB on the audio meter. Rotate the INPUT RANGE control 2 detents CCW. Gradually increase the output of the
RF generator until the audio meter again indicates -3 dB (or a 20 dB decrease). The step attenuators may be used as
necessary to help achieve this reading.
5.3.3.12 Set the RF button to OFF and the INPUT RANGE control 2 detent positions CW. The meter should return to
-3 dB. Return the RF button to ON and rotate the INPUT RANGE control 2 detent positions CCW. The meter should
again indicate -3 dB. Record the input level to the DUT in 5.3.3.12 of the Data Sheet.
5.3.3.13 Repeat paragraphs 5.3.3.3 to 5.3.3.7 for the following frequencies, as applicable to the DUT:
5.4 RECEIVE FREQUENCY RANGE TEST
5.4.1 The purpose of the Receive Frequency Range Test determine both the practical receive frequency range as well
as the absolute maximum frequency range limits.
5.4.2 Test hook-up (See Fig. 5-4)
5.4.2.1 With all power switches in the OFF position, the transmitter function disabled to the fullest extent possible and
the Generator RF switch OFF, connect the following:
Connection Connectors Cable Type
Signal Gen OUTPUT to 10-dB Step Attn INPUT BNC to BNC 50-Ohm Coax
10-dB Step Attn OUTPUT to DUT RF INPUT BNC to As Required 50-Ohm Coax
DUT Audio Output to Dist/Audio Meter Input As Required to BNC 50-Ohm Coax
Connection Connectors Cable Type
8-Ohm Load/HI-Z Amp to Dist/Audio Meter Input As Required As Required
Power Source to DUT Power Input As Required As Required
RF SIGNAL
GENERATOR
MARCONI 2041
10 dB STEP
ATTENUATOR
HP 355D
1 dB STEP
ATTENUATOR
HP 355C
DUT
RECEIVER
AUDIO/
DISTORTION
METER
HP 339A
HI-Z
MONITOR AMP
Fig. 5-4 ── Receive Frequency Range Test Hook-up

45
5.4.3 Test Procedure
5.4.3.1 Turn the DUT and all test equipment power switches to ON. Set the following controls:
Instrument Control Position
DUT Mode CW
Band Selector Lowest Available
Frequency Lowest Available
XMIT/RCV RCV
DRIVE or RF LEVEL Minimum
IF Filters 500 Hz or Closest Available
AGC OFF
Preamplifier OFF
10 dB Step Attn Attenuator 10 dB
RF Generator CARRIER FREQ Same as DUT
RF LEVEL –110 dBm
CARR ON-OFF OFF
AM Off
FM Off
NOISE MODE LOW NOISE
Audio/Distortion Meter FUNCTION REL LEVEL
RELATIVE ADJUST Center Rotation
FILTERS All Off (Out)
INPUT RANGE 30 V
INPUT/GND SELECT DIS (Center)
METER RESPONSE NORM
5.4.3.2 Receiver hiss should be heard. Adjust the volume of the DUT and HI-Z monitor amp to the desired level.
Allow all equipment at least 10 minutes warm-up time before proceeding to step 5.4.3.3.
5.4.3.3 Tune the receiver for the minimum frequency possible. Verify useful sensitivity by performing an MDS test
and record results in 5.4.3.2 of the Data Sheet. If useful sensitivity is not achieved, increase frequency and repeat until
useful sensitivity is obtained. Perform an MDS test the DUT’s specified limit if other than the lowest possible
frequency.
NOTE: Useful sensitivity is somewhat ambiguous. In general terms, a receiver with less than about –100 dBm MDS
sensitivity is probably marginal. Anything less than that is usually not practical for most applications.
5.4.3.4 Tune the receiver to the minimum frequency possible. Note and record any frequencies not being received by
or not included in the tuning range of the DUT.
5.4.3.5 Repeat step 5.4.3.3 for the highest possible frequency. Reduce the as required for useful sensitivity and
perform an MDS test at the maximum specified frequency.
NOTE: For amateur equipment, always check for reception in the cellular bands at 824-849 and 869-894 MHz.

46
5.5 FIRST IF AND IMAGE REJECTION TEST
5.5.1 The purpose of the first IF and Image Rejection Test is to determine the level of signal input to the receiver at the
first IF and Image frequencies that will produce an audio output equal to the MDS level. The test is conducted with
the receiver in the CW mode using the 500 Hz, or closest available, IF filters. Any audio filtering is disabled and the
AGC is set to the OFF position if possible. The test is performed with the DUT tuned to 14.020 MHz.
5.5.2 Test hook-up (See Fig. 5-5)
5.5.2.1 With all power switches in the OFF position, the transmitter function disabled to the fullest extent possible and
the Generator RF switch OFF, connect the following:
Connection Connectors Cable Type
Signal Gen OUTPUT to 10-dB Step Attn INPUT BNC to BNC 50-Ohm Coax
10-dB Step Attn OUTPUT to DUT RF INPUT BNC to As Required 50-Ohm Coax
DUT AUDIO OUTPUT to Dist/Audio Meter IN As Required to BNC 50-Ohm Coax
8-Ohm Load/HI-Z Amp Across Dist/Audio As Required As Required
Meter Input
Power Source to DUT Power Input As Required As Required
RF SIGNAL
GENERATOR
MARCONI 2041
10 dB STEP
ATTENUATOR
HP 355D
1 dB STEP
ATTENUATOR
HP 355C
DUT
RECEIVER
AUDIO/
DISTORTION
METER
HP 339A
HI-Z
MONITOR AMP
Fig. 5-5 ── IFAnd Image Test Hook-up

47
5.5.3 Test Procedure
5.5.3.1 Turn the DUT and all test equipment power switches to ON. Set the following controls:
Instrument Control Position
DUT Mode CW
Band Selector 20 Meters
Frequency 14.020 MHz
XMIT/RCV RCV
DRIVE or RF LEVEL Minimum
IF Filters 500 Hz or Closest Available
AGC OFF
Preamplifier OFF
10 dB Step Attn Attenuator 10 dB
RF Generator CARRIER FREQ DUT 1st IF
RF LEVEL –80 dBm
CARR ON-OFF ON
AM Off
FM Off
NOISE MODE LOW NOISE
Audio/Distortion Meter FUNCTION REL LEVEL
RELATIVE ADJUST Center Rotation
FILTERS All Off (Out)
INPUT RANGE 30 V
INPUT/GND SELECT DIS (Center)
METER RESPONSE NORM
5.5.3.2 Receiver hiss should be heard. Adjust the volume of the DUT and HI-Z monitor amp to the desired level.
Allow all equipment at least 10 minutes warm-up time before proceeding to step 5.5.3.3.
5.5.3.3 Verify the RF Generator Output frequency has remained at the DUT 1st IF. Reset if necessary.
5.5.3.4 Tune the receiver for 14.020 MHz. Rotate the Generator OUTPUT LEVEL control as required until the signal
is just heard in the receiver. Adjust the INPUT RANGE and RELATIVE ADJUST controls as required to maintain
approximately a midscale meter indication while carefully tuning the Generator CARRIER FREQ control for peak
signal response.
5.5.3.5 Set the RF Generator RF switch to OFF. Decrease the Audio Meter INPUT RANGE until the meter indication
is near mid-scale and the two lights above this control are out. Adjust the audio meter RELATIVE ADJUST control
until the audio meter reads –6 dB on the upper scale. (Adjust the INPUT RANGE control one step in either direction
if necessary.)
5.5.3.6 Set the RF Generator RF switch to ON. Rotate the generator OUTPUT LEVEL control to produce an audio
meter reading of –3 dB. Ensure that the Generator CARRIER FREQ control is tuned for peak response.
5.5.3.7 Set the RF Generator RF to OFF. The audio meter should return to –6 dB. Turn the RF back on and the meter
should again indicate -3 dB.
5.5.3.8 Determine the IF level of the receiver by computing the sum of the RF generator output in dBm and the 10 dB
step attenuator. (NOTE: Be sure to include any additional attenuation you may have included in the line between the

48
generator and the DUT.) Find the difference in dB from the 20 Meter MDS (with preamp off) previously measured in
the test battery. Record on the Data Sheet.
Example: a) The RF generator is set for –36.1 dBm output.
b) The step attenuators are set for –10 dB.
c) The receiver IF rejection level, therefore, is:
–36.1 - 10 = –46.1 dBm
d) If we measured the noise floor to be –138.6 dBm
in the Noise Floor Test, then the IF rejection is:
–46.1 dBm - (–138.6 dBm) = 92.5 dB
5.5.3.9 Repeat steps 5.5.3.4 to 5.5.3.8 with DUT preamplifier set to ON.
5.5.3.10 Calculate the first IF image frequency as follows:
14.020 MHz +/- (2 X IF in MHz) = Image Frequency in MHz
Note there are two potential image frequencies if the 1st IF is less than 7.010 MHz Check BOTH frequencies for a
response and record the appropriate one in 5.5.10 of the Data Sheet.
5.5.3.11 Tune the receiver for 14.020 MHz. Rotate the Generator OUTPUT LEVEL control as required until the
signal is just heard in the receiver. Tune the Signal Generator to the other potential image frequency calculated in step
5.5.3.10. Compare the DUT response between the two input frequencies and set the Generator to the frequency that
result in the greatest output response. Reduce the generator to provide an approximately the MDS level at the image
frequency.
5.5.3.12 Adjust the INPUT RANGE and RELATIVE ADJUST controls as required maintaining approximately a mid-
scale meter indication while carefully tuning the Generator CARRIER FREQ control for peak signal response.
Increase the generator output level if necessary.
5.5.3.13 Set the RF Generator RF switch to OFF. Decrease the Audio Meter INPUT RANGE until the meter
indication is near mid-scale and the two lights above this control are out. Adjust the audio meter RELATIVE ADJUST
control until the audio meter reads –6 dB on the upper scale. (Adjust the INPUT RANGE control one step in either
direction if necessary.)
5.5.3.14 Set the RF Generator RF switch to ON. Rotate the generator OUTPUT LEVEL control to produce an audio
meter reading of –3 dB. Ensure that the Generator CARRIER FREQ control is tuned for peak response.
5.5.3.15 Set the RF Generator RF to OFF. The audio meter should return to -6 dB. Turn the RF back on and the
meter should again indicate –3 dB. Record the Signal Generator output in 5.5.3.7 of the data Sheet and calculate the
Image Rejection as follows:
Example: a) The RF generator is set for –59.6 dBm output.
b) The step attenuators are set for –10 dB.
c) The receiver image rejection level, therefore, is: –59.6 - 10 = –69.6 dBm
d) If we measured the noise floor to be -138.6 dBm in the previous
Noise Floor Test, the image rejection is: –69.6 dBm - (–138.6 dBm) = 69.0 dB
5.5.3.16 Reset the generator output level to –80 dBm. Repeat steps 5.5.3.13 to 5.5.3.15 with the DUT preamplifier set
to ON.

49
5.6 ANTENNA PORT ISOLATION TEST
(For Receivers with multiple antenna ports only)
5.6.1 The purpose of this test is to determine the level of isolation between antenna ports with receivers having
multiple antenna ports. A comparison in MDS sensitivity is made between an unused and used antenna port. The test
is conducted with the receiver in the CW mode using the 500 Hz, or closest available, IF filters. Any audio filtering is
disabled and the AGC is set to the OFF position if possible. The test is performed with the DUT tuned to 14.020 MHz.
5.6.2 Test hook-up (See Fig. 5-6)
5.6.2.1 With all power switches in the OFF position, the transmitter function disabled to the fullest extent possible and
the Generator RF switch OFF, connect the following:
Connection Connectors Cable Type
Signal Gen OUTPUT to 10-dB Step Attn INPUT BNC to BNC 50-Ohm Coax
10-dB Step Attn OUTPUT to DUT RF INPUT #1 BNC to As Required 50-Ohm Coax
DUT AUDIO OUT to Dist/Audio Meter IN As Required to BNC 50-Ohm Coax
8-Ohm Load/HI-Z Amp Across Dist/Audio As Required As Required
Meter Input
Power Source to DUT Power Input As Required As Required
RF SIGNAL
GENERATOR
MARCONI 2041
10 dB STEP
ATTENUATOR
HP 355D
1 dB STEP
ATTENUATOR
HP 355C
DUT
RECEIVER
AUDIO/
DISTORTION
METER
HP 339A
HI-Z
MONITOR AMP
Fig. 5-6 Antenna Port Isolation Test Hook-Up
5.6.3 Test Procedure
5.6.3.1 Turn the DUT and all test equipment power switches to ON. Set the following controls:
Instrument Control Position
DUT Mode CW
Band Selector 20 Meters
Frequency 14.020 MHz
IF Filters 500 Hz or Closest Available
AGC OFF
Preamplifier OFF
10 dB Step Attn Attenuator 10 dB

50
RF Generator CARRIER FREQ 14.020 MHz
RF LEVEL –80 dBm
NOISE MODE LOW NOISE
Audio/Distortion Meter FUNCTION REL LEVEL
RELATIVE ADJUST Center Rotation
FILTERS All Off (Out)
INPUT RANGE 30 V
INPUT/GND SELECT DIS (Center)
METER RESPONSE NORM
5.6.3.2 Receiver hiss should be heard. Adjust the volume of the DUT and HI-Z monitor amp to the desired level.
Allow all equipment at least 10 minutes warm-up time before proceeding to step 5.6.3.3.
5.6.3.4 Tune the receiver for 14.020 MHz. Rotate the Generator OUTPUT LEVEL control as required until the signal
is just heard in the receiver. Adjust the INPUT RANGE and RELATIVE ADJUST controls as required to maintain
approximately a mid-scale meter indication while carefully tuning the Generator CARRIER FREQ control for peak
signal response.
5.6.3.5 Set the RF Generator RF switch to OFF. Decrease the Audio Meter INPUT RANGE until the meter indication
is near mid-scale and the two lights above this control are out. Adjust the audio meter RELATIVE ADJUST control
until the audio meter reads –6 dB on the upper scale. (Adjust the INPUT RANGE control one step in either direction
if necessary.)
5.6.3.6 Set the RF Generator RF switch to ON. Rotate the generator OUTPUT LEVEL control to produce an audio
meter reading of –3 dB. Ensure that the Generator CARRIER FREQ control is tuned for peak response. Results
should be similar to the previously measured 20 meter MDS measured in Test 5.1. Now remove the RF Input cable
from RF Input #1 and connect it to RF Input #2. Increase the Generator RF LEV Control until the meter once again
shows a 3 dB increase.
5.6.3.7 Set the RF Generator RF to OFF. The audio meter should return to –6 dB. Turn the RF back on and the meter
should again indicate –3 dB.
5.6.3.8 Determine the Antenna Port Isolation by computing the difference between the two MDS measurements (in
dBm). Record on the Data Sheet if deemed unsatisfactory by the test engineer.
5.6.3.9 Repeat steps 5.6.3.5 and 5.6.3.6 for preamp on and any other antenna port combinations deemed appropriate
by the test engineer.

51
5.7 BLOCKING GAIN COMPRESSION
5.7.1 The purpose of the Blocking Gain Compression Test is to determine the level of gain compression, or
desensitization that occurs as a result of another signal on a nearby frequency. The blocking gain compression is the
difference between the level of the noise floor and the level of undesired signal that produces a 1 dB decrease of audio
in a weak desired signal. Frequencies of 3.520 MHz, 14.020 MHz, 50.020 MHz, 144.020 MHz and 432.020 MHz are
used for this test as appropriate for the DUT. The calculation is as follows:
Blocking Gain Compression = Blocking Level - Noise Floor (MDS level, expressed in dBm)
5.7.2 Test hook-up (See Fig. 5-7)
5.7.2.1 With all power switches in the OFF position, the transmitter function disabled to the fullest extent possible
and the Generator RF switch OFF, connect the following:
Connection Connectors Cable Type
----------------------------------------------------------------------------------------------------------------------
Signal Gen 1 output to Hybrid Combiner input 1 BNC to BNC 50-Ohm Coax
Signal Gen 2 output to Hybrid Combiner input 2 BNC to BNC 50-Ohm Coax
Hybrid Combiner output to 10-dB Step Atten. input BNC to BNC 50-Ohm Coax
10-dB Step Attn output to 1-dB Step Attn input BNC to BNC 50-Ohm Coax
1-dB Step Attn OUTPUT to DUT RF INPUT BNC to As Required 50-Ohm Coax
-----------------------------------------------------------------------------------------------------------------------
DUT Audio OUTPUT to Dist/Audio Meter input As Required to BNC 50-Ohm Coax
DUT Audio Output to Signal Analyzer BNC to BNC 50-Ohm Coax
8 Ohm Load/HI-Z Amp Across Dist/Audio As Required As Required
Meter INPUT
Generator #1
Desired
Frequency
-107 dBm
Generator #2
Blocking
Frequency
Vary (dBm)
Hybrid
Combiner
10 dB
Attenuator
1 dB
Attenuator
HI-Z Monitor
Speaker
HP-3561A
Signal
Analyzer
DUT
At Desired
Frequency
Fig. 5-7 ── Blocking Dynamic Range Test Hook-up

52
5.7.3 Test Procedure
5.7.3.1 Turn the DUT and all test equipment power switches to ON. Set the following controls:
Instrument Position Control
DUT Mode CW
Band Selector 3.520 MHz
XMIT/RCV RCV
DRIVE or RF LEVEL Minimum
IF Filters Closest Available to 500 Hz
Any Audio Filtering Disabled
AGC OFF
VOLUME Lowest Possible Setting
10-dB Step Attn Attenuator 0 dB
1-dB Step Attn Attenuator 0 dB
RF Generator #1 CARRIER FREQ 3.520 MHz
RF LEVEL –107 dBm
CARR ON-OFF ON
NOISE MODE (UTIL) LOW NOISE
RF Generator #2 CARRIER FREQ 3.500 MHz
RF LEVEL –100 dBm
CARR ON-OFF ON
NOISE MODE (UTIL) LOW NOISE
Audio/Distortion Meter FUNCTION REL LEVEL
RELATIVE ADJUST Center Rotation
FILTERS All OFF (Out)
INPUT RANGE 30 V
INPUT/GND SELECT DIS (Center)
METER RESPONSE NORM
Signal Analyzer CENTER FREQUENCY 600 Hz
RANGE 10 dBv
VERTICAL SCALE -10 dBv
SPAN 100 Hz
PEAK TRACK ON
5.7.3.2 Receiver hiss should be heard. Turn the volume level all the way down. Allow all equipment at least 10
minutes warm-up time before proceeding to step 5.7.3.3.
5.7.3.3 Verify generator #1 and generator #2 are still set for 3.520 MHz and 3.500 MHz, respectively. Set Generator
#2 RF switch to OFF.
5.7.3.4 Tune the receiver for 3.520 MHz. Ensure Generator #1 RF Level is set to -107 dBm. Adjust receiver volume
control, turning slowly until the desired signal is barely heard in the monitor speaker (high speaker levels will damage
the Signal Analyzer!). Adjust the INPUT RANGE and REL ADJUST as required to maintain approximately a mid-
scale meter indication while carefully tuning the receiver for peak signal response on the meter.

53
5.7.3.5 Check the Signal Analyzer for a pip and adjust the DUT volume level for a relative reading of -50 dBv on the
scale. Make a note of the exact reading as displayed; ex: Y= -50.23 dB. Re-adjust the INPUT RANGE for a mid scale
reading on the distortion meter. From this point on, the mid-scale reading on the distortion meter will be used for
quick reference for adjustment of the volume control only. NOTE: Do not exceed 0 dBm into the HP-3561A Signal
Analyzer or damage may result to its input circuits. Start each adjustment with the DUT volume down, turning it up
slowly.
5.7.3.6 Determine the 1 dB reduction point (blocking level) by Switching Generator #2 to ON and increase the RF
LEVEL to a point where a 1 dB decrease in audio is observed on the Signal Analyzer. Ex: Y= -50.23 dB with GEN #2
OFF and Y= -51.23 dB with GEN #2 ON and at the blocking level. An increase of noise level is likely, especially at 5
and 2 kHz spacing. Reduce the SPAN on the signal analyzer to 10, 5 or as low as 2 Hz, as needed, to separate the
desired signal from the back round noise. (It may take several minutes for the Signal Analyzer to read the relative
audio level, with the SPAN set to a narrow bandwidth, each time the blocking signal level is changed)
Record the value of the blocking level (Generator #2 level + 3 dB combiner loss = blocking level in dBm) in 5.7.3.5
of the Data Sheet. Be sure to account for the hybrid combiner and any step attenuator losses.
EX: (+5.6 dBm Blocking Signal) + (-3 dBm combiner loss)) = +2.6 dBm = Blocking Level
NOTE: Certain SDR receivers use direct conversion and an analog to digital converter (ADC). The blocking level
may be a few decibels past the point where ADC clipping occurs and may be well above 0 dBm. Do not exceed +10
dBm into DUT.
5.7.3.7 Repeat the above steps for Generator #2 set to 3.540 MHz, then at 5 and 2 kHz above and below the desired
frequency, then repeat steps with Generator #1 set to: 14.020, 50.020 and 432.020 MHz. Record on data sheet.
5.7.3.8 Repeat paragraphs 5.7.3.2 to 5.7.3.7 for 20 kHz spacing above and below the desired frequency with the DUT
preamp ON. If the DUT has more than one preamp setting, test all settings and record on the data sheet.

54
5.7A RECIPROCAL MIXING TEST
5.7A.1 The purpose of the Phase Noise Test is to determine the level of noise generated by the reciprocal
mixing of the DUT due to nearby strong signals. This test, along with Blocking Gain Compression, shows
clearly how well a receiver performs with strong RF signals on nearby frequencies. A 14.025 MHz crystal
controlled oscillator at +15 dBm, with low phase distortion and noise, is connected to the DUT RF input.
The receiver is tuned to a series of nearby frequencies, 2, 5 & 20 kHz above and 2, 5 & 20 kHz below the
oscillator’s frequency. The oscillator attenuation is then reduced to a point where the level of noise is 3 dB
above the noise floor of the DUT. Reciprocal Mixing is calculated for each point by use of the following
equation:
Reciprocal Mixing (in dBc) = (MDS) – (Crystal Oscillator Level at the DUT input)
5.7A.2 Test hook-up, See Figure 5.7A
5.7A.2.1 With all power switches in the OFF position and the transmitter function disabled to the fullest
extent possible, connect the following:
Connection Connectors Cable Type
----------------------------------------------------------------------------------------------------------------------
Low Noise Osc OUTPUT to 10-dB Step BNC to BNC 50 Ohm Coax
Attn INPUT
------------------------------------------------------------------------------------------------------------------------
10-dB Step Attn OUTPUT to 1-dB Step BNC to BNC 50 Ohm Coax
Attn INPUT
1 dB Step Attn OUTPUT to DUT RF INPUT BNC to As Required 50 Ohm Coax
DUT AUDIO OUTPUT to Dist/Audio As Required to BNC 50 Ohm Coax
Meter INPUT
8 Ohm Load/HI-Z Amp Across Dist/Audio As Required As Required
Meter INPUT
Power Source to DUT Power Input As Required As Required
Power Source to Crystal Oscillator As Required As Required

55
5.7A.3 Test Procedure
5.7A.3.1 Turn the DUT and Audio Distortion Meter power switches to ON. Set the following controls:
Instrument Control Position
DUT Mode CW
Band Selector 20 Meters
XMIT/RCV RCV
DRIVE or RF LEVEL Minimum
IF Filters Same as MDS Test (5.1)
10-dB Step Attn Attenuator –100 dB
1-dB Step Attn Attenuator 0 dB
Low Noise Oscillator ON/OFF Switch OFF
Audio/Distortion Meter FUNCTION REL LEVEL
RELATIVE ADJUST Center Rotation
FILTERS All OFF (Out)
INPUT RANGE 30 V
INPUT/GND SELECT DIS (Center)
METER RESPONSE NORM
5.7A.3.2 Receiver hiss should be heard. Adjust the volume to the desired level. Allow all equipment at
least 10 minutes warm-up time before proceeding to step 6.5.3.3.
13.6
Volts
DC
Low Noise
Crystal
Oscillator
14.025 MHz
10 dB Step
Attenuator
10 dB Step
Attenuator
1 dB Step
Attenuator
DUT
HP-339
Distortion
Meter
DUT
HI-Z
Monitor
AMP Figure 5.7A: Reciprocal Mixing Hook-Up

56
5.7A.3.3 Tune the receiver for 14.025 MHz. Decrease the 10 dB Step Attenuator, one step at a time, until
the signal is just heard in the receiver. Adjust the INPUT RANGE control as required to maintain
approximately a midscale meter indication while carefully tuning the receiver for peak signal response.
Tune the DUT receiver down 20 kHz from the point of peak response.
5.7A.3.4 Turn the Low Noise Oscillator switch to OFF. Set the meter REL ADJUST and INPUT RANGE
controls for –6 dB. Turn the Low Noise Oscillator Switch to ON. Carefully decrease the Step Attenuators
for a meter indication of –3 dB. Calculate the input to the DUT, in dBm, by subtracting the step attenuator
settings from the +15 dBm output of the oscillator. Record on the Data Sheet.
5.7A.3.5 Continue to tune the DUT up to the following frequencies and repeat step 6.5.3.4. (NOTE: It is
unnecessary to continue this procedure beyond the point that 3 dB of noise above MDS can no longer be
achieved.)
14.020 MHz---Peak Response - 5 kHz (Completed in step 6.5.3.4)
14.023 MHz---Peak Response - 2 kHz
14.027 MHz---Peak Response + 2 kHz
14.030 MHz---Peak Response + 5 kHz
14.045 MHz---Peak Response + 20 kHz
5.7A.3.6 Calculate Reciprocal Mixing for each test frequency by use of the following equation:
Reciprocal Mixing (in dBc) = (MDS) – (Crystal Oscillator Level at the DUT input)
Record all results on the Data Sheet.
5.7A.3.7 The above steps can be repeated, substituting the IFR-2041 Signal Generator for the crystal
oscillator on 3.502 MHz, provided that the Generator is set for low noise mode.
NOTE: Direct Conversion Receivers contain Analog to Digital Converters which may have little or no
reciprocal mixing up to the point of ADC Clipping. Reciprocal Mixing should be reported as:
Reciprocal Mixing = > (MDS) – (threshold level of ADC Clipping)
EX: MDS = -126 dBm
ADC Clipping = +0.2 dBm
RM = -126 – (+0.2) = 126.2 dBc
We report “better than” –126 dBc

57
5.8 TWO-TONE 2ND AND 3RD ORDER DYNAMIC RANGE TEST
5.8.1 The purpose of the Two-Tone Dynamic Range Test is to determine the range of signals that can be tolerated by
the DUT while producing essentially no undesired spurious responses. To perform the 3rd Order test, two signals of
equal amplitude and spaced 20 kHz apart, are injected into the input of the receiver. If we call these frequencies f1 and
f2, the third-order products will appear at frequencies of (2f1-f2) and (2f2-f1). Similarly, the 2nd order test also requires
two input signals of equal amplitude. The product, however, appears at a frequency of (f1+f2). The intercept points are
calculated for each test point. This test is performed on 3.5 MHz, 14 MHz, 50 MHz, 144 MHz and 432 MHz as
appropriate for the DUT. Additional tests are performed at various frequencies and spacing for the expanded set of
tests (see data sheet).
5.8.2 Test hook-up (See Fig. 5-8)
NOTE: If proceeding from the previous Blocking Dynamic Range Test, no hook-up changes are required.
RF Generator 1: Marconi 2041
RF Generator 2: IFR 2041
RF Generator 3: Rohde & Schwarz CMT 54
“Grey Amp”: Synergy Microwave low noise, wideband amplifier
5.8.2.1 With all power switches in the OFF position and the transmitter function disabled to the fullest extent possible,
connect the following:
Connection Connectors Cable Type
Signal Gen 1 output to input of Grey Amp #1 BNC to BNC 50-Ohm Coax
Signal Gen 2 output to input of Grey Amp #2 BNC to BNC 50-Ohm Coax
Grey Amp #1 output to Hybrid Combiner input BNC to BNC 50-Ohm Coax
Grey Amp #2 output to Hybrid Combiner input BNC to BNC 50-Ohm Coax
Grey
RF AMP
RF GEN
#1
13.980
MHz
1 dB
Step
Attn
10 dB
Step
Attn
Grey
RF AMP
HP-
3561A
Signal
Analyzer
Hybrid
Combiner
Hybrid Combiner
RF GEN
#3
14.020
MHz
RF GEN
#2
14.000
MHz
Distortion
Meter
DUT
14.020
MHz
HI-Z
MON
SPKR
FIGURE 5.8. Second & Third order IMD Dynamic Range Hook-up

58
Hybrid Combiner output to 10-dB Step Attn input BNC to BNC 50-Ohm Coax
10-dB Step Attn output to 1-dB Step Attn input BNC to BNC 50-Ohm Coax
1-dB Step Attn output to Hybrid Combiner input BNC to BNC 50-Ohm Coax
Signal Generator #3 to Hybrid Combiner input BNC to BNC 50-Ohm Coax
Hybrid Combiner output to DUT RF input BNC to as required 50-Ohm-Coax
DUT audio output to Dist/Audio Meter input As Required to BNC 50-Ohm Coax
DUT to HP-3156A Signal Analyzer BNC to BNC 50-Ohm Coax
8 Ohm Load Across Dist/Audio Meter input As Required As Required
Power Source to DUT Power Input As Required As Required
5.8.3 Test Procedure
5.8.3.1 Turn the DUT and all test equipment power switches to ON. Set the following controls:
Instrument Control Position
DUT Mode CW
Band Selector 20 Meters
Frequency 14.020 MHz
XMIT/RCV RCV
DRIVE or RF LEVEL Minimum
IF Filters Closest Available to 500 Hz
DUT Audio Filter(s) Disabled
AGC ON
10-dB Step Attn Attenuator 110 dB
1-dB Step Attn Attenuator 0 dB
RF Generator #1 CARRIER FREQ 13.980MHz
RF LEVEL –18 dBm
CARR ON-OFF OFF
NOISE MODE (UTIL) LOW NOISE
RF Generator #2 CARRIER FREQ 14.000 MHz
RF LEVEL –18 dBm
CARR ON-OFF OFF
NOISE MODE (UTIL) LOW NOISE
RF Generator #3 CARRIER FREQ 14.020 MHz
RF LEVEL -97 dBm
CARR ON-OFF OFF

59
Signal Analyzer CENTER FREQUENCY 600 Hz
RANGE 10 dBv
VERTICAL SCALE -10 dBv
SPAN 100 Hz
PEAK TRACK ON
Audio/Distortion Meter FUNCTION REL LEVEL
RELATIVE ADJUST Center Rotation
FILTERS All OFF (Out)
INPUT RANGE 30 V
INPUT/GND SELECT DIS (Center)
METER RESPONSE NORM
HI-Z Monitor Amp Speaker
5.8.3.2 Receiver hiss should be heard. Adjust the volume to the lowest possible setting. Allow all equipment at least
10 minutes warm-up time before proceeding to step 5.8.3.3.
5.8.3.3 Verify RF generators #1, #2 and #3 are still set for 13.980, 14.000 and 14.020 MHz, respectively. ALL
CARR ON-OFF controls must be in the OFF position before proceeding to the next step.
IMPORTANT NOTE: Before proceeding, it is imperative to insure that both Grey RF amps have the same output of
0 dBm at the output of the Hybrid Combiner. Check the outputs buy hooking up a BCN to BNC cable from the
combiner output to the HP-8563E spectrum analyzer, making sure the two signals are equal and at 0 dBm. Adjust the
output control on each Grey amp if needed.
5.8.3.4 Set Generator #3 to CARR OFF-ON to ON. Turn up the DUT volume so it is just heard in the HI-Z monitor
amp. Tune the receiver for peak response at 14.020 MHz. Decrease the audio meter INPUT RANGE control until the
meter indication is near mid scale. (The two lights just above the RANGE Control should go out.) Check to make sure
the Generator level is adjusted to -94 dBm, which is a -97 dBm (S5) level at the combiner output.
5.8.3.5 Look for a PIP on the Signal Analyzer. This is the desired signal. Center pip if needed. Adjust the DUT
volume so it is close to -50 dB on the scope. Set the audio meter RELATIVE ADJUST control until meter reads –6 dB
(upper scale). Adjust the INPUT RANGE switch as required to achieve this indication. From this point on, The audio
meter is used as a handy reference for adjusting the DUT volume. Do NOT exceed 0 dBm at the input to the Signal
Analyzer, or damage to its input circuits will result. Always start each measurement with the volume down.
5.8.3.6 Turn both the generators #1 & #2 CARR ON-OFF switches to ON. Slowly turn up the 10 dB step attenuator
until a second PIP appears on the Signal Analyzer. This is the IMD signal. With peak tracking on, make both pips on
the screen equal by adjusting the step attenuators. When both are equal, the IMD level is what the attenuators are set
to, plus 3 dB of the combiner loss. Example: Attenuators are set to 26 dB. The IMD level would be -26 dB + 3 dB.
Record the IMD level on the data sheet.
5.8.3.7 Repeat steps 5.8.3.4 to 5.8.3.7, but with Generator #1 & 2 set for 14.010 & 14.015 MHz respectively (5 kHz
spacing). Repeat steps having Generator 1 & 2 at 14.016 & 14-018 MHz respectively (2 kHz spacing). Repeat steps for
2, 5 & 20 kHz spacing above the desired frequency. Record on data sheet.
NOTE: Measurements at 5 and 2 kHz spacing may require reducing the bandwidth on the Signal Analyzer, especially
when Generator #3 is set to the MDS level (plus 3 dB) . When doing so, it will be necessary to put both pips on the
scope as close together as possible before reducing the bandwidth. This is accomplished by adjust either Generator #1
or Generator #2 by small fractions of a Hertz. Slowly adjust one of the generators while watching the IMD signal,
placing the IMD pip close to the desired signal pip. The SPAN may now be adjusted to a smaller bandwidth. (25 or 10
Hz works well).

60
5.8.3.8 Repeat the above IMD measurements, but with Generator #3 set to the MDS plus 3 dB. This results with an
MDS level at the combiner output. If the MDS is -126 dBm, set the generator to -123 dBm.
5.8.3.9 Repeat steps 5.8.3.4 and 5.8.3.7 for preamp for 20 kHz spacing above and below the desired signal. Repeat if
preamp has more than one setting. Return preamp to off.
5.8.3.10 Repeat IMD tests for the required frequencies and spacing shown on the data sheet.
5.8.3.11 Calculate the Two- Tone, Third Order IMD Dynamic Range for each data point.
3rd Order DR = MDS – IMD Level.
Example:
MDS = -126 dBm
IMD level = -26 dBm
3rd Order IMD DR = ( -126 dBm) – (-26 dBm) = 100 dB.
Calculate for each data point
5.8.3.12 Calculate the 3rd Oder Intercept Point (IP3) for each data point using the following formulas:
IP3 at MDS : (1.5)(IMD DR in dB)+(MDS in dB)
Example: IMD DR = 100 dB, MDS = -126 dBm
IP3 (at MDS) = (1.5)(100 dB) + (-126 dBm) = 24 dB
IP3 at S5: 3 X ( S5 IMD level)-(S5 Reference)
2
Example: IMD level = -15 dBm, S5 reference = -97 dBm
IP3 at S5 = 3 X ( -15 dBm) – (-97 dBm) = 26 dB 2
Record all IP3 data points on data sheet.
Second Order Two Tone IMD Test:
Gen 1 = 6.000 MHz, Gen 2 =8.020 MHz, DUT = 14.020 MHz, same procedure as above.
Second Order Intercept = 2 X (S 5 IMD level) – (S 5 level)
Example IMD level = -10 dBm
2Nd Order Intercept Point, S 5 level = 2(-10 dBm) – (-97 dBm) = +77 dBm
Record IP2 data point on data sheet.

61
5.9 FM ADJACENT-CHANNEL SELECTIVITY TEST
5.9.1 The purpose of the FM Adjacent Channel Selectivity Test is to measure the ability of the DUT receiver to reject
interference from individual undesired signals while receiving various levels of desired signal. The desired carrier
signal will be at 29.000 MHz, modulated at 1000 Hz, and the offending signal will be located at adjacent nearby
frequencies with 400 Hz modulation. (NOTE: The SINAD Test in 5.3 must be performed before this test can be
completed.)
5.9.2 Test hook-up (See Fig. 5-9)
NOTE: If proceeding from the previous Two-Tone 3rd-Order Dynamic Range Test, no hook-up changes are required.
Proceed directly to step 5.9.3.
5.9.2.1 With all power switches in the OFF position and the transmitter disabled, connect the following:
Connection Connectors Cable Type
Signal Gen 1 Output to Hybrid Combiner Input 1 BNC to BNC 50-Ohm Coax
Signal Gen 2 Output to Hybrid Combiner Input 2 BNC to BNC 50-Ohm Coax
Hybrid Combiner output to 10-dB Step Attn input BNC to BNC 50-Ohm Coax
10-dB Step Attn output to 1-dB Step Attn input BNC to BNC 50-Ohm Coax
1-dB Step Attn OUTPUT to DUT RF INPUT BNC to As Required 50-Ohm Coax
DUT Audio Output to Dist/Audio Meter input As Required to BNC 50-Ohm Coax
Connection Connectors Cable Type
8 Ohm Load/HI-Z Amp Across Dist/Audio Meter IN As Required As Required
Power Source to DUT Power Input As Required As Required
RF SIGNAL
GENERATOR
MARCONI 2041
10 dB STEP
ATTENUATOR
HP 355D
1 dB STEP
ATTENUATOR
HP 355C
DUT
RECEIVER
AUDIO/
DISTORTION
METER
HP 339A
HI-Z
MONITOR AMP
RF SIGNAL
GENERATOR
IFR 2041
HYBRID
COMBINER
TT 651
Fig. 5-9 ── FM Channel Selectivity Test Hook-up

62
5.9.3 Test Procedure
5.9.3.1 Turn the DUT and all test equipment power switches to ON. Set the following controls:
Instrument Control Position DUT Mode FM Band Selector 10 Meters XMIT/RCV RCV DRIVE or RF LEVEL Minimum IF Filters 15 kHz for FM Any Audio Filtering Disabled Preamp On 10-dB Step Attn Attenuator 0 dB 1-dB Step Attn Attenuator 0 dB RF Generator #1 CARRIER FREQ 29.000 MHz RF LEVEL –110 dBm NOISE MODE (UTIL) NORMAL CARR ON-OFF ON AM OFF FM ON FM DEVN 3 kHz Modulation Frequency 1000 Hz RF Generator #2 CARRIER FREQ 28.980 MHz RF LEVEL –110 dBm NOISE MODE (UTIL) NORMAL CARR ON-OFF OFF AM OFF FM ON FM DEVN 3 kHz Modulation Frequency 400 Hz Instrument Control Position Audio/Distortion Meter FUNCTION DIST DIST RANGE 30 % FREQUENCY 1.0 X 1K RELATIVE ADJUST Center Rotation FILTERS All OFF (Out) INPUT RANGE 30 V INPUT/GND SELECT DIS (Center) METER RESPONSE NORM
5.9.3.2 Receiver hiss should be heard. Adjust the volume to the desired level. Allow all equipment at least 10 minutes
warm-up time before proceeding to step 5.9.3.3.
5.9.3.3 Tune the receiver for 29.000 MHz. Increase the #1 generator RF LEVEL, if necessary, until the signal is just
heard in the receiver. Set the DUT volume control for a normal listening level, and carefully tune the receiver for
minimum distortion. This control should be set for approximately 1/4 to 3/4 of the maximum.
5.9.3.4 Set the #1 signal generator level to produce a 12 dB SINAD response in the DUT. The generator output
should be 16 dB greater than the level previously recorded in 5.3.3.5 of the Data Sheet during the initial SINAD test.
(The 16 dB accounts for the attenuator and combiner losses.) The meter should now indicate 25% distortion. Change
the DISTORTION RANGE to 100. Set the #2 signal generator RF switch to ON. Increase the output level of this
generator until the distortion meter indicates 50% distortion or 6 dB SINAD. Note the generator and attenuator
settings. Calculate the input signal level to the DUT and record in 5.9.3.4 of the Data Sheet.

63
5.9.3.5 Return generator and attenuator levels to their initial settings. Set the #2 generator to 29.020 MHz and set its
RF switch to OFF. Repeat step 5.9.3.4.
5.9.3.6 Repeat paragraphs 5.9.3.4 and 5.9.3.5 for the following bands as applicable to the DUT: 52 MHz,
146 MHz and 440 MHz.
5.9.3.7 Calculate the adjacent channel rejection of the DUT for each test point by subtracting the 12 dB SINAD level
in dBm from the 6 dB SINAD level in dBm measured in steps 5.9.3.4 and 5.9.3.5. Record in 5.9.3.9 of the Data Sheet.
Example: The 12 dB SINAD value measured in 5.3.3.6./5.3.3.7 = –113
The 6 dB SINAD level measured per this test = –68 dBm
Adjacent channel rejection = 6 dB SINAD - 12 dB SINAD = (–68 dBm) - (–113 dBm) = 45 dB
NOTE: The following step need only be performed if proceeding to the FM Two-Tone 3rd-Order Dynamic-Range
Test (5.10). The results will be used to determine phase noise limiting during this test.
5.9.3.8 Return generator and attenuator levels to their initial settings and turn the #2 Generator RF LEVEL and FM
switches to OFF. Repeat step 5.9.3.4 with the #2 generator still set for 29.020 MHz and with the FM switch still set to
OFF. Calculate the equivalent phase noise limit using the same equations as in step 5.9.3.6. This limit figure
represents the FM 2-tone, 3rd-order dynamic range of an unmodulated signal.
5.9.3.9 Repeat step 5.9.3.8 for the following bands as applicable to the DUT: 52 MHz, 146 MHz and 440
MHz.5.8.3.11 Calculate the Dynamic Range by subtracting the MDS noise floor from the IMD figure.
Example: Both RF generators are set at –14 dBm
The RF attenuators are set for –24 dB
The hybrid combiner loss is –6 dB
The receiver noise floor MDS is –135 dBm
IMD LEVEL = (–14 dBm) - 24 dB - 6 dB = –44 dBm
IMD Dynamic Range = IMD LEVEL - NOISE FLOOR = –44 dBm - (–135 dBm) = 91 dB
5.8.3.12 Calculate the Third Order Intercept Point for each applicable Dynamic Range as follows:
Third Order Intercept = (1.5)(IMD Dynamic Range in dB) + (MDS in dBm)
5.8.3.13 Calculate the Second Order Intercept Point using the applicable Dynamic Range as follows:
Second Order Intercept = (2)(2nd Order IMD Dynamic Range in dB) + (MDS @ 14.020 MHz in dBm)
Record on Data Sheet.
5.8.3.14 The preferred method for this test is to use S5 signal levels instead of MDS levels. First, use a signal
generator tuned to the DUT frequency to determine the S5 reference signal level for each of the frequencies of interest.
Note: The DUT’s AGC may need to be on in order to get an S-meter indication.
5.8.3.15 Perform the 2-Tone, 3rd-Order as specified above, but set the attenuators to provide an S5 indication on the
DUT for each of the IMD frequencies.
5.8.3.16 Calculate the 2nd and 3rd-Order intercept points as follows:
Third Order Intercept = (3 * (S5 IMD Level) - (S5 Reference)) / 2
Second Order Intercept = 2 * (S5 IMD Level) - (S5 Reference)

64
5.8.3.17 The results of this method should show close correlation with the intercept points determined by the MDS
test. If not, the test engineer determines (from the MDS and dynamic range data) which method provides the more
accurate result.
5.8.3.18 For the expanded set of tests, repeat this test on additional frequencies and spacing indicated on data sheet.
The swept IMD dynamic range test is performed on 14 MHz only and the data is typically presented in
graphical output form in the expanded test for a clear visual indication of the receiver’s blocking dynamic
range performance over a wide frequency span within the 14 MHz band.
5.8.3.19 Hook-up for higher-level measurements. With some high-performance transceivers, the necessary signal
levels for producing a 3rd order or 2nd order IMD response exceed the spurious-free range of the standard test
setup detailed in section 5.8.2. In these cases, the following alternate hook-up is used.
RF SIGNAL
GENERATOR
MARCONI 2041
HYBRID
COMBINER
TT 651
10 dB STEP
ATTENUATOR
HP 355D
DUT
RECEIVER
AUDIO/
DISTORTION
METER
HP 339A
HI-Z
MONITOR AMP SYNERGY
MICROWAVE
RF AMPLIFIER
SHL-2-12-01
10 dB FIXED
ATTENUATOR
MINI-CIRCUITS
CAT-10
SYNERGY
MICROWAVE
RF AMPLIFIER
SHL-2-12-01
10 dB FIXED
ATTENUATOR
MINI-CIRCUITS
CAT-10
RF SIGNAL
GENERATOR
IFR 2041
This hook-up should be used for generator levels above –14 dBm to prevent problems from test fixture IMD. The
Synergy Microwave amplifiers specified are 24V "ultra-linear" units that provide approximately 25 dB of gain up to
+29 dBm output for frequencies between 1 and 450 MHz.

65
5.10 FM TWO-TONE 3rd ORDER DYNAMIC RANGE TEST
5.10.1 The purpose of the FM Two-Tone 3rd Order Dynamic Range Test is to determine the range of signals that can
be tolerated by the DUT in the FM mode while producing no spurious responses greater than the SINAD level. To
perform this test, two signals, f1 and f2, of equal amplitude and spaced 20 kHz apart, are injected into the input of the
receiver. The signal located 40 kHz from the distortion product being measured is modulated at 1,000 Hz with a
deviation of 3 kHz. The DUT receiver is tuned to the Third Order IMD frequencies as determined by (2f1-f2) and
(2f2-f1). The input signals are then raised simultaneously by equal amounts until 25% distortion, or the 12 dB SINAD
point, is obtained.
5.10.2 Test hook-up (See Fig. 5-7)
NOTE: If proceeding from the previous FM Adjacent Channel Selectivity Test, no hook-up changes are required.
Proceed directly to step 5.10.3.
5.10.2.1 With all power switches in the OFF position and the transmitter function disabled to the fullest extent
possible, connect the following:
Connection Connectors Cable Type
Signal Gen 1 output to Hybrid Combiner input 1 BNC to BNC 50-Ohm Coax
Signal Gen 2 output to Hybrid Combiner input 2 BNC to BNC 50-Ohm Coax
Hybrid Combiner output to 10-dB Step input BNC to BNC 50-Ohm Coax
10-dB Step Attn output to 1-dB Step Attn input BNC to BNC 50-Ohm Coax
1-dB Step Attn output to DUT RF input BNC to As Required 50-Ohm Coax
DUT Audio Output to Dist/Audio Meter input As Required to BNC 50-Ohm Coax
8 Ohm Load/HI-Z Amp Across Dist/Audio As Required As Required
Dist/Audio Meter Input
Power Source to DUT Power Input As Required As Required
RF SIGNAL
GENERATOR
MARCONI 2041
10 dB STEP
ATTENUATOR
HP 355D
1 dB STEP
ATTENUATOR
HP 355C
DUT
RECEIVER
AUDIO/
DISTORTION
METER
HP 339A
HI-Z
MONITOR AMP
RF SIGNAL
GENERATOR
IFR 2041
HYBRID
COMBINER
TT 651
Fig. 5-10 ── FM Two-Tone, 3rd Order Dynamic Range Test Hook-up

66
5.10.3 Test Procedure 5.10.3.1 Turn the DUT and all test equipment power switches to ON. Set the following controls: Instrument Control Position DUT Mode FM Band Selector 10 Meters XMIT/RCV RCV DRIVE or RF LEVEL Minimum IF Filters Narrowest Available DUT Audio Filter(s) Disabled AGC OFF Preamp ON 10-dB Step Attn Attenuator 120 dB 1-dB Step Attn Attenuator 0 dB
RF Generator #1 CARRIER FREQUENCY 29.000 MHz
RF LEVEL –14 dBm
CARR ON-OFF ON
NOISE MODE1 NORMAL1
FM On
AM Off
FM DEVN 3 kHz
Modulation Frequency 1000 Hz
RF Generator #2 CARRIER FREQUENCY 29.020 MHz
RF LEVEL –14 dBm
CARR ON-OFF ON
NOISE MODE2 NORMAL1
FM On
AM Off
FM DEVN 3 kHz
Modulation Frequency 1000 Hz Audio/Distortion Meter FUNCTION DIST RELATIVE ADJUST Any FILTERS All OFF (Out) DISTORTION RANGE 30%/-10 dB INPUT RANGE 30 V INPUT/GND SELECT DIS (Center) METER RESPONSE NORM FREQUENCY 1.0 X 1 kHz OSCILLATOR Any
5.10.3.2 Receiver hiss should be heard. Adjust the volume to the desired level. Allow all equipment at least 10
minutes warm-up time before proceeding to step 5.10.3.3.
5.10.3.3 Verify RF generators #1 and #2 are still set for 29.000 and 29.020 MHz, respectively. Both CARR ON-OFF
controls must be in the ON position before proceeding to the next step. Set generator #1 FM switch to OFF.
5.10.3.4 Tune the receiver for the lower IMD frequency of 28.980 MHz. Decrease the attenuation of the step
attenuators until the signal is just heard in the receiver. Decrease the audio meter INPUT RANGE control until the
two lights just above the range switch go out. Tune the DUT for minimum distortion on the meter.
2 NOTE: 3 kHz deviation is not possible at a frequency of 29 MHz unless the signal generator is in the
Normal Noise Mode. Depress UTILITIES menu button for this setting.
67
5.10.3.5 Decrease the attenuator controls until the distortion meter indicates 25% distortion. Note all attenuator
settings and record receiver signal input level in 5.10.3.5 of the Data Sheet.
5.10.3.6 Set #2 generator FM switch to OFF and the #1 generator FM switch to ON. Tune the DUT to the upper IMD
frequency of 29.040 MHz and repeat paragraphs 5.10.3.3 to 5.10.3.5.
5.10.3.7 Calculate and record the 3rd order dynamic range in dBm for each IMD product as follows:
DYNAMIC RANGE = (IMD LEVEL) - (12 dB SINAD)
Example: Both RF generators are set at –14 dBm
The hybrid combiner loss is –3 dB
The attenuators are set for –24 dB
The 12 dB SINAD is –122.3 dBm
The IMD level = (–14 dBm) - 3 dB - 27 dB - (122.3 dBm) = 78.3 dB
Note: An FM 2-tone, 3rd-order dynamic range that is noise-limited will appear to be better than it actually is due to
the additional signal necessary to overcome the increased noise. If the calculated FM 2-tone, 3rd-order dynamic
range is greater than the phase noise limit determined by the adjacent channel selectivity test, then the actual
dynamic range is the phase noise limit figure and the measurement is noise-limited.
5.10.3.8 Repeat paragraphs 5.10.3.3 to 5.10.3.7 for the following frequency bands as applicable to the DUT:
52 MHz, 146 MHz and 440 MHz. Also perform this test at a spacing of 10 MHz on these bands.

68
5.11 AUDIO POWER OUTPUT TEST
5.11.1 The purpose of the Audio Power Output Test is to measure the audio output voltage developed by the DUT at
1,000 Hz. The manufacturer’s specified load and distortion is used for this test. If unspecified, the power is measured
with an 8 Ohm load at 10% distortion. The audio power is then calculated by the equation:
audio
2
= 8
PV
5.11.2 Test hook-up (See Fig. 5-8)
NOTE: 1) If proceeding from the previous FM Two-Tone 3rd Order Dynamic Range Test, only the hook-up changes
shown with a dotted line are required.
2) Do not use headphone audio output for this test. It will not develop full power.
5.11.2.1 With all power switches in the OFF position and the transmitter function disabled to the fullest extent
possible, connect the following:
Connection Connectors Cable Type
----------------------------------------------------------------------------------------------------------------------
Signal Gen output to 10-dB Step Attn input BNC to BNC 50-Ohm Coax
----------------------------------------------------------------------------------------------------------------------
10-dB Step Attn output to 1-dB Step Attn input BNC to BNC 50-Ohm Coax
1-dB Step Attn output to DUT RF input BNC to As Required 50-Ohm Coax
DUT Audio output to Dist/Audio Meter input As Required to BNC 50-Ohm Coax
Speaker Load/HI-Z Amp Across Dist/Audio As Required As Required
Meter INPUT (See Note 1)
Power Source to DUT Power Input As Required As Required
RF SIGNAL
GENERATOR
MARCONI 2041
10 dB STEP
ATTENUATOR
HP 355D
1 dB STEP
ATTENUATOR
HP 355C
DUT
RECEIVER
AUDIO/
DISTORTION
METER
HP 339A
HI-Z
MONITOR AMP
Fig. 5-11 ── Audio Power Output Test Hook-up
Load
Resistor

69
5.11.3 Test Procedure
5.11.3.1 Turn the DUT and all test equipment power switches to ON. Set the following controls:
Instrument Control Position
DUT Mode USB
AGC Enabled
Band Selector 20 Meters
Frequency Tune 14.200 MHz
XMIT/RCV RCV
DRIVE or RF LEVEL Minimum
IF Filters Widest Available
Any Audio Filter Disabled
10-dB Step Attn Attenuator 10 dB
1-dB Step Attn Attenuator 0dB
RF Generator FREQUENCY TUNE 14.200 MHz
OUT LEVEL –80 dBm
RF ON
AM OFF
FM OFF
Audio/Distortion Meter FUNCTION DIST
RELATIVE ADJUST Any
FILTERS All OFF (Out)
INPUT RANGE 30 V
DISTORTION RANGE 30%
INPUT/GND SELECT DIS (Center)
METER RESPONSE NORM
FREQUENCY 1.0 X 1 kHz
5.11.3.2 Receiver hiss should be heard. Adjust the volume to the desired level. Allow all equipment at least 10
minutes warm-up time before proceeding to step 5.8.3.3.
5.11.3.3 Select the appropriate speaker load resistor which matches the DUT audio output impedance.
511.3.4 Increase the generator OUTPUT LEVEL control, if necessary, until the signal is just heard in the receiver.
5.11.3.5 Tune the DUT for peak response on the receiver S meter. Increase the OUTPUT LEVEL control for an S9
signal.
5.11.3.6 Tune the DUT for approximately 1 kHz audio output. Carefully adjust the DUT tuning control so that both
lights above the FREQUENCY control should are out. Disconnect or turn-off the HI-Z amplifier to eliminate the
otherwise loud and unpleasant 1,000 kHz tone during this test.
5.11.3.7 Slowly increase the DUT audio gain until the meter indicates the manufacturer’s specified distortion. If
unspecified, increase the audio gain for a distortion of 10%. (If the distortion is under 10% at maximum volume, be
sure to note the maximum distortion level on the Data Sheet.)3
3
If the manufacturer specifies audio power output at other than 10% THD, or other than an 8 load, test to specified conditions.

70
5.11.3.8 Change the Meter FUNCTION control to INP LEVEL. Adjust the INPUT RANGE as necessary (over range
lights should be out.) Read the audio output voltage on the correct scale of the Distortion/Audio meter and record on
the Data Sheet.
5.11.3.9 Calculate the audio power using the following equation:
Paudio = V2/8 Also, record THD% with 1 Vrms Audio Level.
If the manufacturer’s specified load used for this test was other than 8 ohms, be sure to substitute the correct load
impedance when calculating power output. Record on the Data Sheet.
5.12 AUDIO AND IF FREQUENCY RESPONSE TEST
5.12.1 The purpose of the Audio and IF Frequency Response Test is to measure the audio frequencies at which the
receiver audio output drops by 6 dB from the peak signal response. The frequency response is then calculated by
taking the difference between the upper and lower frequency.
5.12.2 Test hook-up (See Fig. 5-12)
NOTE: If proceeding from the previous Audio Power Output Test, only the hook-up changes shown in the
diagram are required. Proceed to step 5.12.3.
5.12.2.1 With all power switches in the OFF position and the transmitter function disabled to the fullest extent
possible, connect the following:
Connection Connectors Cable Type
Signal Gen OUTPUT to 10 dB Step Attn INPUT BNC to BNC 50-Ohm Coax
10-dB Step Attn OUTPUT to 1-dB Step BNC to BNC 50-Ohm Coax
Attn INPUT
1-dB Step Attn OUTPUT to DUT RF INPUT BNC to As Required 50-Ohm Coax
DUT AUDIO OUTPUT to Dist/Audio As Required to BNC 50-Ohm Coax
Meter INPUT
Speaker Load to Oscilloscope Input As Required to BNC 50-Ohm Coax
Speaker Load/HI-Z Amp Across Dist/Audio As Required As Required
Meter INPUT
Power Source to DUT Power Input As Required As Required

71
5.12.3 Test Procedure
5.12.3.1 Turn the DUT and all test equipment power switches to ON. Set the following controls:
Instrument Control Position
DUT Mode USB
Band Selector 20 Meters
Frequency 14.200 MHz
XMIT/RCV RCV
DRIVE or RF LEVEL Minimum
IF Filters Widest Normal SSB
AGC ON
10-dB Step Attn Attenuator –70 dB
1-dB Step Attn Attenuator 0 dB
RF Generator FREQUENCY 14.200 MHz
OUTPUT LEVEL –110 dBm
RF ON
AM OFF
FM OFF
Audio/Distortion Meter FUNCTION REL LEVEL
RELATIVE ADJUST Center Rotation
FILTERS All OFF (Out)
INPUT RANGE 30 V
INPUT/GND SELECT DIS (Center)
METER RESPONSE NORM
HI-Z
Monitor
Amp
Marconi 2041
RF Signal
Generator
HP 355D
10 dB Step
Attenuator
HP 355C
1 dB Step
Attenuator
DUT
Speaker
Load
Resistor
HP 339A
Audio
Distortion
Meter
TDS 3052B
Oscilloscope
Figure 5-12: Audio and IF Frequency Response Test Hook-up

72
5.12.3.2 Set the DUT, Signal Generator and Audio Distortion Meter and Frequency Counter power switches to ON.
Receiver hiss should be heard. Adjust the volume to the desired level. Allow all equipment at least 10 minutes
warm-up time before proceeding to step 5.12.3.3.
5.12.3.3 Set the RF generator to 14.200 MHz. Tune the DUT receiver to the Generator frequency. Rotate the
generator OUTPUT LEVEL control to a point where the S meter on the DUT just before it starts to move. Turn off the
AGC.
5.12.3.4 Adjust the INPUT RANGE control as required to maintain approximately a mid-scale meter indication while
carefully tuning the Generator for peak signal response on the meter.
NOTE: Set the Generator to 20 dB above the MDS level if the AGC cannot be disabled.
5.12.3.6 Record the IF filter bandwidth in 5.12.3.6 of the data sheet. Set the RELATIVE ADJUST for a –1 dB
indication on the meter. Tune the Generator downward in frequency until the meter indicates –7 dB. Adjust the
oscilloscope for amplitude and frequency to show several sine waves. Using the measure function on the oscilloscope,
the frequency of the waveform is displayed. Record Frequency indication in 5.12.3.6 of the Data Sheet. Return the
Generator output to its initial level and the DUT to the peak response frequency. The meter should again indicate –1
dB.
5.12.3.7 Tune the Generator upward in frequency until the meter indicates –7 dB. Adjust the oscilloscope for
amplitude and frequency to show several sine waves. Using the measure function on the oscilloscope, the frequency of
the waveform is displayed. Record the Frequency indication in 5.12.3.7 of the Data Sheet. Return the Generator
output to its initial level and the DUT to the peak response frequency. The meter should again indicate –1 dB.
Subtract the lower –6 dB Frequency indication from the upper and record this difference in the space provided.
5.12.3.8 Tune the generator for peak response and repeat paragraphs 5.12.3.6 to 5.12.3.7 for all remaining DSP, SSB
and CW IF filters and IF filter combinations.
AM Audio Frequency Response
5.12.3.9 Connect the output of the HP-8116A Function Generator to the EXT MOD INPUT of the RF Generator.
Adjust the generators to provide an S8 to S9 signal with 80% modulation at approximately 1000 Hz.
5.12.3.10 Tune the DUT for peak audio response as indicated by the Audio Meter. Increase the modulation
frequency until approximately a 6 dB drop is observed. Again, tune the DUT for peak audio response. Record the
IF filter bandwidth in 5.12.3.10 of the data sheet. Record the modulation frequency that produces peak meter
response in 5.12.3.10 of the Data Sheet.
5.12.3.11 Adjust the modulation frequency for peak response. Set the RELATIVE ADJUST for a –1 dB indication
on the meter. Reduce the modulation frequency until the meter indicates –7 dB. Record the modulation frequency in
5.12.3.10 of the Data Sheet. Return the modulation to its initial frequency and the meter should again indicate –1 dB.
5.12.3.12 Increase the modulation frequency until the meter indicates –7 dB. Record the modulation frequency in
5.12.3.10 of the Data Sheet. Return the modulation to its initial frequency. The meter should again indicate –1 dB.
Subtract the lower –6 dB frequency indication from the upper and record this difference in the space provided.
5.12.3.13 Repeat paragraphs 5.12.3.10 to 5.12.3.12 for all remaining AM filters.

73
5.13 SQUELCH SENSITIVITY TEST
5.13.1 The purpose of the Squelch Sensitivity Test is to determine the level of the input signal required to break the
squelch at the threshold point . This test is performed for both FM and SSB.
5.13.2 Test hook-up (See Fig. 5-13)
NOTE: If proceeding from the previous Audio & IF Frequency Response Test, no hook-up changes except
removal of the oscilloscope is required. Proceed to step 5.13.3.
5.13.2.1 With all power switches in the OFF position and the transmitter disabled, connect the following:
Connection Connectors Cable Type
Signal Gen OUTPUT to 10-dB Step Attn INPUT BNC to BNC 50-Ohm Coax
10-dB Step Attn OUTPUT to 1-dB Step Attn IN BNC to BNC 50-Ohm Coax
1-dB Step Attn OUTPUT to DUT RF INPUT BNC to As Required 50-Ohm Coax
DUT Audio OUTPUT to Dist/Audio Meter IN As Required to BNC 50-Ohm Coax
8-Ohm Load/HI-Z Amp Across Dist/Audio As Required As Required
Meter INPUT
Power Source to DUT Power Input As Required As Required
5.13.3 Test Procedure
5.13.3.1 Turn the DUT and all test equipment power switches to ON. Set the following controls:
Instrument Control Position
DUT Mode FM
Band Selector 10 Meters
Frequency 29.000 MHz
XMIT/RCV RCV
DRIVE or RF LEVEL Minimum
IF Filters Suitable for FM
AGC OFF
RF SIGNAL
GENERATOR
MARCONI 2041
10 dB STEP
ATTENUATOR
HP 355D
1 dB STEP
ATTENUATOR
HP 355C
DUT
RECEIVER
AUDIO/
DISTORTION
METER
HP 339A
HI-Z
MONITOR AMP
Fig. 5-13 ── FM Squelch Sensitivity Test Hook-up

74
Preamp ON
Any Audio Filter Disabled
10-dB Step Attn Attenuator 10 dB
1-dB Step Attn Attenuator 0 dB
RF Generator FREQUENCY TUNE 29.000 MHz
OUT LEVEL –110 dBm
AM OFF
FM INT
DEVIATION 3 kHz
MODULATION FREQ 1000 Hz
RF ON
Audio/Distortion Meter FUNCTION REL LEVEL
RELATIVE ADJUST Center Rotation
FILTERS All OFF (Out)
INPUT RANGE 30 V
INPUT/GND SELECT DIS (Center)
METER RESPONSE NORM
5.13.3.2 Receiver hiss should be heard. Adjust the volume to the desired level. Allow all equipment at least 10
minutes warm-up time before proceeding to step 5.13.3.3.
5.13.3.3 Increase the Generator OUTPUT LEVEL control, if necessary, until the signal is just heard in the receiver.
Adjust the INPUT RANGE control as required to maintain approximately a mid-scale meter indication while carefully
tuning the receiver for minimum distortion (FM) or peak signal response (SSB) as appropriate.
5.13.3.4 Set the RF Generator RF switch to OFF. Carefully adjust the squelch control on the DUT to just past the
threshold point, closing the receiver. Set the RF switch back to ON. Slowly increase the Generator output to a level
that holds the receiver open continuously without dropping out. (Use the step attenuator controls as necessary to obtain
the threshold point.) Note the attenuator settings and generator output. Calculate the level of the input signal to the
DUT and record on the Data Sheet. Return the step attenuators to their initial settings.
5.13.3.5 Repeat paragraphs 5.13.3.3 to 5.13.3.4 for the following frequency bands, as appropriate to the DUT:
52 MHz, 146 MHz and 440 MHz.
5.13.3.7 Return the attenuator controls to their initial settings. Set the generator for 14.200 and the FM switch to OFF.
Set the DUT for USB at 14.200 MHz. Repeat paragraphs 5.13.3.4 through 5.13.3.4, if squelch is available for USB,
EXCEPT this time, set the Generator OUTPUT LEVEL to a point where the squelch opens momentarily and closes
again. Calculate the level of the input signal and record on the Data Sheet.
(Note: AGC may have to be enabled)

75
5.14 S METER TEST
5.14.1 The purpose of the S Meter Test is to determine the level of RF input signal required to produce an S9
indication on the receiver S Meter. This test is performed with the DUT in the CW mode at frequencies of 1.020,
14.020, 52.020, 146.020 and 440.020 MHz as appropriate for the DUT. An S9+20 dB signal is also used to check for
significant S Meter deviation. The IF filter is set for the closest bandwidth to 500 Hz.
5.14.2 Test hook-up (See Fig. 5-14)
NOTE: If proceeding from the previous Squelch Sensitivity Test, no hook-up changes are required. Proceed
to step 5.14.3.
5.14.2.1 With all power switches in the OFF position and the transmitter disabled, connect the following:
Connection Connectors Cable Type
Signal Gen OUTPUT to 10-dB Step Attn INPUT BNC to BNC 50-Ohm Coax
10-dB Step Attn OUTPUT to 1-dB Step Attn IN BNC to BNC 50-Ohm Coax
1-dB Step Attn OUTPUT to DUT RF INPUT BNC to As Required 50-Ohm Coax
DUT Audio Output to Dist/Audio Meter Input As Required to BNC 50-Ohm Coax
8 Ohm Load/HI-Z Amp to Dist/Audio Meter Input As Required As Required
Power Source to DUT Power Input As Required As Required
5.14.3 Test Procedure
5.14.3.1 Turn the DUT and all test equipment power switches to ON. Set the following controls:
Instrument Control Position
DUT Mode SSB
Band Selector 20 Meters
Frequency 14.200 MHz
XMIT/RCV RCV
DRIVE or RF LEVEL Minimum
IF Filters Closest to 500 Hz
RF SIGNAL
GENERATOR
MARCONI 2041
10 dB STEP
ATTENUATOR
HP 355D
1 dB STEP
ATTENUATOR
HP 355C
DUT
RECEIVER
AUDIO/
DISTORTION
METER
HP 339A
HI-Z
MONITOR AMP
Fig. 5-14 ── S-meter Test Hook-up
76
AGC ON
Preamp OFF
10-dB Step Attn Attenuator –10 dB
1-dB Step Attn Attenuator 0 dB
RF Generator FREQUENCY TUNE 14.200 MHz
OUT LEVEL –100 dBm
RF ON
AM OFF
FM OFF
Audio/Distortion Meter FUNCTION REL LEVEL
RELATIVE ADJUST Center Rotation
FILTERS All OFF (Out)
INPUT RANGE 30 V
INPUT/GND SELECT DIS (Center)
METER RESPONSE NORM
5.14.3.2 Receiver hiss should be heard. Adjust the volume to the desired level. Allow all equipment at least 10
minutes warm-up time before proceeding to step 5.14.3.3.
5.14.3.3 Rotate the Generator OUTPUT LEVEL control as required until the signal is just heard in the receiver.
Adjust the INPUT RANGE control as required to maintain approximately a mid-scale meter indication while carefully
tuning the receiver for peak signal response.
5. 14.3.4 Increase the Generator OUTPUT LEVEL control for approximately an S9 indication. Adjust the DUT
tuning control for maximum S Meter indication, then set the Generator output for an exact indication of S9. Rock the
DUT tuning control back-and-forth to ensure the S Meter is still peaked on the signal. Note the Generator output and
attenuator settings and record the input signal level in microvolts to the DUT in the 5.14.3.4 of the Data Sheet.
5.14.3.5 Increase the Generator output for an S9+20 dB S Meter indication. Check the appropriate box in 5.14.3.5 if
an approximately 20 dB increase in generator output was required. If not, record levels and settings as in step 5.14.3.4.
5.14.3.6 Repeat steps 5.14.3.4 through 5.14.3.5 with DUT preamp on.
5.14.3.7 Return DUT preamp to off and repeat steps 5.14.3.3 to 5.14.3.6 for frequencies of 1.020, 52.020, 146.020 and
432.020 MHz.
5.15 IN-BAND IMD TEST

77
5.15.1 The purpose of the In-Band IMD Test is to measure the intermodulation-distortion (IMD) products present
in the audio output of the receiver. This test is typically performed on units that will undergo the expanded set of
tests. The receiver will be operated in the SSB mode at 14.200 MHz. Two input signals, spaced 200 Hz apart, are
applied to the DUT and adjusted for equal output amplitude. (The audio tones are approximately 900 and 1100
Hz.) The input signals are adjusted for approximately a single tone n S-9 level and the audio output is observed on
the Spectrum Analyzer. The tones are set for a 0 dB level for a single tone reference. (This is unlike the transmit
two-tone test, where the -6 dB is used for a PEP reference level.) The AGC fast option is used for this test.
5.15.2 Test Hook-up (See FIGURE 5-15)
Note: If proceeding from the previous S-Meter Test, only the hook-up changes shown with a dotted line are
required.
5.15.2.1 With all power switches in the OFF position, the transmitter function disabled to the fullest extent possible
and each Generator RF OFF, connect the following:
Connection Connectors Cable Type
Signal Gen 1 Output to Hybrid Combiner Input 1 BNC to BNC 50-Ohm Coax
Signal Gen 2 Output to Hybrid Combiner Input 2 BNC to BNC 50-Ohm Coax
Hybrid Combiner Output to 10-dB Step BNC to BNC 50-Ohm Coax
Attn Input
10-dB Step Attn Output to 1-dB Step Attn IN BNC to BNC 50-Ohm Coax
1-dB Step Attn Output to DUT RF Input BNC to As Req. 50-Ohm Coax
8 Ohm Load / HI-Z Amp across DUT As Req. As Required
Audio Output
DUT Audio Output to Audio Attn Pad Input As Req. to BNC 50-Ohm Coax
Audio Attn Pad Output to Spectrum BNC to BNC Coax
Analyzer Input
Power Source to DUT Power Input As Req. As Req.
RF SIGNAL
GENERATOR
MARCONI 2041
10 dB STEP
ATTENUATOR
HP 355D
1 dB STEP
ATTENUATOR
HP 355C
DUT
RECEIVER
AUDIO/
DISTORTION
METER
HP 339A
HI-Z
MONITOR AMP
RF SIGNAL
GENERATOR
IFR 2041
HYBRID
COMBINER
TT 651
HP8563E
Spectrum
Analyzer

78
Figure 5-15 In-Band IMD Test Setup
5.15.3 Test Procedure
5.15.3.1 Turn the DUT and all test equipment power switches to ON. Set the following controls:
Instrument Control Position
DUT Mode USB
Band Selector 20 Meters
Frequency 14.20000 MHz
XMIT/RCV RCV
DRIVE or RF LEVEL Minimum
IF Filters SSB Widest Available
Any Audio Filtering Disabled
AGC Fastest Available
AF Gain (Volume Control) Minimum
10-dB Step Attn Attenuator 10 dB
1-dB Step Attn Attenuator 0 dB
RF Generator #1 CARRIER FREQ 14.2009 MHz
RF LEVEL –63 dBm
CARRIER ON-OFF ON
AM OFF
FM OFF
NOISE MODE (UTIL) LOW NOISE
RF Generator #2 CARRIER FREQ 14.2011 MHz
RF LEVEL –63 dBm
CARRIER ON-OFF ON
AM OFF
FM OFF
NOISE MODE (UTIL) LOW NOISE

79
Instrument Control Position
Spectrum Analyzer START FREQ - STOP FREQ 0 - 2 kHz
REF LEV (AMPLITUDE) –10 dBm
ATTEN (AMPLITUDE) 20 dB
RES (BW) 10 Hz
VIDEO BW (BW) 10 kHz
THRESHOLD (DISPLAY) -80 dBm
SWP TIME (SWEEP) AUTO (1.3 s)
CAUTION: The input to the spectrum analyzer at no time should be greater than +10 dBm (0.707 Vrms). Damage
to this instrument will occur at an input level of +30 dBm (7.07 Vrms) or greater. It is recommended to monitor the
audio on the analyzer display at all times during this test - especially when increasing the AF Gain Control or
decreasing the variable attenuators.1
5.15.3.2 Slowly increase the AF Gain control of the DUT. Receiver hiss should be heard. Adjust the volume to the
desired level. Be careful not to exceed the -10 dBm reference limit on the analyzer display. Allow all equipment at
least 10 minutes warm-up time before proceeding to step 5.15.3.3.
5.15.3.3 Tune the DUT for peak response as indicated by the receiver’s S-Meter. Adjust #1 Generator RF LEVEL
control, if necessary, for an S-9 indication. Set the #2 Generator RF switch to ON and set for the same output level
as Generator #1. Both pips should now be clearly visible on the Spectrum analyzer display
5.15.3.4 Adjust the DUT Tuning control, if necessary, for the two tones to be centered on the spectrum analyzer
display. The scan rate may be increased temporarily by adjusting the SWP TIME (SWEEP) control. (NOTE:
Analyzer calibration is lost once the scan rate is increased beyond the point MEAS UNCAL appears on the screen.)
Adjust the attenuators and DUT AF Gain control for an approximate indication of -10 dBm (top reference line) on
the spectrum analyzer.
5.15.3.5 If necessary, slow the scan rate down to a point where the analyzer is again in calibration. Carefully adjust
the #2 RF Generator RF LEVEL control for the second pip to be equal to the first pip. Adjust the DUT audio
output so that both pips are now at the -10 dBm reference (top) line of the spectrum analyzer display. Re-adjust, if
necessary, the #2 RF Generator RF LEVEL Control if the two tones are no longer equal in amplitude.
5.15.3.6 Take a single sweep by depressing the SGL SWEEP (SWEEP) button. Plot and save to an appropriately
named file.
5.15.3.7 Repeat if desired for any other AGC options as deemed appropriate by the Test Engineer.
1 “Woe be unto he who breaks this thing.” ---- Edward F. Hare, W1RFI

80
5.16 NOTCH FILTER TEST
5.16.1 The purpose of the Notch Filter Test is to determine the notch depth of any and all applicable receiver filters.
Two 20–meter input signals, spaced 1200 Hz apart, are applied to the DUT and adjusted for equal output
amplitudes. The receiver notch filter is then set to null the undesired upper audio tone. The lower audio tone is
adjusted to provide a 0–dB reference on the spectrum analyzer display. The depth of the notch filter is then
determined by comparing the difference in levels between the two tones. Similar tests are performed with receivers
having DSP auto-notch capabilities. In addition, the time to notch, or notch attack time will also be measured for
DSP units.
5.16.2 Test Hook-up (See FIGURE 5-16) Note: If proceeding from the previous In-Band IMD Test, only the hook-
up changes shown with a dotted line are required.
5.16.2.1 With all power switches in the OFF position, the transmitter function disabled to the fullest extent possible
and each Generator RF OFF, connect the following:
Connection Connectors Cable Type
Signal Gen 1 Out to Hybrid Combiner IN 1 BNC to BNC 50-Ohm Coax
Signal Gen 2 Out to Hybrid Combiner In 2 BNC to BNC 50-Ohm Coax
Hybrid Combiner Output to 10-dB Step BNC to BNC 50-Ohm Coax
Attn Input
10-dB Step Attn Output to 1-dB Step BNC to BNC 50-Ohm Coax
Attn Input
1-dB Step Attn Output to DUT RF Input BNC to As Req. 50-Ohm Coax
DUT Audio Output to Dist/Audio Meter IN As Req. to BNC 50-Ohm Coax
8 Ohm Load / HI-Z Amp across Dist/ As Req. As Req.
Audio Meter Input
20 dB Audio Pad (Attn) Output to Spectrum BNC to BNC Coax
Analyzer Input
Power Source to DUT Power Input As Req. As Req.

81
RF SIGNAL
GENERATOR
MARCONI 2041
10 dB STEP
ATTENUATOR
HP 355D
1 dB STEP
ATTENUATOR
HP 355C
DUT
RECEIVER
AUDIO/
DISTORTION
METER
HP 339A
HI-Z
MONITOR AMP
RF SIGNAL
GENERATOR
IFR 2041
HYBRID
COMBINER
TT 651
SPECTRUM
ANALYZER
HP-8563E
Figure 5-16 Notch Filter Test Hook-Up
5.16.3 Test Procedure
5.16.3.1 Turn the DUT and all test equipment power switches to ON. Set the following controls:
Instrument Control Position
DUT Mode USB
Band Selector 20 Meters
Frequency 14.200 MHz
XMIT/RCV RCV
DRIVE or RF LEVEL Minimum
IF Filters SSB Widest Available
Any Audio Filtering Disabled
AGC OFF (if available) or Fast
Notch Filter OFF
AF Gain (Volume Control) Minimum
10-dB Step Attn Attenuator 10 dB
1-dB Step Attn Attenuator 0 dB
RF Generator #1 CARRIER FREQ 14.2000 MHz
RF LEVEL –80 dBm
CARRIER ON-OFF ON
AM OFF
FM OFF
NOISE MODE (UTIL) LOW NOISE
RF Generator #2 CARRIER FREQ 14.2012 MHz
RF LEVEL –80 dBm
CARRIER ON-OFF ON
AM OFF
FM OFF
NOISE MODE (UTIL) LOW NOISE

82
Audio/Distortion FUNCTION REL LEVEL
Meter RELATIVE ADJUST Center Rotation
FILTERS All Off (Out)
INPUT RANGE 30 V
INPUT/GND SELECT DIS (Center)
METER RESPONSE NORM
Spectrum Analyzer START FREQ - STOP FREQ 0 – 3 kHz
REF LEV (AMPLITUDE) –10 dBm
ATTEN (AMPLITUDE) 20 dB
RES (BW) 10 Hz
VIDEO BW (BW) 10 kHz
THRESHOLD (DISPLAY) OFF
SWP TIME (SWEEP) AUTO
CAUTION: The input to the spectrum analyzer at no time should be greater than +10 dBm (0.707 Vrms). Damage
to this instrument will occur at an input level of +30 dBm (7.07 Vrms) or greater. It is recommended to monitor the
audio on the analyzer display at all times during this test - especially when increasing the AF Gain Control or
decreasing the variable attenuators.
5.16.3.2 Slowly increase the AF Gain control of the DUT. Receiver hiss should be heard. Adjust the volume to the
desired level. Be careful not to exceed the –10 dBm reference limit on the analyzer display. Allow all equipment at
least 10 minutes warm-up time before proceeding to step 5.16.3.3.
5.16.3.3 Adjust the #1 Generator RF LEVEL control until the signal is just heard in the receiver. Adjust the INPUT
RANGE and receiver controls as required to maintain approximately a mid-scale meter indication while carefully
tuning the receiver for peak signal response on the audio level meter.
5.16.3.4 Set the #2 Generator RF switch to OFF. Peak the DUT tuning control for maximum response as indicated
by the audio level meter.
5.16.3.5A If the DUT AGC is OFF, adjust the #1 RF generator for a level approximately 10 dB below the 1-dB
compression point. Recheck the receiver tuning for peak response on the Distortion Meter. The audio output
frequency should be approximately 500 to 1,000 Hz. If necessary, adjust the receiver tuning to bring the output
audio into this range while maintaining a peak response on the meter as best as is possible.
5.16.3.5B If the DUT AGC is set to Fast, increase the #1 RF generator for approximately an S-9 indication on the
DUT S-Meter. (The input signal to the DUT should be approximately 50 V.) Recheck the receiver tuning for
peak response on the Distortion Meter. The audio output frequency should be approximately 500 to 1,000 Hz.
Adjust, if necessary, the receiver tuning to bring the output audio into this range while maintaining a peak response
on the meter as best as is possible.
5.16.3.6 Adjust the Distortion Analyzer INPUT LEVEL and RELATIVE ADJUST Controls for a meter reading of
–1 dB. Turn on the notch filter and observe any change in the meter indication. Adjust the notch filter for the
minimum meter reading change between Notch Filter On and Off. Record the difference between the –1 dB
reference and the meter reading in 5.16.3.6 of the Data Sheet. Return the notch filter adjustment to its upper or
lower limit.
5.16.3.7 Observe the receiver's output audio on the spectrum analyzer. The scan rate may be increased temporarily
by adjusting the SWP TIME (SWEEP) control. (NOTE: The analyzer will not be in calibration if the scan rate is
increased beyond the point MEAS UNCAL appears on the display.) Adjust the attenuators and DUT AF Gain
control for an indication of –10 dB on the spectrum analyzer.

83
5.16.3.8 Set the #2 RF Generator RF switch to ON. A second tone that is 1,200 Hz greater in pitch should be heard
in the receiver output. Adjust the Spectrum Analyzer CENTER FREQ (FREQUENCY) Control for this second
tone to appear right on the display vertical centerline. Adjust the #2 RF Generator RF LEVEL Control for the
second pip to be equal to the first pip. (The first pip should now be visible just over two divisions to the left of the
display centerline.)
5.16.3.9 If necessary, slow the scan rate down to a point where the analyzer is again in calibration. Adjust the
spectrum analyzer input step attenuator for the two pips to be at the –10 dBm reference (top) line of the spectrum
analyzer display. Re-adjust, if necessary, the #2 RF Generator RF LEVEL Control if the two tones are no longer
equal in amplitude.
5.16.3.10 Set the #1 RF Generator RF switch to OFF. Adjust the notch filter for the best null of the remaining
higher pitched tone. Both the ear and the spectrum analyzer display may be used to determine the point of best
null. The scan rate may again be temporarily increased to facilitate this adjustment. Be sure to slow it down so that
the display is once again calibrated before proceeding to the next step.
5.16.3.11 Set the #1 Signal Generator RF Switch to ON. Adjust, if necessary, the Step Attenuators and DUT AF
GAIN Control for the #1 Generator tone for the -10 dBm reference on the display. The notched #2 Generator tone
should now be on the vertical centerline. The notch depth may now be read directly on the display. A single sweep
may now be taken to facilitate this measurement by depressing the SGL SWEEP Button. Record in 5.16.3.11 of
the Data Sheet.
5.16.3.12 Repeat for all other available DSP, IF and AF notch filters and notch filter combinations. Also try the
following combinations:
2 tones (S9 each), AGC on, manual notch 2 tones (S9 + S1), AGC on, manual notch
1 tone, AGC on, manual notch 1 tone, AGC off, manual notch
1 tone, AGC on, auto notch 1 tone, AGC off, auto notch
Note changes in tone level and noise level. Also note changes in S-meter for AGC on tests.
Auto-Notch Attack Time: Proceed only if DUT has DSP Auto-Notch Feature
5.16.3.13 With all power switches in the OFF position and the transceiver in the receive mode, connect the following:
Connection Connectors Cable Type
Signal Gen Output to 10-dB step INPUT Type N to BNC 50-Ohm coax
10-dB step Attn OUT to 1-dB step IN BNC to BNC 50-Ohm coax
1-dB step Attn IN to DUT RF Input BNC to Type N 50-Ohm coax
Signal Gen Output to Scope CH1 INPUT BNC clip to BNC 50-Ohm coax
DUT Audio Output to Scope CH2 INPUT As Required to BNC 50-Ohm coax
DUT Audio Output to 8 Ohm Load As Required to BNC 50-Ohm coax

84
5.16.3.14 Turn the DUT and test equipment power switches to ON. Set the following controls:
Instrument Control Position
DUT Mode USB
Band Selector 20 Meters
Frequency 14.200 MHz
XMIT/RCV Receive
DRIVE or RF LEVEL Minimum
AGC OFF
Instrument Control Position
RF Generator FREQUENCY TUNE 14.200 MHz
OUT LEVEL –63 dBm
RF ON
AM OFF
FM OFF
10-dB Step Attn Attenuator 10 dB
1-dB Step Attn Attenuator 0 dB
Oscilloscope CH1 VOLTS/DIV 0.5 V
CH1 Coupling DC
CH1 Position As Needed
CH2 VOLTS/DIV 1 V
CH2 Coupling DC
CH2 Position As Needed
TIME/DIV 5 ms
TRIG MODE AUTO
Trigger Coupling DC
Trigger Source CH1
Trigger Level as required
DUT
RECEIVER
POWER SOURCE
1 dB STEP
ATTENUATOR
HP 355C
10 dB STEP
ATTENUATOR
HP 355D DUAL-TRACE
OSCILLOSCOPE
TEKTRONIX
3052B
CH 2
CH 1 SIGNAL
GENERATOR
MARCONI 2041
AUDIO
OUT
Fig. 5-16A ── Notch Attack Time Test Hook-up

85
5.16.3.15 Set the Signal Generator RF to ON. Tune the DUT for peak response. Set the DUT AF Gain control for
comfortable listening level and adjust CH1 and CH2 VOLTS/DIV for suitable display similar to Figure 5.16B. Set
the Signal Generator RF to OFF.
5.16.3.16 Place the oscilloscope into the single sweep storage mode and clear the display. Key the Signal
Generator by pressing the RF to button to ON. Repeat and adjust the trigger level until a single sweep occurs every
time the generator is keyed.
5.16.3.17 Measure the time delay for from the point the signal appears until it is notched by at least 50%. The
oscilloscope sweep rate may be adjusted as required to facilitate this measurement. Make several sweeps and
compare results. Record on data sheet.

86
5.17 DSP NOISE REDUCTION TEST
5.17.1 The purpose of this test is to determine the level of noise reduction possible with receivers equipped with
DSP. An uninterrupted un-modulated CW will be mixed with noise and fed to the DUT RF input. The audio
output will be observed on the spectrum analyzer. Noise level comparisons will be made with the DSP Noise
Reduction on and off..
5.17.2 Test Hook-up (See FIGURE 5.17)
Note: If proceeding from the previous test, only the hook-up changes shown with a dotted line are required.
5.17.2.1 With all power switches in the OFF position, the transmitter function disabled to the fullest extent possible
and each Generator RF OFF, connect the following:
Connection Connectors Cable Type
Signal Gen Output to Hybrid Combiner INPUT BNC to BNC 50-Ohm Coax
Elecraft Noise Gen Output to 10-dB Step Attn Input BNC to BNC 50-Ohm Coax
10-dB Step Attn Output to 1-dB Step Attn Input BNC to BNC 50 Ohm Coax
1-dB Step Attn Output to Hybrid Combiner Input BNC to As Req. 50 Ohm Coax
Hybrid Combiner Output to DUT RF Input BNC to As Req. 50 Ohm Coax
10 dB Step
Attenuator
Elecraft
Noise
Generator
1 dB Step
Attenuator
Hybrid
Combiner
RF Signal
Generator
HP 8563E
Spectrum
Analyzer
HP-339
Distortion
Meter
DUT
PAD
Figure 5.17: DSP Noise Reduction Hook-up

87
Connections Cable Type Connectors
8 Ohm Load / HI-Z Amp across DUT Audio OUT As Req. As Req.
DUT Audio Output to Audio Attn Pad Input As Req. to BNC 50-Ohm Coax
Audio Attn Pad Output to Spectrum Analyzer Input BNC to BNC Coax
Power Source to DUT Power Input As Req. As Req.
5.17.3 Test Procedure
5.17.3.1 Turn the DUT and all test equipment power switches to ON. Set the following controls:
Instrument Control Position
DUT Mode USB
Band Selector 20 Meters
Frequency 14.200 MHz
XMIT/RCV RCV
DRIVE or RF LEVEL Minimum
IF Filters SSB Widest Available
Any Audio Filtering Disabled
AGC OFF
AF Gain (Volume Control) Minimum
10-dB Step Attn Attenuator 10 dB
1-dB Step Attn Attenuator 0 dB
RF Generator CARRIER FREQ 14.2000 MHz
RF LEVEL –63 dBm
CARRIER ON-OFF OFF
AM OFF
FM OFF
NOISE MODE (UTIL) LOW NOISE
Spectrum Analyzer START FREQ - STOP FREQ 0 - 5 kHz
REF LEV (AMPLITUDE) –10 dBm
ATTEN (AMPLITUDE) 20 dB
RES (BW) 10 Hz
VIDEO BW (BW) 10 kHz
THRESHOLD (DISPLAY) –80 dBm
SWP TIME (SWEEP) AUTO (1.3 s)
CAUTION: The input to the spectrum analyzer at no time should be greater than +10 dBm (0.707 Vrms). Damage
to this instrument will occur at an input level of +30 dBm (7.07 Vrms) or greater. It is recommended to monitor the
audio on the analyzer display at all times during this test - especially when increasing the AF Gain Control or
decreasing the variable attenuators.1
5.17.3.2 Slowly increase the AF Gain control of the DUT. Receiver hiss should be heard. Adjust the volume to the
desired level. Be careful not to exceed the -10 dBm reference limit on the analyzer display. Allow all equipment at
least 10 minutes warm-up time before proceeding to step 6.2.3.3.
1 “Woe be unto he who breaks this thing.” ---- Edward F. Hare, W1RFI

88
5.17.3.3 Increase the Generator RF LEVEL control until the signal is just heard in the receiver. Adjust the INPUT
RANGE and receiver controls as required to maintain approximately a midscale meter indication while carefully
tuning the receiver for peak signal response on the Audio meter.
5.17.3.4 Increase the RF generator output for approximately an S-9 indication on the DUT S-Meter. (The input
signal to the DUT should be approximately 50 V.) Recheck the receiver tuning for peak response on the
Distortion Meter. Turn on the Noise Source and adjust for approximately a 3 dB increase as indicated by the meter.
5.17.3.5 Adjust the Distortion Analyzer INPUT LEVEL and RELATIVE ADJUST Controls for a meter reading of
-6 dB. Turn on the DSP Noise Reduction and observe any change in the meter indication. Adjust the Noise
Reduction for best results as determined by ear and note the meter indication. Record the best case increase or
decrease in 6.2.3.5 of the Data Sheet.
5.17.3.6 Vary the signal level, noise level and DSP Noise Reduction Level for the best case. Record results on
data sheet.
5.17.3.7 Turn off the DSP Noise Reduction and Noise Source. Observe the receiver's output audio on the spectrum
analyzer. The scan rate may be increased temporarily by adjusting the SWP TIME (SWEEP) control. (NOTE: The
analyzer will not be in calibration if the scan rate is increased beyond the point MEAS UNCAL appears on the
display.) Adjust the attenuators and DUT AF Gain control for an indication of -10 dB (top line) on the spectrum
analyzer.
5.17.3.8 Set the DSP Noise Reduction to ON. Observe any change in the tone as shown by the spectrum analyzer.
Readjust, if necessary the decrease in the DUT AF Gain Control for the -10 dB reference on the spectrum analyzer.
Turn on the Noise Source and adjust so that the noise floor is 20 dB below the single tone reference. Readjust the
AF Gain control if necessary for the -10 dB reference.

89
5.18 Noise Figure & Equivalent Rectangular Bandwidth
This is an automated test procedure.
Hook-up:
Audio Output to HP3561 Input
Signal Generator set to 14.020 MHz
Set level to -94 dBm
Turn on HP-3551
CVI File, open, project
Up folder
FFT plot
ffplot.prg
load (green arrow)
Set Analyzer to one minute sweep
Single sweep
On the computer, pick points where the edges and the tops meet. Ex: 350 and 845 Hz.
Calculate EqivRBW button (502 HZ)
5.19 Noise Figure Calculation:
Theory:
Resistor noise is -174 dBm/Hz at room temperature
500 Hz is 27 dB away from 1 Hz
Thus, an ideal receiver’s noise figure would be:
-174 dBm/Hz + 27 dB = -147 dBm
Noise Figure of the receiver = 147 dBm – dBm of MDS at 20M
Ex: MDS at 20 meters, preamp off = -129.5 dBm
NF = 147 – 129.5 dBm = 17.5 dB
Calculate the Noise Figure for Preamp off, P1 and P2 if available

90
VI. NON-STANDARD AND SPECIAL PURPOSE TESTS
Chapter 6 contains five non-standard and special purpose tests. These include tests for mobile radios, 9600 baud
packet and obsolete tests dropped from the standard test list.
6.1 LOW VOLTAGE AND TEMPERATURE CHAMBER TEST
6.1.1 The purpose of the Low Voltage and Temperature Chamber Test is to determine the functionality of the mobile
type DUT Transceivers at low voltage and its specified temperature limits. The temperatures and voltage used for this
test are intended to simulate worst case mobile conditions within the manufacturer’s specified limits. Three parameters
are checked at each test point, receiver sensitivity, transmit frequency accuracy and RF power output.
6.1.2 Test hook-up (See Fig. 6-1)
6.1.2.1 With all test equipment and DUT power switches in the OFF position and the transceiver in the receive mode,
set the DUT in the temperature chamber. Connect the following cables to the DUT and route them through the cable
port to the specified termination at the opposite end:
Connection Connectors Cable Type
DUT RF OUTPUT to Wattmeter INPUT As Required to Type N 50-Ohm Coax
Wattmeter OUTPUT to RF Power Attn Type N to Type N 50-Ohm Coax
RF-Power Attenuator Output to Step BNC to BNC 50-Ohm Coax
Attenuator Input
Step Attenuator Output to Frequency BNC to BNC 50-Ohm Coax
Counter Input
Telegraph Key to DUT KEY INPUT As Required As Required
DUT AUDIO OUTPUT to Dist/Audio As Required Double Banana
Meter Input
8-Ohm Load /HI-Z Amp Across Dist/Audio As Required As Required
Meter Input
DC Power Only As Required As Required
1) Variable DC Power supply to AC source.
2) Set power supply to specified voltage and connect to DUT.

91
CAUTION!: Power must only be applied to the
attenuator input! Do not reverse input and output
terminals of the Bird 8329.
RF Power
Attenuator &
Dummy Load
Bird 8329100 WATTS
TYPICAL
100 WATTS
TYPICAL
RF WATTMETER
BIRD 4381
TWO-TONE
AUDIO
GENERATOR
DC ONLY
AC ONLY
PTT SWITCH
TELEGRAPH KEY
DUT
TRANSMITTER
POWER
SUPPLY
Fig. 6-1 ── Chamber Test Hook-up
6.1.3 Test Procedure
6.1.3.1 Turn the DUT and RF wattmeter power switches to ON and set the following controls:
Instrument Control Position
DUT Mode CW
Band Selector 20 Meters
Frequency 14.020 MHz
XMIT/RCV RCV
DRIVE or RF LEVEL Minimum
IF Filters 500 Hz or Closest Available
AGC OFF
Preamplifier OFF
RF Generator CARRIER FREQ 14.020 MHz
RF LEVEL –110 dBm
CARR ON-OFF ON
AM Off
FM Off
NOISE MODE LOW NOISE
RF Wattmeter Push Button mode select FWD CW
Element As Required
Forward Element Range As Required
Step Attn Attenuator 10 dB
Audio/Distortion Meter FUNCTION REL LEVEL
RELATIVE ADJUST Center Rotation
FILTERS All Off (Out)
INPUT RANGE 30 V
INPUT/GND SELECT DIS (Center)
METER RESPONSE NORM
6.1.3.2 Receiver hiss should be heard; adjust volume to desired level. Allow all equipment at least 10 minutes
warm-up time before proceeding to step 6.1.3.3

92
6.1.3.3 Tune the DUT per the DUT operator’s manual. Put the DUT in the CW mode Depress telegraph key.
Observe that some minimum level of RF power is shown by the DUT Po Meter and Bird Wattmeter. Increase the RF
DRIVE/LEVEL control if necessary to the maximum rated power.
6.1.3.4 Adjust the step attenuators for an indication on the Frequency Counter. Record both the power output and the
frequency counter indication in 6.1.3.4 of the Data Sheet.
6.1.3.5 Remove the DUT RF Cable from the Power Wattmeter and connect to the Signal Generator Output. Perform
an MDS Test and record results on Data Sheet.
6.1.3.5 Reduce the Power Supply voltage to 11.5 V dc. Repeat steps 6.1.3.4 and 6.1.3.5 at this reduced voltage.
Return the power supply to voltage to initial setting.
6.1.3.6 Record initial chamber / ambient room temperature. Set chamber for minimum specified temperature. (NOTE:
If temperature is not specified, use -10 C.) Once the chamber reaches minimum temperature, let DUT reach thermal
equilibrium for at least 1 hour. Repeat steps 6.1.3.4 and 6.1.3.5. Temporarily open chamber and check functionality of
several randomly selected main DUT controls.
6.1.3.7 Set chamber for maximum specified temperature. (NOTE: If temperature is not specified, use +60 C.) Once
the chamber reaches maximum temperature, let DUT reach thermal equilibrium for at least 1 hour. Repeat the steps of
6.1.3.4 and 6.1.3.5. Temporarily open chamber and check functionality of several randomly selected main DUT
controls.
6.1.3.8 Set chamber for initial recorded ambient temperature. Once the chamber reaches initial temperature, let DUT
reach thermal equilibrium for at least 1 hour. Repeat steps 6.1.3.4 and 6.1.3.5. Open chamber and check functionality
of several randomly selected main DUT controls.
6.1.3.9 Record on data sheet any significant problems or lack of functionality during any of the test points.
6.2 (Classified)

93
6.3 RECEIVER BIT ERROR RATE (BER) TEST,
No longer part of our testing, but historical in nature.
6.3.1 The purpose of the Receiver Bit Error Rate (BER) is to determine the usefulness of 9600 Baud reception at
various input signal levels.
6.3.2 Test initialization and hook-up (See Fig. 6.3-1)
NOTE: The IEEE Interface Bus, BER Test Box to Computer COM 1 port and BERT software must be correctly
installed before proceeding to this step.
6.3.2.1 Turn on the BER Test box, Marconi Generator and Test Computer. While in DOS, go to the C:\SROOM
subdirectory. Type “BERT” and press Enter to start the initializing process. After completion of this process, type the
DUT radio and model number when prompted to do so. Next, type “R” for Receiver Tests. The next prompt will be
for the test frequency. Use either 146.000 MHz or 440 MHz, whichever is appropriate for the band being tested. Type
“I” for Initial Connections and Set-Up when the next prompt appears. Connect the following test hook-up as prompted
to do so:
Connection Connectors Cable Type
BER Test Box DSP OUTPUT to Marconi BNC to BNC 50 Ohm coax
EXT MOD INPUT
BER Test Box AUDIO IN to DUT RX Data BNC to As Required 50 Ohm coax
Output
BER Test Box AUDIO OUT to Oscilloscope BNC to BNC 50 Ohm coax
CHANNEL 2 INPUT
BER Test Box SYNC OUT to Oscilloscope BNC to BNC 50 Ohm coax
CHANNEL 1 INPUT
BER Test Box Clock Input to HP-8116A OUTPUT BNC to BNC 50 Ohm coax
DUT RF Input to Marconi RF signal OUTPUT As Required to BNC 50 Ohm coax

94
6.3.3 Test Procedure
6.3.3.1 Turn the on the DUT and set the following controls:
Instrument Control Position
Oscilloscope Channel 1 5 V / Div, DC
Channel 2 0.5 V / DIV, AC
VERT MODE ALT
TRIGGER CH 1 ONLY, DC, AUTO
HORIZONTAL TIME BASE 0.2 ms / DIV
Function Generator Mode Square Wave
Amplitude 4.75 +/- 0.25 V to GND
Frequency 500 kHz
BER Test Box DSP OUTPUT LEVEL Fully CW (IMPORTANT)
SOURCE SELECT AUDIO
GAIN ADJUST 1.5 Vpp on ’scope
DUT Mode 9600 Baud Data
Band Selector As Required
Frequency 146 or 440 MHz
XMIT/RCV RCV
DRIVE or RF LEVEL Minimum
IF Filters As Req for 9600 Baud Data
Preamplifier OFF
RF Generator All Set Automatically
DSK
Marconi
Sig Gen
Ext Mod
DUT
RF Out
Ant
Disc
Amp
Offset
Aud Out
Aud In
Fig. 6.3-1 ── Fig 1.

95
NOTE: Software is configured for use with the older IEEE card. However, this card has a conflict with an unknown
device on the IEEE bus. Removal of all IEEE connections except the Marconi is necessary for this and the following
test.
6.3.3.2 Receiver hiss should be heard; adjust volume to desired level. Allow all equipment at least 10 minutes
warm-up time before proceeding to step 6.3.3.3
6.3.3.3 Type “C” for Calibrate. The calibration process requires two steps and prompts appear describing each. The
first is to set two pulses for simultaneous timing. Figure 2A depicts correct trace appearance for this step. The second
sets a 14 us delay as depicted by Figure 2B.
6.3.3.4 A quick check can now be made. Manually set a –50 dBm signal. Type “4” for 10,000 (104) bits. If 0 or
nearly 0 bit errors are detected, the system is functioning correctly. If 10,000 or nearly 10,000 errors are detected, then
invert pulse. If approximately 50%, or 5,000 bit errors are detected, there is a problem with the system or test set-up.
Recalibrate per step 6.3.3.3. Once 0 or nearly 0 errors are obtained , you may proceed to the next step.
6.3.3.5 Select menu option “A” for Automatic Test Sequence. (NOTE: Hook-up and calibration menus will
reappear. Test will run automatically after this.)
6.3.3.6 One the automatic test sequence is completed, type “V” to save data to an appropriately named file that you
select. Plots can be displayed by selecting “P” option.
6.3.3.7 Run a -50 dBm test for 1,000,000 bits. Hand record the results as part of the data.
NOTE: Although the automatic test sequence will generate considerable data, the published data typically only
includes the BER at three test points. In order of ascending signal strength, these points are 12 dB SINAD, 16 dB
SINAD and the hand recorded BER at -50 dBm. The first two data points are typically read from the data tables. The
minimum published BER is <1X10⁻⁵
.
6.4 TRANSMITTER BIT ERROR RATE (BER) TEST
No longer tested, but historical in nature
6.4.1 The purpose of the Transmitter Bit Error Rate (BER) Test is to determine the usefulness of 9600 Baud
transmissions when received at various receive signal levels. The signal will be adjusted for two levels before being
applied to the BER Test Box, 12 dB SINAD and 12 dB SINAD plus 30 dB.
6.4.2 Test initialization and hook-up (see Fig 6.4-1).
NOTE: The IEEE Interface Bus, BER Test Box to Computer COM 1 port and BERT software must be correctly
installed before proceeding to this step.
6.4.2.1 Turn on the BER Test box, Marconi Generator and Test Computer. While in DOS, go to the C:\SROOM
subdirectory. Type “BERT” and press Enter to start the initializing process. After completion of this process, type the
DUT radio and model number when prompted to do so. Next, type “T” for Transmitter Tests. The next prompt is for
the test frequency. Use either 146 MHz or 440 MHz, whichever is appropriate for the band being tested. Type “I” for
Initial Connections and Set-Up when the next prompt appears. Connect the following test hook-up as prompted to do
so:
Connection Connectors Cable Type
TX RF Output to Bird Power Attenuator Input As Required to BNC 50-Ohm coax
TX Data Input to BER Test Box DSP OUTPUT As Required to BNC 50-Ohm coax

96
Bird Power Attenuator Output to Manual BNC to BNC 50-Ohm coax
10 dB Step Attenuator Input
Manual 10 dB Step Attenuator Output to BNC to BNC 50-Ohm coax
HP 10 dB Step Attenuator Input
HP 10 dB Step Attenuator Output to HP 1 dB Step BNC to BNC 50-Ohm coax
Attenuator Input
HP 1 dB Step Attenuator OUT to BNC to BNC 50-Ohm coax
BER Test Box RF INPUT (“RF”)
BER Test Box LO to Marconi RF OUT BNC to BNC 50-Ohm coax
BER Test Box AUDIO OUT to Oscilloscope BNC to BNC 50-Ohm coax
CHANNEL 2 INPUT
BER Test Box DSP Output to DUT TX Data RCA to As Required 50-Ohm coax
input
BER Test Box SYNC OUT to Oscilloscope BNC to BNC 50-Ohm coax
CHANNEL 1 INPUT
6.4.3 Test Procedure
6.4.3.1 Turn the on the DUT and set the following controls:
DSK
DUTData In
Demod
Ant
In
Disc
Amp
Offset
Aud Out
Aud In
Marconi
Sig Gen
RF Out
LO In
Fig. 6.4-1.

97
Instrument Control Position
Oscilloscope Channel 1 5 V / Div, DC
Channel 2 0.5 V / DIV, AC
VERT MODE ALT
TRIGGER CH 1 ONLY, DC, AUTO
HORIZONTAL TIME BASE 0.2 ms / DIV
BER Test Box DSP OUTPUT LEVEL Fully CCW
SOURCE SELECT DEMOD
GAIN ADJUST Fully CCW
Manual 10 dB Step Attenuator Attenuation As required (see below)
DUT Mode 9600 Baud Data
Band Selector As Required
Frequency 146 or 440 MHz
XMIT/RCV RCV
DRIVE or RF LEVEL Minimum
RF Generator All Set Automatically
6.4.3.2 Receiver hiss should be heard; adjust volume to desired level. Allow all equipment at least 10 minutes
warm-up time before proceeding to step 6.4.3.3
6.4.3.3 Set DUT Transmitter for minimum power. Set the manual step attenuator for approximately 0 dBm (±10
dBm) into the HP 10 dB step attenuator.
6.4.3.4 Set the BER Test Box GAIN Control to produce 1.5 Vpp as determined by the lower channel 2 trace on the
oscilloscope.
6.4.3.5 Use spacebar to toggle between reference signal and DUT signal. Adjust the BER Test Box DSP OUTPUT
LEVEL so that both signals are same amplitude as viewed on oscilloscope. Hit any other key to exit.
6.4.3.6 Type “C” for Calibrate. The calibration process requires two steps and prompts appear describing each. The
first is to set two pulses for simultaneous timing. Figure 2A depicts correct trace appearance for this step. The second
sets a 14 s delay as depicted by Figure 2B. Repeat the calibration process to verify the calibration.
Note: Automation of software for this test is not yet complete. Manual control and recording of all data is required. Set
the software to “debug” mode (hit “Q” to back up a menu, then select Debug option). All program control is now done
via the debug menus (see Table 1 for a list of commands). Hit the Esc key to exit debug mode when done.
6.4.3.7 Manually enable the Marconi carrier output and check SINAD level by typing “S”. Set attenuators for 12 dB
SINAD using < and > commands. Adjust noise level output with potentiometer control on BER test box as necessary.
6.4.3.8 A quick check of the test set-up can now be made if desired. Temporarily decrease the step attenuators by 30
or 40 dB. Type “4” for 10,000 (104) bits. If 0 or nearly 0 bit errors are detected, the system is functioning correctly. If
10,000 or nearly 10,000 errors are detected, then invert pulse. If approximately 50%, or 5,000 bit errors are detected,
there is a problem with the system or test set-up. Recalibrate per step 6.4.3.6 and 6.4.3.7. Once 0 or nearly 0 errors are
obtained, you may proceed to the next step.
6.4.3.9 Return the step attenuators for 12 dB SINAD setting. Run the test with 1X106 bits by typing “6”. Manually
record the resulting Bit Error Rate.

98
6.4.3.10 Increase the signal by 30 dB (decrease attenuators 30 dB). Again run the test with 1X106 bits by typing “6”.
Manually record the resulting Bit Error Rate.
NOTE: The published BER typically includes two data points, 12 dB SINAD and 12 dB SINAD + 30 dB. The
minimum published BER is 1X10⁻⁵
.
NOTE: If test frequency is 440 MHz or higher, you may wish to down convert to lower frequency. Use an LO
frequency of 540 MHz for 100 MHz IF.
------------------------------------------------------------------
TABLE 1
Transmitter BER Tests
Use Debug mode of BERT program
Commands
Esc Exit Debug mode
< Decrease attenuation (Shift = 10 dB) > Increase attenuation (Shift = 10 dB)
C Generate calibration signal I Generate idle signal (second stage of calibration)
+ Adjust coarse calibration - Adjust coarse calibration
A Adjust fine calibration
4 BER 104 5 BER 105 6 BER 106
S SINAD measurement N Sine-wave idle signal Q Quiet (unmodulated) idle
1 Data is inverted 0 Data is non-inverted
6.6 Power Meter Test
6.6.1 The purpose of the power meter test is to measure power output developed by a RF transmitter by
the DUT. This measurement directly compared to the HP 432B power meter and the table provided in
Appendix XX.X. This table takes into account losses of attenuators and coax cables between the DUT and
the HP power meter. Measurements will be recorded on Data Sheet X.XX. Also included are
measurements of SWR compared against a known 1:1 and 2:1 load.
Two special RG-8 cables must be used. The dB loss of each cable has been previously measured on the
frequencies used during this test. They are labeled with green tags as “Coax 1” and “Coax 2”.
An RF linear amplifier must be used along with a transceiver capable of more than 100 watts (105 -110
watts) at the frequencies used must also be located. Inspect the data sheets of each DUT to determine if 6
meters or higher frequencies are needed for your choice of transceiver and linear amplifier. Also, use a
linear amplifier that runs off of the 220 volt power receptacle in the screen room.
6.6.2 Test hook-up (See FIG. 6-1)
6.6.2.1 With all test equipment and DUT power switches in the off position and the transmitter in the
receive mode, connect the following:
Connection Connectors Cable Type
-----------------------------------------------------------------------------------------------------

99
HF/VHF transceiver to Linear Amplifier PL-259 to PL-259 50 Ohm Coax
Linear Amplifier to DUT PL-259 to PL-259 50 Ohm Coax
DUT to Bird 8329 30 dB Attenuator PL-259 to Type N “Coax 1”
Bird 8329 to HP 20 dB Attenuator Type N to Type N “Coax 2”
HP 20 dB Attenuator to Bird 10 dB Attenuator Direct Connection
(for high power test)
HP or Bird Attenuator to HP 432B Power Meter Direct Connection
DC Power supply to DUT As Required
Two-Tone Generator to Microphone Jack As Required
Telegraph Key As Required
Keying Generator to Transceiver Key Jack As Required 50 Ohm Coax
Keying connection from Transceiver to Linear Amplifier
6.6.3 Test Procedure
6.6.3.1 Turn on DUT, transceiver and power meter. Turn on DC supply for DUT.
Leave the linear amplifier off until doing the high power tests.
Transceiver
Linear
Amplifier
Bird 8329
30 dB Power
Attenuator
Two-
Tone
Gen
Bird 10 dB
Attenuator
(high power
test)
Bird 8329
30 dB Power
Bird 10 dB
Attenuator
(high power
Test)
Attenuator
HP 20 dB
Attenuator
KEY
HP 20 dB
Attenuator
HP 432B
Power Meter
Figure 6.6: Power Meter Test Hook-up

100
6.6.3.2 Calibrate the HP 432B Power Meter. Make sure the frequency and calibration factor is correct for
each individual test. Consult the power meter manual if needed.
Instrument Control Position
Transceiver Power Output Lowest Setting
Frequency 1.995 MHz
Antenna Port As Required
Mode CW
Mic Gain Lowest Setting
Linear Amplifier AC Power Off
HP Power Meter Frequency .002 GHz
Calibration Factor See Table XX.X
Zero As Required
dBm/mW mW
DUT RANGE 200 or “Mid”
AVE/PEP AVE.
DC Power ON
HOLD Mid Scale
6.6.3.3 Allow all equipment to warm up at least 10 minutes before proceeding to step 6.1.3.4
6.6.3.4 Tune the transceiver per the operator’s manual. Put the transceiver in the CW transmit mode.
Depress the telegraph key. Slowly turn up the power until a reading of XX.X mW is read on the power
meter, equivalent to 100 watts at the DUT. If this reading cannot be attained, get to as close to XX.X as
possible as possible. Note the difference, if any. Transmitting as long as necessary to get a steady reading
on the HP power meter, at least 15 seconds. Let go of the telegraph key to turn off transmit mode.
6.6.3.5 Read DUT meter. Add or subtract power from this reading if an exact level could not be attained
on the HP 432B power meter with step 6.1.3.4. Example:
HP 432B reads .925 mW but should read .930 mW. The DUT meter should be reading approximately 0.5
lower than it should be when applied 100 watts. Add a half of a watt for this example.
In reality, the difference should be multiplied by the percentage of power reaching the HP power meter, in
this case, 0.5 watts X 0.930 = 0.465 watts. This may not make much difference on the 5 and 100 watt tests
(especially with analog power meters), but does on the 1000 watt tests.
6.6.3.6 Remove telegraph key from the transceiver. Plug in Keying Generator. Adjust the keying
generator for its highest speed. This gives the 50% duty cycle required. Turn generator on. Without
adjusting the power output from the previous step, note the power reading on the DUT in the AVE and
also in the PEP mode. (add any correction if necessary as in step 6.1.3.5). Record on Data Sheet.
6.6.3.7 Repeat the above steps for the 5 watt level tests. Set the DUT to the lowest power range. Please
note the table for the HP432B at this level. Record results of the AVE and PEP and 50 % duty cycle
power as in steps 6.1.3.4 through 6.1.3.6 in on Data Sheet.

101
6.6.3.8 Place transceiver on 14 MHz, Replace the keying generator with the telegraph key. Adjust power
until the desired level is reached on the HP power meter for 100 watts at the DUT. Do not forget to adjust
the HP power meter for the proper calibration factor and frequency. Zero before making all
measurements. Record the AVE and PEP on the Data Sheet. Repeat for 5 watt measurements as in steps
6.1.3.4 through 3.1.3.6.
6.6.3.81 Repeat the above steps for 28, 50, 144, 222, & 432 MHz, if necessary.
6.6.3.9 Remove the telegraph key. Plug in the two-tone generator to the transceiver’s microphone jack.
Place the transceiver in the USB mode and turn on the VOX. Turn on the generator, both tones on. Turn
up the mic gain on the transceiver and note the ALC. Adjust gain so the ALC is one quarter scale. Put the
DUT to PEP. Note the power on the DUT and record it on the Data Sheet. Turn off tone generator.
****NOTE: Before the two-tone reading can be made, the two tones of the generator must be exactly
even. Use the HP 8563E Spectrum Analyzer with the proper attenuators and step attenuators to match the
tones evenly. Adjust the “Balance” control on the tone generator to match the tones on the analyzer. ****
6.6.3.10 Turn the AC power “on” on the Linear Amplifier. Place the amplifier in “standby” Allow to
warm up at least 10 minutes. Set the Linear Amplifier and Transceiver for the 160 Meter band, the
transceiver frequency adjusted to 1.995 MHz.
6.6.3.11 Place the 10 dB Bird Attenuator in series with the HP 20 dB attenuator. This is now a total of
over 50 dB of attenuation for the input of the HP 432B power meter. Please note the set of tables for this
extra attenuator for the 1000 watt measurements.
6.6.3.12 Set the transceiver for the lowest power output. Set the DUT to the highest power range. Place
the telegraph key in the transceiver. Make sure the transceiver is in the CW mode. Place the Linear
Amplifier in the “operate” position. Key the transmitter and slowly adjust the power output of the
transceiver. Match the HP power meter to the table provided for 1000 watts at the DUT. Record the AVE
and PEP power read by the DUT on the Data Sheet. Let go of the key ! Repeat the above steps for 50 %
duty cycle, two-tone (14 MHz only) for 14 and 28 Mhz. (At this time, we do not have linear amplifiers for
VHF and UHF testing.) Is it getting hot in there or what ?
Note: Keep an eye on the Linear Amplifier and Transceivers heat dissipation. Let them cool down if
necessary.
SWR TEST
For this test, only the transceiver is used. Make certain the Linear Amplifier AC power is “off”. The test
is preformed at the 100 watt level. Only the 30 dB Bird 8329 Attenuator is needed and used as a 1:1 load.
Two 50 ohm precision carbon resistors in parallel will be used as a 2:1 load. “Coax 1” cable is used
between the DUT and the 1:1 load. The 2:1 is connected directly to the DUT via its 6 inch long coax
cable. Care must be used to keep the 2:1 load away from on top of or near conductive surfaces.
6.6.3.13 With the linear amplifier AC power off, set the power meter to “MID” or the 200 watt range.
Connect the DUT antenna connector to the 1:1 load. Set the frequency of the transceiver to 1.995 Mhz.
Set the power output of the transceiver to the lowest output setting. Place the transceiver in CW transmit
mode and depress the key. Adjust the power output while watching the DUT. Adjust the transceiver for

102
100 watts on the DUT. Read the SWR and record on the Data Sheet. Release the key ! Repeat for 14, 28,
50 MHz, if necessary.
There are two kinds of SWR measuring meters, cross needle and single needle. Cross needle meters are
read directly, single meters employ a “SET” knob and a forward/ reflected switch. If using a single needle
SWR meter, rotate the set knob to full scale in the “forward” position while transmitting. Keep
transmitting and switch to “reflected” to read the SWR.
6.6.3.14 Plug in the 2:1 load to the DUT antenna connector to the 2:1 load. Repeat step
6.6.3.13 and record on the data sheet.

103
VII. DATA SHEETS/ PRODUCT REVIEW TEST MANUAL
Manufacturer:__________ Model:_________ Serial #:_____________
Date:__________________ Test Engineer:_______________________
4.0 TRANSMITTER TESTS
4.1 OUTPUT-POWER TEST
4.1.3.5 DC Power Supply Only/ Maximum Output Power:
Voltmeter Reading: ______V Ammeter Reading: _______A
4.1.3.6 Receive Current:
Maximum volume; no signal; lights default: ______mA
4.1.3.7 to 4.1.3.9; 4.1.3.11 to 4.1.3.13
Band Mode DUT Min Bird Min DUT Max Bird Max Spurs/ Notes
160 CW ________ ________ ________ ________ _____________
80 CW ________ ________ ________ ________ _____________
AM ________ ________ ________ ________ _____________
60 SSB ________ ________ ________ ________ _____________
40 CW ________ ________ ________ ________ _____________
30 CW ________ ________ ________ ________ _____________
20 CW ________ ________ ________ ________ _____________
SSB ________ ________ ________ ________ _____________
17 CW ________ ________ ________ ________ _____________
15 CW ________ ________ ________ ________ _____________
12 CW ________ ________ ________ ________ _____________
10 CW ________ ________ ________ ________ _____________
FM ________ ________ ________ ________ _____________
6 CW ________ ________ ________ ________ _____________
SSB ________ ________ ________ ________ _____________
FM ________ ________ ________ ________ _____________
AM ________ ________ ________ ________ _____________

104
2 CW ________ ________ ________ ________ _____________
SSB ________ ________ ________ ________ _____________
FM ________ ________ ________ ________ _____________
AM ________ ________ ________ ________ _____________
440 CW ________ ________ ________ ________ _____________
SSB ________ ________ ________ ________ _____________
FM ________ ________ ________ ________ _____________
AM ________ ________ ________ ________ _____________
4.1.3.14 Transverter Output
Band µWattmeter Max
20 ________
15 ________
10 ________
4.2 TRANSMIT FREQUENCY RANGE TEST
Band Low Frequency Limit High Frequency Limit
4.2.3.4/ 160 __________________MHz __________________MHz
4.2.3.5
4.2.3.6 80 __________________MHz __________________MHz
60 __________________MHz __________________MHz
40 __________________MHz __________________MHz
30 __________________MHz __________________MHz
20 __________________MHz __________________MHz
17 __________________MHz __________________MHz
15 __________________MHz __________________MHz
12 __________________MHz __________________MHz
10 __________________MHz __________________MHz
6 __________________MHz __________________MHz
2 __________________MHz __________________MHz
440 __________________MHz __________________MHz
All frequencies as measured on transmitter dial read-out.
4.3 CW TRANSMIT-FREQUENCY ACCURACY TEST
Note: See 6.1 Low-Voltage and Temperature Chamber Test for units
designed for mobile and/or portable use.
4.3.3.3 20M Unkeyed DUT Frequency: __________________MHz
4.3.3.5/ 20M Max Power Out/ Counter Display: __________________MHz
4.3.3.6
4.3.3.4/ No significant display variation due to change in DC input
4.3.3.7 Power (12V min) or Power Output ( ).

105
4.3.3.8 6M Unkeyed DUT Frequency: __________________MHz
Max Power Out/ Counter Display: __________________MHz
No significant display variation due to change in
DC input power or Power Output ( ).
2M Unkeyed DUT Frequency: __________________MHz
Max Power Out/ Counter Display: __________________MHz
No significant display variation due to change in
DC input power or Power Output ( ).
440MHz Unkeyed DUT Frequency: __________________MHz
Max Power Out/ Counter Display: __________________MHz
No significant display variation due to change in
DC input power or Power Output ( ).
4.4 SPECTRAL PURITY TEST
Spur @ Spur Check @
Band Max Power Note Min Power Note
4.4.3.9/ 160 ______dBc ______ ______dBc ______
4.4.3.10
4.4.3.11 80 ______dBc ______ ______dBc ______
60 ______dBc ______ ______dBc ______
40 ______dBc ______ ______dBc ______
30 ______dBc ______ ______dBc ______
20 ______dBc ______ ______dBc ______
17 ______dBc ______ ______dBc ______
15 ______dBc ______ ______dBc ______
12 ______dBc ______ ______dBc ______
10 ______dBc ______ ______dBc ______
6 ______dBc ______ ______dBc ______
2 ______dBc ______ ______dBc ______
440 ______dBc ______ ______dBc ______
*NOTE: 5W minimum power.
4.4.3.12 PLOT - WORST CASE/ SPECTRAL PURITY TAKEN ( )
DUT FREQUENCY _________MHz SPUR LEVEL _________dBc
4.4.3.13 DUT Meets FCC Specifications: ______YES ______NO

106
4.5 TWO-TONE TRANSMIT IMD TEST 100W PEP
ac Volt.
4.5.3.7 3.900 MHz - TWO-TONE TRANSMIT IMD 3rd/5th ( / ) ______
4.5.3.8 14.250 MHz - TWO-TONE TRANSMIT IMD 3rd/5th ( / ) ______
4.5.3.9 1.850 MHz - TWO-TONE TRANSMIT IMD 3rd/5th ( / ) ______
5.330 MHz - TWO-TONE TRANSMIT IMD 3rd/5th ( / ) ______
7.250 MHz - TWO-TONE TRANSMIT IMD 3rd/5th ( / ) ______
10.120 MHz - TWO-TONE TRANSMIT IMD 3rd/5
th ( / ) ______
18.120 MHz - TWO-TONE TRANSMIT IMD 3rd/5
th ( / ) ______
21.250 MHz - TWO-TONE TRANSMIT IMD 3rd/5
th ( / ) ______
24.950 MHz - TWO-TONE TRANSMIT IMD 3rd/5
th ( / ) ______
28.350 MHz - TWO-TONE TRANSMIT IMD 3rd/5
th ( / ) ______
50.200 MHz - TWO-TONE TRANSMIT IMD 3rd/5
th ( / ) ______
144.200 MHz - TWO-TONE TRANSMIT IMD 3rd/5
th ( / ) ______
432.200 MHz - TWO-TONE TRANSMIT IMD 3rd/5
th ( / ) ______
Half-Power 14.250 MHz - TWO-TONE TRANSMIT IMD 3rd/5
th ( / )
4.6 SSB CARRIER AND UNWANTED SIDEBAND SUPPRESSION TEST
4.6.3.7 20M Level Of Suppressed Carrier/USB Mode: ______dB Below PEP
20M Level Of Unwanted Sideband/USB Mode: ______dB Below PEP
4.6.3.8 20M Level Of Suppressed Carrier/LSB Mode: ______dB Below PEP
20M Level Of Unwanted Sideband/LSB Mode: ______dB Below PEP
4.6.3.9 6M Level Of Suppressed Carrier/USB Mode: ______dB Below PEP
6M Level Of Unwanted Sideband/USB Mode: ______dB Below PEP
6M Level Of Suppressed Carrier/LSB Mode: ______dB Below PEP
6M Level Of Unwanted Sideband/LSB Mode: ______dB Below PEP
2M Level Of Suppressed Carrier/USB Mode: ______dB Below PEP
2M Level Of Unwanted Sideband/USB Mode: ______dB Below PEP
2M Level Of Suppressed Carrier/LSB Mode: ______dB Below PEP
2M Level Of Unwanted Sideband/LSB Mode: ______dB Below PEP
440 Level Of Suppressed Carrier/USB Mode: ______dB Below PEP
440 Level Of Unwanted Sideband/USB Mode: ______dB Below PEP
440 Level Of Suppressed Carrier/LSB Mode: ______dB Below PEP
440 Level Of Unwanted Sideband/LSB Mode: ______dB Below PEP

107
4.7 CW KEYING WAVEFORM TEST
4.7.3.6 CW KEYING / QSK OFF ( )
CW KEYING / QSK ON ( )
CW KEYING – QSK & HALF POWER - SPIKE? ( )
4.7.3.7 Keying sidebands plots saved ( )
4.8 PTT TO SSB/FM RF OUTPUT TEST
4.8.3.5
20M SSB 50% Delay ON Time: ______ms
4.8.3.6
10M FM 50% Delay ON Time: ______ms
4.8.3.7
6M FM 50% Delay ON Time: ______ms
2M FM 50% Delay ON Time: ______ms
440 FM 50% Delay ON Time: ______ms
4.9 TRANSMIT/ RECEIVE TURNAROUND TIME TEST
4.9.3.5 S9 Signal * /AGC Slow/PTT Key-Up To 50% Audio Output
Time: _______ms
4.9.3.6 S9 Signal * /AGC Fast/PTT Key-Up To 50% Audio Output
Time: _______ms
S9 -20 dB /AGC Slow/PTT Key-Up To 50% Audio Output
Time: _______ms
No significant variation due to change in AGC or a 20 dB
decrease in input signal ( ).
S9 Signal * /AGC Fast/CW Mode/Key-Up to 50% Audio Output
Time: _______ms
MDS + 10dB Signal/AGC Fast/CW Mode/Key-Up to 50% Audio Output
Time: _______ms
4.9.3.7 DUT Suitable For AMTOR: ______YES ______NO
*NOTE: If an S meter is not available, use standard 50 V input signal.

108
4.10 KEYER SPEED AND SIDETONE
4.10.3.3 DOT to DASH ratio near 1:3 ( ).
4.10.3.4 Default keyer speed dit to dit time: ________ ms
Code Speed (WPM): _______
4.10.3.5 Minimum keyer speed dit to dit time: ________ ms
Code Speed (WPM): _______
4.10.3.6 Maximum keyer speed dit to dit time: ________ ms
Code Speed (WPM): _______
4.10.3.7 Default sidetone: __________ Hz
Minimum sidetone: __________ Hz
Maximum sidetone: __________ Hz
4.11 COMPOSITE NOISE TEST
4.11.3.13 Plot taken - Composite Noise at 14.025 MHz ( )
Noise level at 2 kHz offset from carrier: ______ dBc/Hz
Noise level at 22 kHz offset from carrier: ______ dBc/Hz
4.11.3.14 Plot taken - Composite Noise at 50.020 MHz ( )
Noise level at 2 kHz offset from carrier: ______ dBc/Hz
Noise level at 22 kHz offset from carrier: ______ dBc/Hz
Plot taken - Composite Noise at 144.020 MHz ( )
Noise level at 2 kHz offset from carrier: ______ dBc/Hz
Noise level at 22 kHz offset from carrier: ______ dBc/Hz
Plot taken - Composite Noise at 432.020 MHz ( )
Noise level at 2 kHz offset from carrier: ______ dBc/Hz
Noise level at 22 kHz offset from carrier: ______ dBc/Hz

109
5.0 RECEIVER TESTS
5.1 CW MINIMUM DISCERNIBLE SIGNAL (MDS) TEST
Standard (STD) Conditions: 10 dB Step Attn: 10 dB
1 dB Step Attn: 0 dB
IF FILTERS: __________Hz
5.1.3.8/
5.1.3.9 Can AGC be set to OFF?: ________
1.020 MHz Preamp Off, MDS: __________dBm
Preamp One, MDS: __________dBm
Preamp Two, MDS: __________dBm
5.1.3.10
3.520 MHz Preamp Off, MDS: __________dBm S5 Reference: __________dBm
Preamp One, MDS: __________dBm S5 Reference: __________dBm
Preamp Two, MDS: __________dBm S5 Reference: __________dBm
5.1.3.11
14.020 MHz Preamp Off, MDS: __________dBm S5 Reference: __________dBm
Preamp One, MDS: __________dBm S5 Reference: __________dBm
Preamp Two, MDS: __________dBm S5 Reference: __________dBm
5.1.3.12
50.020 MHz Preamp Off, MDS: __________dBm S5 Reference: __________dBm
Preamp One, MDS: __________dBm S5 Reference: __________dBm
Preamp Two, MDS: __________dBm S5 Reference: __________dBm
144.020 MHz Preamp Off, MDS: _________dBm S5 Reference: __________dBm
Preamp One, MDS: _________dBm S5 Reference: __________dBm
Preamp Two, MDS: _________dBm S5 Reference: __________dBm
430.020 MHz Preamp Off, MDS: _________dBm S5 Reference: __________dBm
Preamp One, MDS: _________dBm S5 Reference: __________dBm
Preamp Two, MDS: _________dBm S5 Reference: __________dBm
5.2 AM RECEIVE SENSITIVITY TEST
Standard (STD) Conditions: 10 dB Step Attn: 10 dB
1 dB Step Attn: 0 dB
IF FILTER __________kHz
5.2.3.7/5.2.3.8
1.020 MHz Preamp off, 10 dB (S+N)/N: ________ V
Preamp one, 10 dB (S+N)/N: ________ V
Preamp two, 10 dB (S+N)/N: ________ V
5.2.3.9
3.800 MHz Preamp off, 10 dB (S+N)/N: ________ V
Preamp one, 10 dB (S+N)/N: ________ V
Preamp two, 10 dB (S+N)/N: ________ V

110
5.2.3.10
53.000 MHz Preamp off, 10 dB (S+N)/N: ________ V
Preamp one, 10 dB (S+N)/N: ________ V
Preamp two, 10 dB (S+N)/N: ________ V
120.000 MHz Preamp off, 10 dB (S+N)/N: ________ V
(AIR) Preamp one, 10 dB (S+N)/N: ________ V
Preamp two, 10 dB (S+N)/N: ________ V
146.000 MHz Preamp off, 10 dB (S+N)/N: ________ V
Preamp one, 10 dB (S+N)/N: ________ V
Preamp two, 10 dB (S+N)/N: ________ V
440.000 MHz Preamp off, 10 dB (S+N)/N: ________ V
Preamp one, 10 dB (S+N)/N: ________ V
Preamp two, 10 dB (S+N)/N: ________ V
5.3 FM 12 dB SINAD TEST
Standard (STD) Conditions: 10 dB Step Attn: 10 dB
1 dB Step Attn: 0 dB
IF Filters: ________kHz (Normal/Narrow)
5.3.3.5/5.3.3.6
29.000 MHz Preamp off, 12 dB SINAD: ________ V ________dBm
(Normal/ Preamp one, 12 dB SINAD: ________ V ________dBm
Narrow) Preamp two, 12 dB SINAD: ________ V ________dBm
5.3.3.13
52.000 MHz Preamp off, 12 dB SINAD: ________ V ________dBm
Preamp one, 12 dB SINAD: ________ V ________dBm
Preamp two, 12 dB SINAD: ________ V ________dBm
100.000 MHz Preamp off, 12 dB SINAD: ________ V ________dBm
(Wide) Preamp one, 12 dB SINAD: ________ V ________dBm
Preamp one, 12 dB SINAD: ________ V ________dBm
146.000 MHz Preamp off, 12 dB SINAD: ________ V ________dBm
Preamp one, 12 dB SINAD: ________ V ________dBm
Preamp two, 12 dB SINAD: ________ V ________dBm
162.000 MHz Preamp off, 12 dB SINAD: ________ V ________dBm
Preamp one, 12 dB SINAD: ________ V ________dBm
Preamp two, 12 dB SINAD: ________ V ________dBm

111
223.500 MHz Preamp off, 12 dB SINAD: ________ V ________dBm
Preamp one, 12 dB SINAD: ________ V ________dBm
Preamp two, 12 dB SINAD: ________ V ________dBm
440.000 MHz Preamp off, 12 dB SINAD: ________ V ________dBm
Preamp one, 12 dB SINAD: ________ V ________dBm
Preamp two, 12 dB SINAD: ________ V ________dBm
5.4 RECEIVE FREQUENCY RANGE TEST
Band Low Frequency Limit High Frequency Limit
5.4.3.4/ 160 __________________MHz __________________MHz
5.4.3.5
5.4.3.6 80 __________________MHz __________________MHz
60 __________________MHz __________________MHz
40 __________________MHz __________________MHz
30 __________________MHz __________________MHz
20 __________________MHz __________________MHz
17 __________________MHz __________________MHz
15 __________________MHz __________________MHz
12 __________________MHz __________________MHz
10 __________________MHz __________________MHz
6 __________________MHz __________________MHz
2 __________________MHz __________________MHz
440 __________________MHz __________________MHz
Other __________________MHz __________________MHz
Other __________________MHz __________________MHz
Other __________________MHz __________________MHz
Other __________________MHz __________________MHz
Other __________________MHz __________________MHz
General Coverage __________________MHz __________________MHz
All frequencies as measured on transmitter dial read-out.

112
5.5 FIRST IF AND IMAGE REJECTION TEST
Specified First Intermediate Frequency _______ MHz
IF or Calculated | MDS Level | IF or Image
Image Frequency | in dBm | Suppression in dB
| |
______________________|______________________|____________________
| |
______________________|______________________|____________________
| |
______________________|______________________|____________________
| |
______________________|______________________|____________________
| |
______________________|______________________|____________________
| |
______________________|______________________|____________________
| |
______________________|______________________|____________________
| |
______________________|______________________|____________________
5.7 BLOCKING GAIN COMPRESSION TEST
Standard (STD) Conditions: 10 dB Step Attn: 10 dB
1 dB Step Attn: 0 dB
IF FILTERS __________Hz
5.7.3.5 Preamp off/ 1 dB Compression Point @ 3.520 MHz: ________dBm
Preamp one/ 1 dB Compression Point @ 3.520 MHz: ________dBm
Preamp two/ 1 dB Compression Point @ 3.520 MHz: ________dBm
5.7.3.7
3.520 MHz Block level, Preamp off, lower (3.500 MHz): __________dBm
Block level, Preamp off, lower (3.515 MHz): __________dBm
Block level, Preamp off, lower (3.518 MHz): __________dBm
Block level, Preamp off, upper (3.522 MHz): __________dBm
Block level, Preamp off, upper (3.525 MHz): __________dBm
Block level, Preamp off, upper (3.540 MHz): __________dBm
Block level, Preamp one, lower (3.500 MHz): __________dBm
Block level, Preamp one, upper (3.540 MHz): __________dBm
Block level, Preamp two, lower (3.500 MHz): __________dBm
Block level, Preamp two, upper (3.540 MHz): __________dBm

113
5.7.3.9 Preamp off/ 1 dB Compression Point @ 14.020 MHz: ________dBm
Preamp one/ 1 dB Compression Point @ 14.020 MHz: ________dBm
Preamp two/ 1 dB Compression Point @ 14.020 MHz: ________dBm
14.020 MHz Block level, Preamp off, lower (14.000 MHz): __________dBm
Block level, Preamp off, lower (14.015 MHz): __________dBm
Block level, Preamp off, lower (14.018 MHz): __________dBm
Block level, Preamp off, upper (14.022 MHz): __________dBm
Block level, Preamp off, upper (14.025 MHz): __________dBm
Block level, Preamp off, upper (14.040 MHz): __________dBm
Block level, Preamp one, lower (14.000 MHz): __________dBm
Block level, Preamp one, upper (14.040 MHz): __________dBm
Block level, Preamp two, lower (14.000 MHz): __________dBm
Block level, Preamp two, upper (14.040 MHz): __________dBm
Preamp off/ 1 dB Compression Point @ 50.020 MHz: ________dBm
Preamp one/ 1 dB Compression Point @ 50.020 MHz: ________dBm
Preamp two/ 1 dB Compression Point @ 50.020 MHz: ________dBm
50.020 MHz Block level, Preamp off, lower (50.000 MHz): __________dBm
Block level, Preamp off, lower (50.015 MHz): __________dBm
Block level, Preamp off, lower (50.018 MHz): __________dBm
Block level, Preamp off, upper (50.022 MHz): __________dBm
Block level, Preamp off, upper (50.025 MHz): __________dBm
Block level, Preamp off, upper (50.040 MHz): __________dBm
Block level, Preamp one, lower (50.000 MHz): __________dBm
Block level, Preamp one, upper (50.040 MHz): __________dBm
Block level, Preamp two, lower (50.000 MHz): __________dBm
Block level, Preamp two, upper (50.040 MHz): __________dBm
Preamp off/ 1 dB Compression Point @ 144.020 MHz: ________dBm
Preamp one/ 1 dB Compression Point @ 144.020 MHz: ________dBm
Preamp two/ 1 dB Compression Point @ 144.020 MHz: ________dBm
144.020 MHz Block level, Preamp off, lower (144.000 MHz): __________dBm
Block level, Preamp off, lower (144.015 MHz): __________dBm
Block level, Preamp off, lower (144.018 MHz): __________dBm
Block level, Preamp off, upper (144.022 MHz): __________dBm
Block level, Preamp off, upper (144.025 MHz): __________dBm
Block level, Preamp off, upper (144.040 MHz): __________dBm
Block level, Preamp one, lower (144.000 MHz): __________dBm
Block level, Preamp one, upper (144.040 MHz): __________dBm
Block level, Preamp two, lower (144.000 MHz): __________dBm
Block level, Preamp two, upper (144.040 MHz): __________dBm
Preamp off/ 1 dB Compression Point @ 430.020 MHz: ________dBm
Preamp one/ 1 dB Compression Point @ 430.020 MHz: ________dBm
Preamp two/ 1 dB Compression Point @ 430.020 MHz: ________dBm

114
430.020 MHz Block level, Preamp off, lower (430.000 MHz): __________dBm
Block level, Preamp off, lower (430.015 MHz): __________dBm
Block level, Preamp off, lower (430.018 MHz): __________dBm
Block level, Preamp off, upper (430.022 MHz): __________dBm
Block level, Preamp off, upper (430.025 MHz): __________dBm
Block level, Preamp off, upper (430.040 MHz): __________dBm
Block level, Preamp one, lower (430.000 MHz): __________dBm
Block level, Preamp one, upper (430.040 MHz): __________dBm
Block level, Preamp two, lower (430.000 MHz): __________dBm
Block level, Preamp two, upper (430.040 MHz): __________dBm
5.7A RECIPROCAL MIXING TEST
+15 dBm Crystal Oscillator at 14.025 MHz
14.005 MHz, Preamp Off, Input level: _________dBm
14.020 MHz, Preamp Off, Input level: _________dBm
14.023 MHz, Preamp Off, Input level: _________dBm
14.027 MHz, Preamp Off, Input level: _________dBm
14.030 MHz, Preamp Off, Input level: _________dBm
14.040 MHz, Preamp Off, Input level: _________dBm
14.005 MHz, Preamp One, Input level: _________dBm
14.040 MHz, Preamp One, Input level: _________dBm
14.005 MHz, Preamp Two, Input level: _________dBm
14.040 MHz, Preamp Two, Input level: _________dBm
5.8 TWO-TONE 3rd ORDER DYNAMIC RANGE TEST
5.8.3.6/5.8.3.7/5.8.3.8
3.480/3.500 MHz Preamp Off, IMD level: ________dBm S5: ________dBm
3.510/3.515 MHz Preamp Off, IMD level: ________dBm S5: ________dBm
3.516/3.518 MHz Preamp Off, IMD level: ________dBm S5: ________dBm
3.522/3.524 MHz Preamp Off, IMD level: ________dBm S5: ________dBm
3.525/3.530 MHz Preamp Off, IMD level: ________dBm S5: ________dBm
3.540/3.560 MHz Preamp Off, IMD level: ________dBm S5: ________dBm
3.480/3.500 MHz Preamp One, IMD level: ________dBm S5: ________dBm
3.540/3.560 MHz Preamp One, IMD level: ________dBm S5: ________dBm
3.480/3.500 MHz Preamp Two, IMD level: ________dBm S5: ________dBm
3.540/3.560 MHz Preamp Two, IMD level: ________dBm S5: ________dBm
5.8.3.11
13.980/14.000 MHz Preamp Off, IMD level: ________dBm S5: ________dBm
14.010/14.015 MHz Preamp Off, IMD level: ________dBm S5: ________dBm
14.016/14.018 MHz Preamp Off, IMD level: ________dBm S5: ________dBm
14.022/14.024 MHz Preamp Off, IMD level: ________dBm S5: ________dBm
14.025/14.030 MHz Preamp Off, IMD level: ________dBm S5: ________dBm
14.040/14.060 MHz Preamp Off, IMD level: ________dBm S5: ________dBm
13.980/14.000 MHz Preamp One, IMD level: ________dBm S5: ________dBm
14.040/14.060 MHz Preamp One, IMD level: ________dBm S5: ________dBm

115
13.980/14.000 MHz Preamp Two, IMD level: ________dBm S5: ________dBm
14.040/14.060 MHz Preamp Two, IMD level: ________dBm S5: ________dBm
49.980/50.000 MHz Preamp Off, IMD level: ________dBm S5: ________dBm
50.010/50.015 MHz Preamp Off, IMD level: ________dBm S5: ________dBm
50.016/50.018 MHz Preamp Off, IMD level: ________dBm S5: ________dBm
50.022/50.024 MHz Preamp Off, IMD level: ________dBm S5: ________dBm
50.025/50.030 MHz Preamp Off, IMD level: ________dBm S5: ________dBm
50.040/50.060 MHz Preamp Off, IMD level: ________dBm S5: ________dBm
49.980/50.000 MHz Preamp One, IMD level: ________dBm S5: ________dBm
50.040/50.060 MHz Preamp One, IMD level: ________dBm S5: ________dBm
49.980/50.000 MHz Preamp Two, IMD level: ________dBm S5: ________dBm
50.040/50.060 MHz Preamp Two, IMD level: ________dBm S5: ________dBm

116
143.980/144.000 MHz Preamp Off, IMD level: ________dBm S5: ________dBm
144.010/144.015 MHz Preamp Off, IMD level: ________dBm S5: ________dBm
144.016/144.018 MHz Preamp Off, IMD level: ________dBm S5: ________dBm
144.022/144.024 MHz Preamp Off, IMD level: ________dBm S5: ________dBm
144.025/144.030 MHz Preamp Off, IMD level: ________dBm S5: ________dBm
144.040/144.060 MHz Preamp Off, IMD level: ________dBm S5: ________dBm
143.980/144.000 MHz Preamp One, IMD level: ________dBm S5: ________dBm
144.040/144.060 MHz Preamp One, IMD level: ________dBm S5: ________dBm
143.980/144.000 MHz Preamp Two, IMD level: ________dBm S5: ________dBm
144.040/144.060 MHz Preamp Two, IMD level: ________dBm S5: ________dBm
429.980/430.000 MHz Preamp Off, IMD level: ________dBm S5: ________dBm
430.010/430.015 MHz Preamp Off, IMD level: ________dBm S5: ________dBm
430.016/430.018 MHz Preamp Off, IMD level: ________dBm S5: ________dBm
430.022/430.024 MHz Preamp Off, IMD level: ________dBm S5: ________dBm
430.025/430.030 MHz Preamp Off, IMD level: ________dBm S5: ________dBm
430.040/430.060 MHz Preamp Off, IMD level: ________dBm S5: ________dBm
429.980/430.000 MHz Preamp One, IMD level: ________dBm S5: ________dBm
430.040/430.060 MHz Preamp One, IMD level: ________dBm S5: ________dBm
429.980/430.000 MHz Preamp Two, IMD level: ________dBm S5: ________dBm
430.040/430.060 MHz Preamp Two, IMD level: ________dBm S5: ________dBm
5.8.3.13 TWO-TONE 2nd ORDER DYNAMIC RANGE
RF Generator frequencies: 6.000/8.020 MHz
Preamp off, Second-Order IMD Level: ______dBm (MDS)
Level: ______dBm (S5)
Intercept point: ______dBm
Preamp one, Second-Order IMD Level: ______dBm (MDS)
Level: ______dBm (S5)
Intercept point: ______dBm
Preamp two, Second-Order IMD Level: ______dBm (MDS)
Level: ______dBm (S5)
Intercept point: ______dBm
5.9 FM ADJACENT-CHANNEL SELECTIVITY TEST
NOTE: 6 dB SINAD IS EQUAL TO 50% DISTORTION.
DUT Preamp: On
IF FILTERS __________kHz
5.9.3.4 29.000 MHz/28.980 MHz
Adjacent Channel Level for 6 dB SINAD: ________dBm
5.9.3.5 29.000 MHz/29.020 MHz
Adjacent Channel Level for 6 dB SINAD: ________dBm

117
5.9.3.6 52.000 MHz/51.980 MHz
Adjacent Channel Level for 6 dB SINAD: ________dBm
52.000 MHz/52.020 MHz
Adjacent Channel Level for 6 dB SINAD: ________dBm
146.000 MHz/145.980 MHz
Adjacent Channel Level for 6 dB SINAD: ________dBm
146.000 MHz/146.020 MHz
Adjacent Channel Level for 6 dB SINAD: ________dBm
440.000 MHz/439.980 MHz
Adjacent Channel Level for 6 dB SINAD: ________dBm
440.000 MHz/440.020 MHz
Adjacent Channel Level for 6 dB SINAD: ________dBm
5.9.3.8 Phase noise limit
Phase Noise Limit Level at 28.980 MHz: __________dBm
Phase Noise Limit Level at 29.020 MHz: __________dBm
5.9.3.9
Phase Noise Limit Level at 51.980 MHz: __________dBm
Phase Noise Limit Level at 52.020 MHz: __________dBm
Phase Noise Limit Level at 145.980 MHz: __________dBm
Phase Noise Limit Level at 146.020 MHz: __________dBm
Phase Noise Limit Level at 439.980 MHz: __________dBm
Phase Noise Limit Level at 440.020 MHz: __________dBm
5.6.3.7 Adjacent Channel Rejection
#1 Gen #2 Gen #1 Gen #2 Gen
29.000 28.980 _______dB 29.000 29.020 _______dB
52.000 51.980 _______dB 52.000 52.020 _______dB
146.000 145.980 _______dB 146.000 146.020 _______dB
440.000 439.980 _______dB 440.000 440.020 _______dB
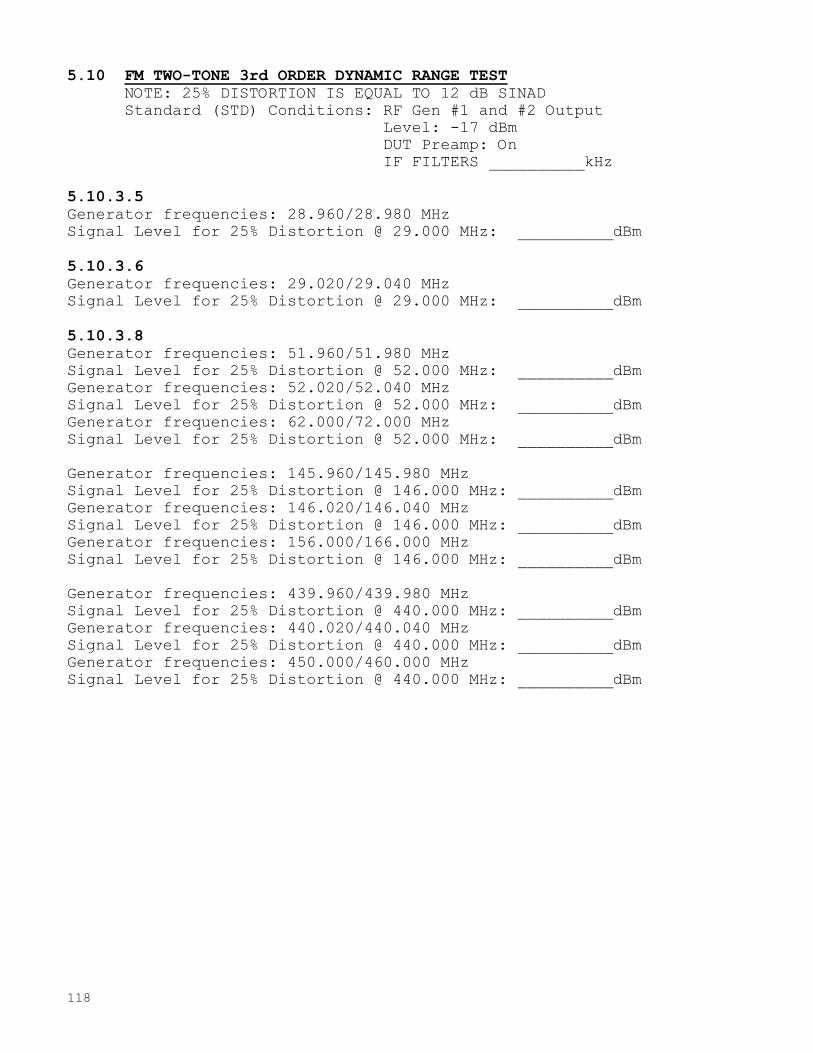
118
5.10 FM TWO-TONE 3rd ORDER DYNAMIC RANGE TEST
NOTE: 25% DISTORTION IS EQUAL TO 12 dB SINAD
Standard (STD) Conditions: RF Gen #1 and #2 Output
Level: -17 dBm
DUT Preamp: On
IF FILTERS __________kHz
5.10.3.5
Generator frequencies: 28.960/28.980 MHz
Signal Level for 25% Distortion @ 29.000 MHz: __________dBm
5.10.3.6
Generator frequencies: 29.020/29.040 MHz
Signal Level for 25% Distortion @ 29.000 MHz: __________dBm
5.10.3.8
Generator frequencies: 51.960/51.980 MHz
Signal Level for 25% Distortion @ 52.000 MHz: __________dBm
Generator frequencies: 52.020/52.040 MHz
Signal Level for 25% Distortion @ 52.000 MHz: __________dBm
Generator frequencies: 62.000/72.000 MHz
Signal Level for 25% Distortion @ 52.000 MHz: __________dBm
Generator frequencies: 145.960/145.980 MHz
Signal Level for 25% Distortion @ 146.000 MHz: __________dBm
Generator frequencies: 146.020/146.040 MHz
Signal Level for 25% Distortion @ 146.000 MHz: __________dBm
Generator frequencies: 156.000/166.000 MHz
Signal Level for 25% Distortion @ 146.000 MHz: __________dBm
Generator frequencies: 439.960/439.980 MHz
Signal Level for 25% Distortion @ 440.000 MHz: __________dBm
Generator frequencies: 440.020/440.040 MHz
Signal Level for 25% Distortion @ 440.000 MHz: __________dBm
Generator frequencies: 450.000/460.000 MHz
Signal Level for 25% Distortion @ 440.000 MHz: __________dBm

119
5.11 AUDIO POWER OUTPUT TEST
5.11.3.6 Specified Distortion: ________% THD
Specified Load Impedance: ________Ohms
5.11.3.7 Audio Voltage: ________V
5.11.3.8 Audio Output Power: ________W
5.11.3.9 Audio voltage at minimum volume (no signal): _______mV
(Hiss level)
5.12 AUDIO AND IF FREQUENCY RESPONSE TEST
5.12.3.6 IF Filters: __________Hz (CW Narrow)
Low Frequency: __________Hz
5.12.3.7 High Frequency: __________Hz Difference: ________Hz
5.12.3.8 IF Filters: __________Hz (USB Wide)
Low Frequency: __________Hz
High Frequency: __________Hz Difference: _________Hz
IF Filters: __________kHz (LSB Wide)
Low Frequency: __________Hz
High Frequency: __________Hz Difference: _________Hz
5.12.3.10 IF Filters: __________kHz (AM)
Low Frequency: __________Hz
High Frequency: __________Hz Difference: _________Hz

120
5.13 SQUELCH SENSITIVITY TEST
Standard (STD) Conditions: 10 dB Step Attn: 10 dB
1 dB Step Attn: 0 dB
Preamp On
IF FILTERS __________Hz
5.13.3.5
FM
29.000 MHz Squelch Threshold Point: __________ V
5.13.3.6
52.000 MHz Squelch Threshold Point: __________ V
146.000 MHz Squelch Threshold Point: __________ V
440.000 MHz Squelch Threshold Point: __________ V
5.13.3.7
SSB
14.200 MHz Squelch Threshold Point: __________ V
5.14 S METER TEST
Standard (STD) Conditions: 10 dB Step Attn: 10 dB
1 dB Step Attn: 0 dB
IF FILTERS __________Hz
5.14.3.4/5.14.3.5
14.200 MHz Preamp Off, S9 Indication: _______dBm _______ V
No significant deviation from expected level
at S9+20 dB( ).
5.14.3.6
14.200 MHz Preamp One, S9 Indication: _______dBm _______ V
No significant deviation from expected level
at S9+20 dB( ).
14.200 MHz Preamp Two, S9 Indication: _______dBm _______ V
No significant deviation from expected level
at S9+20 dB( ).

121
5.14.3.7
1.020 MHz Preamp Off, S9 Indication: _______dBm _______ V
No significant deviation from expected level
at S9+20 dB( ).
1.020 MHz Preamp One, S9 Indication: _______dBm _______ V
No significant deviation from expected level
at S9+20 dB( ).
1.020 MHz Preamp Two, S9 Indication: _______dBm _______ V
No significant deviation from expected level
at S9+20 dB( ).
50.020 MHz Preamp Off, S9 Indication: _______dBm _______ V
No significant deviation from expected level
at S9+20 dB( ).
50.020 MHz Preamp One, S9 Indication: _______dBm _______ V
No significant deviation from expected level
at S9+20 dB( ).
50.020 MHz Preamp Two, S9 Indication: _______dBm _______ V
No significant deviation from expected level
at S9+20 dB( ).
144.020 MHz Preamp Off, S9 Indication: _______dBm _______ V
No significant deviation from expected level
at S9+20 dB( ).
144.020 MHz Preamp One, S9 Indication: _______dBm _______ V
No significant deviation from expected level
at S9+20 dB( ).
144.020 MHz Preamp Two, S9 Indication: _______dBm _______ V
No significant deviation from expected level
at S9+20 dB( ).
420.020 MHz Preamp Off, S9 Indication: _______dBm _______ V
No significant deviation from expected level
at S9+20 dB( ).
420.020 MHz Preamp One, S9 Indication: _______dBm _______ V
No significant deviation from expected level
at S9+20 dB( ).
420.020 MHz Preamp Two, S9 Indication: _______dBm _______ V
No significant deviation from expected level
at S9+20 dB( ).
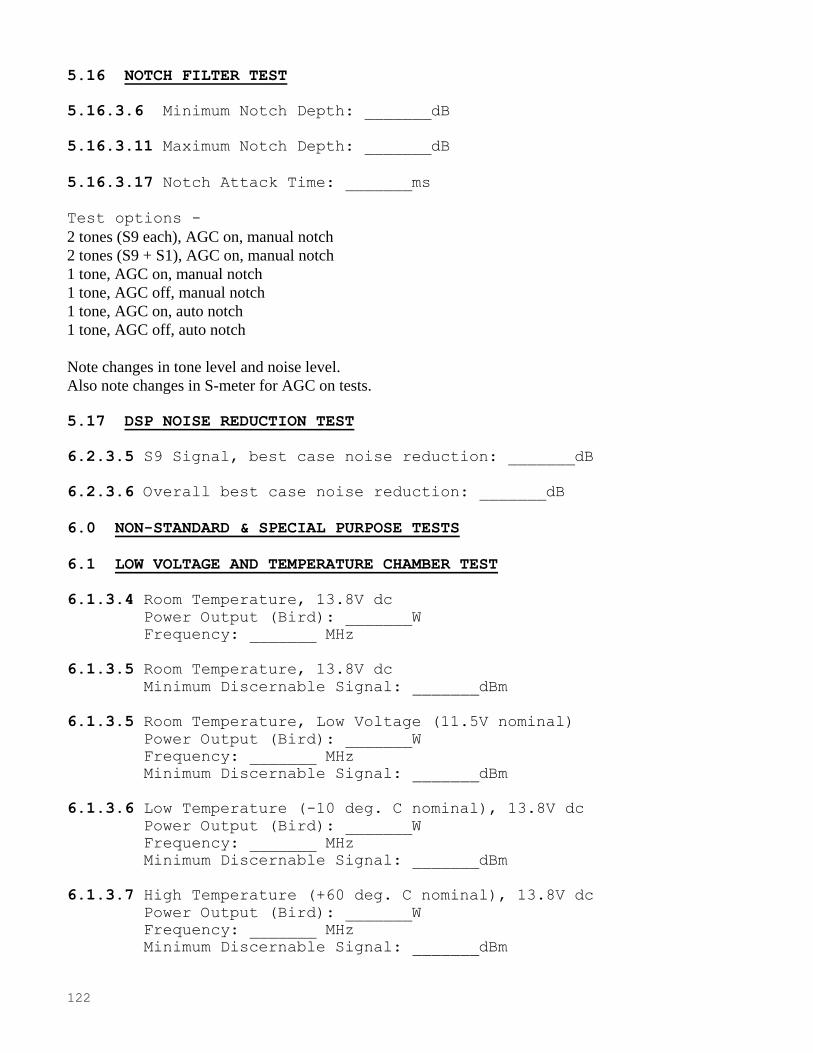
122
5.16 NOTCH FILTER TEST
5.16.3.6 Minimum Notch Depth: _______dB
5.16.3.11 Maximum Notch Depth: _______dB
5.16.3.17 Notch Attack Time: _______ms
Test options -
2 tones (S9 each), AGC on, manual notch
2 tones (S9 + S1), AGC on, manual notch
1 tone, AGC on, manual notch
1 tone, AGC off, manual notch
1 tone, AGC on, auto notch
1 tone, AGC off, auto notch
Note changes in tone level and noise level.
Also note changes in S-meter for AGC on tests.
5.17 DSP NOISE REDUCTION TEST
6.2.3.5 S9 Signal, best case noise reduction: _______dB
6.2.3.6 Overall best case noise reduction: _______dB
6.0 NON-STANDARD & SPECIAL PURPOSE TESTS
6.1 LOW VOLTAGE AND TEMPERATURE CHAMBER TEST
6.1.3.4 Room Temperature, 13.8V dc
Power Output (Bird): _______W
Frequency: _______ MHz
6.1.3.5 Room Temperature, 13.8V dc
Minimum Discernable Signal: _______dBm
6.1.3.5 Room Temperature, Low Voltage (11.5V nominal)
Power Output (Bird): _______W
Frequency: _______ MHz
Minimum Discernable Signal: _______dBm
6.1.3.6 Low Temperature (-10 deg. C nominal), 13.8V dc
Power Output (Bird): _______W
Frequency: _______ MHz
Minimum Discernable Signal: _______dBm
6.1.3.7 High Temperature (+60 deg. C nominal), 13.8V dc
Power Output (Bird): _______W
Frequency: _______ MHz
Minimum Discernable Signal: _______dBm

123
6.1.3.8 Room Temperature, 13.8V dc
Power Output (Bird): _______W
Frequency: _______ MHz
Minimum Discernable Signal: _______dBm
DUT Functions Normally ( ).
6.3 RECEIVER BIT ERROR RATE TEST
6.3.3.7 146 MHz, BER for 12-dB SINAD: ____________
146 MHz, BER for 16-dB SINAD: ____________
146 MHz, BER for -50 dBm: ____________
440 MHz, BER for 12-dB SINAD: ____________
440 MHz, BER for 16-dB SINAD: ____________
440 MHz, BER for -50 dBm: ____________
6.4 TRANSMITTER BIT ERROR RATE TEST
6.4.3.9 146 MHz, BER for 12 dB SINAD: ___________
146 MHz, BER for SINAD + 30 dB: ___________
440 MHz, BER for 12 dB SINAD: ___________
440 MHz, BER for SINAD + 30 dB: ___________
6.5 RECEIVER PHASE NOISE TEST
6.5.3.4 1 kHz offset, crystal oscillator level
6.5.3.5
14.026 MHz, oscillator level: __________dBm
14.027 MHz, oscillator level: __________dBm
14.028 MHz, oscillator level: __________dBm
14.029 MHz, oscillator level: __________dBm
14.030 MHz, oscillator level: __________dBm
14.032 MHz, oscillator level: __________dBm
14.034 MHz, oscillator level: __________dBm
14.036 MHz, oscillator level: __________dBm
14.038 MHz, oscillator level: __________dBm
14.040 MHz, oscillator level: __________dBm
14.042 MHz, oscillator level: __________dBm
14.044 MHz, oscillator level: __________dBm
14.046 MHz, oscillator level: __________dBm
14.048 MHz, oscillator level: __________dBm
14.050 MHz, oscillator level: __________dBm
14.055 MHz, oscillator level: __________dBm
14.060 MHz, oscillator level: __________dBm
14.065 MHz, oscillator level: __________dBm
14.070 MHz, oscillator level: __________dBm
14.075 MHz, oscillator level: __________dBm
14.080 MHz, oscillator level: __________dBm
14.085 MHz, oscillator level: __________dBm
14.090 MHz, oscillator level: __________dBm
14.105 MHz, oscillator level: __________dBm

124
14.115 MHz, oscillator level: __________dBm
14.125 MHz, oscillator level: __________dBm
14.135 MHz, oscillator level: __________dBm
14.145 MHz, oscillator level: __________dBm
14.155 MHz, oscillator level: __________dBm
14.165 MHz, oscillator level: __________dBm
14.175 MHz, oscillator level: __________dBm
14.200 MHz, oscillator level: __________dBm
14.225 MHz, oscillator level: __________dBm
14.250 MHz, oscillator level: __________dBm
14.275 MHz, oscillator level: __________dBm
14.325 MHz, oscillator level: __________dBm
14.375 MHz, oscillator level: __________dBm
14.425 MHz, oscillator level: __________dBm
14.525 MHz, oscillator level: __________dBm

125
5.1.3.13 Expanded Tests
1.820 MHz Preamp Off, MDS: __________dBm
Preamp One, MDS: __________dBm
Preamp Two, MDS: __________dBm
7.020 MHz Preamp Off, MDS: __________dBm
Preamp One, MDS: __________dBm
Preamp Two, MDS: __________dBm
10.120 MHz Preamp Off, MDS: __________dBm
Preamp One, MDS: __________dBm
Preamp Two, MDS: __________dBm
18.088 MHz Preamp Off, MDS: __________dBm
Preamp One, MDS: __________dBm
Preamp Two, MDS: __________dBm
21.020 MHz Preamp Off, MDS: __________dBm
Preamp One, MDS: __________dBm
Preamp Two, MDS: __________dBm
24.910 MHz Preamp Off, MDS: __________dBm
Preamp One, MDS: __________dBm
Preamp Two, MDS: __________dBm
28.020 MHz Preamp Off, MDS: __________dBm
Preamp One, MDS: __________dBm
Preamp Two, MDS: __________dBm
5.7.3.11 Swept Blocking Dynamic Range Lower Frequencies Block
Level (dBm)
Upper Frequencies Block
Level (dBm)
13.820 MHz 14.220 MHz
13.840 MHz 14.200 MHz
13.860 MHz 14.180 MHz
13.880 MHz 14.160 MHz
13.900 MHz 14.140 MHz
13.920 MHz 14.120 MHz
13.940 MHz 14.100 MHz
13.960 MHz 14.080 MHz
13.965 MHz 14.075 MHz
13.970 MHz 14.070 MHz
13.975 MHz 14.065 MHz
13.980 MHz 14.060 MHz
13.985 MHz 14.055 MHz

126
13.990 MHz 14.050 MHz
13.992 MHz 14.048 MHz
13.994 MHz 14.046 MHz
13.996 MHz 14.044 MHz
13.998 MHz 14.042 MHz
14.000 MHz 14.040 MHz
14.002 MHz 14.038 MHz
14.004 MHz 14.036 MHz
14.006 MHz 14.034 MHz
14.008 MHz 14.032 MHz
14.010 MHz 14.030 MHz
14.012 MHz 14.028 MHz
14.014 MHz 14.026 MHz
14.015 MHz 14.025 MHz
14.016 MHz 14.024 MHz
14.017 MHz 14.023 MHz
14.018 MHz 14.022 MHz
14.019 MHz 14.021 MHz

127
5.8.3.18 Swept IMD Dynamic Range (Cont.) First Generator
Frequency
Second Generator
Frequency
Level for MDS
IMD Response
First Generator
Frequency
Second
Generator
Frequency
Level for MDS
IMD Response
13.620 MHz 13.820 MHz 14.022 MHz 14.021 MHz
13.660 MHz 13.840 MHz 14.024 MHz 14.022 MHz
13.700 MHz 13.860 MHz 14.026 MHz 14.023 MHz
13.740 MHz 13.880 MHz 14.028 MHz 14.024 MHz
13.780 MHz 13.900 MHz 14.030 MHz 14.025 MHz
13.820 MHz 13.920 MHz 14.032 MHz 14.026 MHz
13.860 MHz 13.940 MHz 14.036 MHz 14.028 MHz
13.900 MHz 13.960 MHz 14.040 MHz 14.030 MHz
13.910 MHz 13.965 MHz 14.044 MHz 14.032 MHz
13.920 MHz 13.970 MHz 14.048 MHz 14.034 MHz
13.930 MHz 13.975 MHz 14.052 MHz 14.036 MHz
13.940 MHz 13.980 MHz 14.056 MHz 14.038 MHz
13.950 MHz 13.985 MHz 14.060 MHz 14.040 MHz
13.960 MHz 13.990 MHz 14.064 MHz 14.042 MHz
13.964 MHz 13.992 MHz 14.068 MHz 14.044 MHz
13.968 MHz 13.994 MHz 14.072 MHz 14.046 MHz
13.972 MHz 13.996 MHz 14.076 MHz 14.048 MHz
13.976 MHz 13.998 MHz 14.080 MHz 14.050 MHz
13.980 MHz 14.000 MHz 14.090 MHz 14.055 MHz
13.984 MHz 14.002 MHz 14.100 MHz 14.060 MHz
13.988 MHz 14.004 MHz 14.110 MHz 14.065 MHz
13.992 MHz 14.006 MHz 14.120 MHz 14.070 MHz
13.996 MHz 14.008 MHz 14.130 MHz 14.075 MHz
14.000 MHz 14.010 MHz 14.140 MHz 14.080 MHz
14.004 MHz 14.012 MHz 14.180 MHz 14.100 MHz
14.008 MHz 14.014 MHz 14.220 MHz 14.120 MHz
14.010 MHz 14.015 MHz 14.260 MHz 14.140 MHz
14.012 MHz 14.016 MHz 14.300 MHz 14.160 MHz
14.014 MHz 14.017 MHz 14.340 MHz 14.180 MHz
14.016 MHz 14.018 MHz 14.380 MHz 14.200 MHz
14.018 MHz 14.019 MHz 14.420 MHz 14.220 MHz

128
5.15 IN-BAND IMD TEST
5.15.3.6 14.200 MHz, AGC Fast, S9 Signals, plot taken ( ).
14.200 MHz, AGC Fast, S9 Signals, plot taken ( ).
14.200 MHz, AGC Fast, S9+40/60 Signals, plot taken ( ).
14.200 MHz, AGC Fast, S9+40/60 Signals, plot taken ( ).

129
6.7 HF LINEAR AMPLIFIER TEST
6.7.1 The purpose of the Linear Amplifier Test is to determine if the amplifier meets the manufacturer's power output specification, meets FCC Part 97 regarding Spurious Emissions and measure and record the level of Intermodulation Distortion. It is very important for the test engineer to be familiar with the Lab test equipment and the Device Under Test (DUT). The manufacturer's manual should be completely read and understood before any testing is performed. At no time should any equipment be operated in a manner that is inconsistent with the manufacturer's recommended procedures or published limits. Failure to understand the DUT could result in test error, damage to the equipment and worse, damage to the test engineer. 6.7.2 List of Equipment: Instrument Manufacturer Model Quantity Spectrum Analyzer HP 8563E 1 In-Line RF Wattmeter Bird 4381 1 In-Line RF Wattmeter Bird 43 2 Power Attenuator Bird 8329 1 RF Step Attenuator HP 355C 1 RF Step Attenuator HP 355D 1 Fixed RF Attenuator Bird 8340-100 1 Fixed RF Attenuator Bird 8340-200 1 Signal Generator Any Any 2 Driver Amplifier ARRL N/A 2 150W Power Amplifier CCI EB63 2 14 MHz Power Combiner ARRL NA 1 Inter-Connecting Cables NA As Required As Required
6.7A LINEAR AMPLIFIER OPERATION TEST 6.7A.1 The purpose of the Linear Amplifier Operation Test is to determine the ability of the amplifier to produce its full rated output power in each applicable Amateur Band without exceeding any of the manufacturer's specified limits. The input drive power, the input reflected power, the output forward and reflected power and the spurious emissions are measured at each test point. Measurements are made at the edges of the bands and one or more mid-band points. The spectral display on each band is saved to disc. Additionally, the Linear Amplifier will be tested with an input signal of 27 MHz to ensure the amplifier does not function on the Citizen's Band. 6.7A.2 Test Hook-Up (See FIGURE 6.7A) Diagram here: 6.7A.3 With all power switches in the OFF position and the signal generator outputs disabled, connect the following: CONNECTION CONNECTORS CABLE TYPE Signal Generator Out Type N to BNC RG-58 to Driver #1 In Driver #1 Out to Linear BNC to BNC RG-58 Amp #1 In Linear Amp #1 Out to BNC to BNC RG-58

130
Filter #1 In Filter #1 Out to Bird 43 BNC to PL-259 RG-58 Wattmeter In Bird 43 Wattmeter Out PL-259 to As Required RG-58 to DUT In DUT Out to Bird 4381 As required to type N RG-8 Wattmeter In Bird 4381 Wattmeter Out Type N to type N RG-8 to Power Attenuator In Power Attenuator Out Type N to type N RG-58 to 20 dB Attenuator In 20 dB Attenuator Out to Type N to BNC RG-58 10 dB Step Attenuator In 10 dB Step Attenuator Out BNC to BNC RG-58 to 1 dB Step Attenuator In 1 dB Step Attenuator Out BNC to BNC RG-58 to Spectrum Analyzer In 6.7A.4 Set the following controls in the order shown INSTRUMENT CONTROL POSITION DUT Operate/Standby Standby DUT Power On/Off On DUT TUNE Pre-set for 160 m DUT Load Pre-set for 160 m DUT CW/SSB CW Bird 4381 Power On/Off ON Bird 4381 Function FWD CW Bird 4381 Forward Element As Required Bird 43 Element As Required Bird 43 Element Direction Forward 10 dB Step Attn Attenuator >20 dB 1 dB Step Attn Attenuator Any Signal Generator Modulation Off Signal Generator Frequency 1.800 MHz Signal Generator Carrier Off/On Off Signal Generator RF Level < -40dBm **Spectrum Analyzer Reference Level -10dBm Spectrum Analyzer Input Attenuation 20 dB Spectrum Analyzer Threshold -80 dBm Spectrum Analyzer Resolution Bandwidth 10 kHz Spectrum Analyzer Video Bandwidth 30 kHz Spectrum Analyzer Range MHz 0 to 50 MHz Spectrum Analyzer Sweep Time Auto
** NOTE: The spectrum analyzer is automatically set to these values when using the LabWindows/CVI software. 6.7A.5 Allow the equipment to warm up for at least 10 minutes before proceeding to the next step.

131
6.7A.6 Check to make sure all power switches are on, including the filament switch if the DUT has one. 6.7A.7 If the DUT is if the vacuum tube type, the tuning of the amplifier must be performed in a manner consistent with all DUT and vacuum tube limits. Be sure not to exceed the maximum plate current, grid current and DUT power output limits while performing the following steps. If the amplifier is of the solid state type, be sure not to exceed the final PA maximum operating temperature and duty cycle limit. NOTE: Some of the tuning steps may be omitted when the DUT is of the solid state type. Usually, there are no tuning adjustments, such as Plate and Load. Follow the procedure for adjusting the amplifier's drive level for the rated output. 6.7A.8 Switch the DUT to the Operate mode and enable the carrier on the generator. Increase the generator level until a moderate amount of RF is produced but the DUT (consult the operator's manual for the recommended drive level for tune-up). Tune the DUT per the manufacturer's instructions, for the maximum power output without exceeding the maximum rated power output. Be sure to adjust the generator as necessary if the rated output is exceeded. 6.7A.9 Measure and record on the data sheet the following items: MEASUREMENT INSTRUMENT Forward Power Bird 43 Reflected Power Bird 43 Plate Voltage DUT Meter Plate Current DUT Meter Grid Current DUT Meter Output Power Bird 4381 6.7A.9.1 Adjust the step attenuators to provide approximately -10 dBm input to the spectrum analyzer (the fundamental should be just at the top of the frequency sweep display).
NOTE: At no time should the input to the spectrum analyzer exceed 0 dBm. Damage to the instrument will occur at +10 dBm or greater ! 6.7A.9.2 If using the LabWindows/CVI software, click on the READ ANALYZER button to acquire data from the analyzer and display it on the screen. The level of the harmonics and/or spurs, in dB below the fundamental, can be read on the analyzer using the delta function. Note worst case harmonic and spur and record it on the data sheet. Disable the carrier on the signal generator. 6.7A.9.3 Set the generator frequency to the next value on the data sheet and re-tune the DUT as necessary. Repeat step 6.7A.9 for this test frequency. Again, repeat this step incrementing the generator's frequency each time, until the upper limit of the Amateur Band is reached. 6.7A.9.4 Repeat the above steps for each of the available Amateur Bands for each frequency on the data sheet. For 10 to 20 MHz, set the spectrum analyzer for a frequency range of 0 to 100 MHz. For 20 to 30 MHz, set the spectrum analyzer for a frequency range of 0 to 200 MHz.
6.7B LINEAR AMPLIFIER IMD TEST 6.7A.1 The purpose of the Linear Amplifier IMD Test is to measure and record the IMD products generated within the DUT when subjected to two simultaneous input signals. This test is performed by generating two RF signals (at 14.020 and 14.0212 MHz), amplifying them to an appropriate drive level, combining the amplified signals and feeding them to the DUT input. The DUT output IMD products are then displayed on the spectrum analyzer. 6.7B.2 Test Hook-Up (See Figure 6.7B) Diagram here:

132
6.7B.3 With all power switches in the off position and both signal generator carriers disabled, connect the following: CONNECTION CONNECTORS CABLE TYPE Signal Generator #1 Out Type N to BNC RG-58 to Driver #1 In Signal Generator #2 Out Type N to BNC RG-58 to Driver #2 In Driver #1 Out to BNC to BNC RG-58 Linear Amp #1 In Driver #2 Out to BNC to BNC RG-58 Linear Amp #2 In Linear Amp #1 Out BNC to BNC RG-58 to Filter #1 In Linear Amp #2 Out BNC to BNC RG-58 to Filter #2 In Filter #1 Out to BNC to PL-259 RG-58 Bird 43 #1 In Filter #2 Out to BNC to PL-259 RG-58 Bird 43 #2 In Bird 43 #1 Out to PL-259 to As Required RG-58 Power Combiner #1 In Bird 43 #1 Out to PL-259 to As Required RG-58 Power Combiner #2 In Combiner 50 Ohm Out to BNC to SO-239 RG-58 100 Watt Dummy Load Combiner RF Out BNC to As Required RG-58 to DUT RF In DUT RF Out to As Required to Type N RG-8 Bird 4381 In Bird 4381 Out Type N to Type N RG-8 to Power Attenuator In Power Attenuator Out Type N to Type N RG-58 to 20 dB Attenuator In 20 dB Attenuator Out to Type N to BNC RG-58 10 dB Step Attn In 10 dB Step Attn Out to BNC to BNC RG-58 1 dB Step Attn In 1 dB Step Attn Out to BNC to Type N RG-58 Spectrum Analyzer In

133
6.7B.4 Set the following controls in the order shown INSTRUMENT CONTROL POSITION DUT Operate/Standby Standby DUT Power On/Off On DUT TUNE Pre-set for 20 m DUT LOAD Pre-set for 20 m DUT CW/SSB CW Bird 4381 Power On/Off On Bird 4381 Function FWD CW Bird 4381 Forward Element As Required Bird 43 Element As required Bird 43 Element Direction Forward 10 dB Step Attn Attenuator > 40 dB 1 dB Step Attn Attenuator Any Generator #1 Modulation Off Generator #1 Frequency 14.020 MHz Generator #1 Carrier On/Off Off Generator #1 RF Level -40dBm Generator #2 Modulation Off Generator #2 Frequency 14.0212 MHz Generator #2 Carrier On/Off Off Generator #2 RF Level -40 dBm **Spectrum Analyzer Input Attenuation 20 dB Spectrum Analyzer Reference Level -40 dBm Spectrum Analyzer Threshold -110 dBm Spectrum Analyzer Resolution Bandwidth 100 Hz Spectrum Analyzer Video bandwidth 10 kHz Spectrum Analyzer Center Frequency 14.0206 MHz Spectrum Analyzer Span 20 kHz Spectrum Analyzer Sweep Time Auto ** NOTE: The spectrum Analyzer is automatically configured to these values when using the LabWindows/CVI software. 6.7B.5 Allow all equipment to warm up for at least 10 minutes before proceeding to the next step. 6.7B.6 Enable the carrier on Signal Generator #1. Proceed with DUT tuning adjustments as described in the Operation Test. When the DUT tuning is complete, disable the carrier on Signal Generator #1 and reduce its level back to -40 dBm. 6.7B.7 Enable the carrier on both signal generators. Simultaneously, the RF level of both generators slowly until the DUT is operating at about 50% of its rated power output. 6.7B.8 Observe the spectrum analyzer display and adjust the signal generator levels for equal power of the two signals on the spectral display. (Be sure to monitor the DUT's Grid and Plate Current if DUT is a Tube type to keep them within the manufacturer's limits.) 6.7B.9 Adjust the impedance matching controls on the test fixture for minimum SWR (Note that the dummy load matching network shouldn't have to be readjusted after the initial adjustment unless a fixture change has been made). 6.7B.10 It the DUT is not yet at full rated power at this point, slowly increase the signal generator levels simultaneously to bring the power up to the rated full power output. Adjust the step attenuators to adjust the signal peaks to 6 dB below the reference level on the spectrum analyzer. 6.7B.11 Readjust the fixture impedance matching controls if needed and trigger the spectrum analyzer sweep to obtain a static trace. Disable the signal generator carriers to remove the drive to the DUT. Is it getting hot in there or what ?

134
6.7B.12 If using the LabWindows/CVI software, click on the READ ANALYZER button to acquire data from the analyzer and display it on the computer screen. The level of the IMD products, in dB below the PEP level can be directly read off the displayed data. Save the results to a file. 6.7B.13 Record the 3rd and 5th IMD product levels on the data sheet.
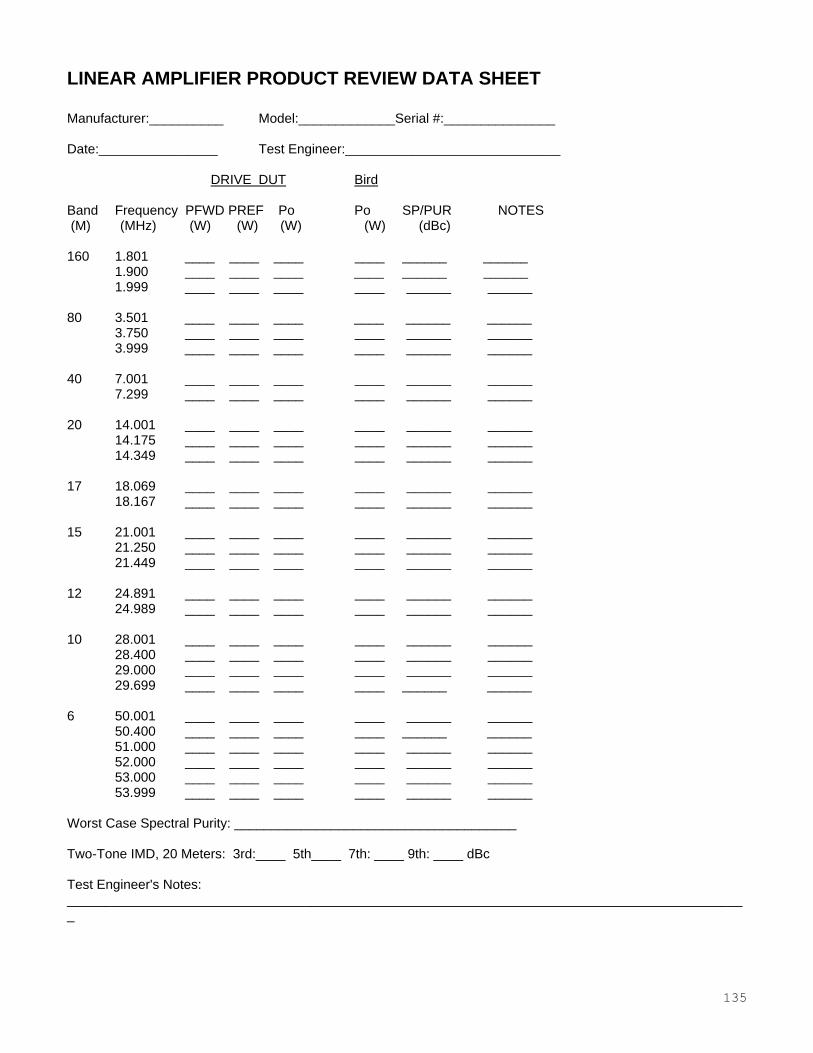
135
LINEAR AMPLIFIER PRODUCT REVIEW DATA SHEET
Manufacturer:__________ Model:_____________Serial #:_______________ Date:________________ Test Engineer:_____________________________ DRIVE DUT Bird Band Frequency PFWD PREF Po Po SP/PUR NOTES (M) (MHz) (W) (W) (W) (W) (dBc) 160 1.801 ____ ____ ____ ____ ______ ______ 1.900 ____ ____ ____ ____ ______ ______ 1.999 ____ ____ ____ ____ ______ ______ 80 3.501 ____ ____ ____ ____ ______ ______ 3.750 ____ ____ ____ ____ ______ ______ 3.999 ____ ____ ____ ____ ______ ______ 40 7.001 ____ ____ ____ ____ ______ ______ 7.299 ____ ____ ____ ____ ______ ______ 20 14.001 ____ ____ ____ ____ ______ ______ 14.175 ____ ____ ____ ____ ______ ______ 14.349 ____ ____ ____ ____ ______ ______ 17 18.069 ____ ____ ____ ____ ______ ______ 18.167 ____ ____ ____ ____ ______ ______ 15 21.001 ____ ____ ____ ____ ______ ______ 21.250 ____ ____ ____ ____ ______ ______ 21.449 ____ ____ ____ ____ ______ ______ 12 24.891 ____ ____ ____ ____ ______ ______ 24.989 ____ ____ ____ ____ ______ ______ 10 28.001 ____ ____ ____ ____ ______ ______ 28.400 ____ ____ ____ ____ ______ ______ 29.000 ____ ____ ____ ____ ______ ______ 29.699 ____ ____ ____ ____ ______ ______ 6 50.001 ____ ____ ____ ____ ______ ______ 50.400 ____ ____ ____ ____ ______ ______ 51.000 ____ ____ ____ ____ ______ ______ 52.000 ____ ____ ____ ____ ______ ______ 53.000 ____ ____ ____ ____ ______ ______ 53.999 ____ ____ ____ ____ ______ ______ Worst Case Spectral Purity: ______________________________________ Two-Tone IMD, 20 Meters: 3rd:____ 5th____ 7th: ____ 9th: ____ dBc Test Engineer's Notes: ____________________________________________________________________________________________

136
About the Linear Amplifier IMD Test Fixture To test for intermodulation distortion (IMD) in power amplifiers, two closely spaced RF signals are necessary. Since a single transmitter would introduce its own IMD into the test setup; two transmitters are used instead, with their outputs combined in a power combiner. An inexpensive hybrid combiner may be constructed using RG-8 and RG-11 coax for a particular design frequency. Slight amounts of reactance at the load port and output port can cause degraded isolation between the input ports, so impedance matching networks are used to adjust these ports for a pure resistive load. For convenience sake, the entire test setup is mounted in a 6-foot tall equipment rack, mounted on wheels for a limited degree of portability. In place of two amateur transceivers or transmitters, signal generators and appropriate amplification may also be used. This allows better control of the power levels as well as improved frequency accuracy and stability. This is the approach taken in the ARRL Lab. Figure 6.7B provides an overview of the test fixture and interconnections used in the test setup. The two signal generators used must be capable of an output up to about +10dBm. Drivers 1 & 2 are an ARRL design. The schematic of the drivers appears in figure 6.7BA. The linear amplifiers are Communications Concepts model EB63. The filters are 20 meter band pass units made by Ed Wetherhold, W3NQN and were described in the May and June 1998 issues of QST. A copy of this article appears in Appendix B. Similar filters may be substituted. The power combiner is a coaxial hybrid ring adapted from a design for 2 meters and 440 MHz that appeared in the 1998 Central States VHF Conference Proceedings. A copy of this paper also appears in Appendix B. The RF Sampling Unit is also an ARRL design. The schematic for this circuit appears in Appendix B. The Directional Coupler is a Tandem Match Design. The circuit of the Tandem Match appeared in January, 1987 QST (also in Appendix B). The PI network used to tune out the stray reactance of the dummy load consists of a 0.432 micro Henry coil and two variable capacitors with a nominal value of 104 Pico farads. The T network used to match the input impedance of the amplifiers under test consists of a 1.07 micro Henry coil and two variable capacitors with a nominal value of 70 Pico farads.

137
Appendix A
ARRL custom test circuits:
Keying
Generator

138

139
Two-Tone Audio
Generator


141
Exterior view of the two-tone audio
generator.
A TWO-TONE AUDIO GENERATOR
The audio frequency generator shown above
makes a very convenient signal source for testing
the linearity of a single-sideband transmitter. To
be suitable for transmitter evaluation, a generator
of this type must produce two non-harmonically
related tones of equal amplitude. The level of
harmonic and intermodulation distortion must be
sufficiently low so as not to confuse the
measurement. The frequencies used in this
generator are 700 and 1900 Hz, both well inside
the normal audio passband of an SSB transmitter.
Spectral analysis and practical application with
many different transmitters has shown this
generator to meet all of the requirements
mentioned above. While designed specifically for
transmitter testing it is also useful any time a
fixed-frequency, low-level audio tone is needed.
Details on distortion measurement and the
two-tone test can be found in Chapter 18.
Circuit Details
Each of the two tones is generated by a separate
Wein bridge oscillator, U1B and U2B. The
oscillators are followed by RC active low-pass
filters, U1A and U2A. Because the filters require
nonstandard capacitor values, provisions have
been made on the circuit board for placing two
capacitors in parallel in those cases where
standard values cannot be used. The oscillator and
filter capacitors should be polystyrene or Mylar
film types if available. Two tones are combined at
op amp U3A. This amplifier has a variable
resistor, R4, in its feedback loop which serves as
the output LEVEL control. While R4 varies both
tones together, R3, the BALANCE control, allows
the level of tone A to be changed without
affecting the level of tone B. This is necessary
because some transmitters do not have equal
audio response at both frequencies. Following the
summing amplifier is a step attenuator; S3
controls the output level in 10-dB steps. The use
of two output level controls, R4 and S3, allows
the output to cover a wide range and still be easy
to set to a specific level.
The remaining op amp, U3B is connected as a
voltage follower and serves to buffer the output
while providing a high-impedance load for the
step attenuator. Either high or low output
impedance can be selected by S4. The values
shown are suitable for most transmitters using
either high- or low- impedance microphones.
Construction and Adjustment
Component layout and wiring are not critical,
and any type of construction can be used with
good results. For those who wish to use a
printed-circuit board, a parts placement guide is
shown on the next page. Because the generator
will normally be used near a transmitter, it should
be enclosed in some type of metal case for
shielding. Battery power was chosen to reduce the
possibility of RF entering the unit through the ac
line. With careful shielding and filtering, the
builder should be able to use an ac power supply
in place of the batteries.
The only adjustment required before use is the
setting of the oscillator feedback trimmers, R1 and
R2. These should be set so that the output of each
oscillator, measured at pin 7 of U1 and U2, is about
0.5 volt RMS. A VTVM or oscilloscope can be
used for this measurement. If neither of these is
available, the feedback should be adjusted to the
minimum level that allows the oscillators to start
reliably and stabilize quickly. When the oscillators
are first turned on, they take a few seconds before
they will have stable output amplitude. This is
caused by the lamps, DS1 and DS2, used in the
oscillator feedback circuit. This is normal and
should cause no difficulty. The connection to the
transmitter should be through a shielded cable.
Parts-placement diagram for the two-tone audio generator, Printed-circuit board etching pattern, shown from the foil side of shown from the component side of the board. the board.
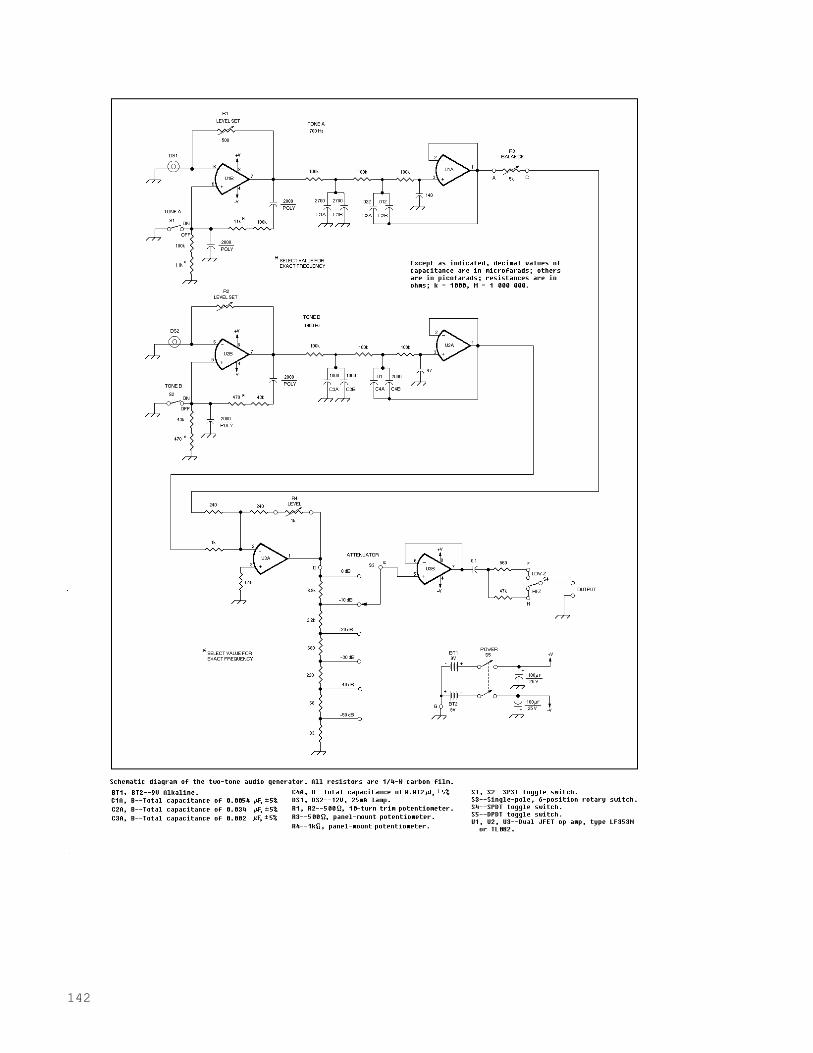
142

143

144

145
Low Noise Amplifier
Audio Low Noise Amplifier Calibration Procedure
Connect the output of the Marconi 2041 RF signal generator to the input of the HP-6536E Spectrum Analyzer.
Set the signal generator to -50 dBm at a frequency of 10 kHz (no modulation).
Set the spectrum analyzer center frequency to 10 kHz and set the frequency span to about 20 kHz or less.
Note the peak signal level on the spectrum analyzer display. It should be close to -50 dBm, but will not be exact. Record this
level.
Switch the input of the spectrum analyzer to the output of the audio low noise amp (LNA).
Set the signal generator level to -99.5 dBm and switch the output of the generator to the input of the LNA.
Observe the signal level on the spectrum analyzer display and adjust the gain trimmer on the LNA for the same signal level as
observed previously. The gain will now be the correct value of 49.5 dB.


147
BER Test Box

148
Measuring 9600-Baud Radio BER Performance
DSP techniques make testing a
G3RUH-compatible radio easy.
[Reproduced from March 1995 QEX]
By Jon Bloom, KE3Z
225 Main Street
Newington, CT 06111
email: [email protected]
One of the jobs of the ARRL Lab is to test the performance of equipment sold to amateurs. With the new crop of 9600-baud
radios coming out, we had to develop a technique for testing their performance. The best way to test the performance of a radio
used for digital communication is, by far, to test the bit-error rate (BER) that the radio provides under various conditions. BER
is a conceptually simple metric that answers the question: How many of the bits get through correctly when a data stream is
passed through the system?
The system we developed uses a Texas Instruments DSP Starter Kit (DSK) board that includes a TMS320C26 processor. Figs
1 and 2 show the circuitry of the BER test box built in the ARRL Lab. The DSP generates a test signal that is passed through
the system under test. For receiver testing, the signal modulates a low-noise FM signal generator that feeds the radio being
tested. The demodulated output of the radio goes to the DSP input so that the demodulated signal can be compared to the
transmitted signal. To test transmitters, the DSP output test signal is applied to the modulation input of the transmitter under
test. The transmitter RF output is attenuated to a low level, then applied to the Lab-built test box where it is mixed with an
unmodulated signal from a signal generator. The resulting IF signal is demodulated by a low-distortion demodulator, and the
demodulated signal is routed to the DSP input for comparison with the generated signal.
G3RUH Signals
The 9600-baud system used for amateur packet radio, both terrestrially and via the UoSat packet satellites, uses signals
handled by the G3RUH modem design. In this system, the binary data stream coming out of a TNC is first "scrambled" to
remove any dc component of the signal. Scrambling, which has nothing to do with encryption or data hiding, is simply
encoding that ensures that, on average, there are as many 1-bits in the data stream as there are 0-bits. The average voltage of
the data signal is thus constant. The scrambled data signal is then used to generate shaped pulses. The shaped-pulse signal is
what is applied to the modulation input of the FM transmitter.
On reception, the shaped-pulse signal is filtered and limited, to recover the scrambled data stream. A clock-recovery circuit
generates a clock signal that is synchronous with the incoming data. Using this clock, the modem descrambles the data stream,
with the end result being a binary data signal identical to the transmitted data signal.
Since our test system has to generate and receive signals like those of the G3RUH modem, some discussion of the pulse
shaping used is necessary. The general problem to be solved when sending digital data using FSK is to limit the bandwidth of
the baseband (data) signal before applying it to the modulator. But you have to be careful how you do that.
When we limit the bandwidth of a pulsed signal, we necessarily stretch the pulses in time. That is, a signal that is band limited
cannot also be time limited. That means that in limiting the bandwidth, we cause each pulse to overlap adjacent pulses. In
theory, each pulse overlaps all of the other pulses, but as you go further away in time from a particular pulse, its amplitude gets
smaller and smaller.
So, we need to find some way of allowing the pulses to overlap their neighbors without interference. One approach to doing so
is to shape the pulses so that, while each pulse does overlap its neighbors, the amplitude of that pulse is zero at the center of
each of the other pulses. That way, we can sample the signal at the center of each pulse period and see only the signal from the
current pulse; none of the other pulses contributes any amplitude to the signal at that time.

149
The spectrum of one pulse that has these characteristics is straightforward. It is flat from 0 Hz out to some chosen frequency,
then rolls off with a cosine-shaped curve, reaching -6 dB at one-half the baud rate.1 It continues curve, reaching -6 dB at one-
half the baud rate.1 It continues rolling off with this cosine curve until it reaches zero. In the G3RUH system, the spectrum
begins rolling off at 2400 Hz, reaches the -6-dB point at 4800 Hz and reaches zero at 7200 Hz.
In the time domain, the pulse shape that results from such a spectrum has a maximum at the center of the bit period, then
decreases in amplitude as we move away from the center of the bit. The pulse signal goes negative, passing through zero at the
center of the preceding and following bits. As we go farther away in time from the bit center, the signal alternates between
positive and negative values, always passing through zero at the center of each bit. There are other spectra that have pulse
shapes that reach zero at the center of all the other pulses, but the benefit of the raised-cosine spectrum is that the pulse
amplitude falls off rapidly with time. This is important because any amplitude or phase distortion present in the system is likely
to cause the zero-crossing points of the pulse to shift in time, causing ISI. Since the amplitude of the pulse is small near the
center of other pulses, the potential for harmful ISI is also small.
Since each bit of the shaped-pulse signal now extends across multiple bit periods -- both preceding and following bits periods -
- we must take this into account in generating our signal. And, since this is DSP, what we are generating is a sampled version
of the signal. What we must end up with at any sample is a signal that comprises a component from the current bit, preceding
bits and following bits. Theoretically, we need components from all of the bits in the data stream, but the amplitude of each
pulse falls off so rapidly that only a few successive bits need be used to generate any given sample. In this system, we chose to
include components of the current bit and the four preceding and four following bits.
Note that only 1-bits contribute to the signal; 0-bits generate no pulse. If we were to send a continuous stream of 0-bits, we’d
get no pulses at all. (Of course, the scrambler circuit ensures that will never occur in a real transmitted data stream.) So, for
each sample we need to add up the contribution of the current bit and the contributions of eight other bits, some of which may
be 0-bits that make no contribution. The contribution of a particular preceding or following 1-bit is the amplitude of its pulse at
the present time. To keep things simple, we use a sampling rate that is a multiple of the baud rate -- and thus a multiple of the
pulse rate.
The method used to implement this pulse forming is an FIR filter. The impulse response of the filter is simply the samples that
comprise a single shaped pulse, extending over nine bit periods. Our sampling rate is four times the bit rate, so the impulse
response is 4 X 9=36 samples long. A Mathcad 5.0 worksheet, shown in Fig 3, calculates the impulse response.
If we feed a single sample of amplitude 1 into the filter, preceded and followed by 0-amplitude samples, the resulting output
will be a single copy of our shaped pulse, as shown in the Mathcad graph in Fig 3. To generate our data stream, we input the
present data value (1 or 0) at one sample, follow it with three samples of 0, then input the next data value. At any time, the FIR
filter contains zeroes in all except (possibly) 9 locations, representing the 9 successive data bits. The output of the filter at any
sample time comprises components of 9 data pulses, which is what we want for our shaped-pulse signal.
Now that we know how to generate the shaped-pulse signal from a data stream, we need to think about how to generate the
data stream itself. We want to generate a data stream that mimics the scrambled signal of the G3RUH modem. The scrambler
in the modem is a tapped shift register with feedback. The logic equation for this circuit is:
y = x0 + x12 + x17
where y is the output of the scrambler, x0 is the current input bit, x12 is the 12th previous input bit and x17 is the 17th
previous input bit. Generating the test data stream is done by making x0 always a 1, implementing a shift register in software,
and calculating y for each new data bit -- once every four samples. Note that this is essentially the same signal generated by the
G3RUH modem in its BER test mode.
Counting Bit Errors
Having generated a test signal, we now need to consider how to compare the signal coming back from the system under test to
the signal we transmitted. In passing through the tested system, the signal will be delayed by some amount, and the amount of
delay will vary from one system to another. What we need to do is determine what the system delay is, then remember what
our transmitted signal was that far back in the past in order to compare it to the samples of the received signal. But we are only
interested in the value of the received signal at one time during each bit period: the center of the bit.

150
The DSP software handles this need using a two-step delay process. First, the operator will tell the DSP system how many
samples of delay there are between the transmitted and received signals. Of course, the system delay is not likely to be kind
enough to let the center of the received bits fall right onto one of our samples -- there are only four samples per bit, after all.
So, the second step is to adjust the phase of the DSP’s transmit and receive sample clocks. The combination of these two
techniques lets us adjust the DSP’s delay with fine resolution.
This calibration procedure is performed using a dual-channel oscilloscope. One channel is connected to the sync signal from
the DSK, the other channel is used to display the demodulated signal that is being fed into the DSK input. The operator first
commands the DSK to generate a calibration signal. The DSK does so by passing a single 1-bit through the FIR filter
described previously, followed by 0-bits. The 1-bit is repeated every 72 samples, resulting in a single shaped pulse every 2 ms.
The oscilloscope is triggered on the sync signal and set for 0.2 µsec/div. The operator then sends commands to the DSK to
alter the number of samples of delay between the transmitted and received signals.
The sync signal, a short pulse, is output during the sample the DSK believes to be the center of the received bit. Thus the
operator simply adjusts the delay value, which causes the received signal trace on the oscilloscope to move relative to the sync
pulse. When the sync pulse is aligned with the shaped pulse of the received signal (Fig 4), the DSK is at the proper sample-
delay value.
To achieve final calibration, the DSK clock phases must be adjusted to take into account the part of the system delay that is
less than one sample period long. This is done by commanding the DSK to output its test signal and switching the oscilloscope
to 10 µsec/div. Now the oscilloscope displays a sync pulse at the right side of the screen, along with the eye pattern of the
received data (Fig 5). The proper sampling point of the bits is the point where the eye is most “open.” However, there is a 14-
µsec delay in the DSK system between the actual sampling point and the sync pulse. Thus, the operator commands the DSK to
step its clock phase until the center of the eye leads the sync pulse by 14 µsec. This is not a hugely critical setting -- a few-
microsecond error isn’t normally detectable in the measured BER. The delay does have to be in the ballpark, however.
There is one more detail to consider during calibration. Depending on the system being tested, the received signal may be
inverted from the transmitted signal; the positive-going pulses we sent may now be negative-going. If this is the case, the DSK
will count all the correctly received bits as bad and all the bad bits as correct. So, the DSK supports a user command to invert
the sense of the received data. The polarity of the received signal is most easily seen during the first calibration phase (Fig 4),
and if the pulse is seen to be inverted then, the DSK’s “invert” command should be issued. That will cause no difference in the
displayed signal, but the DSK will know “which way is up.”
DSP Program Operation
The DSP program used to perform BER measurements is called DBERT. The object file, DBERT.DSK, is downloaded into
the DSK from the host computer. Once DBERT is running, it communicates with the host computer via the DSK’s serial port.
The serial I/O communication mechanism was described in a previous article.2 When serial I/O is occurring, the DSP interrupts
must be disabled. This keeps the DSP from executing its signal-processing operations during serial I/O. For that reason, DSK
operation is controlled by the host computer using a command-response sequence: The host sends a command to the DSK, the
DSK executes that command -- including any needed signal processing -- and reports completion of the command back to the
host, if needed. Each command to the DSK from the host is a single ASCII character. Some commands result in the DSK
needing to send data back to the host. In that case, once the command is completed by the DSK, it sends the data back to the
host via the serial interface. Table 1 lists the commands supported by the DBERT program.
Because the DSK has to stop its signal I/O while communicating with the host, there is a potential problem in taking a
measurement. When the DSK begins generating the test signal, it is possible that the system being tested will exhibit a
response to the start-up transient from the DSK that invalidates the result. So, the BER test signal is started and the DSK waits
20,000 samples (about a half-second) before starting to sample the received signal.
We wanted to be able to test at consistent signal-to-noise ratios in order to establish reference levels for comparing different
radios to one another. Since each unit will exhibit a unique sensitivity, we needed some way of adjusting the input power level
to get a fixed output signal-to-noise ratio. The solution was to include a SINAD measurement function in the DBERT
program. When the DSK receives the SINAD command from the host, it generates a 1-kHz sine wave.

151
About a half-second after it begins generating the sine wave, the SINAD measurement software begins sampling the input
signal. It then takes 8192 samples for measurement. Each measured sample is squared and added to a running sum (the signal-
plus-noise value). The samples are also run through a narrow 1-kHz IIR notch filter that removes the 1-kHz test signal, leaving
only the noise. The output samples from this filter are also squared and added to a (separate) running sum (the noise value).
After 8192 samples have been processed, the two 32-bit sum values are returned to the host computer. The host can then
calculate the SINAD by expressing the ratio of the signal-plus-noise value to the noise value in dB. A more detailed
description of this technique was published in an earlier QEX article.3
The analog I/O of the DSK is performed by a TLC32040 integrated analog subsystem. This chip includes a 14-bit D/A, 14-bit
A/D, sample-clock generator and input and output programmable switched-capacitor filters (SCF). The TLC32040 is driven by
a 10-MHz clock produced by the processor chip. The frequency of this clock, in combination with the programmable dividers
in the analog chip, determines the available sampling rates. The design of the BER test software calls for a 38,400 sample-per-
second (sps) rate. Unfortunately, this exact rate isn’t possible with the 10-MHz clock. The nearest available rate is
approximately 38,461.5 sps. This translates to a 0.16% error in the speed of the test signals, which is negligible in the context
of BER measurements. However, this error is sufficient to make the test signal unreadable by a G3RUH modem since the
clock-recovery loop in that design has a very narrow lock range. I discovered this early on in the development of this system.
To check that the problem was in fact the speed difference and not some problem with the signal I was generating, I
temporarily removed the 40-MHz master oscillator on the DSK board -- from which the 10-MHz clock is derived -- and
connected a signal generator to the clock input through a Schmitt trigger inverter. By setting the signal generator to generate
exactly the clock frequency needed to get a 9600-baud signal, I found that the G3RUH modem was quite happy to consider my
BER test signal a proper one.
Another problem with the TLC32040 is that the input SCF is a band-pass filter that normally cuts off at about 300 Hz. While
the filter cut-off frequency is programmable, it can’t be set anywhere near the very low frequency needed for this application.
So, the DBERT program configures the TLC32040 to operate without its input filter. This requires that an external antialiasing
filter be added. As shown in Fig 2, and described in more detail later, an SCF that cuts off at 10 kHz was added to the BER test
box to fill this need. The final characteristic of the TLC32040 to note is that it includes no internal sinx/x correction -- not
surprising in a chip with a programmable sample rate. Fortunately, with a sampling rate of 38400 Hz and signals of only up to
7200 Hz, the sinx/x roll-off at the upper end of the signal spectrum is only about 1/2 dB. Still, this seems worth correcting. The
TLC32040 data sheet describes a first-order IIR filter that can be used to perform this correction. The Mathcad worksheet of
Fig 6 shows the calculation of the coefficients of this sinx/x correction filter, which is implemented in the DBERT program.
Fig 6 also shows the predicted output response both before and after the correction, as well as the estimated group delay of the
correction filter.
As noted, the calibration procedure requires a sync pulse. The DSK has no uncommitted output signal lines usable for
outputting a pulse, so DBERT outputs the sync pulse on the serial data output line. Since the sync pulse is less than a
microsecond long, this won’t usually bother the serial I/O chip of the host computer. (We did find one computer that was
occasionally confused by the presence of the sync pulse.) The RS-232 signal is available on one of the DSK’s expansion
connectors. A 10-k ohm resistor connected to this point brings the sync signal out to the front panel of the BER test box. The
presence of the resistor protects the RS-232 line from accidental shorting or application of another signal.
Host Application Software
We used two different programs. One, which we won’t cover in detail here, manages the Lab’s computer-controlled signal
generator for stepped BER measurements at various signal levels and frequencies. The other program, BERT.EXE, is a C
program that communicates with the DSK under operator control. Communication with the DSK is normally performed at
19,200 baud, although slower speeds can be used. To ensure that no serial overruns occur, BERT uses interrupt-driven serial
I/O.
The BERT program is quite straightforward. It accepts keyboard commands from the operator and sends them to the DSK. The
command set is the same as that of DBERT -- BERT just passes these commands through to the DSK -- with a couple of
additions. Also, BERT “knows” about those DSK commands that generate a response from DBERT. When such a command is
given, BERT waits for the response from the DSK, then converts the incoming serial bytes to binary values. In the case of
BER test values (commands 4 and 5), it prints out the reported number of errors and the BER, calculating the latter based on
the number of bits the DSK was commanded to use in its test. For the SINAD command (S), BERT computes and prints the
SINAD and the distortion percentage using the values returned by DBERT.

152
The DBERT program can perform BER tests using 10,000 samples or 100,000 samples. The BERT program also provides a 1-
million sample BER test (the 6 command), which it performs by commanding the DSK to perform a 100,000-sample BER test
10 times. BERT sums the values from each of these tests to get the final result. As each BER test result is returned from the
DSK, BERT prints the running total of samples, errors and BER. The L command performs the same function, except that it
stops if 100 or more total errors have been reported. If the operator selects the calibrate (C), idle (I), sine-wave (N) or quiet (Q)
commands, BERT remembers the selected command. Whenever a BER or SINAD test command is performed, BERT waits
for that command to complete, then sends the appropriate command to place DBERT in the most recently selected mode from
among those listed.
BER Test Box Hardware
The BER test box contains several op-amp amplifiers used to keep the input signals within the range of the TLC32040 analog
input. The box also contains a mixer and a demodulator, shown in Fig 2, designed by ARRL Lab Engineer Zack Lau, W1VT.
To test transmitters, the transmitter output is attenuated with a high-power attenuator down to a level that the SBL-1 mixer,
U3, can handle. The LO input of the SBL-1 is driven by a +7-dBm signal from a signal generator set to a frequency 373-kHz
below or above the transmitter frequency. The output from the SBL-1 passes through a low-pass filter that removes the sum
frequency, leaving only the 373-kHz difference frequency. This signal is applied to an NE604 FM IF chip that contains a
limiter, IF amplifier and quadrature FM demodulator. The frequency at which the demodulator operates is set by L1 and its
associated silver-mica capacitor. When Zack built this circuit, the components he used just happened to fall at 373 kHz. If you
reproduce the circuit, it’s likely that your copy will work at a slightly different frequency. This shouldn’t present a problem;
the exact operating frequency isn’t critical.
Since the NE604 operates from a single 5-V supply, its output is a positive voltage. This signal is fed into U4A, which
amplifies the signal and also removes the positive offset, so that the result is zero volts when the input signal is at 373 kHz.
U4B amplifies this demodulated signal or an external input signal (usually the output of a receiver being tested) with
adjustable gain. The signal is finally filtered in an MF4 4th-order Butterworth low-pass SCF, U6 that acts as the antialiasing
filter for the DSP input. The cut-off frequency of U6 is determined by its input clock, with the clock being 50 times the cutoff
frequency. In our test set, this clock is supplied by an external function generator, but it could as easily be provided by a crystal
oscillator and divider chain.
Interpreting BER Measurements
Bit errors are (or should be) due mainly to corruption of the signal by noise. Thus, they should be random. That being the case,
if you make the same measurement several times, you are likely to get different results each time. But the more bits you send
through the system, the more the effect of noise is averaged and the more consistent the measurements will be. That raises the
question: How many bits do you need to use to get a valid result? The answer to that question depends on what you mean by
“a valid result.” The more bits you use, the closer your measurement will be to the “true” BER you would get if you sent an
infinite number of bits through the system. Since sending an infinite number of bits through the system is a little, well,
impractical, we need to come up with some guidelines for selecting a finite number of bits to use.
Unfortunately, in order to do that we have to make some assumptions about the character of the noise in the system.
Fortunately, the assumptions we make hold up pretty well for real systems. (There’s nothing new about this; we make
assumptions about the character of system noise all the time. For example, when we relate noise to system bandwidth we often
assume that the noise is uniformly distributed across the spectrum of interest.)
What we find is that with a given number of bits in the sample set, and a given number of errors within those bits, we can
establish a confidence interval. The confidence interval tells us how likely it is that our measurement is within some specified
factor of the “true” BER. For example, we might find that our measurement gives us an 80% confidence that the value is
within a factor of 3 of the true BER. The end result is that we can get as good a measurement as we want if we are willing to
wait for enough bits to go through the system. Of course, at a low BER we don’t get many errors, so we need to send a lot of
bits!
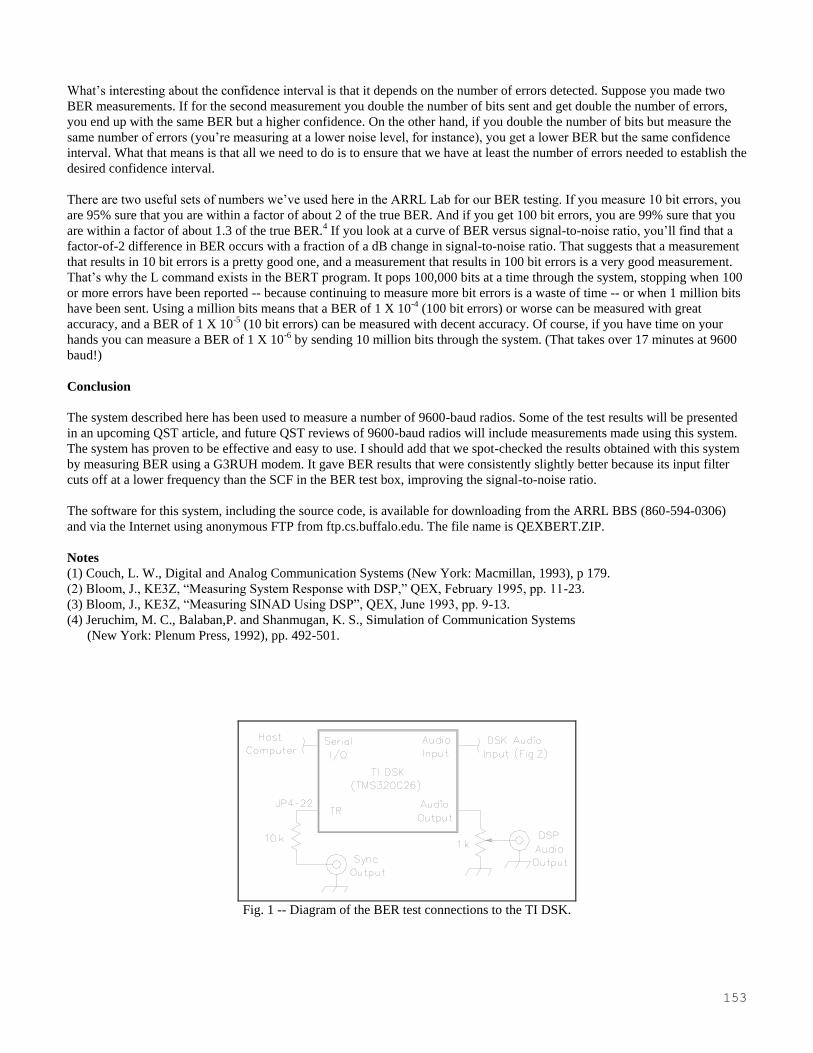
153
What’s interesting about the confidence interval is that it depends on the number of errors detected. Suppose you made two
BER measurements. If for the second measurement you double the number of bits sent and get double the number of errors,
you end up with the same BER but a higher confidence. On the other hand, if you double the number of bits but measure the
same number of errors (you’re measuring at a lower noise level, for instance), you get a lower BER but the same confidence
interval. What that means is that all we need to do is to ensure that we have at least the number of errors needed to establish the
desired confidence interval.
There are two useful sets of numbers we’ve used here in the ARRL Lab for our BER testing. If you measure 10 bit errors, you
are 95% sure that you are within a factor of about 2 of the true BER. And if you get 100 bit errors, you are 99% sure that you
are within a factor of about 1.3 of the true BER.4 If you look at a curve of BER versus signal-to-noise ratio, you’ll find that a
factor-of-2 difference in BER occurs with a fraction of a dB change in signal-to-noise ratio. That suggests that a measurement
that results in 10 bit errors is a pretty good one, and a measurement that results in 100 bit errors is a very good measurement.
That’s why the L command exists in the BERT program. It pops 100,000 bits at a time through the system, stopping when 100
or more errors have been reported -- because continuing to measure more bit errors is a waste of time -- or when 1 million bits
have been sent. Using a million bits means that a BER of 1 X 10⁻⁴ (100 bit errors) or worse can be measured with great
accuracy, and a BER of 1 X 10⁻⁵ (10 bit errors) can be measured with decent accuracy. Of course, if you have time on your
hands you can measure a BER of 1 X 10⁻⁶ by sending 10 million bits through the system. (That takes over 17 minutes at 9600
baud!)
Conclusion
The system described here has been used to measure a number of 9600-baud radios. Some of the test results will be presented
in an upcoming QST article, and future QST reviews of 9600-baud radios will include measurements made using this system.
The system has proven to be effective and easy to use. I should add that we spot-checked the results obtained with this system
by measuring BER using a G3RUH modem. It gave BER results that were consistently slightly better because its input filter
cuts off at a lower frequency than the SCF in the BER test box, improving the signal-to-noise ratio.
The software for this system, including the source code, is available for downloading from the ARRL BBS (860-594-0306)
and via the Internet using anonymous FTP from ftp.cs.buffalo.edu. The file name is QEXBERT.ZIP.
Notes
(1) Couch, L. W., Digital and Analog Communication Systems (New York: Macmillan, 1993), p 179.
(2) Bloom, J., KE3Z, “Measuring System Response with DSP,” QEX, February 1995, pp. 11-23.
(3) Bloom, J., KE3Z, “Measuring SINAD Using DSP”, QEX, June 1993, pp. 9-13.
(4) Jeruchim, M. C., Balaban,P. and Shanmugan, K. S., Simulation of Communication Systems
(New York: Plenum Press, 1992), pp. 492-501.
Fig. 1 -- Diagram of the BER test connections to the TI DSK.

154
Fig 2 -- Schematic diagram of the BER test box circuit.
L1 -- 1.2-mH Toko 10RB fixed inductor. (Digi-Key part TK4401-ND.)
L2, L3 -- 41 turns #28 enamel wire on a T-50-1 toroid core.

155
Fig 3 -- This Mathcad worksheet calculates the impulse response of the FIR filter used to generate the shaped-pulse signal.
Fig 4 -- The first-phase calibration signal. When properly
calibrated, the calibration signal (lower trace) is aligned
with the sync pulse (upper trace) as shown. The
oscilloscope is set for 0.2 µsec/div. The sync pulse is very
narrow and hard to see in this photograph but shows up
well on the oscilloscope screen.
Fig 5 -- Second-phase calibration uses the BER test signal
and sync pulse to produce an eye pattern. The oscilloscope
is set for 10 µsec/div. The center of the eye is adjusted to
lead the sync pulse by 14 µsec as shown.

156
Fig 6 -- Correction of sinx/x roll-
off is performed with a first-order
IIR filter having the coefficients
calculated by this Mathcad
worksheet.

157
Update to BER Test Box:
The ARRL BER test box was modified in March 1999 by the addition of an internal 500-kHz oscillator and high-level pseudo-
random noise source. The internal oscillator was added for convenience sake, eliminating the need for an external function
generator. The noise source was added to alleviate test setup difficulties imposed by transmitters that generated an excessive
amount of common-mode signal.
The output of the oscillator is connected to the clock input shown in figure 2 of the QEX article on BER testing. The noise
source output is resistor summed into the mixer (U3) in the same figure. A 10-turn potentiometer is used for fine control of
noise output so as to achieve as close to 12 dB SINAD as possible.
The schematic of the new circuitry appears on the following page.

158

Spurious-emission Limits - HF

Spurious Emission Limits - VHF
Spurious Attenuation 30-235 MHz
X=Power (Watts)
Power Level
(output) Attenuation
X < 0.1W 50 + 10LOG(X) dB
0.1W X 0.25W 40 dB
0.25W < X 25W 46 + 10LOG(X) dB
X > 25W 60 dB
Appendix B - Formulas for QST Product Review Calculations

Given E and V as volts, Pw as power in watts and dBm as decibels relative to a milliwatt, the following relationships are true:
E
dBm
0 05 10 10. Pw
dBm
0 001 10 10.
dBm LOGE
LOGPw10
0 0510
0 001
2
. .
dB LOG V20 To reduce V values by 10 dB, multiply by 0.3162278
S/N in dB = 10 LOG(10^(0.1 (S N/N)) 1)
Distortion ( ) 100 / 10^(SINAD in dB / 20)
(Assuming meter measures noise as a component of distortion)
ditdittWPMCodeSpeed
2400)( , where tdit-dit is the time between the rising edge of subsequent dits.
Farnsworth method code speed =
spaceeledashdot ttt .322
2.13
(This equation is based on the letter P in the PARIS word length standard).
Formulas for SWR, Reflection Coefficient and Return Loss
For Pf as forward power, Pr as reflected power, Rl as return loss in decibels and as reflection coefficient, the following relationships
are true:
P
P
r
f
SWR1
1
SWR
SWR
1
1
68589.8
lR
e
Temperature
+60 C = +140 F
–10 C = +14 F
–20 C = –4 F
–30 C = –22 F
Noise Floor (dBm)
MDS (theoretical) = –174 + NF + 10 LOG(BW)
Where –174 dBm is the noise level of the cosmos, BW is the receiver noise bandwidth in Hertz and NF is the receiver noise figure in
dB. MDS is the theoretical noise floor of the receiver, which the actual measured noise floor should be close to.