test administrator guide to the student interface ... · test administrator guide to the student...
TRANSCRIPT

Test Administrator Guide to the Student Interface (Training Site), Test Delivery System
Copyright © 2008 American Institutes for Research 8/12/2008 Page 1
Introduction This guide is designed to familiarize Test Administrators (TA) with the Student Interface. Using a step-by-step approach, the tutorial provides an overview of the Student Interface and addresses some of the common issues TAs encounter in a test session.

Test Administrator Guide to the Student Interface (Training Site), Test Delivery System
Copyright © 2008 American Institutes for Research 8/12/2008 Page 2
Table of Contents Introduction .................................................................................................................................................1 Table of Contents ........................................................................................................................................2 The Student Interface .................................................................................................................................3
Secure Browser .........................................................................................................................................3 Student Login............................................................................................................................................4 Verify Student Information.......................................................................................................................5 Wait for Test Administrator Approval......................................................................................................7 Verify Test Information ............................................................................................................................7 Test Buttons and Tool Features for Students ............................................................................................9 Keyboard Navigation..............................................................................................................................11 Test Navigation Rules.............................................................................................................................13 Pausing Tests ..........................................................................................................................................14 Resuming a Paused Test .........................................................................................................................15 Reaching the End of the Test and Reviewing Marked Items..................................................................16 Your Test Results....................................................................................................................................17
Appendix ....................................................................................................................................................18 Appendix A: Special Instructions for Test Administration on Secure Browsers....................................18 Appendix B: Force Quit Commands for Secure Browsers.....................................................................18 Appendix C: Mac OS X Keyboard Combinations..................................................................................19 Appendix D: Secure Browser Error Messages .......................................................................................19

Test Administrator Guide to the Student Interface (Training Site), Test Delivery System
Copyright © 2008 American Institutes for Research 8/12/2008 Page 3
The Student Interface Secure Browser
For the training site, secure browsers are not needed for the Student Interface. Go directly to
http://oakspt.tds.airast.org/student to access the Student Interface. Use your own TA account to get trained
on the Student Interface by following these steps (on the Student Login page):
1. Enter your first name (for example, “John”) in the “First Name” field.
2. Enter your TA username (for example, [email protected]) in the “SSID” field.
3. Enter the ID (for example, AIRO-8) for the session you created in the TA workstation in the
“Session ID” field.
Students must log in through one of the secure browsers provided for OAKS Online. The portal site (http://www.oaks.k12.or.us/) contains instructions for downloading and installing the secure browsers. They are designed to ensure test security by prohibiting students from accessing external applications or navigating away from their test. Please note that there are different browsers depending on the operating system of each student’s computer.
Students will use the secure browser noted for the according operating system: � Mac OS X: Mozilla Firefox 2.0.0.7 � Mac OS 9: Mozilla Firefox 1.3.1 � Windows: Mozilla Firefox 2.0.0.7 � Linux: Mozilla Firefox 1.5.0.8 (Fedora core version fc6) and Mozilla Firefox 2.0.0.6
*Refer to Appendix A for specific instructions on administering tests using the secure browsers.
As a security measure, the secure browsers will automatically log out a student after 20 minutes of
inactivity.

Test Administrator Guide to the Student Interface (Training Site), Test Delivery System
Copyright © 2008 American Institutes for Research 8/12/2008 Page 4
Student Login
The secure browser is automatically directed to the student login page upon being opened.
Students log in using their First Name, SSID, and Session ID provided by the TA as shown in Figure 1.
Figure 1 Student Login Page
The following problems (and suggested TA responses) may be encountered by students upon logging in: � Invalid SSID
Verify that the student has entered his or her SSID correctly. � Invalid Session ID
Verify that the student has correctly entered the Session ID that you have provided.

Test Administrator Guide to the Student Interface (Training Site), Test Delivery System
Copyright © 2008 American Institutes for Research 8/12/2008 Page 5
� Student is not eligible for the test session:
– Test subject/grade does not match student’s eligibility.
Contact your Regional ESD if the system indicates a student is ineligible for a specific test she or he is qualified to take.
– Student has used all testing opportunities for the subject.
Students are permitted three testing opportunities in Math, Reading and Science. Students have two opportunities in Social Sciences. Students have 45-days to complete each testing opportunity. This message indicates a student has used all available testing opportunities.
� User with the same SSID is already logged in.
Verify that the student is using the correct SSID. If the student’s personal information is incorrect, the information will need to be updated during the next SSID import.
� Student must wait at least one day between testing opportunities for a specific test.
Students are required to wait until the next day (after taking a test) before they may use another opportunity for that specific test.
Verify Student Information
After logging in, students see the screen shown in Figure 2.
Figure 2 Is This You?
At this point, the students verify their Legal Name, Grade, Birthday, School, and SSID. If all information is correct, students accept by clicking [Yes]. If any of the information is incorrect, they deny this

Test Administrator Guide to the Student Interface (Training Site), Test Delivery System
Copyright © 2008 American Institutes for Research 8/12/2008 Page 6
information by clicking [No] and are directed to the login page. TAs may want to help confirm this information for younger students.
If the information in the system is incorrect for a student, the student’s profile must be updated. Information presented reflects the student’s information based on his or her SSID. Incorrect information will need to be updated in the SSID data upload.
The screen in Figure 3 appears after a student confirms his or her identity.
Figure 3 Your Tests
The table displays those tests a student is eligible to take. The “Opportunities” column refers to the present test opportunity out of the total number of opportunities available for that test. In the example in Figure 3, this student has not attempted a Reading test and has all three opportunities remaining. The [Start Test] button indicates that the student can start his or her Reading test, whereas the [Resume Test] button indicates that the student has a Mathematics test in progress that can be resumed.
All tests available to students in a particular grade are displayed, but only those tests available within the session will contain clickable buttons. A student logging into a session with only Mathematics tests will not be able to take a Reading test.

Test Administrator Guide to the Student Interface (Training Site), Test Delivery System
Copyright © 2008 American Institutes for Research 8/12/2008 Page 7
Wait for Test Administrator Approval
After students select a test, they receive the message shown in Figure 4 while waiting to be approved by their TA.
Figure 4 Waiting for Test Administrator Approval Message
Verify Test Information
Following approval by the TA, students verify their Test, Test Language, and Print Size (see Figure 5).
Figure 5 Is This Your Test?

Test Administrator Guide to the Student Interface (Training Site), Test Delivery System
Copyright © 2008 American Institutes for Research 8/12/2008 Page 8
Once students verify their test information, they select [Yes, Start My Test] to continue.
If students select [No], they reappear in the TA’s queue and wait for approval.
When sessions are created that are open to all subjects, students should be closely monitored to ensure
they select the correct subject test.
Test Administrator Guide to the Student Interface (Training Site), Test Delivery System
Copyright © 2008 American Institutes for Research 8/12/2008 Page 9
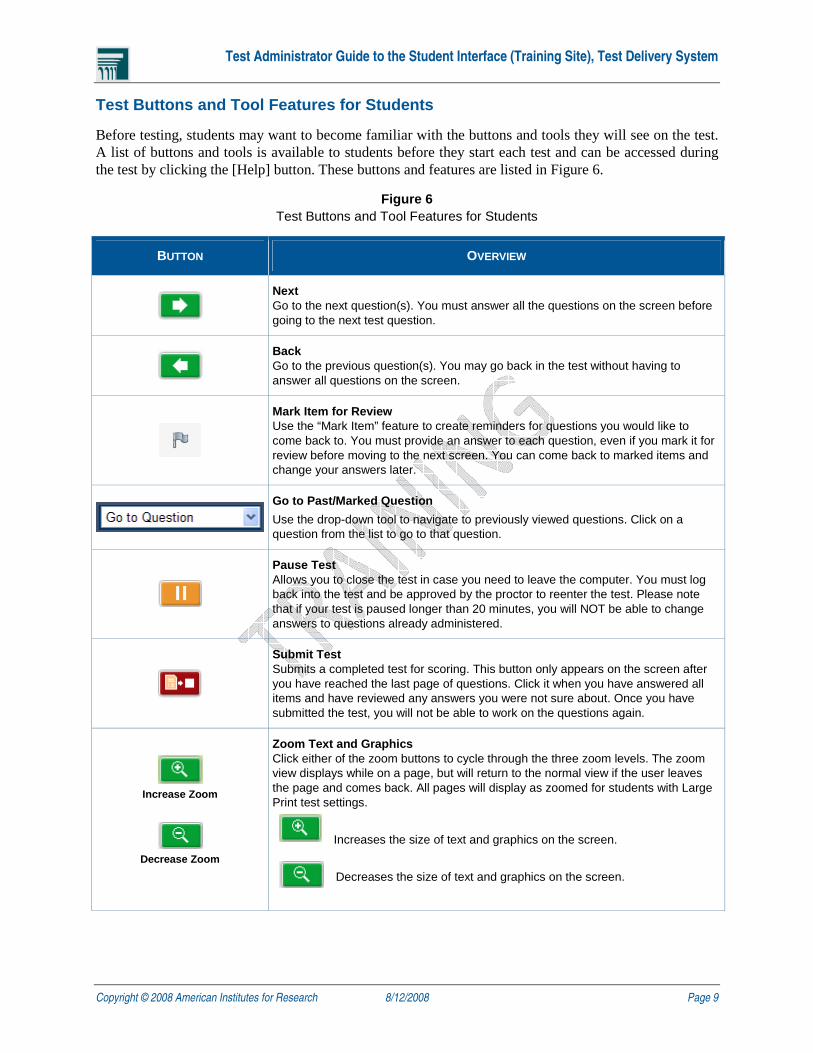
Test Buttons and Tool Features for Students
Before testing, students may want to become familiar with the buttons and tools they will see on the test. A list of buttons and tools is available to students before they start each test and can be accessed during the test by clicking the [Help] button. These buttons and features are listed in Figure 6.
Figure 6 Test Buttons and Tool Features for Students
BUTTON OVERVIEW
Next Go to the next question(s). You must answer all the questions on the screen before going to the next test question.
Back Go to the previous question(s). You may go back in the test without having to answer all questions on the screen.
Mark Item for Review Use the “Mark Item” feature to create reminders for questions you would like to come back to. You must provide an answer to each question, even if you mark it for review before moving to the next screen. You can come back to marked items and change your answers later.
Go to Past/Marked Question
Use the drop-down tool to navigate to previously viewed questions. Click on a question from the list to go to that question.
Pause Test Allows you to close the test in case you need to leave the computer. You must log back into the test and be approved by the proctor to reenter the test. Please note that if your test is paused longer than 20 minutes, you will NOT be able to change answers to questions already administered.
Submit Test Submits a completed test for scoring. This button only appears on the screen after you have reached the last page of questions. Click it when you have answered all items and have reviewed any answers you were not sure about. Once you have submitted the test, you will not be able to work on the questions again.
Increase Zoom
Decrease Zoom
Zoom Text and Graphics Click either of the zoom buttons to cycle through the three zoom levels. The zoom view displays while on a page, but will return to the normal view if the user leaves the page and comes back. All pages will display as zoomed for students with Large Print test settings.
Increases the size of text and graphics on the screen.
Decreases the size of text and graphics on the screen.

Test Administrator Guide to the Student Interface (Training Site), Test Delivery System
Copyright © 2008 American Institutes for Research 8/12/2008 Page 10
BUTTON OVERVIEW
Highlight
Reset Highlighting
Highlighter Tool
Highlights sections of text within Reading passages. Use this to highlight information you would like to reference easily later. Highlighted text will remain highlighted while on a page, but will reset once the user moves to another page.
Select the text you want to highlight (click and hold the mouse button so the text appears blue). Click the highlight button to highlight the text you selected (it will turn yellow). To remove highlighting on a passage, click the [Reset Highlighting] button.
Right-Click Mouse (for two-button mouse)
OR
+Click Mouse (for single-button mouse)
Strikethrough Function
Use the strikethrough function to cross out answers you know are not correct. This can help you focus on the answers you believe may be correct. Options will retain the strikethrough while on a page, but will reset once the user moves to another page.
Note: Some options that you strikethrough will not appear to be crossed out. However, all options you strikethrough will be grayed.
Periodic Table Tool
The [Periodic Table] button will appear if the Periodic Table is to be used on a Science test.
Click the [Periodic Table] button to open and close the table.
Math Formula
The [Math Formula] button will appear if a reference sheet containing math formulas is to be used on the test.
Click the button to open and close the math formula.
Print Request
Click the [Print Request] button to inform the TA that a printout for the passage is requested.
Comment Tool
Click “Comment” to report a major problem with the test question to ODE.
A scroll bar is displayed for questions that are too large to fit on the screen. Reading and Science passages provide independent scroll bars so that students may scroll through the passage and the associated items separately.
Test Administrator Guide to the Student Interface (Training Site), Test Delivery System
Copyright © 2008 American Institutes for Research 8/12/2008 Page 11
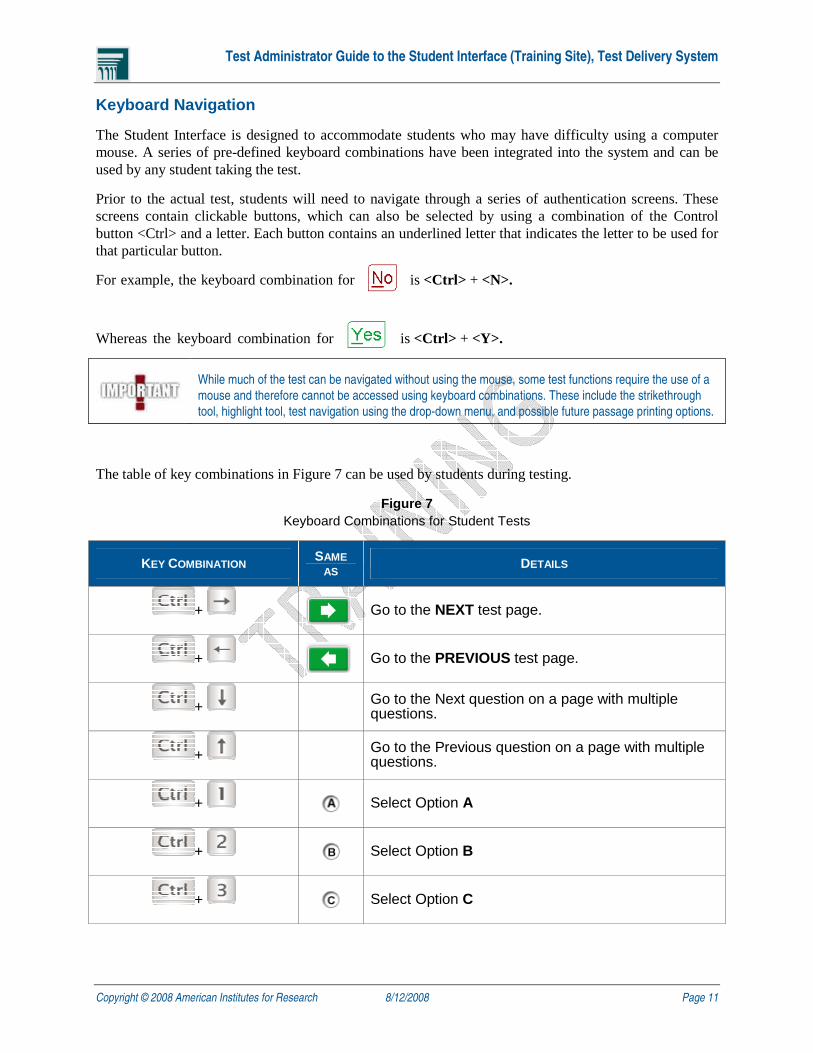
Keyboard Navigation
The Student Interface is designed to accommodate students who may have difficulty using a computer mouse. A series of pre-defined keyboard combinations have been integrated into the system and can be used by any student taking the test.
Prior to the actual test, students will need to navigate through a series of authentication screens. These screens contain clickable buttons, which can also be selected by using a combination of the Control button <Ctrl> and a letter. Each button contains an underlined letter that indicates the letter to be used for that particular button.
For example, the keyboard combination for is <Ctrl> + <N>.
Whereas the keyboard combination for is <Ctrl> + <Y>.
While much of the test can be navigated without using the mouse, some test functions require the use of a
mouse and therefore cannot be accessed using keyboard combinations. These include the strikethrough
tool, highlight tool, test navigation using the drop-down menu, and possible future passage printing options.
The table of key combinations in Figure 7 can be used by students during testing.
Figure 7 Keyboard Combinations for Student Tests
KEY COMBINATION SAME AS DETAILS
+
Go to the NEXT test page.
+
Go to the PREVIOUS test page.
+ Go to the Next question on a page with multiple questions.
+ Go to the Previous question on a page with multiple questions.
+ Select Option A
+ Select Option B
+ Select Option C
Test Administrator Guide to the Student Interface (Training Site), Test Delivery System
Copyright © 2008 American Institutes for Research 8/12/2008 Page 12
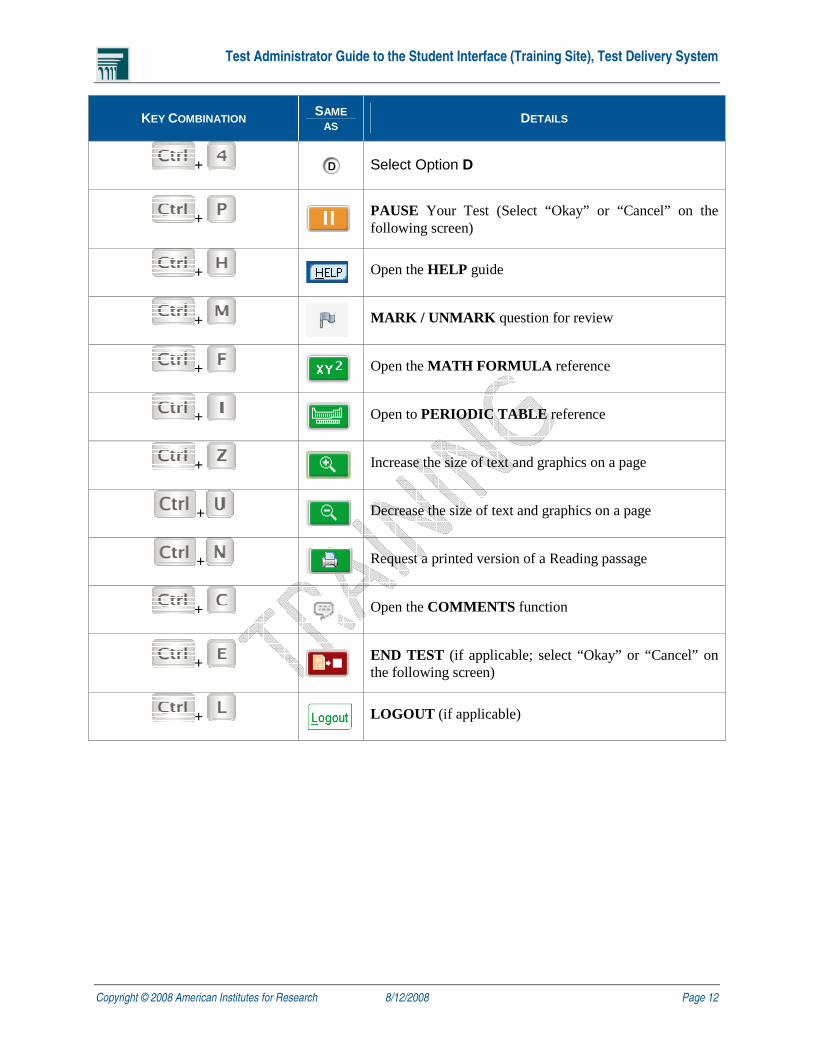
KEY COMBINATION SAME AS DETAILS
+ Select Option D
+
PAUSE Your Test (Select “Okay” or “Cancel” on the following screen)
+ Open the HELP guide
+
MARK / UNMARK question for review
+
Open the MATH FORMULA reference
+
Open to PERIODIC TABLE reference
+
Increase the size of text and graphics on a page
+
Decrease the size of text and graphics on a page
+
Request a printed version of a Reading passage
+
Open the COMMENTS function
+
END TEST (if applicable; select “Okay” or “Cancel” on the following screen)
+
LOGOUT (if applicable)

Test Administrator Guide to the Student Interface (Training Site), Test Delivery System
Copyright © 2008 American Institutes for Research 8/12/2008 Page 13
Test Navigation Rules
Starting a Test
The students may begin their test by clicking the button on the Test Instructions and Help page.
Taking the Test
A sample test page is shown in Figure 8.
Figure 8 Example Test Page
Going Back to Change Answers. Students must answer all items on a page before going on to a new page of items, but within a session, they are allowed to go back in the test to change previous answers.
Going Back in Tests (Reverse Navigation). Students may go back in the test to review or modify responses to previous items without first providing a response to the current item.
Students may use the [Next] button or the Go-to Question drop-down menu to navigate through the test. The Past/Marked Questions drop-down menu displays all the questions a student has viewed during the test. Students can use this tool to navigate to questions they have already viewed. The drop-down navigation tool saves students’ answers when they move between questions, allowing them to go directly to a question without the use of the [Back] or [Next] buttons. The Mark for Review flag appears next to those questions a student has marked.
Test Administrator Guide to the Student Interface (Training Site), Test Delivery System
Copyright © 2008 American Institutes for Research 8/12/2008 Page 14
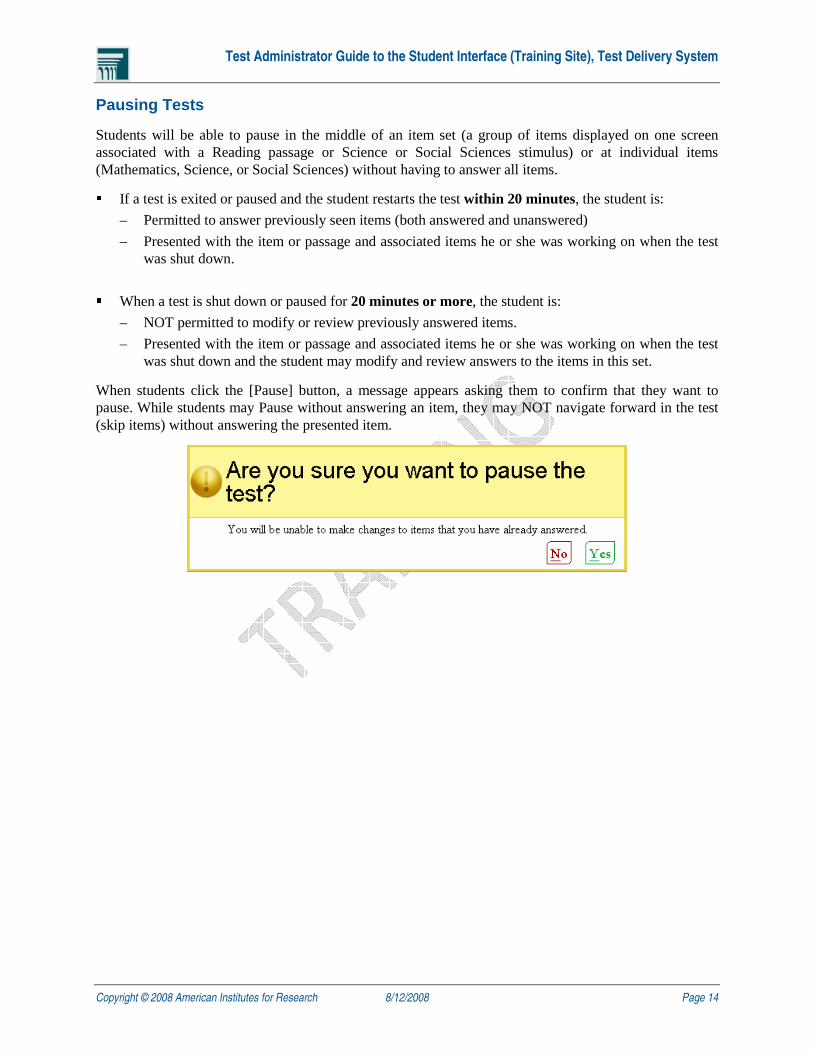
Pausing Tests
Students will be able to pause in the middle of an item set (a group of items displayed on one screen associated with a Reading passage or Science or Social Sciences stimulus) or at individual items (Mathematics, Science, or Social Sciences) without having to answer all items. � If a test is exited or paused and the student restarts the test within 20 minutes, the student is:
– Permitted to answer previously seen items (both answered and unanswered)
– Presented with the item or passage and associated items he or she was working on when the test was shut down.
� When a test is shut down or paused for 20 minutes or more, the student is:
– NOT permitted to modify or review previously answered items.
– Presented with the item or passage and associated items he or she was working on when the test was shut down and the student may modify and review answers to the items in this set.
When students click the [Pause] button, a message appears asking them to confirm that they want to pause. While students may Pause without answering an item, they may NOT navigate forward in the test (skip items) without answering the presented item.

Test Administrator Guide to the Student Interface (Training Site), Test Delivery System
Copyright © 2008 American Institutes for Research 8/12/2008 Page 15
Resuming a Paused Test
To continue a previously started test, students follow the same process used to start a new test. Upon logging in, students see the screen displayed in Figure 9.
Figure 9 Resuming a Test Option
When students resume a test, they will not be able to go back and change previously answered items, even if these items have been marked for review. Going back in tests is allowed only for a current session; if a test is split into multiple sessions, students can only go back to the items viewed and answered in the current session they are working on (except for unintended test interruptions; see “Test Navigation Rules”).

Test Administrator Guide to the Student Interface (Training Site), Test Delivery System
Copyright © 2008 American Institutes for Research 8/12/2008 Page 16
Reaching the End of the Test and Reviewing Marked Items
Once students have answered the last question on their test, the [Submit Test] button appears in the bottom-right corner. When the [Submit Test] button is clicked, the screen shown in Figure 10 is displayed.
Figure 10 Reached End of Test — Review Marked Items
The students have the option to review their test or to accept their answers and submit them for scoring. The [Submit Test] button remains on screen while students review their answers and should be clicked when they are ready to submit their test. They are then directed to the Congratulations screen once again.
Remind students that they will not be permitted to change answers after their test has been paused,
regardless of whether a question has been marked for review.
The student must click [Submit Test for Scoring] to complete their test.
Test Administrator Guide to the Student Interface (Training Site), Test Delivery System
Copyright © 2008 American Institutes for Research 8/12/2008 Page 17
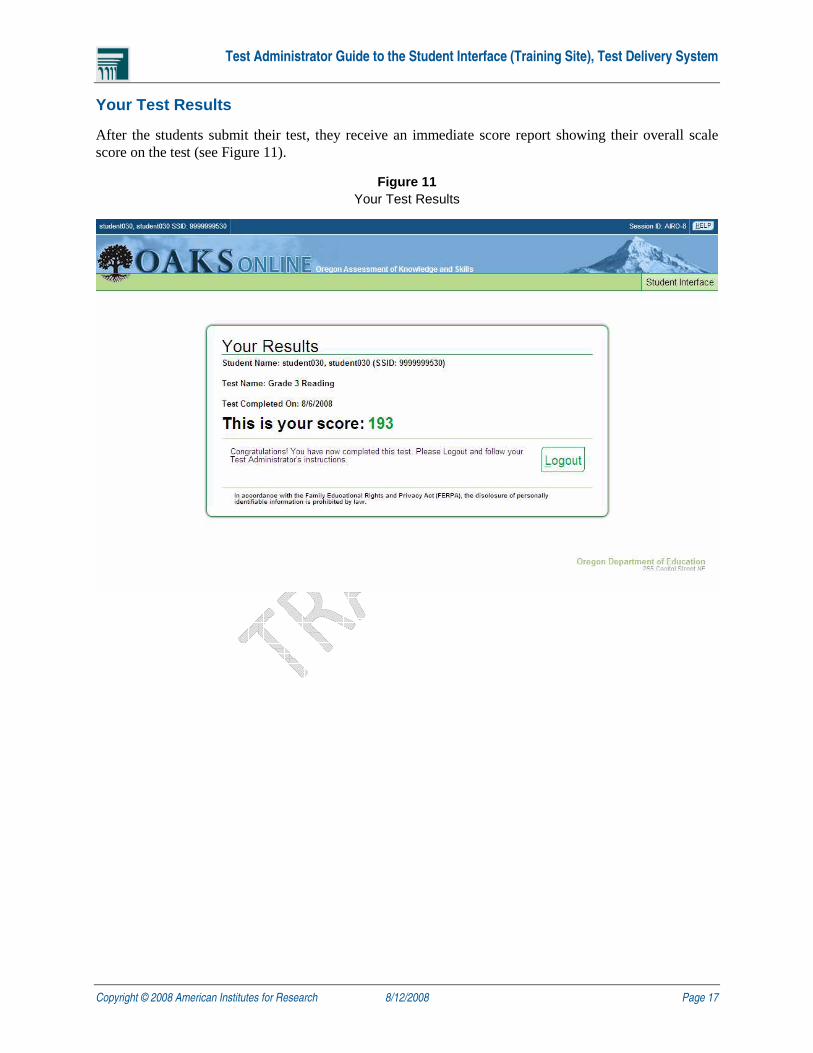
Your Test Results
After the students submit their test, they receive an immediate score report showing their overall scale score on the test (see Figure 11).
Figure 11 Your Test Results

Test Administrator Guide to the Student Interface (Training Site), Test Delivery System
Copyright © 2008 American Institutes for Research 8/12/2008 Page 18
Appendix Appendix A: Special Instructions for Test Administration on Secure Browsers
While the secure browsers are an integral component of test security, Test Administrators provide an equally important role in preserving test integrity. In addition to the guidelines put forth by ODE and individual districts, Test Administrators should be aware of the following and employ the necessary precautions while administering tests.
▶ Close External User Applications
Prior to administering tests, TAs should check individual computers and close all applications except those identified as necessary by the school’s IT Manager. This is due to auto-update and notification features that are built into some applications. We strongly recommend that TAs open secure browsers on all computers prior to testing.
▶ No Testing on Computers with Dual Monitors
Students should not take tests on computers with more than one monitor. Systems that use a dual monitor setup typically display an application on one screen, while another application is accessible on the other screen.
Appendix B: Force Quit Commands for Secure Browsers
In the event that a secure browser freezes or encounters a similar issue that prevents testing, Test Administrators may use the force quit command to close the student’s browser. The force quit commands are as follows:
Windows: <Ctrl> + <Alt> + <Shift> + <F10>
Mac OS X:<Ctrl> + <Alt> + <Shift> + <F10>
Linux: <Ctrl> + <Shift> + <F10>
Mac 9: <Ctrl> + <Shift> + <Apple> + <F12>
This information should not be shared with students for any reason.

Test Administrator Guide to the Student Interface (Training Site), Test Delivery System
Copyright © 2008 American Institutes for Research 8/12/2008 Page 19
Appendix C: Mac OS X Keyboard Combinations
The keyboard combinations enabled for the Mac OS X secure browser function as designed; however, the secure browser does not block the following keyboard combinations:
• <Ctrl>+<Option>+<Command>+<8> Changes screen color from black to white, or from white to black
• <Ctrl>+<Command>+<Eject> Prompts a pop-up message
• <Option>+<Command>+<Eject> Monitor goes into Sleep Mode (hit any key to turn monitor back on)
• <Command>+<F5> Turns Voiceover on/off
These keyboard combinations perform system commands on a Mac OS X. While this information should not be shared with students, the use of these keyboard combinations during testing does not compromise the integrity of the secure browser.
Appendix D: Secure Browser Error Messages
▶ Secure Browser Not Detected Message
The Test Delivery System automatically detects whether a computer is using a secure browser to access the student interface. In the event that a secure browser is not being used, the following message is displayed on the student login screen. However, at ODE’s discretion, non-secure browsers may be denied access to the test.
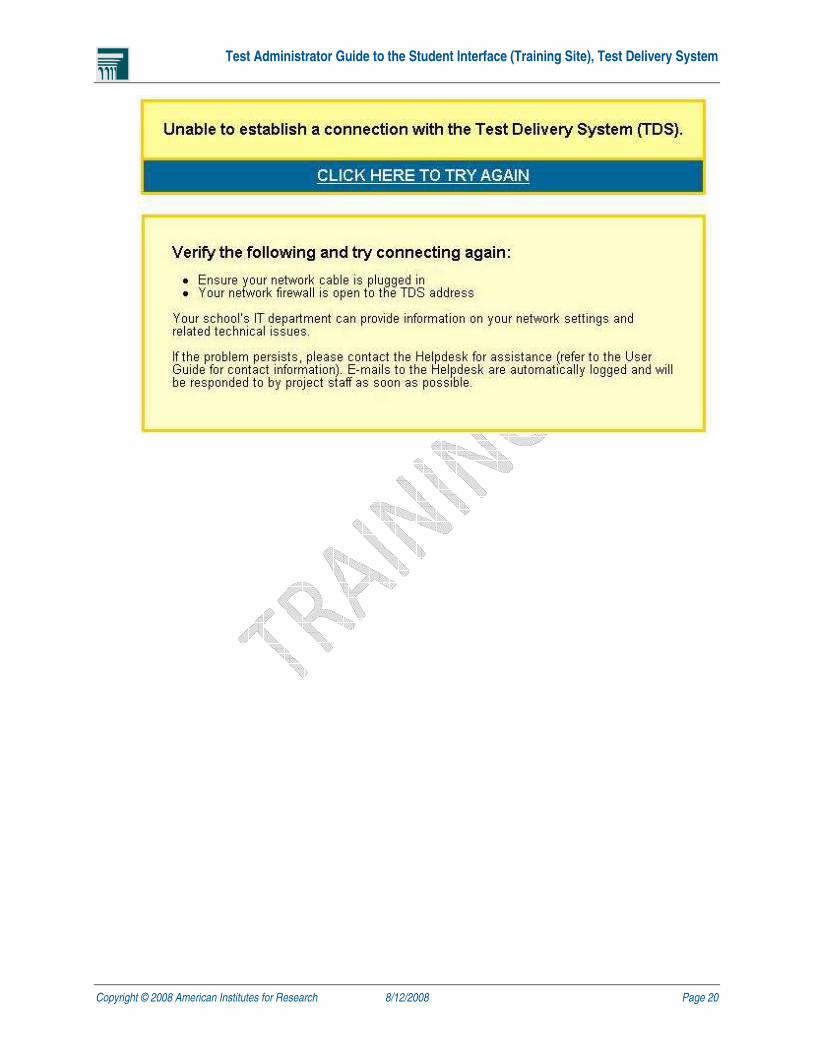
▶ Failure to Connect to the Test Delivery System
If a computer fails to establish or maintain a connection with the Test Delivery System, a screen with the message below is displayed. This would most commonly happen if the there is a network-related problem.
Test Administrator Guide to the Student Interface (Training Site), Test Delivery System
Copyright © 2008 American Institutes for Research 8/12/2008 Page 20