take a hike backpack - tribal - freespirit fabrics · take a hike backpack - tribal collection:...
TRANSCRIPT

1 of 7freespiritfabrics.com
Take a HikeBackpack - Tribal
Collection: Snow Leopard Tribal
Technique: Sewing
Skill Level: Intermediate
Crafting Time: Weekend*
Finished Size: 18” x 13” (45.72cm x 33.02cm)
*Crafting time based on Intermediate skill level
Featuring Snow Leopard Tribal
Whether you’re adventuring to a foreign country or just to a local farmer’s market, this colorful pack is large enough to tote your wares. The front zippered pockets are ideal for stowing your phone or camera to keep them handy. The drawstring top keeps things safely stowed under the latched flap.
Version 2.0

Take a Hike Backpack - Tribal
2 of 7makeitcoats.comCopyright Coats © 2017 FS1028SL Version 2.0
Project designed by Linda Turner Griepentrog
Fabric RequirementsDESIGN COLOR ARTICLE CODE YARDAGE
(A) Alexandria Terra PWSL046.TERRA 7⁄8 yard (80.01cm)(B) Bukhara Terra PWSL049.TERRA 1⁄3 yard (30.48cm)(C) Kira Terra PWSL048.TERRA 3⁄8 yard (34.29cm)(D) Nomad Terra PWSL051.TERRA 1⁄3 yard (30.48cm)(E) Jayanti Dynasty PWSL050.DYNAS 1⁄2 yard (45.72cm)(F) African Baskets Terra PWSL045.TERRA 1⁄3 yard (60.96cm)(G) Nomad Dynasty PWSL051.DYNAS 1 yard (.91m)
Additional Requirements• Coats® Dual Duty All-purpose thread to match fabrics• (3) Eclectic Elements Swivel Latches by Tim Holtz• (3) Eclectic Elements D-rings by Tim Holtz• (2) 9“ Eclectic Elements Zippers by Tim Holtz• 1 yard (.91m) single-sided fusible foam stabilizer, 58” (147.32cm)• 1⁄2 yard (45.72cm) fusible interfacing, 45” (114.30cm)• 11⁄2 yards (1.37m) cotton cord, 1⁄8” (.32cm)• (1) cord lock• Pattern tracing cloth• Pattern templates• Sewing machine• Zipper foot• Basic sewing and pressing supplies
(A) (B) (C) (D) (E)
(F) (G)
Take a Hike Backpack - Tribal
3 of 7makeitcoats.comCopyright Coats © 2017 FS1028SL Version 2.0
PreparationTrace the Backpack Bottom and Backpack Flap patterns onto tracing cloth and cut out.
CuttingFabric A, cut:(2) 18” x 20” (45.72cm x 50.80cm), for backpack front/backEnough 21⁄4” (5.72cm) bias strips to make 36” (91.44cm) finished bias
Fabric B, cut:(2) 9” x 20” (22.86cm x 50.80cm), for pockets/pocket lining
Fabric C, cut:(1) Backpack Bottom
Fabric D, cut:(2) 2” x 21⁄2” (5.08cm x 6.35cm), for side ring holders(2) 21⁄2” x 34” (6.35cm x 86.36cm), for straps(1) 21⁄2” x 15” (6.35cm x 38.10cm), for lower front strap(1) 21⁄2” x 4” (6.35cm x 10.16cm), for flap strap
Fabric E, cut:(1) 3” x 42” (7.62cm x 106.68cm), for casing(1) Backpack Flap, for flap lining
Fabric F, cut:(1) Backpack Flap
Fabric G, cut:(2) 18” x 20” (45.72cm x 50.80cm), for lining (1) Backpack Bottom, for lining
Fusible Foam, cut:(2) 18” x 20” (45.72cm x 50.80cm), for backpack front/back(1) Backpack Bottom(1) Backpack Flap
Interfacing, cut:(1) 9” x 20” (22.86cm x 50.80cm), for pockets(2) 2” x 21⁄2” (5.08cm x 6.35cm), for side ring holders(1) 21⁄2” x 15” (6.35cm x 38.10cm), for front strap(2) 21⁄2” x 3” (6.35cm x 7.62cm), for casing(2) 21⁄2” x 34” (6.35ccm x 86.36cm), for straps(1) 21⁄2” x 4” (6.35cm x 10.16cm), for flap strap
SewingNote: All seams are 1⁄2” (1.37cm) unless otherwise noted. All pieces are sewn right sides together.
1. Following the manufacturer’s instructions, fuse the interfacing to the wrong side of the pocket, front strap, straps, flap strap, and side ring holders. Do not fuse interfacing to the casing strip yet.
2. To make the lining, sew together the 18” x 20” (45.72cm x 50.80cm) Fabric G rectangles along the short sides, leaving a 6” (15.24cm) opening in one side for turning. Press the seams open. Using the side seams as center points, fold the backpack body in half to mark quarter points. Use the Bottom pattern piece to mark the center and side marks on the lining bottom. Match the points and sew the backpack body to the bottom. Trim the seam and set aside.
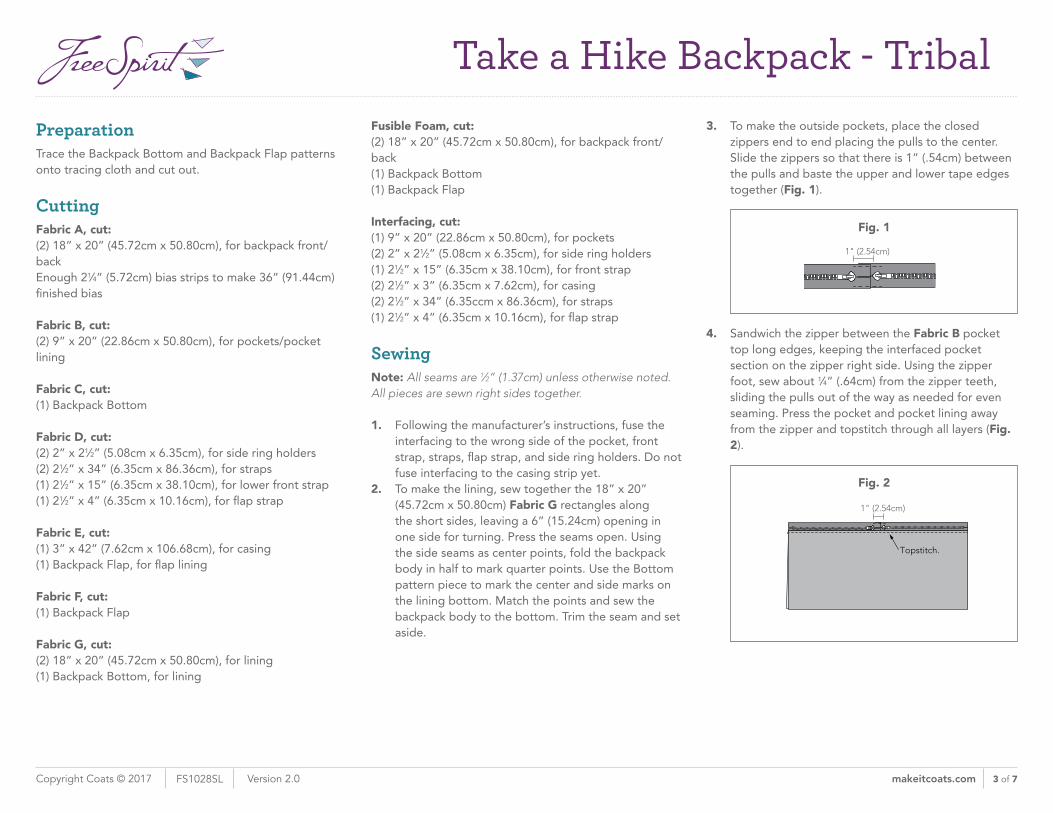
3. To make the outside pockets, place the closed zippers end to end placing the pulls to the center. Slide the zippers so that there is 1” (.54cm) between the pulls and baste the upper and lower tape edges together (Fig. 1).
Fig. 1 Fig. 1
1" (2.54cm)
4. Sandwich the zipper between the Fabric B pocket top long edges, keeping the interfaced pocket section on the zipper right side. Using the zipper foot, sew about 1⁄4” (.64cm) from the zipper teeth, sliding the pulls out of the way as needed for even seaming. Press the pocket and pocket lining away from the zipper and topstitch through all layers (Fig. 2).
Fig. 2 Fig. 2
1" (2.54cm)
Topstitch.
Take a Hike Backpack - Tribal
4 of 7makeitcoats.comCopyright Coats © 2017 FS1028SL Version 2.0
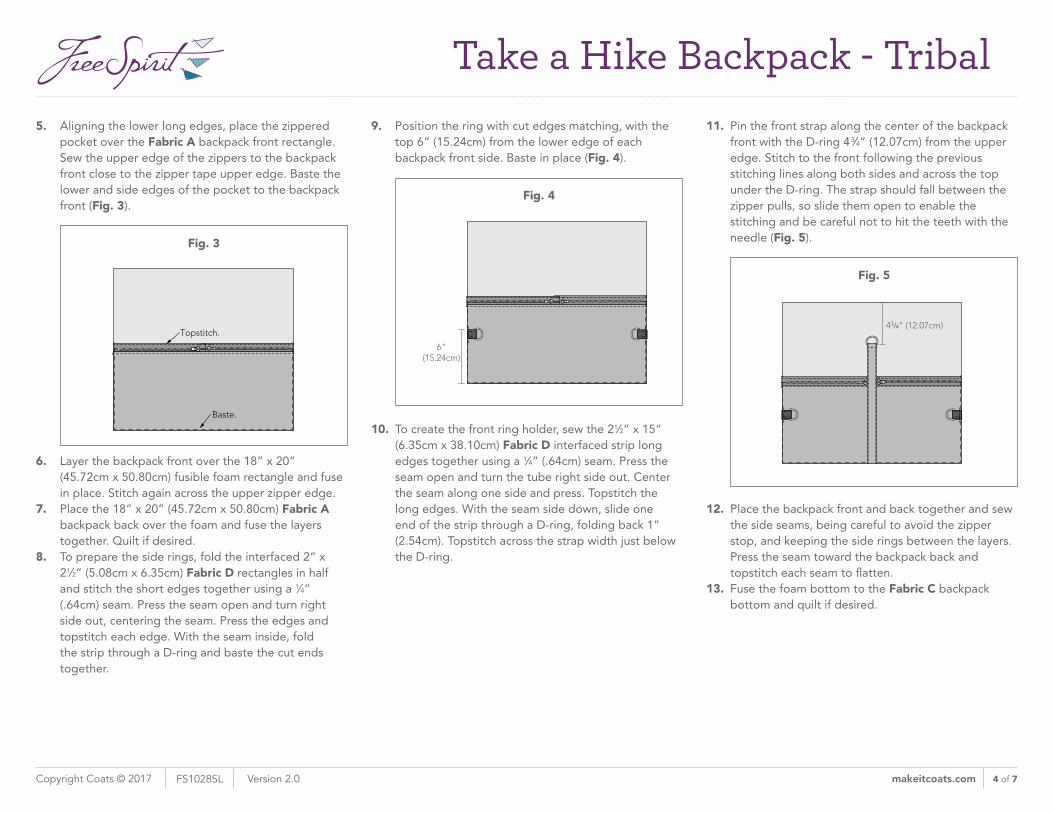
5. Aligning the lower long edges, place the zippered pocket over the Fabric A backpack front rectangle. Sew the upper edge of the zippers to the backpack front close to the zipper tape upper edge. Baste the lower and side edges of the pocket to the backpack front (Fig. 3).
Fig. 3 Fig. 3
Baste.
Topstitch.
6. Layer the backpack front over the 18” x 20” (45.72cm x 50.80cm) fusible foam rectangle and fuse in place. Stitch again across the upper zipper edge.
7. Place the 18” x 20” (45.72cm x 50.80cm) Fabric A backpack back over the foam and fuse the layers together. Quilt if desired.
8. To prepare the side rings, fold the interfaced 2” x 21⁄2” (5.08cm x 6.35cm) Fabric D rectangles in half and stitch the short edges together using a 1⁄4” (.64cm) seam. Press the seam open and turn right side out, centering the seam. Press the edges and topstitch each edge. With the seam inside, fold the strip through a D-ring and baste the cut ends together.
9. Position the ring with cut edges matching, with the top 6” (15.24cm) from the lower edge of each backpack front side. Baste in place (Fig. 4).
Fig. 4
6"(15.24cm)
Fig. 4
10. To create the front ring holder, sew the 21⁄2” x 15” (6.35cm x 38.10cm) Fabric D interfaced strip long edges together using a 1⁄4” (.64cm) seam. Press the seam open and turn the tube right side out. Center the seam along one side and press. Topstitch the long edges. With the seam side down, slide one end of the strip through a D-ring, folding back 1” (2.54cm). Topstitch across the strap width just below the D-ring.
11. Pin the front strap along the center of the backpack front with the D-ring 4 3⁄4” (12.07cm) from the upper edge. Stitch to the front following the previous stitching lines along both sides and across the top under the D-ring. The strap should fall between the zipper pulls, so slide them open to enable the stitching and be careful not to hit the teeth with the needle (Fig. 5).
Fig. 5 Fig. 5
43/4" (12.07cm)
12. Place the backpack front and back together and sew the side seams, being careful to avoid the zipper stop, and keeping the side rings between the layers. Press the seam toward the backpack back and topstitch each seam to flatten.
13. Fuse the foam bottom to the Fabric C backpack bottom and quilt if desired.

Take a Hike Backpack - Tribal
5 of 7makeitcoats.comCopyright Coats © 2017 FS1028SL Version 2.0
14. Mark the quarter points on the backpack and backpack bottom. Match the points, placing the front strap at the center of the long oval bottom edge, and sew the backpack body to the bottom. Stitch again next to the first line of stitching, and trim the seam to 1⁄4” (.64cm). Turn the backpack right side out, shaping the bottom flat.
15. Fuse (1) 21⁄2” x 3” (6.35cm x 7.62cm) interfacing rectangle to each end of the Fabric E casing strip. Press the ends under 11⁄2” (3.81cm) and topstitch near the raw edge. Fold the casing in half wrong sides together and press.
16. To apply the casing, baste the raw edges together with the backpack body upper edge, abutting or slightly overlapping the pressed under ends at the center front.
17. With right sides together, slide the lining over the backpack matching the upper edges. Stitch around the upper edge with the casing between.
18. Turn the backpack right side out through the lining opening and tuck the lining into the pack body. Press the upper edge with the casing extended. Topstitch through all layers just below the casing (Fig. 6).
Fig. 6 Fig. 6
19. Close the opening in the lining.
Finishing20. To make the flap, fuse the Fabric F flap to the foam
flap. Back with the Fabric E flap lining and baste the edges together. Quilt if desired. Join the binding strips end to end using diagonal seams. Fold the binding in half, wrong sides together, and press. Starting at the center back, bind the flap edges, mitering the corners, or bind the curve and straight edge separately. Turn the binding to the flap lining side and hand-stitch in place.
21. To make the straps, fold each 21⁄2” x 34” (6.35cm x 86.36cm) Fabric D strip in half and stitch the long edges together and across one end using a 1⁄4” (.64cm) seam allowance. Press the seam open. Turn the straps right side out and press. Edgestitch each long edge. Fold back 1” (2.54cm) of the finished end through the swivel latch loop and stitch twice to reinforce.
22. Pin-mark a line at the upper backpack back 3” (7.62cm) below the casing upper edge, and mark the center back of both the pack and the flap. Lap the bound flap straight edge to the line, matching centers; pin in place.
23. Tuck both of the unfinished strap ends under the flap straight edge 1” (2.54cm) from the center back. Pin in place. Try on the pack, adjust the straps to a comfortable length and re-pin the ends. Stitch across the flat side of the flap binding, catching the strap ends in the stitching. Trim any excess strap length, and stitch the flap again 1⁄4” (.64cm) above the previous stitching line.
24. To make the flap strap, fold the 21⁄2” x 4” (6.35cm x 10.16cm) Fabric D strip in half and sew the long edges together. Turn, center the seam, press and edgestitch. Slide one end of the strap through the swivel latch loop. Position the strap on the flap center front with the swivel latch extended. Edgestitch in place tucking both ends under 1” (2.54cm) to finish (Fig. 7).
Fig. 7Fig. 7
25. Using a small safety pin or bodkin, thread the cotton cord through the casing. Even the ends and insert through the cord lock. Trim the ends and knot them separately.

freespiritfabrics.com Copyright Coats © 2016 Version 1.0FS1028SL 6 of 7
*** Measure templates before cutting to confirm printing at 100%***
freespiritfabrics.com makeitcoats.comCopyright Coats © 2016 Version 1.0FS1028SL
This squareshould measure
1" x 1"(2.54cm x 2.54cm)
when printed.
51 /4" (1
3.34
cm)
71/4" (18.42cm)
Take a Hike BackpackBottom
Cut 1 Fabric CCut 1 Foam
Cut 1 Fabric G
Plac
e o
n fo
ld.
Reflect pattern along this line.
Reflect pattern along this line.
Reflect pattern along this line.
Fold
line
Re�ect pattern along the marked line to make a half pattern.
Re�ect again on the fold line to make a complete pattern.
Pattern Construction

freespiritfabrics.com Copyright Coats © 2016 Version 1.0FS1028SL 7 of 7
*** Measure templates before cutting to confirm printing at 100%***
This squareshould measure
1" x 1"(2.54cm x 2.54cm)
when printed.
91/4" (29.50cm)
4" (10.16cm)
Take a Hike BackpackFlap
Cut 1 Fabric FCut 1 Foam
Cut 1 Fabric E
Place on fold.