t400 beschrei e
DESCRIPTION
PLC T400TRANSCRIPT

s
SIMADYN D
T400 Technology Module
Brief Description
Edition 09.99

Brief Description T400 Technology Module
Edition Edition version
1 T400 Technology Module 09.98
2 T400 Technology Module 04.00
Copyright © SIEMENS AG 2000 All rights reserved
The reproduction, transmission or use of this document or itscontents is not permitted without express written authority. Offenderswill be liable for damages. All rights, including rights created by patentgrant or registration or a utility model or design, are reserved.
Siemens AGA&D LD R
Frauenauracherstr.8091056 Erlangen
Disclaimer of liability
We have checked the contents of this Manual to ensure that theycoincide with the described hardware and software. However,deviations cannot be completely ruled-out, so we cannot guaranteecomplete conformance. However, the information in this document isregularly checked and the necessary corrections included insubsequent editions. We are thankful for any recommendations orsuggestions.
© Siemens AG 2000Technical data subject to change
Contents
Definitions.................................................................................................................... ...... 2
Danger and warning information...................................................................................... 2
1. Product d escription ...................................................................................................... 3
2. Installation ................................................................................................................. ... 42.1. Installing the module........................................................................................ 4
2.1.1. SRT400............................................................................................. 42.1.2. Electronics box in the MASTERDRIVE / DC MASTER ...................... 4
2.2. Connections..................................................................................................... 5
3. Technical data............................................................................................................... 83.1. Overview......................................................................................................... 83.2. General data.................................................................................................... 93.3. Power supply ................................................................................................... 93.4. Inputs/outputs .................................................................................................. 93.5. Incremental encoder with coarse- and fine pulse evaluation .......................... 11
3.5.1. Pulse encoder 1 .............................................................................. 113.5.2. Pulse encoder 2 .............................................................................. 12
3.5.2.1. Pulse encoder type selection switches S2/1 - S2/8.................. 123.5.2.2. useable pulse encoder types................................................... 13
3.6. Absolute value encoder ................................................................................. 143.7. Serial interfaces............................................................................................. 14
3.7.1. Service interface 1 .......................................................................... 143.7.1.1. Communications switch S1/8.................................................. 143.7.1.2. Connecting cable to the PC .................................................... 15
3.7.2. Interface 2....................................................................................... 153.7.3. Bus termination switches S1/1 - S1/6............................................... 153.7.4. Download switch S1/7 ..................................................................... 15
3.8. Diagnostic LEDs ............................................................................................ 16
4. Troubleshooting ......................................................................................................... 174.1. Hotline........................................................................................................... 17
5. Parameterization ......................................................................................................... 18
6. Configuring ................................................................................................................. 1 96.1. Standard software packages.......................................................................... 196.2. Freely configuring the T400 ........................................................................... 20
7. Manufacturer’s declaration ........................................................................................ 22
8. ESD guidelines ........................................................................................................... 248.1. What is ESD?................................................................................................ 248.2. Handling ESD modules.................................................................................. 248.3. Measuring and making changes on ESD modules ........................................... 28.4. Transporting modules ...................................................................................... 2
Definitions
2 Edition 04.00 Siemens AGSIMADYN D Hardware Brief Description
Definitions
NOTE
The information in this Manual does not purport to cover all details or variations in equipment, nor to provide forevery possible contingency to be met in connection with installation, operation or maintenance.Should further information be desired or should particular problems arise which are not covered sufficiently forthe purchaser’s purposes, please contact your local Siemens office.Further, the contents of this Manual shall not become a part of or modify any prior or existing agreement,commitment or relationship. The sales contract contains the entire obligation of Siemens. The warrantycontained in the contract between the parties is the sole warranty of Siemens. Any statements contained hereindo not create new warranties nor modify the existing warranty.
Qualified personnel
For the purpose of this Manual and product labels, a „Qualified person“ is someone who is familiar with theinstallation, mounting, start-up and operation of the equipment and the hazards involved. He or she must havethe following qualifications, for example:
1. Trained and authorized to energize, de-energize, clear, ground and tag circuits and equipment inaccordance with established safety procedures.
2. Trained in the proper care and use of protective equipment in accordance with established safetyprocedures.
3. Trained in rendering first aid
Danger and warning information
!DANGER For the purpose of this Manual and product labels, „Danger“ indicates death,
severe personal injury and/or substantial property damage will result if properprecautions are not taken.
!WARNING For the purpose of this Manual and product labels, „Warning“ indicates death,
severe personal injury or property damage can result if proper precautionsare not taken.
!CAUTION For the purpose of this Manual and product labels, „Caution“ indicates that
minor personal injury or material damage can result if proper precautions arenot taken.
NOTE For the purpose of this Manual, „Note“ indicates information about theproduct or the respective part of the Instruction Manual which is essential tohighlight.
!CAUTION This board contains components which can be destroyed by electrostatic
discharge. Prior to touching any electronics board, your body must beelectrically discharged. This can be simply done by touching a conductive,grounded object immediately beforehand (e.g. bare metal cabinetcomponents, socket protective conductor contact).
!WARNING Hazardous voltages are present in this electrical equipment during operation.
Non-observance of the safety instructions can result in severe personal injuryor property damage.It is especially important that the warning information in all of the relevantOperating Instructions/Instruction Manuals are strictly observed.

Product description
Siemens AG Edition 04.00 3SIMADYN D Hardware Brief Description
1. Product description
Order No. 6DD1606-0AD0
Applications
The T400 is a technology module. It can be used to complement drives with sophisticated, high-dynamicperformance open-loop and closed-loop control functions at a favorable price. Sampling times down to 100 µsare possible.
Applications include higher-level closed-loop controls for:
• closed-loop tension control• closed-loop position control• winder and coiler• (angular) synchronous control• positioning• cross cutter and flying saws• drive-related open-loop control functions
The T400 can be inserted in the electronics box of
• SIMOVERT MASTERDRIVES VC, MC Compact 6SE70/71 AC drive converters (not in MC Compact PLUS!)• SIMOREG DC-MASTER 6RA70.
Further, the T400 can also be used in the SRT400 SIMADYN D subrack. Two T400 can be inserted in theSRT400.
The T400 is always used in the drives and in the SRT400, together with the MASTERDRIVES or DC MASTERcommunications module, for example, CB1, SCB as well as the ADB carrier module with the communicationsmodules inserted in it, for example, CBP2 (PROFIBUS-DP), CBC (CAN), CBD (DeviceNet).

Installation
4 Edition 04.00 Siemens AGSIMADYN D Hardware Brief Description
2. Installation
2.1. Installing the module
2.1.1. SRT400
If only one T400 is used, then this is inserted in the lefthand slot. The optional 2nd module (second T400 orcommunications module) is inserted at the right. The modules are retained using screws above and below thehandles which are used to insert/withdraw the modules.
2.1.2. Electronics box in the MASTERDRIVE / DC MASTER
Slot in the electronics box Modules
Left Slot 1 (CUx) (left) CU2 / CU3 / CUDC / CUVC / CUMC / ...
Center Slot 3 (options) (center) CB1 / CB2 / CBP / CBP2 / SCB1 / SCB2 / ADB / ... / empty
Right Slot 2 (right) T400
Note:The T400 must always be inserted at slot 2 (right!!!), if it is used in a MASTE RDRIVE or DC MASTER.It is not permissible to use a TSY or the terminal expansion modules EBx (on the ADB) in conjunction with theT400.
In order to be able to insert the option modules inthe electronics box, the LBA (Local Bus Adapter)must be installed in the electronics box.Installing the bus expansion LBA:
♦ Remove the CUx module (lefthand slot in theelectronics box) after releasing the connectingcable to the PMU and the two retaining screws.Use the handles to remove the module.
♦ Insert the bus expansion LBA into theelectronics box (position, refer to the diagram)until it snaps into place.
♦ Insert the CUx module back into the lefthandslot, screw in the retaining screws at thehandles, insert the connecting cable to thePMU.
♦ Insert the T400 in slot 2 (right) and, if requiredthe option module in slot 3 (center) of theelectronics box, and screw into place.
Replacing modules in the electronics box♦ Release the screws retaining the modules
above and below the handles.
♦ Carefully remove the module from theelectronics box using the handles, and takecare that the module does not catch on anyadjacent components and parts.
♦ Carefully locate the new module onto the guiderails and insert it fully into the electronics box.
♦ Tighten the module retaining screws above andbelow the handles.
SLOT 3 (Options)Slot 1 1 (CU)
SLOT 2 (T400)

Installation
Siemens AG Edition 04.00 5SIMADYN D Hardware Brief Description
2.2. Connections
56
5758
5960
46
474849
5354
55
+24V
50
94
AD
+-
96
91
9392
AD
+-
AD
+-
95
AD
+-
AD
+-
90
98
97A
D
AD
11 bit + VZ
72
73
74
75
Datei: T400-io.dsf
M
45P24 external
61
50
51
52
+24VP24 external 45
99
99
0 pulse
+15V / 100mATrack A
Track B
Track A +
Track B +
0 pulse +
81
82
83
63
64
Coarse p.
66
Coarse p.65
84
Track A -
Track B -
0 pulse -.
86
87
88
85M
767778
79
68
RS485, 2-wire
70
71
69
T/Rx+
T/Rx-
T T L
RxD
TxD
67
Ana_In_1
Ana_In_2
Ana_In_3
Ana_In_4
Ana_In_5
Ana_Out_1
Ana_Out_2
BinInput
SSI_1
SSI_2
X02
X01
M
RS232
Increm_1
Increm_2
Dual-Port-RAM
Dual-Port-RAM
Pulseencod.
2
Pulseencod.
1
M
M
T40080
62
+24V
e.g.contact-switch
Hardware-addresses
of the basicconfigured
software
Fct.-block
Tracks A and B from CUx
Zero pulse from CUx
Serial interface 1- Programdownload- CFC test mode (start-up)- USS (SIMOVIS)
2 analog outputs±10V / 10mA11 bits + sign
Fct.-block
BinInOut(bi-directional)
Fct.-block
MASTER DRIVESor DC-MASTER
basic driveCUx
Absolute valueencoder 2
or
Serialinterface 2:for- peer-to-peer- USS
Absolute valueencoder 1
2 binary o utputs
Communic-ations modulee.g. CB1, ADB
4 binary-inputs24V DC
4 binary inputsalarm-capable24V DC(8mA inputcurrent)
4 binaryoutputsbi-directional24V DC(8mA inputcurrent)
5 analog inputsdifferential inputs11 bits + sign±10V / 10kΩ
2 Pulseencoderinputs
HTL
HTL/TTL(RS422)
Selected withswitch S2
MASTER DRIVESor DC-MASTER
basic driveCUx
e.g.contact-switch
Note: All of the grounds are connected with one another and the electronics ground.

Installation
6 Edition 04.00 Siemens AGSIMADYN D Hardware Brief Description
2.2.1. Analog inputs/outputs
T400 terminal assignment Connec-tor
Connec-tor pin
Term-inal
Ground, analog inputs/outputs X9 1 89Analog input 1 Analog input 1+ 2 90
Analog input 1- 3 91Analog input 2 Analog input 2+ 4 92
Analog input 2- 5 93Analog input 3 6 94Analog input 4 7 95Analog input 5 8 96Analog output 1 9 97Analog output 2 10 98Ground, analog inputs/outputs 11 99
If inputs 1 and 2 are not used as differential inputs, terminals 89, 91 and 93 must be connected with oneanother. This means that measurements made at terminals 90 and 92 are with respect to ground.
2.2.2. Binary inputs/outputs
T400 terminal assignment Connec-tor
Connec-tor pin
Term-inal
+ 24 V external (for binary inputs and outputs) X5 1 45Bi-directional binary input and output 1 2 46Bi-directional binary input and output 2 3 47Bi-directional binary input and output 3 4 48Bi-directional binary input and output 4 5 49Ground, binary inputs and outputs 6 50Binary output 1 7 51Binary output 2 8 52Binary input 1 (alarm-capable) 9 53Binary input 2 (alarm-capable) 10 54Binary input 3 (alarm-capable) 11 55Binary input 4 (alarm-capable) X6 1 56Binary input 5 2 57Binary input 6 3 58Binary input 7 4 59Binary input 8 5 60Ground, binary inputs and outputs 6 61
2.2.3. Absolute value encoder
T400 terminal assignment Connec-tor
Connec-tor pin
Term-inal
Absolute encoder 2: data+ Serial interface 2: Rx-RS485+ X7 6 72Absolute encoder 2: data- Serial interface 2: Rx-RS485- 7 73Absolute encoder 2: clock+ Serial interface 2: Tx (Rx)-RS485+ 8 74Absolute encoder 2: clock- Serial interface 2: Tx (Rx)-RS485- 9 75Absolute encoder 1: data+ 10 76Absolute encoder 1: data- 11 77Absolute encoder 1: clock+ X8 1 78Absolute encoder 1: clock- 2 79
Either absolute encoder 2 or serial interface 2 can be used. The selection is made when configuring the softwareusing CFC.

Installation
Siemens AG Edition 04.00 7SIMADYN D Hardware Brief Description
2.2.4. Incremental encoder
T400 terminal assignment Connec-tor
Connec-tor pin
Term-inal
Increm. encod. 2: Track A (HTL)
Increm. encod. 2: Track A+ (RS422)
X6 7 62
Increm. encod. 2: Track B (HTL)
Increm. encod. 2: Track B+ (RS422)
8 63
Increm. encod. 2: Zero pulse(HTL)
Increm. encod. 2: Zero pulse+(RS422)
9 64
Increm. encod. 2: Coarse pulse 10 65Ground, incremental encoder 2 11 66+ 15 V encoder power supply (max. 100 mA) X8 3 80Increm. encod. 1: Track A 4 81Increm. encod. 1: Track B 5 82Increm. encod. 1: Zero pulse 6 83Increm. encod. 1: Coarse pulse 7 84Ground, incremental encoder 1 8 85Increm. encod. 2: Track A- (for RS422) 9 86Increm. encod. 2: Track B- (for RS422) 10 87Increm. encod. 2: Zero pulse- (for RS422) 11 88
If no push-pull signals are used for encoder 2, terminals 85, 86,87 and 88 must be connected with one another.
2.2.5. Serial interfaces
T400 terminal assignment Connec-tor
Connec-tor pin
Term-inal
Ser. interface 1: Rx-RS232 X7 1 67Ser. interface 1: Tx-RS232 2 68Ground, serial interface 3 69Ser. interface 1: Tx/Rx-RS485+ 4 70Ser. interface 1: Tx/Rx-RS485- 5 71Ser. interface 2: Rx-RS485+ 4 wire Absolute encoder 2: data+ 6 72Ser. interface 2: Rx-RS485- 4 wire Absolute encoder 2: data- 7 73Ser. interface 2: Tx (Rx)-RS485+ 2 or 4 wire Absolute encoder 2: clock+ 8 74Ser. interface 2: Tx (Rx)-RS485- 2 or 4 wire Absolute encoder 2: clock- 9 75
Either absolute value encoder 2 or serial interface 2 can be used. The selection is made when configuring thesoftware using CFC.

Technical data
8 Edition 04.00 Siemens AGSIMADYN D Hardware Brief Description
3. Technical data
3.1. OverviewInputs/outputs
2 analog outputs 5 analog inputs 2 binary outputs 8 binary inputs
of which 4 binary inputs can be used to call interrupt tasks (50 µs response time) 4 bi-directional binary inputs or outputs 2 incremental encoder inputs with zero pulse
- encoder 1 for HTL (15V) encoderEncoder pulses of an encoder connected to a SIMOVERT MASTERDRIVES SC/VC which are fedvia the backplane bus to the T400 can also be evaluated. This means it is also possible to use aTTL/RS422 encoder. The pulse encoder simulation via the backplane bus of the SIMOVERTMASTERDRIVES MC can also be used.
- encoder 2 for HTL (15V)- or TTL/RS422 encoder (5V) For each incremental encoder, a coarse pulse input to suppress the zero pulse, the coarse pulse input
(simultaneously) can also be used as binary input. The inputs/outputs are not electrically isolated 2 absolute value encoders with SSI- or EnDat protocol (RS485) for positioning applications
Note: When using absolute value encoder 2, serial interface 2 (peer, USS) cannot be used, as thesame terminals are used for the two applications!
Serial interface 1 with RS232 or RS485 data transfer format;The protocol can be selected using a switch on the module: Service protocol DUST1
for start-up (CFC test mode, service IBS (start-up), TELEMASTER) and downloading programswith a 19.2 kbit/s baud rate at the RS232 interface
USS protocol,2 wire, with selectable RS232 or RS485 data transfer format;max. baud rates, 38.4 kbit/s;can be configured as slave for parameterization with OP1S (from OP1S, version V2.2),or as master for the OP2 operator panel connection
Serial interface 2with RS485 data transfer format, selectable baud rates of: 9.6; 19.2; 38.4; 93.75 and 187.5 kbit/s;the required protocol is selected by appropriately configuring the function block: Peer-to-peer
for fast process coupling, 4 wire USS protocol (USS bus),
can be configured as slave for parameterization with SIMOVIS (2- or 4 wire),as master for OP2 operator panel connection (2 wire) or to control drive converters;max. baud rates, 38.4 kbit/s;
Low deadtimes can be achieved as a result of synchronization : Synchronization of the T400 on the basic drive converter modules (CUx) or second T400 T400 supplies synchronizing signals for other modules (CUx, CBx or second T400)
Other features
• Lowest sampling time is 0.1 ms, 0.8 ms is the typical sampling time for a control loop• As a result of the floating point arithmetic, not only is a high accuracy achieved, but configuring is also
simplified as normalization and value range limits are eliminated• Operation without fan• 3 LEDs for operating status displays• Hardlock-PAL: Plug-in socket for 28-pin EPLD device for copy protection of the user program• Soldered-in flash memory (2 Mbyte) for the program code (compressed), which is downloaded from the PC
via the serial interface; no plug-in memory module is used!• 4 Mbyte DRAM as working memory for programs and data,• 32 Kbyte permanent change memory• NOVRAM for data save at voltage-off for up to 10 configurable values (real type)• Cache memory: 4 Kbyte program, 4 Kbyte data• Clock cycle (external/internal): 32/32 MHz

Technical data
Siemens AG Edition 04.00 9SIMADYN D Hardware Brief Description
3.2. General data
Grounding/ground
The grounds of the following terminals
• interfaces 1 and 2• analog inputs/outputs• binary inputs/outputs• incremental encoders 1 and 2
are connected with the T400 electronics ground.
Slot assignment 1
Dimensions W x H x D [mm] 14 x 267 x 140
Weight Approx. 0.3 kg
Degree of protection IP00
Terminals MINI-COMBICON, Phönixcompany
Humidity class F according to DIN 40040
Ambient temperature From 0°C , up to 55°C (withoutfan)
Storage temperature From -25°C to 75°C
3.3. Power supply
The T400 requires the following voltages at the backplane bus connector X1:
Rated voltage Minimum Maximum Typical current drain
+5 V +4.75 V +5.25 V 1100 mA
+15 V +14.4 V +15.6 V140 mA+ encoder load (terminal 66)(max. 100 mA, electronic. limited)
-15 V -14.55 V -15.45 V 140 mA
24 V (external) 20 V 30 V 150 mA + binary output currents
3.4. Inputs/outputs
Analog outputs
No. 2, non-floating
Output voltage range +/-10 V
Output current Max. +/- 10 mA
Resolution 12 bit (4.88mV)
Linearity error < 1 bit
Absolute accuracy +/- 3 bit
Short-circuit protection toground
Yes
Voltage rate-of-rise of theoutput
Approx. 4.2 V/µs
Delay time 3.5 µs

Technical data
10 Edition 04.00 Siemens AGSIMADYN D Hardware Brief Description
Analog inputs
No. 5
Version2 differential inputs, 3 unipolar;all non-floating
Input voltage range +/- 10 V
Input resistance 20 kohm
Input filter 3 dB transition freq. 25 kHz
Resolution 12 bit (4.88mV)
Measuring principle Sampling
Absolute accuracy +/- 3 bit
Linearity < 1 bit
Offset error +/- 3 bit
Conversion time 12 µs
Differential input resistance > 20 kohm
Hardware smoothing 4.7 µs
Binary outputs
No.
2
+ max. 4 bidirectional;
all non-floating
Power supply External
Nominal value 24 V DC
Permiss. range +15 V to 33 V including ripple
Briefly +35 V, max. 0.5 s
Current drain 20 mA + output currents
Output current for 1 signal Max. 50 mA / output
Short-circuit protectionElectronically and thermally, continuousshort-circuit protection, limited to 220 mA
Inductive switch-off voltagelimiting
Power supply voltage + 1 V
Switching frequency 5 kHz for ohmic loads
Signal level
for 0 signal Max. 0.1 V
for 1 signal Power supply voltage - 0.3 V
Switching delay(0V to 24V)
Max. 70 µs

Technical data
Siemens AG Edition 04.00 11SIMADYN D Hardware Brief Description
Binary inputs
No.
8
+ max. 4 bidirectional
+ 2 coarse pulse signals
all non-floating
Input voltage 24 V DC rated voltage
for 0 signal -1 V to +6 V or open-circuit inputs
for 1 signal +13 V to +33 V
Input current
for 0-Signal 0 mA
for 1-Signal typ. 3 mA, max. 5 mA
Delay time 150 µs
3.5. Incremental encoder with coarse- and fine pulse evaluation
No. of encoders Total, max. 2
VersionEncoder 1 HTL
Encoder 2 either HTL,TTL or RS422
3.5.1. Pulse encoder 1
Input voltage range HTL, 30 V
Input voltage
for 0 signal < 4 V
for 1 signal > 8 V
Input current Approx. 8 mA
Pulse frequency Max. 400 kHz (track frequency)
Phase difference of the tracksignals
Independent of the pulse frequency, min. 200ns
Input filterVia software (function block NAV) can beconfigured
Note:
The pulses for encoder 1 (tracks A, B, zero pulse) can also be retrieved from the basic drive, via the backplanebus, if another module supplies these (e.g. incremental encoder simulation of the CUMC; as TTL signal level).The pulse source selection is configured at the speed actual value block NAV.
Zero pulse evaluation
The zero pulse evaluation can be parameterized and is dependent on the direction of rotation, i.e. the sameencoder position is identified independent of the actual direction of rotation.

Technical data
12 Edition 04.00 Siemens AGSIMADYN D Hardware Brief Description
3.5.2. Pulse encoder 2
2 pulse encoders with different signal levels can be connected at encoder input 2.
• RS422• HTL, bipolar• HTL, unipolar• TTL
3.5.2.1. Pulse encoder type selection switches S2/1 - S2/8
The encoder type is selected using DIL switch S2/1 - S2/8
ON
2 3 4 5 6 7 81
The signal levels of track signals A and B are set according to the following table:
Significance Switch S21 2 3
TTL RS422 ON ON ONHTL, bipolar OFF OFF ONHTL, unipolar OFF OFF OFFTTL ON ON OFF
The signal level of the zero pulse can be set independently of track A and B:
Significance Switch S24 5
TTL RS422 ON ONHTL, bipolar OFF ONHTL, unipolar OFF OFFTTL ON OFF
Bus terminating resistors can be switched-in for RS422 using switches S2/6 to S2/8. This is always required, ifthe T400 is connected at one end of an RS422 cable. If it is located in the center, then it is not permissible thatthe terminating resistors are switched-in.
Significance Switch S2Track A 6Track B 7Zero pulse 8
The terminating resistors are switched-out in the OFF position; they are switched-in in the ON position.The switch settings can only be changed when the module is withdrawn. They are not accessible when themodule is inserted.

Technical data
Siemens AG Edition 04.00 13SIMADYN D Hardware Brief Description
3.5.2.2. useable pulse encoder types
The following properties are valid for the settings for an HTL encoder with push-pull signals:
Input voltage range HTL, differential voltage +/-30 V
Input voltage
for 0 signal - 3V
for 1 signal +3 V
Input current Approx. 2 mA
Pulse frequency Max. 1.5 MHz (track frequency)
Input filterCan be configured per software (functionblock)
The following properties are valid for settings for an HTL encoder without push-pull signals:Input voltage range HTL, 30 V, unipolar
Input voltage
for 0 signal < 4 V
for 1 signal > 8 V
Input current Approx. 2 mA
Pulse frequency Max. 1.5 MHz (track frequency)
Input filterCan be configured per software (functionblock)
If no push-pull signals are used for encoder 2, terminals85, 86, 87 and 88 must be connected with one another.
The following properties are valid for the setting for a TTL encoder:
Input voltage range TTL, 5 V
Input voltage
for 0 signal < 0.8 V
for 1 signal > 2.3 V
Input current Approx. 2 mA
Pulse frequency Max. 1.5 MHz (track frequency)
Input filterCan be configured per software (functionblock)
The following properties are valid for the RS422 setting:
Input voltage range RS422, 5V
Input voltage
for 0 signal < -0.2 V
for 1 signal > 0.2 V
Input current Approx. 2 mA
Pulse frequency Max. 1.5 MHz (track frequency)
Input filterCan be configured per software (functionblock)

Technical data
14 Edition 04.00 Siemens AGSIMADYN D Hardware Brief Description
3.6. Absolute value encoder
The T400 has up to 2 synchronous serial interfaces for absolute value encoders:
Input voltage range RS422, 5V
Encoders which can beconnected
Single- or multi-turn encoders
SSI (synchronous-serial)Protocols
EnDat (accord. to the Heidenhain company)
Data transfer rate 100kHz to 2 MHz
Dual code
Grey codeData representation type
Grey excess code
It is possible to simultaneously use the 2 serial interfaces and absolute value encoder 1 (terminals 76-79).
3.7. Serial interfaces
The T400 has 2 serial interfaces:
3.7.1. Service interface 1
Interface 1 has the two physical versions (they can only be used one at a time!):
• RS 232 for PC coupling (download, service, via the Dust1 protocol with 19.2 kbaud)
• RS 485 (2 wire) for USS to connect
- SIMADYN D OP2 operator panels- MASTER DRIVES OP1 operator panels- SIMOVIS- or to the higher-level (master) / systems (e.g. SIMATIC)
The program is downloaded and service for start-up executed via interface 1. To realize this, the CFC is used inthe test mode or service-IBS V5 (service start-up) (DUST1 protocol, baud rate: 19.2 kbd).
3.7.1.1. Communications switch S1/8
The physical version of serial interface 1 can be selected using S1/8. In addition to the changeover, theappropriate blocks must have been configured for the USS protocol. If the USS protocol is set, it is no longerpossible to realize online visualization with CFC or service-IBS (service-start-up)!
Switch S1 / 8
ON RS485 (2 wire) for USS protocol (bus termination, refer to 3.7.3)
OFF RS232 for service / start-up

Technical data
Siemens AG Edition 04.00 15SIMADYN D Hardware Brief Description
3.7.1.2. Connecting cable to the PC
The connection between the T400 and the configuring-PC is via a serial link; this is established using thefollowing cable which the user must assemble. Switch S1/8 must be in the OFF position.The cable can be ordered as SC400 with the order number 6DD1684-HF0.
PC T4009-pole sub D socket
PinTerminal
2 ←→ 68
3 ←→ 67
5 ←→ 69
3.7.2. Interface 2
Interface 2 is a mixed asynchronous and synchronous RS 485 interface:
• Peer-to-peer with full duplex, 4-wire connection
• USS protocol (master or slave) with half duplex, 2-wire connection
The function blocks @USS_M, @USS_Sor @PEERare used to toggle between 2- and 4- wire operation. As soonas one of these blocks is configured, terminals 72 to 75 can no longer be used for an absolute value encoder.
The following baud rates can be set:Peer to Peer: 9.6 kbd, 19.2 kbd, 38.4 kbd, 93.75 kbd, 187.5 kbdUSS: 9.6 kbd, 19.2 kbd, 38.4 kbd
3.7.3. Bus termination switches S1/1 - S1/6
The bus terminating resistors for serial interfaces 1 and 2 must be switched-in via switches S1/1 - S1/6, if theT400 is located at the beginning or end of the RS485 bus. If it located in the center, it is not permissible that theterminating resistors are switched-in.
Terminals Switch S1Serial interface 1 70 / 71 1, 2Serial interface 2 (2-wire) 74 / 75 3, 4Serial interface 2 (4-wire) 72 / 73 / 74 / 75 3, 4, 5, 6
In the ON position, the terminating resistors are switched-in.
The switches can only be switched when the module is withdrawn. Theyare not accessible when the module is inserted.
3.7.4. Download switch S1/7
Switch S1 / 7
ON User program inhibited, only download possible.
OFF Standard operation
This function will only be available from D7-SYS V4.0 R07/98, and version K of the T400.
ON
2 3 4 5 6 7 81

Technical data
16 Edition 04.00 Siemens AGSIMADYN D Hardware Brief Description
3.8. Diagnostic LEDs
Three diagnostic LEDs are located on the T400.
LED H1 displays the status of the internal T400 monitoringfunction. Under normal operating conditions it flashes slowly,approximately every second (1.5 Hz).
If H1 starts to flash at a average rate (with 2.5 Hz) this indicates aninternal fault/error. Possible faults/errors are:
• user stop• communications error• computation time overflow• hardware monitoring fault
The user stop can be initiated using the CFC- or the configuredsoftware. If the T400 is inserted in an electronics box, generally, thebasic drive converter module signals a fault if the T400 is in theuser stop status.If there is no user stop, the module must be accessed using theCFC in the test mode or with Service-IBS V5, to preciselydetermine the cause and to evaluate the internal fault fields.
If H1 flashes quickly (with 5 Hz), this indicates an initializationerror. The T400 program is either erroneous, or switch S1/7 is inthe ON setting.
If H1 goes into a steady light condition this indicates a systemerror. The user program is not processed. The T400 is eitherdefective or has been incorrectly programmed.The module must be accessed using the CFC in the test mode orwith the service-IBS V5 to precisely determine the cause, and toevaluate the internal fault fields.
LEDs H2 and H3 indicate the coupling status to other modules. Auniform flashing indicates an error-free coupling. The flashfrequency of H2 and H3 is determined by the configuring, i.e. thesampling time of function block @DRIVE.
T400 in the SRT400:
SRT400LED Function Color
lefthand T400 righthand T400
H1Internal T400monitoring
red
flashes slowly 1.25 Hz RUN, standard operationflashes medium frq. 2.50 Hz fault/errorflashes quickly 5 Hz initialization errorsteady light system error
flashes: OKH2
Data transfer to thelefthand T400
yellow always darkdark or steady light: faulted
flashes: OKH3
Data transfer to therighthand T400
greendark or steady light: faulted
always dark
T400 in the MASTERDRIVE or DC MASTER:
LED Function Color MASTERDRIVE / DC MASTER
H1Internal T400monitoring
red
flashes slowly 1.25 Hz RUN, standard operationflashes medium frq. 2.50 Hz fault/errorflashes quickly 5 Hz initialization errorsteady light system error
H2Data transfer to thebasic drive
yellow flashes: OK
H3Data transfer to thecommunications module
green dark or steady light: faulted
T40011pol
X5
11polX6
11polX7
11polX8
11polX9
X137
X135
LED H1 ret
1 S2
1 S1
LED H2 yellow
LED H3 green

Troubleshooting
Siemens AG Edition 04.00 17SIMADYN D Hardware Brief Description
4. Troubleshooting
Fault profile Cause RemedySwitch S1/7 set to ON Switch S1/7 must be set to OFF for
operationNo configured software loaded Program the T400
T400 is not running,MASTERDRIVES initializationstops at 0002,initialization of the DC MASTERstops at 12.2 or F80,H1 on the T400 flashes quickly
T400 defective Replace the T400
T400 completely overloaded S1/7 must be set to ON fordownloading and then set back toOFF
Downloading not possible
T400 defective Replace T400Switch S1/8 set to ON Set switch S1/8 to OFF, USS
operation is then disabled.No connection can be establishedto the T400 using service/IBS orCFC Incorrect COM interface selected CFC:
Click on START in the Windowstask bar, then on SIMATIC,STEP 7 and on SIMADYN Donline interface. Select theinterface
SERVICE/IBS:Select under Options, theinterface of the ComPort
4.1. Hotline
A free-of-charge Hotline is available to support users:
Phone: +49 9131 98 5000Fax: +49 9131 98 1603email: [email protected]
The SIMADYN D Hotline can be accessed from 8.00 to 17.00, Monday to Friday.Outside these times, you can use the telephone answering machine, fax or email.

Parameterization
18 Edition 04.00 Siemens AGSIMADYN D Hardware Brief Description
5. Parameterization
All parameters, which refer to the functions and settings of the T400 technology module, are calledtechnological parameters. They lie in parameter ranges between 1000 and 1999 and between 3000and 3999 (if used).Depending on the access type, thousands are represented directly, or as letter. In this case, there isan additional differentiation between visualization and parameters which can be changed.
The number and the function of the individual technology parameters is dependent on the configuring.
Range Display Example Significance1000 ... 1999 Hxyz H234 Parameter No. 1234 which can be changed1000 ... 1999 dxyz d411 Visualization parameter No. 1411 (this cannot be
changed)3000 ... 3999 Lxyz L234 Parameter No. 3234 which can be changed3000 ... 3999 cxyz c521 Visualization parameter No. 3521 (this cannot be
changed)
The technological parameters can be read and changed (simultaneously) from several locations:• PMU• OP1, OP1S (the configured parameter names are displayed)• CB1 (PROFIBUS)• SCB2 with USS protocol• Serial interfaces 1 and 2 of the CU• PC/start-up program (SIMOVIS)
All parameter changes are stored in a EEPROM. This EEPROM allows a maximum of 100 000 writeaccesses. This limitation must be taken into account, if frequent write accesses, e.g. from a PLC viaPROFIBUS or USS are used, e.g. with continuos commands to ‘store permanently in EEPROM’. Forcontinuos changes the command ‘store temporary in RAM’ should be use.

Configuring
Siemens AG Edition 04.00 19SIMADYN D Hardware Brief Description
6. Configuring
T400 can be configured with the graphic D7-ES configuring tools, based on Windows 95/NT. Thus, it is veryeasy to implement even complex customized supplementary functions in the drives. Complete standardsoftware packages are available for functions and applications which are frequently required.
6.1. Standard software packages
The standard software packages offered, are completely generated using CFC, and can be used in SIMOVERTMASTERDRIVES and SIMOREG DC MASTER without any additional modifications. They are parameterized viathe operator panel, OP1(S), SIMOVIS or via Profibus.Please refer to the instructions of the appropriate standard application software packages for additionalinformation.
Standard software packages are presently available for:• angular synchronous operation• axial winder• cross cutter + flying saws
The software packages are available in the following forms:
• The standard software package is downloaded onto the T400 as code which can run:T400 can be immediately used. When commissioning, only a few parameters have to be set for theparticular application. The user does not have to configure using STEP 7/CFC.
• Standard software packages as CFC source code on floppy disk:We recommend that the source code is used if the software package has to be adapted to the particularapplication, which is impossible using the existing parameters, or if a standard software package is usedvery frequently.The functions of a standard T400 software package can also be implemented on the PM5, PM6 CPUmodules using the source code. In this case, it is especially the closed-loop control-related core which canbe used. In comparison to the configuring for the T400, when porting, only the function blocks for the input,output and communication interfaces have to be adapted to the appropriate SIMADYN D modules.

Configuring
20 Edition 04.00 Siemens AGSIMADYN D Hardware Brief Description
6.2. Freely configuring the T400
In order to generate your own software packages for T400, a Windows PC (Win95 or NT) and the D7-ESsoftware package are required (Order No. = 6DD1801-4DA2) . D7-ES comprises the following components:
Components Function (for T400)STEP 7 General project administration and hardware configurationCFC Graphic editorD7-SYS Operating system, compiler, function block library
As STEP 7 and CFC are components from the SIMATIC software series, it goes without saying that SIMATICS7 programs can also be generated. It is also possible to use SIMADYN D and SIMATIC stations in one and thesame project, so that the user only requires one configuring tool.
Software configured for the T400 can easily be adapted for a CPU in the central SIMADYN D subrack. Amaximum of eight CPUs can be used in multiprocessor operation in SIMADYN D subracks such as these. Thestandard CPU PM5 in this case corresponds to a T400.
Graphic configuring, “Configuring instead of programming“
Closed-loop control-related functions can be configured extremely simply using the CFC graphic configuringinterface (Continuous Function Chart). A programming language does not have to be learned.
Function blocks are simply taken from a library, consisting of approx. 250 function blocks, and placed on asheet, per drag & drop. The blocks in the library aren’t used up, as they are prototypes, which can be called-upas often as required.The function blocks are connected with one another by clicking on an output and an input. For inputs, which areassigned a fixed value, and are not to be connected, this value is simply specified in a parameterizing dialogbox.The configured software is then compiled by the CFC graphic configuring interface, and downloaded into theT400.

Configuring
Siemens AG Edition 04.00 21SIMADYN D Hardware Brief Description
If the program is then running in the T400, the following functions can be realized directly in the graphic manmachine interface using CFC
• actual values can be displayed and changed from the T400• connections can be displayed, changed, deleted and added• function blocks can be added or deleted.
Easy entry with basic configured software
The T400 basic configured software is a resource for users who wish to configure their own application on theT400. It allows users to generate a functioning T400 program quickly and without special SIMADYN D know-how. The basis configured software can already run and includes the following function blocks:
• coupling to basic drive- and communication modules of the drive converter with an interface for the data tobe exchanged (setpoints/actual value)
• analog, binary and incremental encoder interfaces can be read-in and output• serial T400 interfaces can be processed (USS, peer-to-peer)• important connections are defined as parameter, which can be set and diagnosed using the configured
functions (e. g. communications to the basic drive converter) via operator panels or SIMOVIS:
When the T400 (without standard software package) is supplied it is loaded with this software, and cantherefore immediately run in the drive converter or in the subrack. Further, the basic configured software is alsoincluded as CFC source code in the D7-SYS software as example. Based on this project, the user can includefunctions he requires in a form of additional function blocks, or delete functions which he does not require. Adetailed description of the basic configured software is included in D7-SYS as PDF document.
An introduction in the configuring of the T400 is in the manual Configuring Instructions (Order No. =6DD1903-0EA0). It describes the basic steps in configuring a T400.
The function blocks are described in the SIMADYN D documentation (on CD: 6DD1987-0AA2, on paper:6DD1987-1AB2) and in the online help of D7-SYS.

Manufacturer’s declaration
22 Edition 04.00 Siemens AGSIMADYN D Hardware Brief Description
7. Manufacturer’s declaration

Manufacturer’s declaration
Siemens AG Edition 04.00 23SIMADYN D Hardware Brief Description
ESD guidelines
24 Edition 04.00 Siemens AGSIMADYN D Hardware Brief Description
8. ESD guidelines
8.1. What is ESD?
Almost all of the SIMADYN D modules have highly-integrated devices. These devices are, from theirvery nature, extremely sensitive to overvoltage conditions, and therefore also to electrostaticdischarge.
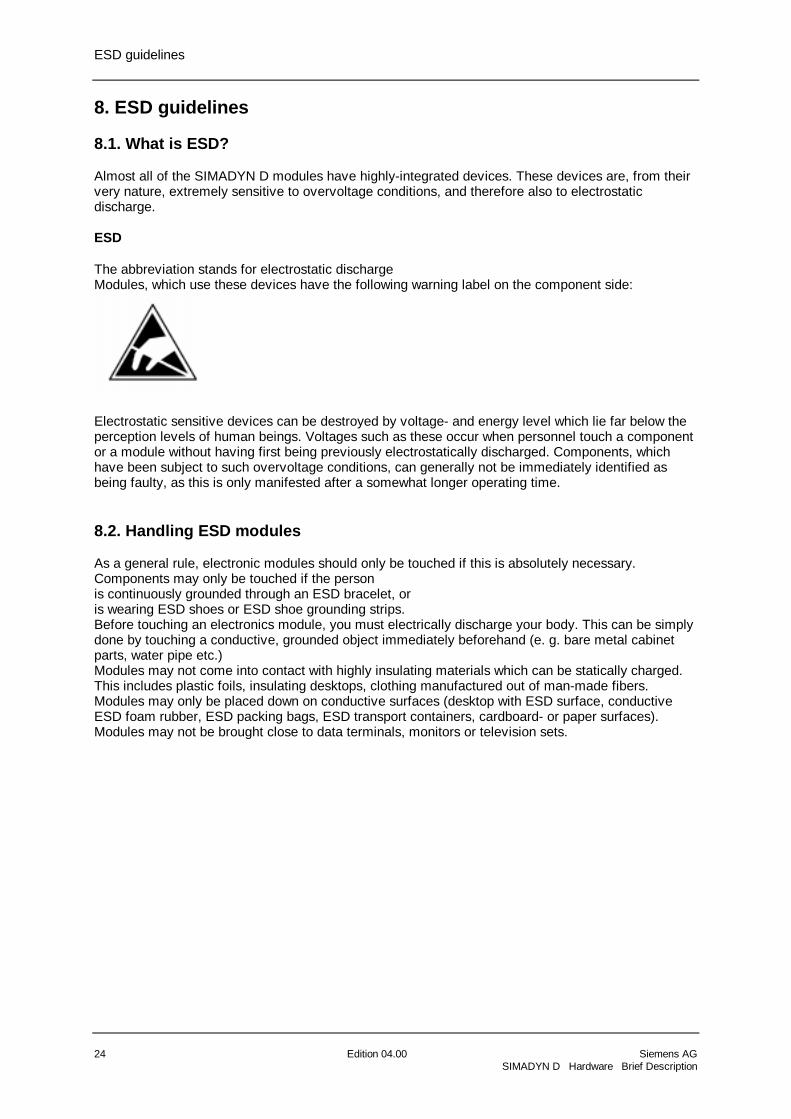
ESD
The abbreviation stands for electrostatic dischargeModules, which use these devices have the following warning label on the component side:
Electrostatic sensitive devices can be destroyed by voltage- and energy level which lie far below theperception levels of human beings. Voltages such as these occur when personnel touch a componentor a module without having first being previously electrostatically discharged. Components, whichhave been subject to such overvoltage conditions, can generally not be immediately identified asbeing faulty, as this is only manifested after a somewhat longer operating time.
8.2. Handling ESD modules
As a general rule, electronic modules should only be touched if this is absolutely necessary.Components may only be touched if the personis continuously grounded through an ESD bracelet, oris wearing ESD shoes or ESD shoe grounding strips.Before touching an electronics module, you must electrically discharge your body. This can be simplydone by touching a conductive, grounded object immediately beforehand (e. g. bare metal cabinetparts, water pipe etc.)Modules may not come into contact with highly insulating materials which can be statically charged.This includes plastic foils, insulating desktops, clothing manufactured out of man-made fibers.Modules may only be placed down on conductive surfaces (desktop with ESD surface, conductiveESD foam rubber, ESD packing bags, ESD transport containers, cardboard- or paper surfaces).Modules may not be brought close to data terminals, monitors or television sets.

ESD guidelines
Siemens AGAutomatisation & DrivesPostfach 3269, D-91050 Erlangen
8.3. Measuring and making changes on ESD modules
It only permissible to make measurements at the modules, ifthe measuring unit is grounded (e. g. via protective conductor) orbefore making measurements with an electrically-isolated measuring device, the probe is brieflydischarged (for example by touching a bare metal control housing).When carrying-out soldering work on modules, ESD soldering irons must be used or at least thesoldering iron tip grounded.
8.4. Transporting modules
Modules and components may only be stored and transported in conductive packing materials (e. g.metallized plastic boxes, metal containers).If the packaging is not conductive, then the modules must first be wrapped in conductive packagingmaterials. This can include, for example conductive foam rubber or normal household aluminum foil.The necessary ESD protective measures are clearly shown in the following diagram.
a = conductive flooring surfaced = ESD coat/jacketb = ESD desk = ESD chainc = ESD shoesf = grounding connection for the cabinets