systems utilities - dawn pilatowicz€¦ · web viewthe system parameter file su01 64. 2.5....
TRANSCRIPT

USER GUIDE

COPYRIGHT RESERVE
The Copyright in this manual vests exclusively with The Titan Trust. All rights are reserved. No part of the manual may be modified, added to, reproduced, transmitted, transcribed, stored in a retrievable system or translated into any language in any form or by any means, electronic, mechanical, magnetic, optical, chemical, manual, or otherwise, in whole or in part, without the prior consent of The Titan Trust. Any unauthorised use of this manual, in whole or in part, will result in legal action being taken against such user.
DISCLAIMER
The Titan Trust hereby disclaims any and all guarantees and warranties on this manual or on the documentation relating to or backing up this manual (“the documentation”), and specifically disclaims any implied warranties of the merchantability or fitness of this manual or the documentation for any particular purpose. This manual and documentation are sold on an “as is” basis; any user of this manual or the documentation uses it entirely at his own risk.
The Titan Trust reserves the right to revise the publication and to make changes from time to time in this manual and the documentation.
The Trademark in the name “Titan” is registered in the name of The Titan Trust. Any unauthorised use of the name “Titan” will result in legal action being taken against such user.
OTHER TRADEMARKS
- ACUCOBOL is a registered trademark of ACUCORP Inc.
- Other brand and product names are trademarks or registered trademarks of their holders.

CONTENTSTHE SYSTEMS UTILITIES SYSTEM
1. GETTING STARTED....................................................................................11.1. HOW TO USE THIS MANUAL.............................................................................11.2. THE TITAN SYSTEM PROFILE..........................................................................21.3. THE SYSTEMS UTILITIES MODULE OVERVIEW..............................................61.4. SYSTEM REQUIREMENTS................................................................................91.5. CONCEPTS AND FUNCTIONS.........................................................................15
1.5.1. USING MENUS.................................................................................................151.5.2. SYSTEM MENU RESTRICTIONS.....................................................................161.5.3. USING FUNCTION KEYS.................................................................................171.5.4. USING CURSOR KEYS....................................................................................181.5.5. EDITING LARGE FIELDS IN UNIX....................................................................181.5.6. SPECIAL KEYS.................................................................................................191.5.7. DATA FIELDS...................................................................................................261.5.8. PRE-LOADED FIELDS......................................................................................271.5.9. COMPANY/BRANCH OPTIONS........................................................................281.5.10. INTERNATIONAL DATE....................................................................................281.5.11. SCREEN NUMBERS.........................................................................................281.5.12. SCANNING.......................................................................................................291.5.13. STATUS MESSAGES.......................................................................................311.5.14. ERROR MESSAGES.........................................................................................311.5.15. ELECTRONIC MAIL..........................................................................................321.5.16. PRINTING OPTIONS........................................................................................341.5.17. CALCULATOR..................................................................................................351.5.18. AUTO-CALL FACILITY......................................................................................351.5.19. COPY AND PASTE...........................................................................................351.5.20. MULTI-LANGUAGE FEATURE..........................................................................361.5.21. USER DEFINABLE MENU BAR IN WINDOWS.................................................36
1.6. LOADING THE SYSTEM...................................................................................371.6.1. LOADING ON MS-DOS SYSTEMS...................................................................381.6.2. LOADING ON UNIX SYSTEMS.........................................................................411.6.3. INSTALLING TITAN ON WINDOWS.................................................................45
1.7. INSTALLING THE SYSTEMS UTILITIES MODULE...........................................461.7.1. THE MAIN MENU..............................................................................................471.7.2. THE UTILITIES SYSTEM MENU.......................................................................48
2. SET-UP AND RUN.....................................................................................492.1. THE SET-UP SEQUENCE.................................................................................492.2. BACKUP...........................................................................................................51
2.2.1. BACKUP DISKS/TAPES....................................................................................522.2.2. BACKUP - MS-DOS SYSTEMS.........................................................................54
iii

2.2.3. RESTORING FROM BACKUP - MS-DOS SYSTEMS........................................542.2.4. BACKUP - UNIX SYSTEMS..............................................................................562.2.5. RESTORING - UNIX SYSTEMS........................................................................56
2.3. CREATE SYSTEM FILES - SU00......................................................................572.4. THE SYSTEM PARAMETER FILE - SU01.........................................................642.5. OPERATING SYSTEM UTILITIES - SU90.........................................................81
3. ON-LINE HELP MODULE..........................................................................823.1. THE ON-LINE HELP MODULE MENU...............................................................823.2. LOAD SUPPLIED HELP (ASCII) - SU10............................................................833.3. COPY SUPPLIED OR USER HELP - SU11.......................................................853.4. USER HELP LINK MAINTENANCE - SU12.......................................................913.5. DELETE SUPPLIED OR USER HELP - SU13...................................................923.6. RENAME HELP VARIABLE NAMES - SU14......................................................96
4. MAINTENANCE MODULE.........................................................................974.1. THE MAINTENANCE MODULE MENU.............................................................974.2. INSTALLATION MAINTENANCE - SU30..........................................................984.3. DESCRIPTIONS FILE MAINTENANCE - SU31...............................................1234.4. NUMBERS FILE MAINTENANCE - SU32........................................................1654.5. NARRATIVE FILE MAINTENANCE - SU33......................................................1684.6. CAPTURE USER DEFINED SCANS - SU34....................................................169
4.6.1. SELECTING A SCAN......................................................................................1694.6.2. CREATING NEW SCANS................................................................................1724.6.3. COPYING SCANS...........................................................................................1794.6.4. AMENDING SCANS........................................................................................1794.6.5. DELETING SCANS.........................................................................................1794.6.6. TITAN SCANS WHICH MAY BE USER DEFINED...........................................179
4.7. CUSTOMISED FORM MAINTENANCE - SU35...............................................1804.7.1. ENTERING FORM TYPES..............................................................................1814.7.2. UPDATING FORM TYPES..............................................................................1934.7.3. DELETING FORM TYPES...............................................................................193
4.8. CUSTOMISED TERMINOLOGY – SU351.......................................................1944.9. CURRENCY FILE MAINTENANCE - SU36......................................................1964.10. SYSTEM FORMULA MAINTENANCE - SU37.................................................198
4.10.1. SETTING UP THE FORMULA.........................................................................2004.10.2. ALTERING AN EXISTING FORMULA.............................................................2024.10.3. DELETING AN EXISTING FORMULA.............................................................202
4.11. SYSTEM PASSWORD MAINTENANCE - SU38..............................................2034.12. MAXIMUM RANGEBATCH PROCESSING - SU39..........................................216
iv

5. MISCELLANEOUS MODULE..................................................................2265.1. THE MISCELLANEOUS MODULE MENU.......................................................2265.2. MEMORY/SPEED OPTIMISATION - SU40......................................................2275.3. REFERENCE FILE MAINTENANCE - SU41....................................................2305.4. COMMON CATEGORY INPUT/MAINTENANCE - SU42..................................2335.5. CUSTOMIZED FILE LAYOUT MAINTENANCE - SU44....................................2355.6. GENERAL CROSS REFERENCE MAINTENANCE - SU45..............................237
6. ENQUIRY MODULE.................................................................................2386.1. THE ENQUIRY & SCAN MODULE MENU.......................................................2386.2. COMPANY FILE ENQUIRY - SU50.................................................................2396.3. DESCRIPTIONS FILE SCAN - SU51...............................................................2406.4. NUMBERS FILE SCAN - SU52........................................................................2416.5. OBJECT VERSION NUMBER MAINTENANCE - SU53...................................2426.6. RUN USER-DEFINED SCANS – SU54............................................................2486.7. GENERAL CROSS REFERENCE ENQUIRY - SU55.......................................2496.8. SYSTEM PASSWORD ENQUIRY - SU58........................................................250
7. PRINT MODULE.......................................................................................2517.1. THE PRINT MODULE MENU..........................................................................2517.2. DESCRIPTION FILE PRINT - SU71................................................................252
8. REPORT MANAGEMENT.........................................................................2548.1. THE REPORT MANAGEMENT AND LOGGING SYSTEM MENU...................2548.2. THE REPORT MANAGEMENT SYSTEM - SU60............................................255
8.2.1. DISPLAYING A REPORT ON A SCREEN.......................................................2568.2.2. CHANGING THE REPORT STATUS...............................................................2588.2.3. DELETING A SINGLE REPORT......................................................................2598.2.4. PRINTING A SINGLE REPORT.......................................................................2608.2.5. PLACING A REPORT RANGE ON HOLD........................................................2668.2.6. RELEASING A RANGE OF REPORTS FROM HOLD......................................2688.2.7. PRINTING A RANGE OF REPORTS...............................................................2698.2.8. DELETING A RANGE OF REPORTS..............................................................2728.2.9. DISPLAYING A RANGE OF REPORTS ON A SCREEN..................................274
8.3. MANAGEMENT REPORT MAINTENANCE - SU61.........................................2768.4. LOGGING MAINTENANCE - SU62.................................................................278
APPENDIX A...................................................................................................280A1. INSTALLATION REGISTRATION FORM..................................................................280
v

APPENDIX B...................................................................................................281B1. DATA FILE UTILITIES..............................................................................................281
INDEX..............................................................................................................287
vi

1. GETTING STARTED
1.1. HOW TO USE THIS MANUAL
Each chapter in this manual leads logically through the important steps to install and maintain your system.
Chapter 1 - Getting Started, describes the hard/software requirements and special features of the TITAN systems.
Chapter 2 - Set-up and Run will take you through the sequential steps required to run the program effectively. As each program has a System Parameter File Program (SU00, AP00 etc.) and usually a Period End Module (SU9, AP9 etc.) these are combined in this chapter to ensure all the set-up data is understood.
The following chapters are the same for most systems. They start with the Input Module, then the Maintenance Module which helps you set up and maintain your file requirements. Then the Enquiry Module which helps you search for data in your files. After that specific modules such as Report Management, Interface to Other Systems, will follow. The last chapter deals with the printing of reports.
If there are specific examples required these are entered in the Appendix. The Index provides a reference to the actual screen prompts as well as key words.
SU - Getting Started JULY 2006 1 - 1

1.2. THE TITAN SYSTEM PROFILE
The system incorporates state-of-the-art transaction processing techniques to optimise high volume general accounting, distribution and manufacturing functions.
The system has features designed to simplify business account requirements, while still providing a powerful management information tool.
SYSTEM FEATURES
A MULTI-USER SYSTEM
This is a true multi-user system supporting multiple terminals and printers. Data and record locking techniques prevent two or more people from trying to update the same element of data simultaneously. This is essential for safe and successful multi-user operation.
MULTIPLE OPERATING SYSTEMS
A further example of system's flexibility is in the range of operating systems that may be used. It operates under most of the popular operating systems and computers, taking maximum advantage of the features these operating systems offer.
A single software solution satisfies, for example, the needs of both the head office using a mainframe or super-mini, a branch office on a smaller multi-user system, and at a depot on a single-user PC.
TERMINAL & PRINTER FLEXIBILITY
A set of utilities enables most terminals and printers to be connected to the system. These utilities allow existing terminals and printers to be used on a new computer system or to add new devices to an existing system, leading to a lowering in overall hardware investment.
SYSTEM INTEGRATION
Each module may be used independently or may be integrated into a comprehensive Accounting, Distribution and Manufacturing System.
MULTIPLE COMPANIES, BRANCHES AND WAREHOUSES
All modules accommodate multiple companies and, if required, multiple branches within these companies. Each of these branches may hold stock in multiple warehouses. These features allow the effective processing of data for many companies on one system.
ON DEMAND DATA PROCESSING
In addition to operating interactively via on-line workstations, you may do tasks on demand. They may be undertaken as circumstances necessitate. This is the freedom and operational flexibility that an effective software solution provides.
1 - 2 JULY 2006 Systems Utilities - User Guide

PASSWORDS FOR DATA SECURITY
To protect information from unauthorised access, the system uses various levels of passwords for each computer user. The use of passwords is designed to make information secure and available only to those people who have the authority to access it.
Whenever a password is entered into the computer, the system makes a note (or log) of the user, password, date and time. This results in complete control over data.
MULTIPLE PATHS INTO OPTIMISED DATA
The system automatically keeps data in an ordered state giving you immediate access to information.
AUDIT TRAILS
Audit trails provide a complete transaction log of what has occurred in the system. In addition, the system stamps each transaction with a unique audit number as a double check.
Audit trails are designed to show exactly which transactions have been entered and processed by the system so that it is possible to back track and analyse earlier transactions. Audit trails also act as a deterrent against unauthorised use and manipulation of data. They are a prerequisite for computer based auditing purposes.
MANAGEMENT INFORMATION PROFILING
Management may select the required depth of information analysis. For example, sales can be analysed, at branch level, product group level or as an individual element.
This feature helps focus on those key elements of information that are important, while still accumulating the remainder of the information in larger groupings.
SYSTEM MENUS
Menus are used as a guide to the available functions and to select options. Losing track requires one keystroke to return to the previous menu.
As users become more proficient the menus can be bypassed allowing for fast movement from module to module. The menus remain available for new users and for training purposes.
SYSTEM PROMPTS
Extensive prompts are provided which guide you through each function, and also indicate when the system is processing data.
You are provided with extensive documentation in the form of on-line help screens and comprehensive well presented manuals.
SU - Getting Started JULY 2006 1 - 3

SCANNING
The powerful scanning feature enables any element of masterfile data to be found without knowing the number or looking up a masterfile listing. Merely by pressing one key, you can scan through a file in various sequences until the data is located.
EXCEPTION-BASED REPORTING AND PREVIEWING
The system has an excellent exception based reporting and previewing facility which provides you with accurate and concise reports. It is often unnecessary to print this data and therefore a screen for pre-viewing reports is provided.
Certain reports that must be printed are safe-guarded and cannot be previewed or deleted by unauthorised users.
SOFT SCREENS
The data input screens are highly flexible and allow you to move freely in any sequence required.
PRE-LOADED DATA FIELDS
To reduce the amount of data to be entered, fields are pre-loaded with the most frequently used information for example, if company 01 and branch 01 are the main company and branch combination, then 01/01 will be pre-loaded. This facility reduces the amount of repetitive data to be entered and hence improves productivity.
SYSTEM BACK-UP
A mechanism is provided to ensure that all data is securely backed up.
Back-up is an area where chances cannot be taken and is, therefore, obligatory. The system double checks to ensure that this function is being done regularly.
TRANSACTION LOGGING
There is a feature which allows transaction logging to a log file which, if used allows you to log all transactions, and in case of a system failure to use these and update your latest backup with the details, thus making recapture unnecessary.
REPORT WRITER AND APPLICATION BUILDER
There are modules to cater for special enquiries, reports and ad-hoc user systems. The Report Writer gives you access to all the data files with security provided down to field level. Output may be to a variety of mediums including ASCII output for spread sheets, word processing or into attached data bases.
The Application Builder enables users to build their own and ad-hoc programs and reports to run against a user defined set of data structures.
1 - 4 JULY 2006 Systems Utilities - User Guide

GROWTH POTENTIAL
Expense, inconvenience and lost time is often encountered when upgrading or changing to a new computer system. This often entails changing existing software or converting files to run on the new system.
This is catered for this with the facility to upgrade the software merely by installing the upgraded system and transferring the data across to the new computer system. As the system appears and operates identically on all modules, minimal retraining required.
INTERFACES
The system is designed to operate in conjunction with other computer and software products. Interfaces are offered to office automation tools (word processing, spreadsheets), point of sale systems, mainframe data transfer, Bar Code printing and input, price change input data, budget input and output, and remote invoicing.
TOTALITY
This is a total business system. There are shortcomings in most environments - normally in at least one of the following areas; data security, printer spooling, report writing, forms handling, job control or peripheral connectivity.
These weaknesses are addressed by including an extensive set of utilities as a standard within the system - thereby giving the option as to the best environment to use.
SU - Getting Started JULY 2006 1 - 5

1.3. THE SYSTEMS UTILITIES MODULE OVERVIEW
The Utilities System forms an integral part of all other Titan systems providing them with a common set of Utilities. For example:
Install the user's company name and systems purchased.
Set up and maintain the company and branch structure and data.
Set up the data files for the system.
Create and maintain description file data which will define various codes and descriptions appearing on the screen and in reports, for example Sales representative's numbers, names, commission rates, product groups, area codes etc.
Maintain the numbers file which supplies various sequential numbers to the systems, for example audit numbers, next invoice number etc.
Report management facilities that enable the reports to be viewed on the screen or to print reports with a wide range of options.
Set up and maintain passwords and access permissions within the systems.
Provide system backup facilities to disk and tape.
Configure the screens, keyboards, printers and operating system functions within the system.
Provision to create and run jobs.
Track and report on system logging.
Create and maintain user defined forms.
Set up of currency details.
Set up of user defined formulae.
Each of the modules contain a number of programs as the following table shows.
1 - 6 JULY 2006 Systems Utilities - User Guide

MODULE REVIEWThe system consists of the following functional modules.
SYSTEM SET-UP MODULE
Use this module to create data files and to set up overall printer and terminal parameters.
System file set-up.
Terminal and printer set-up.
ON-LINE HELP MODULE
The on-line help feature is a valuable aid to operators which may optionally be available at all times. It includes the following.
Load supplied help (ASCII).
Copy supplied or user help.
User help link maintenance
Delete supplied or user help.
Rename help variable names.
MAINTENANCE MODULE
The following maintenance programs are available in the Systems Utilities module.
Installation maintenance.
Descriptions file maintenance.
Numbers file maintenance.
General narrative file maintenance.
Customised form maintenance.
Currency file maintenance.
Formula maintenance.
System password maintenance.
Job processing.
Memory/speed optimisation.
SU - Getting Started JULY 2006 1 - 7
ENQUIRY MODULE
These programs provide methods of scanning into key system files.
Company file enquiry.
Descriptions file scan.
Numbers file scan.
Object version enquiry.
REPORT MANAGEMENT AND LOGGING MODULE
All reports may, if required, be routed to this system thus enabling them to be viewed on the screen or to be printed in various ways. The decision to log information such as system errors and user access depends on the user. The module contains multi-option report management and maintenance programs.
Report management system.
Report management maintenance.
Logging Maintenance.
PRINT MODULE
You may produce a printout of the following.
Descriptions file print.
OPERATING SYSTEM INTERFACE MODULE
This module has a program which performs up to 15 user defined system commands.
Operating system interface.
1 - 8 JULY 2006 Systems Utilities - User Guide
1.4. SYSTEM REQUIREMENTS
Ensure that there is sufficient disk space before loading the system. If installing a demonstration system, for example all the systems with demonstration data files, a minimum of 100Mb is required. A complete system without data files requires 30Mb. The following tables show the minimum hardware and software configurations required.
To run Titan Release 10, you require ACUCOBOL version 5 or higher.
MS - DOSCOMPUTER MEMORY 4 MBDISK DRIVES/TAPE STREAMER
1 x flexible disk drive1 x 100MB Hard disk drive
SCREEN Monochrome or colour24 lines by 80 characters
KEYBOARD Standard keyboard with cursor control keys and 10 function keys.
PRINTER Parallel or serial portPrinter width = 132 characters minimum (220 characters for optimum use of the General Ledger Module)
OPERATING SYSTEM MS-DOS release 5.0 or later, using the ANSI.SYS device driver.Also WINDOWS 3.1, WINDOWS NT, WINDOWS 95, WINDOWS 98 and OS/2
LOCAL AREA NETWORKS(LANS)
The system functions effectively on all NETBIOS standard LANS, provided all workstations have a minimum of 2MB of memory. We recommend that the file server be dedicated and that sufficient memory (not less that *MB for 5 Titan users) is allocated for a Novell system. The minimum requirement would be a 486 type PC.
MOUSE CONTROLACUCOBOL 2.3 or higher
SU - Getting Started JULY 2006 1 - 9

UNIXCOMPUTER MEMORY UNIX systems are normally supplied with a minimum of 1MB
(1024K) by the manufacturer. This is the minimum recommended to run the operating system. It is recommended that an additional 1MB be added for each additional user on the system, where a user is defined as a 'serial port'.
DISK DRIVES/TAPE STREAMER
1 x flexible disk drive or1 x streaming tape drive.1 x Hard disk drive (minimum 80MB).
VDU's Baud rates of either 9600 or above.Monochrome or colour.24 lines by 80 characters.132 mode of optimum viewing of reports.
KEYBOARD Standard keyboard with cursor control keys and a minimum of 10 function keys.
PRINTER 1 x parallel or serial printer depending on the type of printer port available.Printer width = 132 characters minimum (220 characters for optimal use of the General Ledger Module).
OPERATING SYSTEM Most versions of UNIX, including SCO UNIX and XENIX, AIX, SCO Open Server, HP-UX, Solaris, Digital..
ACUCOBOLTITAN Release 8.0 uses Acucobol 4.0TITAN Release 10 uses Acucobol 5 or higher
1 - 10 JULY 2006 Systems Utilities - User Guide

WINDOWSCOMPUTER MEMORY 8 MBDISK DRIVES/TAPE STREAMER
1 x flexible disk drive or1 x Hard disk drive (minimum 80MB).
VDU's Monochrome or colour.24 lines by 80 characters.
KEYBOARD Standard keyboard with cursor control keys and a minimum of 10 function keys.
PRINTER 1 x parallel or serial printer depending on the type of printer port available.Printer width = 132 characters minimum (220 characters for optimal use of the General Ledger Module).
OPERATING SYSTEM MS Windows 3.1 or laterMOUSE CONTROLACUCOBOL 2.3 or higherACUCOBOL TITAN version 10 uses ACUCOBOL 5 or higher
SU - Getting Started JULY 2006 1 - 11

CHANGES TO CBLCONFI
The following entries affect version 9.0 and upwards of TITAN mostly for WINDOWS users but they can also affect CHARACTER based users:
# graphical - displays and accepts Y/N# Unix - this should be set to N # Windows - setting this to N allows a windows user to choose the character version DISPLAY-GRAPHICAL N
# mouse operation# Unix - unused# DOSUSE-MOUSE 1#Windows and DOS - this must be set to 131 to enable - right and left mouse actionsMOUSE-FLAGS 131
# boxed (0) or unboxed (1) # Unix - this MUST be set to 0 otherwise we get additional [ ]'s # Windows - either makes the entry fields boxed or just holes in a templateFIELDS-UNBOXED=1
# set all labels to lower case LOWER-CASE Y
# menu bar - drop down box Y/N # Unix - this must be set to N# Windows - setting this to Y will give a new style drop down menuMENU-BOX N
# if function keys to be push buttons Y/N # Unix - set this to N# Windows - Push buttons = N will retain the line 24 displaysPUSH-BUTTONS Y
# BITMAPS # Unix - does not support push buttons # where to place bitmaps - defaults to line 10 column 30; BITMAP-LINE 5 BITMAP-COL 20 # the size of the bitmap - defaults to 10 lines 30 columns; BITMAP-LINES 15 BITMAP-COLS 60
# PUSH BUTTONS/BITMAPS for Graphical version# uncomment this line if you do not want function keys displayed as push-buttons# set the value to B if you want to use bitmap function keys (bin\titanmen.bmp)PUSH-BUTTONS B
# FORCE ALPHA FIELDS TO BE UPPER CASE# uncomment this line if you do not want alpha fields to be upper caseFORCE-UPPER-CASE Y
1 - 12 JULY 2006 Systems Utilities - User Guide

Other settings:
# uncomment this line if you want to use the TITAN calculator and not the Windows one# WIN-CALC Y
# uncomment this line if you wish TITAN to create the SUSCRN translation file# TITAN-SUSCRN Y
# transaction logging for vision, log-file created in current directory # 0=off; 1=on LOGGING 1 # LOG-DIR # use to specify where log file will be #LOG-FILE default.log #html settings #HTML-TEMPLATE-PREFIX /usr/local/apache/htdocs #CGI-AUTO-HEADER 0
#MAIL_DIALOG Y# uncomment this line if you wish to display reports routed to e-mail in a dialog box
#FORCE UPPERCASE# uncomment this line if you wish all field entries to be foreced to be uppercase#Please note, that this command will be ignored for AB, RW, SA30, SU30, SU34#GL60 and all 00 programs
#MAIL SUFFIX#uncomment this line and change txt to a user definable suffix (e.g. eml)#TITAN-MAIL-SUFFIX txt
SU - Getting Started JULY 2006 1 - 13

OTHER OPERATING SYSTEMS
The programs are compatible with other operating systems and variations of the above. For further information contact an official Dealer or Distributor.
1 - 14 JULY 2006 Systems Utilities - User Guide

1.5. CONCEPTS AND FUNCTIONS
1.5.1. USING MENUSThe menu system consists of three levels.
Level 1 The Main Menu (M)
Level 2 Menus for each system (SU, AR, AP etc.)
Level 3 Individual Module menus (SU1, SU3 etc.)
To select a program enter the Module number for example: 3 for SU3 - Maintenance and view the list of programs.
Then enter the program number for example 31 for SU31 - Descriptions Masterfile Maintenance program.
Press [Esc] to leave the program or press [Enter] to move back through the menus to the Main menu. The program keeps track of three previous menus and having backtracked through these you will return to the main menu.
This menu flexibility extends to all other TITAN systems installed. For example, you may move from Accounts Receivable to Accounts Payable by entering the required program number:
AR3 module menu to AP3 module menu to program AP30 or
IV system menu to program AR30 or
SP5 module menu to AR7 module menu or
GL6 module menu to program AR50.
You may define various options on the menu. See program SU30 - Installation Maintenance in the System Utilities User Guide for further details.
Please note that System and module menus may be excluded from displaying in program SU30 - Installation Maintenance. In this case all programs will display on the Main Menu. We suggest you only do this if you have less than 20 programs.
SU - Getting Started JULY 2006 1 - 15

1.5.2. SYSTEM MENU RESTRICTIONSA number of restrictions apply to accessing systems/programs via the menu.
If the one of following is displayed;
System not installed XX
Program not installed XX99 or XX999
it means that the system/program has not been installed and program SU30 - Installation Maintenance option 4 or 6 must be used.
An authorisation code is required for system installation and must be obtained from the Distributor.
If one of the following is displayed;
Access denied XX (where XX denotes the system)
Access denied XX999 (where XX999 denotes the program)
it indicates that you do not have access to the system or program. Go to program SU38 - System Password Maintenance to change this.
If NO installation has been performed, the user (SYSADMIN only), will be directed into program SU30 - Installation Maintenance to install the system. No programs can be run until this has been done.
1 - 16 JULY 2006 Systems Utilities - User Guide

1.5.3. USING FUNCTION KEYSAll the system programs use function keys which will execute command functions using a single keystroke.
These keys are normally found across the top or down the side of the main keyboard and are usually denoted as [F1], [F2], [F3] ... for function keys 1, 2, 3... The function keys within the system are used as follows:
KEY FUNCTION EXPLANATION[F1] Scan forwards Starts a scan (or search) of a masterfile. Entering
a start value, before pressing [F1], causes the scan to begin at the value entered (known as partial scanning).
[F2] Scan backwards Returns to the previous screen of scan data.[F3] Update or accept Updates the files with the data as displayed or
entered on the screen.[F4] Review or toggle Permits the review of an input transaction or
automatically pre-loads a cross reference number.
[F5] Alternate scan or toggle Starts a scan in alphabetic or alternate sequence or allows a different option to be selected.
[F6] Special Reserved for special use in various programs. The status line will indicate the function allocated to this function key.
[F7] Special Reserved for special use in various programs. The status line will indicate the function allocated to this function key.
[F8] Delete Deletes record displayed on the screen.[F9] Print Prints the details displayed on the screen.[F10] Previous screen Returns to the previous or function screen or
function selected.[Esc] Exit Terminate the program immediately and return to
the previous menu.
All function keys applicable to a particular screen are displayed on the last line, or status line of the screen. If there is insufficient space, the [Esc] and even the [F10] entries may be omitted. These two function keys are however, almost without exception, still operative, and have the functions listed above.
In the Windows graphical version, you may select to use either push buttons or bitmaps as shown below. The push buttons are shown first, followed by bitmaps.
SU - Getting Started JULY 2006 1 - 17

1.5.4. USING CURSOR KEYSCursor keys are used to move the cursor up, down, left and right within a program. This movement is always from field to field. They are indicated in the text as [], [] etc.
The system's `soft screen' facilities make it possible to move about the screen, using the cursor keys. The cursor is under program control and will only allow movement to a field sanctioned by the program. The program guides the cursor to the next field once input has been completed for example, when a field is filled with data or when [Enter] is pressed.
OTHER USEFUL KEYS [Bspace] - Moves the cursor back one space.Control-H - Moves the cursor left within a field.Control-L - Moves the cursor right within a field.Tab - Clears from the cursor to the end of the field with spaces or zeroes
if it is a numeric field.Control-X - Moves the cursor to the beginning of a field (if not re-defined as
the view key).
1.5.5. EDITING LARGE FIELDS IN UNIXTitan allows horizontal scrolling of large fields. For example, where a field is 50 characters long and there is only space on the screen for 30 characters, these field are displayed differently from others. They shows as underlined fields. In order to edit them, you can use:
Ctrl+H to take you to the beginning of the field while it is still highlighted.
Ctrl+L to take you to the end of the field while it is still highlighted.
Once the field is NOT highlighted:
Ctrl+L to move the cursor forwards
[Home , [End], [Backspace], [Insert] and [Delete] work within the field.
1 - 18 JULY 2006 Systems Utilities - User Guide

1.5.6. SPECIAL KEYSThree special keys form part of the standard TITAN System and these keys may be invoked from any part of the TITAN suite. The three keys, named the HELPKEY, the HOTKEY and the VIEWKEY, are set up in SU01 - Terminal and Printer Setup as ^V, ^W and ^X (Control-V etc.) respectively. As these functions require extra memory they can be disabled in program SU30 - Installation Maintenance.
ONLINE HELP
You can use the Online Help by entering Ctrl V (^V). The Online Help shown can be modified by the systems administrator. The following levels of help apply; Help on every ACCEPT (prompt) in the system. Help on a common pool of variables (public). Help on each program. System Help.
These levels may be toggled with [F5] when in the Help screen. If the system attempts to read the Help message for a specific level and this cannot be found, it will automatically try the next level, up to level 4. If it still cannot find any Help, a relevant message will be displayed.
Some of the key concepts in Online Help are;
[F1] - Next Screen of Help to be shown.
[F2] - Previous Screen of Help to be shown.
[F3] - Update changes to level, Help displayed.
[F5] - Level of Help shown to user may be altered.
[F7] - The user (SYSADMIN only) may edit the Help message.
[F10] - Exit Help screen and return to the current position in the TITAN System.
A variable can be linked to another variable in the same or another program ensuring the same Help message does not have to be entered more than once. Help messages may be entered on 1 to 9999 screens per variable.
A load facility is also provided allowing Help messages to be read from an ASCII file. The only rule is that each line in the ASCII file may not exceed 80 characters in length.
To invoke the load facility, enter [F7] when in the Help screen (edit Help), and then [F7] again (load Help). A load screen will be displayed, prompting for an ASCII file name (maximum 8 characters) from which to load.
SU - Getting Started JULY 2006 1 - 19

SYSTEM HOTKEY
When you enter Ctrl W (^W) you are presented with a window which describes your current environment as shown below. (The [F7] key also operates as a HOTKEY from the first screen of any program). log on name current program system period company/branch selected company/branch access logging indicator and level debugging indicator report defaults operating system
These function keys may be selected in the Hotkey window[F1] - Window to the Operating System.
[F2] - Debug mode. This is a tool used in-house and is not accessible to you.
[F9] - Dump the screen to a printer.
[Esc] - Exit the Hotkey Window and return to current position in system.
1 - 20 JULY 2006 Systems Utilities - User Guide

SYSTEM VIEWKEY
The TITAN Viewkey provides you with a data access tool if you are using an accounting system.
By merely entering a user-defined key, a view window, which provides complete access to all accounting information, overlays the current screen.
View the customer's master file information while performing Job Costing Operations, check that an order posted 5 orders back went through with the correct narrative, pinpoint which inventory items are producing the most sales while processing purchases, check stock available in another company or branch. All this without leaving the screen you are currently busy with.
The sophisticated windowing mechanism employed by the software merely overlays the current screen with the VIEW window and once completed repaints the original window.
FEATURES
User-definable key set up in SU01 - terminal independent.
Ability to provide security from file level all the way down to field level.
Windowing mechanism allowing you to overlay current screen with VIEW screen without aborting current operation.
Integrates to Report Writer Dictionary for field and key definitions.
Fast, online access to any data in the TITAN system - alpha, numeric and computational at the depression of a single key.
Full Report Writer compatibility to RW26 - Dictionary Field Maintenance and RW27 - Dictionary Sequence Maintenance.
Ability to interface to non-TITAN COBOL applications.
Ability to skip to selected places in files using various keys.
Ability to set up and store any number of views of the data.
Ability to load VIEW program into memory to provide optional access.
Ability to track and keep current position in file between scans.
SU - Getting Started JULY 2006 1 - 21

DETAILS
The TITAN View facility consists of a special utility program UTVIEW that integrates with the system harness of TITAN providing you with an online view of your data at all times. You are free to tailor the views to your own needs in order to show the information required.
Enter Ctrl X (^X) for the View Window which is loaded with the header for the default View. The default View will be the last file accessed in TITAN.
These function keys may be selected in the View Window[F1] Alters the contents of the View.[F2] Display the view (if it has been previously set up). [F9] Alters key settings.[Esc] Changes the current View.
The current View is always displayed in the top left hand corner of the screen together with the program window that you have overlaid.
RELEVANT PROGRAMS
The View programs which are loaded in the $progs/UT directory are; UTVIEW, UTVFLD, UTVKEY.
SU01 Option 1 - Set up codes for the Viewkey for the specific terminals.SU38 Set up user permissions.
User level (1-9) where 9 is a high access level.Read/Write/Denied permission restricts the user's ability to access, view or modify views.
SU30 Enable the Hot or Help keys.RW26 Perform field maintenance (not mandatory)RW27 Perform key maintenance (not mandatory)
1 - 22 JULY 2006 Systems Utilities - User Guide

HOW TO TAILOR THE VIEW SOFTWARE
[F5] - ALTERING A VIEW
The following details can be set;
RECORD LENGTH : This is not currently needed
DESCRIPTION : Describes the view, the description appears in the centre of the screen
KEY SEQ : This relates the view to a key set up for this file via the [F6] key.
SECURITY LEVEL : A level greater than the user's level in SU38 - System Password Maintenance prevents you from accessing this VIEW
On entering [F1] fields may be set up for the View;
START POSITION : The start position in the file.
LEVEL : Field security level, a level greater than the user's level in SU38 - System Password Maintenance prevents you from accessing this View.
HEADER : 10 character field description.
FIELD TYPE : Alpha (1), numeric (2) or computational (3).If the field type is 2 or 3 you must enter the decimals and whether the field is signed or not.
A full interface to the Report Writer Module is provided. If you press [F1] you can access RWDICT - the TITAN Report Writer Dictionary and select the fields. To do this you must have been provided with the program UTVFLD and the file RWDICT.
[F6] - ALTERING KEYS
The [F6] key corresponds to [F5] except that you can define the keys available for the View. The keys must be physically defined in the COBOL file. Again, an interface to RWDICT is provided for you to select the key definitions. To do this you must have been provided with the program UTVFLD and the file RWDICT.
SU - Getting Started JULY 2006 1 - 23

[F1] - VIEWING THE FILE
Once the View has been defined you can see the contents of the files by pressing [F1].You are prompted for a partial key which enables you to START the view at a particular point in that file based on the key set. If you do not enter a partial key but press [F1] again, the View will commence at the beginning of the data and continue through the file in a sequential fashion.
IF NO KEY HAS BEEN DEFINED - a message "No Key Set" displays to the right of the key input prompt and the View defaults to the prime key of that file.
At the end of the data an "End of data" message will appear and if you press [F1] again it will reset the View to the top of the file.
1 - 24 JULY 2006 Systems Utilities - User Guide

QUICK ACCESS
If you have a multi-user licence, you may use the ‘quick access’ facility provided that not all users are logged on to the system.
This means that you can at any time, while in a specific program, press a special control character and access another program.
This is extremely useful for instance if you are entering customer masterfiles and find that a particular customer group is not on file. Instead of having to exit AR30 - Customer File Maintenance and calling up program SU31 Description File maintenance, you can now press the control character while in AR30 - Customer File Maintenance. A screen like the one below displays.
QUICK ACCESS:
Enter the program you wish to access, in our example SU31 Description File maintenance, enter the data and exit this program. The system will return you to AR30 - Customer File Maintenance where you can continue as normal.
If you wish to exit back to your original program without selecting a new program, enter ‘Q’.
For the quick access facility to be operative, add the following to your CBLCONFIG file.
‘KEYSTROKE exception=44 key’, where ‘key’ is the key to allow the quick access, for example [CNTRL G] (^G).
SU - Getting Started JULY 2006 1 - 25

1.5.7. DATA FIELDSData fields may contain either numeric or alpha-numeric data. They are indicated by a left square bracket at the beginning of the field and a right square bracket at the end of the field. The space between the brackets is the field size that is available for characters or digits, for example;
VENDOR # : [ ]
Field sizes are indicated in this documentation by numbers following the field description. Examples of this usage are as follows;
VENDOR # : 6 characters Such as 123456, ABC456 or JONES.
CREDIT LIMIT : 7 digits Such as 1600000
PURCHASESYEAR-TO-DATE : 9.2 digits
Such as 456789123.27
1 - 26 JULY 2006 Systems Utilities - User Guide

1.5.8. PRE-LOADED FIELDSIn order to reduce the amount of data to be entered, all the system input fields are pre-loaded with the most commonly used options or selections, for example, if company 01 and branch 01 are the main company and branch combination, then 01/01 will be pre-loaded into the company/branch field.
To accept the screen as displayed with the various pre-loaded options, press [Enter] in answer to the "DETAILS OK? (Y/N)" prompt.
To change the pre-loaded field options, enter N (No) or use [Up arrow]. The cursor will move to the first option field for the selection to be entered. This technique is used throughout.
Certain programs have more than one option screen.
Standard default screens, such as company/branch selection may be accepted as before by pressing [Enter] in answer to the "DETAILS OK? (Y/N)" prompt.
Subsequent screens that present options related specifically to that program may be changed according to the requirements by moving the cursor to that field and entering the option. To accept the complete screen as displayed, press [F3] where indicated.
SU - Getting Started JULY 2006 1 - 27

1.5.9. COMPANY/BRANCH OPTIONS On most programs in the TITAN suite you are prompted to enter the Company/Branch combination for enquiry or input entry etc.
However, it is possible to set up defaults to prevent this prompt appearing when entering a program.
A flag may be set in program SU30 - Installation Maintenance option 1 screen to suppress the prompt for the Company/Branch options. If the suppress flag is set ON you will only be prompted to enter the options if (a) the default options are not accepted for a particular program or (b) the user enters the [F10] key from the first screen of any program. The suppress flag may be overridden for individual users by setting the flag in SU38 - System Password Maintenance.
The Company/Branch defaults are set up as either the user defaults when logging on (set in SU38 - System Password Maintenance) or, if the user defaults are not set, the installation defaults on the system.
You may override these by typing [F10] from the main menu, or from the first screen of any program. The defaults may be automatically reset after each program if desired.
1.5.10. INTERNATIONAL DATEThree date formats may be used;DD/MM/CCYY - Format 1MM/DD/CCYY - Format 2CCYY/MM/DD - Format 3
The date format is set up in SU30 - Installation Maintenance - Option 1 - Screen 3.
1.5.11. SCREEN NUMBERSEach program screen is numbered in the right-hand top corner for example, SU30 10/001.
The screen number is unique to each program and is used as a means of program identification.
The number is made up of the following components.
System identifier SUProgram number 30Current release number 80Current version number 001
PLEASE QUOTE THIS NUMBER WHEN USING THE SUPPORT SERVICES
1 - 28 JULY 2006 Systems Utilities - User Guide

1.5.12. SCANNINGThis facility enables the masterfile data to be found without knowledge of the account/reference number, or with reference to the masterfile listing.
Scanning is always available in one sequence, with some programs giving two and sometimes three or four scanning sequences. Examples of scanning sequences are; Customer account number or alphabetic sequences Order number, customer number, delivery date, stock number sequences.
SYSTEM UTILITIES - DESCRIPTIONS FILE SCAN SU51 11/001 CO - 01 - TECHNOLOGIES INCORPORATED BR - 01 - CAPE TOWN STARTING RECORD TYPE [AS] TYPE CODE DESCRIPTION AS GL ACCOUNTING SECTIONS AS A1 Fixed Assets AS A2 Current Assets AS C1 Capital AS C2 COST OF SALES AS E1 Cost of Sales AS E2 Admin Expenses AS I1 Trade income AS I2 Other Income AS L1 Long Term Liabilities AS L2 Current Liabilities AS XX ALL ACCOUNTS BL LAST YEAR'S BUDGET
F1 - SCAN FORWARDS, F10 - CO/BR, ESC - EXIT
Function keys are used to operate scanning. The scanning options available in a program are always displayed on the status line at the bottom of the screen. The figure shows a typical masterfile screen with scanning options.
KEY FUNCTION EXPLANATION[F1] Scan
forwardsStarts a scan (or search) of the masterfile in primary key sequence (bank number sequence etc)
[F2] Scan backwards
Returns to the previous screen of scan data.
[F5] Alternate scan
Starts a scan in alphabetic or alternate sequence.
SU - Getting Started JULY 2006 1 - 29

UTILITIES - DESCRIPTIONS FILE MAINTENANCE SU31 11/001CO : 01 - TECHNOLOGIES INCORPORATEDBR : 01 - CAPE TOWNDESCRIPTION TYPE [AS] AREA CODESDESCRIPTION CODE [C2 ]CODE DESCRIPTIONC2 <-->COST OF SALESE1 Cost of salesE2 Admin expensesI1 Trade IncomeI2 Other IncomeL1 Long Term LiabilitiesL2 Current LiabilitiesXX ALL ACCOUNTS*** NO MORE ITEMS ***
F1 - SCAN DESCRIPTION CODES, F10 - TYPE
The figure shows a masterfile scan screen with a series of scan options displayed.
PARTIAL SCANNING
The scanning facility also allows partial scans of masterfile data. A partial scan starts from a particular point onwards. Just enter the number or alphabetic character from which the scan should start and press the function key applicable either [F1] or [F5].To start a partial scan in an alphabetic or alternate sequence, enter the alternate or alphabetic character from which the scan should start and press [F5].Press [F2] to go back to a previous scan page.
INDIVIDUAL RECORD SCAN
To select the individual record required either enter the record number shown or using the cursor keys, move the pointer <--> down to the number.
The cursor keys control both the up and down movement of the pointer. As the pointer is moved up or down the screen, the record number is automatically pre-loaded into the field.
If [F1] is now pressed, the next page of masterfile data will be displayed, starting with the record denoted by the pointer <-->.
To accept the record selected, press [Enter]. The record selected via the scan is now displayed.
Once the scan has been selected, [F1] will enable further scanning through the masterfile.
1 - 30 JULY 2006 Systems Utilities - User Guide

1.5.13. STATUS MESSAGESThe programs display messages on the status line.
The first message that appears is "CHECKING FILES..." which is displayed as the program loads and checks for their presence and integrity.
Programs that have a processing and updating cycle will display a message "PROCESSING..." on the status line.
As the processing cycle continues the program will indicate activity by displaying the record being processed beside the message, such as PROCESSING...01-01-1800. These numbers will increment as processing proceeds.
As long as this message is displayed DO NOT switch off the terminal or shutdown the computer system.
When processing is complete a message "END OF PROCESSING" will be displayed.
1.5.14. ERROR MESSAGESAn error message is displayed by the system in the following conditions; Invalid data is entered, or a processing error occurs
The error message clearly states the error condition and is designed to assist recovery and correction procedures, therefore, it is important to fully understand the message and its cause, before input or processing is continued.
INPUT ERROR MESSAGE
These are less serious than processing error messages. They are displayed whenever invalid data is present, for example "INVALID CUSTOMER #".
Press [Enter] to acknowledge the invalid input condition. The cursor is then returned to the field in which the error occurred, for the correct data to be entered.
PROCESSING ERROR MESSAGES
If an error occurs in the processing cycle, an error message is displayed on the status line.
Make a note of the error message, and report it immediately to the Dealer or Distributor.
All processing errors that may occur are automatically logged to the system log.
This file may be viewed or printed out using program SU62 - Logging Maintenance (refer to the System Utilities User Guide).
SU - Getting Started JULY 2006 1 - 31

1.5.15. ELECTRONIC MAILInternallyYou may send and receive electronic mail to and from other users if you are on a multi-user or networked system.
The system will warn you via a pop-up box when you have a message waiting.
Any time a menu is displayed, press [F6], a screen such as the one shown below will display.
TITAN MAIL/MESSAGES SYSTEM MAIN-MENU
Log message from SYSADMINMESSAGE DESTINATION [ ] 1 - To Logging 2 - To User[ ]
For Attention : [ ]DETAILS OK? [Y]
F5 - VIEW OWN MAIL, ESC - EXIT
TO SEND MAILYou may send mail to either a User or to the Logging system
MESSAGE DESTINATION : 1 digit[1] to send your message to the Logging system.[2] to send your message to a user.
MESSAGE : 78 charactersEnter a message of up to 78 characters.
FOR ATTENTION : 8 charactersEnter the user Name of the person to which you wish to send the message.If you selected to send the message to the Logging system, the system will enter ‘LOG’ in this field. Changing this will have no effect.
1 - 32 JULY 2006 Systems Utilities - User Guide

TO READ MAILIf mail was sent to the Logging system, you may read this by using Option 4 - Messages in program SU62 - Logging Maintenance
If mail was sent to your User Name, press [F6] on any menu to access the messaging system and then [F5] to view your own mail. A screen as the one shown will display.
TITAN MAIL/MESSAGES SYSTEM MAIN-MENU
Mail Messages for SYSADMINOriginator SYSADMINMessage 001Dated 960514 AT 105447
Sandra, please phone me when you find the time - 461-2398 - thanks
F1 - NEXT , F5 - SEND MAIL, F7 - BEGIN, F8 - DELETE, ESC - EXIT
Press [F1] to see the next message, until you have read them all. Use the [F8] key as normal if you wish to delete the details.
Press [Esc] to return to the menu.
ExternallyAll printed reports and documents may be routed to the outbox of an electronic mail system. This is done by selecting ‘Option 5 – Mail recipient‘ for the Destination any time you select printer options.
In addition, Invoices may be routed to a customer provide that customer has an e-mail address entered in AR30 - Customer File Maintenance in the narrative code designated for that purpose in AR00 - System Record Maintenance.
For windows you must copy MAPI32.DLL to the program (progs) directory. If the environment variable MAIL_DIALOG is set to ‘Y’, then the generated e-mail will be displayed in a dialog box before being sent to the outbox.
SU - Getting Started JULY 2006 1 - 33

1.5.16. PRINTING OPTIONSYou may select to route reports to 5 different destinations.1. Report Management System (the Spooler - as controlled by SU60 - Report
Management System).
2. Direct to the Printer (can be routed to one of 99 possible printers).
3. Direct to a file.
4. Direct to screen - Direct to screen writes the report to the Spooler, but immediately calls SU60 - Report Management System and automatically displays the report.
5. Mail Recipient – This option when selected opens a box where an email address, copy addresses and a subject may be entered.
The Report Management system enables, among other choices, the reports to be viewed on the screen and to print the reports with a wide variety of options.
Please refer to SU60 - Report Management System for a detailed explanation of the report management system.
If printing direct to the printer, up to 99 direct printers may be selected.
The system supplies a number of default setups for printers in SYSCAP. Refer to SU01 - Terminal and Printer Setup for more details on setting up printers.
Dedicated printers may be connected to TITAN and a screen dump option enables you to print the current screen direct to printer to obtain a hard copy.
The default print options assigned to a particular program are the defaults set up for that program.
If no defaults have been set up for that program then the default print options for that System are used.
If no system defaults exist, then the user's defaults are used.
If no user's defaults exist, then the installation defaults are used.
If no defaults whatsoever have been set up, then you will be prompted for the default print options upon entering a program.
The default print destinations are obtained in the following priority;1. Installation defaults - are set up in SU30 (option 1).
2. User defaults - are set up in SU38.
3. System defaults - are set up in SU30 (option 4).
4. Program defaults - are set up in SU30 (option 6).
5. User enters [F9] for PRINT OPTIONS from first screen of program.
1 - 34 JULY 2006 Systems Utilities - User Guide

1.5.17. CALCULATORTITAN includes a calculator on all numeric fields. This enables you to press a control character (specified in your cblconfig file) when your cursor is positioned in any numeric field.
You may then make any calculations you require, and optionally insert the result into the numeric field.
For the calculator to be operative, add the following to your cblconfig file.
‘KEYSTROKE exception=41 key’, where ‘key’ is the key to access the calculator, for example [CNTRL L].
1.5.18. AUTO-CALL FACILITYPlease refer to SU30 - Installation Maintenance option 6 for more details regarding this facility.
For the facility to be operative, add the following to your cblconfig file.
‘KEYSTROKE exception=45 key’, where ‘key’ is the key call the new program, for example [CNTRL V].If you wish to determine the name of specific fields, also create a similar entry for key 46.
1.5.19. COPY AND PASTETitan allows you the normal COPY and paste features in the DOS environment. To use this set up the keys as described below.
To copy and paste add two entries to your cblconfig file:
For copy add KEYSTROKE exception=42 CNTRL Y (^Y)
For paste add KEYSTROKE exception=43 CNTRL Z (^Z)
You may select other keys from ^Y and ^Z, but please beware of conflicts.
When your cursor is positioned on a field to be copied please do the following:1. simply enter the ‘copy’ key2. move your cursor to the new field3. enter the ‘paste’ key.
The copy field will now be in the new field.
SU - Getting Started JULY 2006 1 - 35

1.5.20. MULTI-LANGUAGE FEATUREAll screen prompts can be changed as follows:
A file SUSCRN is created automatically to hold the screen terminology. It is updated for each field which does not already exist on file for all users and all programs.
Terminology may be changed per user per program, per user all programs, or all users per program or all users per all programs.
THIS SHOULD ONLY BE DONE BY SUPPORT STAFF.
To change the terminology enter the following on the command line:
vutil -unload -t SUSCRN SUSCRN.lsNow edit SUSCRN.ls:
The format of this file is: username 8 chrs
program 6 chrs
fixed terminology 30 chrs
user terminology 30 chrs.
PLEASE NOTE: If [or] is in the terminology it must remain on both sides.
To reload the data once the SUSCRN.ls file has been edited, enter the following on the command line.
vutil -load -t -r SUSCRN.ls SUSCRN
Titan will now run with the new terminology.
The CBLCONFIG entry ‘SUSCRN X’ will stop the creation of this file.
1.5.21. USER DEFINABLE MENU BAR IN WINDOWSThe menu bar at the top of the screen in the Windows versions is user definable:
Add a config entry 'menu-bar' and a list of the items to appear there (uses default if blank) options are:
Not all can be used because of the length of the line - select those required most often
Options are: Ok Up Down Left Right F1 F2 F3 F4 F5 F6 F7 F8 F9
F10 Hot Help View Esc Calc Quick Copy Paste Home
1 - 36 JULY 2006 Systems Utilities - User Guide

1.6. LOADING THE SYSTEM
GENERAL
The installation procedure has been automated to ensure that installation proceeds quickly and with a minimum of technical knowledge. The User Guides and computer media are required for each system to be loaded. The media contains all the programs required to load the systems and will be either;
flexible disks or CD-ROM for MS-DOS and UNIX systems
or
a streaming tape cartridge for UNIX systems
Only MS-DOS and UNIX installation procedures are described in the System Utilities User Guide. Installation procedures for other operating systems are available on request through an official Distributor or Dealer.
SU - Getting Started JULY 2006 1 - 37

1.6.1. LOADING ON MS-DOS SYSTEMS
REQUIREMENTS
The latest version of ACU COBOL.
DOS 5.0 or later.
The following diskettes are needed;1. Main Installation Diskette labelled INSTALL
This contains the following files;TITAN.BATINSTALL.BATAB.BAT SA.BATAR.BAT SP.BATAP.BAT IV.BATSU.BAT GL.BATRW.BAT JC.BATFA.BAT UT.BATUT.BAT CW.BATIS.BAT DU.BATBM.BAT CB.BATPO.BAT BL.BATMP.BAT WP.BATPS.BAT EI.BATRUNCBL.EXE SUMASACCCBLCONFIG SUMASCBWCONFIG.SYS SUMASPWDCONFIG.ADD SYSCAPANSI.SYS FORMDEFFCODET PROGSYS
2. Systems Diskettes. One or more diskettes per system. Each diskette will contain the necessary programs for the relevant system.
3. Report Writer and Help files if applicable4 ACUCOBOL installation diskettes
1 - 38 JULY 2006 Systems Utilities - User Guide

PROCEDURE
1. The existing CONFIG.SYS and ANSI.SYS must be renamed as CONFIG.SAV and ANSI.SAV.
The entries in CONFIG.ADD must be added to your CONFIG.SYS. In addition if there are other entries in the old CONFIG.SYS, for example device drivers or network parameters, these should be inserted in the new CONFIG.SYS.
2. Select the drive to be used for the program and data files. Insert the floppy labelled `INSTALL' into drive A.
Type in `A:INSTALL C:' and press [Enter](or `A:INSTALL D:' for drive D: etc.)
4. A message notifying that the main installation is complete, will appear after a few minutes. Select the floppy labelled `SU' and insert it into Drive A.
Type in `SU' and press [Enter]5. Wait for the completion message. Select another system to install, type in the system prefix and press [Enter].6. Repeat Step 5 until all systems have been installed.
7. If Report Writer and Help files are to be installed, use the following DOS restore command;
vio -ivndf ‘device’ where ‘device is a: or b: followed by
H for 1.2MB High-density 5.25”
3 for 1.44MB High-density 3.5”
9 for 720KB, 9-sector low density 3.5”
8 for 320KB, 8-sector low density 5.25”
8. Re-boot the machine, enter TITAN and press [Enter].9. Login as SYSADMIN.
SU - Getting Started JULY 2006 1 - 39

ADDITIONAL INSTALLATION NOTES ON MS-DOS
DOS FILE STRUCTURE FOR TITAN
OTHER FILES TITAN OTHER DIRECTORIES
DATA FILES
BIN SU AP AR OTHER SYSTEMS
Copy the following files from the ACUCOBOL installation diskettes to the TITAN\BIN directory:
runcbl.exe
vutil.exe
vio.exe
1 - 40 JULY 2006 Systems Utilities - User Guide

1.6.2. LOADING ON UNIX SYSTEMS
REQUIREMENTS
1. UNIX Runtime System
2. `tar' program
3. `root' password
4. One of the following terminals;
Ansi (console)
VT100
WY50 WY60 etc. (See $a_termcap)
5. Media containing;
Installation and other scripts/programs
TITAN programs
Core data files and/or
SU - Getting Started JULY 2006 1 - 41

PROCEDURE1. Login as root.2. Choose a TITAN account directory
for example /usr/acctor other if required, such as /u/acct
3. Create this directory using the `mkdir' command, for example;mkdir /usr/acct
4. Change to the new account directory using the `cd' command, for example;cd /usr/acct
5. Insert the supplied media labelled `volume 1' into the floppy diskette drive or the tape drive as is applicable
6. Type in the load command for the UNIX/media combination, for example Xenix with floppy disks;If the media supplied is floppy diskette(s) 360kbtar xvf /dev/rfd048ds9 or tar 0vxIf the media supplied is floppy diskette(s) 720kbtar xvf /dev/rfd096ds9 or tar 2xvIf the media supplied is floppy diskette(s) 1.2mbtar xvf /dev/rfd096ds15For XENIX/UNIX with a streamer tape;If media is a tape(s) made on Xenix/Unix refer to /etc./default/tar for tape definitions.For example :tar xvf /dev/rct0ortar 6xv
7. Insert the next volume and repeat Step 6 until all supplied media is exhausted.
Sometimes programs are supplied on diskettes but in DOS format. In this case the tar command will not work and the supplied 'gutil' script in $bin should be used. However ensure that all program directories have been created and have the correct permissions, and copy the programs only after Step 8 has been completed.
1 - 42 JULY 2006 Systems Utilities - User Guide

8. Type the following command;
sh bin/install9. The following Unix/Xenix files/scripts should also be loaded in $bin.
titan
setenv
cblconfig
a_termcap
btitan
These are machine dependent and may require modifications. They can be found in the distributed ACUDIST directory. Ensure that these are loaded in the '$acct/bin' directory.
We recommend that ownership of 'runcbl' is `titan' and has the user id-bit on.
CHANGES TO CBLCONFIG
For the calculator add ‘KEYSTROKE exception=41 key’, where ‘key’ is the key to access the calculator, for example [CNTRL L] (^L).
For the mouse use MOUSE 1, MOUSE-FLAGS 131
For Logging, use LOGGING 1 (or 0), 0 = OFF, 1 = ON (1 bing the default)
To cut and paste add two entries:
For cut add KEYSTROKE exception=42 CNTRL Y (^Y)
For paste add KEYSTROKE exception=43 CNTRL Z (^Z)
You may select other keys from ^Y and ^Z, but please beware of conflicts.
To specify a directory for printing files to disk
Include an entry: SU60-DIR name_of_directory
The name must include the FULL pathname, for instance /usr/spool/uucppublic/ or C:\TITAN\TEMP\
The file name of 8 characters is appended to this pathname so it MUST include the end slash.
Once the above files/scripts have been set up, you must load the client's licensed ACUCOBOL disk or tape. You need only load the 'runcbl', 'vutil' and 'vio' programs from this disk or tape into the above mentioned bin directories.
To use Vision version 3 file system (with data and indexes combined) V-version 3 otherwise indexes are held in ?????.vix files. For example NLMAST (data), NLMAST.vix (index).
SU - Getting Started JULY 2006 1 - 43

To export reports to external systems via SU60 - Report Management System, you need to complete the following for each external system.
These TITAN-DEST parameters start at 6. Look at the example below:
TITAN-DEST6-NAME Word This contains an optional Name, here we used Word
TITAN-DEST6-"C:\Program Files\Microsoft Office\Office\WINWORD.EXE" This is the command that executes the external package
TITAN-DEST6-SUFFIX .txt This is optional and is the extension given to the temporary print file. If this is omitted, the extension will be .prn
TITAN-DEST6-DELETE N If you retain the default as N (no) then the temporary files will not be deleted on exiting the command. If you change this to Y, then the temporary file will be deleted and you ill have to save the file in the normal manner if you wish to retain this.
1 - 44 JULY 2006 Systems Utilities - User Guide

1.6.3. INSTALLING TITAN ON WINDOWS
1 Load the ACU COBOL from the Program Manager using the Run command. On the command line enter a: setupThis will copy wruncbl.exe, vutil.exe, vio.exe and so forth into TITAN\BIN
2 Create an application TITANFrom Program Manager select File...New and then place it in a selected group.Then select File...Properties and on the command line enter:c:\titan\bin\wrucncbl -12 -c c:\titan\bin\cblconfi -s -l -err.%LOGNAME% UT\UT00Then select File...Properties...Working directory and on the command line enter:c:\titan\progs
3 Ensure that the cblconfi file has the following entries:# to point to programs and filesCODE-PREFIX c:\titan\progs; UT SU AR AP GL .....etc.FILE-PREFIX c:\titan# to use the windows spoolerPRINTER _P SPOOLER# to set the window size - starts with maximised screenSCREEN size=35,79 window=999,999#other areas to look at# to draw lines and boxes with 3D effect3D-LINES 1# to use the graphical font (default)FONT 1# to use a different icon when minimisedICON path of icon# to control whether the window should be able to be closedQUIT-MODE -2 disable close (recommended)
-1 close only on input (i.e. not if running a batch)0 Always close (very dangerous)>0 Program controlled
# to control how hardware errors are handledWIN-ERROR-HANDLING 1 on use host (default)
0 off send message to program# to change the window heading from UT00 to your own headingWINDOW-TITLE heading
SU - Getting Started JULY 2006 1 - 45

1.7. INSTALLING THE SYSTEMS UTILITIES MODULE
After installing the Systems Utilities as described enter "titan" to load the system.
The system logon is displayed and the prompt - User name - appears. Now enter SYSADMIN.
This user name is termed a `Super-User' and will give access to all the programs with special privileges.
This "Super-User" name MUST BE PROTECTED by a password at a later stage to prevent unauthorized use of the user name.
If passwords have already been implemented for this "Super-User", the program will prompt for entry of at least one password.
The program allows three attempts at a password input before returning to the operating system.
Exit the system at this point by pressing [Esc].
1 - 46 JULY 2006 Systems Utilities - User Guide

1.7.1. THE MAIN MENU After completing the system logon procedure the main system menu is displayed which shows all the available systems in the suite.
To logon using a different user name, enter [A] to return to the initial system logon screen.
To quit the system, enter [Q]. The prompt "IS THIS THE LAST RUN OF THE DAY ? [Y/N]" will appear.
Once the system is set up, entering Y (Yes) will first lead into the Report Management Maintenance Program (See the Systems Utilities User Guide - Program SU61 - Report Management Maintenance) and then into the logging procedure if this facility has been enabled. Enter N (No) to return to the operating system prompt.
All entries must be followed by pressing the enter key [Enter] as an acknowledgement to the system that the response is complete.
OTHER FACILITIES
You may configure and define the options on the menu.
You may optionally select to `hide' systems, modules or programs from the menu (SU30 - Installation Maintenance Options 4 and 5).
Use theand keys to scan for the required program.
The [F5] key disables the menu display.
The [F6] key allows you view and send mail.
The [F7] key will display your environment.
The [F10] key is used to set the CO/BR and DATE default.
SU - Getting Started JULY 2006 1 - 47

1.7.2. THE UTILITIES SYSTEM MENUTo select this system from the main menu, enter SU. The following modules and programs form part of the Systems Utilities system.
TITAN SYSTEMS UTILITIES MENUSU0 - SYSTEM SETUP
SU00 CREATE SYSTEM FILES SU01 TERMINAL AND PRINTER SETUPSU1 - ON-LINE HELP MODULE
SU10 LOAD SUPPLIED HELP (ASCII) SU13 DELETE SUPPLIED OR USER HELPSU11 COPY SUPPLIED OR USER HELP SU14 RENAME HELP VARIABLE NAMESSU12 USER HELP LINK MAINTENANCE
SU3 - MAINTENANCE MODULESU30 INSTALLATION MAINTENANCE SU351 CUSTOMISED TERMINOLOGYSU31 DESCRIPTIONS FILE
MAINTENANCESU36 CURRENCY FILE MAINTENANCE
SU32 NUMBERS FILE MAINTENANCE SU37 FORMULA MAINTENANCESU33 NARRATIVE FILE MAINTENANCE SU38 SYSTEM PASSWORD MAINTENANCESU35 CUSTOMISED FORM
MAINTENANCESU39 JOB PROCESSING
SU - MISCELLANEOUS MODULESU40 MEMORY/SPEED OPTIMISATION SU44 CUSTOMISED FILE LAYOUT
MAINTENANCESU41 REFERENCE FILE
MAINTENANCESU45 GENERAL CROSS REFERENCE
MAINTENANCESU42 COMMON CATEGORY INPUT/
MAINTENANCESU5 - ENQUIRY/SCAN MODULE
SU50 COMPANY FILE ENQUIRY SU53 OBJECT VERSION ENQUIRYSU51 DESCRIPTIONS FILE SCAN SU55 GENERAL CROSS REFERENCE
ENQUIRYSU52 NUMBERS FILE SCAN SU58 SYSTEM PASSWORD ENQUIRY
SU6 - REPORT MANAGEMENT SYSTEMSU60 REPORT MANAGEMENT
SYSTEMSU62 LOGGING MAINTENANCE
SU61 REPORT MANAGEMENT MAINTENANCE
SU7 - PRINT MODULESU71 DESCRIPTIONS FILE PRINT
SU9 - OPERATING SYSTEMSU90 OPERATING SYSTEM UTILITIES
As you can see these modules are organised into functional groups, for example the maintenance module (SU3) contains all the programs that are concerned with the maintenance of the system.
The menu system has pre-loaded the SU mnemonic and all that is required is to enter the relevant module number, for example [3] for the Maintenance module.
Enter [M] to select the main menu.
1 - 48 JULY 2006 Systems Utilities - User Guide

2. SET-UP AND RUN
2.1. THE SET-UP SEQUENCE
This section sets out the sequence of procedures that must be followed for setting up the system.
Refer to the relevant section of this User Guide for detailed instructions on how to use the programs listed in this set-up sequence.
Should there be any difficulties during this set up procedure please contact the Dealer or Distributor immediately.
After installing the system, proceed with the following set up sequence;
STEP PROGRAM FUNCTION AND PROCEDURE1. SU30
MandatoryThe Installation Maintenance program must be run to install the Company Name, Systems and Branches. Authority to do this MUST be obtained from the Dealer.Three levels of installation must be performed.1 - System Installation - option 1.An installation number and authorisation code must be obtained from the Dealer before this can be done.2 - Company/Branch Installation - option 2 and 3.Authority codes for each company and branch must be obtained from the Dealer before this can be done.3 - System Installation - option 4.Authority codes are required for each system to be installed. These must be obtained from the Dealer.
If an authority violation occurs or the system is not installed, you will be forced to run SU30 - Installation Maintenance and install the system.2. SU01
MandatorySU01 - Terminal and Printer Setup program contains essential system parameters that are used by all systems in the suite. This program will be set up by the Dealer or Distributor.DO NOT attempt to use this program unless authorised, and trained in its use by the Dealer or Distributor.
3. SU31Mandatory
The Descriptions File Maintenance program is used to set up the various descriptions required by the systems. Refer to the set-up sequences in the relevant User Guides.
4. SU32Mandatory
The Numbers File Maintenance program sets up the various numeric sequences within the system. Refer to the set-up sequences in the relevant User Guides.
5. SU33Optional
The Narrative File Maintenance program is used to set up the various descriptions required by the systems.
SU - Set-up and Run JULY 2006 2- 49

STEP PROGRAM FUNCTION AND PROCEDURERefer to the set-up sequences in the relevant User Guides.
6. SU35Optional
The Customised Forms Maintenance program will set up and maintain the various forms used in the systems.
7. SU36Mandatory
The Currency File Maintenance program is used to set up the various currencies and their descriptions and rates of exchange. Refer to the set-up sequences in the relevant User Guides. Mandatory in order to enter the default currency.
9. SU37Optional
The use of the Formula Maintenance program depends on which other applications you run and will be specified in the individual user guides.
9. SU38Mandatory
The Password Maintenance program is used to create and maintain user names and access permission for all programs.
The Systems Capabilities (SYSCAP) file is set up by SU01 - Terminal and Printer Setup and is created for the whole system.As the system is a multi-company and multi-branch system, the sequence of set-up procedures needs to be repeated for each company/branch on the system.
2 - 50 JULY 2006 System Utilities - User guide

2.2. BACKUP
This section provides important advice on how to backup MS-DOS and UNIX based systems. It is essential for the successful and secure operation of the system, to protect valuable data from possible destruction, corruption and operational failures, and must be regarded as mandatory.
Backup must be performed regularly and for systems with high transaction volumes every four hours is recommended but never less than once per day. It is also essential to backup before doing an interface or period-end run.
Backup not only covers the physical copying of data, but also the keeping of adequate posting and backup records.
General documentation procedures that should be followed before entering any transaction (or group of transactions), are;
Complete a batch listing record. This will serve as a control to ensure that all batches of entries to be processed are in fact processed.
After entering transactions, an audit trail will automatically be printed. Attach this printout to the original source documents, which should be completed in date order. File these printouts in the daily computer file.
After each batch has been entered, each document in the batch must be stamped to indicate that it has been processed.
A suggested batch listing record layout could look like this;
DATE BATCH # DOCUMENT #'S BATCH TOTAL SIGNATURE
12/2/91 254 1347-2563 36874.36 A. MARTIN
13/2/91 255 2564-4712 87862.01 N. BELL
SU - Set-up and Run JULY 2006 2- 51

2.2.1. BACKUP DISKS/TAPESAll disks must be formatted prior to use. Backup disks or tapes to be used are;
DAILY DISKS/TAPESAt least three sets of disk/tapes are required for the daily backups. Label these sets as 1, 2, 3,
The first backup will be on the backup 1 set, the second and third time use the second and third backup sets.
At the last backup, return to the backup 1 set. This procedure continues on a daily basis. It means that there are always at least three levels of backup. Should anything go wrong with the most recent backup set, there will always be at least two other levels of backup disks/tapes to rely on.
These disks/tapes must be stored in a safe place (fireproof safe) each night. It is also advisable to keep a copy off-site (bank or other place of safe-keeping).
Backing-up will often take up more than one disk. In this case each set of backup disks will consist of several disks, each labelled accordingly. For example, if the backup set contains three disks/tapes then they will be labelled as follows;
Backup 1 disk/tape 1 of 3 (first disk/tape).....date
Backup 1 disk/tape 2 of 3 (second disk/tape)....date
Backup 1 disk/tape 3 of 3 (third disk/tape).....date
etc.
INTERFACING DISKS/TAPES
Certain application systems interface to others. These interfaces may be run at the users convenience. It is however essential to keep track of when these interfaces are performed.
Use a separate set of tapes/disks for interface backup. Label these disks/tapes "Before Interfacing".
Keep this set of interfacing disks/tapes separate from the daily and monthly disks/tapes, and use them to backup the system each time before doing an interface run (if the interface is performed once a month, these same disks/tapes will be used once a month).
2 - 52 JULY 2006 System Utilities - User guide

MONTHLY DISKS/TAPES
At the end of every month, once all processing for that month is complete, prior to executing the month-end run, a monthly backup must be taken. Label it accordingly (General Ledger January month-end backup disk 1 of 3) which must be stored in a safe place for a complete year.
This means that at the end of month 1 when performing the monthly backup the disks/tapes are marked as end of Month 1 (January 31, 1991 month-end) disks/tapes. Store these disks/tapes in a fireproof safe.
At the end of month 2, take another set of blank disks/tapes, do a monthly backup, and mark these disks/tapes as end of month 2 (February 28, 1998 month-end) disks/tapes etc.
SU - Set-up and Run JULY 2006 2- 53

2.2.2. BACKUP - MS-DOS SYSTEMSTo backup, insert the next disk to be backed up (refer to the backup record to ensure that the correct disk is used), into drive A. Close the drive.
Exit from TITAN.
Key in the command for backup as provided by your dealer or support person, or the menu number corresponding to this function. The screen now displays the following;
Insert backup diskette 01 in drive A;Warning! Diskette files will be erasedStrike any key when ready
Follow the instructions on inserting the next disk(s) if applicable. Then remove the last disk when the backup is complete and store in a safe place.
CAUTION - Never remove the floppy disk until the red light near the disk drive is off. Always remember to write down the date, time, details and user's initials on the backup record when doing a backup.
2.2.3. RESTORING FROM BACKUP - MS-DOS SYSTEMSShould the data stored on the hard disk (internal disk) become corrupted, it is necessary to restore the data by copying the data from the backup disk(s) to the hard disk.
This is done as follows;
Exit from TITAN.
Insert the most recent backup disk (that contains the information that must be restored), into drive A.
Key in the command provided by the dealer or support person, or the menu number corresponding to this function.
Follow the instructions displayed on the screen. Then remove the disk when the backup is complete and store in a safe place.
CAUTION - Never remove the floppy disk until the red light near the disk drive is off. Whatever work has been done since the most recent backup must be redone. Thus regular backup saves a lot of duplicate work should data need to be restored.
2 - 54 JULY 2006 System Utilities - User guide

DAILY BACKUP RECORD
A suggested daily backup record could look like this;
BACKUP 1 BACKUP 2 BACKUP 3DATE & TIME
DETAILS & INITIALS
DATE & TIME
DETAILS & INITIALS
DATE & TIME
DETAILS & INITIALS
12/2/91 14.05
All files PB 13/02/91 14.30
All files NR 14/02/91 14.15
All files NR
SU - Set-up and Run JULY 2006 2- 55

2.2.4. BACKUP - UNIX SYSTEMSThe system provides you with either automatic or manual backup facilities when using computers operating under these systems.
To select manual backup, enter SU90 - Operating System Utilities and proceed according to the instructions provided by the TITAN Dealer or Distributor.
The module provides an interface to the operating system and will present you with a selection of commands.
This procedure should be used whenever backup is required during the course of the day or when special circumstances demand, for example prior to a hardware upgrade or engineering maintenance.
The available backup functions (set up in program SU01 - Terminal and Printer Setup - Option 5) are prompted by the system.
2.2.5. RESTORING - UNIX SYSTEMSShould the data on the disk become corrupted, it will be necessary to do one of the following;
1. Attempt to recover the corrupt files.
For details contact the Dealer or Distributor.
2. If the recover solution is unacceptable (failed recovery or only partial recovery with no data integrity across files) then it will be necessary to restore from the latest backup.
2 - 56 JULY 2006 System Utilities - User guide

2.3. CREATE SYSTEM FILES - SU00
SU00 - Create System Files enables you to create files for a particular system and verify that the I/O modules are present and performing correctly. It also contains file utility programs which provide such features as file compression and recovery.
SYSTEM UTILITIES - CREATE SYSTEM FILES SU00 11/001 SELECT FUNCTION [1] 1 - Create System Files 2 - Verify IO Modules 3 - File Utility Programs
ESC - EXIT
SU - Set-up and Run JULY 2006 2- 57

OPTION 1 - CREATE SYSTEM FILES.
This first option enables you to create files for one or more systems.
If selected the following prompt appears;CREATE FILES FOR SYSTEM : 2 characters.Press [F1] to scan the systems, [F5] to tag the selected systems, [F3] to initiate the creation of files for the systems tagged. After pressing [F3] the files will be created for all the tagged systems if they do not already exist. However, if they do exist, a message will be displayed and you must press [Enter] for the program to continue.
SYSTEM UTILITIES - CREATE SYSTEM FILES SU00 11/001 CREATE FILES FOR SYSTEM [AP] SYSTEM DESCRIPTION AB APPLICATION BUILDER -> AP <--> ACCOUNTS PAYABLE AR ACCOUNTS RECEIVABLE BM BILL OF MATERIALS CB CASH BOOK CU CONVERSION UTILITIES CV DU DEALER UTILITIES ES ESTIMATING FA FIXED ASSETS GL GENERAL LEDGER IS INSTALMENT SALES IV INVENTORY JC JOB COSTING MP MONTHLY PAYROLL OP OPTIMISATION
F1 - SCAN, F3 - UPDATE, F5 - FLAG, F10 - OPTIONS, ESC - EXIT
Please ensure that newly created files have the correct operating system flags, and where relevant the correct ownership and group indicators.
2 - 58 JULY 2006 System Utilities - User guide

OPTION 2 - VERIFY I/O MODULES
INPUT/OUTPUT MODULES
Associated with each data file is a special I/O module. These reside in the UT program directory. If an I/O module is deleted by accident, you will receive a 'COBOL ERROR 204' on attempting to use these files. The names of the I/O modules correspond to those of the TITAN files, for example DESCRIP, NLMAST and so forth.
You may verify the existence and validity of the I/O modules.
SYSTEM UTILITIES - CREATE SYSTEM FILES SU00 11/001 FILE TO VERIFY [SLMAST ]
SLMAST - VERIFIED Press RETURN to continue...
FILE TO VERIFY : 8 characters.Enter the name of the file to be verified.
The system will output one of the following messages;"I/O MODULE NOT AVAILABLE"This indicates that the module either does not exist or that it is corrupt."FILE DOES NOT EXIST"This will display if the I/O module exists but the associated data file does not."VERIFIED"If both the data file and the I/O module exist, this is the message which will be displayed.
SU - Set-up and Run JULY 2006 2- 59

OPTION 3 - FILE UTILITY PROGRAMS
You may copy files or parts of files using File Utility Programs.
Enter option 3, and complete the following;
SYSTEM UTILITIES - CREATE SYSTEM FILES SU00 11/001 SELECT FILE TO RECOVER [ABMAST ] RECOVER OPTION? [C] C - Index to Index Copy B - Sequential <-> Index Copy DO YOU WISH TO CONTINUE? [N]
F10 - OPTIONS, ESC - EXIT
SELECT FILE TO RECOVER : 29 characters.
Enter the name of the file to be recovered.
RECOVER OPTION : 1 character.[C] lets you create a copy of some or all of the records in the selected index file. The resultant file is an index file. This option also allows you to compress excess data thus saving valuable disk space.[B] Enables you to load an index file from a binary sequential format or create a binary sequential file from an indexed format.
Please note that ‘vutil’ allows you to create and restore binary line sequential files
2 - 60 JULY 2006 System Utilities - User guide

RECOVERY OPTION C - INDEX TO INDEX COPY
If option C - Index to Index Copy was selected the following screen will be displayed;
SYSTEM UTILITIES - CREATE SYSTEM FILES XABMAST 11/011 PROGRAM COPIES INDEX FILE ABMAST TO ABMAST.CPY MAXIMUM NO OF RECORDS TO COPY? [9999999] START KEY [ ] END KEY [ ] MERGE THE TWO FILES? [N] DO YOU WISH TO CONTINUE? [Y]
F10 - NEXT FILE, ESC - EXIT
MAXIMUM NO OF RECORDS TO COPY : 7 digits.
The default is 99999999 and should normally be accepted.
START KEY : 50 characters.If the whole of the file is to be copied press [Enter], or contact the dealer or distributor for information on key structures.
END KEY : 50 characters.If the whole of the file is to be copied press [Enter], or contact the dealer or distributor for information on key structures.
MERGE THE TWO FILES? : Y/N[Y] enables you to join the data in two files with the same structure into one file. The data with the specified name is merged with a file with the same name but suffixed with `.CPY', which must already exist, creating a new merged file called `FILENAME.CPY'. Thus SLMAST will be merged with a file called SLMAST.CPY and the merged data will end up in SLMAST.CPY. If you do not wish to merge two files but merely do an Index to Index copy, a new file will also be created as `FILENAME.COPY'
SU - Set-up and Run JULY 2006 2- 61

DO YOU WISH TO CONTINUE? : Y/N
[Y] will start the process.[N] will allow you to correct or re-enter data.
When the program comes to an end, you must remember to copy the .CPY file to the normal filename.
2 - 62 JULY 2006 System Utilities - User guide

RECOVERY OPTION B - SEQUENTIAL TO/FROM INDEX COPY
If option B - Sequential to/from Index Copy was selected the following screen will be displayed;
SYSTEM UTILITIES - CREATE SYSTEM FILES XABMAST 11/011 FILE CONVERT ABMAST DESTINATION OF COPY? [1] 1 - Binary to Index 2 - Index to Binary DO YOU WISH TO CONTINUE? [Y] WARNING - HAVE YOU SAVED YOUR OLD FILE?
F10 - NEXT FILE, ESC - EXIT
DESTINATION OF COPY : Enter [1] to create an Index file from a binary sequential format.Enter [2] to create a binary sequential file from an indexed format.
When the file being read is an indexed file, the binary sequential file created by the program is suffixed with `.BS", for example SLMAST.BS. When the input file is binary sequential, it MUST be suffixed by `.BS' although you must specify the file name without the suffix.
DO YOU WISH TO CONTINUE? : Y/N
[Y] will start the process.[N] will allow you to correct or re-enter data.
When the program comes to an end, you must remember to copy the files created to the appropriate filenames.
SU - Set-up and Run JULY 2006 2- 63

2.4. THE SYSTEM PARAMETER FILE - SU01
The system parameter file defines global environment - specific parameters that apply to all the systems. This program will be set up by the Dealer or Distributor.
DO NOT attempt to use this program unless trained and authorised in its use, by the Dealer or Distributor.
The information provided in this section is exclusively for those Dealers and user's trained in its use. The program has three distinct functions for controlling terminals, printers, and operating system commands.
Enter SU01 to load the program, the available options are displayed as follows;
SELECT FUNCTION : [1] Set terminal capabilities.[2] Set terminal assignments.[3] Set printer capabilities.[4] Set printer assignments.[5] Set system commands.
SYSTEM UTILITIES - TERMINAL AND PRINTER SETUP SU01 11/001 SELECT FUNCTION [1] 1 - SET TERMINAL CAPABILITIES 2 - SET TERMINAL ASSIGNMENTS 3 - SET PRINTER CAPABILITIES 4 - SET PRINTER ASSIGNMENTS 5 - SET SYSTEM COMMANDS
ESC - EXIT
2 - 64 JULY 2006 System Utilities - User guide

[1] - SET TERMINAL CAPABILITIESSYSTEM UTILITIES - TERMINAL AND PRINTER SETUP SU01 11/001 ENTER THE UNIQUE NAME FOR THIS TERMINAL TYPE: [ANSI ] ANSI VIEWPOINT DG 461 VIEWPOINT80 DUMB VT100 ESPRIT 925 VT52 FREEDOM ONE WYSE 50 HP 2392A WYSE 50-80 HP-150 WYSE 60 IBM 3161 WYSE 75 ICL 6402 XYZ LINK 125 NCR 4920 PC-XT SIEM 97801 TI 940 TVI910
F10 - OPTION MENU, ESC - EXIT
The "Set Terminal Capabilities" option allows you to specifically describe the characteristics of any given terminal. The system is supplied with the descriptions of various terminal types but additional terminals may be added if required. Press [Enter] to accept the default selection or enter the following field;
ENTER THE UNIQUE NAMEFOR THIS TERMINAL TYPE : 12 characters.
Enter the name of the terminal or scan for available terminal types.
After entering or scanning for the terminal type, enter the fields displayed, by pressing the appropriate key once as described on the next page.
It is imperative that these are correctly set for the terminal in use. Ensure that the first key entered is the [Up arrow] key as this will be recognized as the future backtrack key.
It is essential to set the terminal parameters for all other keys except [Home], and the keys for the Help, Hot and View functions. These are optional.
Press the other arrow and [Esc] keys (the terminal must have these to be usable).
To inhibit keys such as [Home], press the space bar twice in each field. This will insert [00] into the relevant field. Doing this for other keys will result in an error message, since all other keys are essential.
SU - Set-up and Run JULY 2006 2- 65

Enter the function key values (function keys 1 to 10).
SYSTEM UTILITIES - TERMINAL AND PRINTER SETUP SU01 11/102
SET TERMINAL PARAMETERS FOR THE PC-XT
PRESS EACH KEY ONCE: Up-Arrow [52] F1 [01] Down-Arrow [53] F2 [02] Left-Arrow [50] F3 [03] Right-Arrow [51] F4 [04] Home [54] F5 [05] Tab [09] F6 [06] Escape [27] F7 [07] Help [23] F8 [08] Hot Key [24] F9 [16] View Key [22] F10 [15]
ENTER TERMINAL PARAMETERS: Lines for Spooler Display [24] Remap Function Keys [N] Display Menu Bar Y/N [Y] Screen saver after (Mins) [15]F1 - NEXT, F3 - ACCEPT, F8 - DELETE, F10 - OPTION MENU, ESC - EXIT
The keyboard must have 10 function keys for optimal use. Each one must be programmed to some value, or string of values, and these strings must match the values expected by the runtime.
On UNIX systems, the strings are set in either the termcap or terminfo files. To set these strings for a particular terminal, consult the UNIX manuals.
Similar procedures should be followed for XENIX systems. The strings can be set to anything required, as long as they are "sensible" and do not clash with existing values.
The standard sequences used are;
F1 Control-A1
F2 Control-A2
F3 Control-A3
F4 Control-A4
F5 Control-A5
F6 Control-A6
F7 Control-A7
F8 Control-A8
F9 Control-P
F10 Control-O
Now complete the next set of parameters;
2 - 66 JULY 2006 System Utilities - User guide

Level 1
ENTER TERMINAL PARAMETERS;
LINES FOR SPOOLER DISPLAY : 2 digits.
Used to specify the number of lines displayed on the screen in SU60 - Report Management System.
REMAP FUNCTION KEYS : Y/NIf you enter [Y], you will be able to remap the 10 function keys mentioned above.
DISPLAY MENU BAR : Y/NIf you enter [Y], a menu bar as shown below will be displayed on all your menu screens. You may use your mouse to point at each of the options or enter [Alt]+[Highlighted character]. For instance, if you wish to use the calculator, enter [Alt+C]. for [F1] you will enter [Alt+1], and so forth.
SCREEN SAVER AFTER : 2 digitsEnter the number of minutes after which you want your screen saver to start in. The default is 15 minutes.If you enter ‘99’ the screen saver facility will not be used.
Press [F1] to continue to the next level.
Level 2
The first prompt appearing on the screen is as follows;
ENTER ESCAPE SEQUENCES TO : 16 characters.
Now enter the escape sequences (in hexadecimal) to set up screen capabilities.
These capabilities are optional. They are used to format all menus, and to display the contents of files, as used in SU60 - Report Management System. These strings and values all refer to screen capabilities.
The Switch Cursor Off/On strings are not currently used.
The Switch Display Off/On strings are used by the menus to blank the display while the screen is being painted.
The Display High/Low Intensity strings are used by the menus.
SU - Set-up and Run JULY 2006 2- 67

The Enter/Exit Graphics Mode strings are used only on those terminals which have a separate graphics mode, such as VT100 emulations as opposed to those that do not, for example PC-XT console.
The Enter 80/132 Column Mode strings are used by SU60 - Report Management System when displaying the contents of a report. Both must be set for either to be recognised by SU60 - Report Management System.
SYSTEM UTILITIES - TERMINAL AND PRINTER SETUP SU01 11/001 ENTER ESCAPE SEQUENCES TO: Switch Cursor Off [0000000000000000] Switch Cursor On [0000000000000000] Switch Display Off [0000000000000000] Switch Display On [0000000000000000] Display High Intensity [1B5B30741B5B316D] Display Low Intensity [1B5B306D00000000] Enter Graphics Mode [1B28301B29300000] Exit Graphics Mode [1B28421B29420000] Enter 80-Column Mode [1B5B3F336C000000] Enter 132-Column Mode [0000000000000000] Switch Aux Port On [1B5B3F3368000000] Switch Aux Port Off [0000000000000000] ENTER HEXADECIMAL VALUES FOR EACH OF THESE GRAPHICS CHARACTERS: Upper-Left Corner [6C] Normal 'T' [77] Upper-Right Corner [6B] Left 'T' [74] Lower-Left Corner [6D] Right 'T' [75] Lower-Right Corner [6A] Inverted 'T' [76] Single Hor. Line [71] Double Hor. Line [71] Single Vert. Line [78] Solid Block [61] F2 - PREVIOUS, F3 - SAVE, F8 - DELETE, F10 - OPTION MENU, ESC - EXIT
The next prompt is;
ENTER HEXADECIMAL VALUES FOR EACH OF THESE GRAPHICS CHARACTERS : 2 digits.
The graphics characters are used by the menus for formatting the boarders, and the TITAN logo on the logon screen. Set unused characters to spare (20 Hex).
Set unused escape sequences to all zeros. (0000000000000000).
2 - 68 JULY 2006 System Utilities - User guide

[2] - SET TERMINAL ASSIGNMENTS
The "Set Terminal Assignments" option provides a mapping between an externally supplied terminal number and a given terminal type. Thirty-two different assignments can be made, allowing up to thirty-two different terminal types to run the system at any given time.
This means that up to 32 different terminal types may coexist on a system at one time. If more than one terminal is of the same type, then a correspondingly higher number can be handled by the system. In practice, the number of terminals will not depend on SU01 - Terminal and Printer Setup, but on a combination of the operating system and computer the system is running on. The figure will therefore vary from 1 to over 100.
Enter [2] to select this option.
The following displays;
ASSIGN TERMINAL TYPES TO TERMINAL NUMBERS : 12 characters.
SYSTEM UTILITIES - TERMINAL AND PRINTER SETUP SU01 11/102ASSIGN TERMINAL TYPES TO TERMINAL NUMBERS: NUMBER TYPE NUMBER TYPE 00 [PC-XT ] 16 [ESPRIT 925 ] 01 [WYSE 50 ] 17 [HP 2392A ] 02 [WYSE 75 ] 18 [DG 461 ] 03 [VT100 ] 19 [NCR 4920 ] 04 [HP-150 ] 20 [ ] 05 [ANSI ] 21 [ ] 06 [VIEWPOINT ] 22 [ ] 07 [TVI910 ] 23 [ ] 08 [FREEDOM ONE ] 24 [ ] 09 [IBM 3161 ] 25 [ ] 10 [WYSE 60 ] 26 [ ] 11 [VT52 ] 27 [ ] 12 [ICL 6402 ] 28 [ ] 13 [SIEM 97801 ] 29 [ ] 14 [LINK 125 ] 30 [ ] 15 [TI 940 ] 31 [DUMB ]F3 - ACCEPT, F4 - COPY PREVIOUS FIELD, F10 - OPTION MENU, ESC - EXIT
The terminal type selected for a given terminal number must have already been defined (see set terminal capabilities). The terminal number, the type is assigned to, will be the terminal number the system is called with (see adding a new terminal type to the system). A given terminal type may be assigned to more than one terminal number.
If you press [F4] a time saving copy facility exists which repeats the field above and allows you to make a minor alteration.
The assignment number must correspond to the switch settings associated with each terminal in the 'titan' script. See "ADDING NEW TERMINAL TYPE" at the end of this section.
SU - Set-up and Run JULY 2006 2- 69

[3] - SET PRINTER CAPABILITIES
The "Set Printer Capabilities" option allows the characteristics of any given printer to be specifically designed for that printer.
The system is supplied with various printer types already described.
Enter [3], to select this option.
ENTER THE UNIQUE NAMEFOR THIS PRINTER TYPE : 12 characters.
Enter the unique name for this printer or scan to find a printer already on file.
SYSTEM UTILITIES - TERMINAL AND PRINTER SETUP SU01 11/001 ENTER THE UNIQUE NAME FOR THIS PRINTER TYPE: [C-310/15X 8"] C-310/15X 8" OKI 294S 11" CI 300 OKI 294S 12" CI-3500 OKI 294S 8.5 DUMMY OKI 93 FX-100+ SPG-8010 LASER SPG-8020 M-1550 SPG-8050 MT 85/86 11" SPG-8070 MT 85/86 8" TI 810 NEC P5 TI 810LQ OKI 182S 11" OKI 182S 8" OKI 192+ OKI 193 OKI 193 I F10 - OPTION MENU, ESC - EXIT
The escape sequences for various functions are displayed in hexadecimal format. The correct escape sequence can be determined from the manual for the printer type being set up.
While entering hexadecimal values, only the characters "0" to "9", "A" to "F" and "a" to "f" are accepted. If any other characters are entered on the line, an error message will be displayed.
Fill the rest of the escape sequence field with zeros. This pads the field with zeros which will be ignored by the printers.
If an escape sequence for a given function is not available, then enter all zeros on the line. This will inform the system that this particular function is not available.
2 - 70 JULY 2006 System Utilities - User guide

This function will not then be offered by the print programs at the time of setting the print mode, font or density.
SYSTEM UTILITIES - TERMINAL AND PRINTER SETUP SU01 11/002 SET PRINTER PARAMETERS FOR THE C-310/15X 8" ENTER ESCAPE SEQUENCES TO: Set Compressed Print [1B0F000000000000]....Compressed cont. [0000000000000000]Set Standard Print [1200000000000000]Set Expanded Print [0000000000000000]Set Letter-Quality Font [1B78010000000000]Set Draft-Quality Font [1B78000000000000]Set 6 Lines / Inch [1B321B4330000000]Set 8 Lines / Inch [1B301B4340000000]Set Job Control e.g. Reset [0000000000000000]....Job control cont. [0000000000000000] F1-NEXT, F3-ACCEPT, F8-DELETE, F10-OPTIONS, ESC-EXIT
A number of printers specify page length in terms of the number of lines which in turn depends on the number of lines per inch.1. Use the printer name to indicate page length e.g. OKI2945 11".2. Specify the SET 6 lines/inch to include the escape sequences for 6 lines/inch and the escape sequence to specify the number of lines/page.3. Repeat (2) for SET 8 lines/inch.
Press [F1] to display the next screen.
ENTER FONT ESCAPE SEQUENCES FOR : 32 characters
This allows you to enter hexadecimal escape sequences for different fonts for each of your printers. You will find these escape sequences in your printer manual.
SU - Set-up and Run JULY 2006 2- 71

You may enter these sequences here, as shown below, or else you may enter up to six different font types and descriptions in SU31 Description File maintenance, type ‘FN’. If you do that, you need only enter the 4 character font code and the hexadecimal characters will be read from the DESCRIP file and displayed here.
SYSTEM UTILITIES - TERMINAL AND PRINTER SETUP SU01 11/002 SET PRINTER PARAMETERS FOR THE OKI 520 IBM ENTER FONT ESCAPE SEQUENCES FOR: 01 [ ] [1B104108313030353130303000000000] 02 [ ] [1B104108313030363130303000000000] 03 [ ] [00000000000000000000000000000000] 04 [ ] [00000000000000000000000000000000] 05 [ ] [00000000000000000000000000000000] 06 [ ] [00000000000000000000000000000000] F2 - PREVIOUS, F3 - SAVE, F8 - DELETE, F10 - OPTION MENU, ESC - EXIT
These fonts may be used in both RW30 - Report Maintenance and SU35 - Customised Form Maintenance. It allows you to print report and document lines in different fonts. Please refer to the relevant user guides for more information regarding this feature.
If you print one of these reports or forms from SU60 - Report Management System, you may change the printer and the system will ensure that the correct fonts are used by reading the details from this record.
2 - 72 JULY 2006 System Utilities - User guide

[4] - SET PRINTER ASSIGNMENTS
The "Set Printer Assignments" option allows not only up to 3 different printers to be specified but additional parameters, such as the default mode, font and print density for that printer.
Enter the printer number to be set up. The system allows up to 99 different printers on the system at the same time, but the operating system may only allow one. Always use printer 1 if in doubt.
SET UP PARAMETERS FOR PRINTER : 2 digits.
Enter the printer number for which parameters are to be specified.
SYSTEM UTILITIES - TERMINAL AND PRINTER SETUP SU01 11/001 SET UP PARAMETERS FOR PRINTER: [01] PRINTER TYPE: [OKI 294S 11"] PRINTER SYNONYM: [PRINTER ] DESCRIPTION: [Our very first prt ] ENTER THE PARAMETERS: ENTER THE SYSTEM DEFAULTS: Skip Pages Before Print [0] Print Mode [C] Compressed Skip Pages After Print [1] Standard Skip Lines at Top of Page [00] Expanded Skip Lines at End of Page [00] Lines/Page [66] Print Font [D] Draft Quality Characters/Line [132] Letter Quality Print Density [6] 6 Lines/Inch 8 Lines/Inch Is this a Dedicated Printer? [N] Should a Banner Page Be Printed? [N] Enable this printer? [Y] Printer Form? [ALL ]
F3 - ACCEPT, F8 - DELETE, F10 - OPTION MENU, ESC - EXIT
Set the relevant parameters;
PRINTER TYPE : 12 characters.This is the unique name for the printer in use, and must already have been defined under "Set Printer Capabilities".
SU - Set-up and Run JULY 2006 2- 73

SYSTEM UTILITIES - TERMINAL AND PRINTER SETUP SU01 11/001 SET UP PARAMETERS FOR PRINTER: [01] PRINTER TYPE: [OKI 294S 11"] PRINTER SYNONYM: [PRINTER ] DESCRIPTION: [Our very first prt ] ENTER THE PARAMETERS: ENTER THE SYSTEM DEFAULTS: Skip Pages Before Print [0] Print Mode [C] Compressed Skip Pages After Print [1] Standard Skip Lines at Top of Page [00] Expanded Skip Lines at End of Page [00] Lines/Page [66] Print Font [D] Draft Quality Characters/Line [132] Letter Quality Print Density [6] 6 Lines/Inch 8 Lines/Inch Is this a Dedicated Printer? [N] Should a Banner Page Be Printed? [N] Enable this printer? [Y] Printer Form? [ALL ] F3 - ACCEPT, F8 - DELETE, F10 - OPTION MENU, ESC - EXIT
PRINTER SYNONYM : 8 characters.The Cobol runtime is supplied with one or more "synonyms" which tell it where to send the print output to. The field on this screen must have a name which matches one of these synonyms.All runtimes should recognise the synonym "PRINTER". However, if the installation has more than one printer and the synonym "PRINTER" is used giving file errors when printing from SU60 - Report Management System, please contact the Dealer or Distributor.
DESCRIPTION : 20 characters.Enter the description for this printer, such as `SYSTEM PRINTER' or `Remittance Adv.'.
Now enter the following printer parameters;
SKIP PAGES BEFORE PRINT : 1 digit.
Zero or non-zeroWhen using SU60 - Report Management System, and a report is printed, a zero in this field will have no effect on paging, and printing will commence immediately. If the field is non-zero, a top-of-form will be performed before printing commences.
2 - 74 JULY 2006 System Utilities - User guide

SKIP PAGES AFTER PRINT : 1 digit.Zero or non-zeroWhen using SU60 - Report Management System, and a report is printed, a zero in this field will have no effect on paging, and printing will commence immediately. If the field is non-zero, a top-of-form will be performed before printing commences.
SKIP LINES AT TOP OF PAGE : 2 digits
This field is not used.
SKIP LINES AT END OF PAGE : 2 digits
Enter the number of lines you wish to skip at the end of every page.
LINES/PAGE : 2 digitsEnter the number of lines per page that your printer is set for.
The number of lines printed on reports is calculated as Lines per Page - Skip lines at end of page - 2.
CHARACTERS/LINE : 3 digitsEnter the number of characters your printer can print per line.
The next fields to be entered are the system default fields, which will be used by the print programs unless the values are deliberately changed.
Only those options for which there are non-null entries (see "Set Printer Capabilities") will be offered here.
PRINT MODE : C/S/EC - Compressed modeS - Standard modeE - Expanded mode
PRINT FONT : D/LD - Draft QualityL - Letter Quality
PRINT DENSITY : 6/86 - 6 Lines per inch8 - 8 Lines per inch
SU - Set-up and Run JULY 2006 2- 75

IS THIS A DEDICATED PRINTER? : Y/N
Enter a [Y] if the printer is to be dedicated to a specific terminal port.
The device directory must also be entered in SU30 - Installation Maintenance option 1. The printer synonym must be the name of the device (port) to which the relevant terminal (and thus the printer) is attached.
For example, device directory "/dev/"
printer synonym "ttyla"
also the dedicated printer must NOT be a defined XENIX/UNIX printer (it should not appear when using the lpstat command.
To find the correct printer synonym, use your hot key to get to the operating system and then enter 'who am i'.
See "ADDING NEW PRINTER TYPE" at the end of this section.
SHOULD A BANNER PAGE BE PRINTED? : Y/N.
If [N] then no banner is printed. If [Y] then enter the name of a text file, in the directory, which is to be printed.
The order of printing in SU60 - Report Management System is; skip page before banner printing and skip page after printing. The banner is only printed by SU60 - Report Management System.
If the banner file is given as "USERNAME" then the banner file printed will have the same name as the users' login name (if logged in as "SYSADMIN" then the file "SYSADMIN" will be printed).
ENABLE THIS PRINTER ? : Y/N.If [N] then no printing can be done on this printer. A message will be displayed when attempting to do so.
PRINTER FORM ? : 6 characters.If this printer is to be used exclusively for the printing of a specific form such as invoices or statements, enter the form type here. Refer to program SU35 - Customised Form Maintenance in the maintenance section of this User Guide for a list of all form types. If the printer is for general use, enter ALL.
2 - 76 JULY 2006 System Utilities - User guide

[5] - SET SYSTEM COMMANDS
The "Set System Commands" option interfaces to the external operating system commands which may be used when backing up data files to disk, flexible disks or to streaming tape to be specified. These commands may be used to call any operating scripts or commands such as backup/restore commands.
If you use the Point-of-Sale features in the Sales Order Processing System, you will also enter the command to open your cash drawer here.
You may enter up to 15 commands. These commands will then be available on a menu in SU90 - Operating System Utilities.
Enter the commands into the two separate command-line strings; one for floppy disk, and the other for entering tape commands. The program which actually uses these strings is SU90 - Operating System Utilities.
SYSTEM UTILITIES - TERMINAL AND PRINTER SETUP SU01 11/001 SET UP COMMAND-LINE STRINGS: COMMAND DESCRIPTION NO 04 [Send a Message ] COMMAND LINE STRING NO 04 [sendmsg ] The Command Line is Operating-System Dependent
F3 - ACCEPT, F10 - OPTION MENU, ESC - EXIT
Enter these strings either as the actual commands to be executed, for example
cpio -ovb "*" > /dev/rtp
or as the name of a shell-script or job-control file holding the actual command. The second method is recommended as proper checks can be made to ensure the backup proceeds smoothly and correctly.
If you wish to go to the Unix command level enter sh as your string and for the DOS command level, enter command.com
SU - Set-up and Run JULY 2006 2- 77

ADDING A NEW TERMINAL TYPE
Proceed as follows for UNIX systems;STEP ACTION1. Have the terminal User or Technical manual available.2. Physically attach the terminal to a terminal port on the computer. Set the
terminal up so that it functions normally as a terminal using the editor etc. Set up a termcap file for it, decide on function key string values, etc.
3. Edit the "titan" shell script file in the titan directory, study the script and become familiar with its basic operation. The actual command to run the system is;
runcbl UT00 -k -s 00000001where....runcbl = Cobol RuntimeUT00 = Menu program/Driver
-k = Status Information Suppression
-s = Switch Settings Follow00000001 = Switch Settings
The left-hand digit is bit 8The right-hand digit is bit 1Bit 8 has this function:
0 Force automatic file backup on a daily basis
1 Do not force automatic backupBits 6 and 7 have the function:
00 single directory system - DOS version01 multi-directory UNIX10 multi-directory DOS
Bits 0 to 5 together form a Binary Terminal Number, such thatTerminal Number = 16* Bit 5 + 8* Bit 4 + 4* Bit 3 + 2* Bit 2 + Bit 1
where Bits 1 to 5 are either "0" or "1", for example;00000 PC XT console00001 Wy5000010 Wy7500011 Vt100 etc.
Hence Wy50 on a UNIX multi-directory system with no forced backup, gives a setting of 10100001.
4. Choose an unused terminal number.If in doubt, use 30 (00011110) or perform steps 5,6,7,8,9,10 and 11 to see which terminal numbers are available, and to define the terminal type, and then return to step 4 again.Add an entry for this terminal number, using the termcap name and corresponding switch setting for this terminal, into the `titan' shell script.
5. Run the system and the message "TERMINAL - TYPE - NOT FOUND" will be displayed. If this happens follow the procedure for setting up a new terminal type
Program SU01 - Terminal and Printer Setup will be run automatically. Now be careful
2 - 78 JULY 2006 System Utilities - User guide

STEP ACTIONand precise;6. Press 1 to set terminal capabilities.7. DO NOT PRESS ANY FUNCTION KEYS.
Enter a unique name for this terminal Press [Enter].The message "NO SPECIFICATION FOR THIS TERMINAL EXISTS" will be displayed. Enter [2] to create a new specification.
8. Carefully press each indicated key once.9. Using the terminal manual as a guide, enter escape sequences and
graphics character values for as many functions as the terminal supports.If the terminal does not support graphics characters, leave the "Enter/Exit Graphics Mode" strings as all zeros, and enter ordinary printable character values as graphics characters (could be used as the "Solid Block"). Press [F3] to update.
10. Press "2 - Set Terminal Assignments". Place the cursor at the start of the field next to the terminal number selected in step 4. Enter the terminal name selected in step 7. Press [F3] to update.
11. Press [Esc] to exit. Again the message "TERMINAL-TYPE - NOT FOUND" is displayed.Enter [E] to exit and return to the operating system.
12. Run the system again. Press [Enter].The system may or may not force a backup, depending on whether Bit 8 of the switch settings is set or not (see step 3) and when the system was last backed up. If necessary, perform backup.
SU - Set-up and Run JULY 2006 2- 79

ADDING A NEW PRINTER TYPE.
Proceed as follows for UNIX & Xenix systems;
STEP ACTION1. Have the printer User or Technical manual available.2. Physically attach the printer to the logical printer port "1", "2" or "3" of the
computer. Set the printer up so that it prints an ordinary text file from the operating system's command line.
3. Run the system and select SU01 - Terminal and Printer Setup. Select Option [3] - Set Printer Capabilities. Enter a unique name for this printer type.
4. Using the manual as a guide, enter the escape sequence strings (in hexadecimal) for each of the printer functions listed on the screen. If the printer does not support a particular function, leave the field filled with zeros. Press [F3] to update.
5. Select Option [4] - Set Printer Assignments. Enter the logical printer number selected in step 2.Enter the same printer name as that entered in step 3. Select the default mode, font and density, as appropriate for this printer. Press [F3] to update. Press [Esc] to exit.
6. Using a print program, check that each of the mode, font and density options set in step 4 actually works for this printer.
RECOMMENDATION - Assign the highest speed system printer as "PRINTER 1", reserving "PRINTER 2" and "PRINTER 3" for special printing devices (letter quality, laser and plotters etc.)
2 - 80 JULY 2006 System Utilities - User guide

2.5. OPERATING SYSTEM UTILITIES - SU90
This program gives access to the operating system. It should be password protected and the various operating system commands are set up in SU01 - Terminal and Printer Setup.
SYSTEM UTILITIES - OPERATING SYSTEM UTILITIES SU90 11/001
SELECT OPTION [00] 1 - BACKUP DATA FILES 2 - RESTORE DATA FILES 3 - Send a Message 4 - Clear a Message 5 - Display Process Status 6 - Show Compile Queue 7 - Display Compile Log 8 - Use Unix Editor Vo 9 - Submit a Compile 10 - Cancel Current or Next Print on Printer 11 - informix - client data base 12 - examine/alter data file performance strategy 13 - RECOVER DATA FILES 14 - Unix Command Level
ESC - EXIT
SELECT OPTION : [00] 1 - 15 available for use.
Press [Esc] to exit.
SU - Set-up and Run JULY 2006 2- 81

3. ON-LINE HELP MODULE
3.1. THE ON-LINE HELP MODULE MENU
This module consists of the following programs;
SU10 - LOAD SUPPLIED HELP (ASCII)
SU11 - COPY SUPPLIED OR USER HELP
SU12 - USER HELP LINK MAINTENANCE
SU13 - DELETE SUPPLIED OR USER HELP
SU14 - RENAME HELP VARIABLE NAMES
These programs enquire into and allow the System Utilities data to be viewed.
Enter SU1 to display the menu.
Enter SU to return to the System Utilities menu or M, to return to the main menu.
3 - 82 JULY 2006 Systems Utilities - User Guide

3.2. LOAD SUPPLIED HELP (ASCII) - SU10
This program is used by the distributor to load the ASCII versions of the User Guides into the system in order to provide on-line Help facilities.
Enter SU10 to select the program.
Level 1
SYSTEM UTILITIES - LOAD SUPPLIED HELP (ASCII) SU10 11/001
SYSTEM TO LOAD [AB] SYSTEM HELP SYSTEM NAME HELP STATUS DATE TIME PAGES INDEX AB <--> APPLICATION BUILDER LOADED 890901 082758 0173 0167 AP ACCOUNTS PAYABLE LOADED 890707 121735 0215 0205 AR ACCOUNTS RECEIVABLE LOADED 890706 175026 0215 0205 ES ESTIMATING LOADED 891127 121654 0126 0123 FA FIXED ASSETS LOADED 891129 114758 0110 0108 GL GENERAL LEDGER LOADED 891128 173159 0201 0173 IV INVENTORY LOADED 891211 145649 0198 0191 PO PURCHASE ORDERS LOADED 890707 123540 0201 0191 RW REPORT WRITER LOADED 891207 153948 0126 0123 SP SALES ORDER PROCESSI LOADED 891129 102925 0169 0165 SU SYSTEMS UTILITIES LOADED 891201 154114 0208 0203 UT SYSTEM OVERVIEW LOADED 890713 123926 0053 0050
*** NO MORE ITEMS *** F1 - SCAN FORWARD, F3 - LOAD, ESC - EXIT
SYSTEM TO LOAD : 2 characters.Enter the 2 characters representing the system to be loaded. For example `AB' for Application Builder and `AP' for Accounts Payable.
The system will automatically append `.HLP' to the 2 characters entered and will attempt to open the ASCII file, for example `AB.HLP'.
SU - Online Help JULY 2006 3 - 83

SYSTEM UTILITIES - LOAD SUPPLIED HELP (ASCII) SU10 11/001 SYSTEM TO LOAD [AP] SYSTEM HELP SYSTEM NAME HELP STATUS DATE TIME PAGES INDEX AB APPLICATION BUILDER LOADED 890901 082758 0173 0167 AP <--> ACCOUNTS PAYABLE LOADED 890707 121735 0215 0205 AR ACCOUNTS RECEIVABLE LOADED 890706 175026 0215 0205 ES ESTIMATING LOADED 891127 121654 0126 0123 FA FIXED ASSETS LOADED 891129 114758 0110 0108 GL GENERAL LEDGER LOADED 891128 173159 0201 0173 IV INVENTORY LOADED 891211 145649 0198 0191 PO PURCHASE ORDERS LOADED 890707 123540 0201 0191 RW REPORT WRITER LOADED 891207 153948 0126 0123 SP SALES ORDER PROCESSI LOADED 891129 102925 0169 0165 SU SYSTEMS UTILITIES LOADED 891201 154114 0208 0203 UT SYSTEM OVERVIEW LOADED 890713 123926 0053 0050 NOTE: All current supplied help will be deleted before the new help will be loaded. OK TO CONTINUE? (Y/N) [N]
F3 - LOAD, ESC - EXIT
HELP SYSTEM NAME : 2 characters.You are prompted for a Help system name. If this is the same as the combination of the system name and `.HLP', (for example AR.HLP) then press [Enter], otherwise enter the name of the appropriate ASCII file.
If no such file is found an appropriate message will display. Before the new Help is loaded, a message 'All current supplied Help will be deleted before the new Help will be loaded' is displayed. This only applies to the CURRENT system being loaded, all other systems will remain unchanged.
OK TO CONTINUE? (Y/N) : Y/N.Accept the default or make the required changes.
After the Help has been loaded, the program will attempt to re-link page and line numbers to the existing variable names (prompts), thus ensuring that each prompt will point to the correct page and line in the manual. Any new prompts added to the manual will have to be linked manually, after which it will be maintained automatically from then on. It could happen that an existing prompt no longer appears in the manual, in this case the link can no longer be maintained, and thus the program will link such unmatched prompts to point to the INDEX page.
Once the system has been loaded and the prompts linked, it should be copied to the Help work file HELPFILB, by using program SU11 - Copy Supplied or User Help. This file may the be sent to users to copy into the HELPFILE, also using program SU11.
3 - 84 JULY 2006 Systems Utilities - User Guide

3.3. COPY SUPPLIED OR USER HELP - SU11
This program is used to copy any Help (supplied or user Help) from the HELPFILE to the HELPFILB or vice versa. This facility is used to transfer portions of the HELPFILE easily to new sites.
Enter SU11 to select the program.
SYSTEM UTILITIES - COPY SUPPLIED OR USER HELP SU11 11/001 SELECT OPTION [1] 1 - Copy records from HELPFILB (work file) to HELPFILE 2 - Copy records to HELPFILB (work file) from HELPFILE 3 - Clear HELPFILB (work file) SELECT TYPE [S] S - Supplied Help U - User Help
ESC - EXIT
Level 1
SELECT OPTION : [1] Copy records from HELPFILB (work file) to HELPFILE.
[2] Copy records to HELPFILB (work file) from HELPFILE.
[3] Clear HELPFILB (work file)
SELECT TYPE : [S] Supplied Help[U] User help
SU - Online Help JULY 2006 3 - 85

If Option 1 and Supplied Help was selected, the following screen is displayed;
SYSTEM UTILITIES - COPY SUPPLIED OR USER HELP SU11 11/001 COPY RECORDS FROM HELP WORK FILE (HELPFILB) SYSTEM NAME [AP ] ALL = ALL SYSTEMS FG# SYSTEM DESCRIPTION HELP STATUS DATE TIME AP <--> ACCOUNTS PAYABLE LOADED 890707 121735
ADDING VARIABLES - AP CONTACT NAME
SYSTEM NAME : 6 characters.Press [F1] to scan all the systems loaded into the HELPFILB (workfile). Move the cursor to the required systems and press [F5] to flag these systems. Once all systems have been flagged, press [F3] to copy these systems from the work file (HELPFILB) to HELPFILE.
COPY SYSTEMS? (Y/N) : Y/NEnter [Y] to initiate the copy, or [N] to return to the `SYSTEM NAME' prompt.
While processing the system displays `ADDING HELP LINES'. On completion the program returns to the options screen.
3 - 86 JULY 2006 Systems Utilities - User Guide

If Option 1 and User Help was selected, the following screen is displayed;
SYSTEM UTILITIES - COPY SUPPLIED OR USER HELP SU11 11/001 COPY RECORDS FROM HELP WORK FILE (HELPFILB) PROGRAM NAME [AP10 ] ALL = ALL PROGRAMS FG# PROGRAM DESCRIPTION AP10 <--> INVOICE/CREDIT NOTE INPUT AP11 MANUAL PAYMENT/DISCOUNT INPUT AP30 VENDOR FILE MAINTENANCE
ADDING HELP LINES - AP10
PROGRAM : 6 characters.Press [F1] to scan all the programs for which you designed your own Help screens. Move the cursor to the required programs and press [F5] to flag these programs. Once all programs have been flagged, press [F3] to copy these programs from the work file (HELPFILB) to HELPFILE.
COPY PROGRAMS? (Y/N) : Y/NEnter [Y] to initiate the copy, or [N] to return to the `PROGRAM NAME' prompt.
While processing the system displays `ADDING HELP LINES'. On completion the program returns to the options screen.
SU - Online Help JULY 2006 3 - 87

If Option 2 and Supplied Help was selected, the following screen is displayed;
SYSTEM UTILITIES - COPY SUPPLIED OR USER HELP SU11 11/001 COPY RECORDS TO HELP WORK FILE (HELPFILB) SYSTEM NAME [AB ] ALL = ALL SYSTEMS FG# SYSTEM DESCRIPTION HELP STATUS DATE TIME AB <--> APPLICATION BUILDER LOADED 890901 082758 AP ACCOUNTS PAYABLE LOADED 890707 121735 AR ACCOUNTS RECEIVABLE LOADED 890706 175026 ES ESTIMATING LOADED 891127 121654 FA FIXED ASSETS LOADED 891129 114758 GL GENERAL LEDGER LOADED 891128 173159 IV INVENTORY LOADED 891211 145649 PO PURCHASE ORDERS LOADED 890707 123540 RW REPORT WRITER LOADED 891207 153948 SP SALES ORDER PROCESSI LOADED 891129 102925 SU SYSTEMS UTILITIES LOADED 891201 154114 UT SYSTEM OVERVIEW LOADED 890713 123926 *** NO MORE ITEMS ***
F1 - SCAN, F3 - COPY SYSTEMS, F5 - FLAG SYSTEM, F10 - OPTIONS, ESC - EXIT
SYSTEM NAME : 6 characters.Press [F1] to scan all the systems loaded into the HELPFILE. Move the cursor to the required systems and press [F5] to flag these systems. Once all systems have been flagged, press [F3] to copy these systems to the work file (HELPFILB).
COPY SYSTEMS? (Y/N) : Y/NEnter [Y] to initiate the copy, or [N] to return to the `SYSTEM NAME' prompt.
While processing the system displays `ADDING HELP LINES'. On completion the program returns to the options screen.
3 - 88 JULY 2006 Systems Utilities - User Guide

If Option 2 and User Help was selected, the following screen is displayed;
SYSTEM UTILITIES - COPY SUPPLIED OR USER HELP SU11 11/001 COPY RECORDS TO HELP WORK FILE (HELPFILB) PROGRAM NAME [AB25 ] ALL = ALL PROGRAMS FG# PROGRAM DESCRIPTION 001 AB25 <--> DICTIONARY FILE MAINTENANCE AB26 DICTIONARY FIELD MAINTENANCE AB30 PROGRAM GENERATOR AB32 MENU GENERATOR AB40 MAIN MENU AB42 RUN A PROGRAM AP10 INVOICE/CREDIT NOTE INPUT AP11 MANUAL PAYMENT/DISCOUNT INPUT AP30 VENDOR FILE MAINTENANCE AR00 SYSTEM RECORD MAINTENANCE AR10 INVOICE/CREDIT NOTE INPUT AR11 PAYMENT INPUT AR12 UNALLOCATED PAYMENT ALLOCATION AR13 UNALLOCATED PAYMENT WORKSHEET AR14 JOURNAL ENTRY INPUT AR15 INVOICE/CREDIT NOTE TAKE-ON ADDING VARIABLES - AB25 DESCRIPTION
PROGRAM : 6 characters.Press [F1] to scan all the programs for which you designed his own Help screens. Move the cursor to the required programs and press [F5] to flag these programs. Once all programs have been flagged, press [F3] to copy these programs to the work file (HELPFILB).
COPY PROGRAMS? (Y/N) : Y/NEnter [Y] to initiate the copy, or [N] to return to the `PROGRAM NAME' prompt.
While processing the system displays `ADDING HELP LINES'. On completion the program returns to the options screen.
SU - Online Help JULY 2006 3 - 89

If Option 3 is selected, all information will be removed from the workfile. The following will display;
SYSTEM UTILITIES - COPY SUPPLIED OR USER HELP SU11 11/001
SELECT OPTION [3] 1 - Copy records from HELPFILB (work file) to HELPFILE 2 - Copy records to HELPFILB (work file) from HELPFILE 3 - Clear HELPFILB (work file) SELECT TYPE [U] S - Supplied Help U - User Help
ARE YOU SURE (Y/N) [Y]
F10 - OPTIONS, ESC - EXIT
ARE YOU SURE? (Y/N) : Y/NEnter [Y] to clear the workfile or [N] to select another option.
While processing the system displays `BUSY CLEARING HELPFILB..'. On completion the operator must press [Enter] for the program to return to the options screen.
3 - 90 JULY 2006 Systems Utilities - User Guide

3.4. USER HELP LINK MAINTENANCE - SU12
The program creates a linked User Help between various programs. This would be done where the Help for two or more programs is the same. Numerous programs may all be linked to one individual program. For example, AR10 may be the link program for AR11, AR12 and AR13. However you may not link a program to another which is itself part of a group. For instance in the above example you would be warned that you may not link AR15 to AR11 as it is already part of that group.
Enter SU12 to select the program.
SYSTEM UTILITIES - USER HELP LINK MAINTENANCE SU12 11/001 PROGRAM NAME AR10 LINK PROGRAM NAME [AR15 ]
F3 - UPDATE, F8 - DELETE, F10 - NEXT PROGRAM, ESC - EXIT
PROGRAM NAME : 6 characters.Enter the program name which is to be linked or press [F1] to view the linked programs.
LINK PROGRAM NAME : 6 characters.Enter the program name to which the previously entered program is to be linked.
The status line displays the available options. Press [F3] to update, [F8] to delete a link, [F10] to return to the `PROGRAM NAME' field and [Esc] to exit the program.
SU - Online Help JULY 2006 3 - 91

3.5. DELETE SUPPLIED OR USER HELP - SU13
This program is supplied to provide the end user of TITAN with the simple means of deleting selected systems and programs from Supplied or User Help and/or deleting selected prompts.
Enter SU13 to select the program.
The following options screen is displayed;
SYSTEM UTILITIES - DELETE SUPPLIED OR USER HELP SU13 11/001 SELECT OPTION [1] 1 - Delete selected Supplied Help 2 - Delete selected User Help 3 - Delete selected Variables/Prompts
ESC - EXIT
SELECT OPTION : [1] Delete selected Supplied Help[2] Delete selected User Help[3] Delete selected Variable/Prompts
Enter the required function.
3 - 92 JULY 2006 Systems Utilities - User Guide

If Option 1 was selected, the following screen is displayed;
SYSTEM UTILITIES - DELETE SUPPLIED OR USER HELP SU13 11/001 DELETE SELECTED SUPPLIED HELP SYSTEM NAME [AB ] ALL = ALL SYSTEMS FG# SYSTEM DESCRIPTION HELP STATUS DATE TIME 001 AB <--> APPLICATION BUILDER LOADED 890901 082758 AP ACCOUNTS PAYABLE LOADED 890707 121735 AR ACCOUNTS RECEIVABLE LOADED 890706 175026 ES ESTIMATING LOADED 891127 121654 FA FIXED ASSETS LOADED 891129 114758 GL GENERAL LEDGER LOADED 891128 173159 IV INVENTORY LOADED 891211 145649 PO PURCHASE ORDERS LOADED 890707 123540 RW REPORT WRITER LOADED 891207 153948 SP SALES ORDER PROCESSI LOADED 891129 102925 SU SYSTEMS UTILITIES LOADED 891201 154114 UT SYSTEM OVERVIEW LOADED 890713 123926 DELETE SYSTEMS? (Y/N) [N] F10 - OPTIONS, ESC - EXIT
SYSTEM NAME : 6 characters.Press [F1] to scan all the systems loaded into the HELPFILE. Move the cursor to the required systems and press [F5] to flag these systems. Once all systems have been flagged, press [F8] to delete these systems from the HELPFILE.
DELETE SYSTEMS? (Y/N) : Y/NEnter [Y] to initiate the deletion, or [N] to return to the `SYSTEM NAME' prompt.
While processing the system displays `DELETING HELP LINES'. On completion the program returns to the options screen.
SU - Online Help JULY 2006 3 - 93

If Option 2 was selected, the following screen is displayed;
SYSTEM UTILITIES - DELETE SUPPLIED OR USER HELP SU13 11/001 DELETE SELECTED USER HELP PROGRAM NAME [AB25 ] ALL = ALL PROGRAMS FG# PROGRAM DESCRIPTION 001 AB25 <--> DICTIONARY FILE MAINTENANCE AB26 DICTIONARY FIELD MAINTENANCE AB30 PROGRAM GENERATOR AB32 MENU GENERATOR AB40 MAIN MENU AB42 RUN A PROGRAM AP10 INVOICE/CREDIT NOTE INPUT AP11 MANUAL PAYMENT/DISCOUNT INPUT AP30 VENDOR FILE MAINTENANCE AR00 SYSTEM RECORD MAINTENANCE AR10 INVOICE/CREDIT NOTE INPUT AR11 PAYMENT INPUT AR12 UNALLOCATED PAYMENT ALLOCATION AR13 UNALLOCATED PAYMENT WORKSHEET AR14 JOURNAL ENTRY INPUT AR15 INVOICE/CREDIT NOTE TAKE-ON DELETE PROGRAMS? (Y/N) [N] F10 - OPTIONS, ESC - EXIT
PROGRAM NAME : 6 characters.Press [F1] to scan all the programs loaded into the HELPFILE. Move the cursor to the required programs and press [F5] to flag these programs. Once all programs have been flagged, press [F8] to delete these programs from the HELPFILE.
DELETE PROGRAMS? (Y/N) : Y/N
Enter [Y] to initiate the deletion, or [N] to return to the `PROGRAM NAME' prompt.
While processing the system displays `DELETING HELP LINES'. On completion the program returns to the options screen.
3 - 94 JULY 2006 Systems Utilities - User Guide

If Option 3 was selected, the following screen is displayed;
SYSTEM UTILITIES - DELETE SUPPLIED OR USER HELP SU13 11/001 DELETE SELECTED VARIABLES/PROMPTS PROG VARIABLE ID VARIABLE NAME [AB25 ABDICT-FILE-DESCRIPTION ] ALL = ALL VARIABLES FG# VARIABLE DESCRIPTION 001 AB25 ABDICT-FILE-DESCRIPTION <--> DESCRIPTION AB25 ABDICT-FILE-SECURITY-LEVEL SECURITY LEVEL AB25 ABDICT-FILE-TYPE FILE TYPE AB25 INKEY FILE NAME AB25 WS-CONTINUE AB25 AB25 WS-MAST-FILE MASTER FILE AB25 WS-PRESS-Q PRESS Q TO QUIT VIEW AB25 WS-VIEW-IND AB25 AB26 ABDIC2-DEFAULT-IND WHEN TO DEFAULT AB26 ABDIC2-DEFAULT-TYPE DEFAULT TYPE AB26 ABDIC2-VALIDATE-FAIL FAIL ACTION AB26 ABDIC2-VALIDATE-MATCH VALIDATE MATCH AB26 ABDIC2-VALIDATE-MESSAGE FAIL MESSAGE AB26 ABDIC2-VALIDATE-TYPE VALIDATE TYPE AB26 ABDICT-FIELD-DATE-FORMAT DATE FORMAT AB26 ABDICT-FIELD-DECIMALS DECIMALS DELETE VARIABLES? (Y/N) [N] F10 - OPTIONS, ESC - EXIT
VARIABLE NAME : 38 characters.Press [F1] to scan all the programs/variables loaded into the HELPFILE. Move the cursor to the required programs/variables and press [F5] to flag these programs/variables. Once all programs/variables have been flagged, press [F8] to delete these programs/variables from the HELPFILE.
DELETE VARIABLES? (Y/N) : Y/N
Enter [Y] to initiate the deletion, or [N] to return to the `VARIABLE NAME' prompt.
While processing the system displays `DELETING HELP LINES'. On completion the program returns to the options screen.
SU - Online Help JULY 2006 3 - 95

3.6. RENAME HELP VARIABLE NAMES - SU14
This program is supplied to provide the end user of TITAN with the simple means of changing variable names. These names are often difficult to interpret as they are used in the programs. For example `customer account number' may be called `SL-ACC' and this may be changed to be easily understood.
Enter SU14 to select the program.
SYSTEM UTILITIES - RENAME HELP VARIABLE NAMES SU14 11/001 PROG VARIABLE ID VARIABLE NAME [AB25 ABDICT-FILE-DESCRIPTION ] NEW NAME [ABDICT-FILE-DESCRIPTION ] VARIABLE DESCRIPTION AB25 ABDICT-FILE-DESCRIPTION <--> DESCRIPTION AB25 ABDICT-FILE-SECURITY-LEVEL SECURITY LEVEL AB25 ABDICT-FILE-TYPE FILE TYPE AB25 INKEY FILE NAME AB25 WS-CONTINUE AB25 AB25 WS-MAST-FILE MASTER FILE AB25 WS-PRESS-Q PRESS Q TO QUIT VIEW AB25 WS-VIEW-IND AB25 AB26 ABDIC2-DEFAULT-IND WHEN TO DEFAULT AB26 ABDIC2-DEFAULT-TYPE DEFAULT TYPE AB26 ABDIC2-VALIDATE-FAIL FAIL ACTION AB26 ABDIC2-VALIDATE-MATCH VALIDATE MATCH AB26 ABDIC2-VALIDATE-MESSAGE FAIL MESSAGE AB26 ABDIC2-VALIDATE-TYPE VALIDATE TYPE AB26 ABDICT-FIELD-DATE-FORMAT DATE FORMAT F3 - UPDATE, F10 - VARIABLE NAME, ESC - EXIT
VARIABLE NAME : 38 characters.Press [F1] to scan all the programs/variables loaded into the HELPFILE. Move the cursor to the required programs/variables and press [F5] to rename the variable name.
NEW NAME : 32 characters.Enter the new program/variable name.
Continue as above until all the required program/variable names have been altered.
3 - 96 JULY 2006 Systems Utilities - User Guide

4. MAINTENANCE MODULE
4.1. THE MAINTENANCE MODULE MENU
This module consists of the following programs;
SU30 INSTALLATION MAINTENANCE - Mandatory for all systemsSU31 DESCRIPTIONS FILE MAINTENANCE - Mandatory for all systemsSU32 NUMBERS FILE MAINTENANCE - Mandatory for all systemsSU33 NARRATIVE FILE MAINTENANCE - Optional
Used by the Sales Order Processing and Inventory Systems.SU35 CUSTOMISED FORM MAINTENANCE
Mandatory for all systems where user-defined forms are used, such as Accounts Receivable, Accounts Payable and Payroll systems.
SU351 CUSTOMISED TERMINOLOGYAllows you to change screen prompts and external names.
SU36 CURRENCY FILE MAINTENANCE - OptionalThis is only used by the individual systems where multi-currency features are used, such as Purchase Ordering.
SU37 FORMULA MAINTENANCE - OptionalRelates only to certain systems. Refer to the individual User Guides for more information.
SU38 SYSTEM PASSWORD MAINTENANCE - Mandatory for all systemsSU39 JOB PROCESSING - Optional
Enter SU3 from the main menu. Then select the number of the program required. The SU is already loaded.
SU - Maintenance JULY 2006 4 - 97

4.2. INSTALLATION MAINTENANCE - SU30
Enter SU30 to select the program.
The screen will now show the following options;
SELECT FUNCTION : [1] General Details.[2] Company Details.[3] Branch Details.[4] System Details.[5] Module Details.[6] Program Details.[7] Loads Details from LOADSYS.
Select the option required. Each option will be described in detail in the following pages.
Please note that options 1 - 3 must always be done for a new installation. Authority codes will be required and must be obtained from the Dealer. A special form is used to request these codes - see Appendix A at the back of this User Guide for an example.
4 - 98 JULY 2006 Systems Utilities - User Guide

OPTION 1. GENERAL INSTALLATION DETAILS
This option consists of three screens of data.
SCREEN 1.
The initial company set up data is displayed. Enter the following fields;
INSTALLATION # : 5 digits.The installation number will be supplied at the time of installation by the Distributor or Dealer. The number is unique to the installation.
INSTALLATION NAME : The installation name appears on the main menu. It is necessary to install an installation name for each computer on which Titan runs. Please consult the dealer or distributor for assistance to do this.
EXPIRY DATE : CCYYMMDDYour dealer will have this date. It will be used in conjunction with the installation name, to calculate a unique authorisation code for your installation. On or after the expiry date, the system will give the following message as you sign on.'WARNING - LICENCE DUE. PLEASE CONSULT YOUR DEALER'.The system will continue to function for a further month after this date, giving the same warning when you sign on. At any time during that period, once your licence fees have been paid, you will be given a new expiry date and authorisation code, and after these have been entered, the message will no longer display.If after a month has expired, and you have not entered the new date and code, you will not be able to use Titan. The following message will be displayed.'LICENCE EXPIRED - CONSULT YOUR DEALER'If this is a NEW installation or if the installation number, name or expiry date is being changed, then the cursor will move to the bottom of the screen and require entry of the authorisation code before proceeding.
MAXIMUM USERS : 3 digitsThis is the maximum number of users that may be working on TITAN at any one time. Your support person will know the number you selected for which to pay licence fees.
SU - Maintenance JULY 2006 4 - 99

DEFAULT COMPANY : 2 digits This will be the number of the company most often used on the system. This company number will appear in all programs as the default company and will be pre-loaded into the company number field.
SYSTEM UTILITIES - INSTALLATION MAINTENANCE SU30 11/003 INSTALLATION # [ 10]INSTALLATION NAME [TECHNOLOGIES INCORPORATED ]EXPIRY DATE [20020930] CCYYMMDDMAXIMUM USERS [999]DEFAULT COMPANY [01]BACKGROUND DISPLAY? (Y/N) [N]LOGFILE OPERATIONAL? (Y/N) [Y]LOGGING LEVEL [5]CYCLES ON RECORD LOCKING [006] LOG DATABASE NOT IN USE REPORT DEFAULTS: Destination Printer # Destinations: 1 [1] [01] 1 = Report management system 2 [1] [01] 2 = Direct to printer 3 [1] [01] 3 = Direct to a file 4 = Direct to screenNUMBER OF USERS LOGGED IN 003 5 = Mail recipient F1-NEXT SCRN, F3-UPDATE, F10-OPTION, ESC-EXIT
BACKGROUND DISPLAY? : Y/NThe flag used for background job processing. See SU39 - Job Processing in the Systems Utilities User Guide for further details.
LOGFILE OPERATIONAL? : Y/NThis dictates whether or not system logging is enabled. Refer to program SU62 - Logging Maintenance in the Report Management section of this User Guide for more information.
LOGGING LEVEL : See SU62 - Logging Maintenance in the System Utilities User Guide for further details.If the logfile is operational the levels 1-5 dictate the depth of the logging to be performed. The levels are;[1] All logging information[2] System errors only[3] File updates only[4] Messages only[5] System access only
4 - 100 JULY 2006 Systems Utilities - User Guide

CYCLES ON RECORD LOCKING : 3 digits
This figure represents the number of times the system will retry reading a locked record. Each retry will take 1 second. At the end of the retry cycle, you will be asked if you wish to start another retry cycle or if you press [Esc], you will exit the program.
Set this to an acceptable level such as '5' or '10'. If you enter '999', you may be locked into the retry cycle for about 16 minutes.
When a record is locked the process ID of the user locking the record is displayed in the record locked window. For instance 11562 is ‘ps –fp11562’. This applies only to UNIX users.
ACUVIEW INSTALLED? (Y/N) : Y/NThis is a separate product which you must purchase if you wish to run the Chart Writer module.
LOG DATABASE IN USE : This is not a prompt but a display. You will see this if you are running TITAN on a database and the transaction logging is set to 'ON'.
LOG DATA BASE NOT IN USE : This is not a prompt but a display. You will see this if
you are running TITAN on a Vision file system.
REPORT DEFAULTS : Installation defaults for reports used if no USER, SYSTEM or PROGRAM defaults are set. The printer number corresponds to the printer # as set up in SU01 - Terminal and Printer Setup and should be specified even for the report destination going directly to report management system or screen.
Remember, if you select the option to route reports directly to the screen, they still go to the Report Management system from where they can be viewed and printed.
SU - Maintenance JULY 2006 4 - 101

NUMBER OF USERS LOGGED IN : 3 digits
The system keeps track of the number of users logged on to TITAN. This number here may NOT exceed the 'MAXIMUM NUMBER OF USERS' specified earlier. If the two numbers are equal and you try to log on to the system, a warning will be given and you will not be able to continue.
If for some exceptional reason such as a power failure, this value has not been reset as happens when a user logs off, please contact your support person who will help you to reset this value to '1'. Please note that ALL users except one person with the proper authority (Level 9must be logged off when doing this.
The status line provides the prompts. Press [F1] or [F3] to update the file and to proceed to the next screen. Press [F10] to return to the option menu or [Esc] to return to the main menu.
4 - 102 JULY 2006 Systems Utilities - User Guide

SCREEN 2 - MENU DETAILS.
SYSTEM UTILITIES - INSTALLATION MAINTENANCE SU30 11/001 PRODUCT NAME : TITAN Release : 5.0 Menu Details: MAIN MENU DESCRIPTION [INTEGRATED FINANCIAL SOFTWARE ] MENU OPERATOR PROMPT [ENTER OPTION : ] CENTRE MENUS? (Y/N) [Y] ARROW SIZE? (3-5) [3] DISPLAY CO/BR/DATE? (Y/N) [Y] Installation terminology: CO : [CO - ] BR : [BR - ] DATE: [DATE ] PAGE # [PAGE ] PERIOD [PERIOD - ] Company/Branch control at start of program: SUPPRESS CO/BR SCREEN? [Y] Y=Yes N=No RESET TO DEFAULT CO/BR? [Y] Y=Yes N=No F1 - NEXT SCREEN, F2 - PREVIOUS SCREEN, F3 - UPDATE, F8 - DELETE, F10 - OPTIONS
MAIN MENU DESCRIPTION : You may define the description that appears on the main menu.
MENU OPERATOR PROMPT : The string that prompts you to enter a program name
on the menu is user-defined.
CENTRE MENUS? : Y/NYou may choose to centre the systems displayed on the main menu or display them from the top down.
ARROW SIZE? (3-5) : The arrow displayed on the main menu may be defined as size 3 or 5 character width.
DISPLAY CO/BR/DATE? : Y/NThe current company, branch and date defaults may be displayed or suppressed on all menus.
SU - Maintenance JULY 2006 4 - 103

INSTALLATION TERMINOLOGY
The terminology that heads each program may be changed according to the users' requirements. The defaults are set as listed below.
CO : CO -
BRANCH : BR -
DATE : DATE
PAGE # : PAGE
PERIOD : PERIOD -
COMPANY BRANCH CONTROL AT START OF PROGRAM
SUPPRESS CO/BR SCREEN? : Y/N
If suppressed, you will not be prompted to enter Co/Br defaults on every program entered, but will have to use the [F10] key to access that screen.
RESET TO DEFAULT CO/BR : Y/N
If set to "Yes" the Co/Br defaults are reset to the initial defaults after exiting the program.
4 - 104 JULY 2006 Systems Utilities - User Guide

SCREEN 3 - NUMERIC ACCEPT DETAILS
SYSTEM UTILITIES - INSTALLATION MAINTENANCE SU30 11/110PRODUCT NAME : TITAN Release : 6.0
LEFT JUSTIFY LEADING ZEROS? [Y] - Numeric Display ModeENABLE CALCULATOR FUNCTIONS?[Y] - Numeric Input Only CENTURY [19]DEVICE DIRECTORY [/dev/ ]DISPLAY STATION ID [Y]SPECIAL FUNCTION MODE [1] 0 - Inhibit Help/Hotkey 1 - Allow Help/HotkeyDATE FORMAT [1] 1 - dd/mm/yy 2 - mm/dd/yy 3 - yy/mm/ddHELP EDIT LEVEL [-] A - All users may edit User help S - Only SYSADMIN may edit User helpDEFAULT HELP LEVEL [-] U - User help, S - Supplied helpMEMORY RANKING [-] H - High, L - LowF2 - PREVIOUS SCREEN, F3 - UPDATE, F8 - DELETE, F10 - OPTIONS, ESC - EXIT
LEFT JUSTIFY LEADING ZEROS? : Y/N
On numeric accepts, a leading zero may be justified to the left or not depending on the setting of this flag.
ENABLE CALCULATOR FUNCTIONS : Y/N
If [Y], you will be able to use the calculator function as described in the GETTING STARTED section of this manual.
Please note that if you use this feature and you wish to enter a negative value in a numeric field, the minus sign (-) must be entered before the value. If not, the system will assume that you are performing a calculation in that field and that you are about to enter another value which must be subtracted from the first
CENTURY : 2 digitsThe current century is set to [19]
DEVICE DIRECTORY : 8 charactersThis variable describes the directory name of the device to be used as the dedicated port, for example /dev/.
DISPLAY STATION ID : Y/NIf you enter [Y, then each program will show your Login station ID under the program reference on line 2 of the screen.[N] - this will inhibit the display.
SU - Maintenance JULY 2006 4 - 105

SPECIAL FUNCTION MODE : [0] off
[1] onThis flag enables you to inhibit HELP/HOT/VIEWKEY if there is insufficient memory to fully utilise these special functions.
DATE FORMAT : [1] dd/mm/ccyy[2] mm/dd/ccyy[3] ccyy/mm/ddThree date formats are available. Select the appropriate one for the installation.
HELP EDIT LEVEL : 1 characterEnter an [A] if all users may edit the User help and an [S] if only the system administrator using the SYSADMIN user name may edit the User help.
DEFAULT HELP LEVEL : 1 characterIf the default help is to be the User help, enter a [U], and enter an [S] if the Supplied help is to be used as a default.
SUPPLIED HELP is supplied by the Distributor and is an on-line version of the User Guides. USER HELP may be added by individual users.
MEMORY RANKING : 1 characterThis feature allows certain large programs to run with a memory boundary of 1MB. Currently it only affects program SP10 - Order Entry in regard to its use via Job Costing programs.Enter an [H] if the computer has a memory of more than 1MB, and an [L] if the memory is 1MB or less.
4 - 106 JULY 2006 Systems Utilities - User Guide

OPTION 2 - COMPANY DETAILS
The default company previously entered appears in the first field of this screen. Press [Enter] to accept the company or enter a new company number.
SYSTEM UTILITIES - INSTALLATION MAINTENANCE SU30 11/103
COMPANY # [01]COMPANY NAME [TECHNOLOGIES INCORPORATED ]ADDRESS 1 [1942 PEACHTREE STREET ]ADDRESS 2 [BLDG. 7 SUITE B ]ADDRESS 3 [ATLANTA ]POSTAL CODE [30341 ]TELEPHONE # [555 4948 ]FAX # # [555 3092 ]COMPANY REGISTRATION # [000005000303 ]COMPANY TAX REGISTRATION # 1 [900090000930038 ]COMPANY TAX REGISTRATION # 2 [ ]DEFAULT BRANCH # [01]COMPANY STOCK PERIOD [12]
F3 - UPDATE, F8 - DELETE, F10 - OPTION MENU, ESC - EXIT
Enter the following fields;
COMPANY # : 2 digits.Enter the required company number or accept the default.
COMPANY NAME : 30 characters.Enter the name of the company as it should appear on all reports and displays.Whenever this name is changed, a new authorisation code must be requested from the distributor or dealer.
The following fields may be left BLANK if required although some of them may be optionally printed on user-defined forms such as statements.
ADDRESS 1 : 25 characters.
ADDRESS 2 : 25 characters.
ADDRESS 3 : 25 characters.
POSTAL CODE : 15 characters.
TELEPHONE # : 15 characters.
SU - Maintenance JULY 2006 4 - 107

FAX # : 15 characters.
COMPANY REGISTRATION # : 20 characters.
COMPANY TAX REGISTRATION # 1 : 20 characters.
COMPANY TAX REGISTRATION # 2 : 20 characters.
DEFAULT BRANCH # : 2 digits.The number of the branch most often used in conjunction with the default company. This number will appear together with the company number as the default company and branch in all programs. This combination will be pre-loaded into all the company/branch fields, for example if company 01 and branch 01 have been entered as the default combination, the company number prompt will read COMPANY/BRANCH # 01/01).
Press [F3] to update the record.
AUTHORITY CODE : 6 digits.This code is unique to this company and must be obtained from the Dealer or Distributor.
Press [F3] to return to the option screen and select Option [3] to enter branch details.
UPDATING/DELETING COMPANY DETAILS
UPDATING A COMPANY
Enter [2] to update the details of existing companies on the system then enter the number of the company to be updated.
Move the cursor down to the field that is to be updated. Once the data has been entered, press [F3] to update the data on the file.
If the name of the company is to be updated a new authority code will be required. This must be obtained from the Dealer or Distributor.
DELETING A COMPANY
Press [F8] to delete company data.
The system, however, will not allow companies to be deleted that have branches or systems allocated to them. These systems and branches have to be to be deleted and de-activated before company deletion will be permitted.
4 - 108 JULY 2006 Systems Utilities - User Guide

OPTION 3 - BRANCH DETAILS
The default branch previously entered appears in the first field of this screen. Press [Enter] to accept the branch or enter a new branch number.
SYSTEM UTILITIES - INSTALLATION MAINTENANCE SU30 11/001 COMPANY # [01] BRANCH # [01] BRANCH NAME [CAPE TOWN ] ADDRESS 1 [ ] ADDRESS 2 [ ] ADDRESS 3 [ ] POSTAL CODE [ ] TELEPHONE # [ ] FAX # [ ] DEFAULT WAREHOUSE [01]
F3 - UPDATE, F8 - DELETE, F10 - OPTION MENU, ESC - EXIT
Enter the following fields;
COMPANY # : 2 digits.Enter the Company number to which the branch, for whom details are being entered, belongs.
BRANCH # : 2 digits.Enter the required Branch number.
BRANCH NAME : 30 characters.Enter the Branch name for whom details are being entered.
ADDRESS 1 : 25 characters.
ADDRESS 2 : 25 characters.
ADDRESS 3 : 25 characters.
POSTAL CODE : 15 characters.
TELEPHONE # : 15 characters.
FAX # : 15 characters.
SU - Maintenance JULY 2006 4 - 109

DEFAULT WAREHOUSE : 2 digits.The number of the warehouse most often used in the branch. This number will appear together with the company/branch number as the default warehouse in all programs where it is relevant. You must specify that warehouses are to be used in program IV00 - System Record Maintenance.
Press [F3] to update the record.
AUTHORITY CODE : 6 digits.This code is unique to this company/branch combination and must be obtained from the Dealer or Distributor.
Continue until all branches to be used have been entered. The status line provides the prompts required.
On completion, press [F10] to return to the option menu.
UPDATING/DELETING BRANCH DETAILS
UPDATING BRANCH DETAILS
To update the branch data, enter the relevant company and branch numbers to be updated.
Move the cursor to the fields that are to be updated. Once the data has been entered, press [F3] to update the data on the file.
If the name of the branch is to be updated a new authorisation code will be required. This must be obtained from the Dealer or Distributor.
DELETING A BRANCH
Press [F8] to delete branch data.
The system, however, will not allow branches to be deleted that have systems allocated to them. These systems have to be to be deleted and de-activated before branch deletion will be permitted.
4 - 110 JULY 2006 Systems Utilities - User Guide

OPTION 4 - SYSTEM DETAILS
While the DEMONSTRATION system is active ALL systems are installed.
When an Installation Name is installed using SU30 - Installation Maintenance - Option [1], ALL systems are automatically uninstalled and must be individually reinstalled. To reinstall a system please contact the Dealer or Distributor and quote the following information;
1. Installation name
2. Installation number
3. System name
The Dealer will then supply the authority code that may be used to install the system.
Please see the special form in Appendix B.
SYSTEM NAME : 2 digitsEnter the required name or scan the systems available using the [F1] key.
INTERNAL SYSTEM # : 2 digits.This is the internal number associated with the system and is NOT available for alteration.
SYSTEM UTILITIES - INSTALLATION MAINTENANCE SU30 11/001 SYSTEM NAME [AB] SYSTEM SYS# USER SEQ# DESCRIPTION STATUS MENUAB <--> 19 003 17 APPLICATION BUILDER INSTALLED YAP 03 010 02 ACCOUNTS PAYABLE INSTALLED YAR 02 000 01 ACCOUNTS RECEIVABLE INSTALLED YBL 17 000 23 BANK LINK INSTALLED YBM 13 000 13 BILL OF MATERIALS INSTALLED YCB 16 004 22 CASH BOOK INSTALLED YCS 25 23 CUSTOMER SPECIALS NCU 23 --- 20 CONVERSION UTILITIES INSTALLED NCV 19 CONVERSIONS INSTALLED NDU 24 --- 21 DEALER UTILITIES INSTALLED NFA 10 001 03 FIXED ASSETS INSTALLED YGL 01 003 04 GENERAL LEDGER INSTALLED YIS 14 000 12 INSTALMENT SALES INSTALLED YIV 05 000 06 INVENTORY INSTALLED YJC 12 001 09 JOB COSTING INSTALLED Y F1 - SCAN, F10 - OPTION MENU, ESC - EXIT
SU - Maintenance JULY 2006 4 - 111

SYSTEM UTILITIES - INSTALLATION MAINTENANCE SU30 11/001 SYSTEM NAME : AB Internal System # 19 STATUS - ON HOLDSYSTEM DESCRIPTION [APPLICATION BUILDER ]EXPIRY DATE [19980930] CCYYMMDDMAXIMUM USERS [ 20]REPORT DEFAULTS: Destination Printer # Destinations: 1 [0] [00] 1 = Report management system 2 [0] [00] 2 = Direct to printer 3 [0] [00] 3 = Direct to a file 4 = Direct to screen 5 = Mail recipient System Terminology: 1 [ ] 2 [ ] 3 [ ] 4 [ ] 5 [ ] MENU SEQUENCE # [15]SHOW ON MENU (Y/N)? [Y]NUMBER OF USERS LOGGED IN [000] F3 - UPDATE, F5 - TOGGLE STATUS, F8 - DELETE, F10 - OPTIONS, ESC – EXIT
SYSTEM DESCRIPTION : 45 charactersIf the description is altered this will then appear on the menu as a replacement of the default.
EXPIRY DATE : CCYYMMDDYour dealer will have this date. It will be used in conjunction with the installation name, to calculate a unique authorisation code for your installation for each specific module. On or after the expiry date, when you try to access the expired system, the following message will be displayed.'System not Installed XX - press RETURN to continue'.'XX' denotes the system, for example 'AR' or 'GL'. This will normally happen when you have decided to discontinue the use of a particular module, or where you had the use of it for a limited period in order to evaluate it for future use.If this is a NEW installation or if the expiry date is being changed, then the cursor will move to the bottom of the screen and require entry of authorisation code before proceeding.
MAXIMUM USERS : 3 digitsThis is the maximum number of users that may be working on this specific application at any one time. Your support person will know the number you selected to pay licence fees for.
4 - 112 JULY 2006 Systems Utilities - User Guide

REPORT DEFAULTS : The destination for reports for this system may be set up either to;
[1] Report Management System[2] Direct to printer[3] Direct to a file[4] Direct to screen[5] Mail recipient
Printer Number; 1 to 99This corresponds to printer definitions set up in program SU01 - Terminal and Printer Setup - Option [4].
Entries made here will override those made in Option 1 for the installation as a whole.
SYSTEM TERMINOLOGY : Certain terminology used by the system may be user-defined. For example `Postal Code' may also be referred to as `Zip Code' and individual users may use their discretion. These fields are not used for system `SU' but must be entered for the following systems.
Accounts Payable :Field 1 : POST CODE
Field 2 : CHEQUE
Field 3 : NOT USED
Field 4 : NOT USED
Field 5 : NOT USED
Accounts Receivable :Field 1 : POST CODE
Field 2 : CHEQUE
Field 3 : AR GROUP
Field 4 : SALESMAN
Field 5 : NOT USED
Inventory :Field 1 : BIN LOCATION
Field 2 : PACKING REF
Field 3 : NOT USED
Field 4 : NOT USED
Field 5 : NOT USED
Job Costing :Field 1 : SETUP
SU - Maintenance JULY 2006 4 - 113

Field 2 : NOT USED
Field 3 : NOT USED
Field 4 : NOT USED
Field 5 : NOT USED
4 - 114 JULY 2006 Systems Utilities - User Guide

Sales Analysis :Field 1 : SA CODE 1
Field 2 : SA CODE 2
Field 3 : NOT USED
Field 4 : NOT USED
Field 5 : NOT USED
Sales Order Processing :Field 1 : POST CODE
Field 2 : REFERENCE
Field 3 : IN BODY OF INVOICE
Field 4 : IN BODY OF INVOICE
Field 5 : IN BODY OF INVOICE
Cash BookField 1 : NOT USED
Field 2 : NOT USED
Field 3 : USER CODE 3
Field 4 : USER CODE 4
Field 5 : NOT USED
MENU SEQUENCE # : 2 digits.The menu sequence controls the order in which systems appear on the menu. For instance if Systems Utilities has sequence number 1, it will appear first on the main menu.
SHOW ON MENU? : Y/NIf set to "No" this will inhibit the system being shown on the Main Menu.
SU - Maintenance JULY 2006 4 - 115

NUMBER OF USERS LOGGED IN : 3 digits
The system keeps track of the number of users using this specific application. This number here may NOT exceed the 'MAXIMUM NUMBER OF USERS' specified earlier. If the two numbers are equal and you try to log on to the application, a warning will be given and you will not be able to continue.
If for some exceptional reason such as a power failure, this value has not been reset as happens when a user logs off, please contact your support person who will help you to reset this value to '1'. Please note that ALL users except SYSADMIN or another user with level 9 authority must be logged off when doing this.
4 - 116 JULY 2006 Systems Utilities - User Guide

On Hold Restrictions
There is an [F5] toggle on the status line which will toggle the system between ‘ON HOLD’ and ‘AVAILABLE’. The ‘ON HOLD’ option will have the effect of the system being inaccessible to all users except ‘SYSADMIN’ and other Level 9 users.
When you press [F5] a new screen displays which allows you to select specific Company/Branch/Warehouse combinations to place on hold. As a further extension, the [F6] key allows you to restrict the on-hold instruction to selected users.
An example of these two screens are shown below.
SYSTEM UTILITIES - INSTALLATION MAINTENANCE SU30 11/007 SYSTEM NAME : AB Internal System # 19 SYSTEM ON HOLD SYSTEM DESCRIPTION [APPLICATION BUILDER ] COMPANY [ 1] BRANCH [02] (00 = ALL BRANCHES) WAREHOUSE [00] (00 = ALL WAREHOUSES)CO BR WH01 <--> 02 00 *** NO MORE ITEMS ***F1-SCAN, F3-ACCEPT, F5-TOGGLE, F6-USERS, F8-DELETE, F10-BACK, ESC-EXIT
SYSTEM UTILITIES - INSTALLATION MAINTENANCE SU30 11/007 SYSTEM NAME : AB Internal System # 19 CO/BR/WH OR USERS ON HOLD SYSTEM DESCRIPTION [APPLICATION BUILDER ] [ABBY ]USERNAME DESCRIPTION STATUSABBY <--> TEMPLATE FOR GROUP 1 ON HOLDABBY1 TESTBR01 BRANCH 01 ONLYBR0102 BRANCH 01 AND 02DAWN DAWN PILATOWICZDP1 TEMP1HAG01 HAGGIE - BR 1,2HAGG02 HAGGIE - BR 3NEW3 NEWSYSADMIN SYSTEM ADMINISTRATORTEMP TEMPLATE FOR GROUP 1TEMP1 TEMP1TEST3 8.1 SU38 MOD RESTRICTIONSON HOLDTHERESA THERESA HARGITAI F1-SCAN, F3-SWITCH, F10-BACK, ESC-EXIT
The same functionality described above has been extended to module and program detail.
SU - Maintenance JULY 2006 4 - 117

OPTION 5 - MODULE DETAILS
Programs within a particular system are grouped into modules - usually Input, Maintenance, Enquiry, Print, Period-end and so forth.
These module names appear on the system menu and may be altered through this option. It is suggested that the defaults be maintained.
MODULE NAME : 3 charactersEnter the required module name or scan the modules available using the [F1] key.
SYSTEM UTILITIES - INSTALLATION MAINTENANCE SU30 11/001 MODULE NAME [GL1] MODULE DESCRIPTION MENU GL1 <--> INPUT MODULE Y GL2 BALANCE TAKE-ON MODULE Y GL3 MAINTENANCE MODULE Y GL4 INTERFACE MODULE Y GL5 ENQUIRY/SCAN MODULE Y GL6 MANAGEMENT REPORTING MODULE Y GL7 PRINT MODULE Y GL9 PERIOD-END MODULE Y IS1 INPUT MODULE Y IS3 MAINTENANCE MODULE Y IS5 ENQUIRY/SCAN MODULE Y IS7 PRINT MODULE Y IS9 PERIOD-END MODULE Y IV1 INPUT MODULE Y IV2 INTERFACE MODULE Y IV3 MAINTENANCE MODULE Y F1 - SCAN, F2 - SCAN BACK, F10 - OPTION MENU, ESC - EXIT
MODULE DESCRIPTION : 45 charactersEnter the required description.
SHOW ON MENU? : Y/NIf set to [N] this will inhibit the module name being shown on the menu.
On Hold Restrictions
There is an [F5] toggle on the status line which will toggle the system between ‘ON HOLD’ and ‘AVAILABLE’. The ‘ON HOLD’ option will have the effect of the system being inaccessible to all users except ‘SYSADMIN’ and other Level 9 users.
When you press [F5] a new screen displays which allows you to select specific Company/Branch/Warehouse combinations to place on hold. As a further extension, the [F6] key allows you to restrict the on-hold instruction to selected users.
Screen examples may be seen under the SYSTEM description.
4 - 118 JULY 2006 Systems Utilities - User Guide

OPTION 6 - PROGRAM DETAILS
This option allows the default program settings to be altered or records for new programs to be entered.
SYSTEM UTILITIES - INSTALLATION MAINTENANCE SU30 11/006 PROGRAM NAME : AR30 Called Synonym : NONE PROGRAM DESCRIPTION [CUSTOMER FILE MAINTENANCE ] REPORT DEFAULTS: Destination Printer # Destinations: 1 [0] [00] 1 = Report management system 2 [0] [00] 2 = Direct to printer 3 [0] [00] 3 = Direct to a fileREPORT ACCESS GROUP [ ] 4 = Direct to screen 5 = Mail recipientSHOW ON MENU (Y/N)? [-] USER [ ]AUTO-CALL TO PROGRAM [------]AUTO-CALL PROMPT [------------------------------]AUTO-CALL MENU TEXT [----------]CALL AS PROGRAM [ ] WITH DEFAULT CO/BR/WH [00/00/00] F3-UPDATE, F5-STATUS, F8-DELETE, F10-OPTIONS, ESC-EXIT
PROGRAM NAME : 6 charactersEnter the required program name or scan the programs available using the [F1] key.
PROGRAM DESCRIPTION : 45 charactersIf the description is altered this will then appear on the menu and in all places where the specific program is referred to.
CALLED SYNONYM : This is an internal field showing the relation between programs. This field may NOT be altered. When a program is a synonym of another, it means that only the synonym physically exists but that the program itself may be called from the menu, which then calls the synonym. Thus SP01 - Financials may be called from the menu, but only SP00 - System Record Maintenance exists physically.
SU - Maintenance JULY 2006 4 - 119

REPORT DEFAULTS : The destination for reports for this system may be set up either to;
[1] Report Management System[2] Direct to printer[3] Direct to a file[4] Direct to screen[5] Mail recipient
Printer Number; 1 to 99This corresponds to printer definitions set up in program SU01 - Terminal and Printer Setup - Option [4].
Please note that for SP19 - Demand Order Entry, you must set Printer 1 to print the Sales Order Documents and Printer 2 to print the Purchase Order documents as there is an option in SP00 - System record Maintenance to automatically create Purchase Orders in this program for back ordered items.
On Hold Restrictions
There is an [F5] toggle on the status line which will toggle the system between ‘ON HOLD’ and ‘AVAILABLE’. The ‘ON HOLD’ option will have the effect of the system being inaccessible to all users except ‘SYSADMIN’ and other Level 9 users.
When you press [F5] a new screen displays which allows you to select specific Company/Branch/Warehouse combinations to place on hold. As a further extension, the [F6] key allows you to restrict the on-hold instruction to selected users.Screen examples may be seen under the SYSTEM description.
REPORT ACCESS GROUP : 4 charactersThis is the first 4 characters of the description in SU38 - System Password Maintenance. If you enter a user group here, then not only will the person who generated this report have access to it in SU60 - Report Management System, but also all members of this user group.
SHOW ON MENU? : Y/NThe facility exists to mask selected programs from the menus if required.
USER : 8 CharactersYou may enter a user name here if you wish this program to only be visible for a single user.
4 - 120 JULY 2006 Systems Utilities - User Guide

AUTO-CALL FACILITY
The following 3 prompts relate to the auto-call facility. This allows users to specify for each program another program that will automatically be called on a keystroke which is specified in the cblconfig file. The #exception value 45 sets the auto-call key. For instance if your auto-call key is CONTROL-V, then the cblconfig entry would be:
KEYSTROKE exception=45 ^|
In addition you should set up key 46 in the same manner to display the field name for entry in the AUTO-CALL PROMPT field.
AUTO-CALL TO PROGRAM : 6 charactersEnter the name of the called program.
AUTO-CALL PROMPT : 30 charactersIf you want the auto-call facility to only be available from a particular prompt on the calling program screen, enter this prompt here. To find the name of this field, go to the relevant field and press the control key set up to display the field name in the case of a numeric field or ?? in the case of an alpha field.
AUTO-CALL MENU TEXT : 10 charactersIf you are using a menu bar, you can define the text for the menu button.
Note: the calling program passes the value of the field the cursor is on when CONTROL-V is pressed.
Below is a few examples of how this facility may be used:
a) In AR30 - Customer File Maintenance hitting CONTROL-V whilst on the account number (i.e. after pressing [F3] to update the new customer) will call SP15 - Batch Invoice Entry, passing it the CO/BR and the account number. SP15 (UTSLM) has been amended to pick up the passed value. Once the invoice is complete and [F3] pressed, the program is passed an [ESC] to pass control back to the calling program.
b) In AR50 - Customer File Enquiry/Print hitting CONTROL-V whilst on the X-REF (invoice number) in the transaction scan, will call SP57 - Invoice Enquiry passing it the invoice number. If it does not exist in the current file use [F5] to select history. If it does not exist [F10] takes you back to the original program. SP10SF has been amended to pick up the passed value.
c) If the program called does not pick up the passed value use the paste option set in the config file (exception=43) to paste in the passed value.
SU - Maintenance JULY 2006 4 - 121

CALL AS : 6 CharactersThis is used where you wish to simulate an already existing program, but wish it to default to a specific CO/BR/WH default.
4 - 122 JULY 2006 Systems Utilities - User Guide

OPTION 7 - LOAD DETAILS FROM LOADSYS
LOADSYS is used to input new program numbers, synonyms and names into the PROGSYS file of individual installations.
The installation of new systems and programs, will be distributed in the LOADSYS file and may be loaded by the user. Users will be advised by support staff when this is to be done.
SYSTEM UTILITIES - INSTALLATION MAINTENANCE SU30 11/001 SELECT FUNCTION [1] 1 Load PROGSYS from LOADSYS Overwrite user terminology? (Y/N) [N]
F10 - OPTIONS, ESC - EXIT
SELECT FUNCTION : 1 digit.Accept the default to update the PROGSYS file for the installation with the latest program/menu names residing in the latest distributed LOADSYS file.
OVERWRITE USERTERMINOLOGY : Y/N
If [Y] is entered, all changes made for the installation using program SU30 - Installation Maintenance options 4 - 6, will be overwritten with the standard details concerning system and program names and menu options. If [N], new entries will be written to the PROGSYS file but all user specific entries will remain unchanged.
SU - Maintenance JULY 2006 4 - 123

4.3. DESCRIPTIONS FILE MAINTENANCE - SU31
This program enables users to enter their own file descriptions against specific description types which are used in the programs. The system already has the standard description types loaded.
To illustrate how this facility is used, consider the use and definition of product groups within the system. Each inventory item in a TITAN Inventory system may be allocated a 4 character product group code. The Sales Analysis system uses these product group codes and their respective descriptions in analysing and printing various Sales Analysis reports.
It is the definition of these product group descriptions and their respective codes that is made within this program.
Product groups would thus be defined for use in the Sales Analysis system, for example 0010 Hand Tools, 0020 Power Tools, by using description code type PG which represents product groups and then entering the four digit product group code and thirty character product group description.
Enter SU31 to select the program.
To illustrate the use of this module the maintenance of a standard description code type (AR - Area) is given at the end of this list of descriptions.
All description types which are entered identically to the area code are listed below with a short description of where they are used.
STANDARD DESCRIPTION CODESA1A2A3
Sub-inventory descriptions.Please refer to the Inventory user Guide Set-up and Run. These description types refer to the three-part sub-inventory number as set up in the systems parameter file (IV00). These are user-defined but could for example refer to colour, style and size.
ADad
You will not be able to set these up as they are used by the system to hold alternate keys for the Accounts Receivable system.
APap
You will not be able to set these up as they are used by the system to hold alternate keys for the Accounts Payable system.
AR Customer area codes.One of these codes are entered on each customer masterfile record. As it forms part of the key on the customer masterfile record, all reports printed from this file may optionally be sequenced by area.It also allows sales to be analysed by area.
AS Accounting section.This is used on the General Ledger masterfile. It provides additional flexibility for analysis on user-defined reports.
BL Last year's budget codes.*
BT This year's budget codes.*
BN Next year's budget codes.*
4 - 124 JULY 2006 Systems Utilities - User Guide

STANDARD DESCRIPTION CODES* A large number of budgets may be held on file for the periods mentioned above. You may select any one or all for reporting purposes.At the end of the financial year, the system will automatically move next year to this year, and this year to last year. Next year will be cleared.
BM Alternate sequence codes for Bill of MaterialsC1 Cashbook User Code 1 descriptions
This is a user defined code and is used in CB30 - Bank Masterfile Maintenance.
C2 Cashbook User Code 2 descriptions.This is a user defined code and is used in CB30 - Bank Masterfile Maintenance.
CA Accounts Payable category.Although these category descriptions are held on the description file, they are entered via program AP34 - Purchase Analysis Maintenance.These categories are used to analyse purchases and control the optional posting to the General Ledger system.
CB Cash Book Control Account.CC Accounts Payable Control accounts.
These descriptions are used in AP00 - System record Maintenance and describe the various transaction types and control accounts.
CG Vendor groups.One of these codes are entered on each vendor masterfile record. As it forms part of the key on the vendor masterfile record, all reports printed from this file may optionally be sequenced by vendor group.
CH Chart Types used by the Titan Chart Writer system - please refer to the Acuview manual for details.
CM Accounts Payable Alternate Category.Purchase categories are set up using program AP34 - Purchase Analysis Maintenance. However, program AP35 - Alternate Category Maintenance allows you to set up alternate categories, providing greater flexibility in reporting. The descriptions of these alternate categories are set up using this code.
CN Company Registration Number.CR Vendor Purchase Category maintained by AP34 - Purchase Analysis
Maintenance.CS Cashbook category as maintained by program CB32 - Cashbook Analysis
Category Maintenance.DA Customer Alternate Sequence.
Program AR34 - Alternate Sequence Maintenance allows you to set up a large number of alternate sequences by which all Accounts Receivable reports may be printed. The descriptions of these sequences may be entered or altered using this code.
SU - Maintenance JULY 2006 4 - 125

STANDARD DESCRIPTION CODESDI Delivery Instructions.
Any one of these codes may be entered at invoicing stage for printing on the invoice/delivery note.
DR Sales Category.These categories may only be maintained in program AR32 - Category File Maintenance, but are held on the descriptions file. They may also be viewed in program SU51 - Descriptions File Scan.
DS Discount reference.These codes are used in conjunction with discounts set up in program SP32 - Discount Maintenance and are used for printing on order or invoice documents.
FC Fixed Asset Control Accounts.These descriptions are used in FA00 - System Record Maintenance and describe the various transaction types and control accounts.
GA GL Allocation descriptions maintained in GL37 - Allocation File Maintenance.
GLGl
Alternate sequence codes set up in GL31 - Alternate Sequence Maintenance.
IB Maintained only in IV15 - Input Inventory Budgets.IC Inventory Control accounts - maintained by the systemIViv
Alternate sequence codes maintained in IV31 - Alternate Sequence Maintenance.
JAja
Alternate sequence as maintained in JC31 - Alternate File Maintenance.
JB Job Costing/Estimating transaction type.Although the transaction types are entered and maintained on the Job Costing and/or Estimating systems, they are held on the description file but are not available for entry in this program.
JC Job Costing/Estimating category.Although the categories are entered and maintained on the Job Costing and/or Estimating systems, they are held on the description file but are not available for entry in this program.
JP Job Costing/Estimating Project.All jobs may be grouped into projects. These codes and descriptions are set up in this program using this type.
JS Job Costing/Estimating Status Code.Although the status codes are entered and maintained on the Job Costing and/or Estimating systems, they are held on the description file but are not available for entry.
MP Salaries Control Accounts.MT Management Reports.
Although Management Report descriptions and parameters are entered and
4 - 126 JULY 2006 Systems Utilities - User Guide

STANDARD DESCRIPTION CODESmaintained in the General Ledger system, the codes and descriptions are held on the description file but should not be maintained in this program.
PAPa
Alternate sequence codes maintained in PO31 - Alternate Sequence File Maintenance.
PO Purchase Order Reference Description.PP Pay point description.
This is used on the Weekly payroll system.RE Reason Code
This is used to enter reasons codes which may be entered in SP17 - Credit Note Entry provided it is on the SP00 - System Record Maintenance jump table.
RG Region CodeThis is held on the AR00 - System Record Maintenance, screen and is used to provide an alternate sequence on the current and history transaction files. This code must be entered at the 'all branches' level, i.e. branch '00'.
RN Range CodeThis is used in SU38 - System Password Maintenance to restrict user access to a range of items.
RR Receiver of Revenue Office.This is used on the Weekly payroll system.
ST Inventory category codes.When issuing inventory on the Inventory system, the issues may be analysed according to inventory categories set up in program IV38 - Categories/Product Analysis Maintenance.
WH Inventory and Sales Order Processing systems – set parameters for inventory usage and stock issue voucher numbers as well as invoice/credit note numbers if required.
USER-DEFINED DESCRIPTION TYPE.X Certain description types such as sub-sections of the General Ledger code are
user-defined. The components of the code may be described and defined by making use of a description type starting with X,Y or Z.
YZALL codes starting with any other characters although not mentioned above, may in future be used by the system.It is therefore imperative that only codes starting with these three characters are used for user-defined description types. For an example of the fields on these codes, please refer to ‘XA’ in ‘ADDITIONAL DESCRIPTION TYPES’ section following this.
EXAMPLE OF A DESCRIPTION TYPE ENTRY
SU - Maintenance JULY 2006 4 - 127

To enter any of the description types which have been described, the following options are available;
Level 1
DESCRIPTION TYPE : 2 characters.Enter a two character description type or press [F1] to scan the file of types and their descriptions on file.
DESCRIPTION CODE : 4 characters.When entering description codes for the first time, always create the description for the type first by pressing [F3] in the code field where the code consists of blank characters and enter the type description.For individual code descriptions, press [F1] to scan the area codes already on file within description type AR.If this code is the same as one in SU41 - Reference File Maintenance, you may enter “_MAN”. If this type is also linked to a debtor via [F7], then it means that the SU41 - Reference File Maintenance code is mandatory for that debtor and the SP1 programs will check if a blank code is entered.
SYSTEM UTILITIES - DESCRIPTIONS FILE MAINTENANCE SU31 11/002CO - 01 - HEAD OFFICEBR - 01 - HEAD OFFICE DESCRIPTION TYPE [AR] AREA CODE DESCRIPTION CODE [BL ] DESCRIPTION [BOLAND ] F3 - UPDATE, F6 - LONG DESC, F8 - DELETE, F10 - TYPE, ESC - EXIT
Move the cursor to an existing area code and press [Enter] to accept the selection or enter a new code.
The area description is displayed if the code already exists. Enter a new area description, for example City Centre. Press [F3] to update the description file with this area description.
4 - 128 JULY 2006 Systems Utilities - User Guide

You may also attach a long description. To do so press [F6]. A new screen as shown below displays.
SYSTEM UTILITIES - DESCRIPTIONS FILE MAINTENANCE SU31 11/002 CO - 01 - TECHNOLOGIES INCORPORATED ttyp0 BR - 01 - CAPE TOWN DESCRIPTION TYPE [XM] MEDICAL AID DESCRIPTION CODE [SANM] DESCRIPTION [SANMED ] [ ] A1 [ ] A2 +------------ LONG DESCRIPTION ------------+ ¦ PLEASE SUBMIT THIS ACCOUNT DIRECTLY TO Y ¦ AMOUNT ¦ OUR MEDICAL AID. ¦ ¦ SIGN THE BOTTOM. ¦ N2 ¦ ¦ ¦ ¦ ¦ ¦ +------------------------------------------+ F3 - UPDATE, F6 - LONG DESC, F8 - DELETE, F10 - PREV, ESC - EXIT
LONG DESCRIPTION 240 charactersThis allows you to enter 6 lines of up to 40 characters each. These lines - concatenated in pairs of two - may optionally be printed on statements (AR91 - Form Print) and invoices (SP70 - Invoice Form Print), provided this is specified in AR00 - System record Maintenance.
To return to the company/branch selection prompt, press [F10].Press [F8] to delete the product code and description.
SU - Maintenance JULY 2006 4 - 129

ADDITIONAL DESCRIPTION TYPES
Description types which carry additional information will be described individually in detail on the following pages.
ADDITIONAL DESCRIPTION TYPES
BI Banklink Interface Types.These are used where you use the Banklink system in conjunction with the Titan Cashbook. The description type must denote the type of interface, for example, CATS, CAMS, BEST, NED or ABSA.
CY Currency conversion codes used in the Payroll system.D1-7 Transport mode details. (User-defined field.)DC Accounts Receivable Control Accounts.
These descriptions are used in AR00 - System Record Maintenance and describe the various transaction types and control accounts. This type allows you to enter a long description which will be used for statement printing, and a short description, which will be used on enquiries and other reports.
DG Debtors groups.One of these codes is entered on each customer masterfile record. As it forms part of the key on the customer masterfile record, all reports printed from this file may optionally be sequenced by customer group. In addition the transaction date option for invoices/credit notes may be set per debtors group provided the option is set in SP00 - System Record Maintenance.
DT Customer termsFM Soft formulaeFN FontsIS Instalment sales arrears interest rate and finance chargesOC Occupation descriptionPD Sundry codes for Purchase OrderingPG Product group codePM Payment method.PR Prefix (for document numbers)PS Inventory category markup for Purchase OrdersP1-4 Customer special codesRC Route code description.RP Representative codesRS Range size descriptionsRT Range size description (greater than 3)SC Sundry codesS1 Sales Analysis code 1
4 - 130 JULY 2006 Systems Utilities - User Guide

ADDITIONAL DESCRIPTION TYPES
S2 Sales analysis code 2.This is a user-defined description type, allowing an additional analysis code to be entered at invoicing stage. For instance it could be used to distinguish special promotion invoices from normal ones.
TT Transaction type for Cash Book.USER-DEFINED DESCRIPTION TYPE.WH Warehouse code.
The Inventory system optionally make use of warehouse locations. The numbers and descriptions must be set up in SU31 - Descriptions File Maintenance. In addition if you wish to number invoices/credit notes by warehouse, you will have to enter details here.
X Certain description types such as sub-sections of the General Ledger code are user-defined. The components of the code may be described and defined by making use of a description type starting with X,Y or Z.
YZALL codes starting with any other characters although not mentioned above, may in future be used by the system.It is therefore imperative that only codes starting with these three characters are used for user-defined description types. For an example of the fields on these codes, please refer to ‘XA’ in this section.
SU - Maintenance JULY 2006 4 - 131

CURRENCY CONVERSION - CY
BANKLINK INTERFACE TYPES - BI
These are used where you use the Banklink system in conjunction with the Titan Cashbook. The description type must denote the type of interface, for example, CATS, CAMS, BEST, NED or ABSA.
The additional details described below relate ONLY to ABSA.
SYSTEM UTILITIES - DESCRIPTIONS FILE MAINTENANCE SU31 10/011CO - 01 - SEAGULL SOFTWARE CCBR - 01 - MAIN BRANCH DESCRIPTION TYPE [BI] BANKLINK INTERFACE TYPES DESCRIPTION CODE [ABSA] NOT ON FILE DESCRIPTION [ ] BANKREF [1] 1 - POSITION 266 - CATG 2 - POSITION 270 - FUNCTION F3-UPDATE, F6-LONG DESC, F10-TYPE, ESC-EXIT
Enter the following details;
BANKREF : 1 character.Select the field to use as the Bank Reference, either the category or the function.
4 - 132 JULY 2006 Systems Utilities - User Guide

CURRENCY CONVERSION - CY
This conversion factor is used in the following systems;
This currency code is used in the Monthly Payroll system to indicate the symbol for the currency such as [$] and the symbol for coinage [c]. In addition the number of coins per unit is indicated, for example 100 cents to the Dollar. These must be entered to provide a coinage analysis.
BASE CURRENCYDESCRIPTION CODE : 4 characters.
To enter details for the base currency press [F3] in the description code when it is filled with blanks.
SYSTEM UTILITIES - DESCRIPTIONS FILE MAINTENANCE SU31 11/001 CO - 01 - TECHNOLOGIES INCORPORATED BR - 01 - CAPE TOWN DESCRIPTION TYPE [CY] DOLLAR DESCRIPTION CODE [ ] CURRENCY SIGN [$] COIN SYMBOL [C] CURRENCY SHORT DESCRIPTION [DOLL] CURRENCY LONG DESCRIPTION [DOLLAR ] FACTOR $1 = [ 100]C DENOMINATIONS: HIGHEST LOWEST NOTES ($) [ 50] [ 20] [ 10] [ 5] [ 2] [ 1] COINS (C) [ 50] [ 20] [ 10] [ 5] [ 2] [ 1]
F3 - UPDATE, F8 - DELETE, F10 - TYPE, ESC - EXIT
Enter the following details;
CURRENCY SIGN : 1 character.This is the symbol to be used by the system, for example [$].
COIN SYMBOL : 1 character.This is the symbol to be used by the system for example [c].
CURRENCY SHORTDESCRIPTION : 4 characters.
For example [DOLL]
CURRENCY LONG :DESCRIPTION : 15 characters.
SU - Maintenance JULY 2006 4 - 133

FACTOR : 4 digits.Enter the number of units (coin symbol) in each currency, such as 100 cents to the dollar.
DENOMINATIONS NOTES : 8 digitsThere are six fields for possible note denominations, for example;100, 50, 20, 10, 5, 1.These run from the highest to the lowest.
DENOMINATIONS COINS : 8 digits.There are six fields for possible coin denominations, for example;50, 20, 10, 5, 2, 1.These run from the highest to the lowest.
Not all six fields need to be used. However, the field used will determine the position when the value is eventually printed on the payslip.
FOREIGN CURRENCIESDESCRIPTION CODE : 4 characters.
Press [F1] to scan the currency codes on file within description type CY move the cursor to the currency code required and press [Enter] to accept the selection.
DESCRIPTION : 30 characters.Enter the required description.
EXCHANGE RATE : 5.4 digits.The rate of exchange used is the foreign currency to the base currency entered on the code containing blanks, for example 1 US Dollar = 2 pounds sterling if sterling is the base currency.
Press [F3] to update the currency file with this new exchange rate.
4 - 134 JULY 2006 Systems Utilities - User Guide

USER-DEFINED FIELD - D1 to D7
These user-defined codes can be used to detail transportation modes, collection details, railway siding names, shipping details etc. They are used in conjunction with delivery address to print on sales order processing documents.
DESCRIPTION TYPE : 2 characters.Scan the file for code i.e. [D1] or enter it.
DESCRIPTION CODE : 4 characters.Enter the code or press [F1] to scan the Customer term codes on file. Press [Enter] to accept the selection.
SYSTEM UTILITIES - DESCRIPTIONS FILE MAINTENANCE SU31 11/001 CO - 01 - TECHNOLOGIES INCORPORATED BR - 01 - CAPE TOWN DESCRIPTION TYPE [D1] TRANSPORT MODE DESCRIPTION CODE [1 ] DESCRIPTION [BY TRUCK ] REFERENCE [899-6543FG]
F3 - UPDATE, F8 - DELETE, F10 - TYPE, ESC - EXIT
Enter the following term fields;
DESCRIPTION : 30 characters.
REFERENCE : 10 characters.
SU - Maintenance JULY 2006 4 - 135

ACCOUNTS RECEIVABLE CONTROL ACCOUNTS - DC
These terms are used to set up descriptions for transaction types to be used by the Accounts Receivable system. These codes and default descriptions are created when you run AR00 - System Record Maintenance, for the first time.
DESCRIPTION TYPE : 2 characters.Scan the file for [DC] or enter it.
DESCRIPTION CODE : 4 characters.Enter the code or press [F1] to scan the Customer codes on file. Press [Enter] to accept the selection.
SYSTEM UTILITIES - DESCRIPTIONS FILE MAINTENANCE SU31 11/001 CO - 01 - TECHNOLOGIES INCORPORATED BR - 01 - CAPE TOWN DESCRIPTION TYPE [DC] ACCOUNTS RECEIVABLE CONTR. A/C DESCRIPTION CODE [DRCN] DESCRIPTION [CREDIT NOTE ] TRANSACTION TYPE [CRN]
F3 - UPDATE, F8 - DELETE, F10 - TYPE, ESC - EXIT
Enter the following term fields;
DESCRIPTION : 20 characters.This is used on the System parameter file and statements.
TRANSACTION TYPE : 3 charactersThis is used for enquiry/display purposes on programs such as AR50 - Customer File Enquiry/Print and AR11 - Payment Input.
4 - 136 JULY 2006 Systems Utilities - User Guide

DEBTORS GROUPS - DG
One of these codes is entered on each customer masterfile record. As it forms part of the key on the customer masterfile record, all reports printed from this file may optionally be sequenced by customer group. In addition the transaction date option for invoices/credit notes may be set per debtors group provided the option is set in SP00 - System Record Maintenance.
SYSTEM UTILITIES - DESCRIPTIONS FILE MAINTENANCE SU31 11/003CO - 01 - TECHNOLOGIES INCORPORATEDBR - 01 - CAPE TOWN DESCRIPTION TYPE [DG] ACCOUNTS RECEIVABLE GROUP DESCRIPTION CODE [0010] DESCRIPTION [WHOLESALERS ] SP - DATE ON IV/AR TRS [ ] I-INVOICE D-DEL DATE L-LATEST DEL DATE F3-UPDATE, F6-LONG DESC, F8-DELETE, F10-TYPE, ESC-EXIT
SP DATE ON IV/AR TRS : 1 character[I] , [D] or [L]Only one date is held on each stock/debtors transaction. Select the appropriate date for your organisation.If you select [I], the invoice date will be used when writing to the stock or debtors transaction file.If you select [D], the delivery date entered on invoices and orders will overwrite the invoice date in all cases.If you select [L], the latest delivery date will be used. SP14 - Release Picked Quantity to Invoice will change the invoice date to the latest if this is set.
SU - Maintenance JULY 2006 4 - 137

CUSTOMER TERMS - DT
These terms are used to calculate settlement discount on customer receipts. They may also be used to calculate interest on overdue accounts.
DESCRIPTION TYPE : 2 characters.Scan the file for [DT] or enter it.
DESCRIPTION CODE : 4 characters.Enter the code or press [F1] to scan the Customer term codes on file. Press [Enter] to accept the selection.
SYSTEM UTILITIES - DESCRIPTIONS FILE MAINTENANCE SU31 11/001 CO - 01 - TECHNOLOGIES INCORPORATED BR - 01 - CAPE TOWN DESCRIPTION TYPE [DT] TERMS DESCRIPTION CODE [0010] DESCRIPTION [STANDARD TERMS ] TERMS : [10.00] % FOR [ 15] DAYS [ 5.00] % FOR [ 30] DAYS NET FOR [ 60] DAYS FROM DOC OR M/E DATE [D]
F3 - UPDATE, F8 - DELETE, F10 - TYPE, ESC - EXIT
Enter the following term fields;
DESCRIPTION : 30 characters.
TERMS % : 2.2 digits.
FOR : 3 digits.Enter the percentage discount and the number of days outstanding to which the discount applies. These two fields occur twice.
NET FOR : 3 digits.Enter the number of days for net payment terms for example 60 days.
4 - 138 JULY 2006 Systems Utilities - User Guide

FROM DOC ORM/E DATE : 1 character.
Enter a [D] for document or [M] for month end. This will determine the date from which settlement discount is to be calculated.For those items containing an [M] a statement date will be written to the file during the Accounts Receivable month-end routine.For those items containing a [D], the due date will be calculated as the records are written to the debtors transaction file. The following programs are involved in the calculation of the due date.AR10 - Invoice/Credit Note Input .AR20 - Batch Input.AR21 - Batch Update.SP91 - Interface to AR and SA.You may optionally print the due dates on statements using AR91 - Statement/Form Print, provided you have specified this field in SU35 - Customised Form Maintenance, form type 'ST'.
Press [F3] to update the description file with this detail. To return to the company/branch selection prompt, press [F10]. Press [F8] to delete the code and description.
SU - Maintenance JULY 2006 4 - 139

FONTS - FN
These fonts may be used in all the soft forms set up in program SU35 - Customised Form Maintenance, as well as in the Report Writer System.
DESCRIPTION TYPE : 2 characters.Scan the file for [FN] or enter it.
DESCRIPTION CODE : 4 characters.Enter the code or press [F1] to scan the Font codes on file. Press [Enter] to accept the selection.
SYSTEM UTILITIES - DESCRIPTIONS FILE MAINTENANCE SU31 11/002CO - 01 - TECHNOLOGIES INCORPORATEDBR - 01 - CAPE TOWNDESCRIPTION TYPE [FN] FONTSDESCRIPTION CODE [0001] NOT ON FILE
DESCRIPTION [OKI 520 IBM ]FONT HEX ESC SEQUENCE [1B104108313030353130303000000000]
F3 - UPDATE, F10 - TYPE, ESC - EXIT
FONT HEX ESC SEQUENCE : 32 characters
Enter the hexadecimal escape sequence for the font relating to your printer. You will find these sequences in your printer manual.
4 - 140 JULY 2006 Systems Utilities - User Guide

INSTALMENT SALES ARREAR INTEREST - IS
This description type is used by the Instalment sales system to calculate interest on overdue contracts.
DESCRIPTION TYPE : 2 characters.Enter or scan the file for [IS].
DESCRIPTION CODE : 4 characters.Enter the code or press [F1] to scan the codes already on file and press [Enter] to accept the selection.
DESCRIPTION : 30 characters.Enter the representative's name and press [Enter] to accept.
ARREARS INTEREST RATE : 3.4 digits.Enter the rate to be used to calculate arrears interest on contracts.
FINANCE CHARGE RATE : 3.4 digitsEnter the rate to be uses by the system for calculating finance charges.
SYSTEM UTILITIES - DESCRIPTIONS FILE MAINTENANCE SU31 11/004CO - 01 - TECHNOLOGIES INCORPORATEDBR - 01 - CAPE TOWN DESCRIPTION TYPE [IS] CONTRACT RATES - INSTALMENT SL DESCRIPTION CODE [1 ] DESCRIPTION [1988/89 BOND RATE ] ARREARS INTEREST RATE [ 20.0000 %] FINANCE CHARGE RATE [ 0.0000 %] F3 - UPDATE, F6 - LONG DESC, F8 - DELETE, F10 - TYPE, ESC - EXIT
SU - Maintenance JULY 2006 4 - 141

OCCUPATION DESCRIPTION - OC
This description type is used on the Weekly Payroll system to clarify report details.
DESCRIPTION TYPE : 2 characters.Enter or scan the file for [OC].
DESCRIPTION CODE : 4 characters.Enter the code or press [F1] to scan the codes already on file and press [Enter] to accept the selection.
DESCRIPTION : 30 characters.Enter a description relevant to this code and press [Enter] to accept.
PATTERSON GRADE NUMBER : 5 characters.
This number is used for Union reporting and is optional. This same field is also available on the employee masterfile as entered in program WP30 - Masterfile Maintenance.
SYSTEM UTILITIES - DESCRIPTIONS FILE MAINTENANCE SU31 11/001 CO - 01 - TECHNOLOGIES INCORPORATED BR - 01 - CAPE TOWN DESCRIPTION TYPE [OC] OCCUPATION CODES DESCRIPTION CODE [0001] DESCRIPTION [LABOURER ] PATTERSON GRADE NUMBER [00000]
F3 - UPDATE, F8 - DELETE, F10 - TYPE, ESC - EXIT
4 - 142 JULY 2006 Systems Utilities - User Guide

PRODUCT GROUP DESCRIPTION - PG
These codes are held on individual Inventory Masterfile records. As it forms part of a key, all inventory reports may optionally be printed in product group sequence. Sales may also be analysed by product group.
SYSTEM UTILITIES - DESCRIPTIONS FILE MAINTENANCE SU31 11/001 CO - 01 - TECHNOLOGIES INCORPORATED BR - 01 - CAPE TOWN DESCRIPTION TYPE [PG] PRODUCT GROUPS DESCRIPTION CODE [0010] DESCRIPTION [ASSORTED TAPS ] SALES TARGET [30000.00 ] TARGET GP% [ 37.50 %
F3 - UPDATE, F8 - DELETE, F10 - TYPE, ESC - EXIT
DESCRIPTION TYPE : 2 characters.Enter or scan the file for [PG].
DESCRIPTION CODE : 4 characters.Enter the code or press [F1] to scan the rep. codes already on file and press [Enter] to accept the selection.
DESCRIPTION : 30 characters.Enter the product group description and press [Enter] to accept.
SALES TARGET : 7.2 digits.This is an optional field which is not used by the system. It may however be accessed with the Report Writer system to be used on user-defined reports.
TARGET GP% : 3.2 digits.This is an optional field which is not used by the system. It may however be accessed with the Report Writer system to be used on user-defined reports.
SU - Maintenance JULY 2006 4 - 143

PAYMENT METHOD - PM
Any one of these codes may be entered on order and invoice headers in the Sales Order Processing system. You may also enter a default payment method for each individual debtor in the Accounts Receivable system.
SYSTEM UTILITIES - DESCRIPTIONS FILE MAINTENANCE SU31 11/006CO - 01 - TECHNOLOGIES INCORPORATEDBR - 01 - CAPE TOWN DESCRIPTION TYPE [PM] PAYMENT METHOD DESCRIPTION CODE [CSH ] CASH DESCRIPTION [ ] CASH ANALYSIS [ ] BLANK-ACCOUNT 1-MULTIPLESU32 REFERENCE CODE [ ] 2-CASH 3-CHEQUEROUND DOWN TO NEAREST [ 0.00] 4-CREDIT 5-BUYAID 6-OTHER (EFT) M-MANUAL EFT F3 - UPDATE, F10 - TYPE, ESC - EXIT
DESCRIPTION TYPE : 2 characters.Enter or scan the file for [pm].
DESCRIPTION CODE : 4 characters.Enter the code or press [F1] to scan the Payment Method codes already on file and press [Enter] to accept the selection.
DESCRIPTION : 30 characters.Enter the description and press [Enter] to accept.
4 - 144 JULY 2006 Systems Utilities - User Guide

CASH ANALYSIS : 1 digit[ ] this blank default indicates on account[1] Multiple[2] Cash[3] Cheque[4] Credit Card[5] Buy Aid[6] Other (EFT)[M] Manual EFTIf this is non-blank, the Sales Order Processing system will allow you to enter an amount tendered for the payment method selected for a customer. If you selected option [1] - Multiple, the customer will be able to pay with a combination of these methods. For more information on Point-of-Sale features, please refer to Appendix A4 in the Sales Order Processing manual.If you select option [6] then SP10 and SP14 will automatically fill in the amount and no manual override will be allowed.If you have created an EFT type, then enter an [M]. This will cause SP10 - Order Entry to ask for the EFT amount. The difference between this and the total of the invoice, will be posted ‘ON ACCOUNT’.
SU32 REFERENCE CODE : 1 digitThis enables you to have a range of invoice numbers for different payment methods.If you leave this blank, the system will use the normal invoice range.However, you may enter any code from 1 to 9 to indicate a different range. If you do so, you must go to SU32 - Numbers File Maintenance, and enter the relevant details for the reference that you enter here.
ROUND DOWN TO NEAREST : 6.2 digitsIf you wish programs SP10/14 to round all cash payments down and add the difference to the discount, then you should enter the amount here. For instance, if payments should be rounded down to the nearest 5 cents, you will enter .05.
SU - Maintenance JULY 2006 4 - 145

PREFIX – PR
These prefixes are used to link to a specified numbering sequence. This numbering sequence will then be used by the relevant programs.
SYSTEM UTILITIES - DESCRIPTIONS FILE MAINTENANCE SU31 11/008CO - 01 - SEAGULL SOFTWARE CCBR - 01 - MAIN BRANCH DESCRIPTION TYPE [PR] PREFIXES DESCRIPTION CODE [IS ] NOT ON FILE DESCRIPTION [ITERNAL REQUISITIONS ] SU32 REFERENCE CODE [W] F3-UPDATE, F6-LONG DESC, F10-TYPE, ESC-EXIT
DESCRIPTION TYPE : 2 characters.Enter or scan the file for [PR].
DESCRIPTION CODE : 4 characters.Enter the code or press [F1] to scan the prefix codes already on file and press [Enter] to accept the selection.
DESCRIPTION : 30 characters.Enter the description and press [Enter] to accept.
SU32 REFERNCE CODE : 1 character.
4 - 146 JULY 2006 Systems Utilities - User Guide

PURCHASE ORDER AUTOMATIC SELLING PRICE MARKUP - PS
These codes refer to the first part of the inventory number (when it is specified as [PS] in IV00 - System Record Maintenance. Any inventory code starting with a code within this description type will have selling prices automatically updated according to this mark-up percentage, if the option determining this is set in the Purchase Order Parameter File.
DESCRIPTION TYPE : 2 characters.Enter or scan the file for [PS].
DESCRIPTION CODE : 4 characters.Enter the code or press [F1] to scan the inventory category codes already on file and press [Enter] to accept the selection.
DESCRIPTION : 30 characters.Enter the description and press [Enter] to accept.
INVENTORY CATEGORY % MARK UP : 2.3 digits.
Press [F3] to update the description file with these details and press [F10] to return to the company/branch selection or press [F8] to delete the code and description.
SYSTEM UTILITIES - DESCRIPTIONS FILE MAINTENANCE SU31 11/001 CO - 01 - TECHNOLOGIES INCORPORATED BR - 01 - CAPE TOWN DESCRIPTION TYPE [PS] AUTOMATIC SELLING PRICE MARKUP DESCRIPTION CODE [1200] DESCRIPTION [HAMMER ] STOCK CATEGORY % MARK UP [40.00 ] %
F3 - UPDATE, F8 - DELETE, F10 - TYPE, ESC - EXIT
SU - Maintenance JULY 2006 4 - 147

CUSTOMER SPECIAL CODES - P1 TO P4
These are only used in conjunction with the special customised module for piecework input into the Weekly Wages Module.
For more information contact your Support Office.
ROUTE CODE - RC
A route code is normally associated with a specific delivery address. This may be printed on invoices/delivery notes. It also allows the analysis of sales by route code in the Sales Analysis module.
DESCRIPTION TYPE : 2 characters.Enter or scan the file for [RC].
DESCRIPTION CODE : 4 characters.Enter the code or press [F1] to scan the route codes already on file and press [Enter] to accept the selection.
DESCRIPTION : 30 characters.Enter the route description press [Enter] to accept.
ROUTE ACCOUNT NUMBER : 5.4 digits.
This is a memorandum field and is not used by the system.
SYSTEM UTILITIES - DESCRIPTIONS FILE MAINTENANCE SU31 11/001 CO - 01 - TECHNOLOGIES INCORPORATED BR - 01 - CAPE TOWN DESCRIPTION TYPE [RC] ROUTE CODE DESCRIPTION CODE [0010] DESCRIPTION [SOUTHERN SUBURBS ] ROUTE ACCOUNT NUMBER [H.T. ]
F3 - UPDATE, F8 - DELETE, F10 - TYPE, ESC - EXIT
4 - 148 JULY 2006 Systems Utilities - User Guide
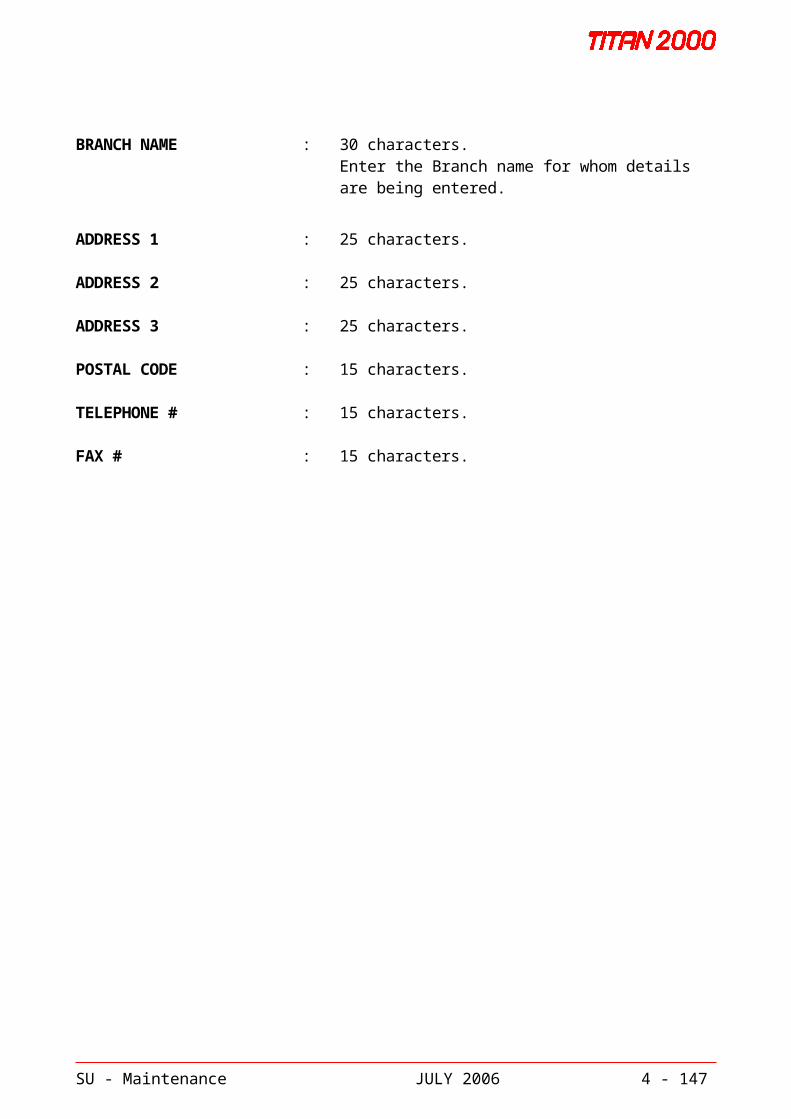
SALESMEN'S NAMES AND COMMISSION RATES - RP
These codes are held on individual customer masterfile records. As it forms part of a key, all customer reports may optionally be printed in representative number sequence. Sales may also be analysed by representative and commission will be calculated by the Sales Analysis system according to the commission rate held.
SYSTEM UTILITIES - DESCRIPTIONS FILE MAINTENANCE SU31 11/001CO - 01 - TECHNOLOGIES INCORPORATEDBR - 01 - CAPE TOWN DESCRIPTION TYPE [RP] SALESMEN NAMES AND COMM. RATES DESCRIPTION CODE [0010] DESCRIPTION [JACK WALTERS ] REPS COMMISSION RATE [50.0000 %] COMMISSION PAYABLE FROM [ 0.00 ] TO [999999999.00 ] F3 - UPDATE, F8 - DELETE, F10 - TYPE, ESC - EXIT
DESCRIPTION TYPE : 2 characters.Enter or scan the file for [RP].
DESCRIPTION CODE : 4 characters.Enter the code or press [F1] to scan the salesmen. codes already on file and press [Enter] to accept the selection.
DESCRIPTION : 30 characters.Enter the representative's name and press [Enter] to accept.
REPS COMMISSION RATE : 5.4 digits.Enter the rate applicable for this salesman for this value range.
SU - Maintenance JULY 2006 4 - 149

The values entered below are memorandum items and are not used by the normal programs. They are available to you in the Report Writer system, where you may use or manipulate them as required.
COMMISSION PAYABLE FROM : 7.2 digits.
COMMISSION PAYABLE TO : 7.2 digits
Press [F3] to update the description file with these details and press [F10] to return to the company/branch selection or press [F8] to delete the code and description.
4 - 150 JULY 2006 Systems Utilities - User Guide

RANGE SIZE DESCRIPTIONS - RS
These codes are held on individual inventory masterfile records in the "packing reference" field. It is used on all user-defined forms in the Inventory, Sales and Purchase ordering systems.
It is also used in the Purchase Ordering system when capturing free range format orders.SYSTEM UTILITIES - DESCRIPTIONS FILE MAINTENANCE SU31 11/001 CO - 01 - TECHNOLOGIES INCORPORATED BR - 01 - CAPE TOWN DESCRIPTION TYPE [RS] RANGE OF SIZES DESCRIPTION CODE [0001] SIZES : [28 ] [42 ] [30 ] [44 ] [32 ] [46 ] [34 ] [48 ] [36 ] [50 ] [38 ] [52 ] [40 ] [54 ]
F3 - UPDATE, F8 - DELETE, F10 - TYPE, ESC - EXIT
DESCRIPTION TYPE : 2 characters.Enter or scan the file for [RS].
DESCRIPTION CODE : 4 characters.Enter the code or press [F1] to scan the range codes. codes already on file and press [Enter] to accept the selection.
SIZES : 3 characters.Fourteen sizes of three characters each may be entered for each code. All unused sizes must be filled with blanks.
If you leave these blank, the system will set up headings automatically when printing. These will then only pertain to the actual sizes sold and will not include the whole range of sizes.
Press [F3] to update the description file with these details and press [F10] to return to the company/branch selection or press [F8] to delete the code and description.
If any size description is greater than three characters, any number prefixed by an "R" may be entered in any of the 14 fields. The system will then look up the description under type [RT] for that code, for example if [R23] is entered in any of the fields, the system will look up code [R23] under description type "RT" to find the description.
SU - Maintenance JULY 2006 4 - 151

RANGE SIZE DESCRIPTIONS - RT
This description type is used where type RS described previously provides insufficient space for size descriptions. A link between an RS type description and an RT type will be established.
SYSTEM UTILITIES - DESCRIPTIONS FILE MAINTENANCE SU31 11/001 CO - 01 - TECHNOLOGIES INCORPORATED BR - 01 - CAPE TOWN DESCRIPTION TYPE [RT] RANGE SIZE DESCRIPTIONS DESCRIPTION CODE [R23 ] DESCRIPTION [HATS 6 3/4 TO 7 1/2 ]
F3 - UPDATE, F10 - TYPE, ESC - EXIT
DESCRIPTION TYPE : 2 characters.Enter or scan the file for [RT].
DESCRIPTION CODE : 4 characters.Enter the code or press [F1] to scan the range codes. Codes already on file and press [Enter] to accept the selection.
All the codes must start with an "R".
DESCRIPTION : 30 charactersYou may enter a description of up to 30 characters to describe the size.
Press [F3] to update the description file with these details and press [F10] to return to the company/branch selection or press [F8] to delete the code and description.
4 - 152 JULY 2006 Systems Utilities - User Guide

SUNDRY CHARGES - SC
Sundry charges are used by the Sales Order Processing system. Any of these codes may be entered on the invoices. Under certain circumstances the value of the charge will be calculated by the system.
SYSTEM UTILITIES - DESCRIPTIONS FILE MAINTENANCE SU31 11/001CO - 01 - TECHNOLOGIES INCORPORATEDBR - 01 - CAPE TOWN DESCRIPTION TYPE [SC] SUNDRY CHARGES DESCRIPTION CODE [1 ] DESCRIPTION [RAILAGE ] SUNDRY CHARGE [ 10.0000 ]MULTIPLY BY [N] GROSS/NET/QUANTITYTAX RATE [0]SUNDRY CHARGE %? (Y/N) [Y]INCLUSIVE OF TAX (Y/N) [ ] N - EXCLUSIVE F3 - UPDATE, F8 - DELETE, F10 - TYPE, ESC - EXIT
DESCRIPTION TYPE : 2 characters.Enter or scan the file for [SC].
DESCRIPTION CODE : 4 characters.Enter the code or press [F1] to scan the sundry charges already on file and press [Enter] to accept the selection. If this code has not already been set up in AR32 - Category File Maintenance, the code will not be accepted and the operator will be required to go to that program and enter the code there first.
DESCRIPTION : 30 characters.Enter the representative's name and press [Enter] to accept.
SUNDRY CHARGE : 7.2 digits.This may either be an absolute value or a percentage of [G]ross, [N]et or [Q]uantity total of the order/invoice.
MULTIPLY BY : 1 character.The value above will either used in a calculation using the gross or net value or the quantity of the order, or, if this field is left blank, the value entered will be used as an absolute but may be altered at invoicing stage.
SU - Maintenance JULY 2006 4 - 153

TAX RATE : 1 digit.This refers to the rates set up on program AR31 - Tax category Maintenance. The value entered here will determine the tax rate applicable to the specific sundry charge.
SUNDRY CHARGE % : Y/NIf you enter [Y] this indicates that the sundry charge is a percentage and not a fixed amount.
INCLUSIVE OF TAX (Y/N) : Y/NThis will be used by program SP10 - Order Entry when capturing orders/invoices and the required calculations will be made accordingly.
4 - 154 JULY 2006 Systems Utilities - User Guide

SALES ANALYSIS CODE 1 - S1
This description type is user-defined and may be entered on any invoice header in order to provide a level of analysis additional to the normal product and customer groups.
The details entered on each code will override normal defaults such as price and discount codes and normal tax parameters held on the customer and inventory masterfiles.
SYSTEM UTILITIES - DESCRIPTIONS FILE MAINTENANCE SU31 11/023CO - 01 - TECHNOLOGIES INCORPORATEDBR - 01 - CAPE TOWNDESCRIPTION TYPE [S1] SALES ANALYSIS CODE 1DESCRIPTION CODE [0001] NOT ON FILE
DESCRIPTION [ ]PRICE # [09]TAX RATE [%] % - DEFAULTS TO CUSTOMERS TAX CATEGORYDISC/SURCHARGE # [09]OVERALL DISC # [09] 9 - DEFAULTS TO CUSTOMERS PRICE AND DISCOUNT/SURCHARGES
F3 - UPDATE, F10 - TYPE, ESC - EXIT
DESCRIPTION TYPE : 2 characters.Enter or scan the file for [S1].
DESCRIPTION CODE : 4 characters.Enter the code or press [F1] to scan the sales analysis codes already on file and press [Enter] to accept the selection.
DESCRIPTION : 30 characters.Enter the representative's name and press [Enter] to accept.
PRICE # : 2 digits.Enter the default price to be used when this analysis code is used on the order/invoice header.A [9] entered here will cause the record to have no effect on any of the normal defaults.
TAX RATE : 1 character.If a [%] sign is entered here, the customer tax category will be taken as the default. Any other character should be as set up in program AR31 - Tax category Maintenance.
SU - Maintenance JULY 2006 4 - 155

DISC/SURCHARGE # : 2 digits.Enter the default discount/surcharge number to be used when this analysis code is used on the order/invoice header. This is read from the records entered in SP32 - Discount/Price Matrix.A [9] entered here will cause the record to have no effect on any of the normal defaults.
OVERALL DISCOUNT # : 2 digits.Enter the default overall discount number to be used when this analysis code is used on the order/invoice header. This is read from the records entered in SP32 - Discount/Price Matrix.A [9] entered here will cause the record to have no effect on any of the normal defaults.
Press [F3] to update the description file with these details and press [F10] to return to the company/branch selection or press [F8] to delete the code and description.
4 - 156 JULY 2006 Systems Utilities - User Guide

Sales analysis code 2 - S2
This is a user-defined description type, allowing an additional analysis code to be entered at invoicing stage. For instance it could be used to distinguish special promotion invoices from normal ones.
It may also be used to suppress the use of messages in the Sales Order Processing and Inventory Systems.
SYSTEM UTILITIES - DESCRIPTIONS FILE MAINTENANCE SU31 11/006CO - 01 - TECHNOLOGIES INCORPORATEDBR - 01 - CAPE TOWN DESCRIPTION TYPE [S2] SALES TYPE DESCRIPTION CODE [S ] DESCRIPTION [SAMPLE SALES ] IV MESSAGE 1 [I]IV MESSAGE 2 [I] F3 - UPDATE, F8 - DELETE, F10 - TYPE, ESC - EXIT
DESCRIPTION TYPE : 2 charactersScan the file for code ‘S2’.
DESCRIPTION CODE : 4 charactersEnter a new code of press [F1] to scan the codes already on file. Press [Enter] to accept the selection.
DESCRIPTION : 30 charactersEnter a description for this code.
IV MESSAGE 1 : 1 characterEnter an ‘I’ in this field if you want the message system in the Sales Order Processing and Inventory Systems to ignore message 1 on an order where this code is entered on the header.
IV MESSAGE 2 : 1 characterEnter an ‘I’ in this field if you want the message system in the Sales Order Processing and Inventory Systems to ignore message 2 on an order where this code is entered on the header.
Press [F3] to update the file with the new information.
SU - Maintenance JULY 2006 4 - 157

TRANSACTION TYPES - TT
There are 3 default transaction types set up when running CB00 - System Record Maintenance, namely CHQ, DEP and JNL. These may be edited to suit the user.
If you use the Bank Link system in conjunction with the Cash Book, the banks will provide you with a list of existing statement codes and their descriptions. You must enter ALL of these.
SYSTEM UTILITIES - DESCRIPTIONS FILE MAINTENANCE SU31 11/107 CO - 01 - TECHNOLOGIES INCORPORATED BR - 01 - CAPE TOWN DESCRIPTION TYPE [TT] TRANSACTION TYPES DESCRIPTION CODE [DEP ] DESCRIPTION [DEPOSITS ] TRANSACTION TYPE [1] 1-dep,2-pay,3-jrn SIGN (+/-) [+] BANK REF [ ] TOTAL FOR MONTH [ 500.00 ] NUMBERING [1] 0 - Manual 1 - Next Deposit (NB MATCH STRING: 2 - Next Cheque a) amt + typ = mandatory 3 - Next Journal b) doc only for Trans type 2 ) 4 - System Numbering MATCH STRING [NYNY] (Y)es,(N)o 1234 1-doc,2-amt,3-date,4-typ AUTO POST BL TO CB? (Y/N) [Y] CATEGORY [0022] BATCH? [N] F3 - UPDATE, F8 - DELETE, F10 - TYPE, ESC - EXIT
DESCRIPTION TYPE : 2 characters.Enter or scan the file for [TT].
DESCRIPTION CODE : 4 characters.Enter the code (i.e. BCH - Bank Charges) or press [F1] to scan the transaction type codes already on file and press [Enter] to accept the selection.
DESCRIPTION : 30 characters.Enter the description, for example BANK CHARGES.
TRANSACTION TYPE : 1 digit[1] Deposit[2] Payment[3] Journal)This is required to link a bank-defined transaction on the incoming flat file to an actual reconciliation transaction which may be posted to the Cashbook as a transaction.
4 - 158 JULY 2006 Systems Utilities - User Guide

SIGN (+/-) : 1 digit.Enter a plus or minus sign to indicate whether this transaction type should increase or decrease the Cash Book balance.
BANK REF : 4 characters.Enter a bank reference/special reference as supplied by your bank. This will automatically appear as a cross reference in the Input programs. If you are using the Banklink interface, you MUST enter the interface type here, for instance CATS, CAMS or BEST. If the system detects that the reference you enter here has been entered in program SU31 - Descriptions File Maintenance, type 'BI', then a new screen will automatically be called. (See below)
SYSTEM UTILITIES - DESCRIPTIONS FILE MAINTENANCE UTBREF11/002 CO - 01 - TECHNOLOGIES INCORPORATED ttyp3 BR - 01 - CAPE TOWN DESCRIPTION CODE DD BANKLINK INTERFACE CAMS BANK REF [3522 ] START POS [23] LENGTH [13] ZEROES IF UNUSED +----------------------------------------------------------------------------+|SUPPLIER REFERENCE CATEGORY || [26800780 0006 ] [1000] || || || || || || || || <x || || <x || ||F1 - SCAN, F3 - UPDATE, F8 - DELETE, F10 - PREV.SCRN |+----------------------------------------------------------------------------+F1 - SCAN, F3 - UPDATE, F8 - DELETE, F10 - PREV.SCRN
BANK REF ; 8 charactersThis new screen will require you to enter the bank references relating to the interface type you selected.
In addition, the bank download file may contain speedpoint transactions. These are deposits made by credit card. Depending on the supplier's reference, these transactions may be allocated automatically to different GL account numbers.
The file BLSUPP holds, by interface type (for example CAMS,) and by bank reference for example. 3522, the supplier's reference and it's associated CB32 category code.
START POS : 2 digits
SU - Maintenance JULY 2006 4 - 159

LENGTH : 2 digitsThe supplier's reference may be selected as a portion of the 50 character narrative available. For example, for interface type CAMS, bank reference 3352, the supplier reference or card number starts at position 23 of the description for a length of 13. The portion of the description selected as the supplier reference will be passed to the transactions as a narrative. If no supplier reference is specifically selected that is START POS 0 and LENGTH 0, then the complete 50 character description (or smaller, depending on the interface type) will be passed to the transaction narrative.
If a starting position and length are entered, a new window pops up which allows a category code to be attached to this supplier reference. This category code must be entered in CB32 - Cashbook Analysis Category Maintenance, and a valid CO/BR and GL account # attached to it. This category will then override the category entered on the first screen of this SU31 option.
Each bank reference code must refer to only ONE transaction type (e.g. CHQ), but each transaction type may have more than one bank reference.
Press [F3] after every reference entered and [F10] when you have entered all the references to take you back to the previous screen.
Continue as described below.
TOTAL FOR MONTH : 5.2 digits.This is automatically adjusted by the Input programs.
NUMBERING : [0] Manual - user enters first document number and the system will increment numbering from there.You enter first document number for the following types in program CB30 - Bank Master File Maintenance. If you use options [1] to [3] below, the system will read that record, allocate the next number to the transaction and increment the masterfile record by one.[1] Next Deposit[2] Next Cheque[3] Next Journal[4] System Numbering - displays the system date as the document number.
4 - 160 JULY 2006 Systems Utilities - User Guide

MATCH STRING : 4 charactersThe four positions correspond to four possible components on which reconciliation items from the bank statement may be matched to transactions. Enter a [Y] or [N]. Note that only 3 transaction types will allow you to enter a [Y] for document number. These are 'CHQ', 'TJK' and 'ACB'. No other incoming transactions held on bank link files possess a uniquely identifying number. If you wish to match on document number you will have to enter the above as description types.The minimum you may enter as match string is a [Y] for amount and type.
AUTO POST TO CB (Y/N) : 1 character[Y] - will automatically write the incoming transaction from the bank link files to the reconciliator as well as create a cashbook transaction where no corresponding entry can be found in the cashbook.The numbering of these cashbook transactions depend on the SU31 - Descriptions File Maintenance option for that transaction type and will be as follows for bank Link items. If numbering method is;[0] - the document number from the flat file will be used.[1], [2] or [3] - the next appropriate document number will be taken from CB30 - Bank Master File Maintenance.[4] - the document date from the flat file will be used as document number.
CATEGORY : 4 characters This prompt will only be displayed if you answered [Y] above. Enter the Cashbook analysis category to which this transaction type should be posted.
Remember that if you use supplier references as described above, that this code will be overwritten by the one attached to the suppliers reference.
SU - Maintenance JULY 2006 4 - 161

BATCH? : Y/NIf [Y] program BL10 - Bank Link Input will post the statement entries to a Cash Book batch. You will therefore be able to amend transactions via CB22 - Batch Input. For instance you will be able to change the General Ledger CO/BR, or split the transaction across different categories, or add a narrative to the transaction header.A separate batch will be captured for Deposits, Payments and Journals using the next batch numbers captured in BL00 - System Record Maintenance. In order to allow review of batches in CB22 - Batch Input, a valid customer/supplier code has to be entered. BL10 - Bank Link Interface to Cashbook uses the bank method e.g. "BEST", "CAMS", "CATS" etc. as the customer/supplier. These must therefore be captured in CB33 - Limited Customers File and CB34 - Limited Suppliers File.If [N] statement transactions will be posted directly to the Cash Book Reconciler.
Press [F3] to update the description file with these details and press [F10] to return to the company/branch selection or press [F8] to delete the code and description.
4 - 162 JULY 2006 Systems Utilities - User Guide

WAREHOUSES - WH
These are used by the Inventory, Sales Order Processing and Purchases Ordering Systems.
SYSTEM UTILITIES - DESCRIPTIONS FILE MAINTENANCE SU31 11/003CO - 01 - TECHNOLOGIES INCORPORATEDBR - 01 - CAPE TOWN DESCRIPTION TYPE [WH] WAREHOUSES WAREHOUSE # [01] DESCRIPTION [CENTRAL ] XFERS OUT ADJUSTMENTSINCLUDE IN USAGE [N] [N] STOCK ISSUE VOUCHER # [000144]INVOICE # [000001] TO [999999] THEN [202020]CREDIT NOTE # [000001] TO [999999] THEN [202020] ALLOCATE STOCK IN PO (Y/N) [N] F3-UPDATE, F6-LONG DESC, F8-DELETE, F10-TYPE, ESC-EXIT
WAREHOUSE # : 2 digitsEnter any value between 1 and 99.
DESCRIPTION : 30 charactersEnter the name of the warehouse.
The following two prompts are used when you wish to do invoicing and credit note numbering by warehouse. This option is set in SP00 - System Record Maintenance.
You enter in sequence the next document number, the last number in the range and then the number to which it reverts when it reaches the end of the range. For instance, next number is 002245, last number in range is 100000 and then when it reaches this end-of-range it will restart at 002000.
INVOICE # : 6 digits x 3Enter the next invoice number, the last invoice number in the range and the new starting number.
CREDIT NOTE # 6 digits x 3Enter the next credit note number, the last credit note number in the range and the new starting number.
ALLOCATE STOCK IN PO : Y/NIf this option is set to [Y] and the same option in PO00 - System Record Maintenance, to [W], then raw material stock will be updated and allocated to a designated customer in PO10 - Order Input.
SU - Maintenance JULY 2006 4 - 163

INCLUDE IN USAGE
Usage figure may be viewed in program IV50 - Enquiries. The usage quantity is always updated by all issues captured in program IV10 - Issues/Receipts/Adjustments/Transfers, and all invoices and credit notes captured in the Sales Order Processing system. In addition you may select to update the usage quantity by transfers out and/or stock count adjustments.
XFERS OUT : Y/N[Y] indicates that all transfers out captured via IV10 - Issues/Receipts/Adjustments/Transfers, and SP20 - Branch Order Entry, must also update the usage figure.[N] indicates that only the defaults above must be used.
ADJUSTMENTS : Y/N[Y] indicates that stock adjustments as updated via program IV84 - Inventory-Count Variance Update, as well as normal adjustments captured in IV10 - Issues/Receipts/Adjustments/Transfers, must also update the usage figure.[N] indicates that only the defaults must be used.
STOCK ISSUE VOUCHER NUMBER : 6 digits
This is the next stock issue number for this warehouse and is incremented automatically for each issue. It is additional to the present issue voucher printed in JC10 - Job Cost Input, and JC22 - Job Cost Input - Fast Materials Input.This number is used by IV10 - Issues/Receipts/ Adjustments/Transfers, JC10 - Job Cost Input and UTJC10 which automatically get the next SIV# for each stock issue and update NUMBWH. In addition to input audit trails, the following programs also print this SIV#. JC10 - Job Cost Input (if the option is set in JC00 - System Record Maintenance), JC73 - Requisition Notes, JC80 - Audit Trail, JC92 - PO Updates to Job, IV77 - Movements Report and JC76 - Work Centre Analysis.
4 - 164 JULY 2006 Systems Utilities - User Guide

USER DEFINED TYPES - X, Y, Z
All description types starting with X,Y or Z are used for user defined purposes.
The screen below gives an example of the fields available for entry.
SYSTEM UTILITIES - DESCRIPTIONS FILE MAINTENANCE SU31 11/106 CO - 01 - TECHNOLOGIES INCORPORATED BR - 01 - CAPE TOWN DESCRIPTION TYPE [XS] NAMIBIAN TIMESHARE SCHEMES DESCRIPTION CODE [A ] DESCRIPTION [MOKUTI LODGE NAMIBIA ] [ ] A1 [ ] A2 [ ] AMOUNT [ 2300.00 ] N2 [00] F3 - UPDATE, F8 - DELETE, F10 - TYPE, ESC - EXIT
DESCRIPTION TYPE : 2 charactersMust start with X, Y or Z
DESCRIPTION : 30 characters
DESCRIPTION CODE : 4 charactersThe code for this description type.
DESCRIPTION : 60 characters
You have two fields of 30 characters each
A1 : 1 characterThis field is user defined
A2 : 1 characterThis field is user defined
AMOUNT : 7.2 digitsThis is the value associated with the code.
N2 : 2 digitsThis is a user defined numeric field.
SU - Maintenance JULY 2006 4 - 165

4.4. NUMBERS FILE MAINTENANCE - SU32
Various sequential numbering systems are maintained in this module, for example next Accounts Receivable audit number, next invoice number etc.
The numbering is extremely flexible allowing for different sequences for various Company/Branch combinations and is entirely under your control.
The following is a list of references used by the system.REF DESCRIPTION1 to 9 Alternate invoicing sequence by Payment Method defined in SU31.A Accounts Receivable audit number.B General Ledger batch number.b BM77 Reference NumberC Sales Order Credit note number.c Job Costing Credit note number.D Inventory transaction audit number.E Inventory Interface error number.F Accounts Payable internal reference number.f Foreign currency payment reference number for Accounts Payable.G General ledger audit number.H Next Standing Purchase Order number.I Sales Order Invoice number.i Job Costing Invoice number.J Job Costing audit number.K Claim number for Purchase Ordersm Batch number for Cashbook (CB22)N Delivery Note Numbern Next order number for SP20O Order number.o Used internally by SP for an internal order number.P Purchase order number.p Cashbook temporary customer number.Q Recommended purchase order number.R Accounts Payable audit number.r Cash Book audit number.s Next Cash Book standing entry audit number.T Next Temporary Stock number.t Next Cash Book reconciliation transaction audit number.V Purchase order GRV number.v Internal Requisition number (Purchase Ordering System)W Purchase Order transaction number.x Automatic payments via bank transfer in the Accounts Payment
system. Used by AP82 - Remittance & Bank Transfer if set in AP00 -
4 - 166 JULY 2006 Systems Utilities - User Guide

REF DESCRIPTIONSystem Record Maintenance. Five (5) digits long and prefixed by ‘T’. Set up a different sequence per CO/BR.
Y Reserved for Customer SpecialsZ Reserved for Customer Specials
The individual User Guides indicate which references are required by each system.
Enter SU32 from the Maintenance module menu to select this program.
REFERENCE CODE : 1 character.Press [F1] to scan the reference codes already on file. The reference codes are displayed together with the next available number.
The system now displays the description field, the present number value and the next available number. Press [Enter] to accept the display or enter [N] to update the display.Enter a new description or press [Enter] to move to the next available number field.
SYSTEM UTILITIES - NUMBERS FILE MAINTENANCE SU32 11/004CO - 01 - TECHNOLOGIES INCORPORATEDBR - 01 - CAPE TOWN REFERENCE CODE [3] DESCRIPTION [CHEQUE ] NUMBERS VALUE 2 NEXT AVAILABLE # [ 2] TO [999999] THEN [ 1] DETAILS OK? (Y/N) [Y] F3-ACCEPT, F8-DELETE, F10-CO/BR, ESC-EXIT
DESCRIPTION : 30 characters.The description is normally system created but may be altered.
NUMBERS VALUE : 6 digits.This field is not available for entry and represents the next available number for this type.
SU - Maintenance JULY 2006 4 - 167

NEXT AVAILABLE # : 6 digits.Enter the new number. This number will be incremented by the various programs that make use of the numbers file. Press [F3] to update the file or enter [Y]. Press [F8] to delete the number file reference code.
TO : 6 digitsYou may optionally set an end to the range and then restart at the number entered in the ‘THEN’ prompt below.
THEN : 6 digitsYou need not restart the sequence from 1 but may select a different restart number.
CAUTION should be used when deleting a reference code, as the systems that use this code will not function without the code and number sequence.
4 - 168 JULY 2006 Systems Utilities - User Guide

4.5. NARRATIVE FILE MAINTENANCE - SU33
This is a general purpose narrative file used by various systems. Refer to the individual User Guides.
SYSTEM UTILITIES - NARRATIVE FILE MAINTENANCE SU33 11/001 NARRATIVE CODE 001 DESCRIPTION [OUT OF PRINT ] TYPE [1] (1-3 for SP00)
F3 - UPDATE, F8 - DELETE, F9 - PRINT, F10 - PREV
NARRATIVE CODE : 3 characters.Enter a three character description type or press [F1] to scan the file of types and their descriptions on file.
DESCRIPTION : 40 characters.Enter a description corresponding to the narrative code and press [F3] to update.
TYPE : 1 digitEntries allowed 1 -3.This is only for use in the Sales Order Processing and Inventory systems. See SP00 - System Record Maintenance and Appendix A1 in the Sales Order Processing User Guide, and IV30 - Company Inventory Maintenance in the Inventory User Guide.
The status line provides the prompts. Press [F3] to update, [F8] to delete a narrative code, [F9] to print all narratives on file and [F10] to return to the previous screen.
SU - Maintenance JULY 2006 4 - 169

4.6. CAPTURE USER DEFINED SCANS - SU34
This program captures user-defined scans. It uses RWDICT Report Writer definitions. Capturing is as per RW30 - Report Maintenance. There is a limit of 8 fields for each scan. If the scan is named the same as an existing Titan scan, then this user defined scan will be used in stead of the normal Titan scan.. Program SU54 - Run User Defined Scans can be used to preview all scans (those that will replace normal Titan scans and any other user defined ones).
The available scans and programs which use them are listed at the end of this section.
Enter SU34 to select the program.
4.6.1. SELECTING A SCAN
SYSTEM UTILITIES - CAPTURE USER DEFINED SCANS SU34 11/003 SCAN NAME [CREDITORS ] SCAN NAME DESCRIPTION FILE USER ACCESS KEYCREDITORS <>>CREDITORS MASTERFILE PLMAST SYSADMIN co/br/suppl#DEBTORS SCAN OF DEBTORS MASTERFILE SLMAST SYSADMIN co/br/acc# *** NO MORE ITEMS ***F1-SCAN, F3-ACCEPT, F4-COPY, F5-ALT SCAN, ESC-EXIT
Enter the following fields;
SCAN NAME : 10 characters.Enter a unique name if creating a new scan or enter the name of an existing scan. If unsure of the name of an existing scan press [F1] to use the scan facility.
SCAN FACILITY
There are three ways of scanning for a name;
Scan name sequence.
User name (indicates which user the scan belongs to)
File Name.
The above scans can be alternated by pressing [F5].
4 - 170 JULY 2006 Systems Utilities - User Guide
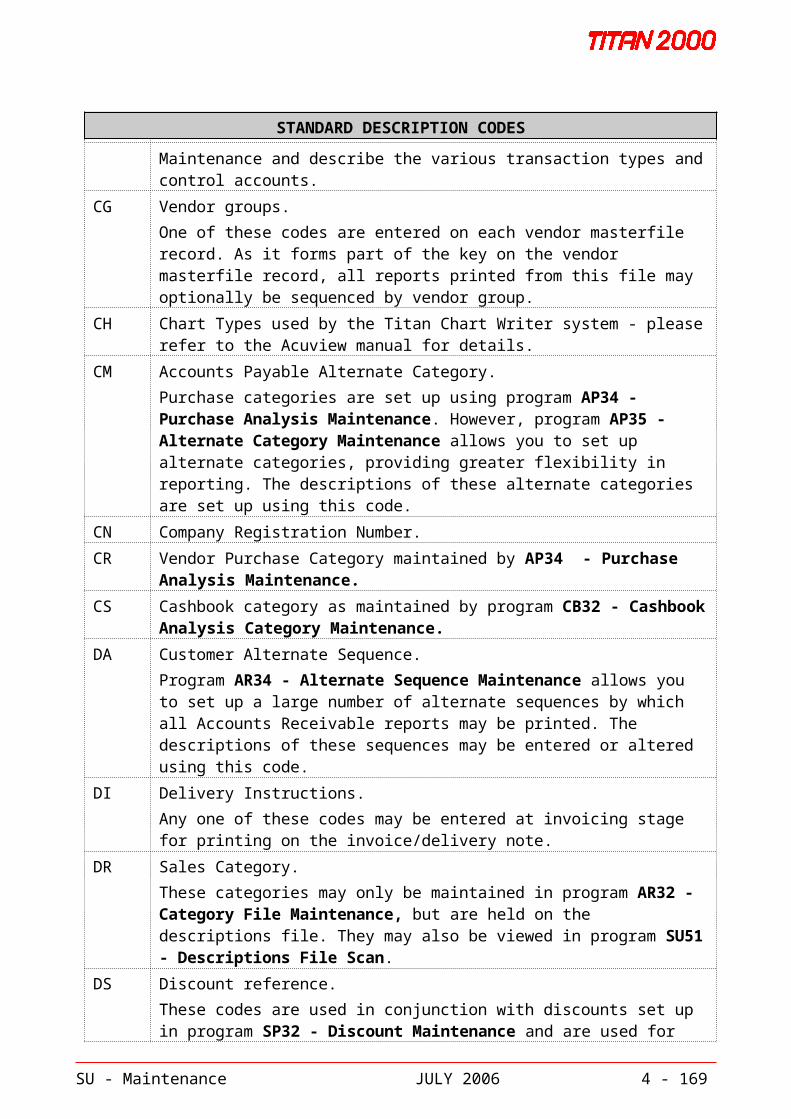
SECURITY LEVELS
Various security levels are used by the system. Whenever a security violation is detected, an appropriate message will be displayed, and access will be denied to the selected field, file or scan. These security levels are set up in program SU38 - System Password Maintenance. Please see the screen below and refer to the Systems Utilities User Guide for more information.
SYSTEM UTILITIES - SYSTEM PASSWORD MAINTENANCE SU38 11/001USER NAME : MARINAUSER DESCRIPTION [DEBTORS CLERK ]REPORT DEFAULTS: Destination Printer# Destinations: 1 [0] [00] 1 = Report management system 2 [0] [00] 2 = Direct to printer 3 [0] [00] 3 = Direct to a file 4 = Direct to screen 5 = Mail recipientCOMPANY ACCESS [01] TECHNOLOGIES INCORPORATEDBRANCH ACCESS [00] ALL BRANCHESWAREHOUSE ACCESS [00] ALL WAREHOUSESSUPERVISOR [ *NONE* ]LEVEL [5]VIEW ACCESS (R/W/D)? [D] O/S ACCESS (Y/N)? [N]
F1 - SET ACCESS, F2 - USER DEFAULTS, F3 - UPDATE, F8 - DELETE, ESC - EXIT
The levels of security are;
SCAN SECURITY : A user may only run or update their own scans, or those belonging to "PUBLIC". SYSADMIN has access to all reports. Permission is required to access another user's scan and then it must be copied over to the new user's name.
SYSTEM SECURITY : Each file used by the Report Writer may be assigned to a particular system, such as AP, AR etc. (RW25 - Dictionary File Maintenance). Whenever the user is prompted for a file name the program will check whether the file belongs to a system to which the user has access and if not the access will be denied. This check will also be performed when trying to run a report.
SU - Maintenance JULY 2006 4 - 171

FILE SECURITY : Each file used by the Report Writer may have a security level of 0 - 9. (0 = No security, 9 = high security).Once a user has been cleared to use a file at system level, the program will check his security level against the level of the file. If his security level is lower than the file security level, he will be denied access to the file.
Security checking is performed by RW30 - Report Maintenance, RW50 - Report Enquiry, RW70 - Report Print and RW71 - Create Disk File.
4 - 172 JULY 2006 Systems Utilities - User Guide

4.6.2. CREATING NEW SCANS
SYSTEM UTILITIES - CAPTURE USER DEFINED SCANS SU34 11/003 SCAN NAME GEN. LEDG. *** NEW SCAN ***USER NAME [SYSADMIN] AUTHOR : SYSADMINSCAN DESCRIPTION [GENERAL LEDGER SCAN ] DISPLAY WIDTH [ 80] FILE NAME DESCRIPTION ACCESS # DESCRIPTION[NLMAST ] FILE NAME DESCRIPTION FILE TYPE SYSTEM SECURITY LVLLOGFILE INDEX 0LYFILE GL - LAST YEAR'S ACCOUNT FILE INDEX GL 0MGTFIL GL - MANAGE/REPORTS PARAM FILE INDEX GL 0MPNAR MP - Narratives INDEX MP 0NLBATCH GL - BATCH INPUT FILE INDEX GL 0NLDIARY GL - DIARISED JOURNAL FILE INDEX GL 0NLMAST <--> GL - MASTER FILE INDEX GL 0 F1-SCAN, F2-BACK, F3-UPDATE, F4-VIEW, F7-FLD DETS
Level 1
SCAN NAME : 10 characters. Enter a meaningful scan name.
USER NAME : 8 characters.The program defaults to the USER NAME running the program. Accept the display or enter the user name to which the scan must belong.
AUTHOR : The author is the user who originally designed a scan. This field is not available for entry. If a scan is copied to another user, the Author Name stays the same.
SCAN DESCRIPTION : 30 charactersEnter a meaningful description for the scan.
DISPLAY WIDTH : 3 digitsEnter a value between 1 and 132 to indicate the display width of the scan.
FILE NAME : 8 characters.Enter the file name to be used in the scan or press [F1] to access the dictionary file.
The display will show the system file name alongside the file description, file type, system and security level.
Select the file to be used as the basis of the scan by pressing [Enter].
SU - Maintenance JULY 2006 4 - 173

ACCESS NUMBER : 2 digits.Enter the access number (1 to 10) or press [F1] to scan the access numbers available for the selected file.The default display shows an access number of 0, which is not a valid access number. This is to ensure that a valid access number (between 1 and 10) is entered.
Each file in the pre-defined Report Writer dictionary has one or more access numbers associated with it (access keys).
The access number is used to determine the sequence in which the scan will display. The access number is also used to enable the setting of start and end ranges for enquiry and reporting purposes. A further use of the access number is to indicate what data is required when a look-up option is used in writing a scan.
After entering or selecting the access number for the file, the access description for the selected access number, is displayed.
Press [Enter] to update the scan thus far.
FIELD DESIGNING
Level 1
FIELD NAME : 30 characters.Press [F1] to scan existing fields. If a new scan is being created, no records will be displayed.Press [F6] to add fields to the scan or enter a new field name.
Level 2
START POSITION : 3 digits.Accept or enter the starting position of the first field in the scan, the default is 1.
The program now displays the following data. The data displayed is derived directly from the pre-defined dictionary for the selected file.
FIELD NAME : The names of the fields, in the selected file as supplied by the Dictionary, that may be used in the scan.
HEADING : The default column heading that will appear in the scan.
4 - 174 JULY 2006 Systems Utilities - User Guide

FORMAT : The nature of the field's contents (ALPHA = alpha-numeric data, NUM = numeric data and PACK = packed numeric data). A packed numeric data field enables twice as much numeric data to be stored in a numeric field. Calculations may be performed on NUM and PACK fields.
LENGTH : The number of characters in the field.
TYPE : Files that use record typing carry a transaction type indicator against each field that is subject to record typing (1, 2, 3 etc.).A blank transaction type field indicates that record typing is not applicable to that field.
Record typing is used when a file is required to accommodate a number of different types of records, which might not have common data fields, in a single record layout.
An example of record typing would be in the Accounts Receivable transaction file (SALENQ). As there are 11 different Accounts Receivable transaction types (invoices, cash payments, credit notes etc.), a 2 digit record type or transaction type (0 through 10) is used to identify each of the 10 transaction types from the other.
In practical terms, record typing is used when a particular type of record is required to be selected from a file and used in a scan.
If, as an example, a scan is needed listing invoice, payment and credit note data, the scan would be written using file SALENQ (the Accounts Receivable transaction file) and transaction types 1, 2 and 3 to select the three types of data required from a file that holds several other transaction types.
Please remember: only 8 fields may be selected for each scan.
Select or flag the fields to be used in the scan by moving the pointer (<-->) to the field required and pressing [F5].A three digit number is allocated to the field selected (001, 002, 003 etc.). This indicates the order in which the field will be displayed in the scan. The top right-hand corner of the display indicates the position status of the scan so far.
Packed numeric fields when used in a scan are expanded to their full size (a field of 7 digits packed numeric will appear as a 14 digit scan field). A scan may consist of a maximum of 8 fields.
After selecting all the fields required in the scan, press [F3] to update the scan so far.
The program adds the selected fields to the scan and returns to the field name.
Press [F1] to scan the scan field names selected and flagged for this scan.
SU - Maintenance JULY 2006 4 - 175

SYSTEM UTILITIES - CAPTURE USER DEFINED SCANS SU34 11/003 SCAN : GEN. LEDG. FILE : NLMAST FIELD NAME [General Ledger # ] FIELD NAME POS LEN END FRMT TYPEGeneral Ledger # <--> 1 30 30 ALPH DICTDescription 31 30 60 ALPH DICTType of Record (B/S, P&L, H,T) 61 1 61 NUM DICT *** NO MORE ITEMS ***F1-SCAN, F6-ADD FLDS, F10-BACK
The display indicates a number of field parameters for each scan field flagged. The parameters are as follows;
POSITION : The starting position of the scan field in the scan.
LENGTH : The length of the scan field in digits or characters.
END : The ending position of the scan field in the scan.
FORMAT : The format of the scan field (NUM, PACK or ALPHA).
TYPE : A scan field type may be either a field supplied by the dictionary (DICT), a field in which calculation is taking place (CALC), a look-up field (LOOKUP), a field that is determined by the value of another field (VARIABLE) or a field that occurs more than once (SUBSCRIPT).
4 - 176 JULY 2006 Systems Utilities - User Guide

At this point any of the scan fields may be accessed and re-defined if required.
SYSTEM UTILITIES - CAPTURE USER DEFINED SCANS SU34 11/003 SCAN : GEN. LEDG. FILE : NLMAST FORMAT : NUMERICFIELD NAME Type of Record (B/S, P&L, H,T) TYPE : COLUMN POSITION [ 61] INTEGERS [01] DECIMALS [00] SIGN [N] (Y/N) COLUMN HEADING [TYPE ] POSITION [000] [ ] [000] F3-UPDATE, F8-DEL, F10-NEXTFLD
To access a scan field displayed, press [Enter]. A field definition screen is displayed. The data displayed is derived directly from the dictionary.
The top part of the screen displays the scan name, the file being accessed and the field name, format and type.
COLUMN POSITION : 3 digits.Indicates the starting position of the scan field. Enter a new starting position if required.
LENGTH : 2 digits.Accept the field length displayed or enter a field length less than the number displayed. Entering a field length less than the field length will cause the field to be shortened. This only displays for alpha fields.
Where fields are numeric or packed, four other fields are displayed in place of the length field, with their default values retrieved from the dictionary.
INTEGERS : 2 digits.Accept the values displayed or enter new values into the integer (whole numbers).
DECIMALS : 2 digits.Accept the values or enter new values in the decimal place field.
SIGN : Y/N.If the field is to print a plus or minus sign, then accept the default [Y]. Enter [N] to select no +/- signs.
SU - Maintenance JULY 2006 4 - 177

All other fields have the same value as for alpha-numeric fields.
COLUMN HEADING : 30 characters.The default column heading as supplied by the data dictionary is displayed. Accept the column heading or enter a new column heading. The column heading may cover two lines.
Press the right arrow key to move to the column heading positioning field.
POSITION : 3 digits.The default value for this field is the same as the field position. Enter a new column position if the column heading is to be offset above the data field.
After editing or accepting the data, press [F3] to update the changes made or press [F10] to select the next scan field.
4 - 178 JULY 2006 Systems Utilities - User Guide

SPECIAL FIELD TYPES
The field type dealt with so far is the dictionary type field (DICT).
There is another type of field, namely LOOKUP
To define such a field, enter a unique field name that does not exist in the dictionary.
It is suggested that all non-dictionary fields (i.e. Calc. Lookup etc) be entered in upper case only. Dictionary fields should be in upper and lower case. If you use this technique you can easily identify the special type fields from Dict fields.
A LOOKUP field type is used to extract data from a particular field (Lookup field) on a particular file (Lookup file). In order to do this a key must be constructed to access the required data. This key is constructed from data extracted from the Report Writer file currently being accessed and/or constants. In the example below ["2" ] and ["BT" ] form the constants.
SYSTEM UTILITIES - CAPTURE USER DEFINED SCANS SU34 11/003 SCAN : GEN. LEDG. FILE : NLMAST FIELD NAME BUDGET TOTAL FOR YEAR FIELD TYPE - LookupLOOKUP FILE NAME [BUDFIL ]LOOKUP FIELD NAME [Budget Year (YYYY) ]LOOKUP ACCESS # [ 1] ACCESS # DESCRIPTION 01 <--> co/br/acc_code/bud_yr/bud_code 02 factor# 03 CO/BR/YR/YYYY/CODE/GL *** NO MORE ITEMS ***F1-SCAN, F3-UPDATE, F10-BACK
FIELD NAME : Enter a unique field name that is not defined in the dictionary.
FIELD TYPE : Lookup. This is displayed by the system and you cannot change it.
LOOKUP FILE NAME : Enter the look-up file name or press [F1] to scan the file.
LOOKUP FIELD NAME : Enter the look-up field name or press [F1] to scan the file.
ACCESS # : Enter the access number or press [F1] to scan the file.
Press [F3] to update this screen and to display the field definition screen.
Define the look-up field as required. Press [F3] to update the look-up definition.
SU - Maintenance JULY 2006 4 - 179

After entering and defining the various fields, the scan is ready for either display via program SU54 - Run User Defined Scans or if you redefined a Titan scan, for use in the programs as listed at the end of this section.
4.6.3. COPYING SCANSUse this facility to copy one scan to another. This may be done for instance where two scans are very similar and only a few minor changes are required on the second one.
SCAN NAME : Select the scan that is to be copied to the new scan.
Press [F4] to initiate the copy function.
SCAN NAME TO COPY TO : Enter scan name.
USER NAME TO COPY TO : Show which user the scan must be copied to, the default will be the current user. If copying to another user, no access to that copied scan will be allowed except if it is SYSADMIN or if the user is PUBLIC.
After copying the scan, the program displays the first scan definition screen.
Proceed modifying the newly copied scan as detailed earlier in the User Guide.
4.6.4. AMENDING SCANSThe program enables you to modify any of the details relating to the scan definition.
Refer to the earlier pages in this section as to the use and function of the various fields and formats available.
4.6.5. DELETING SCANSAny scan may be deleted by pressing the [F8] key, once the scan has been selected you will be asked to accept deletion. You have the choice of deleting the whole scan or only file 2.
Individual fields may be deleted in a scan by pressing [F8] once the field definition screen has been selected.
4.6.6. TITAN SCANS WHICH MAY BE USER DEFINED
TITAN SCANS WHICH MAY BE USER DEFINEDScan Name File Read Programs using ScanUTSLM SLMAST AR30, SP10, AR50
4 - 180 JULY 2006 Systems Utilities - User Guide

4.7. CUSTOMISED FORM MAINTENANCE - SU35
This program sets up the form templates used in various print programs. These templates are used to determine what and where data is to be printed on pre-printed forms.
Templates may be set up at a company or an individual branch level. Form type templates must be set up if using the following systems;
System Type DescriptionAccounts Receivable ST
INStatement/LabelsDebtors Invoices
Accounts Payable RACQ
Remittance AdviceCheques
Bill of Materials BM Bill of Material Sub-assemblyCash Book CB
CQDP
Remittance AdviceChequesDeposit Slip
General Ledger GLMR
Masterfile print with matrixManagement reporting
Instalment Sales IS Instalment sale form - statementsInstalment sale form - invoices
Inventory SFSI
Inventory formStock In -Transit
Job Costing JC Requisition noteMonthly Payroll CQ
MPChequesPayslip
Purchase Orders POP1
Purchase OrderRedistribution of received order (this is user specific and falls outside the scope of this system.)
Sales Order Processing BOIVOASP
Back Orders formInvoiceOrder analysisOrder confirmation/picking slip
Weekly Payroll WP Payslip
Enter SU35 to select the program. Press [Enter], to select the form type, for example IV -Invoices.
SU - Maintenance JULY 2006 4 - 181

4.7.1. ENTERING FORM TYPESThe form type that is to be created may be applied to;
A unique company and branch combination
A unique company and all branches in that company
All companies in a system
During the printing of a document, such as an invoice, the actual form type description used depends on the company and branch combination selected for the document print. If, as an example, 01/01 is selected, the print program will look for the relevant form type for 01/01 and if found it uses it. If not, then the system looks for 01/00 (all branches).
Press [F6], to select all companies or [F7], to select all branches within in a specified company.
SYSTEM UTILITIES - CUSTOMISED FORM MAINTENANCE SU35 11/001 CO - 01 - TECHNOLOGIES INCORPORATED BR - 01 - CAPE TOWN SELECT FORM [GL ] FORM NO FORM/CO/BR/NO DESCRIPTION GL/00/00/ <--> GL70 MATRIX SPECIAL MR/00/00/ MANAGEMENT REPORT MR/00/00/NH MR WITH NO SYSTEM HD CQ/01/01/ CHECK PRINT GL/01/01/01 GL MATRIX ON DEPT GL/01/01/02 MATRIX DEPT ALT-SEQ GL/01/01/CD GL70 MATRIX SPECIAL GL/01/01/HD GL70 MATRIX SPECIAL IS/01/01/ SOFT FORM FOR IS IS/01/01/01 SOFT FORM FOR IS IV/01/01/ INVOICE - STANDARD IV/01/01/01 INVOICE - MASS IV/01/01/02 INVOICE - STANDARD
F1 - SCAN FORWARDS, ESC - EXIT
4 - 182 JULY 2006 Systems Utilities - User Guide

SYSTEM UTILITIES - CUSTOMISED FORM MAINTENANCE SU35 11/001 CO - 01 - TECHNOLOGIES INCORPORATED BR - 01 - CAPE TOWN SELECT FORM [GL ] NO FORM FOR THIS COMPANY AND BRANCH EXISTS ENTER SELECTION [1] 1 Use An Existing Form As A Template 2 Create The New Form Using No Template
F10 - NEXT FORM, ESC - EXIT
To enter an individual company and branch combination, accept the default or enter a new combination.
If no form template exists for this combination, the program will prompt as above. It is possible to use an existing form template [1] as the basis for the new form to be created or create a new form [2].
Should Option [2] be chosen, the program will then present screens that have no data entered.
Press [Enter] to accept the default of using an existing template.
Enter the company/branch to be used as the template and press [Enter] to accept the display and access the Form Specification file.
SU - Maintenance JULY 2006 4 - 183

USER DESIGNED FORM FORMATS
Most of the forms are very simple to design. All fields which could possibly be printed on the form are presented to the operator on the screen with a line and column position to be entered. All the fields are optional and each user may decide which ones to use.
Most of the forms contain a header area, a body area and a trailer area.
Certain form types allow for a more complex form to be designed. This is referred to as a matrix type form. If a matrix type form is selected, it allows the printing of header, detail and total information within the body of a document, and allows columns to be printed across the page.
An example of the use of matrix type forms could be as follows;
If a company holds a range of items in different colours and sizes, they might wish to print a header for a certain style of product, listing all the possible sizes across the page. The individual products of different colours will then be printed underneath this heading. After all products of that style has been printed, a total will be printed showing the total per size and per style.
This User Guide will describe in detail how such a matrix form is to be designed.
MATRIX TYPE FORMSInvoices Form type IVOrder confirmation/Picking list Form type SPPurchase orders Form type PORedistributed Orders Form Type P1User-defined Inventory report Form type SF General Ledger Masterfile print Form type GLOrder Analysis Form type OABack Orders Form Type BO
4 - 184 JULY 2006 Systems Utilities - User Guide

The first form set up screen is displayed.
SYSTEM UTILITIES - CUSTOMISED FORM MAINTENANCE SU35 11/001 GENERAL DATA - GENERAL LEDGER MASTERFILE FORM DESCRIPTION [GL70 MATRIX SPECIAL ] FORM LENGTH (Lines): [066] FORM WIDTH (Columns): [132] START OF BODY: [005] END OF BODY: [065] SUMMARY: HEADER: Line 001 to 004 BODY: Line 005 to 065 TRAILER: Line 066 to 066 IS THE ABOVE INFORMATION CORRECT? (Y/N) [Y]
F1 - NEXT, F3 - ACCEPT, F8 - DELETE, F9 - PRINT, F10 - NEXT FORM, ESC - EXIT
FORM IDENTIFICATION AND SIZE PARAMETERS
Either accept the default display or enter new data into the following fields;
DESCRIPTION : 20 characters. Enter the form description.
FORM LENGTH (Lines) : 3 digits.
Enter the number of lines on the form, for example 66 lines for an 11" form that will be printed at 6 lines to the inch.
FORM WIDTH (Columns) : 3 digits.
Enter the number of columns across the form (120 columns for a 12" form printing at 10 characters to the inch).
START OF BODY : 3 digits.Enter the starting line number on which the body of the document begins, for instance in the case of invoices, the line on which the first invoice detail line must be printed.
SU - Maintenance JULY 2006 4 - 185

END OF BODY : 3 digits.Enter the ending line number on which the body of the document ends, for example in the case of invoices, the line on which the last invoice detail line must be printed.
Most form types present their fields in an identical manner with, however, a slight variation in the statement form, type (ST).
ST enables forms to be printed four-up (one statement alongside the other for different customers) in which case the "NUMBER OF FORMS" field on the first page of the statement form type (ST) must contain a two, three or four.
MP allows 4 up
RA allows 4 up
WP allows 4 up
Certain formtypes allow the same field to be printed more than once by presenting two sets of line/columns. This may be used for example for a tear off portion to be used as a remittance advice.
For one-up forms use only the first set of line/columns.
Forms IV, SP, BM, and PO allow a duplicate form alongside the first.
Please note that the maximum printer width should therefore be twice the width of 1 form.
The program then calculates the HEADER SIZE (where name and address details etc. are printed), BODY SIZE (item lines details etc.) and TRAILER SIZE (totals and messages) of the form.
After completing the screen, press [Enter] to accept the screen as correct or enter [N] to re-enter the details. Enter [N] to take the cursor to the topmost field. Press the [Up arrow] to take the cursor to the lowest field.
4 - 186 JULY 2006 Systems Utilities - User Guide

HEADER DETAILS
Header detail screens will be presented until all header details have been entered.
When header detail entry is complete, the screens for input of relevant body and trailer detail lines will be available.
In each case below, we give you the maximum length of the field to be printed. We display this immediately after the prompt.
You will notice that there are two fields next to each numeric field, namely DGT and DEC, depicted for instance as [07][02]. The first figure represents the size of the whole number and the second the size of its decimal. These indicate the default field size the program will use when printing the forms. You may change these if you wish. Remember that if you specify the size as 7.2, this field will use 11 characters when it is printed as it includes a decimal and a sign.
The DGT field is also used on alpha fields where you wish to print less than the maximum number of characters of a field. The default is zero (0) which indicates the maximum should be printed, if you wish to print fewer characters, enter the number in his field.
Each line also has a 1 character field where you may enter a font number. This corresponds to the hexadecimal escape sequences entered for different fonts in program SU01 - Terminal and Printer Setup.
Please note that only the first occurrence of a font specification will be used for each line of print. Any subsequent specifications will be ignored.
Where you do not have enough space on your stationery for the total size of the field, decrease this to the maximum you will hold on file.
SYSTEM UTILITIES - CUSTOMISED FORM MAINTENANCE SU35 11/001HEADER 1 - GENERAL LEDGER MASTERFILE FORMFONT LINE COLMN DGT/DEC LINE COLMNCO/BR REPORT HEADER (3 LINES) [ ] [001] [001]REPORT NAME [ ] [ ] [ ]
IS THE ABOVE INFORMATION CORRECT? (Y/N) [Y]F1-NEXT, F2-PREVIOUS, F3-SAVE, F8-DELETE, F9-PRINT, F10-NEXT FORM, ESC-EXIT
CO/BR REPORT HEADER (3 LINES) : 3 digits each for line and column.
If a line/column position is entered here the normal TITAN report heading will be printed. It always takes up 3 print lines.
SU - Maintenance JULY 2006 4 - 187

REPORT NAME : 3 digits each for line and column.A line/column position will normally only be entered here if the normal TITAN report heading must NOT be printed, in which case the 20 character form description entered on the previous screen will be printed on the report in the positions specified here.
There is a column (T#) which enables you to specify a title number next to a value field. If you do his, it means that that title will only print when there is a value present.
BODY DETAILS
This section presents you with two options, to either complete details for a matrix type form or for a normal type. If a normal form type is selected, only the column positions on the far right hand side need be entered. In each case below, we give you the maximum length of the field to be printed. We display this immediately after the prompt.
You will notice that there are two fields next to each numeric field, namely DGT and DEC, depicted for instance as [07][02]. The first figure represents the size of the whole number and the second the size of its decimal. These indicate the default field size the program will use when printing the forms. You may change these if you wish. Remember that if you specify the size as 7.2, this field will use 11 characters when it is printed as it includes a decimal and a sign (minus or plus).
The DGT field is also used on alpha fields where you wish to print less than the maximum number of characters of a field. The default is zero (0) which indicates the maximum should be printed, if you wish to print fewer characters, enter the number in his field.
Where you do not have enough space on your stationery for the total size of the field, decrease this to the maximum you will hold on file.
On non-matrix type forms each line also has a 1 character field where you may enter a font number. This corresponds to the hexadecimal escape sequences entered for different fonts in program SU01 - Terminal and Printer Setup.
On matrix type forms, you will use the 3rd position of the Matrix column to indicate the font number.
In addition there is a field on non-matrix type forms which allows you to specify whether you want currency formatting on value fields, that is, whether you wish to see the currency indicator such as R, $, and so forth to print. If so, you will enter [Y] in this field.
On matrix type forms this feature is activated by entering [Y] in the fourth (4th) position of the matrix field for specified values.
Please note that only the first occurrence of a font specification will be used for each line of print. Any subsequent specifications will be ignored.
4 - 188 JULY 2006 Systems Utilities - User Guide

SYSTEM UTILITIES - CUSTOMISED FORM MAINTENANCE SU35 11/004 BODY 4 - GENERAL LEDGER MASTERFILE FORM MATRIX LINE COLMN DGT/DEC BODY COLMN MASTERFILE VALUES - BROUGHT FORWARD AMT [ ] [ ] [ ] [ ][ ] [ ] - CURRENT PERIOD [ ] [ ] [ ] [ ][ ] [ ] - YEAR-TO-CURRENT PER [ ] [ ] [ ] [ ][ ] [ ] - YEAR-TO-DATE VALUE [ ] [ ] [ ] [ ][ ] [ ] USER FIELD 1 [ ] [ ] [ ] [ ]USER FIELD 2 [ ] [ ] [ ] [ ]USER FIELD 3 [ ] [ ] [ ] [ ] COLUMN HEADING IN MATRIX [ ] [ ] [ ] [ ]HORIZONTAL TOTAL OF COLUMNS IN MATRIX [ ] [ ] [ ] [ ][ ] [ ]IS THE ABOVE INFORMATION CORRECT? (Y/N) [Y]F1-NEXT, F2-PREV, F3-SAVE, F8-DELETE, F9-PRINT, F10-FORM, ESC-EXIT
If a matrix type form is selected there are three possible fields requiring entry.
MATRIX : 4 characters.H,B, or T in the first positionQ in the second position.Font number in the 3rd position.[Y] in the 4th position to indicate currency formatting required, else blank.Enter an [H] in the FIRST position of the matrix field if this refers to a heading in the matrix heading.Enter a [B] in the FIRST position of the matrix column if this is represents repeated body lines in the matrix.Enter a [T] in the FIRST position of the matrix column if trailer information is to be printed after each group of body lines in a matrix.A [T] is used to print repetitive information such as `price' on a trailer. However provision has been made to total such fields as GROSS value and COST.Enter a [Q] in the SECOND position of the matrix field (only after a B in the first column) if this field is the value to be printed in columns for a matrix.
SU - Maintenance JULY 2006 4 - 189

LINE : 3 digits.This field is mandatory if a matrix is to be printed as it determines the spacing between header, body and total information for each matrix.An [H] type line must be less than a [B] type, which in turn must be less than a [T] type.The first [H] type line number should be the line number on which the first body line of the document is to be printed.If a line space is required between the matrix headers and the first matrix body line, the body line should be two more than the last header line.Total type records should NOT have line numbers as these will be calculated automatically.
COLUMN : 3 digits.If a normal form type is selected only column positions need be entered.
In order to obtain a matrix print, the very last page of the form, which will also be described in detail, MUST be completed.
Enter these details until the document has been fully formatted.
4 - 190 JULY 2006 Systems Utilities - User Guide

DOCUMENT TITLES
The title section of the form contains a number of optional fields, each thirty characters long, which may be used for messages or for headings for un-domiciled forms. All forms have 999 such fields.
These titles may be printed in the body of the document for a matrix type document. If this is required, an [H], [B] or [T] must be entered in the MATRIX column, as well as the appropriate line number.
SYSTEM UTILITIES - CUSTOMISED FORM MAINTENANCE SU35 11/002 TITLES 1 - SALES ORDER MATRIX LINE COLMN LINE COLMN 1 [CODE ] [ ] [027] [001]2 [ITEM ] [ ] [027] [017]3 [UNIT ] [ ] [027] [050]4 [ORDERED ] [ ] [027] [058]5 [DELIVERED ] [ ] [027] [073]6 [ON B/O ] [ ] [027] [088]7 [EXCL SELL ] [ ] [027] [118]8 [NET ] [ ] [027] [125]9 [O/S ] [ ] [027] [103]10 [TRAILER ] [ ] [040] [001]11 [ ] [ ] [ ] [ ]12 [ ] [ ] [ ] [ ]13 [ ] [ ] [ ] [ ]14 [ ] [ ] [ ] [ ]15 [ ] [ ] [ ] [ ]16 [ ] [ ] [ ] [ ]17 [ ] [ ] [ ] [ ]18 [ ] [ ] [ ] [ ]IS THE ABOVE INFORMATION CORRECT? (Y/N) [Y]F1-NEXT, F2-PREV, F3-SAVE, F5-MORE TEXT, F8-DELETE, F9-PRINT, F10-FORM
There is a column (T#) on all Header and Trailer lines which enables you to specify a title number next to a value field. If you do his, it means that that title will only print when there is a value present.
SU - Maintenance JULY 2006 4 - 191
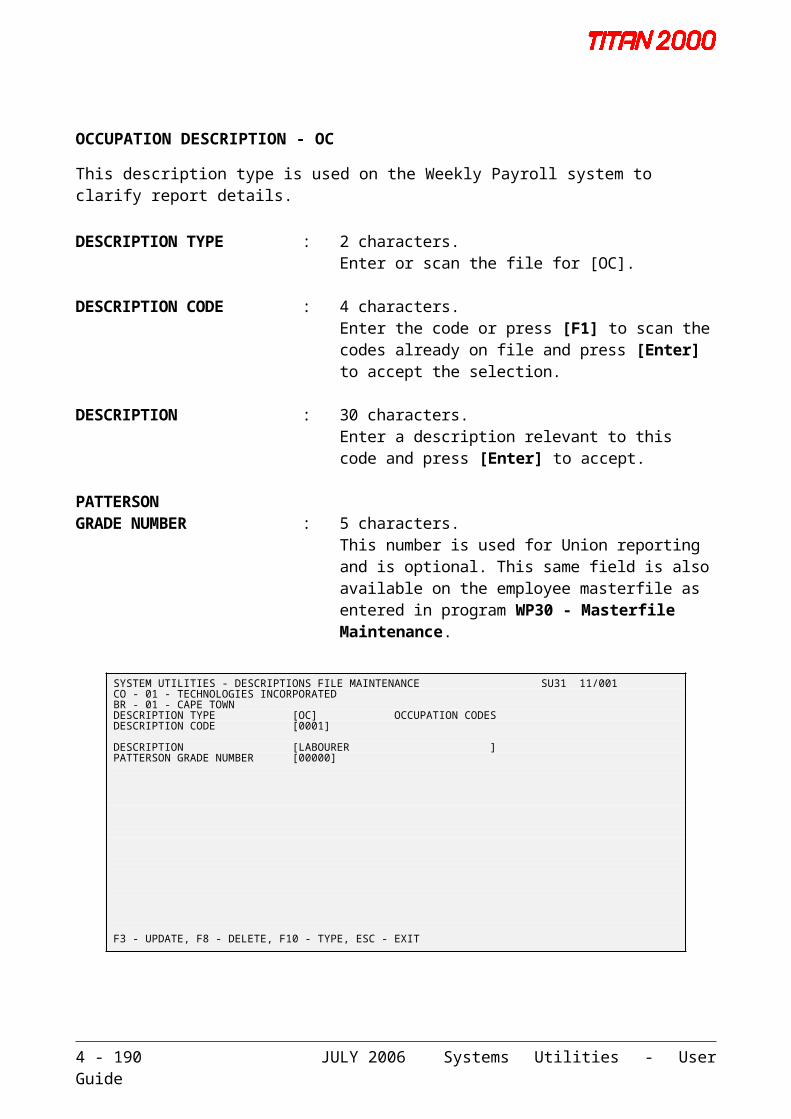
DOCUMENT TRAILER
The document trailer requires no special entries for matrix printing except for the last screen.
Press [F2] to go to a previous screen or [F3] to accept the screen.
There is a column (T#) which enables you to specify a title number next to a value field. If you do his, it means that that title will only print when there is a value present.
SYSTEM UTILITIES - CUSTOMISED FORM MAINTENANCE SU35 11/001 TRAILER 1 - INVOICE LINE COLMN LINE COLMN H/O ACCOUNT NUMBER [ ] [ ] REFERENCE # [ ] [ ] X-REFERENCE # [ ] [ ] SALESMAN (NUMBER CODE "RP") [ ] [ ] (NAME) [ ] [ ] METHOD OF DELIVERY [ ] [ ] METHOD OF PAYMENT [ ] [ ] TERMS (CODE "DT") [ ] [ ] (DESCRIPTION) [ ] [ ] DELIVERY DATE [ ] [ ] SALES TAX NUMBER [ ] [ ] SA#1 (CODE "S1") [ ] [ ] (DESCRIPTION) [ ] [ ] SA#2 (CODE "S2") [ ] [ ] (DESCRIPTION) [ ] [ ] IS THE ABOVE INFORMATION CORRECT? (Y/N) [Y] F1-NEXT, F2-PREVIOUS, F3-SAVE, F8-DELETE, F9-PRINT, F10-NEXT FORM, ESC-EXIT
MATRIX PRINT DETAILS
This section MUST be completed if a matrix type form is required.
Enter the following details;
MANY LINES IN BODY(Y/N/C) : Y/N/C.
[Y] - if you require a matrix type form.[N] - no further entries are required.[C] - consolidation will take place.
NEXT HEADING ONCHANGE OF : 1 digit.
Enter the part of the code which will determine whether a new heading must be printed. A [0] will cause no break. Any other entry will refer to the code part.
NEXT HORZ. LINEON CHANGE OF : 1 digit.
Enter the part of the code which will determine whether a new detail line must be printed. A [0] will cause no break. Any other entry will refer to the code part.
4 - 192 JULY 2006 Systems Utilities - User Guide

The number entered here may not be lower than the one entered for the heading above.
SU - Maintenance JULY 2006 4 - 193

NEXT COLUMNON CHANGE OF : 1 digit.
Enter the part of the code which will determine whether a new column must be printed on the detail line. A [0] will cause no break. Any other entry will refer to the code part.
If an entry other than [0] is entered here, the details on the next screen MUST be completed.
The number entered here may not be lower than the one entered for the horizontal line above.
SYSTEM UTILITIES - CUSTOMISED FORM MAINTENANCE SU35 11/001 MATRIX PRINT DETAILS MANY LINES IN BODY? (Y/N/C) [Y] NEXT HEADING ON CHANGE OF [6] 0 - NO CHECK 1-8 - SEQUENCE ACCOUNT CODE PARTS 1 TO 8 NEXT HORZ. LINE ON CHANGE OF[6] 9 - PERIOD VALUES/BUDGETS NEXT COLUMN ON CHANGE OF [9] ENTER COLUMN DETAILS ON NEXT SCREEN VERTICAL COLM TOTALS? (Y/N) [N] OVERSCORE TOTALS? (Y/N) [N] UNDERSCORE TOTALS? (Y/N) [N] COLUMN WIDTH? [13]
IS THE ABOVE INFORMATION CORRECT? (Y/N) [Y]
F1-COLUMNS, F2-PREVIOUS, F3-SAVE, F8-DELETE, F9-PRINT, F10-NEXT FORM, ESC-EXIT
VERTICAL COLM TOTALS : Y/N.
Enter a [Y] here if totals are to be produced for vertical columns.
OVERSCORE TOTALS : Y/N.Enter a [Y] if overscoring is required.
UNDERSCORE TOTALS : Y/N.Enter a [Y] if underscoring is required.
COLUMN WIDTH : 2 digits.Enter the required width for each vertical column.
UPDATE (Y/N) : 1 character.
After entering all the fields, press [Enter] in response to the update request or enter [N] and re-enter the details.
4 - 194 JULY 2006 Systems Utilities - User Guide

MATRIX COLUMN DETAILS
SYSTEM UTILITIES - CUSTOMISED FORM MAINTENANCE SU35 11/001 MATRIX COLUMN DETAILS ENTER 'TYPE/PERIOD RANGE/DR-CR/BUDGET' PER COLUMN : COLUMN 01 [ ] TYPE (POSITION 1) : 02 [ ] C - CURRENT YEAR ACTUALS 03 [ ] P - PREVIOUS YEAR ACTUALS 04 [ ] L - LAST YEAR BUDGETS 05 [ ] T - THIS YEAR BUDGETS 06 [ ] N - NEXT YEAR BUDGETS 07 [ ] 08 [ ] PERIODS : FROM (POS 2,3) TO (POS 4,5) 09 [ ] 00 - BROUGHT FORWARD BALANCE 10 [ ] 01-13 - PERIODS 1-13 11 [ ] 'C '- CURRENT PERIOD 12 [ ] 13 [ ] SCOPE : DEBIT OR CREDIT (POS 6) 14 [ ] 15 [ ] BUDGET CODE : (POS 7,8,9,10) 16 [ ] 17 [ ] 18 [ ] UPDATE? (Y/N) [Y] F2-PREVIOUS, F3-SAVE, F8-DELETE, F9-PRINT, F10-NEXT FORM, ESC-EXIT
This screen must be completed if columns are to be printed across the page. The system displays the following ;
ENTER CODES PER COLUMN FOR PART `X'
'X' represents the part of the code specified for column change on the previous screen.
COLUMN 01 : 8 characters.This entry occurs 18 times and represents the actual part of the specified code for which values are to be specified in the stated column.
The screen clearly indicates the valid entries for each position.
4.7.2. UPDATING FORM TYPESSelect the form type, and company and branch to be updated.
Using the [F1] and [F2] keys select the screen page to be updated.
Using the cursor keys, move the cursor to the field to be updated. Enter the amendment.
Press [F3] to update the file.
4.7.3. DELETING FORM TYPESSelect the form type, and company and branch to be deleted.
Press [F8] to delete the form type for that company and branch combination.
SU - Maintenance JULY 2006 4 - 195

4.8. CUSTOMISED TERMINOLOGY – SU351
This program allows you to change screen prompts. This may be used to either translate terminology to a different language, or just to change items such as CUSTOMER to DEBTOR.
At any alpha prompt you may enter 3 question marks, this will display the internal name of the field you wish to validate. Alternately, you can use the key (value 46) set up in your config file for determining the prompt name.
SYSTEM UTILITIES - CUSTOMISED TERMINOLOGY 11/001CO - 01 - SEAGULL SOFTWARE CCBR - 01 - MAIN BRANCH USER [ ] PROGRAM [ ] FIELD [*** NO MORE ITEMS *** ]TRANSLATION SCANUSER PROG INTERNAL FIELD TRANSLATION *** NO MORE ITEMS *** <-->*** NO MORE ITEMS *** - - - Create System Files - Create System Files - File Utility Programs - File Utility Programs - Verify IO Modules - Verify IO Modules / / <--> <--> BR - BR - CALLING ... CALLING ... CO - CO - CREATE FILES FOR SYSTEM CREATE FILES FOR SYSTEM CREATING... CREATING... DESCRIPTION DESCRIPTION END OF PROCESSING END OF PROCESSING ENTER OPTION : ENTER OPTION : F1-FWD, F3 – UPDATE, F5-TOGGLE, F10-PREV
In addition, you may toggle to another screen where you will find SUHTML names for use on the Web. Attribute 1 indicates whether the input will be upper or lower case. [Y] will force upper case. Attributes 2 and 3 are used to limit entries to valid values or 2 disallow invalid values. Attribute 2 is for valid values and attribute 3 is used to check for invalid values.
SYSTEM UTILITIES - CUSTOMISED TERMINOLOGY 11/002CO - 01 - SEAGULL SOFTWARE CCBR - 01 - MAIN BRANCH INTERNAL FIELD [INCUST ]ATTRIBUTES SCANINTERNAL FIELD EXTERNAL FIELD ATTRINCUST <-->accno YHJINDEL deladdrno NINDELREQ deldate NINKEY-NAM deladdrname NINKEY-NUM deladdrno NINORD-N ordno NINREP rep NINSA1 sa1 NINWH WH NINXREF xref NO-PART partno YO-PRICE price NO-QTY-DISCPER disc2 NO-QTYORD qty NO-TIME-DISCPER disc1 NUppercase Y/N;Valid type;Invalid typeF3-UPDATE, F8-DELETE
For instance, in the above example, an H will be used to enter valid entries and attribute J for invalid entries. Press [F3] to update and then [F5] to toggle to the new screen where you can enter valid and invalid values as shown on the next screen.
4 - 196 JULY 2006 Systems Utilities - User Guide
SYSTEM UTILITIES - CUSTOMISED TERMINOLOGY 11/002CO - 01 - SEAGULL SOFTWARE CCBR - 01 - MAIN BRANCH TYPE (I/V) [I] ATTR [J] VALUE [000000 ]VALIDATION SCANTYPE ATTR VALUEI J <-->000000I J 000001V H 400001V H 400003 *** NO MORE ITEMS ***F1-SCAN, F5-TOGGLE, F10-PREV
In the above example there are two valid and two invalid values.
SU - Maintenance JULY 2006 4 - 197

4.9. CURRENCY FILE MAINTENANCE - SU36
This information is used in a multi-currency environment. It is mandatory to set up at least the default currency. The code for this consists of 4 blank characters.
SYSTEM UTILITIES - CURRENCY FILE MAINTENANCE SU36 11/001 CO - 01 - TECHNOLOGIES INCORPORATED BR - 01 - CAPE TOWN CURRENCY LONG DESCRIPTION [SA RAND ] LOCAL CURRENCY CURRENCY SHORT DESCRIPTION [RAND] CURRENCY SIGN [R] COIN SYMBOL [C] FACTOR R1 = [ 100]C DENOMINATIONS: (R) [ ] (C) [ 200] HIGHEST [ ] [ 100] [ 50] [ 50] [ 20] [ 20] [ 10] [ 10] [ 5] [ 5] [ ] [ 2] [ ] [ 1] LOWEST
F3 - UPDATE, F8 - DELETE, F9 - PRINT, F10 - CODE, ESC - EXIT
CURRENCY CODE : 4 characters.Enter a unique code to define the currency.
CURRENCY LONGDESCRIPTION : 20 characters.
Enter a description for this currency.
CURRENCY SHORTDESCRIPTION : 4 characters.
Enter a short description for example, [RAND].
CURRENCY SIGN : 1 character.Enter the sign used for this currency i.e. [R]
COIN SYMBOL : 1 character.Enter the sign used for the coins i.e. [C]
FACTOR : 4 digitsEnter the number of units (coin symbol) in each currency, such as 100 cents to the Rand.
4 - 198 JULY 2006 Systems Utilities - User Guide

The following applies only to the local currency which is accessed by enter a blank code.
DENOMINATIONS (R) : 8 digitsThere are eight fields for possible Rand denominations, for example;100, 50, 20, 10, 5, 1.These run from the highest to the lowest.
DENOMINATIONS (c) : 8 digits.There are eight fields for possible cent denominations, for example;50, 20, 10, 5, 2, 1.These run from the highest to the lowest.
You may enter values in either of the two sections. For instance R2.00 may either be entered as 2 in the Rand section, or 200 in the cents section.
Not all eight fields need to be used. However, the field used will determine the position when the value is eventually printed on the payslip.
The following only relates to a foreign currency, that is a non-blank code.
CURRENT EXCHANGERATE # : 2 digits.
Enter the current exchange rate.
EXCHANGE RATE # : 2 digits.Occurs 31 times and refers to the day of the month.Enter the exchange rates as required.
The status line provides the prompts. Press [F3] to update, [F9] to print all currency details on file, [F10] to return to the previous screen and [Esc] to exit the program.
SU - Maintenance JULY 2006 4 - 199

4.10. SYSTEM FORMULA MAINTENANCE - SU37
This program allows formulae to be created that can be used throughout the various systems. Versions of certain standard formulae may be user-defined that will then override the standard formulae.
The formulae to be set up in this program are as follows ;
INVENTORY SYSTEM
Hash totals may be used in program IV10 - Issues/Receipts/ Adjustments/Transfers. You may specify the fields which should be used to determine the hash totals. The formulae are specified in program IV00 - System Record Maintenance and must start with `IV'.
Further formulae may be specified in program IV00 - System Record Maintenance. These refer to the formulae to be used by the Purchase Ordering System to calculate average and standard costs. Formulae should be set up in SU37 for both Company and Branch updates. The naming convention is, for example, IV09 for branch update and IVC9 for the corresponding company update. This convention pertains ONLY to cost updating via the Purchase Ordering module.
Both IV36 - Selling Price Update and IV92 - Standard/Average Cost Update may optionally use a formula set up in this program.
Both the Danger level and the Reorder level used in IV75 - Inventory/Danger/Re - Order Level are calculated using these soft formulae.
A formula for smoothed usage may also be specified in program IV00 - System Record Maintenance. The Inventory Month-end program IV90 - Month-end Update, will then use this formula to update the smoothed usage field on all branch records.
PURCHASE ORDERS
`Standard order quantity' may also be calculated using a specified formula. This calculation is used by the Purchase Ordering system in program PO40 - Create Recommended Purchase Orders.
4 - 200 JULY 2006 Systems Utilities - User Guide
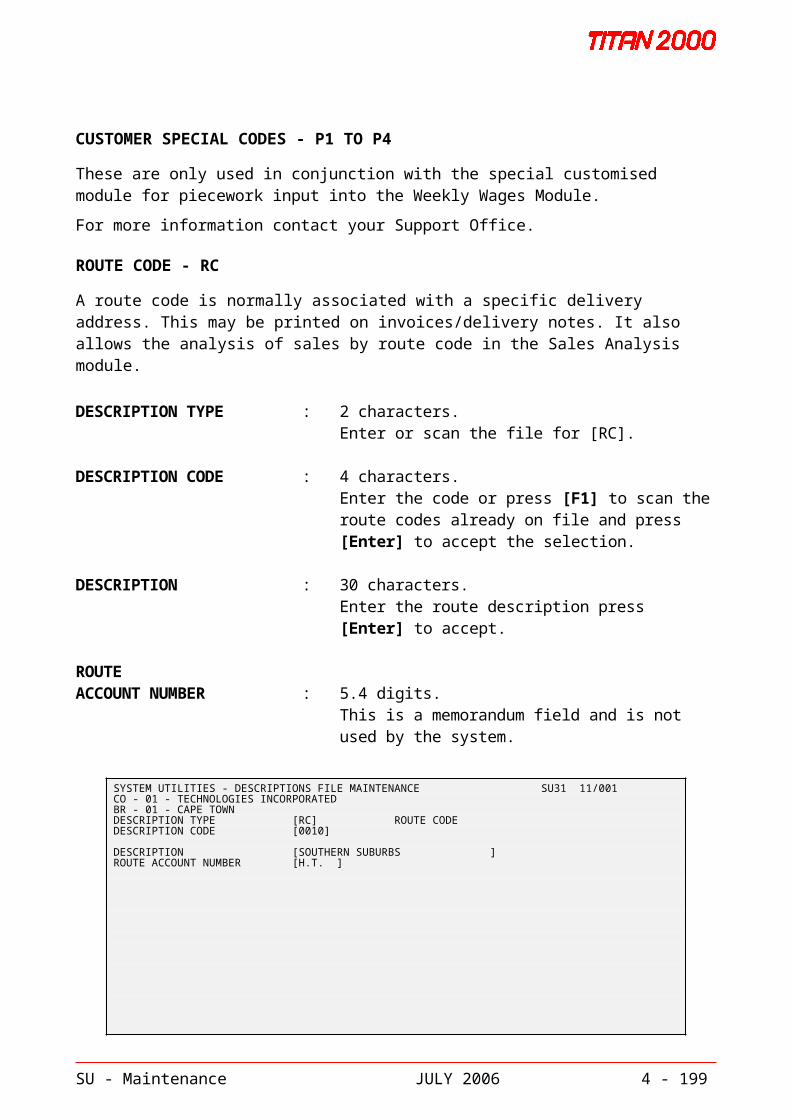
ACCOUNTS RECEIVABLE
The Accounts receivable system also allows you to specify a formula in program AR00 - System Record Maintenance, which will determine the `Top 20' ranking of customers. This formula will be used every time the Accounts Receivable Month-end program (AR92) is run.
A formula consists of;
1. THE FORMULA NAME This is a four character variable consisting of two characters identifying the system to which the formula relate and a two character number, for example;
IV01, AR05, ARAA, MP1X etc.
2. A DESCRIPTION OF THE FORMULA A twenty five character description that identifies the formula, for example;
"IV REORDER QTY - ex PO40"
3. FORMULA VARIABLES The variables that make up the formula. Variables have an identifier which is an alphabetic value from `A' - `Z' and a description which identifies which actual system variable this letter refers to. Variables may be of two types;
a. A field from a TITAN FILE. The user types F1 to scan the list of available fields and enters the number corresponding to the field, for example;
A [Br; Physical Inventory]
B [Br; Maximum Inventory ]
C [Br; Minimum Inventory ]
b. A constant value. The constant value is enclosed in quotes, for example;
D ["55.5" ]
E ["3100" ]
SU - Maintenance JULY 2006 4 - 201

4.THE FORMULA The formula is made up from the variables defined in (3) above. It follows normal rules of precedence and bracketing, for example;
A+(B-(C*A)/A)-D*(D/E)
Enter SU37 to select the program.
4.10.1. SETTING UP THE FORMULALevel 1
FORMULA NAME : 4 characters.Enter the name of the formula to be created.
Refer to the individual User Guides to determine the correct pre-fixes. For example, either IVxy for a branch formula, or IVCy for a company formula.
SYSTEM UTILITIES - FORMULA MAINTENANCE SU37 11/001 FORMULA NAME IV01 DESCRIPTION [BR AVE COST GRV/REC ] DIVISION BY ZERO ACTION [ ] Enter Variable A - Z A [BR:PHYSICAL QUANTITY ] N [ ] B [BR:AVERAGE COST ] O [ ] C [TR:TRANSACTION QUANTITY (PO1) ] P [ ] D [TR:TRANSACTION UNIT COST(PO1) ] Q [ ] E [ ] R [ ] F [ ] S [ ] G [ ] T [ ] H [ ] U [ ] I [ ] V [ ] J [ ] W [ ] K [ ] X [ ] L [ ] Y [ ] M [ ] Z [ ] ----------------------------------- FORMULA ------------------------------------ ((A*B)+(C*D))/(A+C) ------------------------- Example: (A+B+C)/(D*(A-B)) --------------------------- F3 - UPDATE, F6 - EXPAND FORMULA, F8 - DELETE, F10 - NEXT FORMULA, ESC - EXIT
Level 2
DESCRIPTION : 25 characters.Enter the description of the formula, for example New Total Cost.
DIVISION BY ZEROACTION : 1 character.
Enter any variable from A to Z in this field.
(If the variable entered here is a blank, the answer to any calculation resulting in a `divide by zero' will be zero. However, if the variable is not blank, then when a `divide by zero' condition is found the result will be the value of the specified variable. This may be either a constant, for example Z ["1"], or a field, for example Z [Br; Average Cost]).
4 - 202 JULY 2006 Systems Utilities - User Guide

SELECTING THE FORMULA VARIABLES
Allocate variables to the letters A to Z displayed on the screen. This is done by positioning the cursor alongside the letter required and pressing [F1]. The following will appear;
SYSTEM UTILITIES - FORMULA MAINTENANCE SU37 11/103 SELECT VARIABLE NUMBER [ 69] 069 CO:MONTHLY USAGE-4 086 BR:PRODUCT CODE PART 2 (NUM) 070 CO:MONTHLY USAGE-5 087 BR:PRODUCT CODE PART 3 (NUM) 071 CO:MONTHLY USAGE-6 088 SY:NO.WEEKS CURRENT MTH (IV00) 072 CO:PREVIOUS HALF YEAR 089 073 CO:YEAR-TO-DATE USAGE 090 074 BR:WEIGHTED FACTOR (WS) 091 075 BR:DEMAND FACTOR 092 076 BR:SEASONAL FACTOR 093 077 BR:SUPPLY FACTOR 094 078 TR:TRANSACTION QUANTITY (PO1) 095 079 TR:TRANSACTION UNIT COST(PO1) 096 080 TR:TRANSACTION TOTAL COST(PO1) 097 081 TR:TRANSACTION QTY (IV10/RA10) 098 082 TR:TRANSACTION AVE COST (IV10) 099 083 TR:TRANSACTION TOT COST (IV10) 100 084 TR:TRANSACTION PRICE (IV10) 101 085 BR:PRODUCT CODE PART 1 (NUM) 102 F2 - PREVIOUS PAGE, F10 - FORMULA, ESC - EXIT
Select the variables by using the and keys to highlight the required one and press [Enter]. For a company formula, select the variables with the prefix CO; and for a branch formula, select the variable with the prefix BR;
Repeat the variable selection until all the required variables have been chosen. Constant values such as 1, can be entered alongside the letters in inverted commas.
ENTER THE FORMULA
Enter the formula at the bottom of the Level 2 screen using the letters corresponding to the required variables.
Press [F3] to update the system.
“WHAT IF” SCENARIO
You may also use a “what if” scenario by using the “<” to indicate lowest and “>” to indicate highest value. For instance, set A=average cost and B=standard cost. Set the formula to A<B. The calculation will be the lowest of A or B.
SU - Maintenance JULY 2006 4 - 203

EXPAND THE FORMULA
Use the [F6] key to expand the formula. This means that the formula must be displayed in words (as below) rather than in symbols.
SYSTEM UTILITIES - FORMULA MAINTENANCE SU37 11/001 FORMULA NAME IV01 BR AVE COST GRV/REC ------------------------------- EXPANDED FORMULA ------------------------------- ((BR:PHYSICAL QUANTITY * BR:AVERAGE COST) + (TR:TRANSACTION QUANTITY (PO1) * TR: TRANSACTION UNIT COST(PO1))) / (BR:PHYSICAL QUANTITY + TR:TRANSACTION QUANTITY ( PO1)) --------------------------------------------------------------------------------
*** EXPANDED FORMULA REQUEST *** PRESS RETURN
4.10.2. ALTERING AN EXISTING FORMULACall up the already existing formula and alter it as if it were a new one.
4.10.3. DELETING AN EXISTING FORMULACall up the existing formula and press [F8] to delete it from the system.
4 - 204 JULY 2006 Systems Utilities - User Guide

4.11. SYSTEM PASSWORD MAINTENANCE - SU38
The unique password facility which exists in the system secures company data and enforces system and user restrictions.
If the user is not SYSADMIN, only the users own password may be altered. SYSADMIN (the Systems Administrator) may amend and update all user records.
After running SU38 you are automatically logged off and must log on to test the access permission.
THE "SYSADMIN" USER NAME
The SYSADMIN User Name has special capabilities - one of these being its ability to gain access to the Password Maintenance and Installation Maintenance program. Individual sets of access permissions for each user may be set up, alternatively, set up a global profile of access permissions applicable to all users.
SYSADMIN permissions should be set to access all programs.
Enter SU38 to select the program.
SYSTEM UTILITIES - SYSTEM PASSWORD MAINTENANCE SU38 11/103USER/TEMPLATE NAME [MR JAY ]
USER TEMPLATE GRP/DESCRIPTION LOCATIONMR JAY <--> N PAYROLL CLERK PAYROLL OFFICESANDRA N DEBTORS CLERK RECEPTIONSYSADMIN N SYSTEM ADMINISTRATOR
*** NO MORE ITEMS ***
F1-SCAN, F5-TOGGLE, F9 - PRINT
Use [F5] to toggle the display sequence between User name and description.
You may print the details using [F9]. This may be for a selected user or for all users if no user name is entered.
In addition when selecting the print option, you may optionally create a comma delimited output file which contains USER, NAME, PROGRAM, NAME and ACCESS of access permissions.
SU - Maintenance JULY 2006 4 - 205

The following options are available;
USER/TEMPLATE NAME : 8 characters.[F1] can be used to scan the existing users by User Name, and the [F5] key will list users in description sequence. SYSADMIN can add/delete/or update a user record. Please see note under 'IS THIS A TEMPLATE' prompt.
SYSTEM UTILITIES - SYSTEM PASSWORD MAINTENANCE SU38 11/001 NAME : SYSADMIN TEMPLATE? (Y/N) [N]GROUP (4) / DESCRIPTION [SYSTEM ADMINISTRATOR ]REPORT DEFAULTS: Destination Printer# Destinations: 1 [0] [00] 1 = Report management system 2 [0] [00] 2 = Direct to printer 3 [0] [00] 3 = Direct to a file 4 = Direct to screen 5 = Mail recipientMEMORANDUM [ ]FORCE PASSWORD CHANGE [N] SUPERVISOR [ ]LEVEL [9]VIEW ACCESS (R/W/D)? [W] O/S ACCESS (Y/N)? [Y]MAXIMUM LOGINS [999] MAX QUICK ACCESS LOGINS [999]CURRENT LOGINS [023] CURR QUICK ACCESS LOGINS[ ] F1-ACCESS, F2-DEFAULTS, F3-UPDATE, F4-CBW/RANGE, F8-DEL, F9-PRT
OPTION 1 - MAINTAIN USER DETAILS
USER NAME : 8 characters.Each user on the system may be allocated a User Name (up to eight characters). To find existing User Names on the system press [F1] to scan by User Name, and [F5] to scan by description, and press [Enter] to accept the code.
GROUP (4) / DESCRIPTION : 30 characters.Press [Enter] to accept the details displayed or enter new details.The first 4 characters is regarded as a user group by the system. This may be used for instance in SU30 - Installation Maintenance Option 6, to set a user group which is allowed to access reports generated by a specific program.
4 - 206 JULY 2006 Systems Utilities - User Guide

TEMPLATE? (Y/N) : Y/NIf you enter [Y], you may use the [F5] key to copy all the details entered here when setting up a new user belonging to this group. This includes passwords and Company/ Branch Warehouse information. Once copied you may change any or all of the parameters. Please note that you will never be able to use the User Name of a template to log in to TITAN.
REPORT DESTINATION : 1 digit.Default print options for the user. The options override all other report defaults.
MEMORANDUM : 30 charactersThis is a memorandum field but you may leave it blank.
FORCE PASSWORD CHANGE : Y/N
If you enter [Y] you will be forced to change your password after a specified number of log-ins. When this number has been reached and you log on to TITAN, a warning will be given and you will be prompted to enter a new password. Please ensure that you write this down and keep it in a secure place.
FORCE PASSWORD AFTER TIMES : 2 digits
Enter the number of times this user may log on before having to change his password. This prompt will only display if you answered [Y] above.
SUPERVISOR : 8 characters.Certain programs and functions optionally require supervisor permissions. If this facility is required for this user enter the supervisor password here.
LEVEL : 1 digit.The Report Writer system and a few other programs use access permission levels. Levels run from 0 (no checking) up to 9 (the highest level of security). If for instance a 5 is entered here, this specific user will have access to all files, fields and programs with a security level of 5 and lower.
SU - Maintenance JULY 2006 4 - 207

VIEW ACCESS : R/W/D.The View key which was set up in program SU01 - Terminal and Printer Setup may give a user full access to any of the TITAN files. This may be undesirable.[R] will allow a user to view any views set up by other users.[W] will allow a user to set up his own views.[D] will deny a user all access to the View facility.
O/S ACCESS (Y/N)? : Y/N.The Hot Key set up in program SU01 - Terminal and Printer Setup allows users access to the operating system. This may be undesirable.[Y] will allow a user access to the operating system.[N] will deny a user all access to the operating system.
MAXIMUM LOGINS : 3 digitsA single operator can log in on more than 1 screen. The number may be limited by the entry you make here. If you enter 999 then the system will not check and this number may be exceeded.
CURRENT LOGINS : 3 digitsThis is the number of times this user is currently logged in.
MAXIMUM QUICK ACCESS LOGINS : 3 digits
A single operator can have more than one QUICK ACCESS logins. The number may be limited by the entry you make here. If you enter 999 then the system will not check and this number may be exceeded.
CURRENT QUICK ACCESS LOGINS : 3 digits
This is the number of times this user is currently logged in via a QUICK ACCESS login.
4 - 208 JULY 2006 Systems Utilities - User Guide

Accept or make the necessary changes to the fields, the screen will now prompt for;
SET PASSWORD? : Y/N.Enter [Y] to set passwords for the System Administrator. It is strongly recommended that they are set immediately as the new system has no passwords implemented and is not secure until this is done.
NEW PASSWORD : 8 characters.Enter the new password and the new control password (each up to eight characters in length). The chosen passwords must be at least five characters long.
Write down the two passwords you selected before proceeding. Keep this information in a secure place. The passwords are now entirely under the users' control and act as the keys to the system.Should the SYSADMIN passwords be lost then only the Distributor or Dealer will be able to assist and a written authority to "unlock" the passwords must be provided. A charge is levied for "unlocking" the system.
If passwords have been previously entered, press [F10] to leave them unaltered. If you wish to have no password, where you previously did have one, say [Y] to 'SET PASSWORD' and press [Enter] in the password field. This will display '*NONE*' and you can press [F3].Press [Enter] to accept the details as correct or enter [N] and re-enter the data.
SU - Maintenance JULY 2006 4 - 209

OPTIONS FOR PASSWORD CONTROL
The following options are available;
1. No password implemented
Answer [N] to the set password prompt.
2. One password Answer [Y] to the prompt, enter the password and then press [Enter] to bypass the control password entry.
3. One password and a control password
Answer [Y] to the prompt and enter the password followed by the control password.
Enter [F1] to set USER ACCESS PERMISSIONS, [F2] to set USER DEFAULTS or [F4] to set Company/Branch/Warehouse options.
4 - 210 JULY 2006 Systems Utilities - User Guide

SELECT ACCESS PERMISSIONS
Enter [F1] to select the set access permission function or press [Esc] to leave the Password Maintenance program.
Set up the access permissions for all the systems and programs for the user name selected.
SYSTEM UTILITIES - SYSTEM PASSWORD MAINTENANCE SU38 11/001 SYSTEM NAME [AB] Setting access for : SYSADMIN SYSTEM DESCRIPTION SYSTEM ACCESS AB <--> APPLICATION BUILDER All Access AP ACCOUNTS PAYABLE All Access AR ACCOUNTS RECEIVABLE All Access BM BILL OF MATERIALS All Access CB CASH BOOK All Access CU CONVERSION UTILITIES All Access CV All Access DU DEALER UTILITIES All Access FA FIXED ASSETS All Access GL GENERAL LEDGER All Access IS INSTALMENT SALES All Access IV INVENTORY All Access JC JOB COSTING All Access MP MONTHLY PAYROLL All Access OP OPTIMISATION All Access F1 - SCAN, F3 - ALL ACCESS, F8 - DENY ALL, ESC - EXIT
SYSTEM NAME : 2 characters.The system prompts for the system code to which access permission is to be set.
Enter the system code or press [F1] to scan forwards through the systems available.
The [F3] key gives the user access to all systems/programs and the [F8] key denies access. It is possible to set access to individual programs within a system.
SU - Maintenance JULY 2006 4 - 211

The access permission levels are;
READ DATA
By defining a system or program as having read data access, will restrict the user to accessing data from that system or program in a read data mode only. You will not be permitted to update the data. for example;
A user with a read data access permission only may inquire into the Accounts Receivable masterfile (using program AR30 - Customer File Maintenance). Should you attempt to update a field in the masterfile, a message is displayed.
READ AND WRITEThe system or program may be defined to allow a user read and write access permission. This is the highest level of access permission with no restrictions - enabling a user to read and write data within a system or program, for example;
A user can enquire into and amend Customer masterfile data.
DENIEDShould a user be denied all access permission to a system or program, then the latter cannot be loaded and run by that user, for example;
If a user enters program number AR30 (which has access denied to him) the program will not load and a message to the affect will be displayed.
Programs within a system are displayed in an automatic scan. The function keys perform as follows;
[F3] ACCEPT VALUES The access permissions will be accepted as displayed.[F4] SUPERV This indicates that a supervisor password will be required to
access this program.[F5] TOGGLE Change the permission on a program from WRITE to READ to
DENY to WRITE.[F6] ALL READ All the programs displayed will be changed to the all read
access permission.[F7] ALL WRITE All the program access permissions will be changed to the
read/write access level.[F8] ALL DENIED All programs will be set to an access denied state.
Press [F6] to change all the programs in this system to an all read access permission status.
Press [F7] to change the status to all read/write, and [Esc] to return to the system logon menu.
As it may not be necessary to give a user all read or all write or all denied access permission for every program, some will be set to read, others to write, and yet others to access denied status.
4 - 212 JULY 2006 Systems Utilities - User Guide

To set individual programs to a specific access permission status, proceed as follows;
1. Scan to the program and select keys.
2. Enter [F5] to toggle permission until the correct permission is displayed.
3. Continue through the system customising the access permissions required.
Press [F3] when all the access permissions for the system are set.
After pressing [F3], the program returns to the system name scan.
Continue entering access permissions until a profile for all systems to be used by this user has been set up.
On completion, press [Esc] to leave the program. The system will return logon menu.
SU - Maintenance JULY 2006 4 - 213

SELECT USER DEFAULTS
SYSTEM UTILITIES - SYSTEM PASSWORD MAINTENANCE SU38 11/103 USER NAME : SYSADMIN DEFAULT COMPANY [00] SYSTEM DEFAULTDEFAULT BRANCH [00] SYSTEM DEFAULTDEFAULT WAREHOUSE [00] SYSTEM DEFAULT Company/Branch control at start of program: SUPPRESS CO/BR SCREEN? [Y] Y=Yes N=No Space=System default RESET TO DEFAULT CO/BR? [N] Y=Yes N=No Space=System default CLEARING OF SU61;SU60 ACCESS[Y] Y=Yes N=No U=SU60 access to own report F3 - UPDATE, F8 - DELETE, ESC - EXIT
The defaults selected here will override those entered in program SU30 - Installation Maintenance, option 1.
DEFAULT COMPANY # : 2 digitsThis will be the number of the company most often accessed by the user. This company number will appear in all programs as the default company and will be pre-loaded into the company number field.
DEFAULT BRANCH # : 2 digits.The number of the branch most often used in conjunction with the default company for this user. This number will appear together with the company number as the default company and branch in all programs. This combination will be pre-loaded into all the company/branch fields, for example if company 01 and branch 01 have been entered as the default combination, the company number prompt will read COMPANY/BRANCH # 01/01).
4 - 214 JULY 2006 Systems Utilities - User Guide

DEFAULT WAREHOUSE : 2 digits.The number of the warehouse most often used in conjunction with the default the branch for this user. This number will appear together with the company/branch number as the default warehouse in all programs where warehouse is relevant. The use of warehouses must be specified in program IV00 - System Record Maintenance.
COMPANY BRANCH CONTROL AT START OF PROGRAM
SUPPRESS CO/BR SCREEN? : Y/NIf suppressed, this user will not be prompted to enter Co/Br defaults on every program entered, but will have to use the [F10] key to access that screen.
RESET TO DEFAULT CO/BR : Y/NIf set to "Yes" the Co/Br defaults are reset to the initial defaults for this user after exiting the program.
CLEARING OF SU61;SU60 ACCESS : Y/N
If this is set to [Y], the system will automatically call SU61 - Report Management Maintenance at logout and this user may delete all reports in the Spooler. Normally only 'SYSADMIN' may perform this function.If this is set to [N] then SU61 - Report Management Maintenance will not be called automatically at logout.If it is set to [U] and the user does not have access to SU61 - Report Management Maintenance, he will only be able to access his own reports in SU60 - Report Management System.
SU - Maintenance JULY 2006 4 - 215

SELECT COMPANY/BRANCH/WAREHOUSE AND RANGE ACCESS
This screen allows you to specify which company and branches this user may access. You may set as many combinations as required. The default is all Companies, Branches and Warehouses. In all cases '00' indicates all. If for instance a user may access all branches and warehouses in Company 03, you will enter 03,00,00. If the user may only have access to warehouse 01 and 03 in Company/Branch 01/02, you must make two entries, that is 01,02,01 and 01,02,03.
In addition, there is a feature which allows the access of users to s specified range of items. At present this relates only to customers. In order to enable this option, you must enter a range code in SU31 - Descriptions File Maintenance type RN. Customers, must be CUST.
The [F1] key provides a scan of all the combinations that this user may access.
SYSTEM UTILITIES - SYSTEM PASSWORD MAINTENANCE SU38 11/012CO - 01 - TECHNOLOGIES INCORPORATEDCOMPANY/BRANCH/WH ACCESS FOR ABBY COMPANY [ 1] (00 = ALL COMPANIES) BRANCH [00] (00 = ALL BRANCHES) WAREHOUSE [00] (00 = ALL WAREHOUSES)CO BR WH01 <--> 00 0002 01 0102 01 0203 00 00 *** NO MORE ITEMS ***F1-SCAN, F2-RANGES, F3-UPDATE, F8-DELETE, F9-PRINT
COMPANY ACCESS : 2 digits.Enter the required company number or '00'.
BRANCH ACCESS : 2 digits.Enter the required branch number or '00'.
WAREHOUSE ACCESS : 2 digits.Enter the required warehouse number or '00'.
Press [F3] after entering each combination and [F10] on completion to return to the previous screen. You may also use the [F8] key to delete a specific combination.
Press [F2] to enter ranges of items such as customers to which this user will have access.
4 - 216 JULY 2006 Systems Utilities - User Guide

RANGE ACCESS
The screen below shows a range selection for CUST. This code was entered in SU31 - Descriptions File Maintenance type RN.
SYSTEM UTILITIES - SYSTEM PASSWORD MAINTENANCE SU38 11/012CO - 01 - TECHNOLOGIES INCORPORATEDACCESS RANGE FOR ABBY COMPANY - 00 BRANCH - 00 WAREHOUSE - 00 RANGE TYPE [CUST] CUSTOMER FILE MINIMUM RANGE [901000 ] MAXIMUM RANGE [909999 ] F1-Scan, F3-Update, F10-Return
RANGE TYPE : 4 charactersEnter the range type as entered in SU31 - Descriptions File Maintenance or scan for the available types.
MINIMUM RANGE : Dependent on code structureEnter the lower limit of the range required.
MAXIMUM RANGE : Dependent on code structureEnter the upper limit of the range required.
Press [F3] to update the details and [F10] to return to the previous screen.
SU - Maintenance JULY 2006 4 - 217

4.12. MAXIMUM RANGEBATCH PROCESSING - SU39
Batch Processing is the ability to create and submit a job, which is made up of a normal sequence of system operations, so that the job may be run a number of times without the presence of an operator.
The process is twofold; Create a job by describing the keystrokes and programs desired for the job.
Enter the job into either a queue to run in the background at a later stage OR run directly in the foreground.
Key concepts are; Jobs.
Creating and running a job.
Background and foreground.
Queues - background jobs are entered into a queue
Set-ups; Files SUJOB and SUQUE (created in SU00 - Create System Files).
HOME key setup (SU01 - Terminal and Printer Setup).
bTITAN available for background job processing.
Enter SU39 to select the program.
SYSTEM UTILITIES - JOB PROCESSING SU39 11/001 SELECT FUNCTION [1] 1 - Capture a Job 2 - Run a Job/Task 3 - Job Maintenance 4 - Queue Status
F9 - PRINT OPTIONS, ESC - EXIT
4 - 218 JULY 2006 Systems Utilities - User Guide

The following options are available;
Level 1
SELECT FUNCTION : [1] Capture a job.[2] Run a job/task.[3] Job Maintenance (SYSADMIN usage only).[4] View the queue status.
In order for jobs to be run in the background, the following scripts with the required keystrokes must be used. This script starts up a job scheduler which runs in the background polling the job queue for jobs to run. Use btitan.
Correct the script to invoke UT00B instead of UT00. The same applies to DOS. UT00B is invoked instead of UT00. This will invoke UTMN with a parameter which indicates background processing. When processing in background the system will find the specified job in SUQUE. If there is no job the system will wait for 30 seconds and try again. The system will require the keystrokes from a specific job name e.g. AGANAL.INP.
SU - Maintenance JULY 2006 4 - 219

OPTION 1 - CREATING A JOB
Select Option [1] and the system presents a standard scan of the jobs currently available.
Use the arrow key or type the name of a new job.
SYSTEM UTILITIES - JOB PROCESSING SU39 11/001 JOB NAME [ACUFILE ] DESCRIPTION [Creates BSEQ files for ACU ] ACCESS INDICATOR [0] Level 1 - 9 SINGLE USER ONLY? [Y] CAPTURE STATUS OFF RUN STATUS IDLE CAPTURE DATA ON FILE
F3 - UPDATE, F5 - TOGGLE, F8 - DELETE, F10 - NEXT JOB, ESC - EXIT
Level 2
JOB NAME : 8 characters The name or ID of the job.
JOB DESCRIPTION : 30 charactersA description of the job's contents.
ACCESS INDICATOR : 1 digitsThis refers to the 'level' entered for each user in program SU38 - System Password Maintenance, and determines which users will be able to run this job.
SINGLE USER ONLY? : 1 charactersJob may be Multi or Single user. If single user then only one user may run the job at a time.
4 - 220 JULY 2006 Systems Utilities - User Guide

The following fields provide information regarding the status of the job.
SYSTEM UTILITIES - JOB PROCESSING SU39 11/001 JOB NAME [ACUFILE ] DESCRIPTION Creates BSEQ files for ACU ACCESS INDICATOR 0 RUN RESTRICTIONS SINGLE USER CAPTURE STATUS OFF RUN STATUS IDLE CAPTURE DATA ON FILE
F3 - RESET RUN/CAPTURE FLAG, F10 - NEXT JOB, ESC - EXIT
CAPTURE STATUS : Is ON if the job is being captured, otherwise OFF.The same job may not be captured by another user if the CAPTURE STATUS is ON.
RUN STATUS : Is ON if the job is being run, otherwise IDLE.The same job may not be run by another user if the JOB was captured in SINGLE user.A job may not be run if;- The job is currently being run and it was created in
single user.- The job is currently being captured.- There is no captured data on file.
CAPTURE DATA : Displays ON FILE if data for the job exists.
SU - Maintenance JULY 2006 4 - 221

TO CREATE A NEW JOB
Create the job by entering a new job as described in Option [1] and complete the attributes (description, access, user mode). Use the [F3] key to save the entries.
Press the [F5] to begin the capture.
A message CAPTURING...JOBNAME will appear on line 24 and the system prompts at the main menu for data to be entered. An indicator will appear in the top right hand side of the screen to show the capture toggle (either ON, OFF or BYPASS). Initially it is ON therefore data typed in will be captured.
This example creates a job to print in AR70 - Customer File Print.Enter AR70 and enter [Enter], the toggle is ON therefore the keystrokes will have been captured into the job.
The AR70 first screen appears prompting for [Y] or [N]. Enter return to proceed to the next screen.
On the second screen the [F3] key will start the report with the default options, however, please note the following;
If [F3] is pressed with the toggle ON - the keystroke will be captured, but the report will also now be run immediately. To prevent the report from running the following procedure must be followed;
Press the HOME key (set up in SU01 - Terminal and Printer Setup for the terminal) the toggle will change to OFF, press HOME again and the toggle will show BYPASS. Press HOME again and the toggle will be ON. Thus the capture toggle works in a circular manner;
ON -> OFF -> BYPASS -|ON - implies capture to JOB and run in actual TITAN
OFF - implies DO NOT capture to JOB, but run in TITAN
BYPASS - implies CAPTURE in JOB, but do not run (bypass) in TITAN
If your [HOME] key does not work, another Control key, for example CntrlR may be used provided you set it up in SU01 - Terminal and Printer Setup.
Therefore, to capture in JOB, but bypass TITAN, press the [HOME] key twice to set the toggle that appears in the top right hand corner to BYPASS. Now press [F3]. Note that nothing happens in TITAN, but the [F3] will have been captured.
To now escape from AR70 set the toggle to OFF in order to register the ESCAPE in TITAN, but not to capture it to the job. Press HOME and [Enter] to toggle to OFF and then ESCAPE. The system returns to the main menu with the toggle OFF.
Enter SU39 - Option [1] for Capturing and scan for the job being currently created. Note that the CAPTURE STATUS is ON.
Use [F5] to toggle the CAPTURE STATUS to OFF.
The record will now appear with CAPTURE STATUS OFF, RUN STATUS IDLE and CAPTURE DATA ON FILE.
4 - 222 JULY 2006 Systems Utilities - User Guide

SYSTEM UTILITIES - JOB PROCESSING On SU39 11/001 JOB NAME [CHEQUES ] DESCRIPTION [REMITTANCE ADVICE/PAYMENT RUN ] ACCESS INDICATOR [0] Level 1 - 9 SINGLE USER ONLY? [Y] CAPTURE STATUS OFF RUN STATUS IDLE CAPTURE DATA ON FILE
F3 - UPDATE, F5 - TOGGLE, F8 - DELETE, F10 - NEXT JOB, ESC - EXIT
We recommend that for security reasons you use 'Q' to quit out of titan after the last job to be run is completed.
SU - Maintenance JULY 2006 4 - 223

OPTION 2 - RUNNING A JOB
Select Option [2] and a standard scan - including a partial scan - of the jobs currently available is provided.
Use the arrow key or type the name of the job.
SYSTEM UTILITIES - JOB PROCESSING On SU39 11/001 JOB NAME [CHEQUES ] JOB NAME DESCRIPTION OWNER ACCESS STATUS CHEQUES <--> REMITTANCE ADVICE/PAYMENT RUN SYSADMIN 0 IDLE STATE STATEMENT PRINTT SYSADMIN 0 IDLE TRANSFER SP91 INV/CR NOTE RUN SYSADMIN 0 IDLE
*** NO MORE ITEMS *** F1 - SCAN, F10 - OPTIONS MENU, ESC - EXIT
The job may be run in the foreground or background.
A JOB MAY NOT BE RUN...
When the CAPTURE STATUS is ON. When the job was created in SINGLE USER mode and is currently being run. When there is no CAPTURE DATA on file.
4 - 224 JULY 2006 Systems Utilities - User Guide

RUNNING IN THE FOREGROUND (In reactive mode)
Using the job created for AR70 in the above example, run the job in the foreground. Your screen is locked and the keystrokes as entered in the capture are automatically followed so that the report for AR70 can be seen running. The job run is logged in the System Log (SU62 - Logging Maintenance).
RUNNING IN THE BACKGROUND (Batch Mode)
If the background option is selected you are prompted for a time that the job must be scheduled.
The job is then assigned a QUEUE NUMBER and entered into the queue. The presence of jobs in the queue can be viewed in option 4.
If bTITAN is not running the job will remain in the queue indefinitely.
SYSTEM UTILITIES - JOB PROCESSING SU39 11/001 JOB NAME [STATE ] DESCRIPTION [STATEMENT PRINTT ] RUN STATUS IDLE EXECUTION MODE [I] I - Interactive Mode B - Batch Mode
DETAILS OK? [Y] F10 - NEXT JOB, ESC - EXIT
SU - Maintenance JULY 2006 4 - 225

OPTION 3 - JOB MAINTENANCE
Only SYSADMIN may use option [3].
SYSADMIN may selectively alter a CAPTURE STATUS from ON to OFF or terminate a job running.
SYSTEM UTILITIES - JOB PROCESSING SU39 11/001 JOB NAME [CHEQUES ] DESCRIPTION REMITTANCE ADVICE/PAYMENT RUN ACCESS INDICATOR 0 RUN RESTRICTIONS SINGLE USER CAPTURE STATUS OFF RUN STATUS IDLE CAPTURE DATA ON FILE
F3 - RESET RUN/CAPTURE FLAG, F10 - NEXT JOB, ESC - EXIT
4 - 226 JULY 2006 Systems Utilities - User Guide

OPTION 4 - QUEUE STATUS
The status of the queue will show jobs waiting to be run, jobs that have been completed and jobs that had errors and can be scanned and maintained. A job may not be removed from the queue once it is already running.
SYSTEM UTILITIES - JOB PROCESSING SU39 11/100
QUEUE # [0001]JOB NAME QUE # ENTERED TIME AND DATE DUE COMPLETE STATUSACUFILE <--> 0001 070942 070937 on 93/09/20 WAITING
*** NO MORE ITEMS ***F1 - SCAN, F8 - DELETE, F10 - OPTIONS, ESC - EXIT
NOTES ON "bTITAN""bTITAN" can be started by the SYSTEMS ADMINISTRATOR. The program cycles indefinitely, polling the queue for jobs to be run.You may press [Esc] when the system displays “CHECKING QUEUE” and the system allows you to exit."bTITAN" may be run with (a) diagnostics on a screen or (b) unnoticed in the background. Depending on the setup:1.Set Background Display flag in SU30 - Installation Maintenance option 1 (screen 1) to "Y" Start-up as : bTITAN2.Set Background Display flag in SU30 - Installation Maintenance option 1 (screen 1) to "N" Start-up as : bTITAN>/dev/null&To terminate bTITAN must be killed.Option 2 may not be used in DOS.
SU - Maintenance JULY 2006 4 - 227

5. MISCELLANEOUS MODULE
5.1. THE MISCELLANEOUS MODULE MENU
This module consists of the following programs which perform miscellaneous tasks.
SU40 MEMORY/SPEED OPTIMISATIONSU41 REFERENCE FILE MAINTENANCESU42 COMMON CATEGORY INPUT/MAINTENANCE SU44 CUSTOMISED FILE LAYOUT MAINTENANCE
5 - 228 JULY 2006 Systems Utilities - User Guide

5.2. MEMORY/SPEED OPTIMISATION - SU40
SU40 is a special memory optimisation program that enables the SYSTEM ADMINISTRATOR (SYSADMIN) to configure the TITAN system according to the needs of his respective users.
This program should NOT be used without expert knowledge of the product and if in any doubt whatsoever, please contact the Dealer or Distributor before using.
The concept of SU40 is to allow frequently used files to remain open and procedures to reside in memory thus speeding up interactive use of the product, but at the same time requiring larger memory capacity per user.
SU40 opens files by means of the I/O modules which are resident in the UT program directory. There is an I/O module for each TITAN data file. When a user logs on to TITAN and accesses a program for the first time during that session, the I/O modules specified in SU40 are Initialised and loaded into SU40.
The SYSTEMS ADMINISTRATOR may specify which procedures are to be loaded and which files are to be opened for all users (via [F3] for ALL USERS) and for individual users (by selecting the users name). The only procedures that may be entered are the following ;
UTHELP online helpUTLIB RW/AB Applications onlyUTCALC RW/AB Applications onlyUTSCAN RW/AB Applications onlyUTPRT Printer routinesUTDATE Date routinesUTCOBR Company/Branch routinesUTHOT HOT KEY functionsUTPAINT Screen repainter
And any relevant I/O module, for example FCODET, PROGSYS, PASSWD, ...
Entering ANY other procedures into the field could cause corruptions to the TITAN suite of programs.
NOTE 1 The general rule should be - any file in the UT directory except those beginning with UT which are not listed above.NOTE 2 Should incorrect routines or I/O modules be entered in SU40, the user may encounter error messages on initialising those routines. These errors may even crash the user out of TITAN. Should this occur, it may be best to remove CALLFILE from the data directory, re-enter TITAN, recreate and rebuild CALLFILE in SU40.
SU - Miscellaneous JULY 2006 5 - 229

We recommend that the following I/O modules remain in memory by loading them in SU40 for all users (if sufficient memory is available);
Recommended OptionalFCODET UTCOBRPROGSYS UTDATEPASSWD UTPRTSYSCAP DESCRIP
NUMBERS
If you wish to allow Help and Hot KEY functions then the following should be added either for specific users or for all users (if sufficient memory available);UTHELP UTHOTUTPAINT
Users of AB/RW may optimise operations by having the following procedures included in SU40 for those specific users only;
UTLIB UTSCANUTCALC RWDICTRWVARS
Please ensure that these routines are NOT loaded for all users, as this will very quickly overload your memory and slow the system down. They should be loaded only for the relevant users.
Optimise memory by having the I/O modules for the relevant programs included in SU40 for THOSE SPECIFIC users ONLY.
For example an operator using SP10 - Order Entry could have the following loaded in SU40 against his name;
SLMAST ORDERS
DELADD STKBAL
STKMAS
5 - 230 JULY 2006 Systems Utilities - User Guide

An operator using a different program could have a different set of I/O modules loaded against his name.
NOTE 1 It is very important that a user does not have I/O modules loaded in SU40 for systems which the user does not require, as this will seriously slow down performance. For example do not load General Ledger files when the user is only doing Sales Order Processing transactions.NOTE 2 Please note the statement "if sufficient memory is available". Should a system's memory be heavily utilised (e.g. 90% used), then it will be necessary to reduce the number of I/O modules per user in SU40. Heavy memory utilisation may be indicated by slow runtime or access time, by a warning message (dependent on the system) and by excessive disk activity, which indicates that memory is swapping back and forth from the disk. It may be useful to delete I/O modules from SU40 and start rebuilding step by step as described above, to determine the level at which no more routines may be usefully added in SU40.
SU - Miscellaneous JULY 2006 5 - 231

5.3. REFERENCE FILE MAINTENANCE - SU41
This program allows you to create Reference Types and associated codes. One of these types may be linked via AR00 - System Record Maintenance to the debtors masterfile, and one to debtors transactions.
These codes may also be included in alternate sequences set up via program AR33 - Alternate Sequence - User Defined.
If the types are specified in program AR00 - System Record Maintenance, the program AR30 - Customer File Maintenance will allow you to enter a code of the type specified on each debtors masterfile record. In addition, all the SP1 programs in the Sales Order Processing System, will ask for an entry which will then be transferred via SP91 - Interface to AR and SA to the Accounts Receivable system where reporting may be done in alternate sequences.
If you wish to make any of these codes mandatory in the SP1 programs, add the type to SU31 - Descriptions File Maintenance with a code “-MAN”. In AR30 - Customer File Maintenance, add this code via [F7] to mark a debtor as having to have this mandatory code. The SP1 programs will check to see if a “-MAN” code exists for the debtor when a blank code is entered.
SP33 - Alternate Sequence also allows the inclusion of these codes in an alternate sequence.
Enter SU41 to access the program.
To create new reference types enter the following when the screen shown below displays.
SYSTEM UTILITIES - REFERENCE FILE MAINTENANCE SU41 11/001CO - 01 - TECHNOLOGIES INCORPORATEDBR - 01 - CAPE TOWN REFERENCE TYPE [ ]
DESCRIPTION [MOTIVATION CODES ]SHORT DESCRIPTION [MOTIVE ]
F3 - UPDATE, F8 - DELETE, F10 - TYPE, ESC - EXIT
Level 1
REFERENCE TYPE : 2 characters.Enter a two character reference type or press [F1] to scan the file of types and their descriptions on file.
5 - 232 JULY 2006 Systems Utilities - User Guide

Please use only uppercase characters for reference types as lower case is reserved by the system for future use.
SU - Miscellaneous JULY 2006 5 - 233

DESCRIPTION : 30 charactersEnter a description for this reference type, for instance ‘MOTIVATION CODES’.
SHORT DESCRIPTION : 8 charactersEnter a short description for this reference type. This will be used as a label in reports and on screens where you are required to enter codes for this reference type.
When you have created the reference type, you may enter codes for this type.
SYSTEM UTILITIES - REFERENCE FILE MAINTENANCE SU41 10/002CO - 01 - SEAGULL SOFTWARE CCBR - 01 - MAIN BRANCH [A1 ] WARDS A1 DESCRIPTION [E.N.T ] FOR ACCOUNT NO [1010 ] F3-UPDATE, F8-DELETE, F10-TYPE, ESC-EXIT
REFERENCE CODE : 8 characters.Enter a reference code for the reference type.
DESCRIPTION : 30 charactersEnter a description for the reference code.
FOR ACCOUNT NO : 15 charactersIf you enter an account number here, this reference will only be available for entry for the specified debtor. If you leave it blank it will relate to all debtors.
Press [F3] to update the file. Continue in this manner until you have entered all the codes for this type.
TO DELETE A RANGE OF CODES FOR A TYPE
You may delete a range of codes for a type. Do this as follows:
When the code is blank press [F8], the prompt ‘[F8] – DEL RANGE’ will be displayed. Press [F8] again and enter the range to be deleted.
5 - 234 JULY 2006 Systems Utilities - User Guide

5.4. COMMON CATEGORY INPUT/MAINTENANCE - SU42
Common categories are used across all systems. This means a duplication of effort in many cases. For instance both AR32 - Category File Maintenance, and AP34 - Purchase Analysis Maintenance, must be maintained. This program allows you to indicate which systems must be updated. This will then update the relevant files such as DRANAL and CRANAL.
When you call up this program and scan the categories, the details will display as per the screen below. Use [F9] to print the details.
Enter SU42 to select the program.
SYSTEM UTILITIES - COMMON CATEGORY INPUT/MAINTENANCE SU42 11/101 CO - 01 - TECHNOLOGIES INCORPORATED BR - 01 - CAPE TOWN CATEGORY [0003] CODE DESCRIPTION AR AP IV JC CB 0003<-->Sales - Shower/Cubicle set Y N N N N GL # 5100/20/100/00 0020 Sales - Paint Y N N N N GL # 5100/00/200/00 0100 Sales - Shower/Cubicle set Y Y N Y N GL # 5100/20/100/00 1000 Sales - Tools Y Y Y Y Y GL # 5100/00/100/00 1100 Purchases - Handshowers Y Y Y Y Y GL # 6100/20/100/00 1125 Purchases - Miscellaneous Y Y Y Y Y GL # 6100/40/300/00 F1 - SCAN FWDS, F6 – UPD ALL, F9 - PRINT, F10 - PREV.SCRN, ESC - EXIT
SU - Miscellaneous JULY 2006 5 - 235

To allow all codes to be updated to selected systems press [F6]. To enter details for a category, enter the category. The screen below displays.
SYSTEM UTILITIES - COMMON CATEGORY INPUT/MAINTENANCE SU42 11/101 CO - 01 - TECHNOLOGIES INCORPORATED BR - 01 - CAPE TOWN CATEGORY 0100 DESCRIPTION [Sales - Shower/Cubicle set GL ACCOUNT CODE [5100/20/100/00] Sales - Shower/Cubicle set UPDATE AR [Y] UPDATE AP [Y] UPDATE IV [N] UPDATE JC [Y] UPDATE CB [N] F1 - GL SCAN, F3 - UPDATE, F8 - DELETE, F10 - CATEGORY, ESC - EXIT
When you use this you enter the category, it's description and General Ledger code as normal and then indicate which systems must be updated. Please note that the description is defaulted from the General Ledger but you may change it. Both the SUANAL file as well as the normal DESCRIP and category files are updated with the stated details
Please note that this program only allows you to enter the code, its description and General Ledger code. Any additional information MUST be entered in the individual programs.
5 - 236 JULY 2006 Systems Utilities - User Guide

5.5. CUSTOMIZED FILE LAYOUT MAINTENANCE - SU44
This program allows you to define any input file and then to convert it to a new file which one of the standard TITAN input programs can read and use to update files.
Enter SU44 to select the program.
Level 1
SYSTEM UTILITIES - CUSTOMISED IMPORT FILE LAYOUT MAINTENANCE SU44 11/005 ENTER IMPORT PROGRAM NAME [CV03 ]IMPORT PROGRAM DESCRIPTION AP - TRANSACTION TAKEONENTER LAYOUT # [ 1]IMPORT FILE NAME [INFLAT ]IMPORT FILE TYPE [FL] FL = FIXED LENGTH CD = COMMA DELIMTEDLAYOUT DESCRIPTION [IMPORT CREDITORS MASTERFILE ] F3-ACCEPT, F4-CONVERT, F8-DELETE, ESC-EXIT
ENTER IMPORT PROGRAM NAME : 6 characters
Enter the name of the TITAN import program
IMPORT PROGRAM DESCRIPTION : This is displayed by the system and cannot be
changed.
ENTER LAYOUT # : 2 DigitsYou may have more than one input layout and thus need to specify the layout number.
IMPORT FILE NAME : 8 charactersEnter the name of the file to be imported.
IMPORT FILE TYPE : 2 charactersYou may import two types of files. A Fixed length or a comma delimited file.
LAYOUT DESCRIPTION : 30 charactersEnter a name for this layout.
SU - Miscellaneous JULY 2006 5 - 237

Level 2SYSTEM UTILITIES - CUSTOMISED IMPORT FILE LAYOUT MAINTENANCE SU44 11/005 CV03 - IMPORT CREDITORS MASTERFILE LAYOUT # 01 INFILE NAME 08VARIABLE NAME A/N DGT DEC POS POS DEFAULT VALUECOMPANY N 02 00 0001 [ 1] [ ]BRANCH N 02 00 0003 [ 2] [ ]SUPPLIER # A 06 00 0005 [ 3] [ ]DOCUMENT DATE (CCYYMMDD) N 08 00 0011 [ 0] [******************************]TRANSACTION TYPE N 02 00 0019 [ 0] [******************************]DOCUEMTN PREFIX A 02 00 0021 [ 0] [******************************]DOCUMENT # A 08 00 0023 [ 0] [******************************]LINE # N 04 00 0031 [ 0] [******************************]X-REFERENCE A 08 00 0035 [ 0] [******************************]GL ACCOUNT # A 30 00 0043 [ 0] [******************************]CATEGORY CODE A 04 00 0073 [ 0] [******************************]DOCUMENT AMOUNT S 09 02 0077 [ 0] [******************************]TAX AMOUNT S 09 02 0089 [ 0] [******************************]DISCOUNT AMOUNT S 09 02 0101 [ 0] [******************************]PAST ALLOCATION S 09 02 0113 [ 0] [******************************]CURRENT ALLOCATION S 09 02 0125 [ 0] [N ]AMOUNT MARKED S 09 02 0137 [ 0] [******************************]DUE DATE N 08 00 0149 [ 0] [******************************]DETAILS OK? (Y/N) [Y]F1-NEXT, F2-PREV, F3-ACCEPT, F4-CONVERT, F5-FILL*, F8-DELETE, F10-PROG
Use the screen above to map your file (right) to the Titan file layout (left). You may either specify the position on your file of the data, or a default value.
The [F5] will fill the default field with asterisks indicating that no file changes are required for those fields.
Please note that if you are using a Comma Delimited type file as input, the position (POS) is the field number, and when you are using a Fixed Length file, then it is the actual position in the file.
Level 3SYSTEM UTILITIES - CUSTOMISED IMPORT FILE LAYOUT MAINTENANCE UTCVRT11/004 CONVERT FILE FOR IMPORT PROGRAM : CV03 IMPORT FILE NAME INFLATIMPORT FILE TYPE FL FL = FIXED LENGTH CD = COMMA DELIMTEDCONVERT TO FILE NAME [CRIMPORT] F3-CONTINUE, ESC-EXIT
Once you have entered all the details, press [F4] to convert. You will be requested to enter a new file name. This will be the name you enter when you run the program using the Titan conversion program.
5 - 238 JULY 2006 Systems Utilities - User Guide

5.6. GENERAL CROSS REFERENCE MAINTENANCE - SU45
This program enables you to have general cross references, which do not relate or interface to any other TITAN programs. These may be viewed in program SU55 - General Cross Reference Enquiry.
Enter SU45 to select the program.
Level 1
SYSTEM UTILITIES - GENERAL CROSS REFERENCE MAINTENANCE SU45 10/002CO - 01 - SEAGULL SOFTWARE CCBR - 01 - MAIN BRANCH TYPE XREF 1 TYPE XREF 2[XX ] [GGG ] [YYYY] [GGGG ]XREF/TYPE SEQUENCE XX GGG <--> YYYY GGGG *** NO MORE ITEMS ***F1-SCAN, F5-TOGGLE, F10-PREV
You can enter a type and description for both Cross Reference 1 and 2. There after a new box pops up enabling you to enter a free-form attribute, a comment and a link. This latter may be a link to a picture or a sound which will then display. You may enter a sound or a picture in this field as follows <WAV=filename.wav> in which case the sound will play every time the cross rference is displayed. For a picture it should be <JPG=filename.jpg>.
The [F5] key allows you to toggle between scans for Cross Reference types 1 anD 2.
SU - Miscellaneous JULY 2006 5 - 239

6. ENQUIRY MODULE
6.1. THE ENQUIRY & SCAN MODULE MENU
This module consists of the following programs;
SU50 - COMPANY FILE ENQUIRY.
SU51 - DESCRIPTIONS FILE SCAN.
SU52 - NUMBERS FILE SCAN.
SU53 - OBJECT VERSION NUMBER MAINTENANCE.
SU58 - SYSTEM PASSWORD ENQUIRY
These programs enquire into and allow the System Utilities data to be viewed.
Enter SU5 to display the menu.
Enter SU to return to the System Utilities menu or M, to return to the main menu.
6 - 240 JULY 2006 Systems Utilities - User Guide
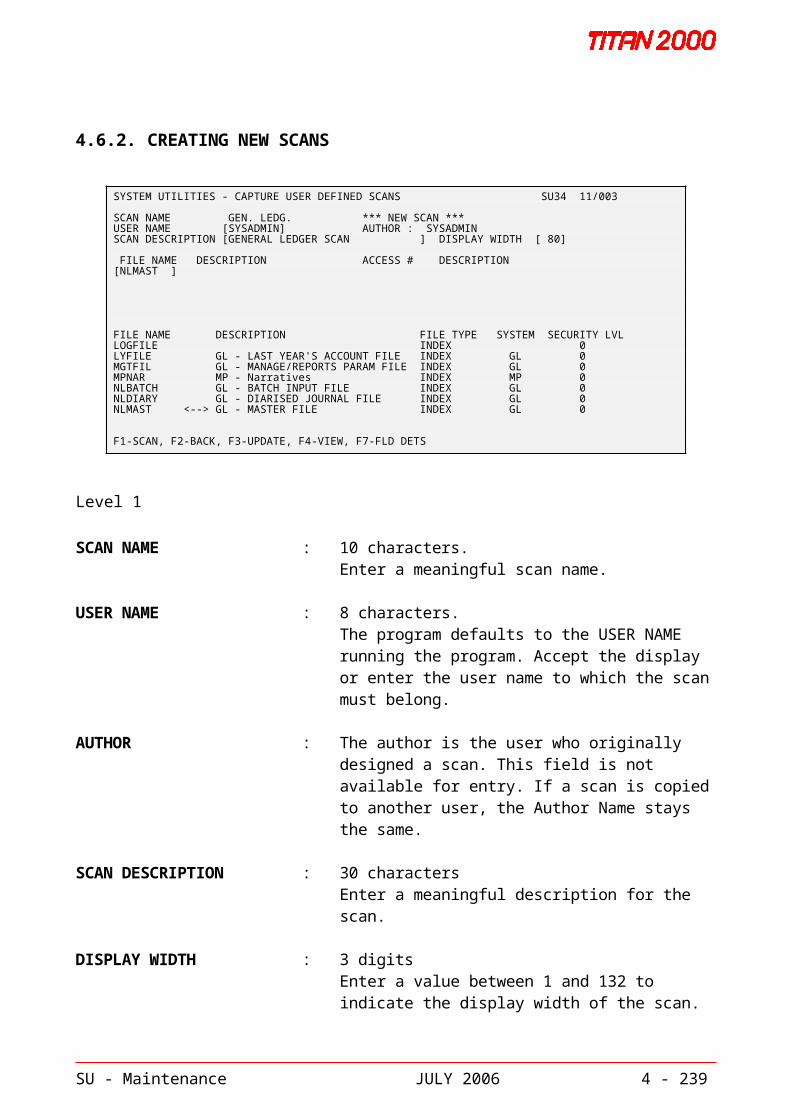
6.2. COMPANY FILE ENQUIRY - SU50
This program provides an enquiry facility into the company and branch file, showing which systems are available to each company and branch combination.
Enter SU50 to select the program.
Level 1
COMPANY/BRANCH : 2 digits/2 digits.Enter the Company/Branch required for enquiry or scan using [F1]. The enquiry detail is displayed.
The enquiry shows which systems are active for the selected company/branch combination.
Press [Enter] when the enquiry is complete.
SYSTEM UTILITIES - COMPANY FILE ENQUIRY SU50 11/001 CO - 01 - TECHNOLOGIES INCORPORATED BR - 01 - CAPE TOWN SYSTEM # [1 ] NO SYSTEM DESCRIPTION 01 <-->GL GENERAL LEDGER SYSTEM 02 AR ACCOUNTS RECEIVABLE 03 AP ACCOUNTS PAYABLE 04 SP SALES ORDER PROCESSING 05 IV INVENTORY CONTROL 06 PO PURCHASE ORDERS SYSTEM 07 SA SALES ANALYSIS SYSTEM 08 WP WEEKLY PAY SYSTEM 09 MP MONTHLY PAY SYSTEM 10 FA FIXED ASSETS SYSTEM 11 ES ESTIMATING SYSTEM 12 JC JOB COSTING SYSTEM 13 BM BILL OF MATERIALS 14 IS INSTALMENT SALES
F1 - SCAN, F10 - CO/BR, ESC - EXIT
SU - Enquiry JULY 2006 6 - 241

6.3. DESCRIPTIONS FILE SCAN - SU51
The user may scan and view the description file record types on file.
Enter SU51 to select the program.
Level 1
STARTING RECORD TYPE : 2 characters.Enter the starting record type or press [F1] to scan.
All the description types within the selected company/branch are displayed.
SYSTEM UTILITIES - DESCRIPTIONS FILE SCAN SU51 11/001 CO - 01 - TECHNOLOGIES INCORPORATED BR - 01 - CAPE TOWN STARTING RECORD TYPE [AS] TYPE CODE DESCRIPTION AS GL ACCOUNTING SECTIONS AS A1 Fixed Assets AS A2 Current Assets AS C1 Capital AS C2 COST OF SALES AS E1 Cost of Sales AS E2 Admin Expenses AS I1 Trade income AS I2 Other Income AS L1 Long Term Liabilities AS L2 Current Liabilities AS XX ALL ACCOUNTS BL LAST YEAR'S BUDGET
F1 - SCAN FORWARDS, F10 - CO/BR, ESC - EXIT
The status line displays the available options. Press [F1] to scan forwards, [F2] to scan backwards, [F10] to access the Company/Branch screen and [Esc] to exit the program.
6 - 242 JULY 2006 Systems Utilities - User Guide

6.4. NUMBERS FILE SCAN - SU52
The program scans the NUMBERS file and displays the type, description and the next audit number for each audit number series.
Enter SU52 to select the program.
SYSTEM UTILITIES - NUMBERS FILE SCAN SU52 11/001 CO - 01 - TECHNOLOGIES INCORPORATED BR - 01 - CAPE TOWN TYPE NEXT NO. A NEXT DEBTORS AUDIT # 1399 B NEXT GL BATCH # 150 C NEXT CREDIT NOTE # 111 D NEXT STOCK AUDIT # 730 E NEXT INSTALMENT SALE AUDIT # 1 F NEXT CR INTERNAL REF. # 283 G NEXT GL AUDIT # 861 I NEXT INVOICE # 3380 J JOB COST AUDIT NO 1 O NEXT ORDER # 1683 P NEXT PURCHASE ORDER # 164 Q NEXT RECOMMENDED PUR/ORDER # 150 R NEXT CREDITORS AUDIT # 2233 S ESTIMATING REVISION NO 2 V 5 W TEST 7
F1 - SCAN FORWARDS, F10 - CO/BR, ESC - EXIT
The status line displays the available options. Press [F1] to scan forwards, [F10] to access the Company/Branch screen and [Esc] to exit the program.
SU - Enquiry JULY 2006 6 - 243

6.5. OBJECT VERSION NUMBER MAINTENANCE - SU53
This program is supplied to provide the end user of TITAN with the simple means to display, to report on, and to update records of the version numbers of the programs in use.
The user is able to display, to report on, and to update records of both the version numbers of the most current programs and also a saved list.
In both instances a comparison is made against the program version numbers distributed by the TITAN distributor in the file OBJDIST.
SYSTEM UTILITIES - OBJECT VERSION ENQUIRY SU53 11/001 SELECT VERSION FUNCTION: [1] 1 EXTRACT CURRENT VERSIONS 2 DISPLAY VERSION NUMBERS 3 PRINT VERSION TABLE REPORT 4 SAVE LATEST VERSION NUMBERS TO SAVE FILE 5 LOAD NEW VERSION NUMBER FILE
ESC - EXIT
MAIN FUNCTIONS
When starting in SU53 two files are always loaded; OBJVER, the default work file which contains the most recently updated program version numbers, and OBJDIST, which contains the program version numbers distributed by the TITAN Distributor.
While each file is loading the message PROCESSING..., and the numbers from 1 to 100 are displayed on the last line of the screen. Should either file be inaccessible then a warning message is displayed. This will not prevent you from using the program, as unavailable data will be represented by omissions in the object version number report or omissions in the screen display.
Once the work files have been loaded then the version function selections are displayed. The functions are;
EXTRACT CURRENT VERSIONS
Update the work file i.e. OBJVER with the latest program version numbers. You may select programs to update per program, per system, or all programs - all systems. The version numbers of the selected programs are then extracted, and the work file is updated.
On entry to this selection the work file OBJVER is always loaded if it is not the current work file (see below - selection LOAD NEW VERSION NUMBER FILE).
6 - 244 JULY 2006 Systems Utilities - User Guide

DISPLAY VERSION NUMBERS
Display the program version numbers of the current work file (see below - selection LOAD NEW VERSION NUMBER FILE) alongside the program version numbers distributed by the TITAN distributor. Where user program version numbers differ from those distributed it will be marked with an asterisk (*).
PRINT VERSION TABLE REPORT
Print a program version number report on the current work file (see below - selection LOAD NEW VERSION NUMBER FILE). The distributed program version numbers are also printed.
SAVE LATEST VERSION NUMBERS TO SAVE FILE
Facility to save the latest program object version numbers to the save file OBJSAVE. This file may then be accessed at a later stage to both display and report on object version numbers (see below - selection LOAD NEW VERSION NUMBER FILE).
LOAD NEW VERSION NUMBER FILE
Select a new program object version number file as the work file. The file to be loaded is specified by the user but defaults to either OBJSAVE or OBJVER, depending on which file is the current work file.
The display and report functions are performed on whichever file is the current work file.
The message ESC - EXIT is displayed in the message area. Press the [Esc] key or the [F10] key to return to the last TITAN screen.
SU - Enquiry JULY 2006 6 - 245

EXTRACT CURRENT VERSIONS
FLAG AND EXTRACTION OF SYSTEMS
Set extraction flags per system or program, and extract the version numbers of the programs flagged.
A matrix of the abbreviations of the TITAN systems is displayed, with a cursor <, marking the current system.
SYSTEM UTILITIES - OBJECT VERSION ENQUIRY SU53 11/001 FLAG AND EXTRACTION OF PROGRAMS GL<-- PO PS RW AR<-- SA JC AB AP WP BM OP SP MP IS CB IV FA SU PROGRAM DESCRIPTION: SYSTEM DESCRIPTION: [SYSTEM RECORD MAINTENANCE ] [ACCOUNTS RECEIVABLE ] AR00<-- AR10<-- AR20<-- AR30<-- AR40<-- AR50<-- AR60<-- AR70<-- AR80<-- AR90<-- AR01<-- AR11<-- AR21<-- AR31<-- AR41<-- AR51<-- AR61<-- AR71<-- AR81<-- AR91<-- AR02<-- AR12<-- AR22<-- AR32<-- AR42<-- AR52<-- AR62<-- AR72<-- AR82<-- AR92<-- AR03<-- AR13<-- AR23<-- AR33<-- AR43<-- AR53<-- AR63<-- AR73<-- AR83<-- AR93<-- AR04<-- AR14<-- AR24<-- AR34<-- AR44<-- AR54<-- AR64<-- AR74<-- AR84<-- AR94<-- AR05<-- AR15<-- AR25<-- AR35<-- AR45<-- AR55<-- AR65<-- AR75<-- AR85<-- AR95<-- AR06<-- AR16<-- AR26<-- AR36<-- AR46<-- AR56<-- AR66<-- AR76<-- AR86<-- AR96<-- AR07<-- AR17<-- AR27<-- AR37<-- AR47<-- AR57<-- AR67<-- AR77<-- AR87<-- AR97<-- AR08<-- AR18<-- AR28<-- AR38<-- AR48<-- AR58<-- AR68<-- AR78<-- AR88<-- AR98<-- AR09<-- AR19<-- AR29<-- AR39<-- AR49<-- AR59<-- AR69<-- AR79<-- AR89<-- AR99<--
RETURN - FLAG, F3 - EXTRACT THIS SYS, F6 - FLAG ALL, F8 - FLAG NONE, F10 - BACK
The description of the current system is displayed below the matrix. The message RETURN - FLAG PROGRAMS, F3 - EXTRACT ALL, F6 - FLAG ALL, F8 - FLAG NONE, F10 - BACK is displayed in the message area.
The direction keys will move the cursor within the matrix, selecting a new system as the current system.
The [RETURN] or [Enter] key will flag the current system, and allow individual programs within that system to be flagged. (See next section - FLAG AND EXTRACTION OF PROGRAMS).
The [F3] key will extract the program version numbers of all flagged programs or systems. The speed of extraction varies from machine to machine but may take as long as two seconds for each program flagged. As a program version number is located the result is displayed on the screen. When the extraction is complete the original matrix is redisplayed on the screen.
The [F6] key will flag all programs of all systems for extraction; [F8] key will remove the flags from all programs and all systems. The [F10] key will return you to the SELECT VERSION FUNCTION screen, updating the work file (OBJVER) with any new version numbers extracted.
6 - 246 JULY 2006 Systems Utilities - User Guide

FLAG AND EXTRACTION OF PROGRAMS
The [RETURN] or [Enter] key on the FLAG AND EXTRACTION OF SYSTEMS screen displays this screen, and allows the individual programs within the current system to be flagged.
A matrix of the program numbers from 00 to 99 for the current system is displayed, with a cursor [ marking the current program. The message RETURN - FLAG, F3 - EXTRACT THIS SYS, F6 - FLAG ALL, F8 - FLAG NONE, F10 - BACK is displayed in the message area.
SYSTEM UTILITIES - OBJECT VERSION ENQUIRY SU53 11/001 EXTRACTION OF VERSION NUMBERS GL<-- PO ES RW AR<-- SA JC AB AP WP BM OP SP MP IS CB IV FA SU SYSTEM DESCRIPTION: [ACCOUNTS RECEIVABLE ] AR0010/001 AR01 AR02 AR03 AR04 AR05
PROCESSING - AR06
The direction keys will move the cursor within the matrix, selecting a new program as the current program. The [RETURN] or [Enter] key will set an extraction flag for the current program.
The [F3] key will extract the program version numbers of all flagged programs in the current system. As a program version number is located the result is displayed on the screen. When the extraction is complete the original system matrix is redisplayed on the screen.
The [F6] key will flag all programs in the current system for extraction. The [F8] key will remove the flags from all programs in the current system, and the [F10] key will return to the FLAG SYSTEMS screen, retaining any flags set for the current system. If the [F3] key is subsequently pressed in the FLAG AND EXTRACTION OF SYSTEMS screen then these flagged programs will be extracted.
SU - Enquiry JULY 2006 6 - 247

DISPLAY EXTRACTED VERSION NUMBERS
This selection allows you to display the program version numbers for each system.
A matrix of the abbreviations of the TITAN systems is displayed, with a cursor, <, marking the current system. The description of the current system is displayed below the matrix.
The direction keys will move the cursor within the matrix, selecting a new system as the current system.
The [RETURN] or [Enter] key will display the work file version numbers for the selected system, along with the distributed version numbers. If the work file is the default OBJVER then the work file versions will be those most recently extracted. Otherwise the work file version numbers will be saved version numbers. If all the version numbers do not fit onto one screen the message ENTER TO CONTINUE will be displayed in the message area. The [RETURN] or [Enter] key will display the remaining version numbers on the screen.
If there are no version numbers for the current system then the message SYSTEM NOT LOADED - CONTINUE [Y] will be displayed in the message area.
The [N] key will return to the DISPLAY EXTRACTED VERSION NUMBERS screen. The [Y] key will display the distributed version numbers for the current system.
The [F10] key will return to the SELECT VERSION FUNCTION screen.
SYSTEM UTILITIES - OBJECT VERSION ENQUIRY SU53 11/001DISPLAY EXTRACTED VERSION NUMBERS GL PO ES RW AR SA JC AB AP WP BM OP SP MP IS CB IV FA SU SYSTEM DESCRIPTION: [GENERAL LEDGER ] EXTRACTED DISTRIBUTED EXTRACTED DISTRIBUTED EXTRACTED DISTRIBUTED GL0041/001 GL0041/001 GL1041/024 GL1041/024 GL20 GL20 GL01 GL01 GL11 GL11 GL21 GL21 GL02 GL02 GL12 GL12 GL22 GL22 GL03 GL03 GL13 GL13 GL23 GL23 GL04 GL04 GL1441/007 GL1441/007 GL24 GL24 GL05 GL05 GL1541/016 GL1541/016 GL25 GL25 GL06 GL06 GL16 GL16 GL26 GL26 GL07 GL07 GL17 GL17 GL27 GL27 GL08 GL08 GL18 GL18 GL2841/004 GL2841/004 GL09 GL09 GL19 GL19 GL29 GL29
ENTER TO CONTINUE
PRINT VERSION NUMBER REPORT
Print a program version number report with an option to print to the management system or direct to the printer.
While the report is being spooled the two character abbreviation of each system if displayed on the message line.
6 - 248 JULY 2006 Systems Utilities - User Guide

SAVE LATEST VERSION NUMBERS TO SAVE FILE.
Save the current work file to the save file OBJSAVE.
The message UPDATE SAVED OBJECT VERSION FILE? is displayed on the screen. Accepting this option will write the current work file to the save file OBJSAVE.
LOAD NEW VERSION NUMBER FILE.
Load a new object version file as the current work file.
The message LOAD NEW FILE? is displayed on the screen. Accepting this option then displays the messages ENTER NAME OF VERSION FILE, THE CURRENT FILE IS XXXXX where XXXXX is either OBJVER (the default work file), or OBJSAVE, depending on which work file has been loaded.
The work file name which is not the current work file is displayed in the accept field as the default file to load. You may press [RETURN] or [Enter] to accept the file name or, should you have another object version file to load, that file name may be specified.
CAUTION - The format of the work file is operating-system dependant, and files may not be directly portable across operating systems. For example, transporting these files between the UNIX and DOS-based operating systems requires the standard newline/carriage-return conversion necessary for all text files.
SU - Enquiry JULY 2006 6 - 249

6.6. RUN USER-DEFINED SCANS – SU54
This program allows you to view all user-defined scans created in program SU34 – Capture User Defined Scans.
Enter SU54 to access the program.
Level 1
Enter the name or scan for the required scan.
Level 2
Enter the selection parameters presented on the screen. These are based on the access code used. For instance, if you selected an access code containing Company and Branch, you will be able to specify which Company/Branch combinations to use.
The results of the scan displays as shown below.
Use the scroll bars on the right hand side to scroll through the data.
The single arrows move you one record at a time and the double arrows, one page at a time.
6 - 250 JULY 2006 Systems Utilities - User Guide

6.7. GENERAL CROSS REFERENCE ENQUIRY - SU55
This program enables you to view general cross references, which do not relate or interface to any other TITAN programs. These are created in program SU45 - General Cross Reference Maintenance.Enter SU55 to select the program.
SU - Enquiry JULY 2006 6 - 251

6.8. SYSTEM PASSWORD ENQUIRY - SU58
The program holds program and user access in a file called SUMASPGM and dynamically updates it as changes are made. It is only an enquiry program.
Enter SU53 to select the program.
SYSTEM UTILITIES - SYSTEM PASSWORD ENQUIRY SU58 11/006 USER NAME [ABBY ] SYS/PROGRAM NAME [ ] USER DESCRIPTION PROGRAM DESCRIPTION ACCESSABBY <-->TEMPLATE FOR GROUP 1 AB APPLICATION BUILDER WriteABBY TEMPLATE FOR GROUP 1 AP ACCOUNTS PAYABLE WriteABBY TEMPLATE FOR GROUP 1 AR ACCOUNTS RECEIVABLE WriteABBY TEMPLATE FOR GROUP 1 BL BANK LINK WriteABBY TEMPLATE FOR GROUP 1 BM BILL OF MATERIALS WriteABBY TEMPLATE FOR GROUP 1 CB CASH BOOK WriteABBY TEMPLATE FOR GROUP 1 CS CUSTOMER SPECIAL WriteABBY TEMPLATE FOR GROUP 1 CU CONVERSION UTILITIES WriteABBY TEMPLATE FOR GROUP 1 CV CONVERSION UTILITIES WriteABBY TEMPLATE FOR GROUP 1 CW CHART WRITER WriteABBY TEMPLATE FOR GROUP 1 DU DEALER UTILITIES WriteABBY TEMPLATE FOR GROUP 1 EI ELECTRONIC DATA INTERCHAN WriteABBY TEMPLATE FOR GROUP 1 FA FIXED ASSETS WriteABBY TEMPLATE FOR GROUP 1 GL GENERAL LEDGER Write F1-SCAN, F5-TOGGLE, F9-PRINT
Use the [F5] key to toggle the display sequence and layout.
6 - 252 JULY 2006 Systems Utilities - User Guide
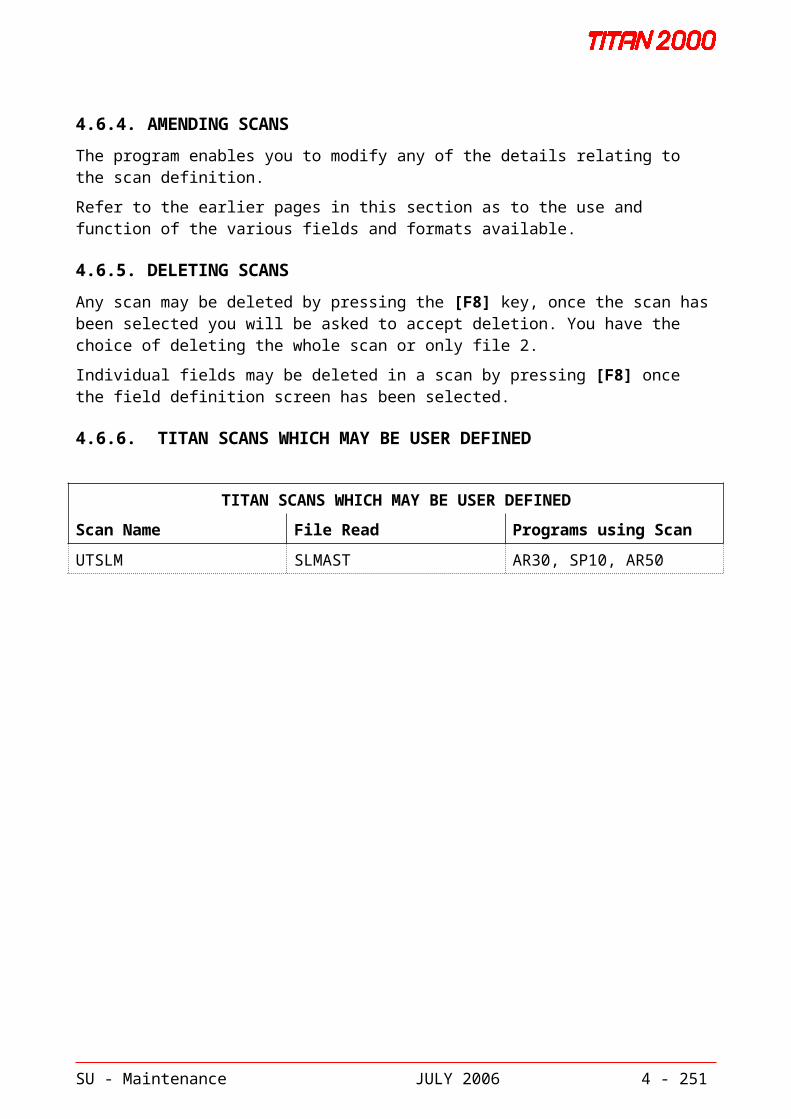
7. PRINT MODULE
7.1. THE PRINT MODULE MENU
This module consists of the following report programs;
SU71 - DESCRIPTIONS FILE PRINT
Enter SU7 to display the Print Module menu.
The programs in this module are pre-loaded with the most frequently used range selections. To change the selection criteria, answer N (No) to the "DETAILS OK? (Y/N)" prompt and move the cursor to the selection option or range to be changed.
SU - Print JULY 2006 7 - 253

7.2. DESCRIPTION FILE PRINT - SU71
The program prints a report listing all descriptions on file. These descriptions are set up and maintained by program SU31 - Descriptions File Maintenance.
Enter SU71 to select the program.
The program has three option levels.
Level 1
TYPE FROM-TO : 2 characters.Enter the required range of description types or press [Enter] in both fields to print all the description types on file.
DETAILS OK? (Y/N) : Y/NAccept the default or make the required change.
7 - 254 JULY 2006 Systems Utilities - User Guide
COMPANY : 01 - TECHNOLOGIES INCORPORATED DESCRIPTIONS FILE REPORT DATE : 20/11/91 @ 15:04 PAGE # 1BRANCH : 01 - CAPE TOWN SU71 11/001------------------------------------------------------------------------------------------------------------------------------------ TYPE CODE DESCRIPTION DETAILS------------------------------------------------------------------------------------------------------------------------------------ CG VENDOR GROUP
CG 0000 MISCELLANEOUS VENDORS
CG 0010 DISTRIBUTORS - TOOLS
CG 0020 DISTRIBUTORS - TIMBER PRODUCTS
CG 0030 DISTRIBUTORS - HOME IMPROVEMEN
CG 0040 DISTRIBUTORS - AGRICULTURAL
CG 0050 MANUFACTURERS - HARDWARE ITEMS
CG 0060 MANUFACTURERS - LEISUREWARE
------------------------------------------------------------------------------------------------------------------------------------ TYPE CODE DESCRIPTION DETAILS------------------------------------------------------------------------------------------------------------------------------------ CL LOCAL CURRENCY
CL 1000 DOLLARS
------------------------------------------------------------------------------------------------------------------------------------ TYPE CODE DESCRIPTION DETAILS------------------------------------------------------------------------------------------------------------------------------------ CM VENDORS ALTERNATE CATEGORY
CM 10 DECRIP CODE
CM 1000 ALTERNATES FOR PRODUCT/GROUP
* * * E N D O F R E P O R T * * *
SU71 - Descriptions File Report
SU - Print JULY 2006 7 - 255

8. REPORT MANAGEMENT
8.1. THE REPORT MANAGEMENT AND LOGGING SYSTEM MENU
This module consists of the following programs;
SU60 - REPORT MANAGEMENT PROGRAM
SU61 - REPORT MAINTENANCE PROGRAM
SU62 - LOGGING MAINTENANCE PROGRAM
The Report Management program provides the following functions;
Displaying reports on the screen.
Changing the status of reports.
Deleting a single/range of reports.
Printing a single/range of reports.
Placing a range of reports on hold.
Releasing a range of reports from hold.
The Report Maintenance program optimises the disk space used by the Report Management system.
The Logging Maintenance program allows users to control the level of logging and to interrogate the logfile.
Enter SU6 to display the menu.
Enter SU to return to the System Utilities menu or M, to return to the main menu.
8 - 256 JULY 2006 Systems Utilities - User Guide

8.2. THE REPORT MANAGEMENT SYSTEM - SU60
This is a multi-purpose program that provides a complete report management facility.
Most print programs route reports directly to a printer or to the report management system. If the latter option is selected, reports can then be managed through this system.
The program consists of various options, all of which will be described on the following pages.
Enter SU60 to select the program.
ENTER SELECTION : 1 digitSelect the required option. Each of these options will be fully described on the following pages.
SYSTEM UTILITIES - REPORT MANAGEMENT SYSTEM SU60 11/001
ENTER SELECTION [1] 1 Display/Alter Status/Delete/Print 2 Place a Range of Reports on Hold 3 Release a Range of Reports from Hold 4 Print a Range of Reports 5 Delete a Range of Reports 6 Display a Range of Reports
ESC - EXIT
SU - Report Management JULY 2006 8 - 257

8.2.1. DISPLAYING A REPORT ON A SCREENPress [Enter] to select Option [1] and a blank page is displayed. The status line gives all the available options.
Each report has a system generated number. These numbers are allocated and attached to each report as it is routed to the report management system.
Press [F7] to scan to the last report.
Press [F1] to scan or enter a number from which the scan is to start. This action will start a scan of all reports on file starting with the number entered or displayed.
Press [F4] to route the report to an email address. A box will display allowing you to enter an email address, copy addresses and a subject,
SYSTEM UTILITIES - REPORT MANAGEMENT SYSTEM SU60 11/001 REPORT NUMBER [1 ] REPORT CO/BR PGM USERNAME DATE TIME PRT FORM PAGES STATUS COUNT 000001<-->01/01 AP74 SYSADMIN 91/06/03 17:34 01 NORMAL 2 PRINT 01/0+ 000002 01/01 AP79 SYSADMIN 91/06/03 17:35 01 NORMAL 3 PRINT 01/0+ 000003 01/01 AP79 SYSADMIN 91/06/03 17:34 01 NORMAL 1 PRINT 01/0+ 000004 01/01 AP80 SYSADMIN 91/06/03 17:35 01 NORMAL 1 PRINT 01/0+ 000005 01/01 AP79 SYSADMIN 91/06/03 17:46 01 NORMAL 3 PRINT 00/0+ 000006 01/01 AP79 SYSADMIN 91/06/03 17:46 01 NORMAL 1 PRINT 00/0+ 000007 01/01 AP00 SYSADMIN 91/06/03 17:50 01 NORMAL 2 PRINT 00/0+ 000008 01/01 SP19 SYSADMIN 91/06/04 12:28 01 ORDER 2 PRINT 00/0+ 000009 01/01 SP12 SYSADMIN 91/06/05 15:58 01 NORMAL 1 PRINT 00/1+ 000010 01/01 SP13 SYSADMIN 91/06/05 16:00 01 INVOIC 2 PRINT 00/0+ 000011 01/01 SP74 SYSADMIN 91/06/05 16:03 01 NORMAL 3 PRINT 00/0+ 000012 01/01 SP74 SYSADMIN 91/06/06 13:51 01 NORMAL 3 PRINT 00/0+ 000013 01/01 SP74 SYSADMIN 91/06/06 13:59 01 NORMAL 4 PRINT 01/0+ 000014 01/01 SP14 SYSADMIN 91/06/06 14:02 01 NORMAL 4 PRINT 01/0+ 000015 01/01 SP70 SYSADMIN 91/06/06 14:03 01 NORMAL 6 PRINT 01/0+
F1 - SCAN, F4 – EMAIL, F5 - TOGGLE, F6 - DISPLAY, F7 - END, F8 - DEL, F9 - PRT, F10 - OPTS
The scan displays the following;
REPORT NUMBER : The sequential number allocated to each report sent to the system.
COMPANY/BRANCH : The company and branch which generated the report.
PGM : The program number that generated the report.
USER NAME : The name of the user that ran the program.
DATE : The date the report was sent to the system.
TIME : The time the report was sent to the system.
PRT : The default printer associated with the report.
8 - 258 JULY 2006 Systems Utilities - User Guide

FORM : The type of form to be used to print the report, for example;NORMAL = normal continuous stationery;REMADV = remittance advice stationery;INVOIC = invoice stationery; STMNT = statement stationery and CRNOTE = credit note stationery.
PAGES : The number of pages in the report. This will include any blank feed pages before and after the report.
STATUS : [PRINT]Report is available for printing.[HOLD]Report is on hold.[BUSY]Report has not been completed or print program has been aborted halfway through.[EMPTY]Displays where no data was found to print.
COUNT : 00/0+.This indicator is made up of two components. The first shows the number of copies that have been printed, for example 02/ indicates that two copies have been printed. The second component shows whether a print is mandatory before a report may be deleted, (/1+) indicates that at least one copy of the report must be printed prior to deletion being permitted.
To scan forwards at this point press [F1] or press [F2] to scan backwards, if on a subsequent page. Using the cursor keys, move the pointer to the report to be displayed and press [F6] or [Enter].If the first page is blank, press [Enter] to move to the second page. This is due to the program having produced a blank form feed page prior to printing the first page.
How the report is displayed is determined automatically by the characteristics of the terminal being used. The characteristics of the terminal are set up in program SU00 - Create System Files.
If the terminal is capable of displaying 132 characters, the report will appear as if printed. If, however, the terminal can only display 80 characters, then only the first 80 characters are displayed. In this case, press [Right arrow] to move the display across to the next 80 characters, and again if the report is wider than 132 characters.
SU - Report Management JULY 2006 8 - 259

The program displays 18 lines at a time. To view the next 18 lines, press [Enter]. Repeat this to view the remainder of the page.
With displays that only show 80 characters, press [Left arrow] to move the display back to the page margin.
USING FUNCTION KEYS TO VIEWPress [F1] to view the next page or enter a page number and press [Enter].Press [F2] to view the previous page.Press [F7] to view the last page of the report.Press [F10] to return to the option menu.
8.2.2. CHANGING THE REPORT STATUSPress [Enter] to select this option [1].
Enter the report sequence number for which the status is to be altered or press [F1] to scan the report file.
All reports are held by the report management system in a print state (available for printing). To change this status to a hold state, press [F5].If the User has read/write access permission the program will proceed. If, however, the User has no read/write or denied access permission, the program will prompt with the message "NO WRITE PERMISSION - Report may not be altered or deleted".
The User will not be able to alter the status.
If the User has access permission, the report selected will be placed on hold and all print options relating to this report will be suspended.
Pressing [F5] will toggle the status from PRINT to HOLD. Pressing it a second time will toggle the status back to print.
The status may only be changed by the User who created the report or by the "Super User" SYSADMIN.
Press [F10] to return to the option selection.
8 - 260 JULY 2006 Systems Utilities - User Guide

8.2.3. DELETING A SINGLE REPORTPress [Enter] to select this option [1].
Enter the report sequence number to be deleted and press [F8] or press [F1] to scan the report file, select and press [F8].If the User has read/write access permission the program will proceed. If, however, the User has no read/write or denied access permission, the program will prompt with the message "NO WRITE PERMISSION - Report may not be altered or deleted".
The User will not be able to delete the report.
If the User has access permission, the report selected will be deleted.
Only reports that have a count of 01/01 or /00 may be deleted by normal users although SYSADMIN and Level 9 Users may delete unprinted reports. Deletion is only permitted by the User who created the report or by the "Super User" SYSADMIN and any Level 9 Users.
Press [F10] to return to the option selection menu.
If you have deleted a report in error you may re-instate it, provided the details are still on file and you know the report number. Do this as follows:Enter the report number and press [F8] to undelete it. Enter all relevant header details.
SU - Report Management JULY 2006 8 - 261

8.2.4. PRINTING A SINGLE REPORTPress [Enter] to select this option [1].
Enter the report sequence number to be printed and press [F9] or press [F1] to scan the report file, select and press [F9].The screen will now display the default options selected. Press [Enter] to accept the default or enter new options.
SYSTEM UTILITIES - REPORT MANAGEMENT SYSTEM SU60 11/001 PRINT REPORT # 0002 FROM PAGE [0001] PRINTER # 01 TO PAGE [0003] NOTE: THE NUMBER OF PAGES TO BE PRINTED IS 0003 NUMBER OF COPIES TO BE PRINTED [1] DO YOU WANT A TEST PRINT? [N] NUMBER OF TEST PRINT PAGES [0001] PRINT EVEN, ODD OR ALL (E,O,A) [A]ARE YOU SURE? (Y/N) [Y]
F3 - ACCEPT, F6 - ALTER PRINTER VALUES, F10 - OPTION MENU, ESC - EXIT
Only the person who created the report, the Super User ‘SYSADMIN’ and Level 9 Users may print reports.
The options are;
FROM PAGE : 4 digits.The program defaults to the first page number of the report. Accept the page number or enter another starting number.
TO PAGE : 4 digits.The program defaults to the last page number of the report. Accept the page number or enter another ending number.
8 - 262 JULY 2006 Systems Utilities - User Guide

The program displays the number of report pages to be printed.
NUMBER OF COPIES TO BEPRINTED : 1 digit.
The program defaults to [1]. Accept the number of copies or enter another number of copies.
TEST PRINT : Y/NThe program defaults to [Y]. The program will print a test print before continuing. Enter [N] for no test print.
NUMBER OF TESTPRINT PAGES : 4 digits.
The program defaults to one page or in the case of longer reports to multiple pages. Accept the default or enter the number of test print pages required.
PRINT EVEN, ODD OR ALL (E,O,A) : 1 character
You may select whether to print even, odd, o all pages of a report.
At this point, pressing [Enter] will start report printing.
If you find that you wish to stop the printer while printing a report, press [Esc]. The following message will display;
PRINTER INTERRUPTED - ENTER TO CONTINUE, ESC - EXITPress [Enter] to continue with the printing, or another [Esc] to stop the printing and mark this report as ‘cancelled’. Use the [F5] toggle to un-cancel a report.
The mode of printing (compressed or standard font, number of lines per inch etc.) will be determined by the printer options set up in SU01 - Terminal and Printer Setup.
To alter these printer options, press [F6].
SU - Report Management JULY 2006 8 - 263

The screen now prompts for the report destination to be selected.
SYSTEM UTILITIES - REPORT MANAGEMENT SYSTEM SU60 11/001 REPORT DEFAULTS: Destination Printer # Destinations: 1 [2] [01] 1 = Report management system 2 = Direct to printer 3 = Direct to a file 4 = Direct to screen 5 = Mail recipient 6 = Exel 7 = Word 8 = @RunDETAILS OK? (Y/N) [Y]
ESC - EXIT
Level 2
PRINTER DESTINATION : [1] Report management System. (This option should not be used in SU60 - Report Management System as it will only result in the report being routed to the spooler for a second time)[2] Direct to the printer.[3] Direct to a file. If this option is selected, the report will be output to a file which is the same as the printer synonym.[4] Direct to screen. This option will display the report on the screen.[5] Mail recipient. This will display a dialog box allowing you to enter an e-mail address to which the current report should be routed.[6] Onwards.
8 - 264 JULY 2006 Systems Utilities - User Guide

From 6 onwards, you need first to create entries in your cblconfig file. These destinations can then be used to direct out put to other packages such as Exel and Word. The entries are as follows, using word as an example:TITAN-DEST6-NAME Word This contains an optional Name, here we used Word
TITAN-DEST6-"C:\Program Files\Microsoft Office\Office\WINWORD.EXE" This is the command that executes the external package
TITAN-DEST6-SUFFIX .txt This is optional and is the extension given to the temporary print file. If this is omitted, the extension will be .prn
TITAN-DEST6-DELETE N If you retain the default as N (no) then the temporary files will not be deleted on exiting the command. If you change this to Y, then the temporary file will be deleted and you ill have to save the file in the normal manner if you wish to retain this.
PRINTER # : 2 digits.If multiple printers have been set up on the system (via SU01 - Terminal and Printer Setup), then select the printer to use.Enter the printer number or use the [F1] key to scan the printers on file and select the one you require. The form indicator advises which form types may be printed on the printer, such as ALL = all types of forms.
Press [Enter] to accept the default or enter another option.
SU - Report Management JULY 2006 8 - 265

Level 3
PRINT MODES
The program then displays the options available for this printer. The printer's characteristics have been defined in SU01 - Terminal and Printer Setup.
SYSTEM UTILITIES - REPORT MANAGEMENT SYSTEM SU60 11/001 SELECT THE DESTINATION PRINTER# [01] Our very first prt Enabled Form=ALL SELECT ONE OF THE FOLLOWING PRINT MODES: [C] Compressed Print Mode Standard Print Mode Expanded Print Mode SELECT ONE OF THE FOLLOWING PRINT FONTS: [D] Draft Quality Letter Quality SELECT ONE OF THE FOLLOWING PRINT DENSITIES: [6] 6 Lines / Inch 8 Lines / Inch PRINTER SYNONYM [PRINTER]. [ .]DETAILS OK? (Y/N) [Y]
F3 - ACCEPT, ESC - EXIT
Press [Enter] to accept the default or enter new options. The options available are;
PRINT MODES : [C] compressed print mode[S] standard print mode[E] expanded mode.
PRINT FONTS : [D] draft quality[L] letter quality.
PRINT DENSITY : 6 or 8 lines per inch vertical print spacing.
PRINTER SYNONYM : 8 characters.If the report is being routed direct to a printer, this field is not available for entry. However, if the report is to be printed to a file, this may be altered. The report will then be written to a file with the name of this synonym. The file will either be in the TITAN data file, or if you have an entry in the cblconfig file, it will be written to the directory specified.In this case the directory name will display above the PRINTER SYNONYM.
8 - 266 JULY 2006 Systems Utilities - User Guide

Include an entry: SU60-DIR name_of_directoryThe name must include the FULL pathname, for instance /usr/spool/uucppublic/ or C:\TITAN\TEMP\You may enter a suffix. Any files which use HTML as the extension, will have HTML embedded in the printout.
The file name of 8 characters is appended to this pathname so it MUST include the end slash.
DETAILS OK? (Y/N) : Y/N.Before proceeding further, check that the printer is switched on and selected if relevant. Enter [N] if not. The program waits until [Y] is entered when the program proceeds to print the report.
Press [F10] to return to the option selection menu.
SU - Report Management JULY 2006 8 - 267

8.2.5. PLACING A REPORT RANGE ON HOLDEnter [2] to select this option.
Only the person who created the report, the Super User ‘SYSADMIN’ and Level 9 Users may place reports on hold.
The screen will now show the following options available.
SYSTEM UTILITIES - REPORT MANAGEMENT SYSTEM SU60 11/001 SELECT REPORTS TO BE PLACED ON HOLD BY [1] 1 A Range of Reports 2 Company / Branch 3 Program Number 4 Username 5 Creation Date and Time 6 Form Type
F10 - OPTION MENU, ESC - EXIT
SELECT REPORTS TO BEPLACED ON HOLD BY : [1] A Range of Reports
[2] Company/Branch[3] Program Number[4] User Name[5] Creation Date and Time[6] Form Type
After completing the process, all reports selected will be in a hold state.
As all the options work in a similar way, only the first one will be described in detail.
SELECT REPORT RANGEFROM/TO : 4 digits/4digits.
Enter the starting number or press [F1] to scan the reports on file. Select the starting report number and press [Enter].Enter the last numbered report to be placed on hold or scan for the report number by pressing [F1]. Select the last report to be placed on hold and press [Enter].
8 - 268 JULY 2006 Systems Utilities - User Guide

Press [Enter] to accept the selection or re-enter the details.
The program will proceed to change all reports for the option selected to a hold status.
Any report which the logged-on user did not create will not be placed on hold. A message NO WRITE PERMISSION - Report may not be altered or deleted will be displayed. These reports will remain in a print state.
Press [Enter] to bypass these reports.
SYSTEM UTILITIES - REPORT MANAGEMENT SYSTEM SU60 11/001
SELECT REPORT RANGE: FROM [0001] TO [11 ] REPORT CO/BR PGM USERNAME DATE TIME PRT FORM PAGES STATUS COUNT 0001 01/01 AP74 SYSADMIN 91/06/03 17:34 01 NORMAL 2 PRINT 01/0+ 0002 01/01 AP79 SYSADMIN 91/06/03 17:35 01 NORMAL 3 PRINT 01/0+ 0003 01/01 AP79 SYSADMIN 91/06/03 17:34 01 NORMAL 1 PRINT 01/0+ 0004 01/01 AP80 SYSADMIN 91/06/03 17:35 01 NORMAL 1 PRINT 01/0+ 0005 01/01 AP79 SYSADMIN 91/06/03 17:46 01 NORMAL 3 PRINT 00/0+ 0006 01/01 AP79 SYSADMIN 91/06/03 17:46 01 NORMAL 1 PRINT 00/0+ 0007 01/01 AP00 SYSADMIN 91/06/03 17:50 01 NORMAL 2 PRINT 00/0+ 0008 01/01 SP19 SYSADMIN 91/06/04 12:28 01 ORDER 2 PRINT 00/0+ 0009 01/01 SP12 SYSADMIN 91/06/05 15:58 01 NORMAL 1 PRINT 00/1+ 0010 01/01 SP13 SYSADMIN 91/06/05 16:00 01 INVOIC 2 PRINT 00/0+ 0011<-->01/01 SP74 SYSADMIN 91/06/05 16:03 01 NORMAL 3 PRINT 00/0+ 0012 01/01 SP74 SYSADMIN 91/06/06 13:51 01 NORMAL 3 PRINT 00/0+ 0013 01/01 SP74 SYSADMIN 91/06/06 13:59 01 NORMAL 4 PRINT 01/0+ 0014 01/01 SP14 SYSADMIN 91/06/06 14:02 01 NORMAL 4 PRINT 01/0+ 0015 01/01 SP70 SYSADMIN 91/06/06 14:03 01 NORMAL 6 PRINT 01/0+
F1 - SCAN, F10 - OPTIONS, ESC - EXIT
SU - Report Management JULY 2006 8 - 269
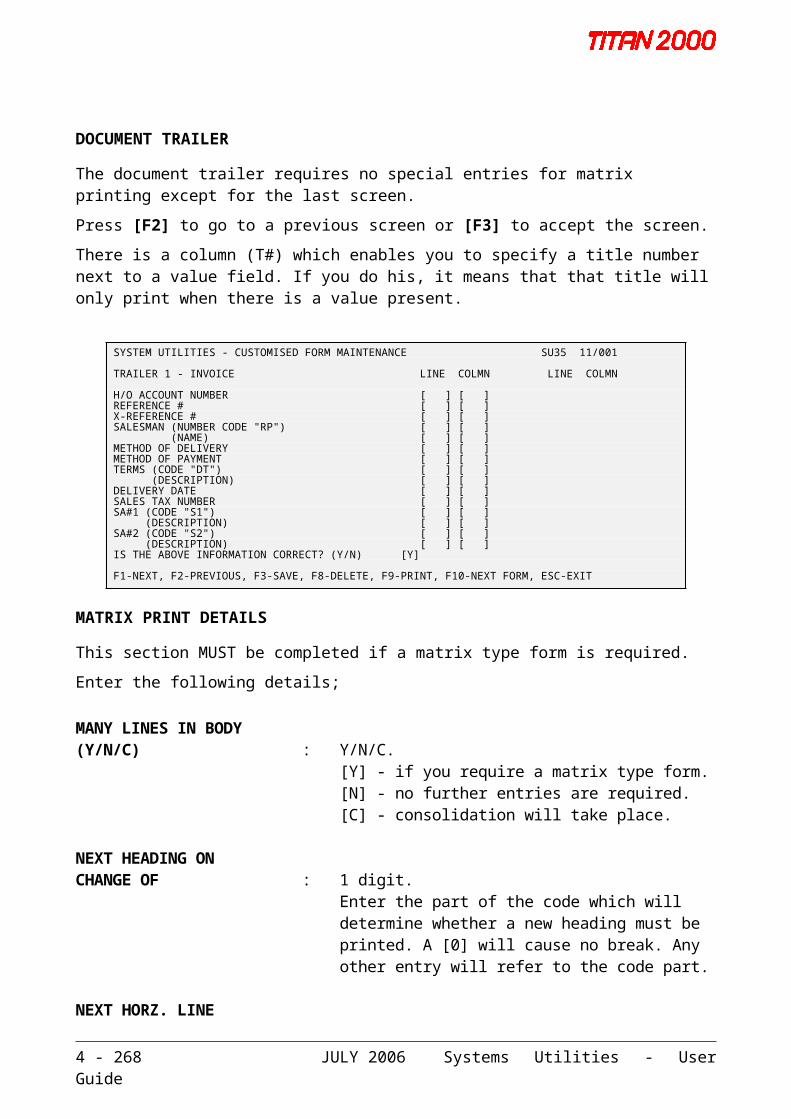
8.2.6. RELEASING A RANGE OF REPORTS FROM HOLDEnter [3] from the first screen select this option.
The screen now shows the range of options available;
SYSTEM UTILITIES - REPORT MANAGEMENT SYSTEM SU60 11/001 SELECT REPORTS TO BE RELEASED FROM HOLD [1] 1 A Range of Reports 2 Company / Branch 3 Program Number 4 Username 5 Creation Date and Time 6 Form Type
F10 - OPTION MENU, ESC - EXIT
SELECT REPORT RANGEFROM/TO : 4 digits/4 digits.
Enter the starting number or press [F1] to scan the reports on file. Select the starting report number and press [Enter].Enter the last numbered report to be changed to print status or scan for the report number by pressing [F1]. Select the last report to be changed to print status and press [Enter].
Press [Enter] to accept the selection or re-enter the details.
The program will proceed to change all reports for the option selected to a print status.Any report which the logged-on user did not create will not be changed from hold. A message NO WRITE PERMISSION - Report may not be altered or deleted will be displayed. These reports will remain in a hold state.Press [Enter] to bypass these reports.The reports selected by report range will be released from hold.
8 - 270 JULY 2006 Systems Utilities - User Guide

8.2.7. PRINTING A RANGE OF REPORTSEnter [4] to select this option.
SYSTEM UTILITIES - REPORT MANAGEMENT SYSTEM SU60 11/001 SELECT REPORTS TO BE PRINTED BY [1] 1 A Range of Reports 2 Company / Branch 3 Program Number 4 Username 5 Creation Date and Time 6 Form Type 7 Reports Not On Hold 8 Reports Not Yet Printed F5 - MULTIPLE SELECTION, F10 - OPTION MENU, ESC - EXIT
The [F5] option on the status line allows you to select more than one range from the list below. For instance you may select CO/BR, Program, User, Date/Time, with a reprint option Y/N.
After each option has been entered, the cursor returns to select the next option until you enter [Y] for the 'SELECTIONS COMPLETE' prompt.
Reports which match all the selections entered will be printed. All options in this selection allow the printer status [F6] to be altered prior to printing.
SELECT REPORTS TO BEPRINTED BY : [1] A Range of Reports
[2] Company / Branch[3] Program Number[4] Username[5] Creation Date and Time [6] Form Type[7] Reports Not On Hold[8] Reports Not Yet Printed
PRINTING REPORTS : By range of reportsPress [Enter] to print reports by report range. Enter the starting number or press [F1] to scan the reports on file. Select the starting report number and press [Enter].Enter the last numbered report to be printed or scan for the report number by pressing [F1]. Select the last report to be printed and press [Enter].
SU - Report Management JULY 2006 8 - 271

Press [Enter] to accept the selection or re-enter the details.
The reports selected by report range will be printed.
PRINTING REPORTS : By company and branch rangeTo print a range of reports by company and branch, enter [2], in response to the prompt. Accept the default company and branch displayed by pressing [Enter] or re-enter another combination.
Press [F7] to select all branches for a company.
The program will print the reports in the company/branch range.
PRINTING REPORTS : By program numberTo print a range of reports by program number, enter [3], in response to the prompt and enter the program number. The program will print all reports for the program number entered.
PRINTING REPORTS : By User nameTo print reports by User name, enter [4], in response to the prompt and enter the user name. The program will print all reports for the User name entered.
PRINTING REPORTS : By creation date and timeTo print a range of reports by creation date and time, enter [5], in response to the prompt.Enter the date and time range.The default supplies the current system date and a time range of 00.00 to 23.59.The program will print all reports within the date and time range entered.
PRINTING REPORTS : By form type.To print reports by form type, enter [6], in response to the prompt.Enter the form type for example, NORMAL, REMADV, INVOIC, STMT and CRNOTE.The program will print all reports with the form type entered.
PRINTING REPORTS : Not placed on hold.To print a range of reports not placed on hold, enter [7], in response to the prompt.Enter [Enter] in response to the prompt.The program will print all reports not placed on hold.
8 - 272 JULY 2006 Systems Utilities - User Guide

PRINTING REPORTS : Not yet printedTo print a range of reports not yet printed, enter [8], in response to the prompt.Enter [Enter] in response to the prompt.The program will print all reports not yet printed.
If you find that you wish to stop the while printing a report, press [Esc]. The following message will display;
PRINTER INTERRUPTED - ENTER TO CONTINUE, ESC - EXITPress [Enter] to continue with the printing, or another [Esc] to stop the printing and mark this report as ‘cancelled’. Use the [F5] toggle to un-cancel a report.
SU - Report Management JULY 2006 8 - 273

8.2.8. DELETING A RANGE OF REPORTSEnter [5] to select this option.
SELECT REPORTS TO BEDELETED BY : [1] A Range of Reports
[2] Company / Branch[3] Program Number[4] Username[5] Creation Date and Time [6] Form Type[7] Reports Not On Hold[8] Reports Not Yet Printed
Reports with a mandatory print count, for example /1+, must normally be printed before deletion may take place - SYSADMIN and Level 9 Users may delete unprinted reports. Only the user who created the report (or the Super User "SYSADMIN") may delete that particular report.
Where deletion of a report which has not yet been printed is requested, the system normally warns you of this, however if you respond with [N] to the PROMPT BEFORE DELETION IF UNPRINTED message displayed by the system, this warning will NOT be given.
DELETING REPORTS : By range of reportsPress [Enter] to delete a range of reports.Enter the starting number or press [F1] to scan the reports on file. Select the starting report number and press [Enter].Enter the last numbered report to be deleted or scan for the report number by pressing [F1]. Select the last report to be deleted and press [Enter].
Press [Enter] to accept the selection or re-enter the details. The reports selected by report range will be deleted.
DELETING REPORTS : By company and branch range.To delete a range of reports by company and branch enter [2].
Accept the default company and branch displayed by pressing [Enter] or re-enter another combination.
Press [F7] to select all branches for a company.
8 - 274 JULY 2006 Systems Utilities - User Guide

The program will delete the reports in the company/branch range.
DELETING REPORTS : By program number.To delete a range of reports by program number, enter [3]. Enter the program number.The program will delete all reports for the program number entered.
DELETING REPORTS : By User name.To delete reports by User name, enter [4].Enter the User name. The program will delete all reports for the User name entered.
DELETING REPORTS : By creation date and timeTo delete a range of reports by creation date and time, enter [5].Enter the date and time range, the default supplies the current system date and a time range of 00.00 to 23.59.The program will delete all reports within the date and time range entered.
DELETING REPORTS : By form type.To delete reports by form type, enter [6].Enter the form type for example, NORMAL, REMADV, INVOIC, STMT and CRNOTE.The program will delete all reports with the form type entered.
DELETING REPORTS : Placed on hold.To delete a range of reports placed on hold, enter [7].Press [Enter] in response to the prompt and the program will delete all reports placed on hold.
DELETING REPORTS : Already printed.To delete a range of reports already printed, enter [8].Press [Enter] in response to the prompt and the program will delete all reports that have already been printed.
SU - Report Management JULY 2006 8 - 275

8.2.9. DISPLAYING A RANGE OF REPORTS ON A SCREENEnter [6] to select this option.
SELECT REPORTS TO BEDISPLAYED BY : [1] A Range of Reports
[2] Company / Branch[3] Program Number[4] Username[5] Creation Date and Time [6] Form Type
DISPLAYING REPORTS : By range of reportsPress [Enter] to display a range of reports.Enter the starting number or press [F1] to scan the reports on file. Select the starting report number and press [Enter].Enter the last numbered report to be displayed or scan for the report number by pressing [F1]. Select the last report to be displayed and press [Enter].
Press [Enter] to accept the selection or re-enter the details. The reports selected by report range will be displayed.
DISPLAYING REPORTS : By company and branch range.To display a range of reports by company and branch enter [2].
Accept the default company and branch displayed by pressing [Enter] or re-enter another combination.
Press [F7] to select all branches for a company.
The program will display the reports in the company/branch range.
DISPLAYING REPORTS : By program number.To display a range of reports by program number, enter [3]. Enter the program number.The program will display all reports for the program number entered.
The program will display the reports selected.
DISPLAYING REPORTS : By User name.To display reports by User name, enter [4].Enter the User name. The program will display all reports for the User name entered.
The program will display the reports selected.
8 - 276 JULY 2006 Systems Utilities - User Guide

DISPLAYING REPORTS : By creation date and timeTo display a range of reports by creation date and time, enter [5].Enter the date and time range, the default supplies the current system date and a time range of 00.00 to 23.59.The program will display all reports within the date and time range entered.
The program will display the reports selected.
DISPLAYING REPORTS : By form type.To display reports by form type, enter [6].Enter the form type for example, NORMAL, REMADV, INVOIC, STMT and CRNOTE.The program will display all reports with the form type entered.
The program will display the reports selected.
SU - Report Management JULY 2006 8 - 277

8.3. MANAGEMENT REPORT MAINTENANCE - SU61
The program optimises the Report Management file, disk space previously occupied by deleted reports is re-cycled for use.
If the automatic backup facility is used the report maintenance option is automatically invoked after backup has taken place. This is an optional facility.
It is recommended, however, that this program be run at the end of each day (either as part of backup or as a separate run) to ensure that disk space used for reports is always optimised.
Enter SU61 to select the module.
SYSTEM UTILITIES - REPORT MANAGEMENT MAINTENANCE SU61 11/001 RUN REPORT MAINTENANCE? (Y/N) [Y] CLEAR ALL LOGFILE RECORDS? (Y/N) [N] DELETE ALL REPORTS? (Y/N) [N]
ESC - EXIT
Level 1
RUN REPORTMAINTENANCE? (Y/N) : Y/N
Enter the appropriate response.
CLEAR ALL LOGFILERECORDS? (Y/N) : Y/N
Refer to program SU62 - Logging Maintenance for more information and enter the appropriate response.
8 - 278 JULY 2006 Systems Utilities - User Guide

If [N] is entered for both of the above prompts, the program will exit. If [Y] was entered for the first prompt, the following will display;
DELETE ALL REPORTS : Y/N.If [Y] is entered ALL reports will be removed from the file.
Under certain circumstances this program deletes and recreates files. For this reason it is essential that it is run in stand-alone mode, i.e. all other users should be logged off before the SYSTEM ADMINISTRATOR runs this program.
SU - Report Management JULY 2006 8 - 279

8.4. LOGGING MAINTENANCE - SU62
The program allows maintenance to be performed on the logfile which captures system logging information.
The decision to log information depends on the user. This option is set in SU30 - Installation Maintenance Option 1, together with the level of logging desired. It is recommended that at least level 5 logging is performed.
SYSTEM UTILITIES - LOGGING MAINTENANCE SU62 11/001 CO - 01 - TECHNOLOGIES INCORPORATED BR - 01 - CAPE TOWN SELECT OPTION [1] 1 - ALL LOGGING INFORMATION 2 - SYSTEM ERRORS ONLY 3 - FILE UPDATES ONLY 4 - MESSAGES ONLY 5 - SYSTEM ACCESS ONLY
F9 - PRINT OPTIONS, F10 - CO/BR, ESC - EXIT
SELECT OPTION : [1] All logging information.[2] System errors only.[3] File updates only.[4] Messages only.[5] System access only.
A higher level of logging also performs all lower levels, for example level 2 will also perform level 1.
8 - 280 JULY 2006 Systems Utilities - User Guide

FUNCTION KEYS FOR THESE OPTIONS[F1] Scan on the date. [F8] Clear the logfile.[F9] Print the logging information.[F10] Return to the options.[Enter] Pressed on any entry and further information will be provided.[Esc] Exit the program.
The cleardown should be performed at least weekly to prevent the LOGFILE from growing too large. You may select the option at the point of logging out of the system and answering [Y] to the question 'IS THIS THE LAST RUN OF THE DAY?', or by running program SU61 - Report Management Maintenance.
The following information is logged;
On every entryCompany numberBranch numberDateTimeOperatorDiagnostic explaining type of logging
Regarding system errorsFile nameError number, class and messageProgram error occurred inOperation causing error
Regarding system accessPrograms accessed
Regarding messagesDestination or recipient of messageThe message itself
SU - Report Management JULY 2006 8 - 281

APPENDIX A
A1. INSTALLATION REGISTRATION FORM
DEALER INSTALLATION #
INSTALLATION NAME (30)
CONTACT NAME SIC CODE
ADDRESS PHONE #
FAX #
MODEM #
E MAIL
APPLICATION Y/N # APPLICATION Y/N #INSTALLATION GENERAL LEDGERAPPLICATION BUILDER INSTALMENT SALESACCOUNTS PAYABLE INVENTORYACCOUNTS RECEIVABLE JOB COSTINGBANK LINK MONTHLY PAYROLLBILL OF MATERIAL POS INTERFACECHART WRITER PURCHASE ORDERSCASH BOOK REPORT WRITERCUSTOMER SPECIAL SALES ANALYSISEDI SALES ORDER
PROCESSINGFIXED ASSETS SYSTEMS UTILITIES
WEEKLY PAYROLLACUCOBOL SERIAL # OPERATING SYS: HARDWARE:
8 - 282 JULY 2006 Systems Utilities - User Guide

APPENDIX B
B1. DATA FILE UTILITIES
ACUCOBOL provides a useful routine with various functions. This routine is called vutil, and can be used to examine files, extract data records and rebuild corrupted indexes. For copyright reasons we cannot provide full documentation on this. Consult your support office for more details.
Vutil File ManagerOn AOS/VS, MS-DOS (including the Windows environment), OS/2, UNIX, MPE/iX, and Windows NT systems, ACUCOBOL-85 uses the Vision indexed file system to manage its indexed data files. For these systems, ACUCOBOL-85 comes with an indexed file utility program called vutil that can be used to examine files, extract data records and rebuild corrupted indexes. The .vutil utility is not supplied for VMS and AMOS systems.
Examining File InformationThe “info” function of vutil returns basic information about Vision indexed files. The command syntax is.
vutil -info [-xp] [files]
Without files, standard input is read. If the “-p” option is used, then vutil pauses between files and prompts the user for a “return” key. Otherwise all the reports are run together. The “x” option causes vutil to report additional information.
This is the basic information provided by “info”: comment Vision version # # of records # of deleted records file size record size (min/max) # of keys user count
Appendix 283

If you request extended information with the -x option, you will also see: for each key: key size (total size and # of segments, if split); key offsets; are duplicates
allowed block size blocks per granule tree height (max/min/avg) # of nodes # of deleted nodes total node space node space used
Testing File IntegrityThe “check” option of vutil tests a file for internal consistency. The command is:
vutil -check [ -afk keynum ] [files]
With no options, it reads a list of files from the standard input and tests each one for a non-zero user count and other quickly tested errors. Files with errors or a non-zero user count are listed. You may place the list of files to check on the command line instead of using the standard input.
-a Test each file having a non-zero user count
-f Test all files
-k keynum Read the file sequentially in the order of the specified key; 1 means first alternate and so forth.
Status returned from “vutil-check”
0 File checked out fine.
1 Check not fully performed because file in use.
2 Non-zero count found.
3 File is corrupt.
255 Vutil fatal error or incorrect command line.
If more than one file is checked, the highest status value that applies is returned.
Appendix 284

Rebuilding FilesThe “rebuild” option is used to rebuild or recreate an indexed file. The command is
vutil -rebuild [-b #] [-23] [-ac] [+ce] [-k keynum][-d dir] [-f factor] [ -s spoolfile] [-r] [-m size][-g ext_factor ] [files]Each file listed on the command line is rebuilt. If no files are listed, then the standard input is read for the list.
When a file is rebuilt, a temporary file is created and each record from the original file is written to it. The temporary file has all of the characteristics of the original except that deleted records are skipped. The command line arguments are:
-b # Blocking Factor; # may be either 1 or 2.
-2 Use Vision version 2 format.
-3 Rebuild in Vision version 3 format.
-a Automatic replacement of original file with new one.
-c Remove record compression.
+c Add record compression.
+e Add record encryption.
-k keynum Rebuild key in order; 0 means primary key, 1 means first alternate, and so forth.
-d dir Place rebuilt file in named directory.
-f factor Compression factor.
-s spoolfile Use spooling
-r Recover interrupted build.
-m size Size of spool media in number of 1024-byte records.
-g ext_factor Extension factor in blocks.
Resetting User CountsThis option resets the user count of each named file to zero. The command is;
vutil -zero [files]
The files may be listed on the command line, or may be read from the standard input. For convenience in building scripts, non-Vision files are ignored.
Appendix 285

File Size Summary ReportThe “size” option gives summary disk usage information for a set of Vision files.
vutil -size [files]
Without files, standard input is read. The printed information includes the total size of the file, the number of records, and the number of deleted records the file contains. It also includes the percentage of records in the file which are not deleted records. This information is useful when you are trying to find candidate files for rebuilding when disk space gets tight. Non-Vision files are ignored by this command.
Vio File Transfer UtilityVio is a file transfer utility similar to the UNIX program cpio. Vio allows you to collect a group of files together into archives, and allows you to extract some or all of the files from these archives. Vio is typically used to back up a set of files or to move files from one machine to another.
Vio runs in two modes, the input mode (-I) and the output mode (-o). The syntax for each mode, with all possible options, is shown here.
vio -o [-b][-f file][-g][-h headerfile]
[-k][-l listfile][-pr][-s blocks][-v]
vio -I [-cd][-f file][-g][-h bytes]
[-kmnstv2][files]
The input mode reads vio archives to extract files. The output mode creates new vio archives.
In the output mode, vio reads its standard input for a list of files to place in the archive. The archive is written to its standard output.
In the output mode, vio reads the archive from its standard input and extracts all the files. The extracted files have the same names, permissions and owners that the had when the archive was created. If files are specified, then only the named files are extracted. Note that each file must exactly match the name of a file in the archive; no wild card characters are allowed.
Appendix 286

ACUCOBOL-85 indexed files are treated in a special way. On output, vio saves certain formatting information with each record; when vio inputs the records later, it uses that information to create a new file with the proper indexed format for the new host system.
When it is archiving files other than indexed files or ACUCOBOL-85 object files, vio assumes that the files are text files. It performs any conversions necessary to match the text file conventions on the host machine. The “-p” option described below can cause these files to be treated as binary files instead, in which case no translation occurs. If you are transferring multiple files at one time, some ASCII and some binary, don’t use the “-p” option. Instead, add a [space. followed by a “b” or a “B” after the name of each binary file in the filename list; this prevents translation on an individual file.
ACUCOBOL-85 object files and indexed files are automatically detected and written out to an archive as binary files, even if you fail to specify “-p”.
Vio OptionsThe following options can be used with the vio utility:
-b Block archive with ten input records per output record.
-c Place all files read from archive into current directory.
-d Create directories as needed.
-f file Names archive file or a device name.
-g Ring bell when new volume needed.
-h number Number of bytes to skip at beginning of each archive volume (input).
h file Add header to volume (output).
-k Record size is 1024 bytes (not 512).
-l file file contains a list of file names to output.
-m Restore file’s modification time.
-n Assign current user as new owner of extracted files.
-p Treat non-indexed files as binary (prevents text file conversion).
-r Treat indexed files as raw data files (prevents conversion).
-s size Specifies size of media in records (of 512 or 1024 bytes).
-t Print titles of files in archives rather than extracting files.
-v Verbose mode - print file names.
-2 Produce Vision version 2 format (rather than 3).
Vio, when it is reading the names of files to be archived, recognises UNIX-style names on non-UNIX environments. For example, if you specify the name “../demo/compfile” on a VAX, vio will treat this name as “[-.DEMO]COMPFILE.”. For this reason, you should use UNIX-style names if you want to move directory structures between machines with different operating systems.
Appendix 287

MS-DOS ConsiderationsOn MS-DOS machines, you may specify a diskette drive by using the fully-qualified file name with the “-f” option. You may also specify the type of diskette by adding one of the following letters immediately after the drive-name’s colon:
H 1.2 MB High-density 5.25”
3 1.44 MB High-density 3.5”
9 720 KB, 9-sector, low density 3.5”
8 320 KB, 8-sector, low density 5.25”
If you leave this letter off, then vio will assume a low density, 360 KB diskette (which can be either 3.5” or 5.25”).
Vio ExamplesSuppose that you have a list of files that you want to move to another machine using some compatible media. You could use the following vio command to create the media.
vio -ovblf listfile device
On the target machine, you can read this archive with:
vio -ivndf device
Assuming that this archive was on a 1.2 MB floppy, you could read this on a MS-DOS machine with:
vio -ivndf a:h:
Now let us assume that you want to move a set of Vision indexed files to another machine, but you do not have any common media. You plan to use a network or modem-transfer to get the files to the target machine, but you have a problem because the indexed file format on the two machines I different. You can use vio to help you in this case by writing the archive to a disk file with this command;
vio -ovbl listfile > diskfile
Then you move “diskfile” to the target machine and use vio to create new indexed files in the correct format with this command:
vio -ivnd <diskfile
Appendix 288

INDEX
AA1............................................................................................................................................................ 164A2............................................................................................................................................................ 164ACCESS #............................................................................................................................................... 178ACCESS INDICATOR.............................................................................................................................. 218ACCESS NUMBER.................................................................................................................................. 173ACCOUNTS RECEIVABLE CONTROL ACCOUNTS - DC.........................................................................135ACUVIEW INSTALLED............................................................................................................................ 101ADDING A NEW PRINTER TYPE..............................................................................................................80ADDING A NEW TERMINAL TYPE............................................................................................................78ADDRESS 1..................................................................................................................................... 107, 109ADDRESS 2..................................................................................................................................... 107, 109ADDRESS 3..................................................................................................................................... 107, 109ADJUSTMENTS....................................................................................................................................... 163ALLOCATE STOCK IN PO....................................................................................................................... 162AMENDING SCANS................................................................................................................................. 179AMOUNT................................................................................................................................................. 164ARE YOU SURE? (Y/N)............................................................................................................................. 90ARREARS INTEREST RATE...................................................................................................................140ARROW SIZE? (3-5)................................................................................................................................ 103ASSIGN TERMINAL TYPES TO TERMINAL NUMBERS...........................................................................69AUTHOR................................................................................................................................................. 172AUTHORISATION CODEAUTHORITY CODE.......................................................................................................................... 108, 110AUTO POST TO CB (Y/N)........................................................................................................................ 160AUTO-CALL MENU TEXT........................................................................................................................ 120AUTO-CALL PROMPT............................................................................................................................. 120AUTO-CALL TO PROGRAM.................................................................................................................... 120
BBACKGROUND DISPLAY?...................................................................................................................... 100BACKUP.................................................................................................................................................... 51BACKUP - MS-DOS SYSTEMS..................................................................................................................54BACKUP - UNIX SYSTEMS....................................................................................................................... 56BACKUP DISKS/TAPES............................................................................................................................ 52BANK REF............................................................................................................................................... 158BANKLINK INTERFACE TYPES - BI........................................................................................................131BANKREF................................................................................................................................................ 131BASE CURRENCY DESCRIPTION CODE...............................................................................................132BATCH PROCESSING............................................................................................................................ 216BATCH?.................................................................................................................................................. 161BODY DETAILS....................................................................................................................................... 187BRANCH................................................................................................................................................. 104BRANCH #............................................................................................................................................... 109BRANCH ACCESS................................................................................................................................... 214BRANCH NAME....................................................................................................................................... 109
C
CALCULATOR........................................................................................................................................... 35CALL AS.................................................................................................................................................. 121CALLED SYNONYM................................................................................................................................ 118CAPTURE DATA..................................................................................................................................... 219
Appendix 289

CAPTURE STATUS................................................................................................................................. 219CAPTURE USER DEFINED SCANS........................................................................................................169CASH ANALYSIS..................................................................................................................................... 144CATEGORY............................................................................................................................................. 160CENTRE MENUS?................................................................................................................................... 103CENTURY............................................................................................................................................... 105CHANGING THE REPORT STATUS........................................................................................................258CHARACTERS/LINE.................................................................................................................................. 75CLEAR ALL LOGFILE RECORDS? (Y/N).................................................................................................276CO........................................................................................................................................................... 104CO/BR REPORT HEADER (3 LINES)......................................................................................................186COIN SYMBOL................................................................................................................................. 132, 196COLUMN................................................................................................................................................. 189COLUMN 01............................................................................................................................................ 193COLUMN HEADING................................................................................................................................. 177COLUMN POSITION................................................................................................................................ 176COLUMN WIDTH..................................................................................................................................... 192COMMISSION PAYABLE FROM..............................................................................................................149COMMISSION PAYABLE TO................................................................................................................... 149COMMON CATEGORY INPUT/MAINTENANCE.......................................................................................233COMPANY #.................................................................................................................................... 107, 109COMPANY ACCESS................................................................................................................................ 214COMPANY FILE ENQUIRY......................................................................................................................239COMPANY NAME.................................................................................................................................... 107COMPANY REGISTRATION #................................................................................................................. 108COMPANY TAX REGISTRATION # 1.......................................................................................................108COMPANY TAX REGISTRATION # 2.......................................................................................................108COMPANY/BRANCH........................................................................................................................ 239, 256COMPANY/BRANCH OPTIONS................................................................................................................. 28COMPUTER MEMORY.............................................................................................................................. 11COMPUTER MEMORY.......................................................................................................................... 9, 10CONCEPTS AND FUNCTIONS.................................................................................................................. 15COPY........................................................................................................................................................ 35COPY PROGRAMS? (Y/N)...................................................................................................................87, 89COPY SUPPLIED OR USER HELP............................................................................................................85COPY SYSTEMS? (Y/N)...................................................................................................................... 86, 88COPYING SCANS................................................................................................................................... 179COUNT.................................................................................................................................................... 257CREATE A NEW JOB.............................................................................................................................. 220CREATE FILES FOR SYSTEM.................................................................................................................. 58CREATE SYSTEM FILES..........................................................................................................................57CREATING NEW SCAN........................................................................................................................... 172CREDIT NOTE #...................................................................................................................................... 162CURRENCY CODE.................................................................................................................................. 196CURRENCY CONVERSION - CY.....................................................................................................131, 132CURRENCY FILE MAINTENANCE...........................................................................................................196CURRENCY LONG DESCRIPTION..................................................................................................132, 196CURRENCY SHORT DESCRIPTION................................................................................................132, 196CURRENCY SIGN............................................................................................................................ 132, 196CURRENT EXCHANGE RATE #..............................................................................................................197CURRENT LOGINS................................................................................................................................. 206CURRENT QUICK ACCESS LOGINS.......................................................................................................206CURSOR KEYS......................................................................................................................................... 18CUSTOMER SPECIAL CODES P1 TO P4................................................................................................147CUSTOMER TERMS - DT........................................................................................................................ 137CUSTOMISED FORM MAINTENANCE....................................................................................................180CUSTOMISED TERMINOLOGY...............................................................................................................194CUSTOMIZED FILE LAYOUT MAINTENANCE.........................................................................................235CYCLES ON RECORD LOCKING............................................................................................................101
Index 290

D
DATA FIELDS............................................................................................................................................ 26DATA FILE UTILITIES.............................................................................................................................. 281DATE............................................................................................................................................... 104, 256DATE - INTERNATIONAL..........................................................................................................................28DATE FORMAT....................................................................................................................................... 106DECIMALS.............................................................................................................................................. 176DEFAULT BRANCH #....................................................................................................................... 108, 212DEFAULT COMPANY.............................................................................................................................. 100DEFAULT COMPANY #........................................................................................................................... 212DEFAULT HELP LEVEL........................................................................................................................... 106DEFAULT WAREHOUSE................................................................................................................. 110, 213DELETE ALL REPORTS..........................................................................................................................277DELETE PROGRAMS? (Y/N)..................................................................................................................... 94DELETE SUPPLIED OR USER HELP........................................................................................................92DELETE SYSTEMS? (Y/N)........................................................................................................................93DELETE VARIABLES? (Y/N)......................................................................................................................95DELETING A RANGE OF REPORTS.......................................................................................................272DELETING A SINGLE REPORT...............................................................................................................259DELETING REPORTS...................................................................................................................... 272, 273DELETING REPORTS............................................................................................................................. 273DELETING SCANS.................................................................................................................................. 179DENOMINATIONS (c).............................................................................................................................. 197DENOMINATIONS (R)............................................................................................................................. 197DENOMINATIONS COINS....................................................................................................................... 133DENOMINATIONS NOTES...................................................................................................................... 133DESCRIPTION...23, 74, 133, 134, 135, 137, 142, 143, 145, 146, 147, 148, 151, 152, 154, 156, 157, 162, 164,
166, 168, 184, 200, 232DESCRIPTION................................................................................................................................. 140, 141DESCRIPTION CODE.............133, 140, 141, 142, 143, 145, 146, 147, 148, 150, 151, 152, 154, 156, 157, 164DESCRIPTION CODE................................................................................................127, 134, 135, 137, 139DESCRIPTION FILE PRINT.....................................................................................................................252DESCRIPTION TYPE... .134, 135, 137, 139, 140, 141, 142, 143, 145, 146, 147, 148, 150, 151, 152, 154, 156,
157, 164DESCRIPTION TYPE............................................................................................................................... 127DESCRIPTIONS FILE MAINTENANCE....................................................................................................123DESCRIPTIONS FILE SCAN....................................................................................................................240DESTINATION OF COPY.......................................................................................................................... 63DEVICE DIRECTORY.............................................................................................................................. 105DISC/SURCHARGE #.............................................................................................................................. 155DISK DRIVES/TAPE STREAMER.....................................................................................................9, 10, 11DISPLAY CO/BR/DATE?..........................................................................................................................103DISPLAY MENU BAR................................................................................................................................. 67DISPLAY STATION ID............................................................................................................................. 105DISPLAY VERSION NUMBERS...............................................................................................................243DISPLAY WIDTH..................................................................................................................................... 172DISPLAYING A RANGE OF REPORTS ON A SCREEN...........................................................................274DISPLAYING A REPORT ON A SCREEN................................................................................................256DISPLAYING REPORTS.................................................................................................................. 274, 275DIVISION BY ZERO ACTION................................................................................................................... 200DO YOU WISH TO CONTINUE?..........................................................................................................62, 63DOCUMENT TITLES................................................................................................................................ 190DOCUMENT TRAILER............................................................................................................................. 191
EELECTRONIC MAIL................................................................................................................................... 32ENABLE CALCULATOR FUNCTIONS......................................................................................................105ENABLE THIS PRINTER ?.........................................................................................................................76END......................................................................................................................................................... 175END KEY................................................................................................................................................... 61
Appendix 291

END OF BODY........................................................................................................................................ 185ENQUIRY & SCAN MODULE MENU........................................................................................................238ENTER ESCAPE SEQUENCES TO...........................................................................................................67ENTER FONT ESCAPE SEQUENCES FOR..............................................................................................71ENTER HEXADECIMAL VALUES FOR EACH OF THESE GRAPHICS CHARACTERS..............................68ENTER IMPORT PROGRAM NAME........................................................................................................235ENTER LAYOUT #................................................................................................................................... 235ENTER SELECTION................................................................................................................................ 255ENTER TERMINAL PARAMETERS...........................................................................................................67ENTER THE FORMULA........................................................................................................................... 201ENTER THE UNIQUE NAME FOR THIS PRINTER TYPE..........................................................................70ENTER THE UNIQUE NAME FOR THIS TERMINAL TYPE........................................................................65ENTERING FORM TYPES....................................................................................................................... 181ERROR MESSAGES................................................................................................................................. 31EXCHANGE RATE................................................................................................................................... 133EXCHANGE RATE #................................................................................................................................ 197EXPAND THE FORMULA........................................................................................................................ 202EXPIRY DATE.................................................................................................................................... 99, 112EXTRACT CURRENT VERSIONS....................................................................................................242, 244
FFACTOR.......................................................................................................................................... 133, 196FAX #............................................................................................................................................... 108, 109FIELD NAME.................................................................................................................................... 173, 178FIELD TYPE....................................................................................................................................... 23, 178FILE NAME.............................................................................................................................................. 172FILE SECURITY...................................................................................................................................... 171FILE TO VERIFY....................................................................................................................................... 59FINANCE CHARGE RATE.......................................................................................................................140FONT HEX ESC SEQUENCE.................................................................................................................. 139FONTS - FN............................................................................................................................................. 139FOR......................................................................................................................................................... 137FOR ACCOUNT NO................................................................................................................................. 232FORCE PASSWORD AFTER TIMES........................................................................................................205FORCE PASSWORD CHANGE................................................................................................................205FOREIGN CURRENCIES......................................................................................................................... 133FORM...................................................................................................................................................... 257FORM LENGTH (Lines)............................................................................................................................ 184FORM WIDTH (Columns)......................................................................................................................... 184FORMAT.......................................................................................................................................... 174, 175FORMULA NAME.................................................................................................................................... 200FROM DOC OR M/E DATE...................................................................................................................... 138FROM PAGE........................................................................................................................................... 260FUNCTION KEYS...................................................................................................................................... 17
GGENERAL CROSS REFERENCE ENQUIRY............................................................................................249GENERAL CROSS REFERENCE MAINTENANCE...................................................................................237GROUP (4) / DESCRIPTION.................................................................................................................... 204
HHEADER.................................................................................................................................................... 23HEADER DETAILS.................................................................................................................................. 186HEADING................................................................................................................................................ 173HELP......................................................................................................................................................... 19HELP EDIT LEVEL................................................................................................................................... 106HELP SYSTEM NAME............................................................................................................................... 84HOTKEY.................................................................................................................................................... 20
Index 292

I
IMPORT FILE NAME............................................................................................................................... 235IMPORT FILE TYPE................................................................................................................................ 235IMPORT PROGRAM DESCRIPTION.......................................................................................................235INCLUDE IN USAGE................................................................................................................................ 163INCLUSIVE OF TAX................................................................................................................................ 153INSTALLATION MAINTENANCE...............................................................................................................98INSTALLATION #....................................................................................................................................... 99INSTALLATION NAME............................................................................................................................... 99INSTALLATION REGISTRATION FORM..................................................................................................280INSTALLATION TERMINOLOGY.............................................................................................................104INSTALLING THE SYSTEMS UTILITIES MODULE....................................................................................46INSTALMENT SALES ARREAR INTEREST - IS.......................................................................................140INTEGERS.............................................................................................................................................. 176INTERNAL SYSTEM #............................................................................................................................. 111INVENTORY CATEGORY % MARK UP..................................................................................................146INVOICE #............................................................................................................................................... 162IS THIS A DEDICATED PRINTER?............................................................................................................76IV MESSAGE 1........................................................................................................................................ 156IV MESSAGE 2........................................................................................................................................ 156
J
JOB DESCRIPTION................................................................................................................................. 218JOB MAINTENANCE............................................................................................................................... 224JOB NAME.............................................................................................................................................. 218
K
KEY SEQ................................................................................................................................................... 23KEYBOARD..................................................................................................................................... 9, 10, 11
LLAYOUT DESCRIPTION.......................................................................................................................... 235LEFT JUSTIFY LEADING ZEROS?..........................................................................................................105LENGTH.................................................................................................................................................. 176LENGTH.................................................................................................................................................. 159LENGTH.......................................................................................................................................... 174, 175LEVEL................................................................................................................................................ 23, 205LINE........................................................................................................................................................ 189LINES FOR SPOOLER DISPLAY..............................................................................................................67LINES/PAGE............................................................................................................................................. 75LINK PROGRAM NAME............................................................................................................................. 91LOAD NEW VERSION NUMBER FILE.....................................................................................................243LOAD SUPPLIED HELP (ASCII).................................................................................................................83LOADING ON MS-DOS SYSTEMS............................................................................................................38LOADING ON UNIX SYSTEMS..................................................................................................................41LOADING THE SYSTEM........................................................................................................................... 37LOCAL AREA NETWORKS.......................................................................................................................... 9LOG DATA BASE NOT IN USE................................................................................................................101LOG DATABASE IN USE......................................................................................................................... 101LOGFILE OPERATIONAL?...................................................................................................................... 100LOGGING LEVEL.................................................................................................................................... 100LOGGING MAINTENANCE......................................................................................................................278LONG DESCRIPTION.............................................................................................................................. 128LOOKUP FILE NAME............................................................................................................................... 178
MMAIN MENU DESCRIPTION....................................................................................................................103MAINTENANCE MODULE MENU..............................................................................................................97MANAGEMENT REPORT MAINTENANCE..............................................................................................276
Appendix 293

MANY LINES IN BODY (Y/N/C)................................................................................................................191MATCH STRING...................................................................................................................................... 160MATRIX................................................................................................................................................... 188MATRIX COLUMN DETAILS....................................................................................................................193MATRIX PRINT DETAILS........................................................................................................................191MAXIMUM LOGINS................................................................................................................................. 206MAXIMUM NO OF RECORDS TO COPY...................................................................................................61MAXIMUM QUICK ACCESS LOGINS.......................................................................................................206MAXIMUM RANGE.................................................................................................................................. 215MAXIMUM USERS............................................................................................................................. 99, 112MEMORANDUM...................................................................................................................................... 205MEMORY RANKING................................................................................................................................ 106MEMORY/SPEED OPTIMISATION..........................................................................................................227MENU OPERATOR PROMPT.................................................................................................................. 103MENU RESTRICTIONS............................................................................................................................. 16MENU SEQUENCE #............................................................................................................................... 114MENUS USING.......................................................................................................................................... 15MERGE THE TWO FILES?........................................................................................................................ 61MINIMUM RANGE................................................................................................................................... 215MISCELLANEOUS MODULE MENU........................................................................................................226MODULE DESCRIPTION......................................................................................................................... 117MODULE NAME...................................................................................................................................... 117MOUSE................................................................................................................................................. 9, 11MULTIPLY BY.......................................................................................................................................... 152
N
N2............................................................................................................................................................ 164NARRATIVE CODE................................................................................................................................. 168NARRATIVE FILE MAINTENANCE..........................................................................................................168NET FOR................................................................................................................................................. 137NEW NAME............................................................................................................................................... 96NEW PASSWORD................................................................................................................................... 207NEXT AVAILABLE #................................................................................................................................. 167NEXT COLUMN ON CHANGE OF............................................................................................................192NEXT HEADING ON CHANGE OF...........................................................................................................191NEXT HORZ. LINE ON CHANGE OF.......................................................................................................191NUMBER OF COPIES TO BE PRINTED..................................................................................................261NUMBER OF TEST PRINT PAGES..........................................................................................................261NUMBER OF USERS LOGGED IN...................................................................................................102, 115NUMBERING........................................................................................................................................... 159NUMBERS FILE MAINTENANCE.............................................................................................................165NUMBERS FILE SCAN............................................................................................................................ 241NUMBERS VALUE................................................................................................................................... 166
O
O/S ACCESS (Y/N)?................................................................................................................................ 206OBJECT VERSION NUMBER MAINTENANCE........................................................................................242OCCUPATION DESCRIPTION - OC.........................................................................................................141ON-LINE HELP MODULE MENU...............................................................................................................82OPERATING SYSTEM..................................................................................................................... 9, 10, 11OPERATING SYSTEM UTILITIES.............................................................................................................81OPTIONS FOR PASSWORD CONTROL..................................................................................................208OTHER OPERATING SYSTEMS...............................................................................................................14OVERALL DISCOUNT #..........................................................................................................................155OVERSCORE TOTALS............................................................................................................................ 192OVERWRITE USER TERMINOLOGY......................................................................................................122
P
PAGE #................................................................................................................................................... 104PAGES.................................................................................................................................................... 257
Index 294

PASTE...................................................................................................................................................... 35PATTERSON GRADE NUMBER..............................................................................................................141PAYMENT METHOD - PM....................................................................................................................... 143PERIOD................................................................................................................................................... 104PGM........................................................................................................................................................ 256PLACING A REPORT RANGE ON HOLD.................................................................................................266POSITION........................................................................................................................................ 175, 177POSTAL CODE................................................................................................................................ 107, 109PRE-LOADED FIELDS............................................................................................................................... 27PRICE #................................................................................................................................................... 154PRINT DENSITY................................................................................................................................ 75, 264PRINT EVEN, ODD OR ALL (E,O,A)........................................................................................................261PRINT FONT............................................................................................................................................. 75PRINT FONTS......................................................................................................................................... 264PRINT MODE............................................................................................................................................ 75PRINT MODES........................................................................................................................................ 264PRINT MODULE MENU........................................................................................................................... 251PRINT VERSION NUMBER REPORT......................................................................................................243PRINTER......................................................................................................................................... 9, 10, 11PRINTER #.............................................................................................................................................. 263PRINTER DESTINATION.........................................................................................................................262PRINTER FORM ?..................................................................................................................................... 76PRINTER SYNONYM......................................................................................................................... 74, 264PRINTER TYPE......................................................................................................................................... 73PRINTING A RANGE OF REPORTS........................................................................................................269PRINTING A SINGLE REPORT................................................................................................................260PRINTING OPTIONS................................................................................................................................. 34PRINTING REPORTS.............................................................................................................................. 270PRINTING REPORTS...............................................................................................................269, 270, 271PRINTING REPORTS.............................................................................................................................. 270PRODUCT GROUP DESCRIPTION.........................................................................................................142PROGRAM.......................................................................................................................................... 87, 89PROGRAM DESCRIPTION......................................................................................................................118PROGRAM NAME........................................................................................................................ 91, 94, 118PRT......................................................................................................................................................... 256PURCHASE CHARGES DETAIL - PD......................................................................................................142PURCHASE ORDER AUTOMATIC SELLING PRICE MARKUP................................................................146
QQUEUE STATUS..................................................................................................................................... 225QUICK ACCESS........................................................................................................................................ 25
R
RANGE SIZE DESCRIPTIONS - RS.........................................................................................................150RANGE SIZE DESCRIPTIONS - RT.........................................................................................................151RANGE TYPE.......................................................................................................................................... 215RECORD LENGTH.................................................................................................................................... 23RECOVER OPTION................................................................................................................................... 60REFERENCE........................................................................................................................................... 134REFERENCE CODE................................................................................................................................ 166REFERENCE CODE................................................................................................................................ 232REFERENCE FILE MAINTENANCE.........................................................................................................230REFERENCE TYPE................................................................................................................................. 230RELEASING A RANGE OF REPORTS FROM HOLD...............................................................................268REMAP FUNCTION KEYS......................................................................................................................... 67RENAME HELP VARIABLE NAMES...........................................................................................................96REPORT ACCESS GROUP..................................................................................................................... 119REPORT DEFAULTS................................................................................................................101, 113, 119REPORT DESTINATION.......................................................................................................................... 205REPORT MANAGEMENT AND LOGGING SYSTEM MENU.....................................................................254
Appendix 295

REPORT MANAGEMENT SYSTEM.........................................................................................................255REPORT NAME....................................................................................................................................... 187REPORT NUMBER.................................................................................................................................. 256REPORT SECURITY............................................................................................................................... 170REPS COMMISSION RATE.....................................................................................................................148RESET TO DEFAULT CO/BR...........................................................................................................104, 213RESTORING - UNIX SYSTEMS.................................................................................................................56RESTORING FROM BACKUP - MS-DOS SYSTEMS.................................................................................54ROUND DOWN TO NEAREST.................................................................................................................144ROUTE ACCOUNT NUMBER..................................................................................................................147ROUTE CODE......................................................................................................................................... 147RUN REPORT MAINTENANCE? (Y/N).....................................................................................................276RUN STATUS.......................................................................................................................................... 219RUN USER-DEFINED SCANS................................................................................................................. 248RUNNING A JOB..................................................................................................................................... 222RUNNING IN THE BACKGROUND..........................................................................................................223RUNNING IN THE FOREGROUND..........................................................................................................223
SSALES ANALYSIS CODE 1 - S1..............................................................................................................154SALES TARGET...................................................................................................................................... 142SALESMEN'S NAMES AND COMMISSION RATES.................................................................................148SAVE LATEST VERSION NUMBERS TO SAVE FILE..............................................................................243SCAN DESCRIPTION.............................................................................................................................. 172SCAN FACILITY...................................................................................................................................... 169SCAN NAME.................................................................................................................................... 172, 179SCAN NAME............................................................................................................................................ 169SCAN NAME TO COPY TO..................................................................................................................... 179SCANNING................................................................................................................................................ 29SCREEN..................................................................................................................................................... 9SCREEN NUMBERS.................................................................................................................................. 28SCREEN SAVER AFTER........................................................................................................................... 67SECURITY LEVEL..................................................................................................................................... 23SECURITY LEVELS................................................................................................................................. 170SELECT ACCESS PERMISSIONS...........................................................................................................209SELECT COMPANY/BRANCH/WAREHOUSE AND RANGE ACCESS.....................................................214SELECT FILE TO RECOVER.....................................................................................................................60SELECT FUNCTION.............................................................................................................64, 98, 122, 217SELECT OPTION.................................................................................................................... 81, 85, 92, 278SELECT REPORT RANGE FROM/TO..............................................................................................266, 268SELECT REPORTS TO BE DELETED BY................................................................................................272SELECT REPORTS TO BE DISPLAYED BY............................................................................................274SELECT REPORTS TO BE PLACED ON HOLD BY..................................................................................266SELECT REPORTS TO BE PRINTED BY................................................................................................269SELECT TYPE........................................................................................................................................... 85SELECT USER DEFAULTS..................................................................................................................... 212SELECTING A SCAN............................................................................................................................... 169SELECTING THE FORMULA VARIABLES...............................................................................................201SET PASSWORD?.................................................................................................................................. 207SET PRINTER ASSIGNMENTS.................................................................................................................73SET PRINTER CAPABILITIES................................................................................................................... 70SET SYSTEM COMMANDS....................................................................................................................... 77SET TERMINAL ASSIGNMENTS...............................................................................................................69SET TERMINAL CAPABILITIES.................................................................................................................65SET UP PARAMETERS FOR PRINTER.....................................................................................................73SETTING UP THE FORMULA..................................................................................................................200SET-UP SEQUENCE................................................................................................................................. 49SHORT DESCRIPTION............................................................................................................................ 232SHOULD A BANNER PAGE BE PRINTED?...............................................................................................76SHOW ON MENU?................................................................................................................... 114, 117, 119
Index 296

SIGN....................................................................................................................................................... 176SIGN (+/-)................................................................................................................................................ 158SINGLE USER ONLY?............................................................................................................................. 218SIZES...................................................................................................................................................... 150SKIP LINES AT END OF PAGE................................................................................................................. 75SKIP LINES AT TOP OF PAGE.................................................................................................................75SKIP PAGES AFTER PRINT......................................................................................................................75SKIP PAGES BEFORE PRINT...................................................................................................................74SP DATE ON IV/AR TRS..........................................................................................................................136SPECIAL FIELD TYPES........................................................................................................................... 178SPECIAL FUNCTION MODE....................................................................................................................106SPECIAL KEYS......................................................................................................................................... 19START KEY............................................................................................................................................... 61START OF BODY.................................................................................................................................... 184START POS............................................................................................................................................ 158START POSITION..................................................................................................................................... 23START POSITION................................................................................................................................... 173STARTING RECORD TYPE..................................................................................................................... 240STATUS.................................................................................................................................................. 257STATUS MESSAGES................................................................................................................................ 31STOCK ISSUE VOUCHER NUMBER.......................................................................................................163SU00......................................................................................................................................................... 57SU01......................................................................................................................................................... 64SU10......................................................................................................................................................... 83SU11......................................................................................................................................................... 85SU12......................................................................................................................................................... 91SU13......................................................................................................................................................... 92SU14......................................................................................................................................................... 96SU30......................................................................................................................................................... 98SU31....................................................................................................................................................... 123SU32....................................................................................................................................................... 165SU32 REFERENCE CODE....................................................................................................................... 144SU32 REFERNCE CODE.........................................................................................................................145SU33....................................................................................................................................................... 168SU34....................................................................................................................................................... 169SU35....................................................................................................................................................... 180SU36....................................................................................................................................................... 196SU37....................................................................................................................................................... 198SU38....................................................................................................................................................... 203SU39....................................................................................................................................................... 216SU40....................................................................................................................................................... 227SU41....................................................................................................................................................... 230SU42....................................................................................................................................................... 233SU44....................................................................................................................................................... 235SU45....................................................................................................................................................... 237SU50....................................................................................................................................................... 239SU51....................................................................................................................................................... 240SU52....................................................................................................................................................... 241SU53....................................................................................................................................................... 242SU54....................................................................................................................................................... 248SU55....................................................................................................................................................... 249SU58....................................................................................................................................................... 250SU60....................................................................................................................................................... 255CLEARING OF SU61............................................................................................................................... 213SU61....................................................................................................................................................... 276SU62....................................................................................................................................................... 278SU71....................................................................................................................................................... 252SU90......................................................................................................................................................... 81SUNDRY CHARGE.................................................................................................................................. 152SUNDRY CHARGE %.............................................................................................................................. 153
Appendix 297

SUNDRY CHARGES - SC........................................................................................................................152SUPERVISOR......................................................................................................................................... 205SUPPRESS CO/BR SCREEN?.........................................................................................................104, 213SYSTEM DESCRIPTION......................................................................................................................... 112SYSTEM FORMULA MAINTENANCE......................................................................................................198SYSTEM NAME......................................................................................................................86, 88, 93, 111SYSTEM NAME....................................................................................................................................... 209SYSTEM PARAMETER FILE..................................................................................................................... 64SYSTEM PASSWORD ENQUIRY............................................................................................................250SYSTEM PASSWORD MAINTENANCE...................................................................................................203SYSTEM REQUIREMENTS......................................................................................................................... 9SYSTEM SECURITY................................................................................................................................ 170SYSTEM TERMINOLOGY.......................................................................................................................113SYSTEM TO LOAD.................................................................................................................................... 83SYSTEMS UTILITIES MODULE OVERVIEW...............................................................................................6
TTARGET GP%......................................................................................................................................... 142TAX RATE........................................................................................................................................ 153, 154TELEPHONE #................................................................................................................................. 107, 109TEMPLATE? (Y/N)................................................................................................................................... 205TERMS %................................................................................................................................................ 137TEST PRINT............................................................................................................................................ 261THE MAIN MENU...................................................................................................................................... 47THE UTILITIES SYSTEM MENU................................................................................................................48THEN....................................................................................................................................................... 167TIME........................................................................................................................................................ 256TITAN SYSTEM PROFILE........................................................................................................................... 2TO........................................................................................................................................................... 167TO PAGE................................................................................................................................................. 260TOTAL FOR MONTH............................................................................................................................... 159TRANSACTION TYPE...................................................................................................................... 135, 157TRANSACTION TYPES - TT....................................................................................................................157TYPE............................................................................................................................................... 168, 175TYPE....................................................................................................................................................... 174TYPE FROM-TO...................................................................................................................................... 252
UUNDERSCORE TOTALS......................................................................................................................... 192UNIX.......................................................................................................................................................... 10UPDATE (Y/N)......................................................................................................................................... 192UPDATING BRANCH DETAILS................................................................................................................110UPDATING FORM TYPES....................................................................................................................... 193UPDATING/DELETING BRANCH DETAILS..............................................................................................110USER...................................................................................................................................................... 119USER DEFINED TYPES - X, Y, Z.............................................................................................................164USER DESIGNED FORM FORMATS.......................................................................................................183USER HELP LINK MAINTENANCE............................................................................................................91USER NAME.................................................................................................................................... 204, 256USER NAME............................................................................................................................................ 172USER NAME TO COPY TO..................................................................................................................... 179USER/TEMPLATE NAME......................................................................................................................... 204USER-DEFINED FIELD - D1 to D7...........................................................................................................134
VVARIABLE NAME................................................................................................................................. 95, 96VAX VMS.................................................................................................................................................. 11VDU's................................................................................................................................................... 10, 11VERTICAL COLM TOTALS......................................................................................................................192VIEW ACCESS........................................................................................................................................ 206
Index 298

VIEWKEY.................................................................................................................................................. 21
WWAREHOUSE #....................................................................................................................................... 162WAREHOUSE ACCESS..........................................................................................................................214WAREHOUSES - WH.............................................................................................................................. 162WINDOWS................................................................................................................................................ 45
X
XFERS OUT........................................................................................................................................................... 163
Appendix 299

Address this reply to your Dealer
YOUR COMMENTS PLEASE(On a copy of this page)
Information from our users is important to the ongoing improvement of this product. Please take the time to tell us what enhancements would be of benefit to yourselves and they will be carefully reviewed, and if applicable, incorporated in future releases.
Program Number
Details
Company
Address
Contact