suzuki c90 – changing your brake pads (front and rear) c90 brake job.pdf · step 1: take a look...
TRANSCRIPT

Suzuki C90 – Changing Your Brake Pads (Front and Rear)
4 / 1 5 / 2 0 1 2
Cole Francis

If you’re like me and you don’t mind saving a few bucks on your next Suzuki C90 brake job, then you might
want to listen up. I’ve seen a lot of posts by people who seem pretty knowledgeable when it comes to
changing the brake pads on a Suzuki C90, but I’m not aware of anyone who has actually documented the
exact steps. Therefore, I’ve decided to take the initiative and document the process that I used to change my
front and rear brake pads and share this information with my fellow riders.
**WARNING – Do not remove the master cylinder covers, and do not pull on the brake levers on the
handlebars throughout this entire process!!!!
Changing the Front Brake Pads
Step 1: Take a look at the Suzuki C90 braking system

Step 2: Remove the decorative hex bolt caps.
Step 3: Remove the hex bolts that attach the calipers to the front forks. Use a longer breaker bar in
order to obtain the proper leverage. Please don’t try to use little hex wrenches or an Allen key set
when performing this step in fear of stripping out the hex bolt. Buy a good hex bit socket set to do
this, which you can purchase at a reasonable price at any major hardware store.

Step 4: A photograph of the hex bolts removed. The calipers are now free from the forks. The
pressure of the brake pads is the only thing keeping them affixed to the rotor at the moment.
Step 5: Have a place to rest your caliper on so that you can work on the brakes without putting any
undue stress on the brake line. This will help avoid rupturing the brake line in any way.

Step 6: Make sure that you have plenty of space to operate on the caliper. If you need some
additional room, then simply slide the brake line out of the supporting clip. This will give you a few
more inches of leeway.
Step 7: Using channel locks, decompress the pistons on the caliper. WARNING…It doesn’t take
very much force to do this, so be very easy on it!!!

Step 8: Make sure that both sides of the caliper pistons are fully decompressed.
Step 9: Locate the hitch pin clip that holds the brake pads on and rotate it to expose the head of the
pin.

Step 10: Safely remove hitch pin clip using.
Step 11: Remove the pin that holds the brake pads in place.

Step 12: Use the following sequential steps to remove the brake pads from the caliper.
Step 13: Remove the brake shoe from the old set of brake pads.
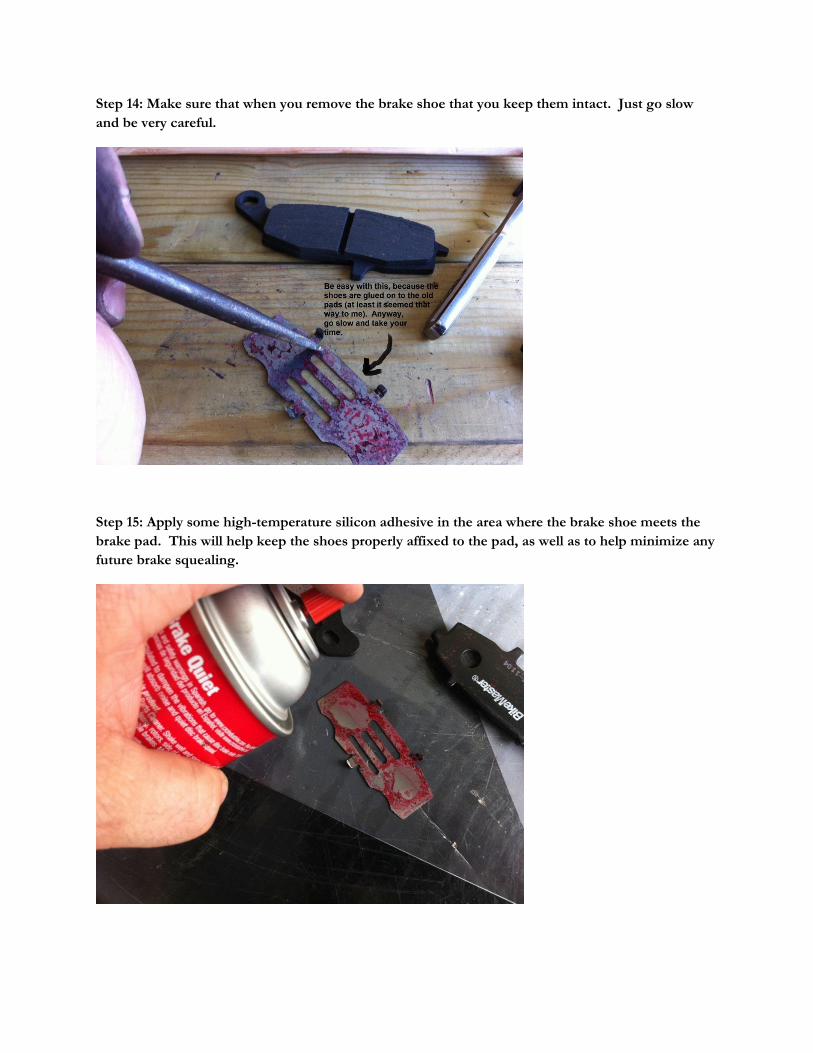
Step 14: Make sure that when you remove the brake shoe that you keep them intact. Just go slow
and be very careful.
Step 15: Apply some high-temperature silicon adhesive in the area where the brake shoe meets the
brake pad. This will help keep the shoes properly affixed to the pad, as well as to help minimize any
future brake squealing.

Step 16: Apply the old brake shoes to the new brake pads. Bend the brake shoe clips into place using
pliers or channel locks. Again, take your time and be careful with them.
Step 17: Insert the new brake pads into the caliper. If your calipers and rotors are full of brake dust,
then it’s recommended that you first clean them brake pad cleaner before embarking on this next
step.

Step 18: Reinsert the pin that holds the brake shoes and pads in place inside the caliper.
Step 19: Prepare the hitch pin clip for reinsertion.

Step 20: Once the hitch pin clip is in, then make sure it’s in there securely and cannot accidentally
work its way back out.
Step 21: Put a few drops of medium-strength Permatex® or Medium Loctite® on the end of the hex
bolt threads that attach the calipers to the forks.

Step 22: Slip the caliper back over the rotor, and then reapply the caliper to the forks by tightening
the associated hex bolts to the recommended manufacturer specification.
Step 23: Always use a calibrated torque wrench to make sure you’ve tightened everything according
to the recommended manufacturer specification. In my case, I’m using a beam-style torque wrench,
which is very easy to use and recalibrate.

Step 24: Reapply the decorative hex cap covers. Finally, pump the front brakes a few times in order
make sure that they’re once again firm. If they are, then take her out for a spin.
Changing the Rear Brake Pads
Changing the single rear brake pad is very easy on the Suzuki C90, at least in my opinion. The pads
themselves are supported by a single hex bolt (let’s refer to it as a pin) and literally float on this pin as you
ride. Upon changing the brakes, once this pin is removed and the pistons are fully decompressed within the
caliper, the brake pads will want to fall out of the bottom. In essence, they pretty much change themselves.
**WARNING – Do not remove the master cylinder covers, and do not engage the rear brake system
throughout this entire process!!!!
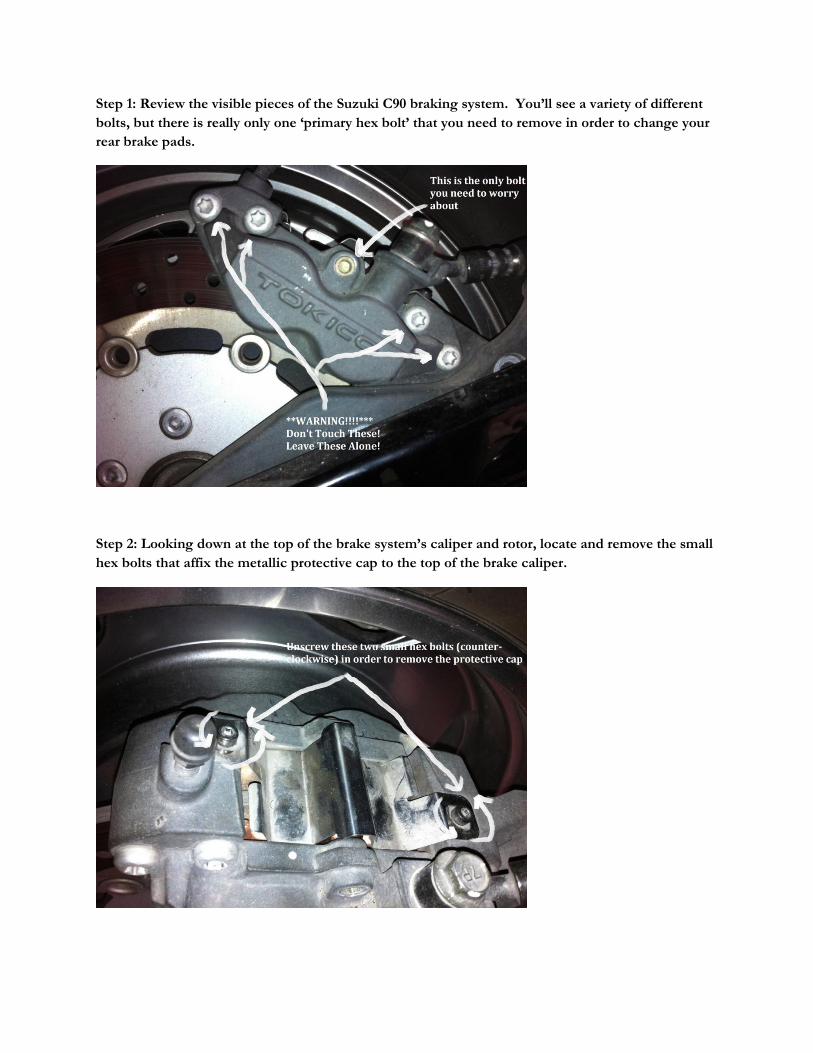
Step 1: Review the visible pieces of the Suzuki C90 braking system. You’ll see a variety of different
bolts, but there is really only one ‘primary hex bolt’ that you need to remove in order to change your
rear brake pads.
Step 2: Looking down at the top of the brake system’s caliper and rotor, locate and remove the small
hex bolts that affix the metallic protective cap to the top of the brake caliper.
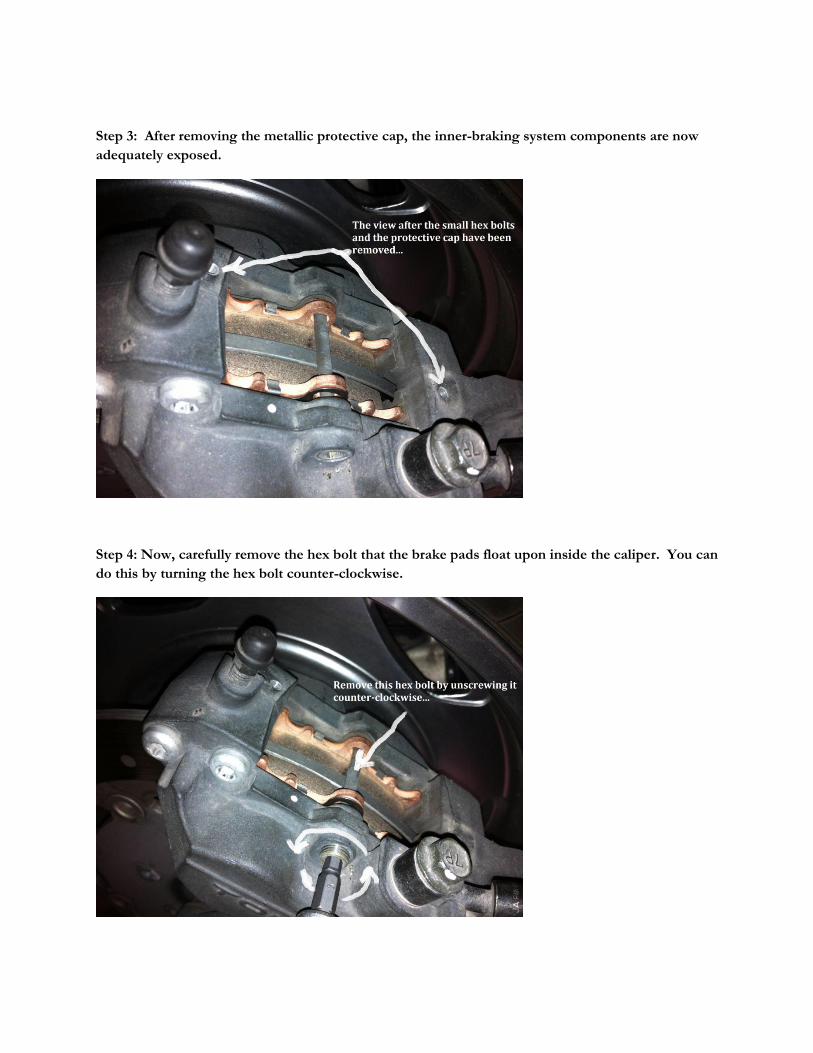
Step 3: After removing the metallic protective cap, the inner-braking system components are now
adequately exposed.
Step 4: Now, carefully remove the hex bolt that the brake pads float upon inside the caliper. You can
do this by turning the hex bolt counter-clockwise.

Step 5: If your brake pads are really worn, they may just fall through the bottom of the caliper once
you remove the hex bolt; this is normal. Just make sure that all of the pieces are accounted for and
that none of the parts have been compromised.
Step 6: If your brake pads don’t fall through the bottom of the caliper, then simply decompress the
caliper pistons using a pair of channel locks. Remember, you don’t need to apply much pressure to
retract the caliper pistons. Be very careful and take your time!

Step 7: Remove the old brake shoes and pads.
Step 8: Decompress the caliper pistons to make room for the new brake pads.

Step 9: If your rotor or brake caliper is dirty, then spray and wipe it down with brake cleaner…
Step 10: Install the new pads (use the old pad’s brake shoes), reinsert the hex bolt, and apply just a
few small drops of medium-strength Permatex® or Loctite®…

Step 11: Replace the protective cap and reinstall the hex screws (Just in case you’re wondering, the
excess liquid you see on my caliper is brake part cleaner). Also, tighten each of the hex bolts to its
proper manufacturer specification. Use a calibrated torque wrench to ensure you’ve met the proper
manufacturer specification. Now, pump the rear brakes a few times in order make sure that they’re
once again firm. If they are, then take her out for a test ride.