store switcher for magento 2
TRANSCRIPT

Store Switcher
for Magento 2
User Guide
Version 1.0
0
Store Switcher

Table of Contents
I) Introduction…………………………………………………………………………………….2
II) Where to Find Extension…………………………………………………………………....3
III) How to Use…………………………………………………………………………………...5
3.1. Configuration Settings ……………………………………………………………..…….5
3.1.1. General Settings …………………………………………………………………...5
3.1.2. Popup Custom……………………………………………………………………..6
3.1.3. Button Custom……………………………………………………………………..9
3.2. Profile Settings…………………………………………………………………………..12
3.2.1. Profile Grid………………………………………………………………………...12
3.2.2. Profile Configuration………………………………………………………………15
IV) Support……………………………………………………………………………………....25
1
Store Switcher

I) Introduction
This document is the User Guide for Store Switcher Extension. It provides extension
functionality and introduces some tips for a quick start.
Store Switcher extension for Magento 2 allows users to detect website visitor’s location by
IP address and use it to bring the appropriate store view to visitors. The store switcher is
like a combination of language and currency switcher. Users can also block certain IPs or
URLs.
● Determine website visitor’s location using IP address
● Suggest visitors to the appropriate store view
● Automatically switch language and currency according to store view
● Customize rules for each country and URL
● Customize popups with various options
2
Store Switcher

II) Where to Find Extension After downloading and installing the extension, from the backend, navigate by this path:
Stores > Configuration > Magezon Extensions > Store Switcher:
3
Store Switcher

4
Store Switcher

III) How to Use
3.1. Configuration Settings
3.1.1. General Settings
In General tab, choose Yes in Enabled to enable the module.
5
Store Switcher

3.1.2. Popup Custom
Under the General tab is Popup Custom tab. This tab shows you a list of options to
customize your popup to fit your desired aesthetic. In Popup Custom tab, you will see:
● Title: enter the popup title.
● Title View All: enter the title in View all locations option.
● Title All Store: enter the title of the location list. This list will appear after visitors click
to view all locations.
● Title Color: choose a color from the color picker for Title.
6
Store Switcher
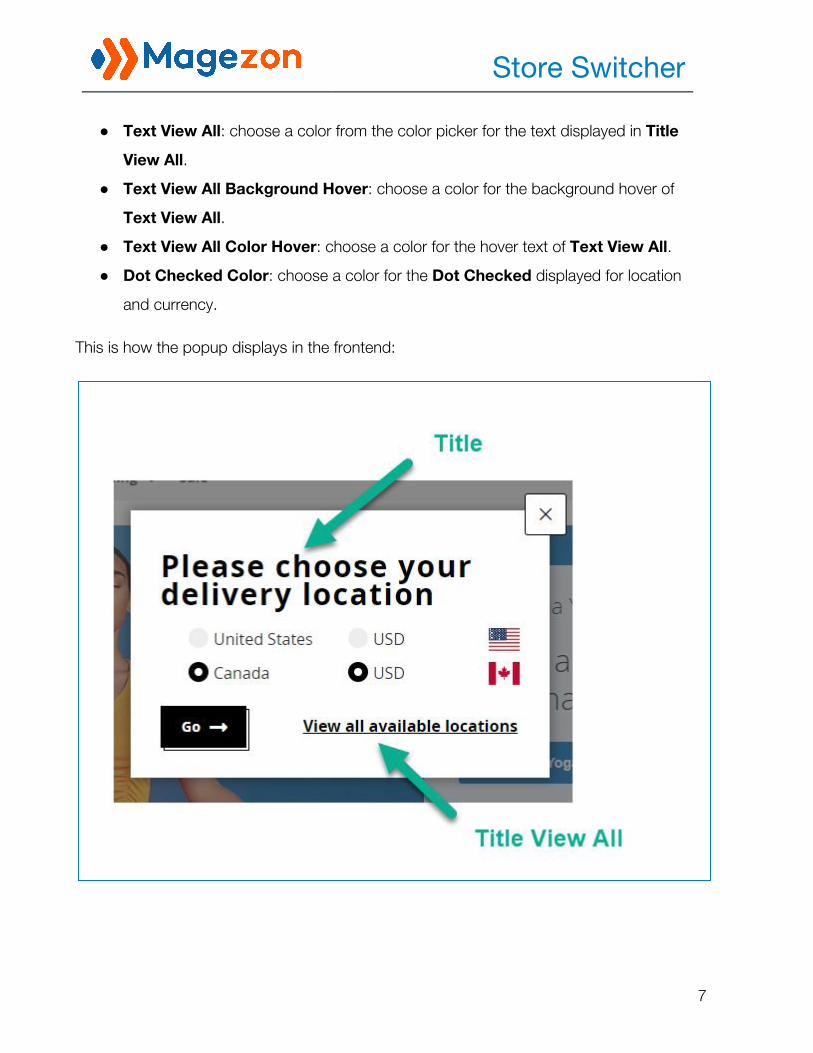
● Text View All: choose a color from the color picker for the text displayed in Title
View All.
● Text View All Background Hover: choose a color for the background hover of
Text View All.
● Text View All Color Hover: choose a color for the hover text of Text View All.
● Dot Checked Color: choose a color for the Dot Checked displayed for location
and currency.
This is how the popup displays in the frontend:
7
Store Switcher

Once visitors click to see all available locations, another pop-up window will appear,
showing all available locations for them to choose.
8
Store Switcher

3.1.3. Button Custom
Move on to Button Custom tab. This tab displays options for button customization.
● Text Button: enter the text displayed for the button.
● Text Color: choose a color for text displayed for the button.
● Background Color: choose a color for the button’s background.
● Text Hover Color: choose a color for the text hover.
● Border Color: choose a color for the button's border.
● Preview Button: see how the button looks like after customization.
9
Store Switcher

Click Save Config button in the upper right corner to save the customization.
10
Store Switcher
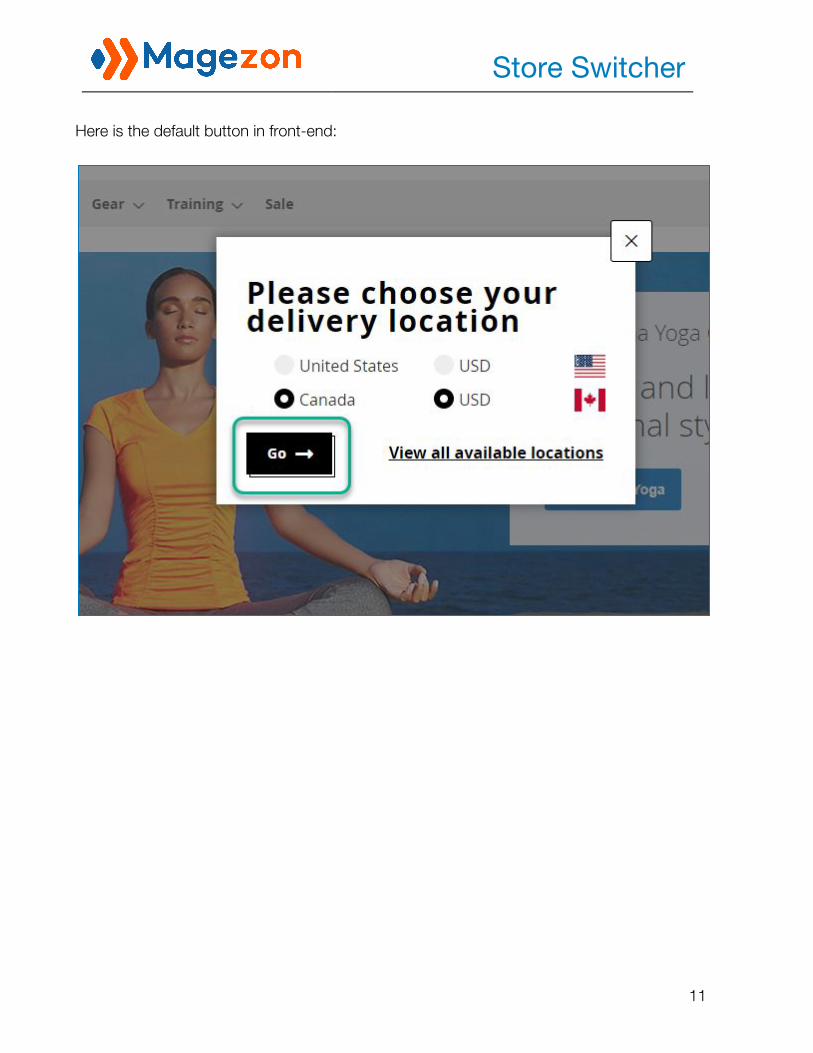
Here is the default button in front-end:
11
Store Switcher

3.2. Profile Settings
3.2.1. Profile Grid
Go to Store > Profiles (under the Store Switcher tab).
12
Store Switcher

Next, a grid will appear, showing a list of profiles and their information as below:
● ID: shows ID of profile.
● Name: shows profile’s name.
● Is Active: shows the status of the profile. The status can be Enabled or Disabled.
To change a profile status, first, select the profile by checking the box in the first
column. Then click the Action dropdown on the upper left corner of the window.
Next, choose the status you want.
13
Store Switcher
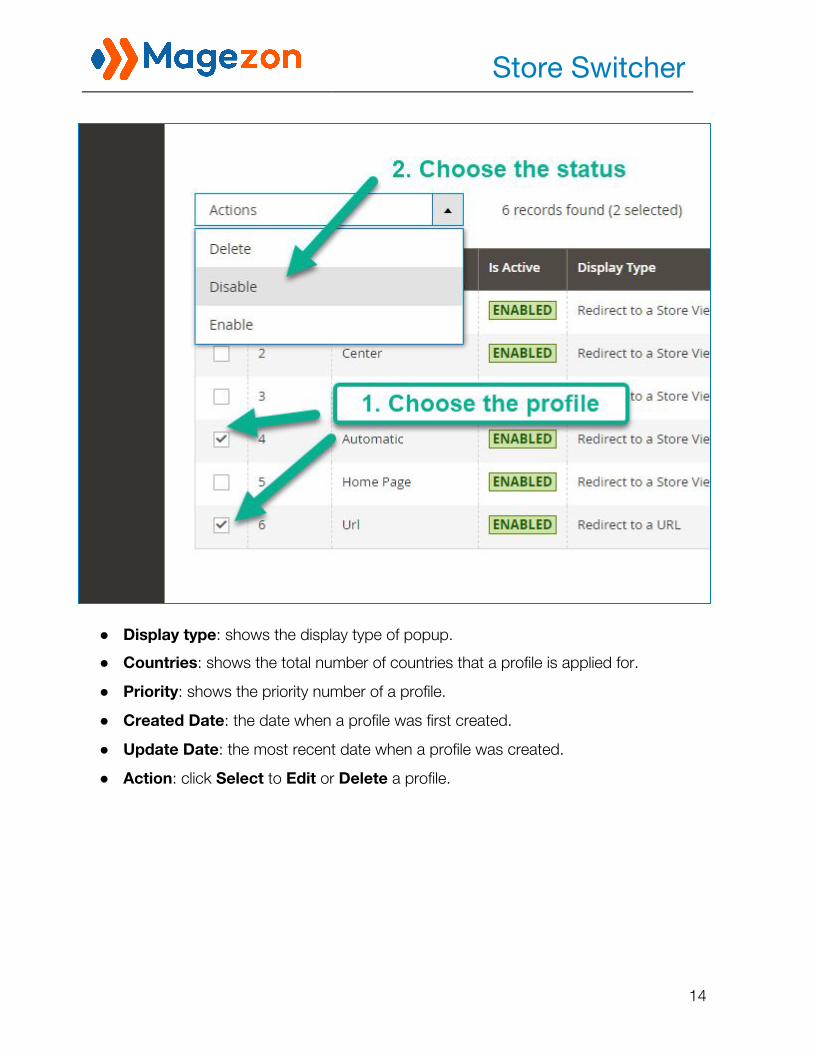
● Display type: shows the display type of popup.
● Countries: shows the total number of countries that a profile is applied for.
● Priority: shows the priority number of a profile.
● Created Date: the date when a profile was first created.
● Update Date: the most recent date when a profile was created.
● Action: click Select to Edit or Delete a profile.
14
Store Switcher

3.2.2. Profile Configuration To Edit a profile, in the Action column, click Select, then choose Edit.
The profile settings will appear. It shows you 3 general options as in the screenshot below:
● Is Active: toggle on/off to enable/disable the profile.
● Name: insert name of profile.
● Priority: insert a number to set priority for a profile. Number values range from 0 to
99, in which 0 gets the highest priority and 99 gets the lowest priority. If you leave
the Priority field blank, the latest created profile will have the highest priority.
15
Store Switcher

Next, click Rule to see options for rule.
16
Store Switcher

Rule options are:
17
Store Switcher

● Type: choose the display type for profile. Three display types are:
Home Page: apply rules to only the home page.
All Pages: apply rules to all pages.
Specific Pages: apply rules to specific pages of your choice.
● Countries: choose the countries you want to apply rules to.
Quick tip: press Ctrl + A to choose all countries.
● Apply by path of URL: This field only shows up for Specific Pages type. Insert the
path of URL you want to apply the rule to. Separate values by a comma.
For example, to apply rules for the page https://www.luma.com/radient-tee.html,
insert /radient-tee.html to the field.
● Exclude by path of URL: This field only shows up for Specific Pages type. Insert
the path of URL you want to exclude. Separate values by a comma.
● Exclude IPs: enter the IP of countries you want to exclude. Separate values by a
comma.
18
Store Switcher
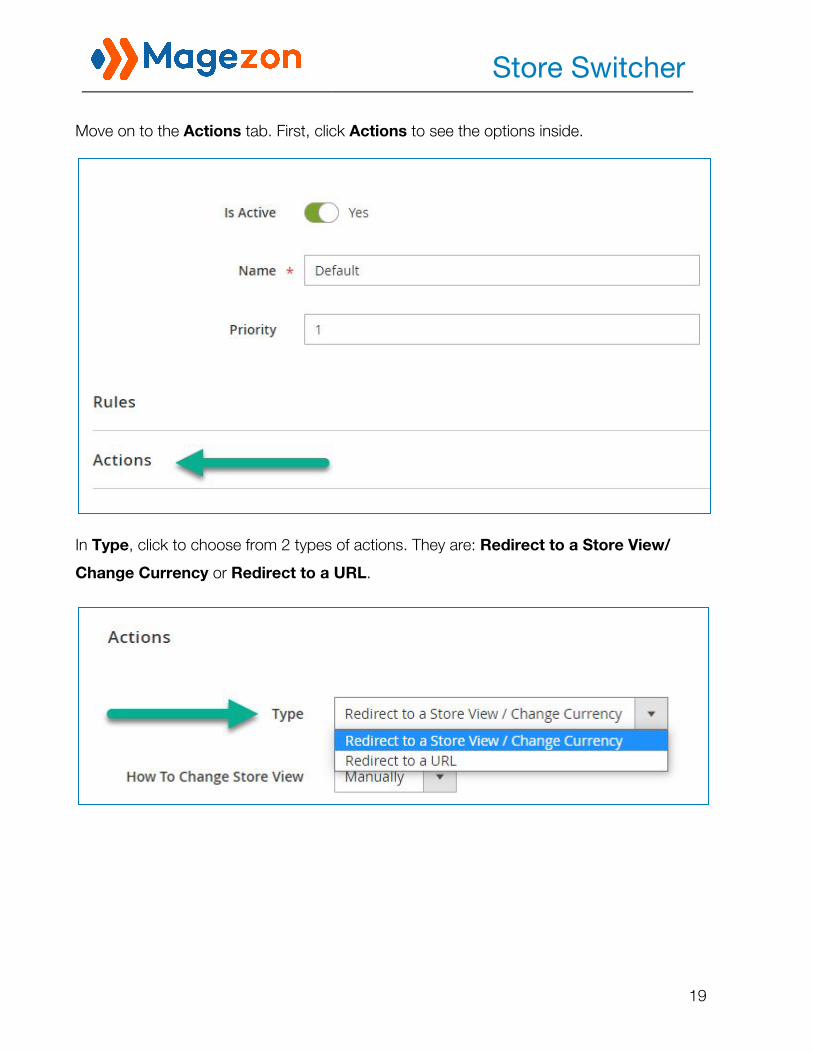
Move on to the Actions tab. First, click Actions to see the options inside.
In Type, click to choose from 2 types of actions. They are: Redirect to a Store View/
Change Currency or Redirect to a URL.
19
Store Switcher

If you choose Redirect to a Store View/ Change Currency, the following options will
show up:
● How To Change Store View: select the way the visitor’s view is switched.
Automatic: automatically switch to a store view without asking visitors.
Manually: ask visitors to select the country and currency they want.
● Popup Types: choose how the popup looks like in the front-end.
Default: use the default popup. This is a simple center popup. It looks like this in the
front-end:
20
Store Switcher

21
Store Switcher
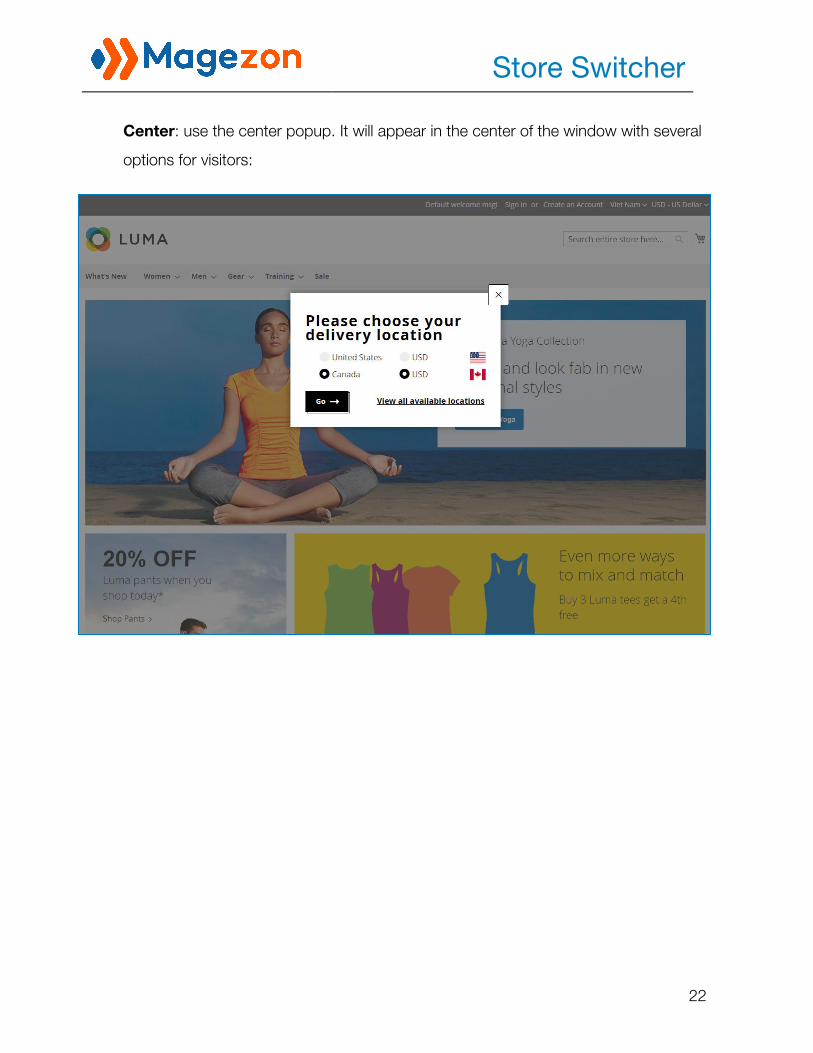
Center: use the center popup. It will appear in the center of the window with several
options for visitors:
22
Store Switcher

Footer: use the footer popup. It has the same function as center popup but it is
placed in the footer:
● Redirect To A Store: choose a store you want to redirect visitors to.
23
Store Switcher

● Change Currency To: choose the currency you want for visitors.
If you choose Redirect to a URL, the following options will show up:
In the URL field, insert the URL you want to resurrect visitors.
Click the Save button in the upper right corner to save the result.
24
Store Switcher

IV) Support
If you have any questions or need any support from our team, please feel free to contact us
via the following ways. We will get back to you within 24 hours since you submit your
request.
● Submit contact form.
● Email us at [email protected].
● Submit a ticket.
● Contact us through Skype: [email protected].
● Contact us via live chat on our website: magezon.com.
25
Store Switcher