storage-based high availability and disaster recovery - ibm
TRANSCRIPT

IBM PowerHA SystemMirror for AIX
Enterprise Edition
Version 7.2
Storage-based high availability anddisaster recovery
IBM

IBM PowerHA SystemMirror for AIX
Enterprise Edition
Version 7.2
Storage-based high availability anddisaster recovery
IBM

NoteBefore using this information and the product it supports, read the information in “Notices” on page 159.
This edition applies to IBM PowerHA SystemMirror 7.2 Enterprise Edition for AIX and to all subsequent releasesand modifications until otherwise indicated in new editions.
© Copyright IBM Corporation 2017, 2018.US Government Users Restricted Rights – Use, duplication or disclosure restricted by GSA ADP Schedule Contractwith IBM Corp.

Contents
About this document . . . . . . . . . vHighlighting . . . . . . . . . . . . . . vCase-sensitivity in AIX . . . . . . . . . . . vISO 9000. . . . . . . . . . . . . . . . vRelated information . . . . . . . . . . . . v
Storage-based high availability anddisaster recovery for PowerHASystemMirror Enterprise Edition . . . . 1What's new in Storage-based high availability anddisaster recovery for PowerHA SystemMirrorEnterprise Edition for AIX . . . . . . . . . . 1DS8000 PPRC replication resources . . . . . . . 1
Metro Mirror . . . . . . . . . . . . . 1Global Mirror. . . . . . . . . . . . . 72
SVC replication resources. . . . . . . . . . 79Overview of SVC management . . . . . . . 79Planning for SVC management . . . . . . . 80Installing PowerHA SystemMirror EnterpriseEdition Metro Mirror for SVC . . . . . . . 86Configuring PowerHA SystemMirror EnterpriseEdition Metro Mirror for SVC . . . . . . . 87Changing an PowerHA SystemMirror EnterpriseEdition for Metro Mirror SVC configuration . . 92Troubleshooting PowerHA SystemMirrorEnterprise Edition for Metro Mirror for SVC . . 95
Disaster recovery management with EMC SRDFreplication . . . . . . . . . . . . . . . 97
EMC SRDF concepts . . . . . . . . . . 98Planning for SRDF replication . . . . . . . 100Installing SRDF filesets . . . . . . . . . 103Configuring SRDF replicated resources . . . . 104Changing SRDF replicated resources . . . . 106Removing a SRDF replicated resource . . . . 107
Hitachi Truecopy/HUR replication resources . . . 107Overview of Truecopy/HUR Management . . 107
Planning for Truecopy/HUR Management . . 108Configuring volume groups and filesystems onTruecopy/HUR protected disks . . . . . . 110Installing Truecopy management filesets . . . 112Configuring Truecopy/HUR resources . . . . 113Changing Truecopy/HUR-Managed replicatedresource . . . . . . . . . . . . . . 115Removing Truecopy/HUR-Managed replicatedresource . . . . . . . . . . . . . . 115
XIV Remote Mirror replication resources . . . . 116XIV Remote Mirror concepts . . . . . . . 116Planning for XIV Remote Mirror . . . . . . 117Installing XIV Remote Mirror . . . . . . . 118Configuring XIV Remote Mirror . . . . . . 118
HyperSwap for PowerHA SystemMirror . . . . 124HyperSwap for PowerHA SystemMirrorconcepts . . . . . . . . . . . . . . 124Planning for HyperSwap for PowerHASystemMirror . . . . . . . . . . . . 137Installing HyperSwap for PowerHASystemMirror . . . . . . . . . . . . 140Configuring HyperSwap for PowerHASystemMirror . . . . . . . . . . . . 140Managing mirror groups for HyperSwap . . . 151Troubleshooting HyperSwap configurations . . 155
Failover rehearsal . . . . . . . . . . . . 157Configuring Fibre Channel disks . . . . . . . 157Troubleshooting manual recovery for storagesubsystems . . . . . . . . . . . . . . 158
Notices . . . . . . . . . . . . . . 159Privacy policy considerations . . . . . . . . 161Trademarks . . . . . . . . . . . . . . 161
Index . . . . . . . . . . . . . . . 163
© Copyright IBM Corp. 2017, 2018 iii

iv Storage-based high availability and disaster recovery

About this document
This document describes the steps that are required to plan, install, and configure different types ofreplicated recourses to work in your environment with PowerHA® SystemMirror® Enterprise Edition forAIX®.
HighlightingThe following highlighting conventions are used in this document:
Bold Identifies commands, subroutines, keywords, files, structures, directories, and other items whose names arepredefined by the system. Also identifies graphical objects such as buttons, labels, and icons that the userselects.
Italics Identifies parameters whose actual names or values are to be supplied by the user.
Monospace Identifies examples of specific data values, examples of text similar to what you might see displayed,examples of portions of program code similar to what you might write as a programmer, messages fromthe system, or information you should actually type.
Case-sensitivity in AIXEverything in the AIX operating system is case-sensitive, which means that it distinguishes betweenuppercase and lowercase letters. For example, you can use the ls command to list files. If you type LS, thesystem responds that the command is not found. Likewise, FILEA, FiLea, and filea are three distinct filenames, even if they reside in the same directory. To avoid causing undesirable actions to be performed,always ensure that you use the correct case.
ISO 9000ISO 9000 registered quality systems were used in the development and manufacturing of this product.
Related informationv The PowerHA SystemMirror Version 7.2 for AIX PDF documents are available in the PowerHA
SystemMirror 7.2 PDFs topic.v The PowerHA SystemMirror Version 7.2 for AIX release notes are available in the PowerHA
SystemMirror 7.2 release notes topic.
© Copyright IBM Corp. 2017, 2018 v

vi Storage-based high availability and disaster recovery

Storage-based high availability and disaster recovery forPowerHA SystemMirror Enterprise Edition
This information describes the necessary steps to plan, install, configure, and maintain Metro Mirror,Global Mirror, SRDF management replicated resources, HyperSwap®, and Hitachi Truecopy/HURmanagement.
What's new in Storage-based high availability and disaster recoveryfor PowerHA SystemMirror Enterprise Edition for AIXRead about new or significantly changed information for the storage-based high availability disasterrecovery topic collection.
How to see what's new or changed
In this PDF file, you might see revision bars (|) in the left margin that identify new and changedinformation.
June 2018
Upgraded the version information and added a note in the Installing SRDF filesets topic.
January 2018
Added a note in the Installing the XCLI topic.
December 2017
Added the “Failover rehearsal” on page 157 topic which provides mirroring status for different storagedevices in a multi-site cluster.
DS8000 PPRC replication resourcesDS8000® series of products belong to IBM® System Storage® (DS) Family Storage Solutions. SystemStorage family products provide for an a robust, highly scalable storage solution. These products providefor rich set of storage management functions and additionally support both data mirroring for bothshorter distances (100 to 200 KMs) and longer distances (1000's of KMs).
Shorter distance mirroring is typically performed synchronously and is called Metro mirroring. Longerdistance mirroring is performed asynchronously and is called Global Mirror. For the DS8000 storagefamily you can use mirroring with PowerHA SystemMirror Enterprise Edition to provide HighAvailability and Disaster Recovery Solution across sites.
Metro MirrorReview the following information provides to plan, install, configure, and maintain the PowerHASystemMirror Enterprise Edition for Metro Mirror (previously known as Synchronous PPRC).
Overview of PowerHA SystemMirror Enterprise Edition for Metro MirrorPowerHA SystemMirror Enterprise Edition for synchronous Peer-to-Peer Remote Copy (PPRC), nowknown as and referred to as Metro Mirror increases data availability for IBM TotalStorage volumes thatuse to copy data to a remote site for disaster recovery purposes.
© Copyright IBM Corp. 2017, 2018 1

PowerHA SystemMirror Enterprise Edition for Metro Mirror takes advantage of the followingcomponents to reduce downtime and recovery time during disaster recovery:v PowerHA SystemMirror cluster managementv PPRC fallover and fallback functionsv Optional components:
– DSCLI PPRC support– SAN Volume Controller (SVC) PPRC support
Prerequisites
Before using PowerHA SystemMirror Enterprise Edition for Metro Mirror documentation, you should befamiliar with:v PowerHA SystemMirror installation and administrationv General background and Metro Mirror support for the type of implementation you intend to configure:
– Direct management PPRC (ESS systems)– DSCLI PPRC (ESS or DS systems)– San Volume Controller (SVC) PPRC
PowerHA SystemMirror Enterprise Edition for Metro Mirror features:
PowerHA SystemMirror Enterprise Edition for Metro Mirror extends PowerHA SystemMirror clustermanagement for highly available applications and servers to support the disaster recovery mechanismsupplied by PPRC.
PPRC is a hardware mirroring technique that the IBM TotalStorage Enterprise Storage Server® uses toreplicate data. It allows mirroring to be suspended and restarted without affecting data integrity.
For all types of Metro Mirror support, PowerHA SystemMirror helps to manage PPRC instances. Directmanagement PPRC is the longest-running type of support through PowerHA SystemMirror EnterpriseEdition, designed to provide basic PPRC management for ESS systems. In response to demand forsimpler management interfaces, PowerHA SystemMirror also provides more automated PPRCmanagement (notably in the area of path and instance (pair) creation) via the following configurations:v DSCLI management for PowerHA SystemMirror Enterprise Edition Metro Mirror allows additional
flexibility by supporting both ESS and DS storage subsystems with the same interface.v SAN Volume Contoller (SVC) Management for PowerHA SystemMirror Enterprise Edition Metro
Mirror provides storage virtualization and an additional layer of disaster recovery via the SVC clusterand hardware configuration.
In general, the styles of Metro Mirror support mentioned above (DSCLI and SVC) are intended to makeMetro Mirror management easier to install and manage. Direct management PPRC has the advantage ofnot having "middle man" software and hardware to maintain, but, in exchange, there is a relatively heavyamount of configuration and maintenance tasks for the administrator.
High Availability and Disaster Recovery Support Features
PowerHA SystemMirror Enterprise Edition for Metro Mirror provides high availability and disasterrecovery with:v Automatic fallover of PPRC-protected volume pairs between nodes within a sitev Automatic fallover of PPRC-protected volume pairs between sitesv Automatic recovery/reintegration of PPRC-protected volume pairs between sitesv Support for user-defined policy-based resource groupsv Support for the following Inter-Site Management Policies for resource groups:
2 Storage-based high availability and disaster recovery

– Prefer Primary Site– Online on Either Site
v Support for the Subsystem Device Driver Path Control Module (SDDPCM).v Support for cluster verification and synchronizationv Support for C-SPOC for cluster administration.
PPRC mirroring:
PPRC is a mirroring technique used to maintain consistent copies of data across two ESS systems that areat different locations. It mirrors at the disk subsystem level, making it transparent to hosts. PPRC is alsocalled Remote Copy and Mirror.
The three types of remote copy and mirror are:v Metro Mirror
Synchronous mirroringv Global Mirror
Asynchronous mirroringv Global Copy
Extended Distance mirroring
In this topic collection, the term PPRC is synonymous with synchronous mirroring.
Disk subsystems:
IBM TotalStorage Disk subsystems (Enterprise Storage System - ESS, or DS) are large disk subsystemsthat are typically configured to provide RAID-5 and RAID-10 volumes. They contain two System pservers connected to the system backplane to manage and monitor the system.
The disk drives are configured to provide groups of logical disks that are divided into partitions. A datapartition in a disk group is referred to as a volume. Each volume is associated with a logical unit number(LUN) that is a subdivision of the physical disk on a storage system.
The disk subsystems have connections to:v System p (or other) host servers over SCSI or Fibre Channel linksv Other disk subsystems over ESCON or Fibre Channel links. (PPRC uses these physical links to mirror
data.)v ESSNet, the local management Ethernet network for the ESS
Commands sent over this network configure and manage PPRC through ESS Copy Services.v Nodes that access stored data.
Note: PowerHA SystemMirror Enterprise Edition for Metro Mirror requires that inter-storage links beavailable to carry data in both directions at the same time. If ESCON links are used, a minimum of twoESCON links is required because each link can carry data in only one direction at a time. You shouldhave at least four links to improve throughput and to provide redundancy of the ESCON cables andadapters.
PPRC overview:
When PPRC is activated, it establishes a mirror between specified volumes on two storage systems. ThePPRC mirrored volumes are referred to as a PPRC pair, instance, or as a PPRC-protected volume.
PPRC can mirror data in one of two ways:
Storage-based high availability and disaster recovery 3

v Synchronous mirroring provides concurrent copy over ESCON links. This is supported by PowerHASystemMirror Enterprise Edition .Note that ESCON links transmit data in one direction and have distance limitations.
v Non-synchronous mirroring, also called Global Mirror mirroring, provides copying over longerdistances. Extended distance mirroring ensures that volumes are consistent with each other at apoint-in-time. This method is not supported in PowerHA SystemMirror Enterprise Edition.
Note: FlashCopy® is an optional feature on the ESS. It is an instant (point-in-time) copy of the data.
Hardware configuration for PPRC mirroring
The following illustrations show sample hardware configurations that support PPRC-mirroring. Theillustrations also show the connections from the ESS to:v Nodes over SCSI or Fibre Channel connectionsv Fibre channel or ESCON links that connect the two ESS systems to mirror datav The ESS Specialist and ESS Copy Services Specialist over ESSNet and a wide-area network (WAN) that
joins the two ESSNets.
Optional Metro Mirror configurations:
These topics are a light overview of each of the optional PowerHA SystemMirror Enterprise Edition forMetro Mirror configurations available.
DSCLI management:
DSCLI management is one type of optional configuration of PowerHA SystemMirror Enterprise Editionfor Metro Mirror. It provides a simplified PPRC interface for both the ESS and DS storage hardware.
The DSCLI interface provides simplified management of PPRC paths and instances in the followingmanners:v Provides a simplified interface to IBM TotalStorage PPRC services on ESS or DS storage systems in
order to allow management and reporting on PPRC instances and paths.v Monitors the status of PPRC relationships and consistency groups between the volumes being
mirrored. It reports any change in status, such as a volume moving to an offline state.
4 Storage-based high availability and disaster recovery

The DSCLI client software interfaces with the ESSNI server on the HMC, SMC or controller connected tothe storage to which the DSCLI client is connected.
The following list highlights a few of the specific types of functions that you can perform with the DScommand-line interface:v Check and verify your storage unit configuration.v Check the current Copy Services configuration that is used by the storage unit.v Create new logical storage and Copy Services configuration settings.v Modify or delete logical storage and Copy Services configuration settings.
For more information on DSCLI configuration, refer to the current DSCLI online or otherwise publisheddocumentation:
(http://publib.boulder.ibm.com/infocenter/dsichelp/ds8000ic/index.jsp?topic=/com.ibm.storage.ssic.help.doc/f2c_cliesscli_1kx2so.html)Related concepts:“PowerHA SystemMirror Enterprise Edition for Metro Mirror with DSCLI management” on page 38These topics describe the planning, installation and configuration tasks for PowerHA SystemMirrorEnterprise Edition for Metro Mirror with DSCLI management, from here on referred to as DSCLImanagement. DSCLI management simplifies how you manage PPRC replicated resources on IBMTotalStorage systems and how you can integrate PPRC replicated resources into an PowerHASystemMirror configuration.Related information:dscli command
SVC management:
SVC management is another optional configuration of PowerHA SystemMirror Enterprise Edition forMetro Mirror.
SVC provides both storage virtualization and PPRC management services in the following ways:v Provides virtualized storage that interfaces with the TotalStorage PPRC services to provide
management services and reporting for PPRC relationships (instances,) and consistency groups.v Monitors the status of PPRC relationships and consistency groups between the volumes being
mirrored. It reports any change in status, such as a volume moving to an offline state.v Responds to a site failure (or possible site failure), by suspending all mirroring, and, if necessary,
activating the mirror copy at the backup site for host access. All data changes are tracked until themirrors can be synchronized again.
v Synchronizes the volumes.Related concepts:“SVC replication resources” on page 79These topics present information for planning, installing, and configuring an PowerHA SystemMirrorEnterprise Edition Metro Mirror for SAN Volume Controller (SVC) cluster.
PowerHA SystemMirror Enterprise Edition for Metro Mirror in an PowerHA SystemMirror cluster:
PowerHA SystemMirror Enterprise Edition for Metro Mirror allows you to include PPRC-mirroredvolumes in an PowerHA SystemMirror cluster.
This requires two PowerHA SystemMirror sites—an PowerHA SystemMirror component to which youassign nodes. Cluster nodes access the same shared volume groups, but the nodes at each site access
Storage-based high availability and disaster recovery 5

them from different physical volumes—the two volumes in a single PPRC pair. This is different from asingle-site PowerHA SystemMirror environment, in which all cluster nodes sharing volume groups havephysical connections to the same set of disks.
PPRC replicated resources:
A PPRC replicated resource is an PowerHA SystemMirror resource that manages a PPRC pair (has aprimary and secondary instance that is copied from one site to another). The managing resource groupdefinition includes the volume groups and filesystems built on top of the volume groups defined to aPPRC replicated resource.
PowerHA SystemMirror Enterprise Edition for Metro Mirror supports three types of replicated resources:v Direct management PPRC replicated resources. A PPRC replicated resource is a PPRC pair associated with
an PowerHA SystemMirror site that is included in an PowerHA SystemMirror cluster. The definitionfor a PPRC replicated resource contains a volume identifier and the name of the associated ESS.PowerHA SystemMirror has knowledge of which volumes are mirrors of each other for each PPRCreplicated resource. Synchronous mirroring is supported.
v DSCLI-managed PPRC replicated resources. A DSCLI-managed PPRC replicated resource is a definition ofa set of volume pairs and the paths needed to communicate between them. The resource groupdefinition includes the volume groups built on top of the PPRC replicated volumes. Synchronousmirroring is supported.
v SVC-managed PPRC replicated resources. An SVC-managed PPRC replicated resource contains the SVCvirtual disk (vDisk) volume pair information combined with the SVC Cluster name bundled in PPRCrelationships and consistency group. Synchronous mirroring is supported.
Resource groups that include PPRC replicated resources:
An PowerHA SystemMirror resource group is a collection of resources that comprise the operatingenvironment for an application. Applications, as resources in a resource group, are made highly available.
Resource group management policies direct which node hosts the resource group during normaloperation and when the host node fails or goes offline. With PowerHA SystemMirror Enterprise Editionfor Metro Mirror, resource group configuration is the same as for other resource groups. In addition, theresource group includesv A shared volume group and the PPRC replicated resources associated with the individual volumes in
the volume groupv An intersite management policy to handle a resource group during site recovery.
Limitations and restrictions on resource groups that include PPRC replicated resources
Refer to the section for the PowerHA SystemMirror Enterprise Edition Metro Mirror configuration youare implementing for additional Limitations lists. In general, the following restrictions apply to PowerHASystemMirror resource groups that will manage PPRC replicated resources because of the way that PPRCinstances are managed (i.e. source site nodes will have I/O access, target site nodes will not.) Theoutcome of this is that any PowerHA SystemMirror policy that allows a resource group to come onlineon more than one site at a time is not supported:v Inter-Site Management Policy Online Both Sides is not supported.v Startup Policies of Online Using Distribution Policy and Online on All Available Nodes are not
supported.v Fallover Policy Fallover Using Dynamic Node Priority is not supported.Related information:Planning guide
6 Storage-based high availability and disaster recovery

PowerHA SystemMirror sites:
PowerHA SystemMirror Enterprise Edition for Metro Mirror support requires the use of sites. PowerHASystemMirror supports two sites. The primary site is the active site, and the secondary site is the standbysite.
The Inter-Site Management Policy for a resource group directs how a resource group and its resources fallover in response to an outage, and how they fall back if configured to do so. For each resource group,one site is an active production site and the other a backup site. If the nodes at the active production sitebecome unavailable, the backup site becomes the active production site.
For non direct-management types of PowerHA SystemMirror Enterprise Edition for Metro Mirror support(DSCLI, SVC PPRC), each site contains at least one storage system and the nodes attached to it. ForPowerHA SystemMirror Enterprise Edition Direct management environments, each site contains only oneESS.
Resource groups have two types of management policies:v Resource group management policies determine fallover behavior if a node becomes unavailable.v Site management policies determine fallover behavior if all of the nodes at a site are not available.Related tasks:“Configuring PowerHA SystemMirror Enterprise Edition for MetroMirror using DSCLI management” onpage 47These topics explain how to configure the DSCLI management with PowerHA SystemMirror.
Fallover and fallback:
PowerHA SystemMirror Enterprise Edition for Metro Mirror handles the automation of fallover from onesite to another in response to an outage at a production site, minimizing recovery time. When a site fails,the resource group configuration determines whether source volumes are accessible from the secondarysite.
PowerHA SystemMirror automates application recovery by managing replicated resources defined toPowerHA SystemMirror resource groups in the following manner:v The fallover of nodes within a site based on node priority (as identified in the nodelist for a resource
group)v The fallover between sites (as specified by the site management policy for a resource group)v The fallback of a resource group or site as configured.
When an application is running on an active production site:v Updates to the application data are made to the disks associated with the active production site.v Data is mirrored using PPRC to the backup disks.
If the node or the disks at the production site become unavailable:v The application moves to a server at the backup site.v The application continues operation using the mirrored copy of the data.
When the initial production site becomes active again, resource group and site management policiesdetermine whether or not the application moves back to the previous site:v The direction of mirroring may be reversed.v The application may be stopped and restarted on another node.v Manual intervention may be required to bring the application back to a nominal functioning state.Related information:
Storage-based high availability and disaster recovery 7

Planning guide
PowerHA SystemMirror Enterprise Edition for Metro Mirror general planningThese topics describe planning tasks required for all the types of PowerHA SystemMirror EnterpriseEdition Metro Mirror support.
PowerHA SystemMirror Enterprise Edition for Metro Mirror management types:
PowerHA SystemMirror Enterprise Edition for Metro Mirror supports both synchronous andextended-distance PPRC mirrored volumes. The method used to manage PPRC depends on the hardwareconfiguration available.
Using the table below, you can decide what type of PPRC configuration you will need to manage yourcluster.
Mirror type Hardware Type PPRC is managed byHow PowerHA SystemMirror manages PPRCpairs
Synchronous ESS 800, etc. Copy Services Server (CSS,on storage controller)
Directly manages the fallover andresynchronization of the PPRC pairs by issuingcommands directly to the ESS systems. In thisbook, this is referred to as Direct management.In general, it refers to PPRC between ESSstorage systems.
Synchronous ESS (800) or DS (8000,6000) or intermix of any ofthese
DSCLI management, viaESSNI Server on eitherstorage controller orHardware ManagementConsole (HMC)
Relies on the ESSNI server to manage PPRCpairs. Directly manages the fallover andresynchronization of the PPRC pairs by issuingcommands directly to the storage systems. Inthis book, this is referred to as DSCLImanagement.
Synchronous vDisks as provided bySAN Volume Controller.(Hardware as supportedby SVC services)
SVC management of PPRCservices on SVC-specifichardware
Relies on the Copy Services Server in order tomanage PPRC function. Directly manages thefallover and resynchronization of the PPRCpairs by issuing commands directly to theCopy Services Server. In this book, this isreferred to as PPRC SVC management.
Coexistence of two solutions
PowerHA SystemMirror Enterprise Edition for Metro Mirror solutions can coexist on the same PowerHASystemMirror cluster only if the PPRC pairs are managed by one of the PPRC solutions at a time. Pleaserefer to the latest support information for which PPRC solutions can successfully coexist on a singlePowerHA SystemMirror cluster.
Planning overview:
Once you have decided what type of PowerHA SystemMirror Enterprise Edition for Metro Mirrorimplementation to set up, you can begin planning the configuration.
At this stage, you should be familiar with the planning tasks for base PowerHA SystemMirror.
The following planning is required for all PowerHA SystemMirror Enterprise Edition for Metro Mirrorimplementations:v Identify sites for PowerHA SystemMirror Enterprise Edition for Metro Mirror.v Identify the resource groups needed to manage the PPRC replicated resources (optional at this point,
can be done at a later stage).v Identify storage systems to be used in the configuration.v Plan for connections to the storage units.
8 Storage-based high availability and disaster recovery

v Plan the PowerHA SystemMirror Enterprise Edition for Metro Mirror configuration.
Identify the type of PowerHA SystemMirror Enterprise Edition for Metro Mirror support to be used.Related information:Planning guide
Planning PowerHA SystemMirror sites:
Within a resource group, the nodes at one site may handle the PPRC replicated resource differently thanthe nodes at the other site, especially in cases where the states of the volumes (suspended or full duplex)are different at the two sites.
PowerHA SystemMirror Enterprise Edition for Metro Mirror requires two PowerHA SystemMirror sitesfor use within a resource group to control which volume in a PPRC pair a node can access. Althoughnodes at both sites can access a volume group, access is permitted to only one volume in a PPRC pair ata time - the source volume. This prevents nodes at different sites from accessing the same volume groupat the same time. Typically, a number of volumes are mirrored through PPRC from one site to the other.
Planning PowerHA SystemMirror Enterprise Edition for Metro Mirror resource groups:
In addition to basic resource group planning, you need to plan for resource group attribute such as sitesand PPRC replicated resources.
Note: An PowerHA SystemMirror resource group can contain multiple volume groups, file systems,PPRC replicated resources, applications, etc.
When configuring a resource group to use a PPRC replicated resource, the resource group includes nodesin both cluster sites. For the resource group to manage nodes and resources across sites, you assign oneof the following inter-site management policies:v Prefer Primary Site . In a two-site configuration, replicated resources at startup are on the site with the
highest priority, fall over to the other site, and then fall back to the site with the highest priority.v Online on Either Site . Replicated resources are on either site at startup, fall over to the other site and
remain on that site after fallover. This selection simplifies resource group takeover rules, which ishelpful if you have a number of resource groups.
Note: Each PPRC pair will be included in a resource group whose home node is located at the site that isprimary for that PPRC pair.
If you want to set up a mutual recovery configuration for ESS volumes, you configure one resourcegroup in which one site is the active site and another resource group in which the other site is the activesite. For an example of a mutual recovery configuration, see Sample configuration for Directmanagement.
Resource group limitations
In PowerHA SystemMirror Enterprise Edition for Metro Mirror configurations, all volume groups in aresource group must contain only PPRC-protected disks.
If PowerHA SystemMirror Enterprise Edition for Metro Mirror is not being used, all volume groups in aresource group must contain only non-PPRC-protected disks.
Each PPRC pair will be included in a resource group whose home node is located at the site that isprimary for that PPRC pair.Related reference:
Storage-based high availability and disaster recovery 9

“Sample configuration for Direct management” on page 18You can set up a mutual recovery configuration in which each site acts as a production site with the othersite acting as an associated backup site.Related information:Planning resource groups
Installing PowerHA SystemMirror Enterprise Edition for Metro MirrorThese topics describe how to install base PowerHA SystemMirror Enterprise Edition filesets. Details forinstalling filesets and prerequisites for specific types of PPRC support are contained in subsequentsections.
Note: At runtime, make sure you have at least 9 MB of free space in the /tmp directory. PPRC commandsuse this directory.
PowerHA SystemMirror Enterprise Edition for Metro Mirror is installed in addition to the PowerHASystemMirror base filesets.
In order to install PowerHA SystemMirror Enterprise Edition for Metro Mirror, you must install thecluster.xd.license fileset in addition to the base PowerHA SystemMirror cluster.license fileset.Related information:Installation guide
Installation prerequisites for PowerHA SystemMirror Enterprise Edition Metro Mirror:
Before installing PowerHA SystemMirror Enterprise Edition Metro Mirror, be sure to have the necessarybase PowerHA SystemMirror filesets installed.
PowerHA SystemMirror Enterprise Edition requires base PowerHA SystemMirror. Base PowerHASystemMirror can be installed at the same time as PowerHA SystemMirror Enterprise Edition. Installationrequisites will ensure the proper version(s) of base PowerHA SystemMirror filesets are installed beforeinstalling PowerHA SystemMirror Enterprise Edition.
At least the following base PowerHA SystemMirror filesets should be installed on all cluster nodes:
Note: Fileset versions must reflect the version of PowerHA SystemMirror you are installing.
In addition, refer to the following table for a list of filesets to install for each type of PPRC managementsupport:
PPRC management type Filesets to install
Direct management cluster.es.pprc.cmdscluster.es.pprc.rtecluster.msg.en_US.pprc
(and other appropriate language message sets)
DSCLI cluster.es.pprc.cmdscluster.es.pprc.rtecluster.es.spprc.cmdscluster.es.spprc.rtecluster.msg.en_US.pprc
(and other appropriate language message sets)
SAN Volume Controller (SVC) cluster.es.svcpprc.cmdscluster.es.svcpprc.rtecluster.msg.en_US.svcpprc
(and other appropriate language message sets)
10 Storage-based high availability and disaster recovery

Since each type of PPRC management has different prerequisites, information on installing the particularfilesets for specific support types (for example, cluster.es.pprc filesets) is deferred to the section specific tothat PPRC management type.
Note: For the latest information about PowerHA SystemMirror Enterprise Edition software, see theRelease Notes in the /usr/es/sbin/cluster/release_notes_xd file.Related concepts:“PowerHA SystemMirror Enterprise Edition for Metro Mirror with Direct management” on page 17These topics describe the planning, installation, and configuration tasks for setting up PowerHASystemMirror Enterprise Edition for Metro Mirror with Direct management. Using this method,PowerHA SystemMirror directly manages PPRC pairs by communicating with the ESS Copy ServicesServer.“PowerHA SystemMirror Enterprise Edition for Metro Mirror with DSCLI management” on page 38These topics describe the planning, installation and configuration tasks for PowerHA SystemMirrorEnterprise Edition for Metro Mirror with DSCLI management, from here on referred to as DSCLImanagement. DSCLI management simplifies how you manage PPRC replicated resources on IBMTotalStorage systems and how you can integrate PPRC replicated resources into an PowerHASystemMirror configuration.“SVC replication resources” on page 79These topics present information for planning, installing, and configuring an PowerHA SystemMirrorEnterprise Edition Metro Mirror for SAN Volume Controller (SVC) cluster.
Contents of the installation media:
The PowerHA SystemMirror Enterprise Edition for Metro Mirror installation media provides the imagesfor installation on each node in the cluster that can take over a PPRC mirrored volume group.
These images include:
Filesets for base install
v cluster.es.pprc
v cluster.es.spprc
v cluster.es.svcpprc
Direct management and DSCLI message sets
v cluster.msg.ja_JP.pprc
v cluster.msg.en_US.pprc
v cluster.msg.Ja_JP.pprc
v cluster.msg.En_US.pprc
SVC PPRC message sets
v cluster.msg.ja_JP.svcpprc
v cluster.msg.en_US.svcpprc
v cluster.msg.Ja_JP.svcpprc
v cluster.msg.En_US.svcpprc
User Documentation for all Management Types
v cluster.doc.en_US.pprc
Storage-based high availability and disaster recovery 11

PowerHA SystemMirror Enterprise Edition for Metro Mirror installation choices:
Install the PowerHA SystemMirror Enterprise Edition for Metro Mirror software on each cluster node(server).
Installing from an installation server:
To install the PowerHA SystemMirror Enterprise Edition for Metro Mirror software in a clusterenvironment, you can create an PowerHA SystemMirror Enterprise Edition for Metro Mirror installationserver (containing the PowerHA SystemMirror Enterprise Edition for Metro Mirror software images forinstallation) on one node and then load the images onto the remaining cluster nodes. This is the fastestway to install PowerHA SystemMirror Enterprise Edition for Metro Mirror.
PowerHA SystemMirror Enterprise Edition for Metro Mirror supports the Network InstallationManagement program and Alternate Disk Migration.Related information:AIX installation and migrationNetwork installation management
Installing from a hard disk:
To install PowerHA SystemMirror Enterprise Edition for Metro Mirror software from your hard disk, youcopy the software from the installation media to the hard disk prior to installation.
To copy the PowerHA SystemMirror Enterprise Edition for Metro Mirror software to your hard disk:1. Place the PowerHA SystemMirror Enterprise Edition for Metro Mirror CD into the CD-ROM drive.2. Enter smit bffcreate
The Copy Software to Hard Disk for Future Installation panel appears.3. Enter the name of the CD-ROM drive in the INPUT device / directory for software field and press
Enter.If you are unsure of the input device name, press F4 to list available devices. Select the correct driveand press Enter. That drive name appears in the INPUT device / directory field as the valid inputdevice.
4. Press Enter to display the Copy Software to Hard Disk for Future Installation panel.5. Enter field values as follows:
Table 1. Copy Software to Hard Disk for Future Installation fields
Field Value
SOFTWARE name Press F4 for a software listing. Install the images for PowerHA SystemMirrorEnterprise Edition for Metro Mirror. For a list of the PowerHA SystemMirrorEnterprise Edition for Metro Mirror images, see the section Contents of theinstallation media.
DIRECTORY for storing software Change the value to the storage directory that all nodes using PowerHASystemMirror Enterprise Edition for Metro Mirror can access.
6. Enter values for the other fields as appropriate for your site.7. When you are satisfied with the entries, press Enter.
SMIT responds: Are you sure?
8. Press Enter again to copy the software.
Installing PowerHA SystemMirror Enterprise Edition for Metro Mirror from the Hard Disk
12 Storage-based high availability and disaster recovery
After the PowerHA SystemMirror Enterprise Edition for Metro Mirror software is on your system, followthe instructions in the section Installing the software from the installation media to install the software.Related tasks:“Installing the software from the installation media”If you install the PowerHA SystemMirror Enterprise Edition for Metro Mirror software from theCD-ROM, install the software directly onto each cluster node.Related reference:“Contents of the installation media” on page 11The PowerHA SystemMirror Enterprise Edition for Metro Mirror installation media provides the imagesfor installation on each node in the cluster that can take over a PPRC mirrored volume group.
Installing the software from the installation media:
If you install the PowerHA SystemMirror Enterprise Edition for Metro Mirror software from theCD-ROM, install the software directly onto each cluster node.
To install the PowerHA SystemMirror Enterprise Edition for Metro Mirror software on a server node:1. If you are installing directly from the installation media, insert the CD into the CD-ROM drive.2. Enter smit install_all
SMIT displays the first Install and Update from ALL Available Software panel.3. Enter the device name of the installation media or install directory in the INPUT device / directory
for software field and press Enter.If you are unsure about the input device name or about the install directory, press F4 to list theavailable devices. Then select the correct device or directory and press Enter. The correct value isentered into the INPUT device / directory field as the valid input device.
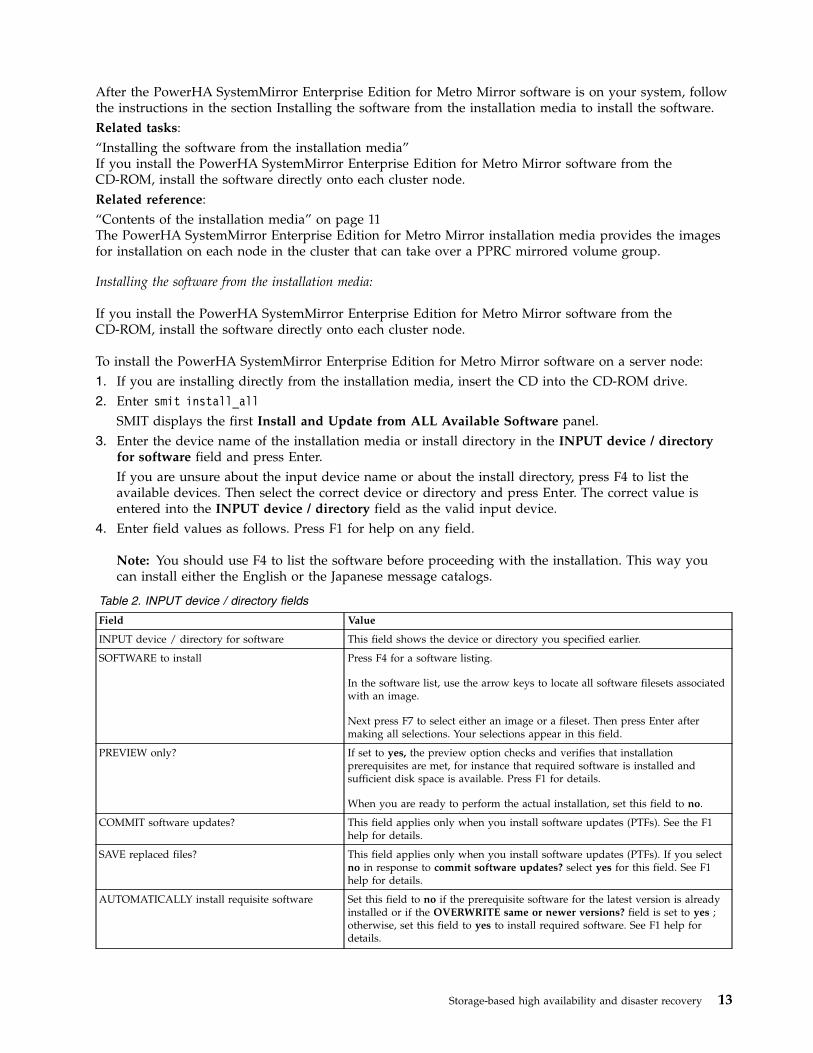
4. Enter field values as follows. Press F1 for help on any field.
Note: You should use F4 to list the software before proceeding with the installation. This way youcan install either the English or the Japanese message catalogs.
Table 2. INPUT device / directory fields
Field Value
INPUT device / directory for software This field shows the device or directory you specified earlier.
SOFTWARE to install Press F4 for a software listing.
In the software list, use the arrow keys to locate all software filesets associatedwith an image.
Next press F7 to select either an image or a fileset. Then press Enter aftermaking all selections. Your selections appear in this field.
PREVIEW only? If set to yes, the preview option checks and verifies that installationprerequisites are met, for instance that required software is installed andsufficient disk space is available. Press F1 for details.
When you are ready to perform the actual installation, set this field to no.
COMMIT software updates? This field applies only when you install software updates (PTFs). See the F1help for details.
SAVE replaced files? This field applies only when you install software updates (PTFs). If you selectno in response to commit software updates? select yes for this field. See F1help for details.
AUTOMATICALLY install requisite software Set this field to no if the prerequisite software for the latest version is alreadyinstalled or if the OVERWRITE same or newer versions? field is set to yes ;otherwise, set this field to yes to install required software. See F1 help fordetails.
Storage-based high availability and disaster recovery 13
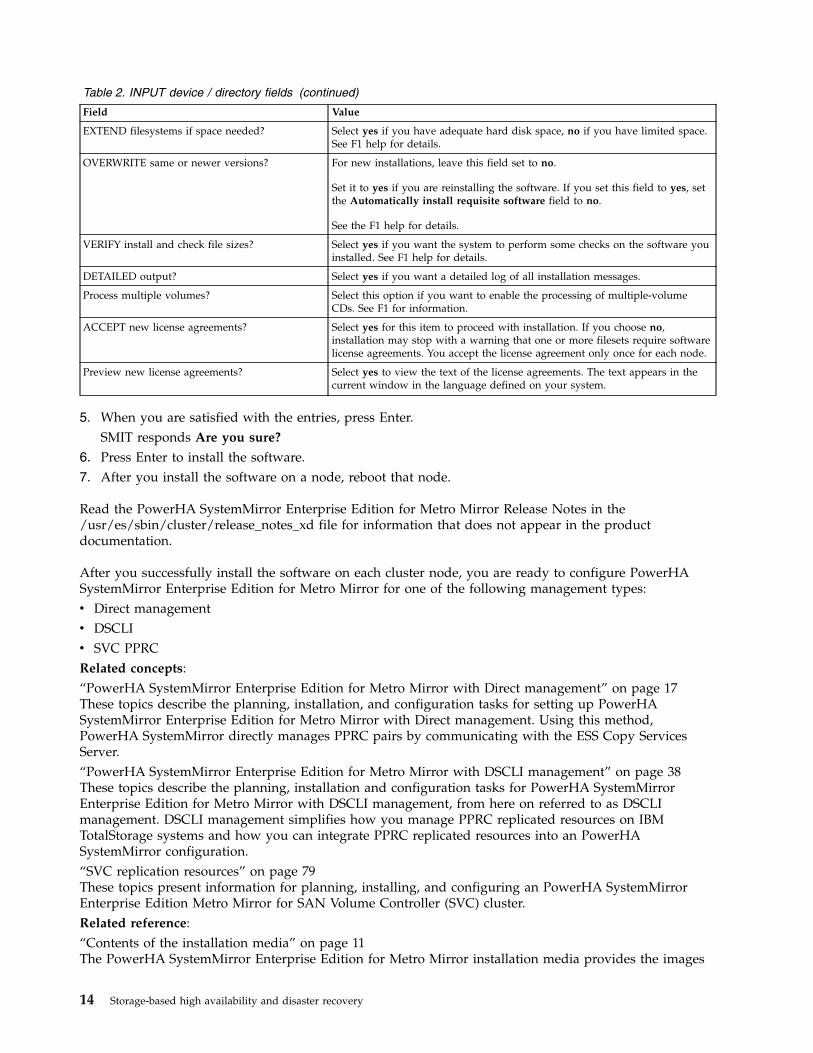
Table 2. INPUT device / directory fields (continued)
Field Value
EXTEND filesystems if space needed? Select yes if you have adequate hard disk space, no if you have limited space.See F1 help for details.
OVERWRITE same or newer versions? For new installations, leave this field set to no.
Set it to yes if you are reinstalling the software. If you set this field to yes, setthe Automatically install requisite software field to no.
See the F1 help for details.
VERIFY install and check file sizes? Select yes if you want the system to perform some checks on the software youinstalled. See F1 help for details.
DETAILED output? Select yes if you want a detailed log of all installation messages.
Process multiple volumes? Select this option if you want to enable the processing of multiple-volumeCDs. See F1 for information.
ACCEPT new license agreements? Select yes for this item to proceed with installation. If you choose no,installation may stop with a warning that one or more filesets require softwarelicense agreements. You accept the license agreement only once for each node.
Preview new license agreements? Select yes to view the text of the license agreements. The text appears in thecurrent window in the language defined on your system.
5. When you are satisfied with the entries, press Enter.SMIT responds Are you sure?
6. Press Enter to install the software.7. After you install the software on a node, reboot that node.
Read the PowerHA SystemMirror Enterprise Edition for Metro Mirror Release Notes in the/usr/es/sbin/cluster/release_notes_xd file for information that does not appear in the productdocumentation.
After you successfully install the software on each cluster node, you are ready to configure PowerHASystemMirror Enterprise Edition for Metro Mirror for one of the following management types:v Direct managementv DSCLIv SVC PPRCRelated concepts:“PowerHA SystemMirror Enterprise Edition for Metro Mirror with Direct management” on page 17These topics describe the planning, installation, and configuration tasks for setting up PowerHASystemMirror Enterprise Edition for Metro Mirror with Direct management. Using this method,PowerHA SystemMirror directly manages PPRC pairs by communicating with the ESS Copy ServicesServer.“PowerHA SystemMirror Enterprise Edition for Metro Mirror with DSCLI management” on page 38These topics describe the planning, installation and configuration tasks for PowerHA SystemMirrorEnterprise Edition for Metro Mirror with DSCLI management, from here on referred to as DSCLImanagement. DSCLI management simplifies how you manage PPRC replicated resources on IBMTotalStorage systems and how you can integrate PPRC replicated resources into an PowerHASystemMirror configuration.“SVC replication resources” on page 79These topics present information for planning, installing, and configuring an PowerHA SystemMirrorEnterprise Edition Metro Mirror for SAN Volume Controller (SVC) cluster.Related reference:“Contents of the installation media” on page 11The PowerHA SystemMirror Enterprise Edition for Metro Mirror installation media provides the images
14 Storage-based high availability and disaster recovery

for installation on each node in the cluster that can take over a PPRC mirrored volume group.
Upgrading to latest release of PowerHA SystemMirror Enterprise Edition:
These topics discuss how to upgrade to the latest release of the PowerHA SystemMirror EnterpriseEdition for Metro Mirror software.
Upgrading the PowerHA SystemMirror Enterprise Edition software:
Before you upgrade to a new release of PowerHA SystemMirror Enterprise Edition for Metro Mirror,make sure you are familiar with the process for installing and configuring PowerHA SystemMirrorEnterprise Edition.
See the section Installing the software from the installation media.v Make sure that your system meets the installation prerequisites. See the section Installation
prerequisites for PowerHA SystemMirror Enterprise Edition Metro Mirror.v Ensure that each cluster node has its own PowerHA SystemMirror Enterprise Edition license.v The PowerHA SystemMirror Enterprise Edition software uses 1 MB of disk space.v Perform the installation process as the root user.
Before upgrading your cluster:1. Archive any localized script and configuration files to prevent losing them during an upgrade.2. Commit the installation (if it is applied but not committed) so that the PowerHA SystemMirror
software can be installed over the existing version. To see if your configuration is already committed,enter: lslpp -h cluster.*
3. If the word COMMIT is displayed under the Action header, continue to the next step.If not, run the smit install_commit utility before installing the latest version software. SMIT displaysthe Commit Applied Software Updates (Remove Saved Files) panel.
4. Enter field values as follows:
Table 3. Commit Applied Software Updates (Remove Saved Files) fields
Field Value
SOFTWARE name Press F4 for a software listing, and select all of the cluster.*filesets.
COMMIT old version if above version used it? Set this field to yes.
EXTEND filesystem if space needed? Set this field to yes.
5. Make a mksysb backup of each node's configuration.If you restore a mksysb backup onto your system, you need to reset the SCSI IDs on the system.
6. Save any customized event information.
Note: When upgrading do not leave the cluster at mixed versions for long periods. Mixed versions of thesoftware in the cluster can impact availability within the cluster.
For information about installing the latest software, see the section Installing the software from theinstallation media. The PPRC filesets must be upgraded at the same time as the other cluster filesets.Related tasks:“Installing the software from the installation media” on page 13If you install the PowerHA SystemMirror Enterprise Edition for Metro Mirror software from theCD-ROM, install the software directly onto each cluster node.Related reference:
Storage-based high availability and disaster recovery 15

“Installation prerequisites for PowerHA SystemMirror Enterprise Edition Metro Mirror” on page 10Before installing PowerHA SystemMirror Enterprise Edition Metro Mirror, be sure to have the necessarybase PowerHA SystemMirror filesets installed.
Verifying the upgraded cluster definition:
After the PowerHA SystemMirror Enterprise Edition for Metro Mirror software is installed on all nodes,and all nodes have been rebooted, you should verify the configuration. Verification provides errors orwarnings to ensure that the cluster definition is the same on all nodes.
To verify the cluster:1. From the command line, enter smit sysmirror.2. From the SMIT interface, select Cluster applications and resources > Verify and synchornize cluster
configurations, and press Enter.
Verification verifies both PowerHA SystemMirror and PowerHA SystemMirror Enterprise Edition forMetro Mirror configuration.
Note: You cannot synchronize a mixed-version cluster. New functionality is available only when allnodes have been upgraded and the cluster has been synchronized. Do not expect commands likeclfindres to supply correct information in a mixed cluster.
Recovering from a failed installation:
When you install PowerHA SystemMirror Enterprise Edition, the cl_convert command runs automaticallyto convert the PowerHA SystemMirror configuration database from a previous release to that of thecurrent release. If the installation fails, run cl_convert from the command line to convert the database.
In a failed conversion, run cl_convert using the -F flag.
To run a conversion utility requires:v Root user privilegesv PowerHA SystemMirror Enterprise Edition version from which you are converting
The cl_convert utility logs conversion progress to the /tmp/clconvert.log file so that you can gaugeconversion success. This log file is regenerated each time cl_convert or clconvert_snapshot runs.Related information:PowerHA SystemMirror commands
Modifying previous cluster snapshots:
After you upgrade your PowerHA SystemMirror Enterprise Edition software to the latest version, youmay want to restore one or more of the previous version cluster snapshots you created using the ClusterSnapshot utility.
The default directory path for storage and retrieval of a snapshot is /usr/es/sbin/cluster/snapshots;however, you may have specified an alternate path using the SNAPSHOTPATH environment variable.Check in these locations before using the /usr/es/sbin/cluster/conversion/clconvert_snapshot utility toconvert the snapshot.
The snapshot is based on your full PowerHA SystemMirror configuration - including the configuration toinclude PPRC replicated resources in a cluster. The clconvert_snapshot utility updates PowerHASystemMirror configuration data with new information for the latest version.
To convert and apply a cluster snapshot, enter:
16 Storage-based high availability and disaster recovery

clconvert_snapshot -v version# -s snapshot_file_name
Where the -s flag is used with the snapshot file name you want to update or apply, and the -v flag isused with the version of the saved snapshot.Related information:Saving and restoring cluster configurations
Addressing problems during the installation:
If you experience problems during the installation, the installation program usually performs a cleanupprocess automatically.
If, for some reason, the cleanup is not performed after an unsuccessful installation:1. Enter smit install to display the Installation and Maintenance menu.2. Select Install and Update Software.3. Select Clean Up After a Interrupted Installation.4. Review the SMIT output (or examine the /smit.log file) for the cause of the interruption.5. Fix any problems and repeat the installation process.
PowerHA SystemMirror Enterprise Edition for Metro Mirror with DirectmanagementThese topics describe the planning, installation, and configuration tasks for setting up PowerHASystemMirror Enterprise Edition for Metro Mirror with Direct management. Using this method,PowerHA SystemMirror directly manages PPRC pairs by communicating with the ESS Copy ServicesServer.
PowerHA SystemMirror Enterprise Edition for Metro Mirror with Direct management is the oldest typeof PPRC support PowerHA SystemMirror provides. It has the simplest hardware configuration, butrequires more work on the administrator's part to set up.
Briefly, PowerHA SystemMirror provides support for direct management of ESS PPRC by managingspecified pair and path tasks as defined by the user on their ESS storage systems Copy Services Server(CSS). PowerHA SystemMirror provides monitoring, fallover and fallback support for PPRC by issuingcommands directly to the CSS via the ESS CLI interface.
Direct management can be used to support PPRC between ESS 800 storage systems.
Planning for Direct management:
You should be familiar with the planning tasks for PowerHA SystemMirror.
You should have completed the planning steps in Metro Mirror general planning for PowerHASystemMirror sites, at least.
To continue the plan for an PowerHA SystemMirror Enterprise Edition for Metro Mirror with Directmanagement environment:v Plan for connections to the ESSv Plan for ESS Copy Servicesv Plan the PowerHA SystemMirror Enterprise Edition for Metro Mirror configuration:
– Identify ESS systems to be included– Identify which resource groups will contain the PPRC replicated resources
v Identify PPRC replicated resources and provide information about the associated volumesv (Optional) Plan for any user-specific PPRC tasks.
Storage-based high availability and disaster recovery 17
Related concepts:“PowerHA SystemMirror Enterprise Edition for Metro Mirror general planning” on page 8These topics describe planning tasks required for all the types of PowerHA SystemMirror EnterpriseEdition Metro Mirror support.Related information:Planning guide
Planning prerequisites for Direct management:
PowerHA SystemMirror Enterprise Edition PPRC with Direct management manages PPRC resources bycommunicating with the Copy Services Server (CSS) on ESS systems via the ESS CLI.
Accordingly, prior to configuring Direct management, ensure the following:v The version of the ESS CLI shipped with the microcode for your storage system has been installed on
all PowerHA SystemMirror cluster nodes.v You have access to the ESS Copy Services Web Interface for the storage systems involved in your
configuration.
You can only use enhanced concurrent volume groups with PPRC.
The ESS Copy Services Web Interface provides a configuration interface for setting up Direct managementPPRC.Related reference:“Installation prerequisites for Direct management” on page 24There are some installation prerequisites for Direct management.Related information:
IBM TotalStorage Enterprise Storage Server: Web Interface User's Guide
Sample configuration for Direct management:
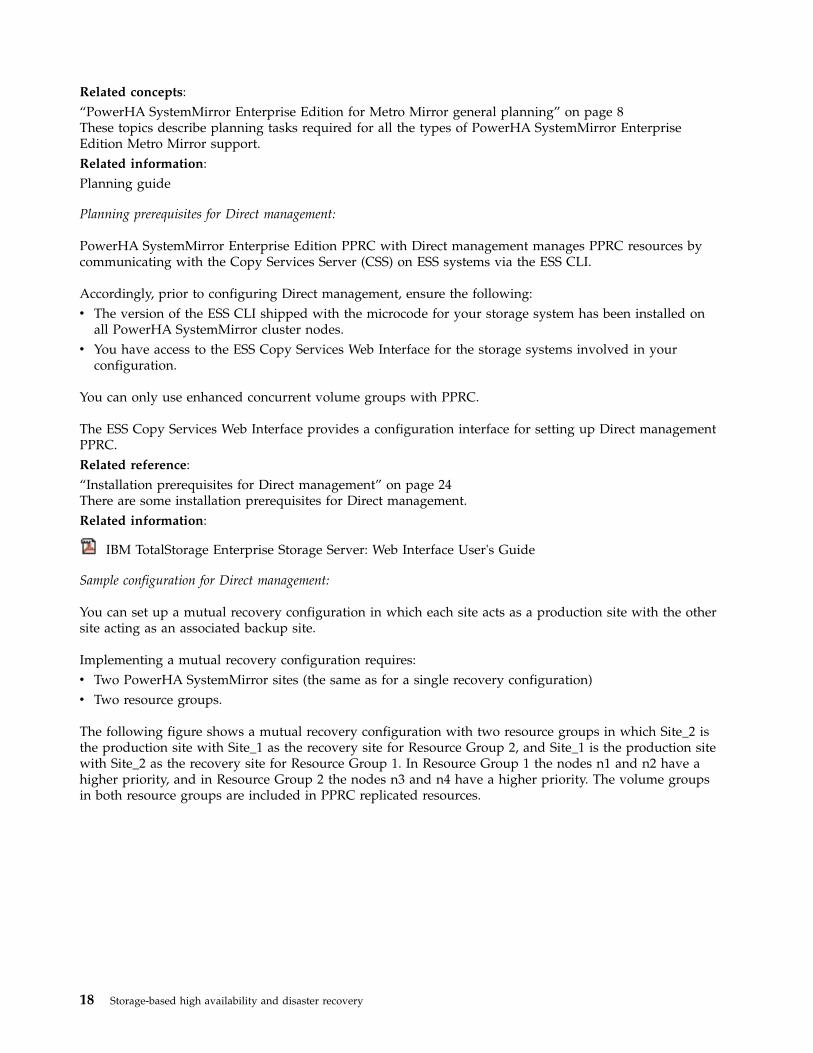
You can set up a mutual recovery configuration in which each site acts as a production site with the othersite acting as an associated backup site.
Implementing a mutual recovery configuration requires:v Two PowerHA SystemMirror sites (the same as for a single recovery configuration)v Two resource groups.
The following figure shows a mutual recovery configuration with two resource groups in which Site_2 isthe production site with Site_1 as the recovery site for Resource Group 2, and Site_1 is the production sitewith Site_2 as the recovery site for Resource Group 1. In Resource Group 1 the nodes n1 and n2 have ahigher priority, and in Resource Group 2 the nodes n3 and n4 have a higher priority. The volume groupsin both resource groups are included in PPRC replicated resources.
18 Storage-based high availability and disaster recovery

The order of the nodes in each resource group's nodelist indicates which site is considered to be theproduction site and which site is considered to be the backup site for that resource group. The site thatincludes the nodes with the highest priority is considered the production site for the resource group.
In the preceding example, the configuration for resource group 1 would be:
Table 4. Sample configuration for resource group 1
Field Value
Ordered sitelist Site_1, Site_2
Primary volume volume100@ESS_1 (mirrored volume on ESS_1)
Secondary volume volume200@ESS_2 (mirrored volume on ESS_2)
Ordered nodelist n1, n2, n3, n4
In the preceding example, the configuration for resource group 2 would be:
Table 5. Sample configuration for resource group 2
Field Value
Ordered sitelist Site_2, Site_1
Primary volume volume210@ESS_2 (mirrored volume on ESS_2)
Secondary volume volume110@ESS_1 (mirrored volume on ESS_1)
Ordered nodelist n3, n4, n1, n2
Planning integration with PPRC:
Before you configure PowerHA SystemMirror Enterprise Edition for Metro Mirror, you configure PPRCon the ESS.
To configure PPRC, you set up:v PPRC paths, ESCON links that transfer mirrored data from one ESS to anotherv PPRC pairs, volumes mirrored from one ESS to another.
The PPRC paths connect PPRC pairs.Related information:
Storage-based high availability and disaster recovery 19

IBM TotalStorage Enterprise Storage Server: Web Interface User's Guide
Planning connections to the ESS:
PowerHA SystemMirror Enterprise Edition for Metro Mirror communication with the ESS requiresconnections to each of the ESS subsystems through the ESSNet administrative network. This access letsPowerHA SystemMirror Enterprise Edition for Metro Mirror use the ESS Command Line Interface (CLI)to control the ESS subsystems during event processing.
Commands are sent to the ESS Copy Services Server software that runs on one of the ESS subsystems inthe environment.
The PowerHA SystemMirror cluster nodes can either connect directly to the ESSNet or connect over arouter or bridge. The interfaces that communicate with the ESSNet can be defined to PowerHASystemMirror, but IP address takeover (IPAT) should not be used on those interfaces. If the interfaces aredefined to PowerHA SystemMirror, ensure that the nodes can gain access to ESSNet at any time.
Note: The reliability of the connection between a node and the ESSNet directly affects the performance ofPowerHA SystemMirror Enterprise Edition for Metro Mirror. A slow or unreliable network connection toESSNet results in commands to initiate a fallover being processed slowly or unreliably.
Planning Copy Services Server on ESS:
Considerations for using Copy Service Server differ depending on the PPRC version.
PPRC Versions before 2.2
When you set up ESS Copy Services, you define one ESS cluster processor complex as the active CopyServices Server and one ESS cluster processor complex on another ESS as the backup Copy ServicesServer.
If the active Copy Services Server fails, a notification message is sent. Because PPRC versions prior to 2.2do not support dual active Copy Services Servers, you manually reset the Copy Services Server to makethe backup server assume the active role. PowerHA SystemMirror cannot restart the Copy Services Server.
Set up the active Copy Services Server at the recovery site.
PPRC Version 2.2 or later
When you set up ESS Copy Services, you define one ESS cluster processor complex in each ESS as aCopy Services Server. Because both Copy Services Servers are active at all times, you do not need tomanually restart a Copy Service Server if one fails.
Configuring PPRC paths:
When configuring PPRC paths that connect PPRC pairs to be included in a PPRC replicated resource,keep in mind that each ESCON link can carry up to 64 paths at the same time. It also carries data in onedirection at a time.
PowerHA SystemMirror Enterprise Edition for Metro Mirror requires that ESCON links be available tocarry data in both directions at the same time; therefore, you need a minimum of two physical links. Toimprove throughput and to provide redundancy for the ESCON cables and adapters, you should have atleast four links. Note that the ESS manages the paths.
20 Storage-based high availability and disaster recovery
Planning for PPRC replicated resources:
PPRC pairs are defined so that one volume in the pair resides on the ESS at one site, and the othervolume in the pair resides on the ESS at the other site. In a PPRC pair, the volume that data is beingwritten to is the source volume, and the volume that contains a mirrored copy of the data is the targetvolume.
The definition for a PPRC replicated resource contains the volume identifier and the name of the ESS forthe source and the target volumes. PowerHA SystemMirror has knowledge of which volumes are mirrorsof each other for each PPRC replicated resource.
To plan PPRC replicated resources for PowerHA SystemMirror Enterprise Edition for Metro Mirror, youshould have a good understanding of the volume groups and volumes involved.
The terms primary and secondary are specific to each pair of PPRC-mirrored volumes as determined bythe pair definition. In configurations that designate one site as a production site and the other as abackup site, the production site holds the primary volumes for the PPRC pairs, and the backup site holdsthe secondary volumes. Each PPRC pair is included in a resource group whose home node is located atthe site that is primary for the PPRC pair.
In a mutual recovery configuration, in which nodes from both sites are active, each site contains primaryvolumes for some PPRC pairs and secondary volumes for others.
Note: PPRC copies the volume information, including the PVID, from one volume in a PPRC pair to theother. The volumes at both sites contain the same logical volumes and must therefore be imported withthe same volume group name. This also allows single-name entries in a resource group definition.
Use ESS Copy Services to obtain information about the ESS configuration and the PPRC pairs that havebeen established.Related information:
IBM TotalStorage Enterprise Storage Server: Web Interface User's Guide
Identifying volume groups:
You use the volume group name when configuring PPRC tasks in ESS Copy Services and when youidentify the volume group to an PowerHA SystemMirror node.
The volume group and logical volume names must be the same on all nodes in each site where thevolume group can be brought online.
To identify volume group information on the ESS, complete the following steps:1. Run the lspv command to view which volume group is associated with which hdisk.2. Run the rsList2105.sh command to see which hdisks are associated with which serial numbers. Or, if
you are using vpaths (as provided by an SDD driver) run the lsvpcfg command to see theinformation.
Related tasks:“Importing mirrored volume groups at the secondary site” on page 29If you have already created volume groups and are sure that volumes are mirroring correctly, skip thissection. If you have not created the volume groups, complete the procedure in this section.
Planning tasks for the ESS:
Tasks are a set of actions to be executed on an ESS. They allow you to automate a series of steps thatotherwise would be performed through the ESS Copy Services Web Interface.
Storage-based high availability and disaster recovery 21

In a direct management environment, PowerHA SystemMirror Enterprise Edition for Metro Mirror relieson PPRC tasks for managing PPRC volume pairs and the associated PPRC paths. These tasks are used toestablish and terminate PPRC pairs during fallover and fallback of volumes. To access these tasks, nodesin an PowerHA SystemMirror cluster that supports PowerHA SystemMirror Enterprise Edition for MetroMirror require access to ESSNet to execute commands.
Using user-specific task names:
User-specific task names can be up to 16 characters long. If possible, base the task name on the namingconventions described in the Understanding task names topic.
Unless you have a configuration conflict (for example if you already have a task named with one of therecommended task names), you should name these tasks as listed in the section Configuring PPRC tasks.
Note: When you specify a user-specific task name for any task, you need to specify task names for all ofthe tasks (whether or not they are different from the recommended names) for each volume group.
You configure these tasks in ESS Copy Services and define them to PowerHA SystemMirror EnterpriseEdition for Metro Mirror. For information about defining a group of user-specific task names to PowerHASystemMirror , see the section Defining PPRC Tasks to PowerHA SystemMirror Enterprise Edition forMetro Mirror for Direct management.
Note: You should use the recommended task names, unless there is a very strong reason to do otherwise.If you do change names, ensure that the names are entered correctly in ESS Copy Services and inPowerHA SystemMirror Enterprise Edition.Related tasks:“Configuring PPRC tasks” on page 26You create 24 PPRC tasks for each PPRC-protected volume group in the cluster. This section lists each ofthese tasks and lists the options in ESS Remote Copy Services that you use to set up the task.Related reference:“Understanding task names”The recommended names for the PPRC tasks specify the volume group and PPRC tasks to manipulatethe volume pairs in the volume group.“Defining the PPRC tasks to PowerHA SystemMirror Enterprise Edition for Metro Mirror for Directmanagement” on page 32You define PPRC tasks to PowerHA SystemMirror Enterprise Edition for Metro Mirror only in cases whereyou named the PPRC tasks differently than recommended. If you used the recommended namingconvention, you can skip this section.
Understanding task names:
The recommended names for the PPRC tasks specify the volume group and PPRC tasks to manipulatethe volume pairs in the volume group.
The recommended task names use the following naming conventions:
volume_ group_action_object_direction_modifier_system
A task name may contain some or all of the components listed in the preceding syntax line.
The following table shows the values for the parts of the task name:
22 Storage-based high availability and disaster recovery
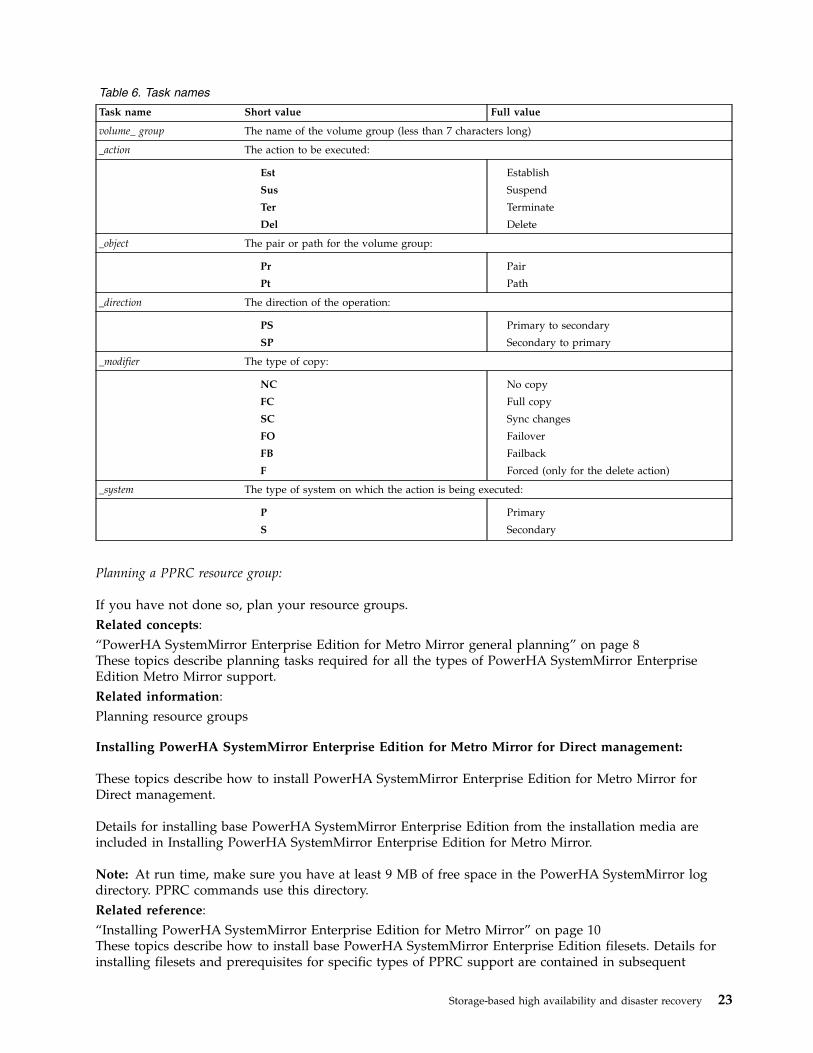
Table 6. Task names
Task name Short value Full value
volume_ group The name of the volume group (less than 7 characters long)
_action The action to be executed:
Est
Sus
Ter
Del
Establish
Suspend
Terminate
Delete
_object The pair or path for the volume group:
Pr
Pt
Pair
Path
_direction The direction of the operation:
PS
SP
Primary to secondary
Secondary to primary
_modifier The type of copy:
NC
FC
SC
FO
FB
F
No copy
Full copy
Sync changes
Failover
Failback
Forced (only for the delete action)
_system The type of system on which the action is being executed:
P
S
Primary
Secondary
Planning a PPRC resource group:
If you have not done so, plan your resource groups.Related concepts:“PowerHA SystemMirror Enterprise Edition for Metro Mirror general planning” on page 8These topics describe planning tasks required for all the types of PowerHA SystemMirror EnterpriseEdition Metro Mirror support.Related information:Planning resource groups
Installing PowerHA SystemMirror Enterprise Edition for Metro Mirror for Direct management:
These topics describe how to install PowerHA SystemMirror Enterprise Edition for Metro Mirror forDirect management.
Details for installing base PowerHA SystemMirror Enterprise Edition from the installation media areincluded in Installing PowerHA SystemMirror Enterprise Edition for Metro Mirror.
Note: At run time, make sure you have at least 9 MB of free space in the PowerHA SystemMirror logdirectory. PPRC commands use this directory.Related reference:“Installing PowerHA SystemMirror Enterprise Edition for Metro Mirror” on page 10These topics describe how to install base PowerHA SystemMirror Enterprise Edition filesets. Details forinstalling filesets and prerequisites for specific types of PPRC support are contained in subsequent
Storage-based high availability and disaster recovery 23

sections.
Installation prerequisites for Direct management:
There are some installation prerequisites for Direct management.
Before you install PowerHA SystemMirror Enterprise Edition Metro Mirror for Direct management, makesure that the following is true for each cluster node:v The PowerHA SystemMirror Enterprise Edition software uses 1 MB of disk space in the /usr filesystem.v You have root access to each node.Related reference:“Planning prerequisites for Direct management” on page 18PowerHA SystemMirror Enterprise Edition PPRC with Direct management manages PPRC resources bycommunicating with the Copy Services Server (CSS) on ESS systems via the ESS CLI.
Software requirements for Direct management:
There are some software requirements for PowerHA SystemMirror Enterprise Edition Metro Mirror.
The following software is required:v AIX level as stated in the support flashv Minimum PowerHA SystemMirror version plus all current APARsv Java™ Runtime Environment version appropriate for the ESS CLI version installed. (This will be tied to
and should be available with the microcode level on the ESS systems.)v ESS CLI as appropriate for your storage microcode (LIC) level:
The ESS Copy Services CLI software is closely tied to the ESS microcode level. CLI code is found onthe MegaCDR that is included in the Customer Software packet.– IBM 2105 Command Line Interface (ibm2105cli.rte )
or– IBM 2105 Command Line Interface (ibm2105esscli.rte) (also included on the MegaCDR).Depending on which version of the ibm2105esscli fileset ships with your level of ESS microcode, thefiles will be installed in one of three locations:1. /usr/opt/ibm2105cli
2. /usr/opt/ibm/ibm2105cli
3. /opt/ibm/ESScli
PowerHA SystemMirror Enterprise Edition assumes a default directory for the ESS CLI executables.Therefore, once the CLI executables are installed in one of the directories listed, you must create thefollowing link:/usr/opt/ibm2105cli -> < ESS cli installation location >so that PowerHA SystemMirror Enterprise Edition can find the executables.
v (Optional but recommended) ESS microcode level vrmf 2.4.x.x. This version provides support for adual active Copy Services Server.
Note: Install microcode vrmf 2.4.x.x on the ESS system to make support for a dual active Copy ServicesServer available. Otherwise, the Copy Services Server must be manually started on a backup CopyServices Server if the primary Copy Services Server is unavailable.Related information:
Support for Copy Services CLI (Command Line Interface)
24 Storage-based high availability and disaster recovery

Installing filesets for Direct management:
You need to install the necessary filesets for Direct management.
If you have not already done so, install the filesets listed in Contents of the installation media for Directmanagement.Related reference:“Contents of the installation media” on page 11The PowerHA SystemMirror Enterprise Edition for Metro Mirror installation media provides the imagesfor installation on each node in the cluster that can take over a PPRC mirrored volume group.
Addressing problems during the installation:
If you experience problems during the installation, the installation program usually performs a cleanupprocess automatically. If, for some reason, the cleanup is not performed after an unsuccessful installation,there are some steps that you can take.
These steps include:1. Enter smit install to display the Installation and Maintenance menu.2. Select Install and Update Software.3. Select Clean Up After an Interrupted Installation.4. Review the SMIT output (or examine the /smit.log file) for the cause of the interruption.5. Fix any problems and repeat the installation process.
Configuring in a Direct management environment:
These topics describe how to configure the ESS system to support PowerHA SystemMirror EnterpriseEdition for Metro Mirror, and how to configure an PowerHA SystemMirror Enterprise Edition directmanagement (ESS CLI) environment.
Configuration prerequisites for Direct management:
Before configuring Direct management, there are some prerequisite steps you need to take.
Before configuring PowerHA SystemMirror Enterprise Edition for Metro Mirror, ensure that:v PPRC is configured and running on the ESS systems.
PowerHA SystemMirror Enterprise Edition for Metro Mirror supports System p servers that cansupport ESS systems.
v You have a good understanding of PowerHA SystemMirror sites for PPRC replicated resources. Formore information about sites, see the section PowerHA SystemMirror sites.
v The PowerHA SystemMirror Enterprise Edition for Metro Mirror software is installed on each clusternode that will support PowerHA SystemMirror Enterprise Edition for Metro Mirror.For information about installing PowerHA SystemMirror Enterprise Edition for Metro Mirror, seeInstalling PowerHA SystemMirror Enterprise Edition for Metro Mirror.
v The PowerHA SystemMirror cluster is configured for:– Nodes– Networks and network interfaces– Service labels– Initial resource groups.
You can modify the attributes for a resource group later to accommodate PPRC replicated resources.Related reference:
Storage-based high availability and disaster recovery 25

“PowerHA SystemMirror sites” on page 7PowerHA SystemMirror Enterprise Edition for Metro Mirror support requires the use of sites. PowerHASystemMirror supports two sites. The primary site is the active site, and the secondary site is the standbysite.“Installing PowerHA SystemMirror Enterprise Edition for Metro Mirror” on page 10These topics describe how to install base PowerHA SystemMirror Enterprise Edition filesets. Details forinstalling filesets and prerequisites for specific types of PPRC support are contained in subsequentsections.
Configuration overview:
Once you have installed PowerHA SystemMirror Enterprise Edition for Metro Mirror, you need to set upconfiguration.
To set up an PowerHA SystemMirror Enterprise Edition for Metro Mirror configuration:1. On the ESS, configure PPRC support for PowerHA SystemMirror Enterprise Edition for Metro Mirror:
a. Configure PPRC tasks in ESS Copy Servicesb. Import the volume groups on the nodes at the secondary site.
2. On cluster nodes, configure support for PowerHA SystemMirror Enterprise Edition for Metro Mirror:a. Define PowerHA SystemMirror sites for PowerHA SystemMirror Enterprise Edition for Metro
Mirror.b. Define ESS systems to be included.c. Define PPRC replicated resources.d. Configure resource groups to include PPRC replicated resources.e. (Optional ) If user-specific task names are used, define them to PowerHA SystemMirror.f. (Optional ) If your cluster has a large number of volume groups, create LUN ID mapping files
before startup as described in Improving the performance of volume groups.Related reference:“Improving the performance of volume groups” on page 34During resource acquisition, PPRC automatically creates LUN ID mappings. If your cluster contains alarge number of volume groups, you can save time by creating these mapping files manually beforebringing up the cluster.
Configuring PowerHA SystemMirror Enterprise Edition for Metro Mirror for Direct management support:
Direct management configuration relies on tasks configured through ESS Copy Services and activated onthe ESS system.
For information about tasks, see the section Planning tasks for the ESS.
Configure the ESS system in preparation for PowerHA SystemMirror Enterprise Edition for Metro Mirrorbefore making configuration changes in PowerHA SystemMirror Enterprise Edition for Metro Mirror.Related reference:“Planning tasks for the ESS” on page 21Tasks are a set of actions to be executed on an ESS. They allow you to automate a series of steps thatotherwise would be performed through the ESS Copy Services Web Interface.
Configuring PPRC tasks:
You create 24 PPRC tasks for each PPRC-protected volume group in the cluster. This section lists each ofthese tasks and lists the options in ESS Remote Copy Services that you use to set up the task.
26 Storage-based high availability and disaster recovery
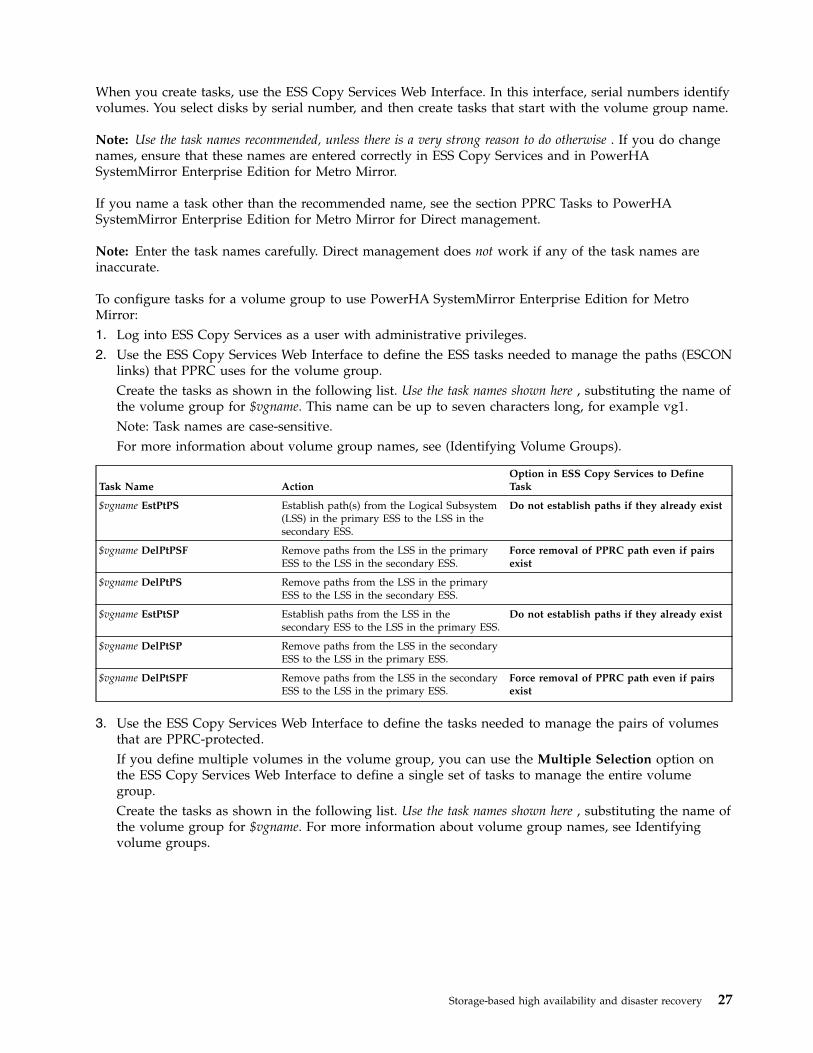
When you create tasks, use the ESS Copy Services Web Interface. In this interface, serial numbers identifyvolumes. You select disks by serial number, and then create tasks that start with the volume group name.
Note: Use the task names recommended, unless there is a very strong reason to do otherwise . If you do changenames, ensure that these names are entered correctly in ESS Copy Services and in PowerHASystemMirror Enterprise Edition for Metro Mirror.
If you name a task other than the recommended name, see the section PPRC Tasks to PowerHASystemMirror Enterprise Edition for Metro Mirror for Direct management.
Note: Enter the task names carefully. Direct management does not work if any of the task names areinaccurate.
To configure tasks for a volume group to use PowerHA SystemMirror Enterprise Edition for MetroMirror:1. Log into ESS Copy Services as a user with administrative privileges.2. Use the ESS Copy Services Web Interface to define the ESS tasks needed to manage the paths (ESCON
links) that PPRC uses for the volume group.Create the tasks as shown in the following list. Use the task names shown here , substituting the name ofthe volume group for $vgname. This name can be up to seven characters long, for example vg1.Note: Task names are case-sensitive.For more information about volume group names, see (Identifying Volume Groups).
Task Name ActionOption in ESS Copy Services to DefineTask
$vgname EstPtPS Establish path(s) from the Logical Subsystem(LSS) in the primary ESS to the LSS in thesecondary ESS.
Do not establish paths if they already exist
$vgname DelPtPSF Remove paths from the LSS in the primaryESS to the LSS in the secondary ESS.
Force removal of PPRC path even if pairsexist
$vgname DelPtPS Remove paths from the LSS in the primaryESS to the LSS in the secondary ESS.
$vgname EstPtSP Establish paths from the LSS in thesecondary ESS to the LSS in the primary ESS.
Do not establish paths if they already exist
$vgname DelPtSP Remove paths from the LSS in the secondaryESS to the LSS in the primary ESS.
$vgname DelPtSPF Remove paths from the LSS in the secondaryESS to the LSS in the primary ESS.
Force removal of PPRC path even if pairsexist
3. Use the ESS Copy Services Web Interface to define the tasks needed to manage the pairs of volumesthat are PPRC-protected.If you define multiple volumes in the volume group, you can use the Multiple Selection option onthe ESS Copy Services Web Interface to define a single set of tasks to manage the entire volumegroup.Create the tasks as shown in the following list. Use the task names shown here , substituting the name ofthe volume group for $vgname. For more information about volume group names, see Identifyingvolume groups.
Storage-based high availability and disaster recovery 27

Task Name ActionOption in ESS Copy Services to DefineTask
$vgname EstPrPSFC Establish a PPRC relationship from thesource volume(s) in the primary ESS to thetarget volume(s) in the secondary ESS.
Copy Entire Volume Permit Read fromSecondary
$vgname EstPrPSNC Establish a PPRC relationship from thesource volume(s) in the primary ESS to thetarget volume(s) in the secondary ESS.
Do Not Copy Volume Permit Read fromSecondary
$vgname EstPrPSSC Establish a PPRC relationship from thesource volume(s) in the primary ESS to thetarget volume(s) in the secondary ESS.
Copy Out-of-Sync Cylinders Only PermitRead from Secondary
$vgname EstPrPSFO Establish a PPRC relationship from the targetvolume(s) in the primary ESS to the sourcevolume(s) in the secondary ESS.
PPRC Failover á
$vgname EstPrPSFB Establish a PPRC relationship from the targetvolume(s) in the primary ESS to the sourcevolume(s) in the secondary ESS.
PPRC Failback
Permit Read from Secondary
$vgname SusPrPSP Suspend a PPRC relationship between thesource volume in the primary ESS and thetarget volume in the secondary ESS.
This task is executed on the primary ESS.
$vgname SusPrPSS Suspend a PPRC relationship between thesource volume in the primary ESS and thetarget volume in the secondary ESS.
This task is executed on the secondary ESS.
$vgname TerPrPSP Terminate a PPRC relationship from thesource volume in the primary ESS to thetarget volume in the secondary ESS. This taskis executed on the primary ESS.
$vgname TerPrPSS Terminate a PPRC relationship from thesource volume in the primary ESS to thetarget volume in the secondary ESS.
This task is executed on the secondary ESS.
$vgname EstPrSPFC Establish a PPRC relationship from thesource volume(s) in the secondary ESS to thetarget volume(s) in the primary ESS.
Copy Entire Volume
Permit Read from Secondary
$vgname EstPrSPNC Establish a PPRC relationship from thesource volume(s) in the secondary ESS to thetarget volume(s) in the primary ESS.
Do Not Copy Volume
Permit Read from Secondary
$vgname EstPrSPSC Establish a PPRC relationship from thesource volume(s) in the secondary ESS to thetarget volume(s) in the primary ESS.
Copy Out-of-Sync Cylinders Only
Permit Read from Secondary
$vgname EstPrSPFO Establish a PPRC relationship from the targetvolume(s) in the secondary ESS to the sourcevolume(s) in the primary ESS.
PPRC Failover
$vgname EstPrSPFB Establish a PPRC relationship from the targetvolume(s) in the secondary ESS to the sourcevolume(s) in the primary ESS.
PPRC Failback
Permit Read from Secondary
$vgname TerPrSPS Terminate a PPRC relationship from thesource volume(s) in the secondary ESS to thetarget volume(s) in the primary ESS.
This task is executed on the secondary ESS.
$vgname TerPrSPP Terminate a PPRC relationship from thesource volume(s) in the secondary ESS to thetarget volume(s) in the primary ESS.
This task is executed on the primary ESS.
28 Storage-based high availability and disaster recovery

Task Name ActionOption in ESS Copy Services to DefineTask
$vgname SusPrSPS Suspend a PPRC relationship between thesource volume in the secondary ESS and thetarget volume in the primary ESS.
This task is executed on the secondary ESS.
$vgname SusPrSPP Suspend a PPRC relationship between thesource volume in the secondary ESS and thetarget volume in the primary ESS.
This task is executed on the primary ESS.
4. Run the ESS rsExecuteTask.sh command to verify that you can execute the tasks created in theprevious step. Note that the command name is case-sensitive.The rsExecuteTask.sh command should return to a command prompt. If it does not, PowerHASystemMirror Enterprise Edition for Metro Mirror does not work.If the command does not return to a command prompt:v Review task configuration and make corrections as needed.v Run the rsExecuteTask.sh command again.
Note: A host server IP address not being defined to the ESS causes a known configuration problemwith the ESS. If this is present, the rsExecuteTask.sh command executes the ESS task, but the programdoes not return.
5. Repeat steps 1 - 4 for each volume group that will use PowerHA SystemMirror Enterprise Edition forMetro Mirror.
Related tasks:“Identifying volume groups” on page 21You use the volume group name when configuring PPRC tasks in ESS Copy Services and when youidentify the volume group to an PowerHA SystemMirror node.Related reference:“Defining the PPRC tasks to PowerHA SystemMirror Enterprise Edition for Metro Mirror for Directmanagement” on page 32You define PPRC tasks to PowerHA SystemMirror Enterprise Edition for Metro Mirror only in cases whereyou named the PPRC tasks differently than recommended. If you used the recommended namingconvention, you can skip this section.
Importing mirrored volume groups at the secondary site:
If you have already created volume groups and are sure that volumes are mirroring correctly, skip thissection. If you have not created the volume groups, complete the procedure in this section.
The secondary volume in a PPRC pair is not visible to the nodes at the secondary site when the PPRCrelationship is active. As a result, use the following procedure to define the disks and volume groups forPowerHA SystemMirror.
To define disks and volume groups to PowerHA SystemMirror:1. Log into ESS Copy Services as a user with administrative privileges.2. Run the $vgname EstPtPS task, where $vgname is the name of the volume group.
This establishes the path(s) from the primary volume to the secondary volume.3. Run the $vgname EstPrPSFC task, where $vgname is the name of the volume group.
This establishes the PPRC pair(s) from the primary volume to the secondary volume and synchronizesthe two copies. This may take awhile.
Storage-based high availability and disaster recovery 29

4. Create the volume group using the AIX Logical Volume Manager (LVM) on nodes on the active site.5. Run the $vgname TerPrPSP task, where $vgname is the name of the volume group.
This terminates the PPRC pair(s).6. Run the $vgname DelPtPS task, where $vgname is the name of the volume group.
This terminates the path(s).7. Run Configuration Manager ( cfgmgr ) on the backup host server to move ESS hdisks to the available
state.8. Import the volume group to all nodes on the secondary site.
The volume group can now be defined to PowerHA SystemMirror Enterprise Edition for Metro Mirror.
Configuring the PowerHA SystemMirror Enterprise Edition Metro Mirror Cluster for Direct management:
Configure PowerHA SystemMirror Enterprise Edition for Metro Mirror after you configure tasks forPPRC on the ESS systems and define sites to support PPRC replicated resources in PowerHASystemMirror.
Defining PPRC replicated resources:
Most of the configuration options for PowerHA SystemMirror Enterprise Edition for Metro Mirror areavailable from the Define PPRC Replicated Resources panel.
To define PPRC replicated resources:1. From the command line, enter smit sysmirror.2. In SMIT, select Cluster Applications and Resources > Resources > PPRC-Managed Replicated
Resources Configuration > ESSCLI-Managed PPRC Replicated Resource Configuration, and pressEnter.From this panel you can:v Define ESS disk subsystems.v Define a PPRC replicated resource.v Define PPRC tasks.v Synchronize the PPRC configuration.v Verify the PPRC configuration.
Defining the ESS Disk Subsystems to PowerHA SystemMirror:
You define the ESS subsystems included in the sites that support PowerHA SystemMirror EnterpriseEdition for Metro Mirror to enable PowerHA SystemMirror to process fallovers for PPRC replicatedresources.
To define an ESS system to PowerHA SystemMirror:1. From the command line, enter smit sysmirror.2. In SMIT, select Cluster Applications and Resources > Resources > PPRC-Managed Replicated
Resources Configuration > ESSCLI-Managed PPRC Replicated Resource Configuration > ESS DiskSubsystem Configuration > Add an ESS Disk Subsystem, and press Enter.
3. In the Add an ESS Disk Subsystem panel, enter field values as follows:
30 Storage-based high availability and disaster recovery

Table 7. Add an ESS Disk Subsystem fields
Field Value
ESS Subsystem Name The name that identifies the ESS subsystem to PowerHA SystemMirror. The name may consistof up to 32 alphanumeric characters, and may include underscores.
ESS site name The name of the site where the ESS resides. The site is already defined in PowerHASystemMirror for the site name to be available from the picklist.
ESS IP Address The IP address, in dotted decimal notation, that the Copy Services Server for an ESS uses.Note: The IP address specified here is the ESSNet address of the ESS at this site.
ESS User ID The user ID used to authenticate logging into the ESS.
ESS password The password associated with the specified ESS User ID .
4. Press Enter.5. Review the settings for the ESS subsystem.
From the Define ESS Disk Subsystem panel, select Change/Show an ESS Disk Subsystem andselect an ESS system.
6. Make changes to the configuration settings as needed.
Defining the PPRC pairs to PowerHA SystemMirror:
You define the PPRC pairs, the primary volume to secondary volume mappings, to allow the PowerHASystemMirror Enterprise Edition for Metro Mirror to manage them.
You must define one PPRC pair for each mirrored volume in the volume group.
To define a PPRC Pair to PowerHA SystemMirror Enterprise Edition for Metro Mirror:1. From the command line, enter smit sysmirror.2. In SMIT, select Cluster Applications and Resources > Resources > PPRC-Managed Replicated
Resources Configurations, and press Enter.3. In the Add a PPRC Resource panel, enter field values as follows:
Table 8. Add a PPRC Resource fields
Field Value
PPRC Resource Name The name of the PPRC volume pair. The name may consist of up to 32 alphanumericcharacters, and may include underscores.
For example, a PPRC replicated resource could be named pprc4.1, with pprc signifying thetype of replicated resource, 4 identifying the volume group to which the PPRC-protectedvolume belongs, and 1 enumerating a PPRC-protected volume in the volume group.Another PPRC replicated resource that includes a different volume in the same volumegroup could be named pprc4.2.
PowerHA SystemMirror Sites The two PowerHA SystemMirror sites, with the primary site for this PPRC pair listed first.The sites are already defined in PowerHA SystemMirror.
Primary Site ESS Info The identifier for the volume in the primary ESS in the form:
volume_id @ ESS_name
where volume_id is the ESS volume ID of the disk, and ess_name is the name of the ESSsubsystem containing this volume.
The primary ESS is the ESS at the site that you chose as primary for this PPRC replicatedresource.
Storage-based high availability and disaster recovery 31

Table 8. Add a PPRC Resource fields (continued)
Field Value
Secondary Site ESS Info The identifier for a volume in the secondary ESS in the form:
volume_id @ ESS_name
where volume_id is the ESS volume ID of the disk, and ess_name is the name of the ESSsubsystem containing this volume.
The secondary ESS is the ESS at the site that you chose as secondary for this PPRCreplicated resource.
4. Press Enter.5. Review the settings for the PPRC pairs. From the Define a PPRC Replicated Resource panel, select
Change/Show a PPRC Resource and select a PPRC pair.6. Make changes to the configuration settings as needed.Related tasks:“Configuring PPRC tasks” on page 26You create 24 PPRC tasks for each PPRC-protected volume group in the cluster. This section lists each ofthese tasks and lists the options in ESS Remote Copy Services that you use to set up the task.
Defining the PPRC tasks to PowerHA SystemMirror Enterprise Edition for Metro Mirror for Direct management:
You define PPRC tasks to PowerHA SystemMirror Enterprise Edition for Metro Mirror only in cases whereyou named the PPRC tasks differently than recommended. If you used the recommended namingconvention, you can skip this section.
See Configuring PPRC tasks.Related tasks:“Configuring PPRC tasks” on page 26You create 24 PPRC tasks for each PPRC-protected volume group in the cluster. This section lists each ofthese tasks and lists the options in ESS Remote Copy Services that you use to set up the task.
Defining PPRC path tasks:
If you specified another name for a PPRC path task in ESS Remote Copy Services, identify that task toPowerHA SystemMirror Enterprise Edition for Metro Mirror.
To define a user-specific PPRC path task name to PowerHA SystemMirror Enterprise Edition for MetroMirror:1. From the command line, enter smit sysmirror.2. In SMIT, select Cluster Applications and Resources > Resources > PPRC-Managed Replicated
Resources Configuration > ESSCLI-Managed PPRC Replicated Resource Configuration > DefinePPRC Tasks > Define PPRC Path Tasks > Add a Group of PPRC Path Tasks, and press Enter.
3. In the Add a Group of PPRC Path Tasks panel, enter field values as follows:
32 Storage-based high availability and disaster recovery

Table 9. Add a Group of PPRC Path Tasks fields
Field Value
Volume Group Name The name of the volume group associated with the PPRC path task.
Establish Path Pri - Sec The name of the task that establishes a PPRC path from the primary ESS to thesecondary ESS as defined in ESS Copy Services.
Delete Path Pri - Sec The name of the task that deletes a PPRC path from the primary ESS to thesecondary ESS as defined in ESS Copy Services.
Delete Path Pri - Sec FORCED The name of the task that deletes a PPRC path from the primary ESS to thesecondary ESS with the Forced option as defined in ESS Copy Services.
Establish Path Sec - Pri The name of the task that establishes a PPRC path from the secondary ESS to theprimary ESS as defined in ESS Copy Services.
Delete Path Sec - Pri The name of the task that deletes a PPRC path from the secondary ESS to theprimary ESS as defined in ESS Copy Services.
Delete Path Sec - Pri FORCED The name of the task that deletes a PPRC path from the secondary ESS to theprimary ESS with the Forced option as defined in ESS Copy Services.
4. Press Enter.5. Review the settings for the PPRC path tasks, from the Define PPRC Path Tasks panel, select
Change/Show a Group of PPRC Path Tasks .6. Make changes to the configuration settings as needed.
Defining PPRC pair tasks:
If you specified another name for a PPRC pair task in ESS Remote Copy Services, identify that task toPowerHA SystemMirror Enterprise Edition for Metro Mirror.
Note: When you specify a user-specific task name, specify task names for all eighteen tasks (whether ornot they are different from the recommended names) for each volume group.
To define a group of user-specific PPRC pair task names to PowerHA SystemMirror Enterprise Editionfor Metro Mirror:1. From the command line, enter smit sysmirror.2. In SMIT, select Cluster Applications and Resources > Resources > PPRC-Managed Replicated
Resources Configuration > ESSCLI-Managed PPRC Replicated Resource Configuration > DefinePPRC Tasks > Define PPRC Pair Tasks > Add a Group of PPRC Pair Tasks, and press Enter.
3. In the Add a Group of PPRC Pair Tasks panel, enter field values as follows:
Table 10. Add a Group of PPRC Pair Tasks fields
Field Value
Volume Group Name The name of the volume group associated with the PPRC pair task.
Direction of the operation: Primary to Secondary
Establish Pair Pri - Sec NO COPY The name of the task that establishes a PPRC pair from the primary ESS to thesecondary ESS with the No Copy option set as defined in ESS Copy Services.
Establish Pair Pri - Sec FULL COPY The name of the task that establishes a PPRC pair from the primary ESS to thesecondary ESS with the Full Copy option set as defined in ESS Copy Services.
Establish Pair Pri - Sec RESYNC The name of the task that establishes a PPRC pair from the primary ESS to thesecondary ESS with the Copy Out-of-sync Cylinders Only option set as defined inESS Copy Services.
Establish Pair Pri - Sec FAILOVER The name of the task that establishes a PPRC pair from the primary ESS to thesecondary ESS with the Failover option set as defined in ESS Copy Services.
Establish Pair Pri - Sec FAILBACK The name of the task that establishes a PPRC pair from the primary ESS to thesecondary ESS with the Failback option set as defined in ESS Copy Services.
Suspend Pair Pri - Sec on Pri The name of the task executed on the primary ESS that suspends PPRC mirroringfrom the primary ESS to the secondary ESS as defined in ESS Copy Services.
Storage-based high availability and disaster recovery 33

Table 10. Add a Group of PPRC Pair Tasks fields (continued)
Field Value
Suspend Pair Pri - Sec on Sec The name of the task executed on the secondary ESS that suspends PPRCmirroring from the primary ESS to the secondary ESS as defined in ESS CopyServices.
Terminate Pair Pri - Sec on Pri The name of the task executed on the primary ESS that ends PPRC mirroring fromprimary ESS to secondary ESS as defined in ESS Copy Services.
Terminate Pair Pri - Sec on Sec The name of the task executed on the secondary ESS that ends PPRC mirroringfrom primary ESS to secondary ESS as defined in ESS Copy Services.
Direction of the operation: Secondary to Primary
Establish Pair Sec - Pri NO COPY The name of the task that establishes a PPRC pair from the secondary ESS to theprimary ESS with the No Copy option set as defined in ESS Copy Services.
Establish Pair Sec - Pri FULL COPY The name of the task that establishes a PPRC pair from the secondary ESS to theprimary ESS with the Full Copy option set as defined in ESS Copy Services.
Establish Pair Sec - Pri RESYNC The name of the task that establishes a PPRC pair from the secondary ESS to theprimary ESS with the Copy Out-of-sync Cylinders Only option set as defined inESS Copy Services.
Establish Pair Sec - Pri FAILOVER The name of the task that establishes a PPRC pair from the secondary ESS to theprimary ESS with the Failover option set as defined in ESS Copy Services.
Establish Pair Sec - Pri FAILBACK The name of the task that establishes a PPRC pair from the secondary ESS to theprimary ESS with the Failback option set as defined in ESS Copy Services.
Suspend Pair Sec - Pri on Sec The name of the task executed on the secondary ESS that suspends PPRCmirroring from the secondary ESS to the primary ESS as defined in ESS CopyServices.
Suspend Pair Sec - Pri on Pri The name of the task executed on the primary ESS that suspends PPRC mirroringfrom the secondary ESS to the primary ESS as defined in ESS Copy Services.
Terminate Pair Sec - Pri on Sec The name of the task executed on the secondary ESS that ends PPRC mirroringfrom the secondary ESS to the primary ESS as defined in ESS Copy Services.
Terminate Pair Sec - Pri on Pri The name of the task executed on the primary ESS that ends PPRC mirroring fromthe secondary ESS to the primary ESS as defined in ESS Copy Services.
4. Press Enter.5. Review the settings for the PPRC pair tasks, from the Define PPRC Pair Tasks panel, select
Change/Show a Group of PPRC Pair Tasks.6. Make changes to the configuration settings as needed.
Improving the performance of volume groups:
During resource acquisition, PPRC automatically creates LUN ID mappings. If your cluster contains alarge number of volume groups, you can save time by creating these mapping files manually beforebringing up the cluster.
To create these mapping files, run the /usr/es/sbin/cluster/pprc/utils/cl_store_LUNPairs command oneach cluster node, and pass the names of your volume groups as parameters as shown in the followingexample:cl_store_LUNPairs MyVg1 MyVg2 MyVg3
This populates the /tmp directory with files named VolumePairs.VolumeGroupName , whereVolumeGroupName corresponds with the volume group names you specified as parameters (for example,MyVg1, MyVg2, and so on). Each file contains pairs of LUN IDs that resemble the following:
34 Storage-based high availability and disaster recovery

Table 11. LUN IDs
PRIMARY_LUN_ID SECONDARY_LUN_ID
50122221 50122225
50222221 50222225
Verifying and synchronizing the PPRC configuration:
The configuration changes that you have completed to this point need to be synchronized to the othercluster nodes.
Verifying configuration for PPRC replicated resources checks the configuration and reports on thefollowing issues:v PowerHA SystemMirror Enterprise Edition for Metro Mirror classes in the PowerHA SystemMirror
Configuration Database are identical on all nodes.v The PPRC Command Line Interface is installed correctly on each node.v The PPRC volume groups are not defined in the Concurrent Volume Groups field for a resource group
that spans on nodes across sites.v Sites defined in the PowerHA SystemMirror disk subsystem exist in an PowerHA SystemMirror site.v The IP addresses of the ESS systems exist and are reachable.v The ESS systems for the PPRC replicated resources are defined as ESS disk subsystems to PowerHA
SystemMirror.v The two volumes of a PPRC pair are on different ESS systems and on different PowerHA SystemMirror
sites.v The volume IDs correspond to physical volumes defined to PowerHA SystemMirror luster nodes.v The PVIDs of the disks in a volume group at each end of a pair are the same.
Typically, you synchronize the PowerHA SystemMirror Enterprise Edition or Metro Mirror configurationwith PowerHA SystemMirror cluster configuration.
You can also verify and synchronize only PowerHA SystemMirror Enterprise Edition for Metro Mirrorconfiguration.
To verify and synchronize PowerHA SystemMirror Enterprise Edition for Metro Mirror configuration:1. From the command line, enter smit sysmirror.2. In SMIT, select Cluster Applications and Resources > Resources > PPRC-Managed Replicated
Resources Configuration, and press Enter.3. Select the type of PPRC resource.4. Select Verify PPRC Configuration, and press Enter.
To synchronize PowerHA SystemMirror Enterprise Editionfor Metro Mirror changes from the commandline interface, you can use the cl_sync_pprc_config command.
To verify PowerHA SystemMirror Enterprise Edition for Metro Mirror changes from the command lineinterface, you can use the cl_verify_pprc_config command.Related information:Verifying and synchronizing a PowerHA SystemMirror cluster
Storage-based high availability and disaster recovery 35
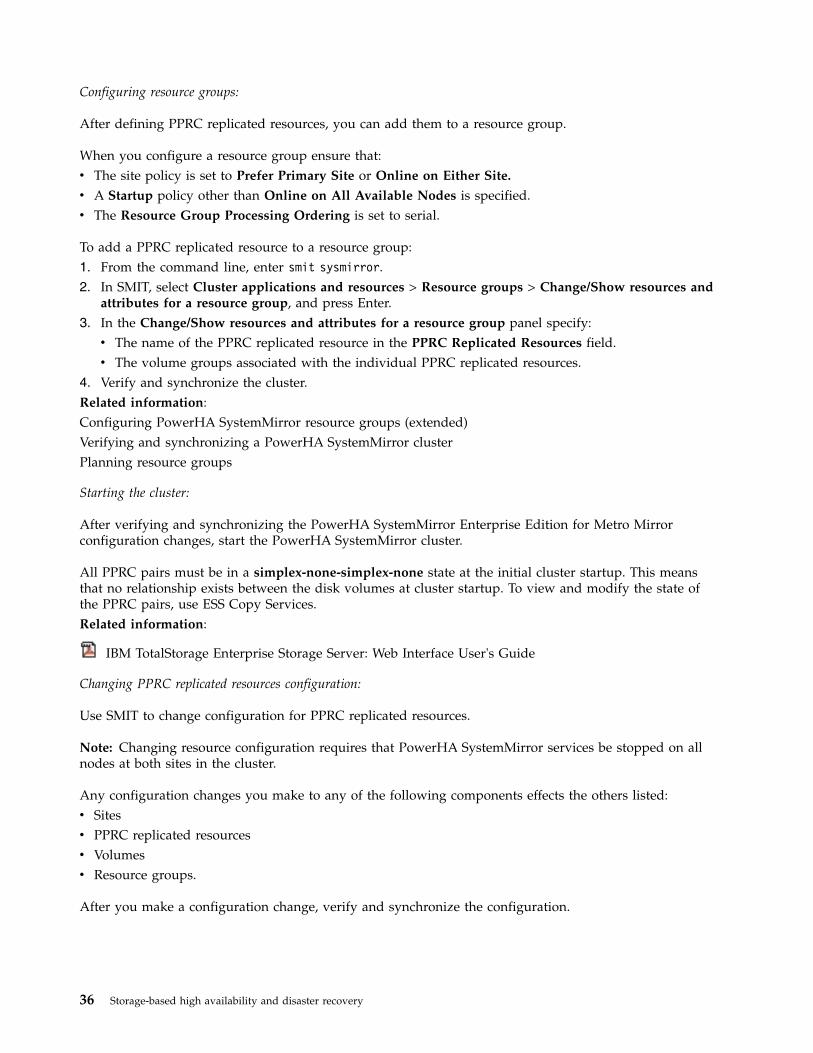
Configuring resource groups:
After defining PPRC replicated resources, you can add them to a resource group.
When you configure a resource group ensure that:v The site policy is set to Prefer Primary Site or Online on Either Site.
v A Startup policy other than Online on All Available Nodes is specified.v The Resource Group Processing Ordering is set to serial.
To add a PPRC replicated resource to a resource group:1. From the command line, enter smit sysmirror.2. In SMIT, select Cluster applications and resources > Resource groups > Change/Show resources and
attributes for a resource group, and press Enter.3. In the Change/Show resources and attributes for a resource group panel specify:v The name of the PPRC replicated resource in the PPRC Replicated Resources field.v The volume groups associated with the individual PPRC replicated resources.
4. Verify and synchronize the cluster.Related information:Configuring PowerHA SystemMirror resource groups (extended)Verifying and synchronizing a PowerHA SystemMirror clusterPlanning resource groups
Starting the cluster:
After verifying and synchronizing the PowerHA SystemMirror Enterprise Edition for Metro Mirrorconfiguration changes, start the PowerHA SystemMirror cluster.
All PPRC pairs must be in a simplex-none-simplex-none state at the initial cluster startup. This meansthat no relationship exists between the disk volumes at cluster startup. To view and modify the state ofthe PPRC pairs, use ESS Copy Services.Related information:
IBM TotalStorage Enterprise Storage Server: Web Interface User's Guide
Changing PPRC replicated resources configuration:
Use SMIT to change configuration for PPRC replicated resources.
Note: Changing resource configuration requires that PowerHA SystemMirror services be stopped on allnodes at both sites in the cluster.
Any configuration changes you make to any of the following components effects the others listed:v Sitesv PPRC replicated resourcesv Volumesv Resource groups.
After you make a configuration change, verify and synchronize the configuration.
36 Storage-based high availability and disaster recovery
Changing the configuration for sites:
You can change the configuration for sites.
To change site configuration in PowerHA SystemMirror:1. From the command line, enter smit sysmirror.2. From the SMIT interface, select Cluster Nodes and Networks > Manage Sites > Change/Show a Site
in Stretched Cluster, and press Enter.Related reference:“Configuring the PowerHA SystemMirror Enterprise Edition Metro Mirror Cluster for Directmanagement” on page 30Configure PowerHA SystemMirror Enterprise Edition for Metro Mirror after you configure tasks forPPRC on the ESS systems and define sites to support PPRC replicated resources in PowerHASystemMirror.
Changing the configuration for PPRC replicated resources:
You can change the configuration for PPRC replicated resources.
To change the configuration for PPRC replicated resources:1. From the command line, enter smit sysmirror.2. In SMIT, select Cluster Applications and Resources > Resources > PPRC-Managed Replicated
Resources Configuration, and press Enter.From this panel, select:v Define ESS Disk Subsystem
For information about field values, see the section Defining the ESS Disk Subsystems to PowerHASystemMirror.
v Define a PPRC Replicated Resource
For information about field values, see the section Defining the PPRC pairs to PowerHASystemMirror.
v Define PPRC Tasks
For information about field values, see the section Defining the PPRC Tasks to PowerHASystemMirror Enterprise Edition for Metro Mirror for Direct management.
v Synchronize PPRC Configuration
v Verify PPRC Configuration
3. After selecting a configuration option, select the Change/Show option for the value you want tochange.
Related tasks:“Defining the PPRC pairs to PowerHA SystemMirror” on page 31You define the PPRC pairs, the primary volume to secondary volume mappings, to allow the PowerHASystemMirror Enterprise Edition for Metro Mirror to manage them.“Defining the ESS Disk Subsystems to PowerHA SystemMirror” on page 30You define the ESS subsystems included in the sites that support PowerHA SystemMirror EnterpriseEdition for Metro Mirror to enable PowerHA SystemMirror to process fallovers for PPRC replicatedresources.Related reference:“Defining the PPRC tasks to PowerHA SystemMirror Enterprise Edition for Metro Mirror for Directmanagement” on page 32You define PPRC tasks to PowerHA SystemMirror Enterprise Edition for Metro Mirror only in cases whereyou named the PPRC tasks differently than recommended. If you used the recommended namingconvention, you can skip this section.
Storage-based high availability and disaster recovery 37

PowerHA SystemMirror Enterprise Edition for Metro Mirror with DSCLImanagementThese topics describe the planning, installation and configuration tasks for PowerHA SystemMirrorEnterprise Edition for Metro Mirror with DSCLI management, from here on referred to as DSCLImanagement. DSCLI management simplifies how you manage PPRC replicated resources on IBMTotalStorage systems and how you can integrate PPRC replicated resources into an PowerHASystemMirror configuration.
You are not required to define tasks on the ESS Web Interface when you use this management system.
Plan which resource groups will contain the DSCLI-managed PPRC replicated resources.
Overview of the DSCLI management system:
DSCLI management provides the ability to execute Copy Services operations directly without relying onpreviously saved GUI tasks. The software dynamically manages DSCLI PPRC-controlled disks, providinga fully automated, highly available disaster recovery management solution.
The PowerHA SystemMirror interface is designed to communicate with the DSCLI so that once the basicPPRC environment is configured, PPRC relationships are created automatically and there is no need formanual access to the DSCLI.
Integration of DSCLI and PowerHA SystemMirror provides:v Support for either Prefer Primary Site or Online on Either Site inter-site management policies.v Flexible user-customizable resource group policies.v Support for cluster verification and synchronization.v Limited support for the PowerHA SystemMirror Cluster Single Point Of Control (C-SPOC). See
Installing the DSCLI management for PPRC Filesets.v Automatic fallover/reintegration of server nodes attached to pairs of PPRC-protected disk subsystem
within and across sites. See Installing the DSCLI management for PPRC Filesets.v Management of PPRC for:
– Fallover/failback of PPRC paths and instances for automatic movement of PPRC-protected disksbetween PowerHA SystemMirror sites.
– Automatic fallover of PPRC-protected volume groups between nodes within a site. See Installing theDSCLI management for PPRC Filesets.
Using DSCLI allows PowerHA SystemMirror to:v Automatically set up PPRC paths and instances that PowerHA SystemMirror will manage.v Manage switching the direction of the PPRC relationships when a site failure occurs, so that the
backup site is able to take control of the PowerHA SystemMirror-managed resource groups from theprimary site.
Related reference:“Installing the DSCLI management for PPRC filesets” on page 45These topics describe how to install DSCLI management for PPRC filesets. You must be logged in as rootto perform installation tasks.
Planning for DSCLI management:
You should be familiar with the planning tasks for PowerHA SystemMirror.
Your environment must meet the following requirements:v PowerHA SystemMirror sites have been planned.
38 Storage-based high availability and disaster recovery

v Basic DSCLI (and ESS CLI, if required for ESS storage,) support has been completely configured. Referto the appropriate documentation on how to install and configure each.
To plan for a DSCLI management in an PowerHA SystemMirror cluster, complete the following tasks:v Identify the Copy Services Servers (CSS) to be used.v Identify the disk subsystems to be used in the cluster.v Identify the vpaths to be used in the configuration, including the volume IDs for each that corresponds
to the storage unit and LUN.v Identify the PPRC Replicated Resources to be usedv Identify the Port Pairs to be used for PPRC Pathsv Identify Volume Pairs (LUNs)v Identify the volume groups to be managed by PPRC Replicated Resourcesv Plan which resource groups will contain the DSCLI-managed PPRC replicated resources (if not already
done in the General Planning section).Related information:Planning guide
Limitations and restrictions for DSCLI management:
The current release of PowerHA SystemMirror Enterprise Edition for Metro Mirror with DSCLImanagement has some limitations and restrictions.
Check the IBM Web site for the latest information on TotalStorage models and PowerHA SystemMirrorsupport.
http://www.ibm.com/servers/storage/disk/index.html
Refer to the README packaged with the DSCLI management filesets for the most up-to-date Limitationsand Restrictions.
Volume group limitations
v A volume group must have the same volume major number across all cluster nodes. (It has beenknown to cause problems during cluster function time, and it is not guaranteed to be fixed duringcluster verification.)
v Resource groups to be managed by PowerHA SystemMirror cannot contain volume groups with bothPPRC-protected and non PPRC-protected disks. For example:– VALID: RG1 contains VG1 and VG2, both PPRC-protected disks.– INVALID: RG2 contains VG3 and VG4, VG3 is PPRC-protected, and VG4 is not protected.– INVALID: RG3 contains VG5, which includes both PPRC-protected and non-protected disks within
the same volume group.
Managed resource limitations
Resource groups cannot manage both DSCLI and Direct management (ESS CLI)-managed PPRC resourcessimultaneously:
Note: ESS Storage resources (LSS and LUNs) are considered DSCLI PPRC Resources in this type ofconfiguration because they are managed via the DSCLI interface and not the ESS CLI.
Storage-based high availability and disaster recovery 39

IBM TotalStorage Copy Services functions limitations
Only IBM TotalStorage Copy Services function Synchronous PPRC (Metro Mirror) is supported (NoGlobal Copy or Global Mirror).
C-SPOC limitations
C-SPOC operations on nodes at the same site as the source volumes successfully perform all taskssupported in PowerHA SystemMirror.
C-SPOC operations will not succeed on nodes at the remote site (that contain the target volumes) for thefollowing LVM operations:v Creating or extending a volume groupv Operations that require nodes at the target site to write to the target volumes (for example, changing
filesystem size, changing mount point, adding LVM mirrors) cause an error message in CSPOC.However, nodes on the same site as the source volumes can successfully perform these tasks. Thechanges are subsequently propagated to the other site via lazy update.
v For C-SPOC operations to work on all other LVM operations, it is highly recommended that youperform all C-SPOC operations when the cluster is active on all PowerHA SystemMirror nodes and theunderlying SVC consistency groups are in a consistent_synchronized state.
Related information:
IBM Disk Storage Systems
Sample configuration for DSCLI management:
You can set up a mutual recovery configuration in which each site acts as a production site with the othersite acting as an associated backup site.
Implementing a mutual recovery configuration requires:v Two PowerHA SystemMirror sites (the same as a single recovery configuration)v Two resource groups.
A standard configuration includes two PowerHA SystemMirror sites, each comprised of nodes attached totwo PPRC-managed groups of ESSes spread across both sites.
A CLI client (ESSNI client) must be installed on the PowerHA SystemMirror hosts. The ESSNI client isthe interface between the application that intends to invoke PPRC commands and the ESSNI or HMC; itmust be installed on all the ESSNI server nodes. PPRC services are invoked using the DSCLI within theESSNI clients. The ESSNI client communicates with the ESSNI server.
The ESSNI Server runs in an HMC for the ESS 2107 and on the management server for ESS 1750. It runsdirectly on the ESS clusters for the 2105. The ESS Server, in turn, communicates the CLI commands to theESS disk controllers.
A PPRC replicated resource contains the ESS disk volume pairs information. The PowerHA SystemMirrorresource group definition includes the volume groups built on top of the PPRC replicated volumes.PowerHA SystemMirror manages PPRC processing by dynamically executing the DSCLI commands. Youno longer have to define tasks on the ESS Web Interface.
The example shows a typical implementation of two ESS model 2107s with PPRC in a four-nodePowerHA SystemMirror geographic cluster. The cluster consists of four System p nodes. Each ESS isconnected to each node (server) via a SCSI or Fibre Channel connection. Two PPRC links (ESCON or FC)between the ESSes provide the basic level of redundancy.
40 Storage-based high availability and disaster recovery

One link carries data from the source Logical Subsystem (LSS) on the Primary site to the target LSS onthe Secondary site, and the other link carries data in the other direction (source is on the Secondary site,target is on the Primary site).
The configuration also includes point-to-point networks for heartbeating to connect the cluster nodes.
Example listing for DSCLI-managed configuration for mutual takeover:
Here is an example of the configuration information for a DSCLI-managed mutual takeoverconfiguration.DS Subsystems-------------m222:
Cluster1 IP: 9.22.22.22Cluster2 IP: 9.44.44.44ESS Storage ID: IBM.2107-2222222Associated CS Server: m222h
m555:Cluster1 IP: 9.55.55.55Cluster2 IP: 9.77.77.77ESS Storage ID: IBM.2107-5555555Associated CS Server: m555h
Copy Services Servers---------------------m222h: IP address 9.112.112.2m555h: IP address 9.115.115.2
Available IO ports
Storage-based high availability and disaster recovery 41
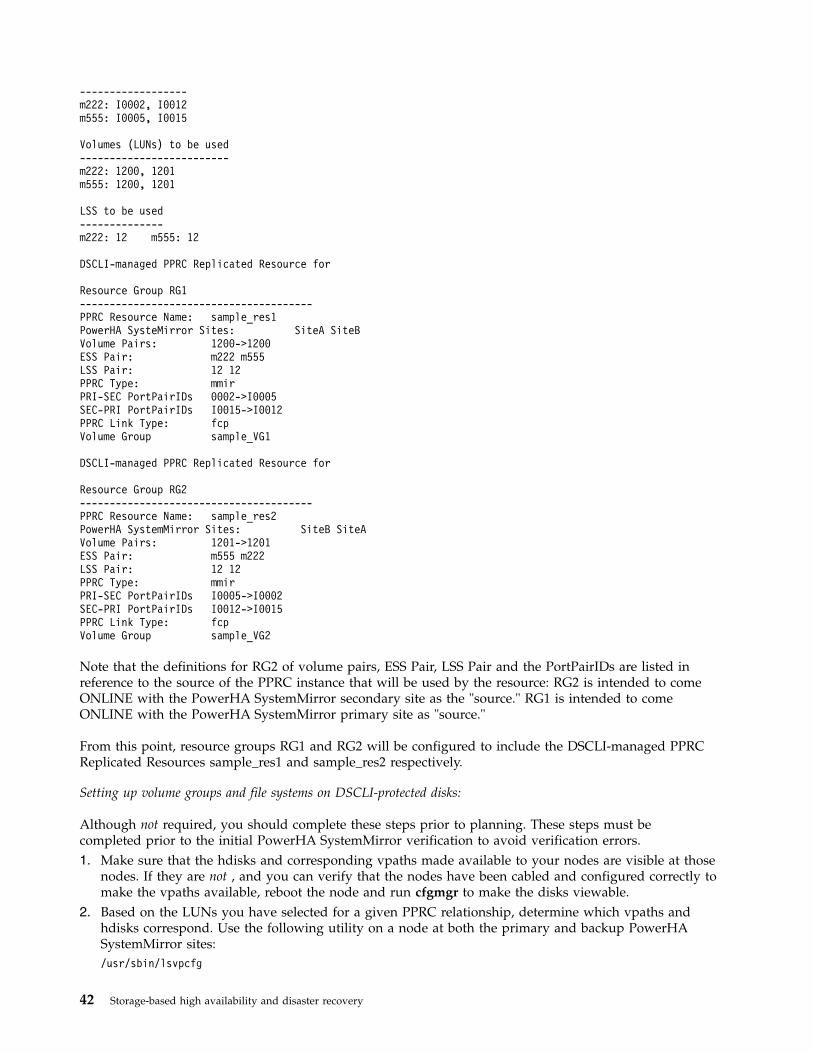
------------------m222: I0002, I0012m555: I0005, I0015
Volumes (LUNs) to be used-------------------------m222: 1200, 1201m555: 1200, 1201
LSS to be used--------------m222: 12 m555: 12
DSCLI-managed PPRC Replicated Resource for
Resource Group RG1---------------------------------------PPRC Resource Name: sample_res1PowerHA SysteMirror Sites: SiteA SiteBVolume Pairs: 1200->1200ESS Pair: m222 m555LSS Pair: 12 12PPRC Type: mmirPRI-SEC PortPairIDs 0002->I0005SEC-PRI PortPairIDs I0015->I0012PPRC Link Type: fcpVolume Group sample_VG1
DSCLI-managed PPRC Replicated Resource for
Resource Group RG2---------------------------------------PPRC Resource Name: sample_res2PowerHA SystemMirror Sites: SiteB SiteAVolume Pairs: 1201->1201ESS Pair: m555 m222LSS Pair: 12 12PPRC Type: mmirPRI-SEC PortPairIDs I0005->I0002SEC-PRI PortPairIDs I0012->I0015PPRC Link Type: fcpVolume Group sample_VG2
Note that the definitions for RG2 of volume pairs, ESS Pair, LSS Pair and the PortPairIDs are listed inreference to the source of the PPRC instance that will be used by the resource: RG2 is intended to comeONLINE with the PowerHA SystemMirror secondary site as the "source." RG1 is intended to comeONLINE with the PowerHA SystemMirror primary site as "source."
From this point, resource groups RG1 and RG2 will be configured to include the DSCLI-managed PPRCReplicated Resources sample_res1 and sample_res2 respectively.
Setting up volume groups and file systems on DSCLI-protected disks:
Although not required, you should complete these steps prior to planning. These steps must becompleted prior to the initial PowerHA SystemMirror verification to avoid verification errors.1. Make sure that the hdisks and corresponding vpaths made available to your nodes are visible at those
nodes. If they are not , and you can verify that the nodes have been cabled and configured correctly tomake the vpaths available, reboot the node and run cfgmgr to make the disks viewable.
2. Based on the LUNs you have selected for a given PPRC relationship, determine which vpaths andhdisks correspond. Use the following utility on a node at both the primary and backup PowerHASystemMirror sites:/usr/sbin/lsvpcfg
42 Storage-based high availability and disaster recovery

Note: It is likely (although not required) that the LUNS will be different at each site, and it is alsolikely (although not required) that the vpaths will be different on each node in each site.The output will look something like this: (this output would be from an PowerHA SystemMirror nodein siteA of the example configuration. Assume more than one type of storage unit is connected to thisnode.)smithers) /usr/sbin/lsvpcfgvpath12 (Avail ) 13AABKK1602 = hdisk14 (Avail ) hdisk44 (Avail )hdisk74 (Avail ) hdisk104 (Avail )vpath13 (Avail ) 13AABKK1603 = hdisk15 (Avail ) hdisk45 (Avail )hdisk75 (Avail ) hdisk105 (Avail )vpath14 (Avail ) 13AABKK1604 = hdisk16 (Avail ) hdisk46 (Avail )hdisk76 (Avail ) hdisk106 (Avail )vpath15 (Avail ) 22222221100 = hdisk17 (Avail ) hdisk47 (Avail )hdisk77 (Avail ) hdisk107 (Avail )vpath16 (Avail pv sample_VG1) 22222221200 = hdisk18 (Avail )hdisk48 (Avail ) hdisk78 (Avail ) hdisk108 (Avail )vpath17 (Avail pv sample_VG2) 22222221201 = hdisk19 (Avail )hdisk49 (Avail ) hdisk79 (Avail ) hdisk109 (Avail )pilot> lshostvol.sh
The third column in this output corresponds to the storage system ID and LUN associated with thevpath listed in column one.Examplesvpath12 above (which has no volume group created on it yet) is on storage systemIBM.XXXX-13AABKK, LSS 16, LUN 002.vpath17 (which has volume group sample_VG2 created on it) is on the same system, with a differentLSS/LUN: IBM.XXXX-2222222, LSS 12, LUN 001.To fill in the 'XXXX' from the system ID above: either from your own documentation, or uselsdev -Ccdisk | grep <hdisk associated with the vpath in question>
to display the underlying disk type: IBM FC 1750 or IBM FC 2107.Example:smithers) /usr/sbin/lsdev -Ccdisk | grep hdisk14
hdisk14 Available 2A-08-02 IBM FC 1750
You see that vpath12 is on IBM.1750-13AABKK, LSS 16, LUN 002.3. Create volume groups and file systems at the Primary PowerHA SystemMirror site.
a. On one of the nodes at the Primary PowerHA SystemMirror site, on the Vpaths) that correspondto the volume pairs for a given PPRC Relationship, set up the volume group(s) and file system(s)to be managed by PowerHA SystemMirror. Ensure that the Volume Major Numbers for thevolume groups can be used on all PowerHA SystemMirror cluster nodes, and that the physicalvolume name for the filesystem can also be used across all PowerHA SystemMirror cluster nodes.
Note: Use the /usr/sbin/lvlstmajor command on each node in the cluster to list the availablevolume major numbers and select a free number on all nodes.
b. After successfully creating all necessary volume groups and file systems on the first node, importthe data to all other nodes at the same site.
4. Use PPRC to mirror disk to the backup PowerHA SystemMirror site5. Create a temporary PPRC relationship in order to copy the volume group/file set information to the
remote disk.Run these commands to set up the PPRC path and instance, and to copy over the local diskinformation (refer to the DSCLI documentation, or run dscli help <command> for more details):a. mkpprcpath
/opt/ibm/dscli/dscli -user <userid> -passwd <password> -hmc1<local hmc name> mkpprcpath -dev <local storage device ID> -remotedev<remote storage device ID> -srclss -tgtlss -remotewwnn<WWNN> <local port>:<remote port>
Storage-based high availability and disaster recovery 43

Example, where IBM.2107-2222222 is at the Primary PowerHA SystemMirror site,IBM.2107-5555555 is at the Backup PowerHA SystemMirror site:/opt/ibm/dscli/dscli -user sluggo -passwd batterup -hmc1m222h mkpprcpath -dev IBM.2107-2222222 -remotedev IBM.2107-5555555-srclss 12 -tgtlss 13 -remotewwnn 6005076303FFC354 I0002:I0005
b. mkpprc/opt/ibm/dscli/dscli -user <userid> -passwd <password> -hmc1<local hmc name> mkpprc -dev <local storage device ID> -remotedev<remote storage device ID> -type <mmir| -mode full <local LUN>:<remote LUN>
Example:/opt/ibm/dscli/dscli -user sluggo -passwd batterup -hmc1m222h mkpprc -dev IBM.2107-2222222 -remotedevIBM.2107-5555555 -type mmir -mode full 1002:1002
At this point, you should have a PPRC instance available, and in a copying state:/opt/ibm/dscli/dscli -user <userid> -passwd <password> -hmc1<local hmc name> lspprc -dev <local storage device ID> -remotedev<remote storage device ID> <local LUN>:<remote LUN>
c. rmpprc
Once the PPRC relationship has completed copying, delete the relationship (if you do not , thenthe Backup PowerHA SystemMirror site nodes will not have write access to the LUNs, and so youwill not be able to import the new volume group(s):/opt/ibm/dscli/dscli -user <userid> -passwd <password> -hmc1<local hmc name> rmpprc -quiet -dev <local storage device ID>-remotedev <remote storage device ID> <local LUN>:<remote LUN>
This step is necessary in order for the next LVM operations to complete successfully.d. Using SMIT or the command line on the backup PowerHA SystemMirror site (the site that is
connected to the remote disk subsystem), import the volume group(s) created in step b.)
At this point, the volume groups and filesystems necessary to configure PowerHA SystemMirror havebeen created.Related tasks:“Configuring a PowerHA SystemMirror node to use in-band communication for traditional Metro MirrorPPRC” on page 142After you configured a storage system to use in-band communication for, you must configure each nodein the cluster to use in-band communication for traditional Metro Mirror Peer-to-Peer Remote Copy(PPRC).
Planning Primary and Secondary site layout for resource groups:
In order for a resource group to come ONLINE correctly at cluster startup time, the definition of thePrimary site must be the same for the PPRC replicated resource and the resource group that contains thatresource.
Defining the Primary Site for a DSCLI-managed PPRC replicated resource
The order that data is entered into the SMIT panel fields when defining a PPRC Replicated Resourceindicates which site will be primary. The following entries are order-sensitive. In all cases (unlessotherwise specified), the first entry corresponds to information for the primary site.v PowerHA SystemMirror Sitesv PPRC Volume Pairs
Example for a resource with multiple volume pairs:[1200->1300 1201->1301]
44 Storage-based high availability and disaster recovery

Primary site LUNS are 1200 and 1201. Secondary site LUNS are 1300 and 1301v ESS Pairv LSS Pairv Pri-Sec Port Pair IDs
For both Pri-Sec and Sec-Pri, the following format is correct when entering data in the SMIT panels:[I0022->I0052 I0023->I0053]
where I0022 and I0023 correspond to Ports on the storage system directly connected to the site that willbe primary for the PPRC Replicated Resource, and I0052 and I0053 are Ports on the storage systemdirectly connected to the secondary site.v Sec-Pri Port Pair IDs
If you were going to use the same Port pairs as in the example above, the Sec-Pri listing would look likethis:[I0052->I0022 I0053->I0023]
where the Ports are on the same systems as described above.
Defining the Primary Site for an PowerHA SystemMirror resource group
When defining the Primary and Secondary site nodes on creating an PowerHA SystemMirror resourcegroup, select nodes from the site where you want the resource group to come ONLINE during clusterstartup as the Primary Site nodes.
Note that combining the Online on Either Site inter-site management policy with the Online on FirstAvailable Node startup policy will allow the resource group to come ONLINE on a node other thanthose defined as belonging to its defined Primary site.
Example:PowerHA SystemMirror Site 1: node11, node12
PowerHA SystemMirror Site 2: node21, node22
To define an PowerHA SystemMirror Resource Group that will come up on Site 1:
Participating Nodes from Primary Site [node11, node12]
Participating Nodes from Secondary Site[node21,node22]
To define an PowerHA SystemMirror Resource Group that will come up on Site 2:
Participating Nodes from Primary Site [node21, node22]
Participating Nodes from Secondary Site[node11,node12]
Related reference:“Sample configuration for DSCLI management” on page 40You can set up a mutual recovery configuration in which each site acts as a production site with the othersite acting as an associated backup site.
Installing the DSCLI management for PPRC filesets:
These topics describe how to install DSCLI management for PPRC filesets. You must be logged in as rootto perform installation tasks.Related reference:
Storage-based high availability and disaster recovery 45

“Installing PowerHA SystemMirror Enterprise Edition for Metro Mirror” on page 10These topics describe how to install base PowerHA SystemMirror Enterprise Edition filesets. Details forinstalling filesets and prerequisites for specific types of PPRC support are contained in subsequentsections.
Installing prerequisite software:
Before installing PowerHA SystemMirror Enterprise Edition DSCLI management for PPRC (spprcfilesets), the prerequisite software must be installed on cluster nodes.
Note: Check the README for updates on versions supported after the first release of this software.1. The latest PowerHA SystemMirror Enterprise Edition version. (Refer to Installing PowerHA
SystemMirror Enterprise Edition for Metro Mirror for more information)2. IBM Subsystem Device Driver (SDD) for the storage system you are using. Check the documentation
and website for the currently approved SDD version to use with a given microcode version. Makesure the following filesets are installed:a. devices.fcp.disk.ibm.rte (1.0.0.0)
Note: It may not be clear during installation of the SDD filesets that this first fileset is necessary,but it is critical for correct fallover behavior.
b. devices.sdd.**.rte (latest version)
c. devices.ibm2105.rte (latest version)
Note: This fileset provides connection scripts for all of the ESS and DS disk types, including ESS800, DS 8000 and DS 6000.
3. DSCLI client software and other configuration specific prerequisites, as shipped with the microcodefor the storage systems to be used in this cluster. Refer to the DSCLI documentation for moreinformation on how to install and configure this software.
4. (Optional) If ESS storage systems are going to be included in your cluster) ESS CLI software is shippedwith the microcode for the storage hardware. DSCLI management code expects the ESS CLI to beinstalled in the following (non-standard) directory/opt/ibm/ibm2105cli
so you may have to create a link from the actual installation location to this location. Be mindful ofthis, as it will cause problems during both the verification and run-time for your cluster.
Related reference:“Installing PowerHA SystemMirror Enterprise Edition for Metro Mirror” on page 10These topics describe how to install base PowerHA SystemMirror Enterprise Edition filesets. Details forinstalling filesets and prerequisites for specific types of PPRC support are contained in subsequentsections.
Installing the DSCLI management filesets:
You need to install the necessary filesets for DSCLI management.
If you have not already done so, install the filesets listed in Contents of the installation media for DSCLImanagement.Related reference:“Contents of the installation media” on page 11The PowerHA SystemMirror Enterprise Edition for Metro Mirror installation media provides the imagesfor installation on each node in the cluster that can take over a PPRC mirrored volume group.
46 Storage-based high availability and disaster recovery

Installation directories:
All PowerHA SystemMirror-PPRC programs and scripts are located in specific directory andsub-directories.
These include:/usr/es/sbin/cluster/pprc/usr/es/sbin/cluster/pprc/spprc
All DSCLI programs and scripts are located in the following directory and sub-directories:/opt/ibm/dscli
All ESSCLI programs and scripts are expected to be located in the following directory:/opt/ibm/ibm2105cli
Upgrading to the lastest version of PowerHA SystemMirror Enterprise Edition for Metro Mirror:
When upgrading from a previous version of PowerHA SystemMirror Enterprise Edition for Metro Mirror,you can choose to upgrade the base pprc filesets only, or you can add the cluster.es.spprc filesets (to addDSCLI management).
Note: Currently there is no migration path from eRCMF management or SVC management to DSCLImanagement. The statements here apply only to Direct management.
You can install the cluster.es.spprc filesets in your current base (Direct management) PPRC environmentand continue to operate the current environment. This is possible because the base pprc and spprcconfiguration information is stored in different configuration databases (ODMs).
The spprc filesets are installed automatically if you already have a previous version of them on yoursystem when you install via smitty update_all.
Configuring PowerHA SystemMirror Enterprise Edition for MetroMirror using DSCLI management:
These topics explain how to configure the DSCLI management with PowerHA SystemMirror.
Configuration requirements
Before configuring PowerHA SystemMirror Enterprise Edition for Metro Mirror with the DSCLImanagement interface, ensure that:v PPRC is configured and running on the storage systems.v ESSNI client and server software is installed (DSCLI software on all PowerHA SystemMirror cluster
nodes, for example).v You have a good understanding of PowerHA SystemMirror sites for PPRC replicated resources. For
more information about sites, see the section PowerHA SystemMirror Sites.v Both the base PowerHA SystemMirror Enterprise Edition for Metro Mirror and DSCLI management
filesets are installed on each cluster node.v The PowerHA SystemMirror cluster is configured for:
– Nodes– Sites– Networks and network interfaces– Service labels, application monitors, etc.– Initial resource groups
Storage-based high availability and disaster recovery 47

You can modify the attributes for a resource group later to accommodate PPRC replicated resources.
Steps for setting up the DSCLI management interface:1. Configure PPRC-Managed Replicated Resources (use the SMIT panels at the bottom of the main
PowerHA SystemMirror PPRC-Managed Replicated Resources menu):a. Configure Copy Services Serversb. Configure disk systems to be includedc. Configure DSCLI-managed PPRC replicated resources
2. Configure PowerHA SystemMirror resource groups to include PPRC-Managed replicated resources.
Configuring DSCLI-managed PPRC replicated resources:
You should configure DSCLI-managed PPRC replicated resources using SMIT panel.
To define DSCLI-managed PPRC replicated resources:1. From the command line, enter smit sysmirror.2. In SMIT, select Cluster Applications and Resources > Resources > PPRC-Managed Replication
Resources Configuration > DSCLI-managed PPRC Replicated Resource Configuration, and pressEnter.
From this panel you can:v Configure Copy Services Serverv Configure DS ESS disk subsystemsv Configure DSCLI-managed PPRC replicated resources.
Configuring Copy Services Server:
Configure Copy Service Server using the SMIT panel.
To configure the Copy Services Server:1. From the command line, enter smit sysmirror.2. In SMIT, select Cluster Applications and Resources > Resources > PPRC-Managed Replication
Resources Configuration > DSCLI-managed PPRC Replicated Resource Configuration > CopyServices Server Configuration > Add a Copy Services Server, and press Enter.
3. In the Add a Copy Services Server panel, enter field values as follows:
Table 12. Add a Copy Services Server fields
Field Value
CSS Subsystem Name Name that identifies the Copy Service Server. The name may consist of up to 64 alphanumericcharacters, and may include underscores.
CSS site name Name of the PowerHA SystemMirror site where the CSS resides. The site must already bedefined in PowerHA SystemMirror for the site name to be available from the picklist.
CLI Type Select DSCLI if you are using the ESS 2107. Select ESSCLI if you are using the ESS 2105.
CSS IP Address IP address, in dotted decimal notation, that the Copy Services Server uses. (This is differentfrom the ESS IP address.)
CSS User ID User ID used to authenticate logging into the CSS.
CSS password Password associated with the specified CSS User ID.
4. Press Enter.5. Repeat these steps for the CSS on the other site.
48 Storage-based high availability and disaster recovery
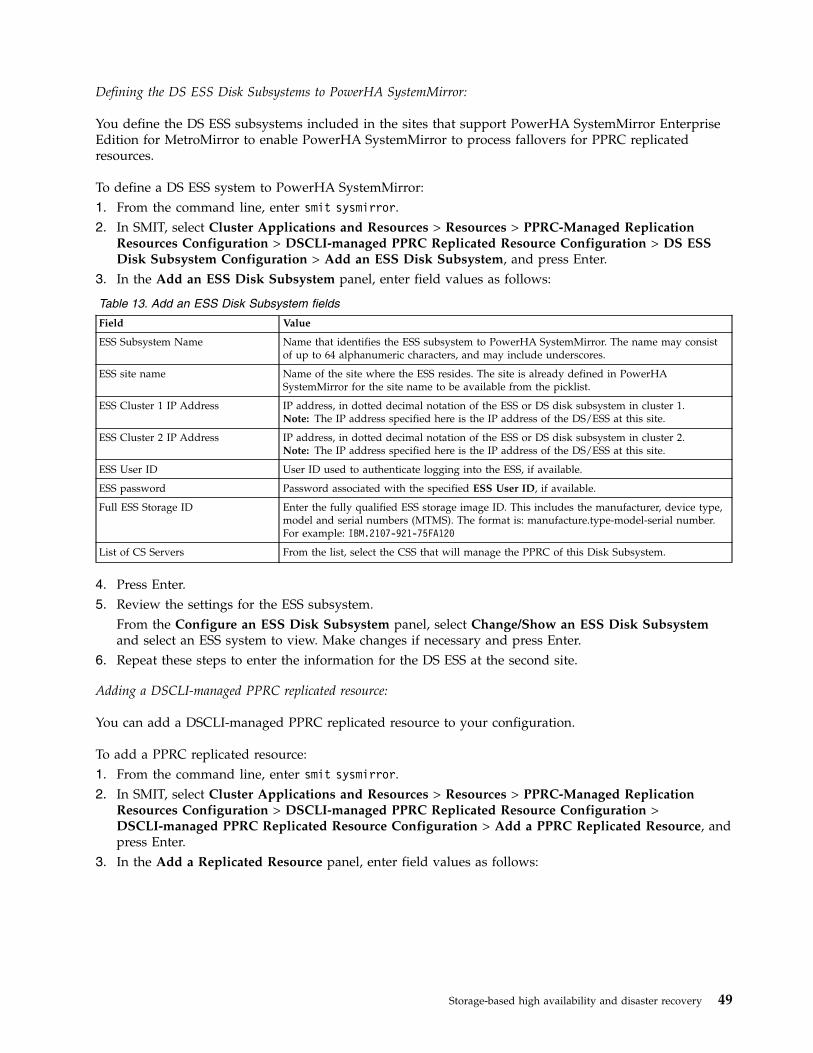
Defining the DS ESS Disk Subsystems to PowerHA SystemMirror:
You define the DS ESS subsystems included in the sites that support PowerHA SystemMirror EnterpriseEdition for MetroMirror to enable PowerHA SystemMirror to process fallovers for PPRC replicatedresources.
To define a DS ESS system to PowerHA SystemMirror:1. From the command line, enter smit sysmirror.2. In SMIT, select Cluster Applications and Resources > Resources > PPRC-Managed Replication
Resources Configuration > DSCLI-managed PPRC Replicated Resource Configuration > DS ESSDisk Subsystem Configuration > Add an ESS Disk Subsystem, and press Enter.
3. In the Add an ESS Disk Subsystem panel, enter field values as follows:
Table 13. Add an ESS Disk Subsystem fields
Field Value
ESS Subsystem Name Name that identifies the ESS subsystem to PowerHA SystemMirror. The name may consistof up to 64 alphanumeric characters, and may include underscores.
ESS site name Name of the site where the ESS resides. The site is already defined in PowerHASystemMirror for the site name to be available from the picklist.
ESS Cluster 1 IP Address IP address, in dotted decimal notation of the ESS or DS disk subsystem in cluster 1.Note: The IP address specified here is the IP address of the DS/ESS at this site.
ESS Cluster 2 IP Address IP address, in dotted decimal notation of the ESS or DS disk subsystem in cluster 2.Note: The IP address specified here is the IP address of the DS/ESS at this site.
ESS User ID User ID used to authenticate logging into the ESS, if available.
ESS password Password associated with the specified ESS User ID, if available.
Full ESS Storage ID Enter the fully qualified ESS storage image ID. This includes the manufacturer, device type,model and serial numbers (MTMS). The format is: manufacture.type-model-serial number.For example: IBM.2107-921-75FA120
List of CS Servers From the list, select the CSS that will manage the PPRC of this Disk Subsystem.
4. Press Enter.5. Review the settings for the ESS subsystem.
From the Configure an ESS Disk Subsystem panel, select Change/Show an ESS Disk Subsystemand select an ESS system to view. Make changes if necessary and press Enter.
6. Repeat these steps to enter the information for the DS ESS at the second site.
Adding a DSCLI-managed PPRC replicated resource:
You can add a DSCLI-managed PPRC replicated resource to your configuration.
To add a PPRC replicated resource:1. From the command line, enter smit sysmirror.2. In SMIT, select Cluster Applications and Resources > Resources > PPRC-Managed Replication
Resources Configuration > DSCLI-managed PPRC Replicated Resource Configuration >DSCLI-managed PPRC Replicated Resource Configuration > Add a PPRC Replicated Resource, andpress Enter.
3. In the Add a Replicated Resource panel, enter field values as follows:
Storage-based high availability and disaster recovery 49

Table 14. Add a Replicated Resource fields
Field Value
PPRC Resource Name Enter a name of the set of PPRC volume pairs that make up the PPRC replicated resource. Useno more than 64 alphanumeric characters and underscores.
PowerHA SystemMirror Sites Enter the names of the PowerHA SystemMirror sites (already defined to PowerHASystemMirror). Enter the name of the primary site followed by the secondary site.
PPRC Volume Pairs List of PPRC volume pairs that are contained in this PPRC replicated resource. The format is:
Primary Volume ID:Secondary Volume ID
v All PPRC volume pairs in a PPRC replicated resource consist of volumes from the same LSSpair.
v Volumes in a PPRC replicated resource must be from the same volume group.
v A volume group can span more than one LSS.
v A volume group can span more than one ESS disk subsystem.
ESS pair Set of ESSs associated with this PPRC resource. The first name in the list is the primary ESS andthe second is the secondary ESS.
LSS Pair Set of LSSs associated with this PPRC resource. The first name in the list is the primary LSS andthe second is the secondary LSS.
PPRC Type Indicates whether the PPRC volume relationships will be Metro Mirror mmir or GlobalCopygep relationships.
v Metro Mirror maintains the PPRC relationship in a consistent manner. I/O write completionstatus is returned to the application once the updates are committed to the target ESS.
v Global Copy maintains the PPRC relationship in a non-synchronous manner. I/O writecompletion status is returned to the application once the updates are committed to the sourceESS. Updates to the target volume are performed at a later point in time. The original order ofupdates is not strictly maintained.
Pri-Sec Port Pair ID List of PPRC Path Port Pair IDs of PPRC Links between a primary LSS and secondary LSS. Thesource and target port must be a Fibre Channel / ESCON I/O port that is configured forpoint-to-point or switch fabric topology.
A PPRC Path Port Pair ID consists of two Port IDs, one designated as the source port and theother as the target port for a PPRC path. The first Port ID is the designated source Port. Thesecond LSS ID is the designated target Port. Separate the two Port IDs of a PPRC Path Port PairID with a colon and no whitespace.
You can have up to 8 PPRC Path Port Pair IDs defined for each pair of LSSs. Use a white spaceto separate multiple PPRC Path Port Pair IDs.
Example of three Port pairs:
I1A10:I2A20<space>I1A11:I2A21<space>I1A12:I2A22
Sec-Pri Port Pair IDs Same as above. The example here shows the reverse source and target order of the pri-sec pairIDs (12 > 11 instead of 11 > 12):
I2A10:I1A20<space>I2A11:I1A21<space>I2A12:I1A22
PPRC Link Type Select ESCON or FCP depending on the connection you are using for the PPRC path.
PPRC Critical Mode This option is used to write-protect the source volume. If the last path fails between the pairs,resulting in the inability to send information to the target, the source becomes write-protected.Current updates and subsequent attempts to update the source will fail, with a unit check onS/390® or a check condition on SCSI. Values are ON ( set critmod) or OFF (do not set critmod).
The default is OFF.
Volume Group Volume group that contains the PPRC volume pairs included in this PPRC replicated resource.The volume group can include volumes pairs from different LSSes as well as from differentESSes.
4. Press Enter.5. Repeat as necessary to define more DSCLI-managed PPRC replicated resources.
50 Storage-based high availability and disaster recovery

Configuring resource groups:
After defining PPRC replicated resources, you can add them to a resource group.
When you configure a resource group ensure that:v The site policy is set to Prefer Primary Site or Online on Either Site.
v A Startup policy other than Online on All Available Nodes is specified.
To add a PPRC replicated resource to a resource group:1. From the command line, enter smit sysmirror.2. In SMIT, select Cluster Applications and Resources > Resource Groups > Change/Show Resources
and Attributes for a Resource Group, and press Enter.3. In the Change/Show Resources and Attributes for a Resource Group panel specify:v The name of the PPRC replicated resource in the PPRC Replicated Resources field.v The volume groups associated with the individual PPRC replicated resources.
The PPRC Replicated Resources entry is a picklist that displays the resource names created in theprevious step. Make sure that the volume groups selected on the Resource Group configurationscreen match the volume groups used in the PPRC Replicated Resource.
4. You must verify before synchronizing the cluster.Related tasks:“Verifying the DSCLI-managed PPRC configuration”Verifying the configuration for DSCLI-managed PPRC replicated resources checks the configuration.Related information:Configuring PowerHA SystemMirror resource groups (extended)Planning resource groups
Verifying the DSCLI-managed PPRC configuration:
Verifying the configuration for DSCLI-managed PPRC replicated resources checks the configuration.
It also reports on the following issues:v SPPRC information in the PowerHA SystemMirror Configuration Database (ODM) is identical on all
nodes.v The DSCLI Command Line Interface is installed correctly on each node.v The PPRC volume groups are not defined in the Concurrent Volume Groups field for a resource group
that spans on nodes across sites.v Sites are properly defined for the PowerHA SystemMirror and PPRC configuration.v The IP addresses of the ESS systems exist and are reachable.v The ESS systems for the PPRC replicated resources are defined as ESS disk subsystems to PowerHA
SystemMirror.v The two volumes of a PPRC pair are on different ESS systems and on different PowerHA SystemMirror
sites.v The volume IDs correspond to physical volumes defined to PowerHA SystemMirror cluster nodes.v The PVIDs of the disks in a volume group at each end of a pair are the same.v All PPRC volumes pairs in a PPRC replicated resource can only consist of volumes from the same LSS
pair.v Volumes in a PPRC replicated resource must be from the same volume groupv Correct PPRC links and their Port IDs have been definedv The defined CLI path and the ESSNI client jar file exist on all the PowerHA SystemMirror servers
Storage-based high availability and disaster recovery 51

v The volume pairs have volumes that do exist on the ESSs defined to PowerHA SystemMirror.
To verify the PowerHA SystemMirror Enterprise Edition DSCLI-managed PPRC configuration:1. From the command line, enter smit sysmirror.2. In SMIT, select Cluster Applications and Resources > Resources > Verify and Synchronize Cluster
Configuration and press Enter.Since the cluster is inactive, the following options appear. Make sure to select Verify in the first field (not both, you do not synchronize the configuration yet):
Table 15. Verification and Synchronization fields
Field Value
Verify Synchronize or Both Select Verify only.
Automatically correct errors found duringverification?
No is the default. PowerHA SystemMirror performs corrective actionswithout prompting you to perform any action.
If you select Interactively, during verification you will be prompted whenPowerHA SystemMirror finds a problem it can correct related to thefollowing, for example:
v Importing a volume group
v Exporting and re-importing shared volume groups (mount points andfilesystems issues) You then choose to have the action taken or not.
Force synchronization if verification fails? No is the default. If you select Yes, cluster verification runs but verificationerrors are ignored and the cluster is synchronized. Use the default.
Verify changes only? No is the default. (Run the full check on resource and topologyconfiguration.) Use the default.
Logging Standard is the default. You can also select Verbose. Verification messagesare logged to /var/hacmp/clverify/clverify.log.
3. Press Enter. The verification output appears in the SMIT Command Status window.4. If any error messages appear, make the necessary changes and run the verification procedure again.
You may see Warnings if the configuration has a limitation on its availability; for example, only oneinterface per node per network is configured.
Related information:Verifying and synchronizing a PowerHA SystemMirror cluster
Synchronizing the cluster:
Typically, you synchronize the PowerHA SystemMirror Enterprise Edition for Metro Mirror configurationwith PowerHA SystemMirror cluster configuration.
To synchronize the PowerHA SystemMirror Enterprise Edition DSCLI-managed PPRC configuration:1. From the command line, enter smit sysmirror.2. In SMIT, select Cluster Applications and Resources > Resources > Verify and Synchronize Cluster
Configuration, and press Enter.3. The PowerHA SystemMirror Verification and Synchronization panel appears. Select either both or
Synchronize in the first field and press Enter.
The cluster is synchronized.
Starting the cluster:
Verification runs automatically at cluster startup unless you turn this option off. After completing thesteps above that set volume groups to show up only as vpaths, cluster verification will fail. To avoid thisissue, set the ignore verification errors? field to true on the Start Cluster Services SMIT panel.
52 Storage-based high availability and disaster recovery
1. From the command line, enter smit cl_admin.2. In SMIT, select PowerHA SystemMirror Services > Start Cluster Services, and press Enter.3. Make the selections for the fields on this panel, setting the field Ignore verification errors? to true.4. Press Enter to start cluster services.
PowerHA SystemMirror will start up and manage the PPRC resources.Related information:Starting and stopping cluster services
Changing the configuration for sites:
Use SMIT to change configuration for PPRC replicated resources.
Note: Changing resource configuration requires that PowerHA SystemMirror services be stopped on allnodes at both sites in the cluster.
Configuration changes you make to any of the following components affects the others listed:v Sitesv PPRC replicated resourcesv Volumesv Resource groups.
After you make a configuration change, verify and synchronize the configuration.
To change site configuration in PowerHA SystemMirror:1. From the command line, enter smit sysmirror.2. In SMIT, select Cluster Nodes and Networks > Manage Sites > Change/Show a Site in a Stretched
Cluster, and press Enter.
For information about field values, see the section Changing the configuration of DSCLI-managed PPRCreplicated resources.Related tasks:“Changing the configuration of DSCLI-managed PPRC replicated resources”You can change the configuration of DSCLI-managed PPRC replicated resources using the SMIT panel.
Changing the configuration of DSCLI-managed PPRC replicated resources:
You can change the configuration of DSCLI-managed PPRC replicated resources using the SMIT panel.
To change or remove the configuration for DSCLI-managed PPRC replicated resources:1. From the command line, enter smit sysmirror.2. In SMIT, select Cluster Applications and Resources > Resources > PPRC-Managed Replication
Resources Configuration > DSCLI-managed PPRC Replicated Resource Configuration, and pressEnter.From this panel, select:
Storage-based high availability and disaster recovery 53

Table 16. Configure PPRC Replicated Resources fields
Field Description
Configure Copy Services Server For information about field values, see the section Configuring CopyServices Server.
Configure DS ESS Disk Subsystem For information about field values, see the section Defining the DSESS Disk Subsystems to PowerHA SystemMirror.
Configure a DSCLI-managed PPRC Replicated Resource For information about field values, see the section Adding aDSCLI-managed PPRC Replicated Resource.
3. After selecting a configuration option, select the Change/Show option for the value you want tochange, or the Remove option for the value you want to remove.
Related tasks:“Configuring Copy Services Server” on page 48Configure Copy Service Server using the SMIT panel.“Defining the DS ESS Disk Subsystems to PowerHA SystemMirror” on page 49You define the DS ESS subsystems included in the sites that support PowerHA SystemMirror EnterpriseEdition for MetroMirror to enable PowerHA SystemMirror to process fallovers for PPRC replicatedresources.“Adding a DSCLI-managed PPRC replicated resource” on page 49You can add a DSCLI-managed PPRC replicated resource to your configuration.
Configuring PPRC consistency groups with PowerHA SystemMirror Enterprise Edition for MetroMirror with DSCLI management:
These topics describe the planning, installation, and configuration tasks for maintaining the consistency ofdisk volumes as PPRC consistency groups within PowerHA SystemMirror resource groups.Related reference:“Installation prerequisites for PowerHA SystemMirror Enterprise Edition Metro Mirror” on page 10Before installing PowerHA SystemMirror Enterprise Edition Metro Mirror, be sure to have the necessarybase PowerHA SystemMirror filesets installed.
Overview of consistency groups:
When applications have one write that is dependent on the completion of another write, theseapplications are said to have dependent writes. Using dependent writes, these applications can managethe consistency of their data, so that a consistent state of the application data on disk is maintained if afailure occurs in the host machine, software, or the storage subsystem.
Common examples of application dependent writes are databases and their associated log files. Databasedata sets are related, with values and pointers from indexes to data. Databases have pointers inside thedata sets, the catalog and directory data sets, and in the logs. Therefore, data integrity must always bekept across these components of the database.
In disaster situations, it is unlikely that the entire complex will fail at the same moment. Failures tend tobe intermittent and gradual, and disaster can occur over many seconds, even minutes. Because some datamight have been processed, and other data lost in this transition, data integrity on the secondary volumesis exposed. The mirrored data at the recovery site must be managed so that data consistency across allthe volumes is preserved during an intermittent or gradual failure. For example, the situation where afire starts in the data center. As the fire spreads, perhaps the adapters or the connectivity that isresponsible for mirroring some of the data is damaged. If the storage system is able to continueoperating, some transactions can continue mirroring while others cannot. This situation becomes a seriousissue where dependent writes are concerned.
54 Storage-based high availability and disaster recovery
To maintain the consistency of data across multiple disk volumes at a backup location, the IBMTotalStorage disk subsystem Peer-to-Peer Remote Copy function supports the concept of a PPRCconsistency group. Disk volumes in a PPRC relationship that are configured into a PPRC ConsistencyGroup are maintained to ensure that a group of dependent updates made to the disk volumes at theprimary location are made together as a unit on the disk volumes at the backup location to maintain dataconsistency. The PPRC Consistency Group attribute changes the behavior of volume pairs when an erroroccurs that affects any of the volumes in the group. Without the PPRC Consistency Group option, theDSS causes the volumes where the error is detected to enter a suspended state, which means that PPRCmirroring is suspended. This still allows updates to that volume. If the PPRC Consistency Group optionis activated, the volume becomes suspended and additionally enters a "long busy" state, where updatesare not possible in that state.
Rather than depending solely on the affected volume that remains in long busy state, the PowerHASystemMirror Enterprise Edition initiates the freeze function to quickly suspend all mirroring between allvolume pairs within the Consistency Group that is protected by the freeze. As a result, if you place allmirrored pairs into the same Consistency Group, the consistency of dependent writes is protected on allvolumes, LSSs, and disk systems.
As a result, if some disk volumes at the backup location cannot be updated, all are bared from update.
PowerHA SystemMirror Enterprise Edition for Metro Mirror provides support for the configuration ofdisk volumes as PPRC consistency groups within PowerHA SystemMirror resource groups.
For more information on PPRC consistency groups refer to:v IBM TotalStorage Enterprise Storage Server Implementing ESS Copy Services in Open Environments
ITSO Redbook SG24-5757 (section 4.6)
Planning for PPRC consistency groups:
You should be familiar with the planning tasks for PowerHA SystemMirror.
To use PowerHA SystemMirror Enterprise Edition for Metro Mirror with TotalStorage disk volumes withthe PPRC consistency group option, you define two PowerHA SystemMirror sites, each comprised of anumber of AIX servers attached to a group of PPRC-managed disk subsystems spread across both sites.PowerHA SystemMirror PPRC replicated resources are defined in the usual way to contain the ESS/DSdisk volume pairs. Volume Groups are built on top of the PPRC-managed disk volumes and added toPowerHA SystemMirror Resource Groups. In addition, PPRC consistency groups are defined to consist ofLogical Subsystem (LSS) disk pairs and the corresponding PPRC path information. All PPRC replicatedresources that are part of a consistency group are required to be part of the same PowerHA SystemMirrorresource group. This means that the PPRC volumes in a consistency group cannot span more than onePowerHA SystemMirror resource group. However, an PowerHA SystemMirror esource group can containone or more PPRC consistency groups.
PowerHA SystemMirror maintains a common state of all consistency groups in a resource group - eitherall (or none) of them replicate data to the backup site. Cluster Administrators will most likely find themost convenient configuration where all the volume groups in a resource group are part of the sameconsistency group. Multiple consistency groups in the same resource group are appropriate when theconfiguration of paths and LSSes do not allow everything to be placed in the same consistency group. Seethe explanation associated with Figure 2 in Sample Configuration for an example of this.
The following prerequisites are required:v PowerHA SystemMirror sites have been planned.v Basic DSCLI support has been completely configured. Refer to the appropriate documentation on how
to install and configure each.
Storage-based high availability and disaster recovery 55
v DSCLI management in an PowerHA SystemMirror cluster has been planned and the following tasksare completed:– Identify the Copy Services Servers (CSS) to be used.– Identify the disk subsystems to be used in the cluster.– Identify the vpaths (for configurations using SDD) to be used in the configuration, including the
volume IDs for each that correspond to the storage unit and LUN.– Identify the PPRC Replicated Resources to be used.– Identify the Port Pairs to be used for PPRC Paths.– Identify Volume Pairs (LUNs).– Identify the volume groups to be managed by PPRC Replicated Resources.
v Plan PowerHA SystemMirror Resource Groups.v Identify consistency groups that will be managed in a Resource Group.Related reference:“Sample consistency group configuration”These illustration display sample consistency group configuration.Related information:Planning guide
Planning a resource group for PPRC consistency group:
You need to plan your resource groups. In addition to basic resource group planning, it is assumed thatresource group attributes, as well as the inter-site management policies for site support, has beenplanned.
You must also identify the following:v The PPRC replicated resources to be added to the Resource Group.v The Consistency Group that will be managed by the Resource Group.
Note: The freeze action is directed to all Consistency Groups in a Resource Group. Therefore, you shouldensure that all consistency groups in a resource group have dependencies. Since the PPRC "freeze" actionis performed at a resource group level, all disk resources in the same resource group are frozen if there istotal loss of the PPRC link between one or two PPRC pairs in a resource group. This ensures that data ofdependent applications are not mirrored to the remote site when data of one or two applications in thesame resource group cannot be mirrored to the remote site.
If an application depends on more than one volume group, the volume groups might be defined to bepart of the same consistency group or different consistency groups. However, it is recommended thatthey both be added to the same PowerHA SystemMirror Resource Group.Related information:Planning resource groups
Sample consistency group configuration:
These illustration display sample consistency group configuration.
Figure 1 illustrates a four-node, two site cluster on which PowerHA SystemMirror Enterprise Edition forMetro Mirror has been configured to provide a high availability disaster recovery solution. Site A and SiteB are two geographically separated sites. Each site includes two nodes and a disk storage subsystem(labeled DSS A and DSS B). The DSS units are connected by redundant FCP links and use PPRC toreplicate data from one storage unit to the other.
56 Storage-based high availability and disaster recovery

Figure 2 shows a cross-section of two disk subsystems, DSS A and DSS B, located at two geographicallyseparated sites, siteA and siteB. As an example, 3 logical PPRC paths Path1, Path2 and Path3 havedefined between the logical subsystems LSS1 on DSS A and LSS1 on DSS B.
A typical configuration, using Database as an example, would require the definition of two volumegroups: one for the application data and the other for the log data. In this configuration, it would berequired that both the application data (datavg1) and the log data (logvg1) be managed together in aconsistency group. For example, a Volume Group (datavg1) that consists of four LUNs, carved from LSS1,on DSS A and a corresponding target Volume Group datavg1 with four LUNs from LSS1 on DSS B, hasbeen defined. A set of four PPRC replicated resources (datapair1, datapair2, datapair3 and datapair4)needs to be defined over the four LUN pairs. Similarly, logvg1 has been defined with source LUNs fromLSS1 on DSS A and target LUNs from LSS1 on DSS B and the corresponding PPRC pair logpair1 definedover the LUN pairs.
To manage all the four PPRC pairs together in a consistency group, a consistency group CG1, is definedfor the LSS pairs LSS1 on DSS A and LSS1 on DSS B over the PPRC path Path 1. Using Path1 as the pathfor this consistency group, whenever the path is established with the consistency group option enabled,all the PPRC pairs that are established between the source volumes of datavg1 and the target volumes ofdatavg1 are automatically put into a consistency group and associated with Path1. Therefore, all PPRCrelationships in datavg1 and logvg1 are all part of the same PPRC consistency group.
Storage-based high availability and disaster recovery 57

On the other hand, CG2 and CG3 are created with the same source LSS (LSS2) but different target LSSes.The application data (datavg2) and log data (logvg2) both have their source volumes in the same LSS buthave their target volumes in different LSSes. While datavg2 is associated with Path2, logv2 is associatedwith Path3. They are, therefore, not part of the same PPRC consistency group. If an application dependson datavg2 and logvg2, they might be defined to be part of the same consistency group or differentconsistency group. However, it is recommended that they both be added to the same PowerHASystemMirror Resource Group because the PPRC "freeze" action is performed at a resource group level.All disk resources in the same resource group are frozen if there is total loss of the PPRC link betweenany of the PPRC pairs in a resource group. This ensures that data of dependent applications are notmirrored to the remote site when data of one or two applications in the same resource group can not alsobe mirrored to the remote site.
Example configuration of consistency group CG1 described above:
Add a PPRC Consistency Group
Type or select values in entry fields.Press Enter AFTER making all desired changes.
[Entry Fields]* PPRC Consistency Group Name [CG1]* LSS Pair [01@DSS_A 01@DSS_B]* Primary - Secondary Port Pair IDs [I000->I0101]* Secondary - Primary Port Pair IDs [I0101-I000]* Resource Group RG1
F1=Help F2=Refresh F3=Cancel F4=ListF5=Reset F6=Command F7=Edit F8=ImageF9=Shell F10=Exit Enter=Do
58 Storage-based high availability and disaster recovery

Installing PowerHA SystemMirror Enterprise Edition for Metro Mirror consistency groups filesets:
If you have not already done so, install the filesets according to instructions listed in the InstallingPowerHA SystemMirror Enterprise Edition for Metro Mirror topic.
cluster.es.cgpprc.cmdsPowerHA SystemMirror Enterprise Edition for Metro Mirror Consistency Group commands
cluster.es.cgpprc.rtePowerHA SystemMirror Enterprise Edition for Metro Mirror Consistency Group runtimecommands
cluster.msg.en_US.cgpprcPowerHA SystemMirror Enterprise Edition for Metro Mirror Consistency Group messages
Note: You can install the appropriate message set for your local.
Configuring PowerHA SystemMirror Enterprise Edition for Metro Mirror consistency groups:
Configuration of Consistency Groups with PowerHA SystemMirror Enterprise Edition for Metro Mirrorwith DSCLI management is accomplished in three steps.
The disk storage configuration steps are accomplished through either WebSM or line mode commands.The PowerHA SystemMirror configuration steps are accomplished through a series of SMIT panels.
Configure the disk storage units to issue SNMP traps:
The storage units must be configured to send traps to one or more of the nodes configured to receivethem. You do this by using WebSM.
The precise method is hardware dependent; consult the publications associated with the storagesubsystem.
Configure PowerHA SystemMirror to receive and handle SNMP traps:
Before using the following procedure to enable SNMP Traps, you should ensure that any other consumerof SNMP traps - such as Netview or Tivoli® or other network management software - is not alreadyrunning. Otherwise the PowerHA SystemMirror Cluster Information Daemon (clinfo) is not able toreceive traps. Conversely, if PowerHA SystemMirror is configured to receive SNMP traps, no othermanagement software is able to receive them.
PowerHA SystemMirror supports the receiving and handling of the following SNMP trap messages:
Generic Type = 6
Specific Types:
100 link degraded
101 link down
102 link up
200 LSS pair-consistency group error
201 Session consistency group error
202 LSS is suspended
PowerHA SystemMirror tests each SNMP trap received to ensure:
Storage-based high availability and disaster recovery 59
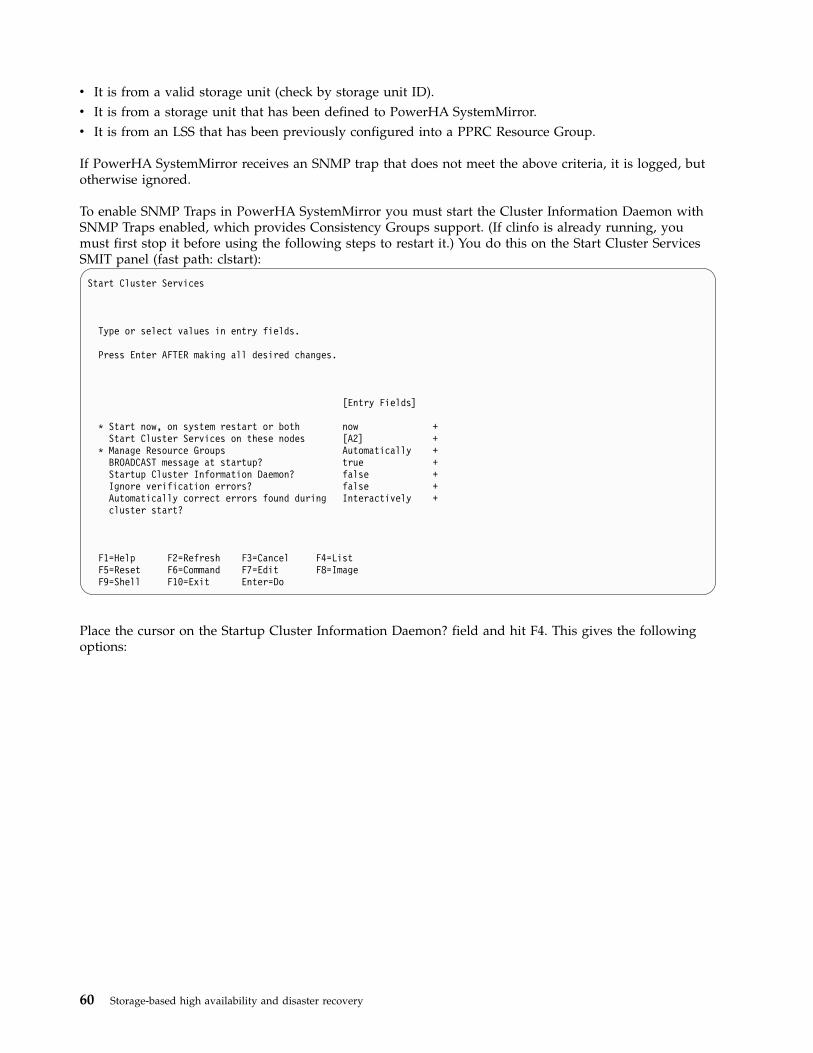
v It is from a valid storage unit (check by storage unit ID).v It is from a storage unit that has been defined to PowerHA SystemMirror.v It is from an LSS that has been previously configured into a PPRC Resource Group.
If PowerHA SystemMirror receives an SNMP trap that does not meet the above criteria, it is logged, butotherwise ignored.
To enable SNMP Traps in PowerHA SystemMirror you must start the Cluster Information Daemon withSNMP Traps enabled, which provides Consistency Groups support. (If clinfo is already running, youmust first stop it before using the following steps to restart it.) You do this on the Start Cluster ServicesSMIT panel (fast path: clstart):
Start Cluster Services
Type or select values in entry fields.
Press Enter AFTER making all desired changes.
[Entry Fields]
* Start now, on system restart or both now +Start Cluster Services on these nodes [A2] +
* Manage Resource Groups Automatically +BROADCAST message at startup? true +Startup Cluster Information Daemon? false +Ignore verification errors? false +Automatically correct errors found during Interactively +cluster start?
F1=Help F2=Refresh F3=Cancel F4=ListF5=Reset F6=Command F7=Edit F8=ImageF9=Shell F10=Exit Enter=Do
Place the cursor on the Startup Cluster Information Daemon? field and hit F4. This gives the followingoptions:
60 Storage-based high availability and disaster recovery

Start Cluster Services
Type or select values in entry fields.Press Enter AFTER making all desired changes.
[Entry Fields]* Start now, on system restart or both now +
Start Cluster Services on these nodes [A2] +BROADCAST message at startup? true +Startup Cluster Information Daemon? false +Ignore verification errors? false +-----------------------------------------------------------------
| Startup Cluster Information Daemon? || || Move cursor to desired item and press Enter. || || false || true || true with consistency group support || || F1=Help F2=Refresh F3=Cancel |
F1| F8=Image F10=Exit Enter=Do |F5| /=Find n=Find Next |F9 ----------------------------------------------------------------
The options are:v false - do not start cluster servicesv true - start cluster servicesv true with consistency group support - start cluster services with SNMP traps enabled
Select true with consistency group support and press Enter.
Configure PowerHA SystemMirror consistency group(s):
Before configuring a Consistency Group, you should have performed all the steps required to configureall the PPRC Replicated Resources that will be added to the consistency groups. The PPRC ReplicatedResources should also be added to a Resource Group. After defining a PPRC replicated resources andadded to a Resource Group, you can add them to a PPRC consistency Group.
To configure a PPRC consistency Group:1. From the command line, enter smit sysmirror.2. In SMIT, select Cluster Applications and Resources > Resources > PPRC-Managed Replicated
Resources Configuration > DSCLI-managed PPRC Replicated Resource Configuration > PPRCConsistency Groups Configuration, and press Enter.The PPRC Consistency Groups Configuration SMIT panel can also be accessed directly with the SMITfast path: def_consistgrp.
3. In the Add a PPRC Consistency Group panel, enter the field values as follows:
Storage-based high availability and disaster recovery 61
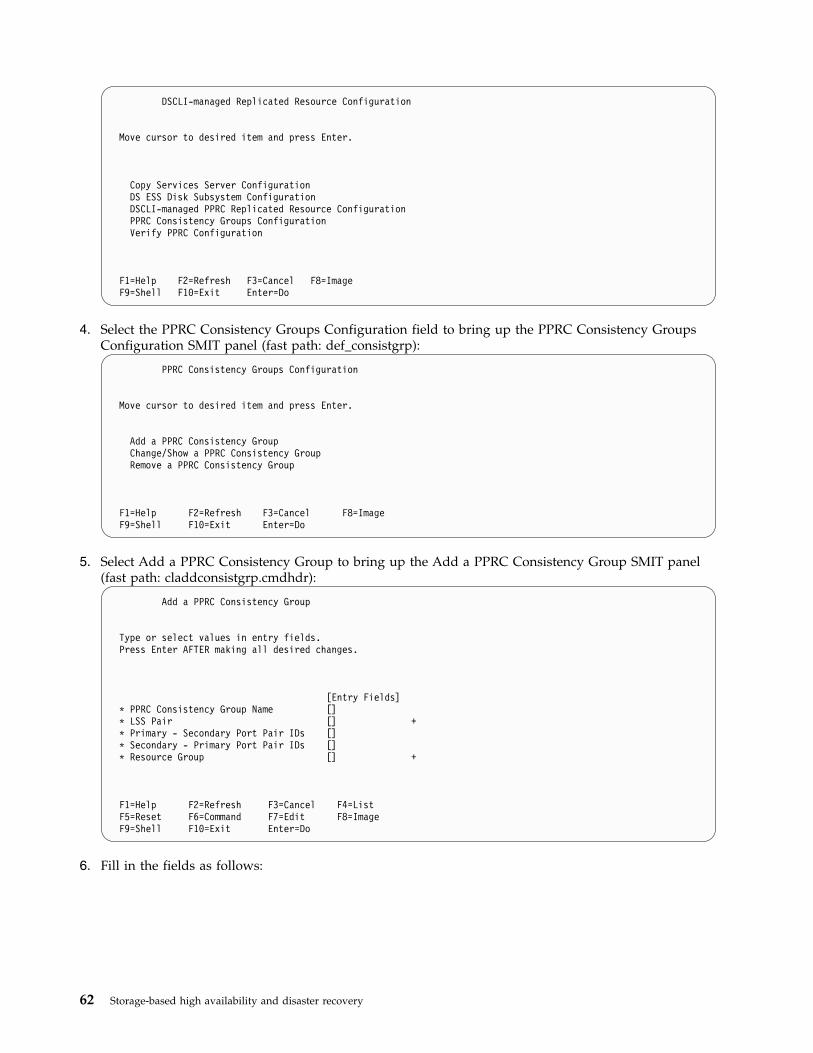
DSCLI-managed Replicated Resource Configuration
Move cursor to desired item and press Enter.
Copy Services Server ConfigurationDS ESS Disk Subsystem ConfigurationDSCLI-managed PPRC Replicated Resource ConfigurationPPRC Consistency Groups ConfigurationVerify PPRC Configuration
F1=Help F2=Refresh F3=Cancel F8=ImageF9=Shell F10=Exit Enter=Do
4. Select the PPRC Consistency Groups Configuration field to bring up the PPRC Consistency GroupsConfiguration SMIT panel (fast path: def_consistgrp):
PPRC Consistency Groups Configuration
Move cursor to desired item and press Enter.
Add a PPRC Consistency GroupChange/Show a PPRC Consistency GroupRemove a PPRC Consistency Group
F1=Help F2=Refresh F3=Cancel F8=ImageF9=Shell F10=Exit Enter=Do
5. Select Add a PPRC Consistency Group to bring up the Add a PPRC Consistency Group SMIT panel(fast path: claddconsistgrp.cmdhdr):
Add a PPRC Consistency Group
Type or select values in entry fields.Press Enter AFTER making all desired changes.
[Entry Fields]* PPRC Consistency Group Name []* LSS Pair [] +* Primary - Secondary Port Pair IDs []* Secondary - Primary Port Pair IDs []* Resource Group [] +
F1=Help F2=Refresh F3=Cancel F4=ListF5=Reset F6=Command F7=Edit F8=ImageF9=Shell F10=Exit Enter=Do
6. Fill in the fields as follows:
62 Storage-based high availability and disaster recovery
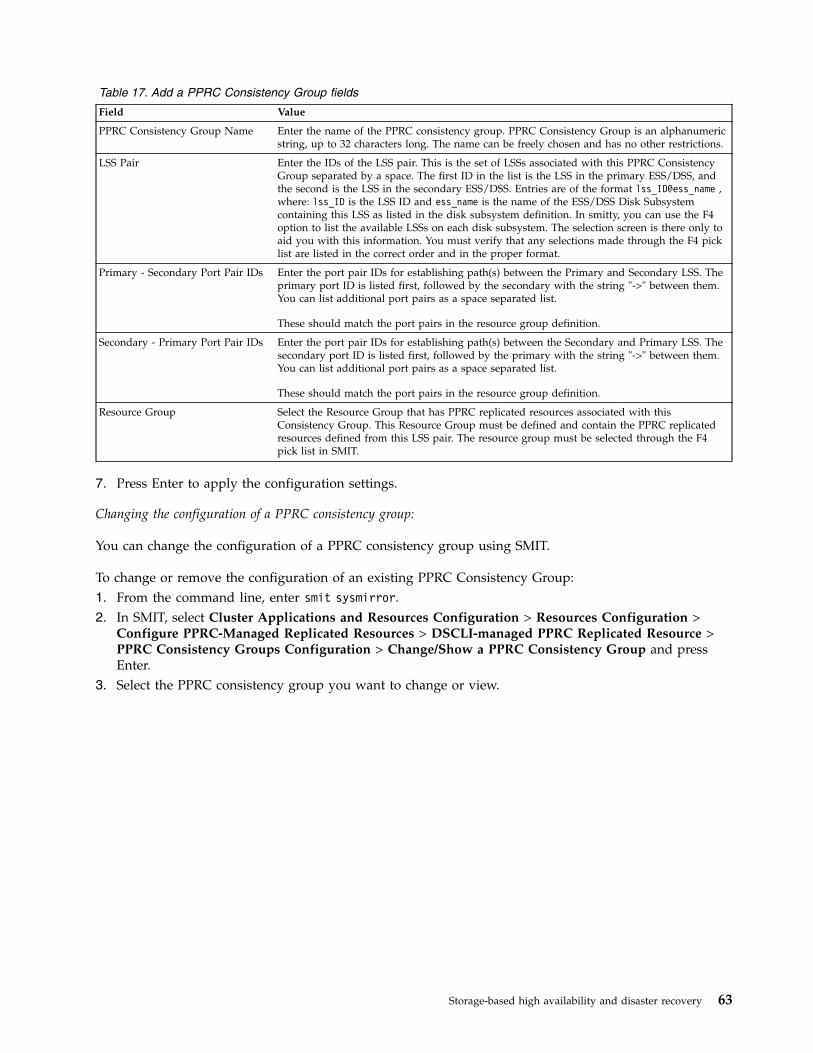
Table 17. Add a PPRC Consistency Group fields
Field Value
PPRC Consistency Group Name Enter the name of the PPRC consistency group. PPRC Consistency Group is an alphanumericstring, up to 32 characters long. The name can be freely chosen and has no other restrictions.
LSS Pair Enter the IDs of the LSS pair. This is the set of LSSs associated with this PPRC ConsistencyGroup separated by a space. The first ID in the list is the LSS in the primary ESS/DSS, andthe second is the LSS in the secondary ESS/DSS. Entries are of the format lss_ID@ess_name ,where: lss_ID is the LSS ID and ess_name is the name of the ESS/DSS Disk Subsystemcontaining this LSS as listed in the disk subsystem definition. In smitty, you can use the F4option to list the available LSSs on each disk subsystem. The selection screen is there only toaid you with this information. You must verify that any selections made through the F4 picklist are listed in the correct order and in the proper format.
Primary - Secondary Port Pair IDs Enter the port pair IDs for establishing path(s) between the Primary and Secondary LSS. Theprimary port ID is listed first, followed by the secondary with the string "->" between them.You can list additional port pairs as a space separated list.
These should match the port pairs in the resource group definition.
Secondary - Primary Port Pair IDs Enter the port pair IDs for establishing path(s) between the Secondary and Primary LSS. Thesecondary port ID is listed first, followed by the primary with the string "->" between them.You can list additional port pairs as a space separated list.
These should match the port pairs in the resource group definition.
Resource Group Select the Resource Group that has PPRC replicated resources associated with thisConsistency Group. This Resource Group must be defined and contain the PPRC replicatedresources defined from this LSS pair. The resource group must be selected through the F4pick list in SMIT.
7. Press Enter to apply the configuration settings.
Changing the configuration of a PPRC consistency group:
You can change the configuration of a PPRC consistency group using SMIT.
To change or remove the configuration of an existing PPRC Consistency Group:1. From the command line, enter smit sysmirror.2. In SMIT, select Cluster Applications and Resources Configuration > Resources Configuration >
Configure PPRC-Managed Replicated Resources > DSCLI-managed PPRC Replicated Resource >PPRC Consistency Groups Configuration > Change/Show a PPRC Consistency Group and pressEnter.
3. Select the PPRC consistency group you want to change or view.
Storage-based high availability and disaster recovery 63

PPRC Consistency Groups Configuration
Move cursor to desired item and press Enter.
Add a PPRC Consistency GroupChange/Show a PPRC Consistency GroupRemove a PPRC Consistency Group
--------------------------------------------------------–| Select the PPRC Consistency Group to show or change || || Move cursor to desired item and press Enter. || || CG1 || CG2 || || F1=Help F2=Refresh F3=Cancel || F8=Image F10=Exit Enter=Do |
F1 | /=Find n=Find Next |F9 ---------------------------------------------------------
4. Position the cursor to the consistency group to show or change and then press Enter to bring up thefollowing SMIT panel:
Change / Show a PPRC Consistency Group
Type or select values in entry fields.Press Enter AFTER making all desired changes.
[Entry Fields]* PPRC Consistency Group Name CG1
New PPRC Consistency Group Name []* LSS Pair [00@mtc111h 01@stand] +* Primary - Secondary Port Pair IDs [I0233->I0002]* Secondary - Primary Port Pair IDs [I0002->I0233]
Resource Group RG1 +
F1=Help F2=Refresh F3=Cancel F4=ListF5=Reset F6=Command F7=Edit F8=ImageF9=Shell F10=Exit Enter=Do
5. Make the desired changes and then press Enter.6. To remove a previously configured consistency group, select Remove a PPRC Consistency Group to
bring up an inset panel from which to select the consistency group to remove:
64 Storage-based high availability and disaster recovery

PPRC Consistency Groups Configuration
Move cursor to desired item and press Enter.
Add a PPRC Consistency GroupChange/Show a PPRC Consistency GroupRemove a PPRC Consistency Group
----------------------------------------------------------------| Remove a PPRC Consistency Group || || Move cursor to desired item and press Enter. || || CG1 || CG2 || || F1=Help F2=Refresh F3=Cancel || F8=Image F10=Exit Enter=Do |
F1 | /=Find n=Find Next |F9 ---------------------------------------------------------------
7. Position the cursor to the consistency group to remove and then press Enter to bring up the followingconfirmation:
PPRC Consistency Groups Configuration
Move cursor to desired item and press Enter.
Add a PPRC Consistency GroupChange/Show a PPRC Consistency GroupRemove a PPRC Consistency Group
----------------------------------------------------------------| ARE YOU SURE? || || Continuing may delete information you may want || to keep. This is your last chance to stop || before continuing. || Press Enter to continue. || Press Cancel to return to the application. || || F1=Help F2=Refresh F3=Cancel |
F1 | F8=Image F10=Exit Enter=Do |F9 -----------------------------------------------------------------
8. Press Enter to confirm the removal of the PPRC consistency group.
Verifying the PowerHA SystemMirror Enterprise Edition for Metro Mirror consistency groups configuration:
The configuration of SNMP Traps and Consistency Groups is verified during PowerHA SystemMirrorcluster verification.
You can also verify the Consistency Group configuration through the Verify PPRC Configuration optionin the main DSCLI-managed Replication Resource Configuration SMIT Panel (fast path: pprc_ds), thatappears as follows:
Storage-based high availability and disaster recovery 65

Verify PPRC Configuration
Type or select values in entry fields.Press Enter AFTER making all desired changes.
[Entry Fields]
Verify PPRC
F1=Help F2=Refresh F3=Cancel F4=ListF5=Reset F6=Command F7=Edit F8=ImageF9=Shell F10=Exit Enter=Do
Press Enter to begin PPRC configuration verification. Verify first checks the Copy Services Server, DS ESSDisk Subsystem and PPRC Replicated Resources configuration. Upon successful verification and theexistence of Consistency Group configuration, verification of Consistency Groups takes place. Verificationchecks the following for each Consistency Group definition:v LSS Pair: for both the source and target (LSS@Disk_Subsys) verify that the LSS exists on the DS ESS
Disk Subsystem.v Resource Group: verify that the specified Resource Group is a valid resource.v Port Pair IDs: for both the primary and secondary list of Port Pair IDs, verify that each port exists on
the respective primary and secondary disk subsystems.
Troubleshooting PPRC consistency groups:
Use these tips to troubleshoot your PPRC consistency groups.
The following is an example of an Error Log entry made for an SNMP Trap:LABEL:OPMSGIDENTIFIER: AA8AB241
Date/Time:Mon Jun 25 12:20:04 2007Sequence Number: 16480Machine Id: 0025A45C4C00Node Id: regaa07Class: OType: TEMPResource Name: SNMP_TRAP_NOTIF
DescriptionOPERATOR NOTIFICATION
User CausesERRLOGGER COMMAND
Recommended ActionsREVIEW DETAILED DATA
Detail DataMESSAGE FROM ERRLOGGER COMMAND2007/06/25 10:17:53 PDTPPRC Links UpUNIT: Mnf Type-Mod SerialNm LSPRI: IBM 2107-922 75-16231 00SEC: IBM 1750-511 13-AAY4A 00Path: Type PP PLink SP SLink RC1: FIBRE 0101 XXXXXX 0001 XXXXXX OK2007/06/25 13:10:17 EDTPPRC Links Up
66 Storage-based high availability and disaster recovery

UNIT: Mnf Type-Mod SerialNm LSPRI: IBM 2105-800 13-22012 10SEC: XXX 2105-XXX XX-16231 FDPath: Type PP PLink SP SLink RC1: FIBRE 0004 XXXXXX 0101 XXXXXX OK
The following steps should be followed when an PowerHA SystemMirror cluster does not appear toexercise consistency group operations:1. Check that the storage unit HMC is configured to send the SNMP traps to the IP address(es) of the
PowerHA SystemMirror cluster node(s) that processes them. Normal best practice is to have the HMCconfigured to send SNMP traps to all PowerHA SystemMirror nodes. If that is not possible, at aminimum, it should send SNMP traps to two nodes, one at each site.
2. Check that the IP address of the copy services server that controls the storage subsystems isconfigured to PowerHA SystemMirror. This can be checked by doing smitty pprc_def >DSCLI-managed PPRC Replicated Resource Configuration > Copy Services Server Configuration >Change / Show a Copy Services Server.
3. Before starting clinfo with consistency group support, verify that there is no other consumer of SNMPtraps running on the PowerHA SystemMirror nodes that process them. Run the following command:Netstat -an | grep 162
There should not be any output from the command. If there is, it will look like the following:udp40 0 *.162 *.*
Programs cannot share access to port 162.4. Try pinging the nodes that are to receive the SNMP traps from the storage subsystem HMC, using the
IP address configured in that HMC for the SNMP trap destination.5. Try pinging the storage subsystem HMC, using the IP address defined for the copy services server,
from the PowerHA SystemMirror cluster nodes that are to process SNMP traps.6. Check the error log using errpt -a and see if there are any SNMP trap entries from the storage
subsystem. An example of such an entry is:LABEL:OPMSGIDENTIFIER: AA8AB241
Date/Time:Mon Jun 25 12:20:04 2007Sequence Number: 16480Machine Id: 0025A45C4C00Node Id: regaa07Class: OType: TEMPResource Name: SNMP_TRAP_NOTIF
DescriptionOPERATOR NOTIFICATION
User CausesERRLOGGER COMMAND
Recommended ActionsREVIEW DETAILED DATA
Detail DataMESSAGE FROM ERRLOGGER COMMAND2007/06/25 10:17:53 PDTPPRC Links UpUNIT: Mnf Type-Mod SerialNm LSPRI: IBM 2107-922 75-16231 00SEC: IBM 1750-511 13-AAY4A 00Path: Type PP PLink SP SLink RC1: FIBRE 0101 XXXXXX 0001 XXXXXX OK2007/06/25 13:10:17 EDTPPRC Links Up
Storage-based high availability and disaster recovery 67

UNIT: Mnf Type-Mod SerialNm LSPRI: IBM 2105-800 13-22012 10SEC: XXX 2105-XXX XX-16231 FDPath: Type PP PLink SP SLink RC1: FIBRE 0004 XXXXXX 0101 XXXXXX OK
7. Send a trap from one PowerHA SystemMirror cluster node to another using the AIX snmptrapcommand. This should log an entry in the error log (see step 6) if the node can receive SNMP traps.In this example,9.3.18.126 -> target node for trap9.3.18.240 -> ipaddress of the storage unit HMC.Change only the addresses listed above. Leave all the other data the same.snmptrap -v 1 -c public 9.3.18.126 1.3.6.1.4.1.2.6.130 9.3.18.2406 202 1 1.3.6.1.4.1.2.6.130.3.2 s "2007/06/27 06:25:34 CDTPrimary PPRC Devices on LSSSuspended Due to ErrorUNIT: Mnf Type-Mod SerialNm LS LD SRPRI: IBM 1750-511 13-AAY4A 06 02 04SEC: IBM 2107-922 75-16231 07 02 00Start: 2007/06/19 11:25:42 CDTPRI Dev Flags (1bit/dev, 1=Suspended):1000000000000000000000000000000000000"
Maintaining and troubleshooting PowerHA SystemMirror Enterprise Edition forMetro MirrorThese topics present general information for maintaining and troubleshooting an PowerHA SystemMirrorEnterprise Edition for Metro Mirror configuration. Issues specific to Direct management (ESS CLI) or toDSCLI management support are noted as such.
For SVC-PPRC Management troubleshooting information, see Troubleshooting PowerHA SystemMirrorEnterprise Edition for Metro Mirror for SVC.Related reference:“Troubleshooting PowerHA SystemMirror Enterprise Edition for Metro Mirror for SVC” on page 95These topics provide information that might help you with troubleshooting SVC PPRC clusters.
Logging messages:
PowerHA SystemMirror Enterprise Edition for Metro Mirror uses the standard logging facilities forPowerHA SystemMirror.Related information:Administration guide
Maintaining PowerHA SystemMirror Enterprise Edition for Metro Mirror:
This section describes situations you might encounter in a running cluster after synchronizing yourPowerHA SystemMirror Enterprise Edition for Metro Mirror configuration. This information applies toDirect management.
Using C-SPOC for configuration changes:
You can use C-SPOC to add, change, and delete logical volumes dynamically on nodes connected to thesource volumes for a PPRC pair.
However, these operations cannot involve allocating additional storage that requires modification of thePPRC pairs. If you make configuration changes that allocate new storage or create logical units, first stopthe associated PPRC volume pairs.
68 Storage-based high availability and disaster recovery

From C-SPOC, you cannot modify the configuration on nodes connected to target volumes for a PPRCpair.
Restarting ESS Copy Services Server on the backup CSS:
An ESS system with a microcode level less then vrmf 2.2.x.x does not support dual active Copy ServicesServers.
If the primary ESS Copy Services Server fails, you manually start the backup Copy Services Server as theactive Copy Services Server for the ESS. You do this through the using the ESS Web Interface.Related reference:“Planning Copy Services Server on ESS” on page 20Considerations for using Copy Service Server differ depending on the PPRC version.Related information:
IBM TotalStorage Enterprise Storage Server: Web Interface User's Guide
Detecting ESS failures:
There is no simple way to detect the failure of an ESS subsystem in a direct management environment.
You can check for the loss of quorum for all the volume groups indicated by a LVM_SA_QUORCLOSEerror. These errors are written to the AIX error log. PowerHA SystemMirror checks whether theLVM_SA_QUORCLOSE error appeared in the AIX error log file and if so, informs the Cluster Manager toselectively move the affected resource group. This PowerHA SystemMirror function is called selectivefallover for volume group loss.
Note: If fallover does not occur, check that the LVM_SA_QUORCLOSE error appeared in the AIX errorlog. When the AIX error log buffer is full, new entries are discarded until space becomes available in thebuffer and an error log entry informs you of this problem..
Certain storage subsystems have been found to generate large amounts of error log entries when they areexperienceing problems. If the error log is not large enough, these error log entries can overrun the errorlog causing the LVM_SA_QUORCLOSE to be lost. To avoid this problem, configure the error log to haveadequate space using the following command:errdemon -B 1048576 -s 10485760
This sets the error log buffer size to 1MB and the log size to 10 MB.Related information:Administration guide
Troubleshooting DSCLI-managed clusters:
This section provides information that may help with troubleshooting DSCLI management clusters.
When a DSCLI management PowerHA SystemMirror Cluster is in a less than optimal functioning state,check the /tmp/hacmp.out file for any obvious issues, and then, if necessary, check the states of the PPRCinstances and paths that underlay the volume groups to make sure they are write-accessible. Use thecommands listed below to discover what the PPRC instances states are, as this will be a major indicatorof the health of your volume groups.
If you encounter problems with your cluster that are not covered in this section or are not easilyremedied, contact your IBM Service Representative.
Storage-based high availability and disaster recovery 69
Common cluster startup problems:
This section discusses some common cluster startup problems.1. If a resource group will not stabilize on its primary node and site, it is probable that the PPRC
Replicated Resource and Resource Group are defined to be primary on different sites. Refer to thePlanning Primary and Secondary Site Layout for DSCLI-managed PPRC Replicated Resources inPowerHA SystemMirror Resource Groups. Make sure all the appropriate entries in the PPRCreplicated resource are aligned in the correct direction, as described in this and the SampleConfiguration section.
2. Another reason a resource group may not come ONLINE, may be unstable, or go into ERROR state isif there is trouble with the PPRC instance or path that the volume group and PPRC replicatedresource being managed requires. See the descriptions below for commands to use to display PPRCinstance states and a description of normal working states.
3. Keep in mind the limitation that a volume group needs to have the same volume major numberacross all cluster nodes. This has been known to cause instability in a resource group when it initiallycomes online.
4. If the Pri-Sec and Sec-Pri port pairs are not declared correctly, this will lead to errors in creating theinitial PPRC paths, which will keep the cluster from coming up correctly. In the /tmp/hacmp.out file,there will be an error message returned from the mkpprcpath call for the PPRC replicated resourceassociated with the resource group that will not come ONLINE.
5. In certain instances, disk reserves can be left on vpaths or hdisks, that DSCLI management is not ableto break. These will keep a resource group from being able to come ONLINE because the disk thathas a reserve on it will never be write accessible. See Other Handy AIX Commands below for ideason how to break disk reserves.
Handy DSCLI commands to know:
Refer to the DSCLI documentation to become familiar with these management commands. Ideally youwill not have to use the DSCLI interface except in troubleshooting situations.
n that case, however, the following commands are useful (all run through the /opt/ibm/dscli/dsclicommand):v lspprc: list the current state of the PPRC instances (see below for valid and common operational
states).v lspprcpath: list the current state of the PPRC paths configured.v lsavailpprcport: list the available PPRC port pairs between two storage systems.v failoverpprc, failbackpprc: switch the direction of PPRC instances.v rmpprc: remove an existing PPRC instance.v rmpmkpprc: create a new PPRC instances.v mkpprcpath: create a new PPRC path.
Refer to the DSCLI documentation for detailed descriptions of these commands, and of others that willallow you to view details of the connected storage systems.
PPRC instance states:
PPRC instance states exist during normal operation.
The states are described in pairs because if you poll the DSCLI at the primary site and the secondary siteyou will get different state information which reflects the I/O accessibility of the disk at that site, as wellas the state of the PPRC instance.
70 Storage-based high availability and disaster recovery

Normal Working State
Primary state: Full Duplex
Secondary state: Target Full Duplex
This is the normal working state for a PPRC instance. In this state, the Primary is accessible for read andwrite I/O but the Secondary is not accessible for either.
Suspended State
Primary state: Full Duplex
Secondary state: Suspended
In this state, the Primary is accessible for read and write I/O and the Secondary is as well. Data integritybetween the two sides of the PPRC instance is not ensured in this state.
In the context of PowerHA SystemMirror clusters, this PPRC instance state occurs when there has been afailure on the PowerHA SystemMirror site connected to the primary site, causing a failover to thesecondary state.
Copy State
Primary and secondary state: Copy Pending
In this state, there is a full disk copy in process between one side of the PPRC instance and the other.
Handy AIX commands:
This section discusses some commonly used AIX commands.
Refer to the AIX documentation for more details on the following commands:
To discover whether a disk reserve exists on a given disk:lquerypr -Vh /dev/<disk name>
To clear a disk reserve that exists on a given disk:lquerypr -ch /dev/<disk name>
To list the existing vpath to storage volume ID (LUN + storage ID) mapping:lsvpcfg
To list the existing vpaths on your system, which will display the volume group mapping:lspv | grep vpath
To list the existing volume groups on your system:lsvg
To list the existing file systems on your system:lsfs
To list the available volume major numbers on your system:lvlstmajor
Storage-based high availability and disaster recovery 71

Global MirrorYou can use Global Mirror on the IBM DS8700 to implement asynchronous mirroring into your PowerHASystemMirror configuration.
To implement an asynchronous PowerHA SystemMirror configuration with Global Mirror on DS8700complete the following steps:1. Plan for the deployment of DS8700 storage across two sites. This step involves understanding your
application and middleware requirements and ensuring that you have those requirements covered inthe context of a high availability PowerHA SystemMirror solution.
2. Set up and configure the DS8700 storage system.3. Plan for the PowerHA SystemMirror implementation. This includes designing resource groups,
policies, and scripts around your applications and mirrored storage resources.4. Install and configure PowerHA SystemMirror to implement the settings you planned for in Step 3.5. Test and verify the configuration is working correctly.
Note: This documentation focuses on Steps 3 and 4, but will mention and discuss the other steps at ahigh level.
Overview of Global MirrorThe IBM DS8700 storage subsystem provides asynchronous mirroring using the Global Mirror feature.Global Mirror is implemented through a combination of FlashCopy functions, Global-Copy functions, andSessions functions to achieve consistency in the context of asynchronous replication.
FlashCopyA technology offered by all enterprise storage systems that allows users to createnear-instantaneous copy of a physical volume. The instantaneous copy is handled by copyingdata in the background while allowing the source and target volumes to be read and written.While the background copying is in progress, all writes to the source volume are handled by thestorage system by first copying the old block to the target volume. This process only occurs if thecorresponding block on the target has not already been modified. Once the background copyingcompletes, both source and target volumes, are exact copies of the last time the FlashCopycommand was issued.
Global CopyA DS8000 technology that allows data to be mirrored to another storage unit in an asynchronousmanner, without giving any guarantees about the order of data replication. Data can appear onthe recovery site out-of-order. This is a good option for any application that wants to handledisaster recovery, but can tolerate out-of-order data.
SessionsA mechanism by which a DS8000 Series storage system coordinates the replication process withthe storage systems on the recovery site. When the Sessions function is used with the FlashCopyfunction and the Global Copy function you can achieve asynchronous replication whilemaintaining consistency properties.
Related information:DS8000 documentation
IBM DS8700 Storage Systems Redbook
Planning for Global MirrorTo correctly implement Global Mirror you must plan correctly.
The following restrictions and limitations apply to Global Mirror:v You must be using the IBM DS8700 storage system. Global Mirror is not supported on earlier models
of the DS8000 storage systems.
72 Storage-based high availability and disaster recovery

v If the volumes being replicated span across multiple IBM DS8700 Logical Sub System, then the sameGlobal Mirror Session Identifier must be used for all of them. The same Global Mirror SessionIdentifier must be used on both PowerHA SystemMirror sites.
v The Hardware Management Console (HMC) associated with the IBM DS8700 storage system that isused with PowerHA SystemMirror, must be accessible using TCP/IP on all PowerHA SystemMirrornodes and both sites.
v The DS8000 configuration can not be changed using DARE, even though the DS8000 Global MirrorReplicated Resources or Mirror Groups can be included and excluded from a PowerHA SystemMirrorResource Group using DARE.
v PowerHA SystemMirror does not handle SNMP events in the context of DS8700 Global Mirrorfunction. If there is a failure in the PPRC path, then in some cases, this can put the corresponding(active) Global Mirror session in a fatal state and PowerHA SystemMirror mirror would not knowabout it. To fix this problem, you must correct the PPRC path and then restart the correspondingresource groups on the appropriate nodes.
Planning the deployment of the IBM DS8700 across two sites:
The application data that you want to mirror using Global Mirror must already reside on a DS8700Storage System.
If you do not have any application data, then follow the migration recommendations and steps describedin the DS8700 migration documentation.
To plan for the deployment of the IBM DS8700 across two sites, complete the following steps:1. Identify your production site for the application. A production site is the location where your
application and its data would primarily reside and function.2. Identify the volumes on the DS8700 Storage System that contain the application data that you want to
be Highly Available with Disaster Recovery.3. Identify the storage unit(s) and AIX hosts that will be running on the recovery site.4. Ensure that there are sufficient number of volumes and Fiber Channel ports available on the storage
systems for the production site and recovery site. This allows a mirror path or PPRC path to becreated between the storage units.
5. Verify that there is a FlashCopy relationship established for each volume that resides on theproduction site and recovery site.
Planning the PowerHA SystemMirror implementation:
To successfully implement PowerHA SystemMirror you must plan accordingly.
Before you implement PowerHA SystemMirror you must complete the following:v Collect the following information for all the HMCs in your environment:
– IP addresses– Login names and passwords– Associations with various storage units
v Verify that the /opt/ibm/dscli/profile/dscli.profile file does not contain the DSCLI password. Ifthe DSCLI password is in the /opt/ibm/dscli/profile/dscli.profile file, any commands that are runby PowerHA SystemMirror fail.
v Verify that all the data volumes that need to be mirrored are visible to all relevant AIX hosts. TheDS8700 volumes should be appropriately zoned so that the FlashCopy volumes are not visible to thePowerHA SystemMirror nodes.
v Ensure all HMCs are accessible using the TCP/IP network for all PowerHA SystemMirror nodes whereyou want to run Global Mirror.
Storage-based high availability and disaster recovery 73

Installing Global MirrorPowerHA SystemMirror Enterprise Edition for AIX file sets must be installed on all the AIX nodes thatyou intend to run your PowerHA SystemMirror cluster.
Installation Prerequisites
Before installing PowerHA SystemMirror Enterprise Edition for AIX for Global Mirror, make sure thefollowing is true for each node in your cluster:v You have root access to each node.
Software Requirements
The following software is required for PowerHA SystemMirror Enterprise Edition for AIX EnterpriseEdition for Global Mirror:v Global Mirror functionality works with all the AIX levels that are supported by PowerHA
SystemMirror Standard Edition.v PowerHA SystemMirror Enterprise Edition for AIX 6.1, or later, with the APARs stated in the support
flash and README.v IBM DS8700 microcode bundle must be 75.1.145.0, or later.v Latest DS8000 DSCLI client interface must be installed on each PowerHA SystemMirror node.v Add the pathname for the dscli client into the PATH for the root user on each PowerHA SystemMirror
node.
Installation Steps
To install Global Mirror, complete the following steps:1. Insert the PowerHA SystemMirror Enterprise Edition for AIX installation media into the CD or DVD
drive.2. From the command line, enter smitty install.3. From SMIT, select Install and Update Software > Install Software.4. Select the following filesets from the list, cluster.es.genxd.rte, cluster.es.genxd.cmds, and
cluster.msg.genxd.xx_XX where xx_XX is the message fileset for your language, and press Enter.
Configuring Global MirrorAfter you have planned and installed Global Mirror you can start to configure it. You must ensure thatthe data volumes on both sites are exact replica of each other, otherwise you will not be able to importthe volume group on the remote site.
Configuring the IBM DS8700 to use Global Mirror:
Before you can configure the IBM DS8700 to use Global Mirror, data must already exist on the the IBMDS8700.
To configuring the IBM DS8700 to use Global Mirror, complete the following steps:1. For each data volume that will participate in the Global Mirror on the production site, complete the
following steps:a. Identify a volume that will serve as its Global Copy Peer. This volume must reside on a DS8700
storage unit on the recovery site.b. Depending on the DS8700 Logical Sub System (LSS) of the source and target volumes for the
Global Copy, you want to create a PPRC path between the source and target LSS. A Global Copypath is a logical path created between two LSS that belong to different DS8700 Storage Systems.Global Copy paths are unidirectional, therefore a path must be created in both directions.
74 Storage-based high availability and disaster recovery

Note: Each logical path between a given LSS pair, must be created on a different physical link. Forredundancy and bandwidth, you should create multiple paths in the same direction.
c. Establish a Global Copy relationship between the volume on the production site storage systemand its mirror volume on the recovery site.
d. On the production site for each Global Copy source volume, establish a persistent FlashCopyrelationship with the FlashCopy source being the Global Copy volume.
e. On the recovery site for each Global Copy target volume, establish a persistent FlashCopyrelationship with the FlashCopy source being the Global Copy volume.
2. On the production site, complete the following steps:a. For each LSS that contains one or more volumes that are participating in the Global Copy
relationships, create a Global Mirror Session. Verify that the Global Mirror Session Identifiermatches for all the LSSs.
b. Add all the Global Copy volumes into the Global Mirror Session.3. Repeat Steps 2 for the recovery site. You must use the same Global Mirror Session Identifier that was
used on the production site for the recovery site.4. If the application has data volumes that are spread across multiple storage units on the production
site, you must use the same Global Mirror Session Identifier on all the storage units.
Configuring PowerHA SystemMirror Enterprise Edition for Global Mirror:
Once you have the IBM DS8700 configured correctly, you can configure PowerHA SystemMirrorEnterprise Edition for Global Mirror.
Before you start configuring PowerHA SystemMirror Enterprise Edition for Global Mirror, yourenvironment must meet the following requirements:v All PowerHA SystemMirror clusters are defined.v All PowerHA SystemMirror nodes are defined.v All PowerHA SystemMirror sites are defined.v All PowerHA SystemMirror resource groups and associated resources are configured and working.
Configuring a Storage Agent:
A Storage Agent is a generic name given by PowerHA SystemMirror for an entity such as the IBMDS8000 Hardware Management Console (HMC). Storage Agents typically provide a one-pointcoordination point and often use TCP/IP as their transport for communication.
You must provide the IP address and authentication information that will be used to communicate withthe HMC.
Adding a Storage Agent:
To add a Storage Agent, complete the following steps:1. From the command line enter, smit sysmirror.2. From the SMIT interface, select Cluster Applications and Resources > Resources > Configure
DS8000 Global Mirror Resources > Configure Storage Agents > Add a Storage Agent and pressEnter.
3. Complete the following fields:
Storage-based high availability and disaster recovery 75

Table 18. Adding a Storage Agent fields
Fields Values
Storage Agent Name Enter the PowerHA SystemMirror name for this HMC.
IP Addresses Select list of IP addresses for the HMC.
User ID Enter the User ID that can access the HMC.
Password Enter the password for the User ID that can access the HMC.
4. Verify all fields are correct and press Enter.
Changing an existing Storage Agent:
To change an existing Storage Agent, complete the following steps:1. From the command line enter, smit sysmirror.2. From the SMIT interface, select Cluster Applications and Resources > Resources > Configure
DS8000 Global Mirror Resources > Configure Storage Agents > Change/Show Storage Agent andpress Enter.
3. From the list select the name of the Storage Agent that you want to change and press Enter.4. Specify the changes you want to make in the fields.5. Verify the changes are correct and press Enter.
Removing a Storage Agent:
To remove a Storage Agent, complete the following steps:1. From the command line enter, smit sysmirror.2. From the SMIT interface, select Cluster Applications and Resources > Resources > Configure
DS8000 Global Mirror Resources > Configure Storage Agents > Remove Storage Agent and pressEnter.
3. From the list of Storage Agents select the name of the Storage Agent you want to remove and pressEnter.
4. Press Enter to confirm the selected Storage Agent is the one you want to remove.
Configure a Storage System:
A Storage System is a generic name given by PowerHA SystemMirror for an entity such as a DS8700Storage Unit.
When using Global Mirror, you must associate one Storage Agent with each Storage System. You mustprovide the IBM DS8700 system identifier for the Storage System. For example, IBM.2107-75ABTV1 is anstorage identifier for a DS8000 Storage System.
Adding a Storage System:
To add a Storage System, complete the following steps:1. From the command line enter, smit sysmirror.2. From the SMIT interface, select Cluster Applications and Resources > Resources > Configure
DS8000 Global Mirror Resources > Configure Storage Systems > Add a Storage System and pressEnter.
3. Complete the following fields:
76 Storage-based high availability and disaster recovery

Table 19. Adding a Storage System fields
Fields Values
Storage System Name Enter the PowerHA SystemMirror name for the storage system.This name must be unique within the cluster definition.
Site Association Enter the PowerHA SystemMirror site name.
Vendor Specific Identification Enter the vendor specified unique identifies for the storagesystem.
WWNN The World Wide Node Name for this storage system. Everystorage system that supports FCP has a unique name.
Storage Agent Name Press F4 to select the Name(s) of the Storage Agent that managethis Storage System from a list.
4. Verify all fields are correct and press Enter.
Changing a Storage System:
To change a Storage System, complete the following steps:1. From the command line enter, smit sysmirror.2. From the SMIT interface, select Cluster Applications and Resources > Resources > Configure
DS8000 Global Mirror Resources > Configure Storage Systems > Change/Show Storage System andpress Enter.
3. From the list select the name of the Storage System that you want to change and press Enter.4. Specify the changes you want to make in the fields.5. Verify the changes are correct and press Enter.
Removing a Storage System:
To remove a Storage System, complete the following steps:1. From the command line enter, smit sysmirror.2. From the SMIT interface, select Cluster Applications and Resources > Resources > Configure
DS8000 Global Mirror Resources > Configure Storage Systems > Remove Storage System and pressEnter.
3. From the list of Storage Systems select the name of the Storage System you want to remove and pressEnter.
4. Press Enter to confirm the selected Storage System is the one you want to remove.
Configuring Mirror Group:
A Mirror Group is a generic name given by PowerHA SystemMirror for a logical collection of volumesthat have to be mirrored to another Storage System that resides on a remote site. A Global Mirror Sessionrepresents a Mirror Group.
Adding a Mirror Group:
To add a Mirror Group, complete the following steps:1. From the command line enter, smit sysmirror.2. From the SMIT interface, select Cluster Applications and Resources > Resources > Configure
DS8000 Global Mirror Resources > Configure Mirror Groups > Add Mirror Group, and press Enter.3. Complete the following fields:
Storage-based high availability and disaster recovery 77

Table 20. Adding a Mirror Group fields
Fields Values
Mirror Group Name Enter the PowerHA SystemMirror for the replicated resource.This is what will be included into a PowerHA SystemMirrorResource Group.
Storage System Names From the list select the Storage Systems on the production sitethat have data volumes forming this Mirror Group.
Vendor Specific Identifier Enter the Global Mirror Sessions Identifier.
Maximum Coordination Time Enter the maximum amount of time (in seconds) that theDS8700 can hold an I/O issued from the host for the purpose ofGlobal Mirror operations.
Maximum Drain Time Enter the maximum amount of time (in seconds) allowed fordata to be drained before failing the current consistency group.
Consistency Group Interval Time Enter the time (in seconds) to wait between the formation oftwo consistency groups.
4. Verify all fields are correct and press Enter.
Changing a Mirror Group:
To change a mirror group, complete the following steps:1. From the command line enter, smit sysmirror.2. From the SMIT interface, select Cluster Applications and Resources > Resources > Configure
DS8000 Global Mirror Resources > Configure Mirror Groups > Configure Mirror Groups >Change/Show Mirror Group, and press Enter.
3. From the list select the name of the Mirror Group that you want to change and press Enter.4. Specify the changes you want to make in the fields.5. Verify the changes are correct and press Enter.
Removing a Mirror Group:
To remove a Mirror Group, complete the following steps:1. From the command line enter, smit sysmirror.2. From the SMIT interface, select Cluster Applications and Resources > Resources > Configure
DS8000 Global Mirror Resources > Configure Mirror Groups > Configure Mirror Groups >Remove Mirror Group, and press Enter.
3. From the list of Mirror Groups select the name of the Mirror Group you want to remove and pressEnter.
4. Press Enter to confirm the selected Mirror Group is the one you want to remove.
Configuring Resource Groups:
After configuring the Mirror Group, include the Mirror Group into the desired PowerHA SystemMirrorResource Group.
Configure resource groups following the procedures in the Configuring PowerHA SystemMirror resourcegroups topic. Make sure that you understand site support for PowerHA SystemMirror resource groups.
When you configure a resource group you must meet the following requirements:v The site policy is set to Prefer Primary Site or Online on Either Site.v A startup policy other than Online on All Available Nodes is specified.v The Resource Group Processing Ordering is set to Serial.
78 Storage-based high availability and disaster recovery
To add a Global Mirror replicated resource to a resource group, complete the following steps:1. From the command line enter, smit sysmirror.2. From the SMIT interface, select Cluster Applications and Resources > Resources Groups >
Change/Show Resources and Attributes for a Resource Group, and press Enter.3. Enter the following:
a. The name of the mirror groups in the Global Mirror Replicated Resources field.b. The name of the volume groups associated with the individual Global Mirror replicated resources
in the Volume Groups field.
Note: The volume group names must be listed in the same order as the DS8700 mirror groupnames.
4. Verify and synchronize the cluster.Related information:Planning resource groupsVerifying and synchronizing a cluster configuration
SVC replication resourcesThese topics present information for planning, installing, and configuring an PowerHA SystemMirrorEnterprise Edition Metro Mirror for SAN Volume Controller (SVC) cluster.
SVC virtualizes storage, assists in managing Peer-to-Peer Remote Copy (PPRC) services on TotalStoragesystems, and simplifies how you can integrate PPRC replicated resources into an PowerHA SystemMirrorconfiguration. SVC management allows SVC PPRC resources to be managed by PowerHA SystemMirrorwith a minimum of user configuration.Related information:
IBM System Storage SAN Volume Controller
Overview of SVC managementThe IBM TotalStorage SAN Volume Controller (SVC) is a virtualization appliance solution that mapsvirtualized volumes visible to hosts and applications to physical volumes on storage devices.
It is an in-band implementation that minimizes the dependency on unique hardware and software,telecopying the storage functions expected in a SAN environment from the storage subsystems andmanaging storage resources. In addition, it provides advanced copy services for data migration andbusiness continuity similar to the Peer to Peer Remote Copy function in the ESS and DS4000® (formerlynamed the FAStT) Storage subsystems. Since the copy services operate on the virtual volumes,dramatically simpler replication configurations can be created using the SAN Volume Controller, ratherthan replicating each physical volume in the managed storage pool.
PowerHA SystemMirror Enterprise Edition for Metro Mirror with SVC management enhances PPRC'sability to provide a fully automated, highly available disaster recovery management solution by takingadvantage of SVC's ability to provide virtual disks derived from varied disk subsystems. The PowerHASystemMirror interface is designed so that once the basic SVC environment is configured, PPRCrelationships are created automatically; no additional access to the SVC interface is needed.
PowerHA SystemMirror configuration information required for SVC PPRC resource management issimple; it is easily acquired from the existing SVC configuration.
The integration of PowerHA SystemMirror and SVC PPRC provides:v PowerHA SystemMirror management of SVC PPRC for automatic fallover/reintegration of SVC
PPRC-protected virtual disks between PowerHA SystemMirror sites
Storage-based high availability and disaster recovery 79

v Support for user-defined policy-based resource groupsv Support for the following Inter-Site Management Policies for resource groups:
– Prefer Primary Site– Online on Either Site.
v Support for the Subsystem Device Driver (SDD) (for the 2145 (SVC) system)v Support for cluster verification and synchronizationv Flexible user-customizable resource group movement policiesv Limited support for C-SPOC (PowerHA SystemMirror Single Point of Control utility)v Automatic fallover/reintegration of server nodes attached to SVC-provided virtual disk pairs within
sitesv Management of automatic fallover of PPRC-protected volume groups between nodes within a sitev SVC management to switch the SVC PPRC relationships over so that the backup site can take control
of the PowerHA SystemMirror-managed resource groups from the primary site in case of a site failurev SVC PPRC Command Line Interface or GUI to manually manage SVC PPRC consistency groups and
relationships.
It is important to understand how the terms master and auxiliary are used in the PowerHA SystemMirrorEnterprise Edition Metro Mirror for the SVC environment. In general, master and auxiliary refer to theSVC virtual disks that are on either end of a SVC PPRC link. Primary and secondary refer to thePowerHA SystemMirror sites that host the resource groups that manage the SVC PPRC replicatedresources that contain those SVC PPRC links.
The terms master and auxiliary can also refer to the SVC clusters themselves. In general, the master SVCcluster is connected to the PowerHA SystemMirror production site, and the auxiliary SVC cluster isconnected to the PowerHA SystemMirror backup and recovery site.Related concepts:“Overview of PowerHA SystemMirror Enterprise Edition for Metro Mirror” on page 1PowerHA SystemMirror Enterprise Edition for synchronous Peer-to-Peer Remote Copy (PPRC), nowknown as and referred to as Metro Mirror increases data availability for IBM TotalStorage volumes thatuse to copy data to a remote site for disaster recovery purposes.Related information:Installation guide
Planning for SVC managementYou should be familiar with the planning tasks for PowerHA SystemMirror.v PowerHA SystemMirror sites have been planned.v Basic SVC and SVC PPRC support has been completely configured. Refer to the SVC documentation
on how to install and configure SVC and SVC PPRC support.v SVC Clusters and native PPRC support on those SVC Clusters has already been configured.
To plan for SVC-managed PPRC replicated resources in an PowerHA SystemMirror cluster, completethe following planning tasks:
v Identify the SVC Clusters and which PowerHA SystemMirror sites they belong to.v Identify SVC relationships.v Identify the volume groups associated with SVC virtual disks (VDisks) to be used in the relationships.v Identify SVC consistency groups.v Identify the relationships to be used in the consistency groups.
Note: The term 'Consistency Group Name' can be, in this instance, interchanged with the term 'PPRCReplicated Resource Name.' In the context of SVC, they are the same.
v Plan which resource groups will contain the SVC-managed PPRC replicated resources.
80 Storage-based high availability and disaster recovery
Related information:Planning guide
Limitations and restrictions for PowerHA SystemMirror Enterprise Edition MetroMirror for SVCThe current release of PowerHA SystemMirror Enterprise Edition SVC PPRC has some limitations andrestrictions.
These include:v Although SVC Host Name Aliases are arbitrary, for PowerHA SystemMirror Enterprise Edition SVC
PPRC, they must match the node names. This ensures that the ssh commands used to execute SVCtasks are completed for the correct nodes.
v PowerHA SystemMirror uses commands to communicate with the SVC PPRC cluster that require ssh .Therefore, some version of ssh must be installed and configured on all SVC PPRC cluster nodes.
v Resource Groups to be managed by PowerHA SystemMirror cannot contain volume groups with bothSVC PPRC-protected and non SVC-PPRC protected disks.For example:– VALID: RG1 contains VG1 and VG2, both PPRC-protected disks.– INVALID: RG2 contains VG3 and VG4, VG3 is PPRC-protected, and VG4 is not.– INVALID: RG3 contains VG5, which includes both PPRC-protected and non-protected disks within
the same volume group.v The Host Aliases on your SVC Clusters must match the node names (short names) used in PowerHA
SystemMirror to define each cluster node.v SVC PPRC does not support concurrent resource groups that are configured with a startup policy of
Online on All Available Nodes (OOAN).v You cannot use C-SPOC for the following LVM operations to configure nodes at the remote site (that
contain the target volumes):– Creating or extending a volume group– Operations that require nodes at the target site to write to the target volumes (for example, changing
filesystem size, changing mount point, adding LVM mirrors) cause an error message in CSPOC. Thisincludes functions such as changing filesystem size, changing mount points, and adding LVMmirrors. However, nodes on the same site as the source volumes can successfully perform thesetasks. The changes are subsequently propagated to the other site via lazy update.
For C-SPOC operations to work on all other LVM operations, it is highly recommended that you performall C-SPOC operations when the cluster is active on all PowerHA SystemMirror nodes and theunderlying SVC consistency groups are in a consistent_synchronized state.
Sample configuration for SVC managementYou can set up a mutual recovery configuration in which each site acts as a production site with the othersite acting as an associated backup site.
PowerHA SystemMirror support the SVC feature Change Volumes for Global Mirror. If you want to usethis feature, you must configure and manage it outside of PowerHA SystemMirror. For more informationabout the SVC feature Change Volumes for Global Mirror, see Low Bandwidth Global Mirror (SVC &V7000).
Implementing a mutual recovery configuration requires:v Two PowerHA SystemMirror sites (the same as a single recovery configuration)v At least two resource groups.
Storage-based high availability and disaster recovery 81

Basic SVC PPRC cluster configuration and operation:
The infrastructure we consider here is a wide-area cluster system whereby the set of local cluster nodesare directly attached to local storage systems but with no access to the geographically separated remotestorage systems.
In a typical setup with AIX server nodes in a wide-area PowerHA SystemMirror cluster configuration, theserver nodes at each PowerHA SystemMirror cluster site are connected directly to the local SVC Clusters.Two or more inter-cluster links are required between the two SVC clusters. The PowerHA SystemMirrornodes at the same geographical site access the same shared volume groups, but the nodes at each siteaccess them from different physical volumes.
The SVC PPRC maintains separate identical local copies of the application data on two separate back endstorage subsystems. Several virtual disks are mirrored via master SVC cluster PPRC from the primary siteto the standby site. When node or site failure occurs, access to disk resources are not passed from onenode to another. Instead, all highly available applications are restarted at the standby site using data copyon secondary volumes. Under normal operation, the application is active on a server at the productionsite, and all updates to the application data are automatically replicated to the backup disk subsystem bythe SVC PPRC framework. PPRC protects the backup copy from inadvertent modification. When a totalsite failure occurs, the application is restarted on a backup server at the remote site.
Prior to restarting the application, which, in this context, means not only the application that end usersinteract with, but also all dependent data base software or other middleware, PowerHA SystemMirrorEnterprise Edition initiates SVC actions to ensure that the backup disk volumes are in the appropriatestate to allow application access.
PowerHA SystemMirror support for geographic clustering is based on the concept of replicated resources .These are defined as a resource type that has a primary and secondary instance, corresponding to thesource and target of data copies that are replicated across two locations. In SVC PPRC, a PPRCconsistency group, comprised of a list of SVC relationships defined to SVC and associated with anPowerHA SystemMirror geographically separated cluster definition and defined to PowerHASystemMirror is referred to as an SVC PPRC replicated resource . The definition for an SVC PPRCreplicated resource contains the VDisk name and the PowerHA SystemMirror volume groups associatedwith the VDisk pairs. SVC recognizes which volumes mirror each other for each PPRC replicatedresource.
In the example shown here, the PowerHA SystemMirror production site includes:v Server A and Server Bv The ESS labeled Primary ESSv A SAN Volume Controller connected by Fibre Channel PPRC links to the SVC at the secondary site
and two connections to the Primary ESS.
The PowerHA SystemMirror recovery site includes:v Server C and Server Dv The ESS labeled Secondary ESSv A SAN Volume Controller connected by Fibre Channel PPRC links to the SVC at the primary site and
two connections to the Primary ESS.
The PowerHA SystemMirror resource group contains:v The four server nodesv IP networks to connect the server nodesv One or more shared volume groupsv The PPRC replicated resource associated with the volumes in the volume group.
82 Storage-based high availability and disaster recovery
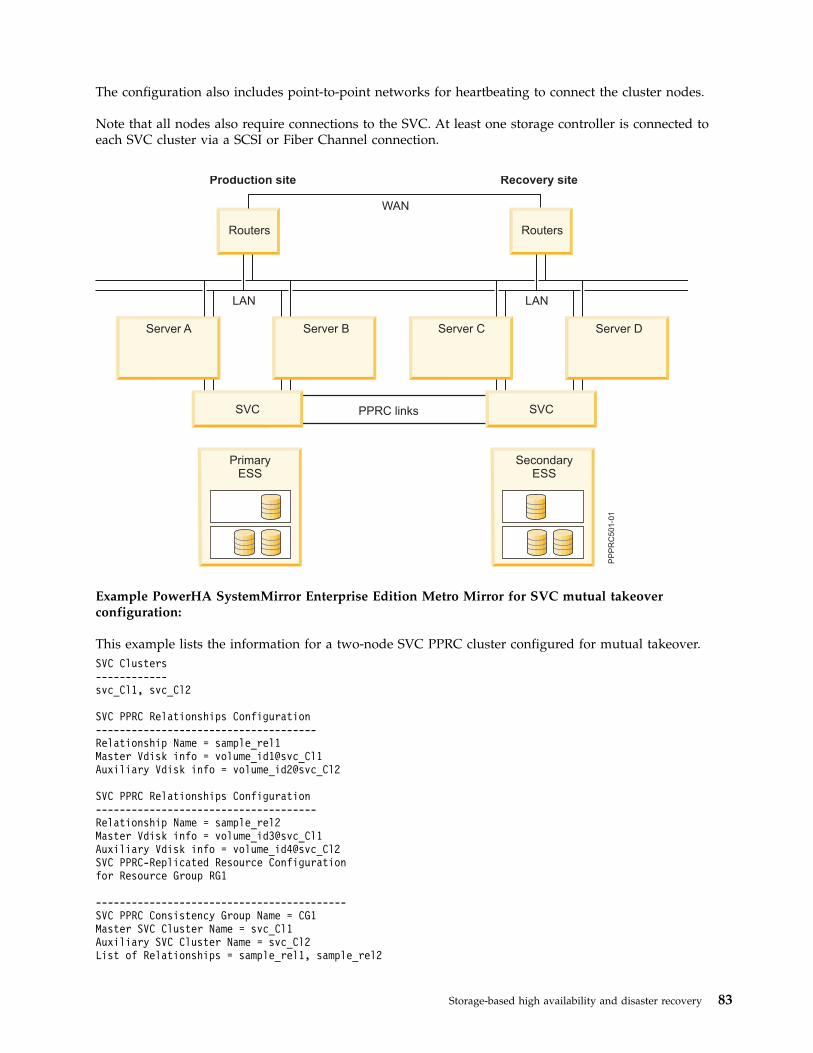
The configuration also includes point-to-point networks for heartbeating to connect the cluster nodes.
Note that all nodes also require connections to the SVC. At least one storage controller is connected toeach SVC cluster via a SCSI or Fiber Channel connection.
Example PowerHA SystemMirror Enterprise Edition Metro Mirror for SVC mutual takeoverconfiguration:
This example lists the information for a two-node SVC PPRC cluster configured for mutual takeover.SVC Clusters------------svc_Cl1, svc_Cl2
SVC PPRC Relationships Configuration-------------------------------------Relationship Name = sample_rel1Master Vdisk info = volume_id1@svc_Cl1Auxiliary Vdisk info = volume_id2@svc_Cl2
SVC PPRC Relationships Configuration-------------------------------------Relationship Name = sample_rel2Master Vdisk info = volume_id3@svc_Cl1Auxiliary Vdisk info = volume_id4@svc_Cl2SVC PPRC-Replicated Resource Configurationfor Resource Group RG1
------------------------------------------SVC PPRC Consistency Group Name = CG1Master SVC Cluster Name = svc_Cl1Auxiliary SVC Cluster Name = svc_Cl2List of Relationships = sample_rel1, sample_rel2
Storage-based high availability and disaster recovery 83

**SVC PPRC Relationships Configurationfor Consistency Group CG3-------------------------------------Relationship Name = sample_rel3Master Vdisk info = volume_id5@svc_Cl2Auxiliary Vdisk info = volume_id6@svc_Cl1
SVC PPRC-Replicated Resource Configurationfor Resource Group RG2------------------------------------------SVC PPRC Consistency Group Name = CG1Master SVC Cluster Name = svc_Cl2Auxiliary SVC Cluster Name = svc_Cl1List of Relationships = sample_rel3
From this point, resource groups RG1 and RG2 are configured to include the SVC PPRC-ReplicatedResources CG1 and CG2 respectively.
Note: Since nodes located at each site treat the pairs differently in some situations, using PPRC pairs inresource groups that have no site preference could lead to unpredictable results.
Planning PPRC-SVC management supportBefore you configure SVC management option, you configure SVC itself to manage PPRC mirroredvolumes.
Verify that your SVC configuration meets the following requirements:v Makes a consistent point-in-time copy of data available at all timesv Has virtual disks (VDisks) made available from both SVC Clusters to be used in the PowerHA
SystemMirror configuration.
For information about configuring SVC, see the appropriate SVC documentation. See also the Limitationsand Restrictions for PowerHA SystemMirror Enterprise Edition Metro Mirror for SVC for any namingconvention restrictions.Related reference:“Limitations and restrictions for PowerHA SystemMirror Enterprise Edition Metro Mirror for SVC” onpage 81The current release of PowerHA SystemMirror Enterprise Edition SVC PPRC has some limitations andrestrictions.
Setting up volume groups and filesets on SVC PPRC-protected disksAs part of planning your PPRC SVC environment, decide what vDisks will be used to support volumegroups and file systems on the PowerHA SystemMirror cluster nodes.
Regardless of whether you simply plan the vDisks at this time or perform the steps listed below, youmust compete these steps prior to the initial PowerHA SystemMirror SVC PPRC verification step. Thatstep creates the final SVC PPRC relationships.
This procedure assumes that the hdisks and corresponding vpaths made available to your nodes arevisible at those nodes. If they are not , and you can verify that SVC has been configured correctly to makethe virtual disks (vDisks) available, reboot the node and run cfgmgr to make the disks viewable.
Discover AIX vpaths associated with SVC vDisks:
You can use SVC vDisks to discover AIX vpaths.1. Select vDisks from your SVC configuration to be used in SVC PPRC relationships (that will be
grouped in consistency groups) that will be managed by PowerHA SystemMirror.
84 Storage-based high availability and disaster recovery

2. Based on the vDisks you have chosen to use in a given SVC PPRC relationship, find out which vpathsand hdisks correspond.a. On an PowerHA SystemMirror node, run:
lsdev -Ccdisk | more
From this output, you can discover which hdisks are associated with the SAN Volume Controller:HAnode1> lspv
...
hdisk32 Available 81-08-02 SAN Volume Controller Devicehdisk33 Available 81-08-02 SAN Volume Controller Devicehdisk34 Available 81-08-02 SAN Volume Controller Devicehdisk35 Available 81-08-02 SAN Volume Controller Devicehdisk36 Available 81-08-02 SAN Volume Controller Devicehdisk37 Available 81-08-02 SAN Volume Controller Devicevpath0 Available Data Path Optimizer Pseudo Device Drivervpath1 Available Data Path Optimizer Pseudo Device Drivervpath2 Available Data Path Optimizer Pseudo Device Drivervpath3 Available Data Path Optimizer Pseudo Device Driver
In the example listing above, hdisk32 - hdisk37 are all SAN Volume Controller Devices.b. Then run one of the following commands:
’lsvpcfg | grep <hdisk>’, to list the vpath for a specific hdisk’lsvpcfg | grep vpath’, to list information for all vpaths.SVC-related vpaths have an output similar to this:[HAnode1][/usr/es/sbin/cluster/svcpprc/utils]> lsvpcfg | grep vpath
vpath2 (Avail pv ) 6005076801898009980000000000012A = hdisk4 (Avail )hdisk11 (Avail ) hdisk24 (Avail ) hdisk31 (Avail )
vpath3 (Avail pv ) 60050768018980099800000000000129 = hdisk5 (Avail )hdisk12 (Avail ) hdisk25 (Avail ) hdisk32 (Avail )
c. Using the volume ID number from lsvpcfg:(ie: 6005076801898009980000000000012A )
Run the following command to get any associated vDisk value. (If there is doubt as to the output,run the command without the trailing 'grep' and 'cut' ):ssh admin@<SVC Cluster IP address> svcinfo lshostvdiskmap -delim : |grep <SVC volume ID value> | cut -f5 -d":"
Example:HAnode1> ssh [email protected] svcinfo lshostvdiskmap -delim : |grep6005076801898009980000000000012C |cut -f5 -d":"
vDisk1
HAnode1>
The value returned should be the name given to the vDisk during its creation on the SVC system.
Setting up volume group and filesystem for PowerHA SystemMirror management:
On the vpath(s) that corresponds to the master vDisk(s) for a given SVC PPRC Relationship, set up thevolume group and filesystem to be managed by PowerHA SystemMirror. Ensure that the Volume MajorNumber for the volume group can be used on all PowerHA SystemMirror cluster nodes, and that thephysical volume name for the file system can also be used across all PowerHA SystemMirror clusternodes.1. Use the lvlstmajor command on each cluster node to display the available Volume Major Numbers.2. Vary off (using varyoffvg ) the newly created volume group and import it to all nodes in the local
PowerHA SystemMirror site.
Storage-based high availability and disaster recovery 85
3. Create a temporary SVC PPRC relationship to copy the volume group/file set information to theauxiliary vDisk. Run the following commands. (Refer to the SVC CLI documentation for moredetails.)ssh admin@<master SVC Cluster IP> svctask mkrcrelationship -master<vDisk_name>-aux <vDisk_name> -cluster <Aux Cluster name> -name<relationship name>
ssh admin@<master SVC Cluster IP> svctask startrcrelationship<relationship name>
At this point, wait until the relationship moves from inconsistent_copying to consistent_synchronisedstate. Check the state by running:ssh admin@master<master SVC Cluster IP> svcinfo lsrcrelationship[relationship name]
4. Once the SVC PPRC relationship has completed copying, delete the relationship: ssh admin@<masterSVC Cluster IP> svctask rmrcrelationship <relationship name>This step is necessary in order for the next LVM operations to complete successfully.
5. Using SMIT or the command line on the Backup PowerHA SystemMirror site (the site that isconnected to the Auxiliary SVC Cluster,) import the volume group(s) created in step 2c.
6. Ensure that on ALL cluster nodes, the AUTO VARYON feature for volume groups is set to NO: Oneach node run: chvg -a 'n' -Q 'y' <volume group name>PowerHA SystemMirror will attempt to auto-correct this during verification but will not be able to doso in the case of remote PPRC. (If done at this point, it will save you time later.)
At this point, the volume groups and file systems necessary to configure PowerHA SystemMirror havebeen created.
Installing PowerHA SystemMirror Enterprise Edition Metro Mirror forSVCThis section describes how to install PowerHA SystemMirror Enterprise Edition Metro Mirror for SVC.You must be logged in as root to perform installation tasks.
Installing prerequisite software
Before installing PowerHA SystemMirror Enterprise Edition Metro Mirror for SVC, the following softwaremust be installed on cluster nodes:1. openssh version 4.6.1 or higher (+ license), for access to the SVC interface.2. Base PowerHA SystemMirror Enterprise Edition at required minimum level (cluster.es.server.rte) or
higher.3. Make sure the recommended versions of the following filesets are installed:
a. devices.fcp.disk.ibm.rte (1.0.0.0)
b. devices.sddpcm.**.rte ()
Note: All these required filesets might vary depend upon SVC SDD version. Hence, refer to theSVC documentation and website for the prereq filesets information.
It may not be clear during installation of the sdd filesets that this first fileset is necessary, but it iscritical in order to ensure that failover works correctly.
Installing PowerHA SystemMirror Enterprise Edition Metro Mirror for SVC filesets
You need to install the necessary filesets for SVC management.
If you have not already done so, install the filesets listed in Contents of the installation media for SVCmanagement.
86 Storage-based high availability and disaster recovery

Related reference:“Contents of the installation media” on page 11The PowerHA SystemMirror Enterprise Edition for Metro Mirror installation media provides the imagesfor installation on each node in the cluster that can take over a PPRC mirrored volume group.
Configuring PowerHA SystemMirror Enterprise Edition Metro Mirror forSVCAfter you install SVC following the procedures outlined in its documentation, follow the steps toconfigure the cluster.
These steps include:1. Check SVC and PowerHA SystemMirror configuration requirements.2. Configure PowerHA SystemMirror and SVC PPRC.3. Verify the PowerHA SystemMirror and SVC PPRC configuration.4. Synchronize the cluster.5. Start the cluster.
SVC and PowerHA SystemMirror configuration requirementsMake sure the configuration requirements are met.
These requirements include:1. Configure ssh for each node that will communicate with the SVC Clusters. Public/private key pairs
must be created on the nodes and distributed to the SVC clusters in order for PowerHA SystemMirrorEnterprise Edition Metro Mirror for SVC to function. (See the prerequisite list above for fileset nameand version.)The SVC PPRC replicated methods used with PowerHA SystemMirror Enterprise Edition rely heavilyon remote commands executed using ssh . It must be possible for example, to remotely execute acommand via ssh on all cluster nodes that are part of a resource group that contains a PPRCreplicated resource. Private/public key pairs must be installed on both the nodes that will access theSVC clusters, and the SVC clusters themselves in order for the SVC PPRC commands to workcorrectly.See the SVC documentation for directions on how to complete this task.
2. Make sure the Host Aliases on your SVC Clusters match the node names (short names) used inPowerHA SystemMirror. To get a list of the current host to vDisk maps on the master and auxiliarySVC clusters, use the SVC CLI commands:ssh admin@<ip_for_MASTER_SVC_Cluster> svcinfo lshostvdiskmap | moressh admin@<ip_for_AUXILIARY_SVC_Cluster> svcinfo lshostvdiskmap | more
Check the host names listed there against your PowerHA SystemMirror node names. If they differ, thenrefer to the SVC documentation on how to change the names to match, either via the SVC CLI or GUIinterface.
Adding an SVC cluster configurationYou can use the SMIT interface to add an SVC cluster configuration.
To add an SVC cluster configuration, complete the following steps:1. From the command line, enter smit sysmirror.2. In SMIT, select Cluster Applications and Resources > Resources > Configure SVC PPRC-Replicated
Resources > SVC Clusters Definition to PowerHA SystemMirror > Add an SVC Cluster, and pressEnter:
3. Enter field values as follows:
Storage-based high availability and disaster recovery 87
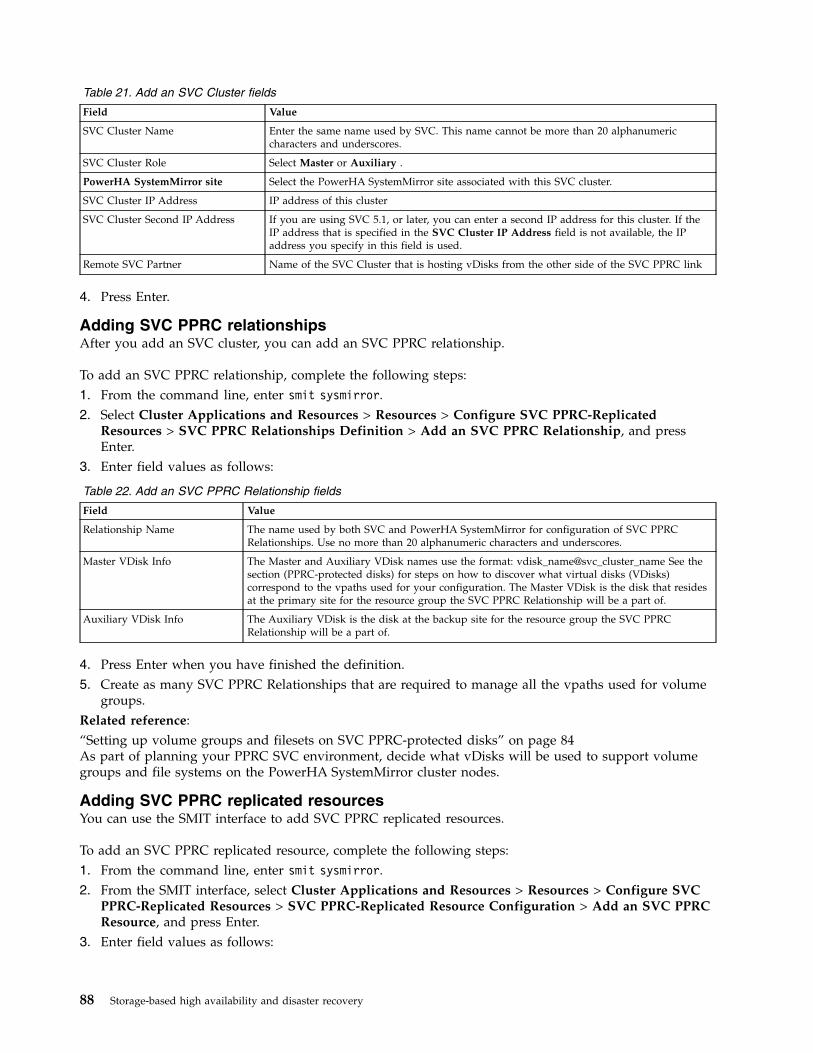
Table 21. Add an SVC Cluster fields
Field Value
SVC Cluster Name Enter the same name used by SVC. This name cannot be more than 20 alphanumericcharacters and underscores.
SVC Cluster Role Select Master or Auxiliary .
PowerHA SystemMirror site Select the PowerHA SystemMirror site associated with this SVC cluster.
SVC Cluster IP Address IP address of this cluster
SVC Cluster Second IP Address If you are using SVC 5.1, or later, you can enter a second IP address for this cluster. If theIP address that is specified in the SVC Cluster IP Address field is not available, the IPaddress you specify in this field is used.
Remote SVC Partner Name of the SVC Cluster that is hosting vDisks from the other side of the SVC PPRC link
4. Press Enter.
Adding SVC PPRC relationshipsAfter you add an SVC cluster, you can add an SVC PPRC relationship.
To add an SVC PPRC relationship, complete the following steps:1. From the command line, enter smit sysmirror.2. Select Cluster Applications and Resources > Resources > Configure SVC PPRC-Replicated
Resources > SVC PPRC Relationships Definition > Add an SVC PPRC Relationship, and pressEnter.
3. Enter field values as follows:
Table 22. Add an SVC PPRC Relationship fields
Field Value
Relationship Name The name used by both SVC and PowerHA SystemMirror for configuration of SVC PPRCRelationships. Use no more than 20 alphanumeric characters and underscores.
Master VDisk Info The Master and Auxiliary VDisk names use the format: vdisk_name@svc_cluster_name See thesection (PPRC-protected disks) for steps on how to discover what virtual disks (VDisks)correspond to the vpaths used for your configuration. The Master VDisk is the disk that residesat the primary site for the resource group the SVC PPRC Relationship will be a part of.
Auxiliary VDisk Info The Auxiliary VDisk is the disk at the backup site for the resource group the SVC PPRCRelationship will be a part of.
4. Press Enter when you have finished the definition.5. Create as many SVC PPRC Relationships that are required to manage all the vpaths used for volume
groups.Related reference:“Setting up volume groups and filesets on SVC PPRC-protected disks” on page 84As part of planning your PPRC SVC environment, decide what vDisks will be used to support volumegroups and file systems on the PowerHA SystemMirror cluster nodes.
Adding SVC PPRC replicated resourcesYou can use the SMIT interface to add SVC PPRC replicated resources.
To add an SVC PPRC replicated resource, complete the following steps:1. From the command line, enter smit sysmirror.2. From the SMIT interface, select Cluster Applications and Resources > Resources > Configure SVC
PPRC-Replicated Resources > SVC PPRC-Replicated Resource Configuration > Add an SVC PPRCResource, and press Enter.
3. Enter field values as follows:
88 Storage-based high availability and disaster recovery

Table 23. Add an SVC PPRC Resource fields
Field Value
SVC PPRC Consistency Group Name The name to be used by SVC and also to be used in the resource groupconfiguration. Use no more than 20 alphanumeric characters and underscores.
Master SVC Cluster Name Name of the Master cluster is the SVC Cluster connected to the PowerHASystemMirror Primary Site
Auxiliary SVC Cluster Name Name of the SVC Cluster connected to the PowerHA SystemMirrorBackup/Recovery Site
List of Relationships List of names of the SVC PPRC relationships
Copy Type Global Mirror processing provides a long-distance remote copy solution across twosites by using asynchronous technology. To use Global Mirroring, select GLOBAL.Metro Mirror functions offer a synchronous remote copy option that constantlyupdates a secondary copy of a volume to match changes that are made to a sourcevolume. To use Metro Mirroring, select METRO.
PowerHA SystemMirror Recovery Action If a site fallover occurs, specify the recovery policy that is used by PowerHASystemMirror. Select AUTOMATED to automatically use the recovery policy.Select MANUAL to use manual intervention when a site fallover occurs.
4. Press Enter.
Adding SVC PPRC consistency groups to PowerHA SystemMirror resource groupsAdd the SVC PPRC Consistency Groups created in the previous step to PowerHA SystemMirror resourcegroups.1. From the command line, enter smit sysmirror.2. From the SMIT interface, select Cluster Applications and Resources > Resource Groups, and press
Enter.Select Change/Show or Add a Resource Group depending on whether you are working with anexisting resource group or creating a new resource group.The SVC PPRC Replicated Resources entry appears at the bottom of the page in SMIT. This entry isa picklist that displays the resource names created in the previous step. Make sure that the volumegroups selected on the Resource Group configuration screen match the vDisks used for the SVC PPRCReplicated Resource.
3. Press Enter.
Setting up PowerHA SystemMirror Enterprise Edition for SVC Metro Mirror on AIXVirtual I/O clientsVirtual I/O Server allows a machine to be divided into LPARs, with each LPAR running a different OSimage allowing the sharing of physical resources between the LPARs including virtual SCSI and virtualnetworking. The VIO Server owns real PCI adapters (Ethernet, SCSI, or SAN), but lets other LPARs sharethem remotely using the built-in Hypervisor services. These other LPARs are called Virtual I/O clientpartitions or VIO clients. And because they don't need real physical disks or real physical Ethernetadapters to run, they can be created quickly and inexpensively.
Storage-based high availability and disaster recovery 89

As an example, in Figure 1 above, the VIO Server has a few disks that could be SCSI or fiber channelstorage area network (SAN) disks. The VIO clients use the VIO client device driver just as they would aregular local device disk to communicate with the matching server VIO device driver, then the VIOServer actually does the disk transfers on behalf of the VIO client.
When PowerHA SystemMirror Enterprise Edition for SVC Metro Mirror is configured on VIO clients theSVC clusters are not directly attached to the VIO clients, therefore the normally SCSI query commandscan not be used to extract the necessary SVC vdisk information. Even though no special configurationsteps are required to define the SVC PPRC resource to PowerHA SystemMirror Enterprise Edition, it isrequired that the following procedures have been performed already before verification can succeed. Ifthis has not been done perform the following actions before proceeding to perform the usual SVC PPRCconfiguration steps.
These steps assume that the disks subsystems have already been physically attached to the SVC clusters.All the necessary SCSI server adapters have been created on the servers and virtual client SCSI adaptershave been mapped to client partitions.1. On the SVC clusters, perform these actions:
a. Identify the managed disks MDisks using the svcinfo lsmdisk commandb. Identify or create the managed disk groups MDiskgrp using svcinfo lsmdiskgrp or the svctask
mkmdiskgrp commandc. Identify or Create the Virtual Disks using the svcinfo lsvdisk or the svctask mkvdisk commandd. Map the VDisks to the VIO Servers as hosts using the svctask mkvdiskhostmap.
2. On the VIO servers, perform these actionsTo get access to the regular AIX command line interface on the VIO server it is recommended thatyou run oem_setup_env.a. Run cfgmgr
b. Use odmget -q "id=unique_id" CuAt to identify the hdisks/vpaths mapped to the SVC vdisks onthe servers
c. Select the disk to export by running lsdev to show the virtual SCSI server adapters that could beused for mapping with a physical disk
d. Run the mkvdev command using the appropriate hdisk#s respectively to create the Virtual TargetDevice (this commands maps the LUNs to the virtual I/O clients:$ mkvdev -vdev hdisk# -vadapter vhost# -dev vhdisk#
e. Map the VDisks to the VIO Servers as hosts using the svctask mkvdiskhostmap.3. On the VIO clients
90 Storage-based high availability and disaster recovery

After the mkvdev command runs successfully on the VIO server, the LUNs will be exported to theVIO clients.a. Run lsdev -Cc disk to identify the LUN info on the clientb. Run cl_vpath_to_vdisk command to identify the SVC vdisk – LUN mapping on the VIO clients.
Verifying and synchronizing the PowerHA SystemMirror Enterprise Edition clusterAt this point, provided you have configured all the other aspects of your resource group (volume groupsbeing the most important), verify the cluster and SVC PPRC configuration.
Take the following steps:1. Verify the PowerHA SystemMirror cluster configuration (using SMIT).2. Verify the SVC PPRC configuration (using CLI).3. Synchronize the PowerHA SystemMirror Cluster configuration (using SMIT).
Verifying the PowerHA SystemMirror cluster configuration:
You can verify the PowerHA SystemMirror cluster configuration using SMIT.
Be careful to run verification only. You must use the Cluster Applications and Resources SMIT path to getthe correct menu.1. From the command line, enter smit sysmirror.2. Select Cluster Applications and Resources > Resources > Verify and Synchronize Cluster
Configuration and press Enter.Enter the field values as follows:
Table 24. Verification and Synchronization fields
Field Value
Verify Synchronize or Both Select Verify .
Automatically correct errors found during verification? Select Yes .
Force synchronization if verification fails? Select No (the default.)
Verify changes only? Select no to run all verification checks that apply to the currentcluster configuration.
Logging Standard is the default. You can also select Verbose . Verificationmessages are logged to /var/hacmp/clverify/clverify.log .
3. Press Enter. The output from the verification is displayed in the SMIT Command Status window.4. If you receive error messages, make the necessary changes and run the verification procedure again.
You may see Warnings if the configuration has a limitation on its availability; for example, only oneinterface per node per network is configured.
Verifying the SVC PPRC configuration:
You can verify the SVC PPRC configuration using the CLI.
To run the SVC PPRC verification, execute the following command:/usr/es/sbin/cluster/svcpprc/utils/cl_verify_svcpprc_config
If any configuration errors appear, go back into the PowerHA SystemMirror SMIT panels and correct theerrors, then re-run this script.
All the SVC PPRC Relationships and Consistency Groups named in the previous steps are created duringthis step. If there were any errors during execution of this script, the SVC PPRC consistency groups andrelationship may not be created.
Storage-based high availability and disaster recovery 91

To verify that the configuration exists, run the following two commands against either of the SVCclusters:ssh admin@<SVC Cluster IP> svcinfo lsrcrelationship
ssh admin@<SVC Cluster IP> svcinfo lsrcconsistgrp
Synchronizing the PowerHA SystemMirror cluster configuration:
You can propagate the new SVC PPRC configuration information (and possibly PowerHA SystemMirrorsite information) across your PowerHA SystemMirror cluster.
Follow these steps:1. From the command line, enter smit sysmirror.2. Select Cluster Applications and Resources > Verify can Synchronize Cluster Configuration, and
press Enter.Enter the field values as follows:
Table 25. Verification and Synchronization fields
Field Value
Verify Synchronize or Both Select Synchronize.
Automatically correct errors found during verification? Select No (the default.)
Force synchronization if verification fails? Select No (the default.)
Verify changes only? Select no to run all verification checks that apply to the currentcluster configuration.
Logging Standard is the default. You can also select Verbose. Verificationmessages are logged to /var/hacmp/clverify/clverify.log.
3. Press Enter. The cluster is synchronized. The output is displayed in the SMIT Command Statuswindow.
Starting the PowerHA SystemMirror Enterprise Edition SVC PPRC clusterYour PowerHA SystemMirror cluster is now ready to be started.
PowerHA SystemMirror will manage the SVC PPRC replicated resources you have just defined.PowerHA SystemMirror starts these SVC PPRC resources automatically, so there should be no need tomanually manage the SVC resources from this point, under normal PowerHA SystemMirror clusteroperation.
Changing an PowerHA SystemMirror Enterprise Edition for MetroMirror SVC configurationUsing SMIT, you can change, show, or remove cluster configurations, PPRC relationships, and resources.
Be sure to update the PowerHA SystemMirror resource group information and synchronize the clusterafter making changes.
Changing an SVC cluster configurationYou can use the SMIT interface to the change an SVC cluster configuration.
To change the SVC cluster, complete the following steps:1. From the command line, enter smit sysmirror.2. In SMIT, select Cluster Applications and Resources > Resources > Configure SVC-PPRC Replicated
Resources > SVC Clusters Definition to PowerHA SystemMirror > Change/Show an SVC Cluster,and press Enter:
3. Select the SVC cluster to change from the picklist, and press Enter.
92 Storage-based high availability and disaster recovery
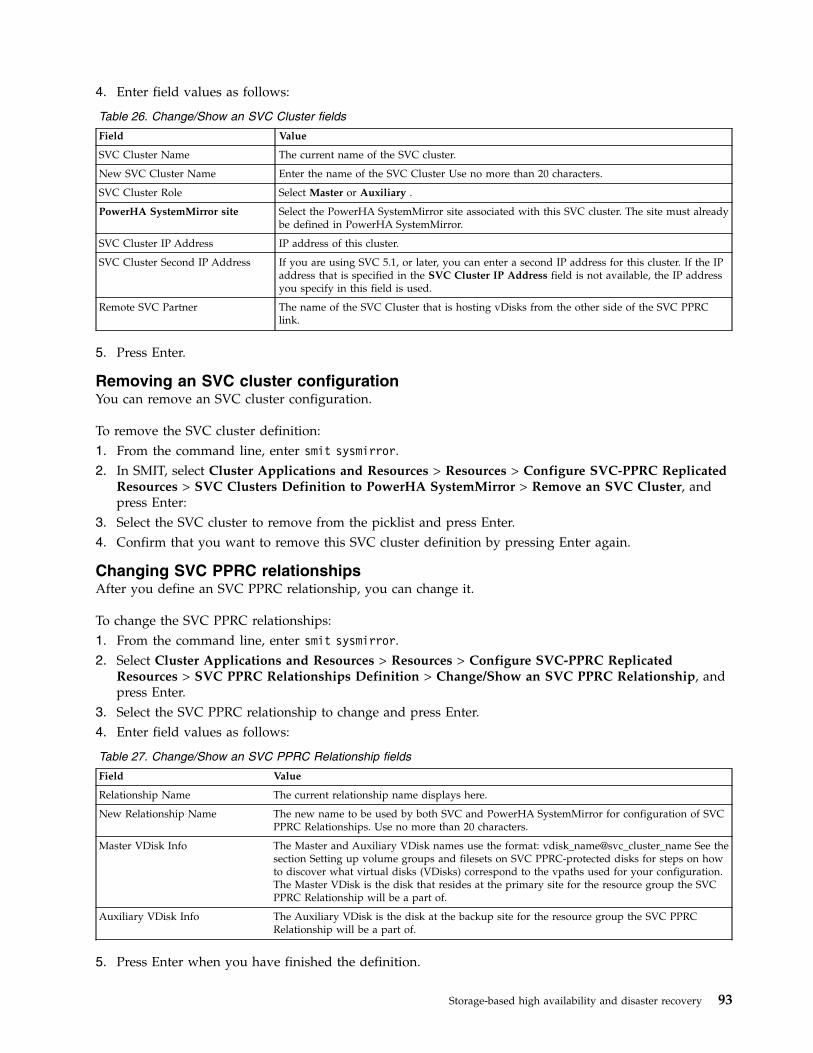
4. Enter field values as follows:
Table 26. Change/Show an SVC Cluster fields
Field Value
SVC Cluster Name The current name of the SVC cluster.
New SVC Cluster Name Enter the name of the SVC Cluster Use no more than 20 characters.
SVC Cluster Role Select Master or Auxiliary .
PowerHA SystemMirror site Select the PowerHA SystemMirror site associated with this SVC cluster. The site must alreadybe defined in PowerHA SystemMirror.
SVC Cluster IP Address IP address of this cluster.
SVC Cluster Second IP Address If you are using SVC 5.1, or later, you can enter a second IP address for this cluster. If the IPaddress that is specified in the SVC Cluster IP Address field is not available, the IP addressyou specify in this field is used.
Remote SVC Partner The name of the SVC Cluster that is hosting vDisks from the other side of the SVC PPRClink.
5. Press Enter.
Removing an SVC cluster configurationYou can remove an SVC cluster configuration.
To remove the SVC cluster definition:1. From the command line, enter smit sysmirror.2. In SMIT, select Cluster Applications and Resources > Resources > Configure SVC-PPRC Replicated
Resources > SVC Clusters Definition to PowerHA SystemMirror > Remove an SVC Cluster, andpress Enter:
3. Select the SVC cluster to remove from the picklist and press Enter.4. Confirm that you want to remove this SVC cluster definition by pressing Enter again.
Changing SVC PPRC relationshipsAfter you define an SVC PPRC relationship, you can change it.
To change the SVC PPRC relationships:1. From the command line, enter smit sysmirror.2. Select Cluster Applications and Resources > Resources > Configure SVC-PPRC Replicated
Resources > SVC PPRC Relationships Definition > Change/Show an SVC PPRC Relationship, andpress Enter.
3. Select the SVC PPRC relationship to change and press Enter.4. Enter field values as follows:
Table 27. Change/Show an SVC PPRC Relationship fields
Field Value
Relationship Name The current relationship name displays here.
New Relationship Name The new name to be used by both SVC and PowerHA SystemMirror for configuration of SVCPPRC Relationships. Use no more than 20 characters.
Master VDisk Info The Master and Auxiliary VDisk names use the format: vdisk_name@svc_cluster_name See thesection Setting up volume groups and filesets on SVC PPRC-protected disks for steps on howto discover what virtual disks (VDisks) correspond to the vpaths used for your configuration.The Master VDisk is the disk that resides at the primary site for the resource group the SVCPPRC Relationship will be a part of.
Auxiliary VDisk Info The Auxiliary VDisk is the disk at the backup site for the resource group the SVC PPRCRelationship will be a part of.
5. Press Enter when you have finished the definition.
Storage-based high availability and disaster recovery 93

6. Create as many SVC PPRC Relationships as will be necessary to manage all the vpaths used forvolume groups that will be managed by HAMCP.
Related reference:“Setting up volume groups and filesets on SVC PPRC-protected disks” on page 84As part of planning your PPRC SVC environment, decide what vDisks will be used to support volumegroups and file systems on the PowerHA SystemMirror cluster nodes.
Removing SVC PPRC relationshipsYou can remove an SVC PPRC relationship.
To remove the SVC PPRC relationships:1. From the command line, enter smit sysmirror.2. Select Cluster Applications and Resources > Resources > Configure SVC-PPRC Replicated
Resources > SVC PPRC Relationships Definition > Remove an SVC PPRC Relationship, and pressEnter.
3. Select the SVC PPRC relationship to remove and press Enter.4. Confirm that you want to remove this SVC PPRC relationship by pressing Enter again.
Changing SVC PPRC resourcesYou can use the SMIT interface to change existing SVC PPRC resources.
To change the SVC PPRC resources, complete the following steps:1. From the command line, enter smit sysmirror.2. Select Cluster Applications and Resources > Resources > Configure SVC-PPRC Replicated
Resources > SVC PPRC-Replicated Resource Configuration > Change/Show an SVC PPRCResource, and press Enter.
3. Select the SVC PPRC resource to change and press Enter.4. Enter field values as follows:
Table 28. Change/Show an SVC PPRC Resource fields
Field Value
SVC PPRC Consistency Group Name The current name that is used by SVC and also used in the Resource GroupConfiguration.
New SVC PPRC Consistency Group Name The new name that is used by SVC and also to be used in the ResourceGroup Configuration.
Master SVC Cluster Name The name of the Master cluster is the SVC Cluster connected to the PowerHASystemMirror Primary Site.
Auxiliary SVC Cluster Name The name of the SVC Cluster connected to the PowerHA SystemMirrorBackup/Recovery Site.
List of Relationships A list of names of the SVC PPRC relationships.
Copy Type Global Mirror processing provides a long-distance remote copy solution acrosstwo sites by using asynchronous technology. To use Global Mirroring, selectGLOBAL. Metro Mirror functions offer a synchronous remote copy optionthat constantly updates a secondary copy of a volume to match changes thatare made to a source volume. To use Metro Mirroring, select METRO.
PowerHA SystemMirror Recovery Action If a site fallover occurs, specify the recovery policy that is used by PowerHASystemMirror. Select AUTOMATED to automatically use the recovery policy.Select MANUAL to use manual intervention when a site fallover occurs.
5. Press Enter.
94 Storage-based high availability and disaster recovery
Removing SVC PPRC resourcesYou can remove SVC PPRC resources.
To remove the SVC PPRC resources:1. From the command line, enter smit sysmirror.2. Select Cluster Applications and Resources > Resources > Configure SVC-PPRC Replicated
Resources > SVC PPRC-Replicated Resource Configuration > Remove an SVC PPRC Resource, andpress Enter.
3. Select the SVC PPRC resource to remove and press Enter.4. Press Enter again to confirm this action.
Troubleshooting PowerHA SystemMirror Enterprise Edition for MetroMirror for SVCThese topics provide information that might help you with troubleshooting SVC PPRC clusters.
SVC PPRC states
The following PPRC Volume states are possible, for either Consistency Groups or PPRC Relationships:v inconsistent_stopped
In this state, the Primary is accessible for read and write I/O but the Secondary is not accessible foreither. A copy process needs to be started to make the Secondary Consistent.
v inconsistent_copying
In this state, the Primary is accessible for read and write I/O but the Secondary is not accessible foreither. This state is entered after a Start command is issued to an InconsistentStopped Relationship orConsistency Group. It is also entered when a Forced Start is issued to an Idling or ConsistentStoppedRelationship or Consistency Group. A background copy process will run which will copy data from thePrimary to the Secondary virtual disk.
v consistent_stopped
In this state, the Secondary contains a Consistent image but it might be out-of-date with respect to thePrimary.
v consistent_synchronized
In this state, the Primary VDisk is accessible for read and write I/O. The Secondary VDisk is accessiblefor read-only I/O. Writes that are sent to the Primary VDisk are sent to both Primary and SecondaryVDisks. Either good completion must be received for both writes, or the write must be failed to thehost, or a state transition out of ConsistentSynchronized must take place before a write is completed tothe host.
v idling
Both Master and Auxiliary disks are operating in the Primary role. Consequently both are accessible forwrite I/O. In this state the Relationship or Consistency Group will accept a 'Start' command. RemoteCopy maintains a record of regions on each disk which have received write I/O while Idling. This willbe used to determine what areas need to be copied following a 'Start' command.
v idling_disconnected
The Virtual Disk(s) in this half of the Relationship or Consistency Group are all in the Primary role andwill accept read or write I/O. No configuration activity is possible (except for deletes or stops) untilthe Relationship becomes connected again. At that point, the Relationship will transition to aConnected state.
v inconsistent_disconnected
The Virtual Disks in this half of the Relationship or Consistency Group are all in the Secondary roleand will not accept read or write I/O. No configuration activity except for deletes is permitted until theRelationship becomes connected again.
Storage-based high availability and disaster recovery 95

v consistent_disconnected
The VDisks in this half of the Relationship or Consistency Group are all in the Secondary role and willaccept read I/O but not write I/O. This state is entered from ConsistentSynchronized orConsistentStopped when the Secondary side of a Relationship becomes disconnected.
v empty
This state only applies to Consistency Groups. It is the state of a Consistency Group which has noRelationships and hence no other state information to show. It is entered when a Consistency Group isfirst created. It is exited when the first Relationship is added to the Consistency Group at which pointthe state of the Relationship becomes the state of the Consistency Group.
Viewing the state of consistency groups
To view the current state of the consistency groups PowerHA SystemMirror is managing (via theconfigured resource groups) execute the following command on any of the PowerHA SystemMirrorcluster nodes:ssh admin@<SVC cluster IP address> svcinfo lsrcconsistgrp
where <SVC Cluster IP Address> is for either SVC cluster being used by PowerHA SystemMirror.
Viewing SVC clustersYou can use commands to view information about SVC clusters.
These commands are stored in the /usr/es/sbin/cluster/svcpprc/cmds directory.
cllssvc command:
List SVC cluster information.cllssvc [-n < svccluster_name >] [-c]
The command lists information about all SVC clusters in the PowerHA SystemMirror configuration or aspecific SVC cluster. If no SVC is specified, all SVC clusters defined will be listed. If a specific SVCcluster is provided via the -n flag, information about this SVC only will be displayed. The -c flag displaysinformation in a colon-delimited format.
Sample output[/usr/es/sbin/cluster/svcpprc/cmds]> cllssvcsvc9Asvc78
[/usr/es/sbin/cluster/svcpprc/cmds]> cllssvc -n svc9Asvccluster_name svccluster_role sitename cluster_ip r_partnersvc9A AuxiliaryVancouver 9.114.230.93 svc78
[/usr/es/sbin/cluster/svcpprc/cmds]> cllssvc -n svc9A -c#SVCNAME:ROLE:SITENAME:IPADDR:RPARTNERsvc9A:Auxiliary:Vancouver:9.114.230.93:svc78
cllssvcpprc command:
List information about all SVC PPRC resources or a specific SVC PPRC resource.cllssvcpprc [-n < svcpprc_consistencygrp >] [-c] [-a] [-h]
If no resource name is specified, the names of all PPRC resources defined will be listed. If the -a flag isprovided, full information about all PPRC resources is displayed. If a specific resource is provided via the-n flag, information about this resource only will be displayed. The -c flag displays information in acolon-delimited format. The -h flag turns off the display of column headers.
96 Storage-based high availability and disaster recovery

Sample output[/usr/es/sbin/cluster/svcpprc/cmds]> cllssvcpprc<HASVC1
[/usr/es/sbin/cluster/svcpprc/cmds]> cllssvcpprc -n HASVC1svcpprc_consistencygrp MasterCluster AuxiliaryCluster relationshipsHASVC1 svc78 svc9A svcrel1
[/usr/es/sbin/cluster/svcpprc/cmds]> cllssvcpprc -n HASVC1 -ca#NAME:MASTER:AUXILIARY:RELATIONSHIPSHASVC1:svc78:svc9A:svcrel1
cllsrelationship command:
List information about all SVC PPRC relationships or a specific PPRC relationship.cllsrelationship [-n <relationship_name>] [-c] [-a] [-h]
If no resource name is specified, the names of all PPRC resources defined will be listed. If the -a flag isprovided, full information about all PPRC relationship is displayed. If a specific relationship is providedvia the -n flag, information about this relationship only will be displayed. The -c flag displaysinformation in a colon-delimited format. The -h flag turns off the display of column headers.
Sample output[/usr/es/sbin/cluster/svcpprc/cmds]> cllsrelationshipsvcrel1
[/usr/es/sbin/cluster/svcpprc/cmds]> cllsrelationship -n svcrel1relationship_name MasterVdisk_info AuxiliaryVdisk_infosvcrel1 c48f1rp06_075@svc78 c48f2rp08_095@svc9A
[/usr/es/sbin/cluster/svcpprc/cmds]> cllsrelationship -n svcrel1 -c#RELATIONSHIP:MASTERVDISK:AUXVDISKsvcrel1:c48f1rp06_075@svc78:c48f2rp08_095@svc9A
cl_verify_svcpprc_config command:
Verifies the SVC definition in the PowerHA SystemMirror configuration.
After the successful verification of the SVC configurations, it establishes all the SVC relationships definedto PowerHA SystemMirror on the SVC clusters and adds them to the corresponding consistency groups.
Disaster recovery management with EMC SRDF replicationPowerHA SystemMirror implements disaster recovery with SRDF storage devices by using the EMCsupplied Symmetrix command-line interface (SYMCLI).
PowerHA SystemMirror uses SYMCLI to automatically manage and monitor the status of SRDF devicesand SRDF links. PowerHA SystemMirror can also use SYMCLI to automatically manage the switching ofthe direction for the SRDF relationships when a site failover occurs. If a primary site fails, the backup siteis able to take control of the resource that PowerHA SystemMirror manages from the primary site.
PowerHA SystemMirror uses SYMCLI to discover the SRDF deployment and capture any missingreplication-related information from the administrator. Using this information, PowerHA SystemMirrormanages the replicated devices as part of the highly available environment for the applications andresource groups.
To enable the PowerHA SystemMirror for HADR of EMC storage devices, complete the following steps:
Storage-based high availability and disaster recovery 97

1. Plan the storage deployment and mirroring functions that are necessary for your environment. Thisstep is related to the applications and middleware that are deployed in the environment, that ismanaged by PowerHA SystemMirror.
2. Use the EMC tools to configure and deploy the storage devices.
Note: Verify whether the gatekeeper devices are mapped and masked to a single host and are notshared for concurrent I/O across hosts. For more information about gatekeeper devices, go to theEMC Enterprise Single Sign-on web page (http://support.emc.com) and search for emc25597.
3. Use PowerHA SystemMirror interfaces to discover the storage devices that are deployed.4. Define PowerHA SystemMirror policies for the applications or resource groups that are using the
mirrored storage devices.
Note: Complete steps 1 and step 2 before you configure PowerHA SystemMirror for HADRmanagement of EMC storage devices.
EMC SRDF conceptsPowerHA SystemMirror implements disaster recovery with SRDF storage devices by using anEMC-supplied Symmetrix command-line interface (SYMCLI).
PowerHA SystemMirror uses SYMCLI to automatically manage SRDF links and to switch the direction ofthe SRDF relationships when a site failover occurs. If a primary site fails, the backup site controls thePowerHA SystemMirror managed resource groups from the primary site.
PowerHA SystemMirror uses these interfaces to discover and integrate the replicated storage from anEMC storage device into the High Availability and Disaster Recovery (HADR) framework of PowerHASystemMirror. You can use this configuration to manage the HADR framework of your applications thatare using the mirrored storage devices.
Integration of SRDF and PowerHA SystemMirror provides the following benefits:v Support for either Prefer Primary Site or Online on Either Site inter-site management policies.v Flexible user-customizable resource group policies.v Support for cluster verification and synchronization.v Limited support for the PowerHA SystemMirror Cluster Single Point Of Control (C-SPOC).v Automatic failover and reintegration of server nodes that are attached to pairs of SRDF disk
subsystems within sites and across sites.
EMC SRDF modesPowerHA SystemMirror supports SRDF replicated resources in synchronous mode (SDRF/S) and inasynchronous mode (SRDF/A).
SRDF synchronous replication In the synchronous mode, the EMC storage device responds to the host that issued a writeoperation to the source of the composite group after the EMC storage, which contains the targetof the composite group, acknowledges that it has received and checked the data.
SRDF asynchronous replicationIn the asynchronous mode, the EMC storage device provides a consistent point-in-time image onthe target of the composite group, which is a short period of time behind the source of thecomposite group. Asynchronous mode is managed in sessions. Asynchronous mode transfers datain predefined timed cycles or in delta sets to ensure that data at the remote target of thecomposite group site is in the dependent write consistent state.
Related tasks:“Adding an SRDF replicated resource” on page 105You must add an SRDF replicated resource before you can add a them to a resource group.
98 Storage-based high availability and disaster recovery

EMC SRDF consistency groupsAll Symmetrix Remote Data Facility (SRDF) operations in PowerHA SystemMirror Enterprise Editionclusters are performed on a composite group and not on individual device groups. The composite groupthat is enabled for consistency is known as the consistency group.
The consistency groups operate in unison to preserve the integrity and dependent write consistency of adatabase distributed across multiple arrays. Consistency for a SRDF replicated resource is maintained atthe composite group level on the EMC storage device.
The following table displays the valid states for a composite group.
Table 29. Valid composite group states
State Description
SyncInProg A synchronization is currently in progress between the source ofthe composite group and the target of the composite group.There are existing invalid tracks between the two pairs and thelogical link between both sides of an RDF pair is up.
Synchronized This state is applicable only to the synchronous mirroring mode.The source of the composite group and the target of thecomposite group are currently in a synchronized state. The samecontent exists on the target of the composite group as the sourceof the composite group. There are no invalid tracks between thetwo pairs.
Split The source of the composite group and the target of thecomposite group are currently Ready to their hosts, but the linkis Not Ready or Write Disabled.
Failed Over The source of the composite group is currently Not Ready orWrite Disabled and operations are failed over to the target of thecomposite group.
R1 Updated The source of the composite group is currently Not Ready orWrite Disabled to the host, there are no local invalid tracks onthe source of the composite group side, and the link is Ready orWrite Disabled.
R1 UpdInProg The source of the composite group is currently Not Ready orWrite Disabled to the host, there are invalid local tracks on thesource side, and the link is Ready or Write Disabled.
Suspended The RDF links have been suspended and are Not Ready orWrite Disabled. If the source of the composite group is Readywhile the links are suspended, any I/O will accumulate asinvalid tracks owed to the target of the composite group.
Partitioned The SYMAPI is currently unable to communicate through thecorresponding RDF path to the remote Symmetrix.
Mixed A composite SYMAPI device group that is in an RDF pair state.Different SRDF pair states exist within a device group.
Invalid This is the default state when no other SRDF state applies. Thecombination of the source of the composite group, the target ofthe composite group, and RDF link states and statuses do notmatch any other pair state. This state might occur if there is aproblem at the disk director level.
Consistent The target source of the composite group for the SRDF/Acapable devices are in a consistent state. Consistent statesignifies the normal state of operation for device pairs that areoperating in asynchronous mode. This state is applicable only toasynchronous mirroring.
Transmit Idle This state is applicable only to asynchronous mirroring. TheSRDF/A session cannot move data in the transmit cycle acrossthe link because the link is not available.
Related tasks:
Storage-based high availability and disaster recovery 99
“Adding an SRDF replicated resource” on page 105You must add an SRDF replicated resource before you can add a them to a resource group.
Planning for SRDF replicationBefore you use SRDF replication for disaster recovery, you must plan to implement SRDF managementwithin an PowerHA SystemMirror environment.
Review the following information before you implement SDRF replication in your environment:v Configure PowerHA SystemMirror Enterprise Edition 7.1.2, or later, across all sites.v Identify SRDF mirroring relationships between storage devices.v Configure the EMC Solution Enabler software on all nodes in the cluster.v Export the consistency groups from nodes that are configured correctly and import the configuration to
other nodes in the cluster.v Configure the various mirroring relationships by using the EMC Solution Enabler software.
Note: Disks are grouped together as necessary for consistency device groups, or composite groups areconfigured, and SRDF pairs are created. You cannot use PowerHA SystemMirror to create SRDF pairs.
Review the following information to plan for SRDF replicated resources in an PowerHA SystemMirrorcluster:v Identify the composite groups or device groups that must be included in the PowerHA SystemMirror
resource groups.v Identify the SRDF pairs and establish the SRDF relationship in PowerHA SystemMirror.v Identify the volume sets, associated volume groups, and the volume group associations with the
applications and middleware software that you are deploying.v Identify associations between applications and the resource groups.v Identify which resource groups contain the SRDF replicated resources.Related information:
Overivew of Groups in EMC Symmetrix and Solution Enabler Environments
Limitations and restrictions of SRDF managementBefore you implement SRDF management, you must be aware of the limitations and restrictions.
PowerHA SystemMirror Enterprise Edition for mirroring with SRDF has the following limitations andrestrictions:v Multi-Hop configuration is not supported.v Mirroring to BCV devices is not supported.v Concurrent RDF configuration is not supported.v PowerHA SystemMirror Enterprise Edition does not support EMC storages that are indirectly
connected to the AIX host system through a host computer.v PowerHA SystemMirror does not trap SNMP notification events for VMAX storage. If the SRDF link
goes down when the cluster is up, and then the link is repaired, you must manually resync the pairs.v The SRDF pair must be created outside of the cluster control. You must create the SRDF pairs before
you start cluster services.v EMC PowerPath disks are not supported for use as a tiebreaker disk.v PowerHA SystemMirror Enterprise Edition does not correct the SRDF pairs or resynchronize the pairs
if the pair states are in the invalid state.
100 Storage-based high availability and disaster recovery
Note: A pair in an invalid state might lead to data corruption if PowerHA SystemMirror EnterpriseEdition tries to recover the state. A pair can be in an invalid state if there is a problem at the diskdirector level.
v Resource groups that are managed by PowerHA SystemMirror cannot contain volume groups withdisks that are SRDF-protected and disks that are not SRDF-protected.For example:– Correct example: RG1 contains VG1 and VG2, VG1 and VG2 are both SRDF-protected disks.– Incorrect example: RG2 contains VG3 and VG4, where VG3 is an SRDF-protected disk, and VG4 is
not an SRDF-protected disk.v Use C-SPOC for the following LVM operations to configure nodes at the remote site that contain the
target volumes:– Creating a volume group.– Operations that require nodes at the target site to write to the target volumes (for example, changing
file system size, changing the mount point, and adding LVM mirrors) cause an error message inC-SPOC. However, nodes on the same site as the source volumes can successfully perform thesetasks. The changes are then propagated to the other site by using the lazy update function.
Note: For C-SPOC operations to work on all other LVM operations, you must perform all C-SPOCoperations when the cluster is active on all PowerHA SystemMirror nodes, and the underlying SRDFpairs are in a synchronized state.
Example configuration for SRDF managementThis example assumes that your environment consists of a mutual recovery configuration in which aproduction site stores different applications and services, and a recovery site acts as an associated backupsite.
The following configuration is required to implement a mutual recovery configuration:v Two PowerHA SystemMirror sites, which are the same as a single recovery configurationv Two resource groups, with each resource group configured to use mirrored storage
In PowerHA SystemMirror, you can configure two sites and a resource group that includes nodes,SRDF-managed replicated resources, and the volume groups that are associated with the replicatedresources.
The SYMCLI client is installed on the PowerHA SystemMirror hosts and on each of the PowerHASystemMirror managed nodes. The EMC SRDF operations are completed by using the SYMCLI softwareon a AIX server. You can use the SYMCLI software on the AIX server to display EMC SRDF informationand run SRDF operations from the command line or with a script file.
An SRDF replicated resource contains the EMC disk volume pairs (composite group) information. ThePowerHA SystemMirror resource group definition includes the volume groups that are built on SRDFreplicated volumes. PowerHA SystemMirror manages SRDF processing by dynamically running theSYMCLI commands.
The following image displays a typical implementation of two EMC VMAX storage with SRDF in afour-node PowerHA SystemMirror geographic cluster. The cluster consists of four IBM Power Systems™
servers. Each storage device is connected to a node (Server A, Server B, Server C, and Server D) throughSCSI or Fibre Channel links. The SRDF links are established between the Primary storage and theSecondary storage. The configuration also includes point-to-point networks for heartbeating to connectthe cluster nodes together.
The order of the nodes in each resource group’s node list indicates which site is considered as theproduction site and which site is considered as the backup site for that resource group.
Storage-based high availability and disaster recovery 101

In the following figure the configuration for resource group 1 is as follows:
Ordered site listProduction site, Recovery site
Ordered node listServer A, Server B, Server C, and Server D
The data mirroring goes from Primary storage, which is owned by the Production site, to the Secondarystorage, which is owned by the Secondary site.
Setting up volume groups and file systems on SRDF protected disksAs part of planning your PowerHA SystemMirror Enterprise Edition SRDF environment, you mustdecide what disks are used to support volume groups and file systems on the PowerHA SystemMirrorcluster nodes.
Note: If EMC hdisks are not available to your nodes, you can verify that EMC storage is configuredcorrectly to make the EMC disks available by rebooting the node and by running the cfgmgr commandto make the disks viewable.
You cannot use PowerHA SystemMirror Enterprise Edition to create SRDF replication pairs. You must usethe EMC Solution Enabler interfaces to create the SRDF pairs before you can use PowerHA SystemMirrorEnterprise Edition.
To discover composite groups, devices groups, and AIX disks that are associated with EMC storagedevices, complete the following steps:1. From the command line, enter the following command to list all host-visible Symmetrix devices:
Figure 1. Sample configuration of resource groups for SRDF-managed replicated resources
102 Storage-based high availability and disaster recovery
# symdev list pd
Example of the output follows:Symmetrix ID: 000190100304
Device Name Directors Device-------------------------------------------------------------------------------
CapSym Physical SA :P DA :IT Config Attribute Sts (MB)-------------------------------------------------------------------------------0026 /dev/rhdiskpower48 04A:1 16D:D5 RDF1+Mir Grp’d RW 43140027 /dev/rhdiskpower49 04A:1 01D:D4 RDF1+Mir Grp’d RW 43140028 /dev/rhdiskpower50 04A:1 01A:C8 RDF1+Mir Grp’d RW 43140029 /dev/rhdiskpower51 04A:1 16A:C9 RDF1+Mir Grp’d RW 4314002A /dev/rhdiskpower52 04A:1 01C:C6 RDF1+Mir N/Grp’d RW 4314002B /dev/rhdiskpower53 04A:1 16C:C7 RDF1+Mir N/Grp’d RW 43140F5C /dev/rhdisk56 04A:1 01C:CA 2-Way Mir N/Grp’d VCM RW 60F9A /dev/rhdiskpower0 04A:1 16C:CB 2-Way Mir N/Grp’d RW 60F9B /dev/rhdiskpower1 04A:1 16A:CB 2-Way Mir N/Grp’d RW 6
2. From the list, select the devices that stores the application data.3. Identify the AIX disks for the Symmetrix device you selected by running the following command:
# powermt display dev=Symmetrix_device_namePseudo name=Symmetrix_device_name
In the following example, the Symmetrix device maps to hard disks hdisk105, hdisk50, hdisk120, andhdisk175 through the two I/O paths, fscsi1 and fscsi0:Symmetrix ID=000190100304Logical device ID=0026state=alive; policy=SymmOpt; priority=0; queued-IOs=0==============================================================================---------------- Host --------------- - Stor - -- I/O Path - -- Stats ---### HW Path I/O Paths Interf. Mode State Q-IOs Errors==============================================================================
1 fscsi1 hdisk105 FA 13aB active alive 0 00 fscsi0 hdisk120 FA 4aB active alive 0 00 fscsi0 hdisk175 FA 13aB active alive 0 01 fscsi1 hdisk50 FA 4aB active alive 0 0
4. Create a volume group with the physical volumes of the Symmetrix device. For example, when youcreate these volume groups you are creating file systems and logical volumes. You must configurevolume groups by using Logical Volume Manager (LVM) on the primary site.
5. Create composite groups and device groups on the EMC storage and add Symmetrix devices tothese groups.
6. Establish full mirroring between the SRDF pairs so that the entire LVM metadata and other data arecopied over to the mirrored volumes.
7. Configure the SRDF replicated resources in PowerHA SystemMirror Enterprise Edition.8. Split the SRDF by using the split command to access the mirrored data on the secondary site.9. Import the volume groups on the secondary site by specifying the same volume groups name and
major number that is used on the primary site for the mirrored storage device.10. Varyon the volume groups and mount the file systems.
Installing SRDF filesetsTo perform any installation task, you must be logged in to the system as a root user.
Software prerequisite
Before you install SRDF filesets, the following software must be installed on all nodes in the cluster:v Your environment must have one of the following version of the AIX operating system installed:
Storage-based high availability and disaster recovery 103

– IBM AIX 6.1 with Technology Level 8, or later– IBM AIX 7.1 with Technology Level 2, or later
v PowerHA SystemMirror Enterprise Edition at the same version.v EMC Solution Enabler for AIX software.v SYMCLI software for AIX. The fileset level for SYMCLI.SYMCLI.rte must be 7.0.0.0, or later.v Java SE Runtime Environment Version 1.6.0, or later.
Note: The default installation directory /usr/java[0-9]*/jre/bin is required to work with SRDF filesets.
Installing SRDF filesets
The following filesets are included on the PowerHA SystemMirror Enterprise Edition media and must beinstalled for SRDF management to work:
cluster.es.sr.cmdsPowerHA SystemMirror Enterprise Edition for SRDF commands
cluster.es.sr.rtePowerHA SystemMirror Enterprise Edition for SRDF runtime commands
cluster.msg.en_US.srPowerHA SystemMirror Enterprise Edition for SRDF English messages
Complete the following steps to install the PowerHA SystemMirror SRDF filesets:1. From the command line, enter smit install.2. From the SMIT interface, select Install and Update Software > Install Software and press Enter.3. Enter the path to the SRDF filessets that you want to install.
Note: All PowerHA SystemMirror SRDF filesets are installed in the /usr/es/sbin/cluster/emcsrdfdirectory.
Configuring SRDF replicated resourcesAfter you install SYMCLI you must configure the cluster.
SRDF and PowerHA SystemMirror configuration requirementsYou must verify that your environment meets specific requirements before you can configure PowerHASystemMirror Enterprise Edition to work with the SRDF.
Before configuring PowerHA SystemMirror Enterprise Edition to work with SRDF, verify that thefollowing criteria is implemented in your environment:v The SRDF is configured and running on the storage systems.v The SYMCLI software is installed.v You have a good understanding of how PowerHA SystemMirror sites and SRDF replicated resources
work.v The base PowerHA SystemMirror Enterprise Edition for Metro Mirror and SRDF management filesets
are installed on each node in the cluster.v The PowerHA SystemMirror cluster has the following functions configured:
– Nodes– Sites– Networks and network interfaces– Service labels and application monitors– Initial resource groups
104 Storage-based high availability and disaster recovery
Note: You can modify the attributes for a resource group later to accommodate SRDF replicatedresources.
Adding an SRDF replicated resourceYou must add an SRDF replicated resource before you can add a them to a resource group.
To add an SRDF replicated resource, complete the following steps:
Note: A device group configuration, without a composite group definition, is only supported inPowerHA SystemMirror 7.1.3, or later.1. From the command line, enter smit sysmirror.2. From the SMIT interface, select Cluster Applications and Resources > Resources > Configure EMC
SRDF Replicated Resources > Add EMC SRDF Replicated Resource, and press Enter.3. Enter values for each of the following fields and press Enter:
EMC SRDF Replicated Resource NameThe name of the SRDF replicated resource that is defined to PowerHA SystemMirror as acomposite group or a device group on the EMC storage device. You can choose an existingcomposite group or device group. You can also define a new group by listing the devicegroups that are included in the composite group or by listing the device group in thereplicated resource.
EMC SRDF ModeThe SRDF mirroring mode. You can enter SYNC (synchronous mirroring) or ASYNC(asynchronous mirroring).
Device GroupsA list of device groups that is included in the preceding composite group or a device group inthe replicated resource.
Recovery ActionIf a site failover occurs, specify the disaster recovery policy that is used by the PowerHASystemMirror resource group. Enter Manual if you want manual intervention when sitefailover occurs. Enter Automated if you do not want manual intervention when site failoveroccurs.
Note: If you specify Manual, it does not indicate that a manual intervention is required for allfailover scenarios. There are some conditions, such as cluster partition, in which an automaticfailover from one site to another, can cause potential data divergence and integrity issues. IfPowerHA SystemMirror detects the potential issue for such a case, and if the recovery actionassociated with the mirror group is set to Manual, PowerHA SystemMirror does not run anautomatic failover.
Resync ActionIf a site failover occurs, specify how you want to resynchronize the data between the sitesafter the failed site is brought back online. Enter AUTO if you want to automaticallyresynchronize the data between the sites as soon as the failed site is online. Enter MANUAL ifyou want to manually resynchronize the data between the sites. The default value for thisfield is AUTO.
Consistency EnabledEnter Yes to enable consistency for the SRDF replicated resource, which is defined as thecomposite group on the EMC storage device. Enter No to disable consistency for the SRDFreplicated resource.
SRDF Group TypeIf devices are managed as a composite group, select CompGroup. If devices are managed as adevice group, select DevGroup.
Related concepts:
Storage-based high availability and disaster recovery 105

“EMC SRDF modes” on page 98PowerHA SystemMirror supports SRDF replicated resources in synchronous mode (SDRF/S) and inasynchronous mode (SRDF/A).“EMC SRDF consistency groups” on page 99All Symmetrix Remote Data Facility (SRDF) operations in PowerHA SystemMirror Enterprise Editionclusters are performed on a composite group and not on individual device groups. The composite groupthat is enabled for consistency is known as the consistency group.
Adding a SRDF replicated resource to a PowerHA SystemMirror resource groupThe SRDF replicated resources must be added to a resource group before they can be managed byPowerHA SystemMirror.
To add a SRDF replicated resource to a PowerHA SystemMirror resource group, complete the followingsteps:1. From the command line, enter smit sysmirror.2. From the SMIT interface, select Cluster Applications and Resources > Resource Groups >
Change/Show Resources and Attributes for a Resource Group, and press Enter.3. In the EMC SRDF Replicated Resource field select the SRDF replicated resource, and press Enter.
Note: The resource group that you select must be the same resource group you used when youcreated the SRDF replicated resource.
4. Verify and synchronize the cluster.
Verifying the SRDF configurationYou must verify the SRDF configuration from the command-line interface.
To verify the SRDF configuration, complete the following steps:1. From the command line, run the /usr/es/sbin/cluster/sr/utils/cl_verify_sr_config command.2. If the verification is successful, the following message is displayed:
PowerHA SystemMirror support for EMC SRDF configuration verified successfully. Status=0
If the verification is not successful, fix any error messages and run the cl_verify_sr_config commandagain.
Starting the SRDF clusterAfter you configure and synchronize SRDF replicated resources, you can start the PowerHASystemMirror Enterprise Edition cluster. PowerHA SystemMirror Enterprise Edition automaticallymanages the SRDF replicated resources that you defined. Therefore, you do not have to manually managethe SRDF replicated resources.
To start the PowerHA SystemMirror Enterprise Edition cluster, complete the following steps:1. From the command line, enter smit cl_admin.2. From the C-SPOC interface, select PowerHA SystemMirror Services > Start Cluster Services.3. Complete all fields, and press Enter to start the cluster services.
Note: Verification runs automatically at cluster startup. You can turn off this option, but it is notrecommended.
Changing SRDF replicated resourcesYou can change the SRDF replicated resources by using the SMIT interface.
Complete the following steps to change the SRDF replicated resources:1. From the command line, enter smit sysmirror.
106 Storage-based high availability and disaster recovery

2. From the SMIT interface, select Cluster Applications and Resources > Resources > Configure EMCSRDF-replicated resources > Change/Show EMC SRDF replicated resource, and press Enter.
3. Select the SRDF replicated resource that you want to change from the list and press Enter.4. Make your changes to the fields, and press Enter.5. Verify and synchronize the cluster.
Removing a SRDF replicated resourceYou can remove a SRDF replicated resource by using the SMIT interface.
To remove a SRDF replicated resource, complete the following steps:1. From the command line, enter smit sysmirror.2. From the SMIT interface, select Cluster Applications and Resources > Resources > Configure EMC
SRDF-replicated resources > Remove EMC SRDF replicated resource, and press Enter.3. Select the SRDF replicated resource that you want to remove from the list and press Enter.4. Confirm that you want to remove this SRDF replicated resources and press Enter.5. Verify and synchronize the cluster.
Hitachi Truecopy/HUR replication resourcesPowerHA SystemMirror Enterprise Edition Version 7.1.2 with Service Pack 2, or later, supports HighAvailability Disaster Recovery support for third-party vendor storage from Hitachi.
Hitachi Storage system supports short distance replication and long-distance replication throughTruecopy synchronous and asynchronous replication with Hitachi Universal Replicator (HUR)technologies. PowerHA SystemMirror Enterprise Edition enables integrated discovery and managementof mirrored resources for management of Highly Available (HA) resource groups.
PowerHA SystemMirror Enterprise Edition enablement for High-Availability and Disaster Recovery(HADR) of Hitachi mirrored storage involves the following steps:1. Plan the storage deployment and replication necessary for your environment. This process is related
to the applications and middleware being deployed in the environment which would eventually beHA managed by PowerHA SystemMirror Enterprise Edition.
2. Use the provided storage configuration tools provide by Hitachi to configure the storage devices youdefined in step 1 and deploy them.
3. Use PowerHA SystemMirror Enterprise Edition interfaces to discover the deployed storage devicesand define the HA policies for the applications or resource groups that are consuming the mirroredstorage.
Overview of Truecopy/HUR ManagementHitachi Truecopy/HUR storage management uses Command Control Interface (CCI) operations from theAIX operating system and PowerHA SystemMirror Enterprise Edition environment.
PowerHA SystemMirror Enterprise Edition uses these interfaces to discover and integrate the HitachiStorage replicated storage into the HADR framework of PowerHA SystemMirror Enterprise Edition. Thisintegration enables you to manage HADR for applications consuming the mirrored storage.
Integration of Truecopy/HUR and PowerHA SystemMirror Enterprise Edition provides the following:v Support for Prefer Primary Site or Online on Either Site inter-site management policies.v Flexible user-customizable resource group policies.v Support for cluster verification and synchronization.
Storage-based high availability and disaster recovery 107

v Limited support for the PowerHA SystemMirror Enterprise Edition Cluster Single Point Of Control(C-SPOC).
v Automatic failover and reintegration of server nodes attached to pairs of Truecopy/HUR disksubsystem within sites and across sites.
v Automatic management for Truecopy/HUR links.v Management for switching the direction of the Truecopy/HUR relationships when a site failure occurs.
This process allows the backup site to take control of the PowerHA SystemMirror Enterprise Editionmanaged resource groups from the primary site.
Planning for Truecopy/HUR ManagementTo successfully use Truecopy/HUR Management, you must correctly plan for its implementation.
Before you continue, your environment must meet the following requirements:v PowerHA SystemMirror Enterprise Edition sites are already correctly configured.v Truecopy/HUR support is already correctly configured.Related information:
Hitachi Command Control Interface (CCI) User and Reference Guide
Limitations for Truecopy/HUR ManagementTo implement Truecopy/HUR Management correctly, you must know its limitations.
PowerHA SystemMirror Enterprise Edition for mirroring with Truecopy/HUR has the followinglimitations:v Only fence level NEVER is supported for synchronous mirroring.v Only HUR is supported for asynchronous mirroring.v The dev_name must map to a logical devices and the dev_group should be defined under
HORCM_LDEV section in the horcm.conf file.v The PowerHA SystemMirror Enterprise Edition Truecopy/HUR solution uses dev_group for any basic
operation. For example, pairresync/pairevtwait/horctakeover. If there are several dev_names in adev_group, the dev_group must be consistency enabled.
v PowerHA SystemMirror Enterprise Edition does not trap SNMP notification events for Truecopy/HURstorage. If a Truecopy link goes down when the cluster is up and later the link is repaired you need tomanually resync the pairs.
v The creation of pairs is done outside the cluster control. You must create the pairs before startingcluster services.
v Resource groups that are managed by PowerHA SystemMirror Enterprise Edition cannot containvolume groups with both Truecopy/HUR-protected and non-Truecopy/HUR-protected disks. AResource group must have either a Truecopy protected disk or a HUR protected disk.
v All nodes in the PowerHA SystemMirror Enterprise Edition cluster must use same horcm instance.v You cannot use C-SPOC for the following LVM operations to configure nodes at the remote site that
contain the target volume:– Creating a volume group.– Operations that require nodes at the target site to write to the target volumes. For example,
changing file system size, changing mount point, or adding LVM mirrors cause an error message inCSPOC. However, nodes on the same site as the source volumes can successfully perform thesetasks. The changes are then propagated to the other site using lazy update.
Note: For C-SPOC operations to work on all other LVM operations, it is highly recommended thatyou perform all C-SPOC operations when the cluster is active on all PowerHA SystemMirrorEnterprise Edition nodes and the underlying Truecopy/HUR PAIRs are in a PAIR state.
108 Storage-based high availability and disaster recovery

Example Truecopy/HUR Management configurationYou can set up a mutual recovery configuration in which each site acts as a production site, for differentapplications and services, with the other site acting as an associated backup site.
To implement a mutual recovery configuration you must have the following:v Two PowerHA SystemMirror Enterprise Edition sites (the same as a single recovery configuration)v Two resource groups
In PowerHA SystemMirror Enterprise Edition you can configure two sites and a resource group thatincludes nodes, Truecopy/HUR-managed replicated resources, and the volume groups associated withthe replicated resources. A Truecopy/HUR replicated resource contains the Hitachi disk volume pairs(dev_group) information. The PowerHA SystemMirror Enterprise Edition resource group definitionincludes the volume groups built on top of the Truecopy/HUR replicated volumes. PowerHASystemMirror Enterprise Edition manages Truecopy/HUR processing by dynamically executing theCommand Control Interface (CCI) commands.
The following image shows a typical implementation of two Hitachi Storage devices with Truecopy/HURin a four-node PowerHA SystemMirror Enterprise Edition geographic cluster. The cluster consists of fournodes. Each storage device is connected to each node using a SCSI or Fibre Channel connection.Truecopy/HUR links are set between Primary Hitachi Storage and Secondary Hitachi Storage. Theconfiguration also includes point-to-point networks for heartbeating to connect the cluster nodes.
Planning worksheets for Truecopy/HUR ManagementYou can use planning worksheets to start planning for your Truecopy/HUR Managementimplementation.
Sample Truecopy/HUR Replicate Resource Worksheet
For information about configuring Truecopy/HUR, see the Truecopy/HUR Configuration Guide that ismaintained by Hitachi.
The following are definitions to help you complete the worksheet:
Truecopy/HUR Resource NameThe name of the Hitachi Truecopy/HUR Resource. A Resource Name is a user-defined name thatcan have one or more device groups with the same fence level and copy mode. The name caninclude up to 128 alphanumeric characters and underscores.
Truecopy/HUR ModeDefines the Truecopy/HUR relationship mode. For synchronous Truecopy only NEVER fence
Storage-based high availability and disaster recovery 109

level is supported. If the dev_groups is managed by Truecopy, the mode is SYNC. If thedev_group is managed by HUR, the mode is ASYNC.
Device GroupsOne or more dev_groups that are defined in the configuration file. The dev_group with the sameCOPY mode can be merged together as device groups.
Horctakeover Timeout ValueThe -t option for the horcrtakeover command. Use a 3short timeout for horctakeover of TrueCopySynchronous. A short timeout or long timeout can be used for horctakeover of the HitachiUniversall Replicator (HUR). It is your decision what timeout option you want to use. Forexample, if returning to production is more important to you than having the most current datain a failure use a short timeout. If ensuring that you lose as little data as possible in a disaster,even if that means the recovery time is elongated, use a long timeout.
Horcm InstanceThe horcm instance that you used. For example, you use the horcm0.conf file then the value ishorcm0. If you use the horcm.conf file then the value is horcm. All nodes in the PowerHASystemMirror Enterprise Edition cluster must use same horcm instance. For example, if node1uses the horcm0.conf file then the same instance (horcm0.conf) must be used by all other nodes inthe cluster.
Pairevtwait Timeout ValueThe -t option for the pairevtwait command. Specifies the interval of monitoring a status specifiedusing the -s option and the time-out period in units of 1 second. Use along timeout for anypairevtwait monitoring a pairresync. The default value is 3600 seconds.
Use the following worksheet to record the Truecopy/HUR replicated resources that go in the PowerHASystemMirror Enterprise Editionresource groups:
Table 30. SYNCRONOUS Truecopy
Truecopy ResourceName Truecopy Mode Device Groups
HorctakeoverTimeout Value Horcm Instance
PairevtwaitTimeout Value
TRU_RES1 SYNC Oradb1 Oradb2Oradb3
300 horcm0 3600
TRU_RES2 SYNC Oradb5 Oradb6 300 horcm0 3600
Table 31. ASYNCRONOUS HUR
Truecopy ResourceName Truecopy Mode Device Groups
HorctakeoverTimeout Value Horcm Instance
PairevtwaitTimeout Value
TRU_RES3 ASYNC Oradb11 Oradb12Oradb13
3600 horcm0 3600
TRU_RES3 ASYNC Oradb15 Oradb16 3600 horcm0 3600
Table 32. Blank worksheet
Truecopy ResourceName Truecopy Mode Device Groups
HorctakeoverTimeout Value Horcm Instance
PairevtwaitTimeout Value
Configuring volume groups and filesystems on Truecopy/HURprotected disksAs part of planning your PowerHA SystemMirror Enterprise Edition Truecopy/HUR environment, decidewhat disks will be used to support volume groups and file systems on the PowerHA SystemMirrorEnterprise Edition cluster nodes.
110 Storage-based high availability and disaster recovery

You must make sure that the Hitachi hdisks are made available to your nodes before you continue theconfiguration process. If the Hitachi hdisk are not available to your nodes you can reboot the nodes andrun the cfgmgr command.
Note: PowerHA SystemMirror Enterprise Edition does not create replication pairs using the Hitachiinterfaces. You must use the Hitachi Storage interfaces to create the same replicated pairs before usingPowerHA SystemMirror Enterprise Edition to achieve HA/DR solution. For information about setting upTruecopy/HUR pairs, see the Hitachi Command Control Interface (CCI) User and Reference Guide that ismaintained by Hitachi.
Discovering dev_groups and AIX disks associated with Hitachi storageYou need to identify the correct mapping between the Hitachi device groups and the corresponding AIXhdisks.
Complete the following step to discover dev_groups and AIX disks associated with Hitachi storage:1. On the PowerHA SystemMirror Enterprise Edition nodes select the disks that are Hitachi disks and
will be used in Truecopy/HUR relationships by running the lsdev command. In the followingexample, hdisk4 and hdisk5 are the Hitachi disks.# lsdev -C -c disk | grep hdisk | inqraidhdisk4 -> [SQ] CL2-A Ser = 45306 LDEV = 256 [Hitachi ] [OPEN-V]
HORC = S-VOL HOMRCF[MU#0 = SMPL MU#1 = SMPL MU#2 = SMPL]hdisk5 -> [SQ] CL2-A Ser = 45306 LDEV = 257 [Hitachi ] [OPEN-V]
HORC = S-VOL HOMRCF[MU#0 = SMPL MU#1 = SMPL MU#2 = SMPL]
2. On the PowerHA SystemMirror Enterprise Edition nodes find the hdisk that will be managed by theRG (Resource Group) and get the LDEV mapping by running the lsdev command. In the followingexample, hdisk4 and hdisk5 need to be managed by a HA/DR solution, and the LDEV numbers are256 for hdisk4 and 257 for hdisk5.# lsdev -C -c disk | grep hdisk | raidscan -findDEVICE_FILE UID S/F PORT TARG LUN SERIAL LDEV PRODUCT_IDhdisk4 0 F CL2-A 0 0 45306 256 OPEN-Vhdisk5 0 F CL2-A 0 1 45306 257 OPEN-V
3. Use the HORCM LDEV section in the horcm2.conf file to identify the dev_group that will bemanaged by PowerHA SystemMirror Enterprise Edition. For example if hdisk4 and hdisk5 will bepart of the resource group then identify the dev_group from the Horcm configuration file. In thefollowing example, dev_group VG01 (LDEV 256) and VG02 (LDEV 257) need to be managed by thePowerHA SystemMirror Enterprise Edition Truecopy/HUR solution.HORCM_LDEV#dev_group dev_name Serial# CU:LDEV(LDEV#) MU#VG01 oradb1 45306 256 0VG02 oradb2 45306 257 0
4. Verify that the PAIRs are established by running the pairvolchk command or the pairdisplaycommand on the dev_group.# pairvolchk -g VG01 -IH2pairvolchk : Volstat is P-VOL.[status = PAIR fence = NEVER MINAP = 3 ]
Note: If pairs are not yet established, you must create the pairs. For instructions about creating pairs,see the CCI/Storage Navigator documentation that is maintained by Hatachi. The following exampleis displayed when pairs are not created.# pairvolchk -g VG02 -IH2pairvolchk : Volstat is SMPL.[status = SMPL]
5. Verify that dev_group is consistency enabled by running the pairvolchk command and CTGID is inthe output. You can also verify if the dev_group is managed by Truecopy SYNC or HUR. If the fencevalue is NEVER, the dev_group is managed by Truecopy SYNC. If the fence value is ASYNC, thedev_group is managed by HUR.# pairvolchk -g VG01 _-IH2pairvolchk : Volstat is P-VOL.[status = PAIR fence = NEVER MINAP = 3 CTGID = 2]
Storage-based high availability and disaster recovery 111

Setting up volume groups and filesystems on Truecopy/HUR-protected disksAfter you have identified the hdisks and dev_groups that will be managed by PowerHA SystemMirrorEnterprise Edition you need to set up the volume groups and filesystems.
Complete the following steps to set up volume groups and filesystems on Truecopy/HUR-protecteddisks:1. On the hdisks that corresponds to the dev_group, set up the volume group and file system to be
managed by PowerHA SystemMirror Enterprise Edition. Verify that the Volume Major Number for thevolume group can be used on all PowerHA SystemMirror Enterprise Edition cluster nodes by runningthe lvlstmajor command on each cluster node. You must also verify that the physical volume namefor the filesystem can also be used across all PowerHA SystemMirror Enterprise Edition cluster nodes.
2. Vary off the newly created volume group by running the varyoffvg command, and import it to allnodes in the local PowerHA SystemMirror Enterprise Edition site.
3. Run the pairresync command on the local disks and make sure that they are in the PAIR state. Thisprocess verifies that the local disk information has been copied to the remote storage.#pairresync -g VG01 -IH2#pairresync -g VG02 -IH2
4. Once the Truecopy relationship has completed copying, run the pairsplit command to SPLIT therelationship. If you do not complete this step future LVM operations will not complete successfully.
5. On the node at the backup PowerHA SystemMirror Enterprise Edition site, remove the paired Hitachihdisk by running the rmdev command. For example, the hdisk4 at primary site is paired with hdiks9at remote site and hdiks5 is paired with hdisk10.#rmdev –d –l hdisk9#rmdev –d –l hdisk10
6. Run the cfgmgr on the backup node.#cfgmgr
7. Using SMIT or the command line on the backup PowerHA SystemMirror Enterprise Edition site (thesite that is connected to the secondary Hitachi Storage) import the volume groups that you created instep 1.
8. Resync the pairs you split steps 4 by running the pairresync command.#pairresync -g VG01 -IH2#pairresync -g VG02 -IH2
9. Verify that on all cluster nodes, the AUTO VARYON feature for volume groups is set to NO byrunning the chvg command.chvg -a ’n’ -Q ’y’ <volume group name here>
Note: PowerHA SystemMirror Enterprise Edition attempts to automatically set the AUTO VARYONto NO during verification, except in the case of remote Truecopy/HUR.
Installing Truecopy management filesetsYou must be logged in as root to perform installation tasks. You must verify that the base filesets areinstalled on cluster nodes.
For instructions about installing the base fileset, see “Installing PowerHA SystemMirror EnterpriseEdition for Metro Mirror” on page 10.
Installing prerequisite software
Before installing PowerHA SystemMirror Enterprise Edition: Truecopy/HUR Management, the followingsoftware must be installed on cluster nodes:v You must have one of the following operating system levels installed:
– IBM AIX 6.1 with Technology Level 8 with Service Pack 1, or later.
112 Storage-based high availability and disaster recovery

– IBM AIX 7.1 with Technology Level 2 with Service Pack 1, or later.v PowerHA SystemMirror Enterprise Edition Version 7.1.2 with Service Pack 2, or later.v Command Control Interface (CCI) software for AIX. For more information about CCI, see Hitachi
Command Control Interface (CCI) User and Reference Guide that is maintained by Hitachi.
Installing Truecopy/HUR Management filesets
The cluster.es.tc fileset is included on the PowerHA SystemMirror Enterprise Edition media and need tobe installed for Truecopy Management. You also must select the message fileset for your locales. Forexample, if you wanted to install the US English fileset you would select the following:cluster.msg.en_US.tc POWERHA TRUECOPY/HUR Messages - U.S. English
All PowerHA SystemMirror Enterprise Edition Truecopy/HUR filesets are installed in the/usr/es/sbin/cluster/tc directory.
Configuring Truecopy/HUR resourcesAfter you install Truecopy/HUR you can configure the cluster resources.
Checking Truecopy/HUR and PowerHA SystemMirror Enterprise Editionconfiguration requirementsBefore you can configure PowerHA SystemMirror Enterprise Edition for Truecopy/HUR interfaces, youmust verify that all your environment settings are correct.
The following criteria must be meet before can configure PowerHA SystemMirror Enterprise Edition forTruecopy/HUR interfaces:1. Truecopy/HUR is configured and running on the storage system2. Command Control Interface (CCI) software is installed. For example, CCI software is installed on
PowerHA SystemMirror Enterprise Edition cluster nodes.3. Both the base PowerHA SystemMirror Enterprise Edition for Metro Mirror and Truecopy/HUR
Management filesets are installed on each cluster node.4. The PowerHA SystemMirror Enterprise Edition cluster is configured for nodes, sites, networks,
network interfaces, service labels, and application monitors.
Note: You can modify the attributes for a resource group later to accommodate Truecopy/HURreplicated resources.
Configuring Truecopy/HUR-Managed replicated resourceYou must define Truecopy/HUR-managed replicated resources before adding them to resource groups.
To define a Truecopy/HUR-managed replicated resource, complete the following steps:1. From the command line, enter smit sysmirror.2. In SMIT select, Cluster Applications and Resources > Resources > Configure Hitachi Truecopy
Replicated Resources > Add Hitachi Truecopy/HUR Replicated Resource, and press Enter.3. Complete the available fields, and press Enter.
Repeat the steps as necessary to define additional Truecopy/HUR-Managed replicated resources.
Adding Truecopy/HUR replicated resources to PowerHA SystemMirror EnterpriseEdition resource groupsAfter you have configured the Truecopy/HUR replicated resources you must add them to the PowerHASystemMirror Enterprise Edition resource groups.
Storage-based high availability and disaster recovery 113

To add a Truecopy replicated resource to a PowerHA SystemMirror Enterprise Edition resource group,complete the following steps:1. From the command line, enter smit sysmirror.2. In SMIT select, Cluster Applications and Resources > Resource Groups. Depending on whether you
are working with an existing resource group or creating a resource group. Make sure that the volumegroups selected on the Resource Group configuration screen match the volume groups used in theTruecopy/HUR Replicated Resource.a. If you are creating a resource group select, Change/Show Resources and Attributes for a Resouce
Group.b. If you are adding a resource group select, Add a Resource Group.
3. In the Truecopy Replicated Resources field verify that the volume group you specify is the samevolume group that you specified on the Resource Group configuration panel.
4. Press Enter.
Next you must verify the cluster.
Verifying the PowerHA SystemMirror Enterprise Edition cluster configurationYou can use the SMIT interface to verify the configuration of a PowerHA SystemMirror EnterpriseEdition cluster.
To run the verification process for the cluster configuration, complete the following steps:1. From the command line, enter smit sysmirror.2. In SMIT select, Custom Cluster Configuration > Verify and Synchronize Cluster Configuration
(Advanced) and press Enter.3. Enter the following values for the available fields:
Table 33. Verify and Synchronize Cluster Configuration
Fields Values
Verify Synchronize or Both Verify
Include custom verification library checks Yes
Automatically correct errors found during verification? Yes
Force synchronization if verification fails? No
Verify changes only? No
Logging StandardNote: Verification messages are logged to the/var/hacmp/clverify/clverify.log file.
4. Press Enter. The output from the verification process is displayed in the SMIT Command Statuswindow.
Note: If you receive error messages, make the necessary changes and run the verification procedureagain. You might see warning messages if the configuration has a limitation on its availability. Forexample, only one interface per node per network is currently configured.
Verifying the Truecopy/HUR configurationBefore you can synchronize the newly created cluster, you must verify the Truecopy/HUR configuration.
To complete Truecopy/HUR verification run the following command:/usr/es/sbin/cluster/tc/utils/cl_verify_tc_config
Correct any configuration errors that appear, then run the script again.
114 Storage-based high availability and disaster recovery

Synchronizing the PowerHA SystemMirror Enterprise Edition cluster configurationYou must verify the PowerHA SystemMirror Enterprise Edition cluster and the Truecopy/HURconfiguration before you can synchronize the cluster.
To propagate the new Truecopy/HUR configuration information and possibly PowerHA SystemMirrorEnterprise Edition site information across your PowerHA SystemMirror Enterprise Edition cluster,complete the following steps:1. From the command line, enter smit sysmirror.2. In SMIT select, Custom Cluster Configuration > Verify and Synchronize Cluster Configuration
(Advanced) and press Enter.3. In the Verify Synchronize or Both field, enter Synchronize.4. In the Automatically correct errors found during verification field, enter No.5. Press Enter. The output is displayed in the SMIT Command Status window.
Starting the PowerHA SystemMirror Enterprise Edition Truecopy/HUR clusterPowerHA SystemMirror Enterprise Edition manages the Truecopy/HUR replicated resources you havedefined for the cluster.
PowerHA SystemMirror Enterprise Edition manages these Truecopy/HUR resources automatically, sothere is no need to manually manage the Truecopy/HUR resources.
To start a Truecopy/HUR cluster services, complete the following steps:
Note: Perform the following only after configuring and synchronizing a cluster.1. From the command line, enter smit cl_admin.2. From SMIT, select Manage Services > Start Cluster Services, and press Enter.3. Complete all fields, and press Enter to start the cluster services.
Changing Truecopy/HUR-Managed replicated resourceUsing SMIT you can change Truecopy/HUR replicated resources.
To change Truecopy/HUR Replicated Resources, complete the following steps:1. From the command line, enter smit sysmirror.2. In SMIT select, Cluster Applications and Resources > Resources > Configure Hitachi Truecopy/HUR
Replicated Resources > Change/Show Hitachi Truecopy/HUR Replicated Resources, and press Enter.3. Update the PowerHA SystemMirror Enterprise Edition resource group information and synchronize
the cluster.
Removing Truecopy/HUR-Managed replicated resourceUsing SMIT you can remove Truecopy/HUR replicated resources.
To remove Truecopy/HUR Replicated Resources, complete the following steps:1. From the command line, enter smit sysmirror.2. In SMIT, select Cluster Applications and Resources > Resources > Configure Hitachi Truecopy/HUR
Replicated Resources > Remove Hitachi Truecopy/HUR Replicated Resources, and press Enter.3. Update the PowerHA SystemMirror Enterprise Edition resource group information and synchronize
the cluster.
Storage-based high availability and disaster recovery 115

XIV Remote Mirror replication resourcesTo use mirroring with the XIV® Remote Mirror management, you must be running PowerHASystemMirror Enterprise Edition 7.1.2, or later in your environment. By using the XIV Remote Mirrormanagement, you can deploy your PowerHA SystemMirror cluster to be integrated with XIV RemoteMirror replicated resources.
PowerHA SystemMirror discovers the XIV deployment, and captures any missing replication-relatedinformation from the administrator. By using this captured information, PowerHA SystemMirror managesthe XIV replicated storage as part of the High Availability management environment for the applicationsand resource groups.
PowerHA SystemMirror supports high availability disaster recovery (HADR) for storage from the IBMXIV Storage Systems. XIV Storage Systems that are capable of replication, support short distance andlong-distance mirroring through synchronous and asynchronous mirroring functions.
PowerHA SystemMirror enables integrated discovery and management of mirrored storage resources forthe high availability management of resource groups.
To use PowerHA SystemMirror for HADR of XIV mirrored storage, you must complete the followingsteps:1. Plan for the deployment of XIV storage across two sites. You must understand your application and
middleware requirements and verify that these requirements are covered in the context of a highavailability PowerHA SystemMirror solution.
2. Use the following XIV configuration tools to set up and configure the XIV Storage System:v XIV Storage System command-line interface (XCLI)v XIV Storage Management GUI (XIVGUI)
3. Plan for the PowerHA SystemMirror implementation. You should design resource groups, policies,and scripts around your applications and mirrored storage resources.
4. Install and configure PowerHA SystemMirror to implement the settings that you planned for in Step3.
5. Test and verify that the configuration is working correctly.
Note: This documentation focuses on step 3 and step 4, but does mention and discuss the other steps ata high level. You must complete step 1 and step 2 before configuring PowerHA SystemMirror for HADRmanagement of XIV storage.Related information:IBM XIV Storage System documentation
PowerHA SystemMirror Enterprise Edition with XIV replication fallover demo
XIV Remote Mirror conceptsThe XIV Remote Mirror function of the IBM XIV Storage System enables a real-time copy between two ormore storage systems over Fibre Channel or iSCSI links. This function provides a method to protect datafrom site failures.
The purpose of mirroring is to create a set of consistent data that can be used by production applicationsduring problems with production volumes or for other purposes. XIV remote mirroring is application andoperating system independent, and does not require server processor cycle usage. XIV remote mirroringcan be a synchronous copy or an asynchronous copy.
Mirroring, whether synchronous or asynchronous, requires two or more XIV systems. The source andtarget of the asynchronous mirroring can reside on the same site and form a local mirroring, or the sourceand target can reside on different sites and enable a disaster recovery plan.
116 Storage-based high availability and disaster recovery

A peer volume or a peer consistency group is assigned either a master or a slave role when the mirror isdefined. By default, in a new mirror definition, the location of the master designates the primary system,and the slave designates the secondary system. A mirror must have one primary system and onesecondary system. The actual function of the peer is based on its role.
XIV enables a set of remote mirrors to be grouped into a consistency group. When using synchronousmirroring or asynchronous mirroring, the consistency groups handle many remote mirror pairs as agroup to make mirrored volumes consistent. Consistency groups simplify the handling of many remotevolume pairs because you do not have to manage the remote volume pairs individually.
Planning for XIV Remote MirrorBefore you start using the XIV Remote Mirror management, you must plan to implement the XIV RemoteMirror management within a PowerHA SystemMirror environment.
The following restrictions and limitations apply to Remote Mirror:v Remote mirror is only supported on IBM XIV Storage Systems 1.2.0, or later.v The XIV configuration cannot be changed by using dynamic automatic reconfiguration (DARE), even
though the XIV Remote Mirror replicated resources or mirror groups can be included and excludedfrom a PowerHA SystemMirror resource group by using DARE.
v PowerHA SystemMirror does not handle Simple Network Management Protocol (SNMP) events in thecontext of the XIV Remote Mirror function. If there is a failure in the XIV links, in some cases, this canput the corresponding Remote Mirror in a failed state and PowerHA SystemMirror might not benotified. To fix this problem, you must correct the links and then restart the corresponding resourcegroups on the appropriate nodes.
Related tasks:“Modifying a mirror group” on page 123You can make changes to any of the properties of an existing mirror group that you have already addedto your environment.
Planning the IBM XIV Storage System deploymentBefore you can deploy an IBM XIV Storage System, you must plan accordingly.
To plan for the deployment of the IBM XIV across two sites, complete the following steps:1. Identify your production site for the application. A production site is the location where your
application and its data primarily reside and function.2. Identify the volumes on the XIV Storage System that contain the application data that you want to be
high availability disaster recovery (HADR).3. Identify the storage units and the AIX hosts that will be running on the recovery site.4. Verify that there are sufficient number of volumes and Fiber Channel ports that are available on the
storage systems for the production site and recovery site. You can create mirror links between thestorage units.
Planning the PowerHA SystemMirror implementationTo successfully implement PowerHA SystemMirror within your IBM XIV Storage Systems environment,you must plan accordingly.
Before you implement PowerHA SystemMirror within your IBM XIV Storage Systems environment, youmust complete the following tasks:v Collect the following information for all the XIVs in your environment:
– IP addresses– Login names and their corresponding passwords– Associations with various storage units
Storage-based high availability and disaster recovery 117

v Verify that all data volumes that need to be mirrored are visible to all relevant AIX hosts.v Verify that all XIV's are accessible by using the TCP/IP network for all PowerHA SystemMirror nodes
where you want to run XIV Remote Mirror.Related information:Initial PowerHA SystemMirror cluster planning
Installing XIV Remote MirrorPowerHA SystemMirror Enterprise Edition for AIX file sets must be installed on all the AIX nodes onwhich you run PowerHA SystemMirror clusters.
Software requirements
You must have the following software installed to use XIV Remote Mirror:v PowerHA SystemMirror Enterprise Edition for AIX 7.1.2, or later, and the required version of the AIX
operating system and Reliable Scalable Cluster Technology (RSCT).v IBM XIV microcode bundle 10.2.4, or later.v IBM XIV command-line interface (XCLI) for AIX 2.4.4, or later, on each PowerHA SystemMirror node.
The (XCLI) provides a mechanism for issuing commands to manage and maintain the XIV systems.
Note: Before you install XCLI, you must have the appropriate AIX operating system release installed.
Installing XIV Remote Mirror
You must have root access to each node before installing PowerHA SystemMirror Enterprise Editionsupport for XIV Remote Mirror.
To install XIV Remote Mirror, complete the following steps:1. Insert the PowerHA SystemMirror Enterprise Edition for AIX media into the DVD or CD-ROM drive.2. From the command line, enter smitty install.3. From SMIT, select Install and Update Software > Install.4. Select the following file sets from the list:v cluster.es.genxd.rtev cluster.es.genxd.cmdsv cluster.msg.genxd.xx_XX, where, xx_XX is the message fileset for your language
5. Press Enter to complete the installation.
Installing the XCLIFor the installation requirements to install XCLI and a list of available packages, see XCLI Release Notes.
To download and install the IBM XIV Storage System command-line interface (XCLI) on the XCLI clientsystem, see Installing the XCLI in the IBM XIV Storage System Information Center.
Note: PowerHA SystemMirror uses the XCLI commands from the /opt/xiv/XIVGUI/xcli directory. Henceyou must install the XCLI in the same path, otherwise PowerHA SystemMirror throws error.Related information:IBM XIV Storage System documentation
Configuring XIV Remote MirrorAfter you have planned and installed XIV Remote Mirror you can start to configure it. You must verifythat the data volumes on both sites are a exact replica of each other, otherwise you cannot import thevolume groups on the remote site.
118 Storage-based high availability and disaster recovery

Configuring XIV to use Remote MirrorBefore you can configure the IBM XIV to use Remote Mirror, data must already exist on the IBM XIVsystem.
To configure the IBM XIV to use Remote Mirror, complete the following steps:1. Define the XIV mirroring target.
To connect two XIV systems for remote mirroring, each system must be defined to be a mirroringtarget of the other. An XIV mirroring target is an XIV system with volumes that receive data copiedthrough XIV remote mirroring. To define an XIV mirroring target for an XIV system, name the targetand specify whether Fibre Channel or iSCSI protocol is used to copy the data.
2. Set the maximum initialization and synchronization rates.With the XIV system you can specify a user specific maximum rate (in MBps) for remote mirroringcoupling initialization, and a different user specific maximum rate for resynchronization.The initialization rate and resynchronization rate are specified for each mirroring target. Themaximum initialization rate must be less than or equal to the maximum synchronization job rate(asynchronous mirroring only), which must be less than or equal to the maximum resynchronizationrate.The default settings follow:v Maximum initialization rate: 100 MBpsv Maximum synchronization job: 300 MBpsv Maximum resynchronization rate: 300 MBps
3. Connect the XIV mirroring ports.After you define the remote mirroring targets, you must make one-to-one connections (iSCSI or FibreChannel) between ports on each XIV system.
4. Define the XIV Volume mirror coupling and peers.After the mirroring targets are defined, a coupling or mirror might be defined, which creates amirroring relationship between two peers.For each data volume that participates in the Remote Mirror on the production site, you must identifya volume that serves as its Remote Mirror Peer. This volume must reside on an XIV storage unit atthe recovery site.
5. Activate XIV mirror couplings.When an XIV mirror coupling is activated, all actual data existing on the master is copied to the slave.This process is referred to as initialization. XIV Remote Mirroring copies volume identificationinformation (that is, physical volume ID or PVID) and any actual data on the volumes. Space that hasnot been used is not copied.
6. Create and add the volume mirror couplings to consistency group mirror coupling.When an XIV consistency group mirror coupling is created, the volumes included in the consistencygroup must not have any application data on them so that there is no data movement and theinitialization process is fast.After a volume mirror coupling has completed the initialization, the master volume can be added to amirrored consistency group in the same storage pool. With each mirroring type there are certainadditional constraints, such as same role, target, and schedule. The slave volume is automaticallyadded to the consistency group on the remote XIV system. One or more additional mirrored volumescan be added to a mirrored consistency group at a later time in the same way.
Note: In a consistency group all volumes have the same role. Consistency groups are handled as a singleentity. For example, in asynchronous mirroring, a delay in replicating a single volume affects the status ofthe entire consistency group.
Storage-based high availability and disaster recovery 119

Configuring a storage agentA storage agent is a generic name given by PowerHA SystemMirror for an entity that provides acoordination point for storage management and often uses TCP/IP as the communication interface.
For PowerHA SystemMirror to manage the XIV remote mirrors, a storage agent must be defined. This isthe XIV management interface, which resides in the XIV controller. You must provide the IP address andauthentication information that is used to communicate with the XIV storage agent.
Adding a storage agent:
Before you can use a storage agent, you must add it to your environment.
To add a storage agent, complete the following steps:1. From the command line, enter smitty sysmirror.2. From the SMIT interface, select Cluster Applications and Resources > Resources > Configure XIV
Remote Mirror Resources > Configure Storage Agents > Add a Storage Agent, and press Enter.3. Enter the following information for the fields:
Table 34. Add a Storage Agent SMIT fields
Fields Values
Storage Agent Name Enter the PowerHA SystemMirror name for the storage agent.This name must be unique within the cluster definition.
IP Addresses Select the IP address for the Storage Agent from the list.
User ID Enter the User ID that can assess the XIV system.
Password Enter the password for the User ID that can access the XIVsystem.
4. Verify all fields are correct and press Enter.
Modifying an existing storage agent:
You can make changes to any of the properties of an existing storage agent that you have already addedto your environment.
To modify any of the properties for a storage agent, complete the following steps:1. From the command line, enter smitty sysmirror.2. From the SMIT interface, select Cluster Applications and Resources > Resources > Configure XIV
Remote Mirror Resources > Configure Storage Agents > Change/Show Storage Agent, and pressEnter.
3. From the list select the name of the storage agent that you want to change and press Enter.4. Enter the changes you want to make in the fields.5. Verify the changes are correct and press Enter.
Removing a storage agent:
If you do not want a storage agent to be included in your environment, you can remove it.
To remove a storage system, complete the following steps:1. From the command line, enter smitty sysmirror.2. From the SMIT interface, select Cluster Applications and Resources > Resources > Configure XIV
Remote Mirror Resources > Configure Storage Agents > Remove a Storage Agent, and press Enter.3. From the list of storage agents select the name of the storage agent that you want to remove and
press Enter.
120 Storage-based high availability and disaster recovery

4. Press Enter to confirm that the selected storage system is the one you want to remove.
Configuring a storage systemA storage system is a generic term that is used by PowerHA SystemMirror for an entity such as a DS8000storage unit.
When using XIV Remote Mirror, you must provide the IBM XIV system identifier for the Storage System.For example, MX90012 is a storage identifier for an XIV Storage System. This information can be added,changed, or removed through the Add, Change, or Remove a Storage System SMIT menus.
Adding a storage system:
Before you can start using your storage system, you must add it to your environment.
To add a storage system, complete the following steps:1. From the command line, enter smitty sysmirror.2. From the SMIT interface, select Cluster Applications and Resources > Resources > Configure XIV
Remote Mirror Resources > Configure Storage Systems > Add a Storage System, and press Enter.3. Enter the following information for the fields:
Table 35. Add a Storage System fields
Fields Values
Storage System Name Enter the PowerHA SystemMirror name for the storage system.This name must be unique within the cluster definition.
Storage Agent Name Enter the name for the storage agent that manage this storagesystem.
Site Association Enter the vendor specific unique identifier for the storagesystem.
Vendor Specific Identification Enter the unique vendor specific ID for this storage system. Forexample, MX90012.
User ID Enter the user ID that can access the XIV system.
Password Enter the password for the user ID that can access the XIVsystem.
4. Verify that all fields are correct and press Enter.
Modifying a storage system:
You can make changes to any of the properties of an existing storage system that you have already addedto your environment.
To modify the properties for a storage system, complete the following steps:1. From the command line, enter smitty sysmirror.2. From the SMIT interface, select Cluster Applications and Resources > Resources > Configure XIV
Remote Mirror Resources > Configure Storage Systems > Change/Show Storage System, and pressEnter.
3. From the list select the name of the storage system that you want to change and press Enter.4. Enter the changes you want to make in the fields.5. Verify that the changes are correct and press Enter.
Storage-based high availability and disaster recovery 121

Removing a storage system:
If you do not want a storage system to be included in your environment, you can remove it.
To remove a storage system, complete the following steps:1. From the command line, enter smitty sysmirror.2. From the SMIT interface, select Cluster Applications and Resources > Resources > Configure XIV
Remote Mirror Resources > Configure Storage Systems > Remove Storage System, and press Enter.3. From the list of storage systems, select the name of the storage system that you want to remove and
press Enter.4. Press Enter to confirm that the selected storage system is the one you want to remove.
Configuring mirror groupsA mirror group is a generic name given by PowerHA SystemMirror for a logical collection of volumes thathave to be mirrored to another storage system that resides on a remote site. An XIV consistency grouprepresents a mirror group.
Adding a mirror group:
Before you can start using your mirror group, you must add it to your environment.
To add a mirror group, complete the following steps:1. From the command line, enter smitty sysmirror.2. From the SMIT interface, select Cluster Applications and Resources > Resources > Configure XIV
Remote Mirror Resources > Configure Mirror Groups > Add Mirror Group, and press Enter.3. Enter the following information for the fields:
Table 36. Add Mirror Group SMIT fields
Fields Values
Mirror Group Name Enter the PowerHA SystemMirror name for the replicatedresource. This name is included in a PowerHA SystemMirrorresource group.
Storage System Name From the list, select the storage system on the production sitethat have data volumes, which forms the mirror group.
Vendor Specific Identifier Enter the XIV consistency group identifier.
Recovery Action If a site fail over occurs, specify the disaster recovery policy thatwill be taken by the PowerHA SystemMirror resource group.
Enter Manual if you want manual intervention when sitefailover occurs.
Enter Automated if you do not want manual intervention whensite failover occurs.Note: If you specify Manual, that does not indicate that amanual intervention is required for all failover scenarios. Thereare some conditions, such as cluster partition, in which doing anautomatic failover from one site to another, can cause potentialdata divergence and integrity issues. If PowerHA SystemMirrordetects the potential for such a case, and if the recovery actionassociated with the mirror group is set to Manual, PowerHASystemMirror does not execute an automatic failover.
4. Verify that all fields are correct and press Enter.
122 Storage-based high availability and disaster recovery

Modifying a mirror group:
You can make changes to any of the properties of an existing mirror group that you have already addedto your environment.
To modify any of the properties for a mirror group, complete the following steps:1. From the command line, enter smitty sysmirror.2. From the SMIT interface, select Cluster Applications and Resources > Resources > Configure XIV
Remote Mirror Resources > Configure Mirror Groups > Change/Show a Mirror Groups, and pressEnter.
3. From the list, select the name of the mirror group that you want to change and press Enter.4. Enter the changes that you want to make in the fields.5. Verify that the changes are correct and press Enter.Related concepts:“Planning for XIV Remote Mirror” on page 117Before you start using the XIV Remote Mirror management, you must plan to implement the XIV RemoteMirror management within a PowerHA SystemMirror environment.
Removing a mirror group:
If you do not want a mirror group to be included in your environment, you can remove it.
To remove a mirror group, complete the following steps:1. From the command line, enter smitty sysmirror.2. From the SMIT interface, select Cluster Applications and Resources > Resources > Configure XIV
Remote Mirror Resources > Configure Mirror Groups > Remove Mirror Groups, and press Enter.3. From the list, of mirror groups select the name of the mirror group that you want to remove and
press Enter.4. Press Enter to confirm the selected mirror group is the one you want to remove.
Configuring resource groupsAfter you configure the mirror group, you should include the mirror group into the desired PowerHASystemMirror resource group.
Before you configure resource groups, you must have a basic understanding of site support for PowerHASystemMirror resource groups. For more information about site support for PowerHA SystemMirrorresource groups, see Planning resource groups.
When you configure a resource group you must meet the following requirements:v Set the site policy to Prefer Primary Site or Online on Either Site.v Specify a startup policy other than Online on All Available Nodes.v Set the Resource Group Processing Ordering field to Serial.
Adding a remote mirror to a resource group:
Before you can start using your remote mirror, you must add it to an existing resource group in yourenvironment.
To add a remote mirror resource that is replicated to a resource group, complete the following steps:1. From the command line, enter smitty sysmirror.2. From the SMIT interface, select Cluster Applications and Resources > Resource Groups >
Change/Show Resources and Attributes for a Resource Group and press Enter.
Storage-based high availability and disaster recovery 123

3. Enter the name of the mirror groups in the DS8000(GM)/XIV Replicated Resources field.4. Enter the name of the volume groups associated with the individual remote mirror resources that are
replicated in the Volume Groups field.
Note: The volume group names must be listed in the same order as the XIV mirror group names.5. Verify and synchronize the cluster.Related information:Configuring PowerHA SystemMirror resource groupsPlanning resource groupsVerifying and synchronizing a PowerHA SystemMirror cluster
HyperSwap for PowerHA SystemMirrorThe HyperSwap function in PowerHA SystemMirror Enterprise Edition 7.1.2, or later, provides forcontinuous availability against storage errors. HyperSwap is based on storage-based synchronousreplication. HyperSwap technology enables the host to transparently switch an applications I/O operationto the auxiliary volumes, provided physical connectivity exists between the host and the auxiliary storagesubsystem.
The HyperSwap function in PowerHA SystemMirror supports the following capabilities within yourenvironment:v Eliminates primary disk subsystems as the single point of failure.v Provides maintenance for storage devices without any application downtime.v Provides migration from an old storage device to a new storage system.
HyperSwap for PowerHA SystemMirror conceptsThe HyperSwap function in PowerHA SystemMirror Enterprise Edition 7.1.2, or later, enhancesapplication availability for storage errors by using IBM DS8000 metro mirroring. If you use theHyperSwap function in your environment, your applications stay online even if errors occur on theprimary storage because PowerHA SystemMirror 7.1.2, or later, transparently routes the application I/Oto an auxiliary storage system.
The HyperSwap function uses a model of communication, which is called in-band, that sends the controlcommands to a storage system through the same communication channel as the I/O for the disk. TheHyperSwap function supports the following types of configurations:
Traditional Metro Mirror Peer-to-Peer Remote Copy (PPRC)The primary volume group is only visible in the primary site and the auxiliary volume group isonly visible in the auxiliary site.
HyperSwapThe primary and auxiliary volume group are visible from the same node in the cluster.
You typically configure the HyperSwap function to be used in the following environments:
Single node environmentA single compute node is connected to two storage systems that are in two sites. This HyperSwapconfiguration is ideal to protect your environment against simple storage failures in yourenvironment.
Multiple site environmentA cluster has multiple nodes that are spread across two sites. This HyperSwap configurationprovides high availability and disaster recovery for your environment.
124 Storage-based high availability and disaster recovery

Mirror groups in HyperSwap for PowerHA SystemMirror represent a container of disks and have thefollowing characteristics:v Mirror group contain information about the disk pairs across the site. This information is used to
configure mirroring between the sites.v Mirror groups can contact a set of logical volume manager (LVM) volume groups and a set of raw
disks that are not managed by the AIX operating system.v All the disks devices that are associated with the LVM volume groups and raw disks that are part of a
mirror group are configured for consistency. For example, the IBM DS8800 views a mirror group as oneentity regarding consistency management during replication.
v The following types of mirror groups are supported:
User mirror groupRepresents the middleware-related disk devices. The HyperSwap function is prioritizedinternally by PowerHA SystemMirror and is considered low priority.
System mirror groupRepresents critical set of disks for system operation, such as, rootvg disks and paging spacedisks. These types of mirror groups are used for mirroring a copy of data that is not used byany other node or site other than the node that host these disks.
Repository mirror groupRepresents the cluster repository disks of that are used by Cluster Aware AIX (CAA).
Swap timeout for HyperSwapSwap time is the amount of I/O delay time in seconds that PowerHA SystemMirror causes whileperforming a HyperSwap operation on a mirror group. The swap timeout value is specific for eachmirror group in a cluster.
There are different swap timeout values for planned HyperSwap and unplanned HyperSwap. The swaptimeout value for a planned HyperSwap is 120 seconds, and it cannot be changed. The swap timeoutvalue for an unplanned HyperSwap is 0 - 180 seconds.
To determine the swap timeout value to use for an unplanned HyperSwap, consider the following factorsabout your environment:1. Number of nodes where the application is hosted. The greater the number of nodes means that more
information is being shared.2. Network latency and application network usage.3. Number of disks that are used by the application.4. I/O response time requirements for the application.
Planned HyperSwap for PowerHA SystemMirrorA planned HyperSwap occurs when you initiate a HyperSwap from the primary storage subsystem to theauxiliary storage subsystem.
During a planned HyperSwap, I/O activity for an application stops after coordination occurs across thehost in the cluster. The application I/O is switched to the auxiliary storage subsystem and the applicationI/O activity continues to function as normal.
A planned HyperSwap is ideal when you perform maintenance on the primary storage subsystem, orwhen you migrate from an old storage subsystem to a new storage subsystem.
The following figure shows a cluster configuration using PowerHA SystemMirror Enterprise Edition forAIX that has the following characteristics:v Two sites called Site A and Site B.v Two nodes for each site for a total of four nodes.
Storage-based high availability and disaster recovery 125
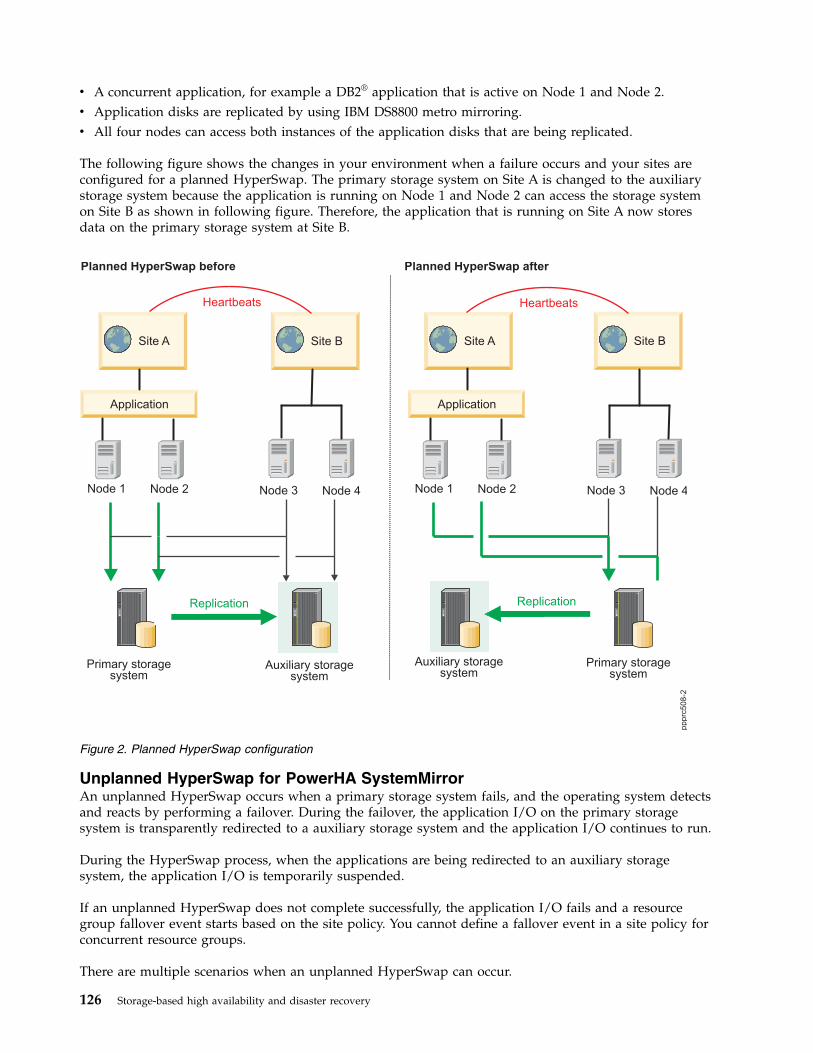
v A concurrent application, for example a DB2® application that is active on Node 1 and Node 2.v Application disks are replicated by using IBM DS8800 metro mirroring.v All four nodes can access both instances of the application disks that are being replicated.
The following figure shows the changes in your environment when a failure occurs and your sites areconfigured for a planned HyperSwap. The primary storage system on Site A is changed to the auxiliarystorage system because the application is running on Node 1 and Node 2 can access the storage systemon Site B as shown in following figure. Therefore, the application that is running on Site A now storesdata on the primary storage system at Site B.
Unplanned HyperSwap for PowerHA SystemMirrorAn unplanned HyperSwap occurs when a primary storage system fails, and the operating system detectsand reacts by performing a failover. During the failover, the application I/O on the primary storagesystem is transparently redirected to a auxiliary storage system and the application I/O continues to run.
During the HyperSwap process, when the applications are being redirected to an auxiliary storagesystem, the application I/O is temporarily suspended.
If an unplanned HyperSwap does not complete successfully, the application I/O fails and a resourcegroup fallover event starts based on the site policy. You cannot define a fallover event in a site policy forconcurrent resource groups.
There are multiple scenarios when an unplanned HyperSwap can occur.
Figure 2. Planned HyperSwap configuration
126 Storage-based high availability and disaster recovery

Scenario: Unplanned HyperSwap configuration for node access failure:
In this scenario, a node loses access to the primary storage system and the redirects application I/O to anauxiliary storage system.
The following figure shows a cluster configuration in the PowerHA SystemMirror Enterprise Edition forAIX environment with the following characteristics:v Two sites called Site A and Site B.v Two nodes for each site, which amounts to a total of four nodes. Node 1 and Node 2 have access to
each storage system at Site A and Site B.v A concurrent application, for example a DB2 application that is active on Node 1 and Node 2.v Application disks that are replicated by using IBM DS8800 metro mirroring.
In the following figure Node 1 and Node 2 loose access to the primary storage system on Site A, and anunplanned HyperSwap occurs. To correct this problem, PowerHA SystemMirror validates whether thenodes that host the application (Node 1 and Node 2) can access the auxiliary storage system on Site B.The HyperSwap function automatically redirects the application I/O from Node 1 and Node 2 to thestorage system on Site B. The storage system on Site B becomes the primary storage system.
Figure 3. Unplanned HyperSwap configuration for node access failure
Storage-based high availability and disaster recovery 127

Scenario: Unplanned HyperSwap configuration for site partition failure:
In this scenario, the heartbeat connection between two sites fails. Replication between both sites does notoccur until the heartbeat connection is fixed and working again.
The following figure is for a cluster configuration in the PowerHA SystemMirror Enterprise Edition forAIX environment with the following characteristics:v Two sites called Site A and Site B.v Two nodes for each site for a total of four nodes. All nodes have access to each storage system at Site
A and Site B.v A concurrent application, for example a DB2 application that is active on Node 1 and Node 2.v Application disks are replicated by using IBM DS8800 metro mirroring.
The following figure describes the effect of an automated failover for applications in a site partition. Thenodes for the cluster in this scenario cannot communicate with each other.
Node 1 and Node 2 can communicate with each other, but they cannot communicate with Node 3 andNode 4. Therefore, Node 1 and Node 2 consider Node 3 and Node 4 to be offline (and vice versa). Theapplication running on Node 1 and Node 2 is configured for automated failover, and the nodes at eachSite A and Site B attempt to bring the application online. The application is now running independentlyon both sites and can cause complex problems, such as data corruption between the two sites.
Figure 4. Unplanned HyperSwap configuration for site failure
128 Storage-based high availability and disaster recovery

You can use the following configuration options in your environment to minimize or eliminateunplanned site failure:
Use split and merge policiesIf a fallover occurs, you can specify the type of policy you want PowerHA SystemMirror toimplement. The policies can reduce site partition during a fallover. The policies that are combinedwith the HyperSwap function can reduce the possibility of data corruption. Thus, if your clusteruses the HyperSwap function you should configure split and merge policies, so that you canautomatically recover data during a fallover. The following types of policies are supported by theHyperSwap function:v Split policyv Merge policyv Split and merge policy
Recovery actionYou can configure your cluster to use either the automatic or manual options for mirror grouprecovery during a fallover.
Starting resource groups and mirror groupsWhen you use PowerHA SystemMirror to start resource groups and mirror groups, you mustverify that the selected resource or mirror group is in the auxiliary storage system. If you selectthe auxiliary storage system, the mirror group or resource group does not start and goes into anerror state because the primary storage system cannot be accessed. Selecting the correct resourceand mirror group minimizes data corruption if your cluster splits during a fallover.
Swapping resource groups and mirror groupsWhen a failure occurs on the primary volume group, an automatic swap occurs. However, theswap does not depend on a cluster split or a recovery option. The swapping process ensures thatthe storage systems that contain the resource groups and mirror groups are accessible, so that aswap can occur.
Fallover process for resource groups and mirror groupsWhen fallover occurs for a node or site that contains resource groups and mirror groups,PowerHA SystemMirror identifies if another node or site is accessible. If the node or site is notaccessible, the resource groups and mirror groups is not started on the auxiliary storage systemunless the cluster is configured with a split or merge policy.
Scenario: Unplanned HyperSwap configuration for suspended storage systems:
In this scenario, the storage systems on both sites are not synchronizing and replication is not occurring.
The following figure is for a cluster configuration in the PowerHA SystemMirror Enterprise Edition forAIX environment with the following characteristics:v Two sites called Site A and Site B.v Two nodes for each site for a total of four nodes. All nodes have access to each storage system at Site
A and Site B.v The storage systems for both sites are in a suspended state.v Application disks are replicated by using IBM DS8800 metro mirroring.
In the following figure, the storage systems for Site A and Site B are in a suspended state. HyperSwap forPowerHA SystemMirror cannot determine where the latest data is available because the storage systemsare in a suspended state. There is no automatic recovery solution to fix the problem.
To correct the problem identified in this scenario, complete the following steps:1. Perform a failback recovery operation on the storage system.2. From the command line, enter smit sysmirror.
Storage-based high availability and disaster recovery 129

3. From the SMIT interface, select System Management (C-SPOC) > Resource Group and Applications> Bring Resource Group Online, and press Enter.
HyperSwap configuration for a system mirror groupIn a HyperSwap configuration for a system mirror group, only one node can access the rootvg disk thatis being mirrored to both the primary storage system and auxiliary storage system. The rootvg diskcontains all the information about booting, configuring, and the file system that is specific to a node.
In the following figure, the rootvg disk is mirrored from the primary storage system to the auxiliarystorage system. A node must not have access to another node’s rootvg disk. For example, Node 2 cannothave access to the rootvg disk for Node 1. You must set up zoning correctly in your networkenvironment to verify that a node does not have access to another node’s rootvg disk.
Figure 5. Unplanned HyperSwap configuration for suspended storage systems
130 Storage-based high availability and disaster recovery

HyperSwap configuration for a repository diskFor linked clusters, repository disks are shared by nodes that are at the same site, and each site has itsown repository disk. Sites based on a stretched cluster share a common repository disk with all the nodesin the cluster.
In the following figure, Node 1 and Node 2 can access the repository disk on Site A and the replicatedrepository disk on Site B. If any type of failure occurs where Node 1 and Node 2 cannot access therepository disk in the primary storage system, the nodes can access the repository disk in the auxiliarystorage system. You must configure your network zone correctly to ensure that only nodes for a specificsite have access the repository disk that belongs to that site. For example, Node 3 and Node 4 on Site Bdo not have access to the repository disk in either storage system because it belongs to Node 1 and Node2, which are part of Site A.
Figure 6. HyperSwap configuration for a system mirror group
Storage-based high availability and disaster recovery 131

HyperSwap configuration for active-active workloadsA PowerHA SystemMirror cluster that has two sites with specific applications (parallel database) anduses the HyperSwap function can operate concurrently with a shared disk.
Your application workloads in this cluster configuration can be balanced between two clusters with accessto shared data, while application data integrity is maintained across the sites through Metro Mirror andHyperSwap functions. If a cluster failure or site failure occurs, the application workloads can establish aconnection to access the data by using a different site. This function is called active-active. Thus, theHyperSwap function extends the capability to build an active-active data center solution.
Active-active workloads across sites:
In an active-active configuration that supports application workloads across sites, all nodes haveapplications that are online and that perform I/O functions concurrently to a storage system. In thisconfiguration, PowerHA SystemMirror performs swap and resync functions.
The following figure shows an active-active configuration that supports application workloads across sitesthat have the following characteristics:v Two sites that are called Site A and Site B.v Two nodes at each site, which amounts to a total of four nodes.
Figure 7. HyperSwap configuration for a repository disk
132 Storage-based high availability and disaster recovery
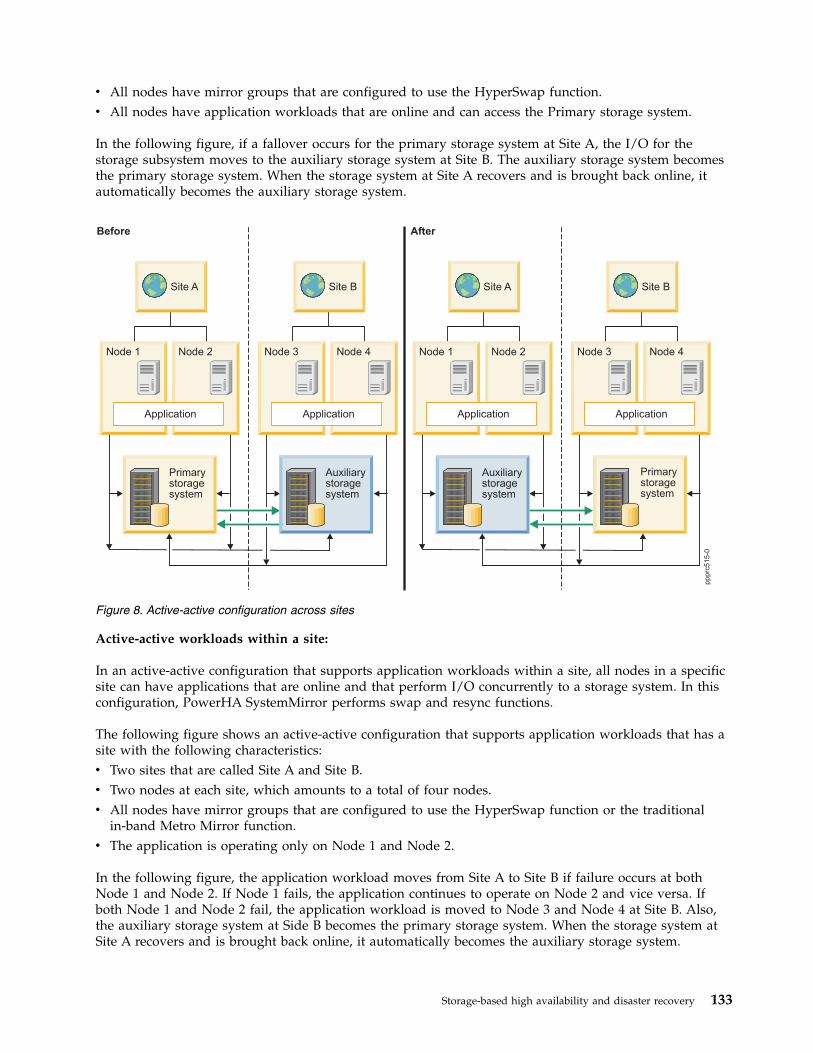
v All nodes have mirror groups that are configured to use the HyperSwap function.v All nodes have application workloads that are online and can access the Primary storage system.
In the following figure, if a fallover occurs for the primary storage system at Site A, the I/O for thestorage subsystem moves to the auxiliary storage system at Site B. The auxiliary storage system becomesthe primary storage system. When the storage system at Site A recovers and is brought back online, itautomatically becomes the auxiliary storage system.
Active-active workloads within a site:
In an active-active configuration that supports application workloads within a site, all nodes in a specificsite can have applications that are online and that perform I/O concurrently to a storage system. In thisconfiguration, PowerHA SystemMirror performs swap and resync functions.
The following figure shows an active-active configuration that supports application workloads that has asite with the following characteristics:v Two sites that are called Site A and Site B.v Two nodes at each site, which amounts to a total of four nodes.v All nodes have mirror groups that are configured to use the HyperSwap function or the traditional
in-band Metro Mirror function.v The application is operating only on Node 1 and Node 2.
In the following figure, the application workload moves from Site A to Site B if failure occurs at bothNode 1 and Node 2. If Node 1 fails, the application continues to operate on Node 2 and vice versa. Ifboth Node 1 and Node 2 fail, the application workload is moved to Node 3 and Node 4 at Site B. Also,the auxiliary storage system at Side B becomes the primary storage system. When the storage system atSite A recovers and is brought back online, it automatically becomes the auxiliary storage system.
Figure 8. Active-active configuration across sites
Storage-based high availability and disaster recovery 133
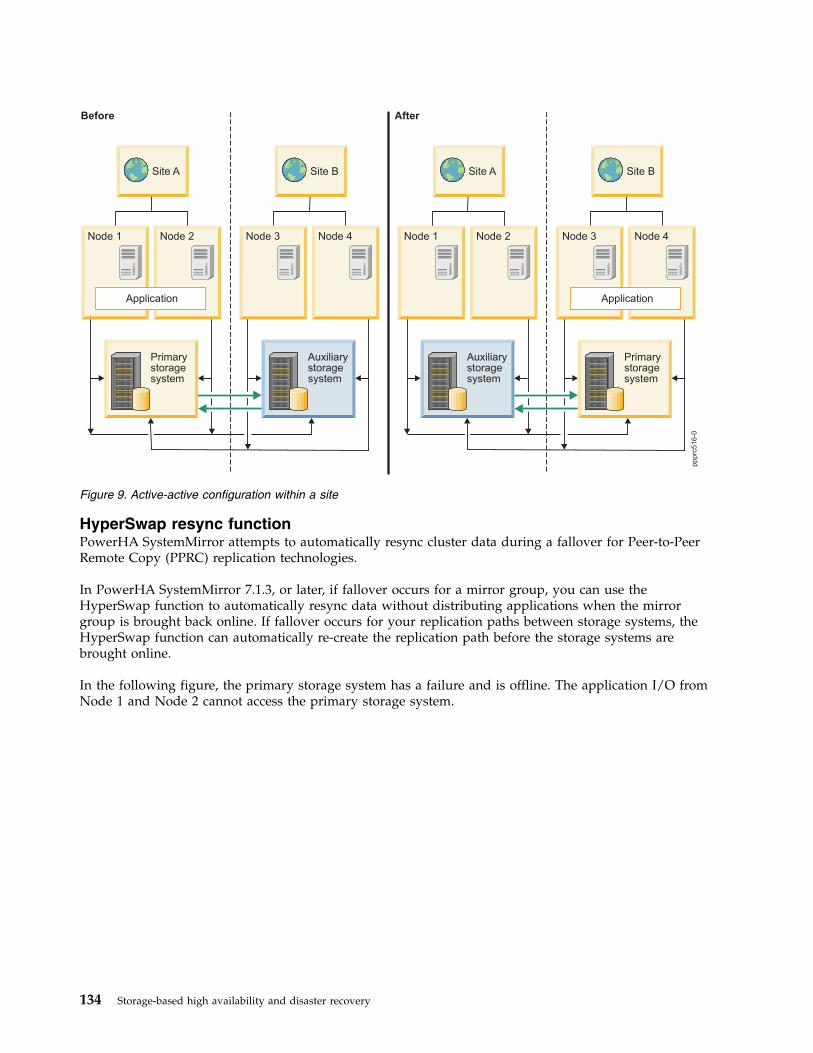
HyperSwap resync functionPowerHA SystemMirror attempts to automatically resync cluster data during a fallover for Peer-to-PeerRemote Copy (PPRC) replication technologies.
In PowerHA SystemMirror 7.1.3, or later, if fallover occurs for a mirror group, you can use theHyperSwap function to automatically resync data without distributing applications when the mirrorgroup is brought back online. If fallover occurs for your replication paths between storage systems, theHyperSwap function can automatically re-create the replication path before the storage systems arebrought online.
In the following figure, the primary storage system has a failure and is offline. The application I/O fromNode 1 and Node 2 cannot access the primary storage system.
Figure 9. Active-active configuration within a site
134 Storage-based high availability and disaster recovery

In the following figure, the application I/O resumes on the auxiliary storage system. The auxiliarystorage system at Site B becomes the primary storage system. The previously primary storage system atSite A is in a suspended state. The replication paths between Site A and Site B are broken.
Figure 10. Primary storage system is offline
Storage-based high availability and disaster recovery 135
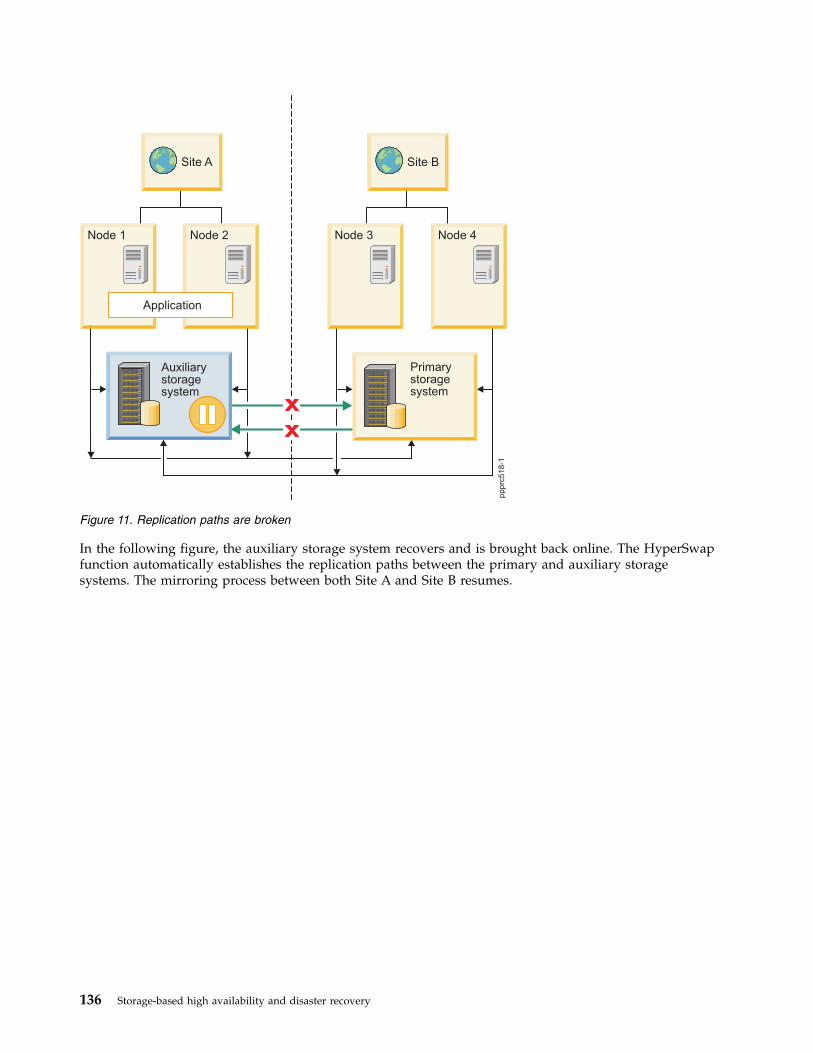
In the following figure, the auxiliary storage system recovers and is brought back online. The HyperSwapfunction automatically establishes the replication paths between the primary and auxiliary storagesystems. The mirroring process between both Site A and Site B resumes.
Figure 11. Replication paths are broken
136 Storage-based high availability and disaster recovery

Planning for HyperSwap for PowerHA SystemMirrorBefore you can install HyperSwap for PowerHA SystemMirror, you must verify that your environment isworking correctly.
To correctly plan for a HyperSwap configuration, review the following information:v Storage level Peer-to-Peer Remote Copy (PPRC) relationships and PPRC paths must be defined before
you configure HyperSwap for PowerHA SystemMirror or In-band PPRC Metro Mirror for PowerHASystemMirror.
v HyperSwap for PowerHA SystemMirror is only supported on IBM DS8800, or later, storage systems.v Concurrent workloads across sites, such as Oracle Real Application Clusters (RAC), and concurrent
resource groups are supported in stretched clusters and linked clusters that are using HyperSwapenabled mirror groups. PowerHA SystemMirror does not support concurrent resource groups for otherPPRC replications solutions.
v You can configure HyperSwap enabled mirror groups for automatic resynchronization when areplication failure occurs. Error logs are created when the replication failure occurs, and the log file canbe used to identify the cause of the failure.
v To maintain consistency group schematics, suspended operations on a storage device must function onthe entire logical subsystem (LSS). For example, if a single IBM DS8800 LSS contains PPRC volumesfrom more than one application and if one of the replication connections breaks, all PPRC paths areremoved. If the applications are not managed by PowerHA SystemMirror, the PPRC paths must bemanually re-created or refreshed after the replication connection is reestablished.
Figure 12. Mirroring resumes between Site A and Site B
Storage-based high availability and disaster recovery 137

v Refresh a mirror group in the cluster after any storage-level PPRC configuration changes or if a PPRCpath is broken. When you refresh a mirror group, you are re-creating the paths for the mirror groupand refreshing any existing configuration changes. Do not run any HyperSwap functions when you arerefreshing a mirror group.
v To add a node to a mirror group, you must perform configuration operations from a node where alldisks are accessible.
v Metro Mirror (in-band) functions, including HyperSwap, are supported in Virtual I/O Server (VIOS)configurations by the N-Port ID Virtualization (NPIV) method of disk management.
v Metro Mirror (in-band) functions, including HyperSwap, are not supported by the virtual SCSI (VSCSI)method of disk management.
v To use Live Partition Mobility (LPM), you must bring the resource group that contains the mirrorgroup into an unmanaged state by using the C-SPOC utility to stop cluster services with theUnmanage Resource Groups option. After you complete the LPM configuration process, you mustbring the resource group back online by using SMIT. This process brings all mirror groups andresource groups back online.
v Disk replication relationships must adhere to a one-to-one relationship between the underlying LSS. AnLSS that is already part of a mirror group, cannot be part of another mirror group.
v Repository disks require that you specify an alternate disk or a disk that is not configured to use theHyperSwap function when you set HyperSwap property to Disable.
v SCSI reservations are not supported for devices that use the HyperSwap function.v You must verify and synchronize the cluster when you change the cluster configuration. If you change
the mirror group configuration while cluster services are active (DARE), those changes might beinterpreted as failures, which result in unwanted cluster events. You must disable the HyperSwapfunction before you change any settings in an active cluster environment.
v A node in an unmanaged state does not respond or perform any swap or resync functions. However,the I/O to the node continues. Thus, having a node in an unmanaged state is ideal for performingLPM on the node. After you complete the LPM process, you can move the node from unmanaged toonline state by using SMIT. If an unplanned event occurs while the node is in an unmanaged state, thenode is moved to a halt state.
Fileset requirements
To run HyperSwap for PowerHA SystemMirror, you must install the following filesets on all nodes in thecluster:
Table 37. HyperSwap fileset requirements for PowerHA SystemMirror
Fileset nameMinimum fileset level for AIX Version7.1
Minimum fileset level for AIX Version6.1
cluster.es.genxd.cmds 7.1.2.0 6.1.8.0
devices.common.IBM.storfwork.rte 7.1.2.0 6.1.8.0
devices.common.IBM.mpio.rte 7.1.2.0 6.1.8.0
devices.fcp.disk.rte 7.1.2.0 6.1.8.0
HyperSwap support for DS8800 Metro MirroringIBM DS8800 provides Metro Mirror (in-band) communication capabilities, which allow PowerHASystemMirror to manage DS8800 replication without using the Hardware Management Console (HMC).
Using the Inband communication model, PowerHA SystemMirror can send replication commands withspecific Small Computer System Interface (SCSI) commands. The SCSI commands are sent through thesame Fibre Channel that is used to send I/O requests to the storage device. This process greatly reducesthe configuration complexities and failover times.Related information:
138 Storage-based high availability and disaster recovery

IBM System Storage DS8000: Architecture and Implementation
HyperSwap support for raw disksSome applications, such as DB2, do not require a file system because they perform functions like logging,tracking data, and caching. These types of applications perform better when using raw disk I/O insteadof using file I/O.
Normally, any raw disks that PowerHA SystemMirror manages require a physical volume ID (PVID).However, with HyperSwap for PowerHA SystemMirror you can add raw disks without defining a PVID.This support includes raw disks that are shared in a single configuration or raw disks that replicateacross sites.
HyperSwap configuration settings PowerHA SystemMirror 7.1 Enterprise Editionfor AIXBefore you configure HyperSwap, you must know the optimal settings to use.
The following table displays the optimal settings to use for a HyperSwap configuration.
Table 38. HyperSwap configuration settings
Name Component Value Description
dyntrk Protocol driver (fscsi) Enabled Provides transparent I/Orecovery if the N_port ID for adevice is changed. Forexample, if the Fibre Channelmoves from one switch port toanother port. This option ishandled at the host busadapter (HBA) level.
fc_err_recov Protocol driver (fscsi) fast_fail Detects Fibre Channelproblems between the switchand the storage device.
hcheck_interval Disk driver (hdisk) 60 Sets the time interval when ahealth check request is sent tothe storage device. The defaultsetting is 60 seconds.
HyperSwap zoning requirementsTo use the HyperSwap function in your cluster, you must configure zones correctly for system mirrorgroups, repository mirror groups, and user mirror groups.
The zoning requirements for specific types of mirror groups follow:
System mirror groupSystem mirror groups are local to a specific node. Therefore, the Peer-to-Peer Remote Copy(PPRC) disks that are associated with a system mirror group are only visible to the single node inthe cluster. For example, if there are two sites (Site A and Site B) with one node at each site(Node A and Node B), you can create a system mirror group in Node A at Site A. In thisexample, you must verify that the disks in the system mirror group are only visible to Node A.The PPRC peers for these disks are only visible to Node A in Site A, even though the PPRC peerdisk is in Site B.
Repository mirror groupThe disks in a repository mirror group are accessible by the nodes that are listed in the associatedsite property list for the repository mirror group. You must verify that the HyperSwap diskassociated with the repository mirror group is accessible to all the nodes that are specified in thesite property list.
Storage-based high availability and disaster recovery 139

User mirror group that is enabled for the HyperSwap functionUser mirror groups are associated to a set of one or more nodes in the cluster. The associatednodes can span across sites, and can have primary disks and auxiliary disks visible to each nodein the cluster.
User mirror group for traditional Metro Mirror PPRC with in-band communicationThese user mirror groups are not configured to use the HyperSwap function. The associatednodes can span across sites, and can have primary disks visible to primary site nodes andauxiliary disks visible to auxiliary site nodes.
Installing HyperSwap for PowerHA SystemMirrorBefore installing HyperSwap for PowerHA SystemMirror, you must verify that each user has root accessto each node in the cluster. Your systems must also be running IBM AIX 6.1 with Technology Level 8, orlater, or IBM AIX 7.1 with Technology Level 2, or later.
To install HyperSwap for PowerHA SystemMirror, complete the following steps:1. Insert the PowerHA SystemMirror Enterprise Edition for AIX DVD into the DVD drive.2. From the command line, enter smit installp.3. From the System Management Interface Tool (SMIT) interface, select Install and Update Software >
Install Software, and press Enter.4. Select the cluster.es.genxd.cmds fileset and press Enter.
Configuring HyperSwap for PowerHA SystemMirrorBefore you can configure HyperSwap for PowerHA SystemMirror, your IBM DS8800 must be configuredcorrectly.
Verify that your environment meets the following requirements before you configure HyperSwap forPowerHA SystemMirror:v A PowerHA SystemMirror cluster is defined.v All PowerHA SystemMirror nodes are defined.v All PowerHA SystemMirror sites are defined.v All PowerHA SystemMirror resource groups and associated resources are configured and working
properly.
Configuring a storage system for HyperSwapA storage system is a generic term that is used by PowerHA SystemMirror for an entity such as an IBMDS8800 storage unit.
Configuring a storage system to use in-band communication for HyperSwap:
To use the HyperSwap function, your storage system must use in-band communication. You might haveto use the DS command-line interface (DSCLI) or the graphical management interface to configure astorage system to use in-band communication though a SCSI connection.
To configure a storage system for in-band communication, you must create a host profile on each storagesystem and associate the host profile with all PowerHA SystemMirror nodes in the cluster.
To configure a storage system to use in-band communication, complete the following steps:1. Verify that the primary disk and auxiliary disk in the storage systems are correctly zoned to all
PowerHA SystemMirror nodes.2. Identify the host connection identifier that is associated with PowerHA SystemMirror nodes by
entering the following command:lshostconnect –dev storage system ID
140 Storage-based high availability and disaster recovery

3. For each node in the cluster, enter the following command to change the host profile to IBM pSeries -AIX with Powerswap support:chhostconect –profile “IBM pSeries - AIX with Powerswap support” host connection ID
4. Define Peer-to-Peer Remote Copy (PPRC) paths and PPRC relationships for each disk that is part ofthe storage system that is used as a replicated resource.The PPRC paths are bidirectional. Thus, PPRC paths must be created from both directions. Forexample, there must be a PPRC path from site A to site B and from site B to site A. You must haveconfigured PPRC paths before you start the mirror group.
5. Enter the following command to verify that both the primary and auxiliary disks are replicatingcorrectly:lspprc –l primary volume ID
Note: The command displays various fields. The State field of the primary disk must displayFull-Duplex. The value for the Out-of-Sync Tracks field must be 0.
Related information:chhostconnect commandlshostconnect commandlspprc command
Configuring a PowerHA SystemMirror node to use in-band communication for HyperSwap:
After you configured a storage system to use in-band communication for, you must configure each nodein the cluster to use in-band communication for HyperSwap.
To configure a PowerHA SystemMirror cluster to use in-band communication, complete the followingsteps on each node in the cluster:1. Enter the following command to configure all disks that are part of the storage system to use the AIX
Path Control Module (PCM) driver:manage_disk_drivers –d device -o AIX_AAPCM
2. Restart the node by entering the shutdown -r command.3. SCSI reservations are not supported for disks that are used in a HyperSwap mirror group. Enter the
following command to verify that no disk reservations are set:devrsrv -c query -l hdisk_name
The command returns the following information:ODM Reservation Policy : NO RESERVEDevice Reservation State : NO RESERVE
4. Enter the following command to change the disk reservation policy to no_reserve:chdev –a reserve_policy=no_reserve –l hdisk_number
5. Enter the following command to transform a disk that is associated with the primary disk totransparently route its I/O to the auxiliary disk:chdev –a san_rep_cfg=migrate_disk–l hdisk_name -U
For example, if the primary disk is hdisk1 and the auxiliary disk is hdisk2, you would run thefollowing command:chdev –a san_rep_cfg=migrate_disk –l hdisk1 –U
When you run this command the auxiliary disk hdisk2 moves to a Defined state and all applicationI/O for hdisk1 is transparently routed to the auxiliary disk.
Note: Enter the following command to rollback hdisk1 from being enabled by using the HyperSwapfunction:
Storage-based high availability and disaster recovery 141

chdev –a san_rep_cfg=revert_disk –l hdisk1 –U
After you enter this command, both the primary and secondary disks are displayed for the node.6. Enter the following command to verify that the disks for the storage system are configured correctly:
lsattr –EO –a san_rep_cfg,san_rep_device,reserve_policy –l hdisk_number
The command returns following information:#san_rep_cfg:san_rep_device:reserve_policymigrate_disk:yes:no_reserve
Note: The value for san_rep_cfg attribute might be displayed as none, which is acceptable. However,the value for the san_rep_device attribute must be set to yes.
7. Use the SMIT interface to import volume groups on all PowerHA SystemMirror nodes by completingthe following steps:a. From the command line, enter smit sysmirror.b. From SMIT interface, select System Managemnet (C-SPOC) > Storage > Volume Groups >
Import a Volume Group, and press Enter.c. From the list, select the volume group that you want to import, and press Enter.
Related information:chdev commanddevrsrv commandlsattr commandmanage_disk_drivers commandshutdown command
Configuring a PowerHA SystemMirror node to use in-band communication for traditional MetroMirror PPRC:
After you configured a storage system to use in-band communication for, you must configure each nodein the cluster to use in-band communication for traditional Metro Mirror Peer-to-Peer Remote Copy(PPRC).
To configure a PowerHA SystemMirror cluster to use in-band communication for traditional Metro MirrorPPRC, complete the following steps on each node in the cluster:1. Enter the following command to configure all disks that are part of the storage system to use the AIX
Path Control Module (PCM) driver:manage_disk_drivers –d device -o AIX_AAPCM
2. Restart the node by entering the shutdown -r command.3. SCSI reservations are not supported for disks that are used in a HyperSwap mirror group. Enter the
following command to verify that no disk reservations are set:devrsrv -c query -l hdisk_name
The command returns the following information:ODM Reservation Policy : NO RESERVEDevice Reservation State : NO RESERVE
4. Enter the following command to change the disk reservation policy to no_reserve:chdev –a reserve_policy=no_reserve –l hdisk_number
5. Enter the following command to change the attributes of the primary disk for all nodes in theprimary site:chdev –a san_rep_cfg=migrate_disk –l hdisk_name -U
142 Storage-based high availability and disaster recovery

Where hdisk_name is the name of the primary disk.6. Enter the following command to change the attributes of the auxiliary disk for all nodes in the
auxiliary site:chdev –a san_rep_cfg=migrate_disk –l hdisk_name -U
Where hdisk_name is the name of the auxiliary disk.7. Enter the following command to verify that the disks in the storage system are configured correctly:
lsattr –EO –a san_rep_cfg,san_rep_device,reserve_policy –l hdisk_number
The command returns the following information:#san_rep_cfg:san_rep_device:reserve_policymigrate_disk:detected:no_reserve
Note: The value for san_rep_cfg might display none, which is acceptable. However, thesan_rep_device value must be detected or yes.
Related tasks:“Setting up volume groups and file systems on DSCLI-protected disks” on page 42Although not required, you should complete these steps prior to planning. These steps must becompleted prior to the initial PowerHA SystemMirror verification to avoid verification errors.
Adding a storage system for HyperSwap:
Before you can start using your storage system, you must add it to your environment.
To add a storage system, complete the following steps:1. From the command line, enter smit sysmirror.2. From the SMIT interface, select Cluster Application and Resources > Resources > Configure
DS8800-Metro Mirror (In-band) Resources > Configure Storage Systems > Add a Storage System,and press Enter.
3. Enter the following information for the fields:
Table 39. Add storage system fields
Field Description
Storage system name Enter the PowerHA SystemMirror name for the storage system.This name must be unique within the cluster definition, andcannot be more than 32 characters.
Site association Press F4 to select an available site name from the list.
Vendor specific identifier Press F4 to select the vendor-specific identifier from the list ofstorage systems that are connected to the local node.
WWNN Press F4 to select the worldwide node name from a list ofstorage systems that are connected to the local node.
4. Verify that all fields are correct and press Enter.
Changing a storage system for HyperSwap:
You can change any of the properties of an existing storage system that you already added to yourenvironment.
To change a storage system, complete the following steps:1. From the command line, enter smit sysmirror.2. From the SMIT interface, select Cluster Application and Resources > Resources > Configure
DS8800-Metro Mirror (In-band) Resources > Configure Storage Systems > Change/Show a StorageSystem, and press Enter.
Storage-based high availability and disaster recovery 143

3. From the list, select the name of the storage system that you want to change and press Enter.4. Enter the following information for the fields:
Table 40. Change storage system fields
Field Description
Storage system name Displays the current name for the PowerHA SystemMirrorstorage system. You cannot change this field.
New storage system name Enter the new name for the PowerHA SystemMirror storagesystem. This name must be unique within the cluster definition.You cannot change this field in dynamic automaticreconfiguration (DARE) or when the underlying mirror group isbeing used. The name can have a maximum of 32 characters.
Site association Press F4 to select an available site name from a list. You cannotchange this field in DARE or when the underlying mirror groupis being used. This field automatically discovers the changedsite name from the PowerHA SystemMirror
Vendors identifier Enter the unique vendor-specific ID for this storage system. Forexample, IBM.2107-75ABTV1 is a storage identifier for a DS8800storage system. Press F4 to display a list of the storage systemsthat are connected to the local node. You cannot change thisfield in DARE or when the underlying mirror group is beingused.
WWNN Press F4 to select the worldwide node name from a list ofstorage systems that are connected to the local node. You cannotchange this field in DARE or when the underlying mirror groupis being used.
5. Verify that all fields are correct and press Enter.
Removing a storage system for HyperSwap:
If you do not want a storage system to be included in your environment, you can remove it.
To remove a storage system, complete the following steps:1. From the command line, enter smit sysmirror.2. From the SMIT interface, select Cluster Application and Resources > Resources > Configure
DS8800-Metro Mirror (In-band) Resources > Configure Storage Systems > Remove a StorageSystem, and press Enter.
3. Enter the storage system name you want to remove, and press Enter.4. Press Enter to confirm that the selected storage system is the one you want to remove.
Configuring user mirror groups for HyperSwapYou can add and change user mirror groups by using HyperSwap functions.
Adding a user mirror group for HyperSwap:
Before you can start using a user mirror group, you must add it to your environment.
Review the following information if you are adding a user mirror group to a single node configurationthat uses the HyperSwap function:v You cannot create a user mirror group if the HyperSwap field is set to Disable.v You cannot change the HyperSwap field after the mirror group is added.v The resource group must contain a single node in the node list. Otherwise, the cluster verification
process fails.v The Recovery action filed must be set to Manual.v You should use the tie breaker option for the split and merge policies.
144 Storage-based high availability and disaster recovery
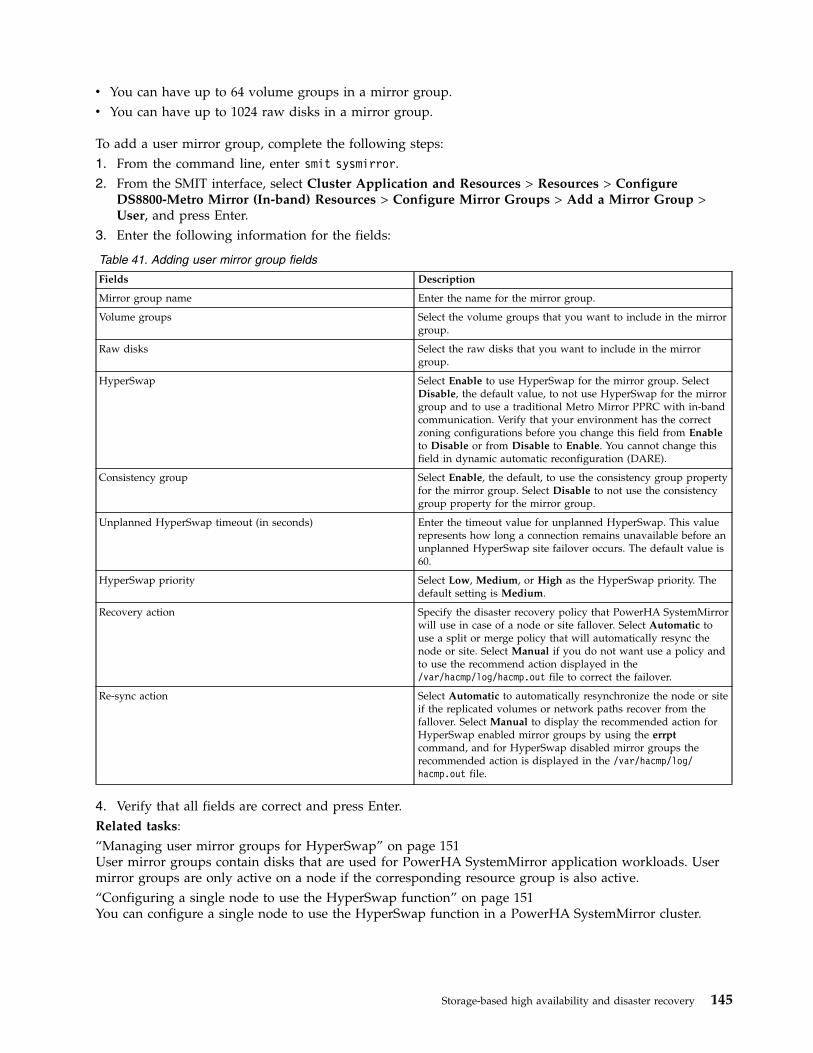
v You can have up to 64 volume groups in a mirror group.v You can have up to 1024 raw disks in a mirror group.
To add a user mirror group, complete the following steps:1. From the command line, enter smit sysmirror.2. From the SMIT interface, select Cluster Application and Resources > Resources > Configure
DS8800-Metro Mirror (In-band) Resources > Configure Mirror Groups > Add a Mirror Group >User, and press Enter.
3. Enter the following information for the fields:
Table 41. Adding user mirror group fields
Fields Description
Mirror group name Enter the name for the mirror group.
Volume groups Select the volume groups that you want to include in the mirrorgroup.
Raw disks Select the raw disks that you want to include in the mirrorgroup.
HyperSwap Select Enable to use HyperSwap for the mirror group. SelectDisable, the default value, to not use HyperSwap for the mirrorgroup and to use a traditional Metro Mirror PPRC with in-bandcommunication. Verify that your environment has the correctzoning configurations before you change this field from Enableto Disable or from Disable to Enable. You cannot change thisfield in dynamic automatic reconfiguration (DARE).
Consistency group Select Enable, the default, to use the consistency group propertyfor the mirror group. Select Disable to not use the consistencygroup property for the mirror group.
Unplanned HyperSwap timeout (in seconds) Enter the timeout value for unplanned HyperSwap. This valuerepresents how long a connection remains unavailable before anunplanned HyperSwap site failover occurs. The default value is60.
HyperSwap priority Select Low, Medium, or High as the HyperSwap priority. Thedefault setting is Medium.
Recovery action Specify the disaster recovery policy that PowerHA SystemMirrorwill use in case of a node or site fallover. Select Automatic touse a split or merge policy that will automatically resync thenode or site. Select Manual if you do not want use a policy andto use the recommend action displayed in the/var/hacmp/log/hacmp.out file to correct the failover.
Re-sync action Select Automatic to automatically resynchronize the node or siteif the replicated volumes or network paths recover from thefallover. Select Manual to display the recommended action forHyperSwap enabled mirror groups by using the errptcommand, and for HyperSwap disabled mirror groups therecommended action is displayed in the /var/hacmp/log/hacmp.out file.
4. Verify that all fields are correct and press Enter.Related tasks:“Managing user mirror groups for HyperSwap” on page 151User mirror groups contain disks that are used for PowerHA SystemMirror application workloads. Usermirror groups are only active on a node if the corresponding resource group is also active.“Configuring a single node to use the HyperSwap function” on page 151You can configure a single node to use the HyperSwap function in a PowerHA SystemMirror cluster.
Storage-based high availability and disaster recovery 145
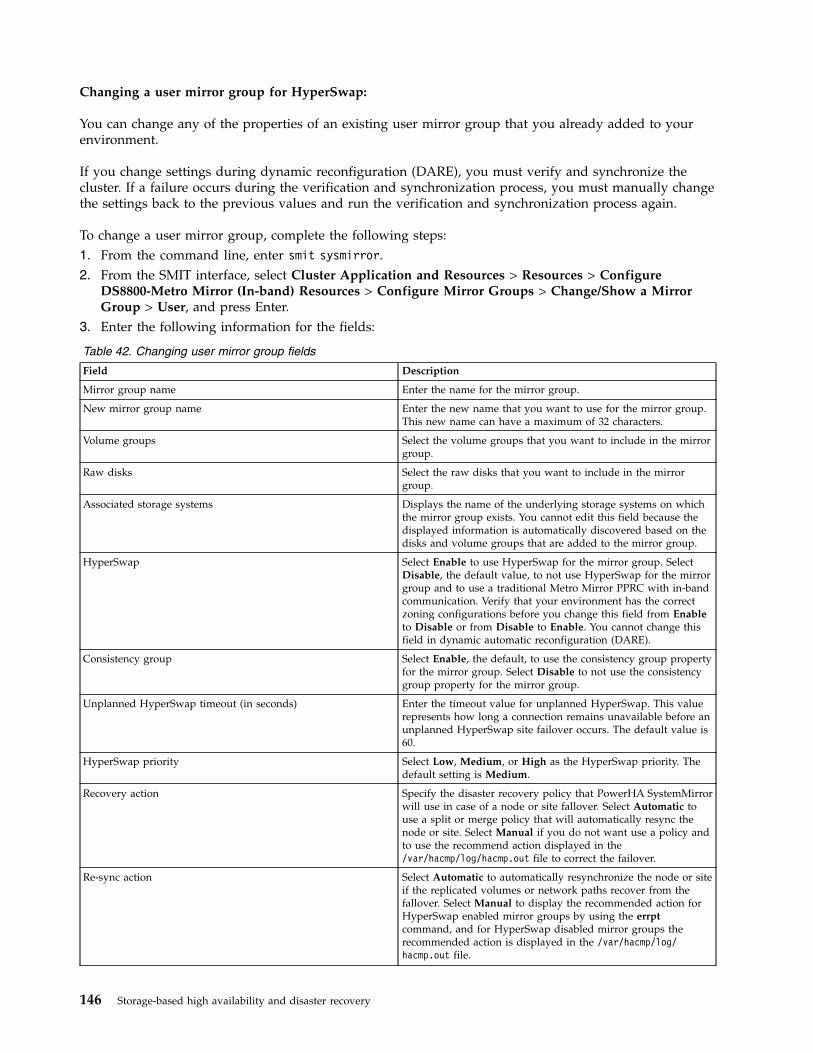
Changing a user mirror group for HyperSwap:
You can change any of the properties of an existing user mirror group that you already added to yourenvironment.
If you change settings during dynamic reconfiguration (DARE), you must verify and synchronize thecluster. If a failure occurs during the verification and synchronization process, you must manually changethe settings back to the previous values and run the verification and synchronization process again.
To change a user mirror group, complete the following steps:1. From the command line, enter smit sysmirror.2. From the SMIT interface, select Cluster Application and Resources > Resources > Configure
DS8800-Metro Mirror (In-band) Resources > Configure Mirror Groups > Change/Show a MirrorGroup > User, and press Enter.
3. Enter the following information for the fields:
Table 42. Changing user mirror group fields
Field Description
Mirror group name Enter the name for the mirror group.
New mirror group name Enter the new name that you want to use for the mirror group.This new name can have a maximum of 32 characters.
Volume groups Select the volume groups that you want to include in the mirrorgroup.
Raw disks Select the raw disks that you want to include in the mirrorgroup.
Associated storage systems Displays the name of the underlying storage systems on whichthe mirror group exists. You cannot edit this field because thedisplayed information is automatically discovered based on thedisks and volume groups that are added to the mirror group.
HyperSwap Select Enable to use HyperSwap for the mirror group. SelectDisable, the default value, to not use HyperSwap for the mirrorgroup and to use a traditional Metro Mirror PPRC with in-bandcommunication. Verify that your environment has the correctzoning configurations before you change this field from Enableto Disable or from Disable to Enable. You cannot change thisfield in dynamic automatic reconfiguration (DARE).
Consistency group Select Enable, the default, to use the consistency group propertyfor the mirror group. Select Disable to not use the consistencygroup property for the mirror group.
Unplanned HyperSwap timeout (in seconds) Enter the timeout value for unplanned HyperSwap. This valuerepresents how long a connection remains unavailable before anunplanned HyperSwap site failover occurs. The default value is60.
HyperSwap priority Select Low, Medium, or High as the HyperSwap priority. Thedefault setting is Medium.
Recovery action Specify the disaster recovery policy that PowerHA SystemMirrorwill use in case of a node or site fallover. Select Automatic touse a split or merge policy that will automatically resync thenode or site. Select Manual if you do not want use a policy andto use the recommend action displayed in the/var/hacmp/log/hacmp.out file to correct the failover.
Re-sync action Select Automatic to automatically resynchronize the node or siteif the replicated volumes or network paths recover from thefallover. Select Manual to display the recommended action forHyperSwap enabled mirror groups by using the errptcommand, and for HyperSwap disabled mirror groups therecommended action is displayed in the /var/hacmp/log/hacmp.out file.
146 Storage-based high availability and disaster recovery

4. Verify that all fields are correct and press Enter.Related tasks:“Managing user mirror groups for HyperSwap” on page 151User mirror groups contain disks that are used for PowerHA SystemMirror application workloads. Usermirror groups are only active on a node if the corresponding resource group is also active.
Configuring a system mirror group for HyperSwapYou can add or change a system mirror group by using HyperSwap functions.
Adding a system mirror group for HyperSwap:
Before you can start using a system mirror group, you must add it to your environment.
To add a system mirror group, complete the following steps:1. From the command line, enter smit sysmirror.2. From the SMIT interface, select Cluster Application and Resources > Resources > Configure
DS8800-Metro Mirror (In-band) Resources > Configure Mirror Groups > Add a Mirror Group >System, and press Enter.
3. Enter the following information for the fields:
Table 43. Adding system mirror group fields
Field Description
Mirror group name Enter the name for the mirror group.
Volume groups Select the volume groups that you want to include in the mirrorgroup.
Raw disks Select the raw disks that you want to include in the mirrorgroup.
Node name Displays the name of the local node. This field is automaticallypopulated and cannot be changed.
HyperSwap This field must be set to Enabled.
Consistency group This field must be set to Enabled.
Unplanned HyperSwap timeout (in seconds) Enter the timeout value for unplanned HyperSwap. This valuerepresents how long a connection remains unavailable before anunplanned HyperSwap site failover occurs. The default value is60.
HyperSwap priority Select Low, Medium, or High as the HyperSwap priority. Thedefault setting is High.
4. Verify that all fields are correct and press Enter.
Note: The resynchronization function occurs automatically for system mirror groups.Related tasks:“Managing system mirror groups for HyperSwap” on page 152System mirror groups are a group of disks and volume groups that are critical to a single node that isrunning the AIX operating system. An example of a system mirror group is a rootvg mirror group or amirror group that contains the paging space.
Changing a system mirror group for HyperSwap:
You can change the properties of an existing system mirror group that you already added to yourenvironment.
To change a system mirror group, complete the following steps:1. From the command line, enter smit sysmirror.
Storage-based high availability and disaster recovery 147
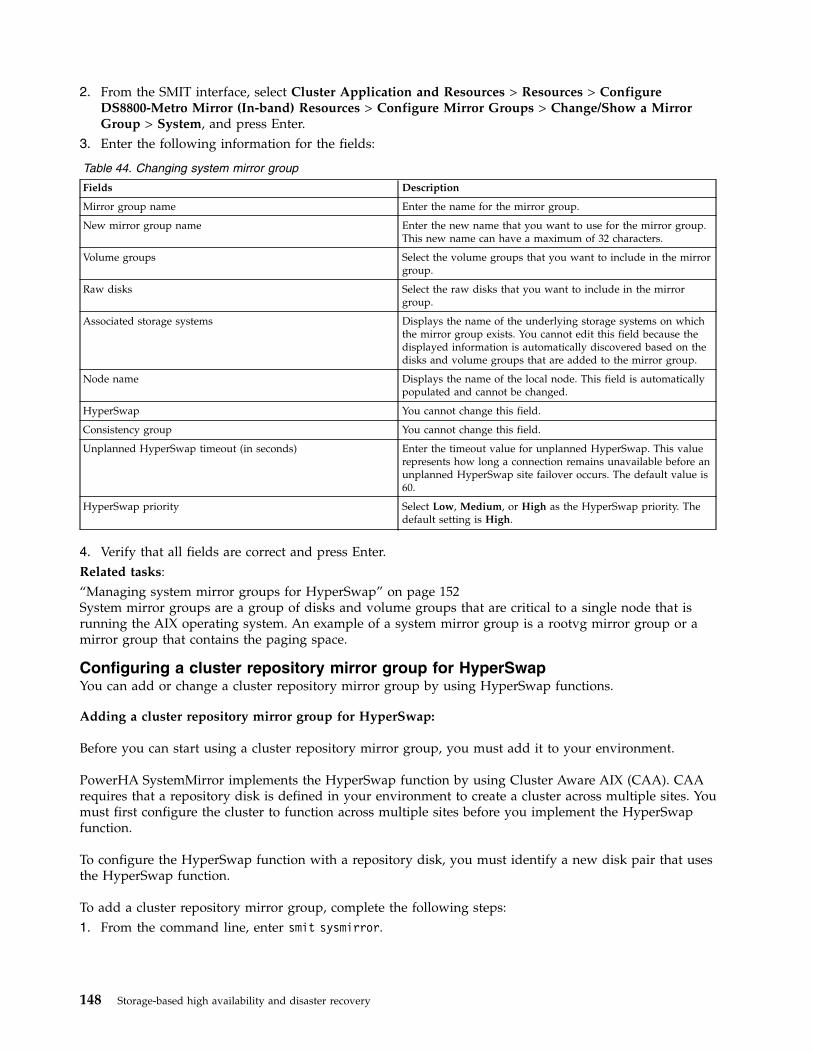
2. From the SMIT interface, select Cluster Application and Resources > Resources > ConfigureDS8800-Metro Mirror (In-band) Resources > Configure Mirror Groups > Change/Show a MirrorGroup > System, and press Enter.
3. Enter the following information for the fields:
Table 44. Changing system mirror group
Fields Description
Mirror group name Enter the name for the mirror group.
New mirror group name Enter the new name that you want to use for the mirror group.This new name can have a maximum of 32 characters.
Volume groups Select the volume groups that you want to include in the mirrorgroup.
Raw disks Select the raw disks that you want to include in the mirrorgroup.
Associated storage systems Displays the name of the underlying storage systems on whichthe mirror group exists. You cannot edit this field because thedisplayed information is automatically discovered based on thedisks and volume groups that are added to the mirror group.
Node name Displays the name of the local node. This field is automaticallypopulated and cannot be changed.
HyperSwap You cannot change this field.
Consistency group You cannot change this field.
Unplanned HyperSwap timeout (in seconds) Enter the timeout value for unplanned HyperSwap. This valuerepresents how long a connection remains unavailable before anunplanned HyperSwap site failover occurs. The default value is60.
HyperSwap priority Select Low, Medium, or High as the HyperSwap priority. Thedefault setting is High.
4. Verify that all fields are correct and press Enter.Related tasks:“Managing system mirror groups for HyperSwap” on page 152System mirror groups are a group of disks and volume groups that are critical to a single node that isrunning the AIX operating system. An example of a system mirror group is a rootvg mirror group or amirror group that contains the paging space.
Configuring a cluster repository mirror group for HyperSwapYou can add or change a cluster repository mirror group by using HyperSwap functions.
Adding a cluster repository mirror group for HyperSwap:
Before you can start using a cluster repository mirror group, you must add it to your environment.
PowerHA SystemMirror implements the HyperSwap function by using Cluster Aware AIX (CAA). CAArequires that a repository disk is defined in your environment to create a cluster across multiple sites. Youmust first configure the cluster to function across multiple sites before you implement the HyperSwapfunction.
To configure the HyperSwap function with a repository disk, you must identify a new disk pair that usesthe HyperSwap function.
To add a cluster repository mirror group, complete the following steps:1. From the command line, enter smit sysmirror.
148 Storage-based high availability and disaster recovery

2. From the SMIT interface, select Cluster Application and Resources > Resources > ConfigureDS8800-Metro Mirror (In-band) Resources > Configure Mirror Groups > Add a Mirror Group >Cluster Repository, and press Enter.
3. Enter the following information for the fields:
Table 45. Adding cluster repository mirror group fields
Field Description
Mirror group name Enter the name for the mirror group.
Site name Select the site that is used as the cluster repository disk andcontains the mirror group. If you select a stretched cluster, bothsite names are displayed. If you select a linked cluster, the localsite name is displayed.
Non-HyperSwap disk Select the name of the non-HyperSwap disk that is used as thecluster repository disk and contains the mirror group. If therepository disk is on a non-HyperSwap disk select that disk.This field is optional if the repository disk is already on theHyperSwap enabled disk.
HyperSwap disk Select the name of the Peer-to-Peer Remote Copy (PPRC) diskthat is used as the cluster repository and contains the mirrorgroup.
HyperSwap This field must be set to Enabled.
Consistency group This field must be set to Enabled.
Unplanned HyperSwap timeout (in seconds) Enter the timeout value for unplanned HyperSwap. This valuerepresents how long a connection remains unavailable before anunplanned HyperSwap site failover occurs. The default value is60.
HyperSwap priority Select Low, Medium, or High as the HyperSwap priority. Thedefault setting is High.
Re-sync action Select Automatic to automatically resynchronize the node or siteif the replicated volumes or network paths recover from thefallover. Select Manual to display the recommended action forHyperSwap enabled mirror groups by using the errptcommand, and for HyperSwap disabled mirror groups therecommended action is displayed in the /var/hacmp/log/hacmp.out file.
4. Verify that all fields are correct and press Enter.
Note: During the cluster verification and synchronization process, if a repository disk is not configured touse the HyperSwap function it moves to a disk that is configured to use the HyperSwap function.Related tasks:“Managing cluster repository mirror groups for HyperSwap” on page 153Cluster repository mirror groups contain disks that are used for the Cluster Aware AIX (CAA) clusterrepository. These disks are shared between multiple nodes, but they cannot be shared across sites.
Changing a cluster repository mirror group for HyperSwap:
You can change any of the properties of an existing cluster repository mirror group that you alreadyadded to your environment.
To change a cluster repository mirror group, complete the following steps:1. From the command line, enter smit sysmirror.2. From the SMIT interface, select Cluster Application and Resources > Resources > Configure
DS8800-Metro Mirror (In-band) Resources > Configure Mirror Groups > Change/Show a MirrorGroup > Cluster Repository, and press Enter.
3. Enter the following information for the fields:
Storage-based high availability and disaster recovery 149

Table 46. Changing cluster repository mirror group fields
Field Description
Mirror group name Enter the name for the mirror group.
New mirror group name Enter the new name that you want to use for the mirror group.This new name can have a maximum of 32 characters.
Site name Select the site that is used as the cluster repository disk andcontains the mirror group. If you select a stretched cluster, bothsite names are displayed. If you select a linked cluster, the localsite name is displayed.
Non-HyperSwap disk Select the name of the non-HyperSwap disk that is used as thecluster repository disk and contains the mirror group. If therepository disk is on a non-HyperSwap disk select that disk.This field is optional if the repository disk is already on theHyperSwap enabled disk.
HyperSwap disk Select the name of the Peer-to-Peer Remote Copy (PPRC) diskthat is used as the cluster repository and contains the mirrorgroup.
Associated storage systems Displays the name of the underlying storage systems on whichthe mirror group exists. You cannot edit this field because thedisplayed information is automatically discovered based on thedisks and volume groups that are added to the mirror group.
HyperSwap You cannot change this field.
Consistency group You cannot change this field.
Unplanned HyperSwap timeout (in seconds) Enter the timeout value for unplanned HyperSwap. This valuerepresents how long a connection remains unavailable before anunplanned HyperSwap site failover occurs. The default value is60.
HyperSwap priority Select Low, Medium, or High as the HyperSwap priority. Thedefault setting is High.
Re-sync action Select Automatic to automatically resynchronize the node or siteif the replicated volumes or network paths recover from thefallover. Select Manual to display the recommended action forHyperSwap enabled mirror groups by using the errptcommand, and for HyperSwap disabled mirror groups therecommended action is displayed in the /var/hacmp/log/hacmp.out file.
4. Verify that all fields are correct and press Enter.Related tasks:“Managing cluster repository mirror groups for HyperSwap” on page 153Cluster repository mirror groups contain disks that are used for the Cluster Aware AIX (CAA) clusterrepository. These disks are shared between multiple nodes, but they cannot be shared across sites.
Removing a mirror group for HyperSwapYou can remove a user, system, or cluster repository mirror group by using SMIT.
To remove a user, system, or cluster repository mirror group, complete the following steps:1. From the command line, enter smit sysmirror.2. From the SMIT interface, select Cluster Application and Resources > Resources > Configure
DS8800-Metro Mirror (In-band) Resources > Configure Mirror Groups > Remove a Mirror Group,and press Enter.
3. Select the mirror group you want to remove and press Enter.4. Press Enter to confirm that the selected mirror group is the one you want to remove.
Note: After you remove a mirror group, the HyperSwap configuration for the storage systems or volumegroups is also removed from the PowerHA SystemMirror database.
150 Storage-based high availability and disaster recovery

Configuring a single node to use the HyperSwap functionYou can configure a single node to use the HyperSwap function in a PowerHA SystemMirror cluster.
You can use the HyperSwap function in a single node configuration by using a minimal amount ofhardware. However, your environment must have a primary storage system and an auxiliary storagesystem.
In a single node configuration that uses the HyperSwap function, you can only have one mirror groupfor the associated node. To create a mirror group in this configuration, your cluster cannot be configuredto use multiple sites. You can use the HyperSwap function to change a mirror group that is associatedwith a single node.
To configure a single node to use the HyperSwap function, complete the following steps:1. From the command line, enter smit sysmirror.2. From the SMIT interface, select Cluster Application and Resources > Resources > Configure
DS8800-Metro Mirror (In-band) Resources > Cluster Wide HyperSwap Policies, and press Enter.3. From Single node HyperSwap list, select Enabled.4. Verify that all fields are correct and press Enter.
Note: You cannot convert the single node configuration that uses the HyperSwap function to a multisiteconfiguration. If you want to create a cluster with multiple sites, you must first remove the existing singlenode configuration from the cluster.Related tasks:“Adding a user mirror group for HyperSwap” on page 144Before you can start using a user mirror group, you must add it to your environment.
Managing mirror groups for HyperSwapAfter you add a mirror group to the cluster, you can manage it by using the System Management(C-SPOC) panel in SMIT.
Managing user mirror groups for HyperSwapUser mirror groups contain disks that are used for PowerHA SystemMirror application workloads. Usermirror groups are only active on a node if the corresponding resource group is also active.
To manage user mirror groups, complete the following steps:1. From the command line, enter smit cspoc.2. From the SMIT interface, select Storage > Manage Mirror Groups > User Mirror Groups, and press
Enter.3. Complete the following fields, and press Enter.
Table 47. User mirror group fields
Field Description
Mirror groups Enter the name or names of one or more mirror groups forwhich you want to change the type of operation.
Storage-based high availability and disaster recovery 151

Table 47. User mirror group fields (continued)
Field Description
Operation Press F4 and select from the following options:
Swap Select this option to perform a planned HyperSwapon the selected mirror group. You can use this optiononly if the mirror group is enabled for HyperSwapand the mirror group is part of a resource group thatis currently online.
Refresh Select this option to rediscover the latest replicationpath from the underlying storage for the selectedmirror group.
Show Active PathSelect this option to display the currently active siteand storage system for the selected mirror group. Youcan use this option only if the mirror group is enabledfor HyperSwap and the mirror group is part of aresource group that is currently online.
4. Verify that all fields are correct and press Enter.Related tasks:“Adding a user mirror group for HyperSwap” on page 144Before you can start using a user mirror group, you must add it to your environment.“Changing a user mirror group for HyperSwap” on page 146You can change any of the properties of an existing user mirror group that you already added to yourenvironment.
Managing system mirror groups for HyperSwapSystem mirror groups are a group of disks and volume groups that are critical to a single node that isrunning the AIX operating system. An example of a system mirror group is a rootvg mirror group or amirror group that contains the paging space.
A system mirror group is only active on a single node; therefore, any HyperSwap request does notrequire any coordination with other nodes in the cluster.
To manage a system mirror group, complete the following steps:1. From the command line, enter smit cspoc.2. From the SMIT interface, select Storage > Manage Mirror Groups > System Mirror Group, and press
Enter.3. Complete the following fields, and press Enter.
Table 48. System mirror group fields
Field Description
Mirror groups Enter the name or names of one or more mirror groups forwhich you want to change the type of operation.
Node name Enter the name of one or more nodes that you want to changeto a different storage system.
152 Storage-based high availability and disaster recovery

Table 48. System mirror group fields (continued)
Field Description
Operation Press F4 and select from the following options:
Swap Select this option to perform a planned HyperSwapon the selected mirror group. You can use this optiononly if the mirror group is enabled for HyperSwapand the mirror group is part of a resource group thatis currently online.
Refresh Select this option to rediscover the latest replicationpath from the underlying storage for the selectedmirror group.
Show Active PathSelect this option to display the currently active siteand storage system for the selected mirror group. Youcan use this option only if the mirror group is enabledfor HyperSwap and the mirror group is part of aresource group that is currently online.
4. Verify that all fields are correct and press Enter.Related tasks:“Adding a system mirror group for HyperSwap” on page 147Before you can start using a system mirror group, you must add it to your environment.“Changing a system mirror group for HyperSwap” on page 147You can change the properties of an existing system mirror group that you already added to yourenvironment.
Managing cluster repository mirror groups for HyperSwapCluster repository mirror groups contain disks that are used for the Cluster Aware AIX (CAA) clusterrepository. These disks are shared between multiple nodes, but they cannot be shared across sites.
To manage a cluster repository mirror group, complete the following steps:1. From the command line, enter smit cspoc.2. From the SMIT interface, select Storage > Manage Mirror Groups > Cluster Repository Mirror
Group, and press Enter.3. Complete the following fields, and press Enter.
Table 49. Cluster repository mirror group fields
Field Description
Mirror groups Enter the name or names of one or more mirror groups forwhich you want to change the type of operation.
Operation Press F4 and select from the following options:
Swap Select this option to perform a planned HyperSwapon the selected mirror group. You can use this optiononly if the mirror group is enabled for HyperSwapand the mirror group is part of a resource group thatis currently online.
Refresh Select this option to rediscover the latest replicationpath from the underlying storage for the selectedmirror group.
Show Active PathSelect this option to display the currently active siteand storage system for the selected mirror group. Youcan use this option only if the mirror group is enabledfor HyperSwap and the mirror group is part of aresource group that is currently online.
Storage-based high availability and disaster recovery 153

4. Verify that all fields are correct and press Enter.Related tasks:“Adding a cluster repository mirror group for HyperSwap” on page 148Before you can start using a cluster repository mirror group, you must add it to your environment.“Changing a cluster repository mirror group for HyperSwap” on page 149You can change any of the properties of an existing cluster repository mirror group that you alreadyadded to your environment.
Managing mirror groups by nodes for HyperSwapYou can manage mirrors groups that belong to different nodes in the cluster.
To manage mirror groups that belong to different nodes, complete the following steps:1. From the command line, enter smit cspoc.2. From the SMIT interface, select Storage > Manage Mirror Groups > Manage Mirror Groups by
Nodes, and press Enter.3. Complete the following fields, and press Enter.
Table 50. Mirror groups by nodes fields
Field Description
Node name Enter the name of one or more nodes that you want to changeto a different storage system.
Include system mirror groups Select yes to include system mirror groups. If you select yes, thesystem mirror groups must be active on the selected nodes.Select no to not include system mirror groups.
Operation Press F4 and select from the following options:
Swap Select this option to perform a planned HyperSwapon the selected mirror group. You can use this optiononly if the mirror group is enabled for HyperSwapand the mirror group is part of a resource group thatis currently online.
Refresh Select this option to rediscover the latest replicationpath from the underlying storage for the selectedmirror group.
Show Active PathSelect this option to display the currently active siteand storage system for the selected mirror group. Youcan use this option only if the mirror group is enabledfor HyperSwap and the mirror group is part of aresource group that is currently online.
4. Verify that all fields are correct and press Enter.
Managing mirror groups by site for HyperSwapYou can manage all mirrors groups that belong to a site.
To manage user mirror groups that belong to a site, complete the following steps:1. From the command line, enter smit cspoc.2. From the SMIT interface, select Storage > Manage Mirror Groups > Manage Mirror Groups by Sites,
and press Enter.3. Complete the following fields, and press Enter.
154 Storage-based high availability and disaster recovery

Table 51. Mirror groups by nodes fields
Field Description
Site name Enter the site name for the mirror groups you want manage. Ifyou want to manage a stretched cluster, you must enter morethan one site name. If you want to manage a linked cluster, youmust manage each site separately.
Include system mirror groups Select yes to include system mirror groups. If you select yes, thesystem mirror groups must be active on the selected site. Selectno to not include system mirror groups.
Include cluster repository mirror groups Select yes to include cluster repository mirror groups. If youselect yes, the cluster repository mirror groups must be activeon the selected site. Select no to not include cluster repositorymirror groups.
Operation Press F4 and select from the following options:
Swap Select this option to perform a planned HyperSwapon the selected mirror group. You can use this optiononly if the mirror group is enabled for HyperSwapand the mirror group is part of a resource group thatis currently online.
Refresh Select this option to rediscover the latest replicationpath from the underlying storage for the selectedmirror group.
Show Active PathSelect this option to display the currently active siteand storage system for the selected mirror group. Youcan use this option only if the mirror group is enabledfor HyperSwap and the mirror group is part of aresource group that is currently online.
4. Verify that all fields are correct and press Enter.
Troubleshooting HyperSwap configurationsTo successfully troubleshoot a HyperSwap configuration, you must know where the log files are locatedand the commands that you can use to fix common problems.
HyperSwap log files
The following table identifies the different log files that you can use to troubleshoot various HyperSwapproblems.
Table 52. Log files to troubleshoot HyperSwap problems
Name Location Description
hacmp.out /var/hacmp/log/hacmp.out Displays messages that are related todetection, migration, termination, andexecution of a PowerHA SystemMirrorcluster for an application.
clutils.log /var/hacmp/log/clutils.log Displays the results of the automaticverification that runs on a specifiedPowerHA SystemMirror cluster nodeevery 24 hours.
clxd_debug.log /var/hacmp/xd/log/clxd_debug.log Displays information about the clxddaemon.
HyperSwap configurations use kernel extension. Thus, you can view error or warning messages from thiskernel extensions by using the errpt command. The following example shows HyperSwap configurationwhen you run the errpt command:
Storage-based high availability and disaster recovery 155

# errptIDENTIFIER TIMESTAMP T C RESOURCE_NAME DESCRIPTIONF6D1B11B 0705061213 P S phake PROGRAM INTERRUPTF6D1B11B 0705061213 P S phake PROGRAM INTERRUPTF6D1B11B 0705061213 P S phake PROGRAM INTERRUPTF6D1B11B 0705061213 P S phake PROGRAM INTERRUPTF6D1B11B 0705061213 P S phake PROGRAM INTERRUPTF6D1B11B 0705061213 P S phake PROGRAM INTERRUPTF6D1B11B 0705061213 P S phake PROGRAM INTERRUPT63B1A1E6 0705061213 I H pha_1065458178 PPRC Replication Path RecoveredDCB47997 0705060813 T H hdisk71 DISK OPERATION ERROR4BD7BBF6 0705060813 T H pha_1065458178 PPRC Replication Path FailedBFCFD000 0705060813 T H hdisk71 PPRC Device Suspended
You can also configure kernel extension to create debug logs in the /etc/syslog.conf file by completingthe following steps:1. In the /etc/syslog.conf file, add the following line:
kern.debug /var/hacmp/xd/log/syslog.phake rotate size 500k files 7
2. Create a file that is called syslog.phake in the /var/hacmp/xd/log directory.3. Refresh the syslogd daemon.
Note: The debug logs are also logged in the console.
Troubleshooting common problems
The following common problems might occur when are configuring the HyperSwap function:v After a system restarts, the clxd daemon is not operating. To troubleshoot this problem, you must start
the clxd daemon by completing the following steps:1. From the command, run the following command:
lssrc -s clxd
2. From the command line, run the following command:tail –f /var/hacmp/xd/log/clxd_debug.log
3. From the command line, run the following command:lspprc –Ao
4. From the command line, run the following command:startsrc –s clxd
If the clxd daemon is still not starting, contact IBM support.v The following error message is displayed when you are creating a mirror group:
Failed to changed XD Mirror Group ’User_RD_MG2’. errno=22 msg=No Storage System name addedOR PPRC path not established properlyOR Hyperswap is not enabled for disks. Check clxd_debug.log for details
This message means that you did not correctly configure the disks that you are using for the mirrorgroup that uses the HyperSwap function. To troubleshoot this problem, review the information in the“Configuring a storage system for HyperSwap” on page 140 topic.
v The following error message is displayed when you are configuring a repository mirror group andHyperSwap moves the mirror group to a disk that is configured to use the HyperSwap function:ERROR: Failed to run ’chrepos’.Follow recommended user actions to recover from here(if needed in case caavg_private has not been seen in some or all nodes).
To troubleshoot this problem, you can use the chrepos –r command on the disk.
156 Storage-based high availability and disaster recovery

v The disks for the mirror group are in a halt state. You can run the lspprc –A command to display thestatus of your disks. The following example output is displayed when you run the lspprc –Acommand:# hdisk# PPRC Primary Secondary Primary Storage Secondary Storage
state path group path group WWNN WWNNID ID
hdisk104 Active -1 0 500507630affc16b 5005076308ffc6d4hdisk14 Halt 0(s) 1 500507630affc16b 5005076308ffc6d4hdisk15 Halt 0(s) 1 500507630affc16b 5005076308ffc6d4hdisk16 Active 0(s) -1 500507630affc16b 5005076308ffc6d4hdisk17 Active 0(s) -1 500507630affc16b 5005076308ffc6d4hdisk18 Active 0(s) 1 500507630affc16b 5005076308ffc6d4
To move a disk from the halt state to an active state, you must reboot the node or bring the resourcegroup for the associated disk online.
Failover rehearsalFailover rehearsal provides mirroring status for different storage devices in a multi-site cluster.
PowerHA SystemMirror 7.2.2, or later, provides you with the following information when you moveresource to other sites:v Storage mirroring availability between storage sitesv Direction of mirroring between sitesv Types of mirroringv Status of mirroring
Note: Failover rehearsal feature is available only in SAN Volume Controller (SVC) storage devices in alinked cluster environment.clmgr manage cluster rehearsal \[ RESOURCE_GROUP=”<RG#1> [,<RG#2>,...]” ]
Example
To check the mirroring status of storage devices included in RG1 and RG2 resource groups, enter thefollowing command:clmgr manage cluster rehearsal RESOURCE_GROUP="RG1 RG2"
Configuring Fibre Channel disksThe fc_err_recov parameter has a default value of delayed_fail that causes extensive retries in responseto problems caused while communicating with the storage subsystem. For the fc_err_recov parameter,you can specify the delay in the response time by a value of 10 minute increments before anunrecoverable error is recognized. You can use the delayed_fail value if there are not any alternativecommunication paths to the storage subsystem, or if the storage subsystem holds a rootvg disk, a pagingspace disk, or other system critical information.
The fast_fail value for the fc_err_recov parameter causes fewer retries and more timely recognition ofan unrecoverable error by the system than the delayed_fail value. Depending on the problem, thefast_fail value allows the AIX MPIO device driver, the AIX Logical Volume Manager (LVM), orPowerHA SystemMirror to react quickly to a communication problem with the storage subsystem. Youcan use the fast_fail value if the configuration is likely to experience solid failures, such as severing ofthe Fibre Channel links or loss of power to the storage subsystem.
Before you change the values for the fc_err_recov parameter, you must determine the appropriate FibreChannel SCSI device or devices by completing the following steps:
Storage-based high availability and disaster recovery 157

1. To list all the disk and the owning volume groups that are known to the subsystem, run the lspvcommand. The names of the disks in the volume groups on the storage subsystem are managed byPowerHA SystemMirror.
2. To determine the name of the Fibre Channel SCSI adapter that is used to communicate with thedevices, run the lsdev -C -l <disk_name> -F parent command for each disk.
To change the values for the fc_err_recov parameter by using the SMIT interface, complete the followingsteps:1. From the command line, enter smit devices.2. From the SMIT interface, select FC adapter > FC SCSI protocol device > Change/Show chracteristics
of an FC SCSI device, and press Enter.3. Select the Fibre Channel SCSI device that you want to change.4. Change the FC Fabric Event Error RECOVERY Policy field to the desired value, and press Enter.5. In the Apply change to DATABASE only field, enter yes .6. Reboot the node.
Troubleshooting manual recovery for storage subsystemsPowerHA SystemMirror Enterprise Edition Version 7.1.2, or later, supports various storage subsystemsthat provide high availability for applications and services by monitoring for failures and implementingan automatic recovery for the failure. The storage subsystems use various replication technologies tomanage the replication of data between a primary and auxiliary data center.
If the storage subsystem is online and available, PowerHA SystemMirror Enterprise Edition 7.1.2, or later,can automatically manage the replicated data during the fallover and fallback. However, the followingscenarios explain in what circumstances PowerHA SystemMirror Enterprise Edition does notautomatically manage the replicated data and when manual intervention is required:v PowerHA SystemMirror Enterprise Edition cannot determine the status of the storage subsystem,
storage links, or device groups. In this scenario, PowerHA SystemMirror Enterprise Edition stops thecluster event processing and displays the corrective actions in the /var/hacmp/log/hacmp.out log file.To troubleshoot storage subsystem problems, review the information in the RECOMMENDED USER ACTIONSsection in the /var/hacmp/log/hacmp.out log file.When the storage subsystem is brought back online, you must manually resume cluster eventprocessing by selecting Problem Determination Tools > Recover PowerHA SystemMirror From ScriptFailure from the SMIT interface.
v A fallover occurs for a partitioned cluster across different sites. The primary and auxiliary partitionsbegin to write data to a local storage subsystem. When the primary partition recovers and the storagelinks are brought back online, you must determine whether the data from the two sites can be mergedor if one site's data can replace the other site’s data. In this scenario, you do not want PowerHASystemMirror Enterprise Edition to use the automatic recovery function.To configure PowerHA SystemMirror Enterprise Edition to use manual recovery, complete thefollowing steps:1. From the command line, enter smit sysmirror.2. In the SMIT interface, select Cluster Applications and Resources > Resources.3. Select the storage subsystem that you want to configure for manual recovery.4. From the Recovery Action field, select MANUAL.
158 Storage-based high availability and disaster recovery

Notices
This information was developed for products and services offered in the US.
IBM may not offer the products, services, or features discussed in this document in other countries.Consult your local IBM representative for information on the products and services currently available inyour area. Any reference to an IBM product, program, or service is not intended to state or imply thatonly that IBM product, program, or service may be used. Any functionally equivalent product, program,or service that does not infringe any IBM intellectual property right may be used instead. However, it isthe user's responsibility to evaluate and verify the operation of any non-IBM product, program, orservice.
IBM may have patents or pending patent applications covering subject matter described in thisdocument. The furnishing of this document does not grant you any license to these patents. You can sendlicense inquiries, in writing, to:
IBM Director of LicensingIBM CorporationNorth Castle Drive, MD-NC119Armonk, NY 10504-1785US
For license inquiries regarding double-byte character set (DBCS) information, contact the IBM IntellectualProperty Department in your country or send inquiries, in writing, to:
Intellectual Property LicensingLegal and Intellectual Property LawIBM Japan Ltd.19-21, Nihonbashi-Hakozakicho, Chuo-kuTokyo 103-8510, Japan
INTERNATIONAL BUSINESS MACHINES CORPORATION PROVIDES THIS PUBLICATION "AS IS"WITHOUT WARRANTY OF ANY KIND, EITHER EXPRESS OR IMPLIED, INCLUDING, BUT NOTLIMITED TO, THE IMPLIED WARRANTIES OF NON-INFRINGEMENT, MERCHANTABILITY ORFITNESS FOR A PARTICULAR PURPOSE. Some jurisdictions do not allow disclaimer of express orimplied warranties in certain transactions, therefore, this statement may not apply to you.
This information could include technical inaccuracies or typographical errors. Changes are periodicallymade to the information herein; these changes will be incorporated in new editions of the publication.IBM may make improvements and/or changes in the product(s) and/or the program(s) described in thispublication at any time without notice.
Any references in this information to non-IBM websites are provided for convenience only and do not inany manner serve as an endorsement of those websites. The materials at those websites are not part ofthe materials for this IBM product and use of those websites is at your own risk.
IBM may use or distribute any of the information you provide in any way it believes appropriate withoutincurring any obligation to you.
Licensees of this program who wish to have information about it for the purpose of enabling: (i) theexchange of information between independently created programs and other programs (including thisone) and (ii) the mutual use of the information which has been exchanged, should contact:
© Copyright IBM Corp. 2017, 2018 159

IBM Director of LicensingIBM CorporationNorth Castle Drive, MD-NC119Armonk, NY 10504-1785US
Such information may be available, subject to appropriate terms and conditions, including in some cases,payment of a fee.
The licensed program described in this document and all licensed material available for it are providedby IBM under terms of the IBM Customer Agreement, IBM International Program License Agreement orany equivalent agreement between us.
The performance data and client examples cited are presented for illustrative purposes only. Actualperformance results may vary depending on specific configurations and operating conditions.
Information concerning non-IBM products was obtained from the suppliers of those products, theirpublished announcements or other publicly available sources. IBM has not tested those products andcannot confirm the accuracy of performance, compatibility or any other claims related to non-IBMproducts. Questions on the capabilities of non-IBM products should be addressed to the suppliers ofthose products.
Statements regarding IBM's future direction or intent are subject to change or withdrawal without notice,and represent goals and objectives only.
All IBM prices shown are IBM's suggested retail prices, are current and are subject to change withoutnotice. Dealer prices may vary.
This information is for planning purposes only. The information herein is subject to change before theproducts described become available.
This information contains examples of data and reports used in daily business operations. To illustratethem as completely as possible, the examples include the names of individuals, companies, brands, andproducts. All of these names are fictitious and any similarity to actual people or business enterprises isentirely coincidental.
COPYRIGHT LICENSE:
This information contains sample application programs in source language, which illustrate programmingtechniques on various operating platforms. You may copy, modify, and distribute these sample programsin any form without payment to IBM, for the purposes of developing, using, marketing or distributingapplication programs conforming to the application programming interface for the operating platform forwhich the sample programs are written. These examples have not been thoroughly tested under allconditions. IBM, therefore, cannot guarantee or imply reliability, serviceability, or function of theseprograms. The sample programs are provided "AS IS", without warranty of any kind. IBM shall not beliable for any damages arising out of your use of the sample programs.
Each copy or any portion of these sample programs or any derivative work must include a copyrightnotice as follows:
© (your company name) (year).
Portions of this code are derived from IBM Corp. Sample Programs.
© Copyright IBM Corp. _enter the year or years_.
160 Storage-based high availability and disaster recovery
Privacy policy considerationsIBM Software products, including software as a service solutions, (“Software Offerings”) may use cookiesor other technologies to collect product usage information, to help improve the end user experience, totailor interactions with the end user or for other purposes. In many cases no personally identifiableinformation is collected by the Software Offerings. Some of our Software Offerings can help enable you tocollect personally identifiable information. If this Software Offering uses cookies to collect personallyidentifiable information, specific information about this offering’s use of cookies is set forth below.
This Software Offering does not use cookies or other technologies to collect personally identifiableinformation.
If the configurations deployed for this Software Offering provide you as the customer the ability to collectpersonally identifiable information from end users via cookies and other technologies, you should seekyour own legal advice about any laws applicable to such data collection, including any requirements fornotice and consent.
For more information about the use of various technologies, including cookies, for these purposes, seeIBM’s Privacy Policy at http://www.ibm.com/privacy and IBM’s Online Privacy Statement athttp://www.ibm.com/privacy/details the section entitled “Cookies, Web Beacons and OtherTechnologies” and the “IBM Software Products and Software-as-a-Service Privacy Statement” athttp://www.ibm.com/software/info/product-privacy.
TrademarksIBM, the IBM logo, and ibm.com are trademarks or registered trademarks of International BusinessMachines Corp., registered in many jurisdictions worldwide. Other product and service names might betrademarks of IBM or other companies. A current list of IBM trademarks is available on the web atCopyright and trademark information at www.ibm.com/legal/copytrade.shtml.
Java and all Java-based trademarks and logos are trademarks or registered trademarks of Oracle and/orits affiliates.
Notices 161

162 Storage-based high availability and disaster recovery

Index
Aadding
DSCLI managementreplicated resource 49
CCD-ROM 13changing
consistency groupsite configuration 63
Direct managementreplicated resource configuration 36, 37site configuration 37
DSCLI managementreplicated resource configuration 53site configuration 53
SVC managementrelationships 93resources 94
cl_verify_svcpprc_config commandSVC management 97
cllsrelationship commandSVC management 97
cllssvc commandSVC management 96
cllssvcpprc commandSVC management 96
clusterconfiguring
Direct Management 30SVC Management 87
PowerHA SystemMirror Enterprise Edition for AIX forMetro Mirror 5
startingDirect management 36DSCLI management 53SVC management 92
SVC managementviewing 96
configuringconsistency group 59Direct management 25
cluster 30overview 26PPRC paths 20PPRC tasks 27prerequisites 25resource groups 36support 26
DSCLI management 47replicated resource 48resource groups 51
SVC management 87cluster 87
consistency groupchanging
site configuration 63configuring 59installing 59
consistency group (continued)overview 54planning 55planning resource group 56sample configuration 56troubleshooting
configuration 66verifying
configuration 65Copy Services Server
definingDSCLI managing 48
planning for Direct management 20
Ddefining
Direct managementESS disk subsystems 30PPRC pairs 31PPRC tasks 32replicated resource 30
DSCLI managementCopy Services Server 48ESS disk subsystems 49
SVC managementreplicated resource configuration 88
Direct managementchanging replicated resource configuration 36, 37changing site configuration 37configuration overview 26configuring 25configuring cluster 30configuring PPRC paths 20configuring PPRC tasks 27configuring prerequisites 25configuring resource groups 36configuring support 26defining ESS disk subsystems 30defining PPRC pair 31defining PPRC task 32defining replicated resource 30improving volume group performance 34installation troubleshooting 25installing 23installing prerequisites 24installing software requirements 24planning 17planning connections 20planning Copy Services Server 20planning integration 19planning PPRC replicated resource 21planning PPRC resource group 23planning prerequisites 18planning tasks for ESS 22PowerHA SystemMirror Enterprise Edition for AIX for
Metro Mirror 17sample configuration 18starting the cluster 36synchronizing PPRC configuration 35verifying PPRC configuration 35
© Copyright IBM Corp. 2017, 2018 163

Direct management (continued)volume groups 21
disk subsystem 3DSCLI management
adding replicated resource 49changing replicated resource configuration 53changing site configuration 53
consistency group 63configuring 47, 87configuring replicated resource 48configuring resource groups 51consistency group
configuring 59defining Copy Services Server 48defining ESS disk subsystems 49installation directories 47installing 45installing consistency group 59installing software requirements 46overview 4, 38
consistency group 54planning 38
consistency groups 55planning prerequisites 39planning resource group 44
consistency group 56PowerHA SystemMirror Enterprise Edition for AIX for
Metro Mirror 38sample configuration 40
consistency group 56starting the cluster 53synchronizing PPRC configuration 52troubleshooting
consistency group configuration 66upgrading 47verifying configuration
consistency group 65verifying PPRC configuration 51volume groups 42
EESS
planning for Direct management 22ESS disk subsystems
definingDirect managing 30DSCLI managing 49
Ffallback 7fallover 7
Hhard disk 12HyperSwap
active-active workloads 132active-active workloads across sites 132active-active workloads within a site 133configuration settings 139Configuring 140Configuring a cluster repository mirror group 148configuring a single node 151Configuring a storage system 140
HyperSwap (continued)Configuring system mirror groups 147Configuring user mirror groups 144in-band communication 140, 141Installing 140Managing cluster repository mirror groups 153Managing mirror groups by nodes 154Managing mirror groups by sites 154Managing system mirror groups 152Managing user mirror groups 151Planned 125Planning 137PowerHA SystemMirror 124Removing a mirror group 150resync function 134support for DS8800 138support for raw disks 139timeout 125troubleshooting 155Unplanned 126zoning requirements 139
Iimproving
Direct managementvolume group performance 34
installation directoriesDSCLI management 47
installation server 12installing
CD-ROM 13consistency group 59Direct management 23
prerequisites 24software requirements 24troubleshooting 25
DSCLI management 45directories 47software requirements 46
hard disk 12installation media 11installation server 12PowerHA SystemMirror Enterprise Edition for AIX for
Metro Mirror 10prerequisites for PowerHA SystemMirror Enterprise
Edition for AIX for Metro Mirror 10recovering from failed installation 16SVC management 86troubleshoot 17
Mmaintaining
PowerHA SystemMirror Enterprise Edition for AIX forMetro Mirror 68
Metro Mirror PPRCin-band communication 142
mirroring 3modifying
previous snapshots 16
Ooverview 2
consistency group 54
164 Storage-based high availability and disaster recovery

overview (continued)Direct management
configuration 26DSCLI management 38planning 8pprc 3SVC management 79
Pplanning
consistency groupresource group 56
consistency groups 55Direct management 17
connections 20Copy Services Server 20integration 19PPRC replicated resource 21PPRC resource group 23prerequisites 18sample configuration 18tasks for ESS 22volume groups 21
DSCLI management 38prerequisites 39resource group 44sample configuration 40volume groups 42
overview for PowerHA SystemMirror Enterprise Editionfor AIX for Metro Mirror 8
PowerHA SystemMirror Enterprise Edition for AIX forMetro Mirror 8
resource group 9site 9SVC management 80
prerequisites 81sample configuration 81support 84volume groups 84
PowerHA SystemMirrorHyperSwap 124
PowerHA SystemMirror Enterprise Edition for AIX for MetroMirror
cluster 5Direct management 17DSCLI management 38
overview 38fallback 7fallover 7installation media 11installing 10installing from CD-ROM 13installing from hard disk 12installing from installation server 12installing prerequisites 10maintaining 68management types 8planning 8planning overview 8SVC management
overview 79troubleshooting 69upgrading 15upgrading software 15verifying upgrade 16
PowerHA SystemMirror for Metro Mirrorrecovering from failed installation 16
PPRC pairdefining
Direct management 31PPRC paths
configuring for Direct management 20PPRC replicated resource 6
planning for Direct management 21PPRC resource group
planning for Direct management 23PPRC task
definingDirect management 32
PPRC tasksconfiguring for Direct management 27
prerequisites 2
Rrecovering
from failed installation 16relationship
SVC managementchanging 93removing 94
removingSVC management 93
relationships 94resources 95
replicated resourceadding
DSCLI management 49changing configuration
Direct management 36, 37DSCLI management 53
configuringDSCLI management 48
definingDirect management 30
defining configurationSVC management 88
Direct management 6DSCLI-managed 6SVC-managed 6
resourceSVC management
changing 94removing 95
resource group 6configuring
Direct management 36DSCLI management 51
planning 9planning for consistency group 56planning for DSCLI management 44
Ssample configuration
consistency group 56Direct management 18DSCLI management 40SVC management 81
Index 165

sitechanging configuration
consistency group 63Direct management 37DSCLI management 53
planning 9snapshots
modifying previous 16software requirements
Direct management 24DSCLI management 46
startingDirect management
cluster 36DSCLI management
cluster 53SVC management
cluster 92SVC management
changingrelationships 93resources 94
cl_verify_svcpprc_config command 97cllsrelationship command 97cllssvc command 96cllssvcpprc command 96configuring cluster 87defining replicated resource configuration 88installing 86overview 5, 79planning 80
support 84volume groups 84
planning prerequisites 81removing 93
relationships 94resources 95
sample configuration 81starting the cluster 92synchronizing PPRC configuration 91troubleshooting 95verifying PPRC configuration 91viewing
clusters 96synchronizing
Direct managementPPRC configuration 35
DSCLI managementPPRC configuration 52
SVC managementPPRC configuration 91
Ttroubleshooting
consistency group 66Direct management installation 25installation 17PowerHA SystemMirror Enterprise Edition for AIX for
Metro Mirror 69SVC management 95
Uupgrading
DSCLI management 47
upgrading (continued)PowerHA SystemMirror Enterprise Edition for AIX for
Metro Mirror 15software for PowerHA SystemMirror Enterprise Edition for
AIX for Metro Mirror 15verifying 16
Vverifying
consistency groupconfiguration 65
Direct managementPPRC configuration 35
DSCLI managementPPRC configuration 51
SVC managementPPRC configuration 91
upgrade 16viewing
SVC managementclusters 96
volume groupDirect management 21DSCLI management 42improving
Direct management 34SVC management 84
166 Storage-based high availability and disaster recovery


IBM®
Printed in USA