step-by-step installation of platform suite for sas …...step-by-step installation of platform...
TRANSCRIPT

Step-by-Step Installation of
Platform Suite for SAS for Unix A visual guide to getting your LSF grid up and running.

25Jul2007 Page 2 of 20
Table of Contents
INTRODUCTION ........................................................................................................................................ 3
OVERVIEW.................................................................................................................................................. 3 NOTES........................................................................................................................................................ 4
INSTALLATION ......................................................................................................................................... 5
PRE-INSTALLATION TASKS......................................................................................................................... 5 INSTALLING PROCESS MANAGER AND LSF ON THE GRID CONTROL MACHINE (LSF MASTER) ................. 6 TESTING THE GRID CONTROL MACHINE INSTALLATION .......................................................................... 12 INSTALLING LSF ON GRID NODES OR FOUNDATION SAS GRID CLIENTS ................................................. 15 TESTING THE GRID NODE INSTALLATION ................................................................................................. 16 ADDING GRID NODES OR FOUNDATION SAS CLIENTS TO THE CLUSTER.................................................. 17 INSTALLING GRID MANAGEMENT SERVICE (GMS).................................................................................. 13 POST INSTALLATION TASKS ..................................................................................................................... 15
CONVERTING A GRID NODE MACHINE TO A GRID CLIENT.... ................................................ 19
LSF QUICK REFERENCE....................................................................................................................... 20
25Jul2007 Page 3 of 20
Introduction
Overview
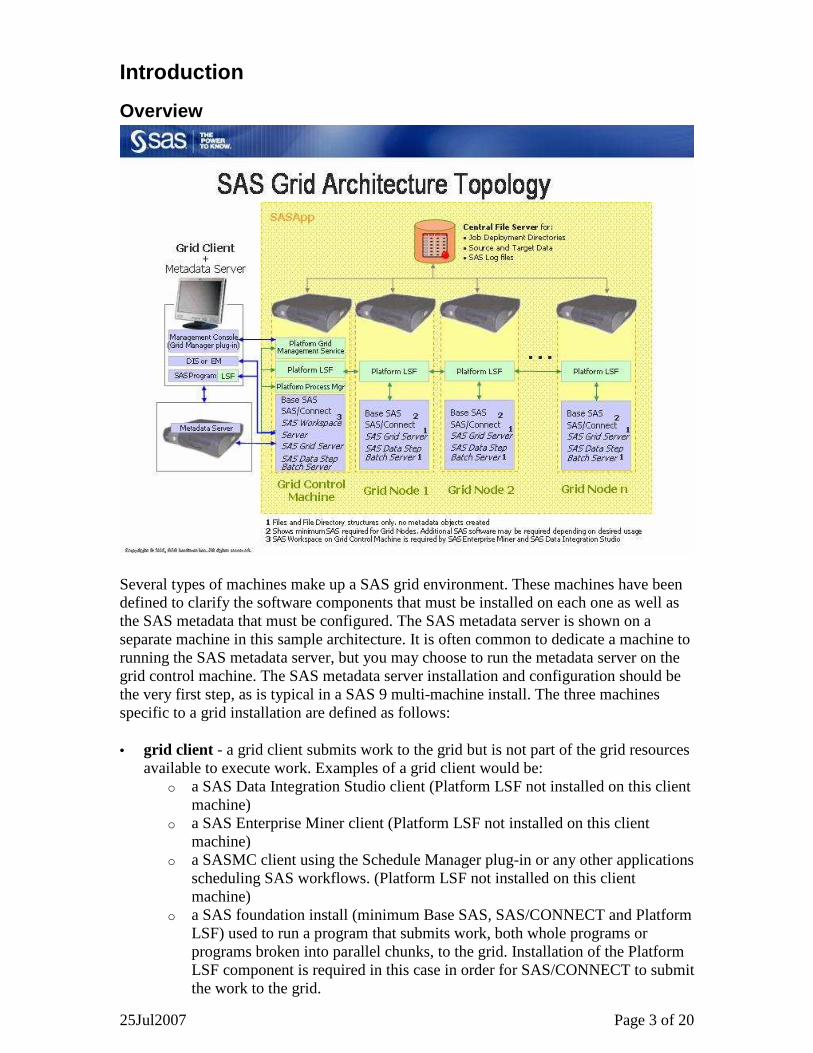
Several types of machines make up a SAS grid environment. These machines have been defined to clarify the software components that must be installed on each one as well as the SAS metadata that must be configured. The SAS metadata server is shown on a separate machine in this sample architecture. It is often common to dedicate a machine to running the SAS metadata server, but you may choose to run the metadata server on the grid control machine. The SAS metadata server installation and configuration should be the very first step, as is typical in a SAS 9 multi-machine install. The three machines specific to a grid installation are defined as follows:
• grid client - a grid client submits work to the grid but is not part of the grid resources available to execute work. Examples of a grid client would be:
o a SAS Data Integration Studio client (Platform LSF not installed on this client machine)
o a SAS Enterprise Miner client (Platform LSF not installed on this client machine)
o a SASMC client using the Schedule Manager plug-in or any other applications scheduling SAS workflows. (Platform LSF not installed on this client machine)
o a SAS foundation install (minimum Base SAS, SAS/CONNECT and Platform LSF) used to run a program that submits work, both whole programs or programs broken into parallel chunks, to the grid. Installation of the Platform LSF component is required in this case in order for SAS/CONNECT to submit the work to the grid.

25Jul2007 Page 4 of 20
• grid control machine - any machine in the grid can be designated as the grid control machine. More software is installed on the grid control machine and more SAS metadata configuration takes place on this machine. You should start the installation of the Platform Suite for SAS on this machine. In a SAS Data Integration Studio and SAS Enterprise Miner scenario the grid control machine runs a workspace server that executes programs that utilize SAS/CONNECT to distribute work to the grid nodes. The grid control machine can be configured as a grid resource capable of receiving work to execute or not, depending on the needs of your environment.
• grid node - a grid node is a grid computing resource capable of receiving the work that is being distributed. Each grid node must be running a minimum of Base SAS, SAS/CONNECT and Platform LSF.
A SAS/CONNECT client could be run on any machine within the grid and also may be capable of receiving work to execute.
Installation of Platform Suite for SAS is performed first on the Grid Control Machine and is followed by installation on all of the Grid Node machines. Installation of Platform LSF on the Grid Control Machine can be installed as a part of the Process Manager installation or it can be installed by itself. This document will only show LSF being installed as part of the Process Manager installation. Not only do machines that do processing for the grid need Platform LSF installed, but machines that submit jobs to run on the grid must also have Platform LSF installed on them. Grid clients such as DI Studio or Enterprise Miner do not submit jobs directly but rather work with a SAS Workspace Server or a Stored-Process Server that does the job submission. Since those grid clients do not submit jobs, they do not need Platform LSF installed, but the machine where the Workspace Server or Stored-Process server would need it installed. If you are writing your own grid-enabled SAS program in Foundation SAS and want to run the program, that grid client workstation must have Platform LSF installed since it will be doing the actual submission of jobs to the grid.
Notes • This document assumes you have received the Platform Suite for SAS license file
(i.e., PlatformJSxxxxxx.txt) either with your software bundle or by ordering it from http://support.sas.com/adminservices-SID.
• This document will assist you installing Platform LSF to create a computer cluster, but to enable the cluster to work with the SAS Business Intelligence Platform, please refer to the Supporting Grid Computing chapter in the SAS Intelligence Platform: Application Server Administrative Guide. This section is available online at http://support.sas.com/onlinedoc/913/docMainpage.jsp?topic=biasag.hlp/a003087200.htm.

25Jul2007 Page 5 of 20
Installation
Pre-installation Tasks 1. Contact your system administrator to create a user account on all machines that will
be used for LSF administration. This installation will assume the user account is ‘ lsfadmin’. The account must have the same UID on all machines.
2. Contact your system administrator to create a network share that all computers on your cluster can access. This can be an NFS mount, a directory on a SAN, a SAMBA share, or any other method of creating a directory that is shared among all the machines in the grid. All machines in the grid must be able to access this share at boot time so have your system admin set that up based on the type of share. This will be referred to as LSF_TOP, the LSF top-level installation directory. This installation will assume that LSF_TOP is mounted on each machine as ‘/usr/share/lsf’. Make sure ‘lsfadmin’ and ‘root’ has read/write access to this subdirectory.
3. Create a directory on the grid control machine that will contain the Process Manager files. This will be referred to as JS_TOP, the Process Manager top-level installation directory. This installation will assume that JS_TOP is ‘/usr/local/pm’.
4. Make a list of the names of all the computers that will participate in the cluster. 5. Choose a name for the cluster. 6. Locate the ‘PlatformJSxxxxxx.txt ’ file that will be used as the LSF license file. 7. Determine all the types of computers in the grid using ‘uname –a’ so that the correct
tar files can be copied for the install so that you can determine the CD(s) that contain the software for all the UNIX operating system types and CPU architectures in the grid. The install requires a pm3.0*.tar of the same OS/CPU type as the grid control machine and lsf6.0*.tar.Z files for all other grid nodes OS/CPU types. • CD #2 – Solaris 7 & Solaris 10 for SPARC (pm3.0_sas_sparc-*.tar,
lsf6.0_solaris*-64.tar.Z) • CD #3 – Linux Kernel 2.4 with glibc 2.3 for x86 or ia64 (pm3.0_sas_linux2.4-
glib2.3-*.tar, lsf6.0_linux2.4-glibc2.3-*.tar.Z). • CD #4 – HP/UX 11.x for HP-PA Risc and ia64 (pm3.0_sas_hp*.tar,
lsf6.0_hppa11-64.tar.Z) • CD #5 – AIX 5.1 (pm3.0_sas_aix5.tar, lsf6.0_aix5-64.tar.Z) & OpenVMS 5
(pm3.0_sas_alpha5.tar, lsf6.0_alpha5_64.tar.Z) • CD #6 – Linux kernel 2.6 with glibc 2.3 for x86, ia64, or amd64
(pm3.0_sas_linux2.6-glib2.3-*.tar, lsf6.0_linux2.4-glibc2.3-*.tar.Z) • CD #7 – Solaris 10 for x86-64 (pm3.0_sas_x86-64-sol10.tar, lsf6.0_x86-64-
sol10.tar.Z) As an example, if the grid control machine is a Solaris 10 SPARC system, but the grid contains Linux 2.4 machines with x86, and Linux 2.6 x86-64 machines, the following tar files will be needed:
o CD #2 – pm3.0_sas_sparc-sol10-64.tar (which contains lsf6.0_sparc-sol10-64.tar.Z)
o CD #3 – lsf6.0_linux2.4-glibc2.3-x86.tar.Z o CD #6 – lsf6.0_linux2.6-glibc2.3-amd64.tar.Z

25Jul2007 Page 6 of 20
Installing Process Manager and LSF on the Grid Control Machine (LSF Master) 1. Log onto the grid control machine as the LSF administrator (lsfadmin). 2. Create a Process Manager install directory to hold the install files. 3. Copy the ‘pm3.0_sas_*.tar’ file from the appropriate Platform Suite for SAS CDs to
the install directory. If there are machines in the grid that are a different OS or CPU architecture than the grid control machine, ‘lsf6.0_*_tar.Z’ files for those OS/CPU types need to be copied also..
4. Change the working directory to the Process Manager install directory. 5. Untar the pm3.0_sas_*.tar file. For example, under Linux you can use the command
“ tar xvf pm3.0_sas_linux2.4-glib2.3-x86.tar“. This should create a pm3.0_sas_pinstall subdirectory in the Process Manager install directory.
6. Change into the ‘pm3.0_sas_pinstall’ subdirectory. 7. Copy the ‘PlatformJSxxxxxx.txt ’ license file into the current directory and rename it
‘ license.dat’. 8. Edit the ‘install.config’ file and change the following sections:
Required Section Description JS_TOP Directory to install Process Manager. This does not
need to be a network share. JS_HOST Host that will be the Process Manager host. This
should be the Grid Control machine’s fully qualified domain name (FQDN).
JS_ADMINS User ID of Process Manager administrators. For our purposes, we will be using ‘lsfadmin’.
LSF_INSTALL Flag indicating whether to install LSF. For our purposes, this must be “true”.
LSF_TOP Network share containing the LSF installation. For our purposes, we are using /usr/share/lsf.
LSF_ADD_SERVERS List of servers that are going to participate in the cluster. The first server in the list will be considered the grid control machine (LSF master machine).
LSF_CLUSTER_NAME Name of cluster. For our purposes, we will use ‘sas_cluster’.
9. Optionally, these sections can be also specified:
Optional Section Description JS_PORT Process Manager port number. Use default of 1966
unless it is in use by another program. JS_TARDIR Path of directory to Process Manager distribution files.
If not used, the tar files are expected to be in the current directory running jsinstall.
JS_LICENSE Full path to Process Manager/LSF license file. If not used, the license.dat file is expected to be in the current directory running jsinstall.
LSF_TARDIR Path of directory to architecture specific tar files. If not used, the tar files are expected to be in the current directory running jsinstall.

25Jul2007 Page 7 of 20
The resulting file should look something like this:
10. Change to the root user and execute the command ‘./jsinstall –f install.config’. This
will install LSF first and then Process Manager. 11. Read and agree to the LSF End User License Agreement.
25Jul2007 Page 8 of 20
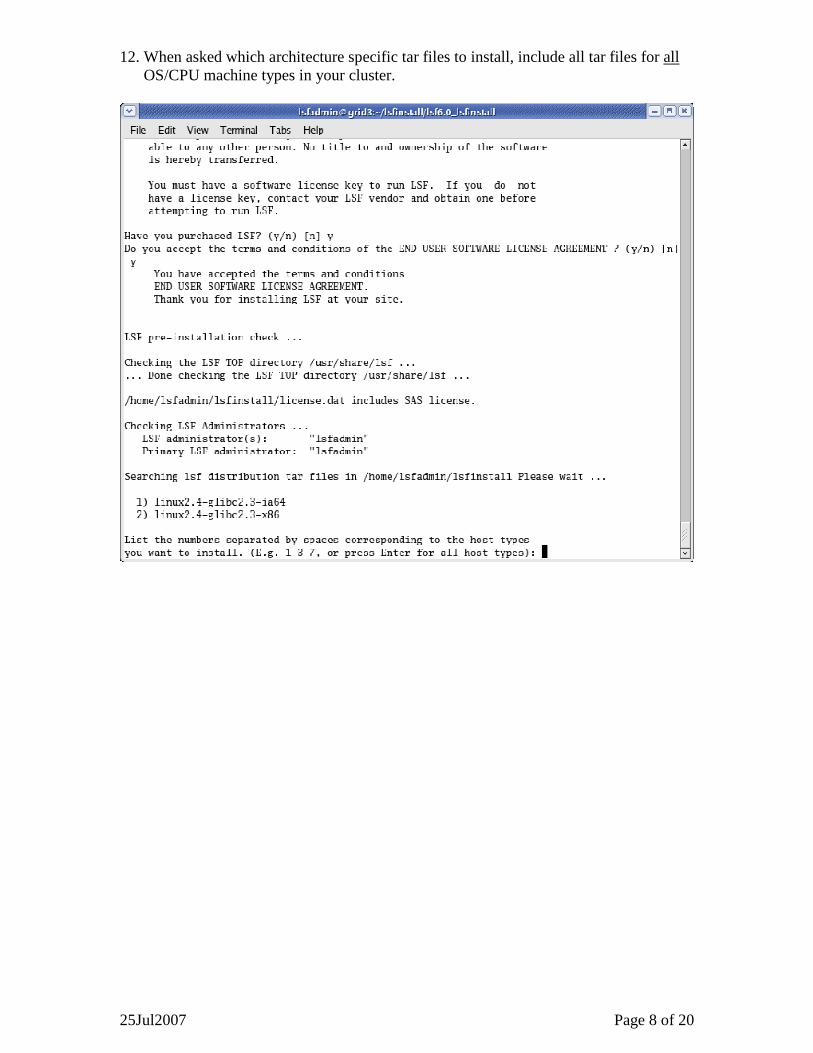
12. When asked which architecture specific tar files to install, include all tar files for all OS/CPU machine types in your cluster.
25Jul2007 Page 9 of 20
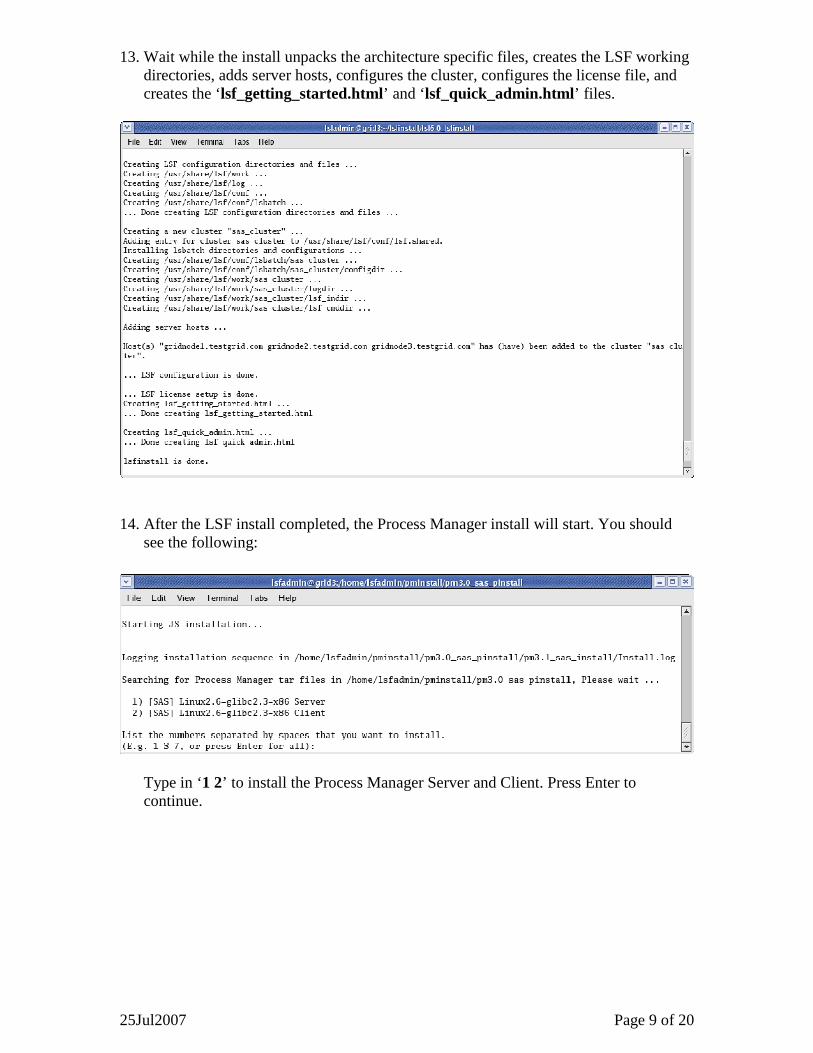
13. Wait while the install unpacks the architecture specific files, creates the LSF working directories, adds server hosts, configures the cluster, configures the license file, and creates the ‘lsf_getting_started.html’ and ‘lsf_quick_admin.html’ files.
14. After the LSF install completed, the Process Manager install will start. You should
see the following:
Type in ‘1 2’ to install the Process Manager Server and Client. Press Enter to continue.
25Jul2007 Page 10 of 20
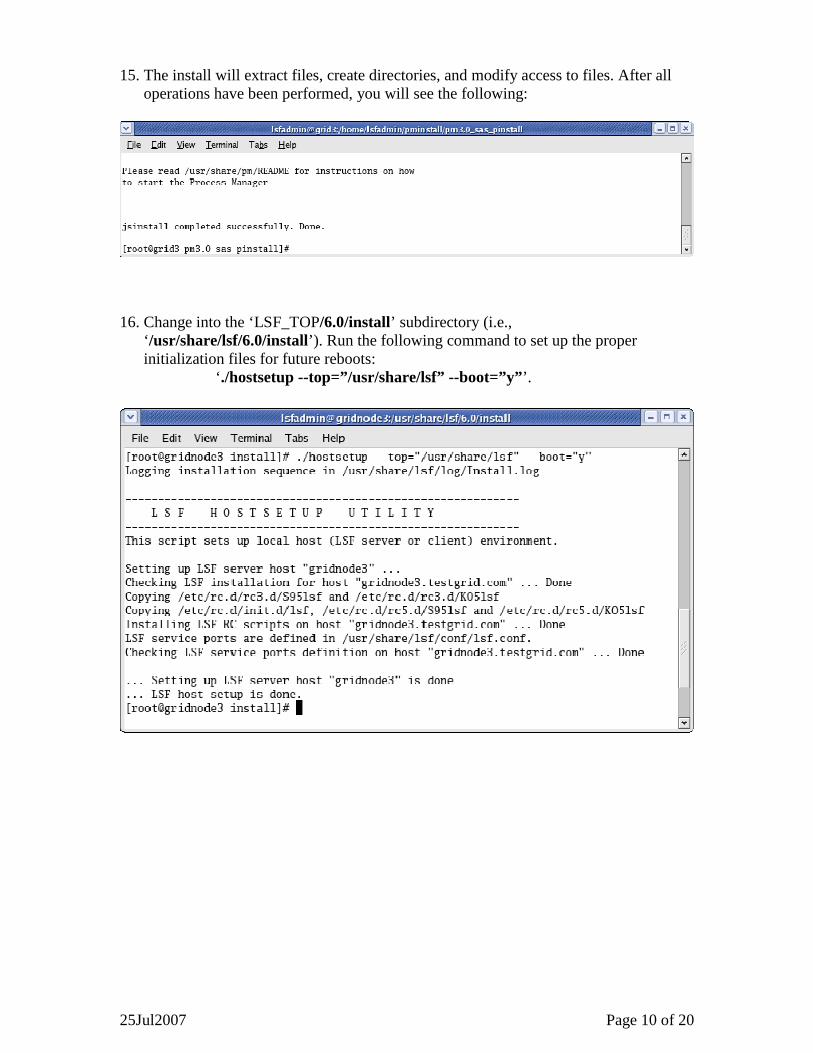
15. The install will extract files, create directories, and modify access to files. After all
operations have been performed, you will see the following:
16. Change into the ‘LSF_TOP/6.0/install’ subdirectory (i.e.,
‘ /usr/share/lsf/6.0/install’). Run the following command to set up the proper initialization files for future reboots:
‘ ./hostsetup --top=”/usr/share/lsf” --boot=”y”’.
25Jul2007 Page 11 of 20
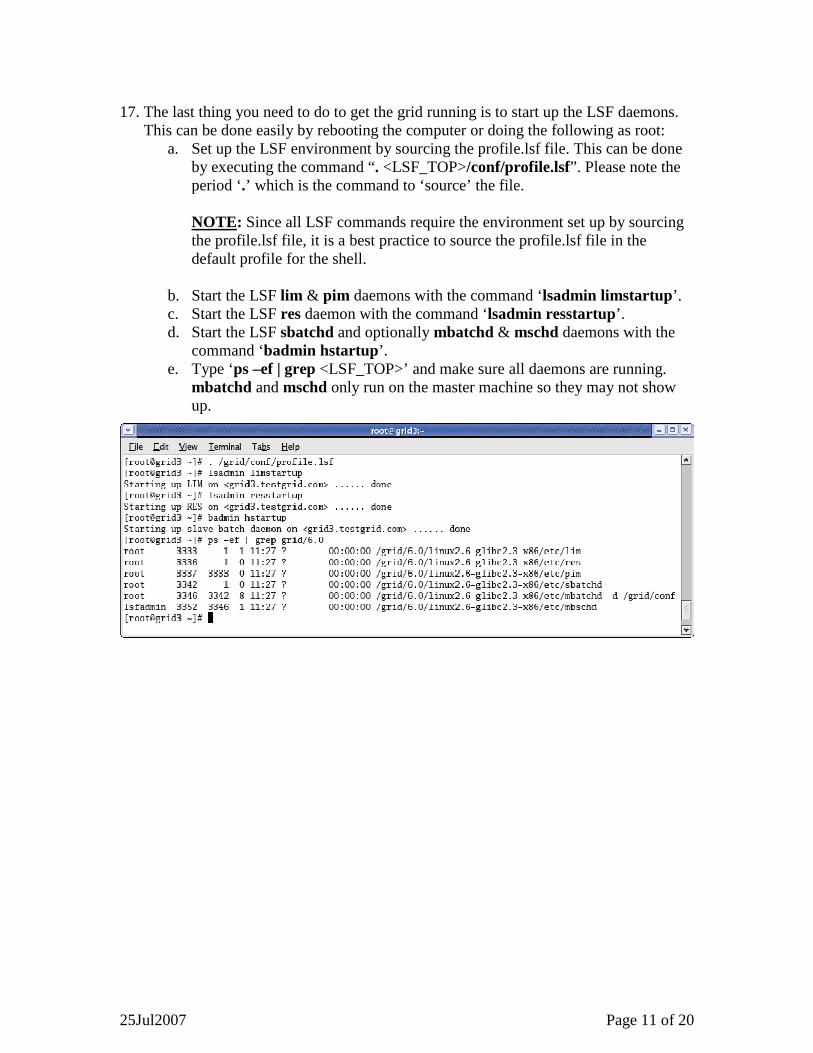
17. The last thing you need to do to get the grid running is to start up the LSF daemons.
This can be done easily by rebooting the computer or doing the following as root: a. Set up the LSF environment by sourcing the profile.lsf file. This can be done
by executing the command “. <LSF_TOP>/conf/profile.lsf”. Please note the period ‘.’ which is the command to ‘source’ the file.
NOTE: Since all LSF commands require the environment set up by sourcing the profile.lsf file, it is a best practice to source the profile.lsf file in the default profile for the shell.
b. Start the LSF lim & pim daemons with the command ‘lsadmin limstartup ’. c. Start the LSF res daemon with the command ‘lsadmin resstartup’. d. Start the LSF sbatchd and optionally mbatchd & mschd daemons with the
command ‘badmin hstartup’. e. Type ‘ps –ef | grep <LSF_TOP>’ and make sure all daemons are running.
mbatchd and mschd only run on the master machine so they may not show up.

25Jul2007 Page 12 of 20
Testing the Grid Control Machine LSF Installation Once the system has rebooted, you can follow these steps to make sure LSF on the grid control machine is operating properly. 1. Log onto the grid control machine as lsfadmin. 2. Open a command prompt and set up the LSF environment by sourcing the profile.lsf
file. This can be done by executing the command “. <LSF_TOP>/conf/profile.lsf”. Please note the period ‘.’ which is the command to ‘source’ the file.
NOTE: Since all LSF commands require the environment set up by sourcing the profile.lsf file, it is a best practice to source the profile.lsf file in the default profile for the shell.
3. Make sure the LSF daemons are running by executing the command “ps –ef | grep
<LSF_TOP>”. This should list 4 or 6 daemons, namely, lim , pim, res, sbatchd, and, if on the master machine, mbatchd and mbschd.
4. Run the command lsid. This should display the cluster name and the LSF master machine name (i.e., grid control machine).
5. Run the command lshosts. This should display static information about the grid control machine.
6. Run the command lsload. This should display dynamic information about the grid control machine.
7. Run the command bsub sleep 100. This will submit a job to the cluster. 8. Run the command bjobs. This will display the job information. As you repeat this
command, you should see the job go from PEND, to RUN, to removed from the queue.
The following is sample output assuming the grid control machine (i.e., LSF master machine) is grid3.testgrid.com.

25Jul2007 Page 13 of 20
Installing Grid Management Service (GMS) Grid Management Service is a daemon that is used by the Grid Manager Plug-in for the SAS Management Console to display grid information. After installing this service, you should be able to use the SAS Management console to view grid information. 1. Log onto the grid control machine as the LSF administrator (lsfadmin). 2. Create a Grid Management Service install directory to hold the install files. 3. Copy the ‘lsf6.0_gms_install.tar.Z’ file from the Platform Suite for SAS CD #1 to
the install directory along with the lsf6.0_gms_<platform>_tar.Z specific to the operating system & architecture of the grid control machine.
4. Change the working directory to the Grid Management Service install directory. 5. Untar the lsf6.0_gms_install.tar.Z file. For example, under Linux you can use the
command “gunzip –d lsf6.0_gms_install.tar.Z” followed by “tar xvf lsf6.0_gms_install.tar“. This should create a lsf6.0_gms_install subdirectory in the Grid Management Service install directory.
6. Change into the ‘lsf6.0_gms_install’ subdirectory. 7. Edit the ‘install.config’ file and change the following sections:
Required Section Description LSF_TOP Network share containing the LSF installation. For our
purposes, we are using /usr/share/lsf. LSF_TARDIR Path of directory to architecture specific tar files. If not
used, the tar files are expected to be in the parent directory of the lsf6.0_gms_install.
GABD_PORT Port GMS should use for incoming connections. If not specified, it will be 1976.
BOOT Setting BOOT=”Y” will install a script that will start the service to start at boot time. Default is not to start at boot time.
25Jul2007 Page 14 of 20
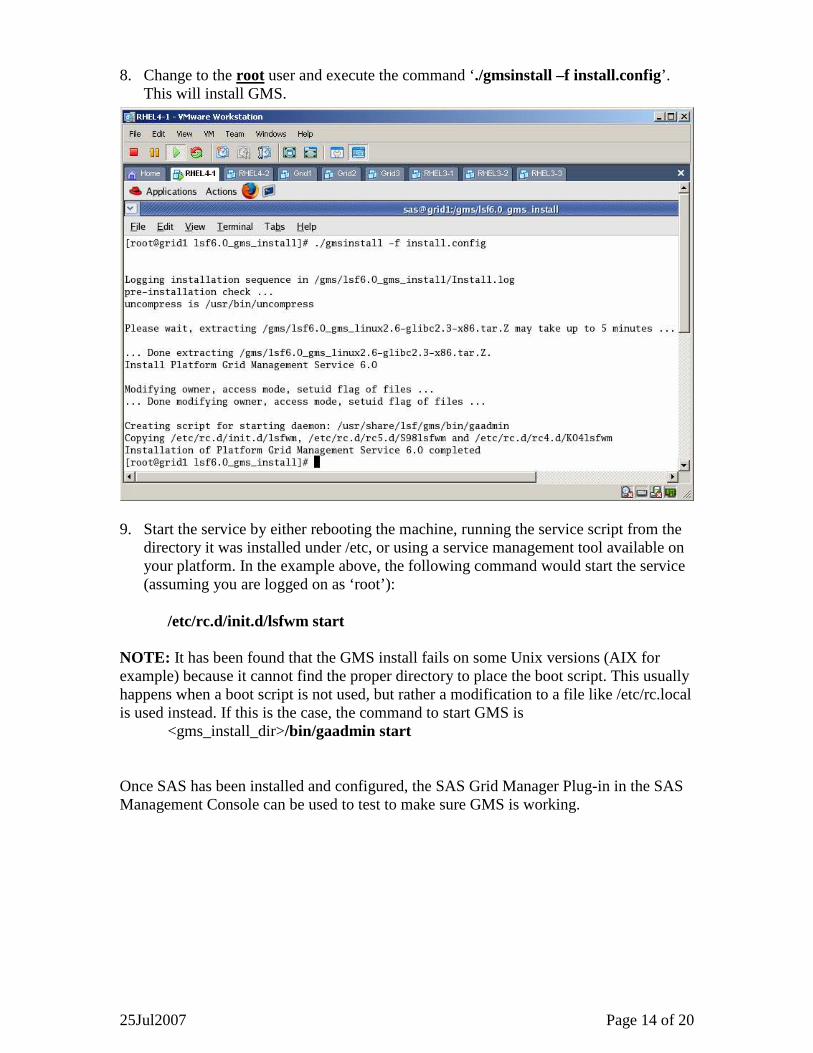
8. Change to the root user and execute the command ‘./gmsinstall –f install.config’.
This will install GMS.
9. Start the service by either rebooting the machine, running the service script from the
directory it was installed under /etc, or using a service management tool available on your platform. In the example above, the following command would start the service (assuming you are logged on as ‘root’):
/etc/rc.d/init.d/lsfwm start
NOTE: It has been found that the GMS install fails on some Unix versions (AIX for example) because it cannot find the proper directory to place the boot script. This usually happens when a boot script is not used, but rather a modification to a file like /etc/rc.local is used instead. If this is the case, the command to start GMS is
<gms_install_dir>/bin/gaadmin start Once SAS has been installed and configured, the SAS Grid Manager Plug-in in the SAS Management Console can be used to test to make sure GMS is working.

25Jul2007 Page 15 of 20
Installing LSF on Grid Nodes or Foundation SAS Grid Clients When you filled out the install.config file you listed machines that you want to be part of the grid. Some of those machines will process jobs and some will submit jobs and some will do both. Grid nodes process jobs for the grid and can optionally submit jobs to the grid. Foundation SAS Grid Clients only submit jobs to the grid without processing grid jobs. 1. Log onto each newly added machine as root. 2. Make sure access to the shared directory where LSF was installed is available. Also,
make sure the share is available for the boot initialization process. 3. Add the ‘lsfadmin’ user if this was not done before the installation process was
started. 4. Change into the LSF/6.0/install share directory (in our example it is
/usr/share/lsf/6.0/install ). 5. Run the following command to set up the proper initialization files for future reboots:
‘ ./hostsetup --top=”/usr/share/lsf” --boot=”y”’. 6. Start the LSF daemons by issuing the following commands:
lsadmin limstartup lsadmin resstartup badmin hstartup
7. A Foundation SAS client is a machine that is running Foundation SAS to submit jobs to the grid, but does not participate in processing jobs on the grid. If this install is for a Foundation SAS Client, follow the steps in Converting a Grid Node Machine to a Grid Client to prevent this machine from processing grid jobs.

25Jul2007 Page 16 of 20
Testing the Grid Node Installation Once the system has rebooted, you can follow these steps to make sure LSF on the cluster is operating properly. 1. Log onto the grid control machine as lsfadmin. 2. Open a command prompt and set up the LSF environment by sourcing the profile.lsf
file. This can be done by executing the command “. <LSF_TOP>/conf/profile.lsf”. Please note the period ‘.’ which is the command to ‘source’ the file.
NOTE: Since all LSF commands require the environment set up by sourcing the profile.lsf file, it is a best practice to source the profile.lsf file in the default profile for the shell.
3. Run the command lshosts. This should display static information about the grid
control machine and all grid node machines. 4. Run the command lsload. This should display dynamic information about the grid
control machine and all grid node machines. 5. Run the command bsub sleep 1000. This will submit a job to the cluster. Repeat this
command once for each node in the cluster. 6. Run the command bjobs. This will display the job information. As you repeat this
command, you should see the job go from PEND, to RUN, to removed from the queue.
The following is sample output of a heterogeneous cluster where the grid control machine (i.e., LSF master machine) is D15003.testgrid.com running the Windows operating system and the grid nodes are grid1.testgrid.com, grid2.testgrid.com, and grid3.testgrid.com, all running Linux. For a homogeneous cluster, all machines will be running the same operating system.
25Jul2007 Page 17 of 20
Adding Grid Nodes or Foundation SAS Clients to the Cluster A grid can have machines added to it at anytime in the future. If a new machine needs to be added to the grid after an initial install, the procedures are very similar to adding grid nodes to a new cluster. To add a node to an existing cluster, do the following:
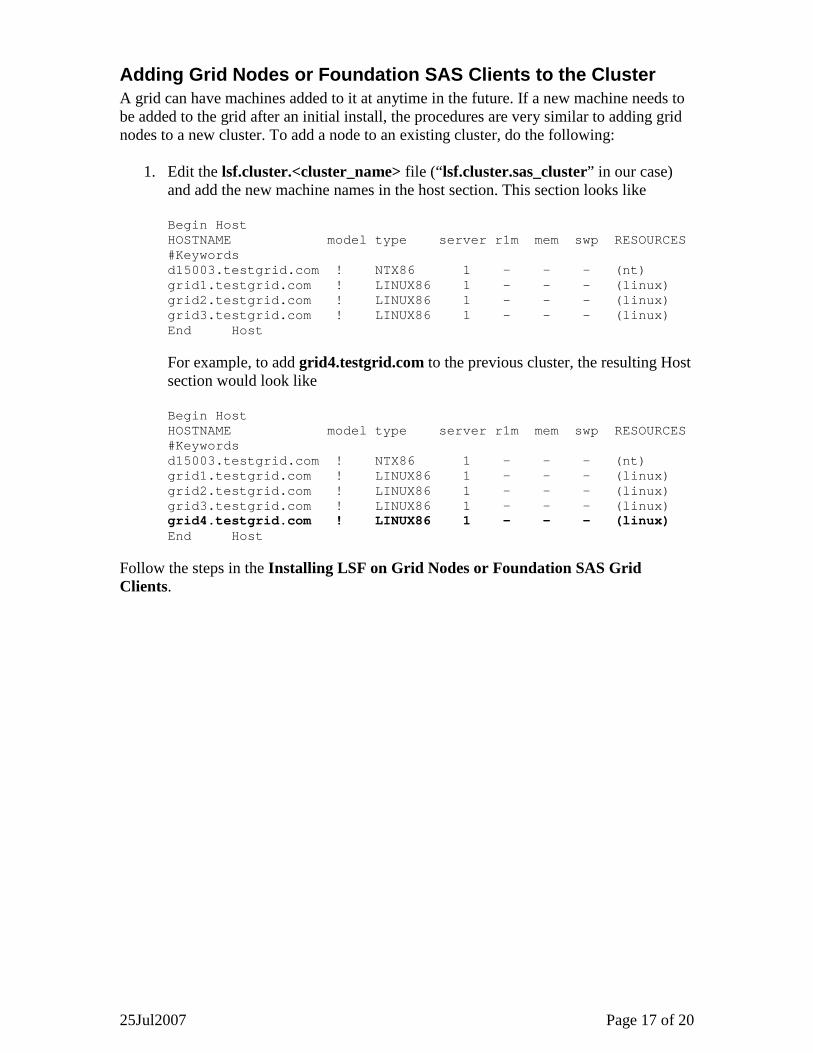
1. Edit the lsf.cluster.<cluster_name> file (“ lsf.cluster.sas_cluster” in our case) and add the new machine names in the host section. This section looks like
Begin Host HOSTNAME model type server r1m mem swp RESOURCES #Keywords d15003.testgrid.com ! NTX86 1 - - - (nt) grid1.testgrid.com ! LINUX86 1 - - - (linux) grid2.testgrid.com ! LINUX86 1 - - - (linux) grid3.testgrid.com ! LINUX86 1 - - - (linux) End Host
For example, to add grid4.testgrid.com to the previous cluster, the resulting Host section would look like Begin Host HOSTNAME model type server r1m mem swp RESOURCES #Keywords d15003.testgrid.com ! NTX86 1 - - - (nt) grid1.testgrid.com ! LINUX86 1 - - - (linux) grid2.testgrid.com ! LINUX86 1 - - - (linux) grid3.testgrid.com ! LINUX86 1 - - - (linux) grid4.testgrid.com ! LINUX86 1 - - - (linux) End Host
Follow the steps in the Installing LSF on Grid Nodes or Foundation SAS Grid Clients.

25Jul2007 Page 18 of 20
Post Installation Tasks Now that you have installed Platform Suite for SAS you still must enable the cluster to work with the SAS. To do this, please refer to the Basic Configuration of the Grid in the Supporting Grid Computing chapter of the SAS Intelligence Platform: Application Server Administrative Guide. This must be done after SAS has been installed and configured. NOTE: In Unix environments, the profile.lsf file MUST be sourced before starting SAS in order for SAS jobs to work correctly on the grid. If this is not done, you may receive a “ERROR: Grid Manager can not be loaded” message. This section is available online at Basic Configuration of the Grid
(http://support.sas.com/onlinedoc/913/getDoc/en/biasag.hlp/a003085111.htm).

25Jul2007 Page 19 of 20
Converting a Grid Node Machine to a Grid Client If you installed Platform LSF on a machine that you are going to run Foundation SAS for the purposes of submitting jobs to the grid without allowing that machine to participate as a grid node, you must set the number of job slots for that machine to zero so that no jobs will be assigned to the machine for processing. To change the job slots for a machine in the cluster, do the following: 1. Edit the lsb.hosts file in the LSF lsbatch configuration directory for your cluster on
the grid control machine. • On Windows this is usually
‘C:LSF_6.0\conf\lsbatch\<cluster_name>\configdir\lsb.hosts’. • On Unix this is ‘LSF_TOP/conf/lsbatch/<cluster_name>/configdir/lsb.hosts’.
2. In the ‘hosts’ section, add a new line for the grid client and set the maximum number
of jobs to 0.The easiest way to do this is to copy the line for the ‘default’ host, change the name, and change the MXJ parameter. This section looks like
Begin Host HOST_NAME MXJ r1m pg ls tmp DISPATCH_WINDOW #hostA () 3.5/4.5 15/ 12/15 0 () # Example #SPARCIPC () 4.0/5.0 18 16 () () # Example default ! () () () () () # Default End Host
For example, to add grid5.testgrid.com as a grid client, the resulting Host section would look like Begin Host HOST_NAME MXJ r1m pg ls tmp DISPATCH_WINDOW #hostA () 3.5/4.5 15/ 12/15 0 () # Example #SPARCIPC () 4.0/5.0 18 16 () () # Example default ! () () () () () # Default grid5.testgrid.com 0 () () () () () End Host
3. If you are not doing this as part of an install, you must restart LSF in order for it to pick up the changes. If you are doing this as part of an install, you will restart LSF at the end of the install, so the restart does not need to be done here.

25Jul2007 Page 20 of 20
LSF Quick Reference Command Description
lsid Displays version number, cluster name, and the master host name. Useful to see if the grid daemons are running and if running in SAS mode.
lshosts Displays information about the hosts recognized by LSF along with their static resource information.
lsload Displays the dynamic resource information for the hosts in the grid. bhosts Displays batch information about all hosts in the cluster. bjobs Displays information about current user’s LSF jobs lsfstartup Starts the LIM, RES, sbatchd, and mbatchd daemons on all hosts in
the cluster. Must be run as root and all hosts must be running rsh or ssh daemons.
lsfrestart Restarts the LIM, RES, sbatchd, and mbatchd daemons on all hosts in the cluster. Must be run as root and all hosts must be running rsh or ssh daemons.
lsfshutdown Shuts down the LIM, RES, sbatchd, and mbatchd daemons daemons on all hosts in the cluster. Must be run as root and all hosts must be running rsh or ssh daemons.
lsadmin Administrative tool for LSF available to LSF administrators. Useful subcommands are reconfig Restarts all LIMs in the cluster to read any
changes in the configuration files. limstartup Starts LIM on the local host limrestart Restarts LIM on the local host resstartup Starts RES on local host resrestart Restarts RES on local host
bhist Displays historical information about jobs. Useful parameters are -p | -r | -d | -a Displays information about specific jobs
(pending, running, done, or all). -l Display in long format. -u <user> | all Displays job for specified or all users. <job ID> Displays only specified job information.
badmin Administrative tool for LSF’s batch processing facility available to LSF administrators. Useful subcommands are reconfig Reconfigures the batch facility without
restarting sbatchd or mbatchd to read any changes in the configuration files.
hstartup Starts sbatchd on the local host hrestart Restarts sbatchd on the local host mbdrestart Restarts mbatchd. Needs to be done when new
hosts are added to the grid. hclose <host> Closes a host preventing it from running jobs. hopen <host> Opens a host to allow it to run jobs.
bsub Submit a job to the grid. Useful parameters are -I Interactive. Remote output displayed locally. -m Submit to a specific host. -R “res_req” Submit with specified resource