step by step home-building a hk-g 3battle rifle
TRANSCRIPT

7/24/2019 Step by Step Home-Building a HK-G 3battle rifle
http://slidepdf.com/reader/full/step-by-step-home-building-a-hk-g-3battle-rifle 1/41
12/23/13, 7:ome-Building a CETME/HK-G3/PTR Rifle - Pirate4x4.Com : 4x4 and O! -Road Forum
Page 1ttp://www.pirate4x4.com/forum/outdoor-sports-recreation/688219-home-building-cetme-hk-g3-ptr-rifle.html
Pirate4x4.Com : 4x4 and Off-Road Forum > Miscellaneous > Outdoor Sports and Recreation
Home-Building a CETME/HK-G3/PTR Rifle
User Name User Name Remember Me?
Password Log in
Register Blogs FAQ Community Calendar Premium Memberships
Notices
Safari Power SaverClick to Start Flash Plug-in
Hey, you! Yeah YOU!How come you haven't registered? Have you read about our new blue
star program? We are donating $10 of each blue star subscription tothe Blue Ribbon Coalition to ensure that we will have trails to recreate
on for years to come. Our blue star comes with all the benefits of ared star such as 10 second searching, blue/red star member only
giveaways, access to the private blue/red star member forums, etc.
So be sure to register, and sign up for your blue star today!
Safari Power SaverClick to Start Flash Plug-in
Page 1 of 8 1 2 3 4 5 > Last »
View First Unread Share 0 Thread Tools Display Modes
06-01-2008, 07:13 PM #1 (permalink)
animatorbig bird
Join Date: Sep 2002Member # 13701Location: Plano/DallasPosts: 4,248
Home-Building a CETME/HK-G3/PTR Rifle
So the latest rifle project I have officially kicked off is an HK/CETME/PTR rifle. My end goal for this buildis to end up with an HK-G3 rifle, using a combination of CETME, PTR, and HK parts. I am also buildingoff an Ohio Rapid Fire 80% flat.
The first step was to acquire some flats. I will be building this with many of the same group of guys Ibuilt FALs and AKs with over the past few years, as well as a possible few newcomers. Either way, I'm
definitely excited.
My list of compliance parts will be:
US Barrel
US Muzzle deviceUS ReceiverUS Rear Stock
US Cocking Handle
I still need 2 US parts, and I hear rumors of triggers and hammers floating around. I will keep my eyesout for one.
7/24/2019 Step by Step Home-Building a HK-G 3battle rifle
http://slidepdf.com/reader/full/step-by-step-home-building-a-hk-g-3battle-rifle 2/41
12/23/13, 7:ome-Building a CETME/HK-G3/PTR Rifle - Pirate4x4.Com : 4x4 and O! -Road Forum
Page 2ttp://www.pirate4x4.com/forum/outdoor-sports-recreation/688219-home-building-cetme-hk-g3-ptr-rifle.html
I will also be doing a clipped-and-pinned SEF lower. I intend to keep the SEF markings, however it will
obviously be a Semi-only build.
I'll post progress as it occurs, but it will not be a continuous thread. I'll post up my experiences duringthis build, so take them for what they are. Your mileage may vary.
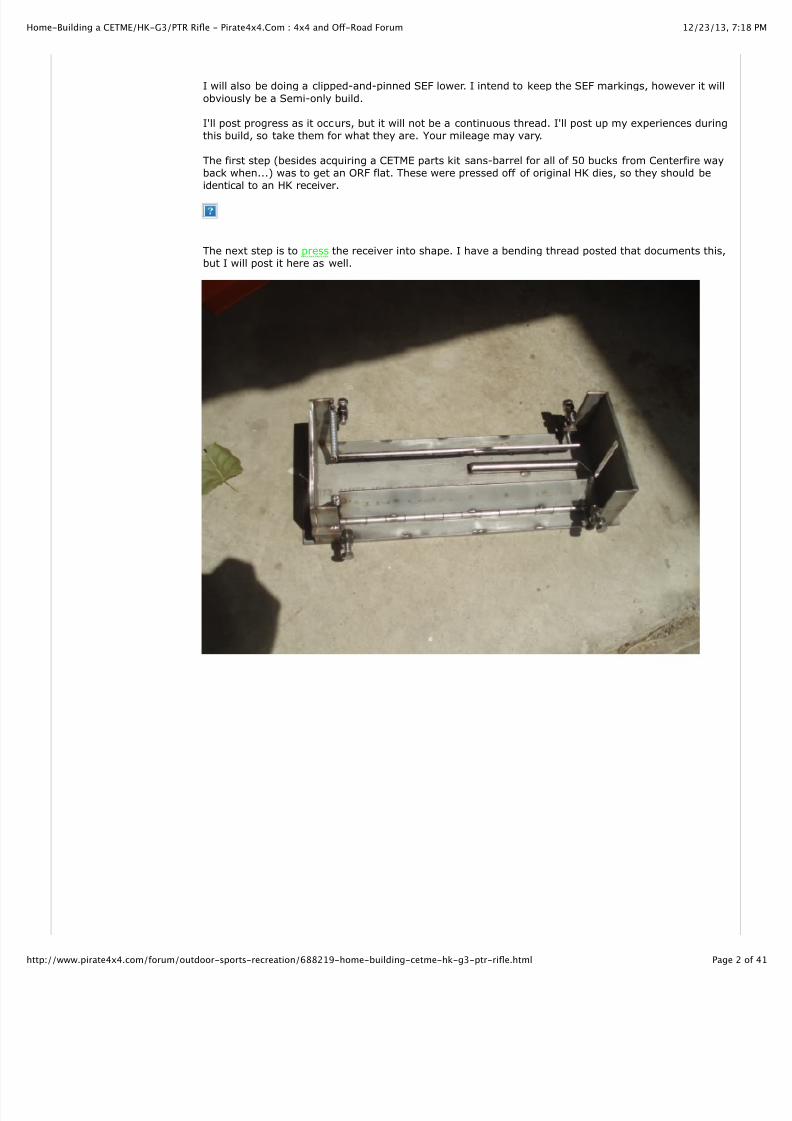
The first step (besides acquiring a CETME parts kit sans-barrel for all of 50 bucks from Centerfire wayback when...) was to get an ORF flat. These were pressed off of original HK dies, so they should beidentical to an HK receiver.
The next step is to press the receiver into shape. I have a bending thread posted that documents this,but I will post it here as well.
7/24/2019 Step by Step Home-Building a HK-G 3battle rifle
http://slidepdf.com/reader/full/step-by-step-home-building-a-hk-g-3battle-rifle 3/41
12/23/13, 7:ome-Building a CETME/HK-G3/PTR Rifle - Pirate4x4.Com : 4x4 and O! -Road Forum
Page 3ttp://www.pirate4x4.com/forum/outdoor-sports-recreation/688219-home-building-cetme-hk-g3-ptr-rifle.html
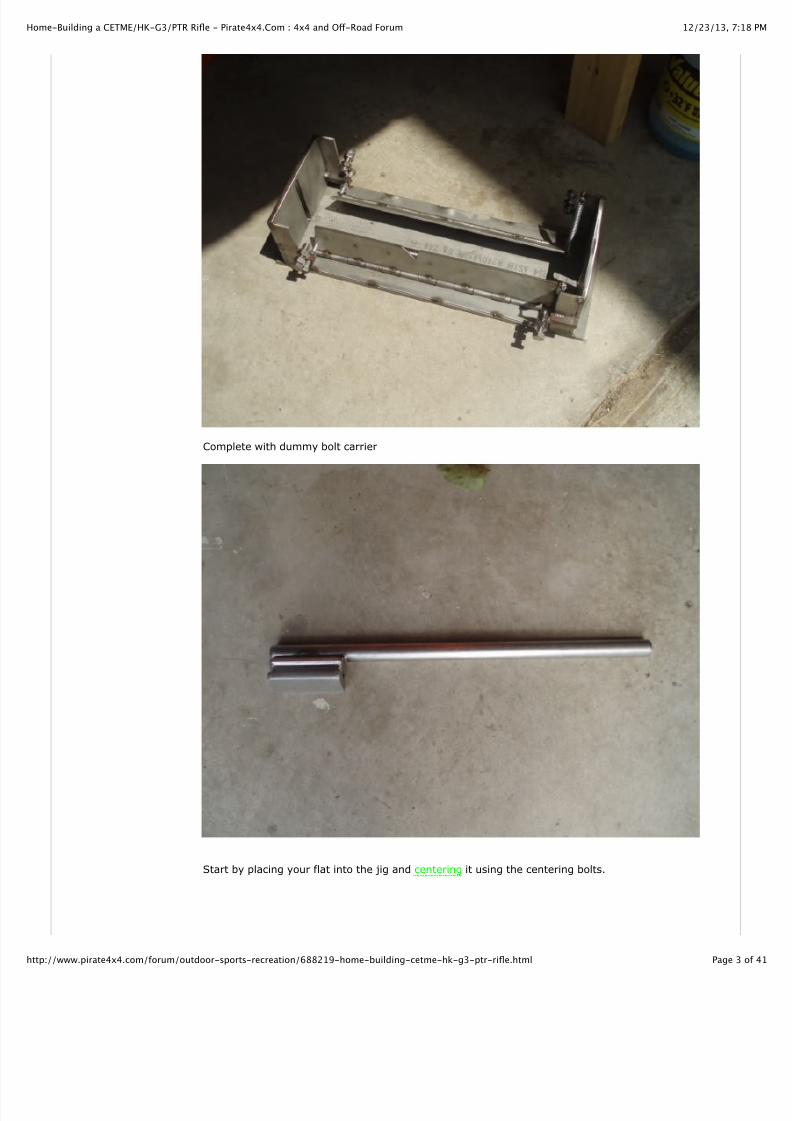
Complete with dummy bolt carrier
Start by placing your flat into the jig and centering it using the centering bolts.
7/24/2019 Step by Step Home-Building a HK-G 3battle rifle
http://slidepdf.com/reader/full/step-by-step-home-building-a-hk-g-3battle-rifle 4/41
12/23/13, 7:ome-Building a CETME/HK-G3/PTR Rifle - Pirate4x4.Com : 4x4 and O! -Road Forum
Page 4ttp://www.pirate4x4.com/forum/outdoor-sports-recreation/688219-home-building-cetme-hk-g3-ptr-rifle.html
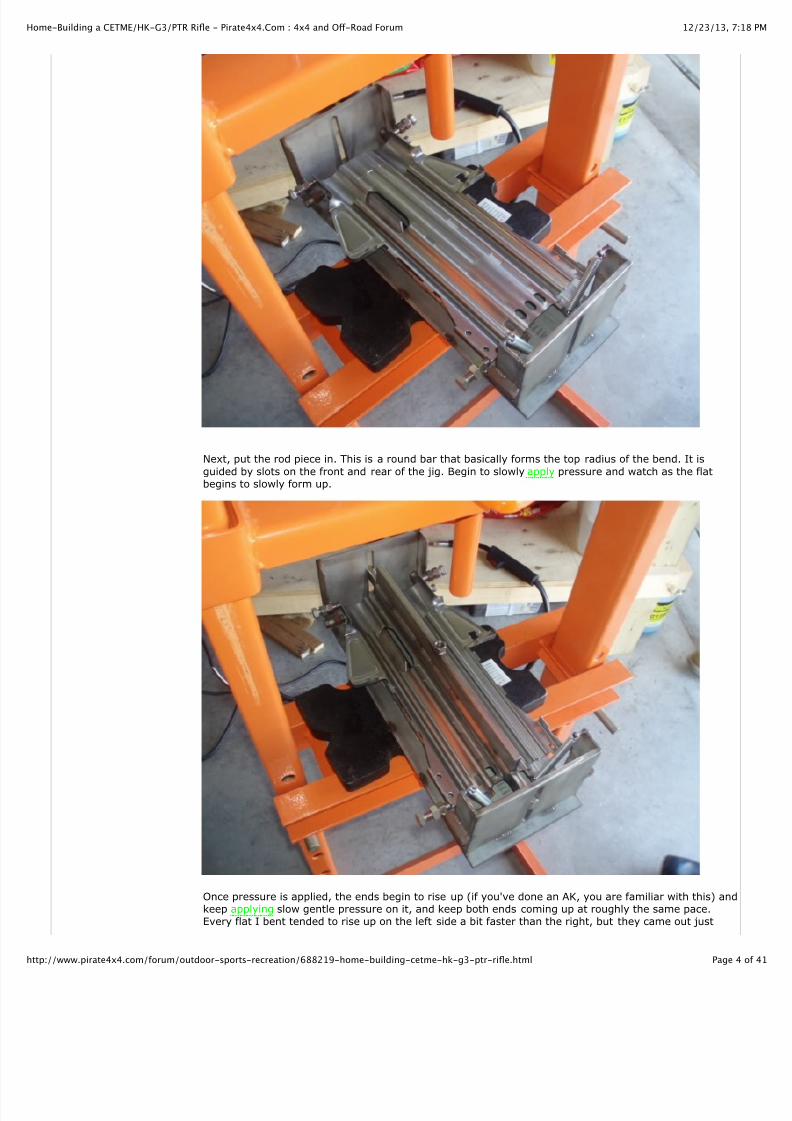
Next, put the rod piece in. This is a round bar that basically forms the top radius of the bend. It is
guided by slots on the front and rear of the jig. Begin to slowly apply pressure and watch as the flatbegins to slowly form up.
Once pressure is applied, the ends begin to rise up (if you've done an AK, you are familiar with this) andkeep applying slow gentle pressure on it, and keep both ends coming up at roughly the same pace.Every flat I bent tended to rise up on the left side a bit faster than the right, but they came out just

7/24/2019 Step by Step Home-Building a HK-G 3battle rifle
http://slidepdf.com/reader/full/step-by-step-home-building-a-hk-g-3battle-rifle 5/41
12/23/13, 7:ome-Building a CETME/HK-G3/PTR Rifle - Pirate4x4.Com : 4x4 and O! -Road Forum
Page 5ttp://www.pirate4x4.com/forum/outdoor-sports-recreation/688219-home-building-cetme-hk-g3-ptr-rifle.html
fine.
Keep pressing until the ends meet, and then do a little more. Remember that metal has memory, andwill tend to bend back the way it was. So by going a little further, once it pops back out, the ends will bemuch closer than they would if you simply stop as soon as they contact. Be sure to check to make sure
both ends are equal, or at least close. If they are not close, you *can* fix it, but it takes a LOT of effort(I know, because one guy bending with us had his get off-center, and we had to spend a lot of timegetting them back right, but the good news is, it can be done.)
7/24/2019 Step by Step Home-Building a HK-G 3battle rifle
http://slidepdf.com/reader/full/step-by-step-home-building-a-hk-g-3battle-rifle 6/41
12/23/13, 7:ome-Building a CETME/HK-G3/PTR Rifle - Pirate4x4.Com : 4x4 and O! -Road Forum
Page 6ttp://www.pirate4x4.com/forum/outdoor-sports-recreation/688219-home-building-cetme-hk-g3-ptr-rifle.html
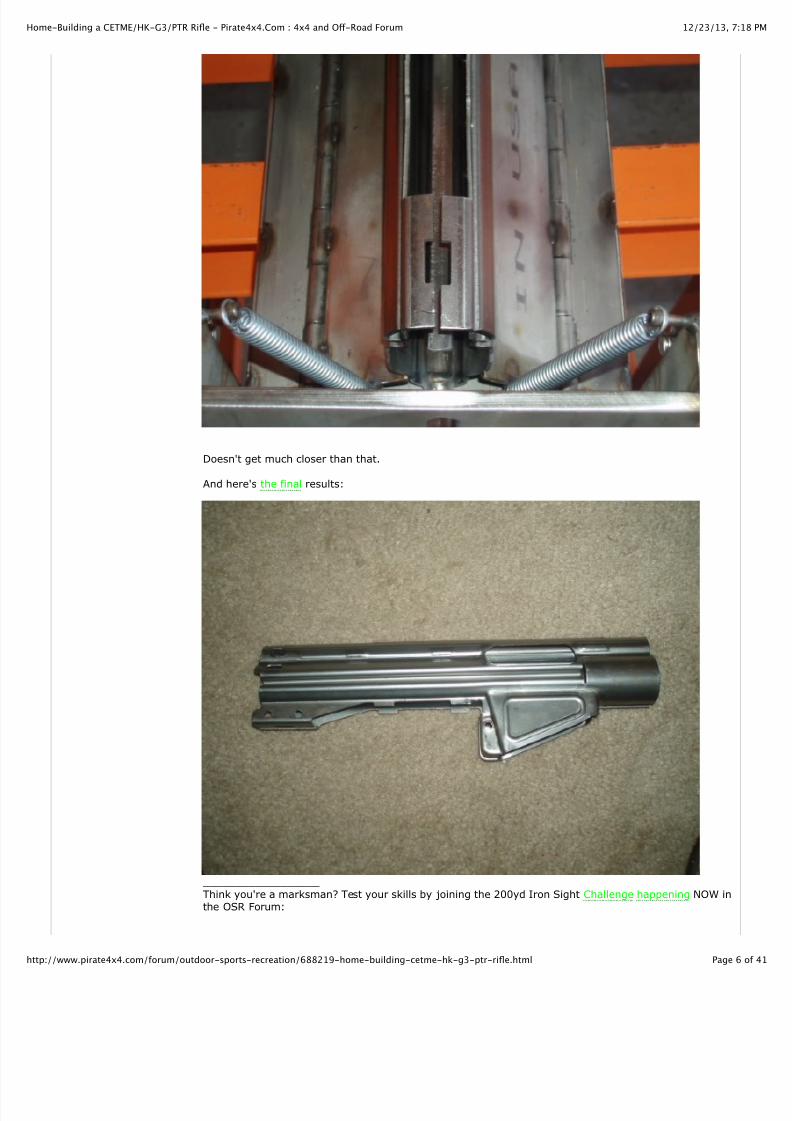
Doesn't get much closer than that.
And here's the final results:
__________________
Think you're a marksman? Test your skills by joining the 200yd Iron Sight Challenge happening NOW inthe OSR Forum:

7/24/2019 Step by Step Home-Building a HK-G 3battle rifle
http://slidepdf.com/reader/full/step-by-step-home-building-a-hk-g-3battle-rifle 7/41
12/23/13, 7:ome-Building a CETME/HK-G3/PTR Rifle - Pirate4x4.Com : 4x4 and O! -Road Forum
Page 7ttp://www.pirate4x4.com/forum/outdoor-sports-recreation/688219-home-building-cetme-hk-g3-ptr-rifle.html
http://www.pirate4x4.com/forum/outdo...-may-31-a.html
Last edited by animator ; 06-01-2008 at 07:57 PM.
06-01-2008, 07:14 PM #2 (permalink)
animatorbig bird
Join Date: Sep 2002Member # 13701Location: Plano/DallasPosts: 4,248
So, the next step is to demil my CETME parts. Mainly, I'm interested in the cocking tube, trunion, andmag lock and release parts.
I start by chocking up the cocking tube and trunion into a vice. Don't go too tight, otherwise you riskdeforming your tube. Notice the plug welds, in addition to the weld where the tube meets the receiver.
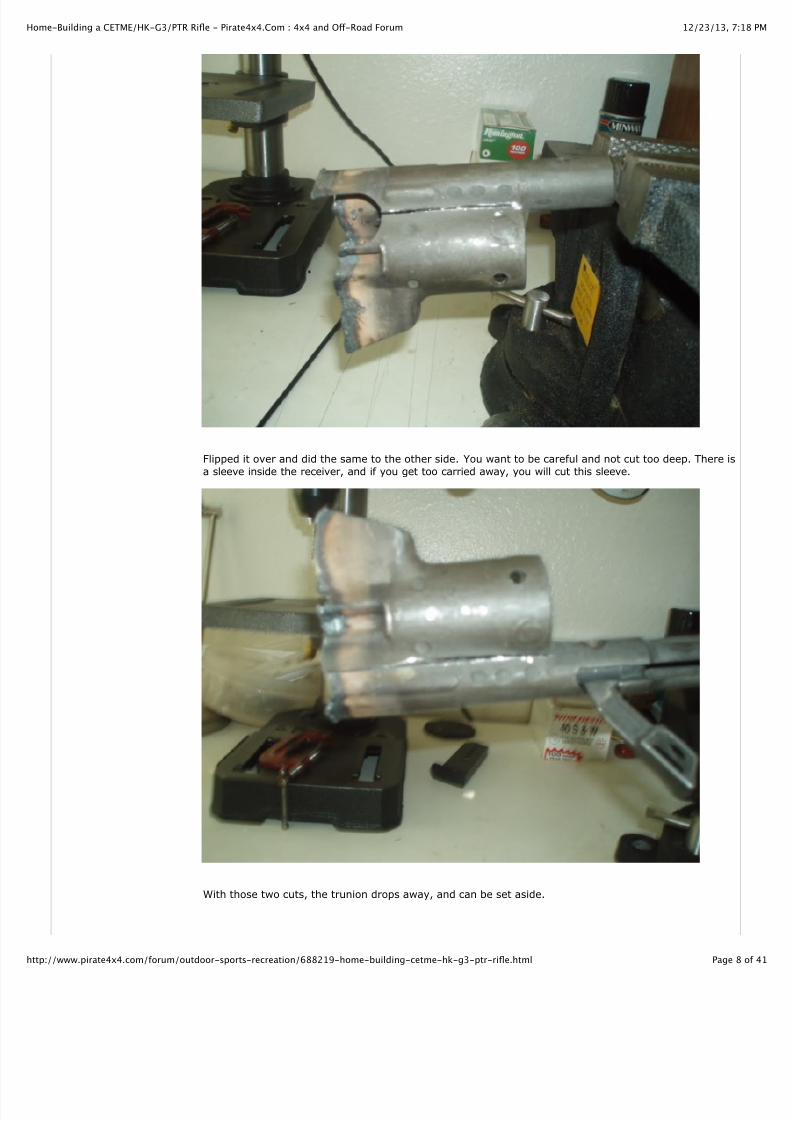
Using a dremel with a cutoff wheel, I cut down the length of the receiver, as shown.
7/24/2019 Step by Step Home-Building a HK-G 3battle rifle
http://slidepdf.com/reader/full/step-by-step-home-building-a-hk-g-3battle-rifle 8/41
12/23/13, 7:ome-Building a CETME/HK-G3/PTR Rifle - Pirate4x4.Com : 4x4 and O! -Road Forum
Page 8ttp://www.pirate4x4.com/forum/outdoor-sports-recreation/688219-home-building-cetme-hk-g3-ptr-rifle.html
Flipped it over and did the same to the other side. You want to be careful and not cut too deep. There is
a sleeve inside the receiver, and if you get too carried away, you will cut this sleeve.
With those two cuts, the trunion drops away, and can be set aside.
7/24/2019 Step by Step Home-Building a HK-G 3battle rifle
http://slidepdf.com/reader/full/step-by-step-home-building-a-hk-g-3battle-rifle 9/41
12/23/13, 7:ome-Building a CETME/HK-G3/PTR Rifle - Pirate4x4.Com : 4x4 and O! -Road Forum
Page 9ttp://www.pirate4x4.com/forum/outdoor-sports-recreation/688219-home-building-cetme-hk-g3-ptr-rifle.html
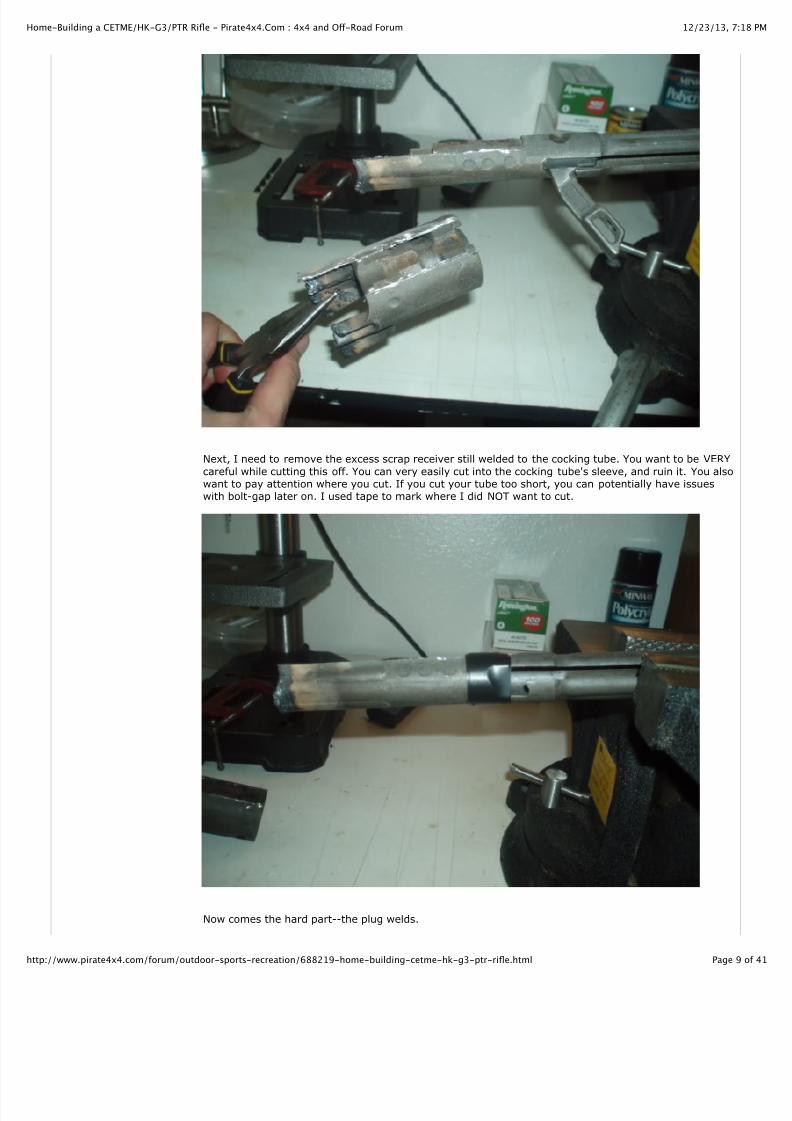
Next, I need to remove the excess scrap receiver still welded to the cocking tube. You want to be VERY
careful while cutting this off. You can very easily cut into the cocking tube's sleeve, and ruin it. You alsowant to pay attention where you cut. If you cut your tube too short, you can potentially have issueswith bolt-gap later on. I used tape to mark where I did NOT want to cut.
Now comes the hard part--the plug welds.
7/24/2019 Step by Step Home-Building a HK-G 3battle rifle
http://slidepdf.com/reader/full/step-by-step-home-building-a-hk-g-3battle-rifle 10/41
12/23/13, 7:ome-Building a CETME/HK-G3/PTR Rifle - Pirate4x4.Com : 4x4 and O! -Road Forum
Page 10ttp://www.pirate4x4.com/forum/outdoor-sports-recreation/688219-home-building-cetme-hk-g3-ptr-rifle.html
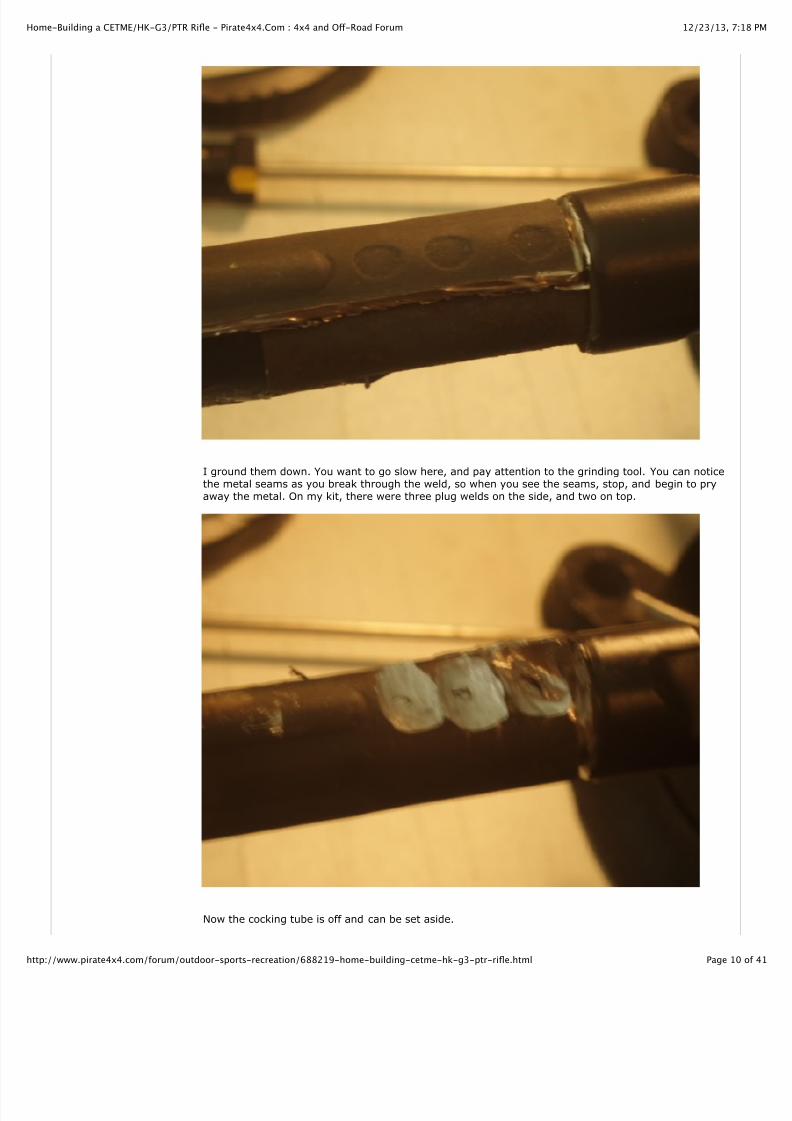
I ground them down. You want to go slow here, and pay attention to the grinding tool. You can noticethe metal seams as you break through the weld, so when you see the seams, stop, and begin to pryaway the metal. On my kit, there were three plug welds on the side, and two on top.
Now the cocking tube is off and can be set aside.
7/24/2019 Step by Step Home-Building a HK-G 3battle rifle
http://slidepdf.com/reader/full/step-by-step-home-building-a-hk-g-3battle-rifle 11/41
12/23/13, 7:ome-Building a CETME/HK-G3/PTR Rifle - Pirate4x4.Com : 4x4 and O! -Road Forum
Page 11ttp://www.pirate4x4.com/forum/outdoor-sports-recreation/688219-home-building-cetme-hk-g3-ptr-rifle.html
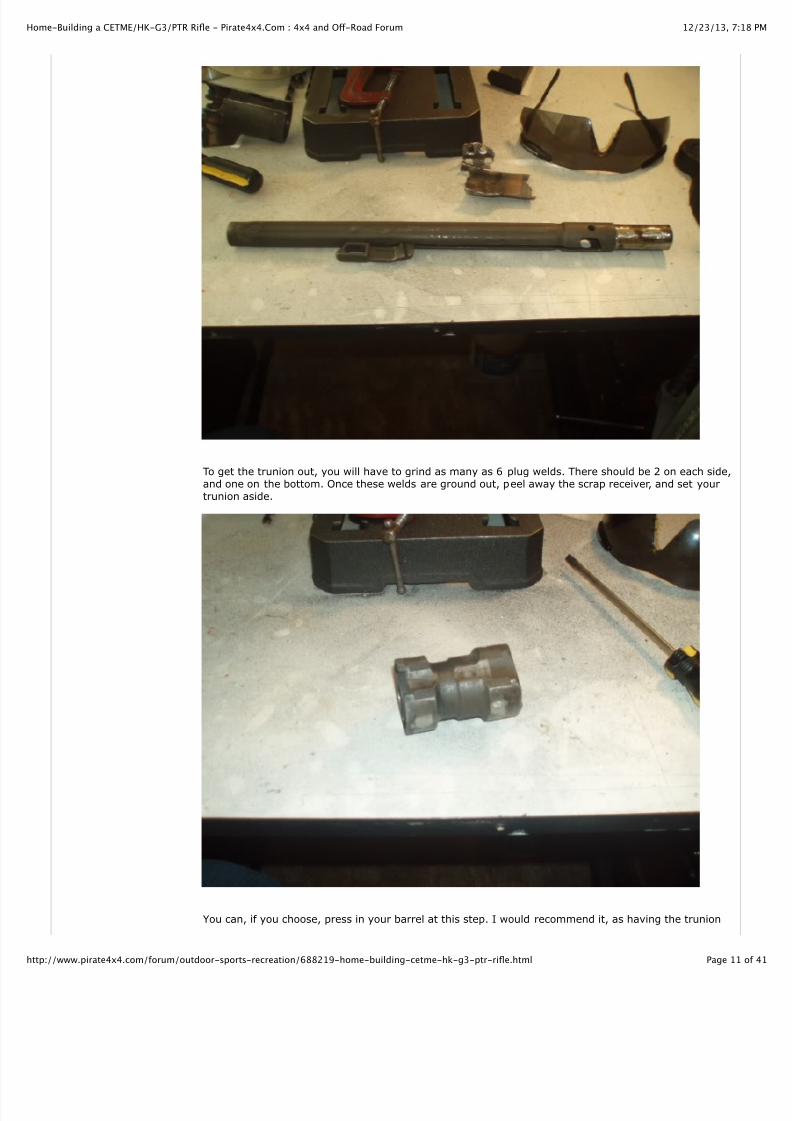
To get the trunion out, you will have to grind as many as 6 plug welds. There should be 2 on each side,and one on the bottom. Once these welds are ground out, peel away the scrap receiver, and set yourtrunion aside.
You can, if you choose, press in your barrel at this step. I would recommend it, as having the trunion
7/24/2019 Step by Step Home-Building a HK-G 3battle rifle
http://slidepdf.com/reader/full/step-by-step-home-building-a-hk-g-3battle-rifle 12/41
12/23/13, 7:ome-Building a CETME/HK-G3/PTR Rifle - Pirate4x4.Com : 4x4 and O! -Road Forum
Page 12ttp://www.pirate4x4.com/forum/outdoor-sports-recreation/688219-home-building-cetme-hk-g3-ptr-rifle.html
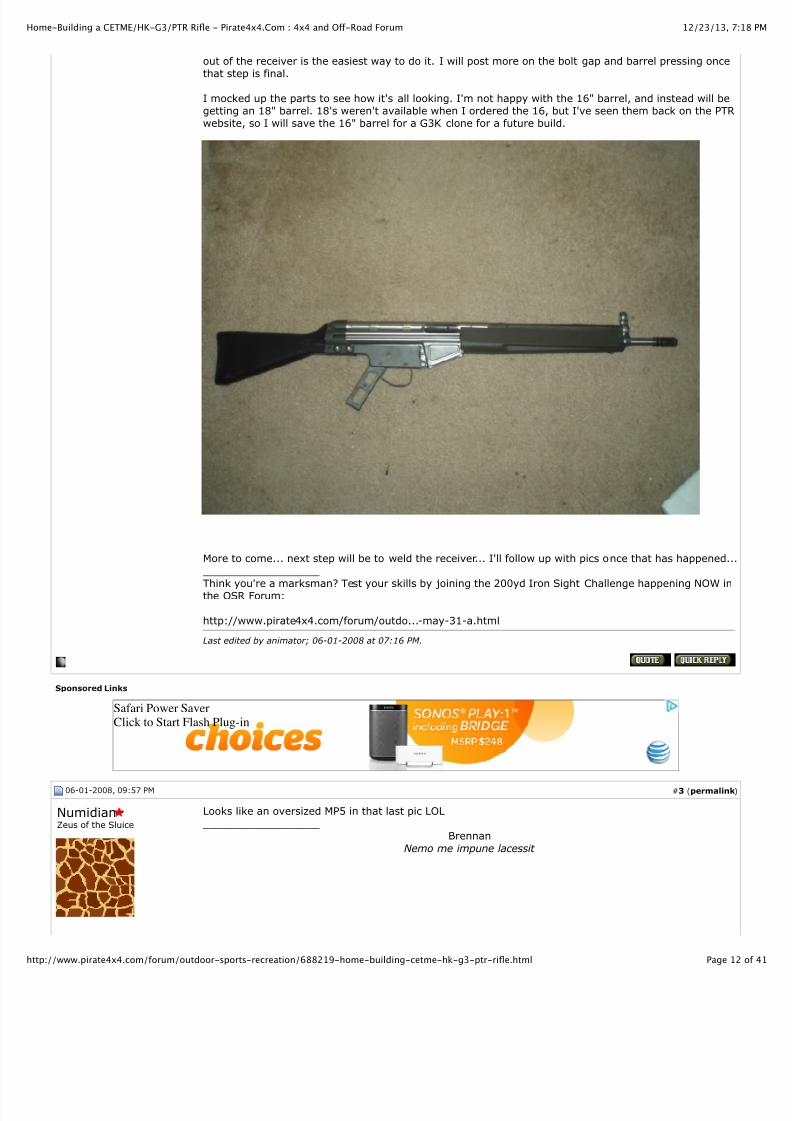
out of the receiver is the easiest way to do it. I will post more on the bolt gap and barrel pressing oncethat step is final.
I mocked up the parts to see how it's all looking. I'm not happy with the 16" barrel, and instead will begetting an 18" barrel. 18's weren't available when I ordered the 16, but I've seen them back on the PTRwebsite, so I will save the 16" barrel for a G3K clone for a future build.
More to come... next step will be to weld the receiver... I'll follow up with pics once that has happened...
__________________Think you're a marksman? Test your skills by joining the 200yd Iron Sight Challenge happening NOW inthe OSR Forum:
http://www.pirate4x4.com/forum/outdo...-may-31-a.html
Last edited by animator; 06-01-2008 at 07:16 PM.
Sponsored Links
Safari Power SaverClick to Start Flash Plug-in
06-01-2008, 09:57 PM #3 (permalink)
NumidianZeus of the Sluice
Looks like an oversized MP5 in that last pic LOL __________________
Brennan
Nemo me impune lacessit

7/24/2019 Step by Step Home-Building a HK-G 3battle rifle
http://slidepdf.com/reader/full/step-by-step-home-building-a-hk-g-3battle-rifle 13/41
12/23/13, 7:ome-Building a CETME/HK-G3/PTR Rifle - Pirate4x4.Com : 4x4 and O! -Road Forum
Page 13ttp://www.pirate4x4.com/forum/outdoor-sports-recreation/688219-home-building-cetme-hk-g3-ptr-rifle.html
Join Date: Oct 2004Member # 36317Location: Shrewsbury PAPosts: 4,499
06-02-2008, 07:34 AM #4 (permalink)
animatorbig bird
Join Date: Sep 2002Member # 13701Location: Plano/DallasPosts: 4,248
Quote:
Originally Posted by Numidian Looks like an oversized MP5 in that last pic LOL
That's because a G3 IS an oversized MP5
__________________Think you're a marksman? Test your skills by joining the 200yd Iron Sight Challenge happening NOW inthe OSR Forum:
http://www.pirate4x4.com/forum/outdo...-may-31-a.html
06-02-2008, 08:10 AM #5 (permalink)
Aces'n'8sAxes of E-ville
Join Date: May 2005Member # 48097Location: West TNPosts: 3,520
Looks good. Do you plan to Tig or Mig the receiver?
06-02-2008, 09:38 AM #6 (permalink)
animatorbig bird
Join Date: Sep 2002Member # 13701Location: Plano/DallasPosts: 4,248
Quote:
Originally Posted by Aces'n'8s
Looks good. Do you plan to Tig or Mig the receiver?
TIG __________________Think you're a marksman? Test your skills by joining the 200yd Iron Sight Challenge happening NOW inthe OSR Forum:
http://www.pirate4x4.com/forum/outdo...-may-31-a.html
06-02-2008, 02:09 PM #7 (permalink)
aloharoverI build stuff
Quote:
Originally Posted by animator
That's because a G3 IS an oversized MP5

7/24/2019 Step by Step Home-Building a HK-G 3battle rifle
http://slidepdf.com/reader/full/step-by-step-home-building-a-hk-g-3battle-rifle 14/41
12/23/13, 7:ome-Building a CETME/HK-G3/PTR Rifle - Pirate4x4.Com : 4x4 and O! -Road Forum
Page 14ttp://www.pirate4x4.com/forum/outdoor-sports-recreation/688219-home-building-cetme-hk-g3-ptr-rifle.html
Join Date: Oct 2002Member # 14561Location: Just outside the evaczonePosts: 16,397
Uhmmm, nope.
MP5 is a miniture G3
__________________
Want to know how I lost 35lbs? Try INSANITY®.
www.beachbodycoach.com/petermhope
"Life is hard. It's harder when you're stupid"
Colorado Springs, CO Based FFL-07/SOT
06-02-2008, 04:53 PM #8 (permalink)
Jason RRegistered User
Join Date: May 2002
Member # 11598Location: USAPosts: 6,062
You should machine and weld a picatinny rail on the receiver...right in front of the drum site. Make it lowprofile and no need for the crappy HK clamp-on shit! __________________This space for rent.
06-02-2008, 05:59 PM #9 (permalink)
animatorbig bird
Join Date: Sep 2002Member # 13701Location: Plano/DallasPosts: 4,248
Quote:
Originally Posted by Jason R You should machine and weld a picatinny rail on the receiver...right in front of the drum site.
Make it low profile and no need for the crappy HK clamp-on shit!
I am way ahead of you on that... __________________Think you're a marksman? Test your skills by joining the 200yd Iron Sight Challenge happening NOW inthe OSR Forum:
http://www.pirate4x4.com/forum/outdo...-may-31-a.html
06-03-2008, 09:14 AM #10 (permalink)
GrimjawRegistered User Join Date: Jun 2004Member # 32013Location: Fort Mill, SC
Posts: 433
Quote:
Originally Posted by animator I am way ahead of you on that...
Ok, that sounds interesting, very interesting.....
What do you have up your sleeve? I may just steal the idea for my two. __________________[QUOTE=My Wife] I was all geared up for sorched earth and by golly somebody's earth is getting
scorched, darnit![/QUOTE]
06-03-2008, 09:18 AM #11 (permalink)
afroman006 Me too, I have 1 1/2' of Scott's steel rail. Any chance I can send it up to you to get the radius cut on the

7/24/2019 Step by Step Home-Building a HK-G 3battle rifle
http://slidepdf.com/reader/full/step-by-step-home-building-a-hk-g-3battle-rifle 15/41
12/23/13, 7:ome-Building a CETME/HK-G3/PTR Rifle - Pirate4x4.Com : 4x4 and O! -Road Forum
Page 15ttp://www.pirate4x4.com/forum/outdoor-sports-recreation/688219-home-building-cetme-hk-g3-ptr-rifle.html
Registered User Join Date: May 2003Member # 19615Location: San Antonio, TXPosts: 1,582
bottom?
__________________Texas A&M Offroad84 Chevy -Pigpen- Best trail truck there ever was...
06-03-2008, 09:47 AM #12 (permalink)
hoohaaRegistered User
Join Date: Oct 2005Member # 55546Location: DallasPosts: 932
Wow, I will be watching this thread closely. I've got a CETME kit that needs to be built as well. Heck, Iwish I had known you would have that flat bending jig, I would have bought a flat and begged to getinvited to the "guys who build 68 rifles at a time club".
06-03-2008, 10:38 AM #13 (permalink)
GozukiPirate4x4 Addict!
Join Date: Jan 2001Member # 3088Location: West Coast, USAPosts: 11,786
Quote:
Originally Posted by afroman006 Me too, I have 1 1/2' of Scott's steel rail. Any chance I can send it up to you to get the radius
cut on the bottom?
What is the radius? __________________
Quote:
Originally Posted by Crash440 I had a HARD ON for forgetting my meds.
06-03-2008, 10:53 AM #14 (permalink)
animatorbig bird
Join Date: Sep 2002Member # 13701Location: Plano/Dallas
Posts: 4,248
Quote:
Originally Posted by hoohaa
Wow, I will be watching this thread closely. I've got a CETME kit that needs to be built as well.Heck, I wish I had known you would have that flat bending jig, I would have bought a flat and begged to get invited to the "guys who build 68 rifles at a time club".
Buy some flats and I'm sure we can work something out. The guy whose jig I used is over in Ft. Worth.
__________________
Think you're a marksman? Test your skills by joining the 200yd Iron Sight Challenge happening NOW inthe OSR Forum:
http://www.pirate4x4.com/forum/outdo...-may-31-a.html
06-03-2008, 12:19 PM #15 (permalink)
GrimjawRegistered User Join Date: Jun 2004
Quote:
Originally Posted by Gozuki What is the radius?

7/24/2019 Step by Step Home-Building a HK-G 3battle rifle
http://slidepdf.com/reader/full/step-by-step-home-building-a-hk-g-3battle-rifle 16/41
12/23/13, 7:ome-Building a CETME/HK-G3/PTR Rifle - Pirate4x4.Com : 4x4 and O! -Road Forum
Page 16ttp://www.pirate4x4.com/forum/outdoor-sports-recreation/688219-home-building-cetme-hk-g3-ptr-rifle.html
Member # 32013Location: Fort Mill, SCPosts: 433 most likely it will be close to 7/8", but mine are not bent,yet.
__________________[QUOTE=My Wife] I was all geared up for sorched earth and by golly somebody's earth is getting
scorched, darnit![/QUOTE]
06-03-2008, 02:08 PM #16 (permalink)
animatorbig bird
Join Date: Sep 2002Member # 13701Location: Plano/DallasPosts: 4,248
Quote:
Originally Posted by Grimjaw most likely it will be close to 7/8", but mine are not bent,yet.
It's just slightly larger than 5/8". Some people use 5/8" rod clamped to a table to draw over theirreceivers. It's a crude method that produces only marginal results...
__________________Think you're a marksman? Test your skills by joining the 200yd Iron Sight Challenge happening NOW inthe OSR Forum:
http://www.pirate4x4.com/forum/outdo...-may-31-a.html
06-03-2008, 03:17 PM #17 (permalink)
afroman006Registered User Join Date: May 2003Member # 19615Location: San Antonio, TXPosts: 1,582
So how're you doing the bottom of your rail?
__________________Texas A&M Offroad84 Chevy -Pigpen- Best trail truck there ever was...
06-03-2008, 07:14 PM #18 (permalink)
animatorbig bird
Join Date: Sep 2002Member # 13701Location: Plano/DallasPosts: 4,248
Quote:
Originally Posted by Grimjaw Ok, that sounds interesting, very interesting.....
What do you have up your sleeve? I may just steal the idea for my two.
I've been talking to scott@rockstomper about getting a few lengths, and once I find out how much I willneed, I'll be making an order.
Once the rail is in, we'll figure out how best to weld it to the receiver. It will be similar to the welding
required to mount the rear sight base, so I'm not too worried about it being too difficult or anything...
Quote:
Originally Posted by afroman006
Me too, I have 1 1/2' of Scott's steel rail. Any chance I can send it up to you to get the radiuscut on the bottom?
You can send it if you want, or hold onto it for build day (which I still don't know when that will be).
Either way, it will get welded on when the time comes. I'm in no rush for it, though...
Quote:

7/24/2019 Step by Step Home-Building a HK-G 3battle rifle
http://slidepdf.com/reader/full/step-by-step-home-building-a-hk-g-3battle-rifle 17/41
12/23/13, 7:ome-Building a CETME/HK-G3/PTR Rifle - Pirate4x4.Com : 4x4 and O! -Road Forum
Page 17ttp://www.pirate4x4.com/forum/outdoor-sports-recreation/688219-home-building-cetme-hk-g3-ptr-rifle.html
Originally Posted by afroman006 So how're you doing the bottom of your rail?
Haven't figured it out yet. Once I see the rail, I'll come up with something... __________________
Think you're a marksman? Test your skills by joining the 200yd Iron Sight Challenge happening NOW inthe OSR Forum:
http://www.pirate4x4.com/forum/outdo...-may-31-a.html
Last edited by animator; 06-03-2008 at 07:15 PM.
06-03-2008, 07:59 PM #19 (permalink)
hoohaaRegistered User
Join Date: Oct 2005Member # 55546Location: DallasPosts: 932
I dont care what they say. CETMEs freakin rock!
09-13-2008,
05:54 PM #20 (perm
animatorbig bird
Join Date: Sep2002Member # 13701Location:Plano/DallasPosts: 4,248
So getting this going again...
I had originally planned on doing this during a build party among some local friends, but I'm kinda tired of waiting onthem... seems like everyone is caught up with other priorities, which is totally cool with me, but I'd like to get this gubuilt, and so I decided to just do it on my own.
Had originally planned to TIG it, but the TIG welding was going to be done by someone else. And since I'm doing it omy own now, I had to settle for MIG. MIG's fine for this, and many people have reported good results with MIG, so I'using what I have.
I started by clamping the magwell area closed. Almost all of this area gets cut out when doing an ATF-approved sembuild, so it's almost a waste to even weld it. I'm doing it to help hold the receiver together. I started by tacking
everything together.
7/24/2019 Step by Step Home-Building a HK-G 3battle rifle
http://slidepdf.com/reader/full/step-by-step-home-building-a-hk-g-3battle-rifle 18/41
12/23/13, 7:ome-Building a CETME/HK-G3/PTR Rifle - Pirate4x4.Com : 4x4 and O! -Road Forum
Page 18ttp://www.pirate4x4.com/forum/outdoor-sports-recreation/688219-home-building-cetme-hk-g3-ptr-rifle.html
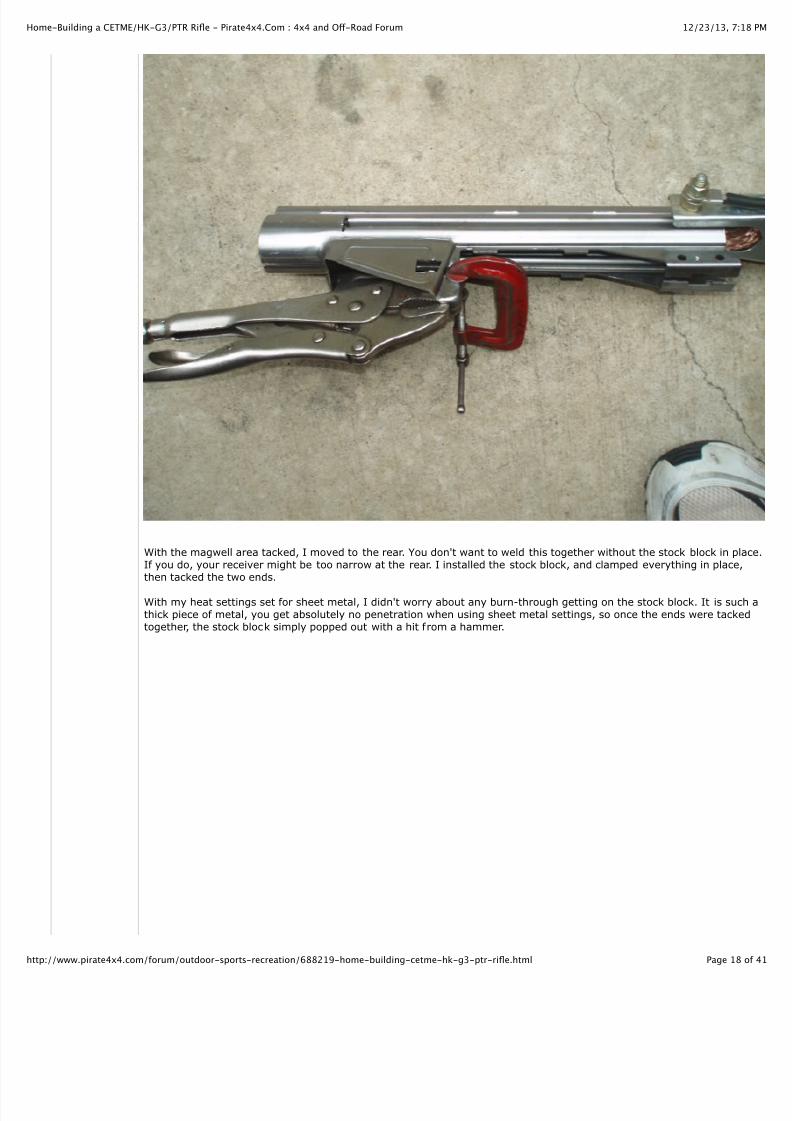
With the magwell area tacked, I moved to the rear. You don't want to weld this together without the stock block in plaIf you do, your receiver might be too narrow at the rear. I installed the stock block, and clamped everything in place,then tacked the two ends.
With my heat settings set for sheet metal, I didn't worry about any burn-through getting on the stock block. It is sucthick piece of metal, you get absolutely no penetration when using sheet metal settings, so once the ends were tacketogether, the stock block simply popped out with a hit from a hammer.

7/24/2019 Step by Step Home-Building a HK-G 3battle rifle
http://slidepdf.com/reader/full/step-by-step-home-building-a-hk-g-3battle-rifle 19/41
12/23/13, 7:ome-Building a CETME/HK-G3/PTR Rifle - Pirate4x4.Com : 4x4 and O! -Road Forum
Page 19ttp://www.pirate4x4.com/forum/outdoor-sports-recreation/688219-home-building-cetme-hk-g3-ptr-rifle.html
The stock block needed a bit of sanding on the bottom. You can see how the holes don't perfectly line up. Personally, rather have a block with no holes cut in it, but this works just as well. I sanded the bottom to try and get the holes acloser, but didn't make it perfect. That won't be a problem, because the holes for the stock pins need to be drilled out
anyway, so I figured the amount it is off won't hurt it, since it will all be drilled out a bit larger anyway.
7/24/2019 Step by Step Home-Building a HK-G 3battle rifle
http://slidepdf.com/reader/full/step-by-step-home-building-a-hk-g-3battle-rifle 20/41
12/23/13, 7:ome-Building a CETME/HK-G3/PTR Rifle - Pirate4x4.Com : 4x4 and O! -Road Forum
Page 20ttp://www.pirate4x4.com/forum/outdoor-sports-recreation/688219-home-building-cetme-hk-g3-ptr-rifle.html
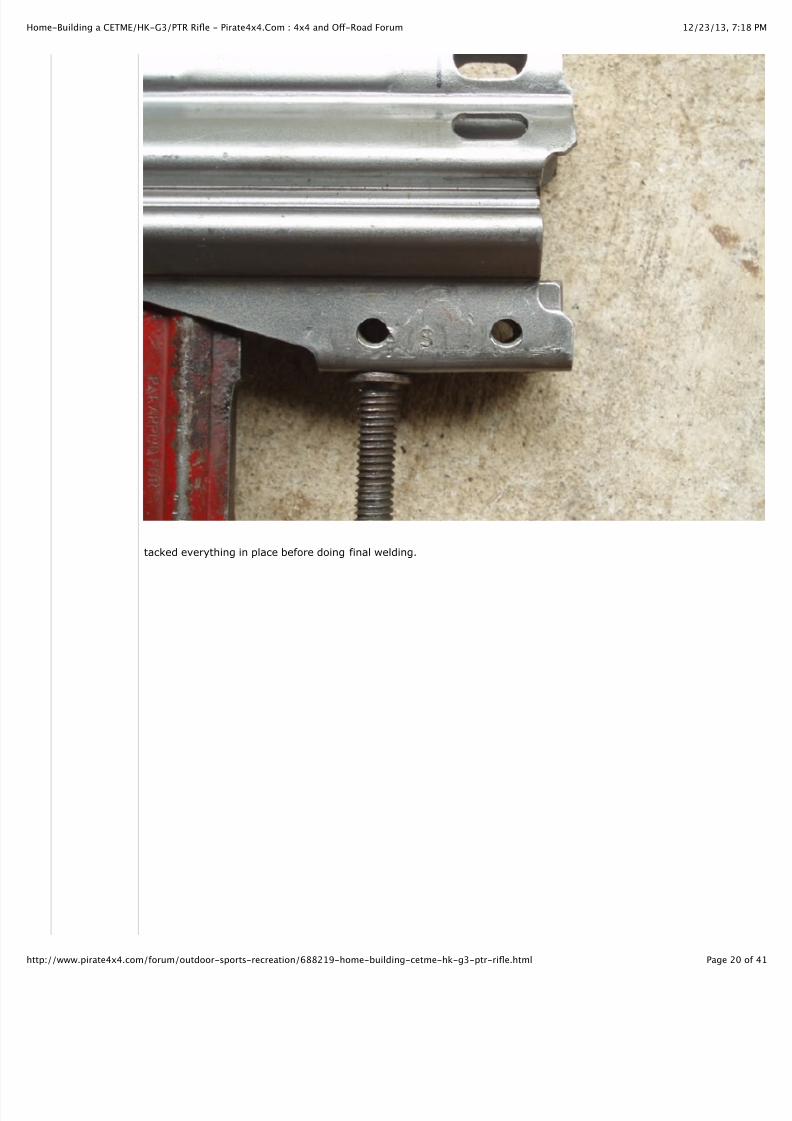
tacked everything in place before doing final welding.

7/24/2019 Step by Step Home-Building a HK-G 3battle rifle
http://slidepdf.com/reader/full/step-by-step-home-building-a-hk-g-3battle-rifle 21/41
12/23/13, 7:ome-Building a CETME/HK-G3/PTR Rifle - Pirate4x4.Com : 4x4 and O! -Road Forum
Page 21ttp://www.pirate4x4.com/forum/outdoor-sports-recreation/688219-home-building-cetme-hk-g3-ptr-rifle.html
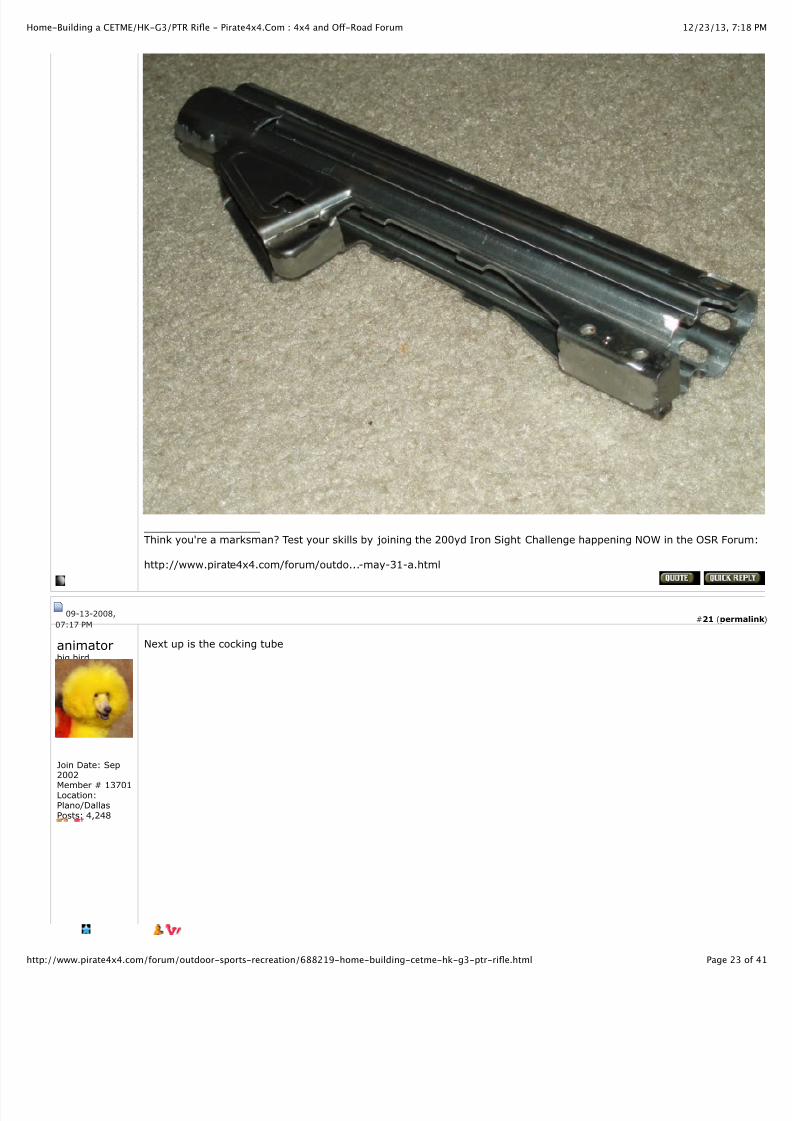
Receiver welded together. I blew through the end a bit, which I figured would happen.. lol. But I'm not worried aboutthat. Once the trunion is installed, I will fill that area with weld. It kinda looks like the receiver was welded with a huggap in the ends. This isn't the case, though. The ends were welded completely flush. I installed the front trunion befo
welding, to make sure everything fit. Then I removed the trunion before doing the final weld.
7/24/2019 Step by Step Home-Building a HK-G 3battle rifle
http://slidepdf.com/reader/full/step-by-step-home-building-a-hk-g-3battle-rifle 22/41
12/23/13, 7:ome-Building a CETME/HK-G3/PTR Rifle - Pirate4x4.Com : 4x4 and O! -Road Forum
Page 22ttp://www.pirate4x4.com/forum/outdoor-sports-recreation/688219-home-building-cetme-hk-g3-ptr-rifle.html
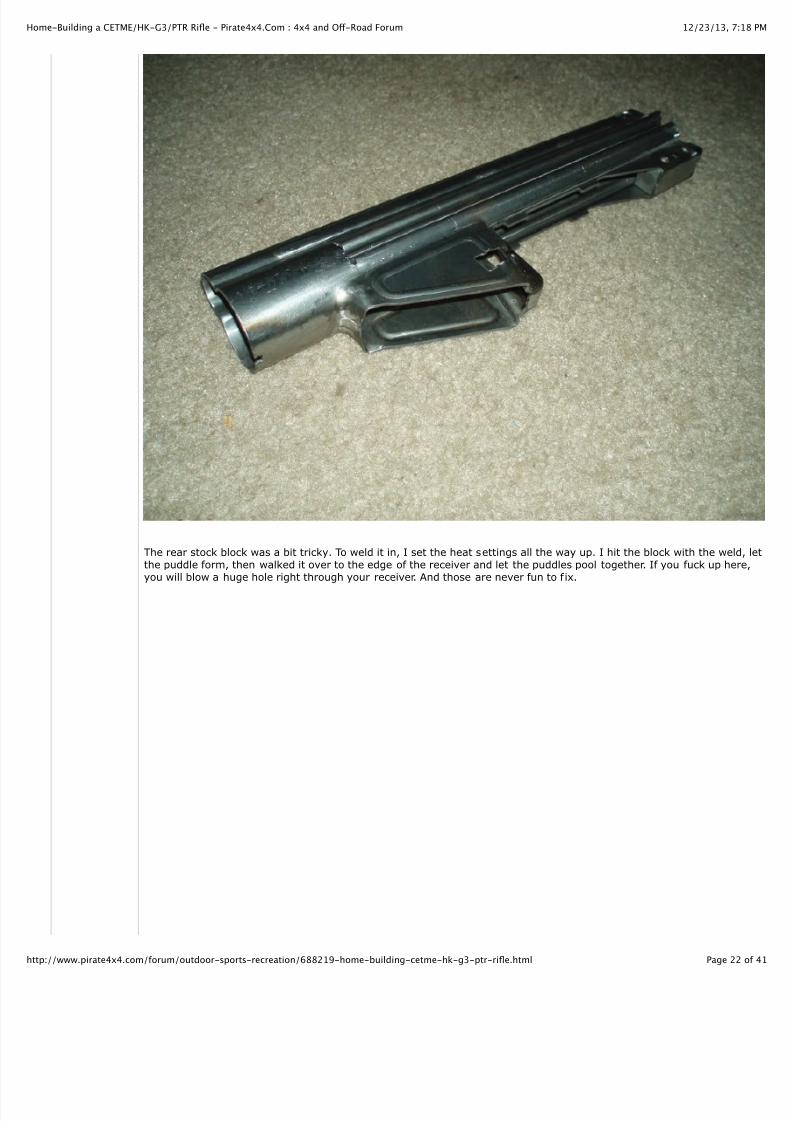
The rear stock block was a bit tricky. To weld it in, I set the heat settings all the way up. I hit the block with the weldthe puddle form, then walked it over to the edge of the receiver and let the puddles pool together. If you fuck up hereyou will blow a huge hole right through your receiver. And those are never fun to fix.
7/24/2019 Step by Step Home-Building a HK-G 3battle rifle
http://slidepdf.com/reader/full/step-by-step-home-building-a-hk-g-3battle-rifle 23/41
12/23/13, 7:ome-Building a CETME/HK-G3/PTR Rifle - Pirate4x4.Com : 4x4 and O! -Road Forum
Page 23ttp://www.pirate4x4.com/forum/outdoor-sports-recreation/688219-home-building-cetme-hk-g3-ptr-rifle.html
__________________Think you're a marksman? Test your skills by joining the 200yd Iron Sight Challenge happening NOW in the OSR Foru
http://www.pirate4x4.com/forum/outdo...-may-31-a.html
09-13-2008,
07:17 PM #21 (perm
animatorbig bird
Join Date: Sep2002
Member # 13701Location:Plano/DallasPosts: 4,248
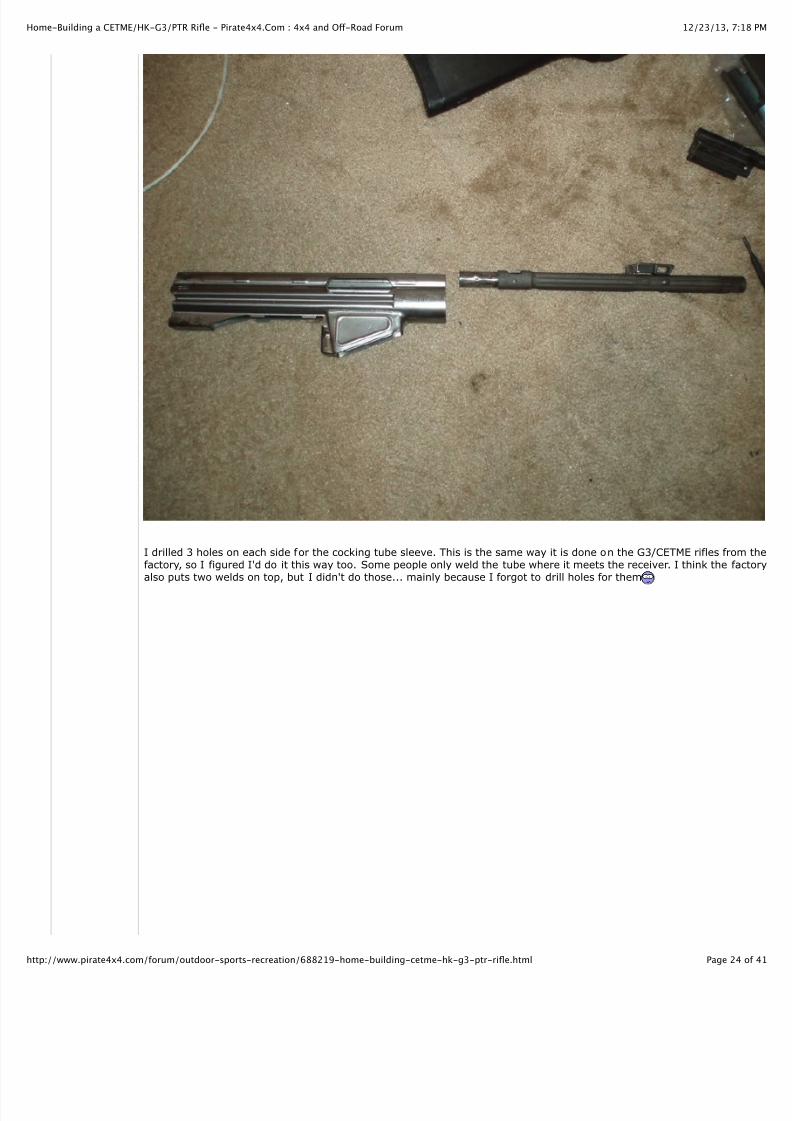
Next up is the cocking tube
7/24/2019 Step by Step Home-Building a HK-G 3battle rifle
http://slidepdf.com/reader/full/step-by-step-home-building-a-hk-g-3battle-rifle 24/41
12/23/13, 7:ome-Building a CETME/HK-G3/PTR Rifle - Pirate4x4.Com : 4x4 and O! -Road Forum
Page 24ttp://www.pirate4x4.com/forum/outdoor-sports-recreation/688219-home-building-cetme-hk-g3-ptr-rifle.html
I drilled 3 holes on each side for the cocking tube sleeve. This is the same way it is done on the G3/CETME rifles fromfactory, so I figured I'd do it this way too. Some people only weld the tube where it meets the receiver. I think the facalso puts two welds on top, but I didn't do those... mainly because I forgot to drill holes for them

7/24/2019 Step by Step Home-Building a HK-G 3battle rifle
http://slidepdf.com/reader/full/step-by-step-home-building-a-hk-g-3battle-rifle 25/41
12/23/13, 7:ome-Building a CETME/HK-G3/PTR Rifle - Pirate4x4.Com : 4x4 and O! -Road Forum
Page 25ttp://www.pirate4x4.com/forum/outdoor-sports-recreation/688219-home-building-cetme-hk-g3-ptr-rifle.html
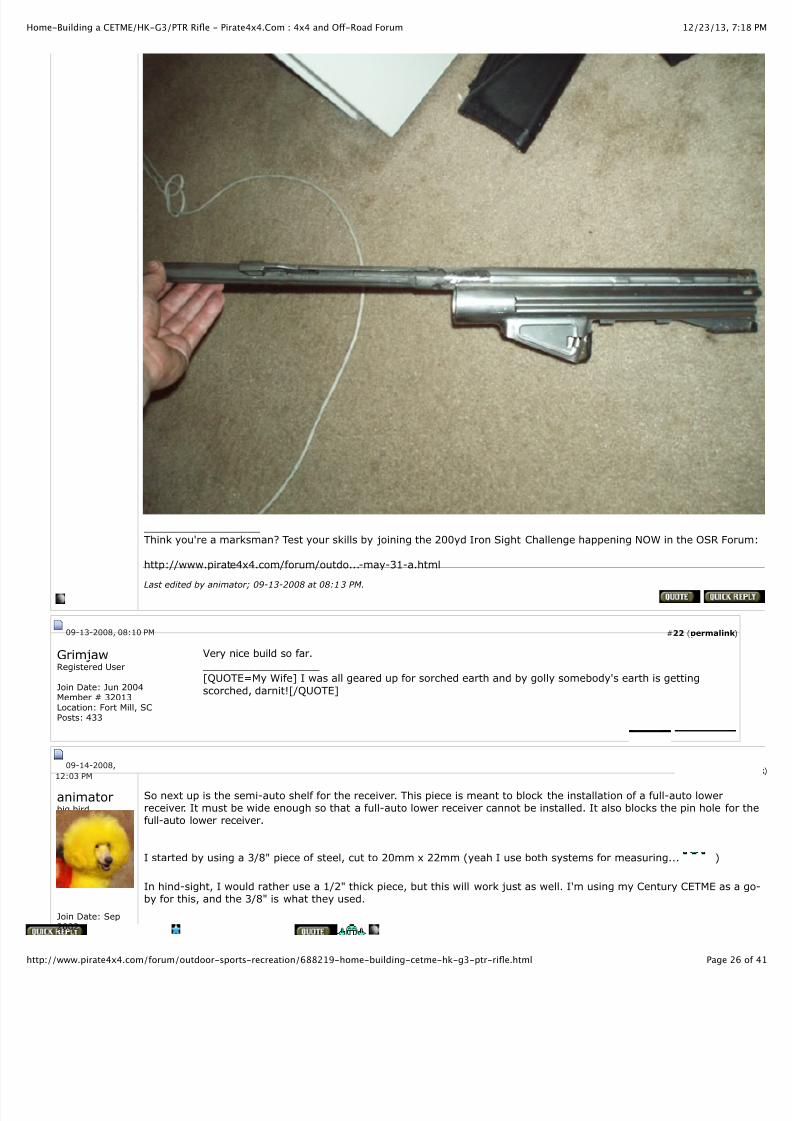
Then weld it on.
7/24/2019 Step by Step Home-Building a HK-G 3battle rifle
http://slidepdf.com/reader/full/step-by-step-home-building-a-hk-g-3battle-rifle 26/41
12/23/13, 7:ome-Building a CETME/HK-G3/PTR Rifle - Pirate4x4.Com : 4x4 and O! -Road Forum
Page 26ttp://www.pirate4x4.com/forum/outdoor-sports-recreation/688219-home-building-cetme-hk-g3-ptr-rifle.html
__________________Think you're a marksman? Test your skills by joining the 200yd Iron Sight Challenge happening NOW in the OSR Foru
http://www.pirate4x4.com/forum/outdo...-may-31-a.html
Last edited by animator; 09-13-2008 at 08:13 PM.
09-13-2008, 08:10 PM #22 (permalink)
GrimjawRegistered User Join Date: Jun 2004Member # 32013Location: Fort Mill, SCPosts: 433
Very nice build so far. __________________[QUOTE=My Wife] I was all geared up for sorched earth and by golly somebody's earth is getting
scorched, darnit![/QUOTE]
09-14-2008,
12:03 PM #23 (perm
animatorbig bird
Join Date: Sep2002
So next up is the semi-auto shelf for the receiver. This piece is meant to block the installation of a full-auto lowerreceiver. It must be wide enough so that a full-auto lower receiver cannot be installed. It also blocks the pin hole for full-auto lower receiver.
I started by using a 3/8" piece of steel, cut to 20mm x 22mm (yeah I use both systems for measuring... )
In hind-sight, I would rather use a 1/2" thick piece, but this will work just as well. I'm using my Century CETME as a by for this, and the 3/8" is what they used.
7/24/2019 Step by Step Home-Building a HK-G 3battle rifle
http://slidepdf.com/reader/full/step-by-step-home-building-a-hk-g-3battle-rifle 27/41
12/23/13, 7:ome-Building a CETME/HK-G3/PTR Rifle - Pirate4x4.Com : 4x4 and O! -Road Forum
Page 27ttp://www.pirate4x4.com/forum/outdoor-sports-recreation/688219-home-building-cetme-hk-g3-ptr-rifle.html
Member # 13701Location:Plano/DallasPosts: 4,248
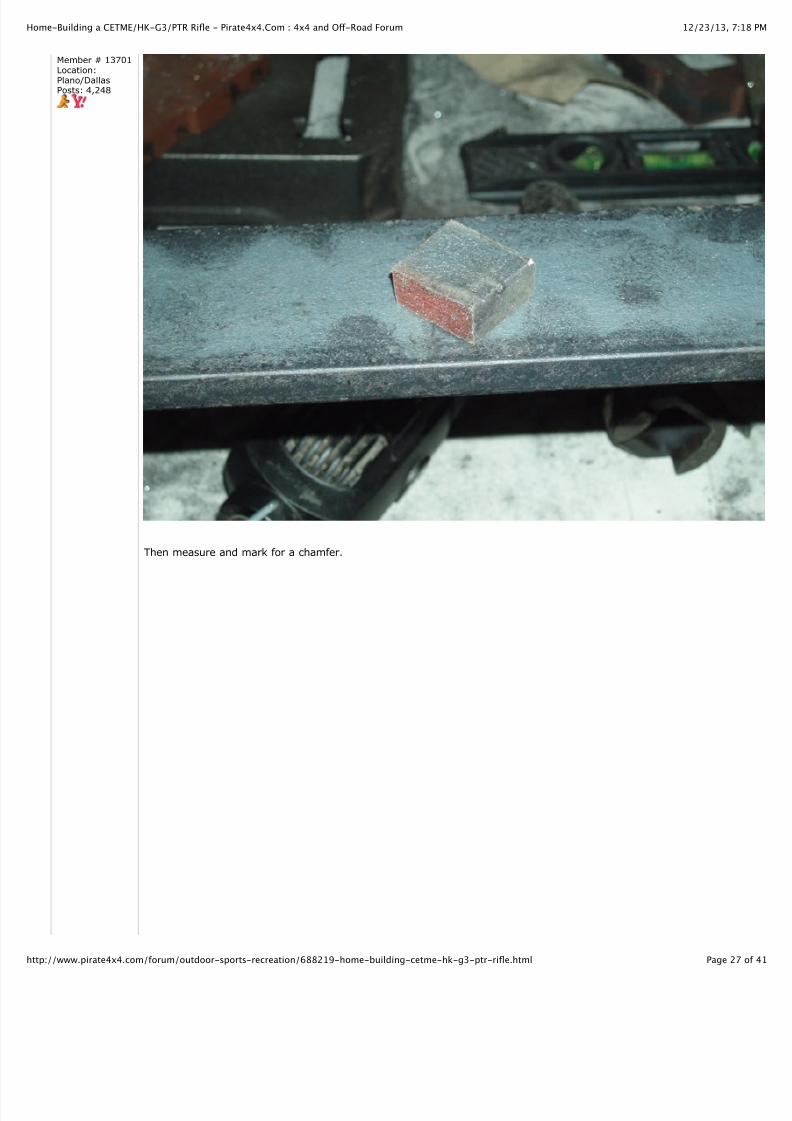
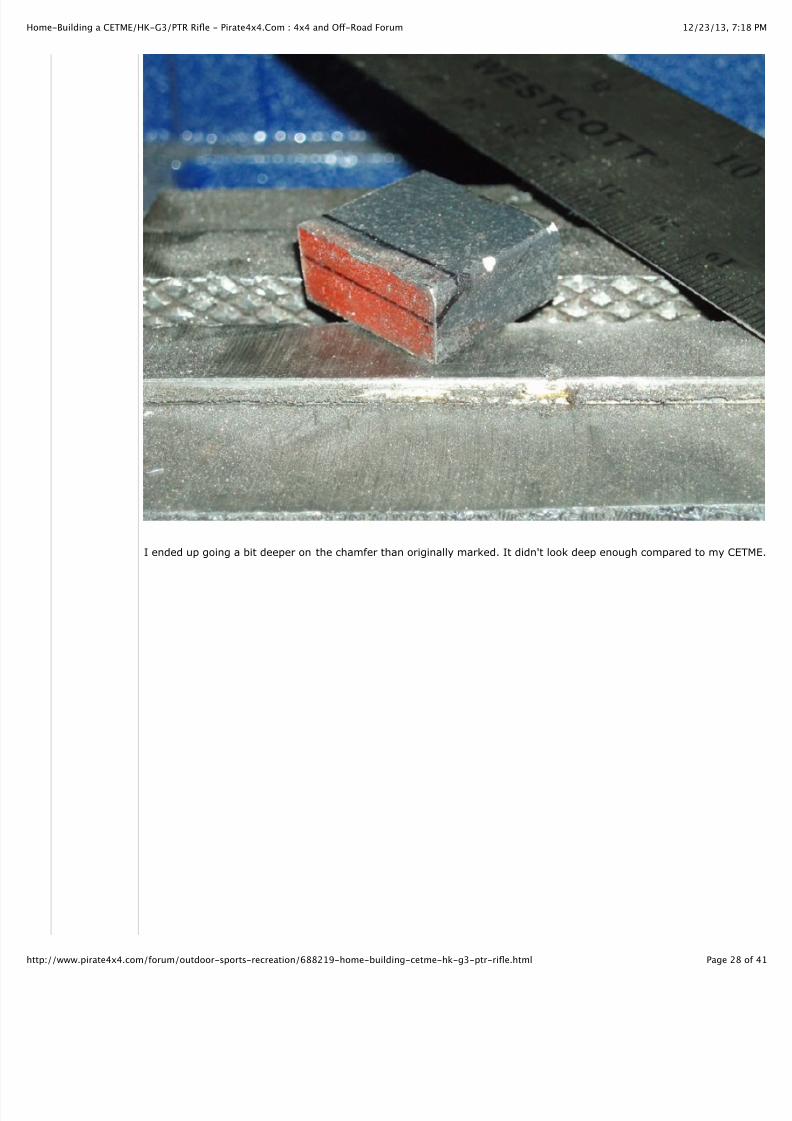
Then measure and mark for a chamfer.
7/24/2019 Step by Step Home-Building a HK-G 3battle rifle
http://slidepdf.com/reader/full/step-by-step-home-building-a-hk-g-3battle-rifle 28/41
12/23/13, 7:ome-Building a CETME/HK-G3/PTR Rifle - Pirate4x4.Com : 4x4 and O! -Road Forum
Page 28ttp://www.pirate4x4.com/forum/outdoor-sports-recreation/688219-home-building-cetme-hk-g3-ptr-rifle.html
I ended up going a bit deeper on the chamfer than originally marked. It didn't look deep enough compared to my CET
7/24/2019 Step by Step Home-Building a HK-G 3battle rifle
http://slidepdf.com/reader/full/step-by-step-home-building-a-hk-g-3battle-rifle 29/41
12/23/13, 7:ome-Building a CETME/HK-G3/PTR Rifle - Pirate4x4.Com : 4x4 and O! -Road Forum
Page 29ttp://www.pirate4x4.com/forum/outdoor-sports-recreation/688219-home-building-cetme-hk-g3-ptr-rifle.html
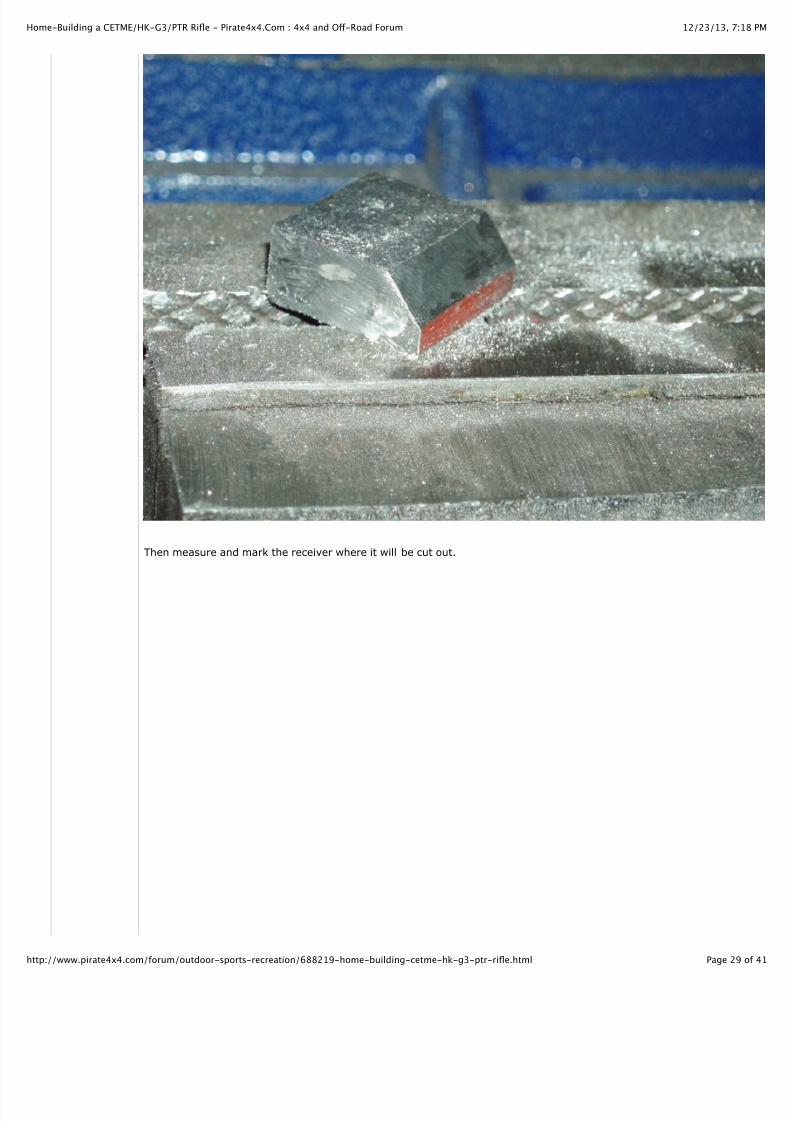
Then measure and mark the receiver where it will be cut out.
7/24/2019 Step by Step Home-Building a HK-G 3battle rifle
http://slidepdf.com/reader/full/step-by-step-home-building-a-hk-g-3battle-rifle 30/41
12/23/13, 7:ome-Building a CETME/HK-G3/PTR Rifle - Pirate4x4.Com : 4x4 and O! -Road Forum
Page 30ttp://www.pirate4x4.com/forum/outdoor-sports-recreation/688219-home-building-cetme-hk-g3-ptr-rifle.html
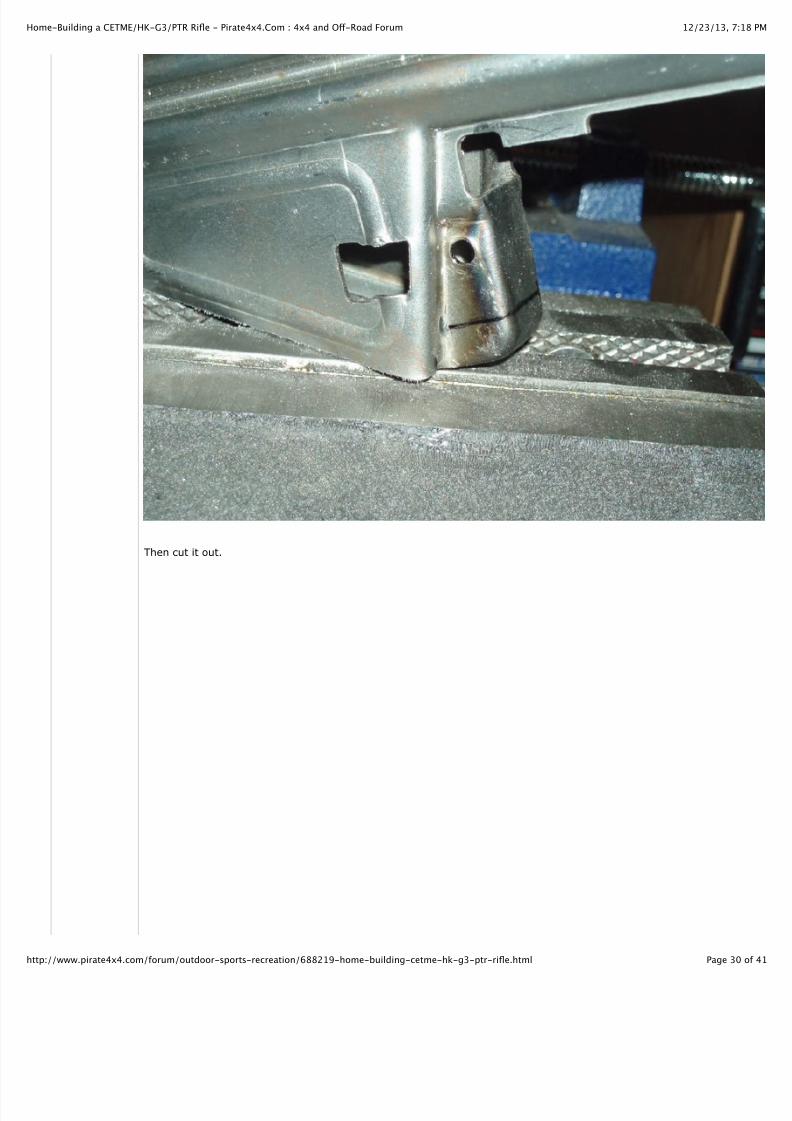
Then cut it out.
7/24/2019 Step by Step Home-Building a HK-G 3battle rifle
http://slidepdf.com/reader/full/step-by-step-home-building-a-hk-g-3battle-rifle 31/41
12/23/13, 7:ome-Building a CETME/HK-G3/PTR Rifle - Pirate4x4.Com : 4x4 and O! -Road Forum
Page 31ttp://www.pirate4x4.com/forum/outdoor-sports-recreation/688219-home-building-cetme-hk-g3-ptr-rifle.html
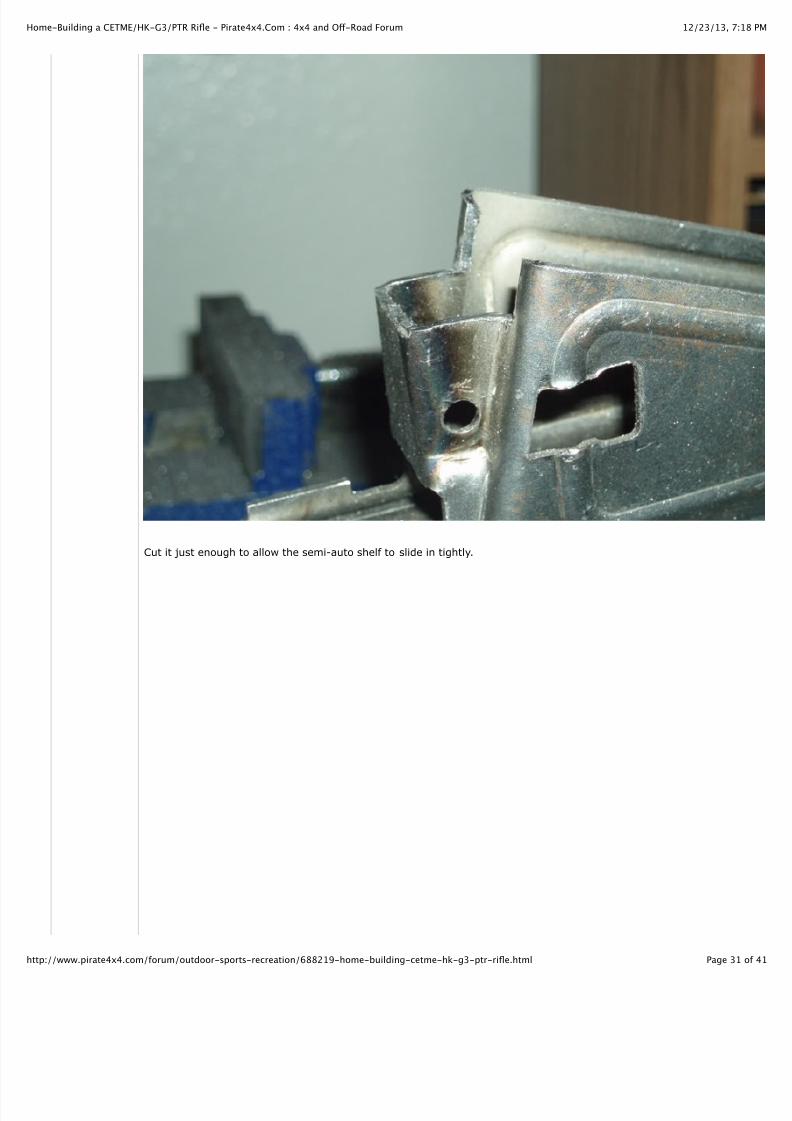
Cut it just enough to allow the semi-auto shelf to slide in tightly.

7/24/2019 Step by Step Home-Building a HK-G 3battle rifle
http://slidepdf.com/reader/full/step-by-step-home-building-a-hk-g-3battle-rifle 32/41
12/23/13, 7:ome-Building a CETME/HK-G3/PTR Rifle - Pirate4x4.Com : 4x4 and O! -Road Forum
Page 32ttp://www.pirate4x4.com/forum/outdoor-sports-recreation/688219-home-building-cetme-hk-g3-ptr-rifle.html
And it is wide enough to clearly block an un-modified full-auto lower receiver.
7/24/2019 Step by Step Home-Building a HK-G 3battle rifle
http://slidepdf.com/reader/full/step-by-step-home-building-a-hk-g-3battle-rifle 33/41
12/23/13, 7:ome-Building a CETME/HK-G3/PTR Rifle - Pirate4x4.Com : 4x4 and O! -Road Forum
Page 33ttp://www.pirate4x4.com/forum/outdoor-sports-recreation/688219-home-building-cetme-hk-g3-ptr-rifle.html
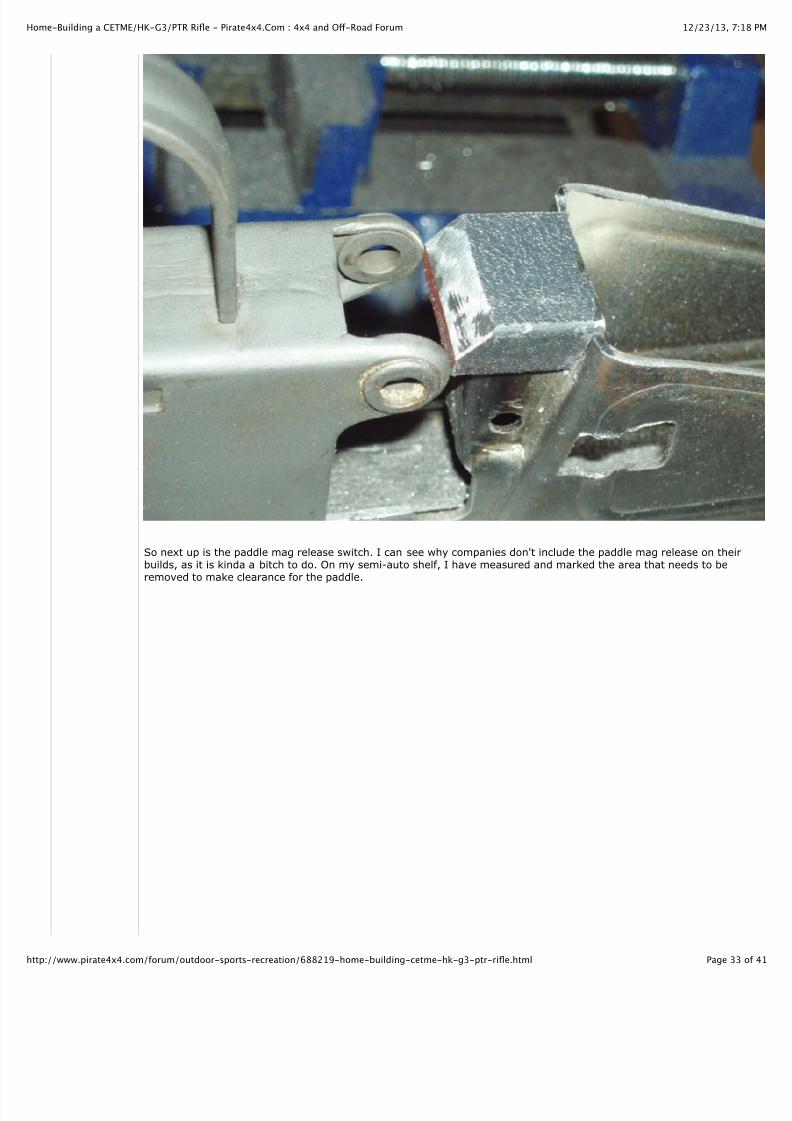
So next up is the paddle mag release switch. I can see why companies don't include the paddle mag release on theirbuilds, as it is kinda a bitch to do. On my semi-auto shelf, I have measured and marked the area that needs to beremoved to make clearance for the paddle.

7/24/2019 Step by Step Home-Building a HK-G 3battle rifle
http://slidepdf.com/reader/full/step-by-step-home-building-a-hk-g-3battle-rifle 34/41
12/23/13, 7:ome-Building a CETME/HK-G3/PTR Rifle - Pirate4x4.Com : 4x4 and O! -Road Forum
Page 34ttp://www.pirate4x4.com/forum/outdoor-sports-recreation/688219-home-building-cetme-hk-g3-ptr-rifle.html
And this is where you guys with your fancy milling equipment can go fawk yourselves with my dremel tool
__________________
Think you're a marksman? Test your skills by joining the 200yd Iron Sight Challenge happening NOW in the OSR Foru
http://www.pirate4x4.com/forum/outdo...-may-31-a.html
09-14-2008,
12:04 PM #24 (perm
animatorbig bird
Join Date: Sep2002Member # 13701Location:Plano/DallasPosts: 4,248
Rather than try to dremel out the whole opening, I drilled it out first.

7/24/2019 Step by Step Home-Building a HK-G 3battle rifle
http://slidepdf.com/reader/full/step-by-step-home-building-a-hk-g-3battle-rifle 35/41
12/23/13, 7:ome-Building a CETME/HK-G3/PTR Rifle - Pirate4x4.Com : 4x4 and O! -Road Forum
Page 35ttp://www.pirate4x4.com/forum/outdoor-sports-recreation/688219-home-building-cetme-hk-g3-ptr-rifle.html
Then dremeled and hand-filed it to make it square.
7/24/2019 Step by Step Home-Building a HK-G 3battle rifle
http://slidepdf.com/reader/full/step-by-step-home-building-a-hk-g-3battle-rifle 36/41
12/23/13, 7:ome-Building a CETME/HK-G3/PTR Rifle - Pirate4x4.Com : 4x4 and O! -Road Forum
Page 36ttp://www.pirate4x4.com/forum/outdoor-sports-recreation/688219-home-building-cetme-hk-g3-ptr-rifle.html
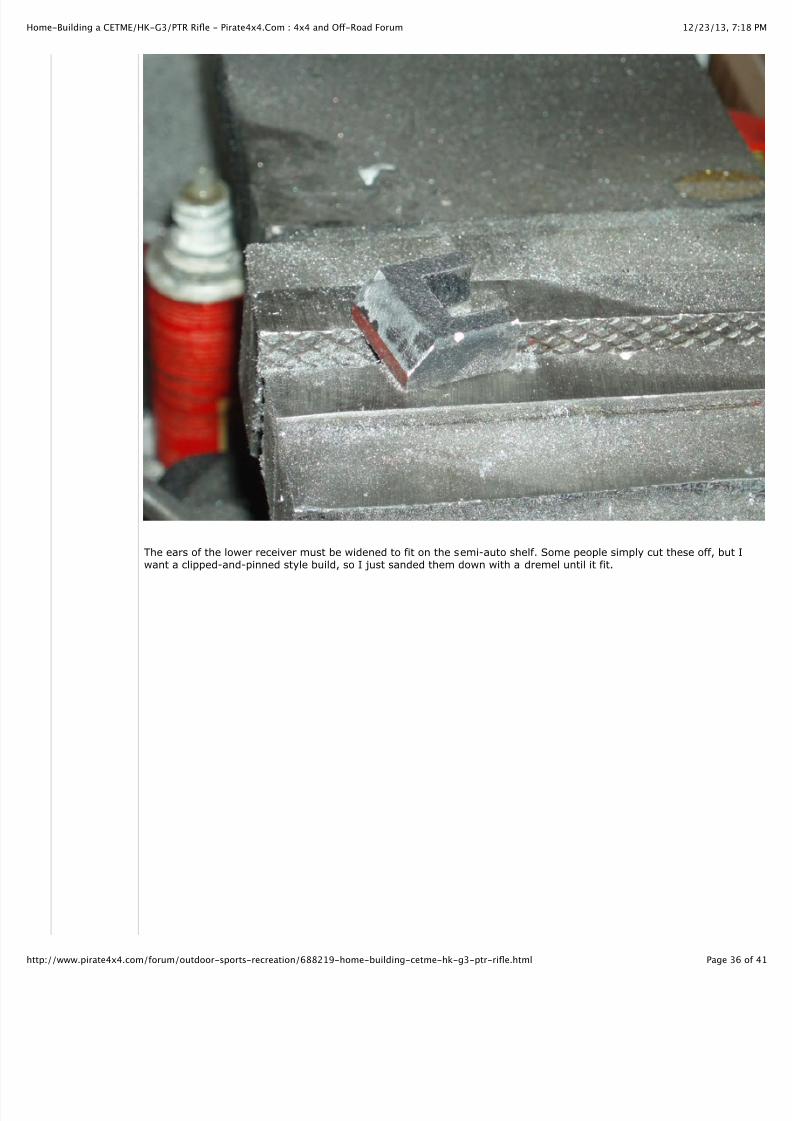
The ears of the lower receiver must be widened to fit on the semi-auto shelf. Some people simply cut these off, but Iwant a clipped-and-pinned style build, so I just sanded them down with a dremel until it fit.
7/24/2019 Step by Step Home-Building a HK-G 3battle rifle
http://slidepdf.com/reader/full/step-by-step-home-building-a-hk-g-3battle-rifle 37/41
12/23/13, 7:ome-Building a CETME/HK-G3/PTR Rifle - Pirate4x4.Com : 4x4 and O! -Road Forum
Page 37ttp://www.pirate4x4.com/forum/outdoor-sports-recreation/688219-home-building-cetme-hk-g3-ptr-rifle.html
__________________
Think you're a marksman? Test your skills by joining the 200yd Iron Sight Challenge happening NOW in the OSR Foru
http://www.pirate4x4.com/forum/outdo...-may-31-a.html
Last edited by animator; 09-14-2008 at 03:55 PM.
09-14-2008,
03:24 PM #25 (perm
animatorbig bird
Join Date: Sep2002Member # 13701Location:Plano/DallasPosts: 4,248
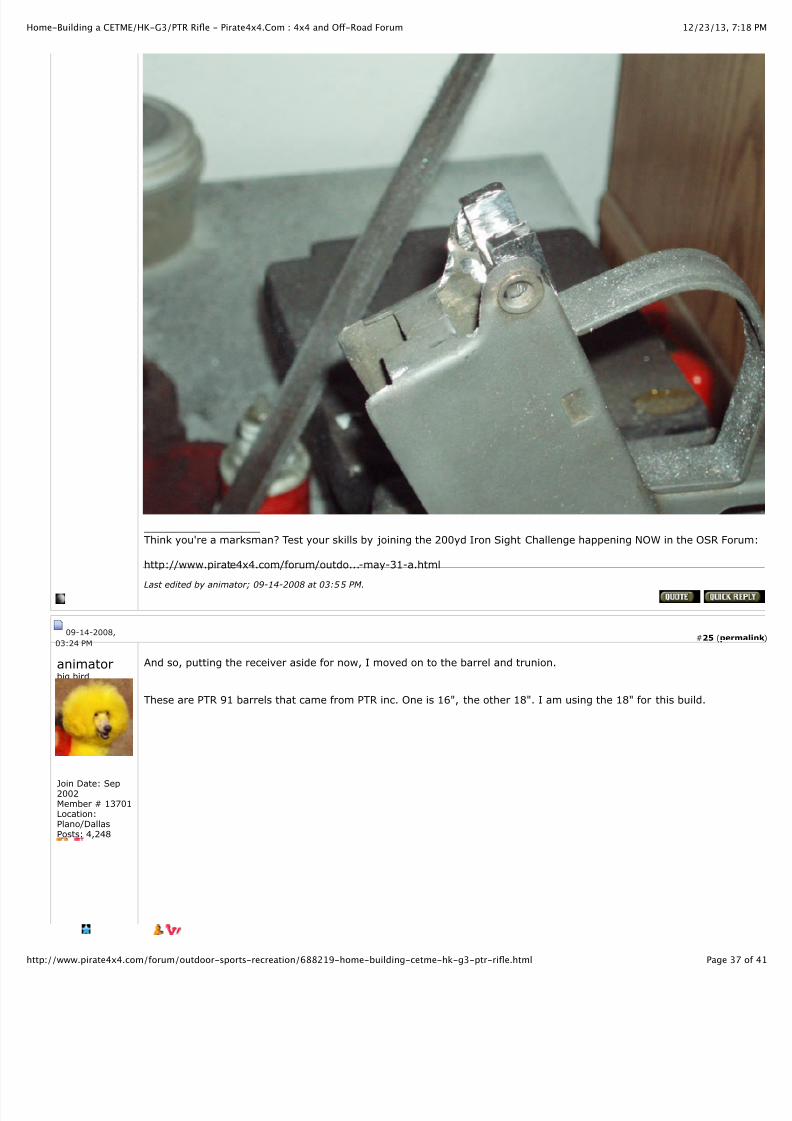
And so, putting the receiver aside for now, I moved on to the barrel and trunion.
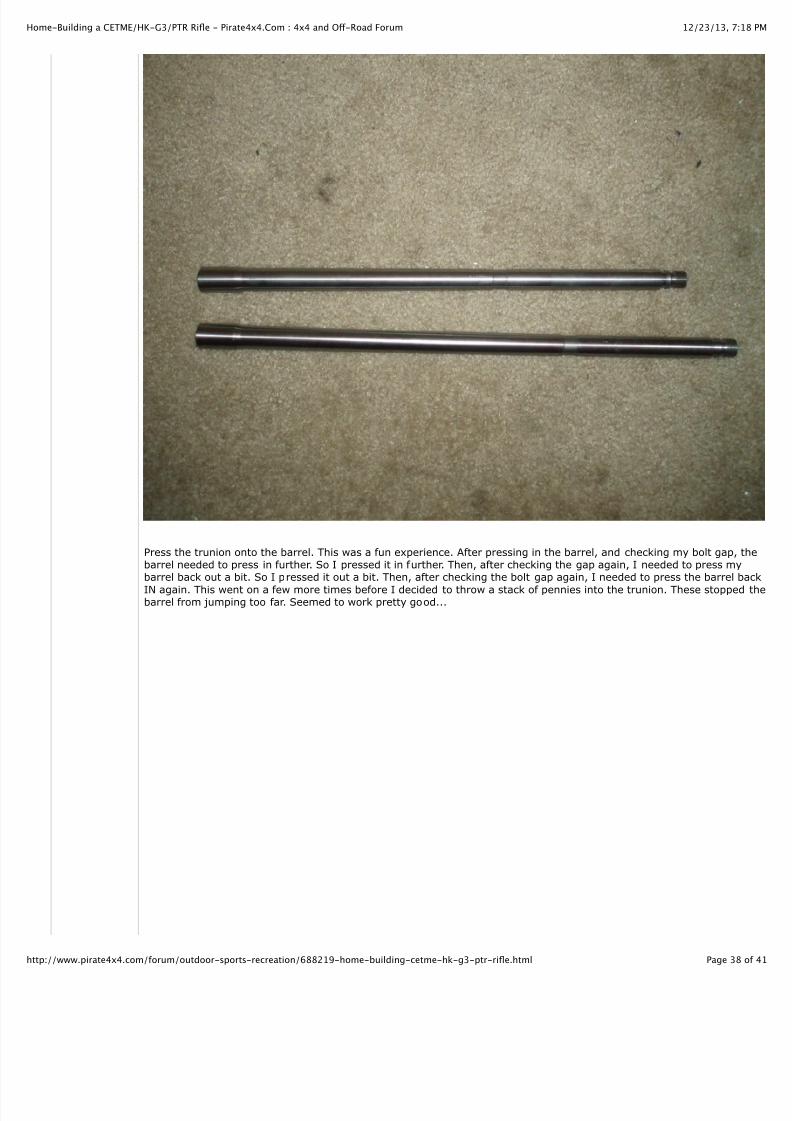
These are PTR 91 barrels that came from PTR inc. One is 16", the other 18". I am using the 18" for this build.
7/24/2019 Step by Step Home-Building a HK-G 3battle rifle
http://slidepdf.com/reader/full/step-by-step-home-building-a-hk-g-3battle-rifle 38/41
12/23/13, 7:ome-Building a CETME/HK-G3/PTR Rifle - Pirate4x4.Com : 4x4 and O! -Road Forum
Page 38ttp://www.pirate4x4.com/forum/outdoor-sports-recreation/688219-home-building-cetme-hk-g3-ptr-rifle.html
Press the trunion onto the barrel. This was a fun experience. After pressing in the barrel, and checking my bolt gap, tbarrel needed to press in further. So I pressed it in further. Then, after checking the gap again, I needed to press mybarrel back out a bit. So I pressed it out a bit. Then, after checking the bolt gap again, I needed to press the barrel b
IN again. This went on a few more times before I decided to throw a stack of pennies into the trunion. These stoppedbarrel from jumping too far. Seemed to work pretty good...
7/24/2019 Step by Step Home-Building a HK-G 3battle rifle
http://slidepdf.com/reader/full/step-by-step-home-building-a-hk-g-3battle-rifle 39/41
12/23/13, 7:ome-Building a CETME/HK-G3/PTR Rifle - Pirate4x4.Com : 4x4 and O! -Road Forum
Page 39ttp://www.pirate4x4.com/forum/outdoor-sports-recreation/688219-home-building-cetme-hk-g3-ptr-rifle.html
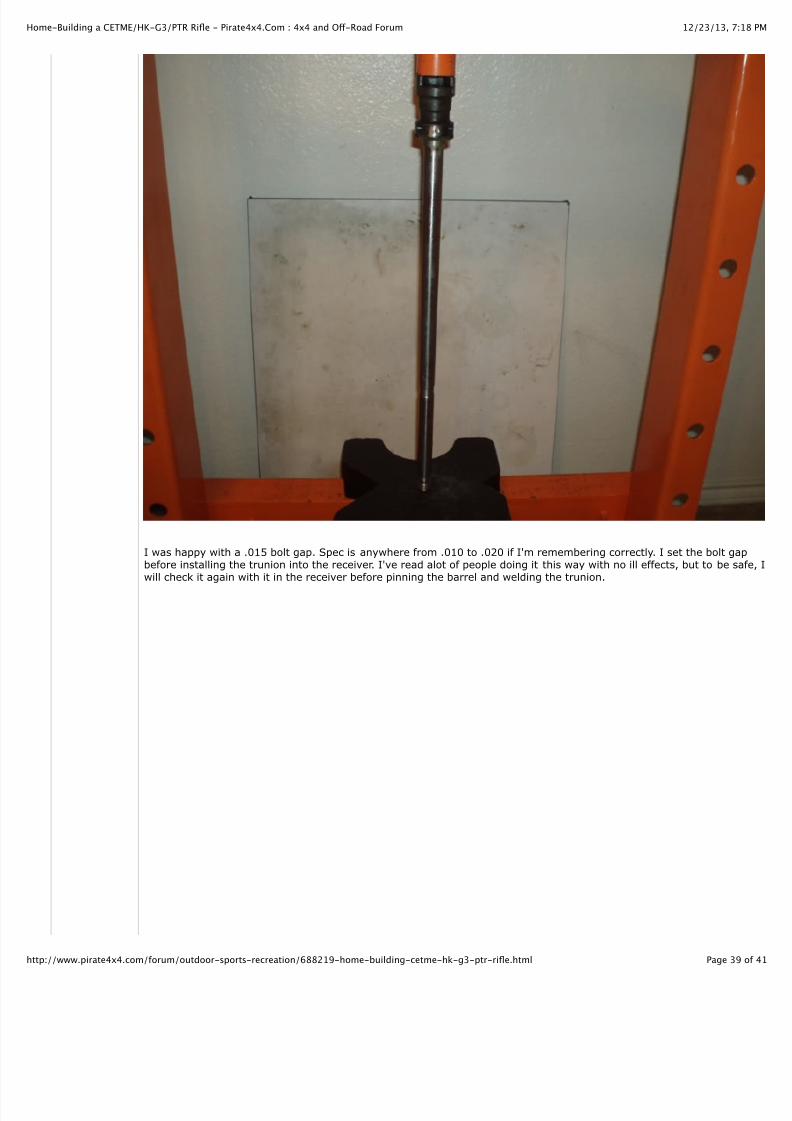
I was happy with a .015 bolt gap. Spec is anywhere from .010 to .020 if I'm remembering correctly. I set the bolt gapbefore installing the trunion into the receiver. I've read alot of people doing it this way with no ill effects, but to be sawill check it again with it in the receiver before pinning the barrel and welding the trunion.

7/24/2019 Step by Step Home-Building a HK-G 3battle rifle
http://slidepdf.com/reader/full/step-by-step-home-building-a-hk-g-3battle-rifle 40/41
12/23/13, 7:ome-Building a CETME/HK-G3/PTR Rifle - Pirate4x4.Com : 4x4 and O! -Road Forum
Page 40ttp://www.pirate4x4.com/forum/outdoor-sports-recreation/688219-home-building-cetme-hk-g3-ptr-rifle.html
__________________Think you're a marksman? Test your skills by joining the 200yd Iron Sight Challenge happening NOW in the OSR Foru
http://www.pirate4x4.com/forum/outdo...-may-31-a.html
Page 1 of 8 1 2 3 4 5 > Last »
Safari Power SaverClick to Start Flash Plug-in
Quick Reply
Message:
Please click one of the Quick Reply icons in the posts above to activate Quick Reply.
Options
Quote message in reply?

7/24/2019 Step by Step Home-Building a HK-G 3battle rifle
http://slidepdf.com/reader/full/step-by-step-home-building-a-hk-g-3battle-rifle 41/41
12/23/13, 7:ome-Building a CETME/HK-G3/PTR Rifle - Pirate4x4.Com : 4x4 and O! -Road Forum
Human Verification
In order to verify that you are a human and not a spam bot, please enter the answer into
the following box below based on the instructions contained in the graphic.
Your Answer
Post Quick Reply Go Advanced
« Previous Thread | Next Thread »
Posting Rules
You may post new threadsYou may post repliesYou may not post attachmentsYou may not edit your posts
BB code is OnSmilies are On[IMG] code is OnHTML code is Off Trackbacks are OnPingbacks are OnRefbacks are On
Forum Rules
All times are GMT -7. The time now is 08:17 PM.
Contact Us - Pirate4x4.Com - Archive - Privacy Statement - Top
Powered by vBulletin® Version 3.8.6Copyright ©2000 - 2013, Jelsoft Enterprises Ltd.
Search Engine Optimization by vBSEO 3.6.0 ©2011, Crawlability, Inc.
Enter the following:
Safari Power SaverClick to Start Flash Plug-in