steel pro™ & power steel™ frame pools owner’s manual
TRANSCRIPT

QUESTIONS? PROBLEMS?MISSING PARTS?
For FAQ, Manuals Or Spare Parts, Please Visit www.bestwaycorp.com
TO THE STORE
S-S-004365
STEEL PRO™ & POWER STEEL™ FRAME POOLSOWNER’S MANUALwww.bestwaycorp.comVisit Bestway YouTube channel

2
S-S-004365
Put 1” to 2” water in the pool to cover the floor. Once pool floor is slightly covered, gently smooth out all wrinkles. Start in the center of the pool and work your way clockwise to the outside.
WARNING
smooth out the bottom
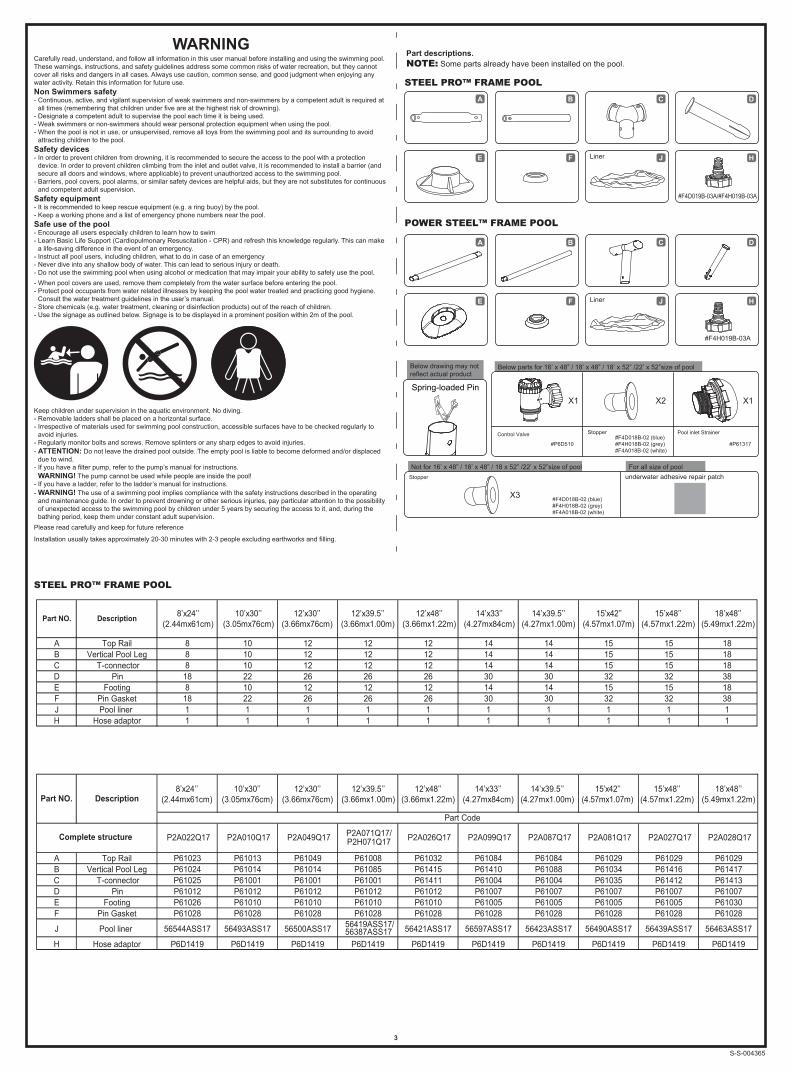
WARNINGCarefully read, understand, and follow all information in this user manual before installing and using the swimming pool. These warnings, instructions, and safety guidelines address some common risks of water recreation, but they cannot cover all risks and dangers in all cases. Always use caution, common sense, and good judgment when enjoying any water activity. Retain this information for future use.Non Swimmers safety- Continuous, active, and vigilant supervision of weak swimmers and non-swimmers by a competent adult is required at
all times (remembering that children under five are at the highest risk of drowning).- Designate a competent adult to supervise the pool each time it is being used. - Weak swimmers or non-swimmers should wear personal protection equipment when using the pool.- When the pool is not in use, or unsupervised, remove all toys from the swimming pool and its surrounding to avoid
attracting children to the pool.Safety devices - In order to prevent children from drowning, it is recommended to secure the access to the pool with a protection
device. In order to prevent children climbing from the inlet and outlet valve, it is recommended to install a barrier (and secure all doors and windows, where applicable) to prevent unauthorized access to the swimming pool.
- Barriers, pool covers, pool alarms, or similar safety devices are helpful aids, but they are not substitutes for continuous and competent adult supervision.
Safety equipment- It is recommended to keep rescue equipment (e.g. a ring buoy) by the pool.- Keep a working phone and a list of emergency phone numbers near the pool.Safe use of the pool- Encourage all users especially children to learn how to swim- Learn Basic Life Support (Cardiopulmonary Resuscitation - CPR) and refresh this knowledge regularly. This can make
a life-saving difference in the event of an emergency.- Instruct all pool users, including children, what to do in case of an emergency- Never dive into any shallow body of water. This can lead to serious injury or death.- Do not use the swimming pool when using alcohol or medication that may impair your ability to safely use the pool.- When pool covers are used, remove them completely from the water surface before entering the pool.- Protect pool occupants from water related illnesses by keeping the pool water treated and practicing good hygiene.
Consult the water treatment guidelines in the user’s manual.- Store chemicals (e.g. water treatment, cleaning or disinfection products) out of the reach of children.- Use the signage as outlined below. Signage is to be displayed in a prominent position within 2m of the pool.
Keep children under supervision in the aquatic environment. No diving.- Removable ladders shall be placed on a horizontal surface.- Irrespective of materials used for swimming pool construction, accessible surfaces have to be checked regularly to
avoid injuries.- Regularly monitor bolts and screws. Remove splinters or any sharp edges to avoid injuries.- ATTENTION: Do not leave the drained pool outside. The empty pool is liable to become deformed and/or displaced
due to wind. - If you have a filter pump, refer to the pump’s manual for instructions. WARNING! The pump cannot be used while people are inside the pool!- If you have a ladder, refer to the ladder’s manual for instructions.- WARNING! The use of a swimming pool implies compliance with the safety instructions described in the operating
and maintenance guide. In order to prevent drowning or other serious injuries, pay particular attention to the possibility of unexpected access to the swimming pool by children under 5 years by securing the access to it, and, during the bathing period, keep them under constant adult supervision.
Please read carefully and keep for future reference
Installation usually takes approximately 20-30 minutes with 2-3 people excluding earthworks and filling.
S-S-004365
Part descriptions.NOTE: Some parts already have been installed on the pool.
POWER STEEL™ FRAME POOL
E F J H
A B C D
Liner
Below parts for 16’ x 48” / 18’ x 48” / 18’ x 52” /22’ x 52”size of pool
Stopper#F4D018B-02 (blue)#F4H018B-02 (grey)#F4A018B-02 (white)
X1X2X1
#P6D510
Control Valve Pool inlet Strainer
#P61317
Not for 16’ x 48” / 18’ x 48” / 18 x 52” /22’ x 52”size of pool For all size of pool
#F4D018B-02 (blue)#F4H018B-02 (grey)#F4A018B-02 (white)
X3
Stopper underwater adhesive repair patch
STEEL PRO™ FRAME POOL
E F J H
A B C D
Liner
#F4D019B-03A/#F4H019B-03A
#F4H019B-03A
Below drawing may not reflect actual product
KSpring-loaded Pin
A Top Rail 8 10 12 12 12 14 14B Vertical Pool Leg 8 10 12 12 12 14 14C T-connector 8 10 12 12 12 14 14D Pin 18 22 26 26 26 30 30E Footing 8 10 12 12 12 14 14F Pin Gasket 18 22 26 26 26 30 30J Pool liner 1 1 1 1 1 1 1H Hose adaptor 1 1 1 1 1 1 1
P2A022Q17 P2A010Q17 P2A049Q17 P2A071Q17/P2H071Q17 P2A026Q17 P2A099Q17 P2A087Q17
A Top Rail P61023 P61013 P61049 P61008 P61032 P61084 P61084B Vertical Pool Leg P61024 P61014 P61014 P61085 P61415 P61410 P61088C T-connector P61025 P61001 P61001 P61001 P61411 P61004 P61004D Pin P61012 P61012 P61012 P61012 P61012 P61007 P61007E Footing P61026 P61010 P61010 P61010 P61010 P61005 P61005F Pin Gasket P61028 P61028 P61028 P61028 P61028 P61028 P61028
J Pool liner 56544ASS17 56493ASS17 56500ASS17 56419ASS17/56387ASS17 56421ASS17 56597ASS17 56423ASS17
H Hose adaptor P6D1419 P6D1419 P6D1419 P6D1419 P6D1419 P6D1419 P6D1419
12’x39.5’’(3.66mx1.00m)
12’x48’’(3.66mx1.22m)
14’x33’’(4.27mx84cm)
14’x39.5’’(4.27mx1.00m)
Part NO. Description
Part NO. Description 8’x24’’(2.44mx61cm)
10’x30’’(3.05mx76cm)
12’x30’’(3.66mx76cm)
Part Code
Complete structure
15 15 1815 15 1815 15 1832 32 3815 15 1832 32 381 1 11 1 1
18’x48’’(5.49mx1.22m)
15’x42’’(4.57mx1.07m)
15’x48’’(4.57mx1.22m)
3
12’x39.5’’(3.66mx1.00m)
12’x48’’(3.66mx1.22m)
14’x33’’(4.27mx84cm)
P2A081Q17 P2A027Q17 P2A028Q17
P61029 P61029 P61029P61034 P61416 P61417P61035 P61412 P61413P61007 P61007 P61007P61005 P61005 P61030P61028 P61028 P61028
56490ASS17 56439ASS17 56463ASS17
P6D1419 P6D1419 P6D1419
18’x48’’(5.49mx1.22m)
15’x42’’(4.57mx1.07m)
15’x48’’(4.57mx1.22m)
14’x39.5’’(4.27mx1.00m)
8’x24’’(2.44mx61cm)
10’x30’’(3.05mx76cm)
12’x30’’(3.66mx76cm)
STEEL PRO™ FRAME POOL

CHOOSE THE CORRECT LOCATIONNOTE: The pool must be set up on a completely flat and level surface. Please do not install the pool if the surface is inclined or sloped.Correct conditions to set up the pool:• The selected location has to be capable of uniformly supporting the weight for the entire time the pool is installed, moreover the location must be flat and must be cleared of all objects and debris including stones and twigs.• We recommend positioning the pool away from any objects children could use to climb into the pool. NOTE: Position the pool near an adequate drainage system to deal with overflow or to discharge the pool. Incorrect conditions to set up the pool:• On uneven ground the pool may collapse causing serious personal injury and/or damage to personal property and will
void the warranty and prevent any service claims.• Sand should not be used to create a level base; the ground must be dug out if necessary.• Directly under overhead power lines or trees. Be sure the location does not contain underground utility pipes, lines or
cables of any kind.• Do not set up the pool on driveways, decks, platforms, gravel or asphalt surfaces. The selected location should be firm
enough to withstand the pressure of the water; Mud, sand, soft / loose soil or tar are not suitable.• Grass or other vegetation under the pool will die and may cause odors and slime to develop, therefore we recommend
removing all grass from the selected pool location.• Avoid areas prone to aggressive plant and weed species that may grow through the ground cloth or liner. NOTE: Check with your local city council for by-laws relating to fencing, barriers, lighting and safety requirements and
ensure you comply with all laws. NOTE: If have a filter pump, refer to the pump’s manual for instructions. NOTE: The ladder must match the pool size and should to be used only for entering and exiting the pool. It is forbidden
to exceed the permitted payload of the ladder. Check regularly if the ladder is properly assembled.
InstallationBestway Inflatables will not be responsible for damage caused to the pool due to mishandling or failure to follow these instructions. 1. Lay out all parts and check that you have the correct quantities as listed in the components list. If you are missing
any part do not assemble the pool, contact Bestway Customers Service. 2. Spread out the pool and make sure the pool is right side up, let it sit exposed to direct sunlight for 1 hour or more so
that the pool is more flexible during set up. 3. Place the pool near an adequate drainage system to deal with overflow water and ensure the pool’s inlet A and outlet
B are correctly positioned to allow your filter pump to connect to a power source. Note: Do not use extension power cords to power your pump. ATTENTION: Do not drag the pool on the ground, this can
damage the pool. 4. Insert the stopper plugs into inlet A and outlet B on the wall from the inside of the pool.(See Fig.1) NOTE: For pool with connection valve, please refer to the connection valve installation on following page. 5. Insert top rail (A) into the pole pockets at the top of the pool. (See Fig.2) 6. Connect top rail (A) with T-Connector (C) at each of corner and insert pins (D) into gasket (F) first and then into
pre-drilled holes of the frame. NOTE: The gasket cups should face downwards to prevent water leaking into the top rails. (See Fig.3,4,5) 7. Repeat steps 5 and 6 until all top rails (A) are connected with T-Connectors (C) and the top frame is set up. For ease
of assembly slightly raise the last 2 rails to an inverted v shape and insert into the last T-Connectors(C). Slowly lower until fully connected taking care not to pinch your fingers. (See Fig.6)
8. Attach all footings (E) to the bottom of the vertical pool legs (B). (See Fig.7) 9. Put all vertical pool legs (B) inside the pool wall band. Connect vertical pool leg (B) into the bottom of the
T-Connector (C) . Make sure the vertical pool leg (B) has the spring loaded pins at the top when connecting the T-Connector (C). (See Fig.8)
NOTE: For 2.44m x 61cm (8’ x 24”) pools, no wall band. 10. Pull the frame from different directions to ensure all rails, pool legs and connectors are firmly jointed. (See Fig.9)11. Ensure drain valve is firmly closed. Smooth out the bottom.12. Put 1” to 2” (2.5cm to 5cm) water in the pool to cover the floor. Once pool floor is slightly covered, gently smooth out
all wrinkles. Start in the center of the pool and work your way clockwise to the outside.
Fig. 1 Fig. 2 Fig. 3
Fig. 6Fig. 5Fig. 4
Fig. 7 Fig. 8 Fig. 9ATTENTION: Do not use pump when pool is in use.During the season of use of the swimming pool, the filtration system must be necessarily put into service every day, enough for a long time to assure at least a complete renewal of the volume of water.
RepairCheck pool for any leaks from valves or seams, check the ground cloth for any evident water loss. Do not add chemicals until this has been done.NOTE: In the event of a leak, patch your pool using the underwater adhesive repair patch provided. Refer to the FAQs for further information.
Filling Pool with WaterATTENTION: Do not leave pool unattended while filling with water1. Fill pool until water capacity is 90%, DO NOT OVERFILL as this could cause the pool to collapse. In times of heavy
rainfall you may need to empty some of the water to ensure the level is correct. (See Fig. 11.12)2. When filling the pool is completed, check that the water is not collecting on any side to ensure the pool is level. IMPORTANT: If pool is not level, drain water and re-level ground by digging out (See Fig. 13). Never attempt to move
the pool with water in it, serious personal injury or damage to the pool may result. WARNING: Your pool may contain a great deal of pressure. If your pool has any
bulge or uneven side then the pool is not level, the sides may burst and the water may discharge suddenly causing serious personal injury and/or damage to property.
3. Check pool for any leaks at valves or seams, check ground cloth for any evident water loss. Do not add chemicals until this has been done.NOTE: In the event of a leak, patch your pool using the underwater adhesive repair patch provided. Refer to the FAQ’s for further information.
TEST
pH value
Cyanuric acid
Free chlorine
Chlorine compound
Algae
Calcium hardness
IDEAL VALUES
7.4– 7.6
30 – 50 ppm
2 – 4 ppm
0
None visible
200 – 400 ppm
Pool MaintenanceIf you do not adhere to the maintenance guidelines below, your health might be at risk, especially that of your children.IMPORTANT: If you don’t respect the ideal values of the water chemicals the PVC can be damaged and become discolor.
The following table lists the sequence of the tests that should be carried out for the ideal values and possible actions. Regularly check the pH value and chlorine concentration weekly and adjust to the ideal values.
To keep your pool clean:1. Contact your local pool supply shop for advice and purchase of chemicals and pH kits. One of the most important factors to increase the life of the liner is to keep continously clean and healthy water. Please strictly follow the instructions from professional technicians for the water treatment through the use of chemicals.2. Locate a bucket of water next to pool to clean users’ feet before entering pool.3. Cover the pool when not in use.4. Skim pool regularly to avoid settled dirt.5. Check and wash the filter cartridge regularly.6. Gently clean any scum from below the top ring with a clean cloth.7. Please be careful in case of rain water, kindly check that the water level is not higher than the expected. If so, YOU HAVE TO DISCHARGE THE EXCESS WATER.
Proper maintenance can maximize the life of your pool.
During the season of use of the swimming pool, the filtration system must be necessarily put into service every day, enough time to assure at least a complete renewal of the volume of water.
Fig. 12
Proper Water Level
Fig. 11
Fig. 13
0°
NOTE: Drawings for illustration purpose only. May not reflect actual product. Not to scale.
4
S-S-004365
Connection Valve AssemblyFor pool with connection valve, (See Fig.10)
Fig. 10
AB
POWER STEEL™ FRAME POOL
A Top Rail 14 16 18 22B Vertical Pool Leg 14 16 18 22C T-connector 14 16 18 22D pin 30 34 38 46E Footing 14 16 18 22F Pin Gasket 30 34 38 46J Pool liner 1 1 1 1H Hose adaptor 1 1 1 1
P2136 P2117Q17 P2121 P2124Q17A Top Rail P61335 P61614 P61345 P61345B Vertical Pool Leg P61336 P61346 P61352 P61352C T-connector P61337 P61347 P61353 P61615D pin P61007 P61349 P61349 P61349E Footing P61338 P61348 P61348 P61348F Pin Gasket P61339 P61339 P61339 P61339
J Pool liner 56643ASS17/ 56649ASS17 56453ASS17 56459ASS17 56392ASS17
H Hose adaptor P6H1419 P6H1419 P6H1419 P6H1419
Part CodeComplete structure
Part NO. Description
16’x48’’ 18’x52’’ 22’x52’’14’x42’’(4.27mx1.07m) (4.88mx1.22m) (5.49mx1.32m) (6.71mx1.32m)
16’x48’’ 18’x52’’ 22’x52’’14’x42’’(4.27mx1.07m) (4.88mx1.22m) (5.49mx1.32m) (6.71mx1.32m)
DescriptionPart NO.

Dismantling1. Unscrew the drain valve cap on the outside of the pool counter clockwise and remove.2. Connect the adaptor to the hose and put the other end of the hose in the area where you are going to drain your pool. (Check local regulations for drainage by-laws).3. Screw control ring of the hose adaptor clockwise onto the drain valve. The drain valve will be open and water will start to drain automatically. ATTENTION: Water flow can be controlled with the control ring.4. When draining is finished, unscrew the control ring to close the valve.5. Disconnect the hose.6. Screw the cap back onto the drain valve.7. Air dry pool.ATTENTION: Do not leave the drained pool outside.
Storage and Winterization1. Please remove all the accessories and spare parts of the pool and store them clean and dry.2. Once pool is completely dry, sprinkle with talcum powder to prevent pool from sticking together, fold pool carefully. If pool is not completely dry, mold may result and will damage the pool liner.3. Store liner and accessories in a dry place with a moderate temperature between 5ºC / 41ºF and 38ºC / 100ºF.4. During the rainy season, pool and accessories should be stored as per above instructions also.5. Improper draining of the pool might cause serious personal injury and/or damage to personal property.6. We strongly recommend the pool is disassembled during the off season (winter months). Store in a dry location out of children’s reach.
11. Do you recommend the use of a filter pump with a Bestway pool? Absolutely! We strongly recommend you use a filter pump which will maintain the cleanliness of the water.
12. Which are the most important functions of my filter pump? The most important function of a filter pump is the elimination of every sort of impurity from the water with the aid of a filter cartridge and chemical products for its sterilization.
Frequently Asked Questions
1. What is a suitable base for the Frame Set pool? Almost any completely flat, solid, level surface can be used. Do not use sand as a leveling material as it is prone to shifting under the pool. The ground should be dug out until it is perfectly level. Do not set up on driveways, decks, platforms, gravel or asphalt. The ground should be firm enough to withstand the weight and pressure of the water: mud, sand, soft / loose soil or tar are not suitable. A concrete base can be used but care should be taken not to drag the pool across the surface as abrasions could tear the liner. If the pool is to be set up on a lawn, it is recommended that the grass is removed from where the pool will sit as it will die and may cause odors / slime. Certain types of hardy grass can grow through the liner as can aggressive bushes / plants by the side of the pool. Ensure adjacent vegetation is cut back where necessary. Use of a ground cloth assists in protecting the base of the pool.
2. How will I know if my pool is set up on unleveled ground? If your pool appears to be bulging on one side it is not set up on level ground. It is important that you empty your pool and move the pool to a level site. If the pool is not on level ground it will place undue stress on the seams and could result in the seams bursting which will cause flooding, property damage and potentially personal injury or death. Fill your pool following the instructions in the owner’s manual carefully. This will ensure that you do not waste water and the pool can be moved easily so that the ground can be leveled at an appropriate time and not after you have completely filled it with water.
3. Can I have my pool filled by a water service? We recommend using a garden hose under low pressure for filling your pool. If it is necessary to use a water delivery service, it is best to fill the pool with one inch of water by hose and smooth wrinkles first. Use a water service that is able to regulate the flow of water to prevent damage. Ensure you stop at each step as noted in the instruction manual to ensure your pool is level. Bestway will not be held responsible for pools damaged or weakened by water delivery services.
4. What is the maximum fill height of the pool? Fill pool until water capacity is 90% up to the bottom of the top rail of the pool. Never attempt to fill your pool beyond the base of the rail. We recommend leaving extra room to account for water displacement when occupants are inside the pool. You may have to top up the water during the season which has been lost through evaporation or normal use.
5. My pool is leaking, what do I do to fix it? The pool does not need to be emptied to fix any holes. Self-adhesive underwater repair patches can be purchased at your local pool / hardware store. For external use, use the repair patch provided. For internal holes, clean the hole on the inside of the pool to wipe off any oils and algae. Cut a circle large enough to cover the hole and apply the patch securely onto the side in the water. Cut a second patch and apply to the outside of the pool for extra strength. If the hole is in the base of the pool use one patch only and weigh it down with a heavy object while it bonds. If you have patched the pool when it is empty we recommend you leave it at least 12 hours before filling.
6. Where can I buy filter cartridges and how often should I change them? Filter cartridges to fit your filter pump should be available from the store where you purchased your pool. If not, most mass retailers sell filter cartridges as an accessory. If you are unable to obtain replacements please call our toll-free number and we will assist you in finding a source local to you. The cartridges should be changed every 2 weeks dependent upon use of the pool. Check the filter on a weekly basis and clean by hosing down any debris and particles. Note: Ensure your pump is disconnected from the electrical supply before checking the filter cartridge.You can also visit our website www.bestwaycorp.com for cartridge purchase.
7. How many times a year should I change the water? This is dependant on the amount of use the pool receives, and the attention paid to covering the pool and keeping chemicals properly balanced. If maintained correctly the water should last a full summer season. Please contact your local pool chemical supplier for detailed information regarding chemicals, they will be able to advise you how to best maintain the cleanliness of your water.
8. Do I need to take my pool down for the winter? Yes, Above-ground pools may collapse under the weight of ice and snow and the PVC walls will be damaged. We recommend taking the pool down when temperatures fall below 8ºC / 45ºF. The pool should be stored indoors in a moderate temperature between 5ºC / 41ºF and 38ºC / 100ºF. Please store away from chemicals and rodents and out of the reach of children.
9. My pool is fading – why is that? Excessive use of chemicals can cause the color of the inside of the liner to fade; this is similar to a swimsuit fading over time from repeated contact with chlorinated water.
10. How many years will the pool last? There is no set time limit for the pool to last; following the instructions in the owner’s manual and with proper care, maintenance and storage you can considerably increase the life of your pool. Improper set-up, use or care can result in failure of the pool.
5
S-S-004365
6
S-S-004365
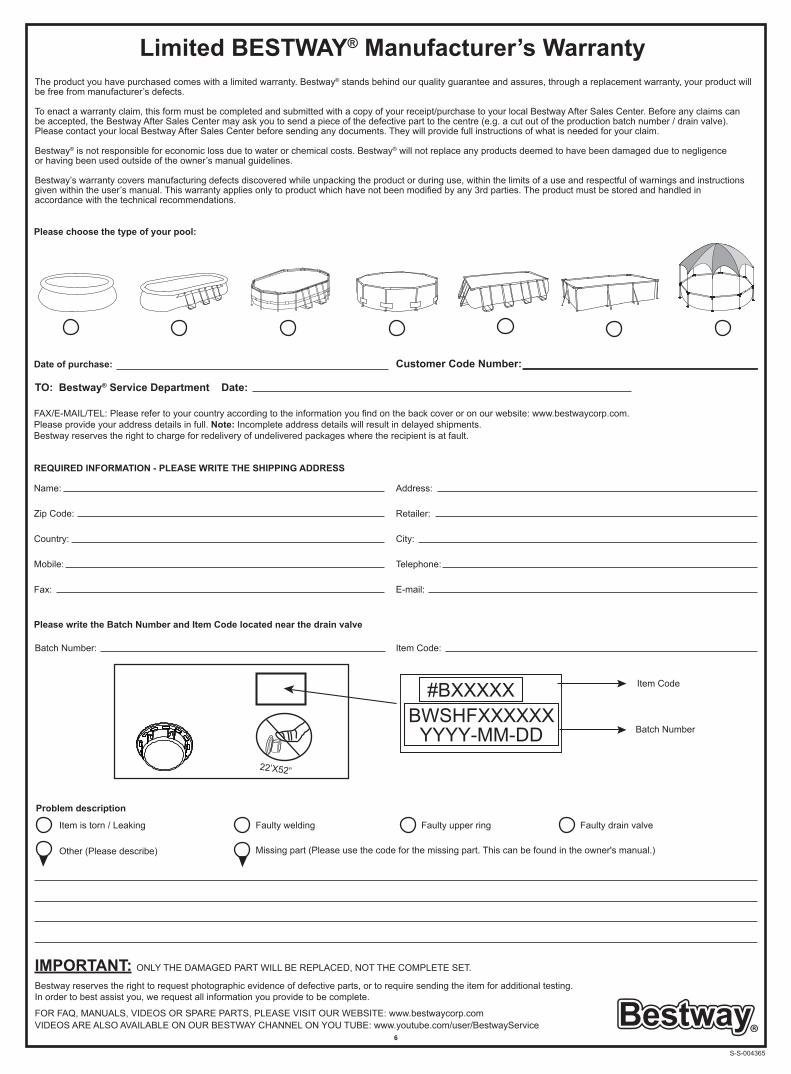
Please choose the type of your pool:
REQUIRED INFORMATION - PLEASE WRITE THE SHIPPING ADDRESS
Please write the Batch Number and Item Code located near the drain valve
Name: Address:
Zip Code: Retailer:
Country: City:
Mobile: Telephone:
E-mail:
Item Code:Batch Number:
TO: Bestway® Service Department Date:
Date of purchase: Customer Code Number:
Limited BESTWAY® Manufacturer’s Warranty The product you have purchased comes with a limited warranty. Bestway® stands behind our quality guarantee and assures, through a replacement warranty, your product willbe free from manufacturer’s defects.
To enact a warranty claim, this form must be completed and submitted with a copy of your receipt/purchase to your local Bestway After Sales Center. Before any claims canbe accepted, the Bestway After Sales Center may ask you to send a piece of the defective part to the centre (e.g. a cut out of the production batch number / drain valve).Please contact your local Bestway After Sales Center before sending any documents. They will provide full instructions of what is needed for your claim.
Bestway® is not responsible for economic loss due to water or chemical costs. Bestway® will not replace any products deemed to have been damaged due to negligenceor having been used outside of the owner’s manual guidelines.
Bestway’s warranty covers manufacturing defects discovered while unpacking the product or during use, within the limits of a use and respectful of warnings and instructionsgiven within the user’s manual. This warranty applies only to product which have not been modified by any 3rd parties. The product must be stored and handled inaccordance with the technical recommendations.
FAX/E-MAIL/TEL: Please refer to your country according to the information you find on the back cover or on our website: www.bestwaycorp.com.Please provide your address details in full. Note: Incomplete address details will result in delayed shipments.Bestway reserves the right to charge for redelivery of undelivered packages where the recipient is at fault.
Fax:
Problem description
Item is torn / Leaking
Missing part (Please use the code for the missing part. This can be found in the owner's manual.)Other (Please describe)
Faulty welding Faulty upper ring Faulty drain valve
Bestway reserves the right to request photographic evidence of defective parts, or to require sending the item for additional testing.In order to best assist you, we request all information you provide to be complete.
FOR FAQ, MANUALS, VIDEOS OR SPARE PARTS, PLEASE VISIT OUR WEBSITE: www.bestwaycorp.comVIDEOS ARE ALSO AVAILABLE ON OUR BESTWAY CHANNEL ON YOU TUBE: www.youtube.com/user/BestwayService
IMPORTANT: ONLY THE DAMAGED PART WILL BE REPLACED, NOT THE COMPLETE SET.
22’X52”
#BXXXXXBWSHFXXXXXX
YYYY-MM-DD Batch Number
Item Code