start here plug in and turn on
TRANSCRIPT
2 PlugInandTurnOn 1 Connectthepoweradaptertothebackof PictureMate.
2 Connectthepowercabletothepoweradapter.
3 Plugtheotherendofthepowercableintoapoweroutlet.
4 Flipthehandletotheback.
5 Openthepapersupport.
6 PresstheOnbuttontoturnonPictureMate.
Afteramoment,youseethisonthephotoviewerscreen:
Nowyoucaninstallyourinitialphotocartridge.
3 InstalltheInitialPhotoCartridge
1 TurnPictureMatearoundandopenthecartridgedoor.
2 SlidethecartridgeleverlefttotheReleaseposition.
3 Removetheinitialphotocartridgefromitspackage.
Caution:DonotinstalladifferentPictureMatecartridgeforinitialsetup.InstallonlytheinitialphotocartridgethatcamewithyourPictureMate.
4 Slidethecartridgestraightintotheslot,labelsideup,untilitclicksintoplace.Itwillnotgoinalltheway.
5 Slidetheleverallthewayright,totheLockposition.
6 Closethecartridgedoor.
PictureMatechargestheprintheadfor3to4minutesanddisplaysthescreenabove.
7 WhenyouseetheChargingcompletemessageonthephotoviewerscreen,pressOK.
Turnover*411058000**411058000*
Start Here
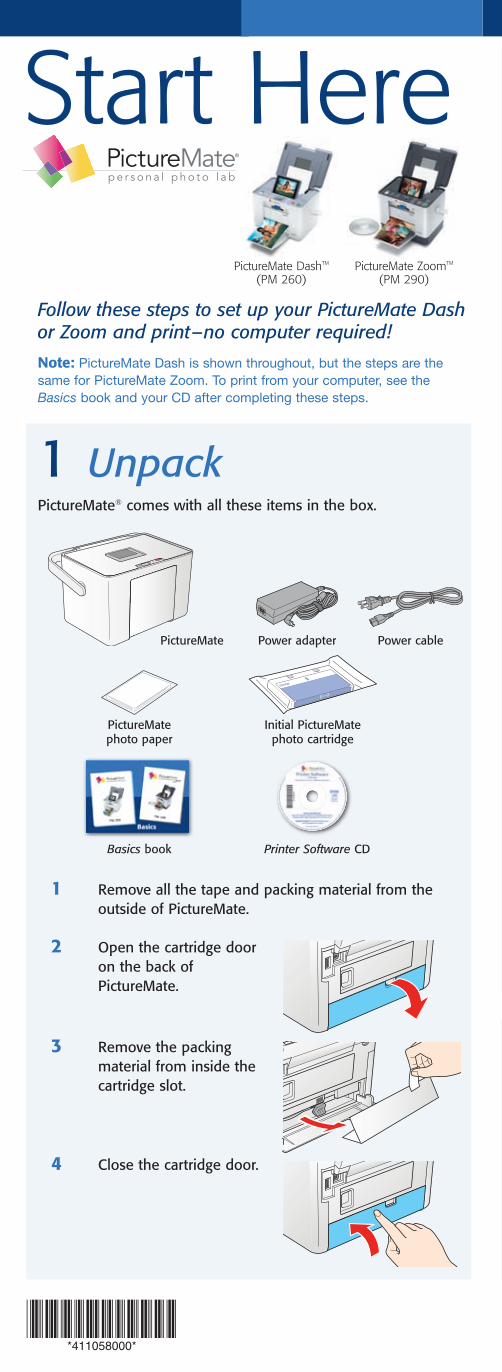
FollowthesestepstosetupyourPictureMateDashorZoomandprint–nocomputerrequired!
Note:PictureMateDashisshownthroughout,butthestepsarethesameforPictureMateZoom.Toprintfromyourcomputer,seetheBasicsbookandyourCDaftercompletingthesesteps.
1 UnpackPictureMate®comeswithalltheseitemsinthebox.
1 RemoveallthetapeandpackingmaterialfromtheoutsideofPictureMate.
2 OpenthecartridgedooronthebackofPictureMate.
3 Removethepackingmaterialfrominsidethecartridgeslot.
4 Closethecartridgedoor.
PictureMate
InitialPictureMatephotocartridge
PictureMatephotopaper
Basicsbook PrinterSoftwareCD
Poweradapter Powercable
Presshere
PictureMate ZoomTM
(PM 290)
I/Onbutton
®
PictureMate DashTM
(PM 260)

2 PlugInandTurnOn 1 Connectthepoweradaptertothebackof PictureMate.
2 Connectthepowercabletothepoweradapter.
3 Plugtheotherendofthepowercableintoapoweroutlet.
4 Flipthehandletotheback.
5 Openthepapersupport.
6 PresstheOnbuttontoturnonPictureMate.
Afteramoment,youseethisonthephotoviewerscreen:
Nowyoucaninstallyourinitialphotocartridge.
3 InstalltheInitialPhotoCartridge
1 TurnPictureMatearoundandopenthecartridgedoor.
2 SlidethecartridgeleverlefttotheReleaseposition.
3 Removetheinitialphotocartridgefromitspackage.
Caution:DonotinstalladifferentPictureMatecartridgeforinitialsetup.InstallonlytheinitialphotocartridgethatcamewithyourPictureMate.
4 Slidethecartridgestraightintotheslot,labelsideup,untilitclicksintoplace.Itwillnotgoinalltheway.
5 Slidetheleverallthewayright,totheLockposition.
6 Closethecartridgedoor.
PictureMatechargestheprintheadfor3to4minutesanddisplaysthescreenabove.
7 WhenyouseetheChargingcompletemessageonthephotoviewerscreen,pressOK.
Turnover*411058000**411058000*
Start Here
FollowthesestepstosetupyourPictureMateDashorZoomandprint–nocomputerrequired!
Note:PictureMateDashisshownthroughout,butthestepsarethesameforPictureMateZoom.Toprintfromyourcomputer,seetheBasicsbookandyourCDaftercompletingthesesteps.
1 UnpackPictureMate®comeswithalltheseitemsinthebox.
1 RemoveallthetapeandpackingmaterialfromtheoutsideofPictureMate.
2 OpenthecartridgedooronthebackofPictureMate.
3 Removethepackingmaterialfrominsidethecartridgeslot.
4 Closethecartridgedoor.
PictureMate
InitialPictureMatephotocartridge
PictureMatephotopaper
Basicsbook PrinterSoftwareCD
Poweradapter Powercable
Presshere
PictureMate ZoomTM
(PM 290)
I/Onbutton
®
PictureMate DashTM
(PM 260)

2 PlugInandTurnOn 1 Connectthepoweradaptertothebackof PictureMate.
2 Connectthepowercabletothepoweradapter.
3 Plugtheotherendofthepowercableintoapoweroutlet.
4 Flipthehandletotheback.
5 Openthepapersupport.
6 PresstheOnbuttontoturnonPictureMate.
Afteramoment,youseethisonthephotoviewerscreen:
Nowyoucaninstallyourinitialphotocartridge.
3 InstalltheInitialPhotoCartridge
1 TurnPictureMatearoundandopenthecartridgedoor.
2 SlidethecartridgeleverlefttotheReleaseposition.
3 Removetheinitialphotocartridgefromitspackage.
Caution:DonotinstalladifferentPictureMatecartridgeforinitialsetup.InstallonlytheinitialphotocartridgethatcamewithyourPictureMate.
4 Slidethecartridgestraightintotheslot,labelsideup,untilitclicksintoplace.Itwillnotgoinalltheway.
5 Slidetheleverallthewayright,totheLockposition.
6 Closethecartridgedoor.
PictureMatechargestheprintheadfor3to4minutesanddisplaysthescreenabove.
7 WhenyouseetheChargingcompletemessageonthephotoviewerscreen,pressOK.
*411058000**411058000*
Start Here
FollowthesestepstosetupyourPictureMateDashorZoomandprint–nocomputerrequired!
Note:PictureMateDashisshownthroughout,butthestepsarethesameforPictureMateZoom.Toprintfromyourcomputer,seetheBasicsbookandyourCDaftercompletingthesesteps.
1 UnpackPictureMate®comeswithalltheseitemsinthebox.
1 RemoveallthetapeandpackingmaterialfromtheoutsideofPictureMate.
2 OpenthecartridgedooronthebackofPictureMate.
3 Removethepackingmaterialfrominsidethecartridgeslot.
4 Closethecartridgedoor.
PictureMate
InitialPictureMatephotocartridge
PictureMatephotopaper
Basicsbook PrinterSoftwareCD
Poweradapter Powercable
Presshere
PictureMate ZoomTM
(PM 290)
I/Onbutton
®
PictureMate DashTM
(PM 260)

SelectaLayout
1 Pressthe Menubutton.
2 PresstoselectPrintSettings,thenpressOK.
3 PressOKtoselectLayout.
4 Pressortoselectthelayoutyouwant,thenpressOK.
CropYourPhotos
Youcanpressthe Zoombuttontoenlargeyourimageupto5times.
Youcanselecttheareayouwanttoprint,andPictureMatewillcropouttherest.Thisdoesnotchangeyouroriginalimage.
MoreonPictureMateCheckyourprintedmanual
SeetheBasicsbookforinstructionsonprintingfromPictureMate,yourcomputer,andotherdevices.AlsolearnhowtosavephotostoorprintphotosfromaCD,replaceyourPrintPack(photopaperandphotocartridge),takecareofPictureMate,andsolveproblems.
Checkyouron-screenmanual
AfteryouinstallyourPictureMatesoftwarefromtheCD,you’llseeaniconforyourPictureMateUser’sGuideonyourcomputerscreen.Double-clickthaticonforcomprehensiveinstructionsonusingPictureMateanditssoftware.
Note:ForinformationonpossiblesoftwareupdatesforPictureMate,gotoepson.com/support,selectPrinters,andselectyourproductunderPersonal Photo Lab.ThencheckforupdatedsoftwareintheDrivers & Downloadssection.
Caution:ToavoiddamagingyourPictureMate,keepitoutofthesunanddon’tleaveitinyourcarorotherlocationwhereitcangettoohotortoocold.
4 LoadPaperPictureMatecomeswithgenuineEpson®glossyphotopapermadeespeciallyforprintinglabqualityphotos.
Caution:Don’tloadorprintonplainpaper;thismaydamagePictureMate.
1 Movethehandletothebackandopenthepapersupport,ifnecessary.
2 Pressthecorneroftheoutputtraytoopenit.
3 Slidetheedgeguidesoutward.
4 Loadupto20sheetsatatime.Fanthesheetstoslightlyseparatethem.
5 Placeyourpaperintotheslotbetweentheedgeguideswiththeglossysideup.Slidetheedgeguidesinwardslightly.
6 Raisethephotoviewerscreen.
Note:Keepunusedpaperintheoriginalpackageandstoreitflattopreventcurling.
5 InsertaMemoryCard
1 Removethememorycardcontainingphotosfrom yourdigitalcamera.
2 InsertyourmemorycardintothecorrectslotonPictureMate.
3 Pushthecardinuntilitstops(itwon’tgoinall theway).Thememorycardlightflashesand PictureMatetellsyouhowmanyphotosare onthecard.
Note:Insertjustonecardatatime.PictureMatewillnotreadmultiplecardsatonce.
6 PrintYourPhotosPictureMate’sphotoviewerscreenmakesiteasytoselectthephotosyouwanttoprint,choosealayout,andevencrop.
SelectSomePhotos
1 Press or toviewyourphotos.
2 PressOKtoselectaphotoforprinting.
3 Toprintmorethanonecopy,presstoincreasethenumber.Presstodecreaseit.
4 Toselectmorephotos,press or toviewthemandpressOKtoselectone.Repeatstep3toselectmorecopies,ifnecessary.
5 Press Printanduse or toreviewyourselectedphotos.Thenpress Printagaintoprint.
EpsonandPictureMateareregisteredtrademarksandExceedYourVisionisatrademarkofSeikoEpsonCorporation.
GeneralNotice:Otherproductnamesusedhereinareforidentificationpurposesonlyandmaybetrademarksoftheirrespectiveowners.Epsondisclaimsanyandallrightsinthosemarks.
©2007EpsonAmerica,Inc.5/07 CPD-23838PrintedinXXXXXXXX.XX-XXXXX
Microdrive™CompactFlash®(TypeIandII)
*Adapterrequired**Maximumcapacity128MB
Bottom
Loadglossysideup
Memorycardlight
SD™(SecureDigital)SDHC™(HighCapacity)miniSD™*miniSDHC*microSD*microSDHC*MMC™(MultiMediaCard™)xDPictureCard™xDPictureCard(TypeMandTypeH)SonyMemoryStick®**MemoryStickDuo™*MemoryStickMicro*MemoryStickPRO™MemoryStickPRODuo™*MagicGate™MemoryStick**MagicGateMemoryStickDuo™*
Top