starboard fx-duo maintenance manual cc 3 -...
TRANSCRIPT
Education Department
Level 1, 1062 Ann Street
Fortitude Valley, QLD 4006
Tel: (07) 3250 0000; Fax: (07) 3250 0010
Copyright © 2008 Videopro Group Page 1 of 20
STARBOARD FX-DUO
MAINTENANCE MANUAL
Hitachi Software Engineering Co., Ltd.
IMS Division
Last Updated: May 13th 2008

Education Department
Level 1, 1062 Ann Street
Fortitude Valley, QLD 4006
Tel: (07) 3250 0000; Fax: (07) 3250 0010
Copyright © 2008 Videopro Group Page 2 of 20
Careful thought was given to the cautions on this device and in this document.
However, unanticipated circumstances might occur. When operating this product, users
themselves must exercise caution as well as follow instructions.

Education Department
Level 1, 1062 Ann Street
Fortitude Valley, QLD 4006
Tel: (07) 3250 0000; Fax: (07) 3250 0010
Copyright © 2008 Videopro Group Page 3 of 20
Table of Contents
PREFACE 4
1. DIAGNOSIS 5
1.1 Starting StarBoard Software 5
1.2 Detecting StarBoard FX-DUO 5
2. TROUBLE SHOOTING FLOWCHART 6
2.1 StarBoard is not detected 6
2.2 StarBoard is not working stably 8
2.3 StarBoard Interactivity is working intermittently 9
2.4 Electronic pen is not working 10
2.5 Electronic pen is working intermittently 11
2.6 There is a gap between the pen tip and the cursor 12
2.7 Cannot calibrate StarBoard 12
3. HOW TO CHANGE PARTS 13
3.1 How to change digitizer 13
3.2 How to change USB cable 16
3.3 How to adjust optical axis 18
3.4 How to install the Brace Kit
4. CONTACT INFORMATION 20

Education Department
Level 1, 1062 Ann Street
Fortitude Valley, QLD 4006
Tel: (07) 3250 0000; Fax: (07) 3250 0010
Copyright © 2008 Videopro Group Page 4 of 20
PREFACE
This document does not cover the information relating to projectors, PC and operating systems. Please refer to the
relevant manuals if required.

Education Department
Level 1, 1062 Ann Street
Fortitude Valley, QLD 4006
Tel: (07) 3250 0000; Fax: (07) 3250 0010
Copyright © 2008 Videopro Group Page 5 of 20
1. Diagnosis
1.1 Starting StarBoard Software
Please double-click on the StarBoard Software icon on the desktop. If you cannot find the icon, please start
StarBoard Software from the start menu.
1.2 Detecting StarBoard FX-DUO
When FX-DUO is not detected (Fig. B), StarBoard Software retries to detect FX-DUO every 10 seconds. If FX-DUO is not detected after several retries, please refer to the chapter 2.
You can also check if FX-DUO is detected by looking at the icon on the Task Tray. If FX-DUO is not detected, the red cross “x” will be shown on the icon.

Education Department
Level 1, 1062 Ann Street
Fortitude Valley, QLD 4006
Tel: (07) 3250 0000; Fax: (07) 3250 0010
Copyright © 2008 Videopro Group Page 6 of 20
C o n n e c t t h e U S B c a b l e d i re c t ly to th e P C .- n o U S B e x t e n s i o n c a b l e s o r w a l l p la t e s
U n p lu g a n d p lu g th e U S B ca b l e
U s e a d i f f e r e n t U S B p o r t
C h e c k S e r i a l n u m b e r o f t h e F X - D U O a n dS ta r B o a rd S o f t w a r e v e r s i o n
S / N : F X D 7 7 - * * * * *
S / N : F X D 7 7 - A * * * * *S / N : F X D 6 3 - A * * * * *
S / N : F X D 7 7 - B * * * * *S / N : F X D 6 3 - B * * * * *
C h e c k S ta r B o a r d S o f tw a r e 8 .0 c o r a b o v e i s in s t a l l e d
I n s t a l l th e la t e s t S ta r B o a r d
S o f t w a re
I n s t a l l th e la t e s t S ta r B o a r d S o f t w a re
C h e c k S t a r B o a r d S o f tw a r e 7 . 1 5 o r
a b o v e i s in s t a l l e d
Y e s
N o
N o
Y e s
C h e c k S ta r B o a rd S o f t w a re 8 . 0 a o r a b o v e i s in s t a l l e d
Y e s N o
N o Y e s
C h e ck i f t h e O S i s V i s t a
Y e s
N o
F X - D U O d r i v e r i s n o t in s t a l l e d .R e l o a d S T a r B o a rd S o f t w a re a n d b e
su re t o s e le c t F X - D U O i n th e h a r d w a r e s e l e c t io n l i s t
N o
N o
S t a r t L S A D R V m a n u a l ly b yd o u b le c l i c k in g th e f o l lo w i n g
f i l e :C : \ P r o g r a m F i l e s \ H i ta c h i S o f tw a r e
E n g in e e r in g \ F X - D U O D r iv e r\ L S A D R V . e x eL S A D R V I c o n a p p e a r in S y s te m T r a y ?
C h e c k w i t h S y s te m A d m in i s t r a to r w h y
L S A D R V is n o t b e i n g r u n a t p o w e r o n
L o g o n a s l o c a l a dm i n is t ra to r . C h e c k i f t h e L S A D R V ic o n i s
s h o w n in t h e s y s t em t r a y ( lo w e r r i g h t c o r n e r o f t h e P C
s c r e e n )
Y e sY e s
U n p l u g t h e U S B d e v i c e ( s )
Y e s
S y s t em O K . M o v e f i n g e r o n b o a r d a n d c u r s o r
w i l l m o v e , I f s t i l l n o t c o n n e c t in g t o S ta r B o a rd S o f tw a r e c h e c k th a t t h e S t a rB o a r d D r i v e r i s
r u n n i n g i n T a s k M a n a g e r ( D G B o a r d e x e . )
R e _ b o o t s y s t em a n d re - c h e c k
R e - I n s ta l l t h e l a t e s t S t a r B o a r dS o f t w a r e a n d r e - c h e c k
N oO pe n D e v i c e M a n a g e r a n d lo o k f o r o n e
o f th e f o l l o w in g e n tr i e s :O p t ic a l S e n s o r H T 5 0 0 0
E L T - X i ro k u L i g h t S e n so r H T 5 0 0 0S ta rB o a rd F X - D U O L i g h t S e n s o r
R ig h t c l i c k th e e n t ry s e le c t P r o p e r t i e s /D r iv e r a n d s e l e c t " I n s ta l l " o r
" U p d a te D r iv e r" T h e d r iv e r f i le s s h o u l d b e l o c a te d a u to m a t ic a l l y b u t i f n o t
p o i n t t h e s y s te m to :C : \ P r o g r a m F i l e s \ H i t a c h i S o f tw a r e
E n g i n e e r i n g \ F X - D u o D r i v e r \ d r iv e r. 2 k
Y e s
2 . C h e ck e a rt h i n g c o p p e r ta p e d i r e c t ly i n f ro n t o fr ig h t s e n s o r . T h is m u s t b e c om p le te l y f l a t .
3 . C h e c k i f t h e r e a r e b i g d e n t s / b u m p s o n th e s u rf a c e , i f p o s s i b le p le a s e re m o v e th e m
4 . R u n L S C A M W I Z . e x e a s d e s c r ib e d o n p a g e
3 - 4 i n th e F X - D U O U s e r G u i d e
1 . C o n ta c t y o u I C T S u p p o r tO r
2 . C h a n g e c o m pu te r a n d r e t r y T h e n
3 . C o n ta c t V i d e o p ro
N o1 . C h e c k r e f le c t i v e ta p e i s c le a n a n d n o t
b lo c k e d
C h e c k S t a r B o a r d S o f tw a r e 8 . 0 a o r a b o v e is i n s ta l le d
C h e c k C a m e ra A d j u s t m e n t b y :
I f t h e L E D is s t i l l o f f c o n ta c t V id e o p r o
C h a n g e th e U S B c a b le
( re f e r t o c h a p t e r 3 . 2 )
C h e c k i f t h e U S B c a b l e i s
c o n n e c t e d t o t h e P C a n d th ed ig i t i z e r L E D i s o n * 1
E n s u r e t h e u p d a te i s in s t a l l e d
f r om th e i n s ta l la t i o n C D
C h e c k i f t h e r e a r e o t h e r U S B d e v i c e ( s ) c o n n e c te d
to th e P C a p a r t f r o m th e m o u s e
D o e s th e L S A D R V I c o n h a v e a c r o s s
o v e r i t ?
2. Trouble Shooting Flow Chart
Board Detection
2.1 StarBoard is not detected

Education Department
Level 1, 1062 Ann Street
Fortitude Valley, QLD 4006
Tel: (07) 3250 0000; Fax: (07) 3250 0010
Copyright © 2008 Videopro Group Page 7 of 20
*1 You can find the digitizer LED by looking up the digitizer from the board surface.

Education Department
Level 1, 1062 Ann Street
Fortitude Valley, QLD 4006
Tel: (07) 3250 0000; Fax: (07) 3250 0010
Copyright © 2008 Videopro Group Page 8 of 20
Check if there are otherUSB device(s) connected
to the PC that consumewide USB bandwidth
Check if StarBoard Softwareis installed properly
Check if there are problems
in driver/OS/USB connection
Contact Videopro
Unplug the USB device(s), oruse a self-powered USB hub and
connect the USB device(s) to the hub
Uninstall and reinstallStarBoard Software
Restart StarBoard Software
Restart the PC
Yes
Yes
YesUnplug and plug the USB cableNo
No
No
Yes
Board Detection
2.2 StarBoard is not working stably

Education Department
Level 1, 1062 Ann Street
Fortitude Valley, QLD 4006
Tel: (07) 3250 0000; Fax: (07) 3250 0010
Copyright © 2008 Videopro Group Page 9 of 20
Please refer to the section2.2 to isolate the
problem
Please adjust optical axis by following the chapter 3.3
Yes
No
The pen is working
intermittently or thereis area where the pen does
not work (both finger/penmodes)
Check earthing copper tape in front of right sensor is
completely flat
Please clean the reflection tape
by following the User's Guide. Ifthe damage of the reflection tape
is severe, please contactVideopro
If there are big dents/bumps/undulation/warping on the
surface, if possible please remove them.
This is easily tested by passing a straight edge e.g metre
ruler over the surface of the board while looking
for dips & rises in the surface.
If the damage of the surface is
severe please call Videopro
Board Detection
2.3 StarBoard Interactivity is working intermittently

Education Department
Level 1, 1062 Ann Street
Fortitude Valley, QLD 4006
Tel: (07) 3250 0000; Fax: (07) 3250 0010
Copyright © 2008 Videopro Group Page 10 of 20
Check if the Styluspen is working(finger mode)
Please refer to the secton2.2 to isolate the problem
Uninstall and reinstall StarBoardSoftware
Unplug and plug the USB cable
Restart the PC
Exchange the Pen
Check if there are problemsin driver/OS/USB
connection
Check if StarBoard works
with a different pen
Yes
Yes
Yes
Yes
Yes
No
No
No
No
No
ContactVideopro
1) Undo the battery andinsert the battery into the
Pen again2) Change to the fully-
charged battery
3) If the LED is notblinking green,
please change the Pen
Check if the LED isblinking green when
the side buttons arepressed *1
Check if StarBoard
Software is installedproperly
Electronic Pen
2.4 Electronic Pen is not working
*1 It is possible to see the battery level by looking at the LED of Electronic Pen.
The LED will blink for 10 seconds.
Interval of LED
blinking
Number of LED
blinking
Battery Level
2 Seconds 1 Over 1.15v
4 Seconds 1 1.15 ~ 1.0v
8 Seconds 1 Under 1.0v
Education Department
Level 1, 1062 Ann Street
Fortitude Valley, QLD 4006
Tel: (07) 3250 0000; Fax: (07) 3250 0010
Copyright © 2008 Videopro Group Page 11 of 20
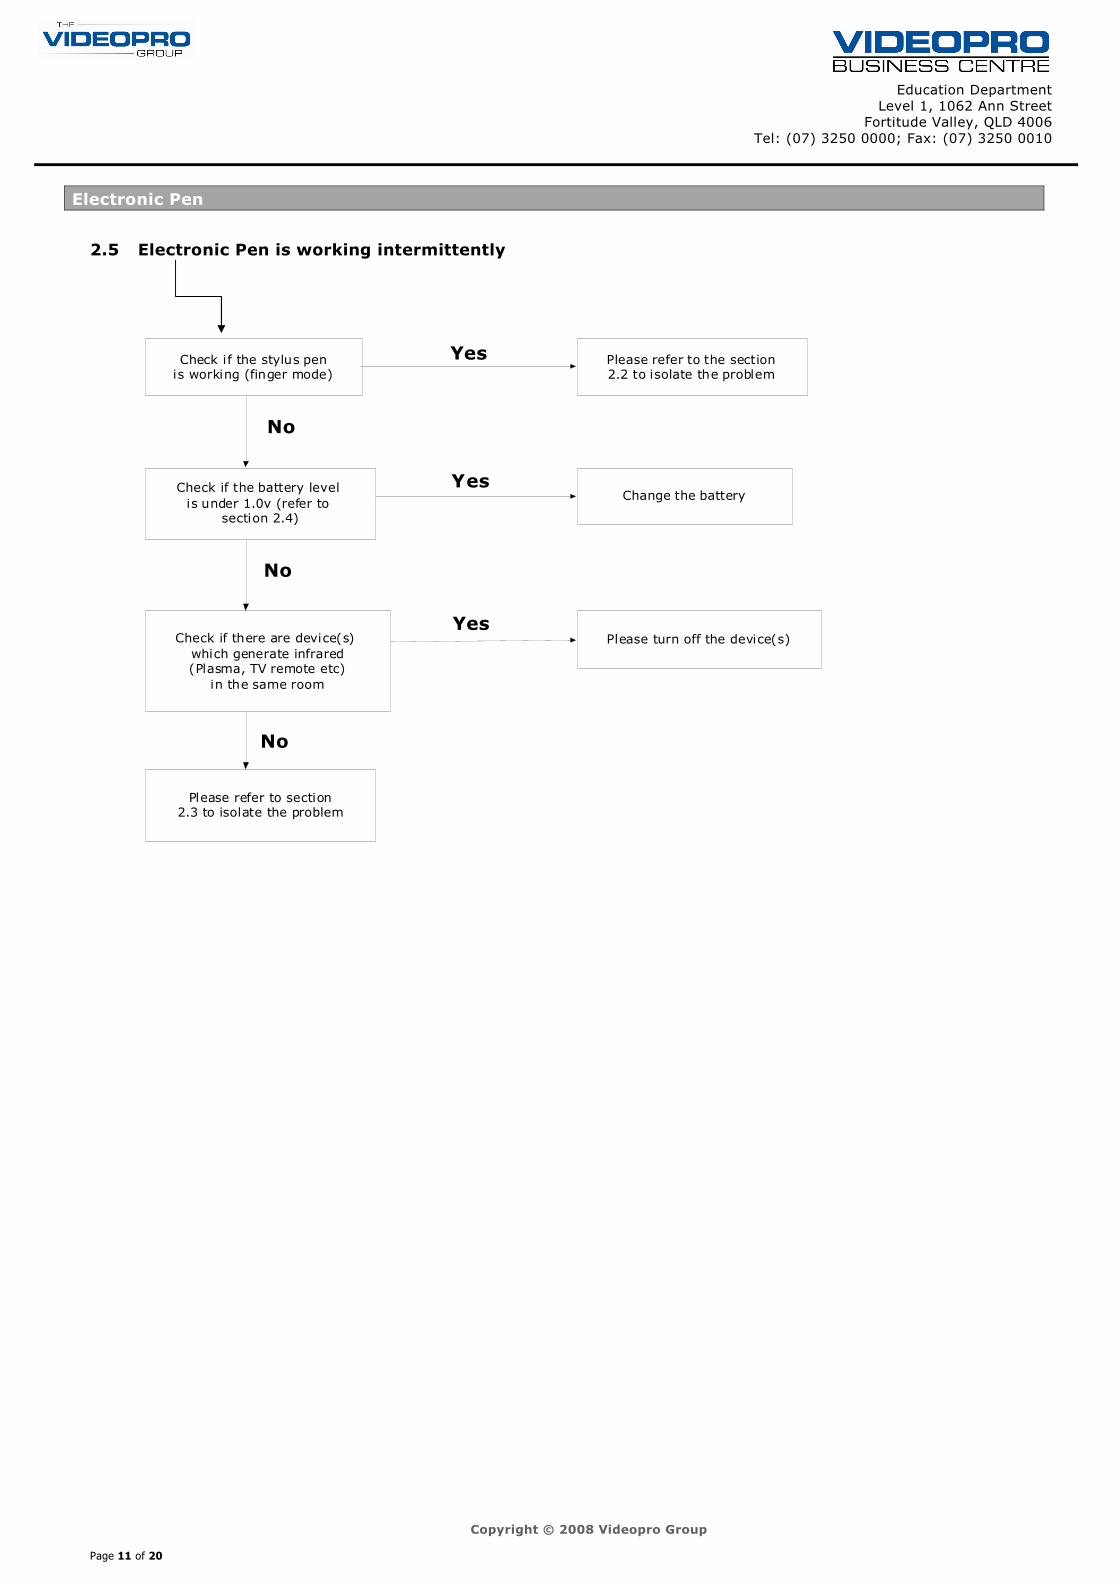
Check if the stylus penis working (finger mode)
Please refer to the section2.2 to isolate the problem
Change the battery
Please turn off the device(s)
Please refer to section2.3 to isolate the problem
No
Yes
Yes
Yes
No
Check if there are device(s)
which generate infrared(Plasma, TV remote etc)
in the same room
No
Check if the battery level
is under 1.0v (refer to section 2.4)
Electronic Pen
2.5 Electronic Pen is working intermittently
Education Department
Level 1, 1062 Ann Street
Fortitude Valley, QLD 4006
Tel: (07) 3250 0000; Fax: (07) 3250 0010
Copyright © 2008 Videopro Group Page 12 of 20
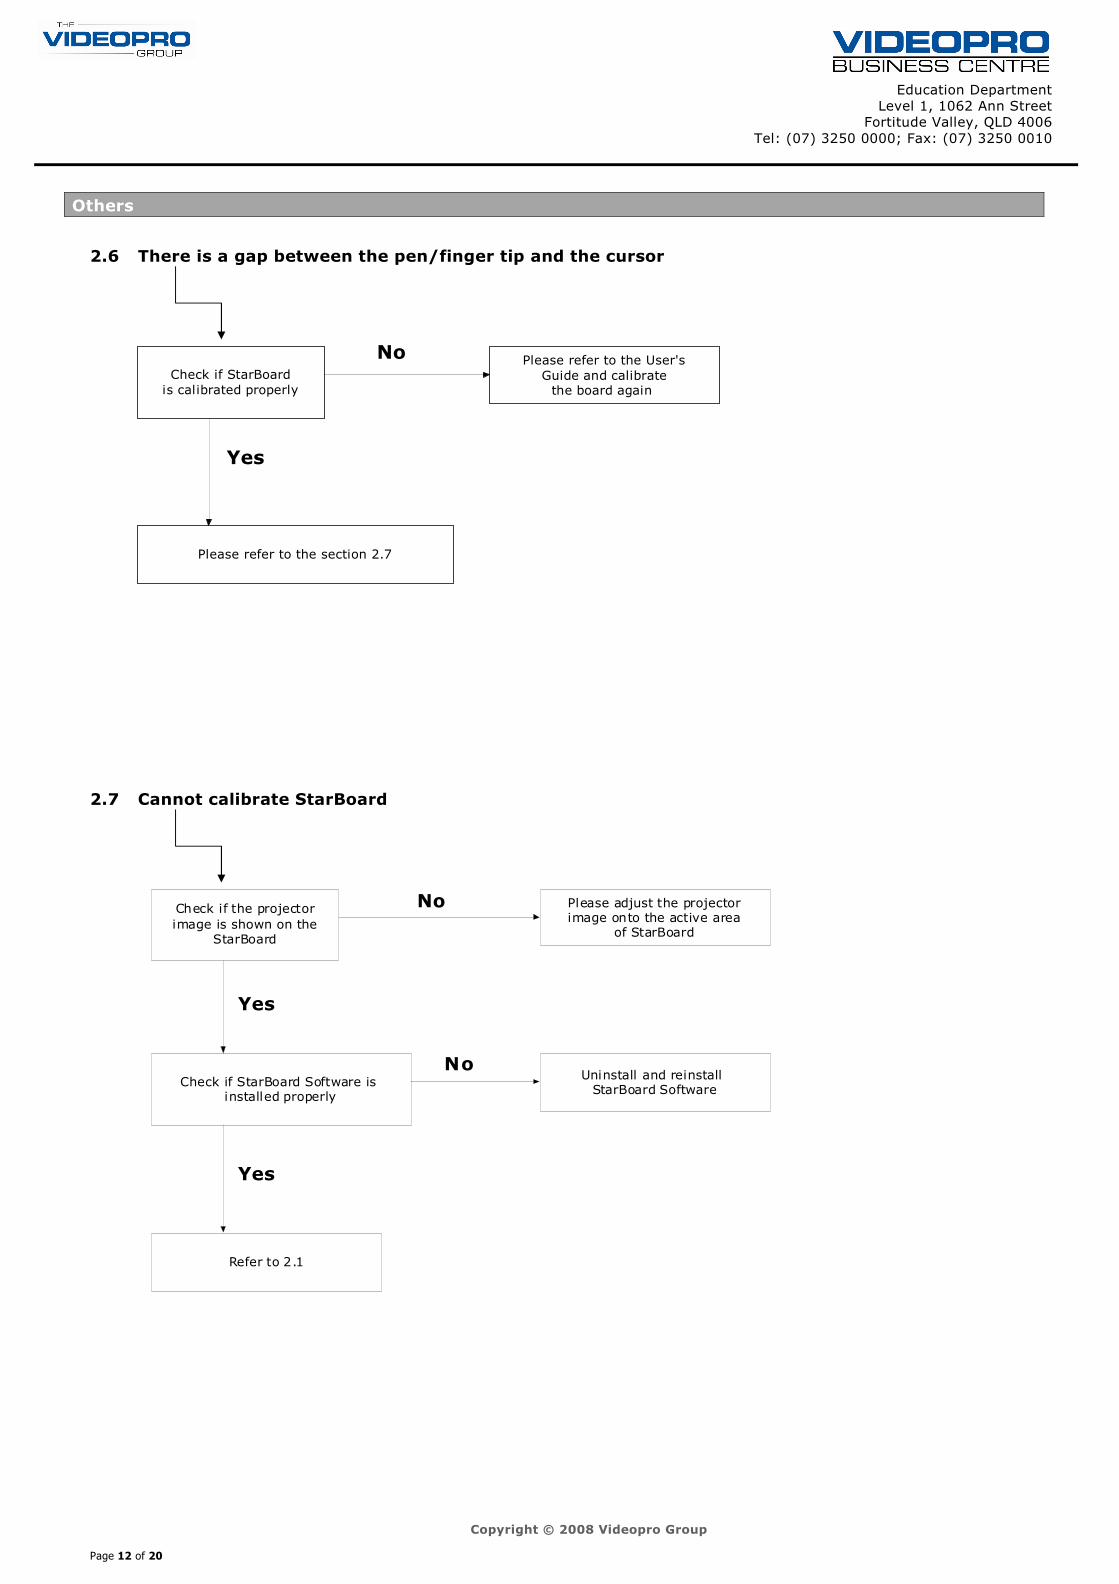
Please refer to the User's
Guide and calibratethe board again
No
Yes
Check if StarBoard
is calibrated properly
Please refer to the section 2.7
Please adjust the projectorimage onto the active area
of StarBoard
No
Yes
Check if the projector
image is shown on theStarBoard
Check if StarBoard Software is installed properly
Uninstall and reinstall StarBoard Software
Yes
No
Refer to 2.1
Others
2.6 There is a gap between the pen/finger tip and the cursor
2.7 Cannot calibrate StarBoard

Education Department
Level 1, 1062 Ann Street
Fortitude Valley, QLD 4006
Tel: (07) 3250 0000; Fax: (07) 3250 0010
Copyright © 2008 Videopro Group Page 13 of 20
3. How to change parts
3.1 How to change the Digitizer
(1) Make sure the USB cable is unplugged from the computer
(2) Undo the screws on top of the whiteboard.
Next, lift the digitizer cover to the position in which the lower joint part of the right and left side cover comes off from the side frame.

Education Department
Level 1, 1062 Ann Street
Fortitude Valley, QLD 4006
Tel: (07) 3250 0000; Fax: (07) 3250 0010
Copyright © 2008 Videopro Group Page 14 of 20
(3) Pull the right side cover out.
(4) Pull the digitizer cover out the left side in the view of in front of the board. In this case, please pull it out gently as not to damage an internal substrate.
(5) Undo the screw for the USB cable, and unplug the USB cable from the circuit board.
(6) Undo the screws of the digitizer and take the digitizer off from the whiteboard.

Education Department
Level 1, 1062 Ann Street
Fortitude Valley, QLD 4006
Tel: (07) 3250 0000; Fax: (07) 3250 0010
Copyright © 2008 Videopro Group Page 15 of 20
Be careful not to damage or drop the digitizer
(7) Put the USB cable through the hole on the digitizer and fix the screws by following the order shown
below:
(8) Plug the USB cable into the circuit board and fix the USB cable (reverse of (5)).
(9) Attach the side cover of the right.

Education Department
Level 1, 1062 Ann Street
Fortitude Valley, QLD 4006
Tel: (07) 3250 0000; Fax: (07) 3250 0010
Copyright © 2008 Videopro Group Page 16 of 20
(10) Attach the digitizer cover.
In this case, please slide in gently as not to damage an internal substrate.
(11) Lift the digitizer cover, and attach the side cover of the left.
(12) Using the screws fix the digitizer cover by following the order shown below:
(13) Adjust optical axi by following the chapter 3.3
3.2 How to change USB cable
(1) Unplug the USB cable from the PC.
(2) Undo the screws to take the digitizer cover off (refer to (2)(3) in the section 3.1 for details).
(3) Undo the screw for the USB cable, and unplug the USB cable from the circuit board (refer to (5) in the section 3.1 for details).

Education Department
Level 1, 1062 Ann Street
Fortitude Valley, QLD 4006
Tel: (07) 3250 0000; Fax: (07) 3250 0010
Copyright © 2008 Videopro Group Page 17 of 20
(4) Pull the USB cable through the hole
(5) Take the USB cable out from bottom right/left Corner as the image shows
(6) Take the cable attachment off from the USB
cable. Please do not lose the attachment because it will be used for the new USB cable.
(7) Detach the screw that is clamping the cable on the back of the upper part of the board.
Education Department
Level 1, 1062 Ann Street
Fortitude Valley, QLD 4006
Tel: (07) 3250 0000; Fax: (07) 3250 0010
Copyright © 2008 Videopro Group Page 18 of 20
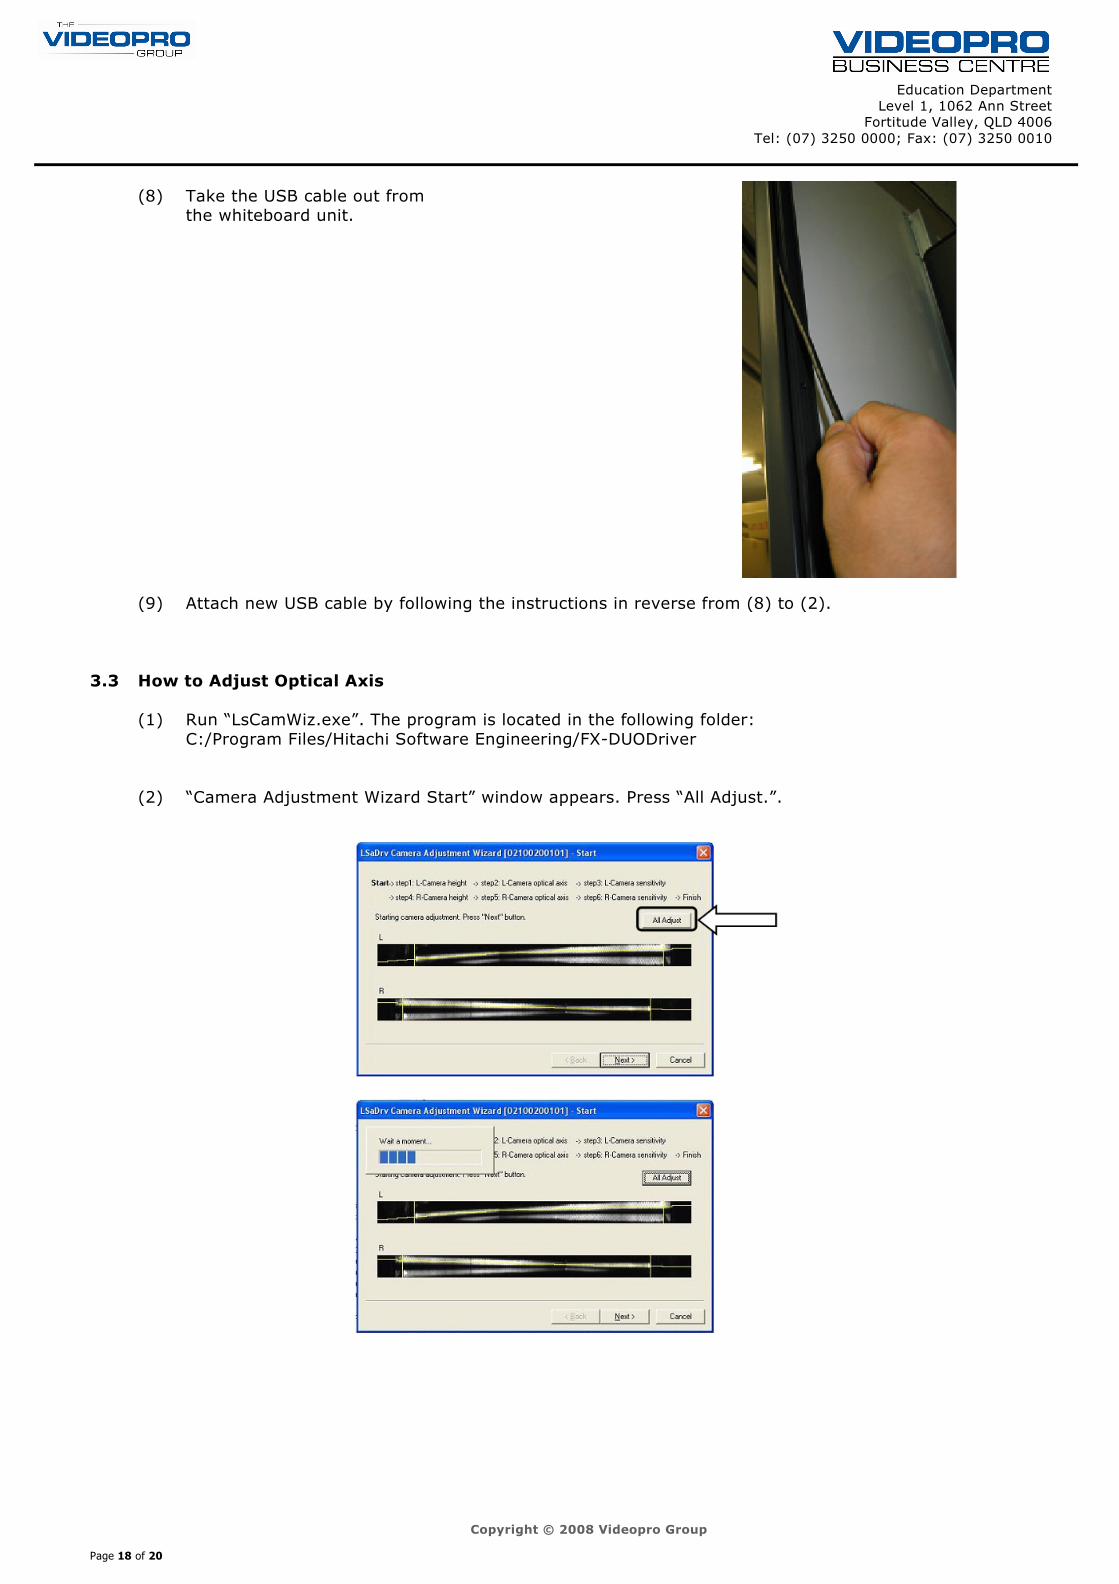
(8) Take the USB cable out from the whiteboard unit.
(9) Attach new USB cable by following the instructions in reverse from (8) to (2).
3.3 How to Adjust Optical Axis
(1) Run “LsCamWiz.exe”. The program is located in the following folder:
C:/Program Files/Hitachi Software Engineering/FX-DUODriver
(2) “Camera Adjustment Wizard Start” window appears. Press “All Adjust.”.

Education Department
Level 1, 1062 Ann Street
Fortitude Valley, QLD 4006
Tel: (07) 3250 0000; Fax: (07) 3250 0010
Copyright © 2008 Videopro Group Page 19 of 20
(3) Press “Finish”.
This completes sensor adjustment.
After making adjustments, check that input can be performed normally.

Education Department
Level 1, 1062 Ann Street
Fortitude Valley, QLD 4006
Tel: (07) 3250 0000; Fax: (07) 3250 0010
Copyright © 2008 Videopro Group Page 20 of 20
4. Contact Information
Videopro Business Centre
Education Department
Level 1
1062 Ann Street
Fortitude Valley
QLD 4006
TEL: +61 (0) 7 3250 0000
FAX: +61 (0) 7 3250 0010
WEB: www.videopro.com.au
EMAIL: [email protected]