spiralizer guide to drying fruits & veggies - april...
TRANSCRIPT
Guide to DryingFRUITS & VEGGIESFRUITS & VEGGIES

Food drying is one of the oldest methods of preserving food for later use. It can either be an alternative to canning or freezing, or compliment these methods. Drying foods is simple, safe and easy to learn. With modern food dehydrators, fruit leathers, banana chips and beef jerky can all be dried year round at home.
How Drying Preserves Food Drying removes the moisture from the food so bacteria, yeast and mold cannot grow and spoil the food. Drying also slows down the action of enzymes (naturally occurring substances which cause foods to ripen), but does not inactivate them.
Because drying removes moisture, the food becomes smaller and lighter in weight. When the food is ready for use, the water is added back, and the food returns to its original shape.
Foods can be dried in the sun, in an oven or in a food dehydrator by using the right combination of warm temperatures, low humidity and air current.
In drying, warm temperatures cause the moisture to evaporate. Low humidity allows moisture tomove quickly from the food to the air. Air current speeds up drying by moving the surroundingmoist air away from the food.
Drying Foods Out-of-DoorsSun DryingThe high sugar and acid content of fruits make them safe to dry in the sun. Vegetables and meats are not recommended for sun drying. Vegetables are low in sugar and acid. This increases the risks for food spoilage. Meats are high in protein making them ideal for microbial growth when heat and humidity cannot be controlled.
To dry in the sun, hot, dry, breezy days are best. A minimum temperature of 86°F is needed with higher temperatures being better. It takes several days to dry foods out-of-doors. Because the weather is uncontrollable, sun drying can be risky.
Also, the high humidity in the South is a problem. A humidity below 60 percent is best for sun drying. Often these ideal conditions are not available when fruit ripens.
Fruits dried in the sun are placed on trays made of screen or wooden dowels. Screens need to be safe for contact with food. The best screens are stainless steel, teflon coated fiberglass or plastic. Avoid screens made from "hardware cloth." This is galvanized metal cloth that is coated with cadmium or zinc. These materials can oxidize, leaving harmful residues on the food. Also avoid copper and aluminum screening. Copper destroys vitamin C and increases oxidation. Aluminum tends to discolor and corrode.
Outdoor Drying Rack
Guide to DryingFRUITS & VEGGIES
1

Most woods are fine for making trays. However, do not use green wood, pine, cedar, oak or redwood. These woods warp, stain the food or cause off-flavors in the food.
Place trays on blocks to allow for better air movement around the food. Because the ground may be moist, it is best to place the racks or screens on a concrete driveway or if possible over a sheet of aluminum or tin. The reflection of the sun on the metal increases the drying temperature. Cover the trays with cheesecloth to help protect the fruit from birds or insects. Fruits dried in the sun must be covered or brought under shelter at night. The cool night air condenses and couldadd moisture back to the food, thus slowing down thedrying process.
Solar DryingRecent efforts to improve on sun drying have led to solardrying. Solar drying also uses the sun as the heat source. A foil surface inside the dehydrator helps to increase thetemperature. Ventilation speeds up the drying time.Shorter drying times reduce the risks of food spoilage ormold growth.
PasteurizationSun or solar dried fruits and vine dried beans need treatment to kill any insect and their eggs that might be on the food. Unless destroyed, the insects will eat the dried food. There are two recommended pasteurization methods:
1. Freezer Method - Seal the food in freezer-type plastic bags. Place the bags in a freezer set at 0°F or below and leave them at least 48 hours.
2. Oven Method - Place the food in a single layer on a tray or in a shallow pan. Place in an oven preheated to 160°F for 30 minutes.
After either of these treatments the dried fruit is ready to be conditioned and stored.
Drying Foods IndoorsMost foods can be dried indoors using modern dehydra-tors, convection ovens or conventional ovens. Microwaveovens are recommended only for drying herbs, becausethere is no way to create airflow in them.
Food Dehydrators A food dehydrator is a small electrical appliance for drying food indoors. A food dehydrator has an electric element for heat and a fan and vents for air circulation.Dehydrators are efficiently designed to dry foods quickly at 140°F.
Food dehydrators are a relatively new item and are available from department stores, mail-order catalogs,natural food stores, seed catalogs and garden supplystores. Costs vary from $40 to $350 or above dependingon features. Some models are expandable and additionaltrays can be purchased later. Twelve square feet of dryingspace dries about a half-bushel of produce.
Oven Drying Everyone who has an oven has a dehydrator. By combining the factors of heat, low humidity and air flow, an oven can be used as a dehydrator.
An oven is ideal for occasional drying of meat jerkies, fruit leathers, banana chips or for preserving excess produce like celery or mushrooms. Because the oven isneeded for every day cooking, it may not be satisfactoryfor preserving abundant garden produce.
Oven drying is slower than dehydrators because it does not have a built-in fan for the air movement. (However,some convection ovens do have a fan). It takes about two times longer to dry food in an oven than it does in a dehydrator. Thus, the oven is not as efficient as a dehydrator and uses more energy.
Homemade Solar Dryer
plastic sheeting
airflow
foilsurface
2

3
To Use Your Oven - First, check the dial and see if it can register as low as 140°F. If your oven does not go this low, then your food will cook instead of dry. Use a thermometer to check the temperature at the "warm"setting.
For air circulation, leave the oven door propped open two to six inches. Circulation can be improved by placing a fan outside the oven near the door. CAUTION: This is not a safe practice for a home with small children.
Because the door is left open, the temperature will vary. An oven thermometer placed near the food gives an accurate reading. Adjust the temperature dial to achieve the needed 140°F.
Drying trays should be narrow enough to clear the sides of the oven and should be 3 to 4 inches shorter than theoven from front to back. Cake cooling racks placed on top of cookie sheets work well for some foods. The ovenracks, holding the trays, should be two to three inches apart for air circulation.
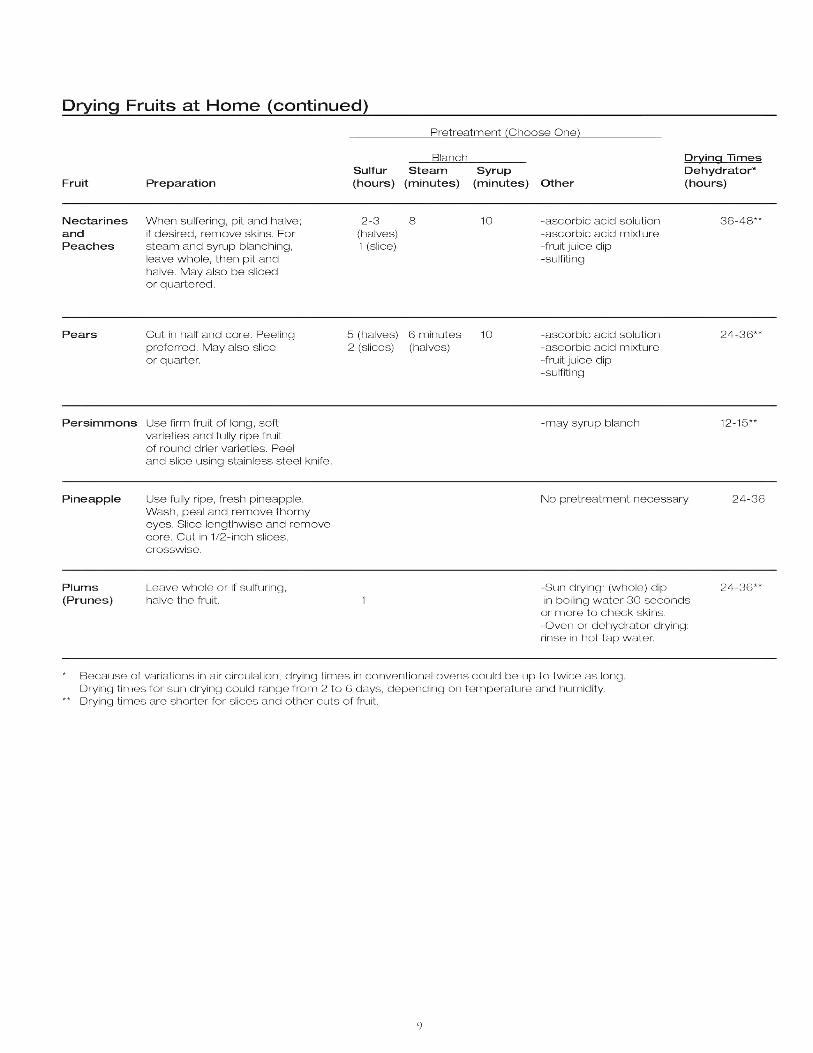
Dried fruits are unique, tasty and nutritious. Begin by washing the fruit and coring it, if needed. For drying, fruits can be cut in half or sliced. Some can be leftwhole. See the table “Drying Fruits at Home” later inthis publication for specific directions for preparing each fruit.
Thin, uniform, peeled slices dry the fastest. The peelcan be left on the fruit, but unpeeled fruit takes thelonger to dry. Apples can be cored and sliced in rings,wedges, or chips. Bananas can be sliced in coins, chipsor sticks.
Fruits dried whole take the longest to dry. Before drying, skins need to be "checked" or cracked to speed drying. To "check" the fruit place it in boiling water and then in cold water.
Because fruits contain sugar and are sticky, spray the drying trays with nonstick cooking spray before placing the fruit on the trays. After the fruit dries for one to twohours, lift each piece gently with a spatula and turn.
Pretreating the Fruit Pretreatments prevent fruits from darkening. Many light-colored fruits, such as apples, darken rapidly when cut and exposed to air. If not pretreated, these fruits will continue to darken after they have dried.
For long-term storage of dried fruit, sulfuring or using a sulfite dip are the best pretreatments. However, sulfitesfound in the food after either of these treatments have been found to cause asthmatic reactions in a small portion of the asthmatic population. Thus, some people may want to use the alternative shorter-term pretreatments. If home dried foods are eaten within a short time, there may be little difference in the long- and short-term pretreatments.
Sulfuring - Sulfuring is an old method of pretreatingfruits. Sublimed sulfur is ignited and burned in anenclosed box with the fruit. The sulfur fumes penetratethe fruit and act as a pretreatment by retarding spoilageand darkening of the fruit. Fruits must be sulfured out-of-doors where there is adequate air circulation.(For more information contact your county Extensionoffice.)
Sulfite Dip - Sulfite dips can achieve the same long-term anti-darkening effect as sulfuring, but morequickly and easily. Either sodium bisulfite, sodium sulfite or sodium meta-bisulfite that are USP (foodgrade) or Reagant grade (pure) can be used. To locatethese, check with your local drugstores or hobby shops,where wine-making supplies are sold.
Directions for Use - Dissolve 3⁄4 to 1 1⁄2 teaspoons sodium bisulfite per quart of water. (If using sodiumsulfite, use 1 1⁄2 to 3 teaspoons. If using sodiummetabisulfite, use 1 to 2 tablespoons.) Place the prepared fruit in the mixture and soak 5 minutes forslices, 15 minutes for halves. Remove fruit, rinse lightlyunder cold water and place on drying trays. Sulfitedfoods can be dried indoors or outdoors. (This solutioncan be used only once. Make a new one for the nextbatch.)
Ascorbic Acid - Ascorbic acid (vitamin C) mixed with water is a safe way to prevent fruit browning. However,its protection does not last as long as sulfuring or sulfiting. Ascorbic acid is available in the powdered ortablet form, from drugstores or grocery stores. One teaspoon of powdered ascorbic acid is equal to 3000 mg
DRYING FRUITS
4
of ascorbic acid in tablet form. (If you buy 500 mgtablets, this would be six tablets).
Directions for Use -Mix 1 teaspoon of powdered ascorbic acid (or 3000 mg of ascorbic acid tablets,crushed) in 2 cups water. Place the fruit in the solutionfor 3 to 5 minutes. Remove fruit, drain well and place ondryer trays. After this solution is used twice, add moreacid.
Ascorbic Acid Mixtures - Ascorbic acid mixtures are a mixture of ascorbic acid and sugar sold for use on fresh fruits and in canning or freezing. It is more expensiveand not as effective as using pure ascorbic acid.
Directions for Use - Mix 1 1⁄2 tablespoons of ascorbic acidmixture with one quart of water. Place the fruit in themixture and soak 3 to 5 minutes. Drain the fruit welland place on dryer trays. After this solution is used twice,add more ascorbic acid mixture.
Fruit Juice Dip - A fruit juice that is high in vitamin C can also be used as a pretreatment, though it is not as effective as pure ascorbic acid. Juices high in vitamin Cinclude orange, lemon, pineapple, grape and cranberry. Each juice adds its own color and flavor to the fruit.
Directions for Use - Place enough juice to cover fruit in abowl. Add cut fruit. Soak 3 to 5 minutes, remove fruit, drain well and place on dryer trays. This solution may be used twice, before being replaced. (The used juice can be consumed.)
Honey Dip - Many store-bought dried fruits have beendipped in a honey solution. A similar dip can be made athome. Honey dipped fruit is much higher in calories.
Directions for Use - Mix 1⁄2 cup sugar with 1 1⁄2 cupsboiling water. Cool to lukewarm and add 1/2 cup honey.Place fruit in dip and soak 3 to 5 minutes. Remove,drain well and place on dryer trays.
Syrup Blanching - Blanching fruit in syrup helps itretain color fairly well during drying and storage. Theresulting product is similar to candied fruit. Fruits thatcan be syrup blanched include apples, apricots, figs, nectarines, peaches, pears, plums and prunes.
Directions for Use - Combine 1 cup sugar, 1 cup lightcorn syrup and 2 cups water in a saucepot. Bring to a
boil. Add 1 pound of prepared fruit and simmer 10 minutes. Remove heat and let fruit stand in hot syrup for30 minutes. Lift fruit out of syrup, rinse lightly in coldwater, drain on paper toweling and place on dryer trays.
Steam Blanching - Steam blanching also helps retaincolor and slow oxidation. However, the flavor and textureof the fruit is changed.
Directions- Place several inches of water in a large saucepot with a tight fitting lid. Heat to boiling. Placefruit not more than 2 inches deep, in a steamer pan orwire basket over boiling water. Cover tightly with lid and begin timing immediately. See below for blanching times. Check for even blanching half way through theblanching time. Some fruit may need to be stirred. When done, remove excess moisture using paper towelsand place on dryer trays.
Drying the Prepared Fruit Whichever drying method you choose-sun drying, solar drying, oven drying or dehydrator drying-be sure to place the fruit in a single layer on the drying trays. Thepieces should not touch or overlap. Follow the directionsfor the drying method you choose and dry until the food tests dry. Approximate drying times are given below. Food dries much faster at the end of the dryingperiod, so watch it closely.
Determining Dryness of Fruits Since dried fruits are generally eaten without being rehydrated, they should not be dehydrated to the point of brittleness. Most fruits should have about 20 percentmoisture content when dried.
To test for dryness, cut several cooled pieces in half.There should be no visible moisture and you should notbe able to squeeze any moisture from the fruit. Somefruits may remain pliable, but are not sticky or tacky. If a piece is folded in half, it should not stick to itself.Berries should be dried until they rattle when shaken.
After drying, cool fruit 30 to 60 minutes before packaging. Packaging food warm can lead to sweatingand moisture buildup. However, excessive delays in packaging could allow moisture to re-enter food.Remember, if you have dried fruit in the sun, it must be pasteurized before it is packaged.
5
Conditioning Fruits When dried fruit is taken from the dehydrator or oven, the remaining moisture may not be distributed equallyamong the pieces because of their size or their location inthe dehydrator. Conditioning is a process used to equal-ize the moisture and reduce the risk of mold growth.
To condition the fruit, take the dried fruit that hascooled and pack it loosely in plastic or glass jars. Seal thecontainers and let them stand for seven to ten days. Theexcess moisture in some pieces will be absorbed by thedrier pieces. Shake the jars daily to separate the piecesand check the moisture condensation. If condensationdevelops in the jar, return the fruit to the dehydrator formore drying. After conditioning, package and store thefruit.
Vegetables can also be preserved by drying. Because theycontain less acid than fruits, vegetables are dried until they are brittle. At this stage, only 10% moisture remainsand no microorganism can grow.
Preparing Vegetables To prepare vegetables for drying, wash in cool water toremove soil and chemical residues. Trim, peel, cut, slice or shred vegetables according to the directions for each vegetable in the chart below. Remove any fibrous orwoody portions and core when necessary, removing alldecayed and bruised areas. Keep pieces uniform in size so they will dry at the same rate. A food slicer or foodprocessor can be used. Prepare only as many as can bedried at one time.
Pretreating Vegetables Blanching is a necessary step in preparing vegetables for drying. By definition, blanching is the process of heatingvegetables to a temperature high enough to destroyenzymes present in tissue. Blanching stops the enzymeaction which could cause loss of color and flavor duringdrying and storage. It also shortens the drying and rehydration time by relaxing the tissue walls so moisturecan escape and later re-enter more rapidly.
Vegetables can be water blanched or steam blanched. Water blanching usually results in a greater loss of nutrients, but it takes less time than steam blanching.
Water Blanching - Fill a large pot 2/3 full of water,cover and bring to a rolling boil. Place the vegetables in a wire basket or a colander and submerge them in the
water. Cover and blanch according to directions. Begintiming when water returns to boiling. If it takes longerthan one minute for the water to come back to boiling,too many vegetables were added. Reduce the amount in the next batch.
Steam Blanching - Use a deep pot with a tight fitting lid and a wire basket, colander or sieve placed so thesteam will circulate freely around the vegetables. Addwater to the pot and bring to a rolling boil. Place thevegetables loosely in the basket no more than 2 inchesdeep. Place the basket of vegetables in the pot, makingsure the water does not come in contact with the vegetables. Cover and steam according to the directions.
Cooling and Drying the Prepared Vegetables After blanching, dip the vegetables briefly in cold water.When they feel only slightly hot to the touch, drain the vegetables by pouring them directly onto the drying trayheld over the sink. Wipe the excess water from under-neath the tray and arrange the vegetables in a single layer.Then place the tray immediately in the dehydrator oroven. The heat left in the vegetables from blanching willcause the drying process to begin more quickly. Watchthe vegetables closely at the end of the drying period.They dry much more quickly at the end and couldscorch.
Determining Dryness of Vegetables Vegetables should be dried until they are brittle or"crisp." Some vegetables would actually shatter if hit
with a hammer. At this stage, they should contain about 10 percent moisture. Because they are so dry, they do not need conditioning like fruits.
Fruit leather is a tasty, chewy, dried fruit product. Fruitleathers are made by pouring puréed fruit onto a flat surface for drying. When dried, the fruit is pulled fromthe surface and rolled. It gets the name "leather" fromthe fact that when puréed fruit is dried, it is shiny andhas the texture of leather.
Leather From Fresh Fruit * Select ripe or slightly overripe fruit.* Wash fresh fruit or berries in cool water. Remove
peel, seeds and stem.* Cut fruit into chunks. Use 2 cups of fruit for each
13" x 15" inch fruit leather. Purée fruit until smooth.* Add 2 teaspoons of lemon juice or 1/8 teaspoon
DRYING FRUIT LEATHER
DRYING VEGETABLES

6
ascorbic acid (375 mg) for each 2 cups of light colored fruit to prevent darkening.
* Optional: To sweeten, add corn syrup, honey or sugar. Corn syrup or honey is best for longer storage because it prevents crystals. Sugar is fine for immediate use or short storage. Use 1⁄4 to 1⁄2 cup sugar, corn syrup or honey for each 2 cups of fruit. Saccharin-based sweeteners could also be used to reduce tartness without adding calories. Aspartame sweeteners may lose sweetness during drying.
Leathers From Canned or Frozen Fruits * Home preserved or store bought canned or frozen
fruit can be used. * Drain fruit, save liquid.* Use 1 pint of fruit for each 13" x 15" leather.* Purée fruit until smooth. If thick, add liquid.* Add 2 teaspoons of lemon juice or 1/8 teaspoon
ascorbic acid (375 mg) for each 2 cups of light colored fruit to prevent darkening.
* If desired, sweeten as directed above for leathers from fresh fruit.
* Applesauce can be dried alone or added to any fresh fruit purée as an extender. It decreases tartness and makes leather smoother and more pliable.
Drying the Leather For drying in the oven or sun, line cookie sheets with plastic wrap. In a dehydrator, use plastic wrap or the specially designed plastic sheets that come with the dehydrator. Pour the leather onto the lined cookie sheets or tray. Spread it evenly to a thickness of 1/8 inch.
Dry the fruit leather at 140° F until no indention is leftwhen you touch the center with your finger. This could take about 6 to 8 hours in the dehydrator, up to 18hours in the oven and 1 to 2 days in the sun. While stillwarm, peel from the plastic wrap. Cool and rewrap inplastic and store.
After foods are dried, cool them completely. Then pack-age them in clean moisture-vapor-resistant containers.Glass jars, metal cans or freezer containers are good storage containers, if they have tight-fitting lids. Plasticfreezer bags are acceptable, but they are not insect and
rodent proof. Fruit that has been sulfured or sulfitedshould not touch metal. Place the fruit in a plastic bagbefore storing it in a metal can.
Dried food should be stored in a cool, dry, dark place. Most dried fruits can be stored for 1 year at 60° F, 6months at 80° F. Dried vegetables have about half theshelf-life of fruits. Fruit leathers should keep for up to 1 month at room temperature. To store any dried product longer, place it in the freezer.
Dried fruits can be eaten as is or reconstituted. Dried vegetables must be reconstituted. Once reconstituted,dried fruits or vegetables are treated as fresh. Fruitleathers and meat jerky are eaten as is.
To reconstitute dried fruits or vegetables, add water tothe fruit or vegetable and soak until the desired volume is restored. (See the chart on rehydrating dried food, forthe amount of water to add and minimum soaking time.)Do not over-soak the food. Over-soaking produces lossof flavor and a mushy, water-logged texture.
For soups and stews, add the dehydrated vegetables,without rehydrating them. They will rehydrate as thesoup or stew cooks. Also, leafy vegetables and tomatoesdo not need soaking. Add enough water to cover andsimmer until tender. CAUTION! If soaking takes morethan 2 hours, refrigerate the product for the remainder of the time.
PACKAGING AND STORING DRIED FOODS
USING DRIED FOODS