speedseal™ foot training guide – standard composition
TRANSCRIPT

snapnrack.com
SpeedSeal™ Foot Training Guide – Standard Composition
Overview
• This training guide outlines best practices for installing the SpeedSeal™ Foot, a design that incorporates fl ashing reliability into the attachment by using a patent pending Lag Driven Sealant Technology. This Guide is meant to supplement the Ultra Rail Installation Manual and provide detailed instructions on installation practices that produce high quality systems and maintain construction e� ciency. The target audience of this guide is experienced rooftop solar installers with a strong understanding of solar construction best practices, and a basic understanding of the Ultra Rail mounting system.
Required Tools
1
Component Details
Drill with 3/16” Pilot Drill Bit
Caulking Gun with approved Roof Sealant
Impact Driver with 1/2” Socket
SpeedSeal™ Foot
5/16” Sealing Lag Screw

snapnrack.com
Using locations drawn on roof during system layout, drill a 3/16” pilot hole into roof framing member.
Remove any dirt or debris from roof surface and properly seal any missed pilot holes with a flashing card before SpeedSeal™ Foot is installed.
Turn SpeedSeal™ Foot over and apply roof sealant, filling the cavity formed by the sealant ring.
SpeedSeal™ Foot Installation
Layout SpeedSeal™ Foot locations on roof and mark locations for fasteners using a marking crayon or chalk based on rafter location and these rules:
1) Pilot hole should be located 1.5-3” from the bottom edge of shingle course above2) SpeedSeal™ Foot should never be installed across two shingle courses
SpeedSeal™ Foot may be installed over the vertical seam between singles in the same row.
2
snapnrack.comSpeedSeal™ Foot Installation
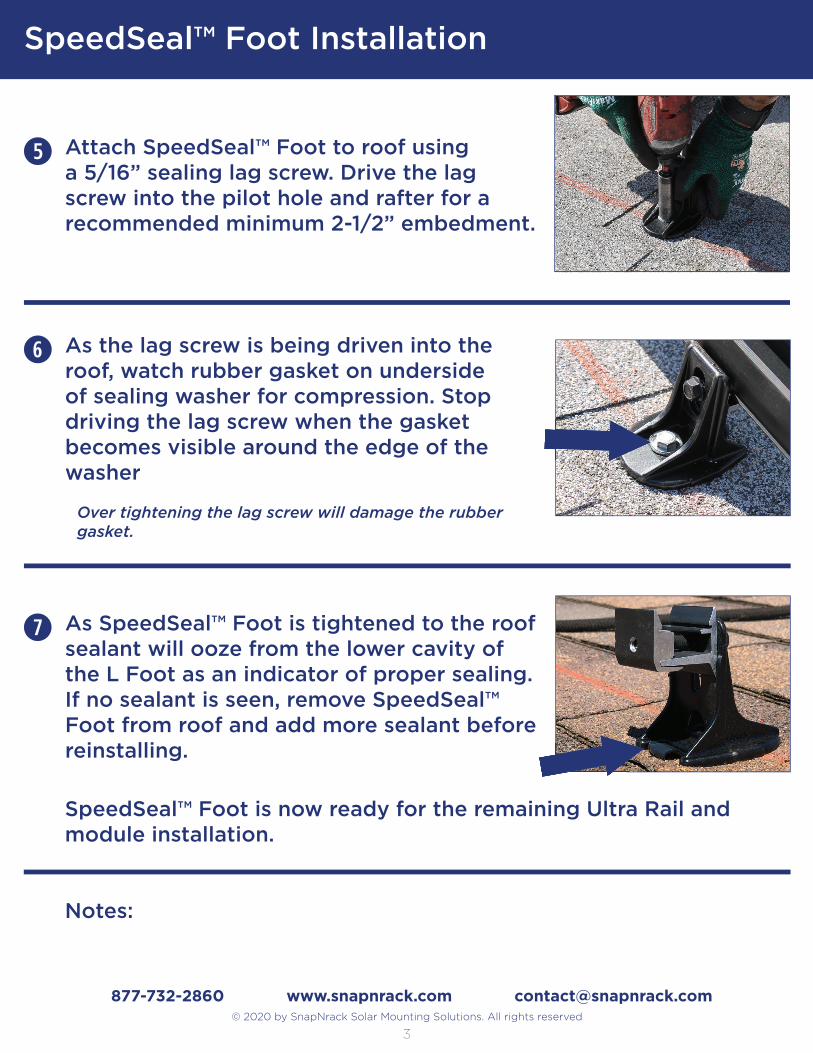
As SpeedSeal™ Foot is tightened to the roof sealant will ooze from the lower cavity of the L Foot as an indicator of proper sealing. If no sealant is seen, remove SpeedSeal™ Foot from roof and add more sealant before reinstalling.
As the lag screw is being driven into the roof, watch rubber gasket on underside of sealing washer for compression. Stop driving the lag screw when the gasket becomes visible around the edge of the washer
Over tightening the lag screw will damage the rubber gasket.
© 2020 by SnapNrack Solar Mounting Solutions. All rights reserved
877-732-2860 www.snapnrack.com [email protected]
3
Notes:
Attach SpeedSeal™ Foot to roof using a 5/16” sealing lag screw. Drive the lag screw into the pilot hole and rafter for a recommended minimum 2-1/2” embedment.
SpeedSeal™ Foot is now ready for the remaining Ultra Rail and module installation.