spatial analysis and decision assistance (sada) … · 1 spatial analysis and decision assistance...
TRANSCRIPT

1
Spatial Analysis and Decision Assistance (SADA) Version 4
Geospatial Overview
EPA Cluin SADA Web Training Series
Robert N. StewartUniversity of Tennessee, Knoxville
Basic Spatial Analysis 1

2
Spatial Analysis and Decision Assistance (SADA) Version 4
Basic Spatial Analysis(Short Version)
EPA Cluin SADA Web Training Series
Robert N. StewartUniversity of Tennessee, Knoxville
Basic Spatial Analysis 2

Basic Spatial Analysis Tools
“All models are wrong; some models are useful.” George Box, Professor Emeritus, University of Wisconsin
3
Basic Spatial Analysis 3

4
Basic Spatial Analysis Tools
Spatial interpolation is used to predict values between sampled locations.
The methods discussed throughout this text estimate the unsampled location as a weighted linear combination:
Where u0 is the estimate, ui are the sampled data and wi are the weights assigned to the data values.
Basic Spatial Analysis 4

Less Alike
points closer are more alike than data points farther away. This plays a key role in all of the approaches to weighting sample values.
More Alike
5
Determining Weights
All of the methods presented here generally work on the principle that data
Basic Spatial Analysis 5

6
Spatial Anisotropy
One example of spatial correlation would occur with a plume or deposition scenario.
More Alike
Less
Alik
e
Factory
Deposition Plume
Prevailing Winds
Basic Spatial Analysis 6

Grid DefinitionRather than estimate values at only a single point, we wish to estimate them at a number of points in order to fill in the picture of contamination. All spatial interpolators in SADA depend on a grid definition to function. A grid definition simply describes the number, size, and location of a uniform set of blocks. These blocks will be the focus of the interpolation schemes. SADA’s interpolation schemes will estimate the concentration value at the center of each block. From the interview list choose Interpolate My Data. Select Set Grid Specs from the Steps Window to define the grid. Press Show Grid to see your
7
result.
Basic Spatial Analysis 7

Nearest Neighbor
This is the simplest of all interpolants in SADA. Any unsampled point is simply equal to the data point closest to it. In our previous notation we would describe Nearest Neighbor as
• Choose Interpolation methods and then select Nearest Neighbor from the list of available interpolants.
• Press Show The Results to see the map.
8
Basic Spatial Analysis 8

Natural Neighbor
In natural neighbor we allow more than the nearest neighbor to influence the estimation. When data points are distributed in space they are inherently representing a certain area around them. Sample points in sparsely sampled regions must represent a higher region than those in more densely sampled areas. These regions are called area of influence and it is possible to draw simple geometries that bound them.
In natural neighbor, the areas of influence are calculated first. Then the area of influence for the point we wish to estimate is overlaid creating regions of overlapping areas of influence. For any given sample point, the portion of the overlap becomes the weight assigned to that sample point.
Where A is the area of influence for u0 and ai is the area of overlap between u0 and ui.
9
Basic Spatial Analysis 9

Natural Neighbor
• Press Interpolation methods and then select Natural Neighbor from the list of available interpolants.
• Press Show The Results to see the map.
10
Basic Spatial Analysis 10
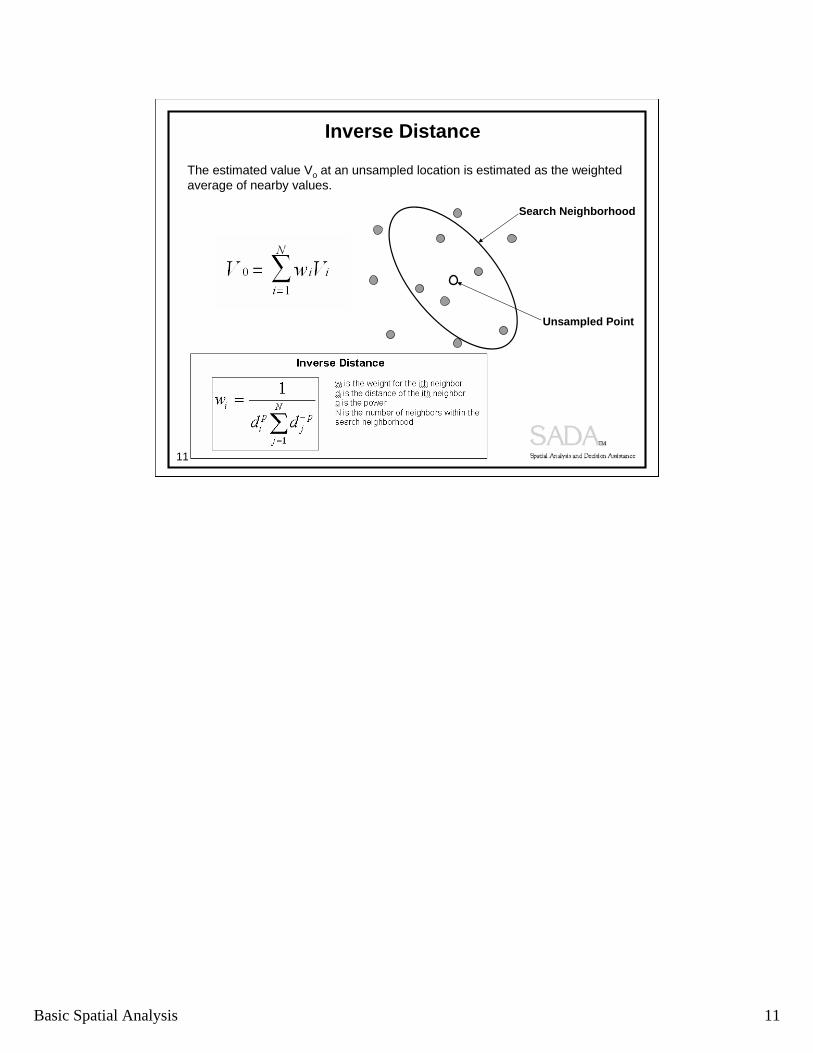
Inverse Distance
The estimated value Vo at an unsampled location is estimated as the weighted average of nearby values.
Search Neighborhood
Unsampled Point
11
Basic Spatial Analysis 11

Search Neighborhoods
Inverse distance requires a neighborhood definition for estimating concentration values at a point. A neighborhood is defined as an area around the point in which data values will be used to estimate the concentration value. Data values outside the neighborhood will be excluded.
The neighborhood is always defined by a search ellipse that can be manipulated in shape and size to include or exclude various data. The parameters which control the shape and size of the search ellipse are entered on the Parameters Window when Search Neighborhood is selected from the Steps Window.
12
Basic Spatial Analysis 12

Search Neighborhoods
The parameters Major Radius, Minor Radius, and XY Angle control the size and shape of the search ellipse.
Major Radius The long radius of the ellipse.
Minor Radius The short radius of the ellipse.
XY Angle The angle or direction the long radius points. This angle is measured clockwise from the positive Y axis (0 deg is North). The minor elliptical axis is perpendicular to the major axis.
13
Basic Spatial Analysis 13

Search Neighborhoods
For three-dimensional data, the ellipse becomes an ellipsoid. The following parameters, in addition to those listed above, describe the search ellipsoid in 3D space.
Z Angle
The angle or dip below the XY plane at the point of estimation. This angle is measured as negative degrees below the plane.
V Radius
Also referred to as Z minor radius, it is the radius of the ellipse in the vertical direction.
Rotation
The parameters described to this point fully form the body of the ellipsoid in 3D space. The rotation parameter then rotates this ellipsoid about the major axis the specified number of degrees.
14
Basic Spatial Analysis 14
Search Neighborhoods
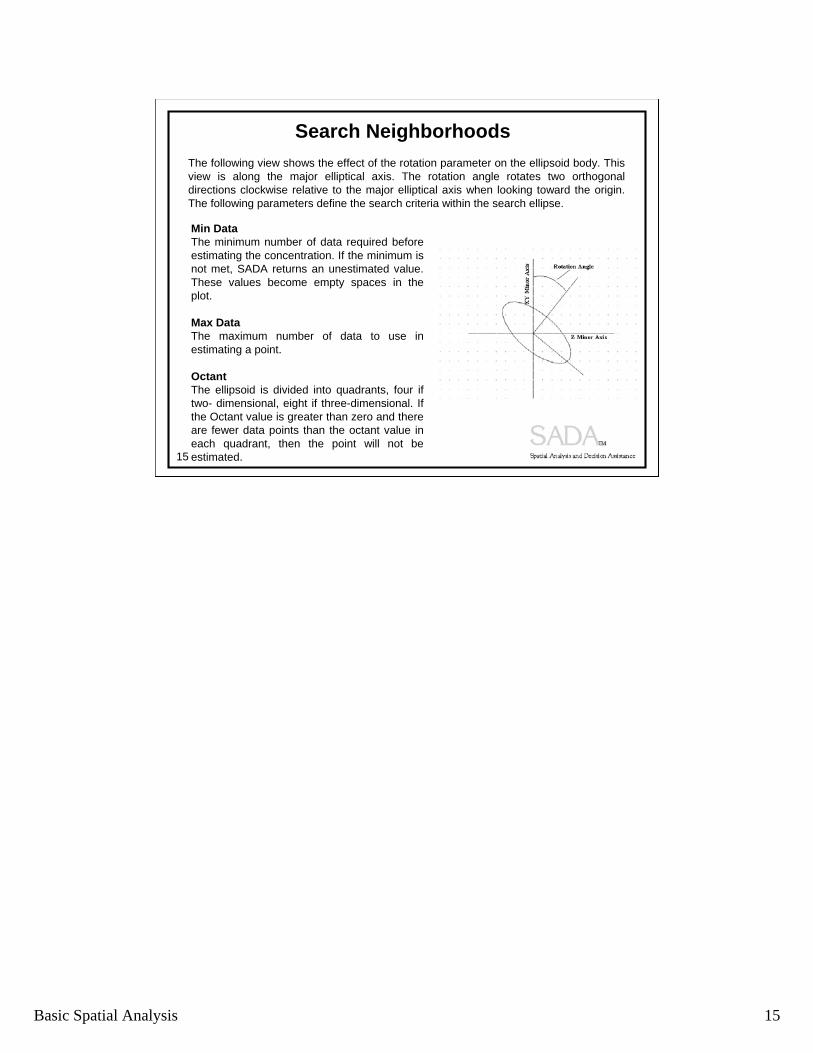
The following view shows the effect of the rotation parameter on the ellipsoid body. This view is along the major elliptical axis. The rotation angle rotates two orthogonal directions clockwise relative to the major elliptical axis when looking toward the origin. The following parameters define the search criteria within the search ellipse.
Min Data The minimum number of data required beforeestimating the concentration. If the minimum isnot met, SADA returns an unestimated value. These values become empty spaces in theplot.
Max Data The maximum number of data to use in estimating a point.
Octant The ellipsoid is divided into quadrants, four if two- dimensional, eight if three-dimensional. If the Octant value is greater than zero and there are fewer data points than the octant value ineach quadrant, then the point will not be
15 estimated.
Basic Spatial Analysis 15

16
Search Neighborhoods
Neighborhoods allow the user to search for a single unsampled point.
Basic Spatial Analysis 16

Inverse Distance in SADA
After understanding “Search Neighborhoods”; the procedure to produce an Inverse Distance map in SADA is simple:
• Select Inverse Distance from the list under Interpolation methods.
• Setup an appropriate search neighborhood and specify the power parameters after selecting Search Neighborhood.
• Press Show The Results to see the map.
17
Inverse Distance Estimates Map
Basic Spatial Analysis 17

18
Extreme Value Effects
Interpolations can be “smeared” by extreme valued points causing an inaccurate elevation of interpolated values for great distances.
Basic Spatial Analysis 18

19
Extreme Value Effects
Extreme values can have unwanted effects on the interpolation model particularly for those that use search neighborhoods. These extreme values can cause high value “smears” or other artifacts in the result.
Search Neighborhood
Basic Spatial Analysis 19

Extreme Value Effects
Sometimes smearing can go unnoticed because of the designation of the legend. Linear continuous legends tend to mask smearing. Categorical legends often better reveal smearing effects.
Here we have exactly the same interpolation results displayed in two different ways: with a smooth linear legend and a categorical legend. Notice how the smearing is highlighted in the later plot.
20
Basic Spatial Analysis 20

Addressing Extreme Value Effects
Smearing effects can be dealt with in various ways. In inverse distance, the power value (p) may be increased. By increasing the value of p, data points have very small influences over even short distances. Other methods include decreasing the search radius.
Power = 2 Power = 7
21
Basic Spatial Analysis 21

Cross Validation
• Cross validation is the process of determining how well our modeling is reflecting reality.
• The truth is that we will almost never know how well it is performing since we will likely never have samples at every point we estimate. If we did we could simply compare them and evaluate the model performance.
• As an approximation to this approach, we can cross validate by removing one at a time each sample that we do have and allow the model to predict its value based on the remaining data
• We can then compare this estimate with the real value and make comparative statements between the different models.
• It is important to remember that cross validation provides evidence (rather than proof) of how a model is performing since in each estimation we have N-1 samples rather than N.
22
Basic Spatial Analysis 22

Cross Validation in SADA
• Once you understand what information cross validation provides, generating error plots in SADA is simple:
• Clicking on Cross validation and choosing a method will allow you to:
– Plot Error (Simple subtraction of estimated and real values),
– Plot Absolute Error (Absolute value of the difference in real and estimated values) and/or,
– Plot Percentage Error (Absolute difference/Real value *100)
23
Basic Spatial Analysis 23

Cross Validation in SADA
• SADA produces a summary of the model’s performance. This can be compared across models as form of performance assessment. – Mean of errors – Absolute mean error – Mean squared error – Number of unestimated points
• Pressing Ok SADA will show the graphical result. These results can understanding about model performances in regions of the site.
24
Basic Spatial Analysis 24

Spatial Analysis and Decision Assistance (SADA) Version 4
Advanced Spatial Tools (Short Version)
EPA Cluin SADA Web Training Series
Robert N. Stewart
University of Tennessee, Knoxville
25
Basic Spatial Analysis 25

Advanced Spatial Tools (Geostatistics )
“Most researchers use statistics the way a drunkard uses a lamppost – more for support than illumination.”
Winifred Castle
26
Basic Spatial Analysis 26

Advanced Spatial Tools (Geostatistics )
With basic spatial analysis tools, each interpolant produced a single estimate for each unsampled point. With a geostatistical approach, a distribution of possible values is constructed and used as a model for the actual unsampled value. Both an estimate and a model of uncertainty can be now obtained. From this distribution of points, a central moment, such as the mean or media, is chosen as a single estimate for contouring purposes.
27
Search Neighborhood Example: Single Estimate = Mean
Basic Spatial Analysis 27

Geostatistics
SADA provides two kriging (geostatistical) models: Ordinary and Indicator kriging. Ordinary kriging assumes a normal or lognormal distribution for the data. Indicator kriging is a non parametric approach that does not assume any distribution.
Like the methods discussed in Basic Spatial Analysis Tools, both methods are based on a weighted combination of nearby samples. However, the development and expression of these weights is quite complex and beyond the scope of this training guide.
It may be helpful to think of kriging as an advanced form of the inverse distance method. Recall that the inverse distance method weights sampled values by their distance from the unsampled location.
Kriging approaches the problem in much the same way. However, rather than distance (d), the weights are based on the amount of spatial correlation or spatial covariance that samples exhibit at varying distances C(d).
28
Basic Spatial Analysis 28

Less Alike
each other are more alike than sample points further away. (More complex spatial correlations exist but this type is the most common).
More Alike
29
Spatial Correlation
If data are spatially correlated, then on average, sample points that are close to
Basic Spatial Analysis 29

30
Spatial Anisotropy
One example of spatial correlation would occur with a plume or deposition scenario.
More Alike
Less
Alik
e
Factory
Deposition Plume
Prevailing Winds
Basic Spatial Analysis 30

Spatial Correlation
θ
θ = Angle Tolerance
Bandwidth
East
α = Angle
α
Lag Group 1 Lag Group 2
Lag Group 3 Lag Group 4
Our final parameter is the angle. The angle specifies in what direction you will be calculating the semi-variogram values. This is sometimes referred to as the angle of anisotropy. Now we are constraining our semi-variogram values to a certain direction.
North
31
Basic Spatial Analysis 31
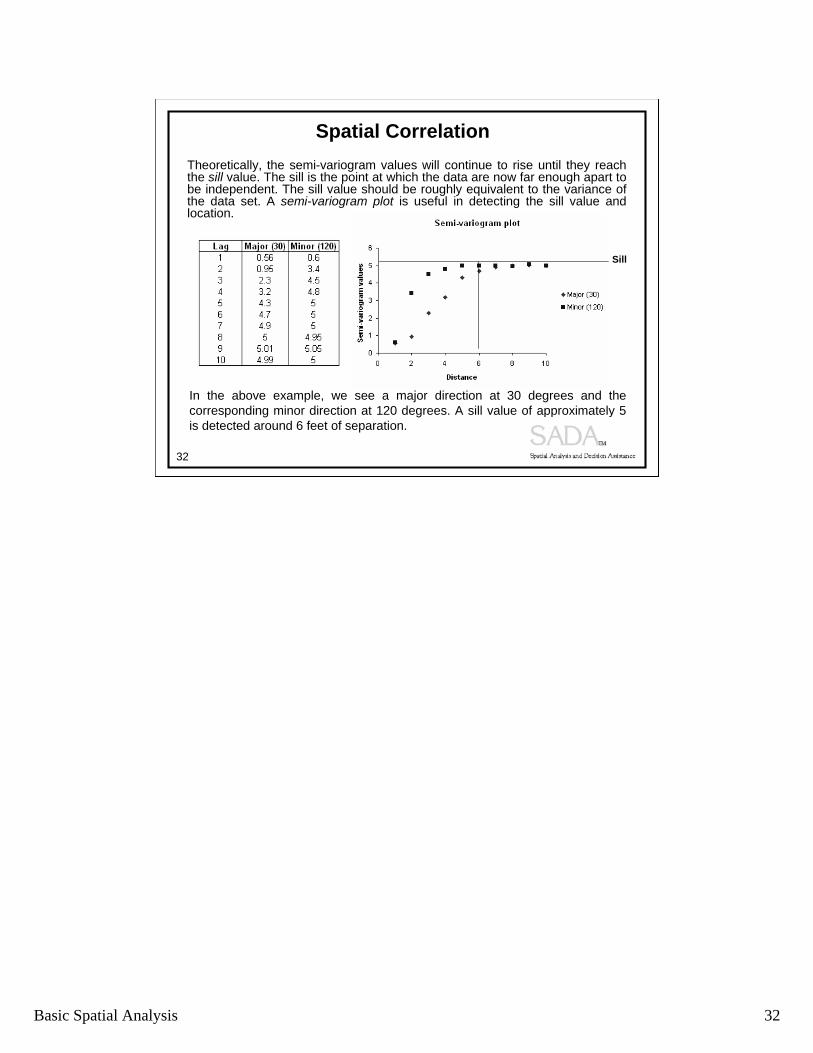
Spatial Correlation
Theoretically, the semi-variogram values will continue to rise until they reach the sill value. The sill is the point at which the data are now far enough apart to be independent. The sill value should be roughly equivalent to the variance of the data set. A semi-variogram plot is useful in detecting the sill value and location.
Sill
In the above example, we see a major direction at 30 degrees and the
32
corresponding minor direction at 120 degrees. A sill value of approximately 5 is detected around 6 feet of separation.
Basic Spatial Analysis 32

Semi-variogram Behaviors
• Semi-variograms often do not conform to the well behaved monotonic increasing variogram structures seen in text book examples.
Sem
i-va
r.
Sem
i-va
r.
Distance Distance
33
Basic Spatial Analysis 33

Semi-variogram Behaviors
• Semi-variograms often do not conform to the well behaved monotonic increasing variogram structures seen in text book examples.
Sem
i-va
r.
Distance
Distance S
emi-
var.
Samples have spatial
A high sample occurs oscillating distribution. close to a small value.
34
Basic Spatial Analysis 34

Semi-variogram Behaviors
• Sometimes the variability is really short range and you have your lags set too large. This blurs the true spatial structure and can result in bizarre cases especially as the cone distance increases. In the case of indicator kriging below we can see this effect.
35
Lag Dist = 5 Lag Dist = 2
Basic Spatial Analysis 35

36
Semi-variogram Behaviors
• In 3d dimensional applications DIP can be very important.
Dip = 0 Lag Dist = 2
Basic Spatial Analysis 36
Setting Variography Model
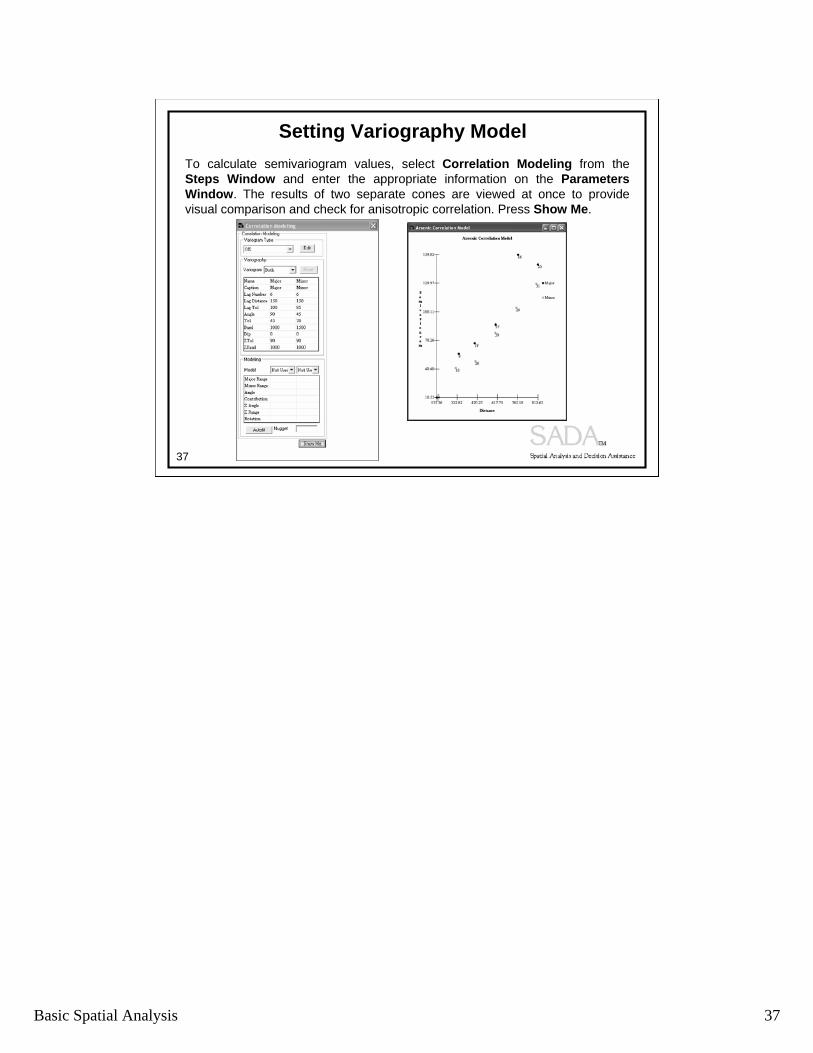
To calculate semivariogram values, select Correlation Modeling from the Steps Window and enter the appropriate information on the Parameters Window. The results of two separate cones are viewed at once to provide visual comparison and check for anisotropic correlation. Press Show Me.
37
Basic Spatial Analysis 37

38
Rose Diagrams
Rather than viewing only on angle at a time, users can view semivariogram values in all directions at once. They can then choose an angle of interest by clicking on the rose diagram map. SADA will show the semivariogram values for that direction.
Basic Spatial Analysis 38

39
Spatial Covariance
When the kriging models are used, they will require that the semi-variogram values are known for any distance h. At this point, we only have these values for a few discrete distances. Therefore, we need to fit a model to the data so that a semi-variogram value is available for every distance.
Basic Spatial Analysis 39

40
Spatial Covariance
SADA provides 3 standard correlation models that provide a great deal of flexibility in semi-variogram data: Spherical, Exponential, and Gaussian.
Basic Spatial Analysis 40

41
Spatial Covariance
All three models require the same set of parameters. Most of these parameters were encountered while specifying a search neighborhood.
2D and 3D • Major Range – distance to sill or correlation length along the major
anisotropic axis. • Minor Range – distance to sill or correlation length along the minor
anisotropic axis. • Angle – the angle of anisotropy
3D • Z Angle – the angle of anisotropy in the Z plane (equal to the Dip parameter
in experimental variography). • Z Range – a value describing how anisotropy behaves in the z minor
direction, relative to major axis. • Rotation – how the anisotropic ellipsoid is rotated about its major axis.
• Contribution – The model’s contribution to the sill (maximal model value) • Nugget – where the model should cross the y axis (white noise)
Basic Spatial Analysis 41

Estimating the Correlation Model
SADA can estimate the model and associated parameters to use for a given set of semi-variogram values. Press the Autofit button and select the models and whether a nested model is needed. Typically, users will only choose a single structure and choose from spherical or exponential. Estimation quality can vary from variogram set to variogram set and results should only be used as a basis for adjusting the correlation model parameters.
42
Basic Spatial Analysis 42

Search Neighborhoods
Inverse distance requires a neighborhood definition for estimating concentration values at a point. A neighborhood is defined as an area around the point in which data values will be used to estimate the concentration value. Data values outside the neighborhood will be excluded.
The neighborhood is always defined by a search ellipse that can be manipulated in shape and size to include or exclude various data. The parameters which control the shape and size of the search ellipse are entered on the Parameters Window when Search Neighborhood is selected from the Steps Window.
43
Basic Spatial Analysis 43

Ordinary Kriging in SADA
• Select the analysis, data type and data name of interest
• Select Interpolate My Data from the Interview list (or any other spatial model map)
• Define a grid by selecting Set Grid Specs.
• Press Interpolation methods, and then select Ordinary Kriging from the list of available interpolants.
• Select Correlation Modeling and set variography and correlation models.
• Setup an appropriate search neighborhood and specify the power parameters after selecting Search Neighborhood.
• Press Show The Results to see the map.
44
Basic Spatial Analysis 44

Indicator Variograms
To this point, all variograms we have calculated have been on the actual data points. This type of variography is necessary for ordinary kriging. Indicator kriging requires variography be calculated on the indicator transformed values. When performing an indicator transform, you need a threshold value t. All sample values greater than t become equal to 1, and all values less than t are 0. We can write the indicator transform of the data as follows
If we plot the transformed data values, they would look something like this.
45
= 1 = 0
Basic Spatial Analysis 45

Indicator Variograms
The following example shows Arsenic data that has been indicator transformed at a threshold of 30 mg/kg.
Raw Data Indicator Transformed (graph not seen in SADA)
Calculations of the variogram of the indicator transformed data then proceed exactly as in the case of the untransformed data.
46
Basic Spatial Analysis 46

Indicator Kriging in SADA
• Select the analysis, data type and data name of interest
• Select Interpolate My Data from the Interview list (or any other spatial model map)
• Define a grid by selecting Set Grid Specs.
• Press Interpolation methods and then select Indicator Kriging from the list of available interpolants.
• Select Correlation Modeling and set variography and correlation models for a range of threshold values.
• Setup an appropriate search neighborhood and specify the power parameters after selecting Search Neighborhood.
• Press Show The Results to see the map.
47
Basic Spatial Analysis 47

Plotting Percentile Maps • Allows one to be conservative (e.g. percentiles > .5)
• Allows one to spatially ascertain the difference between an “optimistic, realistic, and pessimistic” (e.g. 25th, 50th, and 75th) maps.
• Helps identify regions that could benefit from further sampling.
“optimistic”
P=.25
“realistic”
P=.5
“pessimistic”
P=.75
48
Basic Spatial Analysis 48
Geospatial References
• Applied Geostatistics, Isaaks and Srivastava
• Geostatistical Software Library (GSLIB), Deutsch and Journel
• Geostatistics for Natural Resources Evaluation, Pierre Goovaerts
• Geostatistics in Five Easy Lessons, Journel
• Spatial Data, Cressie
49
Basic Spatial Analysis 49

Spatial Analysis and Decision Assistance (SADA) Version 4
Decision Analysis
(Short Version)
EPA Cluin SADA Web Training Series
Robert N. StewartUniversity of Tennessee, Knoxville
50
Basic Spatial Analysis 50

Probability Maps
• A probability map spatially delineates the probability of exceeding a specified threshold.
• The probability of the center of each block exceeding the threshold value is calculated.
• Probability maps can only be created Probability > 3.0 pCi/G
51
Probability > 3.0 pCi/G
with ordinary or indicator kriging.
Basic Spatial Analysis 51

52
Percentile Maps vs Probablity Maps
• In a percentile, we fix the probability and determine what concentration is associated with that probability in each block. So you get a map of concentrations.
• In a probability map, we fix the concentration and calculate the probability associated with that concentration.
Probability > 3.0 pCi/G
3.0 pCi/g
25% (100%-25%) = 75%
Basic Spatial Analysis 52

Area of Concern Maps
• Draws the area of concern based on the modeled values, a threshold value, and a decision framework.
• Can be drawn with any of the five available interpolants.
• Threshold values can come from user-defined concentrations, human health risk, ecological risk, or custom analysis.
• Three decision frameworks are available – Block Scale (Nearest Neighbor, Natural Neighbor, Inverse Distance)
The decision criteria is applied to individual blocks.
– Confidence Based Block Scale (Ordinary and Indicator Kriging)
The decision criteria, which now includes a remedial confidence parameter, is applied to individual blocks.
– Site Scale (All Five Interpolants)
The decision criteria is applied to the site. Individual blocks are “remediated” until the site-wide model average satisfies the specified threshold.
• Density and Post Remediation Parameters
53
Basic Spatial Analysis 53

Decision Scales
• Block Scale (Average Map) – If the estimated block value is above the threshold value, it must be remediated.
For ordinary and indicator kriging, set the confidence parameter equal to .5.
• Block Scale (Percentile Maps) – Given a threshold value, if the specified
percentile (e.g. 90th) is greater than the threshold value, then remediation is required. Otherwise, there is at least for example a 90% chance the true value falls below the threshold.
• Site Scale – If the site-wide model average is above
the threshold value, “remediate” the individual blocks from worst to least contaminated until the average, including post remedial concentrations, drops below the threshold value.
T 95th
54
Basic Spatial Analysis 54

55
Decision Framework Results
Block Scale Block Scale Confidence (90%)
Site Scale
Basic Spatial Analysis 55

Cost Benefit Analysis
• The decision framework (block, block confidence, site) determines the associated cost for a range of cleanup goals.
• Cost is calculated by determining the area of concern (or volume for 3d) for a threshold value, then multiplying the number of blocks in this area by the remedial cost per block.
• After the threshold value range is calculated, cost is calculated for each incremental value in this range.
56
Basic Spatial Analysis 56

Additional SADA Training
“Environmental Assessment Methods Using SADA:”
April 25-27, 2007 in Knoxville, TN (USA)
Includes a more extended discussion, and hands-on training with SADA.
For information and registration:
http://www.tiem.utk.edu/~sada/training_Knoxville_Apr07.html
57
Basic Spatial Analysis 57

58
Thank You
After viewing the links to additional resources, please complete our online feedback form.
Thank You
Links to Additional Resources
Basic Spatial Analysis 58