song writing tips
DESCRIPTION
Song Writing TipsTRANSCRIPT

Breaking Your Music Down To Make It Simpler!
What you should get from this technique:
After this session, you should be able to take any standard chord progression, (that
you’ve created) and turn it into something a little more intricate and a little more
interesting. Anybody (after a bit of practice) can just hammer away at a few chords,
but it can sometimes be a little boring to just strum away, or bang away. Also, the
problem with just banging away at a bunch of chords, is that it lacks dynamics, and
can sound a little boring and repetitive. With this technique, it allows you to add more
space, variety, and colour to your music.
So what do we do?
Ok, let’s begin by taking a simple, random chord progression.
Let’s pick Am, Em, Am, and F.
We can easily just play these chords as they come, but we want to make something a
little more interesting here! Something I use a lot, and have used to very good effect,
is breaking the chord down, and taking one of the notes out so you’re ONLY playing
two notes from the chord. I’ll demonstrate how I would do it on this chord
progression.
As we’ve already discussed, each chord is normally made using a minimum of three
notes. A root (1), a 3 rd, and a 5 th. Again, we could elaborate here and make it a lot
more complex, but for the purposes of this course we don’t need to. Let’s look at each
chord in turn, and I’ll show you how I’ve broken it down (you can hear how I’ve done
this on the audio that is coming soon).
Am: This chord consists of the notes A (1), C (3), and E (5). So instead of taking the
whole chord, we’ll remove the 5 th, and just play the A, and the C like so:

Then we’ll take the next chord, which is the Em. The notes in the Em chord are (you
should already know this by now, I hope you do), E (root), G (3 rd), and B (5 th).
Again we’re going to lose the 5 th, and just play the E, and the G. Here it is again:
Back to the Am, however this time, we don’t want to have the same sound as the
previous Am chord, because we’re trying to keep the sound varied at this point. So
what are we going to do? We’re going to play an inversion (an inversion is simply a
different order using the same notes) of the chord.
So we’ll use the same two notes, A, and C, however, to keep things from getting
boring, this time we’ll play the C as the lower note, and the A as the higher note like
so:
And now we finish on the F Major. Just for continuity, we’ll again play the root note
and the third, so in this example, we’ll play the F and the A. To make it sound even
more varied, we’re going to play out of the octave here, like we did in the E minor
example. So the F is lower, and the A is higher.

Now if you play that, you’ll see how different it sounds to just strumming or playing
full chords, and how it opens the sound up and creates more space. This is even more
valuable when playing in larger groups, as full chords being hammered all the time
can muddy the sound of the band/group.
Let’s have another go. This time we’re going to use the same technique, but we want
as little movement as possible. We’re going to find the notes that correspond in each
chord, and try and keep them going throughout the variation.
We’ll use the chord sequence D, G, C, and G. Let’s examine the chords in a little
more detail.
The notes contained within a D Major chord are as follows:
D F# A
The notes contained within a G Major chord are as follows:
G B D
Notice that the D note is found in both D Major and the G Major, so we’re going to
keep that note going on BOTH chords.

Now we come to the C Major and G Major chords. The notes within C Major are:
C E G
And to remind us again, in G, we have:
G B D
So this time, let’s keep the G going as in this example:
C Major:
G Major:
This time, we did it slightly differently, and used the G note on TOP instead of on the
bottom. This is an easy way of making your life easier, by minimising the amount of
movement you have to do on your instrument.

So by using this technique, it should now have become clear how you can take a
simple (or complex) chord progression, and turn it into something with a little more
space, colour, texture, and variety.
By finding which notes correspond to different chords, it makes it easy to find various
positions to play in, and also means you can economise the amount of work you need
to do in order to create a nice sounding sequence.
What we’ve covered:
We’ve covered taking a chord, and breaking it down to add more space to the sound.
Also, taking a whole chord progression and doing the same, and even making sure we
play different inversions when chords are repeated, to ensure a variety of sound (and
to keep it interesting).
Exercises:
Take either a chord progression you know well, or one that you’ve written
yourself, and A) Look at what notes correspond within each chord, and B)
break it down and simplify it.
Do the same above exercise with a whole song, and link up all the parts to
create a totally different sound, incorporating verses, choruses, and other parts.
Make sure the sound is smooth, with transitions between sections that are easy
on the ear.
Writing Harmonies to make your Melodies
Come Alive
What you should get from this section:
After this section, you should be able to create simple harmonies for your melodies
and vocal lines, and make sure they don’t clash with the rest of the band.
Harmonising sounds like a complicated term, but it simply means playing more than
one note at a time. A chord contains harmony, so if you’ve been playing chords,
you’ve automatically been doing it already!
But how do we USE harmony to enrich a melody or vocal line?

Well that all depends on what you want. Some people like really beautiful, sweet
harmonies, whilst others like nasty harmonies that clash and create a discordant
sound. As a rule:
Major Harmonies will create a happier type sound
Minor harmonies will create a sadder type of sound
Diminished harmonies sound more discordant
On a personal note, my favourite harmonies are minor 3rds, perfect 4ths, and minor
and Major 6ths. My ear tends to like more melancholy types of music, but I also love
Mozart who wrote some pretty happy tunes!!
How to create a harmony:
Here’s a step-by-step process you can use to create a harmony for any melody you
wish to use.
Write your melody out on manuscript paper, and/or record it
On another stave, write out the melody again but a third higher. So if, for
example, you started the original piece on G, start the second stave on B.
Notice that although I went a third HIGHER, I placed the harmony underneath,
as if I placed it higher it would then become more dominant than the original
melody. There are no rules here, but for now I would stay within the same key
signature and not add any sharps or flats.

Repeat the exercise, but write out the melody a fourth higher than the original.
So for example, if you started the melody on A in the original stave, write it out
but start on D.
Write out the same melody, but start a sixth higher than the
original. So in this example, we’ll start on F
Play each harmony over the original melody
Mark which passages you like the sound of or dislike the sound of from each
one.
Mix up the three new harmonies until you have a new, finished, combination
harmony you really like.
Write this one out, and this becomes your new harmony.
You can use this method for vocal lines, piano lines, guitars, strings... you name it.
You can do his with any harmony you like, and you DON’T have to stay within the
key, but at the beginning, it’s a good idea to keep within the key until you’re a bit
more confident, and you’re happy with the harmonies you’re creating.
A mistake a lot of people make when they’re starting to create harmonies, is
harmonising EVERY note in the melody or phrase. You definitely don’t have to do
this. Many pieces of music will have a really simple harmony going in the bass or mid
range, while a more frantic melody line goes over the top. Let’s take a look at how we
can do this. We’ll use the same melody line, but we’ll just simplify it so it’s a lot less
“busy”.

Here is the original melody with a harmony placed underneath.
Please bear in mind that these are ONLY examples and you can use any harmony you
like. If you want to write an entire harmony consisting of nothing but diminished
fifths, then go for it. It will probably sound a bit weird, but as a musician, that’s
perfectly up to you.
What you’ve learned:
How to take a melody and create as many harmonies as you like from it
How to pick which harmonies sound best and how to integrate them to create a
finished harmony.
Harmonic Overtones
Have you ever wondered why different instruments have completely different sounds,
even when playing THE EXACT SAME NOTE?
It's mainly because of "Harmonic Overtones".
Basically, the pitch we hear comes from vibration. So if for example we use the note
"A" vibrating at 440 Hz, it will ALSO vibrate at frequencies above that, at multiples
of 440 Hz (eg 880 Hz, 1320 Hz,
1740 Hz).
These frequencies will have different strengths of vibration according to the type of
instrument playing, so as an example, a trumpet may vibrate more strongly at 880 Hz,

and a piano may vibrate more
strongly at 1320 Hz.
There are MANY frequencies vibrating simultaneously. and the strength of these
vibrations determines the TIMBRE of the instrument.
This is why a piano doesn't sound like a trumpet (or an elephant
for that matter)
Basic Music Theory Explained
What you should get from this section:
In this section, I want to give you a basic understanding of musical theory, but without
overloading you with information. If you know your stuff as far as musical theory
goes, you’ll notice that I’ve left a lot out, and this has been done on purpose.
If you DO have a good understanding and grounding already, you will just be able to
work through the book a bit faster.
Nomenclature :
During the course, I’ll be referring to chord names and interval names, so it’s
important that you understand what we’re talking about. These are the chord names
we’ll be using:
Major Chord :
Any time you see a letter on it’s own for example “F” you know we mean F Major. I
also may write it as “F Maj”, so either of these requires you play the Major chord.

Minor Chord :
If you see a letter followed by a little m E.g. “Fm” then this relates to the minor chord.
Again, I might write “F min”, or “F minor”, and either of these will relate to a minor
chord.
There are literally hundreds of chords, and variations, but you won’t need most of
them in this course, and there are plenty of chord books and chord information on
various websites available, so I won’t cover them all here. The purpose of this course
is to help you to compose music, not learn every chord in existence.
Flats and Sharps:
A flat note uses the symbol (b) and a sharp note uses the symbol (#).
The Octave:
An octave is a musical term that covers a total of 11 notes, and spans from one note,
to the next note of the same name. The notes within the Western musical range are as
follows:
A, A#/Bb, B, C, C#/Db, D, D#/Eb, E, F, F#/Gb, G, G#/Ab,
After the Ab, we end up at the A again. All the notes you’ll ever play will be one of
these. You’ll notice that there are no sharps or flats between the notes B and C or E
and F. There ARE exceptions to this rule, but you won’t need to learn them here.
The Major Scale :
The major scale is a series of seven notes that follow a particular order. The order is as
follows:
1 2 3 4 5 6 7 1

Root - Tone – Tone – Semitone – Tone – Tone – Tone – Semitone
This scale is the basis for all musical theory. You would probably recognise it from
your school days as:
Do – Re – Mi – Far – So – La – Ti – Do
The Minor Scale:
Each major key has a corresponding, relative minor key. The minor key will be in the
same key signature, and will contain the same notes as the major key. The only
difference between the two is that the minor key simply STARTS on a different note.
For example, in the key of C Major, the relevant, corresponding minor key is A
minor.
You can always find the relative minor key by counting up six notes from the root of
the Major key. So in the C Major example: C, D, E, F, G, A, B, C. Hence the minor
key starts on the A.
The sequence of a minor scale is different, and goes like this:
Root – Tone – Semitone – Tone – Tone –Semitone – Tone - Tone
So if as an example we use the A minor scale which is the relative minor scale of C
Major, we have the following sequence of notes:
A B C D E F G A
If we were playing in F Major, the relative minor would again begin on the sixth note
in the key, which would be the D, and the sequence of notes would be:
D E F G A Bb C D

Key Signatures:
A semitone (or half step) is the smallest increment on a western musical instrument.
On a piano, it is represented by moving from one key to the next, and on a guitar, it is
represented by moving from one fret to the next.
As an example, on a piano, moving from middle C to the black key directly next to it
on the right, we would get a C# would be a semitone. Moving from middle C to the
next WHITE key on the right, which is the D, would be a tone from the middle C
(also known as two semitones or a whole step).
On a guitar, moving from the open A string to the first fret on the A string A# would
be a semitone, whilst moving from the open A string to the second fret B would be a
tone (two semitones).
So if we look at the C Major scale, it looks like this:
C (root note)
Then up a TONE to D
Then up a TONE to E
Then up a SEMITONE to F
Then up a TONE to G
Then up a TONE to A
Then up a TONE to B
And finally up a SEMITONE again to finish back on C.
All major keys follow this pattern, and you can start a Major scale on any note.
A couple of things to be aware of: Some notes have the same sound, but different
names depending on which KEY they are in. For example, an A# is the same note as a
Bb as if you move up ONE semitone from A it becomes A# and if you move down
ONE semitone from B it becomes a Bb. Again, you don’t need to worry too much
about this if it’s confusing you as we’re going to stick mainly to simple chords and
keys throughout this site.

Keys :
As a reference, here is a list of all the keys, the notes within them, and the chords
within the key!
C Major :
Notes: C, D, E, F, G, A, B, C
Key signature: (No key signature)
Chords within Key: C, Dm, Em, F, G, Am, B diminished
G Major :
Notes: G, A, B, C, D, E, F#, G
Key signature: One sharp on the F line
Chords Within Key: G, Am, Bm, C, D, Em, F# Diminished

D Major:
Notes: D, E, F#, G, A, B, C#, D
Key Signature: Two Sharps on the F line, and C line
Chords Within Key: D, Em, F#m, G, A, Bm, C# Diminished
A Major:
Notes: A, B, C#, D# E# F#, G#, A
Key Signature: Three sharps on the F line, C line, and G line
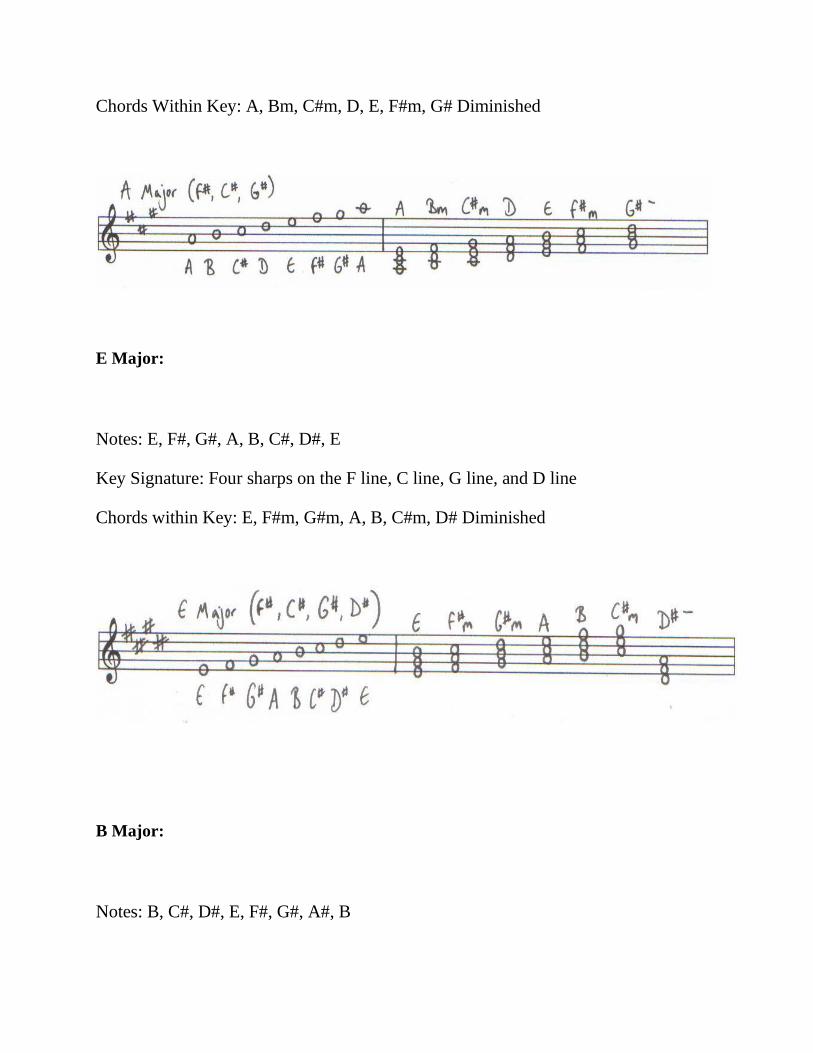
Chords Within Key: A, Bm, C#m, D, E, F#m, G# Diminished
E Major:
Notes: E, F#, G#, A, B, C#, D#, E
Key Signature: Four sharps on the F line, C line, G line, and D line
Chords within Key: E, F#m, G#m, A, B, C#m, D# Diminished
B Major:
Notes: B, C#, D#, E, F#, G#, A#, B
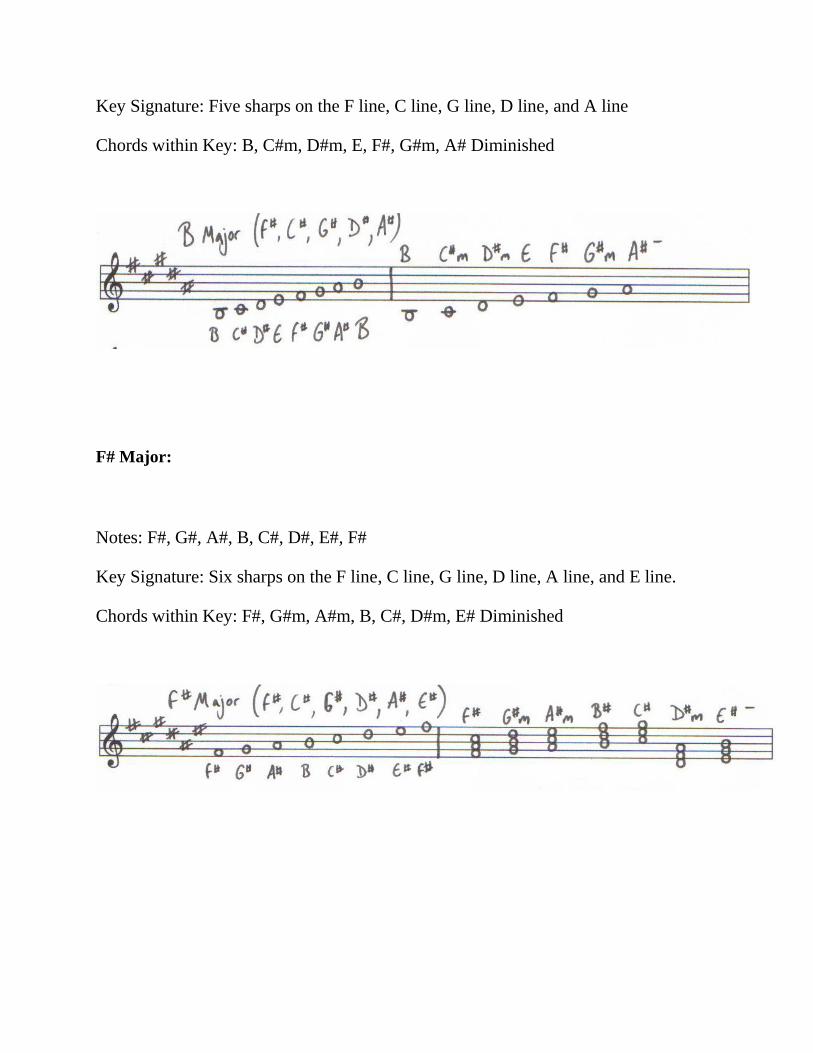
Key Signature: Five sharps on the F line, C line, G line, D line, and A line
Chords within Key: B, C#m, D#m, E, F#, G#m, A# Diminished
F# Major:
Notes: F#, G#, A#, B, C#, D#, E#, F#
Key Signature: Six sharps on the F line, C line, G line, D line, A line, and E line.
Chords within Key: F#, G#m, A#m, B, C#, D#m, E# Diminished

And Now The Flat Keys:
F Major:
Notes: F, G, A, Bb, C, D, E, F
Key Signature: One Flat on the B line
Chords within Key: F, Gm, Am, Bb, C, Dm, E Diminished
Bb Major:
Notes: Bb, C, D, Eb, F, G, A
Key Signature: Two flats on the B line and the E line
Chords within Key: Bb, Cm, Dm, Eb, F, Gm, A Diminished

Eb Major:
Notes: Eb, F, G, Ab, Bb, C, D, Eb
Key Signature: Three flats on the B line, E line, and A line
Chords within Key: Eb, Fm, Gm, Ab, Bb, Cm, D Diminished
Ab Major:
Notes: Ab, Bb, C, Db, Eb, F, G, Ab
Key Signature: Four flats on the B line, E line, A line, and D line
Chords within Key: Ab, Bbm, Cm, Db, Eb, Fm, G Diminished

Db Major:
Notes: Db, Eb, F, Gb, Ab, Bb, C, Db
Key Signature: Five flats on the B line, E line, A line, D line, and G line.
Chords within Key: Db, Ebm, Fm, Gb, Ab, Bbm, C Diminished.
Intervals and chords :
Without covering the gamut of musical theory, I want you to have a basic
understanding of intervals and chord structure. An interval is simply the difference
between one note and another, in particular how they relate to each other in a
particular key.

If we start in the key of C Major as it’s the easiest key, with no sharps or flats. If we
move from C to C#, that interval is a Semitone. This equates to one fret on the guitar,
or one key on the piano. If we move from C to D, that is a TONE. 2 frets, or two keys.
Below is a table comtaining a list of the intervals available if we start on the note C:
Original
note:
New
note: Interval name:
Number of
Keys/frets/Semitones
higher than original note:
C C#/Db Semitone (minor 2 nd) 1
C D Tone (Major 2nd) 2
C D#/Eb Minor 3 rd 3
C E Major 3 rd 4
C F Perfect 4 th 5
C F#/Gb Augmented 4 th/diminished 5 th 6
C G Perfect 5 th 7
C G#/Ab Augmented 5 th/Minor 6 th 8
C A Major 6 th 9
C A#/Bb Minor 7 th 10
C B Major 7 th 11
C C Octave 12
I’ve displayed the intervals only in the Key of C Major here.

This is the same for all keys. So if for example you were playing in Bb Major, and
you wanted to find the Major 3 rd, you just count up five semitones (frets or keys) and
you’ll land on D. Always take the root note (the one you’re starting on) as number 1.
Music Test:
A) What is the minor 3 rd from G?
B) What is the Perfect 4th of Eb?
Answers:
Bb
Ab
If you got these wrong, go over this section again, but don’t spend too much time on
it, you’ll begin to understand it a little more as we go along, and it’s just a matter of
counting up the keys or frets.
The Structure Of Chords:
Now we come on to chords. Again, without going too much into depth, MOST chords
are made up of three notes, which is the root of the chord, the third, and the fifth. For
example, if we take C major again, and write out the scale:
C, D, E, F, G, A, B, C, and attribute a number to each of the letters
1, 2, 3, 4, 5, 6, 7, 1
This is what we end up with. So if we take the numbers 1, 3, and 5, we get the letters
C, E, and G. These are the notes that make up a C chord.

Taking the second chord in C major (See Key section above), we have a Dm chord.
This time, as D is the ROOT note, we class D as number 1, and count up again.
So D becomes 1, F becomes 3, and A becomes 5 and so on. This is how nearly all
chords are formed; again, you needn’t worry TOO much about this, as you won’t need
to know it in great detail.
What notes make up an F Major chord?
Answer:
F A C
Musical Timing:
The purpose of a time signature is to show you what type of feel, rhythm, and speed
you should play certain notes, phrases and bars.
There are various time signatures in music. The two most common are Four-Four
time, and Three- Four time.
The first number in the time signature denotes the NUMBER of notes you will be
playing, PER BAR and the second number tells you what TYPE of note you’ll be
playing.
So if we’re playing in Four-Four time, you would have four even beats of quarter
notes, and count like this: One, Two, Three, Four, One, Two Three, Four etc.
If you were playing in three four time, you’d be using the same length notes, but only
count three of them per bar, for example: One, Two, Three, One, Two, Three etc.
The following are the most common types of note found in Western music, and each
of these notes also has a corresponding rest that has the same duration. These are also
found on the examples below.

Semi-breve:
These last for a full count of four beats and would normally last a whole bar in Four-
Four time.
Minim :
These last for two beats each, also known as a half note as each one of these notes
lasts for half a bar in 4/4 time.
Crotchet : These last for one beat each and are also known as a quarter note as each one of these
notes lasts for a quarter of a bar in 4/4 time.

Quaver : These last for half a beat each and are also known as an 8 th note as each of these lasts
for an 8 th of a bar in 4/4 time.
Semi-quaver: These last for a quarter of a beat each and arealso known as a 16 th note as each one
lasts a 16 th of a bar in 4/4 time.

As always, there is a lot that I have left out when it comes to timing, and again, this is
done on purpose as you won’t need to get any more complicated during this course.
Dotted Notes: If there is a dot directly next to the note, that means that it lasts HALF AGAIN the
value of itself.
For example, if you have a dotted Minim, it will last for three beats as 2 (the normal
value of a minim) + 1 (half the value of the minim) = 3.
There are other time signatures, and note values but you won’t need them on this
course, so we don’t need to go into them here.
How to count:
The easiest way I’ve learnt to count is using the “ta-fi-ti-fi” method.
Basically what you do is:
Count “Ta” (pronounced “ta” as in “tap”) if it falls on the beat
Count “Ti” (pronounced “ti” as in “tin”) if it’s a quarter note
Count “Fi” (pronounced “Fee”) if it’s a sixteenth note. Here’s an example:

Well I’m glad to say that’s about as complicated as it’s going to get. . . In FACT, it’s
all going to be a LOT easier from now on!
What we’ve covered:
Key signatures
The Major scale
Intervals
Basic chord theory
Counting
You now have a reference to use as and when you need it.
Pinch A Rhythm To get Writing Music Quicker!!
What you should get from this technique:
After learning this technique, you should be able to take a song of your choice (or a
combination of songs) and by simply copying the rhythm, create an original piece of
music of your own. I know this sounds a bit like cheating, and TECHNICALLY it is, but
if you read through the exercises and try it out, you’ll see that it’s a very good way
of quickly and easily coming up with something you can use, and when you add different
notes to an old rhythm, it genuinely does become original.
The Technique:
If you can HEAR a piece of music then you can WRITE a piece of music. This is one of
my favourite techniques, and it’s SO easy to incorporate that you should have a lot of
fun with this, even if you just experiment with it for a bit. Basically, this is what
you do:
Take a piece of music you are already familiar with, and that you like, and
write down the rhythm of it WITHOUT COPYING THE NOTES!
Add your own notes to the rhythm
Add harmony, embellishments, and backing to the piece you’ve just written.
That’s it.
Isolating The Rhythm:
The first thing we need to do is isolate the rhythm you want to copy. Listen to any
piece of music that you like, and decide on the rhythm section you want to copy.
The easiest way to copy it, is to either clap or tap it out, or use the “ta-fi-ti-fi”
method I explained earlier.

Once you have isolated the rhythm, either write it down on your manuscript paper, or
record it as a sequence of taps or claps, but with no melody or harmonic structure
whatsoever. Here is an example:
This example, (below) is taken from the intro of Mozart’s “Eine Kleine Nachtmusic”. A
VERY well know piece of music, but I BET that had you just listened to the tune that I
created from it, without knowing what I was up to, you wouldn’t have been able to
guess that I’d copied the rhythm. I’ve changed the individual notes and chords so much
that it’s become totally unrecognisable as the previous tune. Here is the Mozart
version:
And here is what I did with it. You’ll notice that the top line rhythm is EXACTLY the
same, but the notes are completely different:
So if you look at the top line in the example above, it’s an identical rhythm to the
Mozart piece. What I’ve done there is add some bass notes, (as a harmony, which we
shall be working on later), change the key, and hey presto, we have a brand new piece
of original music!
Just from that simple example, I’m sure you can see how easy that was to do, and also
how effective it is.
Let’s look at another example. This is the intro section to the Red Hot Chilli Peppers
song “Don’t Forget Me”. It’s an awesome song, yet the whole thing is built on a simple
rhythm like so:
We shall be going through this song in greater detail later, but for now, I just want
you to think of the rhythm.
Now I’m going to use exactly the same technique, but instead of creating some new
chords or melody, I’m going to create a new bass line instead. Now that I’ve got the
rhythm, I simply created a basic bass line using the same rhythmic structure, again
just changing the notes I’m playing.

I could just as easily have used this rhythm for a bass line, a melody line, a chord
progression, or a vocal line, lead breaks, pretty much anything you like.
One of the great things about this technique, is that it doesn’t have to be limited to
just one rhythm from one piece of music either. Let’s say for example you heard a
couple of pieces of music you liked, and thought the rhythm’s gelled well together.
You can by all means take the rhythm’s of several sections, from several songs, and
incorporate them into yours, adding individual bars from as many songs as you like,
until you have what you want. Practicing this technique will make you realise that
it’s EASY to create rhythms to bass (like the pun?) your music on.
What we’ve covered:
How to take a piece of music and isolate the rhythm
How to take multiple pieces of music and combine the rhythms within various
bars to make your own combination
Adding your own melody and harmony to already well known rhythms
Exercises:
Find five pieces of music you like, isolate the rhythms and either write them
down or clap them out onto your recording equipment.
See if any of them make a good combination (rhythmically only) and combine them
if they do.
Add your own notes to the rhythms to create something new.
Create a simple bass line using one of the above rhythms.
Practicing Your Instrument
I recently watched a video on Youtube all about Kendo masters in Japan. For those of
you who don't know Kendo, it's the Japanese art of Sword fighting, what would have
been the Samurai long ago.
What on earth has that got to do with music I hear you ask?
Actually, quite a lot.
The documentary was about an hour long, and it showed the build up to the 8th Dan

gradings that take place twice a year in Japan.
What was interesting was this..
To even be accepted to TAKE the exam, you have to have been a 7th Dan for 7 years,
and you have to be a minimum of 48 YEARS OLD!!
A MINIMUM!
There were guys there in their 80's taking the exam, and had been taking it for about
20 years in a row and failing 20 years in a row.
Still they practiced daily, and came back year after year.
So what??
What can WE learn from this?
Discipline With Practice
1) Discipline. How often do we actually practice the important things?
One of the guys on the documentary practised just ONE single strike for an hour per
day. If he can do it,
so can you, and gues what, you're going to be pretty damn good at something if you
practice it for an
hour each day!
So even when your practice "seems" boring, just remember the long term goal, and
focus on that. I met a
violinist the other day that was absolutely amazing. I asked him how long he'd been
playing, and how long
it took him to join an orchestra.
It took him 11 years to be good enough to join an orchestra and he's now been playing
for around 47 years. Guess what.... He STILL practices his scales. That's why he's so
good.

Be Patient While Practicing
2) Patience. In the West, we always want the quick fix and the instant result.
Sometimes, the ONLY way to get good at something is practice, practice, practice and
practice some more.
If you're getting frustrated with your composing or music skills, just remember the
little old 80 year olds that have been doing the same moves for DECADES.
And think about the violinist. Would YOU wait 11 years to get good at something?
Mental Rehearsal
Did you know that you don't even need your instrument to practice?
Many professional athletes and musicians practice IN THEIR MIND the moves and
techniques that they want to master.
It's a scientific FACT that your brain cannot distinguish between what happens inside
your mind, with what happens out in the real world.
The same neurological pathways are fired when you do something in your mind, as
when you do something for real. This is why when we think about things that were
sad, we sart to feel sad, and when we think about happy times, we smile.
Here's a little routine you can do to get even better at your music.
1) When you get into bed, decide on ONE thing you want to improve
on your instrument or composing skills.
2) Spend just five minutes, mentally rehearsing it, MAKING SURE
YOU PRACTICE IT PERFECTLY IN YOUR HEAD WITH NO MISTAKES.
3) Make sure that when you do your mental rehearsal, you are associated
into the image. Basically what this means, is that you feel yourself
doing it, rather than looking at an image with yourself in the image
(I hope that made sense).

4) Repeat daily.
5) See how much of a difference it makes in your playing/writing
skills.
The great thing about this exercise, is that you can apply it to
any area of your life that you want to improve.
Putting Chords to an Existing Melody
What you should get from this section:
After completing this section, you should be able to take an existing melody and put
chords, and a bass line to it to create a strong structure.
There are several things you can do to help you put a chord progression to an existing
melody that will make your life a lot easier. Here are a few of them:
The first thing you should try to do is work out what key it’s in. This will make
it a lot easier, as if you know what key you’re playing in, you can pick chords
from that key (see section on theory). How do you do this?
Well, first of all, play the melody. Are there lots of sharps or flats in there? If
so, look at the key signatures in the theory section and see what ones match the
notes you’re playing. Do they match any particular key? If there are F#’s in the
melody, but C naturals, then it might be in G. If there are lots of Bb’s and Eb’s
but natural A’s it may be in Bb major.
If that hasn’t helped, then see what note the melody starts and finishes on.
Quite often a melody will start and/or end on the note of the dominant chord in
the key. So if it’s in A for example, it will quite often start on that note and/or
end on that note.
It could be in the relative minor key. Every Major key has a relative minor key,
which contains the same notes, and the same chords as the Major; it simply

starts on a different note. For example, in the Key of C Major, the relative
minor is Am. So if the piece looks like it’s in C, but starts and/or finishes on A,
it’s probably in A minor. The way to find the relative minor key from each
Major key is to simply count up 6 notes from the root. For example in C Major:
C=1, D=2, E=3, F=4, G=5, A=6 (And this is the minor key). Note how it’s
different from the A Major key.
Try putting a simple bass line to the melody. As bass lines are fairly easy to
write, you should have no problem with this. Once you’ve got the bass line,
take the root notes and use the chords that they correspond to. See if it fits.
Try putting a standard chord progression to the melody. For example, I, IV, I,
V (In C this would be C, F, C, G). The reason this might work is that the way
our Western musical ears are “tuned”, we automatically follow certain musical
patterns without even thinking about it, subconsciously creating melodies that
fit in with the “norm”.
Strip the melody down to its bare essentials. Take out all the notes that aren’t
totally necessary to the overall feel of the melody, and see if that makes it
easier once you’ve got down to the core of the melody.
Here is an Example of how I’d put chords to a melody. Let’s start with a melody that
everybody knows. Amazing grace:
Well it’s in the Key of C Major for a start (it’s easy as I wrote it down in that key, but
I DID work it out...honest)
So the notes in the 2nd bar are C and E. So it’s in C Major, the first accented note is a
C, and the notes in the bar are a C, and an E which are the root and third of the C
Major chord. Do you think a C chord might work here? Let’s try it…Ok, that works!

Next bar. The notes are an E and a D. The E lasts for the majority of the bar however,
so let’s concentrate on that note. We’ll try an Em as it’s the obvious choice, but if you
play it, it doesn’t sound very good so let’s discard that chord. Am also has an E in it,
so let’s try that chord. Ahhhhh much nicer, so we’ll stick with that!
The next bar contains a C and an A so Am could work again here, but I have a hunch
that we should go back to C. Ok that works well.
Where did my hunch come from? I thought it was an appropriate place to change the
chord, and we’d just been on Am so I assumed that C would work, and as the main
note in the bar is a C it stood to reason that it would fit.
Next bar only contains the note G. As the chord G is in our key, and it seems obvious,
let’s try it. . . Bingo! It works.
The next bar is the same as the 2 nd bar so I think it’s safe to try a C there.. Yep, it
fits.
Next bar again, same as the third so we’ll stick an Am in there and it works a treat.
The next TWO bars seem to stay on G, so let’s try a G chord holding it for two bars.
Do you think that worked? Yes it did, so it seems we have a chord progression here
that’s working. If we play the second half of the song using exactly the same chords, it
works fine.
The only difference is the last two bars where we need to finish up with two bars of C
Major, instead of two bars of G Major.
So this is what it looks like with the chords added:
So what guidelines did this melody follow??
We ascertained the key as C Major.
All the notes were in the key, which made it easy. No accidental sharps or flats.

The first AND last chords were C Major, so it followed that basic rule.
All the chords were within the key.
By taking the main notes of the melody, we were able to attribute chords to
them pretty easily.
So what did you learn in this section?
How to take a basic melody and break it down bar by bar to find out what
chords would fit.
Different methods of working out the chords within a melody.
How to ascertain the key a melody is being played in.
How to work out the relative minor keys of the Major key.
Exercise:
Take a couple of melodies, either well known ones, or ones of your own
creation, and using the techniques above, work out what chords would fit with
the melody. Then using your composing skills, add nuances to it to make it a
little more interesting.
Creating A Winning Song Structure
What you should get from this section:
After this section you should have a basic understanding of the key elements of a song
structure, and how to create a song structure using the basic elements.
Creating a song structure can be as easy or as complicated as you like. For the
purposes of this course, the idea is to get you to learn basic composition skills, so
we’ll keep it pretty straightforward.
The good news is, that MOST songs in popular genres normally only utilise between
3 and 6 different sections or parts. This makes your job a lot easier as you won’t have
to try and create 10 different sections for each song you write, and it can be a
relatively quick process. I think the quickest I ever wrote a song was in about 4
minutes (not the lyrics).
So let’s look at the different elements of a song structure, and then we’ll take a look at
three well know songs, break them down, and examine them as well.

Intro : This is quite often the same chords/dynamics as the verse or chorus, mainly
the verse. (“When You Were Young” by the Killers is an example of the chorus being
used as an intro).
Verse : Normally a pretty straightforward structure, containing four to 8 chords.
Chorus : Again, normally pretty straight forward, and consisting of four to eight
chords. There is normally a change in the dynamics of a chorus to make it stand out.
These include volume, intensity, catchyness (is that a real word?), and timbre.
Bridge : This is often literally a bridge-between the verse and the chorus, or the
chorus and the verse. This is especially useful when you have a key change from one
to the other, or the transition from verse to chorus or vice versa isn’t particularly
smooth.
Middle 8: This section is used to break up the song so it isn’t just a sequence of
Verse-Chorus-Verse-Chorus. Can change the whole feel of the song, and if used
properly can make or break it. Again, the dynamics are normally different to add
variety.
Outro : Finally, like the intro, this can often simply be a repeat of the verse or chorus
chords/structure, but can also be totally different. Remember, there are no rules.
Building intensity during a song!
As mentioned earlier, MOST choruses have a more intense feel about them, with
more dynamicness (another new word), going on! There are many ways to achieve
this, using various different methods and different instruments, so let’s take a look at
some of them now:
Crescendo/Diminuendo
These are simply musical terms for an increase or decrease in volume. Building the
overall volume will obviously increase the intensity (though be careful to make sure
you don’t just use volume for volume’s sake and lose the feel, and nuances of the
music). Decreasing the volume will lower the intensity of the music, and is a
technique often employed when leaving a chorus and returning to a verse. (Listen to

CREEP by Radiohead). You can obviously reverse this effect if you want a more
chilled out chorus.
Drums
The Drums play a MASSIVE part in building the intensity of your music, and they
have many different ways of doing so. Here are a few examples:
Adding more fills on the toms, snare, kick drum, leading into, or out of a
chorus/bridges. This lets the listener know that something is coming and they’d better
be ready!
Doubling your beats on the high hat from quarter notes to half or eighth notes. This
gives the impression of increased speed.
Changing the beat altogether. This works wonders as it completely changes the feel of
the piece.
Doubling speed, halving speed, etc. Again, this lets the listener know that something
is changing.
Change from a closed high hat to an open high hat for a louder, more open sound.
Move from the closed high hat to the ride for a different sound.
Guitars and Bass
Again, the guitars can play a MAJOR role in changing the dynamics of a piece of
music, and helping to travel from a verse into a chorus or vice versa. Here are just a
few of the things you can do with it to change the way the music carries.
Increase volume
Move from simple picking to full chords. Again, will boost the volume, and increase
the intensity. Likewise, changing back to simple picking will have the opposite effect.
(Coldplay’s Politik is an excellent example of this).
Adding effects such as distortion, chorus, flange, delay, reverb, will alter the sound
and can be used to increased or decrease the intensity. (Radiohead’s Creep is a perfect
example)
Changing octave. Moving from one octave to either a higher register, or lower register
will change the feel of what you’re doing, and can be employed to good effect.

Frequency of notes. By playing more of the same thing per bar, it’s going to sound
“busier” so will add intensity. The opposite is also true.
Adding bass notes to your melodies/chords will also boost the sound and add
intensity.
Keyboards/Piano.
Piano or keyboards, like guitar can totally change the effect and intensity when used
correctly. Here are some examples: Moving from playing single notes or harmonies to
full, rich chords will boost the sound and add intensity and depth. Heavy bass notes
will do the same.
Frequency of notes
For example, doubling the amount of notes you play per bar will give the impression
of acceleration. If using a keyboard, adding effects will do the same thing as adding
guitar effects. (Listen to Keane for examples of this).
I’m not going to go through each instrument, as I’m sure you get the idea. Try
experimenting and see what works for your particular style, and your particular sound.
Ok, so now we have the basic ingredients, let’s take a look at three well-known songs,
break them down, and examine the structure. You’ll see just how easy it is to write a
song after this section. I strongly suggest listening to these songs so you get an
understanding of how they’ve applied what they have to them, and get a better
understanding of the ideas behind them. You should be able to find the chord
progressions online somewhere. Google them and I’m sure you’ll find them.
Song Number One:
Don’t Forget Me by The Red Hot Chilli Peppers
This song is a PERFECT example of how simple it can be to write a song. It only
consists of four chords, and always played in the same order But this song is a
MASTERCLASS of using dynamics to create an effect. Listen to how each
instrument changes the way it’s played during each section to increase or decrease
intensity. If we look at it in a little more detail then, this is the structure of the song:
Intro – Verse – Bridge – Verse – Chorus – Bridge – Verse – Chorus – Solo – Verse
And the chords throughout the whole song are: Am F C G

Song Number Two:
Give In To Me by Michael Jackson
Another great example of simple song writing, simple structure, and a great use of
dynamics. Again, just a few chords used here, but very effective. The chords used are
as follows: Intro and verse: Em – C D Chorus: Em – C D Bridge: (From verse into
chorus) B5 – A5 – B5 – D5 (Chords with just the root and 5 th. No 3 rd) Middle 8:
Am – G – Em – Em – Am – G – F – B So as you can see, pretty straight forward. I
told you composing was easy :-)
Song Number Three: Space Oddity by David Bowie
Going back a bit here. A lot of you probably won’t remember this song, but it’s
definitely worth checking out. We get a little bit more complicated here, and start
going out of key, and throwing chords in that SHOULDN’T fit if we followed the
rules, but we’re not always going to do that remember.
The chords in this song are as follows:
Intro: C – Em – C – Em – Am – Am7/G (G on the bass) – D7
Verse: C – Em – C – Em – Am – Am7/G (G on the bass) – D7
Chorus: C – E7 – F – Fm – C – F – Fm – C – F
Bridge: FM7 – Em7 – FM7 – Em7 – BbM7 – Am – G – F
Middle 8 : C – F – G – A – A – C – F – G – A – A – FM7 – Em7 – A – C – D – E
This song goes out of key several times, using Fm chords, and Bb Major chords, but it
works, and remember that the only rule you really want to follow, is whether or not is
sounds good!
So what have we covered in this section?
The basic elements of a structure
How to use your instruments to build or decrease intensity
How simple it can be to create a structure
How to use a few simple chords to create a song structure

Using just a few chords, create a VERY BASIC song structure
Once you’ve successfully completed exercise 1, create a verse, chorus, and
bridge/middle 8 using chords from the same key, and put them all together to form a
new song.
Now using technique number 4, break the verses down to create a more varied set
of dynamics for your song
Experiment with using chords that aren’t within the key, to make an even more
varied chord progression for your song.
Decide on the type of dynamics you want to employ within your song to give it
colour, variety, and depth.
Learn The Simple Way To Write Melodies.
What you should get from this section:
The basics on how to write a melody.
Some guidelines on things what to do, and what NOT to do, though remember
that they are only guidelines, and there are no hard and fast rules.
Now that we’ve covered creating an actual song structure, and we have a foundation
in place, we’re going to need a melody line. You may want the melody line for the
vocals, the guitar, the piano’s, or whatever, so let’s look at some of the keys to
creating a melody, and examine some of the basic guidelines.
Repetition.
For a melody to really work, it has to have some degree of repetition. For example,
THIS wouldn’t work as a melody:

Although we need repetition, we don’t want to be TOO repetitive. It’s a fine line
between catchy, and annoying so we need to give it SOME variety as well. Here is an
example of a basic melody with JUST enough repetition to be memorable, but not too
much to get on your nerves.
Tings you can do to keep it memorable, but not boring, while still following the theme
are:
Change the dynamics within the melody. I.e. Increase the volume of some of
the notes within the melody, decrease the force to make them quieter, and stand
out.
Harmonic changes. Add slides (if on guitar), add ghost notes and notes in
between, chromatics etc.
Rhythmic changes. Speed it up, slow it down, pauses, play some sections in a
different rhythm while keeping the same notes etc.
Add harmony to some of the notes to create texture
Add sound effects
Change which instrument is playing the melody.
The Shape of the Melody
A melody will NORMALLY follow a pattern of up’s and downs, and tends to FLOW.
If it just climbs up the stave, or descends down the stave, it’s going to sound more like
a scale than a melody. This is fine during solos but as a CORE melody of a song, it
should have some sort of up and down pattern. If we look at the last melody we
played, I’ve drawn it out so that you can see what I’m talking about.
Notice that it kind of flows, and doesn’t just jump all over the place from one end of
the stave to the other. Doing that could be effective for creating a certain type of

sound, but wouldn’t really work most of the time if you want a nice, smooth sounding
melody.
A melody will normally be contained within ONE octave. As always, there is no hard
and fast rule with regards to this, but as a general guideline, this would normally make
sense. It loses its “catchyness” (there’s that word again) if it goes too far between
ranges.
Here’s the other melody with no shape, or repetition with the shape also drawn on.
Notice how erratic and shapeless it looks.
Length of the melody
The length of your melody will obviously depend upon its purpose, but as a general
guideline, you would want to keep it short enough to be catchy, but long enough to
have variety. There’s probably not much call for a 57 bar melody unless you’re
playing some kind of weird Avant Garde music.
If you’re playing the melody over an intro, verse, chorus, or bridge, it’s going to have
to be the same length or shorter, so bear that in mind.
Coming up with the melody
There are many different ways of actually creating your melody. The way I normally
do it is to improvise, and play along to whatever chord progression the melody is
going over. Once I know what key I’m going to be playing in, I can work out what
scale or scales I need to use (without paying TOO much attention to the rules). Also,
knowing the chords gives me good starting references, and it normally just flows.
Another way is to use one of the earlier techniques to create your melody, then just
transpose it (Change it’s key) and fit it to your song structure.
If you’re having any trouble coming up with melody ideas, go and make a cup of tea
or coffee, listen to something else to give you inspiration, and then come back to it.
What we’ve covered in this section:
The basic SHAPE of a melody
Repetition guidelines
How to keep your melody following a basic theme, while maintaining variety
Determining the length of your melody
How to put an existing melody to a song structure
Exercises:
Using the above ideas, create a new melody or set of melodies for your new
song structure/s that you created during the last section.
Experiment with using harmony and harmonic changes within the melody to
give it variety.
Tips On Writing Lyrics
If I’m going to be 100% honest, lyric writing isn’t something I’ve had to do very
much as with all the bands I’ve been in, this was the vocalist’s job. HOWEVER, I do
know enough about it to give you a few tips and pointers.
There are obviously many ways to get inspiration for lyrics. Some people write
poetry, some tell stories, some just talk absolute nonsense, and they all have their
places, and their fans.
A few pointers:
Do you have a specific audience? If you do, you need to tailor it towards them.
If your audience are teenagers, you’re going to need different lyrical content
than if you’re writing for the over 50’s.
Is there a theme you’re trying to get across? If so, obviously you need to stick
to it.
If you’re going for the story telling option, you need to have a start, middle, and
an end to the story.
Do you want it to rhyme? If so, get your thesaurus out.

Is there a hidden message in your song? If so, define it, and think about how
you’re going to convey it to your audience.
Some lyricists write their lyrics first, and the music second.
Others prefer to write the music first so that they have a feel for what they’re going to
be putting into the song.
There is no specific, set way of doing this.
Other things to consider:
Do you want the chorus’s to all be the same, or do you want to change them to
keep it more interesting?
Is it going to be a serious song, or do you want some humour in there?
Does it sound too much like somebody else?
Another technique used by a lot of clever lyricists, is to slightly change the words
during the various sections of the song, yet keep the meaning the same. A good
example of this is “Trouble” by Coldplay. If you listen throughout, he keeps the theme
going, yet changes the words. Very clever.