smart mobile height- adjustable floor stand
TRANSCRIPT

SMART Mobile Height-Adjustable Floor StandIntegration and Cabling Guide
For SMART Board™ 600 and 800 interactive whiteboard
projector systems

Product Registration
If you register your SMART product, we’ll notify you of new features and software
upgrades.
Register online at www.smarttech.com/registration.
Keep the following information available in case you need to contact SMART
Technical Support.
Serial Number: ___________________________________________________
Date of Purchase: ___________________________________________________
FCC WarningThis equipment has been tested and found to comply with the limits for a Class A digital device, pursuant to Part 15 of the FCC Rules. These limits are designed to provide reasonable protection against harmful interference when the equipment is operated in a commercial environment. This equipment generates, uses and can radiate radio frequency energy and, if not installed and used in accordance with the manufacturer’s instructions, may cause harmful interference to radio communications. Operation of this equipment in a residential area is likely to cause harmful interference in which case the user will be required to correct the interference at his own expense.
Trademark NoticeSMART Board, SMART Hub, smarttech, the SMART logo and all SMART taglines are trademarks or registered trademarks of SMART Technologies ULC in the U.S. and/or other countries. Molex is a registered trademark of Molex, its affiliates, related companies, licensors and/or joint venture partners. Blue-ray is a trademark of the Blue-ray Disc Association. HDMI is a trademark or registered trademark of HDMI Licensing LLC. Phillips is a registered trademark of Phillips Screw Company. All third-party product and company names may be trademarks of their respective owners.
Copyright Notice© 2011 SMART Technologies ULC. All rights reserved. No part of this publication may be reproduced, transmitted, transcribed, stored in a retrieval system or translated into any language in any form by any means without the prior written consent of SMART Technologies ULC. Information in this manual is subject to change without notice and does not represent a commitment on the part of SMART.
03/2011

Contents
1 Best practices for cabling your FS-UX .................................................................. 1
Introduction ..................................................................................................... 1
Best practices for cabling................................................................................ 3
Customizing your cables................................................................................. 4
2 Cabling an 885ix system to an FS-UX .................................................................. 5
Introduction ..................................................................................................... 5
Mounting your HAWM-UX/UF mobility switch ................................................ 6
Placing cables for HAWM-UX/UF-mounted components ............................... 8
Placing cables for other components............................................................ 16
3 Cabling an 880i4 or 885i4 system to an FS-UX .................................................. 23
Introduction ................................................................................................... 23
Mounting your HAWM-UX/UF mobility switch .............................................. 24
Placing cables for HAWM-UX/UF-mounted components ............................. 26
Placing cables for other components............................................................ 32
4 Cabling a 685ix or D685ix system to an FS-UX.................................................. 39
Introduction ................................................................................................... 39
Mounting your HAWM-UX/UF mobility switch .............................................. 40
Placing cables for HAWM-UX/UF-mounted components ............................. 42
Placing cables for other components............................................................ 49
5 Cabling a 600i4 or D600i4 system to an FS-UX ................................................. 59
Introduction ................................................................................................... 59
Mounting your HAWM-UX/UF mobility switch .............................................. 60
Placing cables for HAWM-UX/UF-mounted components ............................. 62
Placing cables for other components............................................................ 66

6 Cabling a 600i3 or D600i3 system to an FS-UX ................................................. 75
Introduction ................................................................................................... 75
Mounting your HAWM-UX/UF mobility switch .............................................. 76
Placing cables for remotely mounted components ....................................... 78
Index ................................................................................................................... 91

Chapter 1
Best practices for cabling your FS-UX
Introduction ..................................................................................................... 1
Best practices for cabling................................................................................ 2
Customizing your cables................................................................................. 3
IntroductionYour SMART Mobile Height-
Adjustable Floor Stand (FS-UX)
supports a SMART Board™
interactive whiteboard system
mounted on a SMART Height-
Adjustable Wall Mount
(HAWM- UX/UF) as well as any
system components. Mounting
your HAWM-UX/UF on the FS-UX,
rather than installing it
permanently on a wall, enables
you not only to operate your
interactive whiteboard system at
multiple levels but also to move it
easily from location to location.
The FS-UX has space in its base and an optional laptop shelf to support a host
computer and a guest computer.

2 | CHAPTER 1 – BEST PRACTICES FOR CABLING YOUR FS-UX
Cable connections from the
HAWM-UX/UF are routed
through the cable management
pass-through holes, one at the
top for management of the IEC
power cable, and one on each
side of the FS-UX for
management of projector and
peripheral cables. These holes
allow access to the power bar
and to route cables. This cabling
requires special precautions and
careful examination of the
lengths of cable you need to
install your system components.
If you’re connecting your
HAWM-UX/UF to a wall, see the
HAWM-UX/UF
Height-Adjustable Wall Mount
Integration and Cabling Guide
(smarttech.com/kb/147509) for
additional instructions.

3 | CHAPTER 1 – BEST PRACTICES FOR CABLING YOUR FS-UX
Best practices for cablingUse the best practices in this section
when placing cables for any type of
interactive whiteboard system mounted on
an FS-UX. Following these best practices
makes it easier to install peripheral
devices to your interactive whiteboard
system, improves the safety and security
of your system and prevents damage to
your devices.
Connect all power connections to the
power bar (not included) that you installed
in the FS-UX. Use this power bar as the
main power connection for all FS-UX
mounted components.
If you need to connect a peripheral device, guest computer or laptop to the interactive
whiteboard system, make sure the cable is long enough so the computer or peripheral
isn’t pulled by the HAWM-UX/UF at its lowest or highest height. Attaching the laptop to
the laptop shelf will ensure that this doesn’t occur.
Place your peripheral devices near the FS-UX on a solid platform. If the peripheral
device moves or can move, it can cause cable strain if the device moves too far from
the FS-UX.
Before placing cables, note the height and location of cable access points (such as
cable tray access hatches, ethernet ports and power outlets) and restrictions in the
room, and note closer locations for your FS-UX to these access points.
WARNING
To prevent a tripping hazard, bundle excess cabling or use cable ties and cable
management clips.

4 | CHAPTER 1 – BEST PRACTICES FOR CABLING YOUR FS-UX
Customizing your cablesCables supplied by SMART for connecting your projector to the extended control
panel (ECP) or interactive whiteboard are long enough to accommodate the additional
distances your HAWM-UX/UF and FS-UX require. You might need longer cables to
connect your interactive whiteboard system to your FS-UX-mounted computer and to
other peripherals.
Before customizing or buying cables, assess your FS-UX location and follow these
best practices for customizing your cabling to your peripheral devices:
• Carefully measure the distance between your devices and their connection
locations on the interactive whiteboard system. Measure the distances at the
HAWM-UX/UF’s lowest and highest height, and use the longest distance as your
minimum cable length.
• Make sure there’s enough slack in your cables to minimize cable strain.
• When measuring the minimum cable length, make sure there are no obstructions
in the cable’s path. A rising or descending cable can catch on an obstruction
unless the cable is properly secured out of the way of the obstruction.

Chapter 2
Cabling an 885ix system to an FS-UX
Introduction ..................................................................................................... 5
Mounting your HAWM-UX/UF mobility switch ................................................ 5
Placing cables for HAWM-UX/UF-mounted components ............................... 7
Placing cables for other components............................................................ 14
IntroductionSMART Board 885ix interactive whiteboard systems include an extended control
panel (ECP) located on the interactive whiteboard and a SMART UX60 ultra-short-
throw projector.
IMPORTANT
Before following these instructions, install your FS-UX and interactive whiteboard
system according to the SMART FS-UX Installation Guide (smarttech.com/kb/
145748). The instructions below are a supplement to, and not a substitute for, the
installation guide.

6 | CHAPTER 2 – CABLING AN 885ix SYSTEM TO AN FS-UX
Mounting your HAWM-UX/UF mobility switchThe mobility switch controls the vertical movement of the HAWM-UX/UF and your
interactive whiteboard system. The mobility switch is wired directly to the rear panel of
the HAWM-UX/UF. Use the installation guide and the following procedure to place and
mount the mobility switch.
To mount the
mobility switch
1. Locate the HAWM-UX/UF mobility switch. If you haven’t done so already, remove
and discard the plastic bag that holds the mobility switch.
2. Choose the mobility switch’s mounting location. There are mounting holes on the
left and the right sides and near the top and the bottom of the interactive
whiteboard.
IMPORTANT
If you installed or plan to install the SBA-L Projection Audio System, mount
the mobility switch on the bottom mounting holes.

7 | CHAPTER 2 – CABLING AN 885ix SYSTEM TO AN FS-UX
3. Secure the mobility switch cable using a Phillips® No. 2 screwdriver and the two
screws listed inside the HAWM-UX/UF installation guide. Secure the cable toward
the side of the interactive whiteboard where you chose to mount the mobility
switch and make sure that the cable is toward the bottom of the switch as you
mount it.
4. Place the cable through the
HAWM-UX/UF’s lower
cable clip, making sure that
the cable is taut between
the interactive whiteboard
and the clip and loose
between the clip and the
base of the HAWM-UX/UF.
5. Bundle the excess cable,
making sure that there is a
minimum of 28" (71.1 cm)
excess straight length or a
14" (35.6 cm) loose loop of
cable.

8 | CHAPTER 2 – CABLING AN 885ix SYSTEM TO AN FS-UX
Placing cables for HAWM-UX/UF-mounted componentsTo prevent cable friction, SMART recommends that you first place the cables that
don’t shift after they’re installed. Cables that connect components mounted to the
HAWM-UX/UF don’t shift after they’re installed. The wire management bundle (WMB)
shifts only if it’s connected to the wall or to a guest computer.
Using the SMART UX60 projector connection panel for HAWM-UX/UF-mounted componentsYou can connect a variety of peripheral devices to your projector, including DVD/Blu-
ray players, VCRs, document cameras, digital cameras and high-definition sources,
as well as peripheral device outputs such as powered speakers. The following
diagram and list identify the projector’s connections to HAWM-UX/UF mounted
components.
To access the projector connection panel and wire management clip, remove the
input/output cover on the left side of the projector and remove the cable covers. For
more information, see the SMART Board X800ix Interactive Whiteboard System
Configuration and User’s Guide (smarttech.com/kb/150502).

9 | CHAPTER 2 – CABLING AN 885ix SYSTEM TO AN FS-UX
The following diagram and list identify the projector’s connections to
HAWM-UX/UF-mounted components.
Number Function
1 3.5 mm audio output connector (recommended for SBA-L speakers)
2 4-pin power mini-DIN 5V/2A connector (reserved for ECP harness
cable)
3 7-pin mini-DIN connector (reserved for ECP harness cable)
4 3.5 mm audio input connector (reserved for pen tray audio cable)
5 HD-DB15 (VGA 2) input connector (reserved for WMB)
6 RCA jack composite video input (reserved for RCA pod)
7 DB9 control (reserved for ECP harness cable)
8 RCA jack audio left/right input (reserved for RCA pod)
2
3
7
4
6
5
1
8

10 | CHAPTER 2 – CABLING AN 885ix SYSTEM TO AN FS-UX
Using the SMART UX60 projector’s ECP for HAWM-UX/UF-mounted componentsThe following diagram and list identify the ECP ports that connect to
HAWM-UX/UF-mounted components.
NOTE
The 4-pin connector cable is an optional accessory that you can order from your
authorized SMART reseller (smarttech.com/where)
Number Function
1 USB A jack (for USB drives)
2 Power button and status LED
3 Volume control
4 Input selection
5 Two mini USB B jacks (connect to computers 1 and 2)
6 11-pin connector (connects to ECP harness cable)
7 4-pin connector (for room control)
2
3
45 76
1

11 | CHAPTER 2 – CABLING AN 885ix SYSTEM TO AN FS-UX
Connecting the SMART UX60 projector’s ECP harness cableThe ECP harness cable controls all signals and commands sent between the ECP
and the projector. To install your ECP, follow the instructions in the SMART Board
X885ix Interactive Whiteboard System textless installation instructions
(smarttech.com/kb/149616).
To connect your
projector’s ECP harness
cable
1. Attach the SMART UX60 projector’s ECP harness cable to the projector. Attach
the 4-pin power mini-DIN connector and the 7-pin mini-DIN connector to the
projector’s connection panel, and the DB9 to the control port, as listed in the
projector connection panel (see page 8).
2. Place the harness cable through the
cable management clip under the
projector. Make sure the harness
cable’s strain relief sits above the
clip point.
IMPORTANT
To add slack to the cable, move
the cable to the clip’s
foam-padded section, increase
the length of cable between the
clip and the projector and close the clip.
3. Connect cables from the
projector to the interactive
whiteboard, placing the
harness cable toward the
left side of the interactive
whiteboard for proximity to
the left-mounted ECP.
4. Place the harness cable
through the upper cable
clips on the side of the
HAWM-UX/UF.
5. Connect the harness
cable’s flat 11-pin connector
to the ECP and right-angle
power connector to the pen
tray.

12 | CHAPTER 2 – CABLING AN 885ix SYSTEM TO AN FS-UX
Connecting your SMART UX60 projector to the wire management bundle (WMB)SMART recommends that when the WMB isn’t in use, that you use the WMB’s
magnetic connection to attach the WMB to the HAWM-UX/UF’s moving frame. By
doing so, you prevent the WMB from shifting as the HAWM-UX/UF rises and
descends.
CAUTION
When attaching a guest computer or laptop to the projector system, make sure
that it is not pulled by the HAWM-UX/UF at its lowest or highest height.
NOTE
If you choose to connect the WMB to the wall-mounted magnetic clip, do so at a
height and location that doesn’t interfere with the HAWM-UX/UF’s movement.
To connect your
projector’s WMB
1. Connect the WMB to the projector by attaching the HD-DB15 connector to the
projector’s connection panel.
NOTE
The USB A plug doesn’t connect to the projector’s connection panel.
2. Place the WMB through the
cable management clip
under the projector. Make
sure the WMB’s strain relief
sits above the clip point.
3. Place the WMB around the
back of the HAWM-UX/UF’s
interactive whiteboard
brackets toward the left side
of the interactive whiteboard
for close proximity to the
ECP.
4. Place the WMB through the top cable clip you installed on the side of the
HAWM-UX/UF.

13 | CHAPTER 2 – CABLING AN 885ix SYSTEM TO AN FS-UX
5. Connect the WMB’s USB A plug to the ECP, and then loop the excess cable
length into the cable clip.
6. Use the WMB’s magnetic connection to attach the WMB to a metal surface until
you need to attach a guest computer to it.
IMPORTANT
Make sure the WMB has a minimum of 28" (71.1 cm) excess straight length or
a 14" (35.6 cm) loose loop of cable.
7. The RCA connector pod includes three RCA jacks for input only, two dual-channel
for audio input and one for composite video input. You can use the RCA connector
pod to connect DVD/Blu-ray™ players and similar devices. Don’t connect SMART
Board Audio (SBA-L) USB speakers to the RCA connector pod.
Connecting peripheral devices to the RCA connector podThe RCA connector pod enables you to connect DVD/Blu-ray players and other
devices to your interactive whiteboard system using the three RCA jacks. The
composite video connector and associated dual channel audio inputs on the RCA
connector pod are for input only.
SMART recommends that you use the RCA connector pod for temporary connections
to peripheral devices, or that you use a permanent connection to the projector’s
connection panel.
Number Function
1 RCA composite video input jack (for peripheral devices such as a
DVD/Blu-ray player)
2 RCA audio jack (right input)
3 RCA audio jack (left input)
1 2 3

14 | CHAPTER 2 – CABLING AN 885ix SYSTEM TO AN FS-UX
To connect peripheral
devices to your RCA
connector pod
1. Place the device near the FS-UX on a stable support and allow enough excess
cable length to accommodate the HAWM-UX/UF’s rise and descent. Make sure
that the FS-UX isn’t moved while the device is attached.
2. Connect your peripheral device’s input cables to the jacks on the RCA connector
pod.
3. When you’re finished with the device, disconnect the cable from the RCA
connector pod.
Connecting the SMART UX60 projector to the pen tray audio jackThe audio and power jacks are beside each other on the back of the pen tray.
To connect the projector
to the audio jack
1. Connect the ends of the stereo Y cable to the VGA 1 and the VGA 2 inputs on
your UF65 or UF65w projector.
2. Connect the other end of the stereo Y cable to the audio jack on the back of your
interactive whiteboard’s pen tray.
Connecting the SMART UX60 projector to the SBA-L Projection Audio SystemThe HAWM-UX/UF is designed to accommodate mounting the SBA-L Projection
Audio System directly to the interactive whiteboard. That way, when the speakers rise
and descend with the HAWM-UX/UF’s and interactive whiteboard’s movement, there’s
less risk of damage to the audio connection and power cables.
Before connecting the audio system to the projector, you must install the speaker
brackets, speakers and speaker cable clips according to the SBA-L Projection Audio
System Installation Instructions (smarttech.com/kb/142552).
Audiojack
Powerjack

15 | CHAPTER 2 – CABLING AN 885ix SYSTEM TO AN FS-UX
To connect the projector
to the speakers
1. Retrieve the 3.5 mm jack to dual channel audio output (two RCA jacks) cable from
the SBA-L packaging. Attach the 3.5 mm jack to the projector’s connection panel.
2. Place the audio connection cable
toward the right side of the
HAWM-UX/UF, and then insert the
cable into the HAWM-UX/UF cable
clips.
3. Place the audio connection cable
through the right speaker cable clip
on the rear of the interactive
whiteboard, toward the right
speaker.
4. Connect the dual channel audio
output to the speaker’s connection
panel, and bundle any excess cable
in the right speaker cable clip.
5. Retrieve the speaker-to-speaker
Molex® (double-barreled) cable
from the SBA-L packaging.
6. Place the Molex cable through the
left speaker cable clip, through the
space between the HAWM-UX/UF
and the interactive whiteboard.
7. Place the Molex cable through the
right speaker cable clip.
8. Connect the Molex cable to both
speakers and bundle any excess
cable in the left speaker cable clip.
Right speakercable clip
Left speakercable clip

16 | CHAPTER 2 – CABLING AN 885ix SYSTEM TO AN FS-UX
Placing cables for other components Cables for peripheral devices connected to the projector but not mounted on the
HAWM-UX/UF are at the greatest risk of damage, because they shift as the
HAWM-UX/UF rises and descends. These peripheral devices and cables include the
following:
• your computer or SMART Hub™ VE220 or SE240 collaboration platform
NOTE
Both the VE220 and SE240 models include 72" (183 cm) output cables to
connect to your projector. You may require cable extensions (not included).
• a room control device (connects to the ECP with a 4-pin accessory cable)
• a network cable
• the projector’s power cable
NOTES
For temporary connections, connect peripheral devices such as DVD/Blu-ray™
players to the SMART Board X800ix interactive whiteboard system’s ECP.
Mount the peripheral device to a permanent location and check cabling to ensure
there’s enough slack and that there are no obstructions in the cable path. Cable
friction, rubbing and strain can occur if you don’t take the proper precautions.

17 | CHAPTER 2 – CABLING AN 885ix SYSTEM TO AN FS-UX
Using the SMART UX60 projector connection panel for other componentsThe following diagram and list identify the projector connection panel connections to
components that don’t mount on the HAWM-UX/UF.
Number Function
1 HD-DB15 (VGA Out) output connector
2 S-video input connector
3 RCA jack audio left/right input (reserved for S-video input connector)
4 RJ45 jack (for network connections)
5 HD-DB15 (VGA 1) input connector (computer analog signal/
component video input)
6 HDMI™ connector input
7 Power socket
2
4
7
6
5
1
3

18 | CHAPTER 2 – CABLING AN 885ix SYSTEM TO AN FS-UX
NOTES
• SMART recommends that you use a VGA out connector on your source input
to simplify the cable placement.
• The HDMI connector is intended for non-interactive audio-video content only,
such as high-definition DVD/Blu-ray players. If you connect a cable from the
HDMI port to a computer, your SMART Board interactive whiteboard doesn’t
recognize touch commands.
Using the SMART UX60 projector ECP for other componentsThe following diagram and list identify the ECP connections to components that aren’t
mounted to the HAWM-UX/UF.
NOTE
The 4-pin connector cable is an optional accessory that you can order from your
authorized SMART reseller (smarttech.com/where).
Number Function
1 USB A jack (for USB drives)
2 Power button and status light
3 Volume control
4 Input selection
5 Two mini USB B jacks (connect to computers 1 and 2)
6 11-pin connector (connects to ECP harness cable)
7 4-pin connector (for room control)
2
3
45 76
1

19 | CHAPTER 2 – CABLING AN 885ix SYSTEM TO AN FS-UX
Connecting the power, network and other peripheral device cables to your projectorConnect all power connections to the power bar (not included) you installed in the
FS-UX. Use this power bar as the main power connection for all
HAWM-UX/UF-mounted components.
To connect your projector
power cable
1. Connect the power cable to the projector’s power socket.
2. Place the power cable through the foam-padded section of the cable clip under
the projector, increase the length of cable between the projector and the clip by 1"
(2.5 cm) and then close the clip.
3. Place the power cable around the left side of the HAWM-UX/UF, and then through
the cable management pass-through hole on the left side of the FS-UX, leaving
enough excess cable for the HAWM-UX/UF’s range of movement.
4. Connect the other end of the power cable to the power bar in the FS-UX, leaving
enough excess cable for the HAWM-UX/UF’s range of movement.
5. Bundle all cables between the HAWM-UX/UF and the FS-UX using zip ties,
convoluted tubing, spiral wrap or expandable loom (not included). This is for
operating safety and to prevent cables from getting caught in the height
adjustment mechanism. Carefully test the movement of the unit, using the
HAWM-UX/UF’s mobility switch. Make sure that the cable isn’t taut at any range of
the HAWM-UX/UF’s movement.
To connect cables using
the HAWM-UX/UF
1. If you don’t want to connect a network cable, proceed to step 3. Otherwise, make
sure you have a network cable with RJ45 plugs (not included) long enough to
connect your projector to a LAN port.
2. Connect the RJ45 plug on the network cable to the RJ45 port on the projector.
Make sure that the network cable is in the middle left position in the cable slot.
3. Connect your peripheral device cables to the appropriate locations on the
projector’s connection panel.
4. Place all cables through the foam-padded section of the cable clip under the
projector. Increase the length of cable between the projector and the clip by 1"
(2.5 cm) and then close the clip.

20 | CHAPTER 2 – CABLING AN 885ix SYSTEM TO AN FS-UX
5. When connecting cables
from the projector to the
interactive whiteboard,
make sure that all cables
pass between the two
interactive whiteboard wall-
mounting brackets. Once
the cables are through the
brackets, place the harness
cable toward the left side of
the interactive whiteboard
for proximity to the left-
mounted ECP.
6. Place the harness cable
through the lower cable
clips on the left side of the HAWM-UX/UF.
7. If you have many cables attached, smoothly bundle your peripheral device cables
together using a cable tie (not included).
8. Attach a cable management clip (not included) to the cables or cable bundles,
making sure that there’s a minimum of 28" (71.1 cm) excess straight length or a
14" (35.6 cm) loose loop of cable.
9. If you don’t want to connect a network cable, proceed to the next step. Otherwise,
connect the other end of the network cable to your LAN port.
10. Connect the other end of the cables to your peripheral devices.
11. Carefully test the movement of the unit, using the HAWM-UX/UF’s mobility switch.
Make sure the cables aren’t taut at any range of the HAWM-UX/UF’s movement. If
they’re still taut, repeat this procedure until you find a suitable mounting location or
length for the cables.
Cable connections from the HAWM-UX/UF are routed through the cable management
pass-through holes, one at the top for management of the IEC power cable, and one
on each side of the FS-UX for management of projector and peripheral cables. These
holes allow access to the power bar and to route cables. This cabling requires special
precautions and careful examination of the lengths of cable you need to install your
system components.

21 | CHAPTER 2 – CABLING AN 885ix SYSTEM TO AN FS-UX
To connect your cables
using the FS-UX
1. If you don’t want to connect a network cable, proceed to step 3. Otherwise, make
sure you have a network cable with RJ45 plugs (not included) long enough to
connect your projector to a LAN connector.
2. Connect the RJ45 plug on the network cable to the RJ45 port on the projector.
Make sure that the network cable is in the middle left position in the cable slot.
3. Connect your peripheral device cables to the appropriate locations on the
projector’s connection panel.
4. Place all cables through the foam-padded section of the cable clip under the
projector. Increase the length of cable between the projector and the clip by 1"
(2.5 cm) and then close the clip.
5. Place the cables around the left
side of the HAWM-UX/UF, and
then through the cable
management pass-through hole
on the left side of the FS-UX,
leaving enough excess cable for
the HAWM-UX/UF’s range of
movement.
NOTE
Cable management for the
IEC power cable is through
the pass-through hole at the
top of the FS-UX.
6. If you don’t want to connect a
network cable, proceed to the
next step. Otherwise, connect the
other end of the network cable to
your LAN connector.
7. Connect the other end of the
cables to your peripheral devices.
8. Bundle all cables between the
HAWM-UX/UF and the FS-UX
using zip ties, convoluted tubing,
spiral wrap or expandable loom (not included). This is for operating safety and to
prevent cables from getting caught in the height adjustment mechanism. Carefully
test the movement of the unit, using the HAWM-UX/UF’s mobility switch. Make
sure the cables are not taut at any range of the HAWM-UX/UF’s movement. If
they’re still taut, repeat this procedure until you find a suitable mounting location or
length for the cables.

22 | CHAPTER 2 – CABLING AN 885ix SYSTEM TO AN FS-UX
Optional laptop shelf for the FS-UXYou can install a laptop shelf on either side of your FS-UX. If you have an 800i series
interactive whiteboard system, the laptop shelf goes on the left side of the FS-UX to
keep the laptop close to the interactive whiteboard’s ECP.
For more information on the FS-UX laptop shelf, see the FS-UX-LTS Laptop Shelf for
SMART Mobile Height-Adjustable Floor Stand Installation Guide (smarttech.com/kb/
153054).
The laptop shelf is available from your authorized SMART reseller (smarttech.com/
where).

Chapter 3
Cabling an 880i4 or 885i4 system to an FS-UX
Introduction ................................................................................................... 23
Mounting your HAWM-UX/UF mobility switch .............................................. 23
Placing cables for HAWM-UX/UF-mounted components ............................. 25
Placing cables for other components............................................................ 33
IntroductionThe SMART Board 880i4 and 885i4 interactive whiteboard systems include a SMART
UF65 high-offset projector or SMART UF65w high-offset widescreen projector, both
with a 3D projection option and an extended control panel (ECP) that’s located on the
interactive whiteboard.
IMPORTANT
Before following these instructions, install your FS-UX and interactive whiteboard
system according to the SMART HAWM-UX/UF Installation Guide
(smarttech.com/kb/145748). The instructions below are a supplement to, and not
a substitute for, the installation guide.

24 | Chapter 3 – CABLING AN 880i4 OR 885i4 SYSTEM TO AN FS-UX
Mounting your HAWM-UX/UF mobility switchThe mobility switch controls the vertical movement of the HAWM-UX/UF and your
interactive whiteboard system. The mobility switch is wired directly to the rear panel of
the HAWM-UX/UF. Use the installation guide with the following procedure to place and
mount the mobility switch.
To mount the
mobility switch
1. Locate the HAWM-UX/UF mobility switch, and then remove and discard the
plastic bag that holds the mobility switch.
2. Choose the mobility switch’s mounting location. There are mounting holes on the
left and the right sides and near the top and the bottom of the interactive
whiteboard.
IMPORTANT
If you installed or plan to install the SBA-L Projection Audio System, mount
the mobility switch on the bottom mounting holes.

25 | CHAPTER 3 – CABLING AN 880i4 OR 885i4 SYSTEM TO AN FS-UX
3. Secure the mobility switch cable toward the side of the interactive whiteboard
where you chose to mount the mobility switch, using a Phillips No. 2 screwdriver
and the two screws listed in the HAWM-UX/UF installation guide. Make sure that
the cable is toward the bottom of the switch as you mount it.
4. Place the cable through the HAWM-UX/UF’s lower cable clip, making sure that the
cable is taut between the interactive whiteboard and the clip, and loose between
the clip and the base of the HAWM-UX/UF.
5. Bundle the excess cable, making sure that there’s a minimum of 28" (71.1 cm)
excess straight length or a 14" (35.6 cm) loose loop of cable.

26 | Chapter 3 – CABLING AN 880i4 OR 885i4 SYSTEM TO AN FS-UX
Placing cables for HAWM-UX/UF-mounted componentsTo prevent cable friction, SMART recommends that you first place the cables that
connect components mounted to the HAWM-UX/UF, as they don’t shift after they’re
installed.
Using the SMART UF65 and SMART UF65w projector connection panel for HAWM-UX/UF mounted componentsTo access the projector connection panel and wire management clip, remove the
input/output cover on the left side of the projector and remove the cable covers. For
more information, see the SMART Board X800i4 Interactive Whiteboard System
Configuration and User’s Guide (smarttech.com/kb/150699).
The following diagram and list identify the SMART UF65 and SMART UF65w
connections to HAWM-UX/UF-mounted components.
Number Function
1 4-pin power mini-DIN 5V/2A connector (reserved for ECP harness cable)
2 7-pin mini-DIN connector (reserved for ECP harness cable)
3 RCA jack composite video input (reserved for RCA pod)
4 RCA jack audio left/right input (reserved for RCA pod)
5 Audio 1 and Audio 2 (reserved for audio cable from pen tray)
6 3.5 mm audio output connector (recommended for SBA-L speakers)
7 DB9 control (reserved for ECP harness)
1 2 3 64 75

27 | CHAPTER 3 – CABLING AN 880i4 OR 885i4 SYSTEM TO AN FS-UX
Using the SMART UF65 and SMART UF65w ECP diagram for HAWM-UX/UF-mounted componentsThe following diagram and list identify the ECP ports that connect to
HAWM-UX/UF-mounted components.
NOTE
The 4-pin connector cable is an optional accessory that you can order from your
authorized SMART reseller (smarttech.com/where).
Number Function
1 USB A jack (for USB drives)
2 Power button and status new
3 Volume control
4 Input selection
5 Two mini USB B jacks (connect to computers 1 and 2)
6 11-pin connector (connects to ECP harness cable)
7 4-pin connector (for room control)
2
3
45 76
1

28 | Chapter 3 – CABLING AN 880i4 OR 885i4 SYSTEM TO AN FS-UX
Connecting your SMART UF65 or SMART UF65w projector’s ECP harness cableThe ECP harness cable controls all signals and commands sent between the ECP
and the projector. To install your ECP, follow the instructions in theSMART Board
X880i4 and X885i4 Interactive Whiteboard Installation Instructions (smarttech.com/kb/
149615).
To connect your
projector’s ECP harness
cables
1. Pass the ECP cable through the
cable slot.
NOTE
The upper part of the ECP
cable is too thick to fit inside
the cable slot, so put the
thinner part of the ECP cable
in the cable slot.
2. From the ECP harness cable,
attach the DB9 connector, the
4-pin power mini-DIN connector and the 7-pin mini-DIN connector to the
projector’s connection panel.
3. Attach the screw on the ECP
strain relief to the projector
housing using a Phillips No. 2
screwdriver.
4. Place the harness cable
around the back of the
HAWM-UX/UF, toward the left
side of the interactive
whiteboard for proximity to the
left-mounted ECP.
5. Place the harness cable
through the upper cable clips
you installed on the side of the
HAWM-UX/UF.
6. Connect the harness cable’s
DB15M plug to the ECP’s
DB15 connector.

29 | CHAPTER 3 – CABLING AN 880i4 OR 885i4 SYSTEM TO AN FS-UX
Connecting peripheral devices to the RCA connector podThe RCA connector pod enables you to connect DVD/Blu-ray players and other
devices to our interactive whiteboard system using the three RCA jacks. The
composite video connector and associated dual channel audio inputs on the RCA
connector pod are for input only.
To connect peripheral
devices to your RCA
connector pod
1. If you have speakers installed, turn the volume dial on the ECP all the way down
to prevent buzzing or sparking.
2. Place the device near the FS-UX on a stable support and allow enough excess
cable length to accommodate the HAWM-UX/UF’s rise and descent. Make sure
that the FS-UX isn’t moved while the device is attached.
3. Connect your peripheral device’s input cables to the jacks on the RCA connector
pod.
Number Function
1 RCA composite video input jack (for peripheral devices, such as a
DVD/Blu-ray player)
2 RCA audio jack (right input)
3 RCA audio jack (left input)
1 2 3

30 | Chapter 3 – CABLING AN 880i4 OR 885i4 SYSTEM TO AN FS-UX
Connecting your SMART UF65 or SMART UF65w projector to the pen tray audio jackThe audio and power jacks are beside each other on the back of the pen tray.
To connect the projector
to the audio jacks
1. Connect the ends of the stereo Y cable to the VGA 1 and the VGA 2 inputs on
your UF65 or UF65w projector.
2. Connect the other end of the stereo Y cable to the audio jack on the back of your
interactive whiteboard’s pen tray.
Connecting your SMART UF65 or SMART UF65w projector to the SBA-L Projection Audio SystemThe HAWM-UX/UF is designed to accommodate mounting the SBA-L Projection
Audio System directly to the interactive whiteboard. That way, when the speakers rise
and descend with the HAWM-UX/UF’s and interactive whiteboard’s movement, there’s
less risk of damage to the audio connection and power cables.
Before connecting the audio system to the projector, you must install the speaker
brackets, speakers and speaker cable clips according to the SBA-L Projection Audio
System Installation Instructions (smarttech.com/kb/142552).
To connect your projector
to your speakers
1. Retrieve the 3.5 mm jack to dual channel audio output (two RCA jacks) cable from
the SBA-L packaging.
2. Pass the audio connection cable through the boom. Place the cables in the left
side of the cable slot.
3. Connect the audio connection cable to the projector’s connection panel.
Audiojack
Powerjack

31 | CHAPTER 3 – CABLING AN 880i4 OR 885i4 SYSTEM TO AN FS-UX
4. Place the audio connection cable
through the right speaker cable clip
on the rear of the interactive
whiteboard, toward the right
speaker.
5. Connect the dual channel audio
output to the speaker’s connection
panel, and bundle any excess cable
in the right speaker cable clip.
6. Retrieve the speaker-to-speaker
Molex (double-barreled) cable from
the SBA-L packaging.
7. Place the Molex cable through the
left speaker cable clip, through the
space between the HAWM-UX/UF
and the interactive whiteboard.
8. Place the cable through the right
speaker cable clip.
9. Connect the Molex cable to both
speakers, and bundle any excess
cable in the left speaker cable clip.
Right speaker
cable clip
Left speaker
cable clip

32 | Chapter 3 – CABLING AN 880i4 OR 885i4 SYSTEM TO AN FS-UX
Placing cables for other components Cables for peripheral devices connected to the projector but not mounted on the
HAWM-UX/UF are at the greatest risk of damage, because they shift as the
HAWM-UX/UF rises and descends. These peripheral devices and cables include the
following:
• your computer or SMART Hub VE220 or SE240 collaboration platform
NOTE
Both the VE220 and SE240 models include 6' (183 cm) output cables to
connect to your projector. You might need cable extensions (not included).
• a room control device
• a network cable
• the projector’s power cable
• other projector-to-input device connections (such as a DVD player) using S-video
connections.
NOTES
• For temporary connections, connect peripheral devices such as a DVD/Blu-
ray player, to the SMART Board X800ix ineractive whiteboard system’s ECP.
• Mount the peripheral device to a permanent location and check cabling to
ensure there’s enough slack and that there are no obstructions in the cable
path. Cable friction, rubbing and strain can occur if you don’t take the proper
precautions.
When connecting these peripheral devices, make sure there’s enough slack, mount
the peripheral device to a permanent location and make sure there are no
obstructions in the cable path. Cable friction, rubbing and strain can occur if you don’t
take the proper precautions.

33 | CHAPTER 3 – CABLING AN 880i4 OR 885i4 SYSTEM TO AN FS-UX
Using the SMART UF65 and SMART UF65w projector connection panel for other componentsThe following diagram and list identify the SMART UF65 and SMART UF65w
projector’s connections to components that don’t mount on the HAWM-UX/UF.
Remove the input/output cover on the left side of the projector and remove the cable
covers to access the projector connection panel and wire management clip . For more
information, see the SMART Board X800i4 Interactive Whiteboard System
Configuration and User’s Guide (smarttech.com/kb/150699).
Number Function
1 RCA jack audio left/right input (reserved for S-video input)
2 S-video input connector
3 3.5 mm audio output connector (reserved for VGA 2-In connector)
4 HD-DB15 (VGA 2) connector
5 3.5 mm audio output connector (reserved for VGA 1-In connector)
5 HD-DB15 (VGA 1) connector
6 VGA output
7 Power socket
8 RJ45 jack (for network connections)
3
2
71
4 5 6 8

34 | Chapter 3 – CABLING AN 880i4 OR 885i4 SYSTEM TO AN FS-UX
NOTE
SMART recommends that you use a VGA out connector on your source input
to simplify the cable placement.
Using the SMART UF65 and SMART UF65w ECP diagram for other componentsThe following diagram and list identify the ECP connections to components that aren’t
mounted to the HAWM-UX/UF.
NOTE
The 4-pin connector cable is an optional accessory that you can order from your
authorized SMART reseller (smarttech.com/where).
Connecting the power, network and other peripheral device cables to your SMART UF65 or SMART UF65w projectorConnect all power connections to the power bar (not included) you installed in the
FS-UX. Use this power bar as the main power connection for all
HAWM-UX/UF-mounted components.
Number Function
1 USB A jack (for USB drives)
2 Power button and status light
3 Volume control
4 Input selection
5 Two mini USB B jacks (connect to computers 1 and 2)
6 11-pin connector (connects to ECP harness cable)
7 4-pin connector (for room control)
2
3
45 76
1

35 | CHAPTER 3 – CABLING AN 880i4 OR 885i4 SYSTEM TO AN FS-UX
To connect your projector
power cable on the
HAWM-UX/UF
1. Pass the power
cable through the
boom and then
connect it to the
power socket. Make
sure that the power
cable is in the far
right position in the
cable slot.
2. Place the power cable through the foam-padded section of the cable clip under
the projector, increase the length of cable between the projector and the clip by 1"
(2.5 cm) and then close the clip.
3. Place the cables around the left side of the HAWM-UX/UF, and then through the
cable management pass-through hole on the left side of the FS-UX.
4. Connect the other end of the power cable to the power bar in the FS-UX, leaving
enough excess cable for the HAWM-UX/UF’s range of movement.
5. Bundle all cables between the HAWM-UX/UF and the FS-UX using zip ties,
convoluted tubing, spiral wrap or expandable loom (not included). This is for
operating safety and to prevent cables from getting caught in the height
adjustment mechanism. Carefully test the movement of the unit, using the
HAWM-UX/UF’s mobility switch. Make sure that the cable isn’t taut at any range of
the HAWM-UX/UF’s movement.
To connect your cables
using the HAWM-UX/UF
1. If you don’t want to connect a network cable, proceed to step 3. Otherwise, make
sure you have a network cable with RJ45 plugs (not included) long enough to
connect your projector to a LAN port.
2. Pass the network cable through the boom and connect the RJ45 plug on the
network cable to the RJ45 port on the projector. Make sure that the network cable
is in the middle left position in the cable slot.
3. Pass peripheral device cables through the boom. Make sure that the peripheral
device cables are in the middle left position in the cable slot.
4. Connect your peripheral device cables to the appropriate locations on the
projector’s connection panel.
5. If you don’t want to connect a network cable, proceed to the next step. Otherwise,
connect the RJ45 plug on the network cable to the RJ45 port on the projector,
making sure that the network cable is in the middle left position in the cable slot.
Cable slot
36 | Chapter 3 – CABLING AN 880i4 OR 885i4 SYSTEM TO AN FS-UX
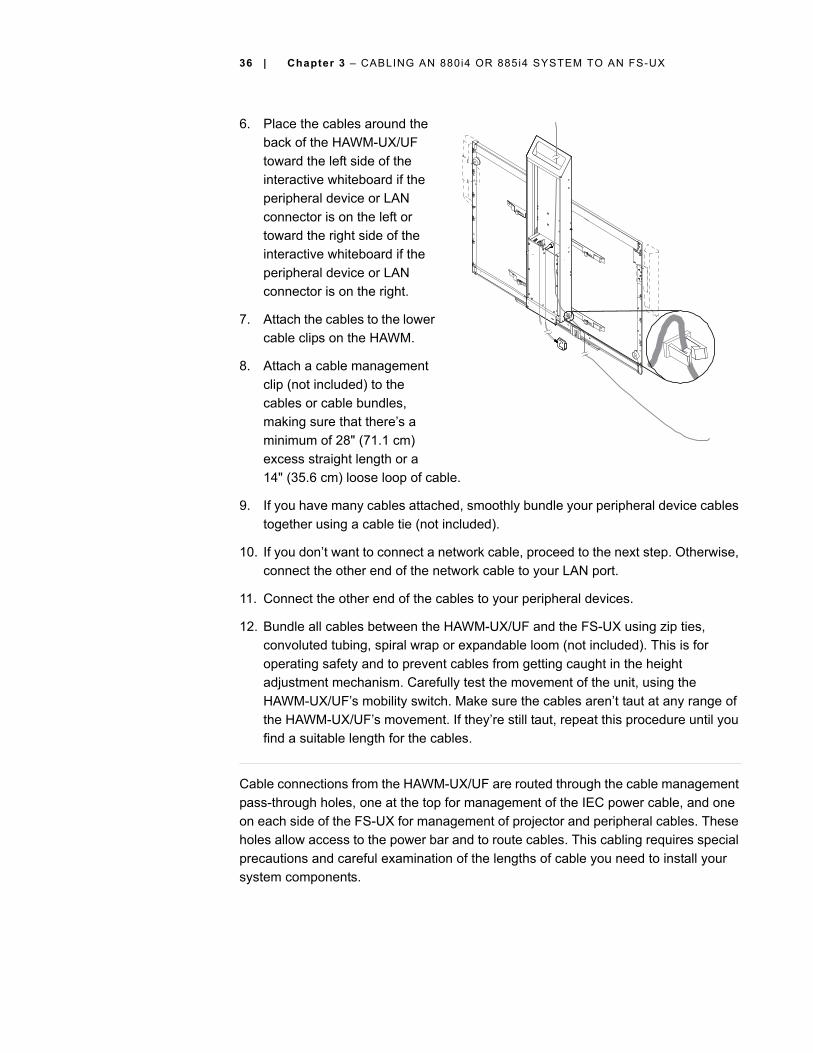
6. Place the cables around the
back of the HAWM-UX/UF
toward the left side of the
interactive whiteboard if the
peripheral device or LAN
connector is on the left or
toward the right side of the
interactive whiteboard if the
peripheral device or LAN
connector is on the right.
7. Attach the cables to the lower
cable clips on the HAWM.
8. Attach a cable management
clip (not included) to the
cables or cable bundles,
making sure that there’s a
minimum of 28" (71.1 cm)
excess straight length or a
14" (35.6 cm) loose loop of cable.
9. If you have many cables attached, smoothly bundle your peripheral device cables
together using a cable tie (not included).
10. If you don’t want to connect a network cable, proceed to the next step. Otherwise,
connect the other end of the network cable to your LAN port.
11. Connect the other end of the cables to your peripheral devices.
12. Bundle all cables between the HAWM-UX/UF and the FS-UX using zip ties,
convoluted tubing, spiral wrap or expandable loom (not included). This is for
operating safety and to prevent cables from getting caught in the height
adjustment mechanism. Carefully test the movement of the unit, using the
HAWM-UX/UF’s mobility switch. Make sure the cables aren’t taut at any range of
the HAWM-UX/UF’s movement. If they’re still taut, repeat this procedure until you
find a suitable length for the cables.
Cable connections from the HAWM-UX/UF are routed through the cable management
pass-through holes, one at the top for management of the IEC power cable, and one
on each side of the FS-UX for management of projector and peripheral cables. These
holes allow access to the power bar and to route cables. This cabling requires special
precautions and careful examination of the lengths of cable you need to install your
system components.

37 | CHAPTER 3 – CABLING AN 880i4 OR 885i4 SYSTEM TO AN FS-UX
To connect your cables
using the FS-UX
1. If you don’t want to connect a network cable, proceed to step 3. Otherwise, make
sure you have a network cable with RJ45 plugs (not included) long enough to
connect your projector to a LAN connector.
2. Connect the RJ45 plug on the network cable to the RJ45 port on the projector.
Make sure that the network cable is in the middle left position in the cable slot.
3. Connect your peripheral device cables to the appropriate locations on the
projector’s connection panel.
4. Place all cables through the foam-padded section of the cable clip under the
projector. Increase the length of cable between the projector and the clip by 1"
(2.5 cm) and then close the clip.
5. Place the cables around the left side of the HAWM-UX/UF, and then through the
cable management pass-through hole on the left side of the FS-UX, leaving
enough excess cable for the HAWM-UX/UF’s range of movement.
NOTE
Cable management for
the IEC power cable is
through the pass-
through hole at the top
of the FS-UX.
6. If you don’t want to
connect a network cable,
proceed to the next step.
Otherwise, connect the
other end of the network
cable to your LAN
connector.
7. Connect the other end of
the cables to your
peripheral devices.

38 | Chapter 3 – CABLING AN 880i4 OR 885i4 SYSTEM TO AN FS-UX
8. Bundle all cables between the HAWM-UX/UF and the FS-UX using zip ties,
convoluted tubing, spiral wrap or expandable loom (not included). This is for
operating safety and to prevent cables from getting caught in the height
adjustment mechanism. Carefully test the movement of the unit, using the HAWM-
UX/UF’s mobility switch. Make sure the cables aren’t taut at any range of the
HAWM-UX/UF’s movement. If they’re still taut, repeat this procedure until you find
a suitable length for the cables.
Optional laptop shelf for the FS-UXYou can install a laptop shelf on either side of your FS-UX. If you have an 800i series
interactive whiteboard system, the laptop shelf goes on the left side of the FS-UX to
keep the laptop close to the interactive whiteboard’s ECP.
For more information on the FS-UX laptop shelf, see the FS-UX-LTS Laptop Shelf for
SMART Mobile Height-Adjustable Floor Stand Installation Guide (smarttech.com/kb/
153054).
The laptop shelf is available from your authorized SMART reseller (smarttech.com/
where).

Chapter 4
Cabling a 685ix or D685ix system to an FS-UX
Introduction ..................................................................................................... 5
Mounting your HAWM-UX/UF mobility switch ................................................ 5
Placing cables for HAWM-UX/UF-mounted components ............................... 7
Placing cables for other components............................................................ 14
IntroductionSMART Board 685ix and D685ix interactive whiteboard systems include a SMART
UX60 ultra-short-throw projector and an extended control panel (ECP) located on the
interactive whiteboard.
IMPORTANT
Before following these instructions, install your HAWM-UX/UF and interactive
whiteboard system according to the SMART HAWM-UX/UF Installation Guide
(smarttech.com/kb/145745). The instructions below are a supplement to, and not
a substitute for, the installation guide.

40 | CHAPTER 4 – CABLING A 685ix OR D685ix SYSTEM TO AN FS-UX
Mounting your HAWM-UX/UF mobility switchThe mobility switch controls the vertical movement of the HAWM-UX/UF and your
interactive whiteboard system. The mobility switch is wired directly to the rear panel of
the HAWM-UX/UF. Use the installation guide and the following procedure to place and
mount the mobility switch.
To mount the mobility
switch
1. Locate the HAWM-UX/UF mobility switch, and then remove and discard the
plastic bag that holds the mobility switch.
2. Choose the mobility switch’s mounting location. There are mounting holes on the
left and the right sides and near the top and the bottom of the interactive
whiteboard.
IMPORTANT
If you installed or plan to install the SBA-L Projection Audio System, mount
the mobility switch on the bottom mounting holes.

41 | CHAPTER 4 – CABLING A 685ix OR D685ix SYSTEM TO AN FS-UX
3. Secure the mobility switch cable using a Phillips® No. 2 screwdriver and the two
screws listed inside the HAWM-UX/UF installation guide. Secure the mobility
switch cable toward the side of the interactive whiteboard where you chose to
mount the mobility switch, and make sure that the cable is toward the bottom of
the switch as you mount it.
4. Place the cable through the HAWM-UX/UF’s lower cable clip, making sure that the
cable is taut between the interactive whiteboard and the clip, and loose between
the clip and the base of the HAWM-UX/UF.
5. Bundle the excess cable, making sure that there is a minimum of 28" (71.1 cm)
excess straight length or a 14" (35.6 cm) loose loop of cable.
42 | CHAPTER 4 – CABLING A 685ix OR D685ix SYSTEM TO AN FS-UX
Placing cables for HAWM-UX/UF-mounted componentsTo prevent cable friction, SMART recommends that you first place the cables that
don’t shift after they’re installed. Cables that connect components mounted to the
HAWM-UX/UF don’t shift after they’re installed. The wire management bundle (WMB)
shifts only if it’s connected to a guest computer.
Using the SMART UX60 projector connection panel for HAWM-UX/UF-mounted componentsTo access the projector connection panel and wire management clip, remove the
input/output cover on the left side of the projector and remove the cable covers. For
more information, see the SMART Board 685ix and D685ix Interactive Whiteboard
System Configuration and User’s Guide (smarttech.com/kb/137396).

43 | CHAPTER 4 – CABLING A 685ix OR D685ix SYSTEM TO AN FS-UX
The following diagram and list identify the projector’s connections to
HAWM-UX/UF-mounted components.
Number Function
1 3.5 mm audio output connector (recommended for SBA-L speakers)
2 4-pin power mini-DIN 5V/2A connector (reserved for ECP harness
cable)
3 7-pin mini-DIN connector (reserved for ECP harness cable)
4 3.5 mm audio input connector (reserved for WMB)
5 HD-DB15 (VGA 2) input connector (reserved for WMB)
6 RCA jack composite video input (reserved for ECP harness cable)
7 RCA jack audio left/right input (reserved ECP harness cable)
2
3
4
6
5
1
7

44 | CHAPTER 4 – CABLING A 685ix OR D685ix SYSTEM TO AN FS-UX
Using the SMART UX60 ECP for HAWM-UX/UF-mounted componentsThe following diagram and list identify the ECP ports that connect to
HAWM-UX/UF-mounted components.
Number Function
1 USB B jack (reserved for WMB)
2 USB A jack (recommended location for interactive whiteboard USB
cable)
3 DB15 ECP connector (reserved for ECP harness cable)
1
3
2

45 | CHAPTER 4 – CABLING A 685ix OR D685ix SYSTEM TO AN FS-UX
Connecting your SMART UX60 projector’s ECP harness cableThe ECP harness cable controls all signals and commands sent between the ECP
and the projector. Choose a side of the interactive whiteboard to install your ECP on,
and then follow the instructions in the SMART Board 685ix and D685ix Interactive
Whiteboard System Installation Instructions (smarttech.com/kb/137394).
To connect your
projector’s ECP harness
cable
1. Attach the SMART UX60 projector’s ECP harness cable to the projector. Attach
the composite video RCA jack, its associated dual channel audio input (two RCA
jacks), the 4-pin power mini-DIN connector and the 7-pin mini-DIN connector to
the projector’s connection panel, as listed in the projector connection panel (see
page 42).
2. Place the harness cable through
the cable management clip under
the projector. Make sure the
harness cable’s strain relief sits
above the clip point.
IMPORTANT
To add slack to the cable,
move the cable to the clip’s
foam-padded section,
increase the length of cable
between the clip and the
projector and close the clip.
3. Place the harness cable around the back of the HAWM-UX/UF’s interactive
whiteboard brackets toward the left side of the interactive whiteboard if the ECP is
mounted on the left or toward the right side of the interactive whiteboard if the
ECP is mounted on the right.
4. Place the harness cable through the upper cable clips on the side of the
HAWM-UX/UF.
5. Connect the harness cable’s DB15M plug to the ECP’s DB15 connector (see
page 44).

46 | CHAPTER 4 – CABLING A 685ix OR D685ix SYSTEM TO AN FS-UX
Connecting your SMART UX60 projector to the wire management bundle (WMB)SMART recommends that when the WMB isn’t in use, you use the WMB’s magnetic
connection to attach the WMB to the HAWM-UX/UF’s moving frame. By doing so, you
prevent the WMB from shifting as the HAWM-UX/UF rises and descends.
CAUTION
When attaching a guest computer or laptop to the projector system, make sure
that it is not pulled by the HAWM-UX/UF at its lowest or highest height.
NOTE
If you choose to connect the WMB to the magnetic clip, do so at a height and
location that doesn’t interfere with the HAWM-UX/UF’s movement.
To connect your
projector’s WMB
1. Connect the WMB to the projector by attaching the HD-DB15 connector and the
3.5 mm audio jack to the projector’s connection panel (see page 42).
NOTE
The USB A plug doesn’t connect to the projector’s connection panel.
2. Place the WMB through
the cable management
clip under the projector.
Make sure the WMB’s
strain relief sits above
the clip point.

47 | CHAPTER 4 – CABLING A 685ix OR D685ix SYSTEM TO AN FS-UX
3. If the ECP is mounted on the left, place the WMB around the back of the
HAWM-UX/UF, toward the left side of the interactive whiteboard. If the ECP is
mounted on the right, place the WMB around the back of the HAWM-UX/UF
toward the right side of the interactive whiteboard.
4. Place the WMB through the top cable clip you installed on the side of the
HAWM-UX/UF.
5. Connect the WMB’s USB A plug to the ECP (see page 44), and loop the excess
cable length into the cable clip.

48 | CHAPTER 4 – CABLING A 685ix OR D685ix SYSTEM TO AN FS-UX
6. Use the WMB’s magnetic connection to attach the WMB to a metal surface, until
you need to attach a guest computer to it.
Connecting your SMART UX60 projector to the SBA-L Projection Audio SystemHAWM-UX/UF is designed to accommodate mounting the SBA-L Projection Audio
System directly to the interactive whiteboard. That way, when the speakers rise and
descend with the HAWM-UX/UF’s and interactive whiteboard’s movement, there’s
less risk of damage to the audio connection and power cables.
Before connecting the audio system to the projector, you must install the speaker
brackets, speakers and speaker cable clips according to the SBA-L Projection Audio
System textless installation instructions (smarttech.com/kb/142552).
To connect your projector
to your speakers
1. Retrieve the 3.5 mm jack to dual
channel audio output (two RCA
jacks) cable from the SBA-L
packaging. Attach the 3.5 mm jack
to the projector’s connection panel.
2. Place the audio connection cable
toward the HAWM-UX/UF’s right
side, inserting the cable into the
HAWM-UX/UF cable clips.
3. Place the audio connection cable
through the right speaker cable clip
on the rear of the interactive
whiteboard toward the right speaker.
4. Connect the dual channel audio
output to the speaker’s connection
panel, and bundle any excess cable
in the right speaker cable clip.
5. Retrieve the speaker-to-speaker
Molex (double-barreled) cable from
the SBA-L packaging.
6. Place the Molex cable through the
left speaker cable clip, through the
space between the HAWM-UX/UF
and the interactive whiteboard.
Right speakercable clip
Left speakercable clip

49 | CHAPTER 4 – CABLING A 685ix OR D685ix SYSTEM TO AN FS-UX
7. Place the Molex cable through the right speaker cable clip.
8. Connect the Molex cable to both speakers and bundle any excess cable in the left
speaker cable clip.
Placing cables for other components Cables for peripheral devices connected to the projector but not mounted on the
HAWM-UX/UF are at the greatest risk of damage, because they shift as the
HAWM-UX/UF rises and descends. These peripheral devices and cables include:
• your computer or SMART Hub VE220 or SE240 collaboration platform
NOTE
Both the VE220 and SE240 models include 72" (182.8 cm) output cables for
connecting to your projector. Cable extensions (not included) may be
required.
• a room control device
• a network cable
• the projector’s power cable
• other projector-to-input device connections (such as DVD/Blu-ray plalyer) using
HDMI or S-video connections
When connecting these peripheral devices, make sure there’s enough slack, mount
the peripheral device to a permanent location and make sure there are no
obstructions in the cable path. Cable friction, rubbing and strain can occur if you don’t
take the proper precautions.

50 | CHAPTER 4 – CABLING A 685ix OR D685ix SYSTEM TO AN FS-UX
Using the SMART UX60 projector connection panel for other componentsThe following diagram and list identify the projector connection panel connections to
components that don’t mount on the HAWM-UX/UF.
Number Function
1 HD-DB15 (VGA Out) output connector
2 S-video input connector
3 RCA jack audio left/right input (reserved for S-video input connector)
4 RJ45 jack (for network connections)
5 3.5 mm audio input connector (reserved for VGA 1 connector)
6 HD-DB15 (VGA 1) input connector (for primary computer)
7 RS-232 connector
8 HDMI connector input
9 Power socket
2
4
9
7
8
6
5
1
3

51 | CHAPTER 4 – CABLING A 685ix OR D685ix SYSTEM TO AN FS-UX
NOTES
• SMART recommends that you use a VGA out connector on your source input,
to simplify the cable placement.
• The HDMI connector is intended for non-interactive audio-video content only,
such as high-definition DVD/Blu-ray players. If you connect a cable from the
HDMI port to a computer, your SMART Board interactive whiteboard doesn’t
recognize touch commands.

52 | CHAPTER 4 – CABLING A 685ix OR D685ix SYSTEM TO AN FS-UX
Using the SMART UX60 projector ECP for other componentsThe following diagram and list identify the ECP connections to components that aren’t
mounted to the HAWM-UX/UF.
Number Function
1 USB A jack (for peripheral device connection)
2 USB B tethered jack (for guest computer or laptop)
3 USB A jack (for peripheral device connection)
4 USB A jack (for peripheral device connection)
5 RCA jack composite video input (for peripheral device connection)
6 RCA jack audio left/right input (for peripheral device connection)
2
1
3
4
5 6

53 | CHAPTER 4 – CABLING A 685ix OR D685ix SYSTEM TO AN FS-UX
Connecting the power, network and other peripheral device cables to your projectorConnect all power connections to the power bar (not included) you installed in the
FS-UX. Use this power bar as the main power connection for all
HAWM-UX/UF-mounted components.
To connect your projector
power cable
1. Connect the power cable to the projector’s power socket.
2. Place the power cable through the foam-padded section of the cable clip under
the projector, increase the length of cable between the projector and the clip by 1"
(2.5 cm) and then close the clip.
3. Place the cables around the left side of the HAWM-UX/UF, and then through the
cable management pass-through hole on the left side of the FS-UX.
4. Connect the other end of the power cable to the power bar in the FS-UX, leaving
enough excess cable for the HAWM-UX/UF’s range of movement.
5. Bundle all cables between the HAWM-UX/UF and the FS-UX using zip ties,
convoluted tubing, spiral wrap or expandable loom (not included). This is for
operating safety and to prevent cables from getting caught in the height
adjustment mechanism. Carefully test the movement of the unit, using the
HAWM-UX/UF’s mobility switch. Make sure that the cable isn’t taut at any range of
the HAWM-UX/UF’s movement.
Cables mounted to the HAWM-UX/UF require a certain amount of slack to
accommodate the projector’s rise and descent. When connecting your projector’s
power cable, don’t bundle it with or place it parallel to other peripheral device cables
you attach to your projector. Any cables that travel the same path must be placed
perpendicular (at right angles) to other unpowered cables to reduce signal
interference.
To connect cables using
the HAWM-UX/UF
1. If you don’t want to connect a network cable, proceed to step 3. Otherwise, make
sure you have a network cable with RJ45 plugs (not included) long enough to
connect your projector to a LAN port.
2. Connect the RJ45 plug on the network cable to the RJ45 port on the projector.
Make sure that the network cable is in the middle left position in the cable slot.
3. Connect your peripheral device cables to the appropriate locations on the
projector’s connection panel (see page 50).
4. Place all cables through the foam-padded section of the cable clip under the
projector. Increase the length of cable between the projector and the clip by 1"
(2.5 cm) and then close the clip.

54 | CHAPTER 4 – CABLING A 685ix OR D685ix SYSTEM TO AN FS-UX
5. Place the cables around
the back of the HAWM-
UX/UF’s interactive
whiteboard brackets
toward the left side of the
interactive whiteboard if
the peripheral device or
LAN port is on the left or
toward the right side of the
interactive whiteboard if
the peripheral device or
LAN port is on the right.
6. Attach the cables to the
lower cable clips on the
HAWM-UX/UF.
7. If you have many cables
attached, smoothly bundle
your peripheral device cables together using a cable tie (not included).
8. Attach a cable management clip (not included) to the cables or cable bundles,
with a minimum of 28" (71.1 cm) excess straight length or a 14" (35.6 cm) loose
loop of cable.
9. If you don’t want to connect a network cable, proceed to the next step. Otherwise,
connect the other end of the network cable to your LAN port.
10. Connect the other end of the cables to your peripheral devices.
11. Carefully test the movement of the unit, using the HAWM-UX/UF’s mobility switch.
Make sure the cables aren’t taut at any range of the HAWM-UX/UF’s movement. If
they’re still taut, repeat this procedure until you find a suitable mounting location or
length for the cables.

55 | CHAPTER 4 – CABLING A 685ix OR D685ix SYSTEM TO AN FS-UX
Cable connections from the HAWM-UX/UF are routed through the cable management
pass-through holes, one at the top for management of the IEC power cable, and one
on each side of the FS-UX for management of projector and peripheral cables. These
holes allow access to the power bar and to route cables. This cabling requires special
precautions and careful examination of the lengths of cable you need to install your
system components.
To connect cables using
the FS-UX
1. If you don’t want to connect a network cable, proceed to step 3. Otherwise, make
sure you have a network cable with RJ45 plugs (not included) long enough to
connect your projector to a LAN port.
2. Connect the RJ45 plug on the network cable to the RJ45 port on the projector.
Make sure that the network cable is in the middle left position in the cable slot.
3. Connect your peripheral device cables to the appropriate locations on the
projector’s connection panel.
4. Place the cables around the left
side of the HAWM-UX/UF, and then
through the cable management
pass-through hole on the left side
of the FS-UX, leaving enough
excess cable for the HAWM-UX/
UF’s range of movement.
NOTE
Cable management for the IEC
power cable is through the
pass-through hole at the top of
the FS-UX.
5. If you don’t want to connect a
network cable, proceed to the next
step. Otherwise, connect the other
end of the network cable to your
LAN port.
6. Connect the other end of the cables
to your peripheral devices.

56 | CHAPTER 4 – CABLING A 685ix OR D685ix SYSTEM TO AN FS-UX
7. Bundle all cables between the HAWM-UX/UF and the FS-UX using zip ties,
convoluted tubing, spiral wrap or expandable loom (not included). This is for
operating safety and to prevent cables from getting caught in the height
adjustment mechanism. Carefully test the movement of the unit, using the
HAWM-UX/UF’s mobility switch. Make sure the cables aren’t taut at any range of
the HAWM-UX/UF’s movement. If they’re still taut, repeat this procedure until you
find a suitable length for the cables.

57 | CHAPTER 4 – CABLING A 685ix OR D685ix SYSTEM TO AN FS-UX
Connecting composite video and USB devices to your projector’s ECPThe ECP has three USB A jacks and one composite video RCA jack with associated
dual-channel audio RCA jacks. SMART recommends that you install only small USB
devices, such as a USB drive, or that you use a USB port on your computer for larger
devices to eliminate the risk of cable damage. SMART also recommends that you use
the composite video connector only for temporary connections to peripheral devices,
or that you use a permanent connection to the projector’s connection panel.
To connect a composite
video device
1. Make sure that you place the device near the HAWM-UX/UF on a stable support.
2. Allow enough excess cable length to accommodate the HAWM-UX/UF’s rise and
descent, or make sure that the HAWM-UX/UF isn’t moved while the device is
attached.
3. When you’re finished with the device, disconnect the cable from the ECP.
Optional laptop shelf for the FS-UXYou can install a laptop shelf on either side of your FS-UX. If you have an 800i series
interactive whiteboard system, the laptop shelf goes on the left side of the FS-UX to
keep the laptop close to the interactive whiteboard’s ECP.
For more information on the FS-UX laptop shelf, see the FS-UX-LTS Laptop Shelf for
SMART Mobile Height-Adjustable Floor Stand Installation Guide (smarttech.com/kb/
153054).
The laptop shelf is available from your authorized SMART reseller (smarttech.com/
where).

58 | CHAPTER 4 – CABLING A 685ix OR D685ix SYSTEM TO AN FS-UX

Chapter 5
Cabling a 600i4 or D600i4 system to an FS-UX
Introduction ................................................................................................... 23
Mounting your HAWM-UX/UF mobility switch .............................................. 23
Placing cables for HAWM-UX/UF-mounted components ............................. 25
Placing cables for other components............................................................ 30
IntroductionSMART Board 600i4 and D600i4 interactive whiteboard systems include a SMART
UF65 high-offset projector or SMART UF65w high-offset widescreen projector, both
with a 3D projection option and an extended control panel (ECP) that’s located on the
interactive whiteboard.
IMPORTANT
Before following these instructions, install your FS-UX and interactive whiteboard
system according to the SMART FS-UX Installation Guide (smarttech.com/kb/
145748). The instructions below are a supplement to, and not a substitute for, the
installation guide.

60 | CHAPTER 5 – CABLING A 600I4 OR D600I4 SYSTEM TO AN FS-UX
Mounting your HAWM-UX/UF mobility switchThe mobility switch controls the vertical movement of the HAWM-UX/UF and your
interactive whiteboard system. The mobility switch is wired directly to the rear panel of
the HAWM-UX/UF. Use the installation guide with the following procedure to place and
mount the mobility switch.
To mount the
mobility switch
1. Locate the HAWM-UX/UF mobility switch, and then remove and discard the
plastic bag that holds the mobility switch.
2. Choose the mobility switch’s mounting location. There are mounting holes on the
left and the right sides and near the top and the bottom of the interactive
whiteboard.
IMPORTANT
If you installed or plan to install the SBA-L Projection Audio System, mount
the mobility switch on the bottom mounting holes.

61 | CHAPTER 5 – CABLING A 600I4 OR D600I4 SYSTEM TO AN FS-UX
3. Secure the mobility switch cable using a Phillips No. 2 screwdriver and the two
screws listed in the HAWM-UX/UF installation guide. Secure the mobility switch
cable toward the side of the interactive whiteboard where you chose to mount the
mobility switch and make sure that the mobility switch cable is toward the bottom
of the switch as you mount it.
4. Place the cable through the HAWM-UX/UF’s lower cable clip, making sure that the
cable is taut between the interactive whiteboard and the clip, and loose between
the clip and the base of the HAWM-UX/UF.
5. Bundle the excess cable, making sure that there’s a minimum of 28" (71.1 cm)
excess straight length or a 14" (35.6 cm) loose loop of cable.
62 | CHAPTER 5 – CABLING A 600I4 OR D600I4 SYSTEM TO AN FS-UX
Placing cables for HAWM-UX/UF-mounted componentsTo prevent cable friction, SMART recommends that you first place the cables that
don’t shift after they’re installed. Cables that connect components mounted to the
HAWM-UX/UF don’t shift after they’re installed. To prevent cable friction, SMART
recommends that you place these cables first.
Using the SMART UF65 and SMART UF65w projector connection panel for HAWM-UX/UF mounted componentsTo access the projector connection panel and wire management clip, remove the
input/output cover on the left side of the projector and remove the cable covers. For
more information, see the SMART Board 600i4 and D600i4 Interactive Whiteboard
System Configuration and User’s Guide (smarttech.com/kb/146184).
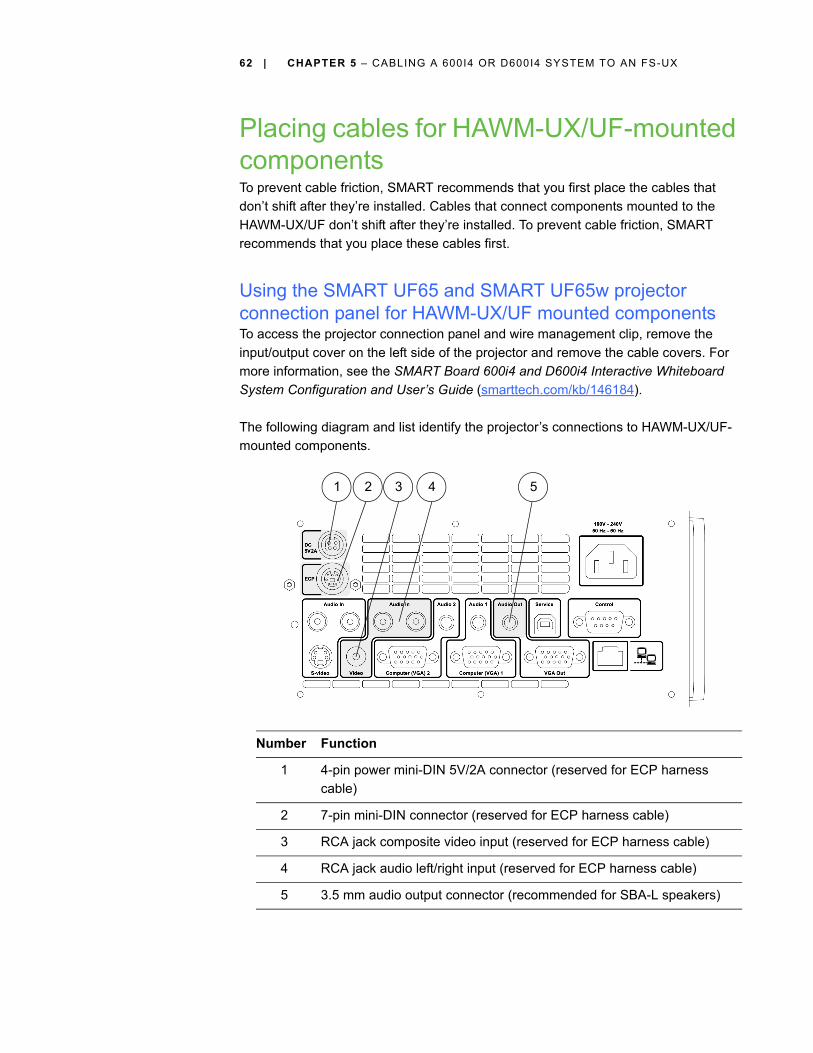
The following diagram and list identify the projector’s connections to HAWM-UX/UF-
mounted components.
Number Function
1 4-pin power mini-DIN 5V/2A connector (reserved for ECP harness
cable)
2 7-pin mini-DIN connector (reserved for ECP harness cable)
3 RCA jack composite video input (reserved for ECP harness cable)
4 RCA jack audio left/right input (reserved for ECP harness cable)
5 3.5 mm audio output connector (recommended for SBA-L speakers)
1 2 3 54

63 | CHAPTER 5 – CABLING A 600I4 OR D600I4 SYSTEM TO AN FS-UX
Using the SMART UF65 and SMART UF65w ECP for HAWM-UX/UF-mounted componentsThe following diagram and list identify the ECP ports that connect to
HAWM-UX/UF-mounted components.
Number Function
1 USB B jack (reserved for the primary computer)
2 DB15 ECP connector (reserved for ECP harness cable)
1
2

64 | CHAPTER 5 – CABLING A 600I4 OR D600I4 SYSTEM TO AN FS-UX
Connecting your SMART UF65 or SMART UF65w projector’s ECP harness cableThe ECP harness cable controls all signals and commands sent between the ECP
and the projector. Choose a side of the interactive whiteboard to install your ECP on,
and then follow the instructions in SMART Board 600i4 and D600i4 Interactive
Whiteboard System Configuration and User’s Guide (smarttech.com/kb/146184).
To connect your
projector’s ECP harness
cables
1. Pass the ECP cable through the
cable slot.
NOTE
The upper part of the ECP cable
is too thick to fit inside the cable
slot, so put the thinner part of the
ECP cable in the cable slot.
2. From the ECP harness cable, attach
the composite video RCA jack, its
associated dual channel audio input (two RCA jacks), the 4-pin power mini-DIN
connector and the 7-pin mini-DIN connector to the projector’s connection panel
(see page 60).
3. Attach the screw on the ECP strain relief to the projector housing using a Phillips
No. 2 screwdriver.
4. Place the harness cable around the back of the HAWM-UX/UF toward the left side
of the interactive whiteboard if the ECP is mounted on the left or toward the right
side of the interactive whiteboard if the ECP is mounted on the right.
5. Place the harness cable through the upper cable clips you installed on the side of
the HAWM-UX/UF.
6. Connect the harness cable’s DB15M plug to the ECP’s DB15 connector.
Connecting your SMART UF65 or SMART UF65w projector to the SBA-L Projection Audio SystemHAWM-UX/UF is designed to accommodate mounting the SBA-L Projection Audio
System directly to the interactive whiteboard. That way, when the speakers rise and
descend with the HAWM-UX/UF’s and interactive whiteboard’s movement, there’s
less risk of damage to the audio connection and power cables.
Before connecting the audio system to the projector, you must install the speaker
brackets, speakers and speaker cable clips according to the SBA-L Projection Audio
System textless installation instructions (smarttech.com/kb/142552).

65 | CHAPTER 5 – CABLING A 600I4 OR D600I4 SYSTEM TO AN FS-UX
To connect your projector
to your speakers
1. Retrieve the 3.5 mm jack to dual channel audio output (two RCA jacks) cable from
the SBA-L packaging. This is the audio connection cable. Attach the 3.5 mm jack
to the projector’s connection panel.
2. Pass the audio connection cable through the boom. Place the cables in the left
side of the cable slot.
3. Connect the audio connection cable to the projector’s connection panel (see
page 60).
4. Place the audio connection cable
through the right speaker cable
clip on the rear of the interactive
whiteboard, toward the right
speaker.
5. Connect the dual channel audio
output to the speaker’s
connection panel, and bundle
any excess cable in the right
speaker cable clip.
6. Retrieve the speaker-to-speaker
Molex (double-barreled) cable
from the SBA-L packaging.
7. Place the Molex cable through
the left speaker cable clip,
through the space between the
HAWM-UX/UF and the
interactive whiteboard.
8. Place the MOlex cable through
the right speaker cable clip.
9. Connect the Molex cable to both
speakers, and bundle any excess
cable in the left speaker cable
clip.
Right speaker
cable clip
Left speaker
cable clip

66 | CHAPTER 5 – CABLING A 600I4 OR D600I4 SYSTEM TO AN FS-UX
Placing cables for other components Cables for peripheral devices connected to the projector but not mounted on the
HAWM-UX/UF are at the greatest risk of damage, because they shift as the
HAWM-UX/UF rises and descends. These peripheral devices and cables include the
following:
• your computer or SMART Hub VE220 or SE240 collaboration platform
NOTE
Both the VE220 and SE240 models include 6' (1.83 m) output cables for
connecting to your projector. You might need cable extensions (not included).
• a room control device
• a network cable
• the projector’s power cable
• other projector-to-input device connections (such as a DVD/Blue-ray player) using
S-video connections
When connecting these peripheral devices, make sure there’s enough slack, mount
the peripheral device to a permanent location and make sure there are no
obstructions in the cable path. Cable friction, rubbing and strain can occur if you don’t
take the proper precautions.
Using the SMART UF65 and SMART UF65w projector connection panel for other componentsTo access the projector connection panel and wire management clip remove the input/
output cover on the left side of the projector and remove the cable covers. For more
information, see the SMART Board 600i4 and D600i4 Interactive Whiteboard System
Configuration and User’s Guide (smarttech.com/kb/146184).
The following diagram and list identify the SMART UF65 and SMART UF65w
projector’s connections to components that don’t mount on the HAWM-UX/UF.

67 | CHAPTER 5 – CABLING A 600I4 OR D600I4 SYSTEM TO AN FS-UX
NOTE
SMART recommends that you use a VGA out connector on your source input
to simplify the cable placement.
Number Function
1 RCA jack audio left/right input (reserved for S-video input)
2 S-video input connector
3 3.5 mm audio output connector (reserved for VGA 2-In connector)
4 HD-DB15 (VGA 2) connector
5 3.5 mm audio output connector (reserved for VGA 1-In connector)
6 HD-DB15 (VGA 1) connector
7 VGA output
8 Power socket
9 RS-232 connector
10 RJ45 jack (for network connections)
3 5
2
81 9
4 6 7 10

68 | CHAPTER 5 – CABLING A 600I4 OR D600I4 SYSTEM TO AN FS-UX
Using the SMART UF65 and SMART UF65w ECP for other componentsThe following diagram and list identify the ECP connections to components that aren’t
mounted to the HAWM-UX/UF.
Number Function
1 USB A jack (for peripheral device connection)
2 USB A jack (for peripheral device connection)
3 USB B tethered jack (for computer connection)
4 USB A jack (for peripheral device connection)
5 USB A jack (for peripheral device connection)
6 RCA jack composite video input (for peripheral device connection)
7 RCA jack audio left/right input (for peripheral device connection)
3
2
4
5
6 7
1

69 | CHAPTER 5 – CABLING A 600I4 OR D600I4 SYSTEM TO AN FS-UX
Connecting the power, network and other peripheral device cables to your SMART UF65 or SMART UF65w projectorConnect all power connections to the power bar (not included) you installed in the
FS-UX. Use this power bar as the main power connection for all
HAWM-UX/UF-mounted components.
To connect your projector
power cable
1. Pass the power
cable through the
boom and then
connect it to the
power socket. Make
sure that the power
cable is in the far
right position in the
cable slot.
2. Place the cables around the left side of the HAWM-UX/UF, and then through the
cable management pass-through hole on the left side of the FS-UX.
3. Connect the other end of the power cable to the power bar in the FS-UX, leaving
enough excess cable for the HAWM-UX/UF’s range of movement.
4. Bundle all cables between the HAWM-UX/UF and the FS-UX using zip ties,
convoluted tubing, spiral wrap or expandable loom (not included). This is for
operating safety and to prevent cables from getting caught in the height
adjustment mechanism. Carefully test the movement of the unit, using the
HAWM-UX/UF’s mobility switch. Make sure that the cable isn’t taut at any range of
the HAWM-UX/UF’s movement.
Cable slot

70 | CHAPTER 5 – CABLING A 600I4 OR D600I4 SYSTEM TO AN FS-UX
Peripheral devices and items not mounted on the HAWM-UX/UF, but that connect to
your projector’s connection panel on the HAWM-UX/UF, require a certain amount of
slack in the cable for the projector’s rise and descent. When connecting your
projector’s power cable, do not bundle it with or place it parallel to other peripheral
device cables you attach to your projector. If the wires cross or travel the same path,
make sure it is placed perpendicular (at right angles) to other unpowered cables
To connect cables using
the HAWM-UX/UF
1. If you don’t want to connect a network cable, proceed to step 3. Otherwise, make
sure you have a network cable with RJ45 plugs (not included) long enough to
connect your projector to a LAN port.
2. Pass the network cable through the boom and connect the RJ45 plug on the
network cable to the RJ45 port on the projector. Make sure that the network cable
is in the middle left position in the cable slot.
3. Pass peripheral device cables through the boom. Make sure that the peripheral
device cables are in the middle left position in the cable slot.
4. Connect your peripheral device cables to the appropriate locations on the
projector’s connection panel (see page 66).
5. If you don’t want to connect a network cable, proceed to the next step. Connect
the RJ45 plug on the network cable to the RJ45 port on the projector, making sure
that the network cable is in the middle left position in the cable slot.
6. Place the cables around
the back of the HAWM-UX/
UF toward the left side of
the interactive whiteboard if
the peripheral device or
LAN port is on the left or
toward the right side of the
interactive whiteboard if the
peripheral device or LAN
port is on the right.
7. Attach the cables to the
lower cable clips on the
HAWM.
8. If you have many cables
attached, smoothly bundle
your peripheral device
cables together using a
cable tie (not included).

71 | CHAPTER 5 – CABLING A 600I4 OR D600I4 SYSTEM TO AN FS-UX
9. Attach a cable management clip (not included) to the cables or cable bundles,
making sure that there’s a minimum of 28" (71.1 cm) excess straight length or a
14" (35.6 cm) loose loop of cable.
10. If you don’t want to connect a network cable, proceed to the next step. Otherwise,
connect the other end of the network cable to your LAN port.
11. Connect the other end of the cables to your peripheral devices.
12. Carefuly test the movement of the unit, using the HAWM-UX/UF’s mobility switch.
Make sure the cables aren’t taut at any range of the HAWM-UX/UF’s movement. If
they’re still taut, repeat this procedure until you find a suitable mounting location or
length for the cables.
Cable connections from the HAWM-UX/UF are routed through the cable management
pass-through holes, one at the top for management of the IEC power cable, and one
on each side of the FS-UX for management of projector and peripheral cables. These
holes allow access to the power bar and to route cables. This cabling requires special
precautions and careful examination of the lengths of cable you need to install your
system components.
To connect cables using
the FS-UX.
1. If you don’t want to connect a network cable, proceed to step 3. Otherwise, make
sure you have a network cable with RJ45 plugs (not included) long enough to
connect your projector to a LAN port.
2. Pass the network cable through the boom and connect the RJ45 plug on the
network cable to the RJ45 port on the projector. Make sure that the network cable
is in the middle left position in the cable slot.
3. Pass peripheral device cables through the boom. Make sure that the peripheral
device cables are in the middle left position in the cable slot.
4. Connect your peripheral device cables to the appropriate locations on the
projector’s connection panel (see page 66).
5. If you don’t want to connect a network cable, proceed to the next step. Connect
the RJ45 plug on the network cable to the RJ45 port on the projector, making sure
that the network cable is in the middle left position in the cable slot.
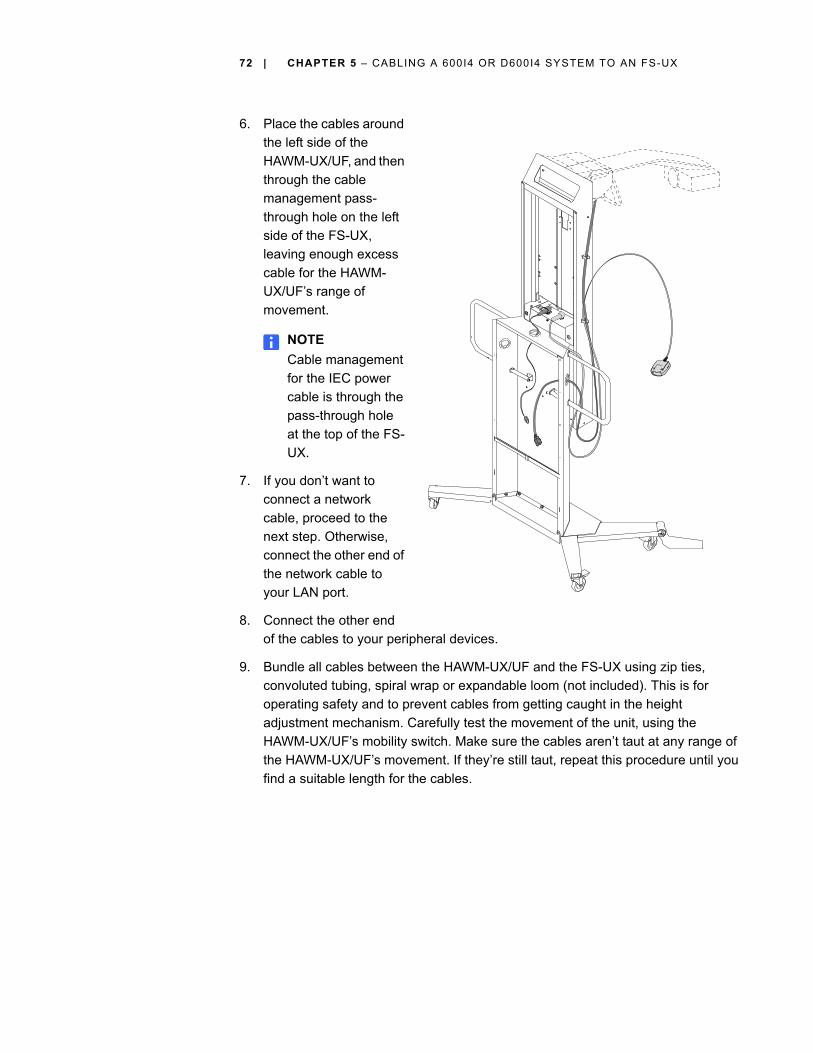
72 | CHAPTER 5 – CABLING A 600I4 OR D600I4 SYSTEM TO AN FS-UX
6. Place the cables around
the left side of the
HAWM-UX/UF, and then
through the cable
management pass-
through hole on the left
side of the FS-UX,
leaving enough excess
cable for the HAWM-
UX/UF’s range of
movement.
NOTE
Cable management
for the IEC power
cable is through the
pass-through hole
at the top of the FS-
UX.
7. If you don’t want to
connect a network
cable, proceed to the
next step. Otherwise,
connect the other end of
the network cable to
your LAN port.
8. Connect the other end
of the cables to your peripheral devices.
9. Bundle all cables between the HAWM-UX/UF and the FS-UX using zip ties,
convoluted tubing, spiral wrap or expandable loom (not included). This is for
operating safety and to prevent cables from getting caught in the height
adjustment mechanism. Carefully test the movement of the unit, using the
HAWM-UX/UF’s mobility switch. Make sure the cables aren’t taut at any range of
the HAWM-UX/UF’s movement. If they’re still taut, repeat this procedure until you
find a suitable length for the cables.

73 | CHAPTER 5 – CABLING A 600I4 OR D600I4 SYSTEM TO AN FS-UX
Connecting composite video and USB devices to your projector’s ECPThe ECP has three USB A jacks and one composite video RCA jack with associated
dual-channel audio RCA jacks. SMART recommends that you install only small USB
devices, such as a USB drive, or that you use a USB port on your computer for larger
devices to eliminate the risk of cable damage. SMART also recommends that you use
the composite video connector only for temporary connections to peripheral devices,
or that you use a permanent connection to the projector’s connection panel.
To connect a composite
video device to your
projector’s ECP
1. Make sure that you place the device near the HAWM-UX/UF on a stable support.
2. Allow enough excess cable length to accommodate the HAWM-UX/UF’s rise and
descent, or make sure that the HAWM-UX/UF isn’t moved while the device is
attached.
3. When you’re finished with the device, disconnect the cable from the ECP.
Optional laptop shelf for the FS-UXYou can install a laptop shelf on either side of your FS-UX. If you have an 800i series
interactive whiteboard system, the laptop shelf goes on the left side of the FS-UX to
keep the laptop close to the interactive whiteboard’s ECP.
For more information on the FS-UX laptop shelf, see the FS-UX-LTS Laptop Shelf for
SMART Mobile Height-Adjustable Floor Stand Installation Guide (smarttech.com/kb/
153054).
The laptop shelf is available from your authorized SMART reseller (smarttech.com/
where).

74 | CHAPTER 5 – CABLING A 600I4 OR D600I4 SYSTEM TO AN FS-UX

Chapter 6
Cabling a 600i3 or D600i3 system to an FS-UX
Introduction ................................................................................................... 37
Mounting your HAWM-UX/UF mobility switch .............................................. 37
Placing cables for remotely mounted components ....................................... 39
IntroductionSMART Board 600i3 or D600i3 interactive whiteboard systems include a SMART
UF55 high-offset projector or SMART UF55w high-offset widescreen projector a
remotely located extended control panel (ECP).
IMPORTANT
Before following these instructions, install your FS-UX and interactive whiteboard
system according to the SMART FS-UX Installation Guide (smarttech.com/kb/
145748). The instructions below are a supplement to, and not a substitute for, the
installation guide.

76 | CHAPTER 6 – CABLING YOUR 600I3 SYSTEM TO YOUR FS-UX
Mounting your HAWM-UX/UF mobility switchThe mobility switch controls the vertical movement of the HAWM-UX/UF and your
interactive whiteboard system. The mobility switch is wired directly to the rear panel of
the HAWM-UX/UF. Use the installation guide with the following procedure to place and
mount the mobility switch.
To mount the
HAWM-UX/UF mobility
switch to your interactive
whiteboard
1. Locate the HAWM-UX/UF mobility switch, and then remove and discard the
plastic bag that holds the mobility switch.
2. Choose the mobility switch’s mounting location. There are mounting holes on the
left and the right sides and near the top and the bottom of the interactive
whiteboard.
NOTE
If you have installed or plan to install the SBA or SBA-L Projection Audio
System, mount the mobility switch on the bottom mounting holes.
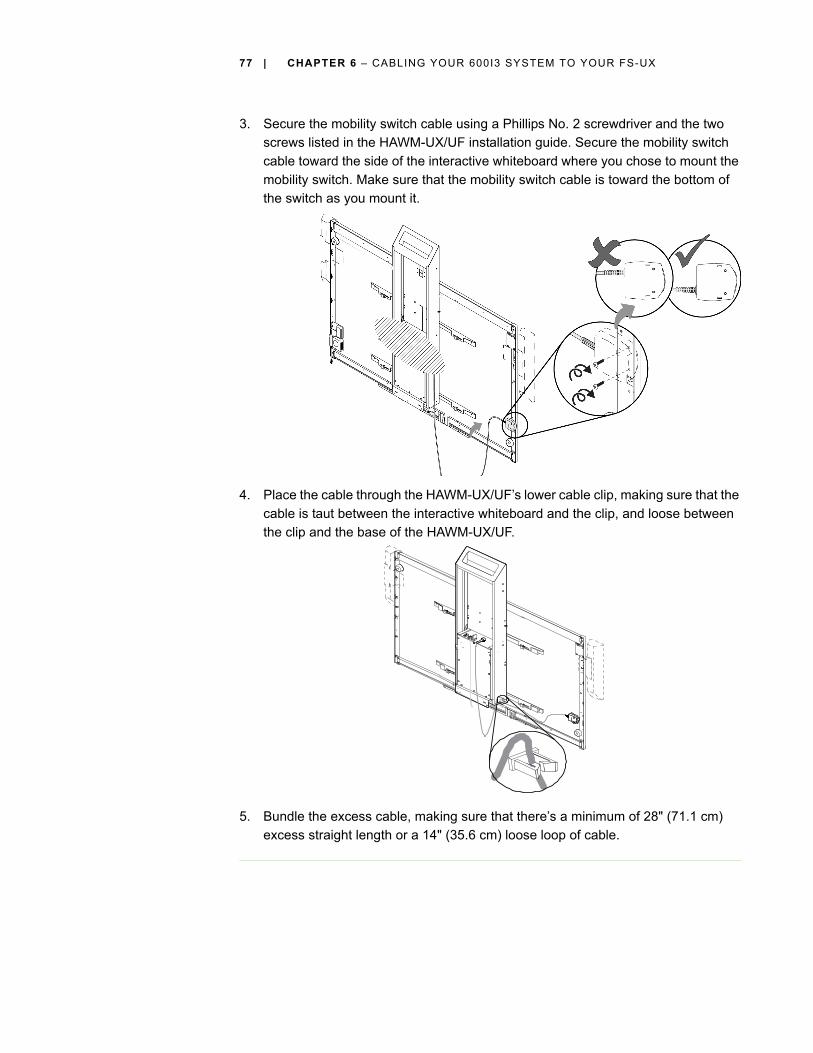
77 | CHAPTER 6 – CABLING YOUR 600I3 SYSTEM TO YOUR FS-UX
3. Secure the mobility switch cable using a Phillips No. 2 screwdriver and the two
screws listed in the HAWM-UX/UF installation guide. Secure the mobility switch
cable toward the side of the interactive whiteboard where you chose to mount the
mobility switch. Make sure that the mobility switch cable is toward the bottom of
the switch as you mount it.
4. Place the cable through the HAWM-UX/UF’s lower cable clip, making sure that the
cable is taut between the interactive whiteboard and the clip, and loose between
the clip and the base of the HAWM-UX/UF.
5. Bundle the excess cable, making sure that there’s a minimum of 28" (71.1 cm)
excess straight length or a 14" (35.6 cm) loose loop of cable.
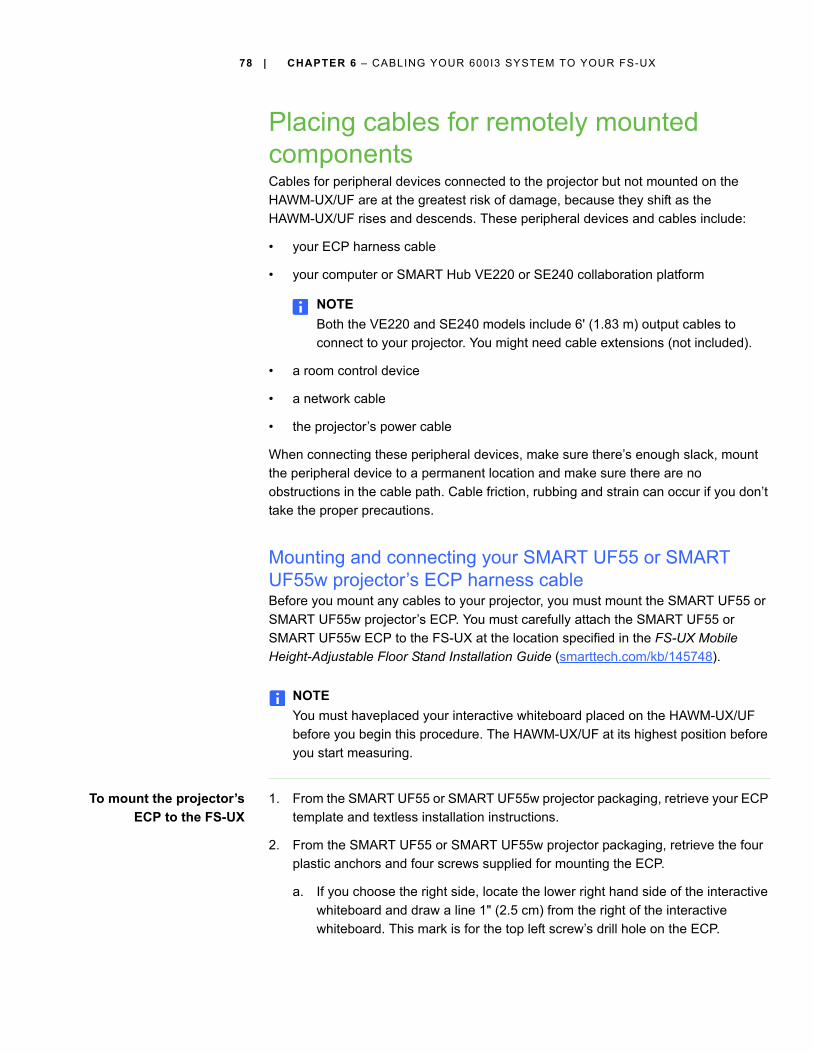
78 | CHAPTER 6 – CABLING YOUR 600I3 SYSTEM TO YOUR FS-UX
Placing cables for remotely mounted components Cables for peripheral devices connected to the projector but not mounted on the
HAWM-UX/UF are at the greatest risk of damage, because they shift as the
HAWM-UX/UF rises and descends. These peripheral devices and cables include:
• your ECP harness cable
• your computer or SMART Hub VE220 or SE240 collaboration platform
NOTE
Both the VE220 and SE240 models include 6' (1.83 m) output cables to
connect to your projector. You might need cable extensions (not included).
• a room control device
• a network cable
• the projector’s power cable
When connecting these peripheral devices, make sure there’s enough slack, mount
the peripheral device to a permanent location and make sure there are no
obstructions in the cable path. Cable friction, rubbing and strain can occur if you don’t
take the proper precautions.
Mounting and connecting your SMART UF55 or SMART UF55w projector’s ECP harness cableBefore you mount any cables to your projector, you must mount the SMART UF55 or
SMART UF55w projector’s ECP. You must carefully attach the SMART UF55 or
SMART UF55w ECP to the FS-UX at the location specified in the FS-UX Mobile
Height-Adjustable Floor Stand Installation Guide (smarttech.com/kb/145748).
NOTE
You must haveplaced your interactive whiteboard placed on the HAWM-UX/UF
before you begin this procedure. The HAWM-UX/UF at its highest position before
you start measuring.
To mount the projector’s
ECP to the FS-UX
1. From the SMART UF55 or SMART UF55w projector packaging, retrieve your ECP
template and textless installation instructions.
2. From the SMART UF55 or SMART UF55w projector packaging, retrieve the four
plastic anchors and four screws supplied for mounting the ECP.
a. If you choose the right side, locate the lower right hand side of the interactive
whiteboard and draw a line 1" (2.5 cm) from the right of the interactive
whiteboard. This mark is for the top left screw’s drill hole on the ECP.

79 | CHAPTER 6 – CABLING YOUR 600I3 SYSTEM TO YOUR FS-UX
3. Attach but don’t tighten, two screws in the two top holes in the back of the FS-UX,
using a Phillips No. 2 screwdriver,
4. Attach the ECP to the screws,
using the top two key holes on
the ECP.
5. Flip up the bottom panel
of the ECP. Attach two
screws in the two bottom
plastic anchors using a
Phillips No. 2 screwdriver
Using the SMART UF55 and SMART UF55w projector’s connection panel for remotely mounted componentsTo access the projector connection panel and wire management clip, first remove the
input/output cover on the left side of the projector and remove the cable covers. For
more information, see the SMART Board 600i3 and D600i3 Interactive Whiteboard
System Configuration and User’s Guide (smarttech.com/kb/131156).

80 | CHAPTER 6 – CABLING YOUR 600I3 SYSTEM TO YOUR FS-UX
The following diagram and list identify the SMART UF55 and SMART UF55w
projector’s connections to components that don’t mount to the HAWM-UX/UF.
IMPORTANT
Use only the input Computer 1 on your projector to connect the ECP harness
cable.
Number Function
1 RCA jack audio left/right input (reserved for ECP harness cable)
2 S-video input connector (reserved for ECP harness cable)
3 RCA jack audio left/right input (reserved for ECP harness cable)
4 RCA jack composite video input connector (reserved for ECP
harness cable)
5 3.5 mm audio output connector (for VGA 2-In connector)
6 HD-DB15 (VGA 2) connector (reserved for ECP harness cable)
7 3.5 mm audio output connector (for VGA 1-In connector)
8 HD-DB15 (VGA 1) connector (computer analog signal/component
video input)
9 HD-DB15 VGA output connector
10 Power socket
11 RS-232 connector (reserved for ECP harness)
12 RJ45 jack (for network connections)
5 7
2
1031 11
6 8 9 124

81 | CHAPTER 6 – CABLING YOUR 600I3 SYSTEM TO YOUR FS-UX
NOTE
SMART recommends that you use a VGA out from your source input to
simplify the cable placement
Connecting the SMART UF55 and SMART UF55w projector’s ECP harness cableThe following diagram and list shows the ECP’s DB25 and VGA connections to the
ECP harness cable.
Connecting the power, network, ECP and peripheral device cables to your SMART UF55 or SMART UF55w projectorConnect all power connections to the power bar (not included) you installed in the
FS-UX. Use this power bar as the main power connection for all
HAWM-UX/UF-mounted components.
Number Function
1 HD-DB15 (VGA 2) connector (reserved for ECP harness cable)
2 DB25 connector (reserved for ECP harness cable)
1 2

82 | CHAPTER 6 – CABLING YOUR 600I3 SYSTEM TO YOUR FS-UX
To connect your projector
power cable
1. Pass the power cable
through the boom and
then connect it to the
power socket. Make
sure that the power
cable is in the far right
position in the cable
slot.
2. Place the cables around the left side of the HAWM-UX/UF, and then through the
cable management pass-through hole on the left side of the FS-UX.
3. Connect the other end of the power cable to the power bar in the FS-UX, leaving
enough excess cable for the HAWM-UX/UF’s range of movement.
4. Bundle all cables between the HAWM-UX/UF and the FS-UX using zip ties,
convoluted tubing, spiral wrap or expandable loom (not included). This is for
operating safety and to prevent cables from getting caught in the height
adjustment mechanism. Carefully test the movement of the unit, using the
HAWM-UX/UF’s mobility switch. Make sure that the cable isn’t taut at any range of
the HAWM-UX/UF’s movement.
Peripheral devices and items not mounted on the HAWM-UX/UF, but that connect to
your projector’s connection panel on the HAWM-UX/UF, require a certain amount of
slack in the cable for the projector’s rise and descent. When connecting your
projector’s power cable, do not bundle it with or place it parallel to other peripheral
device cables you attach to your projector. If the wires cross or travel the same path,
make sure it is placed perpendicular (at right angles) to other unpowered cables
To connect cables using
the HAWM-UX/UF
1. If you don’t want to connect a network cable, proceed to the next step. Otherwise,
make sure you have a network cable with RJ45 plugs (not included) long enough
to connect your projector to a LAN port.
Cable slot

83 | CHAPTER 6 – CABLING YOUR 600I3 SYSTEM TO YOUR FS-UX
2. Pass the ECP cable through
the cable slot.
NOTE
The upper part of the
ECP cable is too thick to
fit inside the cable slot,
so put the thinner part of
the ECP cable in the
cable slot.
3. Connect the S-Video connector and two audio-left/right RCA jacks, the DB9
control cable and the composite video and two audio-left/right RCA jacks, from the
ECP harness cable to their receptacles on the projector’s connection panel (see
page 79).
4. Attach the screw on the ECP strain relief to the projector housing using a Phillips
No. 2 screwdriver,
5. If you don’t want to connect a network cable, proceed to the next step. Otherwise,
pass the network cable through the boom and connect the RJ45 plug on the
network cable to the RJ45 port on the projector. Make sure that the network cable
is in the middle left position in the cable slot.
6. Place the harness cable around the
back of the HAWM-UX/UF toward
the left side of the interactive
whiteboard if the ECP is mounted
on the left or toward the right side
of the interactive whiteboard if the
ECP is mounted on the right.
7. If you have many cables attached,
smoothly bundle your peripheral
device cables together using a
cable tie (not included).
8. If you don’t want to connect a
network cable, proceed to the next
step. Otherwise, connect the other
end of the network cable to your
LAN port.
9. Connect the HD-DB15 (VGA) connector and the DB25 connector from the
harness cable to the ECP (see page 81).
10. Carefully test the movement of the unit, using the HAWM-UX/UF’s mobility switch.
Make sure the cables aren’t taut at any range of the HAWM-UX/UF’s movement.
84 | CHAPTER 6 – CABLING YOUR 600I3 SYSTEM TO YOUR FS-UX
11. Attach a cable management clip (not included) to the cables or cable bundles,
with a minimum of 28" (71.1 cm) excess straight length or a 14" (35.6 cm) loose
loop of cable.
12. Make sure the cables aren’t taut at any range of the HAWM-UX/UF’s movement. If
they’re still taut, repeat this procedure until you find a suitable mounting location or
length for the cables.
Cable connections from the HAWM-UX/UF are routed through the cable management
pass-through holes at the top and sides of the FS-UX. These holes allow access to
the power bar and to route cables. This cabling requires special precautions and
careful examination of the lengths of cable you need to install your system
components.
To connect cables using
the FS-UX
1. If you don’t want to connect a network cable, proceed to step 3. Otherwise, make
sure you have a network cable with RJ45 plugs (not included) long enough to
connect your projector to a LAN port.
2. Pass the network cable through the boom and connect the RJ45 plug on the
network cable to the RJ45 port on the projector. Make sure that the network cable
is in the middle left position in the cable slot.
3. Pass peripheral device cables through the boom. Make sure that the peripheral
device cables are in the middle left position in the cable slot.
4. Connect your peripheral device cables to the appropriate locations on the
projector’s connection panel (see page 79).
5. If you don’t want to connect a network cable, proceed to the next step. Connect
the RJ45 plug on the network cable to the RJ45 port on the projector, making sure
that the network cable is in the middle left position in the cable slot.

85 | CHAPTER 6 – CABLING YOUR 600I3 SYSTEM TO YOUR FS-UX
6. Place the cables around
the left side of the
HAWM-UX/UF, and then
through the cable
management pass-
through hole on the left
side of the FS-UX,
leaving enough excess
cable for the HAWM-UX/
UF’s range of movement.
NOTE
Cable management
for the IEC power
cable is through the
pass-through hole at
the top of the FS-UX.
7. If you don’t want to
connect a network cable,
proceed to the next step.
Otherwise, connect the
other end of the network
cable to your LAN port.
8. Connect the other end of
the cables to your
peripheral devices.
9. Bundle all cables between the HAWM-UX/UF and the FS-UX using zip ties,
convoluted tubing, spiral wrap or expandable loom (not included). This is for
operating safety and to prevent cables from getting caught in the height
adjustment mechanism. Carefully test the movement of the unit, using the
HAWM-UX/UF’s mobility switch. Make sure the cables aren’t taut at any range of
the HAWM-UX/UF’s movement. If they’re still taut, repeat this procedure until you
find a suitable length for the cables.
Connecting your host computer to the projector or ECPYou must connect your host computer’s video and audio outputs to your SMART
UF55 projector, or SMART UF55w projector, or ECP.
If you use guest computers, SMART recommends that you install your host
computer’s video output to your projector and reserve the VGA connector on the ECP
for a guest computer connection, such as a laptop.

86 | CHAPTER 6 – CABLING YOUR 600I3 SYSTEM TO YOUR FS-UX
If you don’t use guest computers, SMART recommends that you install your host
computer’s video output to the VGA connector on the ECP. This makes the cable
installation of SMART UF55 and SMART UF55w projectors much simpler.
Use only one set of the following instructions for your specific installation.
To connect your host
computer’s audio and
video output to your
projector input on the
HAWM-UX/UF
1. Make sure you have VGA and 3.5 mm audio cables (not included) long enough to
connect your computer to your SMART UF55 or SMART UF55w projector.
2. Pass the VGA and audio cables through the boom and connect your VGA cable to
the Computer (VGA) 2 input on your projector.
3. Connect your 3.5 mm audio cable to the Audio 2 input on your projector.
4. Place the cables around the
back of the HAWM-UX/UF
toward the left side of the
interactive whiteboard if your
computer is on the left or
toward the right side of the
interactive whiteboard if your
computer is on the right.
5. If you have many cables
attached, smoothly bundle
your peripheral device cables
together using a cable tie
(not included).
6. Connect the other ends of
your VGA and audio cables
to your computer’s video
output connector.
7. Attach a cable management clip (not included) to the cables or cable bundles,
making sure that there’s a minimum of 28" (71.1 cm) excess straight length or a
14" (35.6 cm) loose loop of cable.
8. Carefully test the movement of the unit, using the HAWM-UX/UF’s mobility switch.
Make sure the cables aren’t taut at any range of the HAWM-UX/UF’s movement.
If the cables are still taut, repeat this procedure until you find a suitable mounting
location or length for the cables.

87 | CHAPTER 6 – CABLING YOUR 600I3 SYSTEM TO YOUR FS-UX
Using the SMART UF55 and SMART UF55w projectors’ ECP diagram for remotely mounted componentsThe following diagram and list identify the SMART UF55 and SMART UF55w
projectors’ connections to components that don’t mount to the HAWM-UX/UF
Connecting peripheral devices to your SMART UF55 and SMART UF55w projectors’ ECP temporarilyTo connect a DVD/Blu-ray player, VCR, document camera, digital camera or other
visual or audio-visual peripheral device, you must connect the device’s video and
audio outputs to the ECP. You can have up to three peripheral devices and a host
computer connected at one time.
Number Function
1 RS-232 connector
2 HD-DB15 (VGA 2) connector (reserved for ECP harness cable)
3 3.5 mm audio output connector (reserved for VGA connector)
4 S-video input connector
5 RCA jack audio left/right input (reserved for S-video connector)
6 RCA jack composite video input connector
7 RCA jack audio left/right input (reserved for composite video
connector
1
2 3 5 6 74

88 | CHAPTER 6 – CABLING YOUR 600I3 SYSTEM TO YOUR FS-UX
The SMART UF55 and SMART UF55w projectors’ ECP has three video inputs and
one communications port: an HD-DB15 with associated 3.5 mm audio jack, an S-
Video jack with associated dual-channel audio RCA jacks, a composite video RCA
jack with associated dual-channel audio RCA jacks and one RS-232 connector
designed for use with room control systems. SMART recommends that you use the
video connectors for temporary connections to peripheral devices, or that you
permanently attach and secure the cables to the wall for installation.
To connect a composite
video device
1. Make sure that you place the device near the HAWM-UX/UF on a stable support.
2. Allow enough excess cable length to accommodate the HAWM-UX/UF’s rise and
descent, or make sure that the HAWM-UX/UF isn’t moved.
3. Connect the device’s video cables to the ECP using the appropriate inputs. Input
2 is the VGA connector, input 3 is the S-video 4-pin mini-DIN connector and input
4 is the composite video input connector.
4. For each peripheral device, connect the device’s audio cables to the associated
red and white RCA jacks next to the appropriate video input connector.
5. When you’re finished with the device, remove the cable from the ECP.
Connecting your SMART UF55 or SMART UF55w projector to the SBA or SBA-L Projection Audio SystemThe HAWM-UX/UF is designed to accommodate mounting the SBA or SBA-L
Projection Audio System directly to the interactive whiteboard. That way, when the
speakers rise and descend with the HAWM-UX/UF’s and interactive whiteboard’s
movement, there’s less risk of damage to the audio connection and power cables.
Before connecting the audio system to the projector, you must install the speaker
brackets, speakers and speaker cable clips according to the SBA-L Projection Audio
System Installation Instructions (smarttech.com/kb/142552).
Using the SMART UF55 and SMART UF55w projector connection panel for SBA and SBA-L Projection Audio SystemTo access the cable channel, remove the input/output cover on the left side of the
projector and remove the cable covers. For more information, see the SMART Board
600i3 and D600i3 Interactive Whiteboard System Configuration and User’s Guide
(smarttech.com/kb/131156).

89 | CHAPTER 6 – CABLING YOUR 600I3 SYSTEM TO YOUR FS-UX
The following diagram and list identify the SMART UF55 and SMART UF55w
projectors’ connections to SBA and SBA-L speakers.
1. 3.5 mm audio-output connector (recommended for SBA/SBA-L speakers)
To connect your projector
to your speakers
1. Retrieve the 3.5 mm jack to dual channel audio output (two RCA jacks) cable from
the SBA-L packaging. This is the audio connection cable.
NOTE
The SBA packaging doesn’t contain a cable of this type. You must supply your
own cable of a suitable length.
2. Pass the audio connection cable through the boom. Place the cables in the left
side of the cable slot.
3. Connect the audio connection cable to the projector’s connection panel (see
above).
4. Place the audio connection
cable through the right
speaker cable clip on the
rear of the interactive
whiteboard, toward the
right speaker.
5. Connect the dual channel
audio output to the
speaker’s connection
panel, and bundle any
excess cable in the right
speaker cable clip.
1
Right speaker
cable clip

90 | CHAPTER 6 – CABLING YOUR 600I3 SYSTEM TO YOUR FS-UX
6. From the SBA packaging, retrieve the speaker-to-speaker Molex
(double-barreled) cable.
7. Place the Molex cable
through the left speaker
cable clip, through the
space between the
HAWM-UX/UF and the
interactive whiteboard.
8. Place the Molex cable
through the right speaker
cable clip.
9. Connect the Molex cable
to both speakers. Bundle
any excess cable in the
left speaker cable clip.
Optional laptop shelf for the FS-UXYou can install a laptop shelf on either side of your FS-UX. If you have an 800i series
interactive whiteboard system, the laptop shelf goes on the left side of the FS-UX to
keep the laptop close to the interactive whiteboard’s ECP.
For more information on the FS-UX laptop shelf, see the FS-UX-LTS Laptop Shelf for
SMART Mobile Height-Adjustable Floor Stand Installation Guide (smarttech.com/kb/
153054).
The laptop shelf is available from your authorized SMART reseller (smarttech.com/
where).
Left speaker
cable clip

Index
Numerics600i3 interactive whiteboard
ECP harness cable, 82
host computer connection, 86
mobility switch, 76
network cable, 82
SMART hub VE220 and SE240, 78
SMART UF55 projector power cable,
82
temporary connections, 88
600i4 interactive whiteboard
mobility switch, 60
network cable, 70
peripheral cable connection, 70
SMART hub VE220 and SE240, 66
SMART UF65 projector, 59
SMART UF65 projector power cable,
69
temporary connections, 73
685ix interactive whiteboard
mobility switch, 40
network cable, 53
peripheral device cable, 53
SMART Hub VE220 and SE240, 49
SMART UX60 projector, 5, 39
temporary connections, 57
800i4 interactive whiteboard
SMART hub VE220 and SE240, 32
SMART UF65 projector power cable,
35
885ix interactive whiteboard
mobility switch, 6
network cabling, 19
peripheral device cabling, 19
SMART hub VE220 and SE240, 16
SMART UX60 projector power cable,
19, 53
Aaudio system
600i3 interactive whiteboard, 88
600i4 interactive whiteboard, 64
SMART UF55 projector, 88
SMART UF65 projector, 30, 64
SMART UX60 projector, 14, 48
Bbest practice
assessing your installation location, 4
preventing tripping hazards, 3
Ccable lengths, 4
cables
wall mount HAWM-UX/UF, 2
EECP
SMART UF55 projector, 78, 81
SMART UF65 projector, 27, 34
SMART UX60 projector, 10, 44
Mmobility switch
600i3 interactive whiteboard, 76
600i4 interactive whiteboard, 60
685ix interactive whiteboard, 40
885ix interactive whiteboard, 6
placement, 7, 41, 61, 77

92 | INDEX
movement switch
600i3 interactive whiteboard, 76
600i4 interactive whiteboard, 60
685ix interactive whiteboard, 40
885ix interactive whiteboard, 6
SSBA(-L) Projection Audio System
SMART UF65 projector, 30
SMART UX60 projector, 14, 48
SBA-L Projection Audio System
SMART UF55 projector, 88
SMART UF65 projector, 64
SMART hub SE240
600i3 interactive whiteboard, 78
600i4 interactive whiteboard, 32, 66
685ix interactive whiteboard, 49
885ix interactive whiteboard, 16
SMART hub VE220
600i3 interactive whiteboard, 78
600i4 interactive whiteboard, 32
685ix interactive whiteboard, 49
885ix interactive whiteboard, 16
SMART UF55 projector
audio system, 88
ECP, 78
ECP harness cable, 81
for remotely-mounted components, 79
power cable, 82
SMART UF65 projector
600i4 interactive whiteboard, 35, 59
audio system, 64
ECP for HAWM-mounted, 34
ECP for HAWM-mounted components,
27, 63
ECP for other components, 34, 68
for HAWM-mounted components, 26,
62
for other components, 33, 67
power cable, 69
smart UF65 projector
SBA(-L) audio system, 30
SMART UX60 projector
685ix interactive whiteboard, 39
885ix interactive whiteboard, 5
audio system, 48
ECP, 44
ECP for HAWM-mounted components,
10, 18, 44
ECP for other components, 18, 52
for HAWM-mounted components, 43
for other components, 17, 50
HAWM-mounted components, 9
power cable to 885ix, 19, 53
SBA(-L) audio system, 14
SMART VE220
600i4 interactive whiteboard, 66
switch
600i3 interactive whiteboard, 76
600i4 interactive whiteboard, 60
685ix interactive whiteboard, 40
Uup-down switch
600i3 interactive whiteboard, 76
600i4 interactive whiteboard, 60
685ix interactive whiteboard, 40
885ix interactive whiteboard, 6
Wwall mount
HAWM-UX/UF, 2

