smart 360 pos - squarespace · pdf file3 smart 360 pos: registration to activate smart 360 pos...
TRANSCRIPT

1
Smart 360 POS How To and Tech Support Guide

2
Table of Contents
Registration Page 3
Receipt Details Page 5
Setting Tax Rates Page 6
Inventory Page 7
Access Id Page 8
Start Page Page 9
Contact Us Page 9
Help Page Page 10
Settings Page 11
o Application Setup Page 12
o Printer Setup Page 13
o Payment Device Setup Page 16
o Payment Processing Page 16
o Database Page 18
o Print Last Z-Out Report Page 20
o Sample Inventory Import Page 21
Point of Sale Page 22
Tech Support Page 25

3
SMART 360 POS: Registration
To activate Smart 360 POS please enter the email, password, and store id that was provided in
the box. It can be found in the Quick Reference Guide in Section E on page 5.
After entering the information provided, you will select either “Register A New Store” button or
“Add A Station To A Existing Store.”
o If this is the first tablet you are registering to your store, please select “Register A New
Store.” After you press the button, you will be required to enter information about your
store. Every field except Address Line 2 is required before pressing continue.

4
o If this is an additional tablet you purchased for your store, please select “Add A Station
To A Existing Store.” After you press the button, you will be prompted with the same
text fields as before. However, the information that you will provide in this section will
differ. You will enter the email, password, and store id that you originally registered
with.
If you do not remember what credentials you registered Smart 360 POS, you will
need to go to “Settings” in Smart 360 POS on a tablet that is registered. Once in
“Settings” please select “Application Information” in the “Administrator”
section. A pop up will appear with your credentials will appear. Please enter that
information into the text fields.
After you have finished entering all information into the text fields for either the “Register A
New Store” button or “Add A Station To A Existing Store” button, please press “Continue.” After
you press the button, a pop up will appear asking you to enter a unique station id. Enter a
number between 1 and 99.
If you have experienced any problems when registering, please go to page 26.

5
SMART 360 POS: Receipt Details
Note: This section is only for users who have pressed “Register A New Store.”
On this page you will enter information you would like to display on your receipts.
For Store Number enter a number between 1 and 9999.
In the Footer Message you can enter whatever messages you like to display on your receipts.
For example: HST Tax number, “Thank You For Your Business!”
After you are satisfied with your input please enter submit on the bottom of the page.
NOTE: You will have the option to alter your receipt in BackOffice at any time
(backoffice.smart360pos.com). Once you have logged in, please select the “Store Details” tab in
BackOffice. From that page you can modify your receipt. When satisfied with your input please
press the “Save” button. Afterwards please log out of Smart 360 POS and re - login to get the
updated receipt.
6
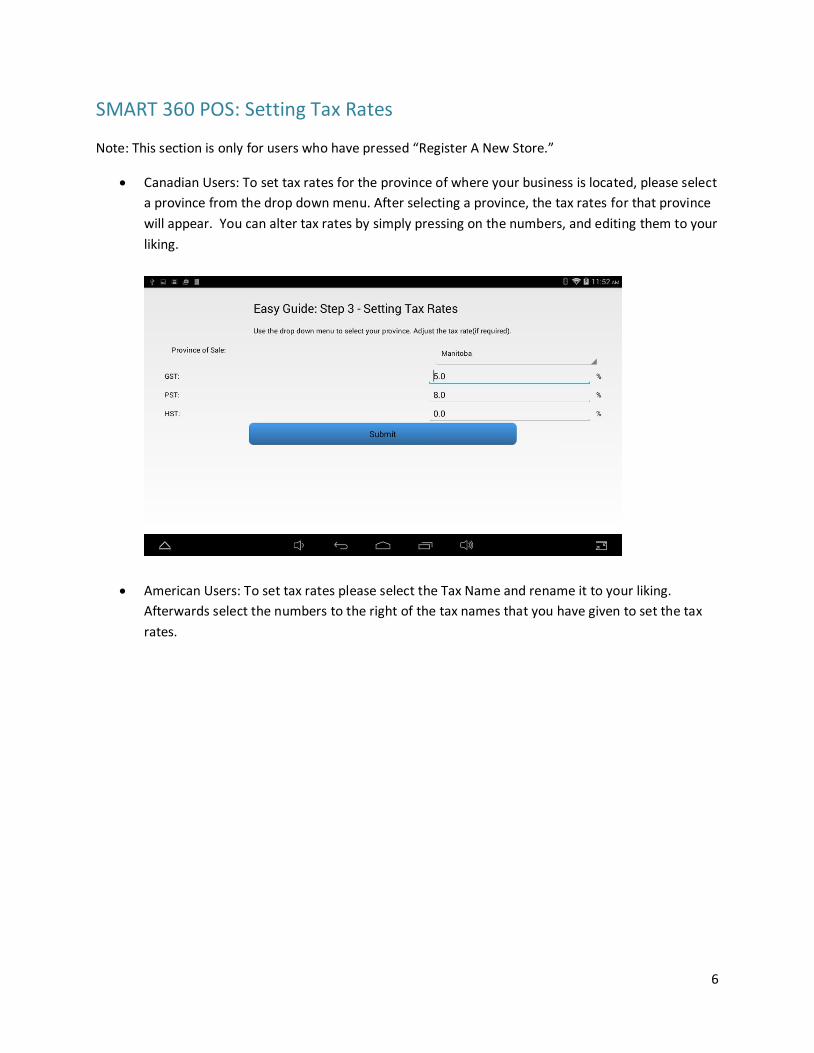
SMART 360 POS: Setting Tax Rates
Note: This section is only for users who have pressed “Register A New Store.”
Canadian Users: To set tax rates for the province of where your business is located, please select
a province from the drop down menu. After selecting a province, the tax rates for that province
will appear. You can alter tax rates by simply pressing on the numbers, and editing them to your
liking.
American Users: To set tax rates please select the Tax Name and rename it to your liking.
Afterwards select the numbers to the right of the tax names that you have given to set the tax
rates.

7
SMART 360 POS: Inventory
Note: This section is only for users who have pressed “Register A New Store.”
You can upload inventory manually, using a barcode scanner, or a spreadsheet.
Manually/ Barcode Scanner
o Note: If you are using a barcode scanner please make sure the scanner is paired.
o To enter a product manually, you will need to enter the barcode/item number, item
name, cost, price, item stock, department, and the taxes that apply to the product.
After you have entered all the fields, press “Save” to add that item to your inventory.
By Spreadsheet
o After you have downloaded the spread sheet to your tablet, press “Open,” then
“sdcard,” and then the appropriate folder where you saved the spreadsheet. Once you
found the file, select the file and press “Upload.”

8
SMART 360 POS: Access Id
The Access Id is a four digit number that is used by employees to login.
Logging in The First Time
o After registering, the default Access Id can be found on the Quick Reference Guide in
Section E on page 5.
If you have forgotten your Access Id, you can press “Forgot your Access Id? Please press here.”
This will take you to BackOffice where you will be able to login and select the employee who’s
Access Id you want to see.
To create additional Access Ids please refer to “Adding Employees” on page 27.

9
SMART 360 POS: Start Page
The Start Page has several options:
SMART 360 POS: Contact Us
Note: You will need to your email setup on BackOffice to use this feature. To see how this done, refer to.
Tell our developers what you would like to see in future updates.

10
SMART 360 POS: Help Page The Help button takes you to the Help page where you will be able to view manuals about the
application and BackOffice.
11
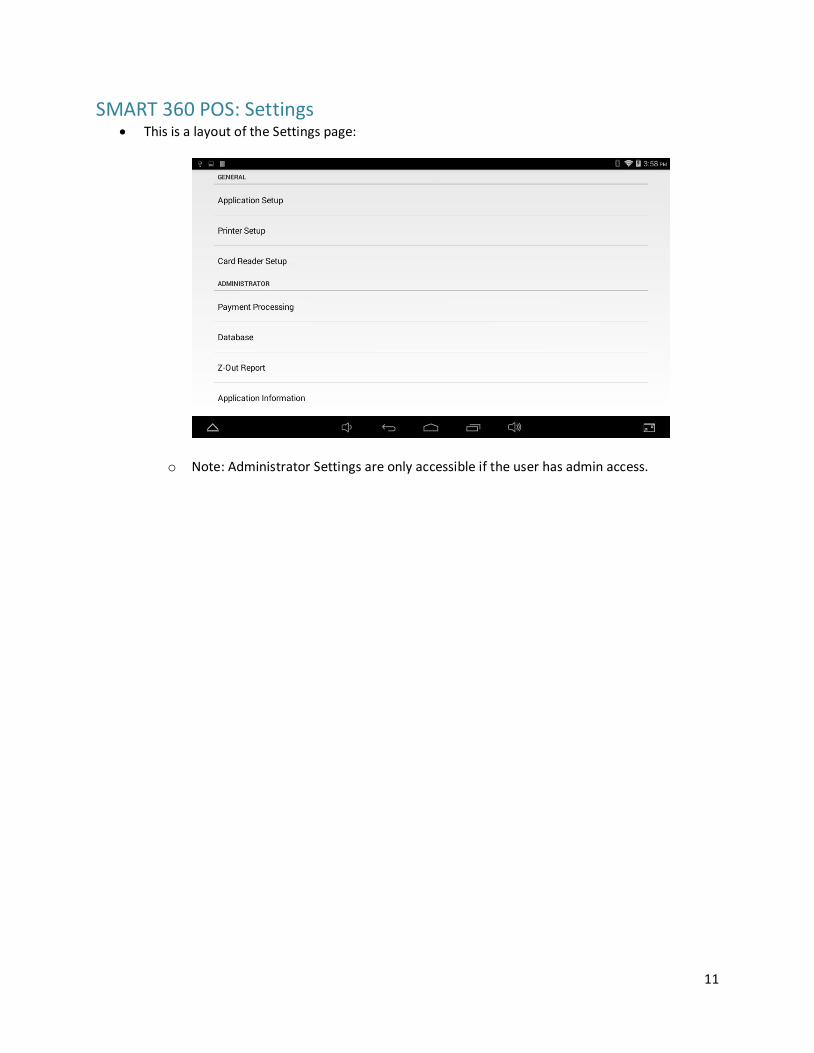
SMART 360 POS: Settings This is a layout of the Settings page:
o Note: Administrator Settings are only accessible if the user has admin access.

12
Application Setup: o Pertains to the user’s personal preference when using Smart 360 POS.
Combine Lines:
If this option is off, the user will have access to the keypad on the Point of Sale Screen.
If this option is on, the user will not have access to the keypad and the same items will appear on the same line and increment in quantity.
Print Receipt:
This option prompts the user if the user would like to always print a receipt, never print a receipt, or prompt the user after a transaction if they want to print a receipt.
Stock Prompt:
Choose whether the user will be notified if an item not in stock is currently being purchased.
Full Description:
Choose whether an item will display a description of 12 or 30 characters.
Decimal Quantity:
Choose whether the quantity of an item must be a whole number or a decimal.
Send Receipt as Email:
Choose if the user wants to send a receipt by email. Camera Scanner:
Choose whether the user uses the camera as a barcode scanner. Use Image Buttons:
After you add images to inventory or departments on BackOffice you have the option to display image buttons. Swipe the button to the left to turn this feature off. To turn this feature on, simply swipe to the button to the right.
To add images on BackOffice please refer to o Round Cash Transaction
This option will prompt the user whether to select "Disabled" or "Round to Nearest Nickel". If you would like to round cash transactions to the nearest nickel, please select "Round to Nearest Nickel".

13
Printer Setup: o The user has the option to choose if they want to use the printer.
o If you have not paired the printer with the tablet, please exit the application, and go to the tablet’s settings and select “Bluetooth.” Afterwards press “Search for Devices.”

14
o After that select “RP58BU” and enter “1234” for the PIN and press OK.
o After the printer is paired, go back to the application and press the “Settings” button in the Start Page. Then press “Printer Setup.” Next swipe the button to the right to turn on Bluetooth printing. Afterwards press “Choose Bluetooth Printer” and select “RP58BU.”

15
o To test that you have connected to the printer press “Click to Print Test Page.” A message stating you have connected will appear and blank piece a paper will print from the printer.
Note: If a paper does not print out, but the message states that the printer is connected, the printer is connected. However, if you want to print a test page Press “Click to Print Test Page” until a page prints.

16
Payment Device Setup: o Note: This option only applies for users who have access to “Other Processing Payment”
option in “Payment Processing.” o Magtek Bullet
Please view our Magtek Bullet and USAePay Manual to set up the Magtek Bullet.
o Ingenico iCT250 Please view our Ingenico iCT250 Chase Paymentech Setup Manual
o Both manuals can be found at http://smart360pos.com/sirclereg/downloads.aspx
Payment Processing: o By default every user is set to Express Checkout. If you want to access Other Processing
Payment option you will need to contact International Point of Sale at 866 – 468 – 5767.

17
o If you have access to “Other Processing Payment” option, you will need to select the appropriate “Payment Processor” option in the drop down menu and fill out any necessary information afterwards.
If you purchased a Payment Processing module from International Point of Sale after you bought Smart 360 POS, and would like to connect your payment processing module select "Update
Payment Processing."
o You will see a message towards the bottom of the page stating that "You Have Access to Other Payment Processing Options." If you did not receive this message, please try again in a few seconds. After you have gained access, you will now be able to uncheck "Express Checkout" and select the appropriate Payment Processing option in the "Other
Payment Processing" button.

18
Database: o Click to Update Database:
You will press this button if you have made changes to your database.
o Clear Invoices: Deletes all recorded invoices if you select “Yes.”

19
o Clear All Products, Invoices, and Custom Departments: Deletes everything saved except for the first four departments, and products.

20
Print Last Z-Out Report: o Prints out the last recorded Z-Out Report.

21
Import Sample Database o If you would like to add inventory to your database without creating your own you can
select from six sample databases. After pressing the "Import Sample Database" button, select one of the six options. After selecting a sample database, a list detailing the
inventory will appear.
If you are satisfied with the sample database you have selected press "Save" to add these items to your database. Or press the "Exit" button to return to the “Settings” menu.
22
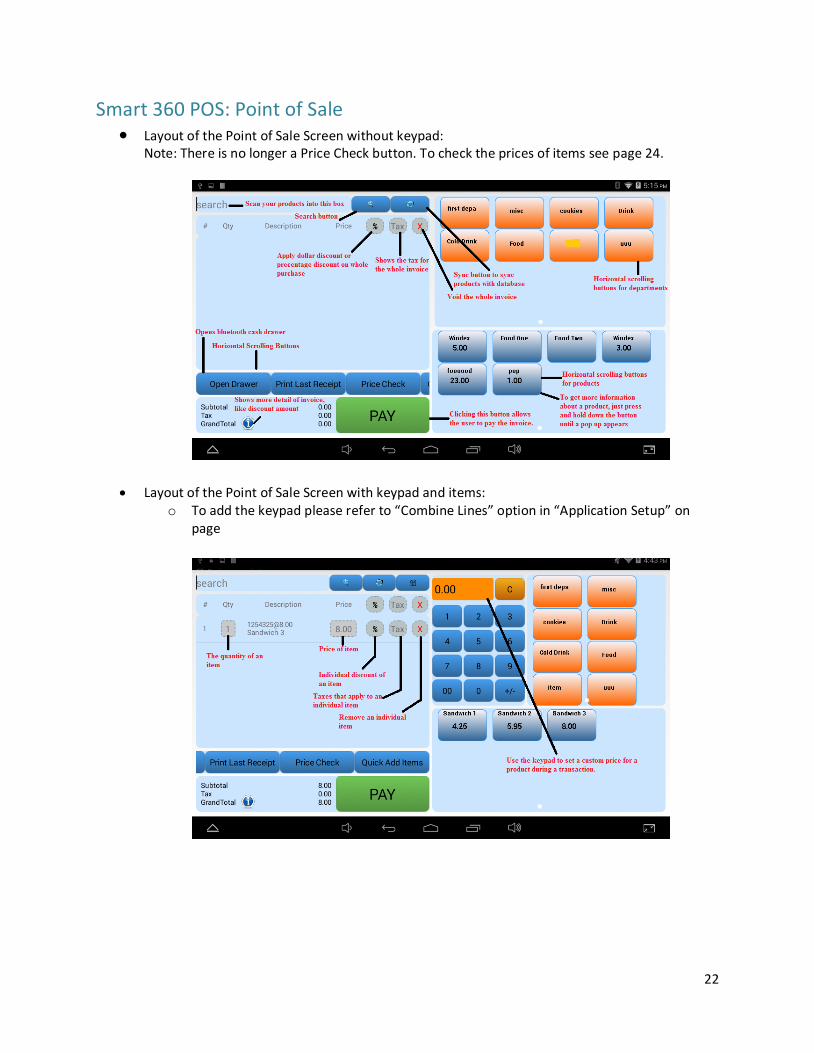
Smart 360 POS: Point of Sale Layout of the Point of Sale Screen without keypad:
Note: There is no longer a Price Check button. To check the prices of items see page 24.
Layout of the Point of Sale Screen with keypad and items: o To add the keypad please refer to “Combine Lines” option in “Application Setup” on
page

23
Layout of payment screen:
Quick Add Items: o This will add a product to your inventory after the user presses save. After that the user
will need to press the sync button to display that item on the Point of Sale screen.

24
Price Check: o To check the price of an item, press and hold an inventory button until a pop up
appears.
Returns:
o To return items you will need to ring up negative sales. To negate the price of an item,
press the “Price” button and a pop with a keypad will appear. Re-enter the price and
press “+ / -“button afterwards to negate that price. Once you have negated all items,
press the pay button and the appropriate payment option to refund customers.

25
Smart 360 POS: Tech Support
Frequent problems when registering:
o Email, Password Store Id:
Often users do not enter the correct information that we have provided them
when registering.
If the user receives a message stating that their account cannot be located in
our database, the user has entered the wrong email when trying to register.
If the user receives an error stating that the “App is Disabled,” the user has
entered either the wrong Store Id or email that we have provided to them.
Please ensure that the user is entering the correct Store Id or email.
If the user receives an error stating that they have entered the wrong password.
The user has entered the wrong password. Have them re-enter the password.
Often users who receive this message confuse an uppercase I with a
lowercase l. If they have entered a lowercase l when they received this
message, ask the user to try entering an uppercase I, and vice versa if
they previously entered an uppercase I.
Users cannot enter spaces in email, password, or store id fields. This is essential!
o Adding an Additional Station:
If the user wants to add an additional station to their store, please ensure that
the user selects “Add A Station To A Existing Store” because this is the only way
for the user to connect a tablet to an existing database. If the user mistakenly
registered the tablet as a new store, they will be required to re-register using
the “Add A Station To A Existing Store” option.
To re – register please refer to Factory Rest on page 27.
o Unique Station Id
The user will need to enter a number between 1 and 99. If a message appears
stating that the Station Id that they have entered is registered, they will need to
re – enter a number that has not already been registered. Repeat as times as
needed until the user enters a unique Station Id that is accepted.
Altering Receipts:
o If the user wants to alter their receipts, please have them login to BackOffice
(backoffice.smart360pos.com). If the user does not remember their BackOffice account,
please refer to: Getting BackOffice Credentials page 27.
o Once the user has logged in, have them select the “Store Details” tab. When on the
“Store Details” page the user can modify receipts to their liking. Please ensure that the
user presses the “Save” button in order to update their receipts. After the user has
pressed saved, have the user logout of Smart 360 POS and re-login to get the updated
receipt information.

26
Altering Tax Rates
o If the user wants to alter their tax rates, please have them login to BackOffice
(backoffice.smart360pos.com). If the user does not remember their BackOffice account,
please refer to: Getting BackOffice Credentials page 27.
o Once the user has logged in, have them select the “Tax Rates” tab. On the “Tax Rate”
webpage the user will be able change the description and the tax rate. After the user is
satisfied with the new tax rates that they have enter please ensure that they press the
“Save” button. After they press “Save”, have the user log out of the tablet and re-login
to get the new tax rates.
Importing Inventory
o To import inventory please refer to this manual:
http://www.smart360pos.com/sirclereg/Smart360POSmanuals/addinventoryqr.pdf
o If the user import fails, the user has not formatted the CSV file to our specifications. Please refer to this manual: http://www.smart360pos.com/sirclereg/Smart360POSmanuals/addinventoryqr.pdf
Delete Recent Import o If a user is not satisfied with a recent import, the user can login into BackOffice, and
delete the most recent import. If the user does not remember their BackOffice account, please refer to: Getting BackOffice Credentials page 27.
o Once logged into BackOffice, have the user select the “Import” tab. On the “Import” page, have the user select “Rollback Today’s Inventory Import.” After the user has pressed the button, they will be prompted with a message asking them if they want to continue. Have the user press “Continue” to delete the most recent import.
Adding Employees o To give employees’ access to Smart 360 POS, the user will need to add employees to
their database on BackOffice. If the user does not remember their BackOffice account, please refer to: Getting BackOffice Credentials page 27.
o Once the user is logged in, the user will by default be redirected to the “Employees” webpage. Have the user press the “Add” button. The user will then enter personal information about the employee. Afterwards have the user check “Access to POS” where they will enter an “Access ID”. The user must enter a 4 digit number for the “Access ID”. Also the user cannot enter an “Access ID” that is registered to another employee. After the user enters an “Access ID,” the user must decide if they want to grant that employee “Admin Access” to the POS. The user can also give that employee “Access to BackOffice” by click the box. If the user has checked “Access to BackOffice,” the user will need to enter a password for that employee and press “Save” when finished. After pressing “Save,” that employee will be added to the database.
Deleting Employees o The user cannot delete the first employee aka, the employee with the smart360pos.com
email and employee ID 1. If the user somehow deletes the first employee the account will be disabled.
o To delete employees select the desire employee you will like to delete, and scroll towards the bottom of the page, and press the “Delete” button.

27
Departments o To add/delete/modify departments individually please refer to this manual:
http://smart360pos.com/sirclereg/Smart360POSmanuals/addingdepartmentsqr.pdf
Reports o To generate sales report please view this manual:
http://smart360pos.com/sirclereg/Smart360POSmanuals/Reporting.pdf
Getting BackOffice Credentials: o If you cannot remember what credentials are needed to login into BackOffice, or to
“Add A Station To A Existing Store,” please go to the settings in Smart 360 POS, and select “Application Information.” A pop up will display the email, password, and store id that you registered the tablet with.
Factory Restore: o To reset Smart 360 POS to factory settings, please exit Smart 360 POS and go to the Play
Store App. If you do not have an account registered, you will need to register with a Gmail account. Once you have registered, please search for Smart 360 POS and select Smart 360 POS. Press “Uninstall”. Once the application is deleted, press “Install” to reinstall the application. You will need to register again after you reinstall the application.
Updating Smart 360 POS: o To update Smart 360 POS, please exit Smart 360 POS and go to the Play Store App. If
you do not have an account registered, you will need to register with a Gmail account. Once you have registered, please search for Smart 360 POS and select Smart 360 POS. Press “Update,” if available.