site 4 troubleshooting - therma-tru doors shooting site 4 2017 4.1 site 4 troubleshooting air and/or...
TRANSCRIPT
Trouble Shooting
SITE 4 2017 4.1
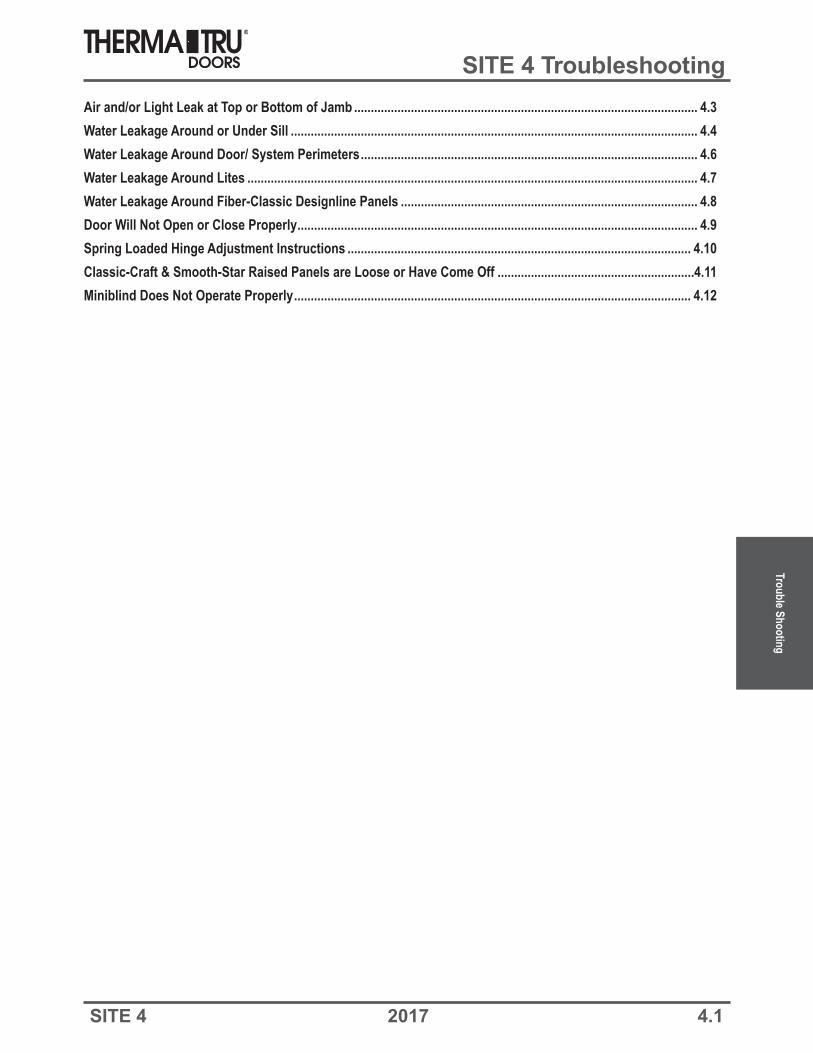
SITE 4 TroubleshootingAir and/or Light Leak at Top or Bottom of Jamb ....................................................................................................... 4.3Water Leakage Around or Under Sill .......................................................................................................................... 4.4Water Leakage Around Door/ System Perimeters ..................................................................................................... 4.6Water Leakage Around Lites ....................................................................................................................................... 4.7Water Leakage Around Fiber-Classic Designline Panels ......................................................................................... 4.8Door Will Not Open or Close Properly ........................................................................................................................ 4.9Spring Loaded Hinge Adjustment Instructions ....................................................................................................... 4.10Classic-Craft & Smooth-Star Raised Panels are Loose or Have Come Off ...........................................................4.11Miniblind Does Not Operate Properly ....................................................................................................................... 4.12
Trou
ble S
hoot
ing
4.2 2017 SITE 4

Trouble Shooting
SITE 4 2017 4.3
Air and/or Light Leak at Top or Bottom of Jamb
Site 5 - Weatherstrip Replacement
Weatherstrip missing.
Weatherstrip painted.
Weatherstrip cracked, torn or damaged.
PROBLEM: Air and/or light leak at top or bottom of jamb.
Cause Solution Refer to…Replace weatherstrip.
Bottom corner seal pads missing or removed.
Replace pads. SHOP Frame Assembly Sections
SITE 1 - Pre-hung Unit Installation for Adjustable Sills
SITE 1 Corner Seal Pad Instructions
Door loose in frame, with excessive in-and-out movement when latched.
Adjust strike plate for tighter fit.
SITE 1 - Pre-hung Unit Installation
Door not meeting weatherstrip evenly when it closes, hitting the top or bottom first.
Realign, reshim, readjust lockside jamb so door meets weatherstrip evenly from top to bottom.
SITE 1 - Pre-hung Unit Installation
Trou
ble S
hoot
ing
4.4 2017 SITE 4
Water Leakage Around or Under Sill
SITE 5 - Weatherstrip Replacement
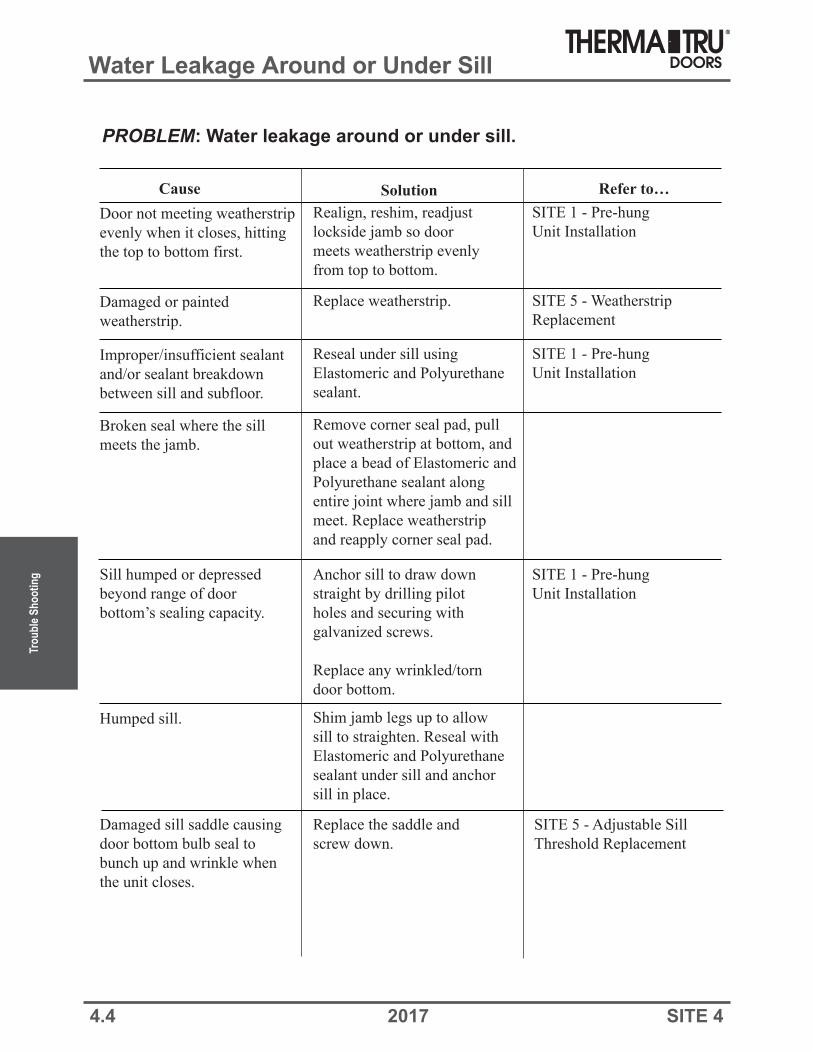
PROBLEM: Water leakage around or under sill.
Cause Solution Refer to…Door not meeting weatherstrip evenly when it closes, hitting the top to bottom first.
Damaged or painted weatherstrip.
Improper/insufficient sealant and/or sealant breakdown between sill and subfloor.
Broken seal where the sill meets the jamb.
Sill humped or depressed beyond range of door bottom’s sealing capacity.
Humped sill.
Damaged sill saddle causing door bottom bulb seal to bunch up and wrinkle when the unit closes.
Realign, reshim, readjust lockside jamb so door meets weatherstrip evenly from top to bottom.
Replace weatherstrip.
Reseal under sill using Elastomeric and Polyurethane sealant.
Remove corner seal pad, pullout weatherstrip at bottom, and place a bead of Elastomeric and Polyurethane sealant along entire joint where jamb and sill meet. Replace weatherstrip and reapply corner seal pad.
Anchor sill to draw down straight by drilling pilot holes and securing with galvanized screws.
Replace any wrinkled/torn door bottom.
Shim jamb legs up to allow sill to straighten. Reseal with Elastomeric and Polyurethane sealant under sill and anchor sill in place.
Replace the saddle and screw down.
SITE 1 - Pre-hung Unit Installation
SITE 1 - Pre-hung Unit Installation
SITE 1 - Pre-hung Unit Installation
SITE 5 - Adjustable Sill Threshold Replacement
Trouble Shooting
SITE 4 2017 4.5
Water Leakage Around or Under Sill
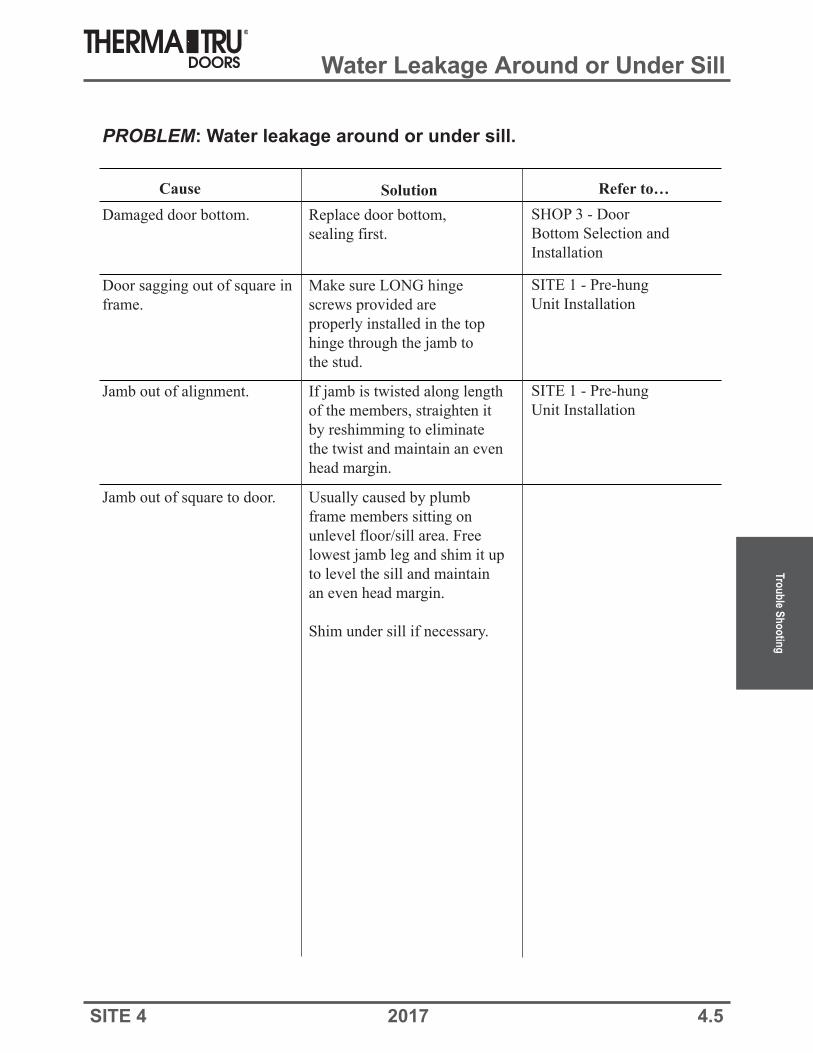
PROBLEM: Water leakage around or under sill.
Cause Solution Refer to…Damaged door bottom.
Door sagging out of square in frame.
Jamb out of alignment.
Jamb out of square to door.
Replace door bottom, sealing first.
Make sure LONG hinge screws provided are properly installed in the top hinge through the jamb to the stud.
If jamb is twisted along length of the members, straighten it by reshimming to eliminate the twist and maintain an even head margin.
Usually caused by plumb frame members sitting on unlevel floor/sill area. Free lowest jamb leg and shim it up to level the sill and maintain an even head margin.
Shim under sill if necessary.
SHOP 3 - Door Bottom Selection andInstallation
SITE 1 - Pre-hung Unit Installation
SITE 1 - Pre-hung Unit Installation
Trou
ble S
hoot
ing
4.6 2017 SITE 4
SITE 1 - Pre-hung Unit Installation
SITE 1 - Pre-hung Unit Installation
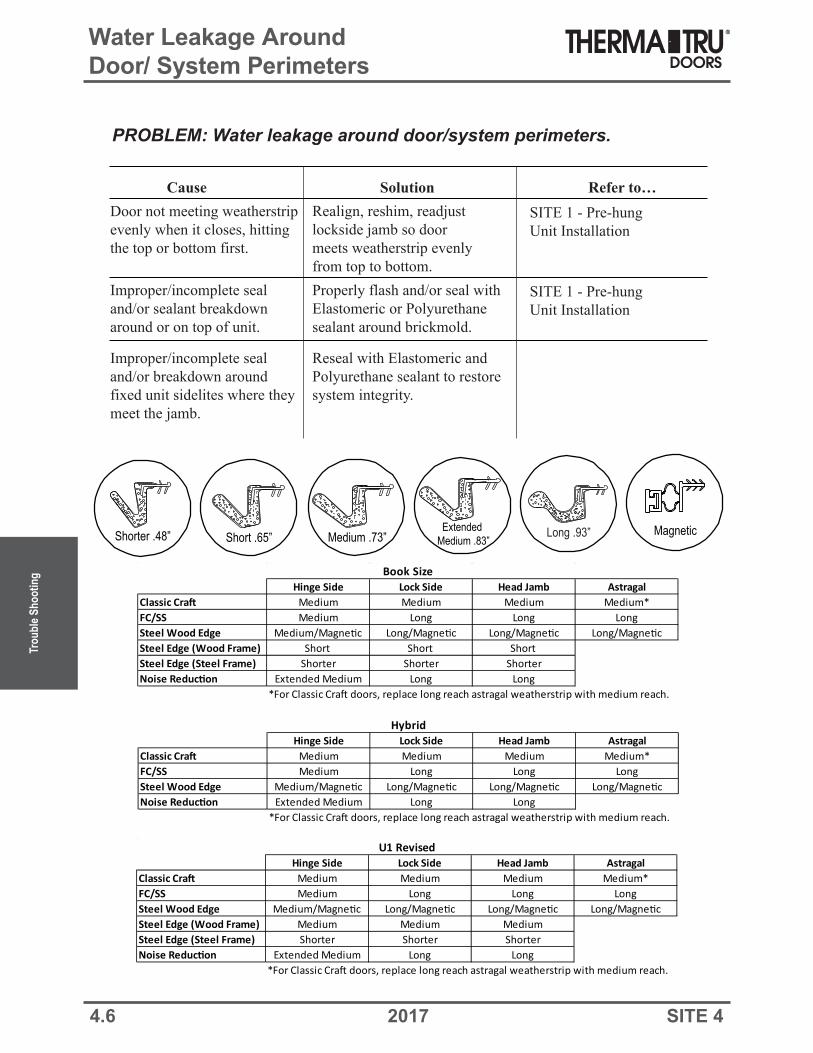
Reseal with Elastomeric and Polyurethane sealant to restore system integrity.
Properly flash and/or seal with Elastomeric or Polyurethane sealant around brickmold.
Realign, reshim, readjust lockside jamb so door meets weatherstrip evenly from top to bottom.
Improper/incomplete seal and/or breakdown around fixed unit sidelites where they meet the jamb.
Improper/incomplete seal and/or sealant breakdown around or on top of unit.
Door not meeting weatherstrip evenly when it closes, hitting the top or bottom first.
PROBLEM: Water leakage around door/system perimeters.
Cause Solution Refer to…
Hinge Side Lock Side Head Jamb AstragalClassic Craft Medium Medium Medium Medium*FC/SS Medium Long Long LongSteel Wood Edge Medium/Magnetic Long/Magnetic Long/Magnetic Long/MagneticSteel Edge (Wood Frame) Short Short Short Steel Edge (Steel Frame) Shorter Shorter ShorterNoise Reduction Extended Medium Long Long
*For Classic Craft doors, replace long reach astragal weatherstrip with medium reach.
Book Size
Hinge Side Lock Side Head Jamb AstragalClassic Craft Medium Medium Medium Medium*FC/SS Medium Long Long LongSteel Wood Edge Medium/Magnetic Long/Magnetic Long/Magnetic Long/MagneticNoise Reduction Extended Medium Long Long
*For Classic Craft doors, replace long reach astragal weatherstrip with medium reach.
Hybrid
Hinge Side Lock Side Head Jamb AstragalClassic Craft Medium Medium Medium Medium*FC/SS Medium Long Long LongSteel Wood Edge Medium/Magnetic Long/Magnetic Long/Magnetic Long/MagneticSteel Edge (Wood Frame) Medium Medium MediumSteel Edge (Steel Frame) Shorter Shorter ShorterNoise Reduction Extended Medium Long Long
*For Classic Craft doors, replace long reach astragal weatherstrip with medium reach.
U1 Revised
MagneticLong .93”Short .65”Extended
Medium .83”Shorter .48” Medium .73”
Water Leakage Around Door/ System Perimeters
Trouble Shooting
SITE 4 2017 4.7
Water Leakage Around Lites
PROBLEM: Water leakage around lites.
Cause Solution Refer to…
Loose lites.
Door face-to-lite frame seal breakdown.
Glass-to-lite frame seal breakdown.
Tighten doorlite screws.
Apply sealing tape around inside perimeter of interior frame if required.
Seal with Elastomeric and Polyurethane sealant around lite perimeter and/or paint or repaint the perimeter to form a paint seal.
Replace doorlite.
SHOP 3 - Doorlite and Designline Panel Installation
SHOP 3 - Doorlite and Designline Panel Installation
Trou
ble S
hoot
ing
4.8 2017 SITE 4
Water Leakage Around Fiber-Classic Designline Panels
PROBLEM: Water leakage around Fiber-Classic Designline panels.
Cause Solution Refer to…
Loose panels.
Door face-to-panel seal breakdown.
Tighten screws.
Apply sealing tape around inside perimeter of interior frame if required.
Seal with Elastomeric and Polyurethane sealant around panel perimeter and /or paint orrepaint the perimeter to form a paint seal.
SHOP 3 - Doorlite and Designline Panel Installation

Trouble Shooting
SITE 4 2017 4.9
Door Will Not Open or Close Properly
PROBLEM: Door will not open or close properly.
Cause Solution Refer to…Door not meeting weatherstrip evenly when it closes, hitting the top or bottom first.
Adjustable strike plate not properly aligned.
Door sagging out of square in frame (uneven head margin).
Frame out of square (uneven sill/door bottom margin).
Realign, reshim, readjust lockside jamb so the door meets the weatherstripping evenly from top to bottom.
Realign adjustable strike plate.
Make sure LONG hinge screws provided are properly installed in the top hinge through the jamb to the stud.
Usually caused by plumb frame members sitting on unlevel floor/sill area. Free lowest jamb leg and shim it up to level the sill and maintain an even head margin.
SITE 1- Pre-hung Unit Installation
SITE 1- Pre-hung Unit Installation
SITE 1 - Pre-hung Unit Installation

Trou
ble S
hoot
ing
4.10 2017 SITE 4
Spring Loaded Hinge Adjustment Instructions
PROBLEM: Door does not have enough or too much force.
Cause Solution Refer to…
Hinge does not have enough force to close and latch the door.
Too much force causes door to slam and make opening difficult.
Remove cross pin. Insert 9/64” allen wrench in hex adjustment hole and turn until holes line up. Re-insert cross pin. Removeallen wrench and test closing action of door. Repeat if necessary. Over tightening mayshorten the life of the hinge.
Another hinge may be required.
Replace one of the hinges with a standard hinge without adjustable tension.
SITE 1- Installation Instructions.
Trouble Shooting
SITE 4 2017 4.11
Classic-Craft & Smooth-Star Raised Panels are Loose or Have Come Off
PROBLEM: Panels are not sticking - need to re-apply
Cause Solution Refer to…Door face to panel adhesive tape breakdown.
Reapply by removing panel. Clean panel and door with 70% Isopropyl Alcohol, taking care to remove all old adhesive. Apply new adhesive tape. Apply adequate pressure.
SHOP 3 - Doorlite and Designline Panel Installation
-

4.12 2017 SITE 4
Miniblind Does Not Operate Properly
PROBLEM: Miniblind does not operate properly.
Cause Solution Refer to…
Handle not attached.
Blinds are uneven.
Reattach the handle. Tilt the handle and place it backinto the track. Slide the handle upor down the length of the track until two audible clicks areheard.
Slide the handle up and down theentire length of the track to bringthe blinds back to a straight and even position.
Parts need replaced. Replacement handle and additional caps for the ends of the track can be ordered by visiting www.thermatru.com or by contacting Customer Serviceat 1-800-THERMA-TRU.