sistemas de videoconferencia profesional
DESCRIPTION
Descripción técnica de sistemas de conexión y de videoconferencia profesional para instituciones académicas con capacidad de conexión punto a punto o multipunto.TRANSCRIPT
Scopia XT4000 Series
User Guide
Version 3.2For Solution 7.7, 8.0.x, 8.2
3.2

© 2000-2013 RADVISION Ltd. All intellectual propertyrights in this publication are owned by RADVISION Ltdand are protected by United States copyright laws, otherapplicable copyright laws and international treatyprovisions. RADVISION Ltd retains all rights notexpressly granted.
All product and company names herein may betrademarks of their registered owners.
This publication is RADVISION confidential. No part ofthis publication may be reproduced in any formwhatsoever or used to make any derivative work withoutprior written approval by RADVISION Ltd.
No representation of warranties for fitness for anypurpose other than what is specifically mentioned in thisguide is made either by RADVISION Ltd or its agents.
RADVISION Ltd reserves the right to revise thispublication and make changes without obligation to notifyany person of such revisions or changes. RADVISION
Ltd may make improvements or changes in theproduct(s) and/or the program(s) described in thisdocumentation at any time.
If there is any software on removable media described inthis publication, it is furnished under a license agreementincluded with the product as a separate document. If youare unable to locate a copy, please contact RADVISIONLtd and a copy will be provided to you.
Unless otherwise indicated, RADVISION registeredtrademarks are registered in the United States and otherterritories. All registered trademarks recognized.
For further information contact RADVISION or your localdistributor or reseller.
User Guide for Scopia XT4000 Series Version 3.2 , June9, 2013
http://www.radvision.com
User Guide for Scopia XT4000 Series Version 3.2 Notices | 2

Table of Contents
Chapter 1: About the Scopia XT Series
About the Models in the Scopia XT Series Product Line ................................................................................. 7
Comparing Between Scopia XT Series Models ............................................................................................. 11
Chapter 2: Getting Started
Initial Workflow for XT Series Users ...............................................................................................................13
How to Control the XT Series .........................................................................................................................14
Accessing XT Series Web Interface ...................................................................................................14
Accessing the Main Menu of the XT Series ....................................................................................... 15
Using the XT Remote Control Unit ..................................................................................................... 17
Pairing an XT Remote Control Unit with a XT Codec Unit ....................................................... 19
Performing Basic Configuration ......................................................................................................................21
Accessing the Quick Setup Procedure ...............................................................................................21
Setting the System Name and Language .................................................................................23
Adjusting the Image Position .................................................................................................... 24
Configuring Network Settings ................................................................................................... 26
Configuring Gatekeeper Settings ..............................................................................................28
Remotely Setting the System Name and Language .......................................................................... 29
Chapter 3: Starting a Videoconference
Preparing for a Videoconference ....................................................................................................................31
Tips for Participating in a Videoconference ........................................................................................31
Managing the Phone Book ................................................................................................................. 32
Adding and Modifying Contacts in the Phone Book ................................................................. 32
Searching for a Contact in the Phone Book ............................................................................. 35
Deleting a Contact from the Phone Book ................................................................................. 36
Dialing a Number Directly from the Endpoint ................................................................................................. 36
Dialing a Number from the XT Series Web Interface .....................................................................................38
Modifying the Default Call Settings ................................................................................................................ 40
Answering and Ending a Video Call ............................................................................................................... 42
Joining a Videoconference ............................................................................................................................. 43
User Guide for Scopia XT4000 Series Version 3.2 Table of Contents | 3
Chapter 4: During Your Videoconference
Recording a Videoconference ........................................................................................................................ 44
Setting Your Recording Preferences ..................................................................................................44
Starting a Recording ...........................................................................................................................46
Viewing a Recording from the Web Interface .....................................................................................49
Controlling your Video and Audio ...................................................................................................................50
Blocking Video From the Scopia XT Series ....................................................................................... 50
Moving the Camera's Position ............................................................................................................51
Adjusting the Volume ..........................................................................................................................52
Muting the Microphone Pod ................................................................................................................53
About Video Layouts .......................................................................................................................................54
Selecting your Video Layout with One Monitor .................................................................................. 54
Selecting your Video Layout with Two Monitors .................................................................................56
Changing the Video Layout During the Call ....................................................................................... 59
Sharing Content ..............................................................................................................................................61
Connecting a Computer to the Scopia XT Series ...............................................................................61
Selecting the Computer Display Resolution ....................................................................................... 63
Start Sharing Content Automatically ...................................................................................................64
Sharing Content in the Local Conference Room ................................................................................65
Sharing Content during a Call ............................................................................................................ 66
Moderating a Videoconference Hosted by Another Scopia XT Series .......................................................... 68
Chapter 5: Customizing Your User Experience
Setting the User PIN Code for the Scopia XT Series .....................................................................................70
Setting Call Answering Preferences ...............................................................................................................71
Confirming Call Disconnections ......................................................................................................................72
Enabling Do Not Disturb to Block All Incoming Calls ..................................................................................... 73
Blocking Video Input by Default ......................................................................................................................75
Activating the Screen Saver ........................................................................................................................... 76
Chapter 6: Troubleshooting the Scopia XT Series
Viewing System Information for Customer Support ....................................................................................... 77
Resolving Monitor Display Problems ..............................................................................................................79
Resolving Problems with PC Presentations ...................................................................................................81
Resolving XT Remote Control Unit Problems ................................................................................................ 81
User Guide for Scopia XT4000 Series Version 3.2 Table of Contents | 4
Restoring Default User Settings ..................................................................................................................... 81
Resolving Video or Audio Disruptions ............................................................................................................ 83
Glossary of Terms for Scopia Solution
User Guide for Scopia XT4000 Series Version 3.2 Table of Contents | 5

Chapter 1 | About the Scopia XT SeriesScopia XT Series endpoints incorporate state-of-the-art video technology for high definition (HD) conferencing. Allmodels of the XT Series include the XT Codec Unit which performs the bulk of the professional videoconferencing,an elegant remote control which gives intuitive access to its features, and a camera, which varies depending on thespecific model.
This section provides an overview of the general features and capabilities available in the different Scopia XT Seriesmodels (Figure 1: Scopia XT Series products on page 7):
• Ability to host videoconferences locally with a high-capacity embedded MCU, without requiring an externalMCU deployment (selected models only).
• Excellent video quality, with resolutions of up to 1080p at an unprecedented 60 frames per second (fps),depending on the model.
• Support for dual HD video streams, allowing presentations and video clips to be shared in resolutions of up to1080p 60 fps, depending on the model.
This includes either video input from two cameras, or one video stream from the camera, and one presentationstream from the PC.
• Allows to easily share data and presentations with third-party endpoints.
• DVD-quality audio with up to 48 kHz sampling rate audio encoding capability, depending on the model. Thesampling rate is a measure of the accuracy of the audio when it is digitized. As the frequency with which theaudio data is collected, or "sampled", increases, so does the audio quality.
Audio input is provided with either a dedicated 3-way/1-way Microphone Pod, or a microphone embedded inthe camera, depending on the model.
• High quality video and audio even with limited bandwidth or poor network conditions, by using two compressionmethods:
– H.264 Scalable Video Coding Technology (SVC, in selected models only).
SVC dramatically increases error resiliency and video quality without the need for higher bandwidth. It isespecially effective over networks with high packet loss (like wireless networks) which deliver low qualityvideo.
– H.246 High Profile, which is a video compression standard used for bandwidth efficiency. This allowsquality video at much lower bit rates (selected models only).
• Ability to record videoconferences using a USB drive (may require license, depending on the model).
• For an even better experience, Scopia Control enables you to select and control the camera for thevideoconference, by using the pan, tilt, and zoom features, and place a call using the intuitive touch interface ofan Apple® iPad® (may require license, depending on the model).
• Secure point-to-point video calls and videoconferences, via encrypted connections or using TLS certificates.You can have up to three remote encrypted participants in a videoconference.
Important:Using encryption is subject to local regulation. In some countries it is restricted or limited for usage. For moreinformation, consult your local reseller.
Figure 1: Scopia XT Series products on page 7 shows the different Scopia XT Series endpoints available.
User Guide for Scopia XT4000 Series Version 3.2 About the Scopia XT Series | 6
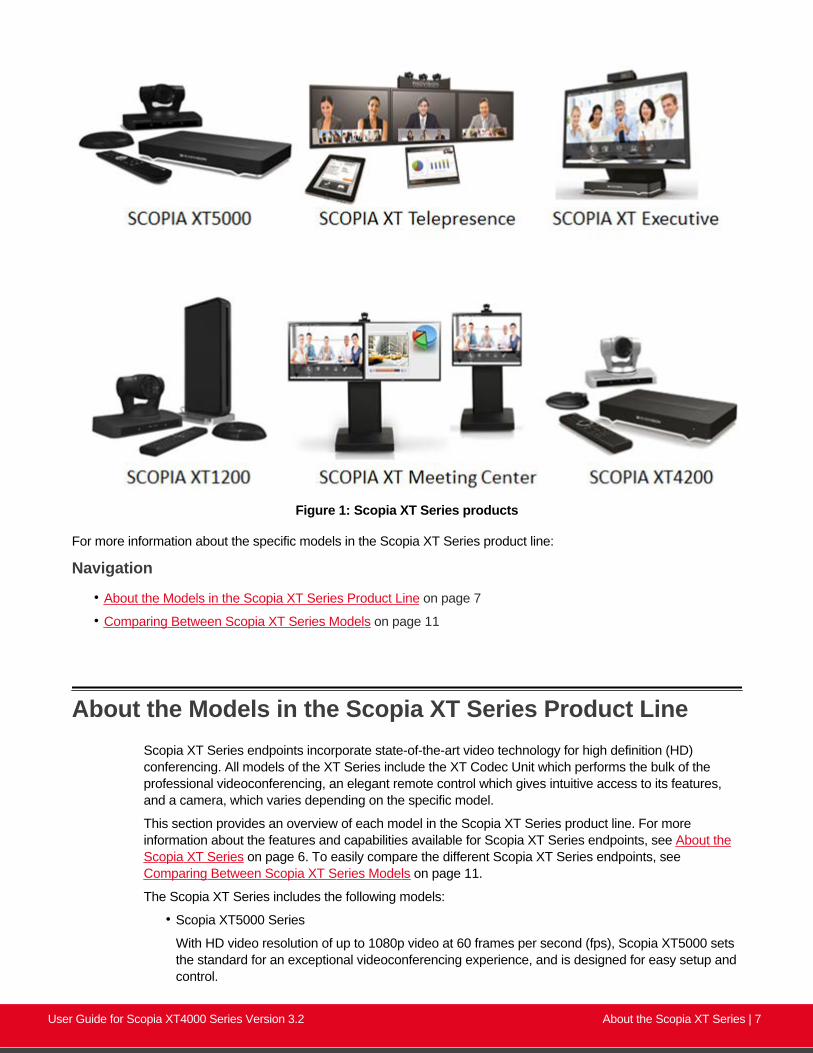
Figure 1: Scopia XT Series products
For more information about the specific models in the Scopia XT Series product line:
Navigation
• About the Models in the Scopia XT Series Product Line on page 7
• Comparing Between Scopia XT Series Models on page 11
About the Models in the Scopia XT Series Product LineScopia XT Series endpoints incorporate state-of-the-art video technology for high definition (HD)conferencing. All models of the XT Series include the XT Codec Unit which performs the bulk of theprofessional videoconferencing, an elegant remote control which gives intuitive access to its features,and a camera, which varies depending on the specific model.
This section provides an overview of each model in the Scopia XT Series product line. For moreinformation about the features and capabilities available for Scopia XT Series endpoints, see About theScopia XT Series on page 6. To easily compare the different Scopia XT Series endpoints, see Comparing Between Scopia XT Series Models on page 11.
The Scopia XT Series includes the following models:
• Scopia XT5000 Series
With HD video resolution of up to 1080p video at 60 frames per second (fps), Scopia XT5000 setsthe standard for an exceptional videoconferencing experience, and is designed for easy setup andcontrol.
User Guide for Scopia XT4000 Series Version 3.2 About the Scopia XT Series | 7
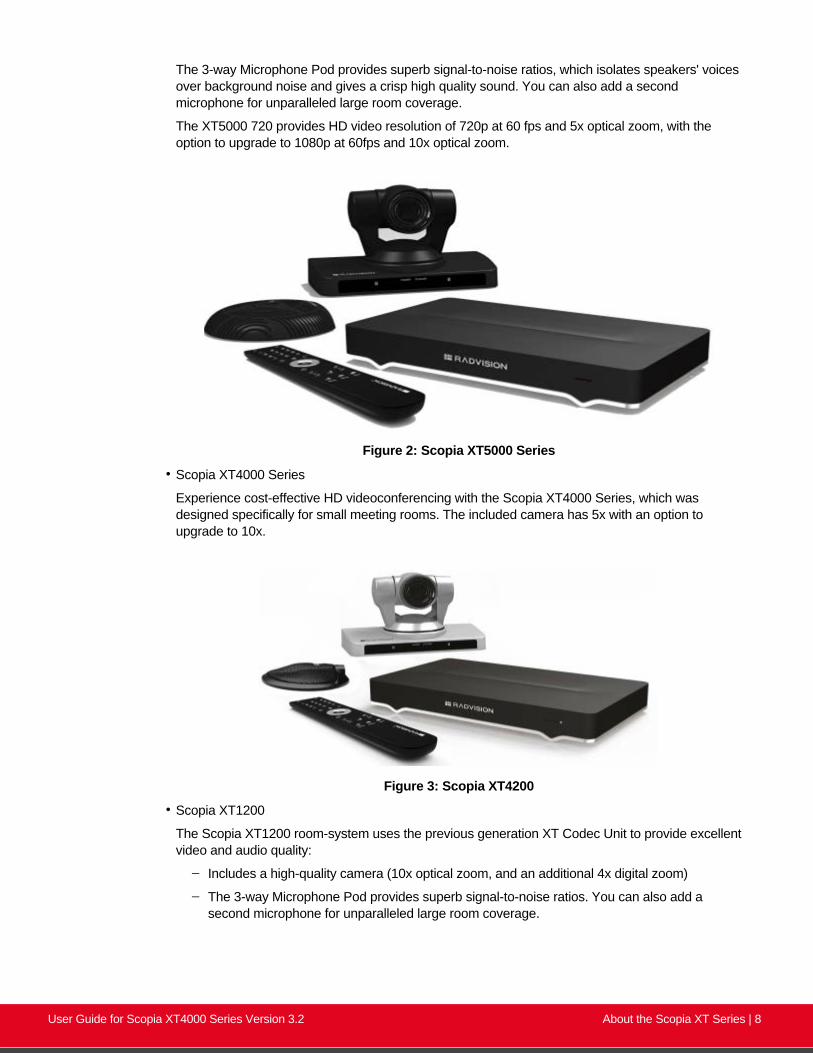
The 3-way Microphone Pod provides superb signal-to-noise ratios, which isolates speakers' voicesover background noise and gives a crisp high quality sound. You can also add a secondmicrophone for unparalleled large room coverage.
The XT5000 720 provides HD video resolution of 720p at 60 fps and 5x optical zoom, with theoption to upgrade to 1080p at 60fps and 10x optical zoom.
Figure 2: Scopia XT5000 Series
• Scopia XT4000 Series
Experience cost-effective HD videoconferencing with the Scopia XT4000 Series, which wasdesigned specifically for small meeting rooms. The included camera has 5x with an option toupgrade to 10x.
Figure 3: Scopia XT4200
• Scopia XT1200
The Scopia XT1200 room-system uses the previous generation XT Codec Unit to provide excellentvideo and audio quality:
– Includes a high-quality camera (10x optical zoom, and an additional 4x digital zoom)
– The 3-way Microphone Pod provides superb signal-to-noise ratios. You can also add asecond microphone for unparalleled large room coverage.
User Guide for Scopia XT4000 Series Version 3.2 About the Scopia XT Series | 8

Figure 4: Scopia XT1200
• Scopia XT Telepresence
Experience the immersive feeling of telepresence using the Scopia XT Telepresence platform. Theexcellent video quality in each of the three cameras, combined with high-quality audio, give thefeeling of an in-person meeting.
Depending on the XT Codec Unit used in your XT Telepresence deployment, you can inherit thefeatures of the Scopia XT1200 or the Scopia XT5000.
Figure 5: Scopia XT Telepresence
• Scopia XT Executive
Designed as a professional personal endpoint, the Scopia XT Executive is an all-in-one HDvideoconferencing desktop endpoint and PC monitor. The Scopia XT Executive fully integrates withyour PC or Mac. Using a unique control application, you can place calls, join videoconferences,and navigate the system menus with your computer's keyboard and mouse. The XT RemoteControl Unit can be used as well.
User Guide for Scopia XT4000 Series Version 3.2 About the Scopia XT Series | 9

The Scopia XT Executive has a built-in, high-quality HD camera with a maximum resolution of1080p at 30 frames per second (fps) together with the display. To fit your videoconferencingneeds, you can also connect an optional XT Premium Camera with PTZ capability.
Figure 6: Scopia XT Executive
• Scopia XT Meeting Center
The Scopia XT Meeting Center is a high performance HD videoconferencing system, designed toquickly convert a regular meeting room into a videoconferencing room: it includes single or dual55-inch high-quality monitors mounted on a mobile stand. This system uses the powerful XT5000Series codec.
Figure 7: Scopia XT Meeting Center
The XT5000, Scopia XT1200, and Scopia XT Executive can also locally host HD continuous presencevideoconferences with their built-in MCU. You can choose a license of up to 4 or 9 participants.
Depending on your deployment and the model, you can locally host videoconferences with otherendpoints (including H.323, SIP, Scopia XT Desktop clients, Scopia Mobile, and ISDN endpoints, if your
User Guide for Scopia XT4000 Series Version 3.2 About the Scopia XT Series | 10

deployment includes an ISDN gateway such as Scopia 100 Gateway) without relying on an externalMCU. You can locally host videoconferences with the following editions:
• Scopia XT Series MCU Edition
The Scopia XT Series MCU Edition allows you to host videoconferences with standard H.323, SIP,and ISDN (via Scopia 100 Gateway) endpoints on your chosen XT Series model.
• Scopia XT Series SMB Edition
The Scopia XT Series SMB Edition allows you to host videoconferences with a variety of differentendpoints on your chosen XT Series model: Scopia XT Desktop clients, Scopia Mobile clients,H.323, SIP, and ISDN (via Scopia 100 Gateway) endpoints.
It includes the software of the Scopia XT Desktop Server which must be deployed in the DMZ.
Important:
If your license allows 9 participants, you can include up to 8 remote endpoints.
If any participants in the videoconference connect from Scopia XT Desktop clients or devicesrunning Scopia Mobile, you can include up to 7 remote endpoints, since one port is reserved forconnecting to the Scopia XT Desktop Server.
For more information on the SMB Solution deployment, see Solution Guide for Scopia Solution.
Comparing Between Scopia XT Series ModelsScopia XT Series endpoints incorporate state-of-the-art video technology for high definition (HD)conferencing. All models of the XT Series include the XT Codec Unit which performs the bulk of theprofessional videoconferencing, an elegant remote control which gives intuitive access to its features,and a camera, which varies depending on the specific model.
This section provides a comparison between the models of the Scopia XT Series product line. For anoverview of each model, see About the Models in the Scopia XT Series Product Line on page 7. To seedetails about the features and capabilities of Scopia XT Series endpoints, see About the Scopia XTSeries on page 6.
Table 1: Differences in features for models in the Scopia XT Series on page 11 summarizes thedifferences between each of the models in the Scopia XT Series.
Table 1: Differences in features for models in the Scopia XT Series
FeatureScopiaXT5000
Scopia XT5000720
Scopia XT4000Series
ScopiaXT1200
Scopia XTTelepresence
Scopia XTExecutive
Maximum HDResolution
1080p 60fps 720p 60 fps(1080p optional)
720p 60fps 1080p 30fps 1080p x3 at 60or 30 fps
720p 30fps/60fps (1080poptional)
Hosting withinternal MCU
Can hostvideo-conferences(optional)
Can host video-conferences(optional)
_ Can hostvideo-conferences(optional)
_ Can hostvideo-conferences(optional)
User Guide for Scopia XT4000 Series Version 3.2 About the Scopia XT Series | 11
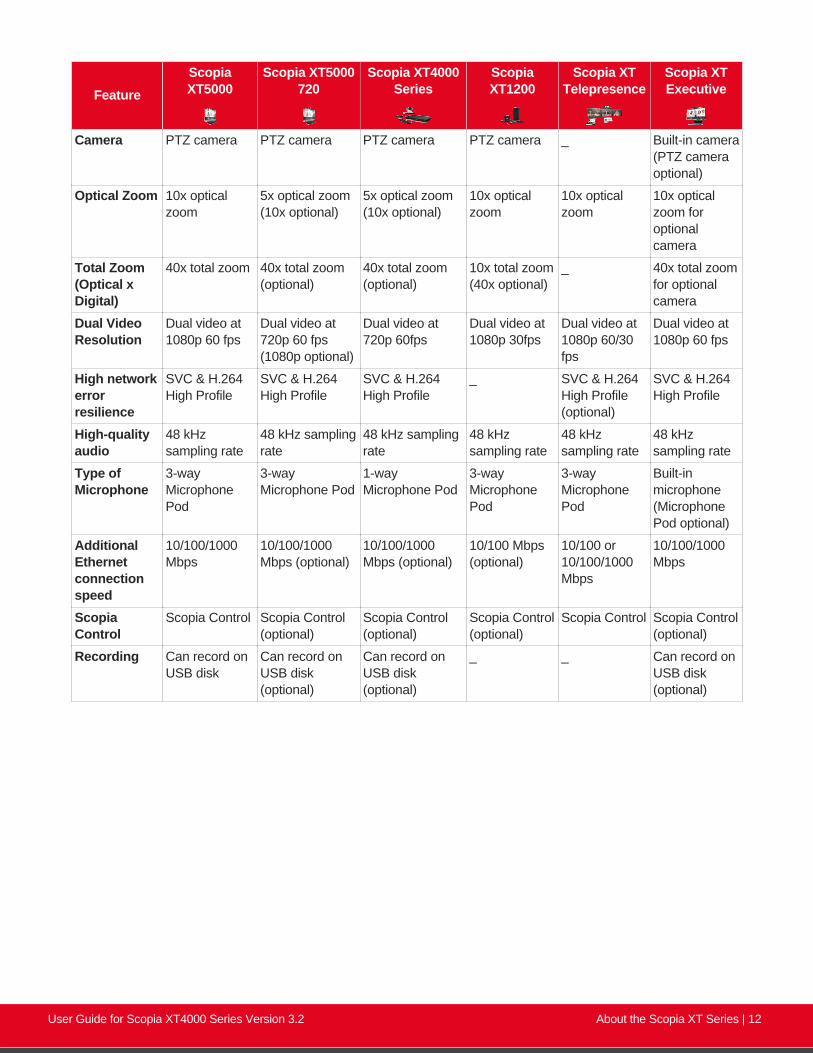
FeatureScopiaXT5000
Scopia XT5000720
Scopia XT4000Series
ScopiaXT1200
Scopia XTTelepresence
Scopia XTExecutive
Camera PTZ camera PTZ camera PTZ camera PTZ camera _ Built-in camera(PTZ cameraoptional)
Optical Zoom 10x opticalzoom
5x optical zoom(10x optional)
5x optical zoom(10x optional)
10x opticalzoom
10x opticalzoom
10x opticalzoom foroptionalcamera
Total Zoom(Optical xDigital)
40x total zoom 40x total zoom(optional)
40x total zoom(optional)
10x total zoom(40x optional)
_ 40x total zoomfor optionalcamera
Dual VideoResolution
Dual video at1080p 60 fps
Dual video at720p 60 fps(1080p optional)
Dual video at720p 60fps
Dual video at1080p 30fps
Dual video at1080p 60/30fps
Dual video at1080p 60 fps
High networkerrorresilience
SVC & H.264High Profile
SVC & H.264High Profile
SVC & H.264High Profile
_ SVC & H.264High Profile(optional)
SVC & H.264High Profile
High-qualityaudio
48 kHzsampling rate
48 kHz samplingrate
48 kHz samplingrate
48 kHzsampling rate
48 kHzsampling rate
48 kHzsampling rate
Type ofMicrophone
3-wayMicrophonePod
3-wayMicrophone Pod
1-wayMicrophone Pod
3-wayMicrophonePod
3-wayMicrophonePod
Built-inmicrophone(MicrophonePod optional)
AdditionalEthernetconnectionspeed
10/100/1000Mbps
10/100/1000Mbps (optional)
10/100/1000Mbps (optional)
10/100 Mbps(optional)
10/100 or10/100/1000Mbps
10/100/1000Mbps
ScopiaControl
Scopia Control Scopia Control(optional)
Scopia Control(optional)
Scopia Control(optional)
Scopia Control Scopia Control(optional)
Recording Can record onUSB disk
Can record onUSB disk(optional)
Can record onUSB disk(optional)
_ _ Can record onUSB disk(optional)
User Guide for Scopia XT4000 Series Version 3.2 About the Scopia XT Series | 12
Chapter 2 | Getting StartedTo get started with video calls and videoconferences, activate the product and use the quick setup wizard toconfigure the basic settings of the unit. We recommend following the workflow described in Initial Workflow for XTSeries Users on page 13.
Navigation
• Initial Workflow for XT Series Users on page 13
• How to Control the XT Series on page 14
• Performing Basic Configuration on page 21
Initial Workflow for XT Series Users
About this task
To quickly get started with your XT Series, follow the steps in this workflow.
Before you begin
Your system administrator should install and activate your XT Series. For details, see the followingdocumentation:
• Quick Setup Guide for Scopia XT Series: Explains the simplest configuration necessary for thesystem to work properly.
• Safety Instructions leaflet for Scopia XT Series
• Installation Guide for Scopia XT Series
Your system administrator may have customized certain features described in this guide to suit theenvironment of your company.
Procedure
1. Turn on the XT Codec Unit by pressing the Power key on the XT Remote Control Unit.
2. Configure the basic settings required to start using the XT Series, as described in PerformingBasic Configuration on page 21.
For details on how to use the XT Remote Control Unit and access both the endpoint interfaceand the web interface, see How to Control the XT Series on page 14.
3. You can now make point-to-point video calls and videoconferences, as described in Startinga Videoconference on page 31.
User Guide for Scopia XT4000 Series Version 3.2 Getting Started | 13
Enter the number using your XT Remote Control Unit, and press or ok/menu. For otherways to make a call, see Dialing a Number Directly from the Endpoint on page 36 or Dialing a Number from the XT Series Web Interface on page 38.
Before or during the meeting, you can do the following (see During Your Videoconference onpage 44 for details):
• Define your video layout
• Share a presentation from your computer
• Record the videoconference (license required)
4. Set up your phonebook to easily dial your contacts, as described in Managing the PhoneBook on page 32.
5. Customize XT Series settings to best fit your needs, as described in Customizing Your UserExperience on page 70.
For example, you can block others from seeing your video by default, define when thesystem answers calls, or request a confirmation prompt before calls are disconnected.
How to Control the XT SeriesYou can set up and control your XT Series, as well as make calls, in the following ways:
• From the endpoint's main menu, using your XT Remote Control Unit (see Using the XT RemoteControl Unit on page 17 and Accessing the Main Menu of the XT Series on page 15).
• From the XT Series's web interface (see Accessing XT Series Web Interface on page 14).
Before performing initial configuration, we recommend reading the following topics to familiarize yourselfwith how to control the XT Series:
Navigation
• Accessing XT Series Web Interface on page 14
• Accessing the Main Menu of the XT Series on page 15
• Using the XT Remote Control Unit on page 17
Accessing XT Series Web Interface
About this task
This procedure describes how to access the XT Series web interface. The XT Series supports thefollowing internet browsers:
• Internet Explorer version 8 or later
• Google Chrome version 11 or later
• Mozilla Firefox version 3.6 or later
User Guide for Scopia XT4000 Series Version 3.2 Getting Started | 14
• Apple Safari version 5 or later
• Opera version 11 or later
Procedure
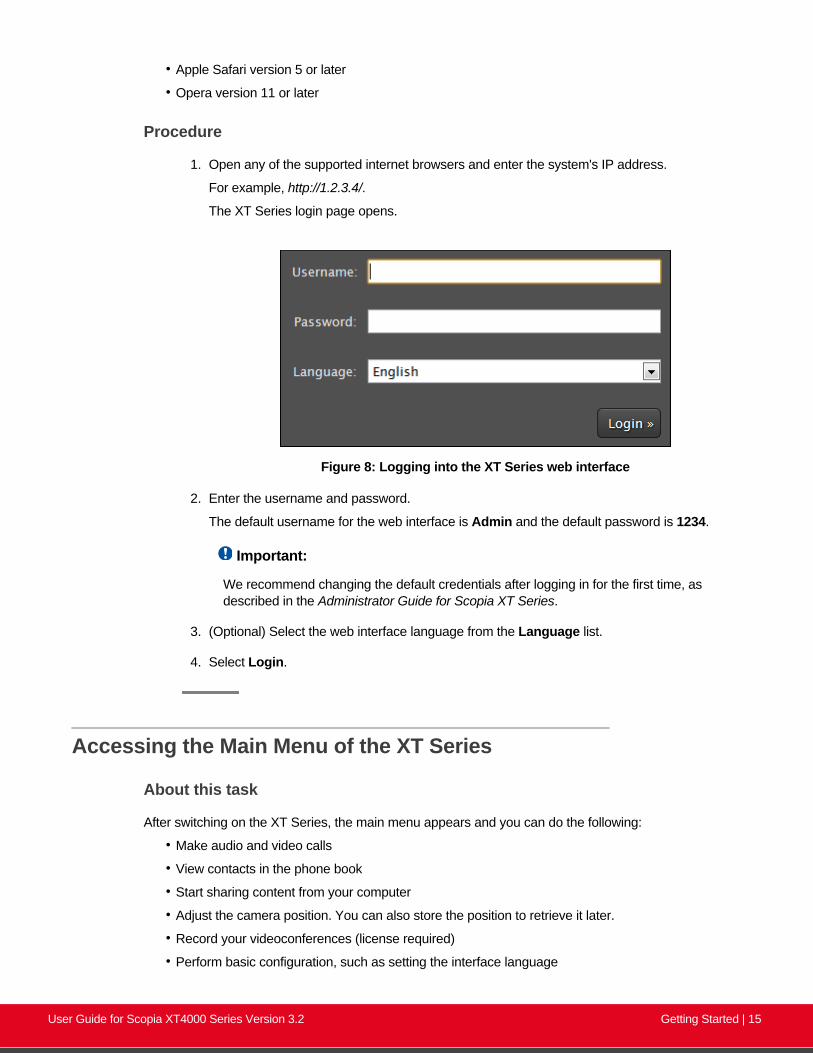
1. Open any of the supported internet browsers and enter the system's IP address.
For example, http://1.2.3.4/.
The XT Series login page opens.
Figure 8: Logging into the XT Series web interface
2. Enter the username and password.
The default username for the web interface is Admin and the default password is 1234.
Important:
We recommend changing the default credentials after logging in for the first time, asdescribed in the Administrator Guide for Scopia XT Series.
3. (Optional) Select the web interface language from the Language list.
4. Select Login.
Accessing the Main Menu of the XT Series
About this task
After switching on the XT Series, the main menu appears and you can do the following:
• Make audio and video calls
• View contacts in the phone book
• Start sharing content from your computer
• Adjust the camera position. You can also store the position to retrieve it later.
• Record your videoconferences (license required)
• Perform basic configuration, such as setting the interface language
User Guide for Scopia XT4000 Series Version 3.2 Getting Started | 15

• Set your preferences, such as activating the Do Not Disturb feature
• Check the system status
You navigate XT Series menus using arrow keys and pressing the ok/menu key on the XT RemoteControl Unit (for details, see Using the XT Remote Control Unit on page 17).
Procedure
1. Verify that the LED on the front panel of the XT Codec Unit is blinking.
2. Turn on the XT Codec Unit by pressing the Power key on the XT Remote Control Unit.
3. The system home page appears on the monitors, and you can access the following menus:
• Call—make audio and video calls
• Contacts—view, edit, and call contacts in the phonebook
• Present—start sharing content from your computer
• Control Camera—adjust camera position
• Recording—start recording a videoconference (license required)
• Configure—perform basic configuration and check the system status
Important:
When you access the system for the first time only, the Quick Setup wizard is displayed(for details, see Accessing the Quick Setup Procedure on page 21).
Figure 9: Main menu
4. Select one of the options using the arrow keys of the XT Remote Control Unit.
User Guide for Scopia XT4000 Series Version 3.2 Getting Started | 16

Using the XT Remote Control UnitThis section explains how to use the XT Remote Control Unit to navigate through the system menus,and lists the function of each key.
The XT Remote Control Unit has an improved design and increases usability to give you a smoother andmore efficient videoconferencing experience. Figure 10: The new XT Remote Control Unit on page 17describes the functions of the XT Remote Control Unit.
User Guide for Scopia XT4000 Series Version 3.2 Getting Started | 17
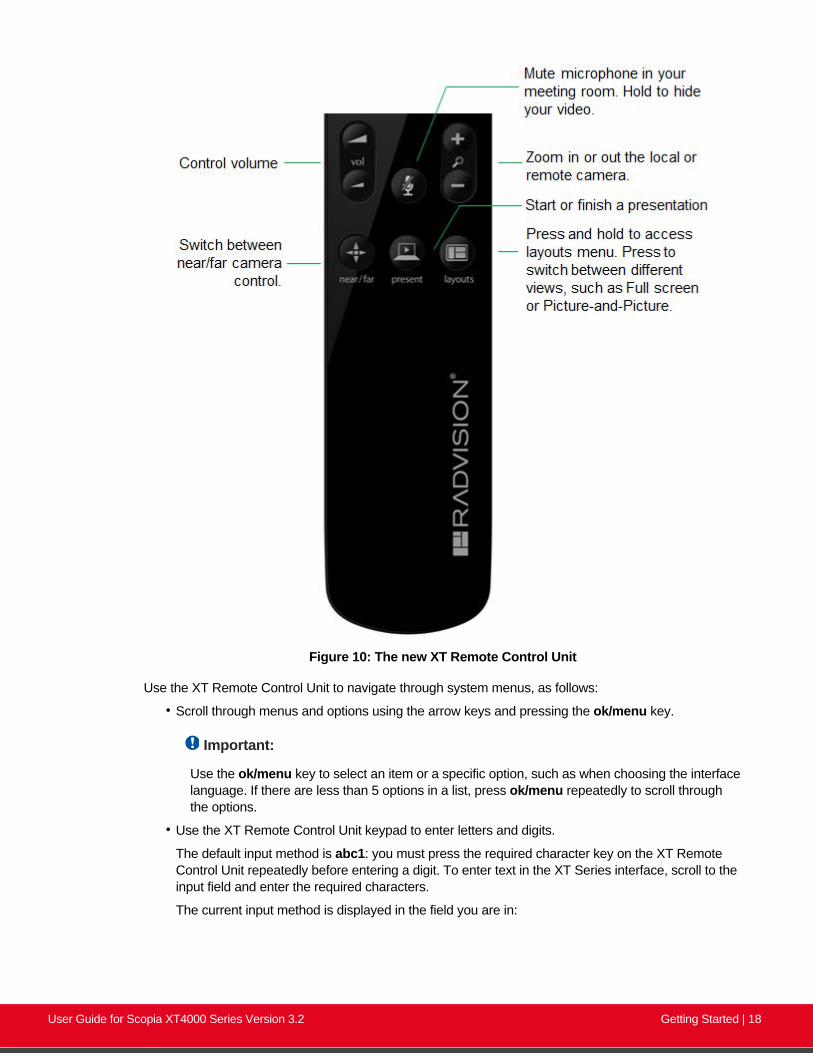
Figure 10: The new XT Remote Control Unit
Use the XT Remote Control Unit to navigate through system menus, as follows:
• Scroll through menus and options using the arrow keys and pressing the ok/menu key.
Important:
Use the ok/menu key to select an item or a specific option, such as when choosing the interfacelanguage. If there are less than 5 options in a list, press ok/menu repeatedly to scroll throughthe options.
• Use the XT Remote Control Unit keypad to enter letters and digits.
The default input method is abc1: you must press the required character key on the XT RemoteControl Unit repeatedly before entering a digit. To enter text in the XT Series interface, scroll to theinput field and enter the required characters.
The current input method is displayed in the field you are in:
User Guide for Scopia XT4000 Series Version 3.2 Getting Started | 18

You can also switch between ABC, abc, and 123 input methods by pressing 1/a/A repeatedlywhile the cursor is in the input field.
Pairing an XT Remote Control Unit with a XT Codec Unit
About this task
Multiple XT Codec Units can be set up in the conference room and controlled with different XT RemoteControl Units.
Each XT Remote Control Unit is dedicated to one XT Codec Unit by pairing them. This is done byconfiguring the same numeric code in your XT Remote Control Unit and the system software.
An XT Remote Control Unit is configured with code 01 by default.
Before you begin
Decide what numeric code you want to use for your monitor and the XT Codec Unit. You can chooseany value between 1-99.
Procedure
1. Access the general settings, as follows:
• From the web interface, select Basic Settings > General.• From the endpoint's Main menu, select Configure > General.
User Guide for Scopia XT4000 Series Version 3.2 Getting Started | 19

Figure 11: Setting the XT Remote Control Unit Code
2. Enter the numeric code in the Remote control code field. You can choose any valuebetween 1-99.
3. From the web interface only, select Save.
4. On the XT Remote Control Unit, press the * and # keys simultaneously until the red led blinkstwice.
Figure 12: Setting the code on the XT Remote Control Unit
5. Using the keypad, type the number you just entered in the Remote control code field.
Important:
You must always use two digits for a code. For example, to set the code to “1”, enter “01”.
The code of the XT Remote Control Unit is changed and the Remote Control icon withthe new Remote Control code appear at the top-right corner of the screen:
User Guide for Scopia XT4000 Series Version 3.2 Getting Started | 20

Important:
The code and icon do not appear when the default code, 01, is used.
6. Set the code and exit by doing one of the following:
• In the web interface, select Finish.
• In the endpoint, press OK.
Performing Basic ConfigurationBefore you perform basic configuration for the XT Series, your system administrator should install andactivate your XT Series (for details, see the Quick Setup Guide for Scopia XT Series, the InstallationGuide for Scopia XT Series, and Safety Instructions leaflet for Scopia XT Series.
To start using your XT Series, first define basic settings, such as the system's name, language, andnetwork settings. This is relevant for both new installations, and also after restoring default settings andre-installing software.
Important:
Your system administrator might already have set these parameters for you and customized certainfeatures described in this guide to suit the environment of your company. If your administrator set upPIN protection, you need the PIN number before continuing with the configuration.
You can define these settings as follows:
• Following the quick setup procedure on the XT Series endpoint.
We recommend this method to quickly start using your XT Series, since the quick setup wizardincludes only the basic required settings.
• Remotely defining the settings from the XT Series web interface (see Accessing XT Series WebInterface on page 14).
Your administrator may define some settings remotely, such as for the network or gatekeeper (seethe Scopia XT Series Installation Guide for details). The quick setup is available from the webinterface if you have not already completed the procedure from the endpoint.
You cannot remotely set the image on the monitor; this must be done from the endpoint itself.
Navigation
• Accessing the Quick Setup Procedure on page 21
• Remotely Setting the System Name and Language on page 29
User Guide for Scopia XT4000 Series Version 3.2 Getting Started | 21
Accessing the Quick Setup Procedure
About this task
Access the quick setup procedure to define basic settings for your Scopia XT Series, such as thesystem's name, language, and network settings. Follow the tasks of the quick setup procedure in theorder they are presented.
This is relevant for both new installations, and also after restoring default settings and re-installingsoftware.
You can do this procedure from the endpoint itself or from the XT Series web interface.
Before you begin
Your system administrator might already have set these parameters for you and customized certainfeatures described in this guide to suit the environment of your company. If your administrator set up PINprotection, you need the PIN number before continuing with the configuration.
Procedure
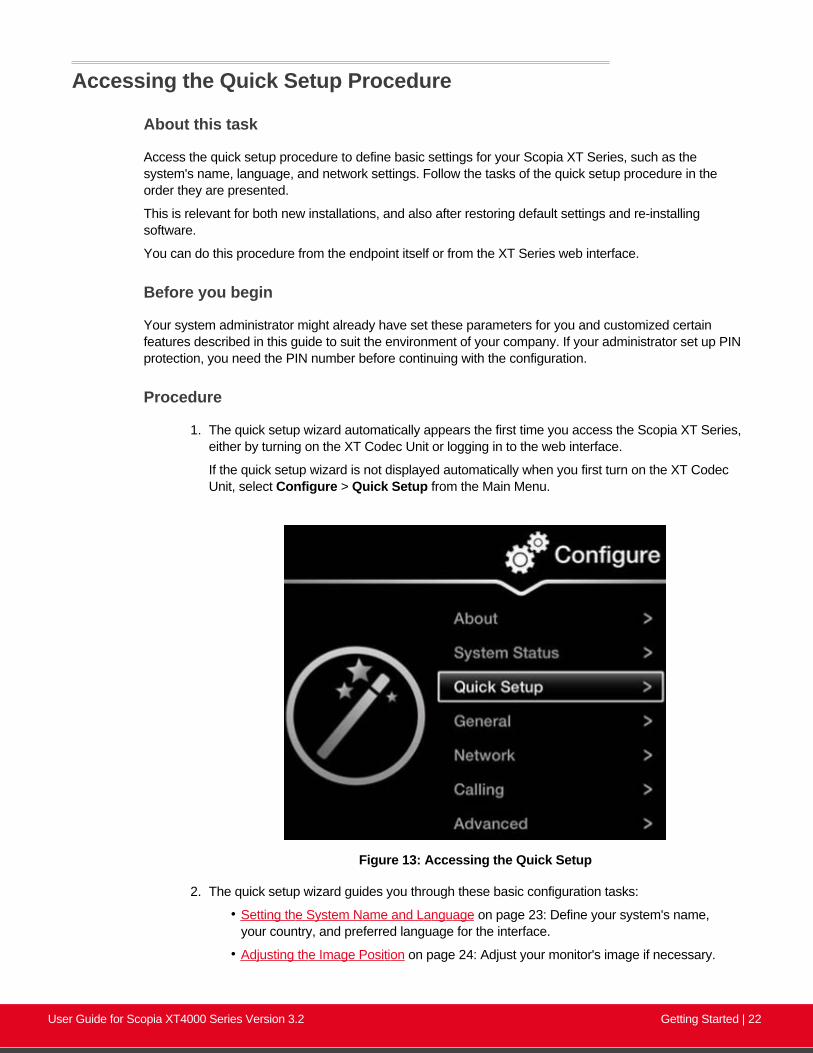
1. The quick setup wizard automatically appears the first time you access the Scopia XT Series,either by turning on the XT Codec Unit or logging in to the web interface.
If the quick setup wizard is not displayed automatically when you first turn on the XT CodecUnit, select Configure > Quick Setup from the Main Menu.
Figure 13: Accessing the Quick Setup
2. The quick setup wizard guides you through these basic configuration tasks:
• Setting the System Name and Language on page 23: Define your system's name,your country, and preferred language for the interface.
• Adjusting the Image Position on page 24: Adjust your monitor's image if necessary.
User Guide for Scopia XT4000 Series Version 3.2 Getting Started | 22
Important:
This task is not available from the web interface. If you are configuring from the webinterface, perform this procedure from the endpoint.
• Configuring Network Settings on page 26: Define your system's network settings toallow you to place and receive calls.
• Configuring Gatekeeper Settings on page 28: If your Scopia XT Series works inconjunction with a gatekeeper, configure gatekeeper-related settings.
Setting the System Name and Language
About this task
You can select the name of your XT Codec Unit, to be displayed on the monitors participating in thevideoconference call (for example: Hong-Kong, or 9th-Floor-Room, or NY-Office), and on the system'stitlebar.
There is also a unicode version of the system name for users who want the name displayed on thetitlebar to contain non-English characters. For more information, see Administrator Guide for Scopia XTSeries.
You can also select the country in which the system is located and the language in which the systemmenus are displayed.
After initial setup, you can modify these settings by selecting Configure > General from the Main menu,or from the web interface as described in Remotely Setting the System Name and Language on page29.
Before you begin
Access the quick setup wizard from the endpoint or web interface, as described in Accessing the QuickSetup Procedure on page 21.
Procedure
1. Enter the name of the XT Series in the System Name field. This name is also used for theSIP username and the H.323 name, which can be manually changed.
If you perform this task from the endpoint interface, use the alphanumeric keys of the XTRemote Control Unit (for more information, see Using the XT Remote Control Unit on page17).
User Guide for Scopia XT4000 Series Version 3.2 Getting Started | 23

Figure 14: Setting Country and Language
2. Select the required country from the Country list. If performing this task from the endpointinterface, use the arrow keys and press ok/menu.
The system menu and the Language field automatically change to the language used in theselected country.
3. If you want to change the language of the system menus, select Language.
If performing this task from the endpoint interface, press ok/menu to display the list oflanguages. Scroll to the preferred language and press ok/menu.
4. To adjust the image on your monitor, select Next and continue with Adjusting the ImagePosition on page 24.
If performing the quick setup from the web interface, access the quick setup from theendpoint to adjust the image. This can be done at any time.
Adjusting the Image Position
About this task
If your monitor does not center the image correctly, perform this procedure. This can be done from theendpoint itself only.
Before you begin
This procedure is performed as part of the Quick Setup Wizard, after Setting the System Name andLanguage on page 23.
Access the quick setup wizard from the endpoint, as described in Accessing the Quick Setup Procedureon page 21.
User Guide for Scopia XT4000 Series Version 3.2 Getting Started | 24

Procedure
1. Examine the image on the monitor to decide if you need to adjust the image position.
The triangles in the top left corner and bottom right corner must be fully visible so that thewhite border of the triangle is fully visible on all sides.
If the image is centered correctly, skip this procedure and select Next.
Figure 15: Examining the image position
2. Press 1 to align the top left corner.
Figure 16: Adjusting the image position
User Guide for Scopia XT4000 Series Version 3.2 Getting Started | 25

3. Use the arrow keys on the XT Remote Control Unit to position the image, and then pressok/menu.
4. Press 2 to align the bottom right corner.
5. Use the arrow keys on the XT Remote Control Unit to position the image, and then pressok/menu.
6. To configure network settings, select Next and continue with Configuring Network Settingson page 26.
Configuring Network Settings
About this task
This procedure describes how to set up the network settings and the IP address the system uses forplacing a call.
If you are modifying the network settings after initial setup, navigate to Configure > Network > GLAN 1from the Main menu. For more information, see Installation Guide for Scopia XT Series.
Before you begin
This procedure is performed as part of the Quick Setup Wizard, after Adjusting the Image Position onpage 24. Consult with your network administrator to configure these fields.
Access the quick setup wizard from the endpoint or web interface, as described in Accessing the QuickSetup Procedure on page 21.
Procedure
1. Press ok/menu and select one of the following from the IP Address Mode list:
• Automatic: (Default) Select this option if the system gets its IP address automatically(using DCHP).
The IP address, Subnet mask, Gateway, and DNS fields appear as read-only. See Table 2: Configuring IP addresses on page 27 for a description of these fields.
• Manual: Select this option if you require a static IP address. This is required, forexample, if the XT Series is connected directly to the Internet, without any addresstranslation, or when other external endpoints need to dial to this endpoint as an MCU.Enter the fields as described in Table 2: Configuring IP addresses on page 27.
To secure SIP connections using TLS certificates, your system must have a static IPaddress, since the system generates the certificate request using its IP address as theCommon Name (CN). For more information, see Administrator Guide for Scopia XTSeries.
User Guide for Scopia XT4000 Series Version 3.2 Getting Started | 26

Figure 17: Defining IP Settings
2. If you selected Manual, configure the following, as instructed by the system administrator:
Table 2: Configuring IP addresses
Field Name DescriptionIP address Enter the system static IP address here, used for accessing and
managing the system.
If the system retrieves its IP address automatically, this fielddisplays the IP address assigned to the system.
Subnet mask Enter the subnet mask associated with the IP address.
If the system retrieves its IP address automatically, this fielddisplays the subnet mask that has been assigned.
Gateway Enter the default gateway static IP address. The gateway is used toroute information between two subnets, for example, between theheadquarters and a partner site.
If the system gets its IP address automatically, this field displays thegateway IP address assigned to the system.
DNS Enter the DNS server IP address. The DNS server in your networkresolves domain names in your network and translates them into IPaddresses.
If the system gets its IP address automatically, this field displays theassigned DNS server IP address.
3. To configure your gatekeeper's settings, select Next and continue with ConfiguringGatekeeper Settings on page 28.
User Guide for Scopia XT4000 Series Version 3.2 Getting Started | 27
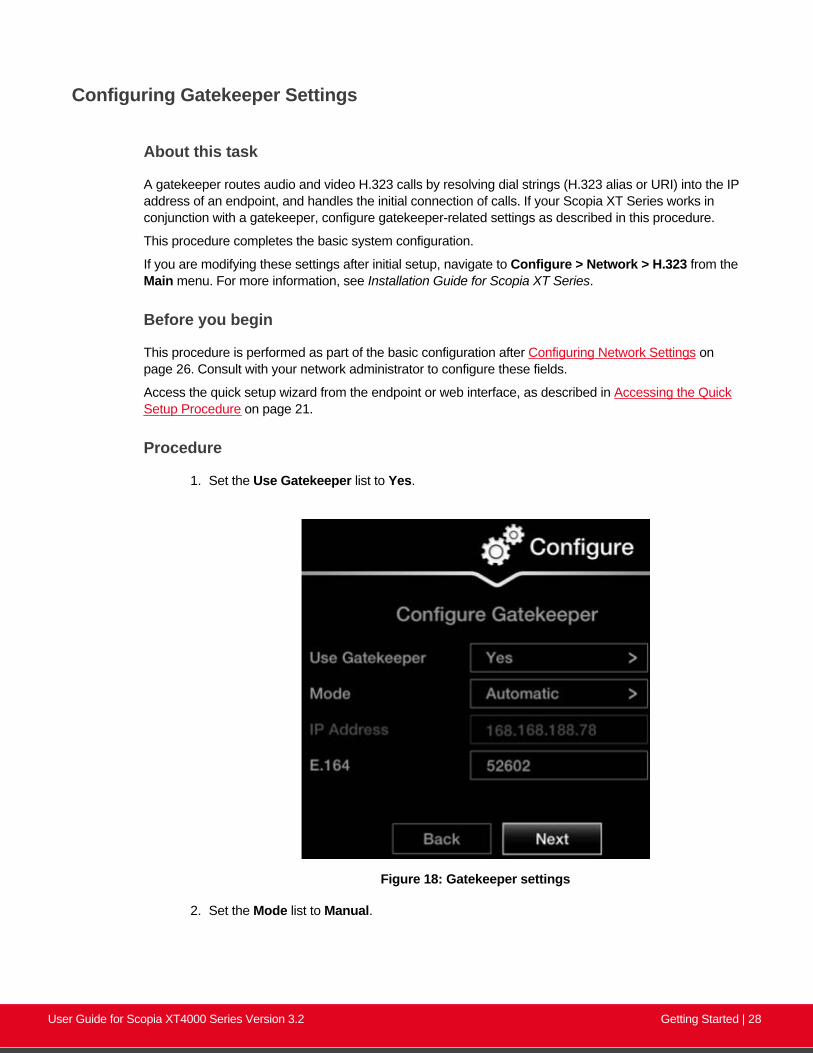
Configuring Gatekeeper Settings
About this task
A gatekeeper routes audio and video H.323 calls by resolving dial strings (H.323 alias or URI) into the IPaddress of an endpoint, and handles the initial connection of calls. If your Scopia XT Series works inconjunction with a gatekeeper, configure gatekeeper-related settings as described in this procedure.
This procedure completes the basic system configuration.
If you are modifying these settings after initial setup, navigate to Configure > Network > H.323 from theMain menu. For more information, see Installation Guide for Scopia XT Series.
Before you begin
This procedure is performed as part of the basic configuration after Configuring Network Settings onpage 26. Consult with your network administrator to configure these fields.
Access the quick setup wizard from the endpoint or web interface, as described in Accessing the QuickSetup Procedure on page 21.
Procedure
1. Set the Use Gatekeeper list to Yes.
Figure 18: Gatekeeper settings
2. Set the Mode list to Manual.
User Guide for Scopia XT4000 Series Version 3.2 Getting Started | 28

Important:
If the gatekeeper is configured to be automatically detected by endpoints, selectAutomatic (depends on the type of gatekeeper). Consult the network administrator.
3. Enter the IP address of the gatekeeper in the Gatekeeper IP address field.
4. Enter the H.323 number required to dial the XT Codec Unit in the E.164 field.
5. Select Done.
The basic configuration of your Scopia XT Series is complete.
Remotely Setting the System Name and Language
About this task
This procedure describes how to set the name and language of the endpoint from the web interface. Youcan also do this as part of the quick setup from the endpoint itself, as described in Setting the SystemName and Language on page 23.
You can also configure the endpoint to use alternate system name, such as the SIP username, on boththe titlebar and on the monitors participating in the videoconference call, as described in AdministratorGuide for Scopia XT Series.
Procedure
1. Access the name and language settings:
• From the XT Series web interface, select Basic Settings > Preferences > General.• From the endpoint's main menu, select Configure > General.
User Guide for Scopia XT4000 Series Version 3.2 Getting Started | 29
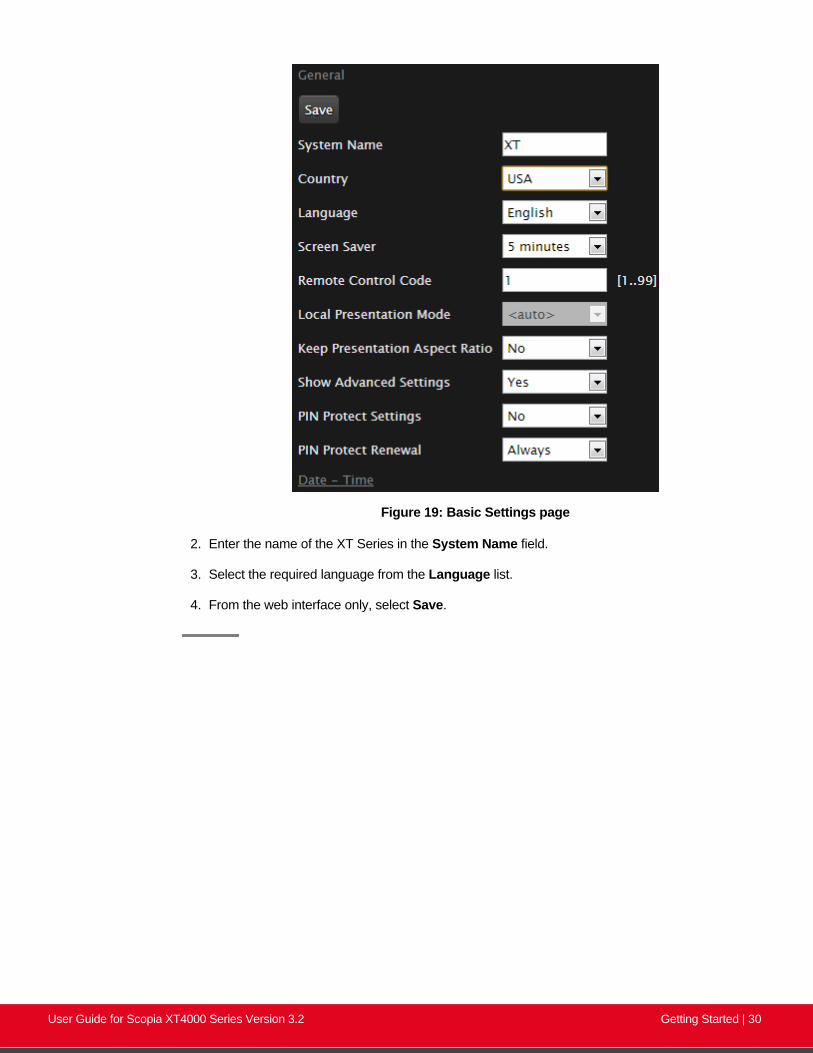
Figure 19: Basic Settings page
2. Enter the name of the XT Series in the System Name field.
3. Select the required language from the Language list.
4. From the web interface only, select Save.
User Guide for Scopia XT4000 Series Version 3.2 Getting Started | 30

Chapter 3 | Starting a VideoconferenceYou can start a videoconference on the Scopia XT Series in several ways. This chapter outlines how to dial to otherendpoints in different modes, how to answer and end a meeting, and how to perform tasks during a videoconference,such as sharing content or changing your layout.
To quickly dial with the settings best suited for a specific contact, we recommend setting up your phone book toinclude calling preferences, along with the contact's information. For example, you can set a specific contact to audio-only, and this setting is automatically used when calling this contact.
Navigation
• Preparing for a Videoconference on page 31
• Dialing a Number Directly from the Endpoint on page 36
• Dialing a Number from the XT Series Web Interface on page 38
• Modifying the Default Call Settings on page 40
• Answering and Ending a Video Call on page 42
• Joining a Videoconference on page 43
Preparing for a VideoconferenceThis section describes how to prepare for a videoconference.
To quickly dial with the settings best suited for a specific contact, we recommend setting up your phonebook to include calling preferences, along with the contact's information. For example, you can set aspecific contact to audio-only, and this setting is automatically used when calling this contact.
Navigation
• Tips for Participating in a Videoconference on page 31
• Managing the Phone Book on page 32
Tips for Participating in a VideoconferenceThere are several general recommendations you should follow to optimize your videoconferencingexperience.
We recommend that you read this section before participating in a videoconference for the first time.
• Use natural gestures and speak normally as in a real meeting.
• Do not rustle paper or tap on the table or the Microphone Pod.
• Keyboard clicking can be disruptive to the videoconference, so we recommend using the mutewhen listening but not actively participating.
• Zooming too close can show that your eyes are not looking directly at the camera, in some cases.
User Guide for Scopia XT4000 Series Version 3.2 Starting a Videoconference | 31

• If you are using a laptop during a meeting, do not place it too close to the microphone. Noiseproduced by the computer cooling system may interfere with audio quality.
• Mute the Microphone Pod before moving it.
• Avoid using your cellular phones during your meeting to avoid electromagnetic interference.
Managing the Phone BookIf you are using the Scopia XT Series's local LDAP server, you can add, edit, delete, and search forcontacts, as described in this section.
For other LDAP servers, such as Scopia Management, a third-party LDAP server, or another XT Series,the contact list is predefined and you can only search for contacts.
Contact your administrator for details about your organization's LDAP server.
Navigation
• Adding and Modifying Contacts in the Phone Book on page 32
• Searching for a Contact in the Phone Book on page 35
• Deleting a Contact from the Phone Book on page 36
Adding and Modifying Contacts in the Phone Book
About this task
If you are using the Scopia XT Series's local LDAP server, you can add a new contact to the phonebookand update your phone book with the latest changes in your contact’s information. You can do thisprocedure from the endpoint itself or from the XT Series web interface.
Procedure
1. Access either the Recent Calls list or the Contacts list:
• From the endpoint's main menu, select Call to add a recent number. Select the right-arrow next to a number from the list.
• From the endpoint's main menu, select Contacts > Add.
• From the XT Series web interface, select, Make your call > Basic Options > RecentCalls to add a recent number, or select Make your call > Contacts > Add Contact.
User Guide for Scopia XT4000 Series Version 3.2 Starting a Videoconference | 32
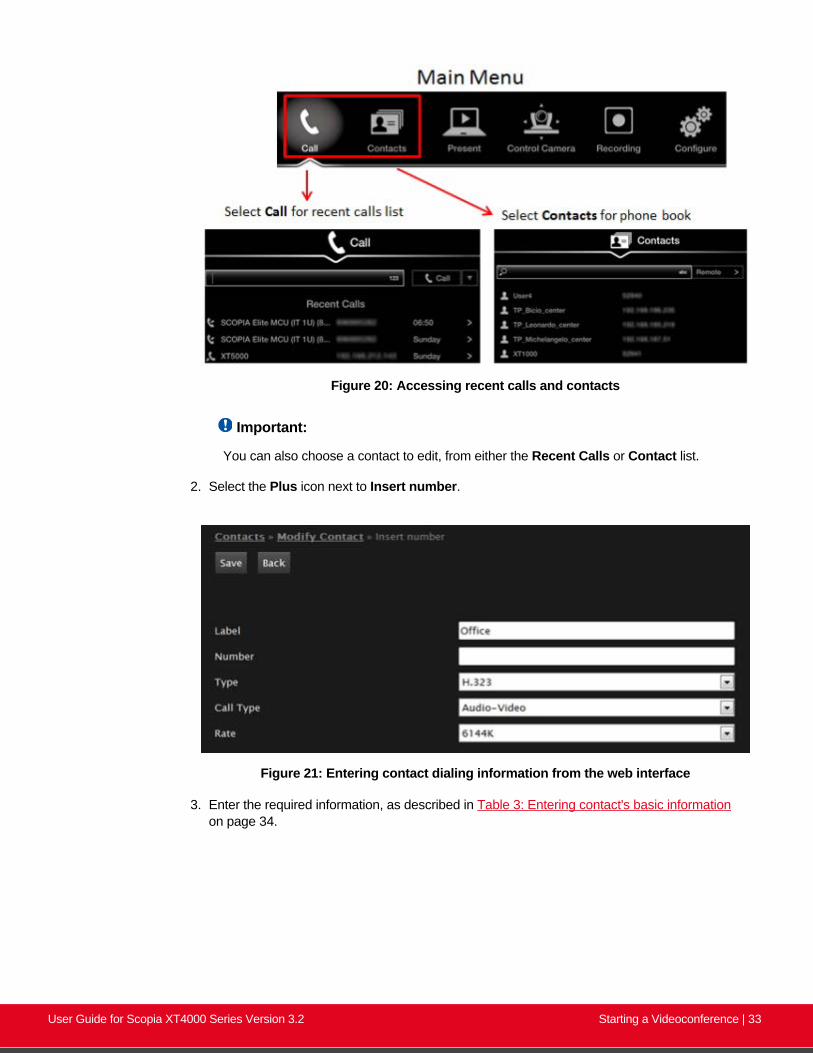
Figure 20: Accessing recent calls and contacts
Important:
You can also choose a contact to edit, from either the Recent Calls or Contact list.
2. Select the Plus icon next to Insert number.
Figure 21: Entering contact dialing information from the web interface
3. Enter the required information, as described in Table 3: Entering contact's basic informationon page 34.
User Guide for Scopia XT4000 Series Version 3.2 Starting a Videoconference | 33
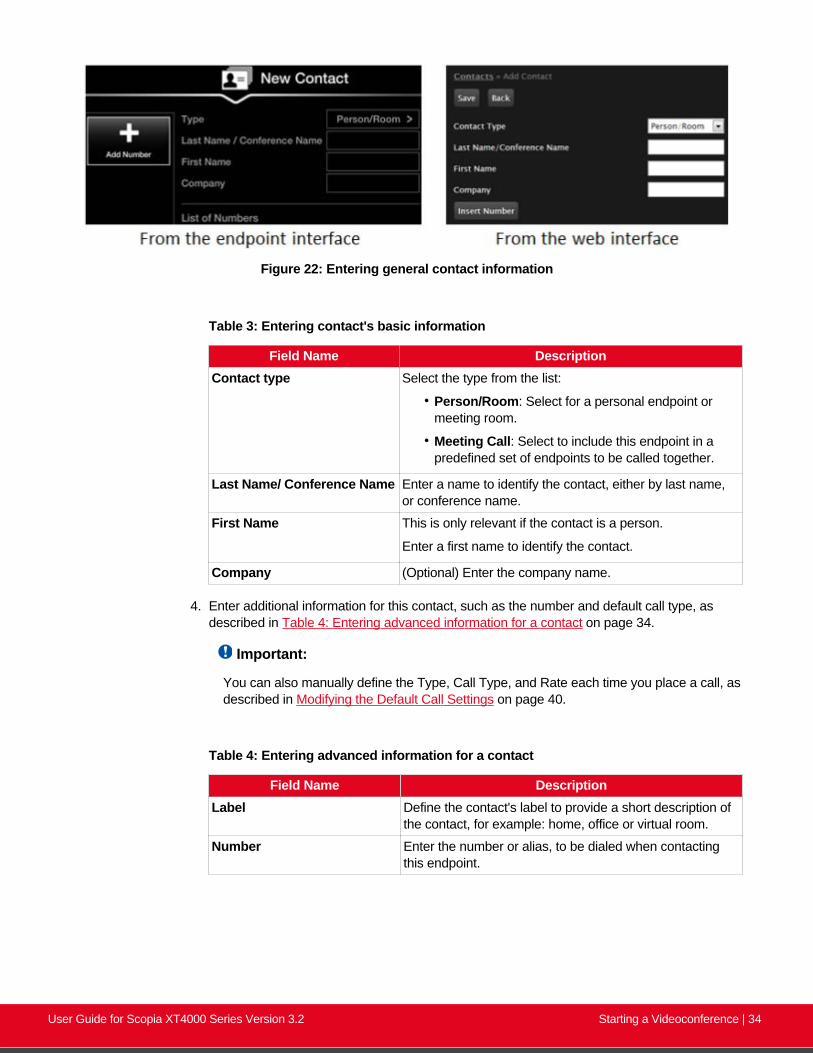
Figure 22: Entering general contact information
Table 3: Entering contact's basic information
Field Name DescriptionContact type Select the type from the list:
• Person/Room: Select for a personal endpoint ormeeting room.
• Meeting Call: Select to include this endpoint in apredefined set of endpoints to be called together.
Last Name/ Conference Name Enter a name to identify the contact, either by last name,or conference name.
First Name This is only relevant if the contact is a person.
Enter a first name to identify the contact.
Company (Optional) Enter the company name.
4. Enter additional information for this contact, such as the number and default call type, asdescribed in Table 4: Entering advanced information for a contact on page 34.
Important:
You can also manually define the Type, Call Type, and Rate each time you place a call, asdescribed in Modifying the Default Call Settings on page 40.
Table 4: Entering advanced information for a contact
Field Name DescriptionLabel Define the contact's label to provide a short description of
the contact, for example: home, office or virtual room.
Number Enter the number or alias, to be dialed when contactingthis endpoint.
User Guide for Scopia XT4000 Series Version 3.2 Starting a Videoconference | 34
Field Name DescriptionType If necessary, select the protocol to use when calling this
personal endpoint or meeting room:
• H.323: Select for H.323 endpoints, such as other XTSeries endpoints, or when joining a videoconferencehosted by a Scopia Elite MCU.
• SIP: Select for SIP endpoints, such as when callingMicrosoft Lync clients.
• ISDN: If enabled, select to call ISDN endpoints.
Call Type Select whether the call is Audio-Video or Audio-Only.
Rate Select the default call rate to be used when calling thiscontact. Otherwise, the maximum available bandwidth isused.
5. From the web interface only, select Save.
Searching for a Contact in the Phone Book
About this task
You can search by first or last name, or you can display all contacts. You can do this procedure from theendpoint itself or from the XT Series web interface.
Procedure
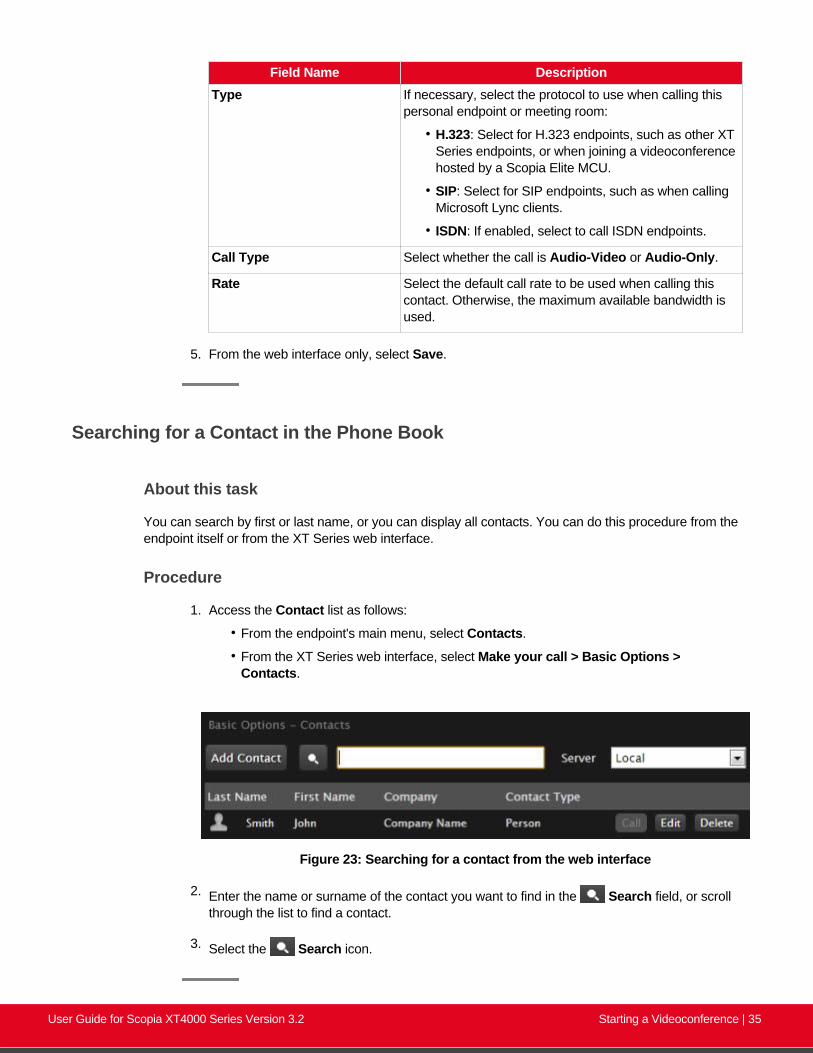
1. Access the Contact list as follows:
• From the endpoint's main menu, select Contacts.
• From the XT Series web interface, select Make your call > Basic Options >Contacts.
Figure 23: Searching for a contact from the web interface
2. Enter the name or surname of the contact you want to find in the Search field, or scrollthrough the list to find a contact.
3. Select the Search icon.
User Guide for Scopia XT4000 Series Version 3.2 Starting a Videoconference | 35

Deleting a Contact from the Phone Book
About this task
If you are using the Scopia XT Series's local LDAP server, you can remove unused contacts from yourphone book. You can do this procedure from the endpoint itself or from the XT Series web interface.
Procedure
1. Access the Contacts list as follows:
• From the endpoint's main menu, select Contacts.
• From the XT Series web interface, select Make your call > Contacts.
Figure 24: The Contacts page
2. Search for the contact (Searching for a Contact in the Phone Book on page 35) and delete itas follows:
• From the endpoint, select the right-arrow next to the contact and Delete Contact.• From the web interface, select Delete.
3. Select Yes to confirm.
Dialing a Number Directly from the Endpoint
About this task
This section describes how to dial a number from the endpoint itself. This is the most common way toplace calls. Alternatively, you can dial a number remotely from the XT Series web interface (see Dialinga Number from the XT Series Web Interface on page 38).
If your system administrator enabled encryption in your system and your call is secured, an icon showinga padlock appears on your display. For more information, see Administrator Guide for Scopia XTSeries.
User Guide for Scopia XT4000 Series Version 3.2 Starting a Videoconference | 36

Important:Using encryption is subject to local regulation. In some countries it is restricted or limited for usage.For more information, consult your local reseller.
From your endpoint, you can dial a number in the following ways:
• Dialing a number using the XT Remote Control Unit
• Dialing a contact in the phone book (to add a contact to the phone book, see Adding and ModifyingContacts in the Phone Book on page 32)
• Dialing a number from the recent calls list
The system stores a list of recent calls, and displays these icons appear next to a contact number orname:
• — Received call
• — Dialed call
• — Missed call
Important:
Your organization may also have implemented a dial plan, which defines various dial prefixes todetermine the characteristics of a call. For example, you may be able to dial 8 before thevideoconference number for a lower bandwidth call, or 6 for an audio-only call. For more informationon the dial plan in your organization, contact your system administrator.
Select the number to call in one of the following ways:
• Dial the number using the numeric keys on the XT Remote Control Unit, and press , or selectCall and press ok/menu.
• Dial a contact or recent call from the endpoint's main menu:
– Dial a contact in the phone book by selecting Contacts, and enter the name of the contact.
Using the XT Remote Control Unit, press , or select Call and press ok/menu.
– Dial a number from the list of recent calls by selecting Call.
Using the XT Remote Control Unit, press , or select Call and press ok/menu.
Important:
To modify advanced calling options, such as the call rate, see Modifying the Default CallSettings on page 40.
User Guide for Scopia XT4000 Series Version 3.2 Starting a Videoconference | 37

Figure 25: Dialing a number from the endpoint
Dialing a Number from the XT Series Web Interface
About this task
This procedure describes how to dial a number remotely, from the XT Series web interface. This can beuseful, for example, when you are moderating a call remotely.
You can also do this from the endpoint interface (see Dialing a Number Directly from the Endpoint onpage 36).
If your system administrator enabled encryption in your system and your call is secured, an icon showinga padlock appears on your display. For more information, see Administrator Guide for Scopia XTSeries.
Important:Using encryption is subject to local regulation. In some countries it is restricted or limited for usage.For more information, consult your local reseller.
The system stores a list of recent calls, and displays these icons appear next to a contact number orname:
• — Received call
• — Dialed call
• — Missed call
User Guide for Scopia XT4000 Series Version 3.2 Starting a Videoconference | 38
Important:
Your organization may also have implemented a dial plan, which defines various dial prefixes todetermine the characteristics of a call. For example, you may be able to dial 8 before thevideoconference number for a lower bandwidth call, or 6 for an audio-only call. For more informationon the dial plan in your organization, contact your system administrator.
Procedure
1. Access the XT Series web interface, as described in Accessing XT Series Web Interface onpage 14.
2. Select the number to call from XT Series web interface (see Figure 26: Dialing from the webinterface on page 40):
Important:
To modify advanced calling options, such as the call rate, see Modifying the Default CallSettings on page 40.
• Dial a new number by selecting Make your call > Basic Options > Direct Call. Enterthe number and select Call.
• Dial a number from the list of recent calls by selecting Make your call > Recent calls.Choose the number and select Call.
• Dial a contact in the phone book by selecting Make your call > Basic Options >Contacts. Choose the contact and select Call.
User Guide for Scopia XT4000 Series Version 3.2 Starting a Videoconference | 39

Figure 26: Dialing from the web interface
Modifying the Default Call Settings
About this task
When dialing a number or contact, you can change the default call settings, if necessary. For example,you can set the call as audio only to conserve bandwidth.
You can also modify contacts in your phone book to always use these customized settings, as describedin Adding and Modifying Contacts in the Phone Book on page 32.
Procedure
1. Access the Advanced Calling Options menu, as follows:
• From the endpoint, choose the number you are calling and select (for details aboutselecting the number to dial, see Dialing a Number Directly from the Endpoint on page36).
• From the web interface, select Advanced Calling Options > Direct call.
User Guide for Scopia XT4000 Series Version 3.2 Starting a Videoconference | 40

If you are dialing from the Contacts, Recent Calls, or Direct Call page, select Editnext to the number you are calling (for more information about navigating to thesepages, see Dialing a Number from the XT Series Web Interface on page 38).
Figure 27: Changing advanced call settings
2. Modify the call settings as described below.
From the endpoint interface, select options using arrow keys on XT Remote Control Unit andconfirm with the ok/menu key .
Table 5: Advanced Calling Settings
Field Name DescriptionCall protocol If necessary, select the protocol to use when calling this
personal endpoint or meeting room:
• H.323: Select for H.323 endpoints, such as other XTSeries endpoints, or when joining a videoconferencehosted by a Scopia Elite MCU.
• SIP: Select for SIP endpoints, such as when callingMicrosoft Lync clients.
• ISDN: If enabled, select to call ISDN endpoints.
Call rate By default, the system uses either the maximum availablebandwidth or the rate you specified as the default call rate forthis contact (for details, see Adding and Modifying Contactsin the Phone Book on page 32).
Call type Select whether the call is Audio-Video or Audio-Only.
3. Dial the number, as follows:
• Using the XT Remote Control Unit, press , or select Call and press ok/menu.
• From the web interface, select Call.
User Guide for Scopia XT4000 Series Version 3.2 Starting a Videoconference | 41
Answering and Ending a Video CallYou can answer calls manually or set the system to answering the call automatically:
• If you set your system to automatic answering, the endpoint answers after the predefined numberof rings (see Setting Call Answering Preferences on page 71 for details).
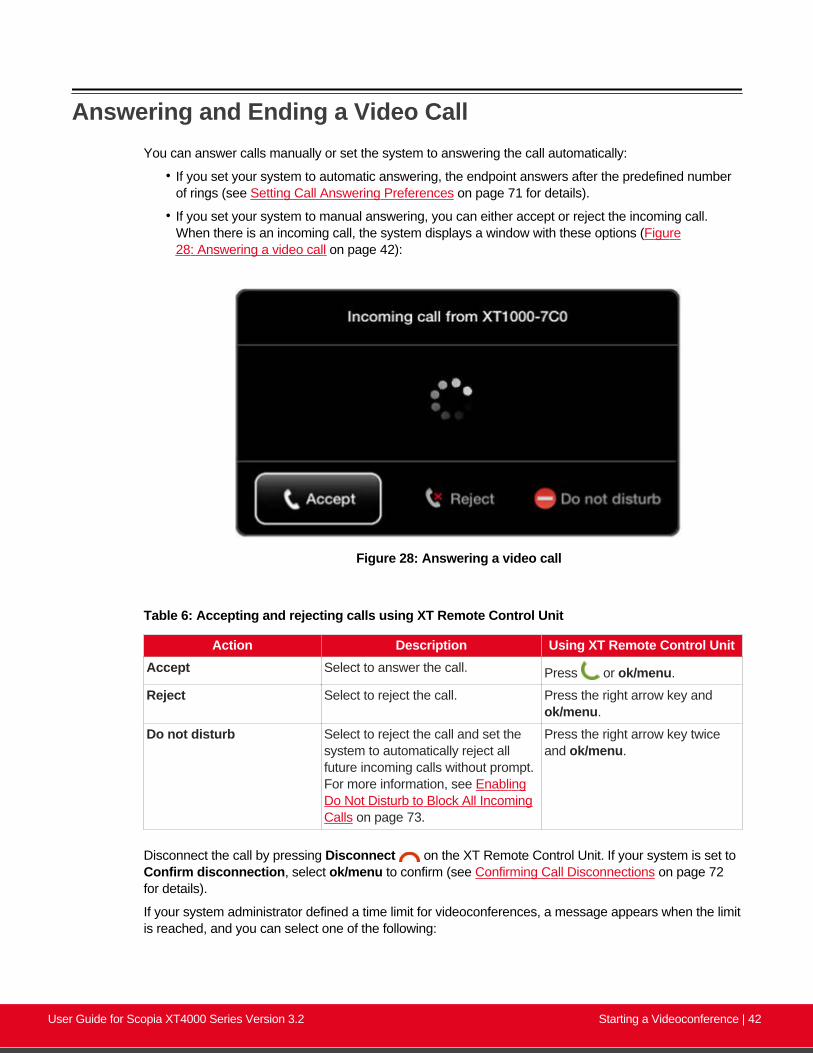
• If you set your system to manual answering, you can either accept or reject the incoming call.When there is an incoming call, the system displays a window with these options (Figure28: Answering a video call on page 42):
Figure 28: Answering a video call
Table 6: Accepting and rejecting calls using XT Remote Control Unit
Action Description Using XT Remote Control UnitAccept Select to answer the call. Press or ok/menu.
Reject Select to reject the call. Press the right arrow key andok/menu.
Do not disturb Select to reject the call and set thesystem to automatically reject allfuture incoming calls without prompt.For more information, see EnablingDo Not Disturb to Block All IncomingCalls on page 73.
Press the right arrow key twiceand ok/menu.
Disconnect the call by pressing Disconnect on the XT Remote Control Unit. If your system is set toConfirm disconnection, select ok/menu to confirm (see Confirming Call Disconnections on page 72for details).
If your system administrator defined a time limit for videoconferences, a message appears when the limitis reached, and you can select one of the following:
User Guide for Scopia XT4000 Series Version 3.2 Starting a Videoconference | 42

Figure 29: Meeting Duration Alert
• End Meeting to immediately end the call
• Do Not Limit to remove the time limit
• Snooze to postpone the reminder and extend the meeting for another hour
If your system administrator enabled encryption in your system and your call is secured, an icon showinga padlock appears on your display. For more information, see Administrator Guide for Scopia XTSeries.
Important:Using encryption is subject to local regulation. In some countries it is restricted or limited for usage.For more information, consult your local reseller.
Joining a Videoconference
About this task
To join a videoconference, dial the number of the XT Series hosting the videoconference, or the meetingID of the videoconference which was given by the meeting's host. For more information, see Dialing aNumber Directly from the Endpoint on page 36 or Dialing a Number from the XT Series Web Interfaceon page 38.
If your system administrator enabled encryption in your system and your call is secured, an icon showinga padlock appears on your display. For more information, see Administrator Guide for Scopia XTSeries.
Important:Using encryption is subject to local regulation. In some countries it is restricted or limited for usage.For more information, consult your local reseller.
User Guide for Scopia XT4000 Series Version 3.2 Starting a Videoconference | 43
Chapter 4 | During Your VideoconferenceThis chapter describes the different actions available during your videoconference, such as recording thevideoconference or sharing content with other participants:
Navigation
• Recording a Videoconference on page 44
• Controlling your Video and Audio on page 50
• About Video Layouts on page 54
• Sharing Content on page 61
• Moderating a Videoconference Hosted by Another Scopia XT Series on page 68
Recording a VideoconferenceThis section describes how to record videoconferences. You can define the recording settings, such asthe recording bitrate to determine the recording's file size, and how to view recordings from the XTSeries web interface.
Navigation
• Setting Your Recording Preferences on page 44
• Starting a Recording on page 46
• Viewing a Recording from the Web Interface on page 49
Setting Your Recording Preferences
About this task
You can record videoconferences and store them to a connected USB storage device. This proceduredescribes how to configure your recording preferences, such as the video resolution and bitrate. This isuseful, for example, to increase the time available for recording on your USB storage device. You can dothis procedure from the endpoint itself or from the XT Series web interface.
This may require a license, depending on your model. For more information, see Installation Guide forScopia XT Series.
You can play the recordings using any standard media player. The system saves the file as an MP4, andrecords the video in H.264 format and audio in AAC-LC format.
You cannot record videoconferences when encryption is enabled. For more information, seeAdministrator Guide for Scopia XT Series or contact your administrator.
User Guide for Scopia XT4000 Series Version 3.2 During Your Videoconference | 44

Procedure
1. Access the recording settings:
• From the XT Series web interface, select Basic Settings > Recording > General.• From the endpoint's main menu, select Configure > Recording.
Figure 30: Setting your recording preferences
2. Define the following recording settings:
User Guide for Scopia XT4000 Series Version 3.2 During Your Videoconference | 45
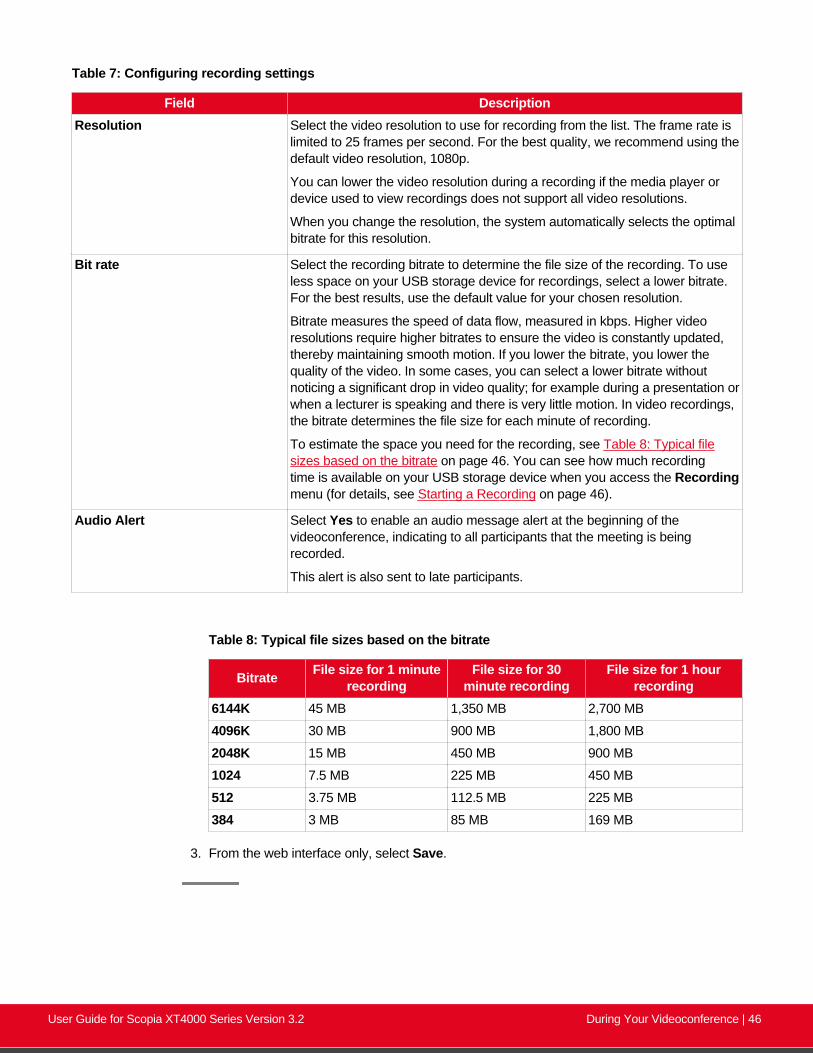
Table 7: Configuring recording settings
Field DescriptionResolution Select the video resolution to use for recording from the list. The frame rate is
limited to 25 frames per second. For the best quality, we recommend using thedefault video resolution, 1080p.
You can lower the video resolution during a recording if the media player ordevice used to view recordings does not support all video resolutions.
When you change the resolution, the system automatically selects the optimalbitrate for this resolution.
Bit rate Select the recording bitrate to determine the file size of the recording. To useless space on your USB storage device for recordings, select a lower bitrate.For the best results, use the default value for your chosen resolution.
Bitrate measures the speed of data flow, measured in kbps. Higher videoresolutions require higher bitrates to ensure the video is constantly updated,thereby maintaining smooth motion. If you lower the bitrate, you lower thequality of the video. In some cases, you can select a lower bitrate withoutnoticing a significant drop in video quality; for example during a presentation orwhen a lecturer is speaking and there is very little motion. In video recordings,the bitrate determines the file size for each minute of recording.
To estimate the space you need for the recording, see Table 8: Typical filesizes based on the bitrate on page 46. You can see how much recordingtime is available on your USB storage device when you access the Recordingmenu (for details, see Starting a Recording on page 46).
Audio Alert Select Yes to enable an audio message alert at the beginning of thevideoconference, indicating to all participants that the meeting is beingrecorded.
This alert is also sent to late participants.
Table 8: Typical file sizes based on the bitrate
Bitrate File size for 1 minuterecording
File size for 30minute recording
File size for 1 hourrecording
6144K 45 MB 1,350 MB 2,700 MB
4096K 30 MB 900 MB 1,800 MB
2048K 15 MB 450 MB 900 MB
1024 7.5 MB 225 MB 450 MB
512 3.75 MB 112.5 MB 225 MB
384 3 MB 85 MB 169 MB
3. From the web interface only, select Save.
User Guide for Scopia XT4000 Series Version 3.2 During Your Videoconference | 46

Starting a Recording
About this task
You can record videoconferences and store them to a connected USB storage device. This sectiondescribes how to start, pause, and stop a recording during a videoconference. This may require alicense, depending on your model. For more information, see Installation Guide for Scopia XT Series.
You can do this procedure from the endpoint itself or from the XT Series web interface.
You can play the recordings using any standard media player. The system saves the file as an MP4, andrecords the video in H.264 format and audio in AAC-LC format.
You cannot record videoconferences when encryption is enabled. For more information, seeAdministrator Guide for Scopia XT Series or contact your administrator.
You cannot (at present) record to a network disk, or to Scopia Desktop's Recording Server. This isplanned for future versions.
Before you begin
• Insert a USB storage device (either an external hard drive or a USB key) into any of the USB portsof the XT Series:
Figure 31: Connecting a USB drive to the XT Series
You cannot start the recording before connecting a USB storage device.
• (Optional) Customize your recording settings, such as video resolution, as described in SettingYour Recording Preferences on page 44. For example, to increase the recording time allowed,lower the recording bitrate.
You can see how much recording time is available on your USB storage device when you accessthe Recording menu as described in the procedure below.
Procedure
1. Access the Recording menu as follows:
• From the XT Series web interface, select More Actions > Recording.
• From the endpoint's main menu, select Recording.
During a videoconference, press ok/menu on the XT Remote Control Unit, and selectMeeting Options > Recording.
The Recording menu appears, indicating the amount of time you can record based on theavailable space on your USB storage device.
User Guide for Scopia XT4000 Series Version 3.2 During Your Videoconference | 47

Figure 32: Starting a recording
2. Start your recording by selecting Start from the menu on the left.
The recording icon appears at the top of the endpoint interface, next to the remaining timeavailable for the recording. In the web interface, the remaining time appears at the bottom ofthe recording page (Figure 35: Viewing a Recording from the Web Interface on page 50).
Figure 33: Recording icon and time remaining on this USB drive
3. To pause the recording during a videoconference, select Pause from the Recording menu.
4. To stop the recording during a videoconference, select Stop from the Recording menu.
If you started the recording at any time after the videoconference started, the recordingautomatically stops when the videoconference ends. Otherwise, stop the recording byselecting Stop.
User Guide for Scopia XT4000 Series Version 3.2 During Your Videoconference | 48

Figure 34: Stopping a recording
5. To view your recorded videoconferences, see Viewing a Recording from the Web Interfaceon page 49.
Viewing a Recording from the Web Interface
About this task
This procedure describes how to view the recordings from the XT Series web interface. You can recordvideoconferences and store them to a connected USB storage device. This may require a license,depending on your model. For more information, see Installation Guide for Scopia XT Series.
Alternatively, you can also view the recordings from the USB storage device itself. The file is saved as<endpoint ID><name of endpoint><date><time>.MP4, for example0011D_XT_2013_05_01_10_30.MP4.
For more information on how to record a videoconference, see Starting a Recording on page 46.
You can play the recordings using any standard media player. The system saves the file as an MP4, andrecords the video in H.264 format and audio in AAC-LC format.
Before you begin
Verify that you have one of the following Internet Browsers installed, required to view the recording:
• Google Chrome version 11 or later
• Apple Safari version 5 or later
User Guide for Scopia XT4000 Series Version 3.2 During Your Videoconference | 49

Procedure
1. Access the XT Series web interface, as described in Accessing XT Series Web Interface onpage 14.
2. Select More Actions > Recording.
Figure 35: Viewing a Recording from the Web Interface
3. Find the recording from the list and select either Play or Download.
The file is saved as <endpoint ID><name of endpoint><date><time>.MP4.
Controlling your Video and AudioThis chapter details the configurations you can make on your Scopia XT Series to control the way thevideo is displayed, to control the audio output and input.
Navigation
• Blocking Video From the Scopia XT Series on page 50
• Moving the Camera's Position on page 51
• Adjusting the Volume on page 52
• Muting the Microphone Pod on page 53
Blocking Video From the Scopia XT Series
About this task
During a call, you can block and unblock your local video and replace it with a system-generated image.
Alternatively, you can also configure your XT Series to block video input from your local endpoint bydefault at the start of each call. For more information, see Blocking Video Input by Default on page 75.
User Guide for Scopia XT4000 Series Version 3.2 During Your Videoconference | 50

Procedure
Block your video during a videoconference as follows:
• Press and hold the Mute key on the XT Remote Control Unit.
• Press ok/menu to access the In-call menu, and select Privacy Options > Privacy:
Figure 36: In-call menu
The system sends a pre-defined image to the remote endpoint, indicated by the icon onyour display.
Moving the Camera's Position
About this task
This procedure describes how to position your camera's angle and zoom, to include all people present inthe room in the video. You can do this procedure from the endpoint itself or from the XT Series webinterface.
By default, the system stores the last camera position and retrieves this position the next time thecamera is switched on. You can store multiple camera positions for future use, as described inAdministrator Guide for Scopia XT Series.
Before you begin
Configure your camera settings, as described in Installation Guide for Scopia XT Series.
Procedure
1. Access the camera control menu as follows:
User Guide for Scopia XT4000 Series Version 3.2 During Your Videoconference | 51
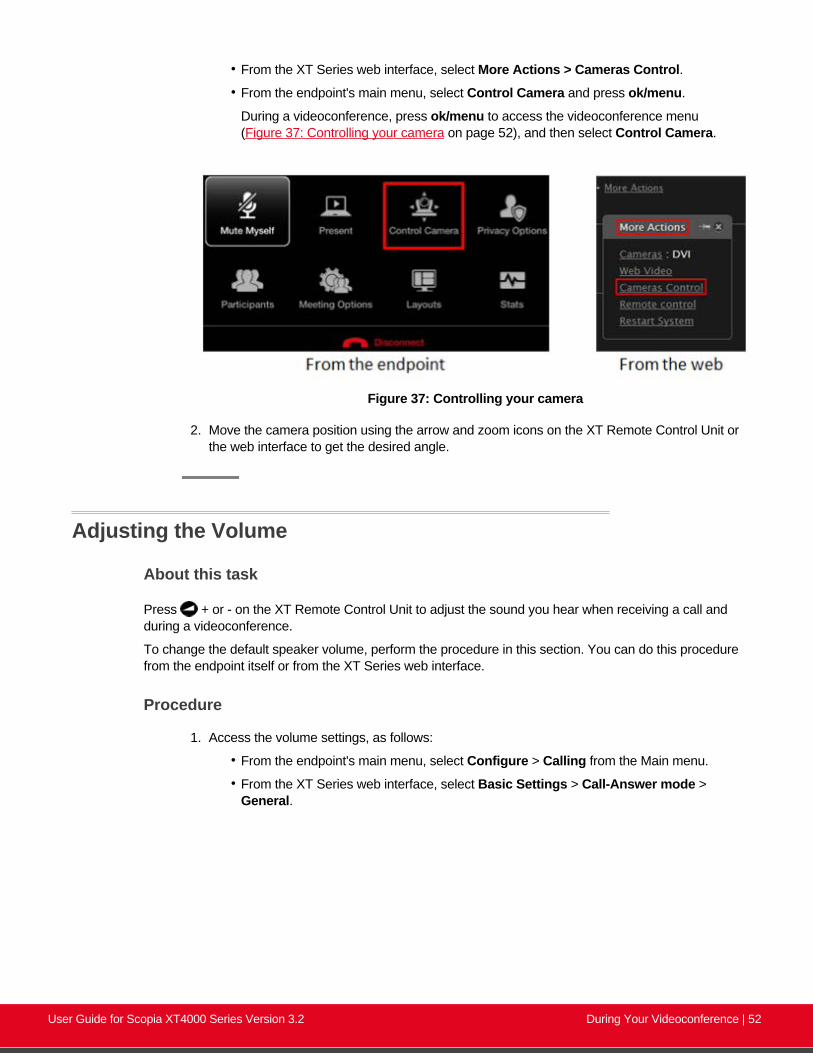
• From the XT Series web interface, select More Actions > Cameras Control.• From the endpoint's main menu, select Control Camera and press ok/menu.
During a videoconference, press ok/menu to access the videoconference menu(Figure 37: Controlling your camera on page 52), and then select Control Camera.
Figure 37: Controlling your camera
2. Move the camera position using the arrow and zoom icons on the XT Remote Control Unit orthe web interface to get the desired angle.
Adjusting the Volume
About this task
Press + or - on the XT Remote Control Unit to adjust the sound you hear when receiving a call andduring a videoconference.
To change the default speaker volume, perform the procedure in this section. You can do this procedurefrom the endpoint itself or from the XT Series web interface.
Procedure
1. Access the volume settings, as follows:
• From the endpoint's main menu, select Configure > Calling from the Main menu.
• From the XT Series web interface, select Basic Settings > Call-Answer mode >General.
User Guide for Scopia XT4000 Series Version 3.2 During Your Videoconference | 52
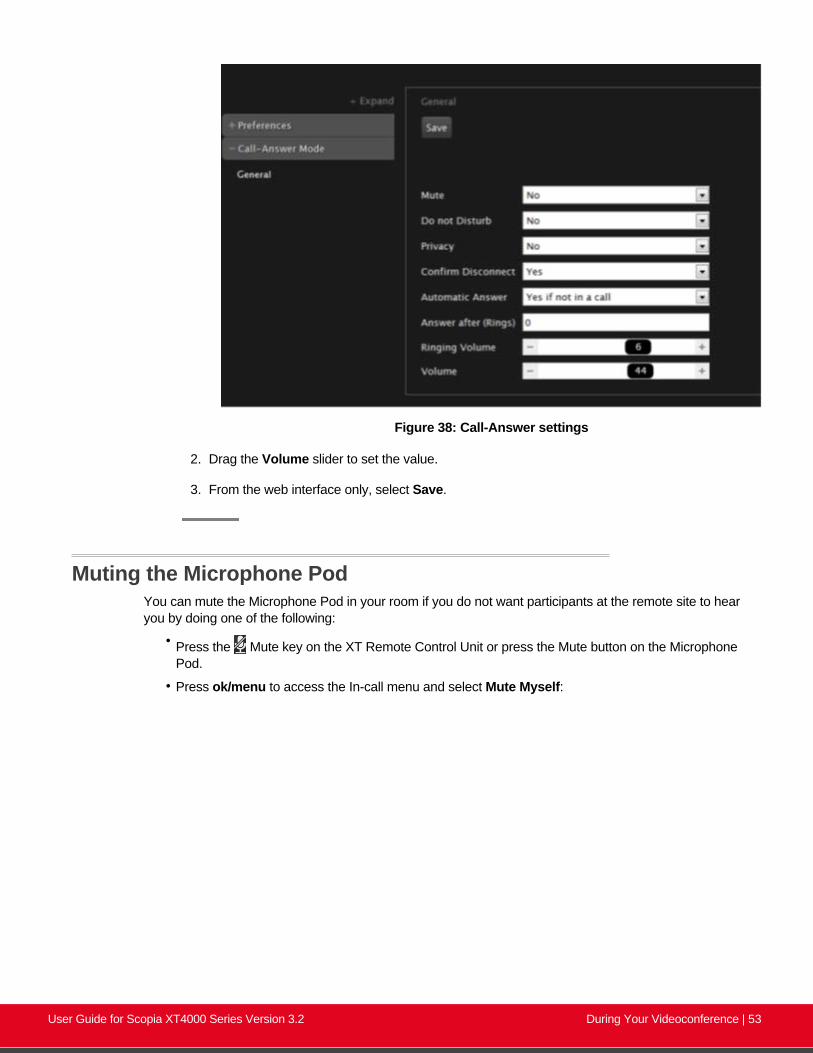
Figure 38: Call-Answer settings
2. Drag the Volume slider to set the value.
3. From the web interface only, select Save.
Muting the Microphone PodYou can mute the Microphone Pod in your room if you do not want participants at the remote site to hearyou by doing one of the following:
• Press the Mute key on the XT Remote Control Unit or press the Mute button on the MicrophonePod.
• Press ok/menu to access the In-call menu and select Mute Myself:
User Guide for Scopia XT4000 Series Version 3.2 During Your Videoconference | 53
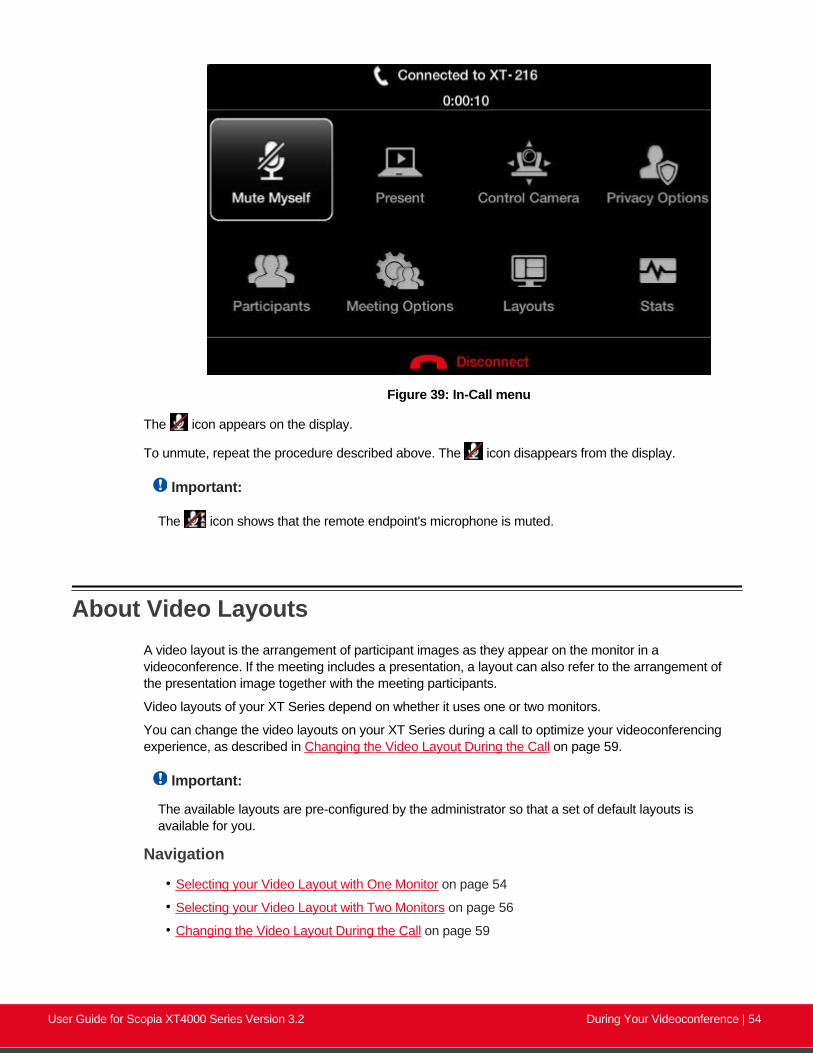
Figure 39: In-Call menu
The icon appears on the display.
To unmute, repeat the procedure described above. The icon disappears from the display.
Important:
The icon shows that the remote endpoint's microphone is muted.
About Video LayoutsA video layout is the arrangement of participant images as they appear on the monitor in avideoconference. If the meeting includes a presentation, a layout can also refer to the arrangement ofthe presentation image together with the meeting participants.
Video layouts of your XT Series depend on whether it uses one or two monitors.
You can change the video layouts on your XT Series during a call to optimize your videoconferencingexperience, as described in Changing the Video Layout During the Call on page 59.
Important:
The available layouts are pre-configured by the administrator so that a set of default layouts isavailable for you.
Navigation
• Selecting your Video Layout with One Monitor on page 54
• Selecting your Video Layout with Two Monitors on page 56
• Changing the Video Layout During the Call on page 59
User Guide for Scopia XT4000 Series Version 3.2 During Your Videoconference | 54

Selecting your Video Layout with One Monitor
About this task
A video layout is the arrangement of participant images as they appear on the monitor in avideoconference. If the meeting includes a presentation, a layout can also refer to the arrangement ofthe presentation image together with the meeting participants.
You see the video layout and hear the audio on the monitor, even when a computer is connected.
Important:
If you connect another monitor to the free HD socket and the monitor is configured to Auto by theAdministrator, the additional monitor is automatically used to show local video or a presentation (localor remote). See the Installation Guide for Scopia XT Series for information.
In a call, the monitor can split the screen to show both the participants' video (local and remote) andpresentation (local or remote) in different windows, with the system menus displayed transparently:
Figure 40: Available video and content (example)
When you are not in a call, the monitor automatically displays the system menus and the video taken bythe local camera
You can arrange the monitor layout and content in the following views (see Figure 41: Showing themonitor in Pip, PaP, and PoP views on page 56):
• PiP
The PiP (Picture In Picture) view shows a video image in the main screen, with an additionalsmaller image overlapping in the corner. Typically, a remote presentation is displayed in the mainpart of the screen, and the remote video is in the small image. If the remote endpoint does notshow any content, the display shows the remote video in the main part of the screen, and the localpresentation in the small image.
• PaP
User Guide for Scopia XT4000 Series Version 3.2 During Your Videoconference | 55
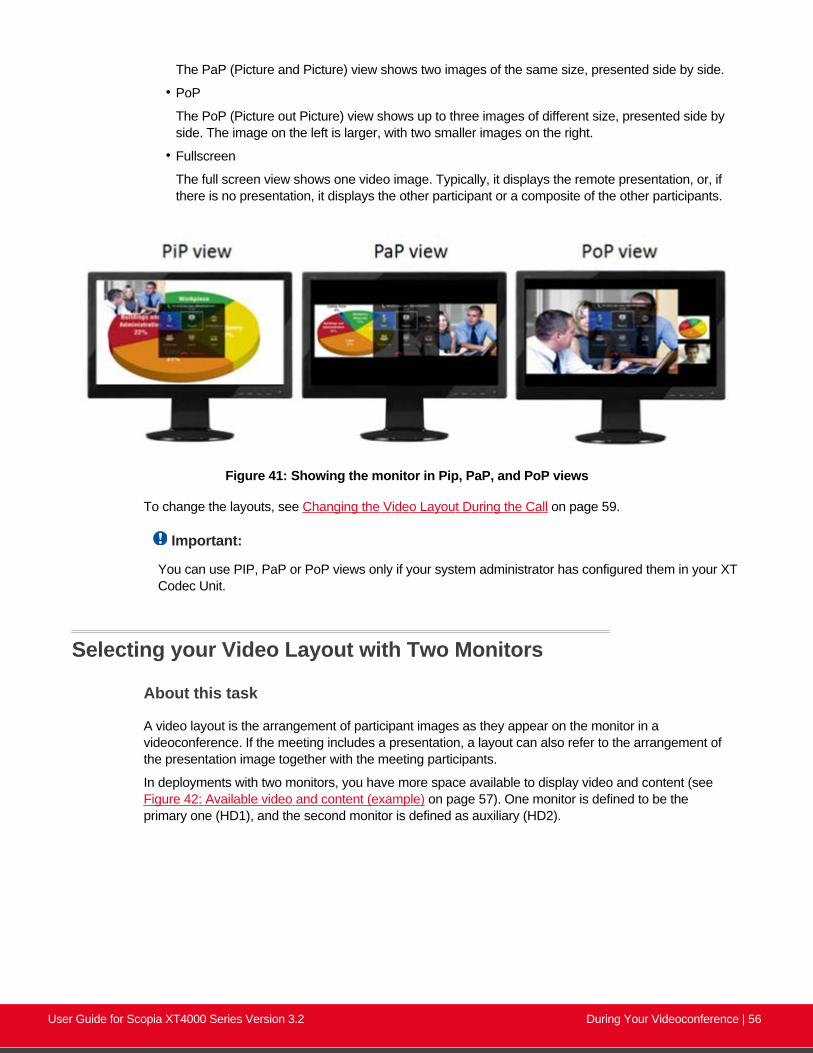
The PaP (Picture and Picture) view shows two images of the same size, presented side by side.
• PoP
The PoP (Picture out Picture) view shows up to three images of different size, presented side byside. The image on the left is larger, with two smaller images on the right.
• Fullscreen
The full screen view shows one video image. Typically, it displays the remote presentation, or, ifthere is no presentation, it displays the other participant or a composite of the other participants.
Figure 41: Showing the monitor in Pip, PaP, and PoP views
To change the layouts, see Changing the Video Layout During the Call on page 59.
Important:
You can use PIP, PaP or PoP views only if your system administrator has configured them in your XTCodec Unit.
Selecting your Video Layout with Two Monitors
About this task
A video layout is the arrangement of participant images as they appear on the monitor in avideoconference. If the meeting includes a presentation, a layout can also refer to the arrangement ofthe presentation image together with the meeting participants.
In deployments with two monitors, you have more space available to display video and content (see Figure 42: Available video and content (example) on page 57). One monitor is defined to be theprimary one (HD1), and the second monitor is defined as auxiliary (HD2).
User Guide for Scopia XT4000 Series Version 3.2 During Your Videoconference | 56

Figure 42: Available video and content (example)
Important:
By default, the video layout appears as follows:
• When you are not in a call, one monitor shows the system menus, and both monitors display thevideo taken by the local camera.
• During a videoconference, one monitor shows the system menus, and both monitors show theavailable video and presentation (local and remote), according to the selected monitorconfiguration described below. You can further arrange the monitor layouts and content by usingLayout and PIP keys on the XT Remote Control Unit.
Your system administrator configures the monitors to show one of these layouts when you are in a call(see Table 9: Video configuration options with two monitors on page 58):
User Guide for Scopia XT4000 Series Version 3.2 During Your Videoconference | 57

Figure 43: Video configuration options with two monitors
Table 9: Video configuration options with two monitors
Layout DescriptionHD1 (Menu & Video Rx) + HD2(Present)
The main monitor (HD1) shows the system menus, thereceived video, and local video. The local video is in a smalloverlapping window, also called a PIP (Picture in Picture)view. The auxiliary monitor (HD2) shows the presentation(local or remote), if available. The audio is enabled on HD1.This is the default configuration.
HD1 (Menu & Present) + HD2 (VideoRx)
HD1 shows the system menus, the presentation (local orremote) if available, and the local video in a smalloverlapping window. HD2 shows the received video. Theaudio is automatically enabled on HD1.
HD1 (Present) + HD2 (Menu & VideoRx)
HD1 shows the presentation (local or remote), if available.HD2 shows the system menus, the received video, and thelocal video in a small overlapping window.
HD1 (Video Rx) + HD2 (Menu &Present)
HD1 shows the received video. HD2 shows the systemmenus, the presentation (local or remote) if available, andthe local camera image in a small overlapping window.
For more information about configuring your monitor views, see Administrator Guide for Scopia XTSeries.
During a call, you can also define the relative size of the windows. For example, two images side by sideand at the same size in one monitor is called PaP (Picture and Picture) view. For more information, see Changing the Video Layout During the Call on page 59.
User Guide for Scopia XT4000 Series Version 3.2 During Your Videoconference | 58

Important:
You can use PIP, PaP or PoP views only if your system administrator has configured them in your XTCodec Unit.
Important:
When there is no call, you can reset the monitors to the default configuration by pressing and then0 on the XT Remote Control Unit.
Changing the Video Layout During the Call
About this task
A video layout is the arrangement of participant images as they appear on the monitor in avideoconference. If the meeting includes a presentation, a layout can also refer to the arrangement ofthe presentation image together with the meeting participants.
During the call, you can change your monitor’s current layout to the options described in Table 10: Videolayout options on page 59.
For more information about video layouts in point-to-point calls, see About Video Layouts on page 54.
Important:
You can use PIP, PaP or PoP views only if your system administrator has configured them in your XTCodec Unit.
You can change the layout in one of the following ways:
• Press the Layouts key on the XT Remote Control Unit repeatedly to switch between the fullscreen, PoP, PaP, and PiP video layouts, described in Table 10: Video layout options on page59.
Table 10: Video layout options
Layout Description
Fullscreen The full screen view shows one video image. Typically, it displaysthe remote presentation, or, if there is no presentation, it displaysthe other participant or a composite of the other participants.
PoP The PoP (Picture out Picture) view shows up to three images ofdifferent size, presented side by side. The image on the left islarger, with two smaller images on the right.
User Guide for Scopia XT4000 Series Version 3.2 During Your Videoconference | 59

Layout Description
PaP The PaP (Picture and Picture) view shows two images of the samesize, presented side by side.
PiP The PiP (Picture In Picture) view shows a video image in the mainscreen, with an additional smaller image overlapping in the corner.Typically, a remote presentation is displayed in the main part of thescreen, and the remote video is in the small image. If the remoteendpoint does not show any content, the display shows the remotevideo in the main part of the screen, and the local presentation inthe small image.
• Access the In-call menu by pressing ok/menu on the XT Remote Control Unit and then selectLayouts.
Alternatively, press and hold the Layouts key (refer to Table 10: Video layout options on page59 for layout descriptions).
Figure 44: In-Call menu
Use the arrows to browse through the layouts (Figure 45: Available video layouts in a call on page61), and select the desired layout.
The In-call menu automatically disappears from the display after a few seconds in a call. To bringback the In-call menu, press ok/menu on the XT Remote Control Unit.
User Guide for Scopia XT4000 Series Version 3.2 During Your Videoconference | 60
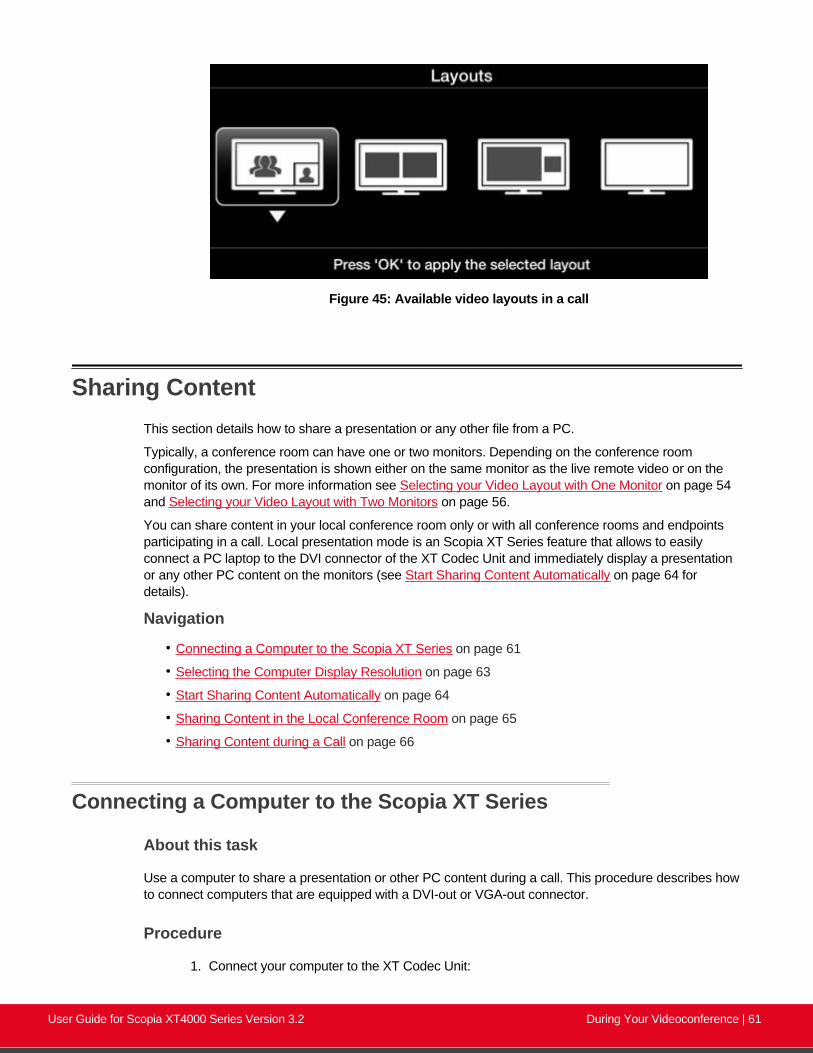
Figure 45: Available video layouts in a call
Sharing ContentThis section details how to share a presentation or any other file from a PC.
Typically, a conference room can have one or two monitors. Depending on the conference roomconfiguration, the presentation is shown either on the same monitor as the live remote video or on themonitor of its own. For more information see Selecting your Video Layout with One Monitor on page 54and Selecting your Video Layout with Two Monitors on page 56.
You can share content in your local conference room only or with all conference rooms and endpointsparticipating in a call. Local presentation mode is an Scopia XT Series feature that allows to easilyconnect a PC laptop to the DVI connector of the XT Codec Unit and immediately display a presentationor any other PC content on the monitors (see Start Sharing Content Automatically on page 64 fordetails).
Navigation
• Connecting a Computer to the Scopia XT Series on page 61
• Selecting the Computer Display Resolution on page 63
• Start Sharing Content Automatically on page 64
• Sharing Content in the Local Conference Room on page 65
• Sharing Content during a Call on page 66
Connecting a Computer to the Scopia XT Series
About this task
Use a computer to share a presentation or other PC content during a call. This procedure describes howto connect computers that are equipped with a DVI-out or VGA-out connector.
Procedure
1. Connect your computer to the XT Codec Unit:
User Guide for Scopia XT4000 Series Version 3.2 During Your Videoconference | 61
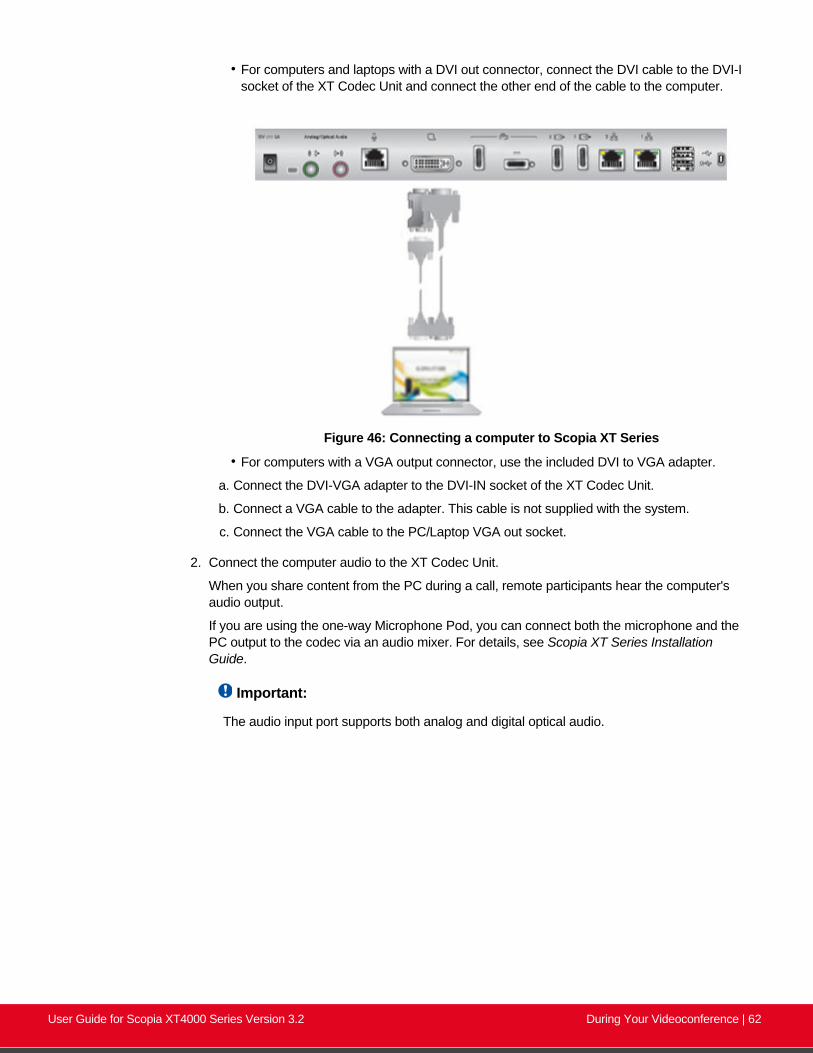
• For computers and laptops with a DVI out connector, connect the DVI cable to the DVI-Isocket of the XT Codec Unit and connect the other end of the cable to the computer.
Figure 46: Connecting a computer to Scopia XT Series
• For computers with a VGA output connector, use the included DVI to VGA adapter.
a. Connect the DVI-VGA adapter to the DVI-IN socket of the XT Codec Unit.
b. Connect a VGA cable to the adapter. This cable is not supplied with the system.
c. Connect the VGA cable to the PC/Laptop VGA out socket.
2. Connect the computer audio to the XT Codec Unit.
When you share content from the PC during a call, remote participants hear the computer'saudio output.
If you are using the one-way Microphone Pod, you can connect both the microphone and thePC output to the codec via an audio mixer. For details, see Scopia XT Series InstallationGuide.
Important:
The audio input port supports both analog and digital optical audio.
User Guide for Scopia XT4000 Series Version 3.2 During Your Videoconference | 62

Figure 47: Connecting the computer's audio to the XT Codec Unit
3. Continue with setting the display resolution, as described in Selecting the Computer DisplayResolution on page 63.
Selecting the Computer Display Resolution
About this task
For optimal display quality, and to prevent the screen from flickering during the videoconference, set thecomputer display to one of the supported picture resolutions and refresh frequencies. This procedureassumes computers running Microsoft Windows.
Procedure
1. From the Windows Control Panel, navigate to the screen resolution settings.
2. Select the desired screen resolution. See Table 11: DVI input formats supported by XTCodec Unit on page 63 for the list of resolutions supported by the XT Codec Unit.
Table 11: DVI input formats supported by XT Codec Unit
Name Resolution1080p 1920x1080
SXGA 1280x1024
HD+ (900p) 1600x900
WSGA 1440x900
UVGA 1280x960
WXGA 1280x768/ 1280x800
720p 1280x720
User Guide for Scopia XT4000 Series Version 3.2 During Your Videoconference | 63

Name ResolutionXGA 1024x768
SVGA 800x600
VGA 640x480
3. Select Apply.
4. Select the refresh frequency rate from the Screen refresh rate field. See Table12: Resolution and refresh rates on page 64 for the supported resolution and refresh rates.
Table 12: Resolution and refresh rates
Name Resolution Digital Refresh Rate (Hz) Analog Refresh Rate Frequency(Hz)
1080p 1920x1080 60 60
SXGA 1280x1024 60,75 60, 75
HD+(900p)
1600x900 60 N/A
WSGA 1440x900 60 60
UVGA 1280x960 60, 85 60, 85
WXGA 1280x768 /1280x800
60 60
720p 1280x720 60 60
XGA 1024x768 60, 70, 75 60, 70, 75
SVGA 800x600 60, 72, 75 60, 72, 75
VGA 640x480 72, 75 72, 75
5. Select Apply.
Start Sharing Content Automatically
About this task
By default, your XT Series automatically starts presenting PC content on the monitors to others in thesame room when you connect a PC.
When local presentation mode is enabled, the XT Series:
• Automatically starts presenting when you connect a PC to the DVI connector on the XT CodecUnit, if there is no active call.
• Does not automatically accept incoming calls.
• When you have an incoming call, local presentation mode is suspended and you are asked how tohandle the call (accept/reject/do not disturb).
• Video input switches to DVI and the audio settings associated to DVI are automatically used.
User Guide for Scopia XT4000 Series Version 3.2 During Your Videoconference | 64

Alternatively, you can manually start presenting content (for details, see Sharing Content during a Callon page 66 and Sharing Content in the Local Conference Room on page 65).
Procedure
1. Access the general settings, as follows:
• From the web interface, select Basic Settings.
• From the endpoint's Main menu, select Configure > General.
Figure 48: General settings
2. Select Auto from the Local presentation mode list.
3. From the web interface only, select Save.
Sharing Content in the Local Conference Room
About this task
You can share the content of your computer screen with other participants in the local conference roomwhen the Scopia XT Series is not in a call. This mode is called local presentation. When in the localpresentation mode, the XT Series:
• Does not automatically accept incoming calls.
• When you have an incoming call, local presentation mode is suspended and you are asked how tohandle the call (accept/reject/do not disturb).
User Guide for Scopia XT4000 Series Version 3.2 During Your Videoconference | 65

Before you begin
You must setup your computer and the XT Codec Unit before starting the presentation:
• Verify that the XT Series is not in a call.
• Configure your computer to the resolution and refresh rates supported by the system. See Selecting the Computer Display Resolution on page 63 for detailed information.
• To hear the PC input locally and remotely, you need to route PC audio through the input audioport:
Navigate to Administrator settings > I/O connections > Audio - Inputs > Analog audio >Audio selection and select one of the following options:
– Analog audio associated to DVI: Select to transmit audio only when the using the DVIcamera as the video source.
– Analog audio always: Select to always transmit audio, whether using the DVI or HD1camera as the video source.
• To enable audio from the PC in the local conference room, navigate to Administrator settings >I/O connections > Audio - Outputs > Analog audio > Analog Audio to output and select oneof the following options:
– All: Select to enable audio from all sources HD1, HD2, digital, and analog audio.
– HD1+Digital audio+Analog audio: Select to enable only HD1, digital, and analog audio.
Procedure
1. If your XT Series is configured to enter the local presentation mode automatically, connectyour computer to the DVI-I connector of the XT Codec Unit. The content appears on themonitors of your local conference room. For more information about automatically enteringlocal presentation mode, see Start Sharing Content Automatically on page 64.
For information about connecting your computer, see the Quick Setup Guide for installationinstructions.
2. If your XT Series is not configured to enter the local presentation mode automatically,perform these steps:
a. Share PC content by pressing the Presentation key , or Present from the Mainmenu.
The XT Codec Unit saves the live camera and switches to DVI mode.
Menus are hidden.
b. End local presentation mode in one of the following ways:
• or the Back key from the XT Remote Control Unit
• Present from the Main menu
The XT Codec Unit switches back to the previously used live camera.
User Guide for Scopia XT4000 Series Version 3.2 During Your Videoconference | 66

Sharing Content during a Call
About this task
Once a call has been established, you can share your computer screen with the remote endpoint.
If you are not in a call, you can share your presentation with participants in the local conference room(see Sharing Content in the Local Conference Room on page 65).
If the remote endpoint can receive presentation in addition to live video, the XT Codec Unit sends bothlive video and presentation without switching to DVI mode. Otherwise, the XT Codec Unit can send onlyone video stream. The XT Codec Unit sends the presentation in place of live video and switchesautomatically to DVI mode. When the presentation ends, the XT Codec Unit switches back automaticallyto the live camera.
By default, the total available bandwidth is evenly divided between live video and presentation. In mostcases it ensures the best content sharing experience. If necessary, your system can change thebandwidth dedicated to live video and presentation to suite your network requirements.
Before you begin
Before sharing content, proceed as follows:
• Configure your computer to the resolution and refresh rates supported by the system. See Selecting the Computer Display Resolution on page 63 for detailed information.
• Connect your computer to the DVI-I connector of the XT Codec Unit, as described in Connecting aComputer to the Scopia XT Series on page 61.
• To hear the PC input locally and remotely, you need to route PC audio through the input audioport:
Navigate to Administrator settings > I/O connections > Audio - Inputs > Analog audio >Audio selection and select one of the following options:
– Analog audio associated to DVI: Select to transmit audio only when the using the DVIcamera as the video source.
– Analog audio always: Select to always transmit audio, whether using the DVI or HD1camera as the video source.
• To enable audio from the PC in the local conference room, navigate to Administrator settings >I/O connections > Audio - Outputs > Analog audio > Analog Audio to output and select oneof the following options:
– All: Select to enable audio from all sources HD1, HD2, digital, and analog audio.
– HD1+Digital audio+Analog audio: Select to enable only HD1, digital, and analog audio.
Procedure
1. During the call, start sharing the presentation in one of the following ways:
• Press the Present key on the XT Remote Control Unit.
• Select Present from the In-call menu. Access the call menu by pressing OK on the XTRemote Control Unit:
User Guide for Scopia XT4000 Series Version 3.2 During Your Videoconference | 67

Figure 49: In-call menu
2. Repeat the previous step to stop sharing the presentation.
Moderating a Videoconference Hosted by Another ScopiaXT Series
About this task
When you use the Scopia XT Series as an endpoint, you can moderate videoconferences hosted by anexternal MCU or another endpoint with a built-in MCU. This functionality is only available if:
• The hosting endpoint or MCU supports H.243, which enables remote videoconferencemanagement.
• You are not connecting to the videoconference via SIP.
You can do this procedure from the endpoint itself or from the XT Series web interface.
Important:
If the endpoint hosting the meeting does not support H.243, and your Scopia XT Series does not havea built-in MCU, the Meeting option in the in-call menu is not available (see Figure 44: In-Call menu onpage 60).
Procedure
1. Access the active videoconference:
• From the endpoint, press ok/menu on the XT Remote Control Unit and selectParticipants.
User Guide for Scopia XT4000 Series Version 3.2 During Your Videoconference | 68
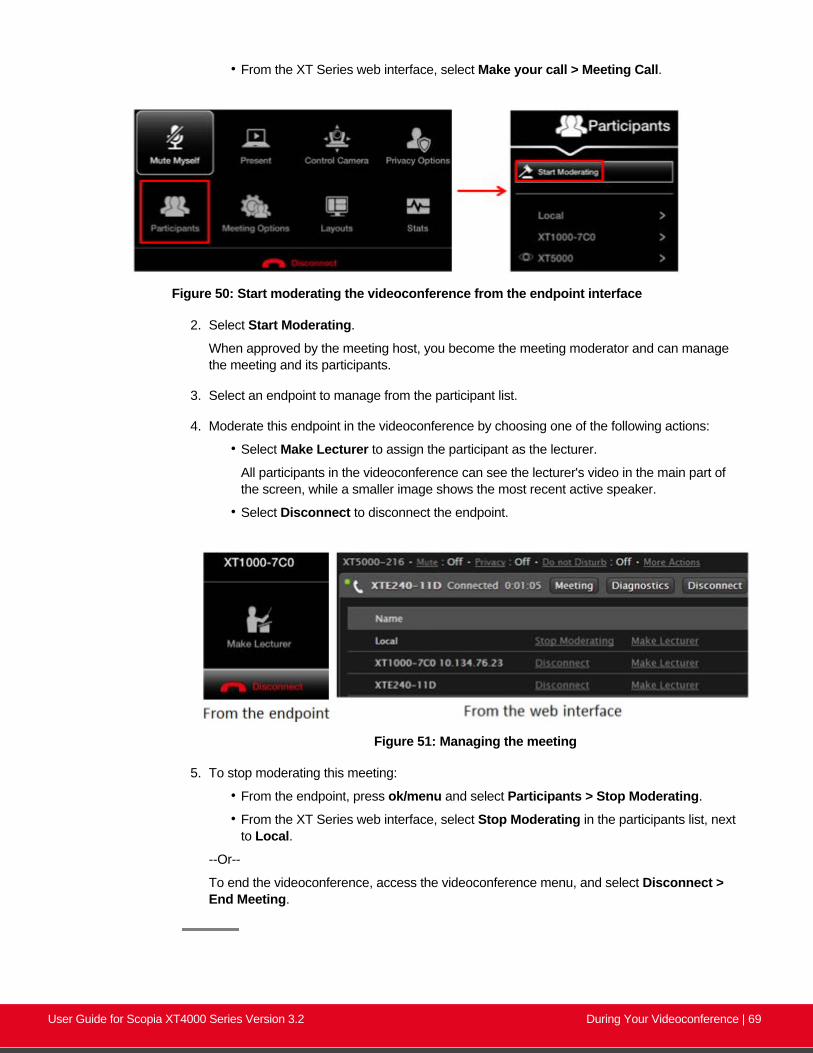
• From the XT Series web interface, select Make your call > Meeting Call.
Figure 50: Start moderating the videoconference from the endpoint interface
2. Select Start Moderating.
When approved by the meeting host, you become the meeting moderator and can managethe meeting and its participants.
3. Select an endpoint to manage from the participant list.
4. Moderate this endpoint in the videoconference by choosing one of the following actions:
• Select Make Lecturer to assign the participant as the lecturer.
All participants in the videoconference can see the lecturer's video in the main part ofthe screen, while a smaller image shows the most recent active speaker.
• Select Disconnect to disconnect the endpoint.
Figure 51: Managing the meeting
5. To stop moderating this meeting:
• From the endpoint, press ok/menu and select Participants > Stop Moderating.
• From the XT Series web interface, select Stop Moderating in the participants list, nextto Local.
--Or--
To end the videoconference, access the videoconference menu, and select Disconnect >End Meeting.
User Guide for Scopia XT4000 Series Version 3.2 During Your Videoconference | 69

Chapter 5 | Customizing Your UserExperience
This section explains how to configure your Scopia XT Series so that your user experience is optimal. For example,you can automatically block your video so that other participants cannot see you when you accept a call, or definehow you answer incoming calls.
All configurations described in this section are optional; you can perform them in any order and at any time.
Navigation
• Setting the User PIN Code for the Scopia XT Series on page 70
• Setting Call Answering Preferences on page 71
• Confirming Call Disconnections on page 72
• Enabling Do Not Disturb to Block All Incoming Calls on page 73
• Blocking Video Input by Default on page 75
• Activating the Screen Saver on page 76
Setting the User PIN Code for the Scopia XT Series
About this task
You can set a PIN code to access basic settings, such as the language displayed on the interface. If set,you are required to enter this code before viewing or modifying any basic settings. You can do thisprocedure from the endpoint itself or from the XT Series web interface.
By default, you do not need to enter any PIN to access and modify basic settings.
You can also modify the administrator PIN code, required to access and modify advanced settings, suchas defining camera settings. To modify the web username and password for the XT Series, seeAdministrator Guide for Scopia XT Series.
Before you begin
If configuring from the endpoint, you must first enable advanced configuration, as described inAdministrator Guide for Scopia XT Series.
To modify the PIN, you must be connected via HTTPS (see Administrator Guide for Scopia XT Series).
Procedure
1. Access the user PIN settings, as follows:
• From the endpoint's main menu, select Configure > Advanced > Utilities > PINProtect Settings > Basic Settings.
User Guide for Scopia XT4000 Series Version 3.2 Customizing Your User Experience | 70

You need to enter the PIN required to access the Advanced settings. The default PINis 1234.
• From the XT Series web interface, select Administrator Settings > Utilities > PINProtect Settings > Basic.
Figure 52: Modifying the user PIN
2. Set Enable to Yes.
3. If you previously set a user PIN, enter it in the Old PIN Code field.
4. Enter your new 4 digit PIN code.
From the web interface only, re-enter your new PIN in the Confirm PIN Code field.
5. Save your changes as follows:
• From the endpoint, select Done.
• From the web interface, select Save.
Use this new PIN the next time you are required access basic settings.
Setting Call Answering Preferences
About this task
This procedure describes how to define your preferences when receiving calls. By default, the endpointnever answers calls automatically. You can configure the system to, for example, always automaticallyanswer calls when you are available. If you enable automatic answering, you can define the number ofrings until the system automatically answers the call.
You can do this procedure from the endpoint itself or from the XT Series web interface.
Procedure
1. Access the call settings, as follows:
• From the XT Series web interface, select Basic Settings > Call-Answer Mode >General.
User Guide for Scopia XT4000 Series Version 3.2 Customizing Your User Experience | 71

• From the endpoint's main menu, select Configure > Calling.
Figure 53: Calling preferences
2. Select the required option from the Automatic answer list:
• Yes always: Enables automatic answer to an incoming call. The system will not promptyou to accept a call if the display shows the Home page.
• Never: Disables automatic answer to an incoming call. The system will always promptyou to accept a call.
• Yes if not in a call (available only for XT Series with a built-in MCU): Enablesautomatic answer only if the system is not in a call. If the system is in a call, it displays anotification about another incoming call, allowing you to accept it. When you are alreadyin a call and accept an incoming call, the built-in MCU is activated, adding the caller toa videoconference.
3. (Optional) Enter the number of rings in the Answer after (Rings) list to specify after howmany rings the system accepts a call. This option is relevant only if automatic answering isenabled.
4. From the web interface only, select Save.
Confirming Call Disconnections
About this task
To prevent accidental disconnection from a call, you can configure the system to confirm before a call isdisconnected. By default, calls are disconnected when a participant ends the call, without requiring aconfirmation.
User Guide for Scopia XT4000 Series Version 3.2 Customizing Your User Experience | 72

Procedure
1. Access the call settings, as follows:
• From the XT Series web interface, select Basic Settings > Call-Answer Mode >General.
• From the endpoint's main menu, select Configure > Calling.
Figure 54: Calling preferences
2. Set Confirm Disconnect to Yes.
3. From the web interface only, select Save.
Enabling Do Not Disturb to Block All Incoming Calls
About this task
If you do not want to answer incoming calls, you can configure the Scopia XT Series to block allincoming calls by enabling Do Not Disturb (DND).
When the Do Not Disturb feature is enabled:
• The system blocks notifications of incoming calls.
• The icon appears in the system information area of the monitor display.
• When a remote endpoint calls, the system informs it that you are unavailable and automaticallydisconnects the calling endpoint.
User Guide for Scopia XT4000 Series Version 3.2 Customizing Your User Experience | 73

Important:
You can also temporarily enable Do Not Disturb when receiving an incoming call. To enable, selectDo not disturb on the window which appears when your endpoint rings (Figure 55: Enabling Do NotDisturb on page 74). To disable, select Turn off Do not disturb from the endpoint's main menu andpress ok/menu.
Figure 55: Enabling Do Not Disturb
Procedure
1. Access the call settings, as follows:
• From the XT Series web interface, select Basic Settings > Call-Answer Mode >General.
• From the endpoint's main menu, select Configure > Calling.
User Guide for Scopia XT4000 Series Version 3.2 Customizing Your User Experience | 74

Figure 56: Calling preferences
2. Set Do Not Disturb to Yes.
3. From the web interface only, select Save.
Blocking Video Input by Default
About this task
You can configure the Scopia XT Series to transmit audio only by default at the start of each call. Youcan do this, for example, to ensure privacy. You can do this procedure from the endpoint itself or fromthe XT Series web interface.
When configured in this way, the system sends a pre-defined image to the remote endpoint. The icon appears on your display, indicating that the remote endpoint no longer receives video from yourlocal endpoint.
Alternatively, you can block video manually during a call, as described in Blocking Video From theScopia XT Series on page 50.
Procedure
1. Access the call settings, as follows:
• From the XT Series web interface, select Basic Settings > Call-Answer Mode >General.
• From the endpoint's main menu, select Configure > Calling.
User Guide for Scopia XT4000 Series Version 3.2 Customizing Your User Experience | 75
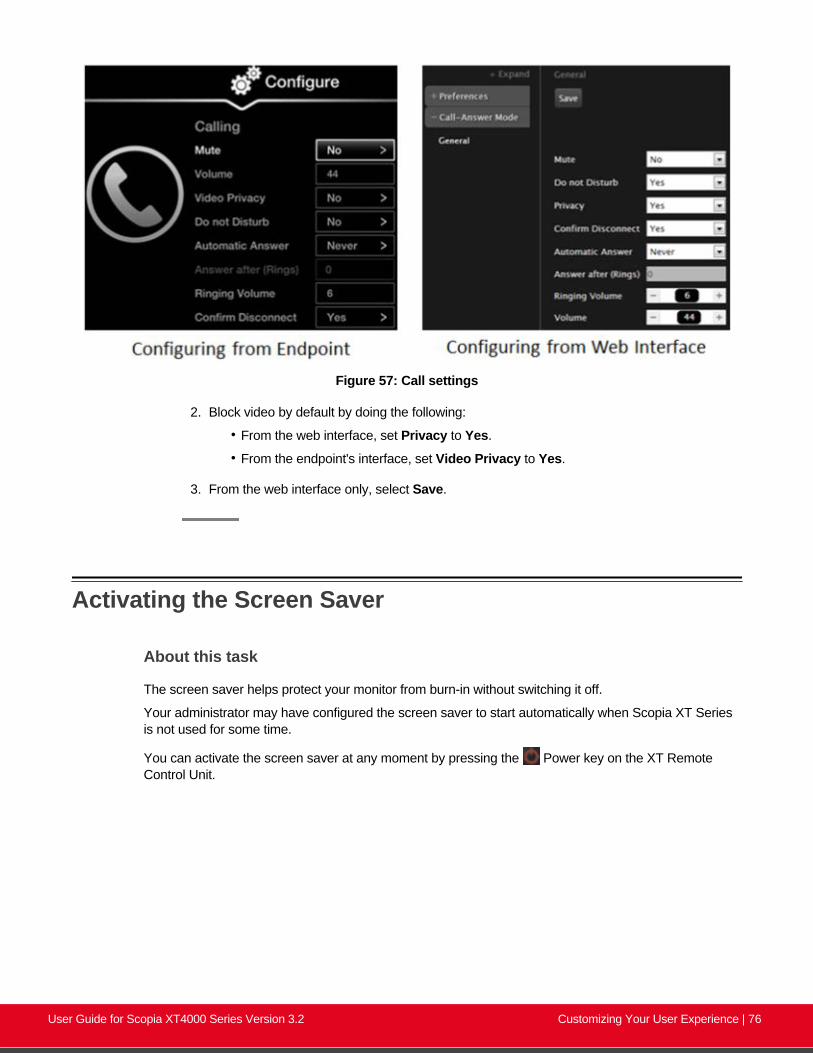
Figure 57: Call settings
2. Block video by default by doing the following:
• From the web interface, set Privacy to Yes.
• From the endpoint's interface, set Video Privacy to Yes.
3. From the web interface only, select Save.
Activating the Screen Saver
About this task
The screen saver helps protect your monitor from burn-in without switching it off.
Your administrator may have configured the screen saver to start automatically when Scopia XT Seriesis not used for some time.
You can activate the screen saver at any moment by pressing the Power key on the XT RemoteControl Unit.
User Guide for Scopia XT4000 Series Version 3.2 Customizing Your User Experience | 76

Chapter 6 | Troubleshooting the Scopia XTSeries
This section covers troubleshooting problems that may occur when setting up and using the Scopia XT Series.
Navigation
• Viewing System Information for Customer Support on page 77
• Resolving Monitor Display Problems on page 79
• Resolving Problems with PC Presentations on page 81
• Resolving XT Remote Control Unit Problems on page 81
• Restoring Default User Settings on page 81
• Resolving Video or Audio Disruptions on page 83
Viewing System Information for Customer Support
About this task
When contacting customer support or your system administrator, you may need to provide informationabout the system. This procedure describes how to view the following system information:
• Software version
• User code (MAC address)
• IP addresses
• Serial number
• System name and model
• Licenses
• Network, gatekeeper, and SIP settings
You can do this procedure from the endpoint itself or from the XT Series web interface.
Important:
The system serial number also appears on the label at the back of the XT Codec Unit.
Procedure
1. View system information as follows:
• From the XT Series web interface, log in. The system information is displayed in theHome tab.
User Guide for Scopia XT4000 Series Version 3.2 Troubleshooting the Scopia XT Series | 77

• From the endpoint's main menu, select Configure > About using the XT RemoteControl Unit.
Important:
If your system is currently in a call, press ok/menu and select Stats > Configure >About.
Figure 58: Viewing system information
2. To view additional system information such as IP addresses and the gatekeeper'sregistration status from the endpoint, press the Back key and select System Status.
User Guide for Scopia XT4000 Series Version 3.2 Troubleshooting the Scopia XT Series | 78

Figure 59: Viewing system network information
Resolving Monitor Display ProblemsProblem The system displays a flickering or blank screen.
Solution The rear panel of the XT Codec Unit features 2 HD outputs for connecting a main andauxiliary screen. For cabling, see the cabling diagram in the Quick Setup Guide.
Your system administrator must configure the system for correct video resolution.
When you are not in a call, you can set the refresh frequency of the monitor display:
• Set to 50 Hz by pressing then 5.• Set to 60 Hz by pressing then 6.
Problem The system displays a blank screen.
Solution Verify the power cord of the XT Codec Unit is connected properly at both ends.
Solution Verify the monitor’s power cord is connected properly at both ends.
Solution Check that the monitor power switch is set to ON.
Solution Verify the XT Codec Unit’s LED is on. If the LED is blinking, press the Power key on theXT Remote Control Unit.
User Guide for Scopia XT4000 Series Version 3.2 Troubleshooting the Scopia XT Series | 79

Solution Make sure the XT Codec Unit output is properly connected to the monitor input. Make surethe monitor/DVI cable is connected properly at both ends.
Problem The screen layout appears to be cropped.
Solution Configure the monitor layout as described below.
1. From the endpoint's main menu, select Configure > Quick Setup.
2. Select Next to navigate to the Configure Monitor page.
3. Follow the instructions on the screen to adjust the image.
If necessary, refer to Adjusting the Image Position on page 24 for operationalinformation.
Problem The system menus or the remote presentation appears to be cropped.
Solution Adjust the way the image appears on the monitor. To see your adjustments in real-time, werecommend performing this procedure from the endpoint itself.
If configuring from the endpoint, you must first enable advanced configuration, as describedin Administrator Guide for Scopia XT Series.
1. Access the monitor settings as follows:
• From the endpoint's main menu, select Configure > Advanced > I/O connections> Monitor > Graphic Adjustments.
• From the XT Series web interface, select Administrator settings > I/Oconnections > Monitor > Graphic Adjustments.
2. Navigate to the monitor requiring adjustment (Monitor HD1 or Monitor HD2).
3. Select your preferred image view mode:
Table 13: Adjustment options for the monitor
Option DescriptionAdjustment Mode Select to adjust where the windows are displayed
on the monitor:
• Menu: Select to adjust the system menusonly.
• Menu, presentation (default): Select toadjust both the system menu andpresentation, local or received.
Top Drag the sliders to the required sizes until themenu or presentation borders are visible on themonitor.
Important:
You can also adjust the image for the monitordisplaying the system menu, in the quick setupwizard as described in Adjusting the ImagePosition on page 24.
LeftBottomRight
4. From the web interface only, select Save.
User Guide for Scopia XT4000 Series Version 3.2 Troubleshooting the Scopia XT Series | 80
Resolving Problems with PC PresentationsProblem I cannot send a presentation from my PC.
Solution Make sure the VGA/DVI cable is properly connected between the PC and the XT Codec Unit,as described in Connecting a Computer to the Scopia XT Series on page 61.
Solution Make sure the resolution of the PC output is supported by the XT Codec Unit (see Selectingthe Computer Display Resolution on page 63).
Resolving XT Remote Control Unit ProblemsProblem The XT Remote Control Unit does not function.
Solution Replace the battery, as described in Scopia XT Series Installation Guide. When the XTRemote Control Unit's battery power is low, an icon appears in the system menus letting youknow that you should replace the battery:
• Half-charged Battery
• Low Battery
Solution If the battery power is not low, configure the XT Remote Control Unit code on the XT CodecUnit to the same number that it is set on the XT Remote Control Unit, as described in Pairingan XT Remote Control Unit with a XT Codec Unit on page 19).
Solution If you still experience problems, reconfigure the XT Remote Control Unit code to be anumber between 01-04, inclusive.
Restoring Default User Settings
About this task
This procedure explains how to restore the default settings if necessary. You can do this from theendpoint itself only.
Before you begin
• Turn on the Scopia XT Series unit.
• Verify that you have the four-digit PIN code required to make changes to the system settings. Thedefault PIN code is 1234.
User Guide for Scopia XT4000 Series Version 3.2 Troubleshooting the Scopia XT Series | 81
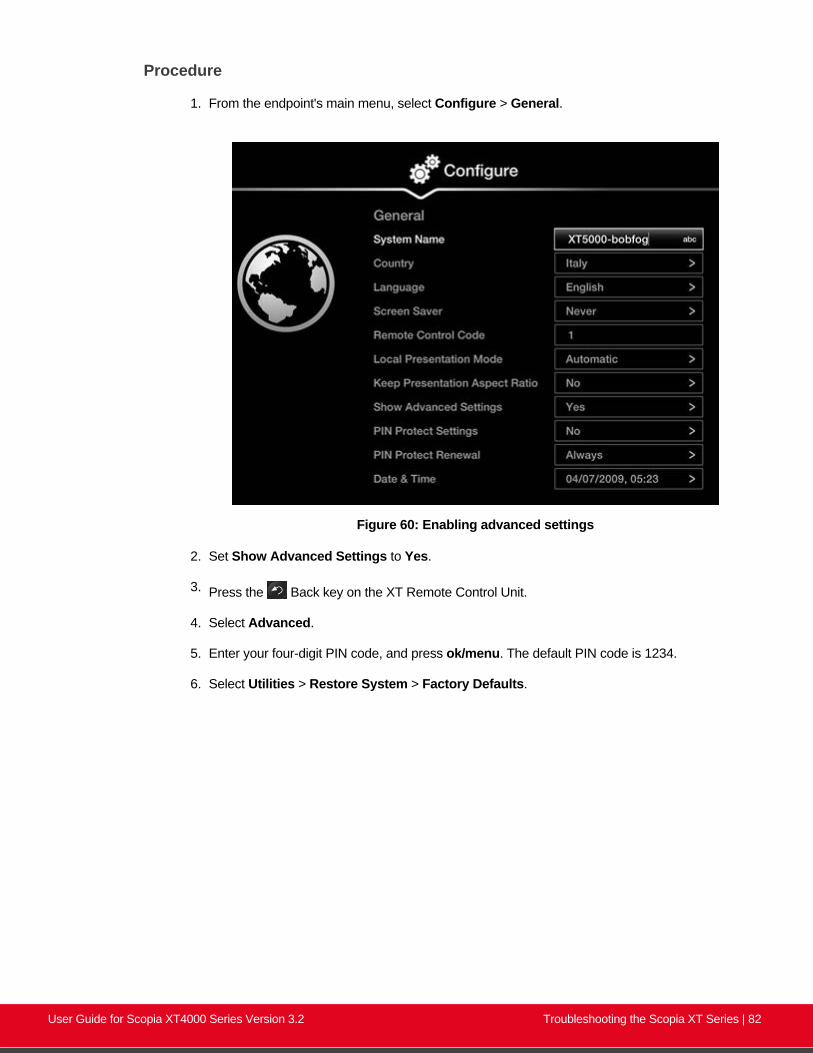
Procedure
1. From the endpoint's main menu, select Configure > General.
Figure 60: Enabling advanced settings
2. Set Show Advanced Settings to Yes.
3. Press the Back key on the XT Remote Control Unit.
4. Select Advanced.
5. Enter your four-digit PIN code, and press ok/menu. The default PIN code is 1234.
6. Select Utilities > Restore System > Factory Defaults.
User Guide for Scopia XT4000 Series Version 3.2 Troubleshooting the Scopia XT Series | 82
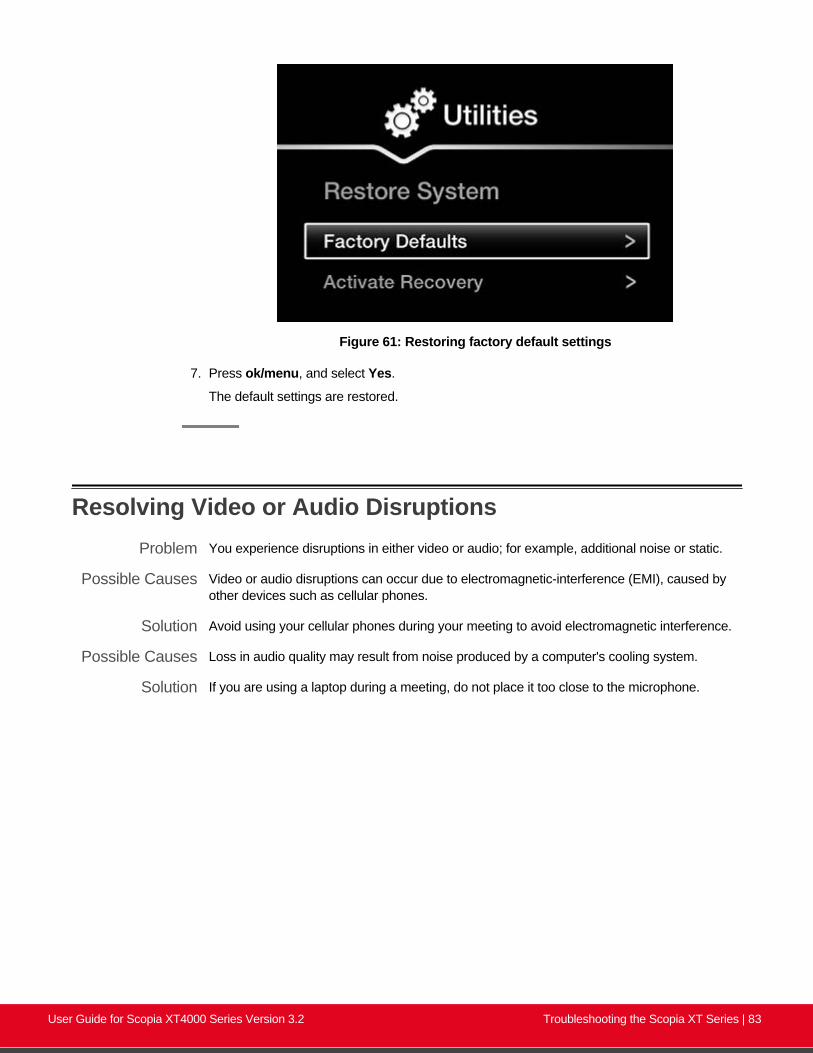
Figure 61: Restoring factory default settings
7. Press ok/menu, and select Yes.
The default settings are restored.
Resolving Video or Audio DisruptionsProblem You experience disruptions in either video or audio; for example, additional noise or static.
Possible Causes Video or audio disruptions can occur due to electromagnetic-interference (EMI), caused byother devices such as cellular phones.
Solution Avoid using your cellular phones during your meeting to avoid electromagnetic interference.
Possible Causes Loss in audio quality may result from noise produced by a computer's cooling system.
Solution If you are using a laptop during a meeting, do not place it too close to the microphone.
User Guide for Scopia XT4000 Series Version 3.2 Troubleshooting the Scopia XT Series | 83

Glossary of Terms for Scopia Solution
1080p
See Full HD on page 88.
2CIF
2CIF describes a video resolution of 704 x 288 pixels (PAL) or 704 x 240 (NTSC). It is double the widthof CIF, and is often found in CCTV products.
2SIF
2SIF describes a video resolution of 704 x 240 pixels (NTSC) or 704 x 288 (PAL). This is often adoptedin IP security cameras.
4CIF
4CIF describes a video resolution of 704 x 576 pixels (PAL) or 704 x 480 (NTSC). It is four times theresolution of CIF and is most widespread as the standard analog TV resolution.
4SIF
4SIF describes a video resolution of 704 x 480 pixels (NTSC) or 704 x 576 (PAL). This is often adoptedin IP security cameras.
720p
See HD on page 91.
AAC
AAC is an audio codec which compresses sound but with better results than MP3.
Alias
In H.323, an alias represents the unique name of an endpoint. Instead of dialling an IP address to reachan endpoint, you can dial an alias, and the gatekeeper resolves it to an IP address.
User Guide for Scopia XT4000 Series Version 3.2 Glossary of Terms for Scopia Solution | 84

Auto-Attendant
Auto-Attendant, also known as video IVR, offers quick access to meetings hosted on MCUs, via a set ofvisual menus. Participants can select menu options using standard DTMF tones (numeric keypad).
BFCP (Binary Floor Control Protocol)
BFCP is a protocol which coordinates shared videoconference features in SIP calls, often used by oneparticipant at a time. For example, when sharing content to others in the meeting, one participant isdesignated as the presenter, and is granted the floor for presenting. All endpoints must be aware that thefloor was granted to that participant and react appropriately.
Bitrate
Bitrate measures the speed of data flow, measured in kbps. Higher video resolutions require higherbitrates to ensure the video is constantly updated, thereby maintaining smooth motion. If you lower thebitrate, you lower the quality of the video. In some cases, you can select a lower bitrate without noticinga significant drop in video quality; for example during a presentation or when a lecturer is speaking andthere is very little motion. In video recordings, the bitrate determines the file size for each minute ofrecording.
Call Control
See Signaling on page 96.
Cascaded Videoconference
A cascaded videoconference is a meeting distributed over more than one physical MCU, where a masterMCU connects to one or more slave MCUs to create a single videoconference. It increases the meetingcapacity by combining the resources of several MCUs. This can be especially useful for distributeddeployments across several locations, reducing bandwidth usage.
CIF
CIF, or Common Intermediate Format, describes a video resolution of 352 × 288 pixels (PAL) or 352 x240 (NTSC). This is sometimes referred to as Standard Definition (SD).
Continuous Presence
Continuous Presence enables viewing multiple participants of a videoconference at the same time,including the active speaker. This graphics-intensive work requires scaling and mixing the imagestogether into one of the predefined video layouts. The range of video layouts depends on the type ofmedia processing supported, typically located in the MCU.
User Guide for Scopia XT4000 Series Version 3.2 Glossary of Terms for Scopia Solution | 85
Control
Control, or media control, is the set of messages used to setup and manage the media of a call (audio,video and data). Control messages include checking compatibility between endpoints, negotiating videoand audio codecs, and other parameters like resolution, bitrate and frame rate. Control is communicatedvia H.245 in H.323 endpoints, or by SDP in SIP endpoints. Control occurs within the framework of anestablished call, after signaling.
CP
See Continuous Presence on page 85.
Dedicated Endpoint
A dedicated endpoint is a hardware endpoint for videoconferencing assigned to a single user. It is oftenreferred to as a personal or executive endpoint, and serves as the main means of video communicationsfor this user. For example, Scopia XT Executive. It is listed in the organization's LDAP directory asassociated exclusively with this user.
Dial Plan
A dial plan defines various dial prefixes to determine the characteristics of a call. For example, dial 8before a number for a lower bandwidth call, or 6 for an audio-only call, or 5 to route the call to a differentbranch.
Dial Prefix
A dial prefix is a number added to the start of a dial string to route it to the correct destination, or todetermine the type of call. Dial prefixes are defined in the organization's dial plan. For example, dial 9 foran outside line, or dial 6 for an audio only call.
Distributed Deployment
A distributed deployment describes a deployment where the solution components are geographicallydistributed in more than one network location.
DNS Server
A DNS server is responsible for resolving domain names in your network by translating them into IPaddresses.
User Guide for Scopia XT4000 Series Version 3.2 Glossary of Terms for Scopia Solution | 86
DTMF
DTMF, or touch-tone dialling, is the tones you hear when you dial on a touch-tone telephone.
Dual Video
Dual video is the transmitting of two video streams during a videoconference, one with the live videowhile the other is a shared data stream, like a presentation.
E.164
E.164 is an address format for dialling an endpoint with a standard telephone numeric keypad, whichonly has numbers 0 - 9 and the symbols: * and #.
Endpoint
An endpoint is a tool through which people can participate in a videoconference. Its display enables youto see and hear others in the meeting, while its microphone and camera enable you to be seen andheard by others. Endpoints include dedicated endpoints, like Scopia XT Executive, software endpointslike Scopia Desktop Client, mobile device endpoints like Scopia Mobile, room systems like XT Series,and telepresence systems like Scopia XT Telepresence.
Endpoint Alias
See Alias on page 84.
FEC
Forward Error Correction (FEC) is a proactive method of sending redundant information in the videostream to preempt quality degradation. FEC identifies the key frames in the video stream that should beprotected by FEC. There are several variants of the FEC algorithm. The Reed-Solomon algorithm (FEC-RS) sends redundant packets per block of information, enabling the sender (like the Scopia Elite MCU)to manage up to ten percent packet loss in the video stream with minimal impact on the smoothness andquality of the video.
FECC
Far End Camera Control (FECC) is a feature of endpoints, where the camera can be controlled remotelyby another endpoint in the call.
Forward Error Correction
See FEC on page 87.
User Guide for Scopia XT4000 Series Version 3.2 Glossary of Terms for Scopia Solution | 87
FPS
See Frames Per Second on page 88.
Frame Rate
See Frames Per Second on page 88.
Frames Per Second
Frames Per Second (fps), also known as the frame rate, is a key measure in video quality, describingthe number of image updates per second. The average human eye can register up to 50 frames persecond. The higher the frame rate, the smoother the video.
Full HD
Full HD, or Full High Definition, also known as 1080p, describes a video resolution of 1920 x 1080pixels.
Full screen Video Layout
The full screen view shows one video image. Typically, it displays the remote presentation, or, if there isno presentation, it displays the other participant or a composite of the other participants.
Gatekeeper
A gatekeeper routes audio and video H.323 calls by resolving dial strings (H.323 alias or URI) into the IPaddress of an endpoint, and handles the initial connection of calls. Gatekeepers also implement the dialplan of an organization by routing H.323 calls depending on their dial prefixes. Scopia Managementincludes a built-in Scopia Gatekeeper, while ECS is a standalone gatekeeper.
Gateway
A gateway is a component in a video solution which routes information between two subnets or acts as atranslator between different protocols. For example, a gateway can route data between the headquartersand a partner site, or between two protocols like the Scopia TIP Gateway, Radvision SIP Gateway, orthe Scopia TIP Gateway.
GLAN
GLAN, or gigabit LAN, is the name of the network port on the Scopia XT Series. It is used on the XTSeries to identify a 10/100/1000MBit ethernet port.
User Guide for Scopia XT4000 Series Version 3.2 Glossary of Terms for Scopia Solution | 88

H.225
H.225 is part of the set of H.323 protocols. It defines the messages and procedures used bygatekeepers to set up calls.
H.235
H.235 is the protocol used to authenticate trusted H.323 endpoints and encrypt the media stream duringmeetings.
H.239
H.239 is a widespread protocol used with H.323 endpoints, to define the additional media channel fordata sharing (like presentations) alongside the videoconference, and ensures only one presenter at atime.
H.243
H.243 is the protocol used with H.323 endpoints enabling them to remotely manage a videoconference.
H.245
H.245 is the protocol used to negotiate call parameters between endpoints, and can control a remoteendpoint from your local endpoint. It is part of the H.323 set of protocols.
H.261
H.261 is an older protocol used to compress CIF and QCIF video resolutions.
H.263
H.263 is an older a protocol used to compress video. It is an enhancement to the H.261 protocol.
H.264
H.264 is a widespread protocol used with SIP and H.323 endpoints, which defines video compression.Compression algorithms include 4x4 transforms and a basic motion comparison algorithm called P-slices. There are several profiles within H.264. The default profile is the H.264 Baseline Profile, butH.264 High Profile uses more sophisticated compression techniques.
User Guide for Scopia XT4000 Series Version 3.2 Glossary of Terms for Scopia Solution | 89

H.264 Baseline Profile
See H.264 on page 89.
H.264 High Profile
H.264 High Profile is a standard for compressing video by up to 25% over the H.264 Baseline Profile,enabling high definition calls to be held over lower call speeds. It requires both sides of the transmission(sending and receiving endpoints) support this protocol. H.264 High Profile uses compression algorithmslike:
• CABAC compression (Context-Based Adaptive Binary Arithmetic Coding)
• 8x8 transforms which more effectively compress images containing areas of high correlation
These compression algorithms demand higher computation requirements, which are offered with thededicated hardware available in Scopia Solution components. Using H.264 High Profile invideoconferencing requires that both the sender and receiver's endpoints support it. This is different fromSVC which is an adaptive technology working to improve quality even when only one side supports thestandard.
H.320
H.320 is a protocol for defining videoconferencing over ISDN networks.
H.323
H.323 is a widespread set of protocols governing the communication between endpoints invideoconferences and point-to-point calls. It defines the call signaling, control, media flow, andbandwidth regulation.
H.323 Alias
See Alias on page 84.
H.324M
H.324M is the videoconferencing standard for endpoints connecting via 3G mobile networks. ScopiaMobile, however, uses the same protocols as Scopia Desktop Client.
H.350
H.350 is the protocol used to enhance LDAP user databases to add video endpoint information for usersand groups.
User Guide for Scopia XT4000 Series Version 3.2 Glossary of Terms for Scopia Solution | 90

HD
A HD ready device describes its high definition resolution capabilities of 720p, a video resolution of 1280x 720 pixels.
High Availability
Deploying additional servers ensures better service by protecting your organization from serverdowntime through various strategies including deployment of redundant servers managed by loadbalancing systems.
High Definition
See HD on page 91.
High Profile
See H.264 High Profile on page 90.
HTTPS
HTTPS is the secured version of the standard web browser protocol HTTP. It secures communicationbetween a web browser and a web server through authentication of the web site and encryptingcommunication between them. For example, you can use HTTPS to secure web browser access to theweb interface of many Scopia Solution products.
Image Resolution
See Resolution on page 95.
kbps
Kilobits per second (kbps) is the standard unit to measure bitrate, measuring the throughput of datacommunication between two devices. Since this counts the number of individual bits (ones or zeros), youmust divide by eight to calculate the number of KB (kilobytes) per second.
LDAP
LDAP is a widespread standard database format which stores network users. The format is hierarchical,where nodes are often represented as branch location > department > sub-department, or executives >managers > staff members. The database standard is employed by most user directories includingMicrosoft Active Directory, IBM Sametime and others. H.350 is an extension to the LDAP standard forthe videoconferencing industry.
User Guide for Scopia XT4000 Series Version 3.2 Glossary of Terms for Scopia Solution | 91
Lecture Mode
Scopia Desktop's lecture mode allows the participant defined as the lecturer to see all the participants,while they see only the lecturer. All participants are muted except the lecturer, unless a participant askspermission to speak and is unmuted by the lecturer. This mode is tailored for distance learning, but youcan also use it for other purposes like when an executive addresses employees during company-widegatherings.
Load balancer
A load balancer groups together a set (or cluster) of servers to give them a single IP address, known asa virtual IP address. It distributes client service requests amongst a group of servers. It distributes loadsaccording to different criteria such as bandwidth, CPU usage, or cyclic (round robin). Load balancers arealso known as application delivery controllers (ADC).
Location
A location is a physical space (building) or a network (subnet) where video devices can share a singleset of addresses. A distributed deployment places these components in different locations, oftenconnected via a VPN.
Management
Management refers to the administration messages sent between components of the Scopia Solution asthey manage and synchronize data between them. Management also includes front-end web browsersinterfaces sending server settings to the back-end server.
MCU
An MCU, or Multipoint Control Unit, connects multiple endpoints into a single videoconference. Ittypically manages the audio mixing and video layouts, adjusting the output to suit each endpoint'scapabilities.
MCU service
See Meeting Type on page 93.
Media
Media refers to the audio, video and data real time streams sent during a call. Besides the live audio andvideo streams, you can also send a shared data stream, like a presentation, also known as dual video.Far end camera control (FECC) is another example of information carried on the data stream. Media istransmitted via the RTP and RTCP protocols in both SIP and H.323 calls.
User Guide for Scopia XT4000 Series Version 3.2 Glossary of Terms for Scopia Solution | 92
Media Control
See Control on page 86.
Meeting Type
Meeting types (also known as MCU services) are meeting templates which determine the corecharacteristics of a meeting. For example, they determine if the meeting is audio only or audio andvideo, they determine the default video layout, the type of encryption, PIN protection and many otherfeatures. Meeting types are created in the MCU. You can invoke a meeting type by dialing its prefix infront of the meeting ID.
Moderator
A moderator is a participant with special rights in a videoconference, including muting the sound andvideo of other participants, inviting new participants, disconnecting participants, defining a meeting PINto restrict access, determining video layouts, and closing meetings. In Scopia Desktop Client, an ownerof a virtual room is the moderator when the room is protected by a PIN. Without this protection, anyparticipant can assume moderator rights.
MTU
The MTU, or Maximum Transmission Unit, is the maximum size of data packets sent around yournetwork. This value must remain consistent for all network components, including servers like the MCUand Scopia Desktop Server, endpoints like XT Series and other network devices like LDAP servers andnetwork routers.
Multi-Point
A multi-point conference has more than two participants.
Multi-tenant
Service provider, or multi-tenant, deployments enable one installation to manage multiple organizations.All the organizations can reside as tenants within a single service provider deployment. For example,Scopia Management can manage a separate set of users for each organization, separate localadministrators, separate bandwidth policies etc. all within a single multi-tenant installation.
NAT
A NAT, or Network Address Translation device, translates external IP addresses to internal addresseshoused in a private network. This enables a collection of devices like endpoints in a private network,each with their own internal IP address, can be represented publicly by a single, unique IP address. TheNAT translates between public and private addresses, enabling users toplace calls between publicnetwork users and private network users.
User Guide for Scopia XT4000 Series Version 3.2 Glossary of Terms for Scopia Solution | 93

NetSense
NetSense is a proprietary Radvision technology which optimizes the video quality according to theavailable bandwidth to minimize packet loss. As the available bandwidth of a connection variesdepending on data traffic, NetSense's sophisticated algorithm dynamically scans the video stream, andthen reduces or improves the video resolution to maximize quality with the available bandwidth.
Packet Loss
Packet loss occurs when some of the data transmitted from one endpoint is not received by the otherendpoint. This can be caused by narrow bandwidth connections or unreliable signal reception onwireless networks.
PaP Video Layout
The PaP (Picture and Picture) view shows two images of the same size, presented side by side.
PiP Video Layout
The PiP (Picture In Picture) view shows a video image in the main screen, with an additional smallerimage overlapping in the corner. Typically, a remote presentation is displayed in the main part of thescreen, and the remote video is in the small image. If the remote endpoint does not show any content,the display shows the remote video in the main part of the screen, and the local presentation in the smallimage.
Point-to-Point
Point-to-point is a feature where only two endpoints are communicating with each other.
PoP Video Layout
The PoP (Picture out Picture) view shows up to three images of different size, presented side by side.The image on the left is larger, with two smaller images on the right.
Prefix
See Dial Prefix on page 86.
Q.931
Q.931 is a telephony protocol used to start and end the connection in H.323 calls.
User Guide for Scopia XT4000 Series Version 3.2 Glossary of Terms for Scopia Solution | 94

QCIF
QCIF, or Quarter CIF, defines a video resolution of 176 × 144 pixels (PAL) or 176 x 120 (NTSC). It isoften used in older mobile handsets (3G-324M) limited by screen resolution and processing power.
Redundancy
Redundancy is a way to deploy a network component, in which you deploy extra units as 'spares', to beused as backups in case one of the components fails.
Registrar
A SIP Registrar manages the SIP domain by requiring that all SIP devices register their IP addresseswith it. For example, once a SIP endpoint registers its IP address with the Registrar, it can place orreceive calls with other registered endpoints.
Resolution
Resolution, or image/video resolution, is the number of pixels which make up an image frame in thevideo, measured as the number of horizontal pixels x the number of vertical pixels. Increasing resolutionimproves video quality but typically requires higher bandwidth and more computing power. Techniqueslike SVC, H.264 High Profile and FEC reduce bandwidth usage by compressing the data to a smallerfootprint and compensating for packet loss.
Room System
A room system is a hardware videoconferencing endpoint installed in a physical conference room.Essential features include its camera's ability to PTZ (pan, tilt, zoom) to allow maximum flexibility ofcamera angles enabling participants to see all those in the meeting room or just one part of the room.
RTP
RTP or Real-time Transport Protocol is a network protocol which supports video and voice transmissionover IP. It underpins most videoconferencing protocols today, including H.323, SIP and the streamingcontrol protocol known as RTSP. The secured version of RTP is SRTP.
RTCP
Real-time Control Transport Protocol, used alongside RTP for sending statistical information about themedia sent over RTP.
User Guide for Scopia XT4000 Series Version 3.2 Glossary of Terms for Scopia Solution | 95

RTSP
RTSP or Real-Time Streaming Protocol controls the delivery of streamed live or playback video over IP,with functions like pause, fast forward and reverse. While the media itself is sent via RTP, these controlfunctions are managed by RTSP
Sampling Rate
The sampling rate is a measure of the accuracy of the audio when it is digitized. During conversionsfrom analog to digital sound, if you increase the frequency that audio data is collected, or "sampled", youincrease the audio quality.
SBC
A Session Border Controller (SBC) is a relay device between two different networks. It can be used infirewall/NAT traversal, protocol translations and load balancing.
Scalability
Scalability describes the ability to increase the capacity of a network device by adding another identicaldevice (one or more) to your existing deployment. In contrast, a non-scalable solution would requirereplacing existing components to increase capacity.
SD
Standard Definition (SD), is a term used to refer to video resolutions which are lower than HD. There isno consensus defining one video resolution for SD.
Service
Also known as MCU service. See Meeting Type on page 93.
SIF
SIF defines a video resolution of 352 x 240 pixels (NTSC) or 352 x 288 (PAL). This is often used insecurity cameras and countries.
Signaling
Signaling, also known as call control, is the set of messages used to setup, manage and end a call. Theyinclude the authorization to make the call, checking bandwidth, resolving endpoint addresses, androuting the call through different servers. Signaling is transmitted via the H.225.0/Q.931 and
User Guide for Scopia XT4000 Series Version 3.2 Glossary of Terms for Scopia Solution | 96
H.225.0/RAS protocols in H.323 calls, or by the SIP headers in SIP calls. Signaling occurs before thecontrol aspect of call setup.
SIP
Session Initiation Protocol (SIP) is a signaling protocol for starting, managing and ending voice andvideo sessions over TCP, TLS or UDP. Videoconferencing endpoints typically are compatible with SIP orH.323, and in some cases (like Scopia XT Series), an endpoint can be compatible with both protocols.As a protocol, it uses fewer resources than H.323.
SIP Server
A SIP server is a network device communicating via the SIP protocol.
SIP URI
See URI on page 99.
SIP Registrar
See Registrar on page 95.
Single Sign On
Single Sign On (SSO) automatically uses your network login and password to access different enterprisesystems. Using SSO, you do not need to separately login to each system or service in your organization.
SNMP
Simple Network Management Protocol (SNMP) is a protocol used to monitor network devices bysending messages and alerts to their registered SNMP server.
Software endpoint
A software endpoint turns a computer or portable device into a videoconferencing endpoint via asoftware application only. It uses the system's camera and microphone to send image and sound to theother participants, and displays their images on the screen. For example, Scopia Desktop Client orScopia Mobile.
User Guide for Scopia XT4000 Series Version 3.2 Glossary of Terms for Scopia Solution | 97

SRTP
Secure Real-time Transport Protocol (SRTP) adds security to the standard RTP protocol, which is usedto send video and audio data between devices in SIP calls using TLS. It offers security via encrypting,authenticating and ensuring message integrity.
SSO
See Single Sign On on page 97.
Standard Definition
See SD on page 96.
Streaming
Streaming is a method of delivering multimedia content in one direction. Streaming recipients cannot notuse a microphone or camera to communicate back to the videoconference. The content can be a livevideoconference, or it can be a stored recording.
STUN
A STUN server enables you to directly dial an endpoint behind a NAT or firewall by giving thatcomputer’s public internet address.
SVC
SVC extends the H.264 codec standard to dramatically increases error resiliency and video qualitywithout the need for higher bandwidth. It is especially effective over networks with high packet loss (likewireless networks) which deliver low quality video. It splits the video stream into layers, comprising asmall base layer and then additional layers on top which enhance resolution, frame rate and quality.Each additional layer is only transmitted when bandwidth permits. This allows for a steady videotransmission when available bandwidth varies, providing better quality when the bandwidth is high, andadequate quality when available bandwidth is poor.
SVGA
SVGA defines a video resolution of 800 x 600 pixels.
SQCIF
SQCIF defines a video resolution of 128 x 96 pixels.
User Guide for Scopia XT4000 Series Version 3.2 Glossary of Terms for Scopia Solution | 98

Switched video
Switching is the process of redirecting video as-is without transcoding, so you see only one endpoint'simage at a time, usually the active speaker, without any video layouts or continuous presence (CP).Using video switching increases the port capacity of the MCU by four times.
Important:
Use switched video only when all endpoints participating in the videoconference support the sameresolution. If a network experiences high packet loss, switched video might not be displayed properlyfor all endpoints in the videoconference.
SXGA
SXGA defines a video resolution of 1280 x 1024 pixels.
Telepresence
A telepresence system combines of two or more endpoints together to create a wider image, simulatingthe experience of participants being present in the same room. For example, Scopia XT Telepresence.
TLS
TLS enables network devices to communicate securely by exchanging certificates, to provideauthentication of the devices and encryption of the communication between them.
Transcoding
Transcoding is the process of converting video into different sizes, resolutions or formats. This enablesmultiple video streams to be combined into one view, enabling continuous presence, as in a typicalvideoconferencing window.
UC (Unified Communications)
UC, or unified communications deployments offer solutions covering a wide range of communicationchannels. These include audio (voice), video, text (IM or chat), data sharing (presentations), whiteboardsharing (interactive annotations on shared data).
URI
URI is an address format to locate a device on a network. For a SIP call, the URI consists of theendpoint's name or number, followed by the SIP server domain name. For example, <endpointname>@<SIP server domain name> or user@domain_name.com.
User Guide for Scopia XT4000 Series Version 3.2 Glossary of Terms for Scopia Solution | 99

URI Dialling
Accessing a device via its URI on page 99.
VFU
See Video Fast Update (VFU) on page 100.
VGA
VGA defines a video resolution of 640 x 480 pixels.
Videoconference
A videoconference is a meeting of more than two participants with audio and video using endpoints.Professional videoconferencing systems can handle many participants in single meetings, and multiplesimultaneous meetings, with a wide interoperability score to enable a wide variety of endpoints to jointhe same videoconference. Typically you can also share PC content, like presentations, to otherparticipants.
Video Fast Update (VFU)
Video Fast Update (VFU) is a request for a refreshed video frame, sent when the received video iscorrupted by packet loss. In response to a VFU request, the broadcasting endpoint sends a new intra-frame to serve as the baseline for the ongoing video stream.
Video Layout
A video layout is the arrangement of participant images as they appear on the monitor in avideoconference. If the meeting includes a presentation, a layout can also refer to the arrangement ofthe presentation image together with the meeting participants.
Video Resolution
See Resolution on page 95.
Video Switching
See Switched video on page 99.
Virtual Room
A virtual room in Scopia Desktop and Scopia Mobile offers a virtual meeting place for videoconferences.An administrator can assign a virtual room to the organization's users and conference rooms. Users can
User Guide for Scopia XT4000 Series Version 3.2 Glossary of Terms for Scopia Solution | 100

send invitations to others with a link bringing participants directly into their virtual room. Externalparticipants can download Scopia Desktop or Scopia Mobile free to access a registered user's virtualroom and participate in the videoconference.
Waiting Room
A waiting room is a holding place for participants waiting for the host or moderator to join the meeting.While waiting, participants see a static image with the name of the owner's virtual room, with an optionalaudio message periodically saying the meeting will start when the host arrives.
Webcast
A webcast is a streamed live broadcast of a videoconference over the internet. A Scopia Desktopwebcast becomes available when a participant in the videoconference enables the streaming feature. Toinvite users to the webcast, one of the participants attending the Scopia Desktop videoconference mustsend this information in an e-mail or an instant message:
• The link to the webcast
or
• The link to the Scopia Desktop portal and the meeting ID
WUXGA
WUXGA defines a video resolution of 1920 x 1200 pixels.
XGA
XGA defines a Video resolution of 1024 x 768 pixels.
Zone
Gatekeepers like Scopia ECS Gatekeeper split endpoints into zones, where a group of endpoints in azone are registered to a gatekeeper. Often a zone is assigned a dial prefix, and usually corresponds to aphysical location like an organization's department or branch.
User Guide for Scopia XT4000 Series Version 3.2 Glossary of Terms for Scopia Solution | 101

About RadvisionRadvision, an Avaya company, is a leading provider of videoconferencing andtelepresence technologies over IP and wireless networks. We offer end-to-endvisual communications that help businesses collaborate more efficiently.Together, Radvision and Avaya are propelling the unified communicationsevolution forward with unique technologies that harness the power of video,voice, and data over any network.www.radvision.com