simple steps to hair braiding steps to hair braiding is a guide designed to teach you how to create...
TRANSCRIPT

1
Simple Steps to Hair Braiding

2
Other titles by Bukola Oriola
IMPRISONED: The Travails of a Trafficked Victim
Bukola Braiding Photo Book

3
Simple Steps to Hair Braiding
BUKOLA ORIOLA

4
All rights reserved. This document cannot be published or used in any other form, in
whole or part without written permission from the publisher.
Simple Steps to Hair Braiding
Printed in the United States
© 2011 by Bukola Oriola
Bukola Publishing (Bukola Braiding & Beauty Supply)
1628 County Highway 10 #210
Spring Lake Park MN 55432
763-433-9454
www.bukolabraiding.com
Email: [email protected]

5
CONTENTS
Introduction……………………………………………………………………….7
History of Hair Braiding…………………………………………………………..9
Hair Braiding Tools……………………………………………………………….11
Single & Micro Braids.……………………………………………………………13
Cornrows…………………………………………………………………………..17
Weave……………………………………………………………...........................21
Twist………………………………………………………………….....................29
About the Author………………………………………………………………….33
Reference & Resources…………………………………………………………...35

6

7
INTRODUCTION
Simple Steps to Hair braiding is a guide designed to teach you how to create painless,
simple, braiding styles. It reveals the various steps involved in natural hair braiding
with extensions. You would also be able acquire the technique to braid extensions into
natural (virgin) or processed hair in a professional but simple way.
The skill of braiding without pain is essential to successful hair braiding both for the
braider and the person you are braiding for.
To create braid without pain, therefore, you have to hold the hair firmly rather than
tightly. As a beginner, your braiding might not be smooth, do not worry but keep
braiding without holding too tight. As you continue to practice, you would perfect
your braiding skill. Tight braids hurt and could result in tension, causing little bump
all over head or in the tight areas.

8
It is also important to braid with hair cream or grease. It is both soothing and healthy
for the scalp. The four beginner styles, including single braids, cornrows, weaves and
kinky twist are the main focus of this guide.

9
HISTORY OF HAIR BRAIDING
Hair braiding can be traced back to as far as 3500 BC. It was an art practiced among
people to adorn themselves either as a regular hair style or for special occasion such as
wedding, naming ceremony and so on. In fact, braids are worn by some regions as a
tribal identification. Hair braiding is time consuming. It gives women the opportunity
to socialize while having their hair braided. Some styles such as Micro braids could
take up to seven hours or more. Men have also been found braiding their hair. Some
men wear braids for war or religious purpose. In the book, Braiding & Knotting:
techniques and projects, Constatine A. Belash noted, “in the periods when men wore
their hair long, they seem to have taken great pride in their braids and curls…” Hair
braiding has since been improving with the creation of various modern styles.
Whatever the occasion, there is a style for it, even for a formal place like the
professional place of work.
Even though, hair braiding is a major part of the African woman's life style, it has
gradually become a style worn by other races such as Asians, Indians, Caucasians and

10
so on. That shows the extent to which hair braiding has been accepted and explored by
various cultures.
There are various names, however, for different braiding styles. These names vary
from country to country and region to region. For example, cornrows in the American
context are known as weaving in some West African countries. The weaves for
American is known as “fixing” for some Africans. The “Pen brai” is another example
where Nigerians refer to it as “Ghana weaving” while the Kenyans know it as “Abuja”
braids. The Americans on the other hand refer to the same style as “No-Knot”
cornrow. Tree braids for the Americans is known as “fish bourne” for the Nigerians.
The Zambians call it “fish.” The same goes for various other styles by giving different
names for the same style depending on the region.
The first three basic styles to learn are Cornrows, Weaves and Single braids. Once
these styles are mastered, it would be easy to create other complex styles of hair
braiding.

11
HAIR BRAIDING TOOLS & ACCESSORIES/PRODUCTS
Just like the peasant farmer cannot go to farm without a hoe, you cannot braid hair
without the necessary tools.
The tools needed for hair braiding include but not limited to:
1. Cutting comb
2. Tail comb
3. Big and small teeth combs
4. 14 to 18 inches needles
5. Crochet thread
6. Scissors
7. Blade
8. Rollers
9. Hair pins
10. Rubber or hair band

12
The accessories/products needed, include but not limited to:
1. Extensions
2. Weaves of various length, size, volume, color etc
3. Hair cream or grease
4. Mousse
5. Oil Sheen spray
6. Wrapping lotion
7. Gel
8. Detangler
9. Pink lotion
10. Beads
13
SINGLE & MICRO BRAIDS
There are 6 steps required to create a Single & Micro Braids. The only difference is
the portion of hair braided. In a Single Braids style, you part the few strands of hair a
little more than you would with Micro braids.
1. Part a portion of the natural hair into few strands.
2. Take few strands of extensions and divide into three by parting one part of it
into two.
3. Hold the divided extensions in your hands and use it to divide the parted hair
into three

14
4. Bring the right part into the center, as you do this, the one at the center
automatically goes on to the right side.
5. Bring the left side into the center and the one at the center also goes to the left.
6. Continue the same process of right to the center and left to the center, as the one
at the center goes automatically to either side of the two, as you braid to your
desired length.
Continue the same routine until you are finished.

15
Single and Micro Braids

16

17
CORNROWS
Cornrow is the ability to braid hair using three parts and locking them interchangeably
onto the scalp. You can create cornrows in various styles and designs depending on
your imagination and skill.
It is created in 5 steps:
1. Part the hair in reasonable amount depending on the style you are creating
2. Start from the beginning by parting it into three
3. Bring the one on the right to the center and the one at the center automatically
goes to the right
4. Bring the one on the left to the center, as the one at the center automatically
goes to the left
5. Pick few strands of hair as you continue this process
Repeat the same routine as you braid until you have finished.

18
You can create various designs of cornrows, depending on what your client wants or
the style that you are creating.
Cornrows

19
Cornrows

20
Men’s cornrows

21
WEAVE
Weaves could be sewn or glued onto the hair in various ways depending on the style
that you are creating. With a sew-in weave, you need 14 inches to 18 inches needle to
perform the task. For a glued weave, you would require bonding glue. This text shows
how to create a sew-in weave. Weave is such a dynamic style that you could explore
by creating two-in one style such as weave/cornrows or weave/micro braids.
To create a simple 8inch curly weave there are 5 steps to follow
1. Part few strands of hair from the back of the head, that is, the nape area and
braid in a circle until the whole hair is braided
2. Use a black crochet thread by putting it through a 14inches to 18 inches needle
and cut it at a desired length
3. Tie a knot on the thread and begin to sew the weave onto the cornrow from the
nape area where the braid started until it has gone round the entire cornrow

22
4. Check to see if there were open spaces in between the weaves and then fill it up
by sewing additional weaves onto those areas if you have left over weaves from
the one you were sewing to give the hair volume and make it beautiful
5. Style the weave with hair products such as mousse, pink oil, setting wrap etc
into a desired style
Weaves

23
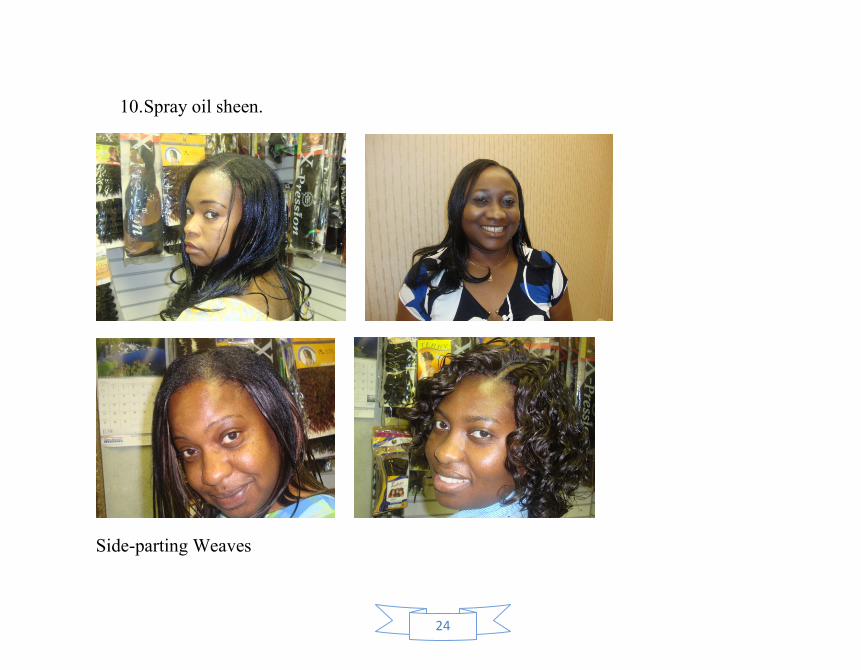
To create straight weave in a side-parting style, however, there are 10 steps to follow.
Note that you can use any straight weave from 8 inches, depending on how long you
want it to be.
1. Part the natural hair on the side where you want the parting in front of the head.
2. Part some strands of hair around the part and hold together with a hair band.
You can also cornrow it separately just to keep it out of the way. This will be
used to cover the weave when you are done.
3. Create cornrows going to the back.
4. Braid the tips of the cornrows at the back together
5. Sew the braided tips together with your needle and thread to avoid unraveling
during the period that the style would be worn
6. Place the weave on the cornrows from ear to ear starting at the nape area
7. Sew the weave onto the cornrows with your needle and thread, one cornrow at a
time, making a knot on each as you sew. Cut the weave when you get to the end
of one side and start another line from ear to ear.
8. Sew the weave onto the cornrow in a U-Shape form when you get to the top of
the head until you have sewn the weave onto all parts of the cornrow
9. Comb the strands of hair you left out at the front onto the weave and style as
you want.
24
10. Spray oil sheen.
Side-parting Weaves

25
Two-in-One Weave styles are created in various ways depending on the style.
Weave/Cornrows
There are 7 steps required to create weave/cornrows
1. Part some hair at the front of the head from one ear to the other or on the side
from the front to the nape
2. Hold the rest of the hair in place with a hair band
3. Part few strands of hair from that portion and create cornrows going to the back
or to the side with any design of your choice
4. Part the remaining hair in a circle form starting from the nape area. When you
get to the front where you already have cornrows, just braid the tips into the
circle form cornrows you started from the nape.
5. Continue until you have braided the whole head into a circle form cornrows.
6. Sew your weave, preferably an 8 inch weave onto the cornrows. To create
volume, add left over weaves in between lines of cornrows by sewing it under a
weave. You can do this for the first three or four rows from one ear to the other.
7. Styles as desired and spray oil sheen

26
Weave/Cornrows
Weave/Micro braids
There are 7 steps to do weave/micro braids. It can be done in a side-parting form, all
front or around all edges. It takes about the same process except that for the side-
parting, you part the hair just like you would when doing a regular weave with parting
in front and instead of brushing the hair you left out onto the weave, you braid it into
micro braids. For all around the edges, you part some hair around the edges of the
head to braid into micro braids when you are done.

27
1. Part some hair at the front of the head from one ear to the other
2. Hold the rest of the hair in place with a hair band
3. Part few strands of hair in the front and braid into micro braids with some of the
weaves you will sew onto the rest of the hair. To do this, cut out some parts of
the weave and gently use scissors to cut off the thread that holds the weave
together so that you can have it in individual form like a braiding extension.
4. Part the remaining hair in a circle form starting from the nape area. Keep the
micro braids out of it by holding it together with a hair band
5. Continue until you have braided the whole head into a circle form cornrows.
6. Sew your weave, preferably curly or wavy of any weave onto the cornrows. To
create volume, add left over weaves in between lines of cornrows by sewing it
under a weave. You can do this for the first three or four rows from one ear to
the other.
7. Styles as desired with hair products such as pink lotion and spray oil sheen. Do
not use mousse for this style if you do not want the weave to become hard.
Otherwise, mousse is a very good styling agent that helps you hold the curls in
place regardless of wind.

28
Weave/Micro braids

29
TWIST
Creating Kinky or Rope Twist
Kinky or Rope twist are created in a similar way. The obvious difference between the
two is the texture of extension used. For a Kinky twist, the texture of the extension is
coarse and has to be thoroughly combed to create shiny and lasting twist. A regular
braiding extension would perform the work for a rope twist. You must however be
selective of the kind of extension you would like to use. You need to ensure that the
extension is silky and can be hot water curled.
There are 13 steps required to create Twist
1. Part few strands of hair
2. Apply hair cream/grease to the parted section
3. Pick out few strands of extension in two portion, depending on the size you
want to create
4. Cross the extensions to have criss-cross shape on both sides of your hands
5. Hold the extensions at the cross
6. Place the extension on the parted section of hair
7. Divide the hair into three with the extension
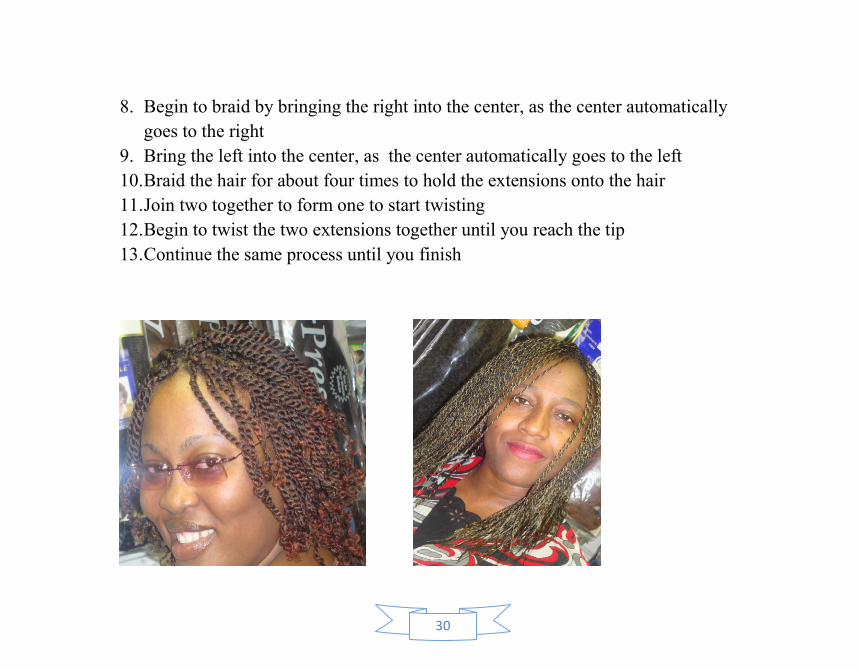
30
8. Begin to braid by bringing the right into the center, as the center automatically
goes to the right
9. Bring the left into the center, as the center automatically goes to the left
10. Braid the hair for about four times to hold the extensions onto the hair
11. Join two together to form one to start twisting
12. Begin to twist the two extensions together until you reach the tip
13. Continue the same process until you finish

31
Twists

32

33
ABOUT THE AUTHOR
Bukola Oriola is the Chief-Executive-Officer of Bukola Braiding & Beauty Supply, LLC.
Bukola understands the importance of beauty by providing unique, classy and painless
hair braiding to women, girls and men. She began her hair braiding business to service a
need among women and girls across all race, culture background and ethnic groups. Her
clients range from 2 to 65 years old. She has over 20 years experience in hair braiding,
braiding hair as a little girl from her home country in Nigeria. She began hair braiding
training in 2009 to impart the knowledge of hair braiding into others. Bukola is also a
writer. She has been a journalist since 2000 and has won several awards. She has covered
the education beat for six years in Nigeria before she came to the United States. Bukola,
who has an international experience in journalism, is a fellow of the International
Institute For Journalism, Berlin, Germany. After enduring severe agony as a victim of
human trafficking for two years in the United States, Bukola decided to go public with
her story, putting the face to the story to help victims of human trafficking and domestic
abuse, using her personal experience. She has also put her experiences together in form of
a book, IMPRISONED: The Travails of a Trafficked Victim to set others free from
modern day slavery, human trafficking and domestic abuse. Bukola, who is an advocate
for victims of human trafficking and domestic abuse gives public presentations at various
places and organizations within and outside Minnesota to create awareness. She was also

34
given the 2009 Change Maker Award for her courage by the Minnesota Women’s Press.
Her faith is pivotal to her triumph from the valley of the shadow of death.

35
Reference & Resources
Braiding & Knotting: techniques and projects by Constatine A. Belash
www.ukhairdressers.com
www.bestdooz.com
www.weddinghairupdos.com
www.beyondjane.com

36