sewing machine parts - davis school district · if the sewing machine does not sew properly, it is...
TRANSCRIPT
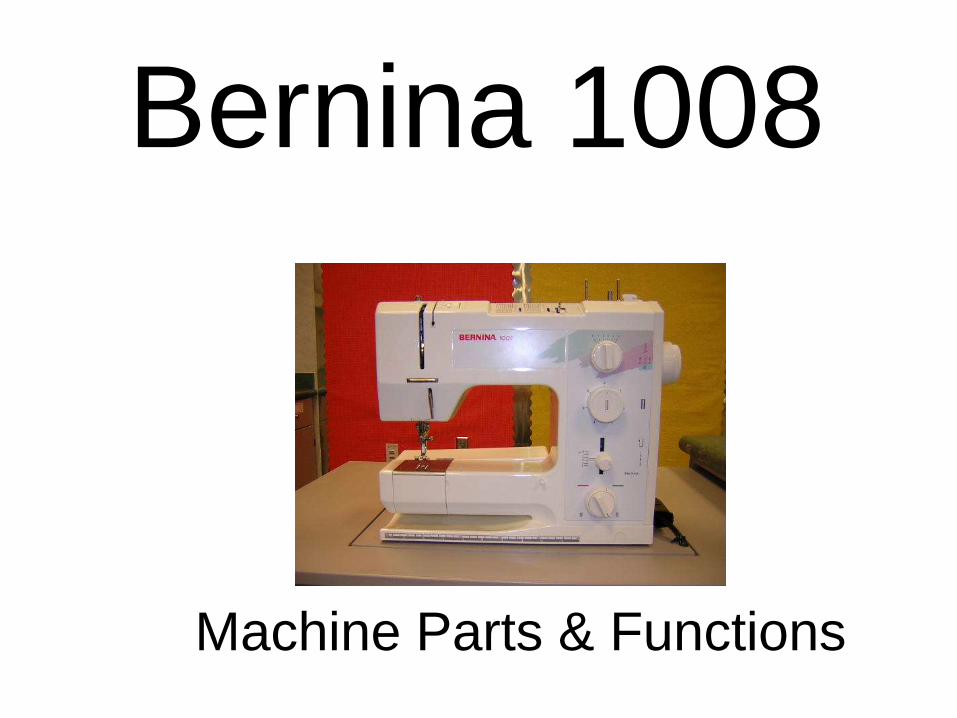
Bernina 1008
Machine Parts & Functions

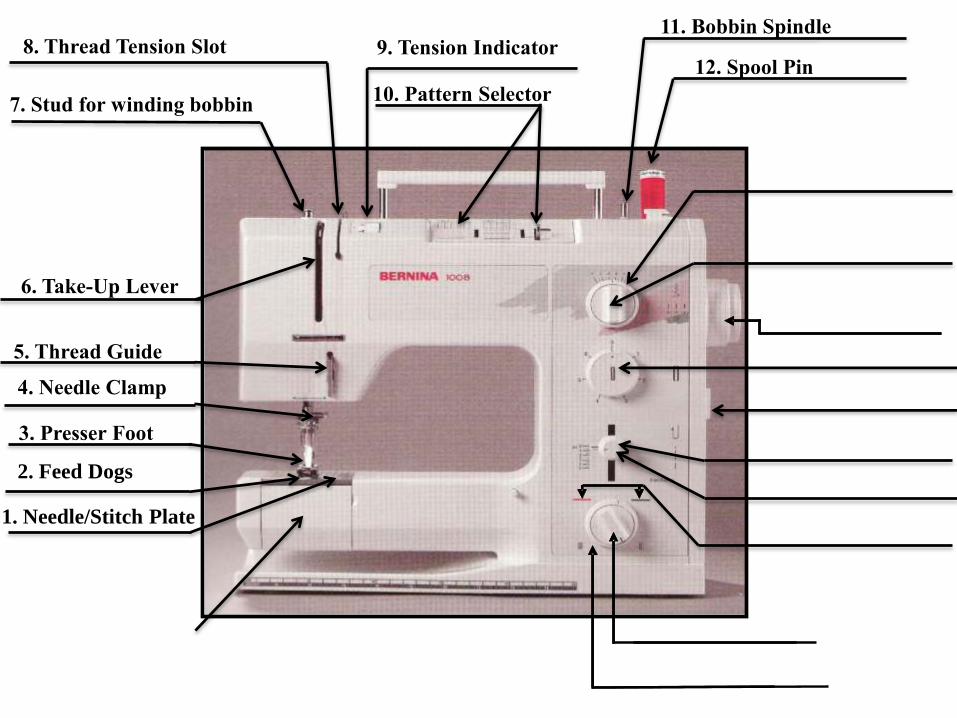
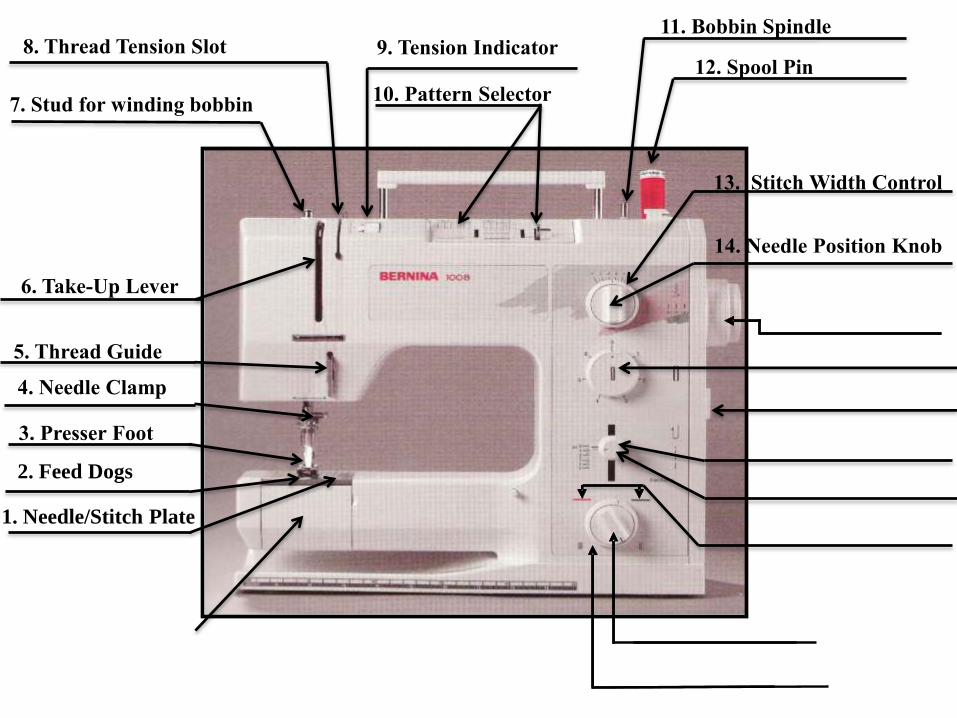
1. Stitch Plate

1. Stitch Plate

Stitch Plate
• Has guidelines to
help you stitch
straight seams at
measured distances
from the edge of the
fabric.

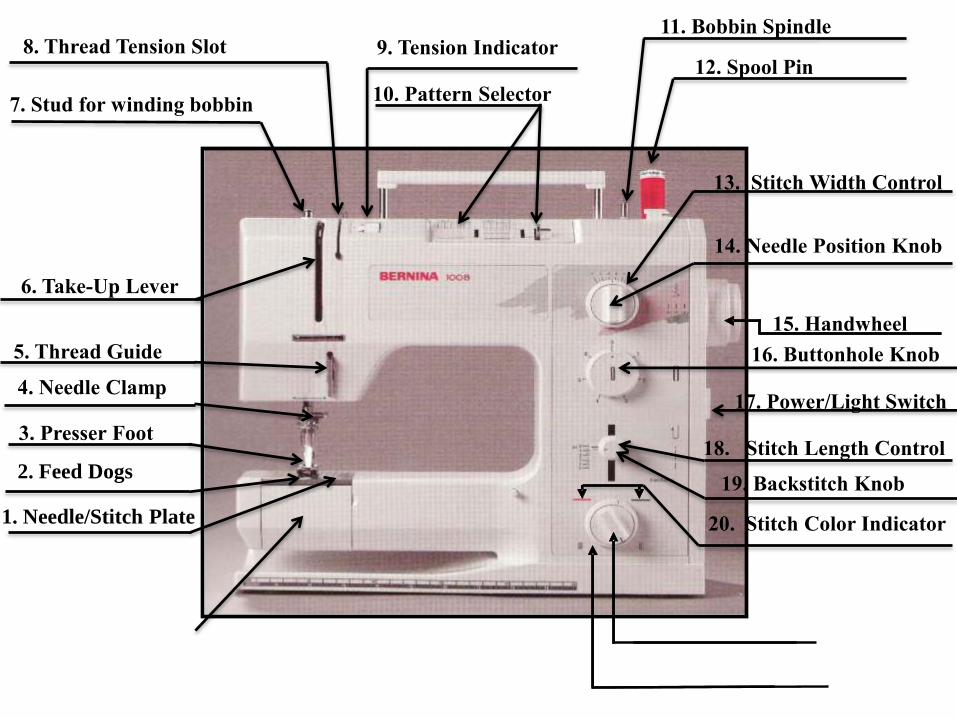
1. Needle/Stitch Plate
2. Feed Dogs

6
2. Feed Dogs
6

Feed Dogs
• Move the fabric
through the machine
while stitching.

1. Needle/Stitch Plate
2. Feed Dogs
3. Presser Foot
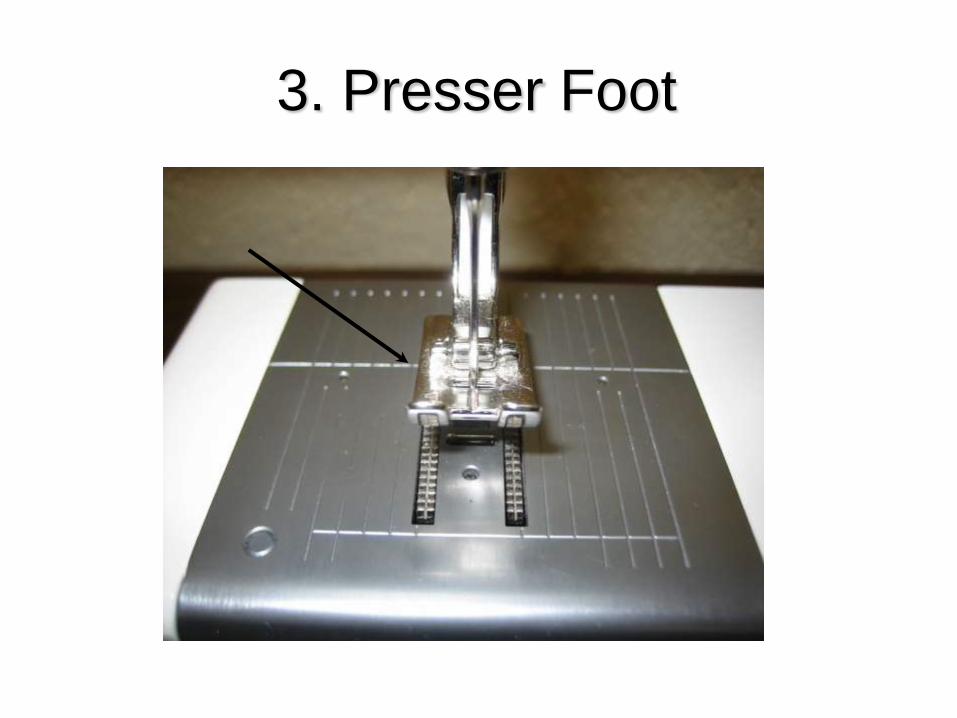
3. Presser Foot

Presser Foot
• Holds the fabric firmly in place against the feed dogs.
• To change feet
– push the red button on the back while foot is up. The old foot will fall off.
– Place new foot under the leg so that the pin is directly under the groove on the leg.
– Lower the leg and it will grab onto the new foot.

1. Needle/Stitch Plate
2. Feed Dogs
3. Presser Foot
4. Needle Clamp
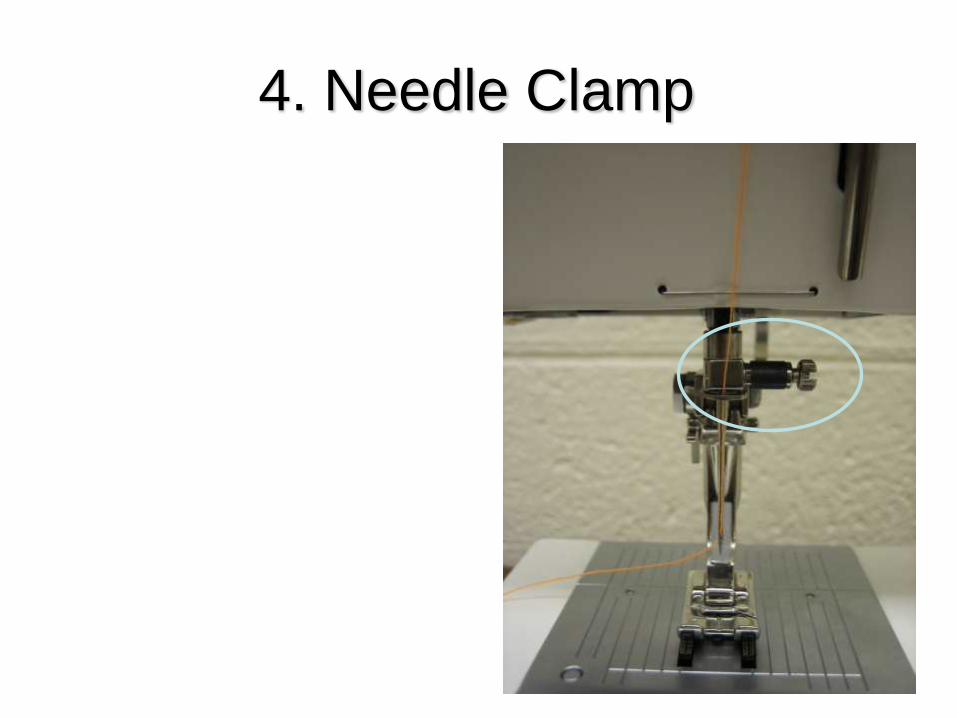
4. Needle Clamp
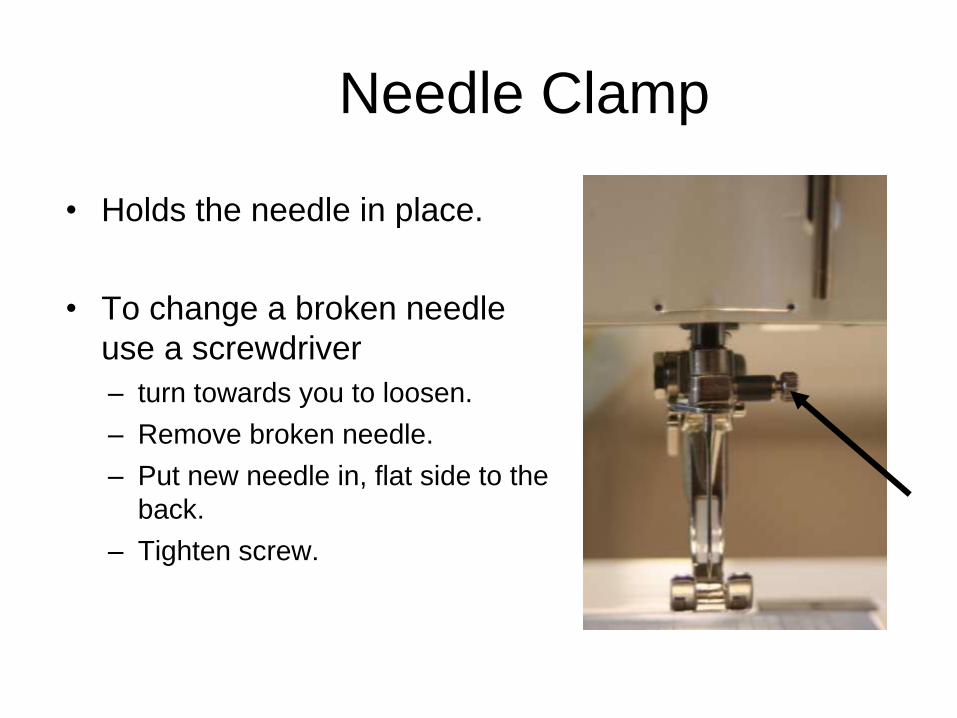
Needle Clamp
• Holds the needle in place.
• To change a broken needle
use a screwdriver
– turn towards you to loosen.
– Remove broken needle.
– Put new needle in, flat side to the
back.
– Tighten screw.

Needle
• Carries the thread
and pierces the
fabric.

1. Needle/Stitch Plate
2. Feed Dogs
3. Presser Foot
4. Needle Clamp
5. Thread Guide

5. Thread Guide

Thread guides
• Hold the thread in
place on the sewing
machine.

1. Needle/Stitch Plate
2. Feed Dogs
3. Presser Foot
4. Needle Clamp
5. Thread Guide
6. Take-Up Lever

6. Take-up Lever
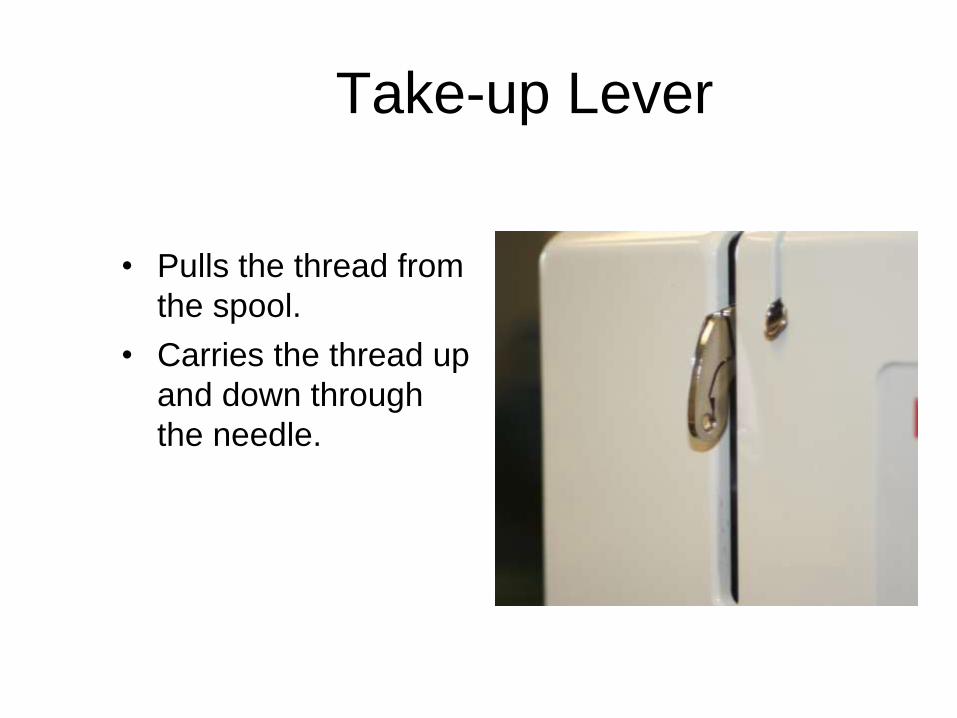
Take-up Lever
• Pulls the thread from
the spool.
• Carries the thread up
and down through
the needle.

1. Needle/Stitch Plate
2. Feed Dogs
3. Presser Foot
4. Needle Clamp
5. Thread Guide
6. Take-Up Lever
7. Stud for winding bobbin
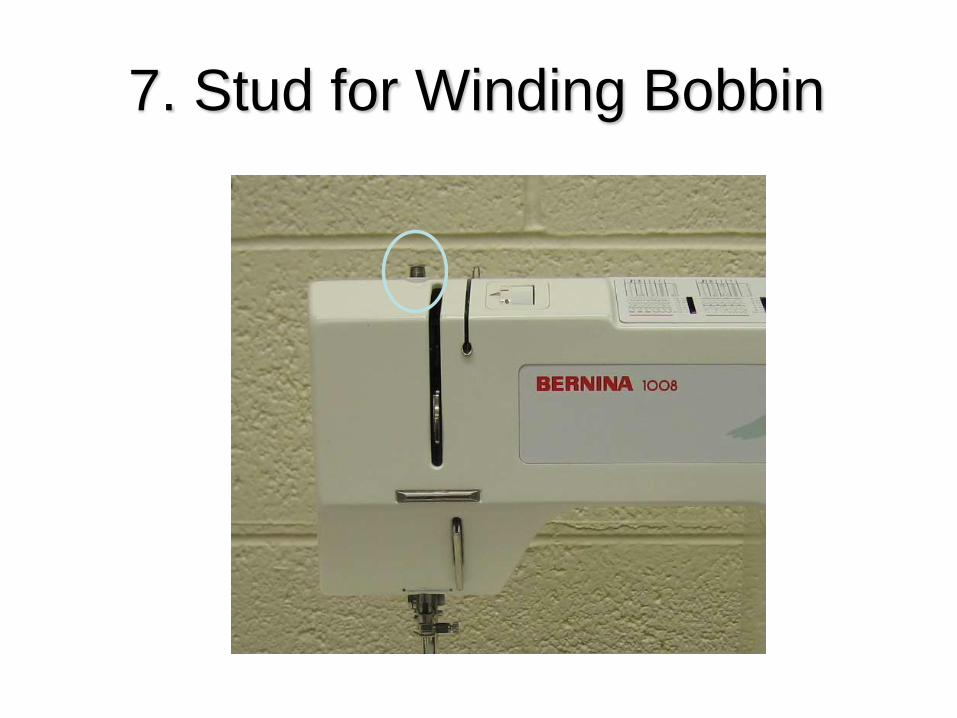
7. Stud for Winding Bobbin

Stud for Winding Bobbin
• Applies tension when
winding a bobbin

1. Needle/Stitch Plate
2. Feed Dogs
3. Presser Foot
4. Needle Clamp
5. Thread Guide
6. Take-Up Lever
7. Stud for winding bobbin
8. Thread Tension Slot

8. Thread Tension Slot

Thread Tension Slot
• Applies tension to the
upper thread.

1. Needle/Stitch Plate
2. Feed Dogs
3. Presser Foot
4. Needle Clamp
5. Thread Guide
6. Take-Up Lever
7. Stud for winding bobbin
8. Thread Tension Slot 9. Tension Indicator

9. Tension Indicator
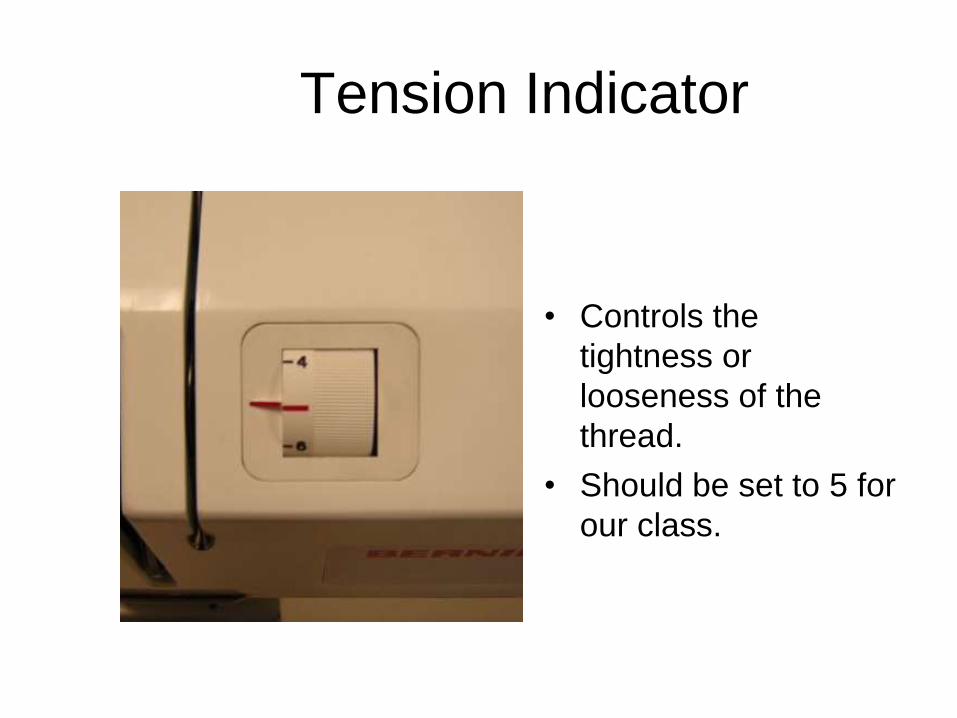
Tension Indicator
• Controls the
tightness or
looseness of the
thread.
• Should be set to 5 for
our class.

1. Needle/Stitch Plate
2. Feed Dogs
3. Presser Foot
4. Needle Clamp
5. Thread Guide
6. Take-Up Lever
7. Stud for winding bobbin
8. Thread Tension Slot 9. Tension Indicator
10. Pattern Selector

10. Pattern Selector
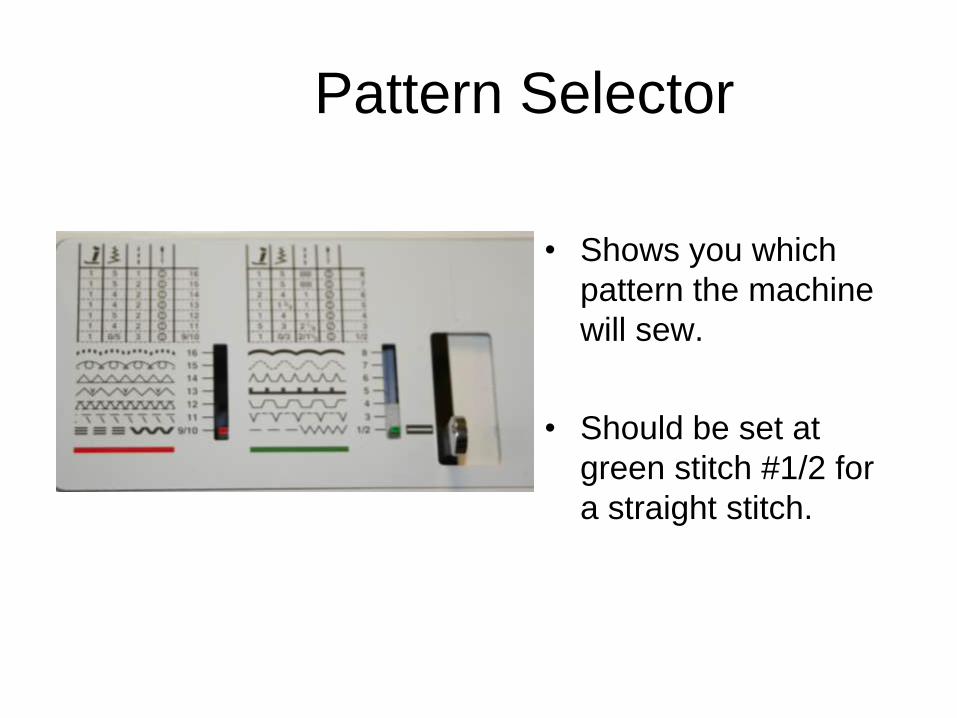
Pattern Selector
• Shows you which
pattern the machine
will sew.
• Should be set at
green stitch #1/2 for
a straight stitch.

Decorative Stitches Lever

1. Needle/Stitch Plate
2. Feed Dogs
3. Presser Foot
4. Needle Clamp
5. Thread Guide
6. Take-Up Lever
7. Stud for winding bobbin
8. Thread Tension Slot 9. Tension Indicator
10. Pattern Selector
11. Bobbin Winder

11. Bobbin Winder

Bobbin Winder
• Spins to wind thread
onto the bobbin.
1. Needle/Stitch Plate
2. Feed Dogs
3. Presser Foot
4. Needle Clamp
5. Thread Guide
6. Take-Up Lever
7. Stud for winding bobbin
8. Thread Tension Slot 9. Tension Indicator
10. Pattern Selector
11. Bobbin Spindle
12. Spool Pin

12. Spool Pin

Spool Pins
• Hold the spool of
thread

1. Needle/Stitch Plate
2. Feed Dogs
3. Presser Foot
4. Needle Clamp
5. Thread Guide
6. Take-Up Lever
7. Stud for winding bobbin
8. Thread Tension Slot 9. Tension Indicator
10. Pattern Selector
11. Bobbin Spindle
12. Spool Pin
13. Stitch Width Control

13. Stitch Width Control

Stitch Width
• Controls the width of the zig-zag stitches.
• 0 = straight stitch
(no width.)
• 5 = widest stitch.
1. Needle/Stitch Plate
2. Feed Dogs
3. Presser Foot
4. Needle Clamp
5. Thread Guide
6. Take-Up Lever
7. Stud for winding bobbin
8. Thread Tension Slot 9. Tension Indicator
10. Pattern Selector
11. Bobbin Spindle
12. Spool Pin
13. Stitch Width Control
14. Needle Position Knob

14. Needle Position Knob

Needle Position
• Moves the needle to
different positions:
– Center
– left
– right.

15. Handwheel
1. Needle/Stitch Plate
2. Feed Dogs
3. Presser Foot
4. Needle Clamp
5. Thread Guide
6. Take-Up Lever
7. Stud for winding bobbin
8. Thread Tension Slot 9. Tension Indicator
10. Pattern Selector
11. Bobbin Spindle
12. Spool Pin
13. Stitch Width Control
14. Needle Position Knob

15. Handwheel

Hand wheel
• Controls the
movement of the
take-up lever and
needle.
• Can be controlled by
power or by hand.
• ALWAYS turn
TOWARDS you!!!

Hand Wheel Release
• Stops the needle
from moving when
you wind a bobbin.

15. Handwheel
1. Needle/Stitch Plate
2. Feed Dogs
3. Presser Foot
4. Needle Clamp
5. Thread Guide
6. Take-Up Lever
7. Stud for winding bobbin
8. Thread Tension Slot 9. Tension Indicator
10. Pattern Selector
11. Bobbin Spindle
12. Spool Pin
13. Stitch Width Control
14. Needle Position Knob
16. Buttonhole Knob

16. Buttonhole Knob

Buttonhole Knob
• This dial sets the
machine to perform
the 6 steps to form a
buttonhole.
(All you have to do is
change the stitch
length to 0.5 while
the dial is still set at
0)

15. Handwheel
1. Needle/Stitch Plate
2. Feed Dogs
3. Presser Foot
4. Needle Clamp
5. Thread Guide
6. Take-Up Lever
7. Stud for winding bobbin
8. Thread Tension Slot 9. Tension Indicator
10. Pattern Selector
11. Bobbin Spindle
12. Spool Pin
13. Stitch Width Control
14. Needle Position Knob
16. Buttonhole Knob
17. Power/Light Switch

17. Power/Light Switch

Power/Light Switch
• Turns the machine
on and off.
• Turn to first position
to turn on machine.
• Turn to second
position to turn on
light

15. Handwheel
1. Needle/Stitch Plate
2. Feed Dogs
3. Presser Foot
4. Needle Clamp
5. Thread Guide
6. Take-Up Lever
7. Stud for winding bobbin
8. Thread Tension Slot 9. Tension Indicator
10. Pattern Selector
11. Bobbin Spindle
12. Spool Pin
13. Stitch Width Control
14. Needle Position Knob
16. Buttonhole Knob
17. Power/Light Switch
18. Stitch Length Control
19. Backstitch Knob
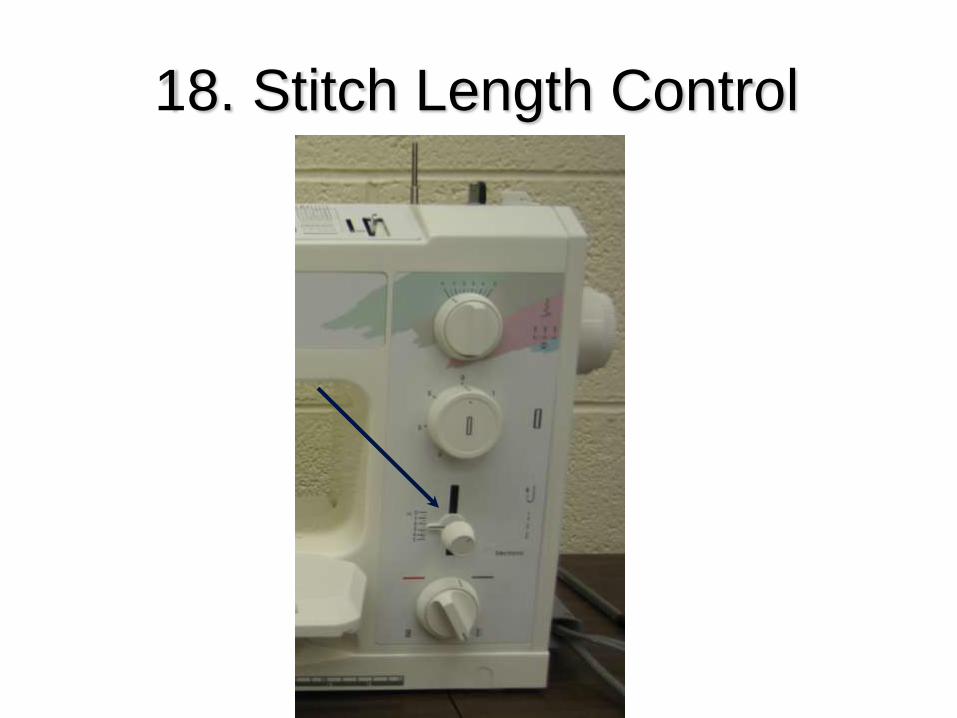
18. Stitch Length Control

Stitch Length
• Controls the length of the
stitches making them
longer or shorter.
• 1= reinforcement
stitch length
• 3.0= standard stitch
length
• 5= basting stitch
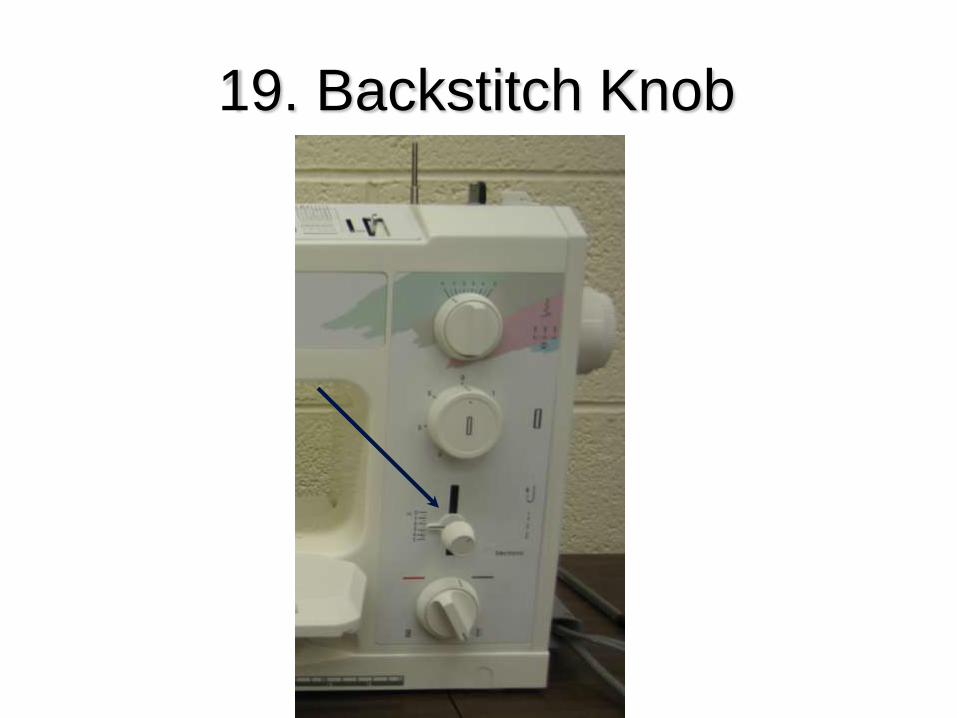
19. Backstitch Knob

Backstitch or Reverse
• Allows the machine to stitch backward.
• Same dial as stitch length.
• Hold all the way at the top and the machine will sew backward.
• You should always backstitch when you begin and end a line of stitching to secure the thread.
15. Handwheel
1. Needle/Stitch Plate
2. Feed Dogs
3. Presser Foot
4. Needle Clamp
5. Thread Guide
6. Take-Up Lever
7. Stud for winding bobbin
8. Thread Tension Slot 9. Tension Indicator
10. Pattern Selector
11. Bobbin Spindle
12. Spool Pin
13. Stitch Width Control
14. Needle Position Knob
16. Buttonhole Knob
17. Power/Light Switch
18. Stitch Length Control
19. Backstitch Knob
20. Stitch Color Indicator

20. Stitch Color Indicator

Stitch Color Indicator
• Indicates which
category of stitch you
want to make (red or
green).
• Used with the pattern
selector.

15. Handwheel
21. Feed Dog Control
1. Needle/Stitch Plate
2. Feed Dogs
3. Presser Foot
4. Needle Clamp
5. Thread Guide
6. Take-Up Lever
7. Stud for winding bobbin
8. Thread Tension Slot 9. Tension Indicator
10. Pattern Selector
11. Bobbin Spindle
12. Spool Pin
13. Stitch Width Control
14. Needle Position Knob
16. Buttonhole Knob
17. Power/Light Switch
18. Stitch Length Control
19. Backstitch Knob
20. Stitch Color Indicator

21. Feed Dog Control

Feed Dog Control
• Lowers and raises the feed dogs.
• If the feed dogs are up and running the dial should be pointed towards this picture
• If the dial is pointing to this picture the feed dogs are down the fabric will not move through the machine.

15. Handwheel
21. Feed Dog Control
22. Stitch Selector Knob
1. Needle/Stitch Plate
2. Feed Dogs
3. Presser Foot
4. Needle Clamp
5. Thread Guide
6. Take-Up Lever
7. Stud for winding bobbin
8. Thread Tension Slot 9. Tension Indicator
10. Pattern Selector
11. Bobbin Spindle
12. Spool Pin
13. Stitch Width Control
14. Needle Position Knob
16. Buttonhole Knob
17. Power/Light Switch
18. Stitch Length Control
19. Backstitch Knob
20. Stitch Color Indicator

22. Stitch Selector Knob
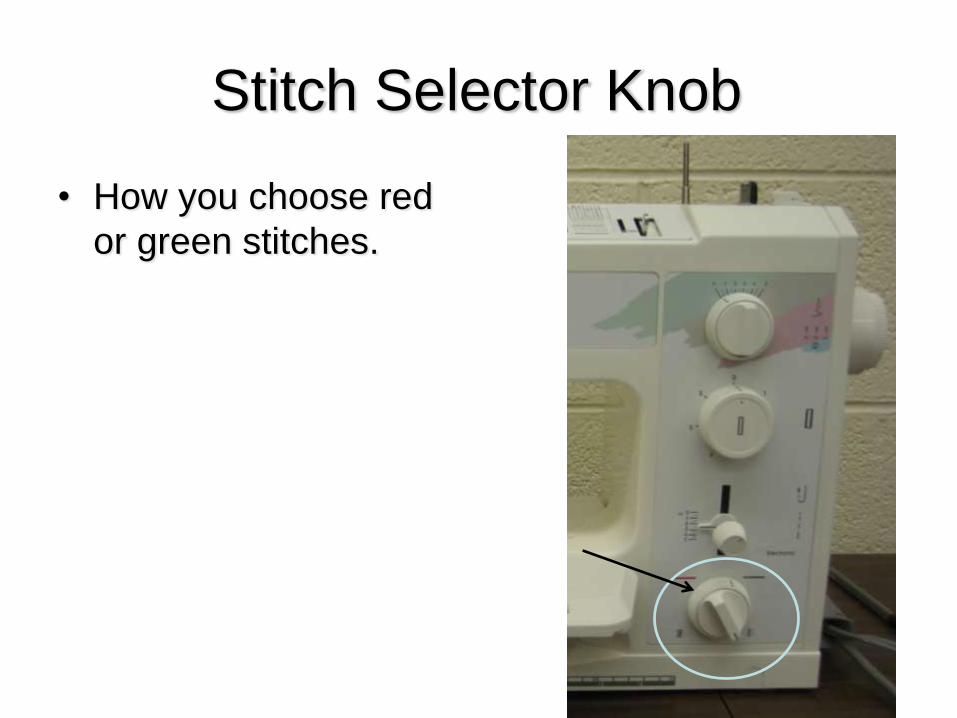
Stitch Selector Knob
• How you choose red
or green stitches.

15. Handwheel
21. Feed Dog Control
22. Stitch Selector Knob
1. Needle/Stitch Plate
2. Feed Dogs
3. Presser Foot
4. Needle Clamp
5. Thread Guide
6. Take-Up Lever
7. Stud for winding bobbin
8. Thread Tension Slot 9. Tension Indicator
10. Pattern Selector
11. Bobbin Spindle
12. Spool Pin
13. Stitch Width Control
14. Needle Position Knob
16. Buttonhole Knob
17. Power/Light Switch
18. Stitch Length Control
19. Backstitch Knob
20. Stitch Color Indicator
Front Cover—where bobbin case goes

71
23. Thread Cutter
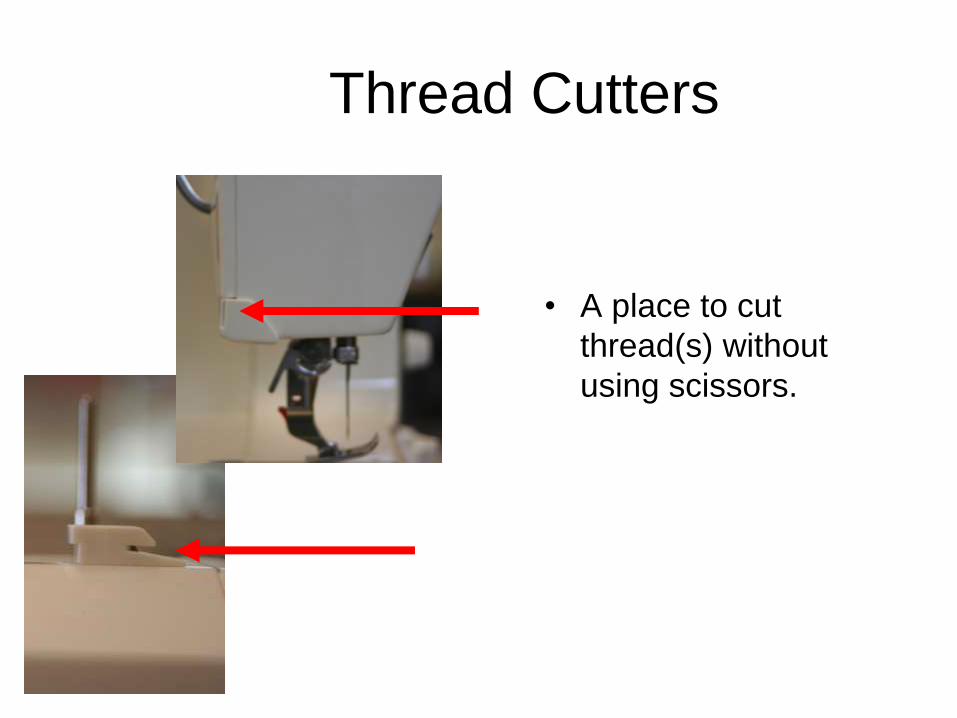
Thread Cutters
• A place to cut
thread(s) without
using scissors.

73
23. Thread Cutter
24. Presser Foot Lifter/Lever
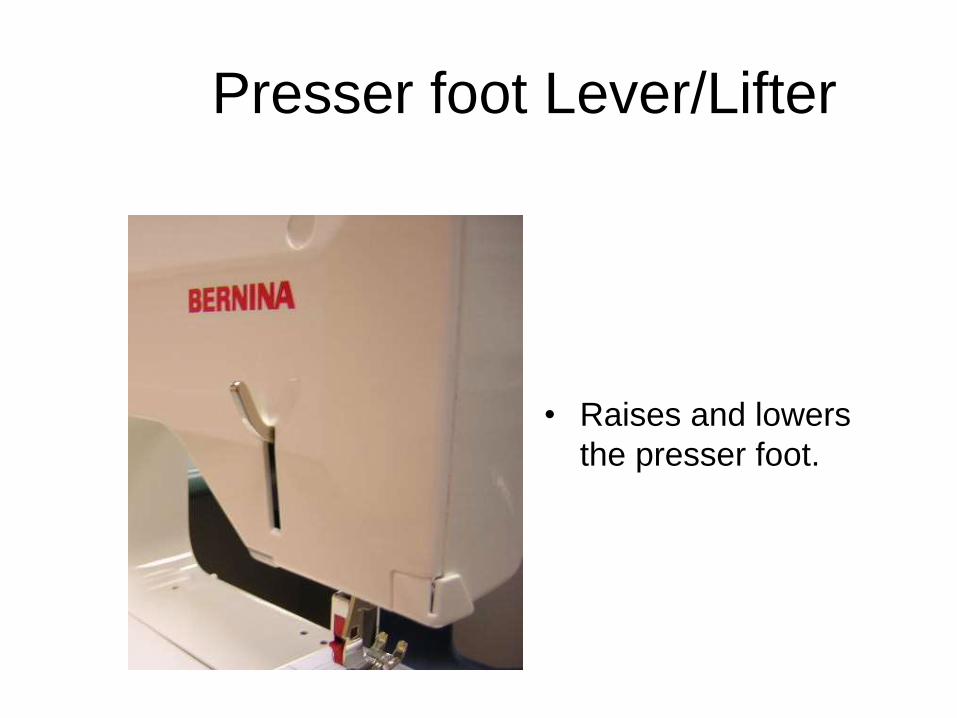
Presser foot Lever/Lifter
• Raises and lowers
the presser foot.

75
25. Bobbin 26.Bobbin Case
75
25. Bobbin
26. Bobbin Case

Bobbin and Bobbin Case
• Bobbin
– Small metal spool that
holds the lower thread.
• Bobbin Case
– Holds the bobbin and
provides tension for
bottom thread.

Foot Pedal / Foot Control
• Controls how fast the
machine sews.
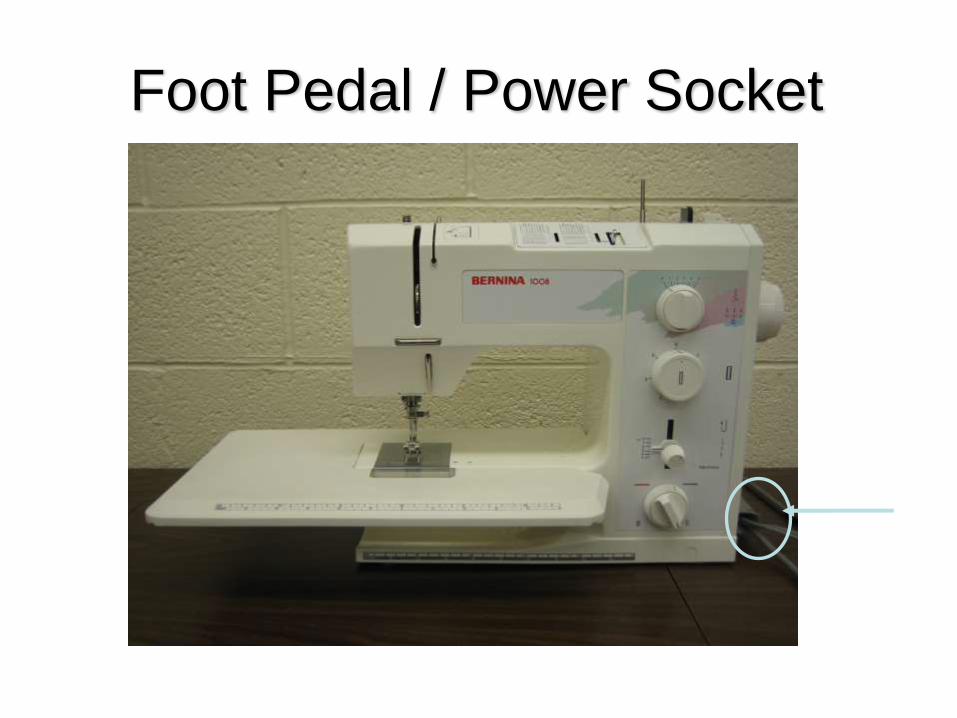
Foot Pedal / Power Socket

Carrying Handle
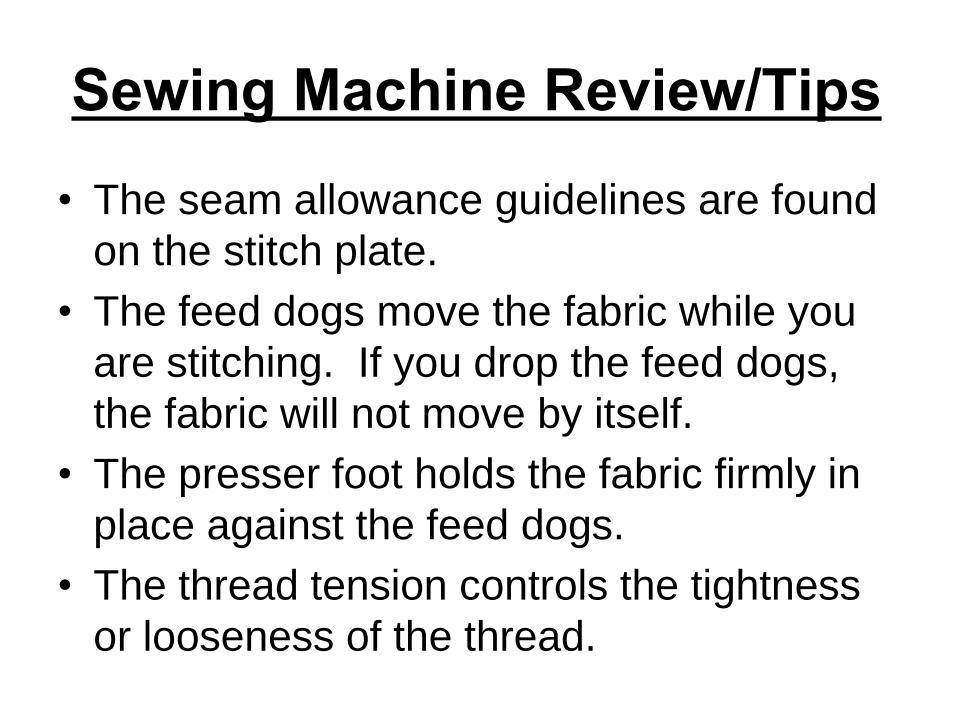
Sewing Machine Review/Tips
• The seam allowance guidelines are found
on the stitch plate.
• The feed dogs move the fabric while you
are stitching. If you drop the feed dogs,
the fabric will not move by itself.
• The presser foot holds the fabric firmly in
place against the feed dogs.
• The thread tension controls the tightness
or looseness of the thread.

• The presser foot lever raises or lowers the presser foot. It must be lowered onto your fabric before you begin to sew. It is found on the back of your machine.
• The thread take-up lever pulls the thread from the spool pin. It must be at its highest point before you begin to sew or your machine will come unthreaded.
Thread Take-Up
Lever at Its
Highest Point

• The handwheel on the sewing machine
should always be turned TOWARD you to
raise and lower the needle. It will turn
away from you only when you backstitch.
• The bobbin case holds the bobbin. It
looks like this:
Remember, this is what a bobbin looks like:
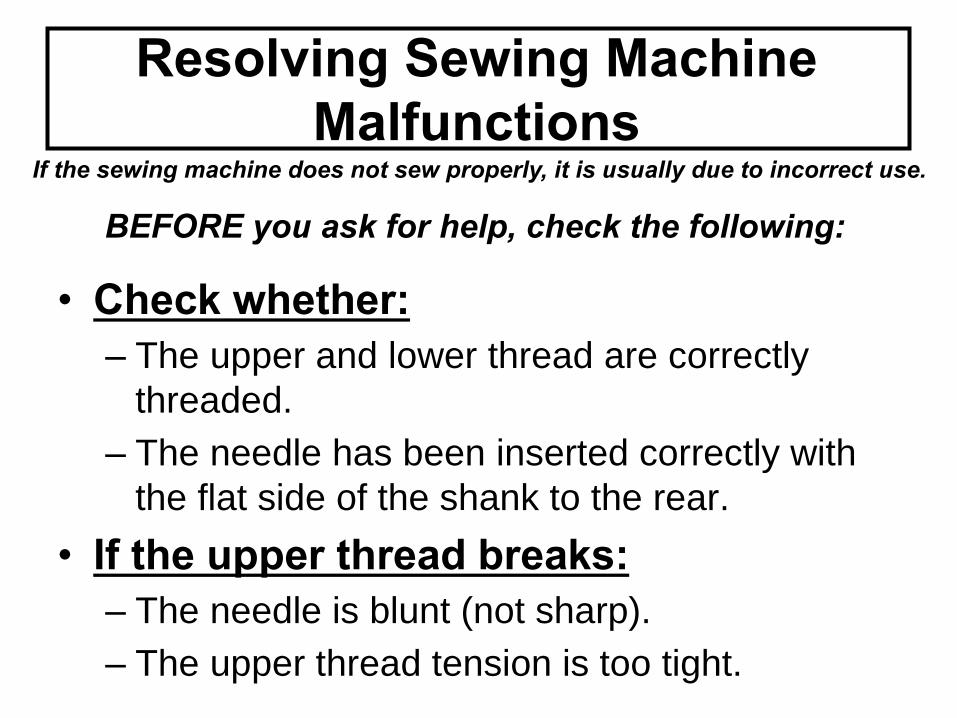
Resolving Sewing Machine
Malfunctions
• Check whether:
– The upper and lower thread are correctly
threaded.
– The needle has been inserted correctly with
the flat side of the shank to the rear.
• If the upper thread breaks:
– The needle is blunt (not sharp).
– The upper thread tension is too tight.
If the sewing machine does not sew properly, it is usually due to incorrect use.
BEFORE you ask for help, check the following:
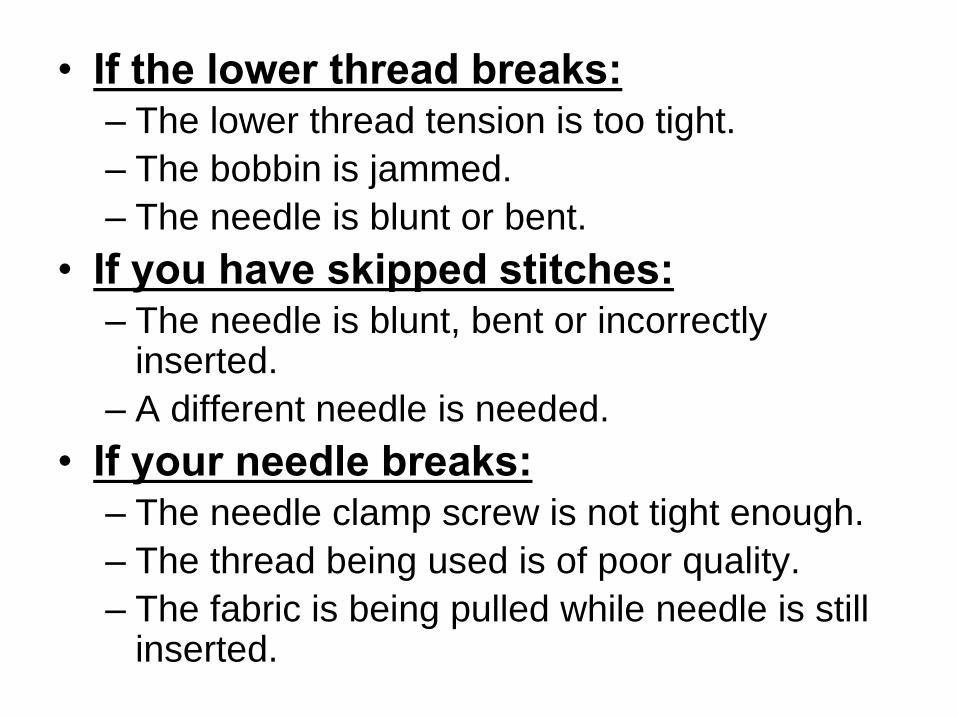
• If the lower thread breaks:– The lower thread tension is too tight.
– The bobbin is jammed.
– The needle is blunt or bent.
• If you have skipped stitches:– The needle is blunt, bent or incorrectly
inserted.
– A different needle is needed.
• If your needle breaks:– The needle clamp screw is not tight enough.
– The thread being used is of poor quality.
– The fabric is being pulled while needle is still inserted.

• If your machine fails to run:
– The plug is not inserted correctly.
– The power is not on.
– The bobbin winder is engaged.
– The handwheel is loose.