setup manual for ifbd-hi01x/02x - star-asia
TRANSCRIPT

Rev2.2
Setup Manual for
IFBD-HI01X/02X
Wireless LAN Printer
Star webPRNT
CloudPRNT
STAR MICRONICS CO.,LTD.

Setup Manual for IFBD-HI01X/02X
- 1 -
IFBD-HI01X/02X with Star Printer – How to setup
1. Introduction P2
2. Web configuration utility P3
How to set SSL/TLS setting for web server of HI01X P6
How to reset the web configuration utility settings P9
3. Firmware Update P14
4. WLAN dongle setting P23
5. Star webPRNT P35
Initial setting/ BCR setting/ Demo
6. CloudPRNT P46
Initial setting/ Peripheral device setting
7. Star Micronics Cloud P52
Initial setting
8. DNS Setting P57
Appendix A. Term and Condition P59
Appendix B. Privacy Policy P59
History P60

Setup Manual for IFBD-HI01X/02X
- 2 -
1. Introduction
IFBD-HI01X/02X is supporting the following printers.
Interface
Board
model
Printer
model
Printer Firmware
Interface Firmware Boot Version Main Version
IFBD-HI01X
TSP650II 1.0 or later 1.0 or later 1.1 or later
TSP700II 2.0 or later 3.0 or later 1.2 or later
TSP800II
TSP650IISK
1.0 or later
1.0 or later
1.2 or later
1.0 or later
1.2 or later
1.9 or later
IFBD-HI02X SP700 2.0 or later 3.0 or later 1.2 or later
The printer with IFBD-HI01X/02X can be worked as USB Printer, LAN Printer, and Wireless Printer by
using Wireless LAN dongle.
In addition, the printer with IFBD-HIX interface can be Star webPRNT Printer(HI01X) and
CloudPRNT Printer(HI01X/02X).
[Notes]
When changes the printer setting (e.g. Memory Switch Settings, Register Logo Setting,
Printer F/W・Font writing…), then please turn off and on the printer power to apply
the changed settings on the IFBD-HIX I/F and Printer correctly.
After updating an HI01/02X firmware to latest version and printer is rebooted, if web config ui
does not show/work correctly, please reboot a web browser and access the web config ui
page again to show the web page correctly.
IFBD-HI01X/02X is supporting the following printer drivers.
Driver StarPRNT Intelligence
CUPS Driver
(Web Release)
JavaPOS Driver
(Web Release)
Version Printer Driver
Ver. 2.0
or later
OPOS
Ver1.13.2
or later
StarIO
Ver1.2.2
or later
Linux: Ver3.1.1
Mac: Ver3.1.1
or later
Ver1.9.13 or later
Support ○*3 *5 ○*1 *6 ○ *5 ○ *2 *4 *6 ○ *6
*1 : OPOS driver with USB is supported from HI01X/02X firmware version 1.2.

Setup Manual for IFBD-HI01X/02X
- 3 -
*2 : To use CUPS driver, LPR must be set Enable from WebUI. (Default is Disable)
To use LPR, 9100 port also must be set Enable.
*3 : When use PSA Logo Store tool with TSP650II,
please “Reload” Logo again if it is failed to “Reload” the registered Logo from the printer.
*4 : To use CUPS driver with Star Micronics Cloud, the ”Fixed Length” of “Page Type” can not use
correctly. The printing result becomes same as “Variable Length” of “Page Type”.
*5 : TSP650IISK is supported PSA Ver 3.7 or later and StarIO Ver 5.14.0 or later.
*6 : TSP650IISK does not support CUPS / JavaPOS / OPOS driver.
2. Web configuration utility
The web configuration utility is located in HI01X/02X. It is shown below how to access to the web
configuration utility.
1. Check the IP address of the IFBD-HI01X/02X by self-print by following below procedure.
- Connect Ethernet cable to the IFBD-HI01X/02X - Printer.
- Turn on the IFBD-HI01X/02X - Printer with pushing the feed button for 5 seconds.
- The IP address of the IFBD-HI01X/02X - Printer is shown in 2nd print paper.
2. Put IP address of IFBD-HI01X/02X into the web-browser. Then the web configuration utility is shown.
Ethernet Network: IP Address :xxx.xxx.xxx.xxx (※Protocol) Subnet Mask :xxx.xxx.xxx.xxx Default Gateway :xxx.xxx.xxx.xxx
Setup Manual for IFBD-HI01X/02X
- 4 -
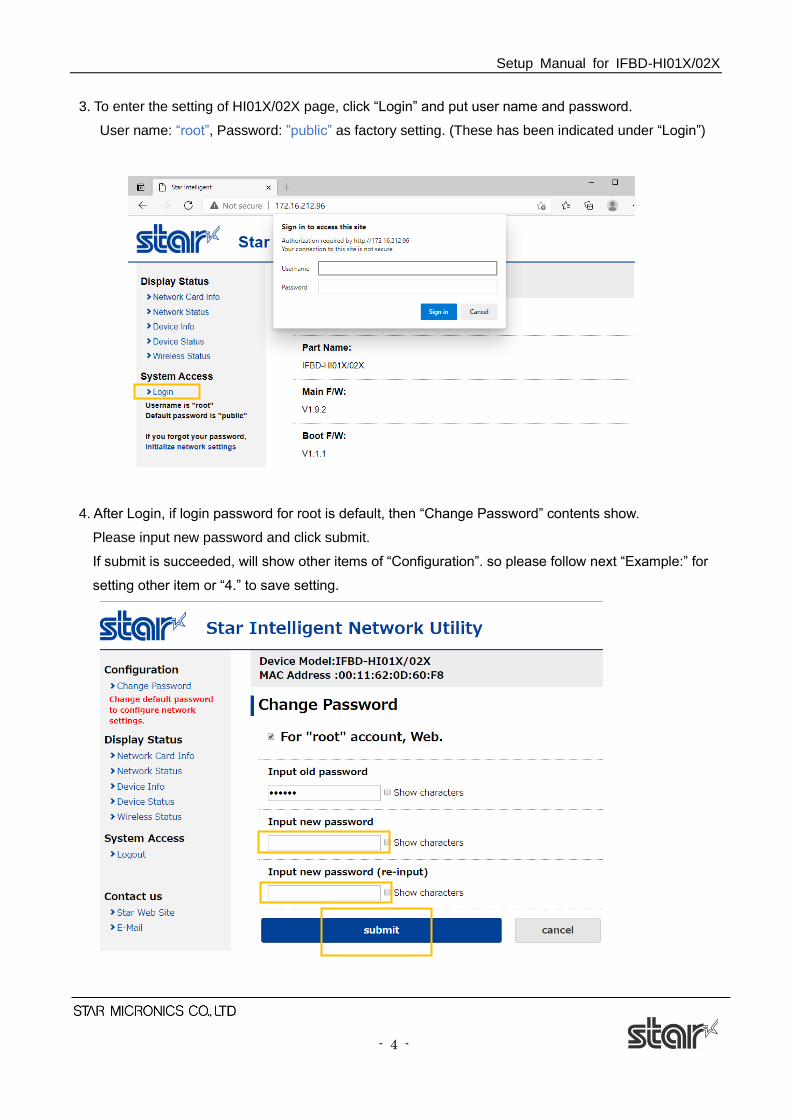
3. To enter the setting of HI01X/02X page, click “Login” and put user name and password.
User name: “root”, Password: ”public” as factory setting. (These has been indicated under “Login”)
4. After Login, if login password for root is default, then “Change Password” contents show.
Please input new password and click submit.
If submit is succeeded, will show other items of “Configuration”. so please follow next “Example:” for
setting other item or “4.” to save setting.

Setup Manual for IFBD-HI01X/02X
- 5 -
Example : changing LPR setting from Disable to Enable
In the screen below, select [System Configuration] from left menu, and select LPR: ENABLE.
Then, click Submit in the bottom of this screen.
5. Click the menu [Save].
Select any of the following, the click Execute:
・Save → Configuration Printing → Restart device
・Save → Restart device
(After the set print is output, when you select, Configuration Printing) Wait for the printer to reset.
Setup Manual for IFBD-HI01X/02X
- 6 -
Fin
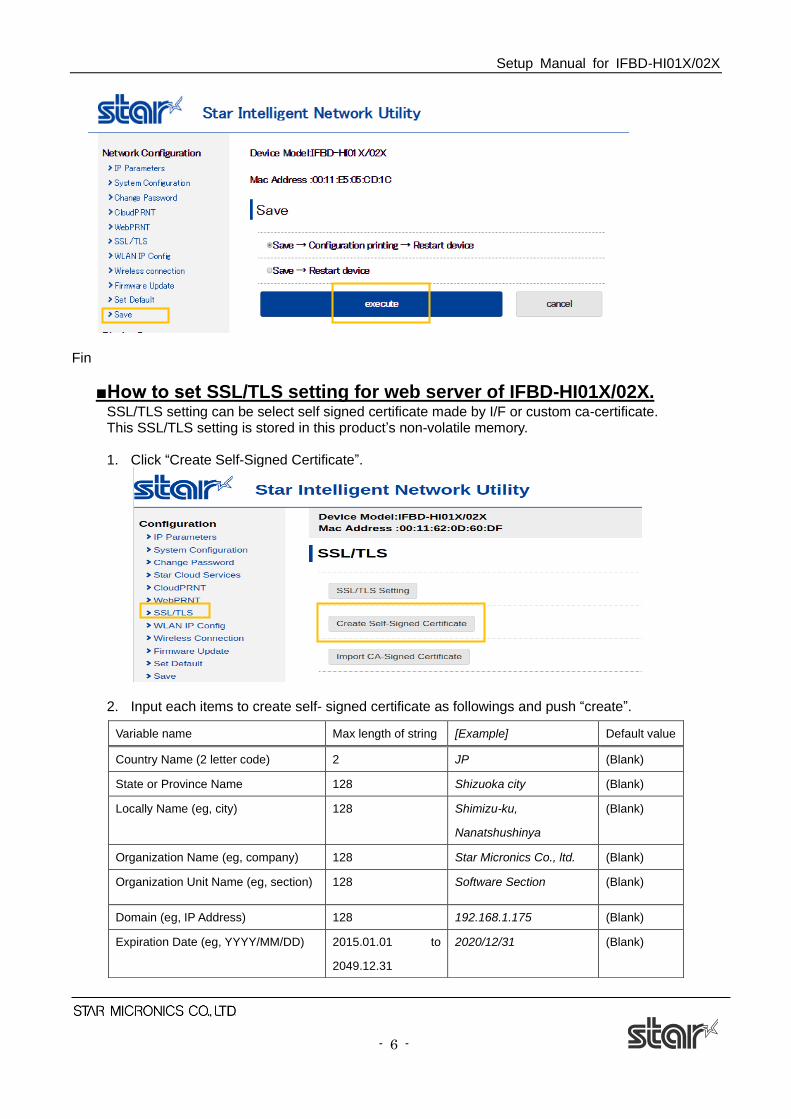
■How to set SSL/TLS setting for web server of IFBD-HI01X/02X. SSL/TLS setting can be select self signed certificate made by I/F or custom ca-certificate. This SSL/TLS setting is stored in this product’s non-volatile memory. 1. Click “Create Self-Signed Certificate”.
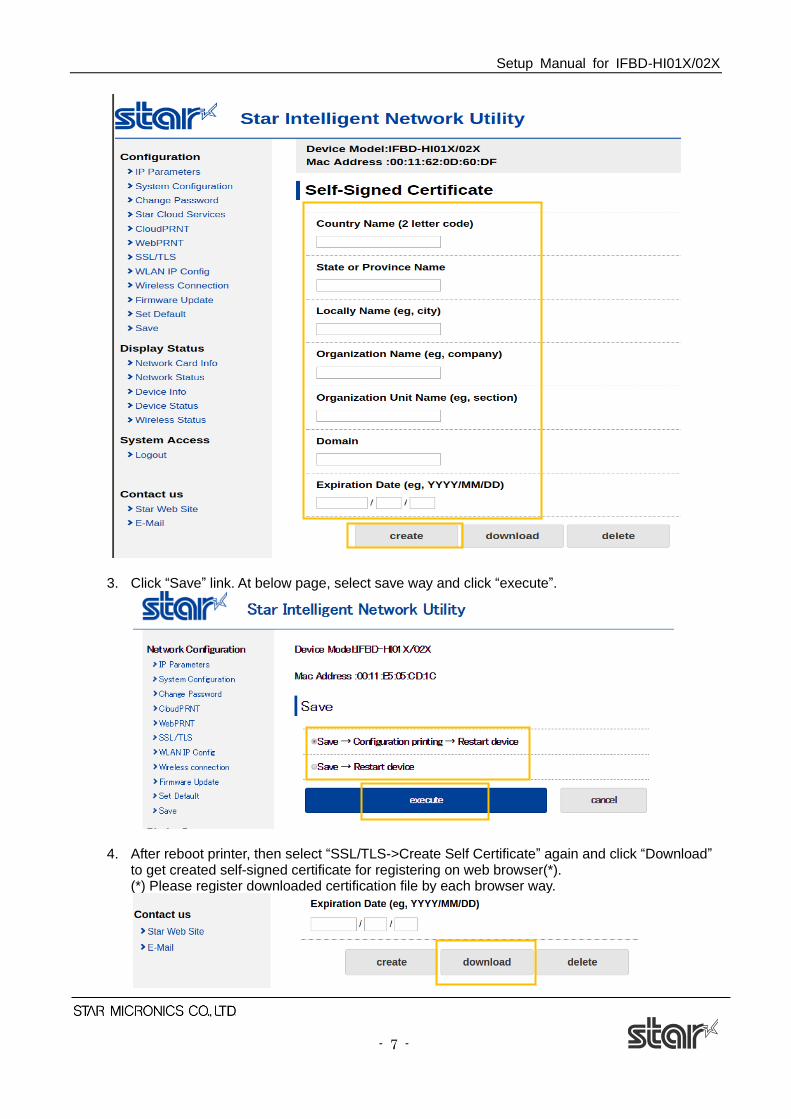
2. Input each items to create self- signed certificate as followings and push “create”.
Variable name Max length of string [Example] Default value
Country Name (2 letter code) 2 JP (Blank)
State or Province Name 128 Shizuoka city (Blank)
Locally Name (eg, city) 128 Shimizu-ku,
Nanatshushinya
(Blank)
Organization Name (eg, company) 128 Star Micronics Co., ltd. (Blank)
Organization Unit Name (eg, section) 128 Software Section (Blank)
Domain (eg, IP Address) 128 192.168.1.175 (Blank)
Expiration Date (eg, YYYY/MM/DD) 2015.01.01 to
2049.12.31
2020/12/31 (Blank)
Setup Manual for IFBD-HI01X/02X
- 7 -
3. Click “Save” link. At below page, select save way and click “execute”.
4. After reboot printer, then select “SSL/TLS->Create Self Certificate” again and click “Download” to get created self-signed certificate for registering on web browser(*). (*) Please register downloaded certification file by each browser way.

Setup Manual for IFBD-HI01X/02X
- 8 -
5. Select “SSL/TLS” and click “SSL/TLS Setting”.
6. Input each items at “SSL/TLS Setting”. And push “submit”.(In this case, choose “Self_Signed”)
Setting Items Input Range (*) Initial Value (Factory Default)
SSL/TLS ENABLE / DISABLE DISABLE
TCP Port 1 ~ 65535 443
Certificate Self_Signed/CA-Signed Self_Signed
7. Click “Save” link. At below page, select save way and click “execute”(Same as “3.”). It can access to https://[Printer IP Address] after reboot.
Fin.
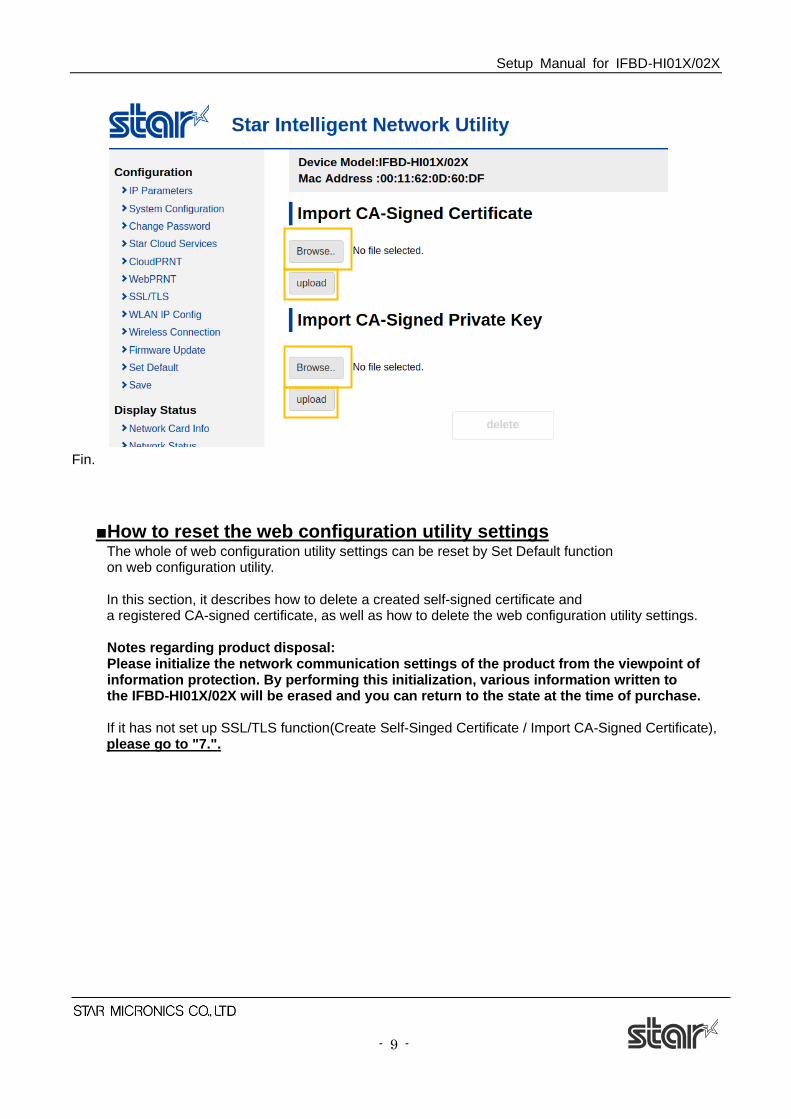
[If use custom “CA-Signed Certificate”] Please select “SSL/TLS” and click “Import CA-Signed Certificate” on “1.”. And please upload custom CA-Signed Certificate and Private Key by “Browse” and “Upload”.
Setup Manual for IFBD-HI01X/02X
- 9 -
Fin.
■How to reset the web configuration utility settings
The whole of web configuration utility settings can be reset by Set Default function on web configuration utility.
In this section, it describes how to delete a created self-signed certificate and
a registered CA-signed certificate, as well as how to delete the web configuration utility settings.
Notes regarding product disposal: Please initialize the network communication settings of the product from the viewpoint of information protection. By performing this initialization, various information written to the IFBD-HI01X/02X will be erased and you can return to the state at the time of purchase.
If it has not set up SSL/TLS function(Create Self-Singed Certificate / Import CA-Signed Certificate), please go to "7.".

Setup Manual for IFBD-HI01X/02X
- 10 -
[How to delete self-signed certificate] (This can be skipped if not set previously.)
1. Click “Create Self-Signed Certificate”.
2. Click “delete” button.

Setup Manual for IFBD-HI01X/02X
- 11 -
3. Confirm OK message.
[How to delete CA-signed certificate/private key] (This can be skipped if not set previously.) 4. Click “Import CA-Signed Certificate”.

Setup Manual for IFBD-HI01X/02X
- 12 -
5. Click “delete” button.
6. Confirm that “delete” button is gray out.

Setup Manual for IFBD-HI01X/02X
- 13 -
[How to reset web configuration utility settings]
7. Select “Set Default”.
8. Click “execute” button and please wait to complete the printer restart.
9. Confirm that progress message and back to top page(or Success dialog) after printer reboot.
Notes: Depends on network environment, ip address is possible to be different from
previous setting by this reset. In the case, enough to confirm that printer restart is
started. And if it does not back to top page after printer restart, please reload the page.

Setup Manual for IFBD-HI01X/02X
- 14 -
3. Firmware Update
It is shown below how to update the firmware. This product allows uploading F/W from Web UI.
There are 2 ways for uploading. One is online updating from Star Micronics Cloud. The other is offline
updating from a local file.
(From V1.5.0 (Sep, 2018)):
IFBD-HI01X/02X is supported to the firmware update function with USB Memory.
It can be useful for offline situation without ethernet cable and Wireless LAN dongle.
The current firmware version can be confirmed from [Network Card Info] menu of WebUI

Setup Manual for IFBD-HI01X/02X
- 15 -
A. Updating from Star Micronics Cloud (Online)
This procedure can be valid in the case of the network connecting internet.
A-1. Click "Network Configuration" ->Firmware Update.
A-2. Click [Check for updates]

Setup Manual for IFBD-HI01X/02X
- 16 -
A-3. If the latest firmware data is available, version number and release note are shown as below.
A-4. After clicking the download button, when all data has been confirmed to be correctly received, start
writing to the Flash ROM with below screen.
After writing to the Flash ROM ends correctly, the printer will automatically be reset. Writing takes several
minutes. Absolutely never turn off the power or apply a reset prior to final reset being applied. If
terminated partway, the Flash ROM data will be damaged, and later it may not start up.
* If your current firmware version is latest, [Your Interface hardware is up-to-date] is expressed, and no
need to update firmware.

Setup Manual for IFBD-HI01X/02X
- 17 -
B. Updating from a local file (Offline)
For this procedure user must obtain a F/W file from Star Micronics in advance.
B-1. Click "Network Configuration" ->Firmware Update.
B-2. Click [from a local file]

Setup Manual for IFBD-HI01X/02X
- 18 -
B-3 . Click [Browse] button, and select a firmware file.
B-4. Click "upload" button.
When all data has been confirmed to be correctly received, start writing to the Flash ROM with below
screen.
If writing to the Flash ROM ends correctly, the printer will automatically be reset. Writing takes several
minutes. Absolutely never turn off the power or apply a reset prior to final reset being applied. If
terminated partway, the Flash ROM data will be damaged, and later it may not start up.

Setup Manual for IFBD-HI01X/02X
- 19 -
C. Updating from USB memory stick (Offline) - From V1.5.0 (Sep, 2018)
For this procedure user must obtain a F/W file from Star Micronics in advance.
This product allows updating a firmware by generic USB memory that stores a specified setting file.
C-1. An operator connects USB memory (FAT32 formatted) which has "star-hix.conf" file and
“HIXUPDATE.bin” file to this product with printer power OFF status.
For the details of these file, see the bottom of this section.
C-2. Turn ON the printer with FEED button pushing. (Self printing is conducted.)
If USB memory is correctly mounted, and "star-hix.conf" file parameter and “HIXUPDATE.bin” file
name is correct, then below printing is conducted.
If star-hix.conf file parameter or the firmware file name/content is incorrect, the error messages will
be printed after performing printer cover open and close mentioned in C-3. Then the update mode will
be canceled(*).
(*) if star-hix.conf file does not exist but HIXUPDATE.bin exists in USB memory, Firmware update
process will proceed.
C-3. An operator executes printer cover open 1 second or more and close within one minute after 2. If
printer cover open and close is not executed within one minute, printer prints "USB configuration mode
cancelled", and setting mode is canceled.
********************************* USB CONFIGURATION & FIRMWARE UPDATE
********************************* To start configuration,
please open printer cover for more than 1 sec.
and then close within 1min.

Setup Manual for IFBD-HI01X/02X
- 20 -
C-4. Printer starts verifying the "HIXUPDATE.bin". When the verification is finished correctly, below
printing is conducted.
USB memory can be taken out after this printing.
C-5. Printer reboots automatically. Then firmware is updated.
・Configuration file specification
File name : star-hix.conf (fixed)
File path : root directory of USB memory (fixed)
File format : text file, field name and value must be divided by semicolon.
・Firmware file specification
File name : HIXUPDATE.bin or HIXUPDATE_XXX….bin(XXX is md5 hash value) (fixed)
File path : root directory of USB memory (fixed)
File format : firmware file, user must obtain a F/W file from Star Micronics in advance.
Applying settings...
Changing Configuration Settings : Usbconfig : ENABLE
Firmware Update Settings : allow_firmware_update : TRUE … **********************************
Updating Now... **********************************
Please wait, your printer will automatically Restart when the update is complete. This operation will take approximately 1min.
You can disconnect USB device now

Setup Manual for IFBD-HI01X/02X
- 21 -
Category Field Name Value and details
Firmware
update
allow_firmware_update Set to TRUE or FALSE to set whether firmware update will be allowed or not.
If firmware package file is in USB stick,
Firmware update process will be performed.
firmware_checksum
Firmware package checksum value (md5). If supplied, checksum of the
firmware package will be checked.
If firmware package file name is with checksum value
(HIXUPDATE_XXXXXX.bin(XXXXXX is md5 checksum value)),
the checksum value in the file name will be used to compare with this value.
If it does not match, firmware update will be denied.
allow_main_firmware_update Set to TRUE or FALSE to set whether Main firmware update will be allowed
or not.
allow_application_firmware_update Set to TRUE or FALSE to set whether application firmware file update will be
allowed or not.
"star-hix.conf" example :
(# columns are ignored)
[Notes]
This firmware update function can be use with USB configuration at same time as below.
#Firmware update settings
allow_firmware_update: TRUE
firmware_checksum: 650d59efd35023dbb2dca995f16c3682
allow_main_firmware_update: TRUE
allow_application_firmware_update: TRUE

Setup Manual for IFBD-HI01X/02X
- 22 -
"star-hix.conf" example for “configuration” and “firmware update” :
About other “configuration” settings,
please refer to “4. WLAN dongle setting” -> “B Setting by USB memory”.
Fin.
#Firmware update settings
allow_firmware_update: TRUE
firmware_checksum: 650d59efd35023dbb2dca995f16c3682
allow_main_firmware_update: TRUE
allow_application_firmware_update: TRUE
#WifiSettings
ssid: 000A79C03D79
security: WPA2-PSK
encryption: AES
key: 71428246
wifi_ip: DHCP

Setup Manual for IFBD-HI01X/02X
- 23 -
4. WLAN dongle setting
The following list shows the Wireless LAN dongle tested by Star.
WLAN chipset Brand Model Vendor ID:Product ID Supported Interface
Version
RTL8188CUS
PLANEX GW-USNANO2A 2019:ab2a 1.1 or later
TRENDnet TEW-648UBM V1.1R 20f4:648b 1.1 or later
EDIMAX EW-7811UN V1.0A 7392:7811 1.1 or later
NETGEAR WNA1000M 0846:9041 1.1 or later
TRENDnet TEW-648UBM V2.0R 20f4:648c 1.9.2 or later
RTL8812AU
PLANEX GW-900D 2019:ab30 1.1 or later (*1)
Buffalo WI-U2-433DM 0411:0242 1.1 or later
TRENDnet TEW-805UB
HW:V1.0R 20f4:805b 1.1 or later (*1)
TP-LINK Archer T4U Ver.1 2357:0101 1.1 or later (*1)
TP-LINK Archer T4U Ver.2 2357:010d 1.3 or later (*1)
D-Link DWA-182
H/W:C1, F/W:3.06 2001:3315 1.1 or later (*1)
LINKSYS WUSB6300 13b1:003f 1.1 or later (*1)
RTL8192DU Aus Linx AL-9904R3 0bda:8194 1.1 or later
RTL8822BU
EDIMAX EW-7822ULC V1.0A 7392:b822 1.6 or later
TP-LINK Archer T4U Ver.3 2357:0115 1.6 or later (*1)
ASUS USB-AC53 Nano 0b05:184c 1.9.2 or later
D-Link DWA-182 H/W:D1 2001:331c 1.9.2 or later (*1)
RTL8188EU EDIMAX EW-7811UN V2 7392:b811 1.9.2 or later
*1 In case of SP700, the dongle cannot mount directly to USB-A port due to the dongle size.
In this case please use other dongle or use a general USB extension cable.

Setup Manual for IFBD-HI01X/02X
- 24 -
■How to set WLAN IP configuration by using WLAN dongle.
For the setting to connect to access point, there are 2 methods. One is from WebUI, and the other is by
using USB memory.
A. Setting from WebUI
Access the WebUI by wired LAN connection with WLAN dongle inserted.
A-1. Access the homepage for administrator (http://IP Address/home.html).
(Example: For IP address = 192.168.10.1,access http://192.168.10.1/home.html)
A-2. Login with User Name and Password (UN: "root" and PW:"public" as factory setting)
A-3. Click "Network Configuration" ->Wireless Connection.
[Method by automatic access point searching]
A-4. Click [Enter] of Site Survey.

Setup Manual for IFBD-HI01X/02X
- 25 -
A-5. Then found access point are listed. Click [Select] of access point to connect.
A-6. Input the Key, and click [connect].

Setup Manual for IFBD-HI01X/02X
- 26 -
A-7. Click [save] menu or “save” link to save the setting. In this case, do not click back button of the
browser, otherwise setting is disappeared.
A-8. Select [Save -> Configuration printing -> Restart device] for rebooting with setting print, or [Save ->
Restart device] for rebooting without setting print, and click [execute]. Then printer executes reboot and
setting is finished.
Setup Manual for IFBD-HI01X/02X
- 27 -
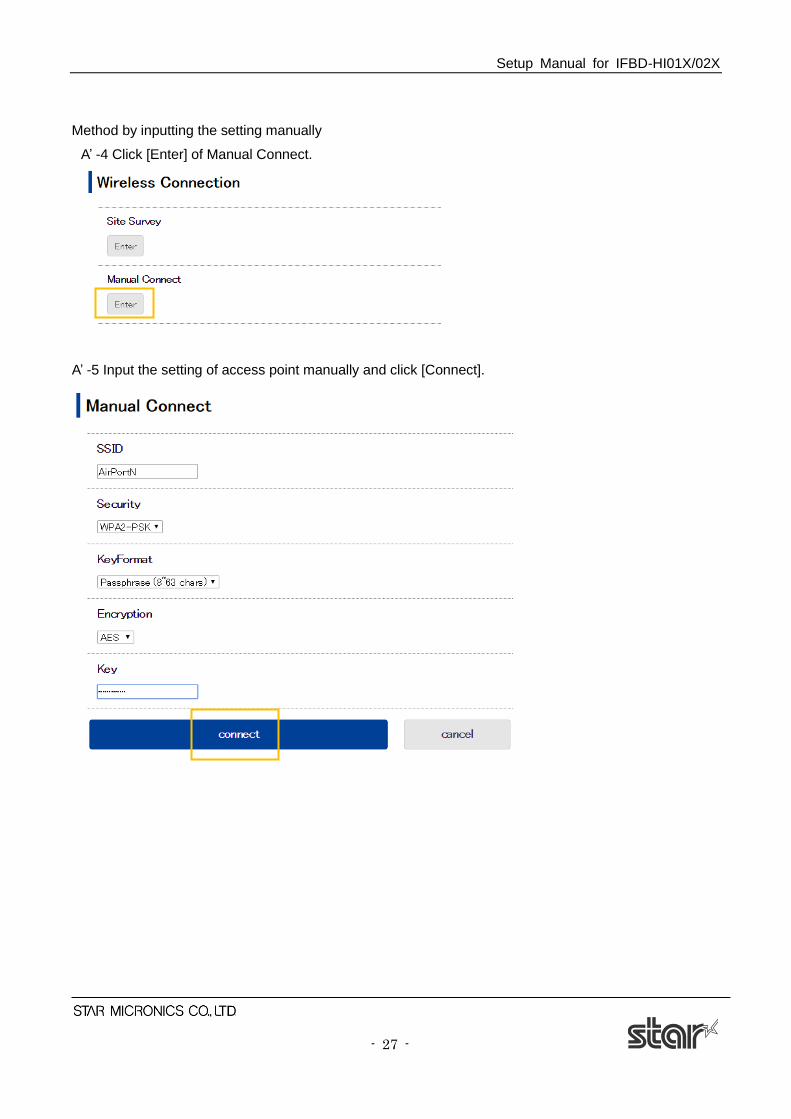
Method by inputting the setting manually
A’ -4 Click [Enter] of Manual Connect.
A’ -5 Input the setting of access point manually and click [Connect].

Setup Manual for IFBD-HI01X/02X
- 28 -
A’ -6 Click [save] menu or “save” link to move to save menu. In this case, do not click back button of the
browser, otherwise setting is disappeared.
A’ -7 Select [Save -> Configuration printing -> Restart device] for rebooting with setting print, or [Save ->
Restart device] for rebooting without setting print, and click [execute]. Then printer executes reboot and
setting is finished.

Setup Manual for IFBD-HI01X/02X
- 29 -
Wireless connection status can be confirmed from [Wireless Status] menu of WebUI.

Setup Manual for IFBD-HI01X/02X
- 30 -
B Setting by USB memory
This product allows changing the network setting by generic USB memory that stores a specified setting
file.
・Procedure of WLAN setting by USB memory
B-1. An operator connects USB memory (FAT32 formatted) which has "star-hix.conf" file to this
product with printer power OFF status. For the details of this file, see the bottom of this section.
B-2. Turn ON the printer with FEED button pushing. (Self printing is conducted.)
If USB memory is correctly mounted, and "star-hix.conf" file parameter is correct, then below
printing is conducted.
If there is no "star-hix.conf" file in USB memory, printer prints "USB configuration mode cancelled",
or if "star-hix.conf" file parameter is incorrect, printer prints "Authentication Error", and setting mode is
canceled.
B-3. An operator executes printer cover open 1 second or more and close within one minute after
2. If printer cover open and close is not executed within one minute, printer prints "USB configuration
mode cancelled", and setting mode is canceled.
********************************* USB CONFIGURATION
********************************* To start configuration,
please open printer cover for more than 1 sec.
and then close within 1min.
Setup Manual for IFBD-HI01X/02X
- 31 -
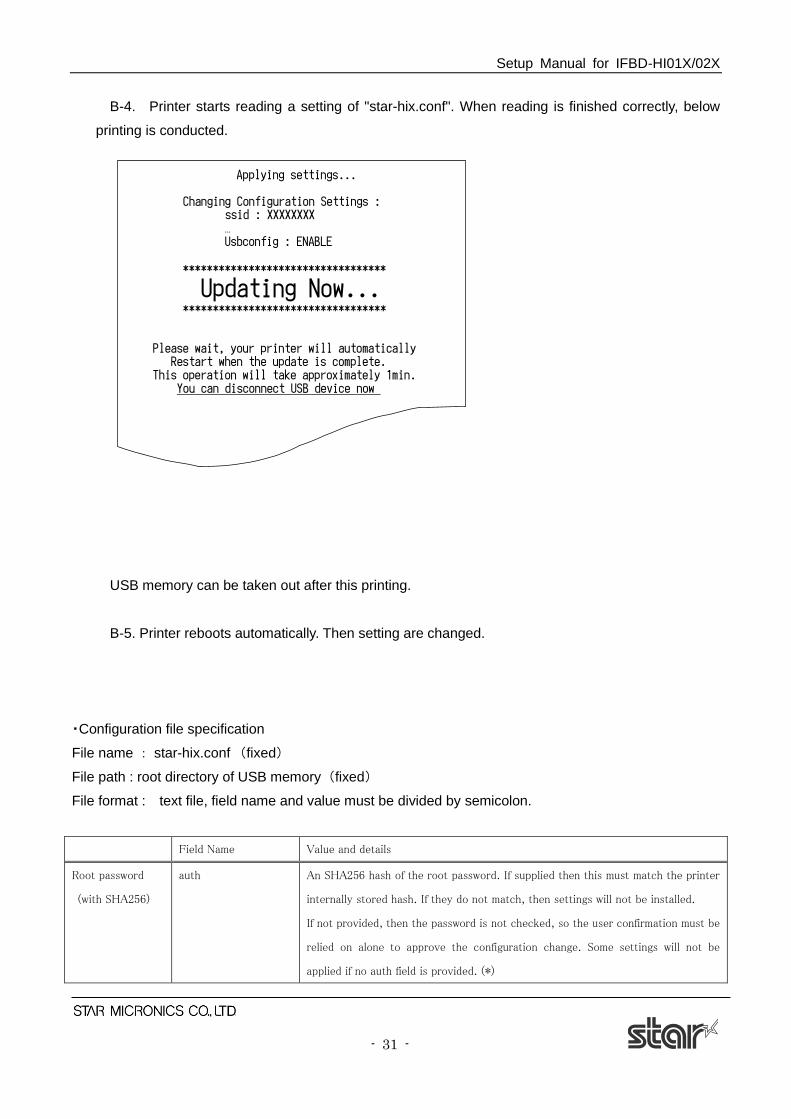
B-4. Printer starts reading a setting of "star-hix.conf". When reading is finished correctly, below
printing is conducted.
USB memory can be taken out after this printing.
B-5. Printer reboots automatically. Then setting are changed.
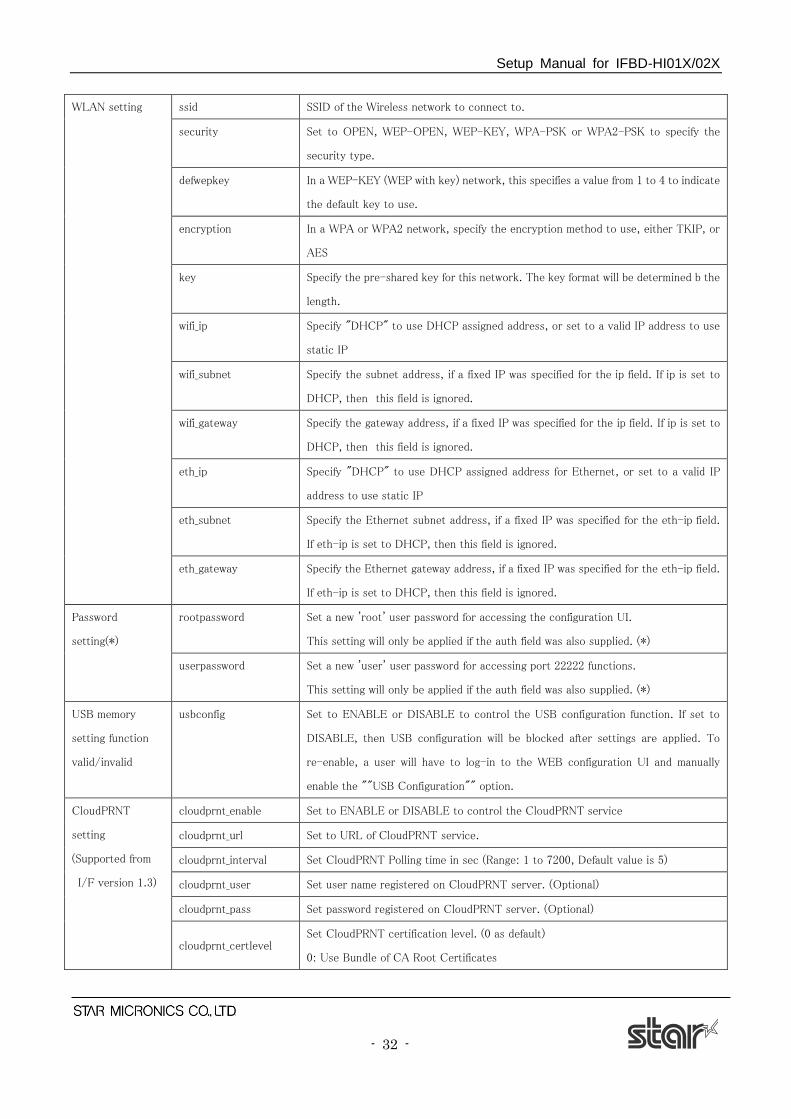
・Configuration file specification
File name : star-hix.conf (fixed)
File path : root directory of USB memory (fixed)
File format : text file, field name and value must be divided by semicolon.
Field Name Value and details
Root password
(with SHA256)
auth An SHA256 hash of the root password. If supplied then this must match the printer
internally stored hash. If they do not match, then settings will not be installed.
If not provided, then the password is not checked, so the user confirmation must be
relied on alone to approve the configuration change. Some settings will not be
applied if no auth field is provided. (*)
Applying settings...
Changing Configuration Settings : ssid : XXXXXXXX …
Usbconfig : ENABLE **********************************
Updating Now... **********************************
Please wait, your printer will automatically Restart when the update is complete. This operation will take approximately 1min.
You can disconnect USB device now
Setup Manual for IFBD-HI01X/02X
- 32 -
WLAN setting ssid SSID of the Wireless network to connect to.
security Set to OPEN, WEP-OPEN, WEP-KEY, WPA-PSK or WPA2-PSK to specify the
security type.
defwepkey In a WEP-KEY (WEP with key) network, this specifies a value from 1 to 4 to indicate
the default key to use.
encryption In a WPA or WPA2 network, specify the encryption method to use, either TKIP, or
AES
key Specify the pre-shared key for this network. The key format will be determined b the
length.
wifi_ip Specify "DHCP" to use DHCP assigned address, or set to a valid IP address to use
static IP
wifi_subnet Specify the subnet address, if a fixed IP was specified for the ip field. If ip is set to
DHCP, then this field is ignored.
wifi_gateway Specify the gateway address, if a fixed IP was specified for the ip field. If ip is set to
DHCP, then this field is ignored.
eth_ip Specify "DHCP" to use DHCP assigned address for Ethernet, or set to a valid IP
address to use static IP
eth_subnet Specify the Ethernet subnet address, if a fixed IP was specified for the eth-ip field.
If eth-ip is set to DHCP, then this field is ignored.
eth_gateway Specify the Ethernet gateway address, if a fixed IP was specified for the eth-ip field.
If eth-ip is set to DHCP, then this field is ignored.
Password
setting(*)
rootpassword Set a new 'root' user password for accessing the configuration UI.
This setting will only be applied if the auth field was also supplied. (*)
userpassword Set a new 'user' user password for accessing port 22222 functions.
This setting will only be applied if the auth field was also supplied. (*)
USB memory
setting function
valid/invalid
usbconfig Set to ENABLE or DISABLE to control the USB configuration function. If set to
DISABLE, then USB configuration will be blocked after settings are applied. To
re-enable, a user will have to log-in to the WEB configuration UI and manually
enable the ""USB Configuration"" option.
CloudPRNT
setting
(Supported from
I/F version 1.3)
cloudprnt_enable Set to ENABLE or DISABLE to control the CloudPRNT service
cloudprnt_url Set to URL of CloudPRNT service.
cloudprnt_interval Set CloudPRNT Polling time in sec (Range: 1 to 7200, Default value is 5)
cloudprnt_user Set user name registered on CloudPRNT server. (Optional)
cloudprnt_pass Set password registered on CloudPRNT server. (Optional)
cloudprnt_certlevel Set CloudPRNT certification level. (0 as default)
0: Use Bundle of CA Root Certificates
Setup Manual for IFBD-HI01X/02X
- 33 -
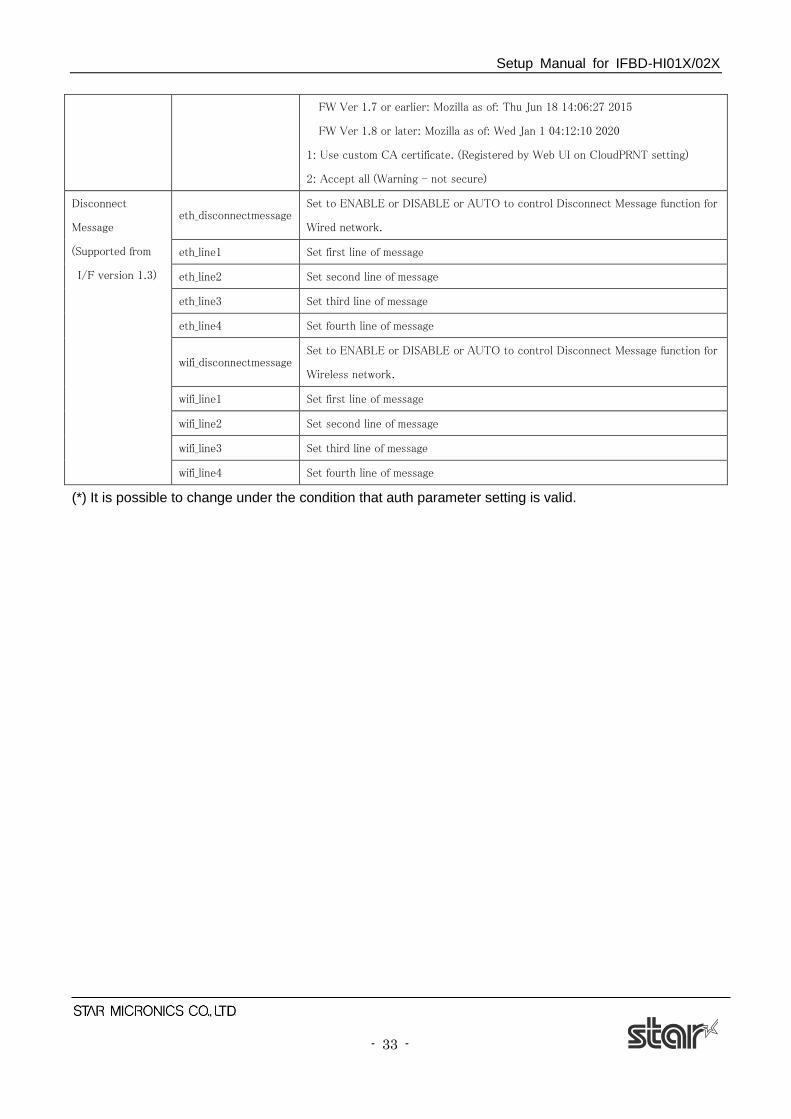
FW Ver 1.7 or earlier: Mozilla as of: Thu Jun 18 14:06:27 2015
FW Ver 1.8 or later: Mozilla as of: Wed Jan 1 04:12:10 2020
1: Use custom CA certificate. (Registered by Web UI on CloudPRNT setting)
2: Accept all (Warning - not secure)
Disconnect
Message
(Supported from
I/F version 1.3)
eth_disconnectmessage Set to ENABLE or DISABLE or AUTO to control Disconnect Message function for
Wired network.
eth_line1 Set first line of message
eth_line2 Set second line of message
eth_line3 Set third line of message
eth_line4 Set fourth line of message
wifi_disconnectmessage Set to ENABLE or DISABLE or AUTO to control Disconnect Message function for
Wireless network.
wifi_line1 Set first line of message
wifi_line2 Set second line of message
wifi_line3 Set third line of message
wifi_line4 Set fourth line of message
(*) It is possible to change under the condition that auth parameter setting is valid.
Setup Manual for IFBD-HI01X/02X
- 34 -
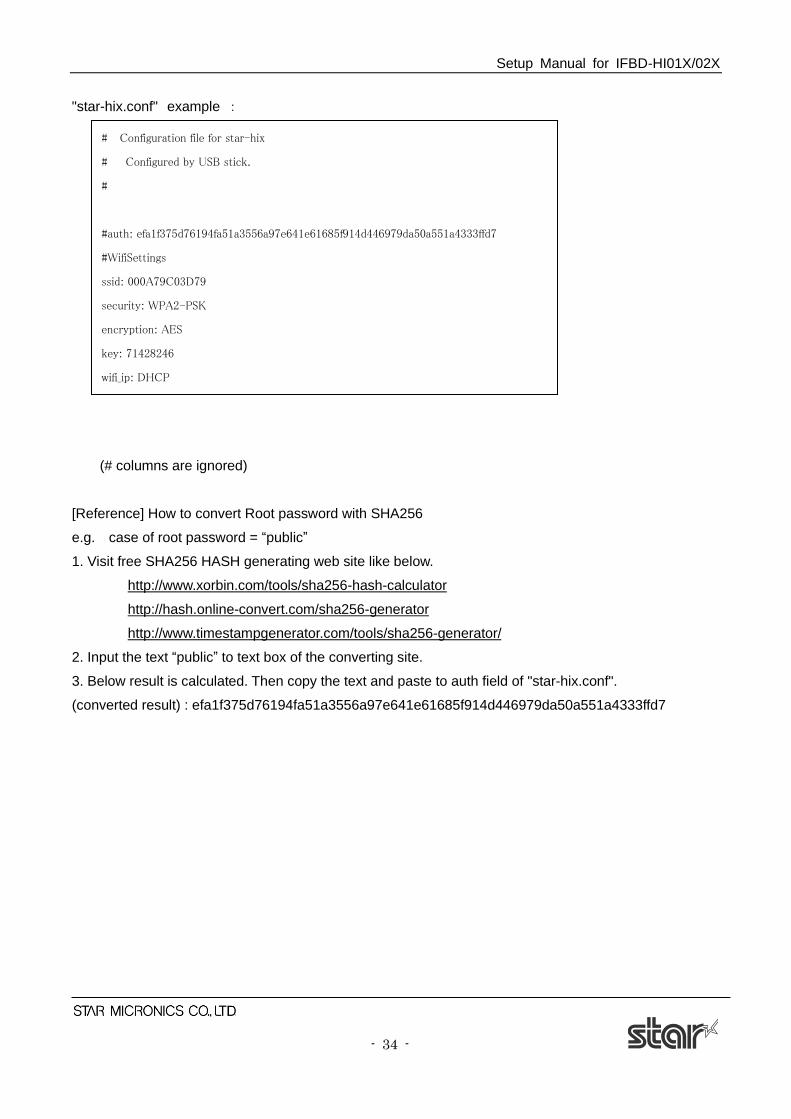
"star-hix.conf" example :
(# columns are ignored)
[Reference] How to convert Root password with SHA256
e.g. case of root password = “public”
1. Visit free SHA256 HASH generating web site like below.
http://www.xorbin.com/tools/sha256-hash-calculator
http://hash.online-convert.com/sha256-generator
http://www.timestampgenerator.com/tools/sha256-generator/
2. Input the text “public” to text box of the converting site.
3. Below result is calculated. Then copy the text and paste to auth field of "star-hix.conf".
(converted result) : efa1f375d76194fa51a3556a97e641e61685f914d446979da50a551a4333ffd7
# Configuration file for star-hix
# Configured by USB stick.
#
#auth: efa1f375d76194fa51a3556a97e641e61685f914d446979da50a551a4333ffd7
#WifiSettings
ssid: 000A79C03D79
security: WPA2-PSK
encryption: AES
key: 71428246
wifi_ip: DHCP

Setup Manual for IFBD-HI01X/02X
- 35 -
5. Star webPRNT
■How to enable Star webPRNT in HI01X
*The default setting of Star webPRNT is “Enable”
Visit the web configuration utility to enable Star webPRNT.
1. Select “Web Print” after “Login”
2. Select “ENABLE” in Star webPRNT Service section
3. Click “Submit” button.
4 The following message is shown. Select “Save”.
③
② ①
④

Setup Manual for IFBD-HI01X/02X
- 36 -
5 Select “Save-> Configuration printing -> Restart device”
6 Click “execute” button. Then printer executes reboot and setting is finished.
Fin
⑤
⑥

Setup Manual for IFBD-HI01X/02X
- 37 -
■How to set BCR for Star webPRNT (example: mPOP-BCR)
From I/F firmware ver. 1.2, you don’t need to change to HID class setting for mPOP-BCR
[Star SCD222U]
Please connect to USB A port on HI01X interface and power on a printer, HI01X firmware will detect
automatically if there is a supported device. (Firmware Version 1.4 or later)
[mPOP-BCR1 / Zebra DS9208]
Visit the web configuration utility.
1. Select [System Configuration] menu
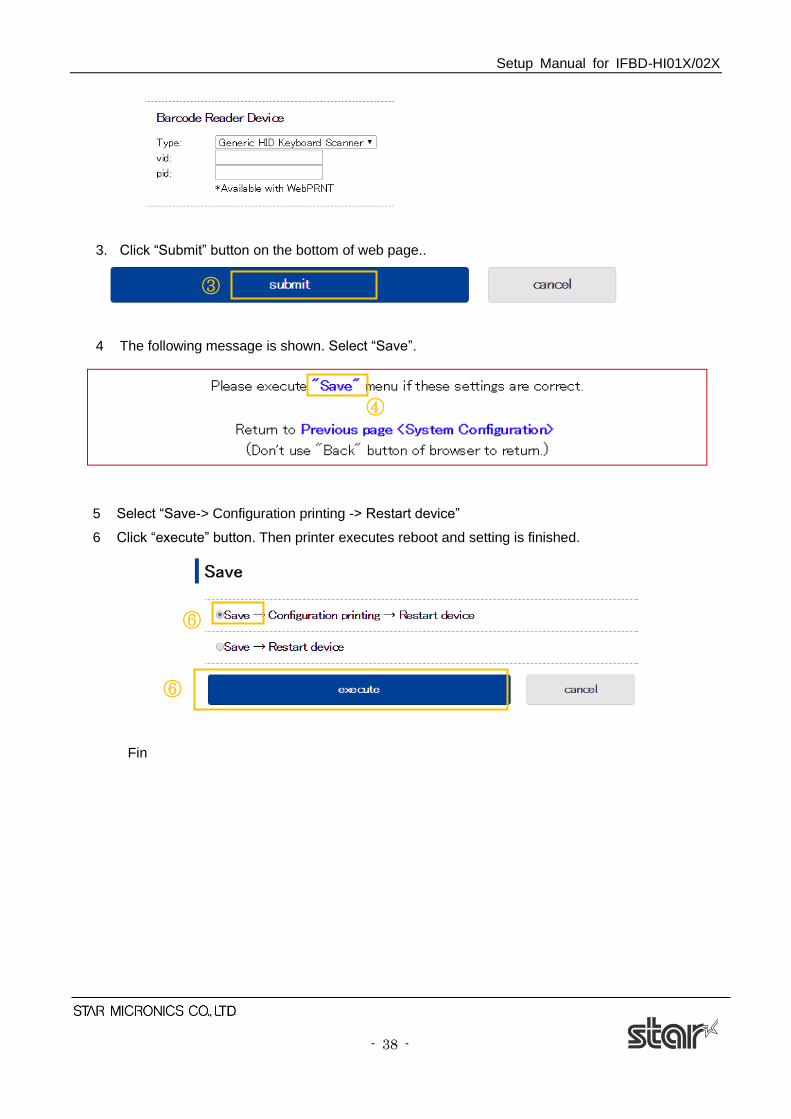
2. Select mPOP-BCR in [Barcode Reader Device]. (Firmware Version 1.2 or later)
* For other HID BCR, select [Generic HID Keyboard Scanner] and put VID and PID of Barcode
Reader Device. In this case, “a” to “f” must be input as lower case.
You can check the BCR of VID and PID by Windows “Device manager”
(Windows button > Computer > Manage (right click)
②
①
Setup Manual for IFBD-HI01X/02X
- 38 -
3. Click “Submit” button on the bottom of web page..
4 The following message is shown. Select “Save”.
5 Select “Save-> Configuration printing -> Restart device”
6 Click “execute” button. Then printer executes reboot and setting is finished.
Fin
③
④
⑥
⑥

Setup Manual for IFBD-HI01X/02X
- 39 -
■Star webPRNT demo
Open the web browser (Safari, Chrome) and put “http://IPaddress/webprnt/A002.html” into
web-browser to visit Star webPRNT demo site. Star webPRNT demo site which is located in
IFBD-HI01X is shown as below.
<Print demo>
1. Select “Text Receipts” to make print demo
2. Select “3 inch” at Paper Width.
3. Put “http://”IPaddress”/StarWebPRNT/SendMessage“ into the URL of web app sample.
4. Click “Send” button. Then the printer prints a receipt.
Fin
①
④
③
②

Setup Manual for IFBD-HI01X/02X
- 40 -
<Barcode reader demo>
Note: Before making BCR demo you have to set BCR information (VID, PID).
Please see previous section for the detail.
1. Select “Barcode Scan / Status Manager”.
2. Put “http://”IPaddress” /StarWebPRNT/SendMessage“ into the URL of web app sample.
①
②
Setup Manual for IFBD-HI01X/02X
- 41 -
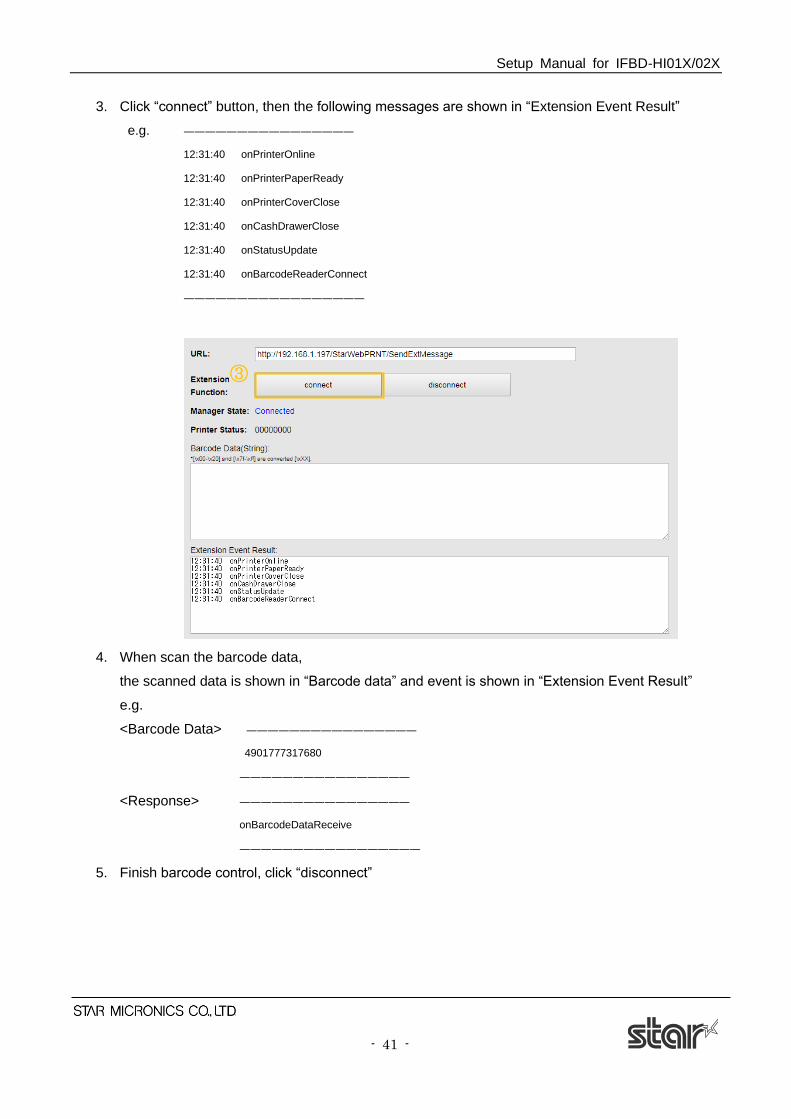
3. Click “connect” button, then the following messages are shown in “Extension Event Result”
e.g. ――――――――――――――――
12:31:40 onPrinterOnline
12:31:40 onPrinterPaperReady
12:31:40 onPrinterCoverClose
12:31:40 onCashDrawerClose
12:31:40 onStatusUpdate
12:31:40 onBarcodeReaderConnect
―――――――――――――――――
4. When scan the barcode data,
the scanned data is shown in “Barcode data” and event is shown in “Extension Event Result”
e.g.
<Barcode Data> ――――――――――――――――
4901777317680
――――――――――――――――
<Response> ――――――――――――――――
onBarcodeDataReceive
―――――――――――――――――
5. Finish barcode control, click “disconnect”
③

Setup Manual for IFBD-HI01X/02X
- 42 -
Fin
⑤
④
④

Setup Manual for IFBD-HI01X/02X
- 43 -
<Customer Display demo>
1. Select “Display / Display Manager”.
2. Put “http://”IPaddress” /StarWebPRNT/SendMessage“ into the URL of web app sample.
①
②

Setup Manual for IFBD-HI01X/02X
- 44 -
3. Click “connect” button, then the following messages are shown in “Extension Event Result”
e.g. ――――――――――――――――
11:12:26 onDisplayConnect
―――――――――――――――――
③

Setup Manual for IFBD-HI01X/02X
- 45 -
4. When it writes the customer display data(Please push any “Send” button), event is shown in
“Extension Event Result”
e.g.
――――――――――――――――---
11:12:29 onWrite
―――――――――――――――――
5. Click “disconnect” button, then the following messages are shown in “Extension Event Result”
Fin
⑤
④
④

Setup Manual for IFBD-HI01X/02X
- 46 -
6. CloudPRNT
■How to set CloudPRNT in HI01X/02X
1. Select [CloudPRNT] menu of WebUI.
2. Select “ENABLE”. (Factory setting is ENABLE)
3. Put server URL (Factory setting is https://cloudprnt.starmicronicscloud.com/cpdevice)
(This setting is just pre-setting, so please change to the available server url)
4. Set polling time e.g. [5] seconds (Factory setting : [120] seconds)
5. Set User Name and Password if the server request. (If required)
6. Click “Submit” button.
7. Select “Save”

Setup Manual for IFBD-HI01X/02X
- 47 -
8. Select “Save -> Configuration printing -> Restart device” or “Save -> Restart device”
9. Click “execute” button. Then printer executes reboot and setting is finished.
10. To use secure HTTPS communication to server, please set CA-certification to follow server
specification.
0: Use Bundle of CA Root Certificates
FW Ver 1.7 or earlier - Mozilla as of: Thu Jun 18 14:06:27 2015
FW Ver 1.8 or later - Mozilla as of: Wed Jan 1 04:12:10 2020
1: Use custom CA certificate. (Registered by Web UI on CloudPRNT setting)
2: Accept all (Warning - not secure)
11. (If select “1: Use custom CA certificate set” at “10.”) Click “Browse..” button and select custom CA
certificate file. And click “upload” button. Also Select “Previous page <CloudPRNT>” link and
select “1: Use custom CA certificate” again.
12. Select NTP server to obtain the calendar and precious time information.
Default setting is using Star NTP server. If you prefer to use other NTP server,
select “Use custom NTP server” and input your NTP server URL.
13. Click “Submit” button, and execute “save” by following 7. 8. 9.
Fin
⑩
⑪
⑬
⑧
⑨
⑫

Setup Manual for IFBD-HI01X/02X
- 48 -
* For server side preparation, Star Micronics provides a server developing document. Please contact your
nearest Star Micronics.
■How to set Peripheral Device for CloudPRNT in HI01X/02X
From I/F firmware ver. 1.4, you can control to peripheral device via CloudPRNT
[Star SCD222U]
Please connect to USB A port on HI01X02X interface and power on a printer, HI01X02X firmware will
detect automatically if there is a supported device. (Firmware Version 1.4 or later)
[mPOP-BCR1 / Zebra DS9208]
Visit the web configuration utility.
1. Select [System Configuration] menu
4. Select “Auto Detect” in [Barcode Reader Device]. (Firmware Version 1.4 or later)
* For other HID BCR, “Auto Detect” can’t be used to detect Generic HID Keyboard Scanner. So
please select [Generic HID Keyboard Scanner] and put VID and PID of Barcode Reader
Device. In this case, “a” to “f” must be input as lower case.
You can check the BCR of VID and PID by Windows “Device manager”
(Windows button > Computer > Manage (right click)
②
①

Setup Manual for IFBD-HI01X/02X
- 49 -
5. Click “Submit” button on the bottom of web page..
6. The following message is shown. Select “Save”.
7 Select “Save-> Configuration printing -> Restart device”
8 Click “execute” button. Then printer executes reboot and setting is finished.
③
④
⑦
⑥

Setup Manual for IFBD-HI01X/02X
- 50 -
[HID Keyboard Device]
Visit the web configuration utility.
1. Select [System Configuration] menu
2. Select “vid:” and “pid:” in [Keyboard Device] and put VID and PID of HID Keyboard Device.
In this case, “a” to “f” must be input as lower case. (Firmware Version 1.4 or later)
3. Click “Submit” button on the bottom of web page.
4. The following message is shown. Select “Save”.
9 Select “Save-> Configuration printing -> Restart device”
10 Click “execute” button. Then printer executes reboot and setting is finished.
③
④
②
①

Setup Manual for IFBD-HI01X/02X
- 51 -
⑧
⑥

Setup Manual for IFBD-HI01X/02X
- 52 -
7. Star Micronics Cloud
HI01X/02X supports AllReciepts and do not need to install the driver supporting SCS.
It can be set by using Web Configuration Utility of HI01X/02X instead.
Raster data, Text data and Micro Receipt are supported from IFBD-HI01X V1.3.0 (Sep, 2017)
IFBD-HI01X/02X is supporting the following printing solution for All Receipts.
- Star Line Thermal Printer are supported
- Star Dot Matrix Printer does not be supported.
I/F
Board
Model
Printer
Model
Interface
Firmware
Version
Supported Printer Driver / SDK
IFBD-HI01X
TSP650II
TSP700II
TSP800II
TSP650IISK
1.2
1.9 or later(*1)
・Android StarIO SDK V3.X (Raster data)
・iOS StarIO SDK V3.X (Raster data)
・StarPRNT Intelligence Printer Driver (Raster data)
・Linux / Mac OS X CUPS Driver
・CloudPRNT (Raster data)
1.3 or later
1.9 or later(*1)
・Android StarIO SDK V3.X
・iOS StarIO SDK V3.X
・StarPRNT Android SDK V5.X
・StarPRNT iOS SDK V5.X
・StarPRNT WindowsStoreApps SDK V5.X
・StarPRNT Intelligence Printer Driver
・Linux / Mac OS X CUPS Driver
・OPOS Driver
・JavaPOS Driver
・CloudPRNT
・Star webPRNT
IFBD-HI02X SP700 No Support No Support
(As of June 2020)
(*1) TSP650IISK is supported from FW Ver 1.9 or later
[Note]
Please do not use the driver supporting SCS together with HI01X/02X SCS function at the
same time. If do this, multiple QR code will be added to the receipts.
Setup Manual for IFBD-HI01X/02X
- 53 -
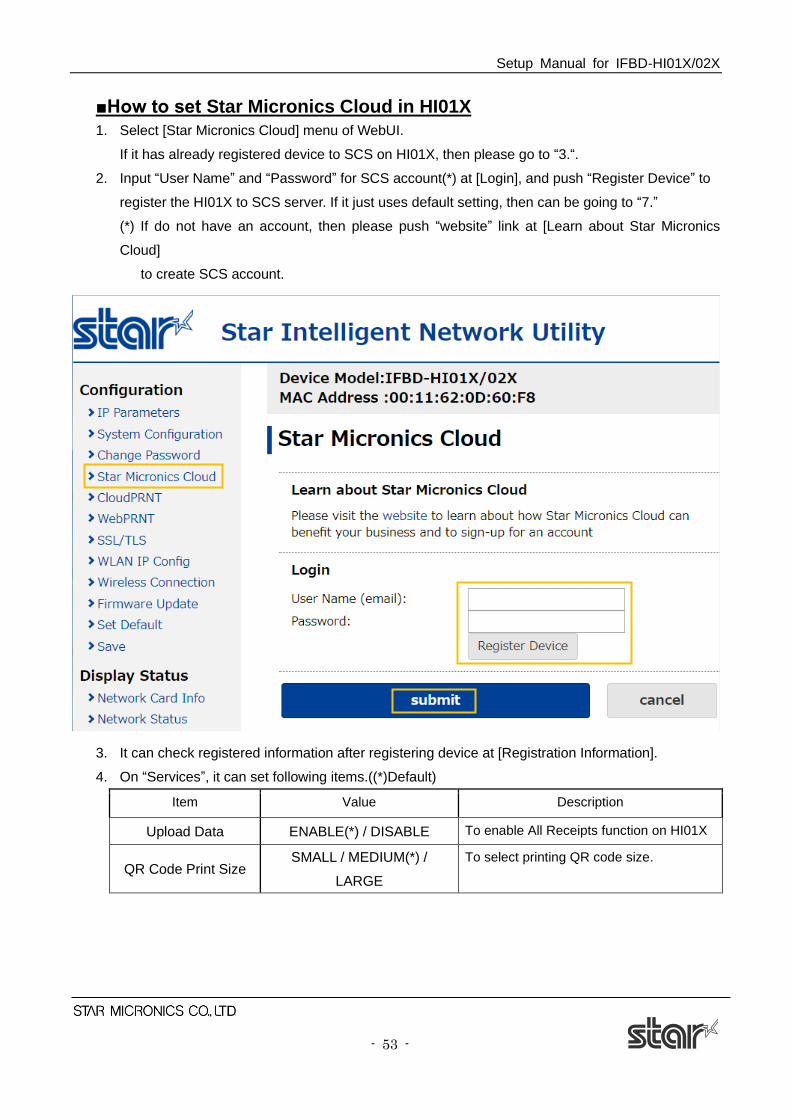
■How to set Star Micronics Cloud in HI01X
1. Select [Star Micronics Cloud] menu of WebUI.
If it has already registered device to SCS on HI01X, then please go to “3.“.
2. Input “User Name” and “Password” for SCS account(*) at [Login], and push “Register Device” to
register the HI01X to SCS server. If it just uses default setting, then can be going to “7.”
(*) If do not have an account, then please push “website” link at [Learn about Star Micronics
Cloud]
to create SCS account.
3. It can check registered information after registering device at [Registration Information].
4. On “Services”, it can set following items.((*)Default)
Item Value Description
Upload Data ENABLE(*) / DISABLE To enable All Receipts function on HI01X
QR Code Print Size SMALL / MEDIUM(*) /
LARGE
To select printing QR code size.

Setup Manual for IFBD-HI01X/02X
- 54 -
Micro Receipt
DISABLE: Full Receipt(*) /
Information + QR code /
Only QR code
To set enable/disable and select printing
receipt style with All Receipts function as
“Print Content + CTA Logo + QR code”
or “CTA Logo + QR code”, “QR code”.
5. On “Configuration”, it can set local time zone by selecting area manually or push “Determine from
browser location”(*).
(*)It has to set “SSL/TLS” (Reference: “2. Web configuration utility”) on IFBD-HI01X and access
the UI by https because web browser requires the secure access to get a location information.
6. Click “submit” button.

Setup Manual for IFBD-HI01X/02X
- 55 -
7. Select “Save”.
8. Select “Save -> Configuration printing -> Restart device” or “Save -> Restart device”.
Click “execute” button. Then printer executes reboot and setting is finished.(Fin.)

Setup Manual for IFBD-HI01X/02X
- 56 -
■How to use “On demand” function for Micro Receipt
“On demand” fuction can change the style of Micro Receipt in real time by web browser.
Therefore an operator easily can use different Micro Receipt setting on each printed receipt.
1. Click a link on the “Star Micronics Cloud -> Services-> Micro Receipt” of Web Config UI.
Or please input the URL which is http://<Printer IP Address>/microreceipt.html on web browser.
2. Select style of Micro Receipt. The red color button is showed a current selected style. (Fin)
These item description are same as step “4.” in “How to set Star Micronics Cloud in HI01X”.

Setup Manual for IFBD-HI01X/02X
- 57 -
8. DNS Setting
HI01X/02X supports specifying DNS server as optional from IFBD-HI01X V1.5.0 (Sep, 2018).
It can be set by using Web Configuration Utility of HI01X/02X.
■How to set specified DNS Setting in HI01X/02X
1. Select [System Configuration] menu of WebUI.
2. Scroll down on the bar of right hand side and input specified DNS Server’s IP address.
(Please input the IP at “DNS 1” or “DNS 2”)

Setup Manual for IFBD-HI01X/02X
- 58 -
3. Click “Submit” button in the bottom of this screen.
4. Click the menu [Save].
Select any of the following, the click Execute:
・Save → Configuration Printing → Restart device
・Save → Restart device
(After the set print is output, when you select, Configuration Printing) Wait for the printer to reset.
Fin

Setup Manual for IFBD-HI01X/02X
- 59 -
Appendix A. Term and Condition
Please refer to https://www.starmicronicscloud.com/legal/retailers/terms-and-conditions/.
Appendix B. Privacy Policy
Please refer to https://www.starmicronicscloud.com/legal/retailers/privacy-policy/.

Setup Manual for IFBD-HI01X/02X
- 60 -
History
Rev 1.0 29th September 2016 Official Release
Rev 1.1 13th January 2017 Applicable printer models added
BCR setting Changed
Rev 1.2 27th September 2017 Added 3 supported Wi-Fi dongles
Added Notes about changing setting of printer at “Instruction”
Added SSL/TLS setting description at “Web configuration utility”
Added CloudPRNT setting and Disconnect Message at “Setting by
USB memory”
Added the description of All Receipts and Micro receipt settings
Rev 1.3 9th March 2018 Added Peripheral Device setting for CloudPRNT function
Rev 1.4 12th September 2018 Added USB Memory Firmware Update feature
Added Customer Display Device support for webPRNT function
Added specified DNS server setting feature
Renamed from Star Cloud Services to Star Micronics Cloud
Added factory setting for CloudPRNT settings
Added Appendix A and Appendix B
Revised the address of company
Rev 1.5 8th February 2018 Revised written errors
Revised the address of company
Rev 1.6 24th June 2019 Revised written errors
Added 2 supported WiFi dongles
Rev 1.7 9th September 2019 Added Change Password description at “Web configuration utility”
Rev 1.8 7th November 2019 Added WiFi dongle description
Rev 1.9 28th February 2020 Added Notes at introduction
Revised image/description for web configuration of CloudPRNT.
Rev 2.0 17th June 2020 Added applicable printer model
Rev 2.1 26th February 2021 Added Set Default description at “Web configuration utility”
Rev 2.2 25th June 2021 Added 4 supported Wi-Fi dongles.
Changed the top page of Web configuration utility image.
