server install guide · pdf fileserver install guide ... chapter 2: installing ivanti ......
TRANSCRIPT

8.5 Update 1
Server Install Guide


- 3 -
NoticesVersion InformationIvanti Endpoint Security Server Install Guide; - Ivanti Endpoint Security Version 8.5 Update 1 - Published:May 2017Document Number: 02_202_8.5 Update 1_171251546
Copyright InformationThis document contains the confidential information and/or proprietary property of Ivanti, Inc. and itsaffiliates (referred to collectively as “Ivanti”), and may not be disclosed or copied without prior writtenconsent of Ivanti.Ivanti retains the right to make changes to this document or related product specifications anddescriptions, at any time, without notice. Ivanti makes no warranty for the use of this document andassumes no responsibility for any errors that can appear in the document nor does it make a commitmentto update the information contained herein.For the most current product information, please visit www.ivanti.com.
Copyright© 2017, Ivanti. All rights reserved.Ivanti and its logos are registered trademarks or trademarks of Ivanti, Inc. and its affiliates in the UnitedStates and/or other countries. Other brands and names may be claimed as the property of others.

Notices
- 4 -

Table of Contents
- 5 -
Table of Contents
System Requirements.................................................................................................................................... 7Supported Operating Systems....................................................................................................................................................................... 7Supported Languages and Locales.............................................................................................................................................................. 8Software Requirements......................................................................................................................................................................................9
Web Browser Requirements.................................................................................................................................................................. 10SQL Server Requirements....................................................................................................................................................................... 11IIS Requirements.........................................................................................................................................................................................12.NET Framework Requirements............................................................................................................................................................ 13
Hardware Requirements..................................................................................................................................................................................13Network Requirements....................................................................................................................................................................................14Recommended Configurations.....................................................................................................................................................................15
Combined Ivanti Endpoint Security Application and Database Server................................................................................ 16Separated Ivanti Endpoint Security Application and Database Servers...............................................................................17
Chapter 2: Installing Ivanti Endpoint Security.........................................................................................21Downloading Ivanti Endpoint Security..................................................................................................................................................... 21About SQL Server Instance Location.........................................................................................................................................................22Defining the Web Client Account and Service Account................................................................................................................... 22Selecting an Installation Method................................................................................................................................................................23Installing Using a New SQL Server Instance..........................................................................................................................................24Installing Using an Existing SQL Server Instance (Either Locally or Remotely)........................................................................ 34Installing Using a Remote SQL Server Instance (with no Local Instance).................................................................................. 48Installing Ivanti Endpoint Security (Separate Ivanti Endpoint Security and SQL Server Admins)......................................61
Beginning Installation (Part I)................................................................................................................................................................62Creating Components on SQL Server (Part II)............................................................................................................................... 69Completing Installation (Part III)..........................................................................................................................................................71
Logging In to Ivanti Endpoint Security.................................................................................................................................................... 76Setting Up Ivanti Endpoint Security.......................................................................................................................................................... 77
Appendix A: Configuring Remote SQL Server Instances........................................................................81Creating Remote Accounts............................................................................................................................................................................81Configuring SQL Server to Accept Remote Connections................................................................................................................. 84Configuring Windows Firewall for SQL Server Instance Access.....................................................................................................86
Appendix B: Configuring Your Server to use SSL................................................................................... 87Configuring SSL.................................................................................................................................................................................................. 87
Appendix C: Upgrading from Previous Installations.............................................................................. 93
Appendix D: Installation Checklist............................................................................................................ 95Server Installation Checklist...........................................................................................................................................................................95

Ivanti Endpoint Security
- 6 -

- 7 -
System Requirements
Before installing Ivanti Endpoint Security, verify that the targets meets hardware, software, and networkrequirements.On servers that do not meet recommended system requirements If your target server does not meetthe system requirements, Ivanti Endpoint Security will not perform optimally, or may not install.Review all hardware, software, and network requirements before proceeding with installation.
Supported Operating SystemsThe Ivanti Endpoint Security server is supported on a number of Microsoft Windows operating systems.
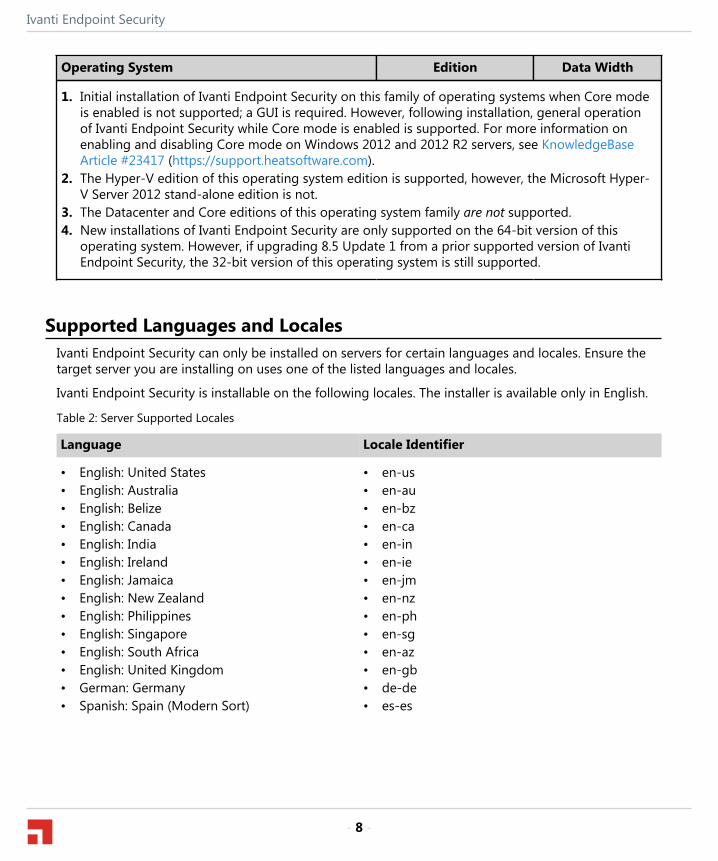
Table 1: Supported Operating Systems
Operating System Edition Data Width
Microsoft Windows Server 2016 StandardDatacenter
64-bit
Microsoft Windows Server 2012 R21 Standard2
Datacenter2
Foundation
64-bit
Microsoft Windows Server 20121 Standard2
Datacenter2
Foundation
64-bit
Microsoft Windows Web Server 2008 R2 Web 64-bit
Microsoft Windows Server 2008 R2 SP13 Standard2
Enterprise264-bit
Microsoft Windows Server 2008 SP23 WebStandardEnterprise
64-bit4
Ivanti Endpoint Security
- 8 -
Operating System Edition Data Width
1. Initial installation of Ivanti Endpoint Security on this family of operating systems when Core modeis enabled is not supported; a GUI is required. However, following installation, general operationof Ivanti Endpoint Security while Core mode is enabled is supported. For more information onenabling and disabling Core mode on Windows 2012 and 2012 R2 servers, see KnowledgeBaseArticle #23417 (https://support.heatsoftware.com).
2. The Hyper-V edition of this operating system edition is supported, however, the Microsoft Hyper-V Server 2012 stand-alone edition is not.
3. The Datacenter and Core editions of this operating system family are not supported.4. New installations of Ivanti Endpoint Security are only supported on the 64-bit version of this
operating system. However, if upgrading 8.5 Update 1 from a prior supported version of IvantiEndpoint Security, the 32-bit version of this operating system is still supported.
Supported Languages and LocalesIvanti Endpoint Security can only be installed on servers for certain languages and locales. Ensure thetarget server you are installing on uses one of the listed languages and locales.
Ivanti Endpoint Security is installable on the following locales. The installer is available only in English.
Table 2: Server Supported Locales
Language Locale Identifier
• English: United States• English: Australia• English: Belize• English: Canada• English: India• English: Ireland• English: Jamaica• English: New Zealand• English: Philippines• English: Singapore• English: South Africa• English: United Kingdom• German: Germany• Spanish: Spain (Modern Sort)
• en-us• en-au• en-bz• en-ca• en-in• en-ie• en-jm• en-nz• en-ph• en-sg• en-az• en-gb• de-de• es-es
System Requirements
- 9 -
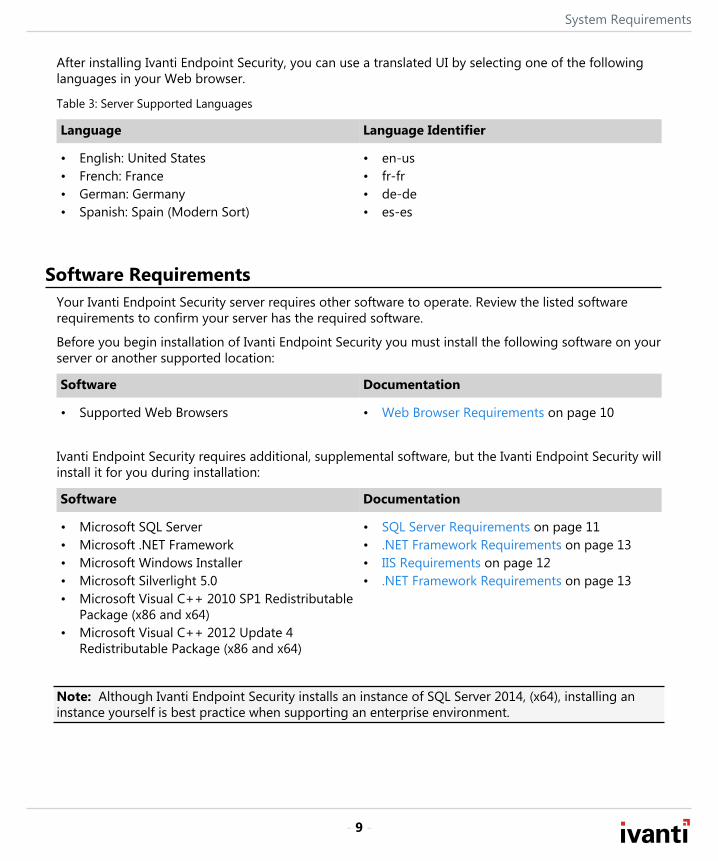
After installing Ivanti Endpoint Security, you can use a translated UI by selecting one of the followinglanguages in your Web browser.
Table 3: Server Supported Languages
Language Language Identifier
• English: United States• French: France• German: Germany• Spanish: Spain (Modern Sort)
• en-us• fr-fr• de-de• es-es
Software RequirementsYour Ivanti Endpoint Security server requires other software to operate. Review the listed softwarerequirements to confirm your server has the required software.
Before you begin installation of Ivanti Endpoint Security you must install the following software on yourserver or another supported location:
Software Documentation
• Supported Web Browsers • Web Browser Requirements on page 10
Ivanti Endpoint Security requires additional, supplemental software, but the Ivanti Endpoint Security willinstall it for you during installation:
Software Documentation
• Microsoft SQL Server• Microsoft .NET Framework• Microsoft Windows Installer• Microsoft Silverlight 5.0• Microsoft Visual C++ 2010 SP1 Redistributable
Package (x86 and x64)• Microsoft Visual C++ 2012 Update 4
Redistributable Package (x86 and x64)
• SQL Server Requirements on page 11• .NET Framework Requirements on page 13• IIS Requirements on page 12• .NET Framework Requirements on page 13
Note: Although Ivanti Endpoint Security installs an instance of SQL Server 2014, (x64), installing aninstance yourself is best practice when supporting an enterprise environment.

Ivanti Endpoint Security
- 10 -
Web Browser RequirementsYou need one of several specific Web browsers to use the Ivanti Endpoint Security Web console afterinstallation.
Table 4: Supported Web Browsers
Supported Browser Supported Versions
Google Chrome 53 and higher
Microsoft Edge EdgeHTML 14 and higher
Microsoft Internet Explorer 9 and higher
Mozilla Firefox 31 Extended Support Release and higherSupport cannot be guaranteed due to the acceleratedrelease cycle of Mozilla Firefox Rapid Release.
Important:
• Microsoft Silverlight 5.0 is also required to use Ivanti Installation Manager.• Google Chrome and Microsoft Edge are currently incompatible with these Ivanti Endpoint Security
features:
• Patch & Remediation Patch Package Editor• Device Control Media Hasher• Install Manager
System Requirements
- 11 -
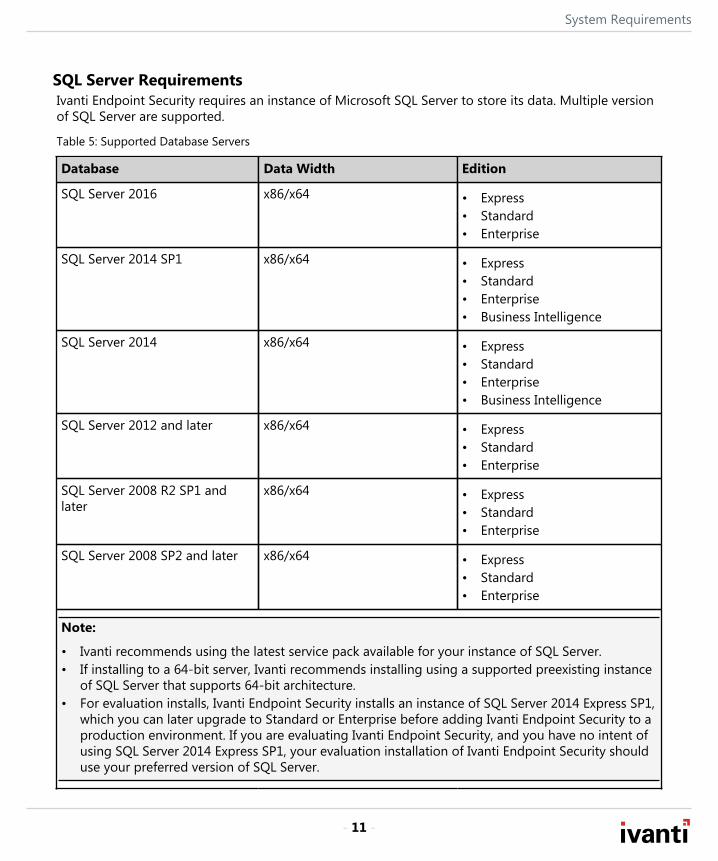
SQL Server RequirementsIvanti Endpoint Security requires an instance of Microsoft SQL Server to store its data. Multiple versionof SQL Server are supported.
Table 5: Supported Database Servers
Database Data Width Edition
SQL Server 2016 x86/x64 • Express• Standard• Enterprise
SQL Server 2014 SP1 x86/x64 • Express• Standard• Enterprise• Business Intelligence
SQL Server 2014 x86/x64 • Express• Standard• Enterprise• Business Intelligence
SQL Server 2012 and later x86/x64 • Express• Standard• Enterprise
SQL Server 2008 R2 SP1 andlater
x86/x64 • Express• Standard• Enterprise
SQL Server 2008 SP2 and later x86/x64 • Express• Standard• Enterprise
Note:
• Ivanti recommends using the latest service pack available for your instance of SQL Server.• If installing to a 64-bit server, Ivanti recommends installing using a supported preexisting instance
of SQL Server that supports 64-bit architecture.• For evaluation installs, Ivanti Endpoint Security installs an instance of SQL Server 2014 Express SP1,
which you can later upgrade to Standard or Enterprise before adding Ivanti Endpoint Security to aproduction environment. If you are evaluating Ivanti Endpoint Security, and you have no intent ofusing SQL Server 2014 Express SP1, your evaluation installation of Ivanti Endpoint Security shoulduse your preferred version of SQL Server.

Ivanti Endpoint Security
- 12 -
You can install one of the supported database servers instances listed above in the following locationsrelative to the Ivanti Endpoint Security server.
Table 6: Supported Database Instance Install Locations
Location
• On the target Ivanti Endpoint Security server itself, as installed by the Ivanti server installer, whichinstalls an instance of SQL Server 2014 Express SP1 (x64).
• On the target Ivanti server itself, using a preexisting instance of SQL Server.• On a remote server that the Ivanti server remotely connects to, using a preexisting instance of SQL
Server.
Important: When installing Ivanti Endpoint Security using an existing SQL Server instance, theinstance collation must be set to one of the following values:
• SQL_Latin1_General_CP1_CI_AS• Latin1_General_CI_AS
IIS RequirementsBefore you can install Ivanti Endpoint Security, Microsoft Internet Information Services 7.0 or later mustbe installed.
Table 7: Internet Information Services (IIS) Requirements
Required IISVersion
Operating System Family Microsoft Documentation
Microsoft Windows Server 2012 R2 http://www.iis.net/learn/install/installing-iis-85/installing-iis-85-on-windows-server-2012-r2
Microsoft Windows Server 2012 http://www.iis.net/learn/get-started/whats-new-in-iis-8/installing-iis-8-on-windows-server-2012
Microsoft Windows Server 2008 R2 http://technet.microsoft.com/en-us/library/cc771209.aspx
MicrosoftInternetInformationServices 7.0+
Microsoft Windows Server 2008 http://technet.microsoft.com/en-us/library/cc771209(WS.10).aspx

System Requirements
- 13 -
.NET Framework RequirementsIvanti Endpoint Security requires installation of .NET Framework 4.5.2.
Microsoft Windows Server 2012 and 2012 R2 use .NET 4.5, which comes installed by default.
Table 8: .NET Framework Requirements
Required .NET Framework Version Operating System Family
• Microsoft .NET Framework 4.5.2+• Microsoft .NET Framework 4.5.2 with KB
2934520
Note: Ivanti Endpoint Security providesthe .NET Framework 4.5.2 installer duringinstallation or upgrade (reboot required).
• Microsoft Windows Web Server 2008 R2• Microsoft Windows Server 2008 R2 SP1• Microsoft Windows Server 2008 SP2• Microsoft Windows Server 2012• Microsoft Windows Server 2012 R2
Hardware RequirementsThe Ivanti Endpoint Security server must meet or exceed the specified hardware requirements.
Note:
• Installing the Ivanti Endpoint Security server on a dedicated server is recommended.• The minimum hardware recommendation is designed for trial environments of 50 endpoints.
For a Ivanti Endpoint Security configuration ideal for your environment, see RecommendedConfigurations on page 15.
• 2.0 GHz dual-core processor• 4 GB RAM• 50 GB or more hard drive space
• RAID 1 disk array• 7200 RPM drive speed
• 1 Gbps Network Card

Ivanti Endpoint Security
- 14 -
Network RequirementsYour Ivanti Endpoint Security server needs access to specific websites and network services.
Network Requirement
Server Role: Your Ivanti Endpoint Security should not be a domain controller.
Firewall Access URLs forreplication and agentcommunication:
• https://cdn.securegss.net• http://cache.patchlinksecure.net• http://cache.lumension.com• http://gssnews.lumension.com• https://leicapi-lemss.lumension.com• http://download.windowsupdate.com• http://www.download.windowsupdate.com (For Microsoft content)• http://go.microsoft.com (For Microsoft content)• http://ardownload.adobe.com (For Adobe content)• http://swupdl.adobe.com (For Adobe content)• http://armdl.adobe.com (For Adobe content)• http://download.adobe.com (For Adobe content)•
Important:
• Refer to KnowledgeBase Article 22967 (https://support.heatsoftware.com) and KnowledgeBase Article 22795(https://support.heatsoftware.com) for additional URLs andIP Addresses which may be required depending upon yourconfiguration and content subscriptions.
• The firewalls on your server may require modification to accessthese URLs. If your corporate policies do not allow you to makethe necessary firewall modifications, please contact Support for arecommended configuration.
Network DiscoveryWindows Services:
Ivanti Endpoint Security uses the server Network Discovery WindowsServices to discover other computers and devices on your networkand installation. At time of install, the Ivanti Endpoint Security installerprompts you to enable these services:
• DNS Client• Function Discovery Resource Publication• SSDP Discovery• UPnP Device Host

System Requirements
- 15 -
Network Requirement
Encryption Protocols: Ivanti Endpoint Security uses Transport Layer Security forcommunication between the Ivanti Endpoint Security Server and theIvanti Endpoint Security Agent: TLS 1.0, 1.1, and 1.2. Ivanti EndpointSecurity prompts you to enable these protocols during installation.
Recommended ConfigurationsIvanti recommends different hardware and software requirements customized for your Ivanti EndpointSecurity network setup.
Server Configuration ConsiderationsIvanti Endpoint Security requires two main components to function:
• Ivanti Endpoint Security Application Server: This server is responsible for Web site, replicationservices, and endpoint distribution services.
• Ivanti Endpoint Security Database Server: This server is responsible for SQL database and storedprocedures.
These servers can be installed on a single server, or on two, separate servers.
• Combined Application and Database Server: In configurations where the Ivanti Endpoint Securityapplication and database are installed on the same server, the server requires both high processingpower and disk speed, as it is performs both application and database functions.Combined Ivanti Endpoint Security Application and Database Server on page 16
• Separate Application and Database Servers: In configurations where the Ivanti Endpoint Securityapplication and database are installed on separate servers, the server requirements are different.Although processing and software requirements on both servers remain the same, the databaserequires increased HDD specifications, as it executes disk-intensive functions.Separated Ivanti Endpoint Security Application and Database Servers on page 17
Endpoint Scaling ConsiderationsRegardless of your Ivanti Endpoint Security application and database configuration, your server (orservers) require increasingly high-end hardware and software to offset increased load from endpoints.Use better hardware in environments with a high endpoint count.

Ivanti Endpoint Security
- 16 -
Additional Considerations
• For additional information about the physical memory limits for Windows releases, refer toMemory Limits for Windows Releases (http://msdn.microsoft.com/en-us/library/windows/desktop/aa366778(v=vs.85).aspx).
• For additional information about moving SQL Server databases, refer to Move System Databases(http://msdn.microsoft.com/en-us/library/ms345408.aspx).
• For additional information about Microsoft's top ten best practices for storage, refer to Storage TopTen Best Practices (http://technet.microsoft.com/en-us/library/cc966534.aspx).
Combined Ivanti Endpoint Security Application and Database ServerFor optimal performance, the hardware and software supporting Ivanti Endpoint Security should bescaled to your endpoint count.
The following table lists the recommended hardware and software for you Ivanti Endpoint Securitynetwork.
Note: Installation on a physical server is assumed. If installing to virtual environment, refer toKnowledgeBase Article 22724 (https://support.heatsoftware.com).
Combined Server Recommended Configuration
Endpoint Count < 50 < 500 < 1,000 < 5,000 < 10,0001
Operating System Windows2012 R2
Windows2012 R2
Windows2012 R2
Windows2012 R2
Windows2012 R2
Operating System Edition Standard Standard Standard Standard Standard
Operating SystemArchitecture
x64 x64 x64 x64 x64
Database Server SQL 2016 SQL 2016 SQL 2016 SQL 2016 SQL 2016
Database Server Edition Standard2 Standard Standard Standard Enterprise
Software
Database ServerArchitecture
x64 x64 x64 x64 x64
Core Architecture3 2 2 4 8 16
Core Speed (GHz) 2.0+ 2.0+ 2.0+ 2.0+ 2.0+
RAM (GB)4 4 4 8 16 32
Network (LAN) 1 Gb/s 1 Gb/s 1 Gb/s 1 Gb/s 1 Gb/s
Disk Array 5 RAID 1 RAID 1 MultipleRAID
MultipleRAID
MultipleRAID
Hardware
# Hard Drives 2 2 4 6 8

System Requirements
- 17 -
Endpoint Count < 50 < 500 < 1,000 < 5,000 < 10,0001
Drive Speed (RPM) 7200 7200 10k/SSD 10k/SSD 15k/SSD
Hard Drive Volume Breakdown
OS/Data 250GB 500GB N/A N/A N/A
OS N/A N/A RAID 1- 250GB
RAID 1- 250GB
RAID 1- 250GB
Data N/A N/A RAID 1- 500GB
RAID 1/SSD - 1TB
RAID 10/SSD - 1TB
Temp DB N/A N/A N/A RAID 0- 250GB
SSD -240GB
1. If you are managing 10000+ endpoints, contact Ivanti Self Service Support (https://support.heatsoftware.com) for a recommended configuration.
2. Evaluation customers should use Express edition with Advanced Services.3. A Sandy Bridge Xeon+ or AMD equivalent is recommended. On virtualized servers, 2x the
assigned cores is recommended.4. On virtualized servers, 2x RAM is recommended for networks supporting 1000+ endpoints.5. Due to performance issues, do not use RAID 5 configurations. Replace the disk array with a shared
SAN, an enterprise-class SSD, or another enterprise storage solution.
• 1000 IOPS minimum sustained performance is recommended.• A dedicated array or LUN is recommended.
Separated Ivanti Endpoint Security Application and Database ServersWhen the Application Server and Database Server are installed on two physical servers, then eachservers recommended hardware requirements will increase according to the number of managedendpoints in your network.
Review the following information when the components are installed on separate servers.
Note: Installation on a physical server is assumed. If installing to virtual environment, refer toKnowledgeBase Article 22724 (https://support.heatsoftware.com).
Recommended Application Server ConfigurationThe following table lists the recommended configuration for the Application Server.
Endpoint Count < 50 < 500 < 1,000 < 5,000 < 10,0001
Software Operating System Windows2012 R2
Windows2012 R2
Windows2012 R2
Windows2012 R2
Windows2012 R2

Ivanti Endpoint Security
- 18 -
Endpoint Count < 50 < 500 < 1,000 < 5,000 < 10,0001
Operating SystemEdition
Standard Standard Standard Standard Standard
Operating SystemArchitecture
x64 x64 x64 x64 x64
Core Architecture2 2 2 4 8 16
Core Speed (GHz) 2.0+ 2.0+ 2.0+ 2.0+ 2.0+
RAM (GB)3 4 4 8 16 16
Network (LAN) 1 Gb/s 1 Gb/s 1 Gb/s 1 Gb/s 1 Gb/s
Disk Array4 RAID 1 RAID 1 RAID1/SSD
RAID1/SSD
RAID1/SSD
# Hard Drives 2 2 2 2 2
Drive Speed (RPM) 7200 7200 10k/SSD 10k/SSD 10k/SSD
Hard Drive Volume Breakdown
ApplicationServerHardware
OS/Data (GB) 250 500 500 500 500
1. If you are managing 10000+ endpoints, contact Ivanti Self Service Support (https://support.heatsoftware.com) for a recommended configuration.
2. A Sandy Bridge Xeon+ or AMD equivalent is recommended. On virtualized servers, 2x theassigned cores is recommended.
3. On virtualized servers, 2x RAM is recommended for networks supporting 1000+ endpoints.4. Due to performance issues, do not use RAID 5 configurations. Replace the disk array with a shared
SAN, an enterprise-class SSD, or another enterprise storage solution.
• 1000 IOPS minimum sustained performance is recommended.• A dedicated array or LUN is recommended.
Recommended SQL Server ConfigurationThe following table lists the recommended configuration for the Database Server.
Endpoint Count < 50 < 500 < 1,000 < 5,000 < 10,0001
Operating System Windows2012 R2
Windows2012 R2
Windows2012 R2
Windows2012 R2
Windows2012 R2
Operating System Edition Standard Standard Standard Standard Standard
Software
Operating SystemArchitecture
x64 x64 x64 x64 x64

System Requirements
- 19 -
Endpoint Count < 50 < 500 < 1,000 < 5,000 < 10,0001
Database Server SQL 2016 SQL 2016 SQL 2016 SQL 2016 SQL 2016
Database ServerArchitecture
x64 x64 x64 x64 x64
Database Server Edition Standard2 Standard Standard Standard Enterprise
Core Architecture3 2 2 4 8 16
Core Speed (GHz) 2.0+ 2.0+ 2.0+ 2.0+ 2.0+
RAM (GB)4 4 4 8 16 32
Network (LAN) 1 Gb/s 1 Gb/s 1 Gb/s 1 Gb/s 1 Gb/s
Disk Array 5 RAID 1 RAID 1 MultipleRAID
MultipleRAID
MultipleRAID
# Hard Drives 2 2 4 6 8
Drive Speed (RPM) 7200 7200 10k/SSD 10k/SSD 15k/SSD
Hard Drive Volume Breakdown
OS/Data (GB) 250 500 N/A N/A N/A
OS (GB) N/A N/A RAID 1- 250
RAID 1- 250
RAID 1- 250
Data N/A N/A RAID 1- 500GB
RAID 1/SSD - 1TB
RAID 10/SSD - 1TB
SQLServerHardware
Temp DB (GB) N/A N/A N/A RAID 0- 250
SSD - 240
1. If you are managing 10000+ endpoints, contact Ivanti Self Service Support (https://support.heatsoftware.com) for a recommended configuration.
2. Evaluation customers should use Express edition with Advanced Services.3. A Sandy Bridge Xeon+ or AMD equivalent is recommended. On virtualized servers, 2x the
assigned cores is recommended.4. On virtualized servers, 2x RAM is recommended for networks supporting 1000+ endpoints.5. Due to performance issues, do not use RAID 5 configurations. Replace the disk array with a shared
SAN, an enterprise-class SSD, or another enterprise storage solution.
• 1000 IOPS minimum sustained performance is recommended.• A dedicated array or LUN is recommended.

System Requirements
- 20 -

- 21 -
Chapter
2Installing Ivanti Endpoint Security
In this chapter:
• Downloading Ivanti EndpointSecurity
• About SQL Server Instance Location• Defining the Web Client Account
and Service Account• Selecting an Installation Method• Installing Using a New SQL Server
Instance• Installing Using an Existing SQL
Server Instance (Either Locally orRemotely)
• Installing Using a Remote SQL ServerInstance (with no Local Instance)
• Installing Ivanti Endpoint Security(Separate Ivanti Endpoint Securityand SQL Server Admins)
• Logging In to Ivanti EndpointSecurity
• Setting Up Ivanti Endpoint Security
Complete the Ivanti Endpoint Security installation method that isbest for your network environment.Before installation, download the latest Ivanti Endpoint Security(Ivanti Endpoint Security) installer.There is an installation procedure for all Ivanti Endpoint Securityinstallation scenarios.After installation, complete any additional procedures associatedwith the installation method.
Downloading Ivanti Endpoint SecurityWhen you purchase Ivanti Endpoint Security, you receive no physical media. Rather, you download itfrom the company Web site.
Download Ivanti Endpoint Security from the Ivanti Customer Portal (https://support.heatsoftware.com).
1. Open your Web browser.
2. Browse to the Ivanti Customer Portal (https://support.heatsoftware.com) .

Ivanti Endpoint Security
- 22 -
3. Browse to and download the most recent version of the Ivanti Endpoint Security installer to yourdesired location.
After Completing This Task:Complete the installation procedure applicable to your network environment. For additionalinformation, refer to Selecting an Installation Method on page 23.
About SQL Server Instance LocationIvanti Endpoint Security requires an instance of Microsoft SQL Server to store system data values.You can install this SQL Server instance on your target Ivanti Endpoint Security server or a remoteserver.
Local SQL Server Instance A SQL Server instance can be installed on the same server as IvantiEndpoint Security. When using a local SQL Server instance, youcan use either a named or default instance of SQL Server that ispreexisting, or you can use a new instance of SQL Server (which is setup by the Ivanti Endpoint Security Server installer).
Remote SQL Server Instance A SQL Server instance can be installed on a different server thanIvanti Endpoint Security, and Ivanti Endpoint Security can thenaccess that remote instance. If you elect to use a remote SQL Serverinstance, you must direct Ivanti Endpoint Security toward the remoteinstance during Ivanti Endpoint Security installation. However, beforedirecting Ivanti Endpoint Security to the remote instance, you mustconfigure that instance to accept remote connections. For additionalinformation, refer to Configuring SQL Server to Accept RemoteConnections on page 84.
Tip: Install Ivanti Endpoint Security using a remote SQL Server instance to increase performance.
Defining the Web Client Account and Service AccountIvanti Endpoint Security requires two user accounts to operate critical components: a Web clientaccount and a service account.Ivanti recommends creating new local user accounts to use as Web client and service accounts (asdefined in the installation procedures). However, you can also use preexisting local or domain accounts.When using preexisting local or domain accounts, certain requirements must be fulfilled. Remember

Installing Ivanti Endpoint Security
- 23 -
the following rules if you use preexisting user accounts when installing Ivanti Endpoint Security using aremote instance of SQL Server:
• In cross-domain network configurations, accounts from either domain may be used as the Webclient and service accounts, but the domains must have a trust relationship.
• Any install in which either the Ivanti Endpoint Security server or the SQL server is in a workgroupmust use local accounts as the Web client and service accounts.
• When using local accounts as the Web client and service accounts, there must be a duplicate ofeach account on each server. For example, if the Ivanti Endpoint Security server hosts an accountnamed serviceadmin with a password of Password.0, then the SQL server must host an accountcalled serviceadmin with a password of Password.0.
• When using a domain account for the service accounts it must also belong to the localAdministrator group in order to run critical services including Internet Information Services (IIS).
Note: You can use existing user accounts as the Web client account and service account. However,Ivanti recommends creating new accounts specifically for Ivanti Endpoint Security using the installer(if using a remote SQL Server instance, manual creation of identical accounts is required). Creatingaccounts specifically for the product increases security and automates creation of trust relationships.
Selecting an Installation MethodThere are multiple methods of installing the product. When installing, identify the scenario that bestsuits your network environment, and complete the scenario according to the provided procedures.For small network environments that do not require complex instances of SQL Server, completethe basic Ivanti Endpoint Security (Ivanti Endpoint Security) installation. This installation includes aninstallation of Microsoft SQL Server 2014, Express Edition (x64). This installation method is the simplestIvanti Endpoint Security method.
• Installing Using a New SQL Server Instance on page 24For larger network environments, the Ivanti Endpoint Security installation requires a more sophisticatedSQL Server instance that must be installed independently from Ivanti Endpoint Security. This instanceof SQL Server, which must be installed before Ivanti Endpoint Security, can be installed on either thetarget Ivanti Endpoint Security server or a remote server.
• Installing Using an Existing SQL Server Instance (Either Locally or Remotely) on page 34• Installing Using a Remote SQL Server Instance (with no Local Instance) on page 48In especially large environments, the SQL Server administrator and the Ivanti Endpoint Securityadministrator may be separate individuals. In this scenario, a special installation procedure is requireddue to administrator access right limitations.
• Installing Ivanti Endpoint Security (Separate Ivanti Endpoint Security and SQL Server Admins) onpage 61
Attention: Complete Downloading Ivanti Endpoint Security on page 21 before beginning aninstallation procedure.

Ivanti Endpoint Security
- 24 -
Installing Using a New SQL Server InstanceIf SQL Server is not installed on your target server, or if you want to use a new instance instead of anexisting one, you can create a new SQL Server 2014, Express Edition (x64) instance during the IvantiEndpoint Security installation.
Prerequisites:
• You have completed Downloading Ivanti Endpoint Security on page 21.• As applicable to your network environment, you have gathered the information and completed the
tasks itemized in the Server Installation Checklist on page 95.
Note: For additional information about using preexisting user accounts to operate critical IvantiEndpoint Security components, refer to Defining the Web Client Account and Service Account on page22.If you are installing using a Secure Sockets Layer (SSL), complete the first portion of Configuring SSL onpage 87
1. Log on to the server on which you want to install Ivanti Endpoint Security using either a local ordomain user account with system administrator privileges.
2. Stop or disable any AntiVirus products (such as McAfee, Trend-micro, Symantec, and so on) runningon your server.
Note: An AntiVirus product can prevent processes from running correctly during the installation.Therefore, to ensure a successful installation, all AntiVirus services must be stopped or disabledprior to running the Ivanti Endpoint Security installer.
3. Double-click the Ivanti Endpoint Security installer at the location defined during the download.
Step Result: The Ivanti Endpoint Security InstallShield Wizard opens and begins extracting files.This process may take several minutes.
4. If prompted, install prerequisites and reboot your server.The installer reopens by itself after the reboot.
5. Click Next.
Step Result: The License Agreement page opens.
Tip: Click Print for a hard copy of the license agreement.
6. Review the License Agreement and select the I accept the terms of the license agreementoption.

Installing Ivanti Endpoint Security
- 25 -
7. Click Next.
Step Result: The Customer Information page opens.
Figure 1: Customer Information Page
8. Type the applicable information in the following fields:
Field Description
Company Name Your company name.
Serial Number Your Ivanti Endpoint Security serial number.
Note: Your serial number is two groups of eight alphanumericcharacters. Letters are not case sensitive. If you cannot locateyour serial number, obtain it by contacting the Ivanti SalesSupport ([email protected]) .
Tip: Retain your serial number following installation, as it is necessary if a reinstall of the IvantiEndpoint Security server is needed.

Ivanti Endpoint Security
- 26 -
9. Click Next.A new page or dialog opens.
Page/Dialog Step
If the Question dialogopens:
Click Yes to start network discovery services. The followingservices are necessary to use discovery features within IvantiEndpoint Security:
• DNS Client• Function Discovery Resource Location• SSDP Discover• UPnP Device Host
If the Required IIS Featurespage opens:
Your server does not have the required IIS features installed.Click Install Features to install the features and proceed.
Note: On Windows Server 2008, the default installation ofIIS lacks components necessary for Ivanti Endpoint Security.The Ivanti Endpoint Security installer installs the following IIScomponents if not present:
• Static Content• Default Document• HTTP Errors• ASP.NET• .NET Extensibility• ASP• ISAPI Extensions• ISAPI Filters• Basic Authentication• Windows Authentication• Static Content Compression• Dynamic Content Compression
Installing Ivanti Endpoint Security
- 27 -
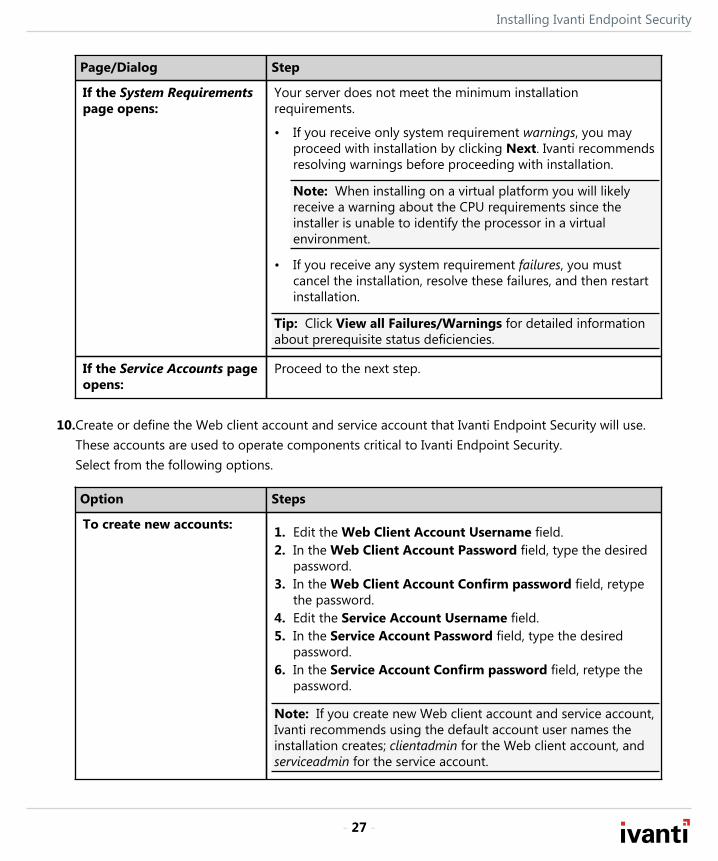
Page/Dialog Step
If the System Requirementspage opens:
Your server does not meet the minimum installationrequirements.
• If you receive only system requirement warnings, you mayproceed with installation by clicking Next. Ivanti recommendsresolving warnings before proceeding with installation.
Note: When installing on a virtual platform you will likelyreceive a warning about the CPU requirements since theinstaller is unable to identify the processor in a virtualenvironment.
• If you receive any system requirement failures, you mustcancel the installation, resolve these failures, and then restartinstallation.
Tip: Click View all Failures/Warnings for detailed informationabout prerequisite status deficiencies.
If the Service Accounts pageopens:
Proceed to the next step.
10.Create or define the Web client account and service account that Ivanti Endpoint Security will use.These accounts are used to operate components critical to Ivanti Endpoint Security.Select from the following options.
Option Steps
To create new accounts: 1. Edit the Web Client Account Username field.2. In the Web Client Account Password field, type the desired
password.3. In the Web Client Account Confirm password field, retype
the password.4. Edit the Service Account Username field.5. In the Service Account Password field, type the desired
password.6. In the Service Account Confirm password field, retype the
password.
Note: If you create new Web client account and service account,Ivanti recommends using the default account user names theinstallation creates; clientadmin for the Web client account, andserviceadmin for the service account.

Ivanti Endpoint Security
- 28 -
Option Steps
To use preexisting accounts: 1. Type the user name associated with the desired account inthe Web Client Account Username field.
2. Type the password associated with the user name in the WebClient Account Password field.
3. Retype the password in the Web Client Account Confirmpassword field.
4. Type the user name associated with the desired account inthe Service Account Username field.
5. Type the password associated with the service account username in the Service Account Password field.
6. Retype the password in the Service Account Confirmpassword field
Note: Ivanti recommends creating new accounts. If usingdomain accounts, include the domain name as part of theuser name (DOMAIN\Username). You may only use preexistingaccounts if they meet the requirements defined in Defining theWeb Client Account and Service Account on page 22.

Installing Ivanti Endpoint Security
- 29 -
11.Click Next.If required, acknowledge the creation of new accounts by clicking OK.
Step Result: The SQL Server Instance page opens.
Figure 2: SQL Server Instance Page
12.Select the Install a new SQL Server instance option.
13.[Optional] Type a new instance name in the Instance Name field.

Ivanti Endpoint Security
- 30 -
14.Click Next.
Step Result: The Destination Location page opens.
Figure 3: Destination Location Page
15.[Optional] Change the Ivanti Endpoint Security installation location.
a) Click Browse.b) Define the desired file path using either the Look in lists or the Folder name field.c) Click OK.
Step Result: The Installation Folder field reflects your changes.
16.[Optional] Change the Ivanti Endpoint Security content storage location.The content storage location is the location where patches and other content items aredownloaded. Ivanti recommends allocating at least 32 GB of storage space to content (plus anadditional 10 GB if managing non-Windows endpoints).
a) Click Browse.b) Define the desired file path using either the Look in lists or the Folder name field.c) Click OK.
Step Result: The Content Storage Location field reflects your changes.

Installing Ivanti Endpoint Security
- 31 -
17.Click Next.
Step Result: The Proxy Settings page opens.
Note: Refer to the Ivanti Endpoint Security: Requirements Guide (https://help.ivanti.com) for a complete list of proxy types that Ivanti Endpoint Securitysupports.
Figure 4: Proxy Settings Page
Note: If one or both of the storage directories defined on the Destination Locationpage does not contain the recommended available disk space, the Proxy Settingspage does not immediately open. Rather, a dialog that lets you redefine the storagedirectories will open. Then after redefining the storage directories, the Proxy Settingspage will open.
18.If your network uses a proxy server to access the Internet, select the A proxy server is requiredcheck box and type the applicable information in the following fields.
Field Type
Server Address The IP address of the applicable proxy server.

Ivanti Endpoint Security
- 32 -
Field Type
Port The port number used for communication.
Note: You can also configure Ivanti Endpoint Security to use a proxy following installation. Refer toThe Service Tab in the Ivanti Endpoint Security User Guide (https://help.ivanti.com/) for additionalinformation on proxy communication.
19.If your network uses a proxy server to access the Internet, and that proxy requires authentication,select the Authentication required check box and type the applicable information in the followingfields.
Field Type
Username A user name that authenticates with the proxy.
Password The password associated with the user name.
Confirm Password The password retyped.
20.Click Next.
Step Result: The Agent to Server Communication page opens.
Figure 5: Agent to Server Communication Page

Installing Ivanti Endpoint Security
- 33 -
21.If you are using SSL for server and agent communication, select the Use SSL security for Patchagent communication with the server check box.
Note: You must possess an SSL certificate to implement SSL communication. Implementationof SSL communication during installation is optional. This feature can be implemented followinginstallation.
22.In the Default server identity field, type the name of your server in one of the following formats:
• DNS name (computername.domainname.com)• Computer name (computername)• IP address (10.10.10.10)During agent registration, the Ivanti Endpoint Security agents use this name to identify the server.
Note: If you are using SSL, the server name that you type in the field must match the server namedon your certificate.
23.Click Next.
Step Result: The Installation Ready page opens.
Figure 6: Installation Ready Page

Ivanti Endpoint Security
- 34 -
24.[Optional] If you only want to install core components, clear the Automatically include all licensedmodules and updates during installation check box.
Note: You may use the Ivanti Installation Manager after the initial installation of Ivanti EndpointSecurity to install additional components. For additional information, refer to Using IvantiInstallation Manager in the Ivanti Endpoint Security User Guide (https://help.ivanti.com/) .
25.Review the installation information and click Install to begin the installation of Ivanti EndpointSecurity. This process may take several minutes.
Important: During installation, do not attempt to access the Ivanti Endpoint Security Web site.Accessing the Web site during installation can cause installation errors.
26.After installation completes, click Finish.
27.Acknowledge the notification that appears by clicking OK.The credentials you use to log in to the Ivanti Endpoint Security Web site for the first time are thecredentials that you used when you logged into the server initially.
Result: Ivanti Endpoint Security is installed and can now be accessed.
After Completing This Task:Proceed to one of the following procedures based on selections made during installation.
• If your server will use SSL, finish Configuring SSL on page 87.• If your server will not use SSL, proceed to Logging In to Ivanti Endpoint Security on page 76.
Installing Using an Existing SQL Server Instance (Either Locally orRemotely)
You can configure your Ivanti Endpoint Security installation to use a SQL Server instance that existseither locally or remotely.
Prerequisites:
• Complete Downloading Ivanti Endpoint Security on page 21.• As applicable to your network environment, you have gathered the information and completed the
tasks itemized in the Server Installation Checklist on page 95.• If you are installing using SSL, complete the first portion of Configuring SSL on page 87• If you are installing using a remote instance of SQL Server, complete Configuring SQL Server to
Accept Remote Connections on page 84Additionally, if you are installing using a remote instance of SQL Server, and no instances of SQL Serverexist locally, complete Installing Using a Remote SQL Server Instance (with no Local Instance) on page48 rather than this procedure.

Installing Ivanti Endpoint Security
- 35 -
1. If installing using a remote instance of SQL Server, complete Creating Remote Accounts on page81.
Note: If using preexisting accounts, you may skip completion of this step.
2. Using either a local or domain account with system administrator privileges, log in to the server onwhich you will install Ivanti Endpoint Security.
3. Stop or disable any AntiVirus products (such as McAfee, Trend-micro, Symantec, and so on) runningon your server.
Note: An AntiVirus product can prevent processes from running correctly during the installation.Therefore, to ensure a successful installation, all AntiVirus services must be stopped or disabledprior to running the Ivanti Endpoint Security installer.
4. Double-click the Ivanti Endpoint Security installer at the location defined during the download.
Step Result: The Ivanti Endpoint Security InstallShield Wizard opens and begins extracting files.This process may take several minutes.
5. If prompted, install prerequisites and reboot your server.The installer reopens by itself after the reboot.
6. Click Next.
Step Result: The License Agreement page opens.
Tip: Click Print for a hard copy of the license agreement.
7. Review the License Agreement and select the I accept the terms of the license agreementoption.

Ivanti Endpoint Security
- 36 -
8. Click Next.
Step Result: The Customer Information page opens.
Figure 7: Customer Information Page
9. Type the applicable information in the following fields:
Field Description
Company Name Your company name.
Serial Number Your Ivanti Endpoint Security serial number.
Note: Your serial number is two groups of eight alphanumericcharacters. Letters are not case sensitive. If you cannot locateyour serial number, obtain it by contacting the Ivanti SalesSupport ([email protected]) .
Tip: Retain your serial number following installation, as it is necessary if a reinstall of the IvantiEndpoint Security server is needed.

Installing Ivanti Endpoint Security
- 37 -
10.Click Next.A new page or dialog opens.
Page/Dialog Step
If the Question dialogopens:
Click Yes to start network discovery services. The followingservices are necessary to use discovery features within IvantiEndpoint Security:
• DNS Client• Function Discovery Resource Location• SSDP Discover• UPnP Device Host
If the Required IIS Featurespage opens:
Your server does not have the required IIS features installed.Click Install Features to install the features and proceed.
Note: On Windows Server 2008, the default installation ofIIS lacks components necessary for Ivanti Endpoint Security.The Ivanti Endpoint Security installer installs the following IIScomponents if not present:
• Static Content• Default Document• HTTP Errors• ASP.NET• .NET Extensibility• ASP• ISAPI Extensions• ISAPI Filters• Basic Authentication• Windows Authentication• Static Content Compression• Dynamic Content Compression

Ivanti Endpoint Security
- 38 -
Page/Dialog Step
If the System Requirementspage opens:
Your server does not meet the minimum installationrequirements.
• If you receive only system requirement warnings, you mayproceed with installation by clicking Next. Ivanti recommendsresolving warnings before proceeding with installation.
Note: When installing on a virtual platform you will likelyreceive a warning about the CPU requirements since theinstaller is unable to identify the processor in a virtualenvironment.
• If you receive any system requirement failures, you mustcancel the installation, resolve these failures, and then restartinstallation.
Tip: Click View all Failures/Warnings for detailed informationabout prerequisite status deficiencies.
If the Service Accounts pageopens:
Proceed to the next step.
11.Define the Web client account and service account that Ivanti Endpoint Security will use.Define these accounts based on how you are configuring your Ivanti Endpoint Security server.
Option Steps
If your install will use a localSQL Server instance:
Define the credentials for two new user accounts (which arecreated by the installer).
1. In the Web Client Account Username field, edit the username.
2. In the Web Client Account Password field, type a password.3. In the Web Client Account Confirm password field, retype
the password.4. In the Service Account Username field, edit the user name.5. In the Service Account Password field, type a password.6. In the Service Account Confirm password field, retype the
password.

Installing Ivanti Endpoint Security
- 39 -
Option Steps
If your install will use aremote SQL Server instance:
Define the credentials for the two user accounts created whilecompleting Creating Remote Accounts on page 81.
1. In the Web Client Account Username field, type the username of the Web client account on your SQL Server.
2. In the Web Client Account Password field, type thepassword of the Web client account on your SQL Server.
3. In the Web Client Confirm password field, retype thepassword.
4. In the Service Account Username field, type the user nameof the service account on your SQL Server.
5. In the Service Account Password field, type the password ofthe service account on your SQL Server.
6. In the Service Account Confirm password field, retype thepassword.
Important: The Web client account and the service accountcredentials must be identical on both the SQL Server and theIvanti Endpoint Security server. If they are not, you cannot accessthe Ivanti Endpoint Security Web site.
If your install will usea local or remote SQLServer instance that usespreexisting accounts asthe Web Client and ServiceAccounts:
Define the credentials for the preexisting accounts.
1. Type the user name associated with the desired account inthe Web Client Account Username field.
2. Type the password associated with the user name in the WebClient Account Password field.
3. Retype the password in the Web Client Account Confirmpassword field.
4. Type the user name associated with the desired account inthe Service Account Username field.
5. Type the password associated with the service account username in the Service Account Password field.
6. Retype the password in the Service Account Confirmpassword field.
Important: You can use either local or domain accounts. Ifusing domain accounts, include the domain name as part ofthe user name (DOMAIN\username). Additionally, preexistingaccounts may only be used if they meet the requirements listedin Defining the Web Client Account and Service Account on page22.

Ivanti Endpoint Security
- 40 -
12.Click Next.If required, acknowledge the creation of new accounts by clicking OK.
Step Result: The SQL Server Instance page opens.
Figure 8: SQL Server Instance Page
13.Ensure the Connect to an existing SQL Server instance option is selected.

Installing Ivanti Endpoint Security
- 41 -
14.Click Next.
Step Result: The SQL Server and Instance page opens. Use this page to define the SQL Serverinstance you will use with Ivanti Endpoint Security.
Figure 9: SQL Server and Instance Page
15.Select a Server Location.Select one of the following options.
Option Steps
To use a locally installedexisting SQL Server instance:
Select the On this machine (local) option.
To use a remotely installedexisting SQL Server instance:
1. Select the On another machine (remote) option.2. Type the server name (not the IP address) in the Server name
field.
Note: If you must define an IP address, either map the IPaddress to the server name in the hosts file or create an aliasusing SQL Server Configuration Manager.

Ivanti Endpoint Security
- 42 -
16.Select a SQL Server Instance.Select one of the following options:
Option Steps
To use a default instance ofSQL Server:
Select the Default instance option.
To use a named instance ofSQL Server:
1. Select the Named instance option.2. If the SQL Server instance is local, select it from the list. If the
SQL Server instance is remote, type its name in the field.
17.Click Next.
Step Result: The SQL Server Authentication page opens.
Figure 10: SQL Server Authentication Page
18.Define the credentials that will be used to access the SQL Server instance (based upon itsauthentication mode).Select from the following options:
Option Steps
To use Windowsauthentication:
Select the Windows Authentication option.
Installing Ivanti Endpoint Security
- 43 -
Option Steps
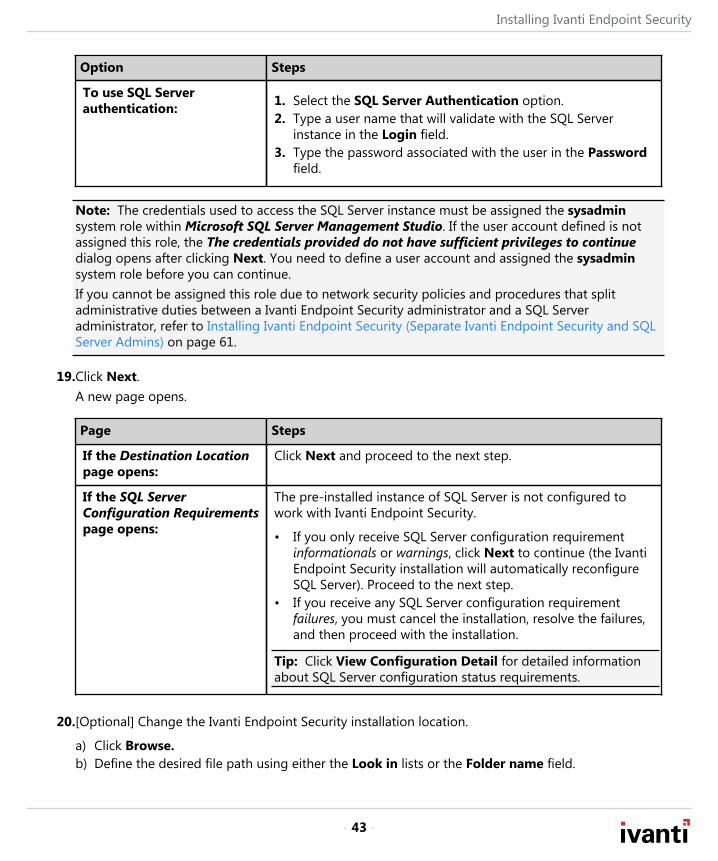
To use SQL Serverauthentication: 1. Select the SQL Server Authentication option.
2. Type a user name that will validate with the SQL Serverinstance in the Login field.
3. Type the password associated with the user in the Passwordfield.
Note: The credentials used to access the SQL Server instance must be assigned the sysadminsystem role within Microsoft SQL Server Management Studio. If the user account defined is notassigned this role, the The credentials provided do not have sufficient privileges to continuedialog opens after clicking Next. You need to define a user account and assigned the sysadminsystem role before you can continue.If you cannot be assigned this role due to network security policies and procedures that splitadministrative duties between a Ivanti Endpoint Security administrator and a SQL Serveradministrator, refer to Installing Ivanti Endpoint Security (Separate Ivanti Endpoint Security and SQLServer Admins) on page 61.
19.Click Next.A new page opens.
Page Steps
If the Destination Locationpage opens:
Click Next and proceed to the next step.
If the SQL ServerConfiguration Requirementspage opens:
The pre-installed instance of SQL Server is not configured towork with Ivanti Endpoint Security.
• If you only receive SQL Server configuration requirementinformationals or warnings, click Next to continue (the IvantiEndpoint Security installation will automatically reconfigureSQL Server). Proceed to the next step.
• If you receive any SQL Server configuration requirementfailures, you must cancel the installation, resolve the failures,and then proceed with the installation.
Tip: Click View Configuration Detail for detailed informationabout SQL Server configuration status requirements.
20.[Optional] Change the Ivanti Endpoint Security installation location.
a) Click Browse.b) Define the desired file path using either the Look in lists or the Folder name field.

Ivanti Endpoint Security
- 44 -
c) Click OK.
Step Result: The Installation Folder field reflects your changes.
21.[Optional] Change the Ivanti Endpoint Security content storage location.The content storage location is the location where patches and other content items aredownloaded. Ivanti recommends allocating at least 32 GB of storage space to content (plus anadditional 10 GB if managing non-Windows endpoints).
a) Click Browse.b) Define the desired file path using either the Look in lists or the Folder name field.c) Click OK.
Step Result: The Content Storage Location field reflects your changes.

Installing Ivanti Endpoint Security
- 45 -
22.Click Next.
Step Result: The Proxy Settings page opens.
Note: Refer to the Ivanti Endpoint Security: Requirements Guide (https://help.ivanti.com) for a complete list of proxy types that Ivanti Endpoint Securitysupports.
Figure 11: Proxy Settings Page
Note: If one or both of the storage directories defined on the Destination Locationpage does not contain the recommended available disk space, the Proxy Settingspage does not immediately open. Rather, a dialog that lets you redefine the storagedirectories will open. Then after redefining the storage directories, the Proxy Settingspage will open.
23.If your network uses a proxy server to access the Internet, select the A proxy server is requiredcheck box and type the applicable information in the following fields.
Field Type
Server Address The IP address of the applicable proxy server.

Ivanti Endpoint Security
- 46 -
Field Type
Port The port number used for communication.
Note: You can also configure Ivanti Endpoint Security to use a proxy following installation. Refer toThe Service Tab in the Ivanti Endpoint Security User Guide (https://help.ivanti.com/) for additionalinformation on proxy communication.
24.If your network uses a proxy server to access the Internet, and that proxy requires authentication,select the Authentication required check box and type the applicable information in the followingfields.
Field Type
Username A user name that authenticates with the proxy.
Password The password associated with the user name.
Confirm Password The password retyped.
25.Click Next.
Step Result: The Agent to Server Communication page opens.
Figure 12: Agent to Server Communication Page

Installing Ivanti Endpoint Security
- 47 -
26.If you are using SSL for server and agent communication, select the Use SSL security for Patchagent communication with the server check box.
Note: You must possess an SSL certificate to implement SSL communication. Implementationof SSL communication during installation is optional. This feature can be implemented followinginstallation.
27.In the Default server identity field, type the name of your server in one of the following formats:
• DNS name (computername.domainname.com)• Computer name (computername)• IP address (10.10.10.10)During agent registration, the Ivanti Endpoint Security agents use this name to identify the server.
Note: If you are using SSL, the server name that you type in the field must match the server namedon your certificate.
28.Click Next.
Step Result: The Installation Ready page opens.
Figure 13: Installation Ready Page

Ivanti Endpoint Security
- 48 -
29.[Optional] If you only want to install core components, clear the Automatically include all licensedmodules and updates during installation check box.
Note: You may use the Ivanti Installation Manager after the initial installation of Ivanti EndpointSecurity to install additional components. For additional information, refer to Using IvantiInstallation Manager in the Ivanti Endpoint Security User Guide (https://help.ivanti.com/) .
30.Review the installation information and click Install to begin the installation of Ivanti EndpointSecurity. This process may take several minutes.
Important: During installation, do not attempt to access the Ivanti Endpoint Security Web site.Accessing the Web site during installation can cause installation errors.
31.After installation completes, click Finish.
32.Acknowledge the notification that appears by clicking OK.The credentials you use to log in to the Ivanti Endpoint Security Web site for the first time are thecredentials that you used when you logged into the server initially.
Result: Ivanti Endpoint Security is installed and can now be accessed.
After Completing This Task:Proceed to one of the following procedures based on selections made during installation.
• If your server will use SSL, finish Configuring SSL on page 87.• If your server will not use SSL, proceed to Logging In to Ivanti Endpoint Security on page 76.
Installing Using a Remote SQL Server Instance (with no Local Instance)Installing Ivanti Endpoint Security using an existing remote SQL Server instance differs slightly when noSQL Server instance exists locally.
Prerequisites:
• Complete Downloading Ivanti Endpoint Security on page 21.• As applicable to your network environment, you have gathered the information and completed the
tasks itemized in the Server Installation Checklist on page 95.• Complete Configuring SQL Server to Accept Remote Connections on page 84• If installing using SSL, complete the first portion of Configuring SSL on page 87.
1. Complete Creating Remote Accounts on page 81.
Note: If using preexisting accounts, you may skip completion of this procedure.
2. Using either a local or domain account with system administrator privileges, log in to the server onwhich you will install Ivanti Endpoint Security.
Installing Ivanti Endpoint Security
- 49 -
3. Stop or disable any AntiVirus products (such as McAfee, Trend-micro, Symantec, and so on) runningon your server.
Note: An AntiVirus product can prevent processes from running correctly during the installation.Therefore, to ensure a successful installation, all AntiVirus services must be stopped or disabledprior to running the Ivanti Endpoint Security installer.
4. Double-click the Ivanti Endpoint Security installer at the location defined during the download.
Step Result: The Ivanti Endpoint Security InstallShield Wizard opens and begins extracting files.This process may take several minutes.
5. If prompted, install prerequisites and reboot your server.The installer reopens by itself after the reboot.
6. Click Next.
Step Result: The License Agreement page opens.
Tip: Click Print for a hard copy of the license agreement.
7. Review the License Agreement and select the I accept the terms of the license agreementoption.
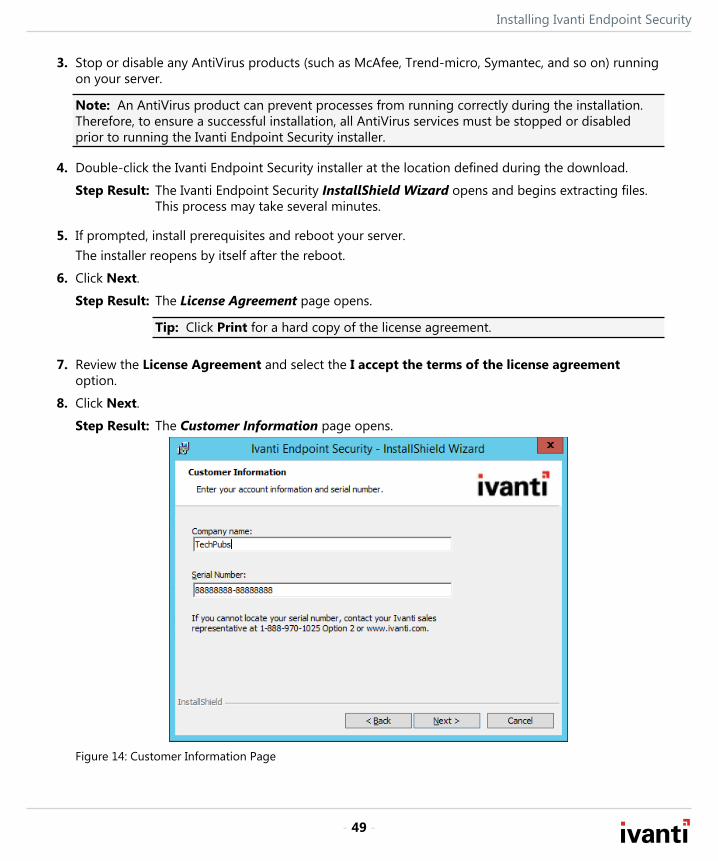
8. Click Next.
Step Result: The Customer Information page opens.
Figure 14: Customer Information Page

Ivanti Endpoint Security
- 50 -
9. Type the applicable information in the following fields:
Field Description
Company Name Your company name.
Serial Number Your Ivanti Endpoint Security serial number.
Note: Your serial number is two groups of eight alphanumericcharacters. Letters are not case sensitive. If you cannot locateyour serial number, obtain it by contacting the Ivanti SalesSupport ([email protected]) .
Tip: Retain your serial number following installation, as it is necessary if a reinstall of the IvantiEndpoint Security server is needed.
10.Click Next.A new page or dialog opens.
Page/Dialog Step
If the Question dialogopens:
Click Yes to start network discovery services. The followingservices are necessary to use discovery features within IvantiEndpoint Security:
• DNS Client• Function Discovery Resource Location• SSDP Discover• UPnP Device Host

Installing Ivanti Endpoint Security
- 51 -
Page/Dialog Step
If the Required IIS Featurespage opens:
Your server does not have the required IIS features installed.Click Install Features to install the features and proceed.
Note: On Windows Server 2008, the default installation ofIIS lacks components necessary for Ivanti Endpoint Security.The Ivanti Endpoint Security installer installs the following IIScomponents if not present:
• Static Content• Default Document• HTTP Errors• ASP.NET• .NET Extensibility• ASP• ISAPI Extensions• ISAPI Filters• Basic Authentication• Windows Authentication• Static Content Compression• Dynamic Content Compression
If the System Requirementspage opens:
Your server does not meet the minimum installationrequirements.
• If you receive only system requirement warnings, you mayproceed with installation by clicking Next. Ivanti recommendsresolving warnings before proceeding with installation.
Note: When installing on a virtual platform you will likelyreceive a warning about the CPU requirements since theinstaller is unable to identify the processor in a virtualenvironment.
• If you receive any system requirement failures, you mustcancel the installation, resolve these failures, and then restartinstallation.
Tip: Click View all Failures/Warnings for detailed informationabout prerequisite status deficiencies.
If the Service Accounts pageopens:
Proceed to the next step.

Ivanti Endpoint Security
- 52 -
11.Define the Web client account and service account that your Ivanti Endpoint Security server will use.Select from the following options.
Option Steps
To duplicate the accountson your SQL Server: 1. In the Web Client Account Username field, type the user
name of the Web client account on your SQL Server.2. In the Web Client Account Password field, type the
password of the Web client account on your SQL Server.3. In the Web Client Account Confirm password field, retype
the password.4. In the Service Account Username field, type the user name
of the service account on your SQL Server.5. In the Service Account Password field, type the password of
the service account on your SQL Server.6. In the Service Account Confirm password field, retype the
password.
Important: The Web client account and the server accountcredentials must be identical on both the SQL Server and theIvanti Endpoint Security server. If they are not, you cannot accessthe Ivanti Endpoint Security Web site.
To use preexisting accounts: 1. Type the user name associated with the desired account inthe Web Client Account Username field.
2. Type the password associated with the user name in the WebClient Account Password field.
3. Retype the password in the Web Client Account Confirmpassword field.
4. Type the user name associated with the desired account inthe Service Account Username field.
5. Type the password associated with the service account username in the Service Account Password field.
6. Retype the password in the Service Account Confirmpassword field.
Important: You can use either local or domain accounts. Ifusing domain accounts, include the domain name as part ofthe user name (DOMAIN\username). Additionally, preexistingaccounts may only be used if they meet the requirements listedin Defining the Web Client Account and Service Account on page22.
Installing Ivanti Endpoint Security
- 53 -
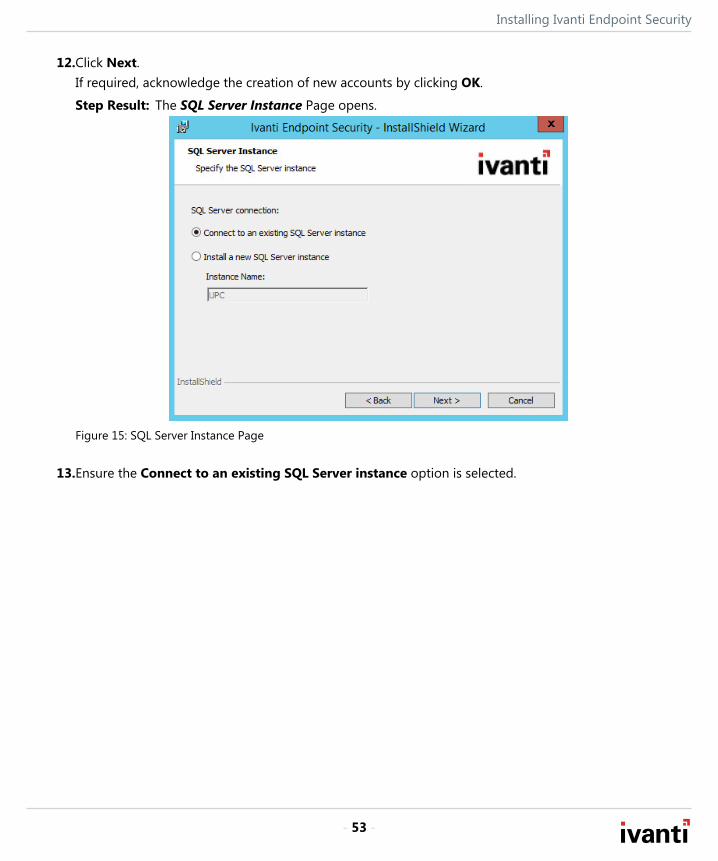
12.Click Next.If required, acknowledge the creation of new accounts by clicking OK.
Step Result: The SQL Server Instance Page opens.
Figure 15: SQL Server Instance Page
13.Ensure the Connect to an existing SQL Server instance option is selected.

Ivanti Endpoint Security
- 54 -
14.Click Next.
Step Result: The SQL Server and Instance page opens.
Figure 16: SQL Server and Instance Page (No Local Options)
Important: If Server Location options are available from this page, you areperforming the wrong procedure. Instead, perform Installing Using an Existing SQLServer Instance (Either Locally or Remotely) on page 34.
15.Type the name (not the IP address) of the server hosting the remote SQL Server instance in theServer name field.
16.Based on the SQL Server instance you are using, select a SQL Server Instance option.Select one of the following options.
Option Steps
To use a default SQL Serverinstance:
Select the Default instance option.
To use a named SQL Serverinstance: 1. Select the Named instance option.
2. Type the instance name in the Named instance field.

Installing Ivanti Endpoint Security
- 55 -
17.Click Next.
Step Result: The SQL Server Authentication page opens.
Figure 17: SQL Server Authentication Page
18.Define the credentials that will be used to access the SQL Server instance (based upon itsauthentication mode).Select from the following options:
Option Steps
To use Windowsauthentication:
Select the Windows Authentication option.

Ivanti Endpoint Security
- 56 -
Option Steps
To use SQL Serverauthentication: 1. Select the SQL Server Authentication option.
2. Type a user name that will validate with the SQL Serverinstance in the Login field.
3. Type the password associated with the user in the Passwordfield.
Note: The credentials used to access the SQL Server instance must be assigned the sysadminsystem role within Microsoft SQL Server Management Studio. If the user account defined is notassigned this role, the The credentials provided do not have sufficient privileges to continuedialog opens after clicking Next. You need to define a user account and assigned the sysadminsystem role before you can continue.If you cannot be assigned this role due to network security policies and procedures that splitadministrative duties between a Ivanti Endpoint Security administrator and a SQL Serveradministrator, refer to Installing Ivanti Endpoint Security (Separate Ivanti Endpoint Security and SQLServer Admins) on page 61.
19.Click Next.A new page opens.
Page Steps
If the Destination Locationpage opens:
Click Next and proceed to the next step.
If the SQL ServerConfiguration Requirementspage opens:
The pre-installed instance of SQL Server is not configured towork with Ivanti Endpoint Security.
• If you only receive SQL Server configuration requirementinformationals or warnings, click Next to continue (the IvantiEndpoint Security installation will automatically reconfigureSQL Server). Proceed to the next step.
• If you receive any SQL Server configuration requirementfailures, you must cancel the installation, resolve the failures,and then proceed with the installation.
Tip: Click View Configuration Detail for detailed informationabout SQL Server configuration status requirements.

Installing Ivanti Endpoint Security
- 57 -
20.[Optional] Change the Ivanti Endpoint Security content storage location.The content storage location is the location where patches and other content items aredownloaded. Ivanti recommends allocating at least 32 GB of storage space to content (plus anadditional 10 GB if managing non-Windows endpoints).
a) Click Browse.b) Define the desired file path using either the Look in lists or the Folder name field.c) Click OK.
Step Result: The Content Storage Location field reflects your changes.
21.Click Next.
Step Result: The Proxy Settings page opens.
Note: Refer to the Ivanti Endpoint Security: Requirements Guide (https://help.ivanti.com) for a complete list of proxy types that Ivanti Endpoint Securitysupports.
Figure 18: Proxy Settings Page
Note: If one or both of the storage directories defined on the Destination Locationpage does not contain the recommended available disk space, the Proxy Settingspage does not immediately open. Rather, a dialog that lets you redefine the storagedirectories will open. Then after redefining the storage directories, the Proxy Settingspage will open.

Ivanti Endpoint Security
- 58 -
22.If your network uses a proxy server to access the Internet, select the A proxy server is requiredcheck box and type the applicable information in the following fields.
Field Type
Server Address The IP address of the applicable proxy server.
Port The port number used for communication.
Note: You can also configure Ivanti Endpoint Security to use a proxy following installation. Refer toThe Service Tab in the Ivanti Endpoint Security User Guide (https://help.ivanti.com/) for additionalinformation on proxy communication.
23.If your network uses a proxy server to access the Internet, and that proxy requires authentication,select the Authentication required check box and type the applicable information in the followingfields.
Field Type
Username A user name that authenticates with the proxy.
Password The password associated with the user name.
Confirm Password The password retyped.

Installing Ivanti Endpoint Security
- 59 -
24.Click Next.
Step Result: The Agent to Server Communication page opens.
Figure 19: Agent to Server Communication Page
25.If you are using SSL for server and agent communication, select the Use SSL security for Patchagent communication with the server check box.
Note: You must possess an SSL certificate to implement SSL communication. Implementationof SSL communication during installation is optional. This feature can be implemented followinginstallation.
26.In the Default server identity field, type the name of your server in one of the following formats:
• DNS name (computername.domainname.com)• Computer name (computername)• IP address (10.10.10.10)During agent registration, the Ivanti Endpoint Security agents use this name to identify the server.
Note: If you are using SSL, the server name that you type in the field must match the server namedon your certificate.

Ivanti Endpoint Security
- 60 -
27.Click Next.
Step Result: The Installation Ready page opens.
Figure 20: Installation Ready Page
28.[Optional] If you only want to install core components, clear the Automatically include all licensedmodules and updates during installation check box.
Note: You may use the Ivanti Installation Manager after the initial installation of Ivanti EndpointSecurity to install additional components. For additional information, refer to Using IvantiInstallation Manager in the Ivanti Endpoint Security User Guide (https://help.ivanti.com/) .
29.Review the installation information and click Install to begin the installation of Ivanti EndpointSecurity. This process may take several minutes.
Important: During installation, do not attempt to access the Ivanti Endpoint Security Web site.Accessing the Web site during installation can cause installation errors.
30.After installation completes, click Finish.

Installing Ivanti Endpoint Security
- 61 -
31.Acknowledge the notification that appears by clicking OK.The credentials you use to log in to the Ivanti Endpoint Security Web site for the first time are thecredentials that you used when you logged into the server initially.
Result: Ivanti Endpoint Security is installed and can now be accessed.
After Completing This Task:Proceed to one of the following procedures based on selections made during installation.
• If your server will use SSL, finish Configuring SSL on page 87.• If your server will not use SSL, proceed to Logging In to Ivanti Endpoint Security on page 76.
Installing Ivanti Endpoint Security (Separate Ivanti Endpoint Securityand SQL Server Admins)
When installing Ivanti Endpoint Security using a remote SQL Server instance in a large networkenvironment, a special installation procedure that splits install duties between the Ivanti EndpointSecurity and the SQL Server administrator may be necessary.When installing Ivanti Endpoint Security (Ivanti Endpoint Security) using a remote SQL Server instance,the user account you use to access the SQL server instance must be assigned the sysadmin rolewithin Microsoft SQL Server Management Studio. However, Ivanti recognizes that in larger networkenvironments, the administrator installing Ivanti Endpoint Security may not be able to obtain this roledue to IT policies and procedures; only the SQL Server administrator can access the applicable SQLinstance.Therefore, under these circumstances, the network administrator and SQL Server administrator mustcooperate to complete Ivanti Endpoint Security installation. To install Ivanti Endpoint Security in thistype of environment, the installation is broken in to three separate procedures.
Table 9: Install Procedure
Procedure Portion Description
Beginning Installation (Part I)on page 62
Performed by the Ivanti Endpoint Security administrator on the targetIvanti Endpoint Security server, this procedure begins the productinstallation. During this procedure, the Ivanti Endpoint Securityadministrator reviews a licence agreement, defines registrationinformation, defines the remote SQL Server location, and creates ascript to modify the SQL Server instance.
Creating Components onSQL Server (Part II) on page69
Performed by the SQL Server administrator on the server hosting theapplicable SQL instance, this procedure creates the user accountsnecessary to operate Ivanti Endpoint Security and then runs thescript created in part I. This script modifies the SQL Server instance toaccommodate Ivanti Endpoint Security installation for an administratorwithout sysadmin rights within Microsoft SQL Server.

Ivanti Endpoint Security
- 62 -
Procedure Portion Description
Completing Installation (PartIII) on page 71
Performed by the Ivanti Endpoint Security administrator on the targetIvanti Endpoint Security server, this procedure completes IvantiEndpoint Security installation. This procedure defines where the IvantiEndpoint Security server and its content will be stored, whether theserver will use a proxy server, and whether the server will use SSL.
Beginning Installation (Part I)The Ivanti Endpoint Security administrator performs the first portion of the install procedure. At the endof this portion, the installer creates a script that is delivered to the SQL Server administrator.
Prerequisites:
• Complete Downloading Ivanti Endpoint Security on page 21.• As applicable to your network environment, you have gathered the information and completed the
tasks itemized in the Server Installation Checklist on page 95.• Complete Configuring SQL Server to Accept Remote Connections on page 84• If installing using SSL, complete the first portion of Configuring SSL on page 87.
This first portion of this installation procedure is performed by the Ivanti Endpoint Security (IvantiEndpoint Security) administrator on the target Ivanti Endpoint Security server.
1. Using either a local or domain account with system administrator privileges, log in to the server onwhich you will install Ivanti Endpoint Security.
2. Stop or disable any AntiVirus products (such as McAfee, Trend-micro, Symantec, and so on) runningon your server.
Note: An AntiVirus product can prevent processes from running correctly during the installation.Therefore, to ensure a successful installation, all AntiVirus services must be stopped or disabledprior to running the Ivanti Endpoint Security installer.
3. Double-click the Ivanti Endpoint Security installer at the location defined during the download.
Step Result: The Ivanti Endpoint Security InstallShield Wizard opens and begins extracting files.This process may take several minutes.
4. If prompted, install prerequisites and reboot your server.The installer reopens by itself after the reboot.
5. Click Next.
Step Result: The License Agreement page opens.
Tip: Click Print for a hard copy of the license agreement.
6. Review the License Agreement and select the I accept the terms of the license agreementoption.

Installing Ivanti Endpoint Security
- 63 -
7. Click Next.
Step Result: The Customer Information page opens.
Figure 21: Customer Information Page
8. Type the applicable information in the following fields:
Field Description
Company Name Your company name.
Serial Number Your Ivanti Endpoint Security serial number.
Note: Your serial number is two groups of eight alphanumericcharacters. Letters are not case sensitive. If you cannot locateyour serial number, obtain it by contacting the Ivanti SalesSupport ([email protected]) .
Tip: Retain your serial number following installation, as it is necessary if a reinstall of the IvantiEndpoint Security server is needed.

Ivanti Endpoint Security
- 64 -
9. Click Next.A new page or dialog opens.
Page/Dialog Step
If the Question dialogopens:
Click Yes to start network discovery services. The followingservices are necessary to use discovery features within IvantiEndpoint Security:
• DNS Client• Function Discovery Resource Location• SSDP Discover• UPnP Device Host
If the Required IIS Featurespage opens:
Your server does not have the required IIS features installed.Click Install Features to install the features and proceed.
Note: On Windows Server 2008, the default installation ofIIS lacks components necessary for Ivanti Endpoint Security.The Ivanti Endpoint Security installer installs the following IIScomponents if not present:
• Static Content• Default Document• HTTP Errors• ASP.NET• .NET Extensibility• ASP• ISAPI Extensions• ISAPI Filters• Basic Authentication• Windows Authentication• Static Content Compression• Dynamic Content Compression

Installing Ivanti Endpoint Security
- 65 -
Page/Dialog Step
If the System Requirementspage opens:
Your server does not meet the minimum installationrequirements.
• If you receive only system requirement warnings, you mayproceed with installation by clicking Next. Ivanti recommendsresolving warnings before proceeding with installation.
Note: When installing on a virtual platform you will likelyreceive a warning about the CPU requirements since theinstaller is unable to identify the processor in a virtualenvironment.
• If you receive any system requirement failures, you mustcancel the installation, resolve these failures, and then restartinstallation.
Tip: Click View all Failures/Warnings for detailed informationabout prerequisite status deficiencies.
If the Service Accounts pageopens:
Proceed to the next step.
10.Create the Web client account and server accounts that Ivanti Endpoint Security will use.
Important: Preexisting accounts or domain accounts cannot be used for this installationprocedure.
a) [Optional] Edit the Web Client Account Username field.b) In the Web Client Account Password field, type the desired password.c) In the Web Client Account Confirm password field, retype the password.d) [Optional] Edit the Service Account Username field.e) In the Service Account Password field, type the desired password.f) In the Service Account Confirm password field, retype the password.
Note: Ivanti recommends using the default account user names the installation creates.

Ivanti Endpoint Security
- 66 -
11.Click Next.If required, acknowledge the creation of new accounts by clicking OK.
Step Result: The SQL Server Instance Page opens.
Figure 22: SQL Server Instance Page
12.Ensure the Connect to an existing SQL Server instance option is selected.

Installing Ivanti Endpoint Security
- 67 -
13.Click Next.
Step Result: The SQL Server and Instance page opens.
Figure 23: SQL Server and Instance Page (No Local Options)
Important: If Server Location options are available from this page, you areperforming the wrong procedure. Instead, perform Installing Using an Existing SQLServer Instance (Either Locally or Remotely) on page 34.
14.Type the name (not the IP address) of the server hosting the remote SQL Server instance in theServer name field.
15.Based on the SQL Server instance you are using, select a SQL Server Instance option.Select one of the following options.
Option Steps
To use a default SQL Serverinstance:
Select the Default instance option.
To use a named SQL Serverinstance: 1. Select the Named instance option.
2. Type the instance name in the Named instance field.

Ivanti Endpoint Security
- 68 -
16.Click Next.
Step Result: The SQL Server Authentication page opens.
Figure 24: SQL Server Authentication Page
17.Click Next.
Step Result: The credentials provided do not have sufficient privileges to continue dialogopens.
Figure 25: Insufficient Credentials Dialog
18.Note where the script is located and click Close.
19.Leave the installer open on its current page.You will continue from this point during the last portion of the procedure.

Installing Ivanti Endpoint Security
- 69 -
20.Deliver the script to your SQL Server administrator.
After Completing This Task:Have your SQL Server administrator complete Creating Components on SQL Server (Part II) on page69.
Creating Components on SQL Server (Part II)The SQL Server administrator performs this portion of the install procedure, which installs componentson the SQL Server instance necessary for Ivanti Endpoint Security to function. These components areinstalled via the script your Ivanti Endpoint Security administrator delivers.
Prerequisites:
• Complete Configuring SQL Server to Accept Remote Connections on page 84.• Complete Configuring Windows Firewall for SQL Server Instance Access on page 86.• Obtain the script created by the Ivanti Endpoint Security (Ivanti Endpoint Security) installation from
your network Ivanti Endpoint Security administrator and ensure it is on your SQL Server.• Review the script to ensure it coincides with your IT department's policies and procedures.
This second portion of the installation procedure is performed by the SQL Server administrator on yourexisting remote instance of SQL Server.
Tip: If you have any questions and/or require additional assistance, contact Ivanti support at https://community.ivanti.com/community/contact-support.
1. Log in to your SQL Server using an account with administrative privileges. This account should alsobe assigned the sysadmin server role within Microsoft SQL Server Management Studio.
2. Create three user accounts.
Important: Preexisting accounts or domain accounts cannot be used for this installationprocedure.
The first account you will create is identical to the user account used to begin the installationof Ivanti Endpoint Security. This account will be granted a login to the Ivanti Endpoint Securitydatabases and assigned the db_owner role within Microsoft SQL Server Mangement Studio.The second and third accounts created are the Web client account and the service account. Theseaccounts are used to operate components critical to Ivanti Endpoint Security.
Important: The credentials for each of these accounts must match their respective accounts onthe Ivanti Endpoint Security target server. Consult your network administrator for the credentials foreach account. If these accounts are not identical, Ivanti Endpoint Security will not function correctly.
Complete the following substeps to create the account:
a) Select Start > Administrative Tools > Computer Management.
Step Result: The Computer Management dialog opens.

Ivanti Endpoint Security
- 70 -
b) Expand the directory tree structure to Users (Computer Mangement [local] > System Tools >Local Users and Groups > Users).
c) Right-click Users and select New User.
Step Result: The New User dialog opens.
Figure 26: New User Dialog
d) Create a user account identical to the user account used to begin installation of Ivanti EndpointSecurity.
• In the User name field, type the applicable user name.• In the Password field, type the applicable password.• In the Confirm password field, retype the password.
Note: Consult your Ivanti Endpoint Security administrator to obtain these credentials.
e) Clear the User must change password at next logon check box.f) Select the Password never expires check box.g) Click Create.
Step Result: The user account is created.
h) Repeat substeps d though g to create the Web client account.i) Repeat substeps d though g to create the service account.j) Click Close.
3. Select Start > Run.

Installing Ivanti Endpoint Security
- 71 -
4. In the field, type cmd.
5. Click OK.
Step Result: A command prompt opens.
6. From the command prompt, type sqlcmd -SSERVERNAME\INSTANCENAME -E -ifilepath\PreInstallDBAscript.sql -k1>c:\PreInstallDBAScript_out.txt.
Note: Remember the following information when entering this command at the prompt:
• All characters in the command are case sensitive.• When typing SERVERNAME\INSTANCENAME, the slash and instance name are not necessary if
the applicable instance is a default instance.• The -E command instructs sqlcmd to connect to the SQL Server using a trusted connection.• The -i command defines where to locate the script to execute. If this command is executed
from the directory where PreInstallDBAScript.sql is located, then the file path is not necessary;otherwise, the full file path must be defined.
• The -k1 command instructs sqlcmd to remove any control characters found in the input file.
Result: The following databases are created:
PLUS Patch Management Database
PLUS_Staging Content Replication Database
SCM Security Configuration Management Database
STAT_Guardian Network Discovery/Agent Deployment Database
UPCCommon Endpoint Management Platform Database
The modifications necessary for your Ivanti Endpoint Security administrator to completeinstallation of Ivanti Endpoint Security are finished.
After Completing This Task:Have your Ivanti Endpoint Security administrator complete Completing Installation (Part III) on page71.
Completing Installation (Part III)The Ivanti Endpoint Security administrator performs this portion of the install procedure, whichcompletes installation of the Ivanti Endpoint Security.
The final portion of the installation procedure is performed by the Ivanti Endpoint Security (IvantiEndpoint Security) administrator on your target Ivanti Endpoint Security server.
Tip: If you have any questions and/or require additional assistance, contact Ivanti support at https://community.ivanti.com/community/contact-support.
1. Ensure Windows Authentication is selected.

Ivanti Endpoint Security
- 72 -
2. Click Next.A new page opens.
Page Steps
If the Destination Locationpage opens:
Click Next and proceed to the next step.
If the SQL ServerConfiguration Requirementspage opens:
The pre-installed instance of SQL Server is not configured towork with Ivanti Endpoint Security.
• If you only receive SQL Server configuration requirementinformationals or warnings, click Next to continue (the IvantiEndpoint Security installation will automatically reconfigureSQL Server). Proceed to the next step.
• If you receive any SQL Server configuration requirementfailures, you must cancel the installation, resolve the failures,and then proceed with the installation.
Tip: Click View Configuration Detail for detailed informationabout SQL Server configuration status requirements.
3. [Optional] Change the Ivanti Endpoint Security installation location.
a) Click Browse.b) Define the desired file path using either the Look in lists or the Folder name field.c) Click OK.
Step Result: The Installation Folder field reflects your changes.
4. [Optional] Change the Ivanti Endpoint Security content storage location.The content storage location is the location where patches and other content items aredownloaded. Ivanti recommends allocating at least 32 GB of storage space to content (plus anadditional 10 GB if managing non-Windows endpoints).
a) Click Browse.b) Define the desired file path using either the Look in lists or the Folder name field.c) Click OK.
Step Result: The Content Storage Location field reflects your changes.

Installing Ivanti Endpoint Security
- 73 -
5. Click Next.
Step Result: The Proxy Settings page opens.
Note: Refer to the Ivanti Endpoint Security: Requirements Guide (https://help.ivanti.com) for a complete list of proxy types that Ivanti Endpoint Securitysupports.
Figure 27: Proxy Settings Page
Note: If one or both of the storage directories defined on the Destination Locationpage does not contain the recommended available disk space, the Proxy Settingspage does not immediately open. Rather, a dialog that lets you redefine the storagedirectories will open. Then after redefining the storage directories, the Proxy Settingspage will open.
6. If your network uses a proxy server to access the Internet, select the A proxy server is requiredcheck box and type the applicable information in the following fields.
Field Type
Server Address The IP address of the applicable proxy server.

Ivanti Endpoint Security
- 74 -
Field Type
Port The port number used for communication.
Note: You can also configure Ivanti Endpoint Security to use a proxy following installation. Refer toThe Service Tab in the Ivanti Endpoint Security User Guide (https://help.ivanti.com/) for additionalinformation on proxy communication.
7. If your network uses a proxy server to access the Internet, and that proxy requires authentication,select the Authentication required check box and type the applicable information in the followingfields.
Field Type
Username A user name that authenticates with the proxy.
Password The password associated with the user name.
Confirm Password The password retyped.
8. Click Next.
Step Result: The Agent to Server Communication page opens.
Figure 28: Agent to Server Communication Page
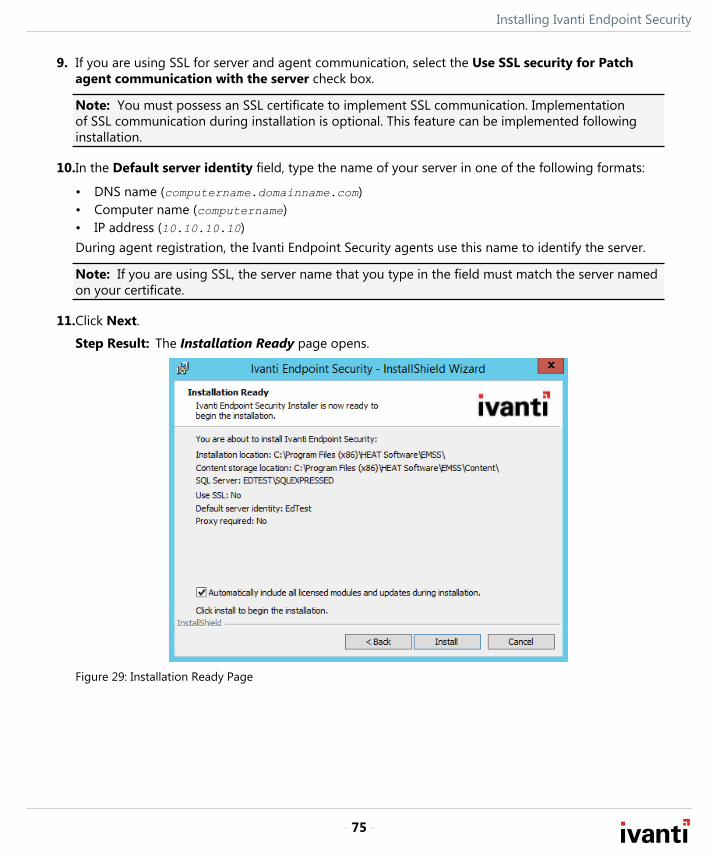
Installing Ivanti Endpoint Security
- 75 -
9. If you are using SSL for server and agent communication, select the Use SSL security for Patchagent communication with the server check box.
Note: You must possess an SSL certificate to implement SSL communication. Implementationof SSL communication during installation is optional. This feature can be implemented followinginstallation.
10.In the Default server identity field, type the name of your server in one of the following formats:
• DNS name (computername.domainname.com)• Computer name (computername)• IP address (10.10.10.10)During agent registration, the Ivanti Endpoint Security agents use this name to identify the server.
Note: If you are using SSL, the server name that you type in the field must match the server namedon your certificate.
11.Click Next.
Step Result: The Installation Ready page opens.
Figure 29: Installation Ready Page

Ivanti Endpoint Security
- 76 -
12.[Optional] If you only want to install core components, clear the Automatically include all licensedmodules and updates during installation check box.
Note: You may use the Ivanti Installation Manager after the initial installation of Ivanti EndpointSecurity to install additional components. For additional information, refer to Using IvantiInstallation Manager in the Ivanti Endpoint Security User Guide (https://help.ivanti.com/) .
13.Review the installation information and click Install to begin the installation of Ivanti EndpointSecurity. This process may take several minutes.
Important: During installation, do not attempt to access the Ivanti Endpoint Security Web site.Accessing the Web site during installation can cause installation errors.
14.After installation completes, click Finish.
Result: Ivanti Endpoint Security is installed and can now be accessed.
After Completing This Task:Proceed to one of the following procedures based on selections made during installation.
• If your server will use SSL, finish Configuring SSL on page 87.• If your server will not use SSL, proceed to Logging In to Ivanti Endpoint Security on page 76.
Logging In to Ivanti Endpoint SecurityAfter installing Ivanti Endpoint Security, log in to begin configuring the system.
Prerequisites:
One of the following Web browsers:
• Google Chrome• Mozilla Firefox
You can access the console from any endpoint within your network.
Note: When accessing the Ivanti Endpoint Security console using a Web browser with high securitysettings enabled, the following message may display:Scripting must be enabled to display this application properly.
In this event, Ivanti recommends adding the Ivanti Endpoint Security Web address as a trusted site inyour browser settings to view the Web console.
1. Open your Web browser.
Installing Ivanti Endpoint Security
- 77 -
2. In your browser’s address bar, type the Ivanti Endpoint Security URL (http[s]://ServerURL) and pressENTER.
Tip: You can also use the server IP address.
Step Result: A dialog prompting you for credentials opens.
3. Type your user name in the User name field.When logging in for the first time, type the user name of the Windows user account used to installIvanti Endpoint Security. You can use additional user names after adding new user profiles to IvantiEndpoint Security. If logging in using a domain account, type the name in the following format:DOMAIN\Username.
4. Type your password in the Password field.
5. Click OK.
Result: Ivanti Endpoint Security opens to the Home page and launches the Application SetupManager.
After Completing This Task:Complete Setting Up Ivanti Endpoint Security on page 77.Setting Up Ivanti Endpoint Security onpage 77
Setting Up Ivanti Endpoint SecurityFollowing installation and initial log in, the Application Setup Manager dialog opens. This dialogappears only once, the first time you log in to Ivanti Endpoint Security and you use it to configure basicoptions within the system.
Prerequisites:
Complete Ivanti Endpoint Security (Ivanti Endpoint Security) installation and open the Web console inyour browser.
You cannot reopen this dialog following its completion. However, you can access these settings fromvarious Ivanti Endpoint Security pages.
1. Log in to Ivanti Endpoint Security. For additional information, refer to Logging In to Ivanti EndpointSecurity on page 76.
Step Result: Ivanti Endpoint Security opens and the Application Setup Manager displays. Thisdialog only appears the first time Ivanti Endpoint Security is opened.
2. Ensure the Customer Info tab is selected.

Ivanti Endpoint Security
- 78 -
3. Type the applicable information in the following fields.
Field Description
First name Your first name.
Last name Your last name.
Company name Your company name. The company name specified duringinstallation appears by default but can be edited.
4. Click Apply.
5. [Optional] Select the Languages tab.
6. [Optional] Select the check boxes associated with the languages you want to receive content in(Patch and Remediation only).Each content item available in Ivanti Endpoint Security may be available in multiple versions fordifferent languages.
7. Click Apply.
8. Select the Uninstall Password tab.
9. Define the global agent uninstall password.
a) In the Global uninstall password field, type the desired password.b) In the Confirm password field, retype the password.
This password can be used to manually uninstall Ivanti Endpoint Security agents and should be keptconfidential.
Tip: Following installation, you can change the global uninstall password. For additionalinformation on how to change the password outside the Application Setup Manager, referto Defining the Global Uninstall Password in the Ivanti Endpoint Security User Guide (https://help.ivanti.com/) .
10.Click Apply.
11.[Optional] Select the Email Notifications tab.
12.[Optional] Define the email information used for email notifications.Email notifications are alerts sent by Ivanti Endpoint Security when certain system events occur.Type the applicable information in the following fields.
Field Description
SMTP Host The local SMTP mail host name. Ivanti Endpoint Security usesyour corporate Internet (SMTP) mail server.

Installing Ivanti Endpoint Security
- 79 -
Field Description
‘From’ email address The email address used when the system sends emailnotifications.
‘To’ email address An email address you use to receive system notifications.
Important: When upgrading Ivanti Endpoint Security via a fresh installation, you must reconfigureyour email notifications after installing your licensed server modules. For additional detailsregarding Email Notifications, refer to The Email Notifications Page in the Ivanti Endpoint SecurityUser Guide (https://help.ivanti.com/) .
13.Click Apply.
14.[Optional] Select the Install an Agent tab.
15.[Optional] Select the Automatically install an agent on the server check box to install an agent onthe server.
a) Select the check boxes of the applicable modules.Selecting these modules activates agent functionality associated with the module.
16.Click Apply.
Step Result: Your initial settings are applied.
17.Click Close.
Result: Initial configuration is complete. You are now ready to begin monitoring your network withIvanti Endpoint Security.

Installing Ivanti Endpoint Security
- 80 -

- 81 -
Appendix
AConfiguring Remote SQL Server Instances
In this appendix:
• Creating Remote Accounts• Configuring SQL Server to Accept
Remote Connections• Configuring Windows Firewall for
SQL Server Instance Access
If you elect to install Ivanti Endpoint Security using a remoteinstance of SQL Server, you must first create two user accountson the server hosting the instance (provided you are not usingpreexisting accounts for your installation).Additionally, you must also configure your instance (and, if inplace, its Windows Firewall) to accept remote connections fromthe server that will host Ivanti Endpoint Security.Procedures to configure remote instances of SQL Server areprovided, as well as a procedure to create the necessary useraccounts.
Creating Remote AccountsWhen installing Ivanti Endpoint Security using a remote instance of SQL server, you must first createtwo user accounts on the server hosting your instance: a Web client account and a service account.Ivanti Endpoint Security uses these accounts to operate components critical to the system. Withoutthese accounts, Ivanti Endpoint Security will be unable to access the remote SQL Server.
Create these accounts on the server hosting your SQL Server instance.
Note: If using domain accounts, these accounts do not have to be created locally. However, anydomain account used as the service account must be added to the database server's administratorsgroup. To use a domain account as a service account, complete this task, skipping steps 3-13.
1. Log in to the server hosting your SQL Server instance using either a local or domain user accountwith system administrator privileges.If your SQL Server instance uses mixed mode authentication, ensure that the user account you login with supports SQL Server login.
2. Open the Computer Management dialog.
a) Open Windows Control Panel.b) Open Administrative Tools.

Ivanti Endpoint Security
- 82 -
c) Open Computer Management.
Step Result: The Computer Management dialog opens.
3. Expand the tree to the Users folder (System Tools > Local Users and Groups > Users).
4. Right-click the Users folder.
5. Select New User.
Step Result: The New User dialog opens.
Figure 30: New User Dialog
6. In the User name field, type the desired Web client account name (or service account name).Ivanti recommends clientadmin for the Web client account, and serviceadmin for the serviceaccount.
7. In the Password field, type the desired password.
8. In the Confirm Password field, retype the Password.
9. Ensure the User must change password at next logon check box is cleared.
Important: When creating these accounts, failure to clear the User must change password atnext logon will deny you access to the Ivanti Endpoint Security Web site following installation.
10.Select the Password never expires check box.
11.Click Create.
Step Result: The Web client account is created.

Configuring Remote SQL Server Instances
- 83 -
12.Repeat steps 5 through 11 to create the service account.
Step Result: The service account is created.
13.Click Close.
14.Expand the directory tree structure to the Groups folder (System Tools > Local Users andGroups > Groups).
15.In the main pane, double-click Administrators.
Step Result: The Administrators Properties dialog opens.
Figure 31: Administrators Properties Dialog

Ivanti Endpoint Security
- 84 -
16.Click Add.
Step Result: The Select Users dialog opens.
Figure 32: Select Users Dialog
17.In the Enter the object names to select dialog, type your service account name.
18.Click OK.
Step Result: The service account is added to the Administrators group.
19.Click OK.
Result: The Web client and service accounts are created.
Configuring SQL Server to Accept Remote ConnectionsWhen configuring Ivanti Endpoint Security for use with a remote SQL Server instance, you mustconfigure that instance to accept remote connections.
Perform this task on the server hosting the SQL Server instance you want to use with Ivanti EndpointSecurity (Ivanti Endpoint Security).
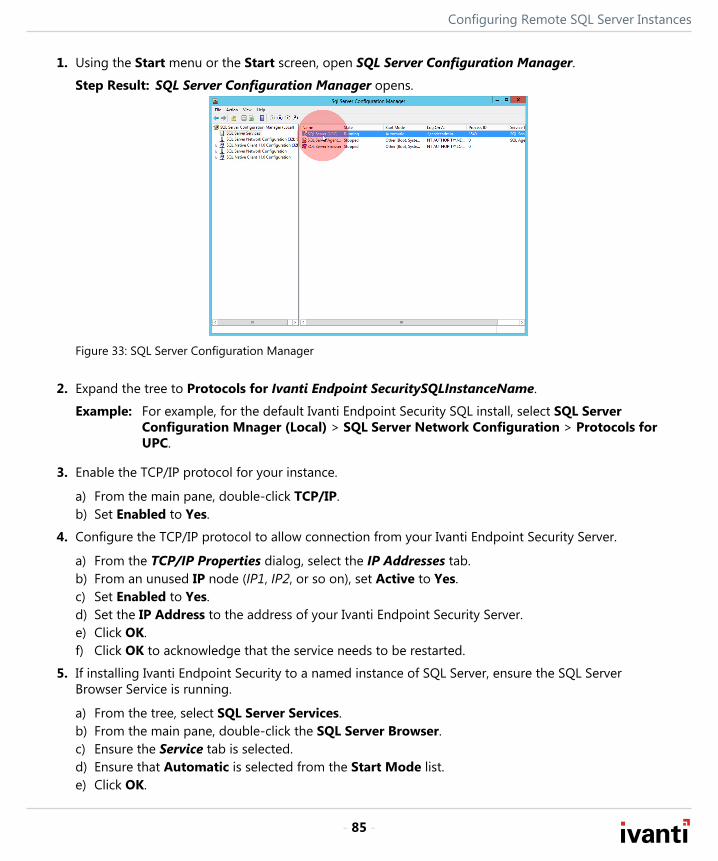
Configuring Remote SQL Server Instances
- 85 -
1. Using the Start menu or the Start screen, open SQL Server Configuration Manager.
Step Result: SQL Server Configuration Manager opens.
Figure 33: SQL Server Configuration Manager
2. Expand the tree to Protocols for Ivanti Endpoint SecuritySQLInstanceName.
Example: For example, for the default Ivanti Endpoint Security SQL install, select SQL ServerConfiguration Mnager (Local) > SQL Server Network Configuration > Protocols forUPC.
3. Enable the TCP/IP protocol for your instance.
a) From the main pane, double-click TCP/IP.b) Set Enabled to Yes.
4. Configure the TCP/IP protocol to allow connection from your Ivanti Endpoint Security Server.
a) From the TCP/IP Properties dialog, select the IP Addresses tab.b) From an unused IP node (IP1, IP2, or so on), set Active to Yes.c) Set Enabled to Yes.d) Set the IP Address to the address of your Ivanti Endpoint Security Server.e) Click OK.f) Click OK to acknowledge that the service needs to be restarted.
5. If installing Ivanti Endpoint Security to a named instance of SQL Server, ensure the SQL ServerBrowser Service is running.
a) From the tree, select SQL Server Services.b) From the main pane, double-click the SQL Server Browser.c) Ensure the Service tab is selected.d) Ensure that Automatic is selected from the Start Mode list.e) Click OK.

Ivanti Endpoint Security
- 86 -
f) From the main pane, right-click SQL Server Browser.g) Select Restart (or Start if Restart is unavailable).
6. From the tree, select SQL Server Configuration Manager (Local) > SQL Server Services.
7. From the main pane, right-click SQL Server (Ivanti Endpoint SecuritySQLInstanceName) andselect Restart.
Example: Restart SQL Server (UPC).
8. Close Sql Server Configuration Manager.
Result: Your SQL Server instance is ready for use with Ivanti Endpoint Security. Proceed with theinstallation procedure (provided your SQL Server instance is not behind a Windows Firewall).
After Completing This Task:If your SQL server instance is behind a Windows Firewall, complete Configuring Windows Firewall forSQL Server Instance Access on page 86.
Configuring Windows Firewall for SQL Server Instance AccessIf you are configuring Ivanti Endpoint Security for use with a remote SQL Server instance, you mustconfigure your SQL Server's Windows Firewall to allow access to Ivanti Endpoint Security (if your SQLServer has Windows Firewall enabled).Configure your SQL Server firewall according to your SQL server instance version. Complete the stepslisted at Configure a Windows Firewall for Database Engine Access (http://msdn.microsoft.com/en-us/library/ms175043.aspx).
Note: You edit your Windows Firewall settings according to your specific server operating system.The procedures available at the provided Microsoft Web sites may differ slightly when you edit yourspecific settings.

- 87 -
Appendix
BConfiguring Your Server to use SSL
In this appendix:
• Configuring SSL
During installation of the Ivanti Endpoint Security server, you canconfigure Ivanti Endpoint Security to use SSL for server to agentcommunication after obtaining an SSL certificate from a trustprovider.Obtaining a trusted SSL certificate can take several days.Therefore, Ivanti recommends obtaining an SSL certificate beforeinstalling Ivanti Endpoint Security. Certificates can be obtainedfrom trust providers such as Verisign Inc. (www.verisign.com) orEntrust (www.entrust.com).
Configuring SSLFor security purposes, you can configure the Ivanti Endpoint Security server and agent to use SSLcommunication. To use SSL, assign your certificate to the Ivanti Endpoint Security Web site.
Prerequisites:
You must obtain a certificate from a root certificate authority.
Associate your certificate with the Ivanti Endpoint Security (Ivanti Endpoint Security) Web site in yourserver's Internet Information Services (IIS) Manager.
Note: The first portion of this procedure is performed before installation of Ivanti Endpoint Security,and the second portion is performed following installation of Ivanti Endpoint Security.
Important: If you are installing Ivanti Endpoint Security on a server that already hosts a Website, a different procedure must be used for SSL configuration. For additional information, refer toKnowledgeBase Article 23214 (https://support.heatsoftware.com) for additional guidance.
1. If necessary, import your certificate.To import your certificate, complete the following substeps.
a) Open Internet Information Services (IIS) Manager, which can be found in AdministrativeTools within Control Panel.
Step Result: Internet Information Services (IIS) Manager opens.

Ivanti Endpoint Security
- 88 -
b) From the tree, select your Ivanti Endpoint Security server.
Figure 34: Internet Information Services (IIS) Manager
c) In the main pane, scroll to the IIS section and double-click Server Certificates.
Step Result: The Server Certificates page opens.
Figure 35: Server Certificates Page

Configuring Your Server to use SSL
- 89 -
d) Click the Import link.
Step Result: The Import Certificate dialog opens.
Figure 36: Import Certificate Dialog
e) Click the Elipses button ( ... ), browse to your certificate, and click Open.You may have to edit the File name type list to see your certificate.
f) Type the certificate Password.g) Click OK.
2. Assign the certificate to the default Web site.To assign the certificate, complete the following substeps.
a) From the tree, expand to Default Web Site (Server Name > Sites > Default Web Site).b) Click the Bindings link.
Step Result: The Site Bindings dialog opens.

Ivanti Endpoint Security
- 90 -
c) Click Add.
Step Result: The Add Site Binding dialog opens.
Figure 37: Add Site Binding Dialog
d) From the Type list, select https.e) From the SSL certificate list, select your certificate.f) Click OK.g) Click Close.
3. Complete one of the following Ivanti Endpoint Security installation procedures listed in Selecting anInstallation Method on page 23.While installing Ivanti Endpoint Security, select the Use SSL security for Patch agentcommunication with the server check box.
Note: Name resolution of the server, endpoints, and the root certificate authority is required to useSSL.
4. Assign the certificate to the Ivanti Endpoint Security Web site.Complete the following substeps to assign the certificate.
a) Open Internet Information Services (IIS) Manager, which can be found in AdministrativeTools within Control Panel.
Step Result: Internet Information Services (IIS) Manager opens.
b) From the tree, select Ivanti Web site (Server Name > Sites > Ivanti).c) Click the Bindings link.
Step Result: The Site Bindings dialog opens.

Configuring Your Server to use SSL
- 91 -
d) Click Add.
Step Result: The Add Site Binding dialog opens.
Figure 38: Add Site Binding Dialog
e) From the Type list, select https.f) From the SSL certificate list, select your certificate.g) Click OK.h) Click Close.
5. Configure the Web site to accept only SSL connections.
a) In the main pane, scroll to the IIS section.b) Double-click SSL Settings.c) Select the Require SSL check box.d) Click Apply.
Result: Your server is now configured for SSL communication.
After Completing This Task:
• Complete Logging In to Ivanti Endpoint Security on page 76.• Complete Setting Up Ivanti Endpoint Security on page 77.• After you have completed setup, edit your global configuration policy set and ensure Use SSL for
agent to server communication to True. For additional information, refer to Secure Your ServerWith SSL in the Ivanti Endpoint Security User Guide (https://help.ivanti.com/) .

Configuring Your Server to use SSL
- 92 -

- 93 -
Appendix
CUpgrading from Previous Installations
Ivanti routinely releases updates that upgrade previous productinstallations. Install these new versions to take advantage of newfeatures.Rather than deleting the previous product installation, you canupgrade the existing installation to the new version. For moreinformation, see the Ivanti Endpoint Security: Upgrade Guide (https://help.ivanti.com) .

Upgrading from Previous Installations
- 94 -

- 95 -
Appendix
DInstallation Checklist
In this appendix:
• Server Installation Checklist
For your convenience, an installation checklist is provided thatitemizes information and tasks.
Server Installation ChecklistThis checklist itemizes the information you will need and tasks you will need to complete wheninstalling the Ivanti Endpoint Security server.
Prior to installing Ivanti Endpoint Security (Ivanti Endpoint Security), you must gather and confirm thefollowing information:
You target server has the required service packs installed for its operating system. For moreinformation, see Supported Operating Systems on page 7.
Your target computer meets or exceeds the hardware requirements listed in Combined IvantiEndpoint Security Application and Database Server on page 16.
Your server is not a Domain Controller.
Your server has all required software installed:
Software Requirements
Microsoft SQL Server SQL Server Requirements on page 11
Microsoft Internet Information Services IIS Requirements on page 12
Web Browser Web Browser Requirements on page 10
Ensure the target server uses one of supported locales and browser languages listed in SupportedLanguages and Locales on page 8.
Your Ivanti Endpoint Security server meets network requirements listed in Network Requirementson page 14.

Ivanti Endpoint Security
- 96 -
If your server is a member of a domain, the default security policies are in effect.
Warning: Avoid changing any Domain Group Policy object (GPO) settings that could overwrite theLog on as a service or Impersonate a client after authentication settings within the User RightsAssignments area of your local server. Overwriting these settings causes critical SQL Server andIvanti Endpoint Security settings to be ignored and may result in system failure.
Your server DNS host name is: ___________________________________
Your Ivanti Endpoint Security serial number is: __________-__________
Your target system is connected to the Internet.
If you are using SSL, a valid SSL Web certificate has been obtained.
Note: If you are using SSL, you need to obtain a valid Web certificate, from a trust provider suchas Verisign Inc. (www.verisign.com) or Entrust (www.entrust.com), prior to installing Ivanti EndpointSecurity.
If you are using SSL, you have started the first portion of Configuring SSL on page 87 (the secondportion is completed after installation).
If a proxy server will be used, you know the proxy server’s name, IP address, port, user name, andpassword.
• Name: _____________________• IP address: ____-____-____-____• Port: _______________________• User name: __________________• Password: ___________________
If you are using a preexisting instance of SQL Server, the instance is set to one of the followingcollation values:
• SQL_Latin1_General_CP1_CI_AS• Latin1_General_CI_AS
If you are using a preexisting instance of SQL Server, whether local or remote, the operating systemof the server hosting the instance is set to an English language locale.
If you are using a remote SQL instance, the instance is configured to accept remote connections.For additional information, refer to Configuring SQL Server to Accept Remote Connections on page84.
If you are using a remote SQL instance, and that instance is behind a firewall, the firewall isconfigured to allow the Ivanti Endpoint Security server access. For additional information, refer toConfiguring Windows Firewall for SQL Server Instance Access on page 86.
Your local SMTP mail host name is: ________________________________