agent install guide - ivanti endpoint security- 8 -windows endpoint operating systems ivanti...
TRANSCRIPT

8.5 Update 1
Agent Install Guide


- 3 -
NoticesVersion InformationIvanti Endpoint Security Agent Install Guide - Ivanti Endpoint Security Version 8.5 Update 1 - Published:May 2017Document Number: 02_017_8.5 Update 1_171251616
Copyright InformationThis document contains the confidential information and/or proprietary property of Ivanti, Inc. and itsaffiliates (referred to collectively as “Ivanti”), and may not be disclosed or copied without prior writtenconsent of Ivanti.Ivanti retains the right to make changes to this document or related product specifications anddescriptions, at any time, without notice. Ivanti makes no warranty for the use of this document andassumes no responsibility for any errors that can appear in the document nor does it make a commitmentto update the information contained herein.For the most current product information, please visit www.ivanti.com.
Copyright© 2017, Ivanti. All rights reserved.Ivanti and its logos are registered trademarks or trademarks of Ivanti, Inc. and its affiliates in the UnitedStates and/or other countries. Other brands and names may be claimed as the property of others.

Notices
- 4 -
Table of Contents
- 5 -
Table of Contents
Chapter 1: Agent Requirements.................................................................................................................. 7Supported Endpoint Operating Systems................................................................................................................................................... 7
Windows Endpoint Operating Systems...............................................................................................................................................8Mac Endpoint Operating Systems.........................................................................................................................................................9Linux Endpoint Operating Systems.....................................................................................................................................................10UNIX Endpoint Operating Systems.....................................................................................................................................................10
Supported Endpoint Browsers......................................................................................................................................................................11Windows Endpoint Requirements.............................................................................................................................................................. 11Linux, UNIX, or Mac Endpoint Requirements........................................................................................................................................ 13Agent Locales and Internationalization....................................................................................................................................................16Supported Endpoint Module Operating Systems................................................................................................................................17
Windows Endpoint Supported Modules.......................................................................................................................................... 17Linux, UNIX, and Mac Supported Modules.....................................................................................................................................18
Chapter 2: Understanding Agent Installation..........................................................................................19The Ivanti Endpoint Security Agent Workflow......................................................................................................................................19Understanding Agent Installation Methods........................................................................................................................................... 21
Chapter 3: Installing the Agent on Windows.......................................................................................... 23Windows Installation Methods.................................................................................................................................................................... 23Agent Management Job for Windows..................................................................................................................................................... 23
Agent Management Job Checklist...................................................................................................................................................... 24Port and ICMP Requirements for an Agent Management Job............................................................................................... 25Configuring Windows Endpoints......................................................................................................................................................... 26Configuring the Ivanti Endpoint Security Server for Discovery Scanning...........................................................................34Installing Agents by Agent Management Job............................................................................................................................... 35
Command Line for Windows........................................................................................................................................................................54Command Line Workflow for Windows........................................................................................................................................... 54Downloading the Installer.......................................................................................................................................................................55Silently Installing the Agent by Command Line for Windows................................................................................................ 57
Install of the Agent for Windows Manually........................................................................................................................................... 60Manual Install Workflow for Windows..............................................................................................................................................61Downloading the Installer.......................................................................................................................................................................61Manually Installing the Agent for Windows................................................................................................................................... 63
Chapter 4: Installing the Agent on Linux, UNIX, or Mac....................................................................... 67Linux and UNIX Installation Method.........................................................................................................................................................67Installing Java Runtime Environment........................................................................................................................................................ 67Command Line Workflow for Linux, UNIX, or Mac.............................................................................................................................68
Downloading the Installer.......................................................................................................................................................................69Installing the Agent by Command Line for Linux, UNIX, or Mac...........................................................................................71Silent Install by Command Line for Linux, UNIX, or Mac..........................................................................................................73
Appendix A: Upgrading Agents.................................................................................................................77Agent Upgrade on Windows........................................................................................................................................................................77
Ivanti Endpoint Security
- 6 -
Upgrading Agents From the Web Console.....................................................................................................................................77Agent Upgrade on Linux, UNIX or Mac.................................................................................................................................................. 80
Upgrading Agents by Deployment for Linux, UNIX, or Mac................................................................................................... 80Upgrading Agents by Command Line for Linux, UNIX, or Mac..............................................................................................82
Appendix B: Uninstalling Agents...............................................................................................................85Agent Uninstall on Windows........................................................................................................................................................................85
Uninstalling the Agent by Agent Management Job....................................................................................................................85Uninstalling the Agent on Windows..................................................................................................................................................96Uninstalling the Agent by Command Line...................................................................................................................................... 98
Agent Uninstall on Linux, UNIX, or Mac............................................................................................................................................... 100Uninstalling the Agent for Mac, Linux, or UNIX......................................................................................................................... 100
- 7 -
Chapter
1Agent Requirements
In this chapter:
• Supported Endpoint OperatingSystems
• Supported Endpoint Browsers• Windows Endpoint Requirements• Linux, UNIX, or Mac Endpoint
Requirements• Agent Locales and
Internationalization• Supported Endpoint Module
Operating Systems
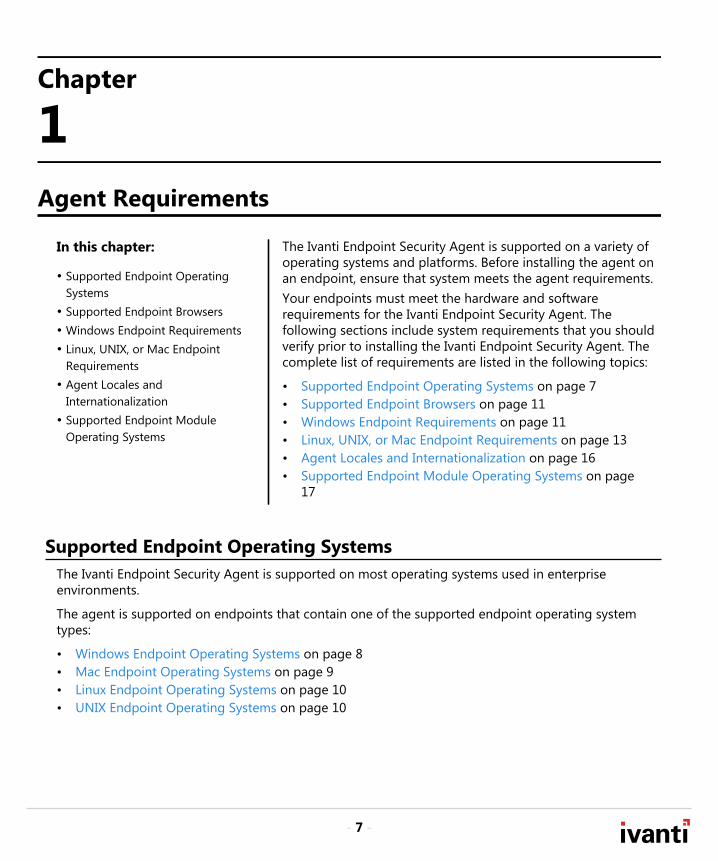
The Ivanti Endpoint Security Agent is supported on a variety ofoperating systems and platforms. Before installing the agent onan endpoint, ensure that system meets the agent requirements.Your endpoints must meet the hardware and softwarerequirements for the Ivanti Endpoint Security Agent. Thefollowing sections include system requirements that you shouldverify prior to installing the Ivanti Endpoint Security Agent. Thecomplete list of requirements are listed in the following topics:
• Supported Endpoint Operating Systems on page 7• Supported Endpoint Browsers on page 11• Windows Endpoint Requirements on page 11• Linux, UNIX, or Mac Endpoint Requirements on page 13• Agent Locales and Internationalization on page 16• Supported Endpoint Module Operating Systems on page
17
Supported Endpoint Operating SystemsThe Ivanti Endpoint Security Agent is supported on most operating systems used in enterpriseenvironments.
The agent is supported on endpoints that contain one of the supported endpoint operating systemtypes:
• Windows Endpoint Operating Systems on page 8• Mac Endpoint Operating Systems on page 9• Linux Endpoint Operating Systems on page 10• UNIX Endpoint Operating Systems on page 10
Ivanti Endpoint Security
- 8 -
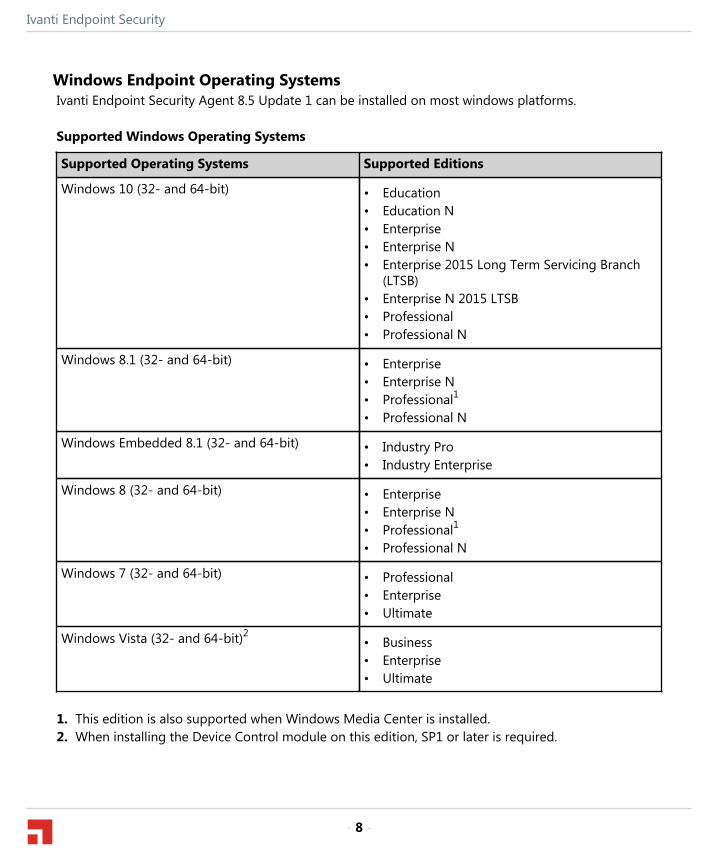
Windows Endpoint Operating SystemsIvanti Endpoint Security Agent 8.5 Update 1 can be installed on most windows platforms.
Supported Windows Operating Systems
Supported Operating Systems Supported Editions
Windows 10 (32- and 64-bit) • Education• Education N• Enterprise• Enterprise N• Enterprise 2015 Long Term Servicing Branch
(LTSB)• Enterprise N 2015 LTSB• Professional• Professional N
Windows 8.1 (32- and 64-bit) • Enterprise• Enterprise N• Professional1
• Professional N
Windows Embedded 8.1 (32- and 64-bit) • Industry Pro• Industry Enterprise
Windows 8 (32- and 64-bit) • Enterprise• Enterprise N• Professional1
• Professional N
Windows 7 (32- and 64-bit) • Professional• Enterprise• Ultimate
Windows Vista (32- and 64-bit)2 • Business• Enterprise• Ultimate
1. This edition is also supported when Windows Media Center is installed.2. When installing the Device Control module on this edition, SP1 or later is required.
Agent Requirements
- 9 -
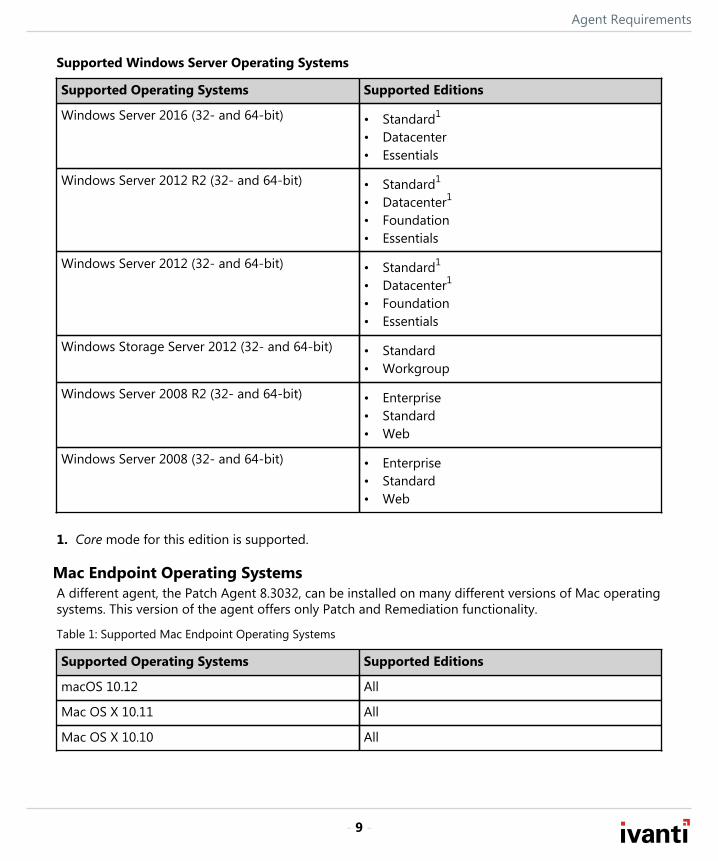
Supported Windows Server Operating Systems
Supported Operating Systems Supported Editions
Windows Server 2016 (32- and 64-bit) • Standard1
• Datacenter• Essentials
Windows Server 2012 R2 (32- and 64-bit) • Standard1
• Datacenter1
• Foundation• Essentials
Windows Server 2012 (32- and 64-bit) • Standard1
• Datacenter1
• Foundation• Essentials
Windows Storage Server 2012 (32- and 64-bit) • Standard• Workgroup
Windows Server 2008 R2 (32- and 64-bit) • Enterprise• Standard• Web
Windows Server 2008 (32- and 64-bit) • Enterprise• Standard• Web
1. Core mode for this edition is supported.
Mac Endpoint Operating SystemsA different agent, the Patch Agent 8.3032, can be installed on many different versions of Mac operatingsystems. This version of the agent offers only Patch and Remediation functionality.
Table 1: Supported Mac Endpoint Operating Systems
Supported Operating Systems Supported Editions
macOS 10.12 All
Mac OS X 10.11 All
Mac OS X 10.10 All
Ivanti Endpoint Security
- 10 -
Supported Operating Systems Supported Editions
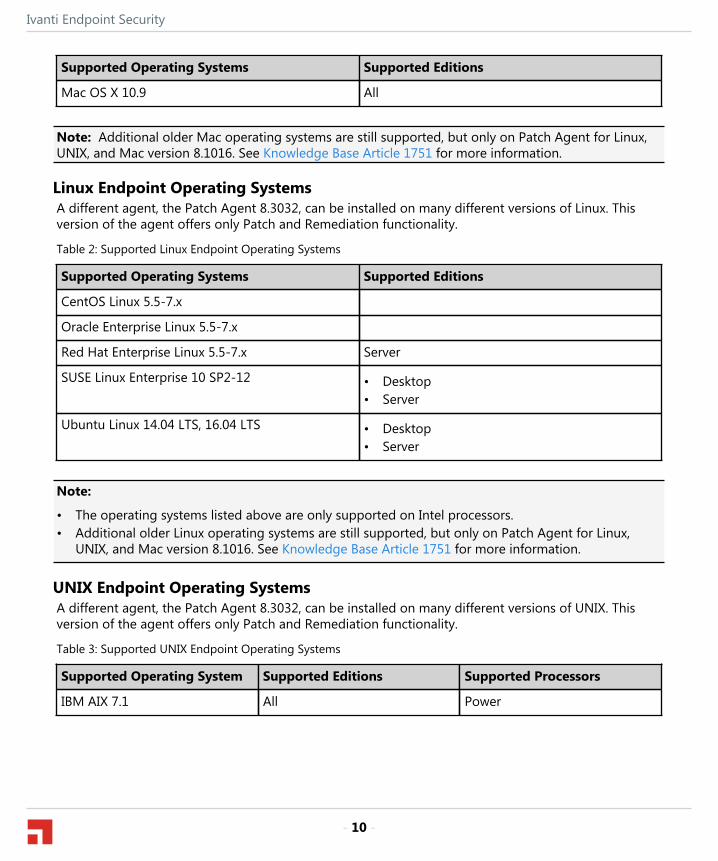
Mac OS X 10.9 All
Note: Additional older Mac operating systems are still supported, but only on Patch Agent for Linux,UNIX, and Mac version 8.1016. See Knowledge Base Article 1751 for more information.
Linux Endpoint Operating SystemsA different agent, the Patch Agent 8.3032, can be installed on many different versions of Linux. Thisversion of the agent offers only Patch and Remediation functionality.
Table 2: Supported Linux Endpoint Operating Systems
Supported Operating Systems Supported Editions
CentOS Linux 5.5-7.x
Oracle Enterprise Linux 5.5-7.x
Red Hat Enterprise Linux 5.5-7.x Server
SUSE Linux Enterprise 10 SP2-12 • Desktop• Server
Ubuntu Linux 14.04 LTS, 16.04 LTS • Desktop• Server
Note:
• The operating systems listed above are only supported on Intel processors.• Additional older Linux operating systems are still supported, but only on Patch Agent for Linux,
UNIX, and Mac version 8.1016. See Knowledge Base Article 1751 for more information.
UNIX Endpoint Operating SystemsA different agent, the Patch Agent 8.3032, can be installed on many different versions of UNIX. Thisversion of the agent offers only Patch and Remediation functionality.
Table 3: Supported UNIX Endpoint Operating Systems
Supported Operating System Supported Editions Supported Processors
IBM AIX 7.1 All Power
Agent Requirements
- 11 -
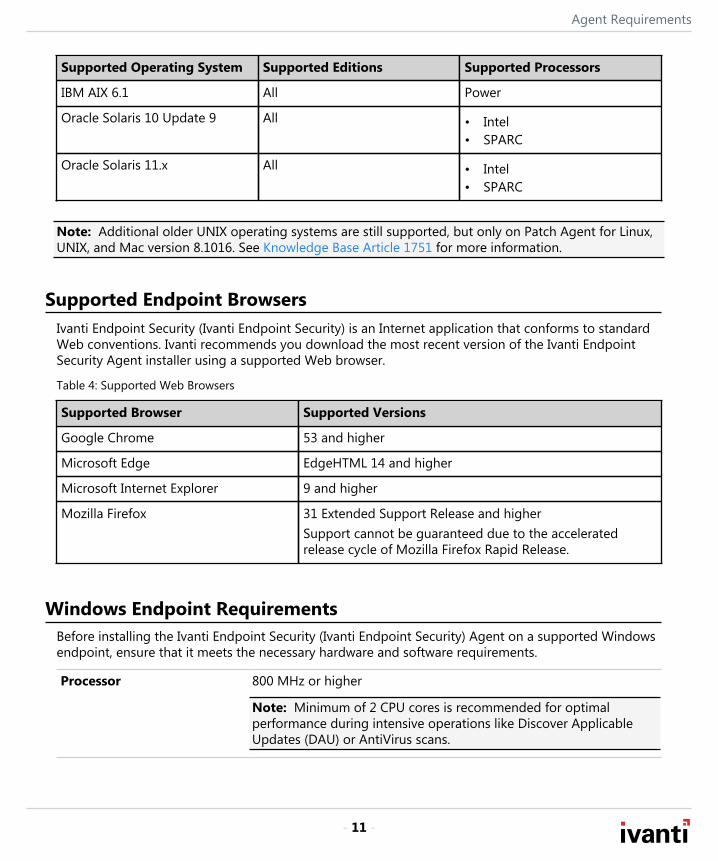
Supported Operating System Supported Editions Supported Processors
IBM AIX 6.1 All Power
Oracle Solaris 10 Update 9 All • Intel• SPARC
Oracle Solaris 11.x All • Intel• SPARC
Note: Additional older UNIX operating systems are still supported, but only on Patch Agent for Linux,UNIX, and Mac version 8.1016. See Knowledge Base Article 1751 for more information.
Supported Endpoint BrowsersIvanti Endpoint Security (Ivanti Endpoint Security) is an Internet application that conforms to standardWeb conventions. Ivanti recommends you download the most recent version of the Ivanti EndpointSecurity Agent installer using a supported Web browser.
Table 4: Supported Web Browsers
Supported Browser Supported Versions
Google Chrome 53 and higher
Microsoft Edge EdgeHTML 14 and higher
Microsoft Internet Explorer 9 and higher
Mozilla Firefox 31 Extended Support Release and higherSupport cannot be guaranteed due to the acceleratedrelease cycle of Mozilla Firefox Rapid Release.
Windows Endpoint RequirementsBefore installing the Ivanti Endpoint Security (Ivanti Endpoint Security) Agent on a supported Windowsendpoint, ensure that it meets the necessary hardware and software requirements.
Processor 800 MHz or higher
Note: Minimum of 2 CPU cores is recommended for optimalperformance during intensive operations like Discover ApplicableUpdates (DAU) or AntiVirus scans.
Ivanti Endpoint Security
- 12 -
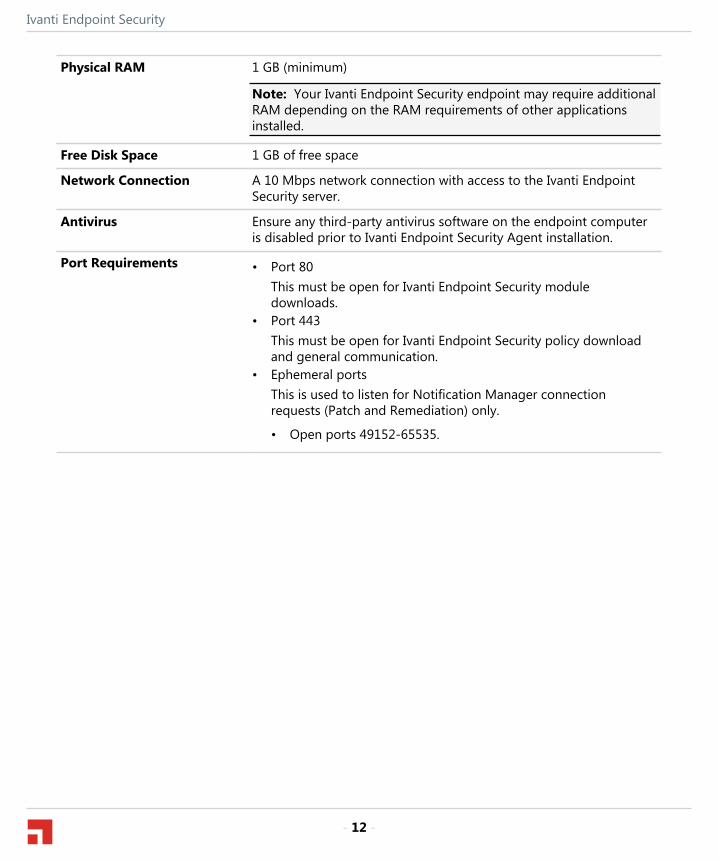
Physical RAM 1 GB (minimum)
Note: Your Ivanti Endpoint Security endpoint may require additionalRAM depending on the RAM requirements of other applicationsinstalled.
Free Disk Space 1 GB of free space
Network Connection A 10 Mbps network connection with access to the Ivanti EndpointSecurity server.
Antivirus Ensure any third-party antivirus software on the endpoint computeris disabled prior to Ivanti Endpoint Security Agent installation.
Port Requirements • Port 80This must be open for Ivanti Endpoint Security moduledownloads.
• Port 443This must be open for Ivanti Endpoint Security policy downloadand general communication.
• Ephemeral portsThis is used to listen for Notification Manager connectionrequests (Patch and Remediation) only.
• Open ports 49152-65535.
Agent Requirements
- 13 -
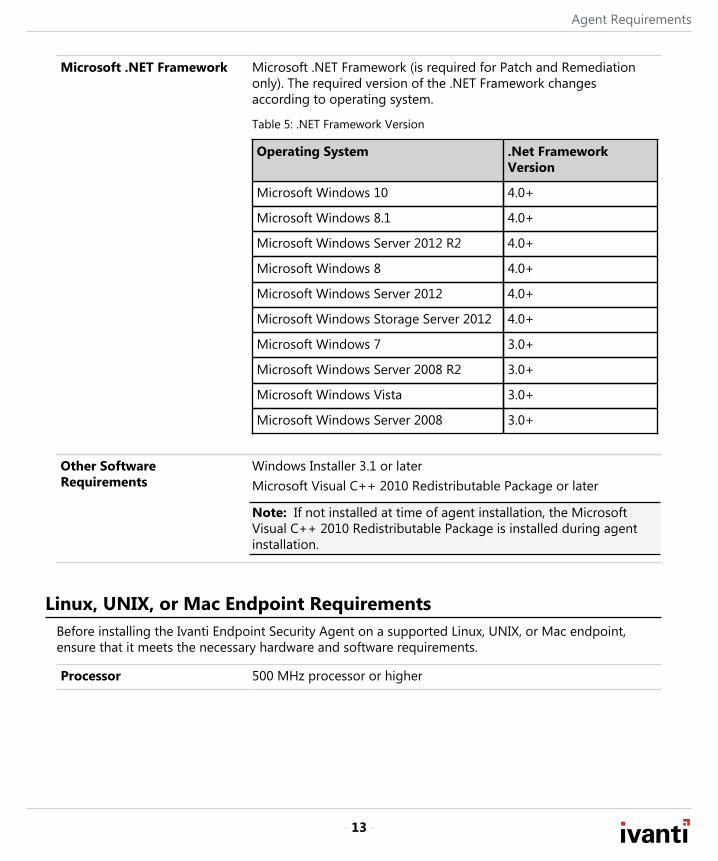
Microsoft .NET Framework Microsoft .NET Framework (is required for Patch and Remediationonly). The required version of the .NET Framework changesaccording to operating system.
Table 5: .NET Framework Version
Operating System .Net FrameworkVersion
Microsoft Windows 10 4.0+
Microsoft Windows 8.1 4.0+
Microsoft Windows Server 2012 R2 4.0+
Microsoft Windows 8 4.0+
Microsoft Windows Server 2012 4.0+
Microsoft Windows Storage Server 2012 4.0+
Microsoft Windows 7 3.0+
Microsoft Windows Server 2008 R2 3.0+
Microsoft Windows Vista 3.0+
Microsoft Windows Server 2008 3.0+
Other SoftwareRequirements
Windows Installer 3.1 or laterMicrosoft Visual C++ 2010 Redistributable Package or later
Note: If not installed at time of agent installation, the MicrosoftVisual C++ 2010 Redistributable Package is installed during agentinstallation.
Linux, UNIX, or Mac Endpoint RequirementsBefore installing the Ivanti Endpoint Security Agent on a supported Linux, UNIX, or Mac endpoint,ensure that it meets the necessary hardware and software requirements.
Processor 500 MHz processor or higher
Ivanti Endpoint Security
- 14 -
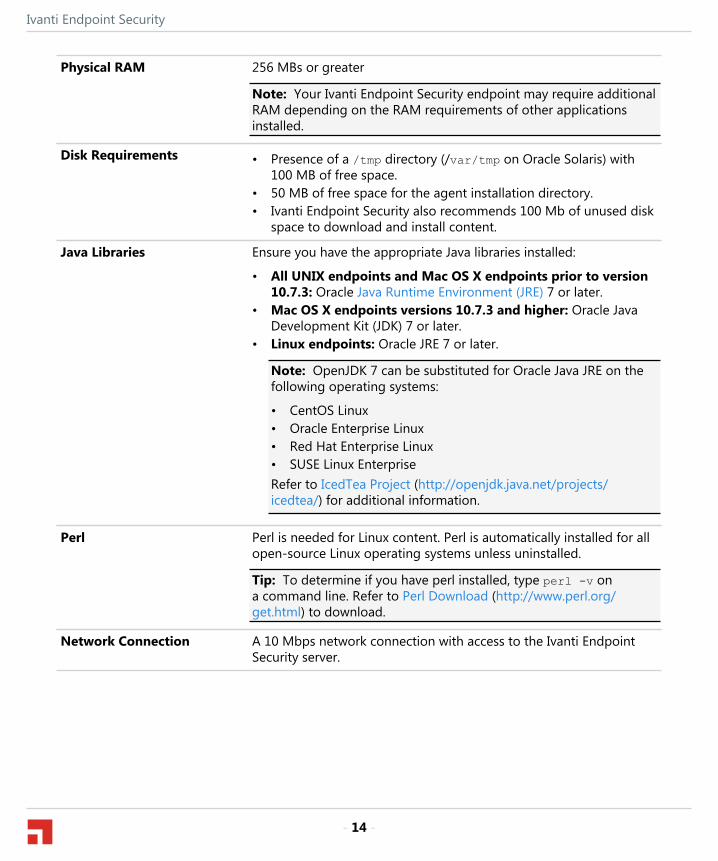
Physical RAM 256 MBs or greater
Note: Your Ivanti Endpoint Security endpoint may require additionalRAM depending on the RAM requirements of other applicationsinstalled.
Disk Requirements • Presence of a /tmp directory (/var/tmp on Oracle Solaris) with100 MB of free space.
• 50 MB of free space for the agent installation directory.• Ivanti Endpoint Security also recommends 100 Mb of unused disk
space to download and install content.
Java Libraries Ensure you have the appropriate Java libraries installed:
• All UNIX endpoints and Mac OS X endpoints prior to version10.7.3: Oracle Java Runtime Environment (JRE) 7 or later.
• Mac OS X endpoints versions 10.7.3 and higher: Oracle JavaDevelopment Kit (JDK) 7 or later.
• Linux endpoints: Oracle JRE 7 or later.
Note: OpenJDK 7 can be substituted for Oracle Java JRE on thefollowing operating systems:
• CentOS Linux• Oracle Enterprise Linux• Red Hat Enterprise Linux• SUSE Linux EnterpriseRefer to IcedTea Project (http://openjdk.java.net/projects/icedtea/) for additional information.
Perl Perl is needed for Linux content. Perl is automatically installed for allopen-source Linux operating systems unless uninstalled.
Tip: To determine if you have perl installed, type perl -v ona command line. Refer to Perl Download (http://www.perl.org/get.html) to download.
Network Connection A 10 Mbps network connection with access to the Ivanti EndpointSecurity server.

Agent Requirements
- 15 -
Antivirus Ensure any antivirus software installed on the applicable endpointcomputer is disabled.
Port Requirements • Port 80. This must be open for Ivanti Endpoint Security moduledownloads.
• Port 443. This must be open for Ivanti Endpoint Security policydownload and general communication.
• Ports 49152-65535. These ports are used as listener ports forcheck now commands, which are server-sent requests that agentsuse to check for tasks. Closing these ports delays agent tasks untilthey check in themselves.
Ivanti Endpoint Security
- 16 -
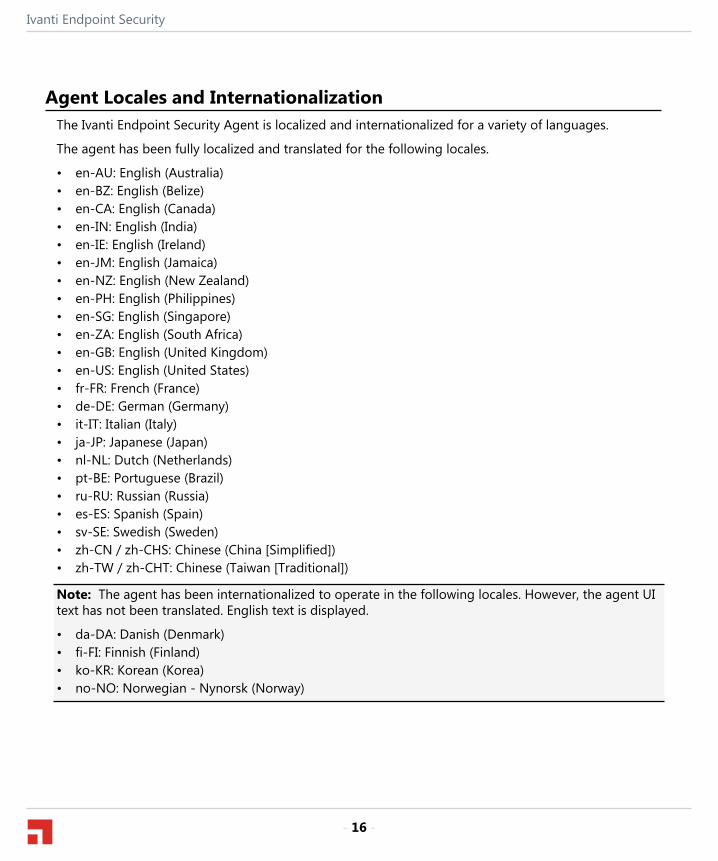
Agent Locales and InternationalizationThe Ivanti Endpoint Security Agent is localized and internationalized for a variety of languages.
The agent has been fully localized and translated for the following locales.
• en-AU: English (Australia)• en-BZ: English (Belize)• en-CA: English (Canada)• en-IN: English (India)• en-IE: English (Ireland)• en-JM: English (Jamaica)• en-NZ: English (New Zealand)• en-PH: English (Philippines)• en-SG: English (Singapore)• en-ZA: English (South Africa)• en-GB: English (United Kingdom)• en-US: English (United States)• fr-FR: French (France)• de-DE: German (Germany)• it-IT: Italian (Italy)• ja-JP: Japanese (Japan)• nl-NL: Dutch (Netherlands)• pt-BE: Portuguese (Brazil)• ru-RU: Russian (Russia)• es-ES: Spanish (Spain)• sv-SE: Swedish (Sweden)• zh-CN / zh-CHS: Chinese (China [Simplified])• zh-TW / zh-CHT: Chinese (Taiwan [Traditional])
Note: The agent has been internationalized to operate in the following locales. However, the agent UItext has not been translated. English text is displayed.
• da-DA: Danish (Denmark)• fi-FI: Finnish (Finland)• ko-KR: Korean (Korea)• no-NO: Norwegian - Nynorsk (Norway)
Agent Requirements
- 17 -
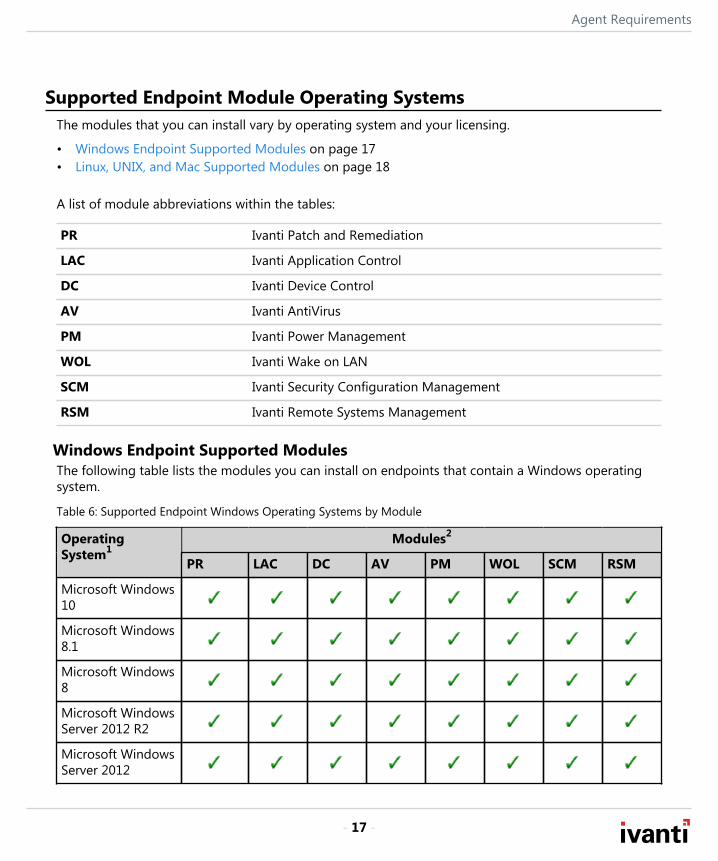
Supported Endpoint Module Operating SystemsThe modules that you can install vary by operating system and your licensing.
• Windows Endpoint Supported Modules on page 17• Linux, UNIX, and Mac Supported Modules on page 18
A list of module abbreviations within the tables:
PR Ivanti Patch and Remediation
LAC Ivanti Application Control
DC Ivanti Device Control
AV Ivanti AntiVirus
PM Ivanti Power Management
WOL Ivanti Wake on LAN
SCM Ivanti Security Configuration Management
RSM Ivanti Remote Systems Management
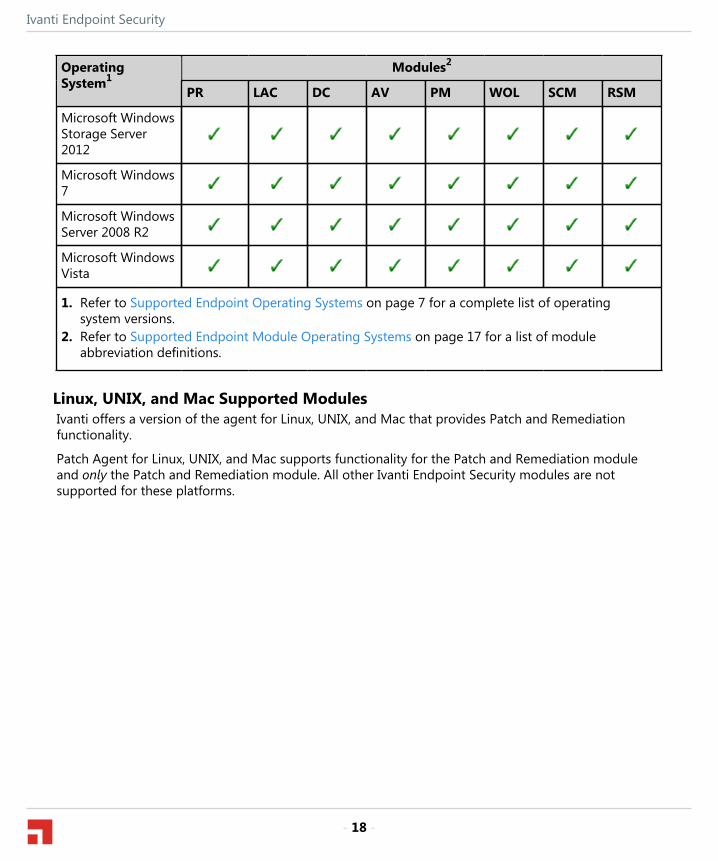
Windows Endpoint Supported ModulesThe following table lists the modules you can install on endpoints that contain a Windows operatingsystem.
Table 6: Supported Endpoint Windows Operating Systems by Module
Modules2OperatingSystem1
PR LAC DC AV PM WOL SCM RSM
Microsoft Windows10
Microsoft Windows8.1
Microsoft Windows8
Microsoft WindowsServer 2012 R2
Microsoft WindowsServer 2012
Ivanti Endpoint Security
- 18 -
Modules2OperatingSystem1
PR LAC DC AV PM WOL SCM RSM
Microsoft WindowsStorage Server2012
Microsoft Windows7
Microsoft WindowsServer 2008 R2
Microsoft WindowsVista
1. Refer to Supported Endpoint Operating Systems on page 7 for a complete list of operatingsystem versions.
2. Refer to Supported Endpoint Module Operating Systems on page 17 for a list of moduleabbreviation definitions.
Linux, UNIX, and Mac Supported ModulesIvanti offers a version of the agent for Linux, UNIX, and Mac that provides Patch and Remediationfunctionality.
Patch Agent for Linux, UNIX, and Mac supports functionality for the Patch and Remediation moduleand only the Patch and Remediation module. All other Ivanti Endpoint Security modules are notsupported for these platforms.
- 19 -
Chapter
2Understanding Agent Installation
In this chapter:
• The Ivanti Endpoint Security AgentWorkflow
• Understanding Agent InstallationMethods
The Ivanti Endpoint Security agent is installed on networkendpoints to manage their behavior.
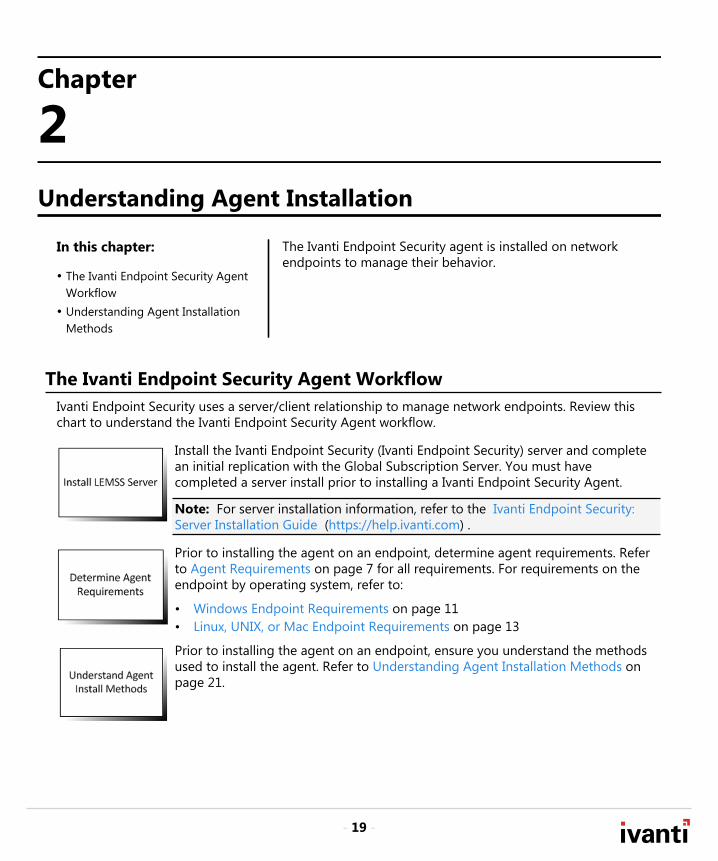
The Ivanti Endpoint Security Agent WorkflowIvanti Endpoint Security uses a server/client relationship to manage network endpoints. Review thischart to understand the Ivanti Endpoint Security Agent workflow.
Install the Ivanti Endpoint Security (Ivanti Endpoint Security) server and completean initial replication with the Global Subscription Server. You must havecompleted a server install prior to installing a Ivanti Endpoint Security Agent.
Note: For server installation information, refer to the Ivanti Endpoint Security:Server Installation Guide (https://help.ivanti.com) .
Prior to installing the agent on an endpoint, determine agent requirements. Referto Agent Requirements on page 7 for all requirements. For requirements on theendpoint by operating system, refer to:
• Windows Endpoint Requirements on page 11• Linux, UNIX, or Mac Endpoint Requirements on page 13
Prior to installing the agent on an endpoint, ensure you understand the methodsused to install the agent. Refer to Understanding Agent Installation Methods onpage 21.
Ivanti Endpoint Security
- 20 -
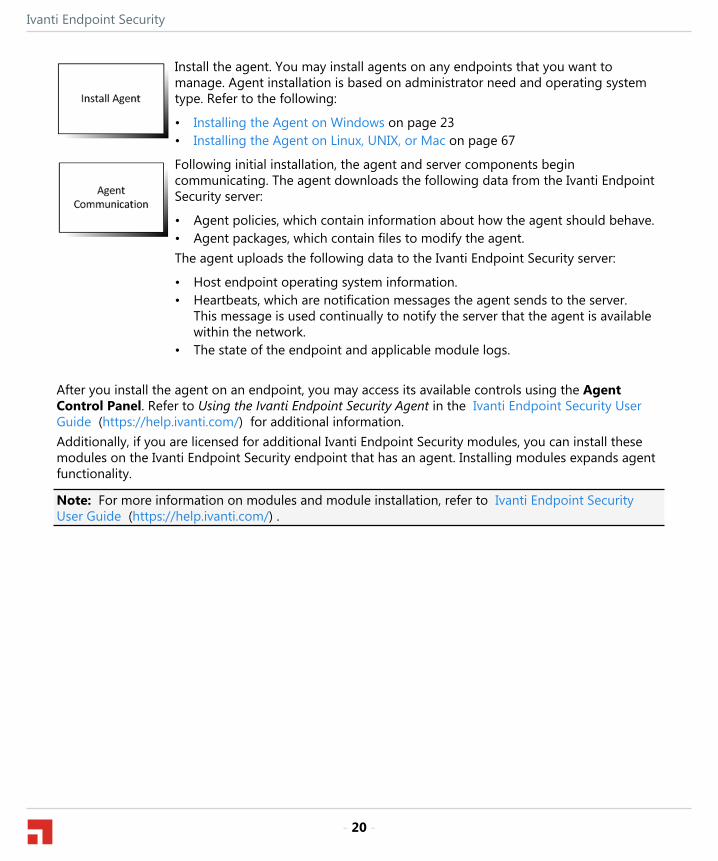
Install the agent. You may install agents on any endpoints that you want tomanage. Agent installation is based on administrator need and operating systemtype. Refer to the following:
• Installing the Agent on Windows on page 23• Installing the Agent on Linux, UNIX, or Mac on page 67
Following initial installation, the agent and server components begincommunicating. The agent downloads the following data from the Ivanti EndpointSecurity server:
• Agent policies, which contain information about how the agent should behave.• Agent packages, which contain files to modify the agent.The agent uploads the following data to the Ivanti Endpoint Security server:
• Host endpoint operating system information.• Heartbeats, which are notification messages the agent sends to the server.
This message is used continually to notify the server that the agent is availablewithin the network.
• The state of the endpoint and applicable module logs.
After you install the agent on an endpoint, you may access its available controls using the AgentControl Panel. Refer to Using the Ivanti Endpoint Security Agent in the Ivanti Endpoint Security UserGuide (https://help.ivanti.com/) for additional information.Additionally, if you are licensed for additional Ivanti Endpoint Security modules, you can install thesemodules on the Ivanti Endpoint Security endpoint that has an agent. Installing modules expands agentfunctionality.
Note: For more information on modules and module installation, refer to Ivanti Endpoint SecurityUser Guide (https://help.ivanti.com/) .
Understanding Agent Installation
- 21 -
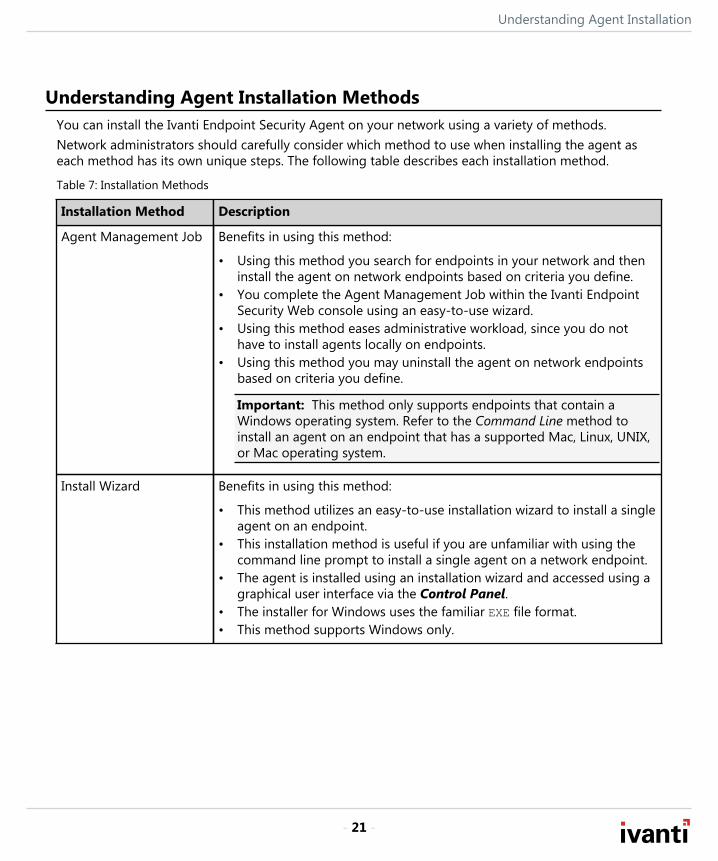
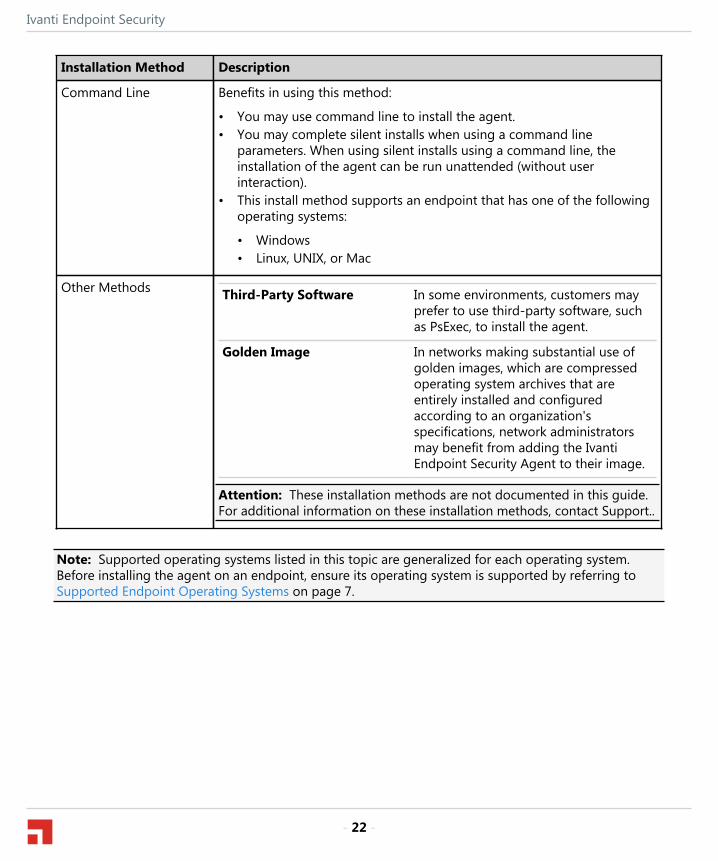
Understanding Agent Installation MethodsYou can install the Ivanti Endpoint Security Agent on your network using a variety of methods.Network administrators should carefully consider which method to use when installing the agent aseach method has its own unique steps. The following table describes each installation method.
Table 7: Installation Methods
Installation Method Description
Agent Management Job Benefits in using this method:
• Using this method you search for endpoints in your network and theninstall the agent on network endpoints based on criteria you define.
• You complete the Agent Management Job within the Ivanti EndpointSecurity Web console using an easy-to-use wizard.
• Using this method eases administrative workload, since you do nothave to install agents locally on endpoints.
• Using this method you may uninstall the agent on network endpointsbased on criteria you define.
Important: This method only supports endpoints that contain aWindows operating system. Refer to the Command Line method toinstall an agent on an endpoint that has a supported Mac, Linux, UNIX,or Mac operating system.
Install Wizard Benefits in using this method:
• This method utilizes an easy-to-use installation wizard to install a singleagent on an endpoint.
• This installation method is useful if you are unfamiliar with using thecommand line prompt to install a single agent on a network endpoint.
• The agent is installed using an installation wizard and accessed using agraphical user interface via the Control Panel.
• The installer for Windows uses the familiar EXE file format.• This method supports Windows only.
Ivanti Endpoint Security
- 22 -
Installation Method Description
Command Line Benefits in using this method:
• You may use command line to install the agent.• You may complete silent installs when using a command line
parameters. When using silent installs using a command line, theinstallation of the agent can be run unattended (without userinteraction).
• This install method supports an endpoint that has one of the followingoperating systems:
• Windows• Linux, UNIX, or Mac
Other Methods Third-Party Software In some environments, customers mayprefer to use third-party software, suchas PsExec, to install the agent.
Golden Image In networks making substantial use ofgolden images, which are compressedoperating system archives that areentirely installed and configuredaccording to an organization'sspecifications, network administratorsmay benefit from adding the IvantiEndpoint Security Agent to their image.
Attention: These installation methods are not documented in this guide.For additional information on these installation methods, contact Support..
Note: Supported operating systems listed in this topic are generalized for each operating system.Before installing the agent on an endpoint, ensure its operating system is supported by referring toSupported Endpoint Operating Systems on page 7.
- 23 -
Chapter
3Installing the Agent on Windows
In this chapter:
• Windows Installation Methods• Agent Management Job for
Windows• Command Line for Windows• Install of the Agent for Windows
Manually
There are various methods when installing the Ivanti EndpointSecurity Agent on a Windows endpoint.
Windows Installation MethodsTo install the Ivanti Endpoint Security Agent on a Windows platform you can utilize various methods.
• An Agent Management Job. This method supports installing an agent on endpoints that havea Windows operating system using the Ivanti Endpoint Security Web console. For additionalinformation, refer to Installing Agents by Agent Management Job on page 35.
• You may use a command line to install an agent on Windows endpoints. For additional information,refer to Silently Installing the Agent by Command Line for Windows on page 57.
• You may use the Ivanti Endpoint Security installer. This method uses an easy-to-use installationwizard that allows you to install a single agent on an endpoint. For additional information, refer toManually Installing the Agent for Windows on page 63.
For a description of the benefits of each install method, refer to Understanding Agent InstallationMethods on page 21.
Agent Management Job for WindowsThe Ivanti Endpoint Security Web console utilizes the Agent Management Job method to install agentson Windows endpoints. This method uses an easy-to-use wizard to discover endpoints within yournetwork and then install the agent.This method only supports endpoints that use the Windows operating system.
Ivanti Endpoint Security
- 24 -
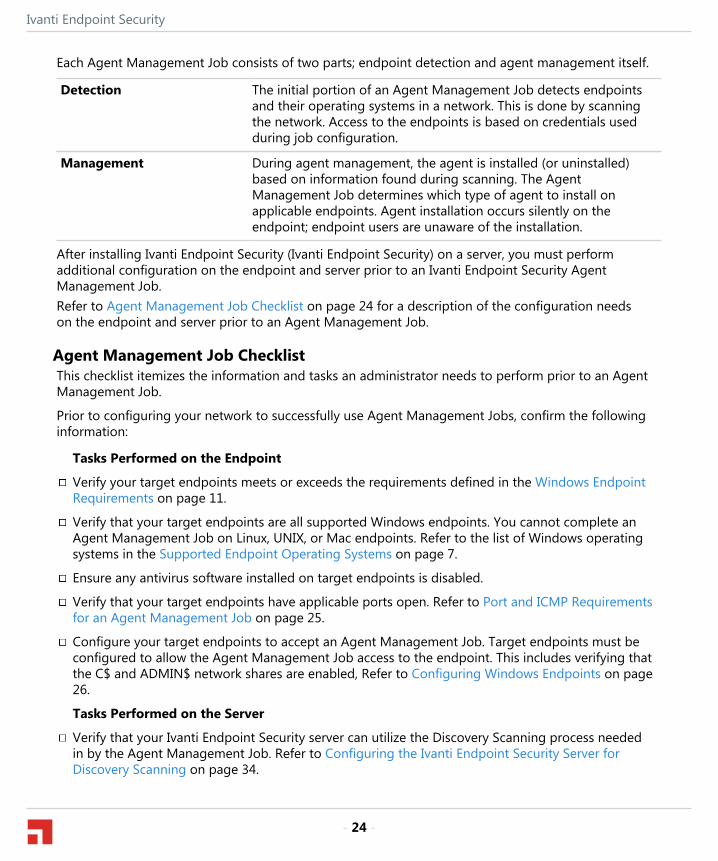
Each Agent Management Job consists of two parts; endpoint detection and agent management itself.
Detection The initial portion of an Agent Management Job detects endpointsand their operating systems in a network. This is done by scanningthe network. Access to the endpoints is based on credentials usedduring job configuration.
Management During agent management, the agent is installed (or uninstalled)based on information found during scanning. The AgentManagement Job determines which type of agent to install onapplicable endpoints. Agent installation occurs silently on theendpoint; endpoint users are unaware of the installation.
After installing Ivanti Endpoint Security (Ivanti Endpoint Security) on a server, you must performadditional configuration on the endpoint and server prior to an Ivanti Endpoint Security AgentManagement Job.Refer to Agent Management Job Checklist on page 24 for a description of the configuration needson the endpoint and server prior to an Agent Management Job.
Agent Management Job ChecklistThis checklist itemizes the information and tasks an administrator needs to perform prior to an AgentManagement Job.
Prior to configuring your network to successfully use Agent Management Jobs, confirm the followinginformation:
Tasks Performed on the Endpoint
Verify your target endpoints meets or exceeds the requirements defined in the Windows EndpointRequirements on page 11.
Verify that your target endpoints are all supported Windows endpoints. You cannot complete anAgent Management Job on Linux, UNIX, or Mac endpoints. Refer to the list of Windows operatingsystems in the Supported Endpoint Operating Systems on page 7.
Ensure any antivirus software installed on target endpoints is disabled.
Verify that your target endpoints have applicable ports open. Refer to Port and ICMP Requirementsfor an Agent Management Job on page 25.
Configure your target endpoints to accept an Agent Management Job. Target endpoints must beconfigured to allow the Agent Management Job access to the endpoint. This includes verifying thatthe C$ and ADMIN$ network shares are enabled, Refer to Configuring Windows Endpoints on page26.
Tasks Performed on the Server
Verify that your Ivanti Endpoint Security server can utilize the Discovery Scanning process neededin by the Agent Management Job. Refer to Configuring the Ivanti Endpoint Security Server forDiscovery Scanning on page 34.
Installing the Agent on Windows
- 25 -
Gather credentials for the endpoints. A user name and password that authenticates with Windows-based endpoints is required during configuration of the Agent Management Job. Type the username in a local format (UserName) or a domain format (DOMAIN\UserName).
Gather proxy information if your agents will be required to use a proxy to access your IvantiEndpoint Security server. The proxy information is required during configuration of the AgentManagement Job that is using a proxy server.
Note: A Squid proxy server will only properly resolve using a fully qualified domain name.Refer to KnowledgeBase Article 23402 (https://support.heatsoftware.com) for additional informationon a Squid proxy server configuration.
Once you have completed the tasks in the list you may begin installing or uninstalling the IvantiEndpoint Security Agent using an Agent Management Job. For information on this install method, referto Installing Agents by Agent Management Job on page 35.
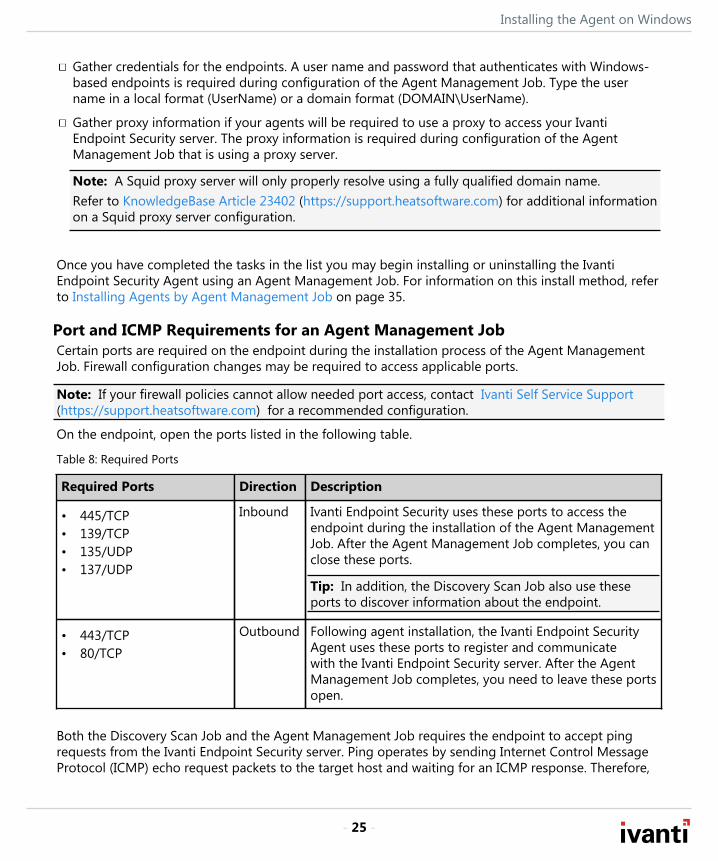
Port and ICMP Requirements for an Agent Management JobCertain ports are required on the endpoint during the installation process of the Agent ManagementJob. Firewall configuration changes may be required to access applicable ports.
Note: If your firewall policies cannot allow needed port access, contact Ivanti Self Service Support (https://support.heatsoftware.com) for a recommended configuration.
On the endpoint, open the ports listed in the following table.
Table 8: Required Ports
Required Ports Direction Description
• 445/TCP• 139/TCP• 135/UDP• 137/UDP
Inbound Ivanti Endpoint Security uses these ports to access theendpoint during the installation of the Agent ManagementJob. After the Agent Management Job completes, you canclose these ports.
Tip: In addition, the Discovery Scan Job also use theseports to discover information about the endpoint.
• 443/TCP• 80/TCP
Outbound Following agent installation, the Ivanti Endpoint SecurityAgent uses these ports to register and communicatewith the Ivanti Endpoint Security server. After the AgentManagement Job completes, you need to leave these portsopen.
Both the Discovery Scan Job and the Agent Management Job requires the endpoint to accept pingrequests from the Ivanti Endpoint Security server. Ping operates by sending Internet Control MessageProtocol (ICMP) echo request packets to the target host and waiting for an ICMP response. Therefore,
Ivanti Endpoint Security
- 26 -
you need an exception within your endpoint firewall for inbound Internet Control Message Protocol(ICMP) echo request.Refer to Enable or disable Internet Control Message Protocol requests for ICF (http://technet.microsoft.com/en-us/library/cc738771(v=ws.10).aspx) for additional information.
Configuring Windows EndpointsPrior to using an Agent Management Job to install agents on your Windows endpoints, you must firstconfigure your endpoints.
Prerequisites:
Prior to configuring, review the following requirements:
• You can perform these steps on endpoints with the following operating systems:
• Windows 10• Windows 8.1• Windows 8• Windows 7• Windows Vista• Windows Server 2012 R2• Windows Server 2012• Windows Server 2008 R2• Windows Server 2008
• You have gathered and confirmed the information and tasks in the Agent Management Jobchecklist. Refer to Agent Management Job Checklist on page 24 for a description.
• Verify your Windows endpoint meets the defined hardware and software requirements. Refer toAgent Requirements on page 7 for a complete list of agent requirements.
Note: If your organization uses a third-party firewall:
• Do not complete the steps for creating Windows Firewall exceptions. Your third-party firewall makesthem unnecessary.
• However, you must create exceptions for Ivanti Endpoint Security within you third-party firewall.For additional information, refer to Port and ICMP Requirements for an Agent Management Job onpage 25.
1. Start applicable Windows services.
Tip: There are specific Windows services that are necessary for successful Agent Management Jobcompletion.
a) Open Administrative Tools.b) Double-click Services.
Step Result: The Services dialog opens.
Installing the Agent on Windows
- 27 -
c) Ensure the necessary Windows services are started for an Agent Management Job.The following list itemizes the services that must be started for Agent Management Jobcompletion.
• DCOM Server Process Launcher• Remote Procedure Call (RPC)• Server• Windows Firewall• Windows Management Instrumentation
Note: In environments that use a third-party firewall, ensure the Windows Firewall service isinstead disabled.
d) If all of the listed services required for your configuration purposes have a Server status ofStarted, continue to the next step. If any of the listed services for your configuration purposesare not started, complete the following:
1. Right-click the applicable service and select Properties.2. Ensure Startup type list is set to Automatic. If edits are necessary, click Apply after selecting
Automatic from the list.3. Click Start.4. Click OK.5. If necessary, repeat the previous steps for each unstarted service.
e) Close the Services dialog and the Administrative Tools dialog.
Step Result: The applicable Windows services for a successful Agent Management Job are started.
2. Configure Sharing and Discovery settings.
Tip: The discovery setting allows the endpoint to be seen by the Ivanti Endpoint Security server,while the file sharing setting allows the Ivanti Endpoint Security server to install the agent duringagent management. These settings are necessary for a successful Agent Management Job.
a) From Control Panel, click Network and Internet.
Step Result: Control Panel opens to the Network and Internet options.
b) Click Network and Sharing Center.
Step Result: Control Panel opens to the Network and Sharing Center.
c) Ensure Network discovery is enabled.Enabling this setting makes the endpoint publicly known within the network.
Tip: Ivanti Endpoint Security uses the information shared by this setting to return more detailedinformation about the endpoint during discovery scanning.
Based on the endpoint operating system, complete the applicable steps.

Ivanti Endpoint Security
- 28 -
Operating System Step
Windows Vista or Windows Server 2008 1. Click the arrow icon adjacent to Networkdiscovery.
2. Ensure Turn on network discovery option isselected.
3. If necessary, click Apply.
Windows 7 1. Click Change advanced sharing settings.2. Expand one of the following network locations:
• Home or Work• Public• Domain
3. Scroll to Network discovery.4. Ensure Turn on network discovery option is
selected.5. If necessary, click Save Changes.6. Repeat these steps for each profile section.
• Windows 8• Windows 8.1• Windows Server 2012• Windows Server 2012 R2
1. Click Change advanced sharing settings.2. Expand one of the following network locations:
• Private• Guest or Public• Domain
3. Scroll to Network discovery.4. Ensure Turn on network discovery option is
selected.5. Ensure Turn on automatic setup of network
connected devices option is cleared.6. If necessary, click Save Changes.7. Repeat these steps for each profile section.
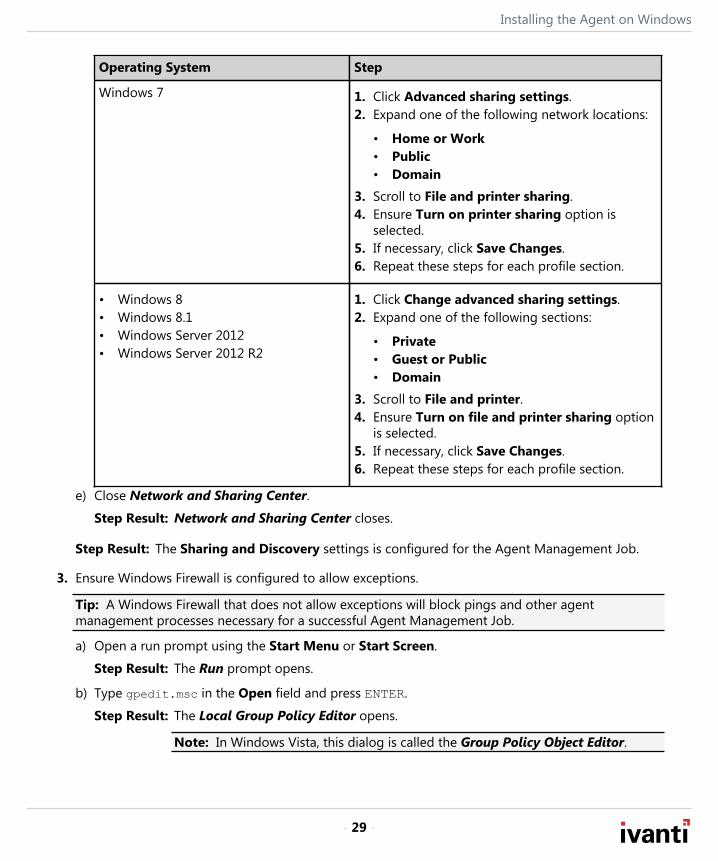
d) Ensure File sharing is enabled.Based on the endpoint operating system, complete the applicable steps.
Operating System Step
Windows Vista or Windows Server 2008 1. Click the arrow icon adjacent to File Sharing.2. Ensure Turn on file sharing option is selected.3. If necessary, click Apply.
Installing the Agent on Windows
- 29 -
Operating System Step
Windows 7 1. Click Advanced sharing settings.2. Expand one of the following network locations:
• Home or Work• Public• Domain
3. Scroll to File and printer sharing.4. Ensure Turn on printer sharing option is
selected.5. If necessary, click Save Changes.6. Repeat these steps for each profile section.
• Windows 8• Windows 8.1• Windows Server 2012• Windows Server 2012 R2
1. Click Change advanced sharing settings.2. Expand one of the following sections:
• Private• Guest or Public• Domain
3. Scroll to File and printer.4. Ensure Turn on file and printer sharing option
is selected.5. If necessary, click Save Changes.6. Repeat these steps for each profile section.
e) Close Network and Sharing Center.
Step Result: Network and Sharing Center closes.
Step Result: The Sharing and Discovery settings is configured for the Agent Management Job.
3. Ensure Windows Firewall is configured to allow exceptions.
Tip: A Windows Firewall that does not allow exceptions will block pings and other agentmanagement processes necessary for a successful Agent Management Job.
a) Open a run prompt using the Start Menu or Start Screen.
Step Result: The Run prompt opens.
b) Type gpedit.msc in the Open field and press ENTER.
Step Result: The Local Group Policy Editor opens.
Note: In Windows Vista, this dialog is called the Group Policy Object Editor.
Ivanti Endpoint Security
- 30 -
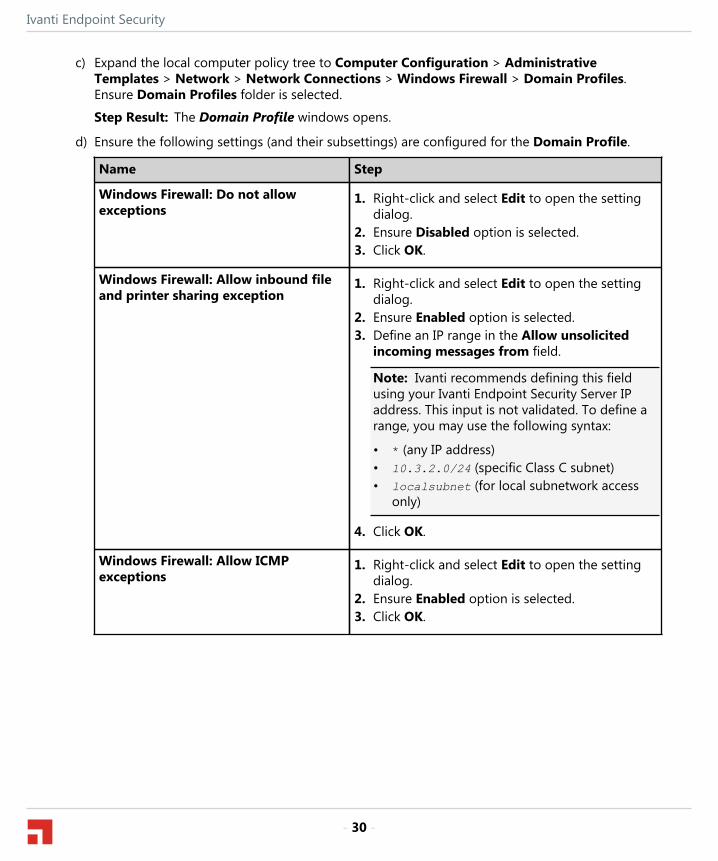
c) Expand the local computer policy tree to Computer Configuration > AdministrativeTemplates > Network > Network Connections > Windows Firewall > Domain Profiles.Ensure Domain Profiles folder is selected.
Step Result: The Domain Profile windows opens.
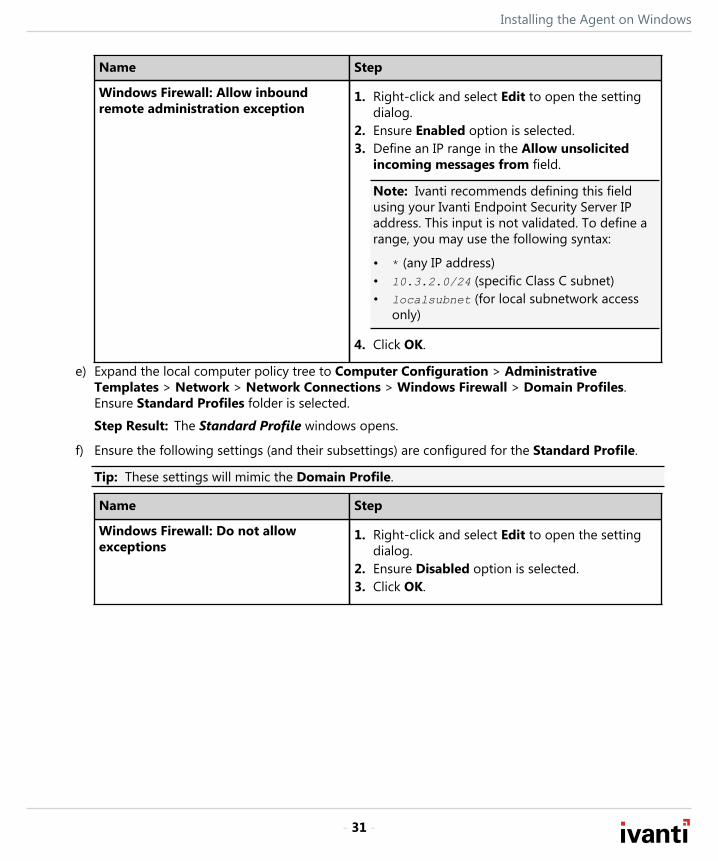
d) Ensure the following settings (and their subsettings) are configured for the Domain Profile.
Name Step
Windows Firewall: Do not allowexceptions
1. Right-click and select Edit to open the settingdialog.
2. Ensure Disabled option is selected.3. Click OK.
Windows Firewall: Allow inbound fileand printer sharing exception
1. Right-click and select Edit to open the settingdialog.
2. Ensure Enabled option is selected.3. Define an IP range in the Allow unsolicited
incoming messages from field.
Note: Ivanti recommends defining this fieldusing your Ivanti Endpoint Security Server IPaddress. This input is not validated. To define arange, you may use the following syntax:
• * (any IP address)• 10.3.2.0/24 (specific Class C subnet)• localsubnet (for local subnetwork access
only)
4. Click OK.
Windows Firewall: Allow ICMPexceptions
1. Right-click and select Edit to open the settingdialog.
2. Ensure Enabled option is selected.3. Click OK.
Installing the Agent on Windows
- 31 -
Name Step
Windows Firewall: Allow inboundremote administration exception
1. Right-click and select Edit to open the settingdialog.
2. Ensure Enabled option is selected.3. Define an IP range in the Allow unsolicited
incoming messages from field.
Note: Ivanti recommends defining this fieldusing your Ivanti Endpoint Security Server IPaddress. This input is not validated. To define arange, you may use the following syntax:
• * (any IP address)• 10.3.2.0/24 (specific Class C subnet)• localsubnet (for local subnetwork access
only)
4. Click OK.
e) Expand the local computer policy tree to Computer Configuration > AdministrativeTemplates > Network > Network Connections > Windows Firewall > Domain Profiles.Ensure Standard Profiles folder is selected.
Step Result: The Standard Profile windows opens.
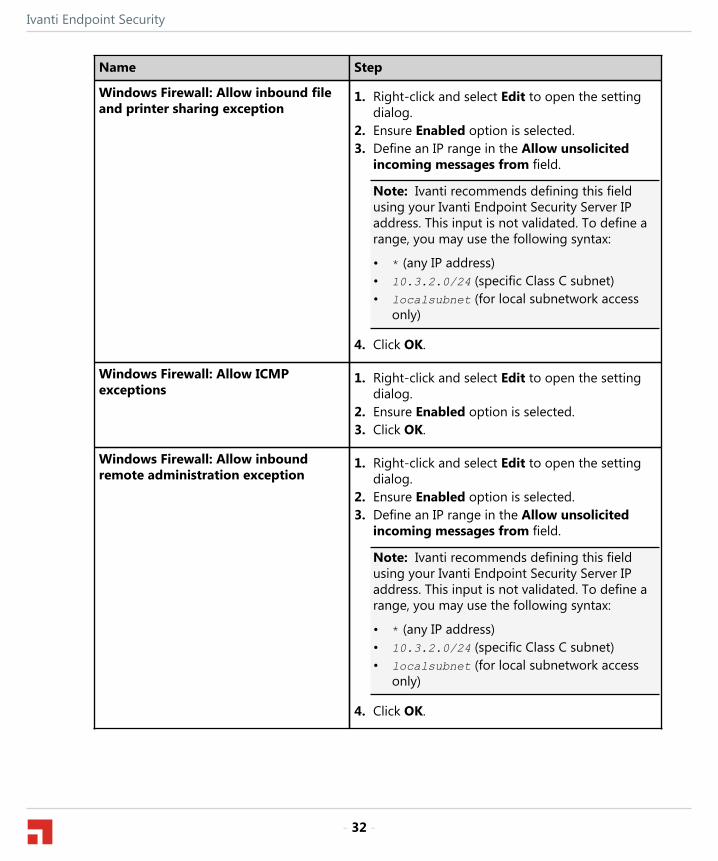
f) Ensure the following settings (and their subsettings) are configured for the Standard Profile.
Tip: These settings will mimic the Domain Profile.
Name Step
Windows Firewall: Do not allowexceptions
1. Right-click and select Edit to open the settingdialog.
2. Ensure Disabled option is selected.3. Click OK.
Ivanti Endpoint Security
- 32 -
Name Step
Windows Firewall: Allow inbound fileand printer sharing exception
1. Right-click and select Edit to open the settingdialog.
2. Ensure Enabled option is selected.3. Define an IP range in the Allow unsolicited
incoming messages from field.
Note: Ivanti recommends defining this fieldusing your Ivanti Endpoint Security Server IPaddress. This input is not validated. To define arange, you may use the following syntax:
• * (any IP address)• 10.3.2.0/24 (specific Class C subnet)• localsubnet (for local subnetwork access
only)
4. Click OK.
Windows Firewall: Allow ICMPexceptions
1. Right-click and select Edit to open the settingdialog.
2. Ensure Enabled option is selected.3. Click OK.
Windows Firewall: Allow inboundremote administration exception
1. Right-click and select Edit to open the settingdialog.
2. Ensure Enabled option is selected.3. Define an IP range in the Allow unsolicited
incoming messages from field.
Note: Ivanti recommends defining this fieldusing your Ivanti Endpoint Security Server IPaddress. This input is not validated. To define arange, you may use the following syntax:
• * (any IP address)• 10.3.2.0/24 (specific Class C subnet)• localsubnet (for local subnetwork access
only)
4. Click OK.
Installing the Agent on Windows
- 33 -
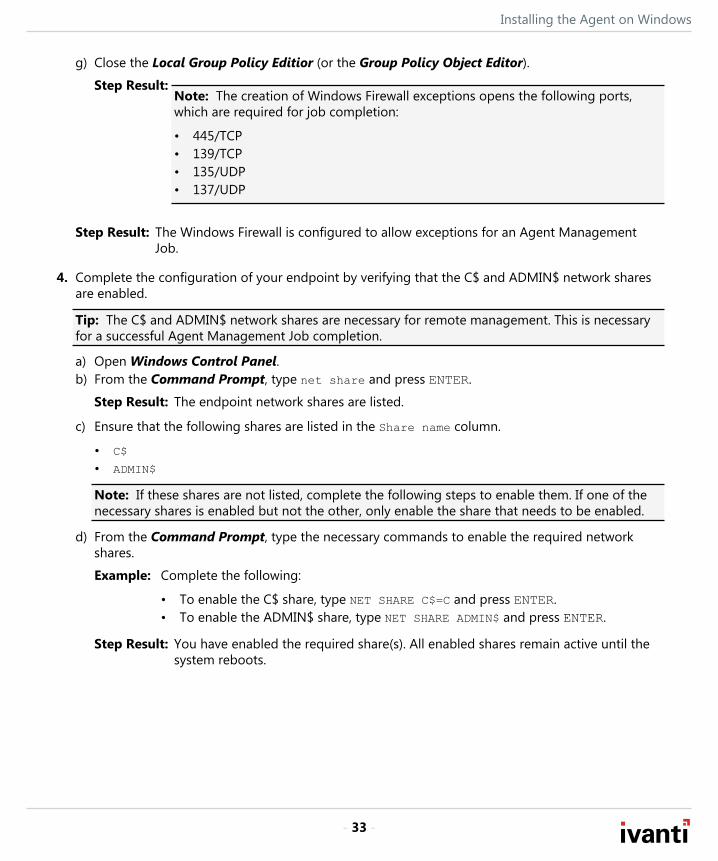
g) Close the Local Group Policy Editior (or the Group Policy Object Editor).
Step Result:Note: The creation of Windows Firewall exceptions opens the following ports,which are required for job completion:
• 445/TCP• 139/TCP• 135/UDP• 137/UDP
Step Result: The Windows Firewall is configured to allow exceptions for an Agent ManagementJob.
4. Complete the configuration of your endpoint by verifying that the C$ and ADMIN$ network sharesare enabled.
Tip: The C$ and ADMIN$ network shares are necessary for remote management. This is necessaryfor a successful Agent Management Job completion.
a) Open Windows Control Panel.b) From the Command Prompt, type net share and press ENTER.
Step Result: The endpoint network shares are listed.
c) Ensure that the following shares are listed in the Share name column.
• C$
• ADMIN$
Note: If these shares are not listed, complete the following steps to enable them. If one of thenecessary shares is enabled but not the other, only enable the share that needs to be enabled.
d) From the Command Prompt, type the necessary commands to enable the required networkshares.
Example: Complete the following:
• To enable the C$ share, type NET SHARE C$=C and press ENTER.• To enable the ADMIN$ share, type NET SHARE ADMIN$ and press ENTER.
Step Result: You have enabled the required share(s). All enabled shares remain active until thesystem reboots.
Ivanti Endpoint Security
- 34 -
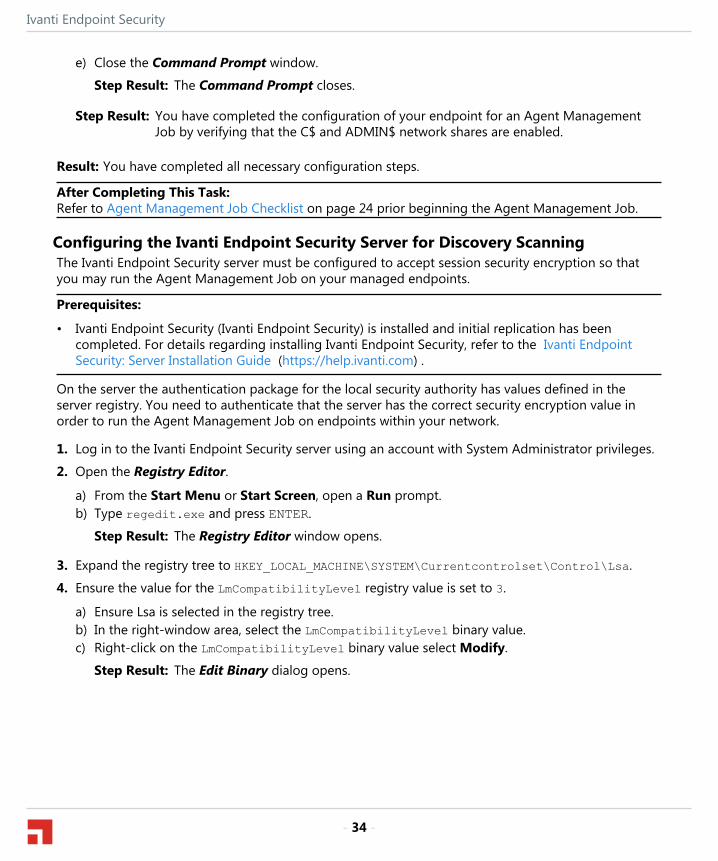
e) Close the Command Prompt window.
Step Result: The Command Prompt closes.
Step Result: You have completed the configuration of your endpoint for an Agent ManagementJob by verifying that the C$ and ADMIN$ network shares are enabled.
Result: You have completed all necessary configuration steps.
After Completing This Task:Refer to Agent Management Job Checklist on page 24 prior beginning the Agent Management Job.
Configuring the Ivanti Endpoint Security Server for Discovery ScanningThe Ivanti Endpoint Security server must be configured to accept session security encryption so thatyou may run the Agent Management Job on your managed endpoints.
Prerequisites:
• Ivanti Endpoint Security (Ivanti Endpoint Security) is installed and initial replication has beencompleted. For details regarding installing Ivanti Endpoint Security, refer to the Ivanti EndpointSecurity: Server Installation Guide (https://help.ivanti.com) .
On the server the authentication package for the local security authority has values defined in theserver registry. You need to authenticate that the server has the correct security encryption value inorder to run the Agent Management Job on endpoints within your network.
1. Log in to the Ivanti Endpoint Security server using an account with System Administrator privileges.
2. Open the Registry Editor.
a) From the Start Menu or Start Screen, open a Run prompt.b) Type regedit.exe and press ENTER.
Step Result: The Registry Editor window opens.
3. Expand the registry tree to HKEY_LOCAL_MACHINE\SYSTEM\Currentcontrolset\Control\Lsa.
4. Ensure the value for the LmCompatibilityLevel registry value is set to 3.
a) Ensure Lsa is selected in the registry tree.b) In the right-window area, select the LmCompatibilityLevel binary value.c) Right-click on the LmCompatibilityLevel binary value select Modify.
Step Result: The Edit Binary dialog opens.
Installing the Agent on Windows
- 35 -
d) Ensure 3 is visible in the Value data field. If not present, then change the value to 3.
Note: Under most network conditions, a setting of 3 (Send NTLM 2 response only) is sufficient.However, in some networks, this key may require a different value. To determine which value touse, refer to How to Enable NTLM 2 Authentication (http://support.microsoft.com/kb/239869).
Result: The Ivanti Endpoint Security server is configured to utilize discovery scanning.
After Completing This Task:If you are configuring the server for scanning in preparation for an Agent Management Job, ensureyou have complete the tasks needed for an Agent Management Job. For more information, see AgentManagement Job Checklist on page 24.
Installing Agents by Agent Management JobYou may install agents on network endpoints remotely using an Agent Management Job.
Prerequisites:
• Ivanti Endpoint Security (Ivanti Endpoint Security) is installed and initial replication has beencompleted. For details regarding installing Ivanti Endpoint Security, refer to the Ivanti EndpointSecurity: Server Installation Guide (https://help.ivanti.com) .
• Ensure that your endpoint meets the minimum requirements for agent installation. For additionalinformation, refer to Agent Requirements on page 7.
Note: You cannot complete an Agent Management Job on Linux, UNIX, or Mac endpoints.
• You have gathered and confirmed the information and tasks in the Agent Management Jobchecklist. Refer to Agent Management Job Checklist on page 24 for a description.
Configuration using an Agent Management Job is similar to configuration using the Discovery ScanJob. Configuration occurs using the Install Agents Wizard.
1. Log in to Ivanti Endpoint Security.For additional information, refer to Ivanti Endpoint Security User Guide (https://help.ivanti.com/) .
2. Begin configuration of the Install Agent Wizard.Complete one of the following steps to begin configuration.
Context Steps
To open the Wizard withouttargets predefined:
Select Discover > Assets and Install Agents.
Ivanti Endpoint Security
- 36 -
Context Steps
To open the Wizard withtarget predefined:
1. Select Manage > Endpoints.2. Select the endpoints you want to install the agent on.3. From the toolbar, select Manage Agents > Install Agents.
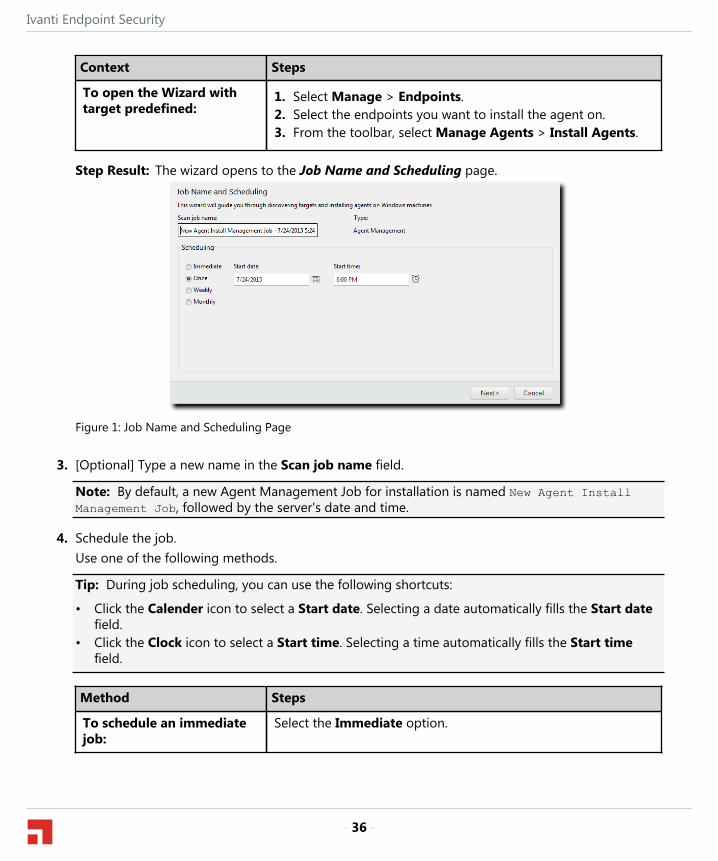
Step Result: The wizard opens to the Job Name and Scheduling page.
Figure 1: Job Name and Scheduling Page
3. [Optional] Type a new name in the Scan job name field.
Note: By default, a new Agent Management Job for installation is named New Agent InstallManagement Job, followed by the server's date and time.
4. Schedule the job.Use one of the following methods.
Tip: During job scheduling, you can use the following shortcuts:
• Click the Calender icon to select a Start date. Selecting a date automatically fills the Start datefield.
• Click the Clock icon to select a Start time. Selecting a time automatically fills the Start timefield.
Method Steps
To schedule an immediatejob:
Select the Immediate option.

Installing the Agent on Windows
- 37 -
Method Steps
To schedule a one-time job: 1. Ensure the Once option is selected.2. Define a start date by typing a date in the Start date field.
Note: Type the date in a mm/dd/yyyy format.
3. Define a start time by typing a time in the Start time field.
Note: Type the time in hh:mm format followed by AM or PM (ifnecessary). This field supports both 12- and 24-hour time.
Tip: Scheduling a one-time job for a past date and time willlaunch the job immediately.
To schedule a recurringweekly job:
1. Select the Weekly option.2. Define a start date by typing a date in the Start date field.
Note: Type the date in a mm/dd/yyyy format.
3. Define a start time by typing a time in the Start time field.
Note: Type the time in hh:mm format followed by AM or PM (ifnecessary). This field supports both 12- and 24-hour time.
4. Define the day of the week the job runs by selecting a dayfrom the Run every week on the following day list.
To schedule a recurringmonthly job:
1. Select the Monthly option.2. Define a start date by typing a date in the Start date field.
Note: Type the date in a mm/dd/yyyy format.
3. Define a start time by typing a time in the Start time field.
Note: Type the time in hh:mm format followed by AM or PM (ifnecessary). This field supports both 12- and 24-hour time.
4. Define the day of the month the job runs by typing a day inthe Run every month on the following day field.
Tip: One-time and recurring jobs scheduled for the last day of a 31-day month are automaticallyrescheduled for the last day of shorter months.
Ivanti Endpoint Security
- 38 -
5. Click Next.
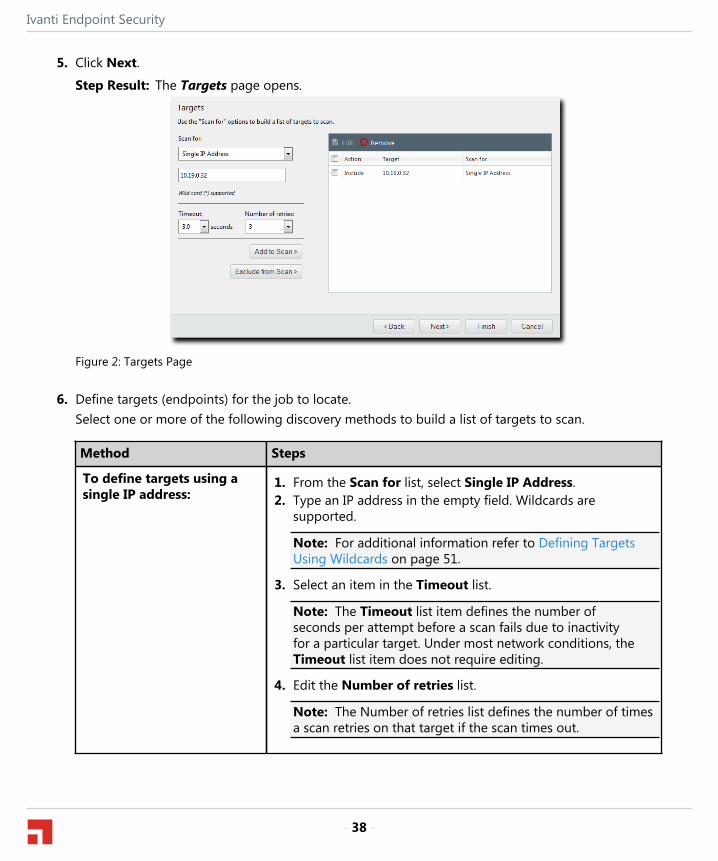
Step Result: The Targets page opens.
Figure 2: Targets Page
6. Define targets (endpoints) for the job to locate.Select one or more of the following discovery methods to build a list of targets to scan.
Method Steps
To define targets using asingle IP address:
1. From the Scan for list, select Single IP Address.2. Type an IP address in the empty field. Wildcards are
supported.
Note: For additional information refer to Defining TargetsUsing Wildcards on page 51.
3. Select an item in the Timeout list.
Note: The Timeout list item defines the number ofseconds per attempt before a scan fails due to inactivityfor a particular target. Under most network conditions, theTimeout list item does not require editing.
4. Edit the Number of retries list.
Note: The Number of retries list defines the number of timesa scan retries on that target if the scan times out.
Installing the Agent on Windows
- 39 -
Method Steps
To define targets using an IPrange:
1. From the Scan for list, select IP Range.2. In the first empty field, type the beginning of IP range.
Note: Wildcards are supported. For additional informationrefer to Defining Targets Using Wildcards on page 51.
3. In the second empty field, type the ending of the IP range.4. Select an item in the Timeout list.
Note: The Timeout list defines the number of seconds perattempt before a scan fails due to inactivity for that particulartarget. Under most network conditions, the Timeout list itemdoes not require editing.
5. Select an item in the Number of retries list.
Note: The Number of retries item defines the number oftimes a scan retries on that target if the scan times out.
To define targets using acomputer name:
1. From the Scan for list, select Computer name.2. In the empty field, type an endpoint name in one of the
following formats: computername or domain\computername.
To define targets usingnetwork neighborhood:
1. From the Scan for list, select Network Neighborhood.2. From the second list, select the desired network
neighborhood.
Ivanti Endpoint Security
- 40 -
Method Steps
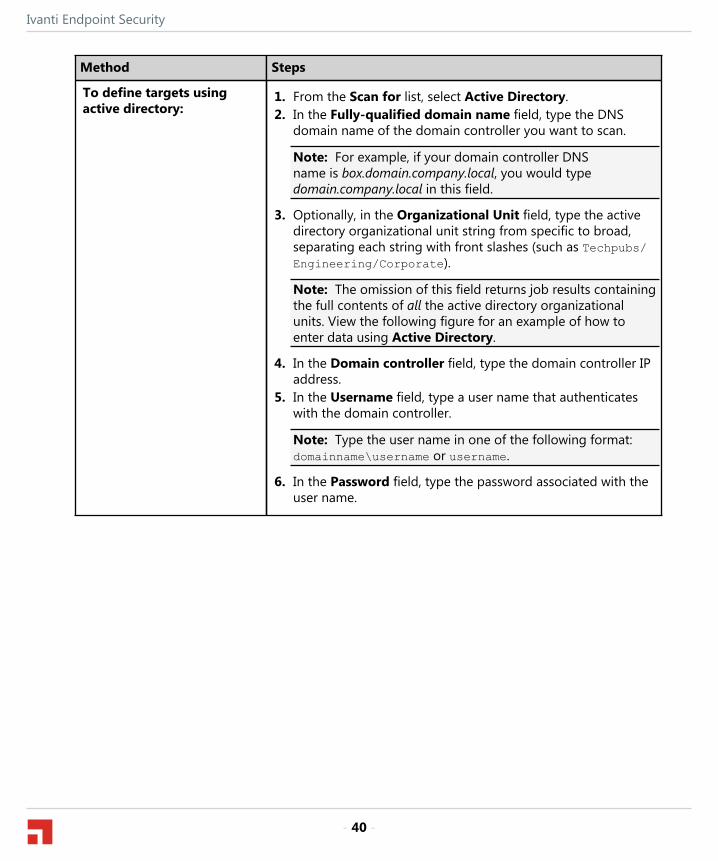
To define targets usingactive directory:
1. From the Scan for list, select Active Directory.2. In the Fully-qualified domain name field, type the DNS
domain name of the domain controller you want to scan.
Note: For example, if your domain controller DNSname is box.domain.company.local, you would typedomain.company.local in this field.
3. Optionally, in the Organizational Unit field, type the activedirectory organizational unit string from specific to broad,separating each string with front slashes (such as Techpubs/Engineering/Corporate).
Note: The omission of this field returns job results containingthe full contents of all the active directory organizationalunits. View the following figure for an example of how toenter data using Active Directory.
4. In the Domain controller field, type the domain controller IPaddress.
5. In the Username field, type a user name that authenticateswith the domain controller.
Note: Type the user name in one of the following format:domainname\username or username.
6. In the Password field, type the password associated with theuser name.
Installing the Agent on Windows
- 41 -
Method Steps
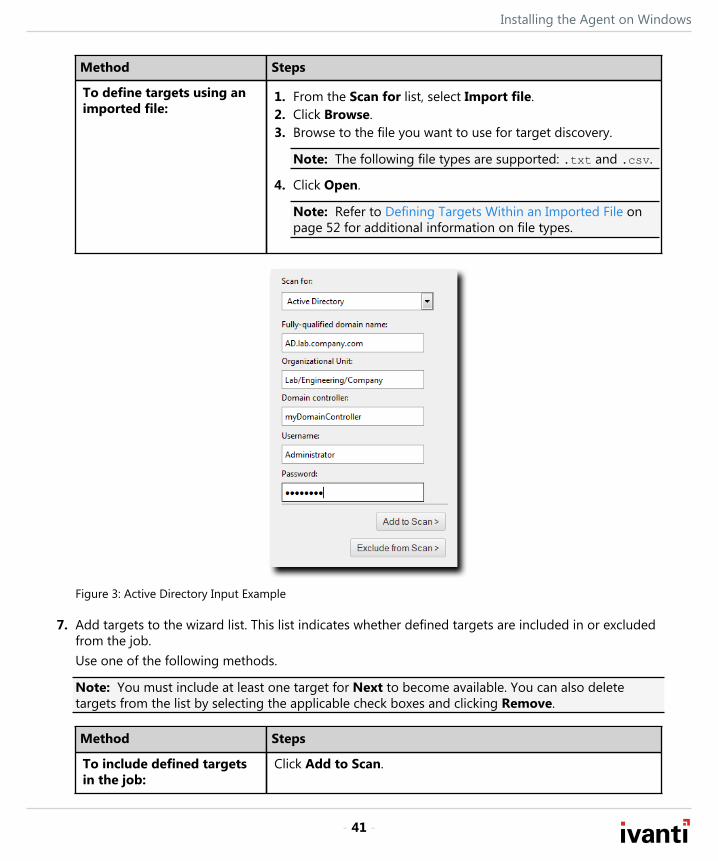
To define targets using animported file:
1. From the Scan for list, select Import file.2. Click Browse.3. Browse to the file you want to use for target discovery.
Note: The following file types are supported: .txt and .csv.
4. Click Open.
Note: Refer to Defining Targets Within an Imported File onpage 52 for additional information on file types.
Figure 3: Active Directory Input Example
7. Add targets to the wizard list. This list indicates whether defined targets are included in or excludedfrom the job.Use one of the following methods.
Note: You must include at least one target for Next to become available. You can also deletetargets from the list by selecting the applicable check boxes and clicking Remove.
Method Steps
To include defined targetsin the job:
Click Add to Scan.
Ivanti Endpoint Security
- 42 -
Method Steps
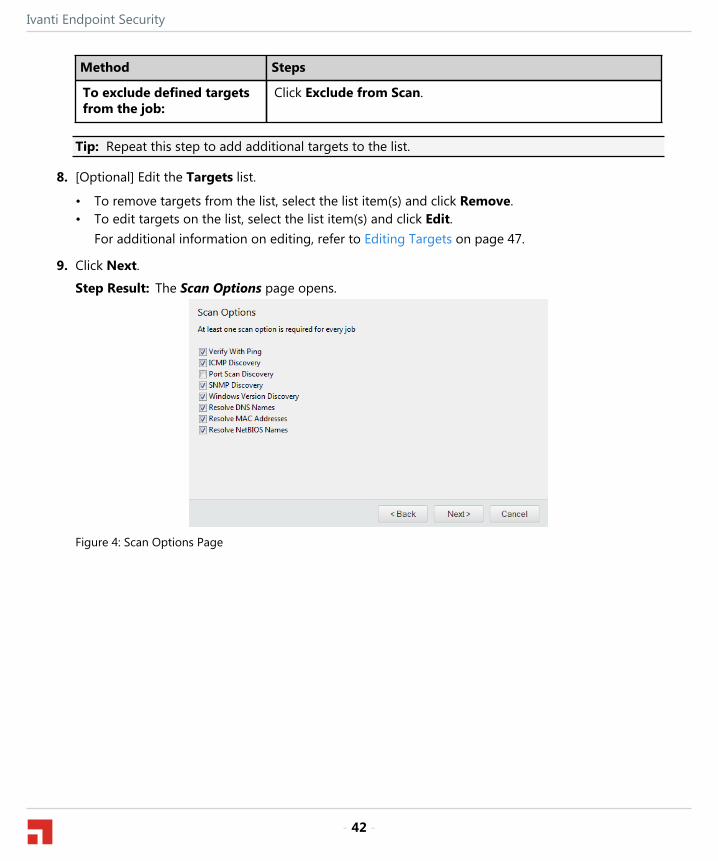
To exclude defined targetsfrom the job:
Click Exclude from Scan.
Tip: Repeat this step to add additional targets to the list.
8. [Optional] Edit the Targets list.
• To remove targets from the list, select the list item(s) and click Remove.• To edit targets on the list, select the list item(s) and click Edit.
For additional information on editing, refer to Editing Targets on page 47.
9. Click Next.
Step Result: The Scan Options page opens.
Figure 4: Scan Options Page
Installing the Agent on Windows
- 43 -
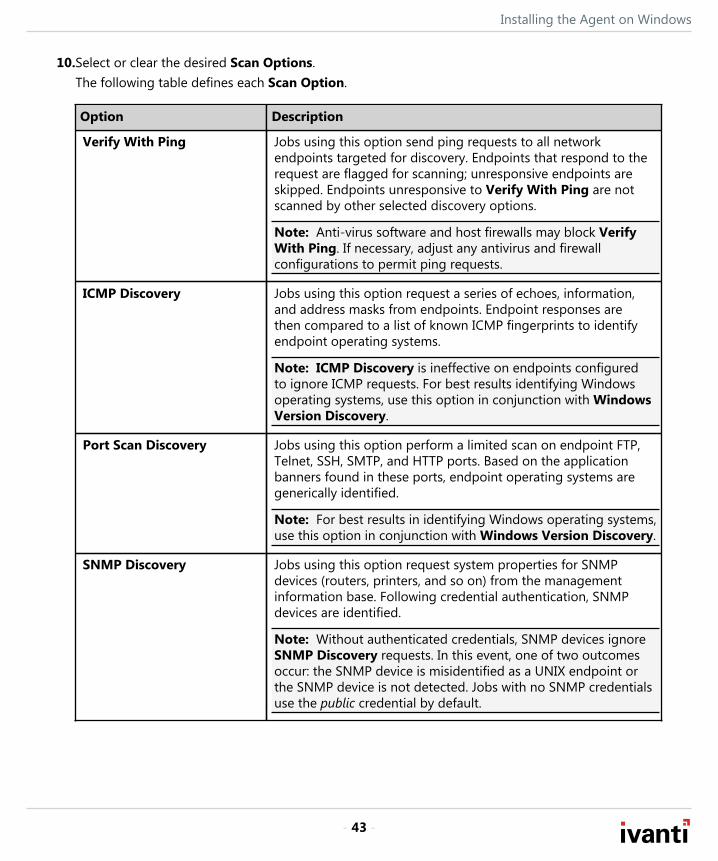
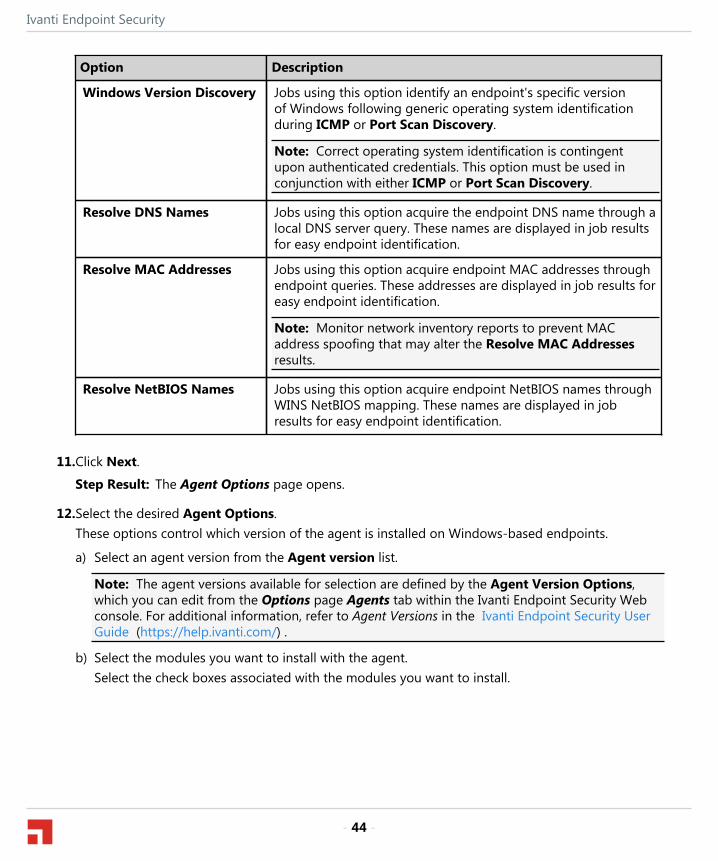
10.Select or clear the desired Scan Options.The following table defines each Scan Option.
Option Description
Verify With Ping Jobs using this option send ping requests to all networkendpoints targeted for discovery. Endpoints that respond to therequest are flagged for scanning; unresponsive endpoints areskipped. Endpoints unresponsive to Verify With Ping are notscanned by other selected discovery options.
Note: Anti-virus software and host firewalls may block VerifyWith Ping. If necessary, adjust any antivirus and firewallconfigurations to permit ping requests.
ICMP Discovery Jobs using this option request a series of echoes, information,and address masks from endpoints. Endpoint responses arethen compared to a list of known ICMP fingerprints to identifyendpoint operating systems.
Note: ICMP Discovery is ineffective on endpoints configuredto ignore ICMP requests. For best results identifying Windowsoperating systems, use this option in conjunction with WindowsVersion Discovery.
Port Scan Discovery Jobs using this option perform a limited scan on endpoint FTP,Telnet, SSH, SMTP, and HTTP ports. Based on the applicationbanners found in these ports, endpoint operating systems aregenerically identified.
Note: For best results in identifying Windows operating systems,use this option in conjunction with Windows Version Discovery.
SNMP Discovery Jobs using this option request system properties for SNMPdevices (routers, printers, and so on) from the managementinformation base. Following credential authentication, SNMPdevices are identified.
Note: Without authenticated credentials, SNMP devices ignoreSNMP Discovery requests. In this event, one of two outcomesoccur: the SNMP device is misidentified as a UNIX endpoint orthe SNMP device is not detected. Jobs with no SNMP credentialsuse the public credential by default.
Ivanti Endpoint Security
- 44 -
Option Description
Windows Version Discovery Jobs using this option identify an endpoint's specific versionof Windows following generic operating system identificationduring ICMP or Port Scan Discovery.
Note: Correct operating system identification is contingentupon authenticated credentials. This option must be used inconjunction with either ICMP or Port Scan Discovery.
Resolve DNS Names Jobs using this option acquire the endpoint DNS name through alocal DNS server query. These names are displayed in job resultsfor easy endpoint identification.
Resolve MAC Addresses Jobs using this option acquire endpoint MAC addresses throughendpoint queries. These addresses are displayed in job results foreasy endpoint identification.
Note: Monitor network inventory reports to prevent MACaddress spoofing that may alter the Resolve MAC Addressesresults.
Resolve NetBIOS Names Jobs using this option acquire endpoint NetBIOS names throughWINS NetBIOS mapping. These names are displayed in jobresults for easy endpoint identification.
11.Click Next.
Step Result: The Agent Options page opens.
12.Select the desired Agent Options.These options control which version of the agent is installed on Windows-based endpoints.
a) Select an agent version from the Agent version list.
Note: The agent versions available for selection are defined by the Agent Version Options,which you can edit from the Options page Agents tab within the Ivanti Endpoint Security Webconsole. For additional information, refer to Agent Versions in the Ivanti Endpoint Security UserGuide (https://help.ivanti.com/) .
b) Select the modules you want to install with the agent.Select the check boxes associated with the modules you want to install.
Installing the Agent on Windows
- 45 -
c) [Optional] Select the Overwrite existing agents check box.This option reinstalls the agent on endpoints.
Attention: Selecting this option will cause data loss when an endpoint's Ivanti Endpoint SecurityAgent is overwritten. However, you may select Agent Versions on the Manage Endpoints pageto upgrade agents without losing data. Refer to Upgrading the Agent Using the Endpoints Pageon page 79 for details.
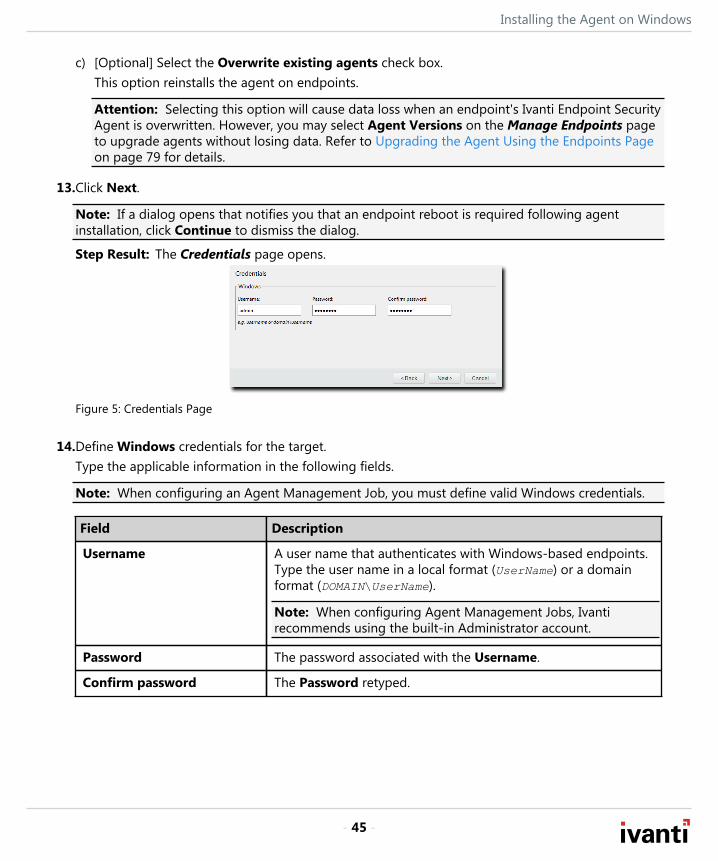
13.Click Next.
Note: If a dialog opens that notifies you that an endpoint reboot is required following agentinstallation, click Continue to dismiss the dialog.
Step Result: The Credentials page opens.
Figure 5: Credentials Page
14.Define Windows credentials for the target.Type the applicable information in the following fields.
Note: When configuring an Agent Management Job, you must define valid Windows credentials.
Field Description
Username A user name that authenticates with Windows-based endpoints.Type the user name in a local format (UserName) or a domainformat (DOMAIN\UserName).
Note: When configuring Agent Management Jobs, Ivantirecommends using the built-in Administrator account.
Password The password associated with the Username.
Confirm password The Password retyped.
Ivanti Endpoint Security
- 46 -
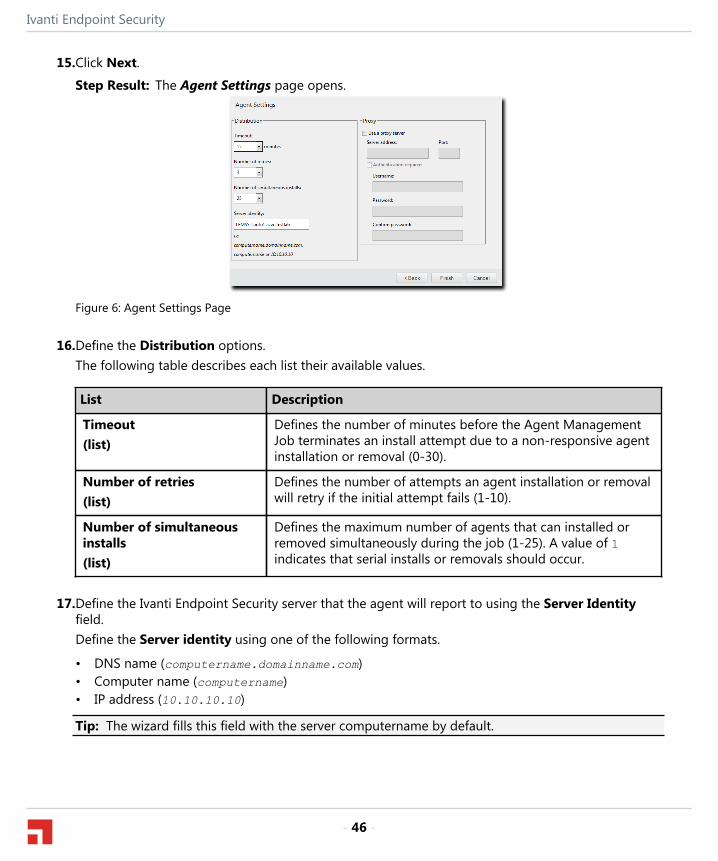
15.Click Next.
Step Result: The Agent Settings page opens.
Figure 6: Agent Settings Page
16.Define the Distribution options.The following table describes each list their available values.
List Description
Timeout(list)
Defines the number of minutes before the Agent ManagementJob terminates an install attempt due to a non-responsive agentinstallation or removal (0-30).
Number of retries(list)
Defines the number of attempts an agent installation or removalwill retry if the initial attempt fails (1-10).
Number of simultaneousinstalls(list)
Defines the maximum number of agents that can installed orremoved simultaneously during the job (1-25). A value of 1indicates that serial installs or removals should occur.
17.Define the Ivanti Endpoint Security server that the agent will report to using the Server Identityfield.Define the Server identity using one of the following formats.
• DNS name (computername.domainname.com)• Computer name (computername)• IP address (10.10.10.10)
Tip: The wizard fills this field with the server computername by default.
Installing the Agent on Windows
- 47 -
18.If the target endpoints will communicate with the Ivanti Endpoint Security server through a proxyserver following initial agent installation, select the Use a proxy server check box and define thefollowing fields.
Note: In many network environments, although a proxy is used for Internet access, a proxy bypassis used for all access within the corporate network. Therefore, only enter proxy information if youragents will be required to use a proxy to access your Ivanti Endpoint Security server.
Field Description
Server address The applicable proxy IP address.
Port The applicable proxy port number used to communicate.
19.If the target endpoints will use a proxy for agent to server communication, and that proxy requiresauthentication, select the Authentication required check box and define the following fields.
Field Description
Username A user name that authenticates with the proxy.
Password The password associated with the Username.
Confirm password The Password retyped.
20.Click Finish.
Result: The Install Agents Wizard closes. Depending on how you configured the job, it movesto either the Scheduled tab or Active tab on the Job Results page. The job will run at theapplicable time, installing agents on the defined targets, and move to Completed tab whenfinished.
Note: After the Agent Management Job completes, install agent modules. For additionalinformation, refer to Managing Endpoint Modules in Ivanti Endpoint Security User Guide (https://help.ivanti.com/) .
Editing TargetsWhile configuring jobs, you can edit items included in the Targets list in the Install Agents Wizard.
Edit Target list items from the Targets page of the wizard.
1. From the Targets list, select the check box associated with the item you want to edit.
Step Result: The Edit button becomes active.
Ivanti Endpoint Security
- 48 -
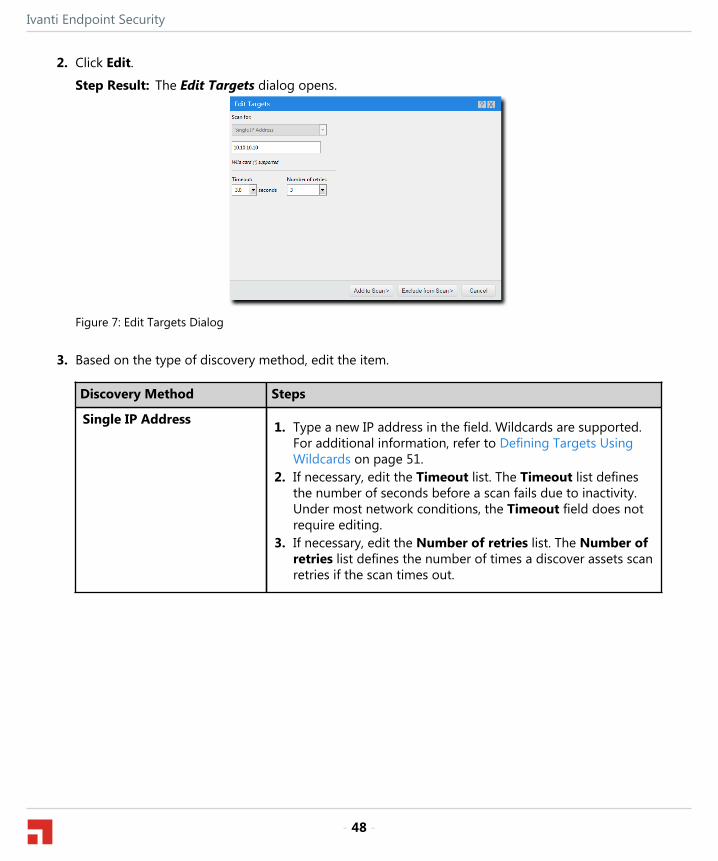
2. Click Edit.
Step Result: The Edit Targets dialog opens.
Figure 7: Edit Targets Dialog
3. Based on the type of discovery method, edit the item.
Discovery Method Steps
Single IP Address 1. Type a new IP address in the field. Wildcards are supported.For additional information, refer to Defining Targets UsingWildcards on page 51.
2. If necessary, edit the Timeout list. The Timeout list definesthe number of seconds before a scan fails due to inactivity.Under most network conditions, the Timeout field does notrequire editing.
3. If necessary, edit the Number of retries list. The Number ofretries list defines the number of times a discover assets scanretries if the scan times out.
Installing the Agent on Windows
- 49 -
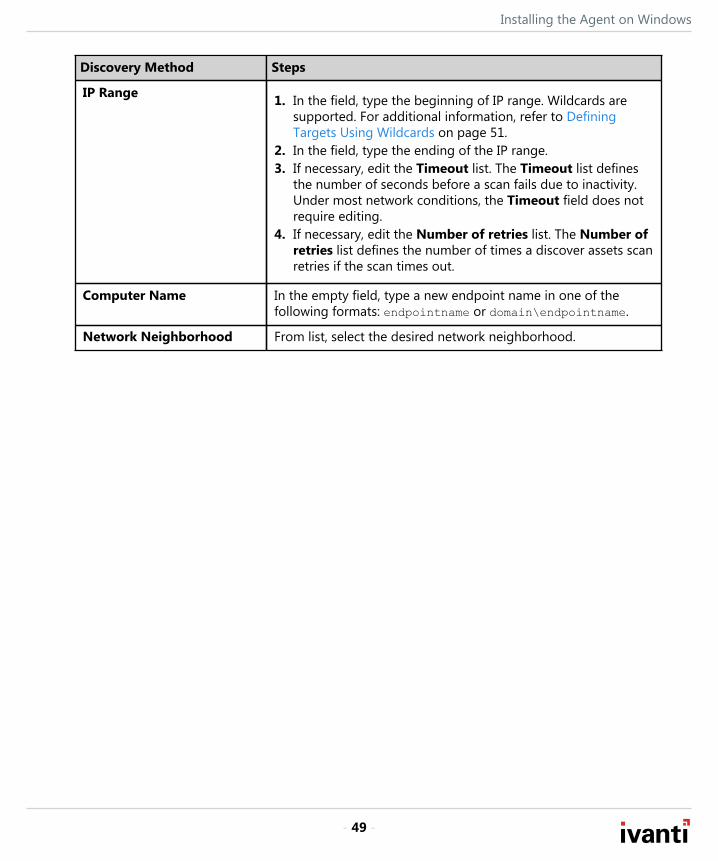
Discovery Method Steps
IP Range 1. In the field, type the beginning of IP range. Wildcards aresupported. For additional information, refer to DefiningTargets Using Wildcards on page 51.
2. In the field, type the ending of the IP range.3. If necessary, edit the Timeout list. The Timeout list defines
the number of seconds before a scan fails due to inactivity.Under most network conditions, the Timeout field does notrequire editing.
4. If necessary, edit the Number of retries list. The Number ofretries list defines the number of times a discover assets scanretries if the scan times out.
Computer Name In the empty field, type a new endpoint name in one of thefollowing formats: endpointname or domain\endpointname.
Network Neighborhood From list, select the desired network neighborhood.
Ivanti Endpoint Security
- 50 -
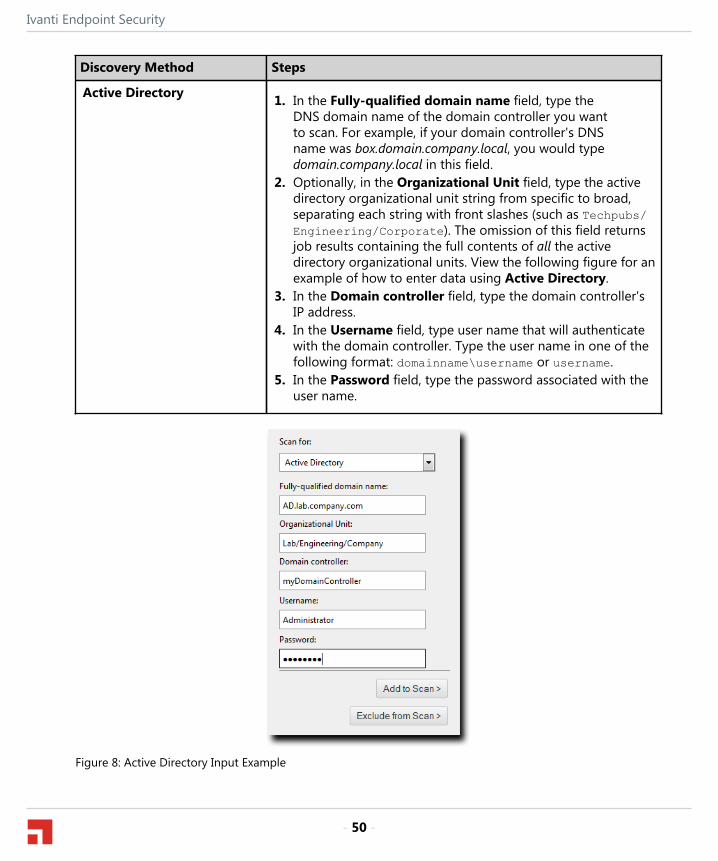
Discovery Method Steps
Active Directory 1. In the Fully-qualified domain name field, type theDNS domain name of the domain controller you wantto scan. For example, if your domain controller's DNSname was box.domain.company.local, you would typedomain.company.local in this field.
2. Optionally, in the Organizational Unit field, type the activedirectory organizational unit string from specific to broad,separating each string with front slashes (such as Techpubs/Engineering/Corporate). The omission of this field returnsjob results containing the full contents of all the activedirectory organizational units. View the following figure for anexample of how to enter data using Active Directory.
3. In the Domain controller field, type the domain controller'sIP address.
4. In the Username field, type user name that will authenticatewith the domain controller. Type the user name in one of thefollowing format: domainname\username or username.
5. In the Password field, type the password associated with theuser name.
Figure 8: Active Directory Input Example
Installing the Agent on Windows
- 51 -
4. Add targets to the wizard list. This list indicates whether defined targets are included in or excludedfrom the job.Use one of the following methods.
Method Steps
To include defined targetsin the job:
Click Add to Scan.
To exclude defined targetsfrom the job:
Click Exclude from Scan.
5. Review the Targets list.
Result: The Targets list reflects your changes.
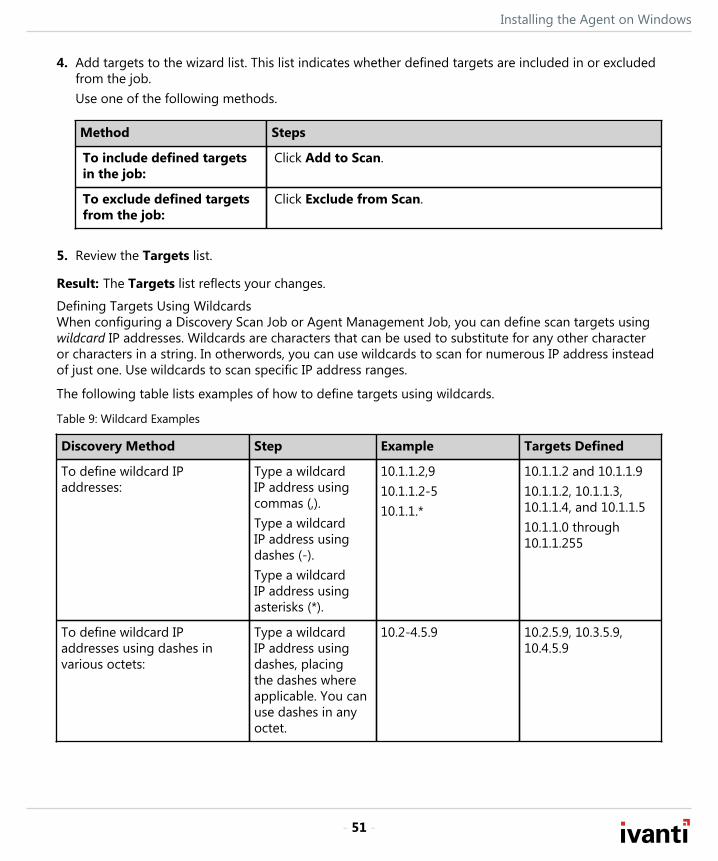
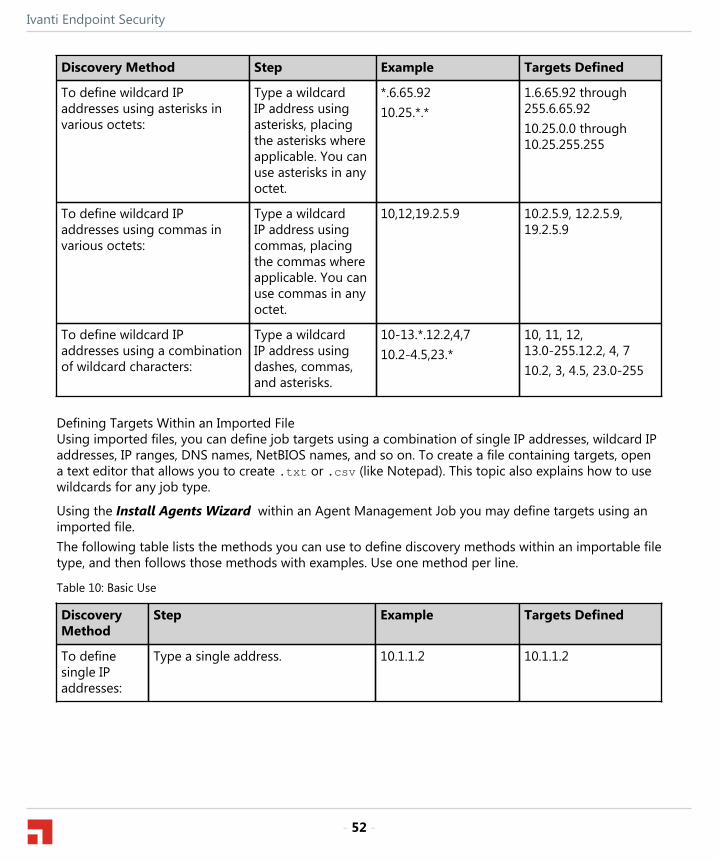
Defining Targets Using WildcardsWhen configuring a Discovery Scan Job or Agent Management Job, you can define scan targets usingwildcard IP addresses. Wildcards are characters that can be used to substitute for any other characteror characters in a string. In otherwords, you can use wildcards to scan for numerous IP address insteadof just one. Use wildcards to scan specific IP address ranges.
The following table lists examples of how to define targets using wildcards.
Table 9: Wildcard Examples
Discovery Method Step Example Targets Defined
To define wildcard IPaddresses:
Type a wildcardIP address usingcommas (,).Type a wildcardIP address usingdashes (-).Type a wildcardIP address usingasterisks (*).
10.1.1.2,910.1.1.2-510.1.1.*
10.1.1.2 and 10.1.1.910.1.1.2, 10.1.1.3,10.1.1.4, and 10.1.1.510.1.1.0 through10.1.1.255
To define wildcard IPaddresses using dashes invarious octets:
Type a wildcardIP address usingdashes, placingthe dashes whereapplicable. You canuse dashes in anyoctet.
10.2-4.5.9 10.2.5.9, 10.3.5.9,10.4.5.9
Ivanti Endpoint Security
- 52 -
Discovery Method Step Example Targets Defined
To define wildcard IPaddresses using asterisks invarious octets:
Type a wildcardIP address usingasterisks, placingthe asterisks whereapplicable. You canuse asterisks in anyoctet.
*.6.65.9210.25.*.*
1.6.65.92 through255.6.65.9210.25.0.0 through10.25.255.255
To define wildcard IPaddresses using commas invarious octets:
Type a wildcardIP address usingcommas, placingthe commas whereapplicable. You canuse commas in anyoctet.
10,12,19.2.5.9 10.2.5.9, 12.2.5.9,19.2.5.9
To define wildcard IPaddresses using a combinationof wildcard characters:
Type a wildcardIP address usingdashes, commas,and asterisks.
10-13.*.12.2,4,710.2-4.5,23.*
10, 11, 12,13.0-255.12.2, 4, 710.2, 3, 4.5, 23.0-255
Defining Targets Within an Imported FileUsing imported files, you can define job targets using a combination of single IP addresses, wildcard IPaddresses, IP ranges, DNS names, NetBIOS names, and so on. To create a file containing targets, opena text editor that allows you to create .txt or .csv (like Notepad). This topic also explains how to usewildcards for any job type.
Using the Install Agents Wizard within an Agent Management Job you may define targets using animported file.The following table lists the methods you can use to define discovery methods within an importable filetype, and then follows those methods with examples. Use one method per line.
Table 10: Basic Use
DiscoveryMethod
Step Example Targets Defined
To definesingle IPaddresses:
Type a single address. 10.1.1.2 10.1.1.2
Installing the Agent on Windows
- 53 -
DiscoveryMethod
Step Example Targets Defined
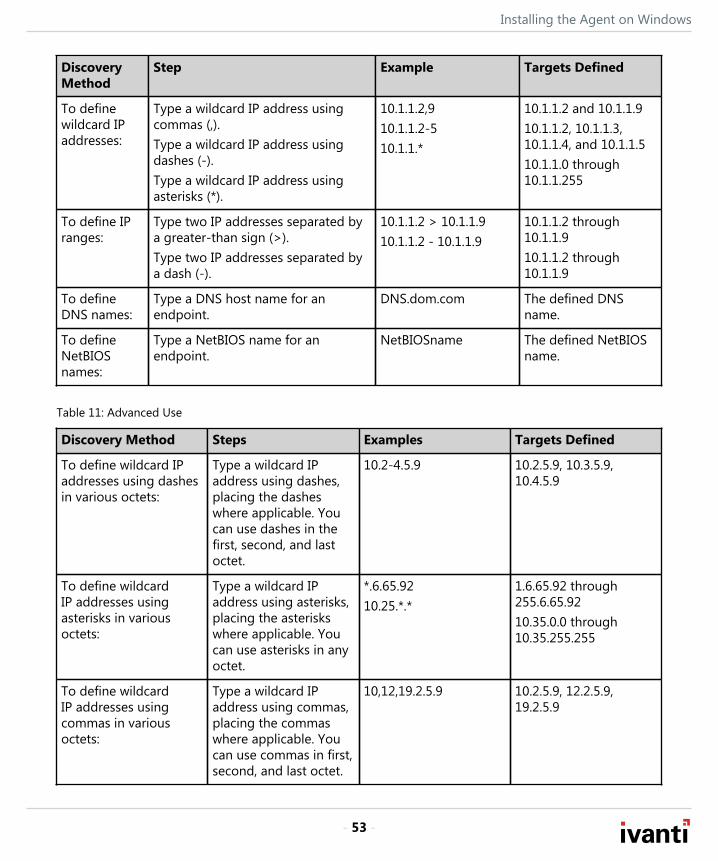
To definewildcard IPaddresses:
Type a wildcard IP address usingcommas (,).Type a wildcard IP address usingdashes (-).Type a wildcard IP address usingasterisks (*).
10.1.1.2,910.1.1.2-510.1.1.*
10.1.1.2 and 10.1.1.910.1.1.2, 10.1.1.3,10.1.1.4, and 10.1.1.510.1.1.0 through10.1.1.255
To define IPranges:
Type two IP addresses separated bya greater-than sign (>).Type two IP addresses separated bya dash (-).
10.1.1.2 > 10.1.1.910.1.1.2 - 10.1.1.9
10.1.1.2 through10.1.1.910.1.1.2 through10.1.1.9
To defineDNS names:
Type a DNS host name for anendpoint.
DNS.dom.com The defined DNSname.
To defineNetBIOSnames:
Type a NetBIOS name for anendpoint.
NetBIOSname The defined NetBIOSname.
Table 11: Advanced Use
Discovery Method Steps Examples Targets Defined
To define wildcard IPaddresses using dashesin various octets:
Type a wildcard IPaddress using dashes,placing the dasheswhere applicable. Youcan use dashes in thefirst, second, and lastoctet.
10.2-4.5.9 10.2.5.9, 10.3.5.9,10.4.5.9
To define wildcardIP addresses usingasterisks in variousoctets:
Type a wildcard IPaddress using asterisks,placing the asteriskswhere applicable. Youcan use asterisks in anyoctet.
*.6.65.9210.25.*.*
1.6.65.92 through255.6.65.9210.35.0.0 through10.35.255.255
To define wildcardIP addresses usingcommas in variousoctets:
Type a wildcard IPaddress using commas,placing the commaswhere applicable. Youcan use commas in first,second, and last octet.
10,12,19.2.5.9 10.2.5.9, 12.2.5.9,19.2.5.9
Ivanti Endpoint Security
- 54 -
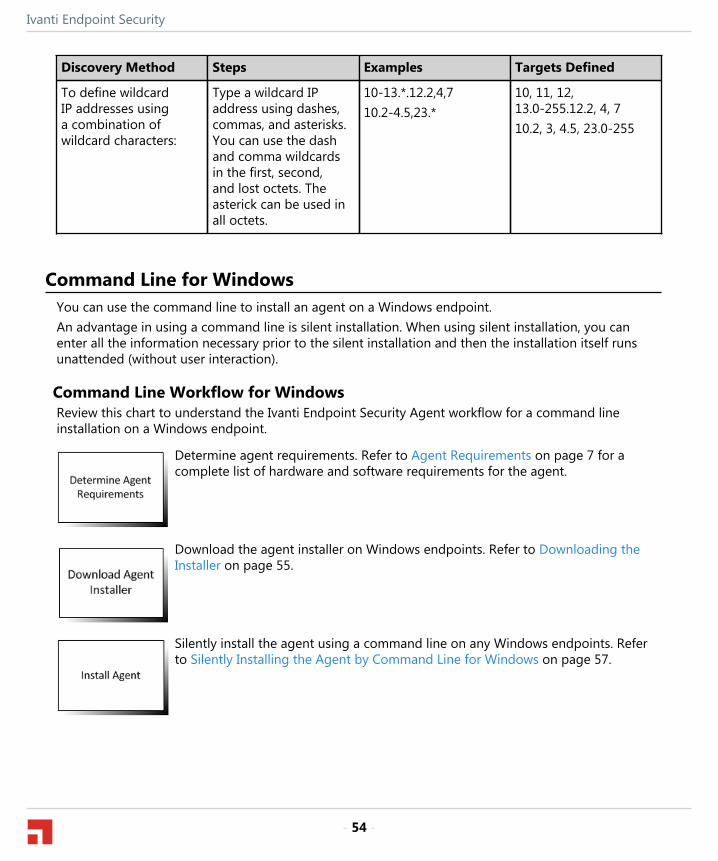
Discovery Method Steps Examples Targets Defined
To define wildcardIP addresses usinga combination ofwildcard characters:
Type a wildcard IPaddress using dashes,commas, and asterisks.You can use the dashand comma wildcardsin the first, second,and lost octets. Theasterick can be used inall octets.
10-13.*.12.2,4,710.2-4.5,23.*
10, 11, 12,13.0-255.12.2, 4, 710.2, 3, 4.5, 23.0-255
Command Line for WindowsYou can use the command line to install an agent on a Windows endpoint.An advantage in using a command line is silent installation. When using silent installation, you canenter all the information necessary prior to the silent installation and then the installation itself runsunattended (without user interaction).
Command Line Workflow for WindowsReview this chart to understand the Ivanti Endpoint Security Agent workflow for a command lineinstallation on a Windows endpoint.
Determine agent requirements. Refer to Agent Requirements on page 7 for acomplete list of hardware and software requirements for the agent.
Download the agent installer on Windows endpoints. Refer to Downloading theInstaller on page 55.
Silently install the agent using a command line on any Windows endpoints. Referto Silently Installing the Agent by Command Line for Windows on page 57.
Installing the Agent on Windows
- 55 -
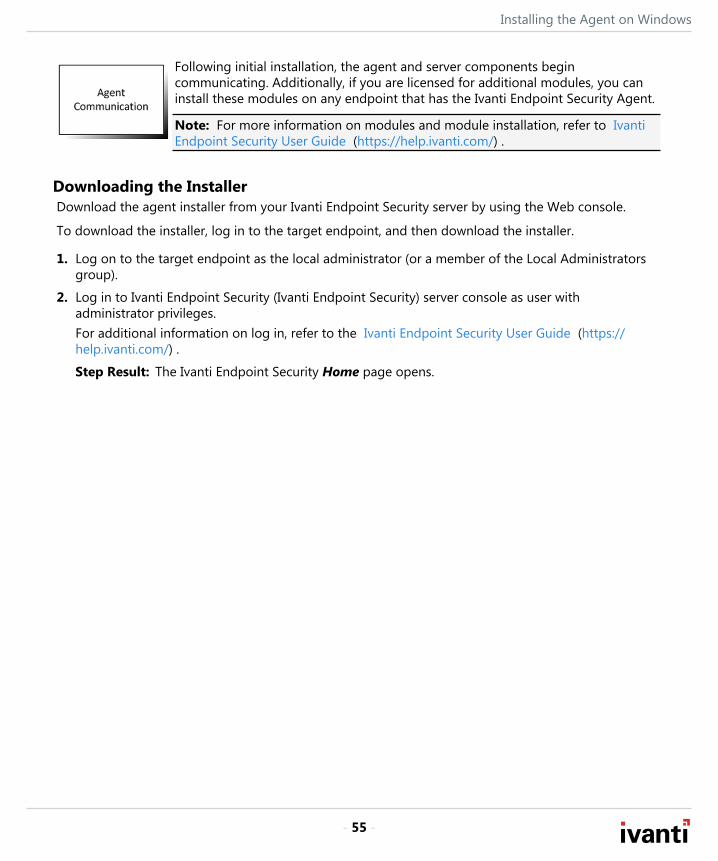
Following initial installation, the agent and server components begincommunicating. Additionally, if you are licensed for additional modules, you caninstall these modules on any endpoint that has the Ivanti Endpoint Security Agent.
Note: For more information on modules and module installation, refer to IvantiEndpoint Security User Guide (https://help.ivanti.com/) .
Downloading the InstallerDownload the agent installer from your Ivanti Endpoint Security server by using the Web console.
To download the installer, log in to the target endpoint, and then download the installer.
1. Log on to the target endpoint as the local administrator (or a member of the Local Administratorsgroup).
2. Log in to Ivanti Endpoint Security (Ivanti Endpoint Security) server console as user withadministrator privileges.For additional information on log in, refer to the Ivanti Endpoint Security User Guide (https://help.ivanti.com/) .
Step Result: The Ivanti Endpoint Security Home page opens.

Ivanti Endpoint Security
- 56 -
3. Select Tools > Download Agent Installer.
Step Result: The Download Agent Installers dialog opens.
Figure 9: Download Agent Installers Dialog
Tip: The icon allows you to copy information to your clipboard.
4. Select your endpoint's operating system from the Operating System drop-down list.
5. Select the version of the agent that you want to install from the Agent Version drop-down list.
Note: The agent versions available for selection are defined by the Agent Version Options, whichyou can edit from the Options page Agents tab within the Ivanti Endpoint Security Web console.For additional information, refer to Configuring the Agents Tab in the Ivanti Endpoint Security UserGuide (https://help.ivanti.com/) .
6. Click Download.
Step Result: A dialog opens, prompting you to define a download location.
Tip: The Download Agent Installers dialog remains open during the installerdownload.
7. Using the dialog controls, define a download location and begin the download.
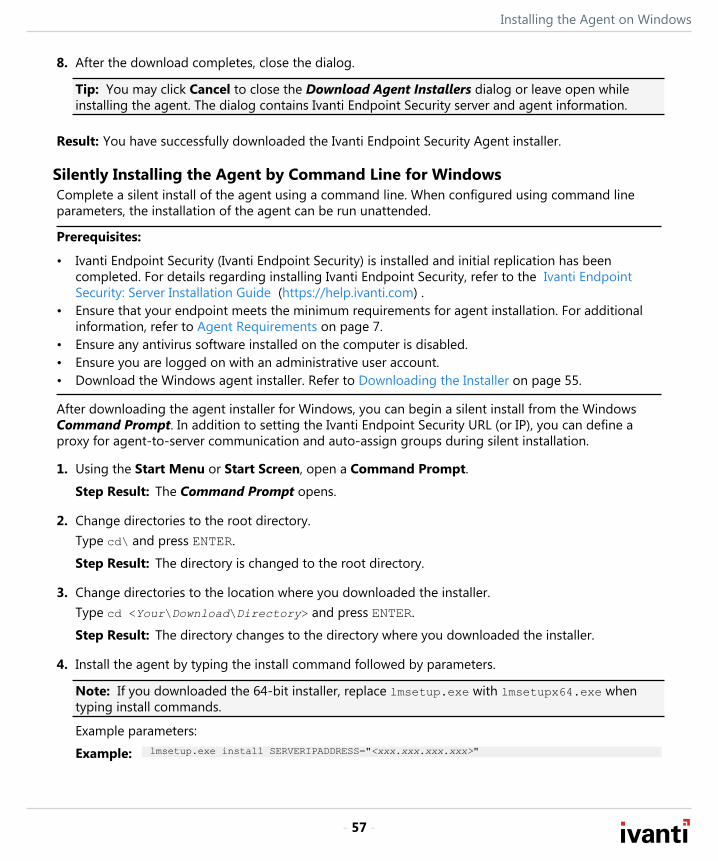
Installing the Agent on Windows
- 57 -
8. After the download completes, close the dialog.
Tip: You may click Cancel to close the Download Agent Installers dialog or leave open whileinstalling the agent. The dialog contains Ivanti Endpoint Security server and agent information.
Result: You have successfully downloaded the Ivanti Endpoint Security Agent installer.
Silently Installing the Agent by Command Line for WindowsComplete a silent install of the agent using a command line. When configured using command lineparameters, the installation of the agent can be run unattended.
Prerequisites:
• Ivanti Endpoint Security (Ivanti Endpoint Security) is installed and initial replication has beencompleted. For details regarding installing Ivanti Endpoint Security, refer to the Ivanti EndpointSecurity: Server Installation Guide (https://help.ivanti.com) .
• Ensure that your endpoint meets the minimum requirements for agent installation. For additionalinformation, refer to Agent Requirements on page 7.
• Ensure any antivirus software installed on the computer is disabled.• Ensure you are logged on with an administrative user account.• Download the Windows agent installer. Refer to Downloading the Installer on page 55.
After downloading the agent installer for Windows, you can begin a silent install from the WindowsCommand Prompt. In addition to setting the Ivanti Endpoint Security URL (or IP), you can define aproxy for agent-to-server communication and auto-assign groups during silent installation.
1. Using the Start Menu or Start Screen, open a Command Prompt.
Step Result: The Command Prompt opens.
2. Change directories to the root directory.Type cd\ and press ENTER.
Step Result: The directory is changed to the root directory.
3. Change directories to the location where you downloaded the installer.Type cd <Your\Download\Directory> and press ENTER.
Step Result: The directory changes to the directory where you downloaded the installer.
4. Install the agent by typing the install command followed by parameters.
Note: If you downloaded the 64-bit installer, replace lmsetup.exe with lmsetupx64.exe whentyping install commands.
Example parameters:
Example: lmsetup.exe install SERVERIPADDRESS="<xxx.xxx.xxx.xxx>"
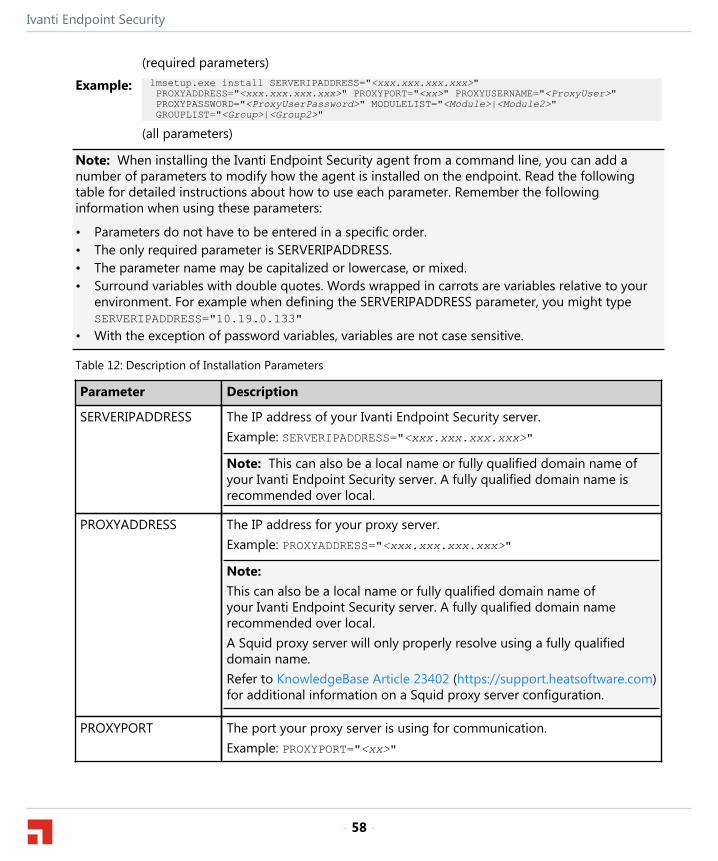
Ivanti Endpoint Security
- 58 -
(required parameters)
Example: lmsetup.exe install SERVERIPADDRESS="<xxx.xxx.xxx.xxx>" PROXYADDRESS="<xxx.xxx.xxx.xxx>" PROXYPORT="<xx>" PROXYUSERNAME="<ProxyUser>" PROXYPASSWORD="<ProxyUserPassword>" MODULELIST="<Module>|<Module2>" GROUPLIST="<Group>|<Group2>"
(all parameters)
Note: When installing the Ivanti Endpoint Security agent from a command line, you can add anumber of parameters to modify how the agent is installed on the endpoint. Read the followingtable for detailed instructions about how to use each parameter. Remember the followinginformation when using these parameters:
• Parameters do not have to be entered in a specific order.• The only required parameter is SERVERIPADDRESS.• The parameter name may be capitalized or lowercase, or mixed.• Surround variables with double quotes. Words wrapped in carrots are variables relative to your
environment. For example when defining the SERVERIPADDRESS parameter, you might typeSERVERIPADDRESS="10.19.0.133"
• With the exception of password variables, variables are not case sensitive.
Table 12: Description of Installation Parameters
Parameter Description
SERVERIPADDRESS The IP address of your Ivanti Endpoint Security server.Example: SERVERIPADDRESS="<xxx.xxx.xxx.xxx>"
Note: This can also be a local name or fully qualified domain name ofyour Ivanti Endpoint Security server. A fully qualified domain name isrecommended over local.
PROXYADDRESS The IP address for your proxy server.Example: PROXYADDRESS="<xxx.xxx.xxx.xxx>"
Note:This can also be a local name or fully qualified domain name ofyour Ivanti Endpoint Security server. A fully qualified domain namerecommended over local.A Squid proxy server will only properly resolve using a fully qualifieddomain name.Refer to KnowledgeBase Article 23402 (https://support.heatsoftware.com)for additional information on a Squid proxy server configuration.
PROXYPORT The port your proxy server is using for communication.Example: PROXYPORT="<xx>"
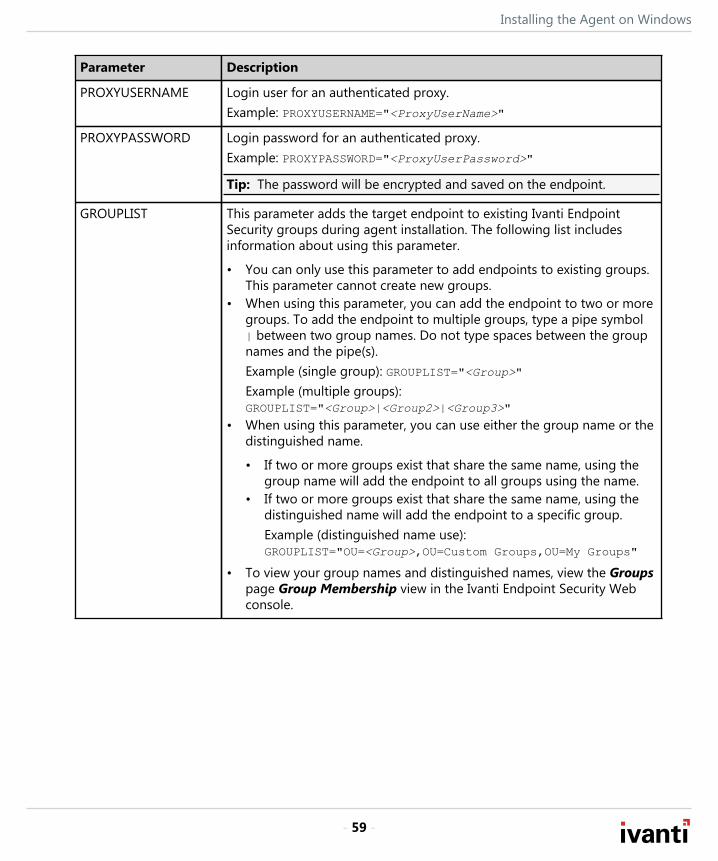
Installing the Agent on Windows
- 59 -
Parameter Description
PROXYUSERNAME Login user for an authenticated proxy.Example: PROXYUSERNAME="<ProxyUserName>"
PROXYPASSWORD Login password for an authenticated proxy.Example: PROXYPASSWORD="<ProxyUserPassword>"
Tip: The password will be encrypted and saved on the endpoint.
GROUPLIST This parameter adds the target endpoint to existing Ivanti EndpointSecurity groups during agent installation. The following list includesinformation about using this parameter.
• You can only use this parameter to add endpoints to existing groups.This parameter cannot create new groups.
• When using this parameter, you can add the endpoint to two or moregroups. To add the endpoint to multiple groups, type a pipe symbol| between two group names. Do not type spaces between the groupnames and the pipe(s).Example (single group): GROUPLIST="<Group>"Example (multiple groups):GROUPLIST="<Group>|<Group2>|<Group3>"
• When using this parameter, you can use either the group name or thedistinguished name.
• If two or more groups exist that share the same name, using thegroup name will add the endpoint to all groups using the name.
• If two or more groups exist that share the same name, using thedistinguished name will add the endpoint to a specific group.Example (distinguished name use):GROUPLIST="OU=<Group>,OU=Custom Groups,OU=My Groups"
• To view your group names and distinguished names, view the Groupspage Group Membership view in the Ivanti Endpoint Security Webconsole.
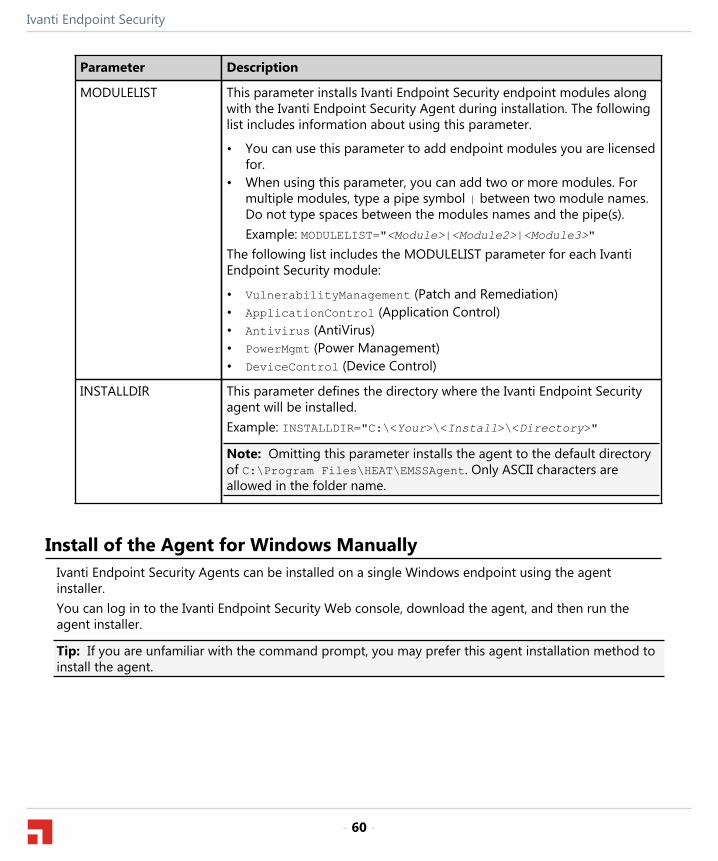
Ivanti Endpoint Security
- 60 -
Parameter Description
MODULELIST This parameter installs Ivanti Endpoint Security endpoint modules alongwith the Ivanti Endpoint Security Agent during installation. The followinglist includes information about using this parameter.
• You can use this parameter to add endpoint modules you are licensedfor.
• When using this parameter, you can add two or more modules. Formultiple modules, type a pipe symbol | between two module names.Do not type spaces between the modules names and the pipe(s).Example: MODULELIST="<Module>|<Module2>|<Module3>"
The following list includes the MODULELIST parameter for each IvantiEndpoint Security module:
• VulnerabilityManagement (Patch and Remediation)• ApplicationControl (Application Control)• Antivirus (AntiVirus)• PowerMgmt (Power Management)• DeviceControl (Device Control)
INSTALLDIR This parameter defines the directory where the Ivanti Endpoint Securityagent will be installed.Example: INSTALLDIR="C:\<Your>\<Install>\<Directory>"
Note: Omitting this parameter installs the agent to the default directoryof C:\Program Files\HEAT\EMSSAgent. Only ASCII characters areallowed in the folder name.
Install of the Agent for Windows ManuallyIvanti Endpoint Security Agents can be installed on a single Windows endpoint using the agentinstaller.You can log in to the Ivanti Endpoint Security Web console, download the agent, and then run theagent installer.
Tip: If you are unfamiliar with the command prompt, you may prefer this agent installation method toinstall the agent.
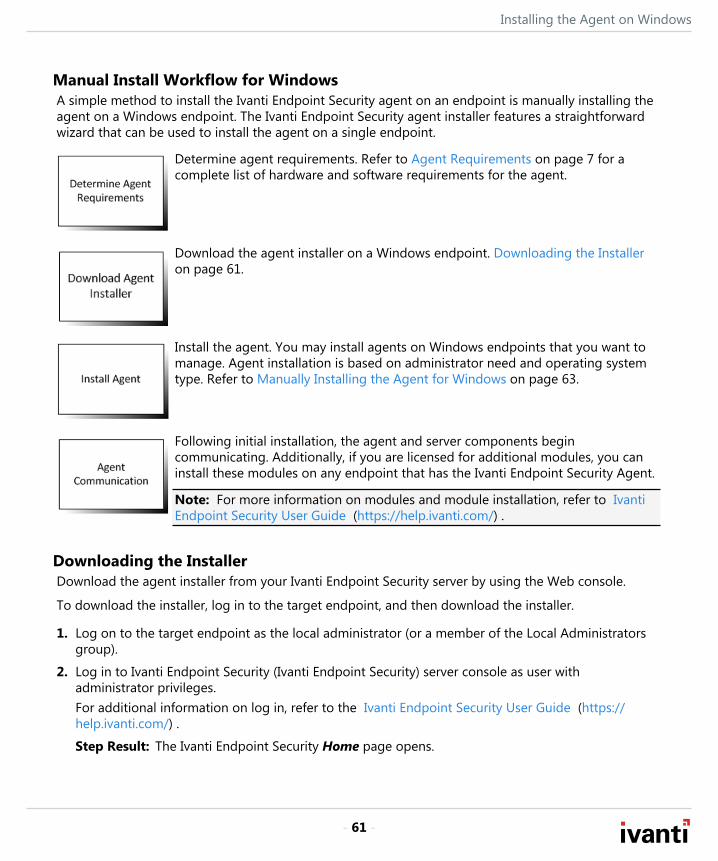
Installing the Agent on Windows
- 61 -
Manual Install Workflow for WindowsA simple method to install the Ivanti Endpoint Security agent on an endpoint is manually installing theagent on a Windows endpoint. The Ivanti Endpoint Security agent installer features a straightforwardwizard that can be used to install the agent on a single endpoint.
Determine agent requirements. Refer to Agent Requirements on page 7 for acomplete list of hardware and software requirements for the agent.
Download the agent installer on a Windows endpoint. Downloading the Installeron page 61.
Install the agent. You may install agents on Windows endpoints that you want tomanage. Agent installation is based on administrator need and operating systemtype. Refer to Manually Installing the Agent for Windows on page 63.
Following initial installation, the agent and server components begincommunicating. Additionally, if you are licensed for additional modules, you caninstall these modules on any endpoint that has the Ivanti Endpoint Security Agent.
Note: For more information on modules and module installation, refer to IvantiEndpoint Security User Guide (https://help.ivanti.com/) .
Downloading the InstallerDownload the agent installer from your Ivanti Endpoint Security server by using the Web console.
To download the installer, log in to the target endpoint, and then download the installer.
1. Log on to the target endpoint as the local administrator (or a member of the Local Administratorsgroup).
2. Log in to Ivanti Endpoint Security (Ivanti Endpoint Security) server console as user withadministrator privileges.For additional information on log in, refer to the Ivanti Endpoint Security User Guide (https://help.ivanti.com/) .
Step Result: The Ivanti Endpoint Security Home page opens.
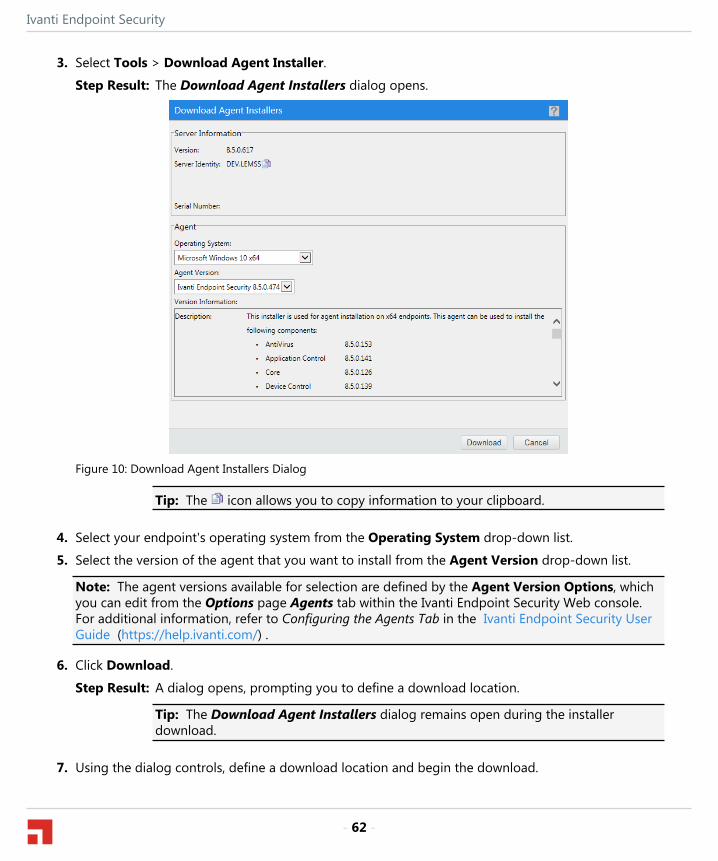
Ivanti Endpoint Security
- 62 -
3. Select Tools > Download Agent Installer.
Step Result: The Download Agent Installers dialog opens.
Figure 10: Download Agent Installers Dialog
Tip: The icon allows you to copy information to your clipboard.
4. Select your endpoint's operating system from the Operating System drop-down list.
5. Select the version of the agent that you want to install from the Agent Version drop-down list.
Note: The agent versions available for selection are defined by the Agent Version Options, whichyou can edit from the Options page Agents tab within the Ivanti Endpoint Security Web console.For additional information, refer to Configuring the Agents Tab in the Ivanti Endpoint Security UserGuide (https://help.ivanti.com/) .
6. Click Download.
Step Result: A dialog opens, prompting you to define a download location.
Tip: The Download Agent Installers dialog remains open during the installerdownload.
7. Using the dialog controls, define a download location and begin the download.
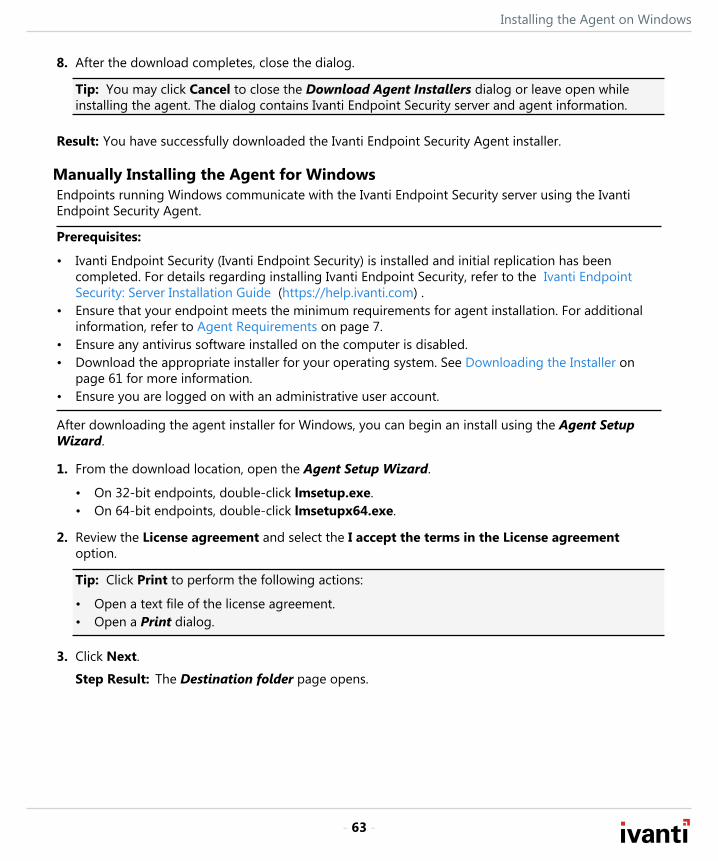
Installing the Agent on Windows
- 63 -
8. After the download completes, close the dialog.
Tip: You may click Cancel to close the Download Agent Installers dialog or leave open whileinstalling the agent. The dialog contains Ivanti Endpoint Security server and agent information.
Result: You have successfully downloaded the Ivanti Endpoint Security Agent installer.
Manually Installing the Agent for WindowsEndpoints running Windows communicate with the Ivanti Endpoint Security server using the IvantiEndpoint Security Agent.
Prerequisites:
• Ivanti Endpoint Security (Ivanti Endpoint Security) is installed and initial replication has beencompleted. For details regarding installing Ivanti Endpoint Security, refer to the Ivanti EndpointSecurity: Server Installation Guide (https://help.ivanti.com) .
• Ensure that your endpoint meets the minimum requirements for agent installation. For additionalinformation, refer to Agent Requirements on page 7.
• Ensure any antivirus software installed on the computer is disabled.• Download the appropriate installer for your operating system. See Downloading the Installer on
page 61 for more information.• Ensure you are logged on with an administrative user account.
After downloading the agent installer for Windows, you can begin an install using the Agent SetupWizard.
1. From the download location, open the Agent Setup Wizard.
• On 32-bit endpoints, double-click lmsetup.exe.• On 64-bit endpoints, double-click lmsetupx64.exe.
2. Review the License agreement and select the I accept the terms in the License agreementoption.
Tip: Click Print to perform the following actions:
• Open a text file of the license agreement.• Open a Print dialog.
3. Click Next.
Step Result: The Destination folder page opens.

Ivanti Endpoint Security
- 64 -
4. [Optional] Change the Ivanti Endpoint Security agent installation location.
Tip: Only ASCII characters are allowed in the folder name.
a) Click Browse.
Step Result: The Browse for Folder dialog opens.
b) Define the desired file path using either the Look in lists or the Folder name field.c) Click OK.
Step Result: The Browse for Folder dialog closes and the Destination folder page reflects thenew location.
5. Click Next.
Step Result: The Server Information page opens.
6. Type the appropriate server address information in the Server identity field.
Server Definition Option Step
To define the server with anIP address:
Type xxx.xxx.xxx.xxx
To define the server with aserver name:
Type ServerName
To define the server usinga fully qualified domainname:
Type ServerName.DomainName.com
7. [Optional] If the agent will communicate with the Ivanti Endpoint Security server through a proxyserver, select the A proxy server is required check box and complete the following steps.
Note: In many network environments, although a proxy is used for Internet access, a proxy bypassis used for all access within the corporate network. Therefore, only enter proxy information ifyour agents will be required to use a proxy to access your Ivanti Endpoint Security server. Proxyinformation is not validated. A Squid proxy server will only properly resolve using a fully qualifieddomain name.Refer to KnowledgeBase Article 23402 (https://support.heatsoftware.com) for additional informationon a Squid proxy server configuration.
a) Type the proxy IP address or host name in the Proxy server address field.b) Type the port number that the proxy uses in the Port number field.c) [Optional] If the proxy server requires authentication, complete the following steps:
1. Select the Authentication is required check box.2. Type the user name in the Username field.3. Type a new password for the proxy in the Password field.
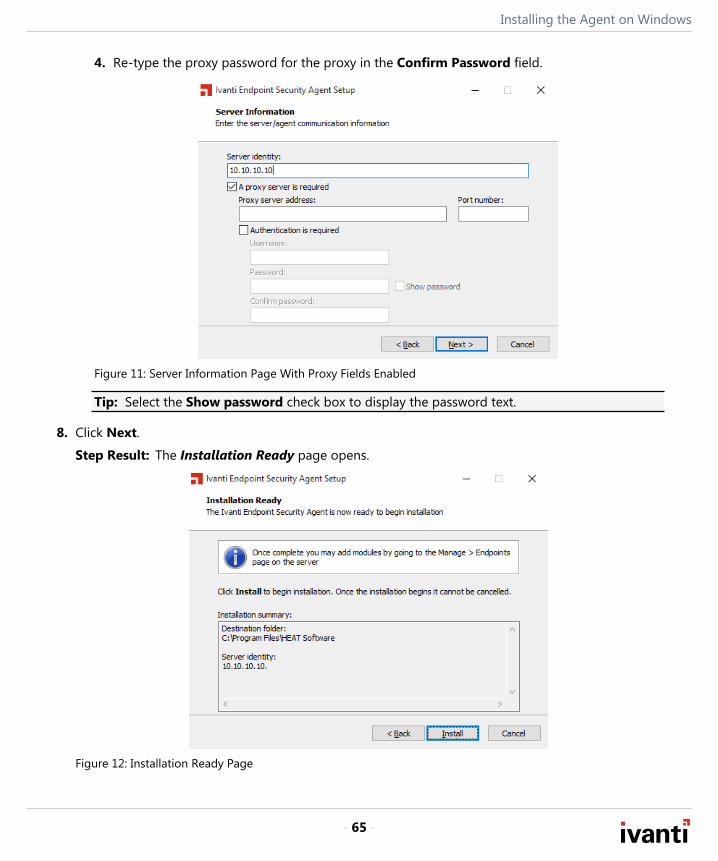
Installing the Agent on Windows
- 65 -
4. Re-type the proxy password for the proxy in the Confirm Password field.
Figure 11: Server Information Page With Proxy Fields Enabled
Tip: Select the Show password check box to display the password text.
8. Click Next.
Step Result: The Installation Ready page opens.
Figure 12: Installation Ready Page

Ivanti Endpoint Security
- 66 -
9. Review the installation information and click Install to install the agent.
Note: Once installation begins it cannot be cancelled.
Step Result: The agent is installed and the Installation Complete page displays.
Tip: Click Open setup log to open lmsetup.log in your text editor.
10.Click Close to exit the wizard.
- 67 -
Chapter
4Installing the Agent on Linux, UNIX, or Mac
In this chapter:
• Linux and UNIX Installation Method• Installing Java Runtime Environment• Command Line Workflow for Linux,
UNIX, or Mac
Use the Command Line method when installing the IvantiEndpoint Security Agent on a Linux, UNIX, or Mac endpoints.
Note: To install an agent on Linux, UNIX, or Mac you arerestricted to the command line method. For a description ofthe command line method, refer to Understanding AgentInstallation Methods on page 21.
Linux and UNIX Installation MethodA command line is the only method that can be used to install the Ivanti Endpoint Security Agent onLinux, UNIX, or Mac platform.Install the Ivanti Endpoint Security (Ivanti Endpoint Security) Agent on an endpoint that contains aLinux, UNIX, or Mac operating system using one of the following;
• Use an install parameter in a command line. For additional information, refer to: Installing the Agentby Command Line for Linux, UNIX, or Mac on page 71.
• Use a silent install parameter in a command line. Refer to Silent Install by Command Line for Linux,UNIX, or Mac on page 73.
Note: For a description of agent install methods, refer to Understanding Agent Installation Methodson page 21.
Installing Java Runtime EnvironmentPrior to installing the Ivanti Endpoint Security Agent, you must have Java Runtime Environment (JRE) 7or higher.
Verify you are running Java Runtime Environment (JRE) 7 or later on your target endpoint.
1. Log in to the target endpoint using the root user account.
2. Open the Terminal window.
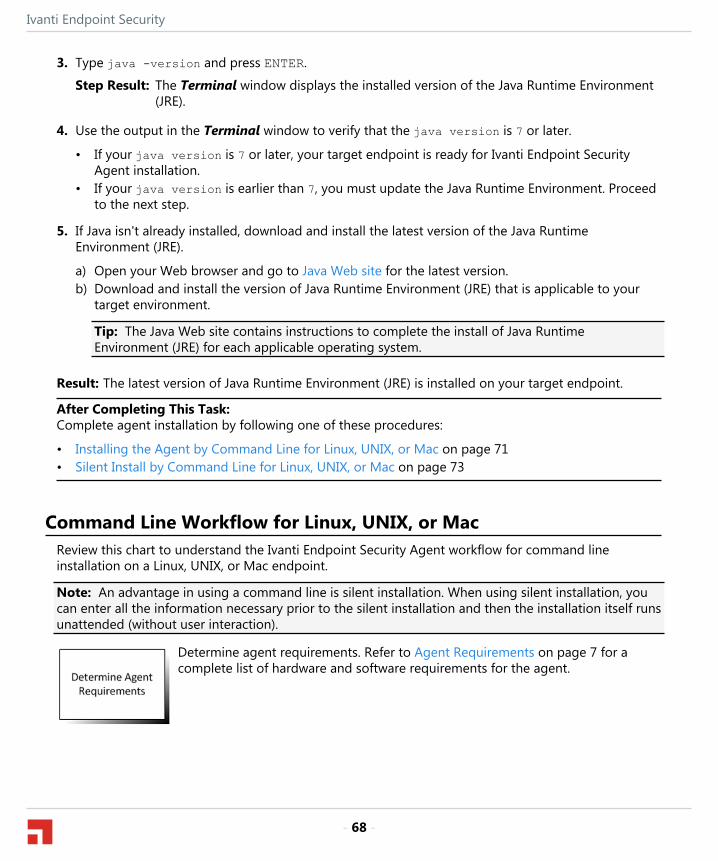
Ivanti Endpoint Security
- 68 -
3. Type java -version and press ENTER.
Step Result: The Terminal window displays the installed version of the Java Runtime Environment(JRE).
4. Use the output in the Terminal window to verify that the java version is 7 or later.
• If your java version is 7 or later, your target endpoint is ready for Ivanti Endpoint SecurityAgent installation.
• If your java version is earlier than 7, you must update the Java Runtime Environment. Proceedto the next step.
5. If Java isn't already installed, download and install the latest version of the Java RuntimeEnvironment (JRE).
a) Open your Web browser and go to Java Web site for the latest version.b) Download and install the version of Java Runtime Environment (JRE) that is applicable to your
target environment.
Tip: The Java Web site contains instructions to complete the install of Java RuntimeEnvironment (JRE) for each applicable operating system.
Result: The latest version of Java Runtime Environment (JRE) is installed on your target endpoint.
After Completing This Task:Complete agent installation by following one of these procedures:
• Installing the Agent by Command Line for Linux, UNIX, or Mac on page 71• Silent Install by Command Line for Linux, UNIX, or Mac on page 73
Command Line Workflow for Linux, UNIX, or MacReview this chart to understand the Ivanti Endpoint Security Agent workflow for command lineinstallation on a Linux, UNIX, or Mac endpoint.
Note: An advantage in using a command line is silent installation. When using silent installation, youcan enter all the information necessary prior to the silent installation and then the installation itself runsunattended (without user interaction).
Determine agent requirements. Refer to Agent Requirements on page 7 for acomplete list of hardware and software requirements for the agent.
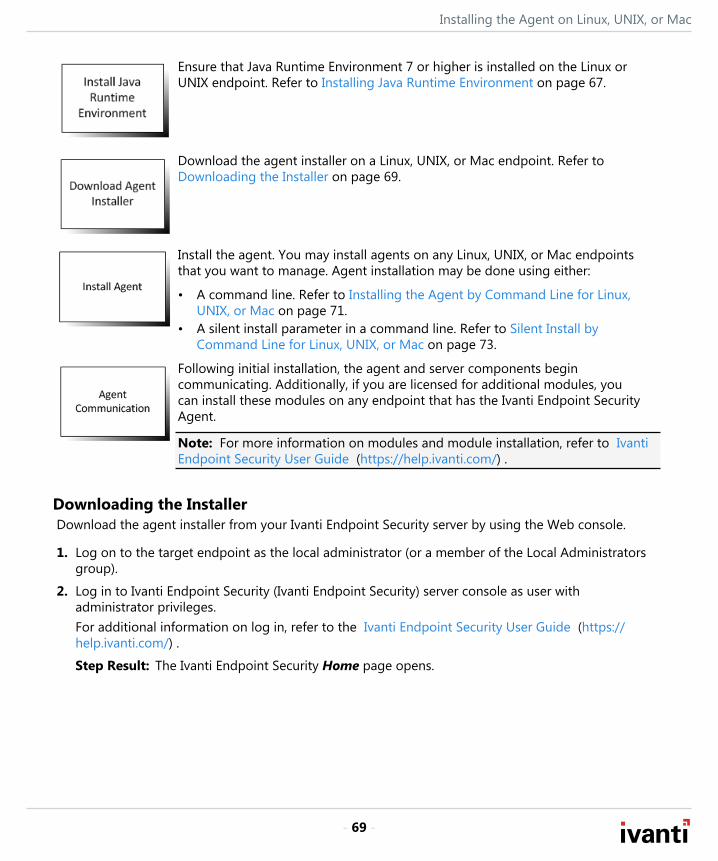
Installing the Agent on Linux, UNIX, or Mac
- 69 -
Ensure that Java Runtime Environment 7 or higher is installed on the Linux orUNIX endpoint. Refer to Installing Java Runtime Environment on page 67.
Download the agent installer on a Linux, UNIX, or Mac endpoint. Refer toDownloading the Installer on page 69.
Install the agent. You may install agents on any Linux, UNIX, or Mac endpointsthat you want to manage. Agent installation may be done using either:
• A command line. Refer to Installing the Agent by Command Line for Linux,UNIX, or Mac on page 71.
• A silent install parameter in a command line. Refer to Silent Install byCommand Line for Linux, UNIX, or Mac on page 73.
Following initial installation, the agent and server components begincommunicating. Additionally, if you are licensed for additional modules, youcan install these modules on any endpoint that has the Ivanti Endpoint SecurityAgent.
Note: For more information on modules and module installation, refer to IvantiEndpoint Security User Guide (https://help.ivanti.com/) .
Downloading the InstallerDownload the agent installer from your Ivanti Endpoint Security server by using the Web console.
1. Log on to the target endpoint as the local administrator (or a member of the Local Administratorsgroup).
2. Log in to Ivanti Endpoint Security (Ivanti Endpoint Security) server console as user withadministrator privileges.For additional information on log in, refer to the Ivanti Endpoint Security User Guide (https://help.ivanti.com/) .
Step Result: The Ivanti Endpoint Security Home page opens.
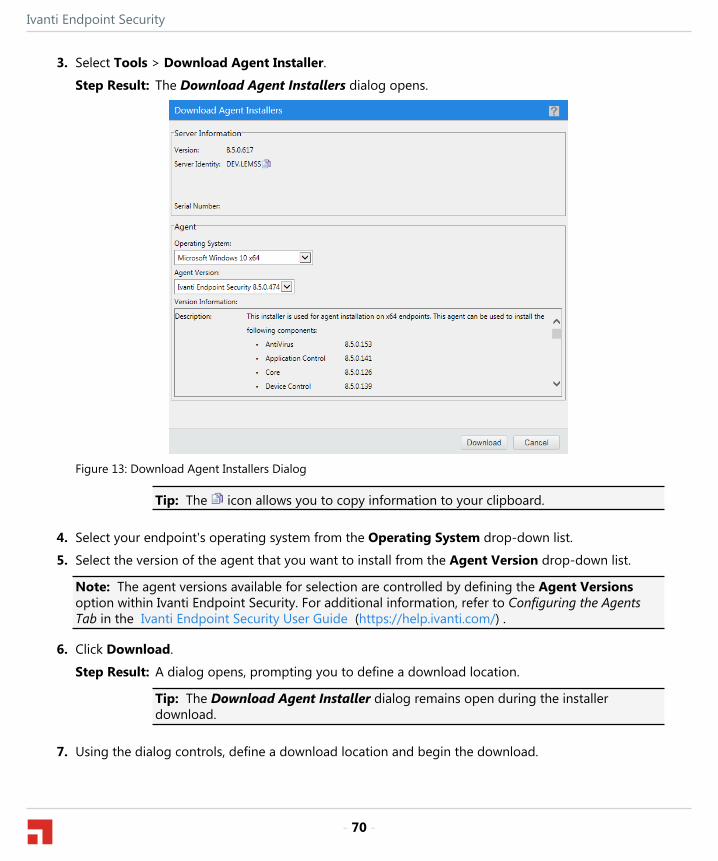
Ivanti Endpoint Security
- 70 -
3. Select Tools > Download Agent Installer.
Step Result: The Download Agent Installers dialog opens.
Figure 13: Download Agent Installers Dialog
Tip: The icon allows you to copy information to your clipboard.
4. Select your endpoint's operating system from the Operating System drop-down list.
5. Select the version of the agent that you want to install from the Agent Version drop-down list.
Note: The agent versions available for selection are controlled by defining the Agent Versionsoption within Ivanti Endpoint Security. For additional information, refer to Configuring the AgentsTab in the Ivanti Endpoint Security User Guide (https://help.ivanti.com/) .
6. Click Download.
Step Result: A dialog opens, prompting you to define a download location.
Tip: The Download Agent Installer dialog remains open during the installerdownload.
7. Using the dialog controls, define a download location and begin the download.
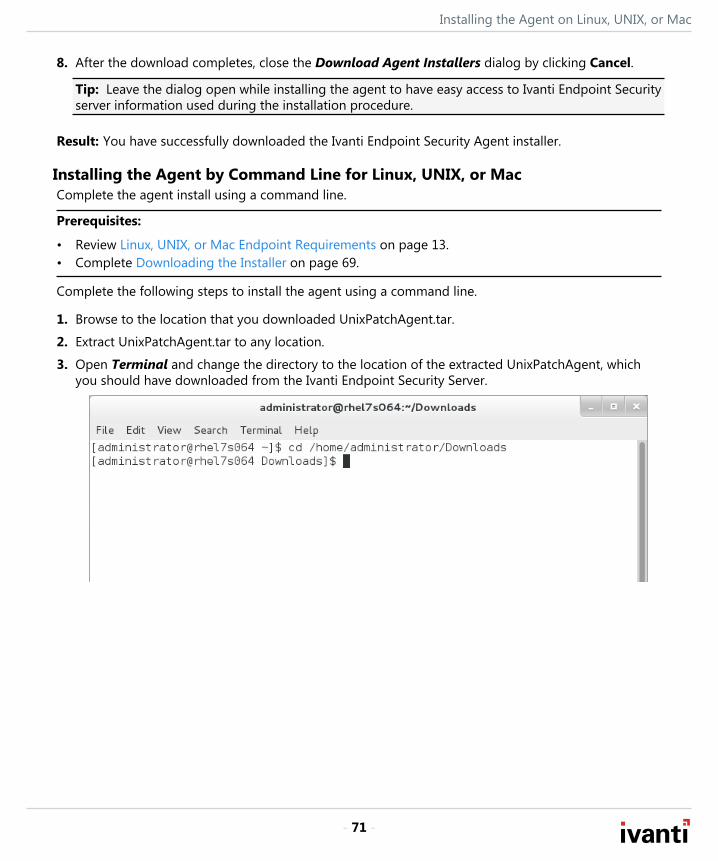
Installing the Agent on Linux, UNIX, or Mac
- 71 -
8. After the download completes, close the Download Agent Installers dialog by clicking Cancel.
Tip: Leave the dialog open while installing the agent to have easy access to Ivanti Endpoint Securityserver information used during the installation procedure.
Result: You have successfully downloaded the Ivanti Endpoint Security Agent installer.
Installing the Agent by Command Line for Linux, UNIX, or MacComplete the agent install using a command line.
Prerequisites:
• Review Linux, UNIX, or Mac Endpoint Requirements on page 13.• Complete Downloading the Installer on page 69.
Complete the following steps to install the agent using a command line.
1. Browse to the location that you downloaded UnixPatchAgent.tar.
2. Extract UnixPatchAgent.tar to any location.
3. Open Terminal and change the directory to the location of the extracted UnixPatchAgent, whichyou should have downloaded from the Ivanti Endpoint Security Server.
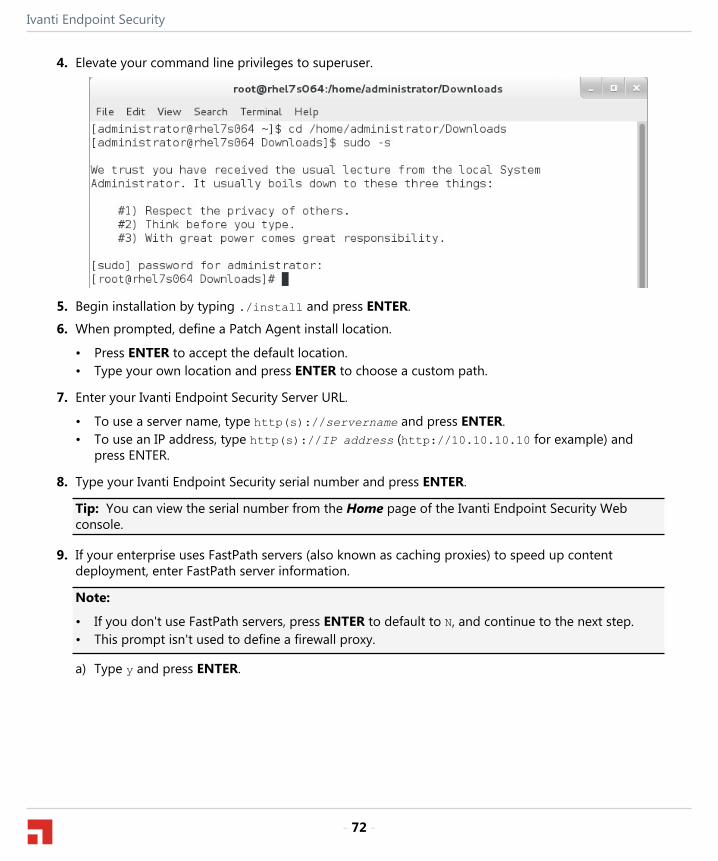
Ivanti Endpoint Security
- 72 -
4. Elevate your command line privileges to superuser.
5. Begin installation by typing ./install and press ENTER.
6. When prompted, define a Patch Agent install location.
• Press ENTER to accept the default location.• Type your own location and press ENTER to choose a custom path.
7. Enter your Ivanti Endpoint Security Server URL.
• To use a server name, type http(s)://servername and press ENTER.• To use an IP address, type http(s)://IP address (http://10.10.10.10 for example) and
press ENTER.
8. Type your Ivanti Endpoint Security serial number and press ENTER.
Tip: You can view the serial number from the Home page of the Ivanti Endpoint Security Webconsole.
9. If your enterprise uses FastPath servers (also known as caching proxies) to speed up contentdeployment, enter FastPath server information.
Note:
• If you don't use FastPath servers, press ENTER to default to N, and continue to the next step.• This prompt isn't used to define a firewall proxy.
a) Type y and press ENTER.
Installing the Agent on Linux, UNIX, or Mac
- 73 -
b) Enter your proxy server URL and press ENTER.
• To use a server name, type http(s)://servername and press ENTER.• To use an IP address, type http(s)://IP address (http://10.10.10.10 for example) and
press ENTER.
Note: A Squid proxy server will only properly resolve using a fully qualified domain name.Refer to KnowledgeBase Article 23402 (https://support.heatsoftware.com) for additionalinformation on a Squid proxy server configuration.
c) If your proxy requires authentication, enter a username and password that authenticate with theproxy. If the proxy doesn�t require authentication, just press ENTER to continue.
10.If you want the endpoint to add itself to existing Ivanti Endpoint Security groups during registration,complete the following substeps. If not, simply press ENTER and continue to the next step.
a) Type y and press ENTER.b) Type the groups that you want the endpoint to register with, using the syntax rules that follow.
Press ENTER when you're done.
Example: GroupName1|GroupName2|GroupName3
Syntax rules:
• Separate each group using a pipe ( | ). If only adding the endpoint to a single group, omit thepipe.
• If you want to add the group to multiple groups, and those groups share the same shortname, used the group distinguished name instead.
Tip: You can view group names and distinguished group names within the Group Membershipview in the Ivanti Endpoint Security console.
11.If you want to define a nice value for the UnixPatchAgent.tar, type a value (-20 through 20) andpress ENTER. If you don't want to define a nice value, just leave the prompt empty and pressENTER.
Result: The agent is installed. When the process is complete, you can close terminal.
Silent Install by Command Line for Linux, UNIX, or MacComplete a silent install using a command line. When configured using command line parameters, theinstallation of the agent can be run unattended.
Prerequisites:
• Review Linux, UNIX, or Mac Endpoint Requirements on page 13.• Complete Downloading the Installer on page 69.
Complete the following steps from your Linux, UNIX, or Mac endpoints.
1. Browse to the location that you downloaded UnixPatchAgent.tar.
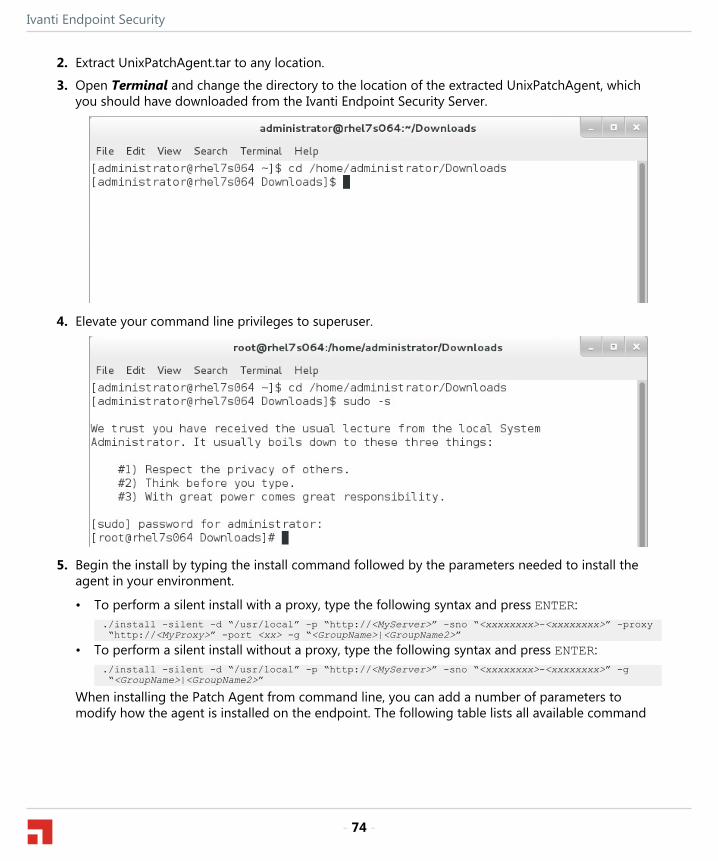
Ivanti Endpoint Security
- 74 -
2. Extract UnixPatchAgent.tar to any location.
3. Open Terminal and change the directory to the location of the extracted UnixPatchAgent, whichyou should have downloaded from the Ivanti Endpoint Security Server.
4. Elevate your command line privileges to superuser.
5. Begin the install by typing the install command followed by the parameters needed to install theagent in your environment.
• To perform a silent install with a proxy, type the following syntax and press ENTER:./install -silent -d “/usr/local” -p “http://<MyServer>” -sno “<xxxxxxxx>-<xxxxxxxx>” -proxy “http://<MyProxy>” -port <xx> -g “<GroupName>|<GroupName2>”
• To perform a silent install without a proxy, type the following syntax and press ENTER:./install -silent -d “/usr/local” -p “http://<MyServer>” -sno “<xxxxxxxx>-<xxxxxxxx>” -g “<GroupName>|<GroupName2>”
When installing the Patch Agent from command line, you can add a number of parameters tomodify how the agent is installed on the endpoint. The following table lists all available command
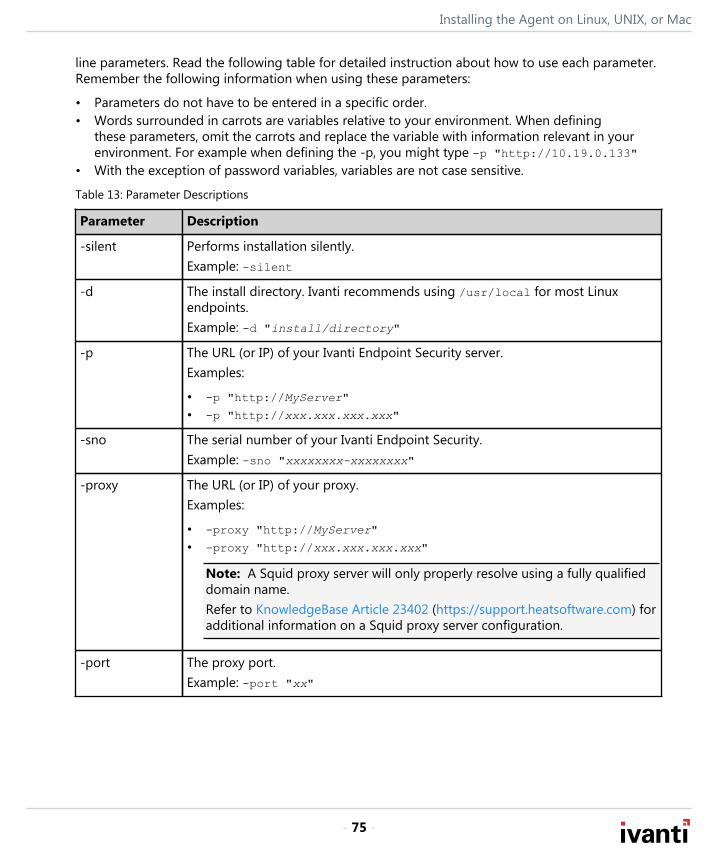
Installing the Agent on Linux, UNIX, or Mac
- 75 -
line parameters. Read the following table for detailed instruction about how to use each parameter.Remember the following information when using these parameters:
• Parameters do not have to be entered in a specific order.• Words surrounded in carrots are variables relative to your environment. When defining
these parameters, omit the carrots and replace the variable with information relevant in yourenvironment. For example when defining the -p, you might type -p "http://10.19.0.133"
• With the exception of password variables, variables are not case sensitive.
Table 13: Parameter Descriptions
Parameter Description
-silent Performs installation silently.Example: -silent
-d The install directory. Ivanti recommends using /usr/local for most Linuxendpoints.Example: -d "install/directory"
-p The URL (or IP) of your Ivanti Endpoint Security server.Examples:
• -p "http://MyServer"
• -p "http://xxx.xxx.xxx.xxx"
-sno The serial number of your Ivanti Endpoint Security.Example: -sno "xxxxxxxx-xxxxxxxx"
-proxy The URL (or IP) of your proxy.Examples:
• -proxy "http://MyServer"
• -proxy "http://xxx.xxx.xxx.xxx"
Note: A Squid proxy server will only properly resolve using a fully qualifieddomain name.Refer to KnowledgeBase Article 23402 (https://support.heatsoftware.com) foradditional information on a Squid proxy server configuration.
-port The proxy port.Example: -port "xx"
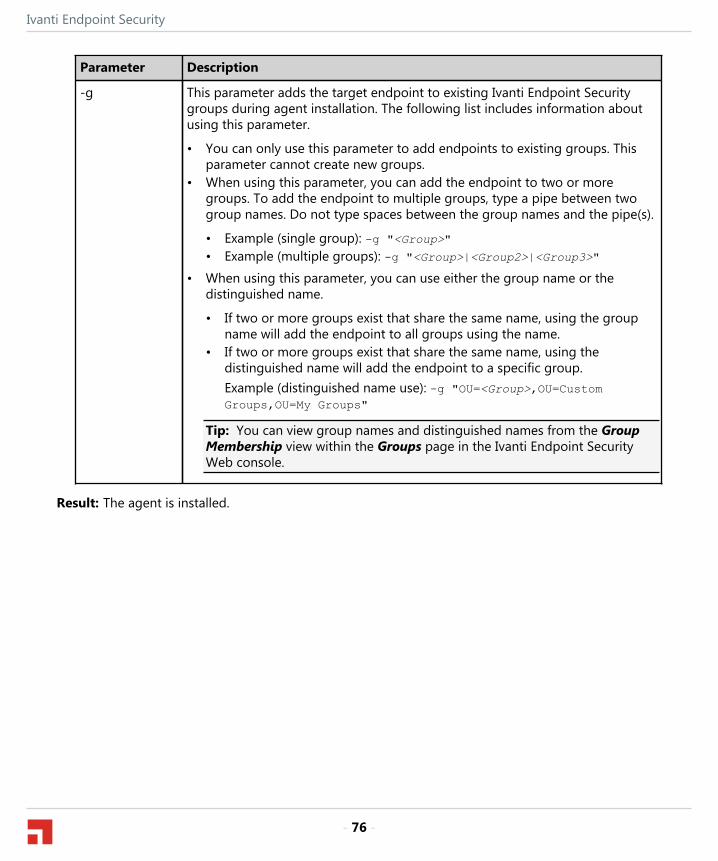
Ivanti Endpoint Security
- 76 -
Parameter Description
-g This parameter adds the target endpoint to existing Ivanti Endpoint Securitygroups during agent installation. The following list includes information aboutusing this parameter.
• You can only use this parameter to add endpoints to existing groups. Thisparameter cannot create new groups.
• When using this parameter, you can add the endpoint to two or moregroups. To add the endpoint to multiple groups, type a pipe between twogroup names. Do not type spaces between the group names and the pipe(s).
• Example (single group): -g "<Group>"• Example (multiple groups): -g "<Group>|<Group2>|<Group3>"
• When using this parameter, you can use either the group name or thedistinguished name.
• If two or more groups exist that share the same name, using the groupname will add the endpoint to all groups using the name.
• If two or more groups exist that share the same name, using thedistinguished name will add the endpoint to a specific group.Example (distinguished name use): -g "OU=<Group>,OU=CustomGroups,OU=My Groups"
Tip: You can view group names and distinguished names from the GroupMembership view within the Groups page in the Ivanti Endpoint SecurityWeb console.
Result: The agent is installed.
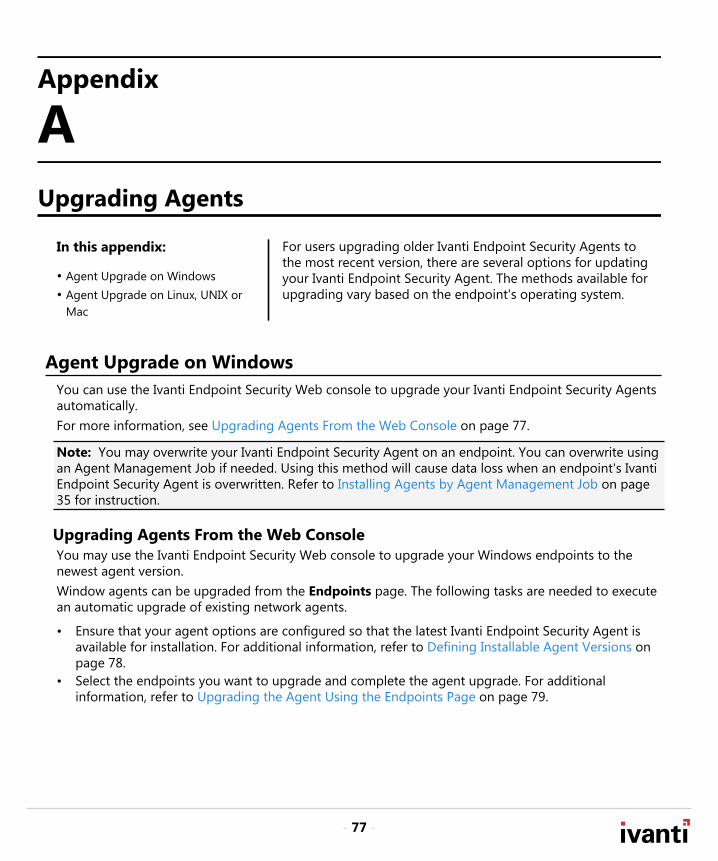
- 77 -
Appendix
AUpgrading Agents
In this appendix:
• Agent Upgrade on Windows• Agent Upgrade on Linux, UNIX or
Mac
For users upgrading older Ivanti Endpoint Security Agents tothe most recent version, there are several options for updatingyour Ivanti Endpoint Security Agent. The methods available forupgrading vary based on the endpoint's operating system.
Agent Upgrade on WindowsYou can use the Ivanti Endpoint Security Web console to upgrade your Ivanti Endpoint Security Agentsautomatically.For more information, see Upgrading Agents From the Web Console on page 77.
Note: You may overwrite your Ivanti Endpoint Security Agent on an endpoint. You can overwrite usingan Agent Management Job if needed. Using this method will cause data loss when an endpoint's IvantiEndpoint Security Agent is overwritten. Refer to Installing Agents by Agent Management Job on page35 for instruction.
Upgrading Agents From the Web ConsoleYou may use the Ivanti Endpoint Security Web console to upgrade your Windows endpoints to thenewest agent version.Window agents can be upgraded from the Endpoints page. The following tasks are needed to executean automatic upgrade of existing network agents.
• Ensure that your agent options are configured so that the latest Ivanti Endpoint Security Agent isavailable for installation. For additional information, refer to Defining Installable Agent Versions onpage 78.
• Select the endpoints you want to upgrade and complete the agent upgrade. For additionalinformation, refer to Upgrading the Agent Using the Endpoints Page on page 79.
Ivanti Endpoint Security
- 78 -
Defining Installable Agent VersionsUse the Ivanti Endpoint Security Web console to define that the latest version of the Ivanti EndpointSecurity Agent is available for agent installation.
Prerequisites:
Ensure Ivanti Endpoint Security replicates with the Global Subscription Service. This will make certainyou have the latest agent version available. Refer to Replication in the Ivanti Endpoint Security UserGuide (https://help.ivanti.com/) for additional information.
Define the Agent Versions from within the Ivanti Endpoint Security (Ivanti Endpoint Security) Webconsole.
1. Log in to the Ivanti Endpoint Security Web console.For additional information, refer to the Logging in to Ivanti Endpoint Security in the Ivanti EndpointSecurity User Guide (https://help.ivanti.com/) .
2. Select Tools > Options.
Step Result: The Options page opens.
3. Select the Agents tab.
Step Result: The Agents tab opens.
4. Define the Agent Version.
a) Locate the Agent Versions area.b) Select Newest available in the Windows Vista and newer agent versions field.
Tip: The Newest available option determines that only the latest agent is available forendpoints. However, you can alternatively select Ivanti Endpoint Security<AgentVersion>+when selecting an agent version. This selection makes available all agent versions released afterthe selected version.
5. Click Save.
Result: Your agent version selection is saved.
After Completing This Task:Complete the agent upgrade. For additional information, refer to Upgrading the Agent Using theEndpoints Page on page 79.

Upgrading Agents
- 79 -
Upgrading the Agent Using the Endpoints PageYou may upgrade your Windows agent by using the Ivanti Endpoint Security Web console.
Prerequisites:
• You have a Ivanti Endpoint Security Agent installed on an endpoint containing a supportedWindows operating system. Refer to Supported Endpoint Operating Systems on page 7 for a list ofsupported operating systems.
• Complete Defining Installable Agent Versions on page 78.• The agent status for the endpoint is Online.
Upgrade your Windows agents from the Endpoints page of the Ivanti Endpoint Security (IvantiEndpoint Security) Web console.
1. Log in to the Ivanti Endpoint Security Web console.
2. Select Manage > Endpoints.
Step Result: The Endpoints page opens to the All tab.
3. From the page list, select the endpoints that you want to upgrade to the latest agent version.
4. Click Agent Versions.
Step Result: The Manage Agent Versions dialog opens.
5. From the Select One list, select the most recent agent version and click Apply to All Agents.
Tip: You may want to test the upgrade on a few endpoints before upgrading your entire network.Do so, by selecting endpoints to test and then select the latest agent version for the endpoints fromthe Agent Version list.
6. Click OK.
Step Result: The agent begins upgrading and the Manage Agent Versions dialog closes.
Note: The upgrade process may take several minutes. You may only upgrade anendpoint again once the first upgrade has completed.
Result: The agent is upgraded on all selected endpoints.
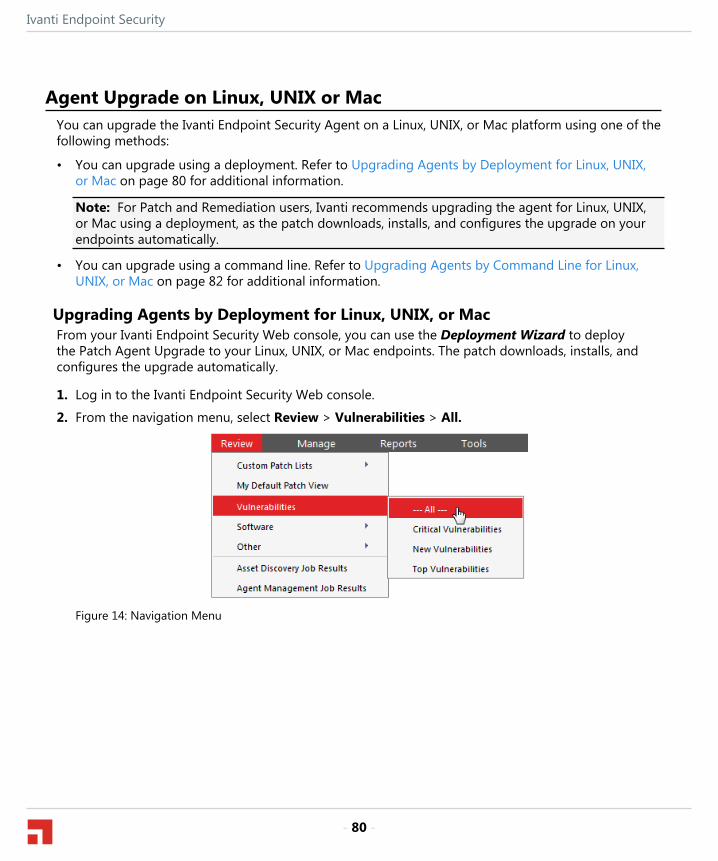
Ivanti Endpoint Security
- 80 -
Agent Upgrade on Linux, UNIX or MacYou can upgrade the Ivanti Endpoint Security Agent on a Linux, UNIX, or Mac platform using one of thefollowing methods:
• You can upgrade using a deployment. Refer to Upgrading Agents by Deployment for Linux, UNIX,or Mac on page 80 for additional information.
Note: For Patch and Remediation users, Ivanti recommends upgrading the agent for Linux, UNIX,or Mac using a deployment, as the patch downloads, installs, and configures the upgrade on yourendpoints automatically.
• You can upgrade using a command line. Refer to Upgrading Agents by Command Line for Linux,UNIX, or Mac on page 82 for additional information.
Upgrading Agents by Deployment for Linux, UNIX, or MacFrom your Ivanti Endpoint Security Web console, you can use the Deployment Wizard to deploythe Patch Agent Upgrade to your Linux, UNIX, or Mac endpoints. The patch downloads, installs, andconfigures the upgrade automatically.
1. Log in to the Ivanti Endpoint Security Web console.
2. From the navigation menu, select Review > Vulnerabilities > All.
Figure 14: Navigation Menu

Upgrading Agents
- 81 -
3. Enter Patch Agent Upgrade in the Name or CVE_ID field and click Update View to search for thepatch agent.
Figure 15: Search Input Example
Step Result: A list of matching packages displays.
4. Select C – Ivanti Patch Agent Upgrade for LinuxUnixMac from 7.0+ to 8.3032 (See Notes).
Note: Do not select the patch titled C – Ivanti Patch Agent for LinuxUnixMac from 7.0+ to8.3032 (Manual Install) (See Notes). This patch requires manual installation and does not upgradeyour endpoints automatically.
5. Click Deploy.
Step Result: The Deployment Wizard opens.
6. Click Next.
7. Select the Linux, UNIX, and Mac endpoints you want to upgrade.
8. Click Next.
Step Result: A list of available packages displays.
9. The C – Ivanti Patch Agent Upgrade for LinuxUnixMac from 7.0+ to 8.3032 (See Notes) patchis preselected in the list. Click Next.
10.Accept the terms and conditions of the end user license agreement and click Next.
11.Continue through the rest of the wizard. Click Finish to finalize the deployment of the package youselected.
Step Result: The agent is upgraded.
Ivanti Endpoint Security
- 82 -
Upgrading Agents by Command Line for Linux, UNIX, or MacUpgrading the agent manually by command line uninstalls the existing Ivanti Endpoint Security Agentrunning on Linux, UNIX, or Mac endpoints and installs the most recent version of the agent. The agentupgrade retains all existing agent data.
Prerequisites:
• You have an Ivanti Endpoint Security Agent installed on a Linux, UNIX, or Mac supported operatingsystem. Refer to Supported Endpoint Operating Systems on page 7 for a list of supported operatingsystems.
• You are logged on to the endpoint using a root user account.
Perform these steps on a Linux, UNIX, or Mac endpoint.
1. Download the most recent version of the agent that is applicable to your target endpoint. Refer toDownloading the Installer on page 69 for more information.
2. Upgrade the agent using one of the following methods:
• You may upgrade by command line. Refer to Upgrading the Agent by Command Line for Linux,UNIX, or Mac on page 82 for more information.
• You may use a silent upgrade by command line. Refer to Silent Upgrade by Command Line forLinux, UNIX, or Mac on page 83 for more information.
Step Result: The agent is upgraded.
Result: After the upgrade completes, you may use the new agent.
Upgrading the Agent by Command Line for Linux, UNIX, or MacComplete the agent upgrade using a command line.
Prerequisites:
• Review Linux, UNIX, or Mac Endpoint Requirements on page 13.• Complete Downloading the Installer on page 69.
Complete the following steps to upgrade the agent using a command line.
1. Browse to the location that you downloaded UnixPatchAgent.tar.
2. Extract UnixPatchAgent.tar to any location.
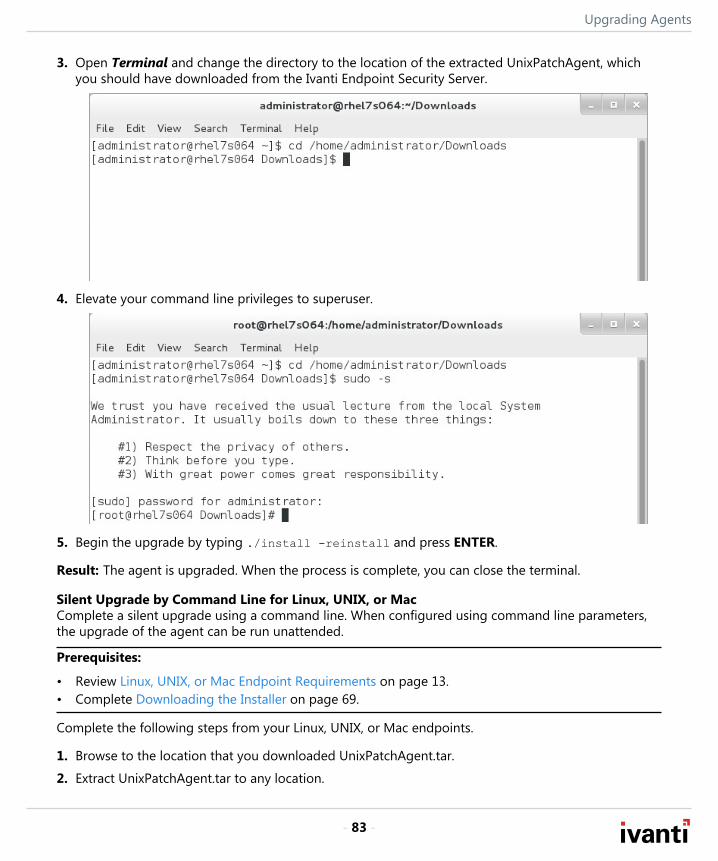
Upgrading Agents
- 83 -
3. Open Terminal and change the directory to the location of the extracted UnixPatchAgent, whichyou should have downloaded from the Ivanti Endpoint Security Server.
4. Elevate your command line privileges to superuser.
5. Begin the upgrade by typing ./install -reinstall and press ENTER.
Result: The agent is upgraded. When the process is complete, you can close the terminal.
Silent Upgrade by Command Line for Linux, UNIX, or MacComplete a silent upgrade using a command line. When configured using command line parameters,the upgrade of the agent can be run unattended.
Prerequisites:
• Review Linux, UNIX, or Mac Endpoint Requirements on page 13.• Complete Downloading the Installer on page 69.
Complete the following steps from your Linux, UNIX, or Mac endpoints.
1. Browse to the location that you downloaded UnixPatchAgent.tar.
2. Extract UnixPatchAgent.tar to any location.
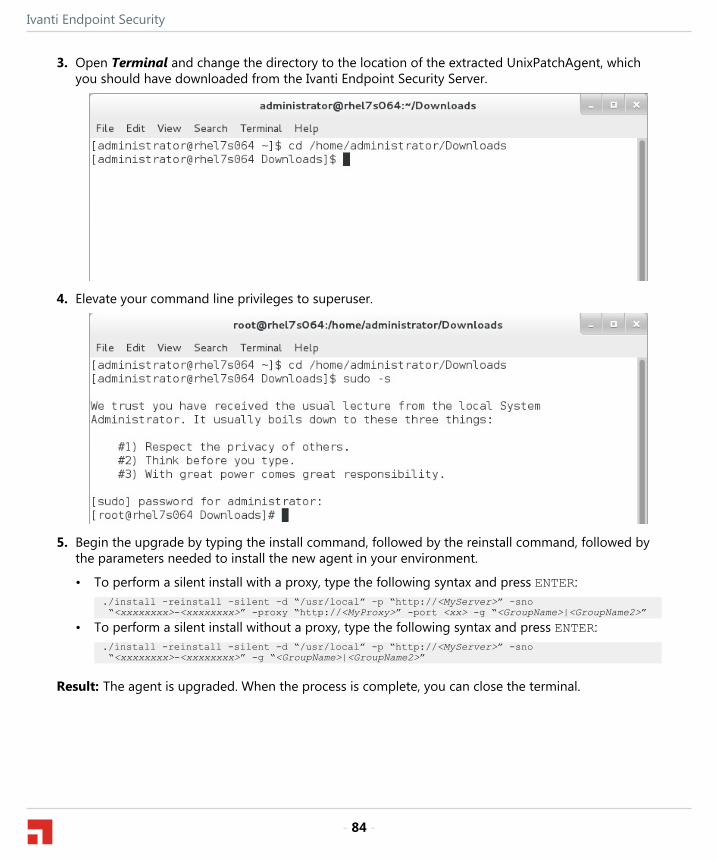
Ivanti Endpoint Security
- 84 -
3. Open Terminal and change the directory to the location of the extracted UnixPatchAgent, whichyou should have downloaded from the Ivanti Endpoint Security Server.
4. Elevate your command line privileges to superuser.
5. Begin the upgrade by typing the install command, followed by the reinstall command, followed bythe parameters needed to install the new agent in your environment.
• To perform a silent install with a proxy, type the following syntax and press ENTER:./install -reinstall -silent -d “/usr/local” -p “http://<MyServer>” -sno “<xxxxxxxx>-<xxxxxxxx>” -proxy “http://<MyProxy>” -port <xx> -g “<GroupName>|<GroupName2>”
• To perform a silent install without a proxy, type the following syntax and press ENTER:./install -reinstall -silent -d “/usr/local” -p “http://<MyServer>” -sno “<xxxxxxxx>-<xxxxxxxx>” -g “<GroupName>|<GroupName2>”
Result: The agent is upgraded. When the process is complete, you can close the terminal.
- 85 -
Appendix
BUninstalling Agents
In this appendix:
• Agent Uninstall on Windows• Agent Uninstall on Linux, UNIX, or
Mac
You can uninstall the Ivanti Endpoint Security Agent usingseveral methods. The methods available for uninstall vary basedon the endpoint's operating system.
Agent Uninstall on WindowsTo uninstall the Ivanti Endpoint Security Agent on a Windows platform you can utilize the followingmethods:
• For uninstalling the agent using an Agent Management Job, refer to Uninstalling the Agent byAgent Management Job on page 85.
• For uninstalling using Windows Control Panel, refer to Uninstalling the Agent on Windows on page96.
• For uninstall using a command prompt, refer to Uninstalling the Agent by Command Line on page98
Uninstalling the Agent by Agent Management JobYou can remotely uninstall an agent from Windows endpoints using an Agent Management Job.An Agent Management Job allows you to uninstall the agent from the Ivanti Endpoint Security Webconsole.
Prerequisites:
• You completed the configuration needs for an Agent Management Job. Refer to AgentManagement Job Checklist on page 24 for a description.
• Verify that your target endpoint that you installed an agent on is a Windows endpoint. Mac, Linux,and UNIX endpoints cannot have agents uninstalled using an Agent Management Job.
• The agent status for the endpoint is Online.

Ivanti Endpoint Security
- 86 -
You complete the Agent Management Job within the Ivanti Endpoint Security Web console using aneasy-to-use wizard. Configuration occurs in the Uninstall Agents Wizard.
Note: Configuration of the Agent Management Job is similar to configuration of a Discovery Scan Job.
1. Begin configuration of the Uninstall Agent Wizard.Complete one of the following sets of steps to begin configuration.
Context Steps
To open the Wizard withouttargets predefined:
Select Discover > Assets and Uninstall Agents.
To open the Wizard withtarget predefined:
1. Select Manage > Endpoints.2. Select the endpoints you want to uninstall agents from.3. From the toolbar, select Manage Agents > Uninstall Agents.
Step Result: The wizard opens to the Job Name and Scheduling page.
Figure 16: Job Name and Scheduling Page
2. [Optional] Type a new name in the Scan job name field.
Note: By default, a new Agent Management Job for uninstallation is named New Agent UninstallManagement Job, followed by the server's date and time, which is formatted according to yourbrowser's locale setting.
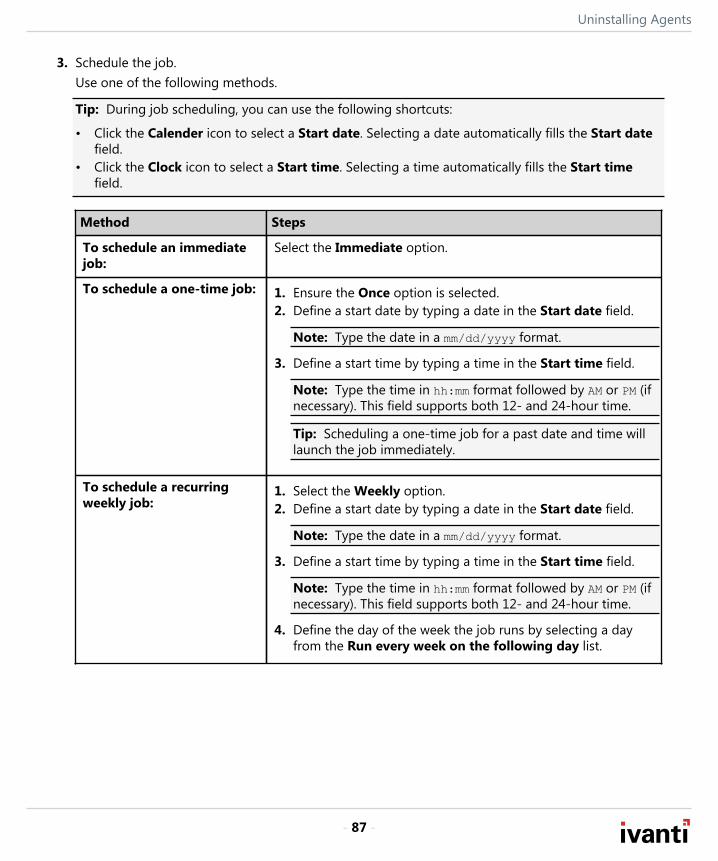
Uninstalling Agents
- 87 -
3. Schedule the job.Use one of the following methods.
Tip: During job scheduling, you can use the following shortcuts:
• Click the Calender icon to select a Start date. Selecting a date automatically fills the Start datefield.
• Click the Clock icon to select a Start time. Selecting a time automatically fills the Start timefield.
Method Steps
To schedule an immediatejob:
Select the Immediate option.
To schedule a one-time job: 1. Ensure the Once option is selected.2. Define a start date by typing a date in the Start date field.
Note: Type the date in a mm/dd/yyyy format.
3. Define a start time by typing a time in the Start time field.
Note: Type the time in hh:mm format followed by AM or PM (ifnecessary). This field supports both 12- and 24-hour time.
Tip: Scheduling a one-time job for a past date and time willlaunch the job immediately.
To schedule a recurringweekly job:
1. Select the Weekly option.2. Define a start date by typing a date in the Start date field.
Note: Type the date in a mm/dd/yyyy format.
3. Define a start time by typing a time in the Start time field.
Note: Type the time in hh:mm format followed by AM or PM (ifnecessary). This field supports both 12- and 24-hour time.
4. Define the day of the week the job runs by selecting a dayfrom the Run every week on the following day list.
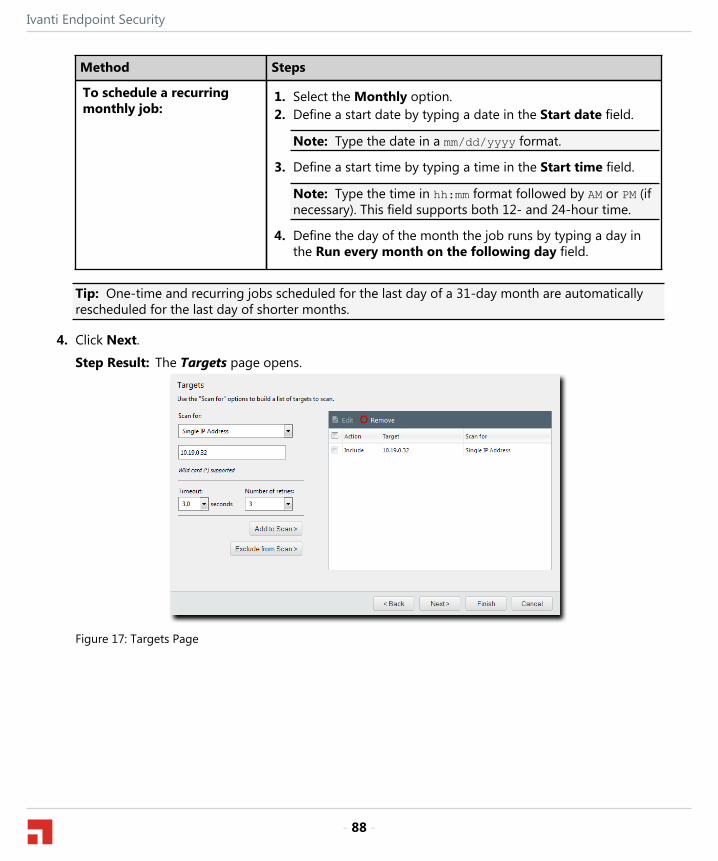
Ivanti Endpoint Security
- 88 -
Method Steps
To schedule a recurringmonthly job:
1. Select the Monthly option.2. Define a start date by typing a date in the Start date field.
Note: Type the date in a mm/dd/yyyy format.
3. Define a start time by typing a time in the Start time field.
Note: Type the time in hh:mm format followed by AM or PM (ifnecessary). This field supports both 12- and 24-hour time.
4. Define the day of the month the job runs by typing a day inthe Run every month on the following day field.
Tip: One-time and recurring jobs scheduled for the last day of a 31-day month are automaticallyrescheduled for the last day of shorter months.
4. Click Next.
Step Result: The Targets page opens.
Figure 17: Targets Page
Uninstalling Agents
- 89 -
5. Define targets (endpoints) for the job to locate.Use one or more of the following discovery methods.
Method Steps
To define targets using asingle IP address:
1. From the Scan for list, select Single IP Address.2. Type an IP address in the empty field.
Note: Wildcards are supported. For additional information,refer to Defining Targets Using Wildcards on page 51.
3. Edit the Timeout list.
Note: The Timeout list defines the number of secondsbefore a scan fails due to inactivity for a particular target.Under most network conditions, the Timeout field does notrequire editing.
4. Edit the Number of retries list.
Note: The Number of retries list defines the number oftimes a scan retries on that target if the scan times out.
To define targets using an IPrange:
1. From the Scan for list, select IP Range.2. In the first empty field, type the beginning of IP range.
Note: Wildcards are supported. For additional information,refer to Defining Targets Using Wildcards on page 51.
3. In the second empty field, type the ending of the IP range.4. Edit the Timeout list.
Note: The Timeout list defines the number of secondsbefore a scan fails due to inactivity for that particular target.Under most network conditions, the Timeout field does notrequire editing.
5. Edit the Number of retries list.
Note: The Number of retries list defines the number oftimes a scan retries on that target if the scan times out.
To define targets using acomputer name:
1. From the Scan for list, select Computer name.2. In the empty field, type an endpoint name.
Note: Use one of the following formats: endpointname ordomain\endpointname.
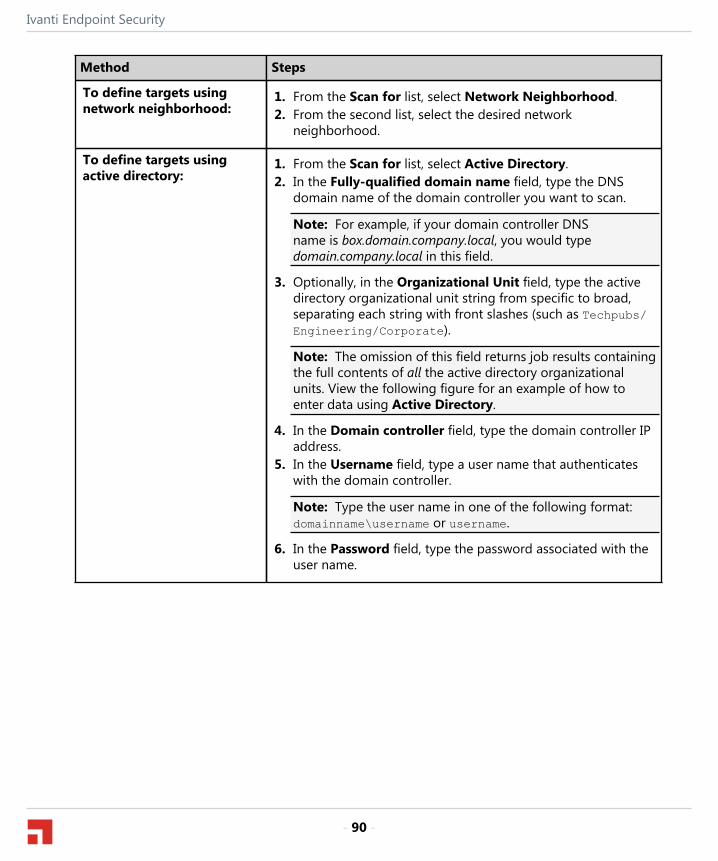
Ivanti Endpoint Security
- 90 -
Method Steps
To define targets usingnetwork neighborhood:
1. From the Scan for list, select Network Neighborhood.2. From the second list, select the desired network
neighborhood.
To define targets usingactive directory:
1. From the Scan for list, select Active Directory.2. In the Fully-qualified domain name field, type the DNS
domain name of the domain controller you want to scan.
Note: For example, if your domain controller DNSname is box.domain.company.local, you would typedomain.company.local in this field.
3. Optionally, in the Organizational Unit field, type the activedirectory organizational unit string from specific to broad,separating each string with front slashes (such as Techpubs/Engineering/Corporate).
Note: The omission of this field returns job results containingthe full contents of all the active directory organizationalunits. View the following figure for an example of how toenter data using Active Directory.
4. In the Domain controller field, type the domain controller IPaddress.
5. In the Username field, type a user name that authenticateswith the domain controller.
Note: Type the user name in one of the following format:domainname\username or username.
6. In the Password field, type the password associated with theuser name.
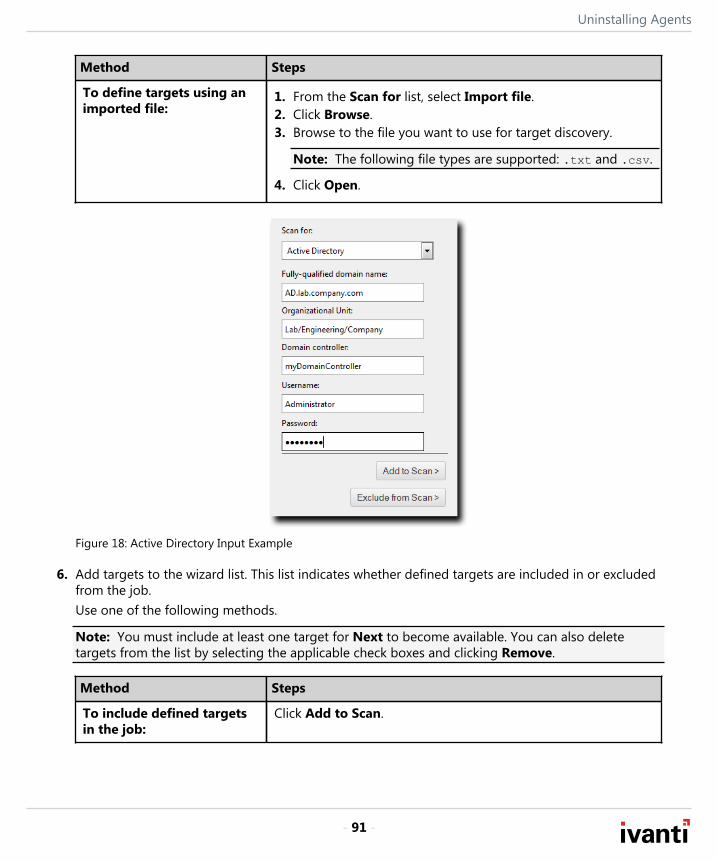
Uninstalling Agents
- 91 -
Method Steps
To define targets using animported file:
1. From the Scan for list, select Import file.2. Click Browse.3. Browse to the file you want to use for target discovery.
Note: The following file types are supported: .txt and .csv.
4. Click Open.
Figure 18: Active Directory Input Example
6. Add targets to the wizard list. This list indicates whether defined targets are included in or excludedfrom the job.Use one of the following methods.
Note: You must include at least one target for Next to become available. You can also deletetargets from the list by selecting the applicable check boxes and clicking Remove.
Method Steps
To include defined targetsin the job:
Click Add to Scan.
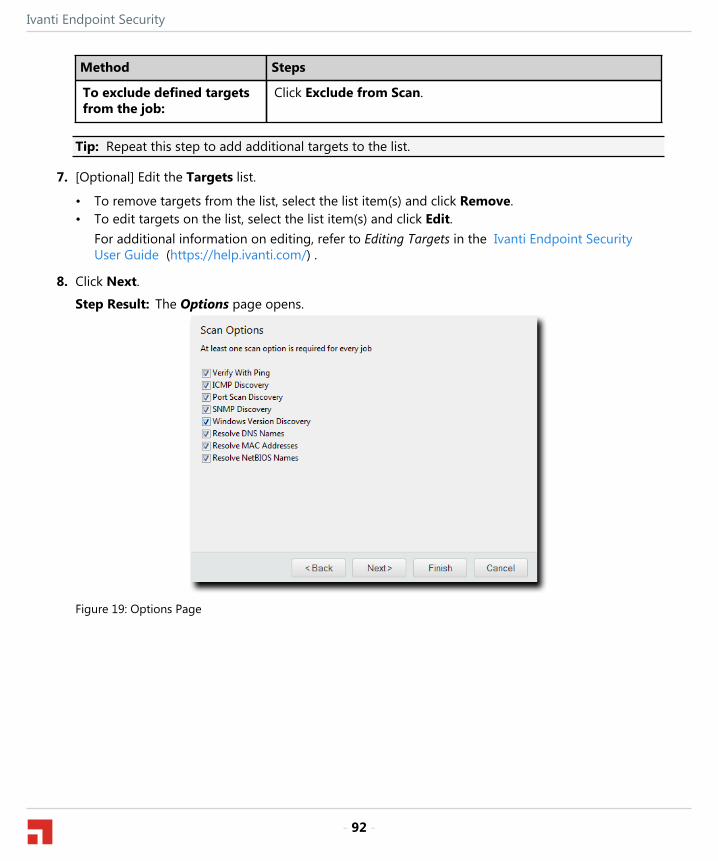
Ivanti Endpoint Security
- 92 -
Method Steps
To exclude defined targetsfrom the job:
Click Exclude from Scan.
Tip: Repeat this step to add additional targets to the list.
7. [Optional] Edit the Targets list.
• To remove targets from the list, select the list item(s) and click Remove.• To edit targets on the list, select the list item(s) and click Edit.
For additional information on editing, refer to Editing Targets in the Ivanti Endpoint SecurityUser Guide (https://help.ivanti.com/) .
8. Click Next.
Step Result: The Options page opens.
Figure 19: Options Page
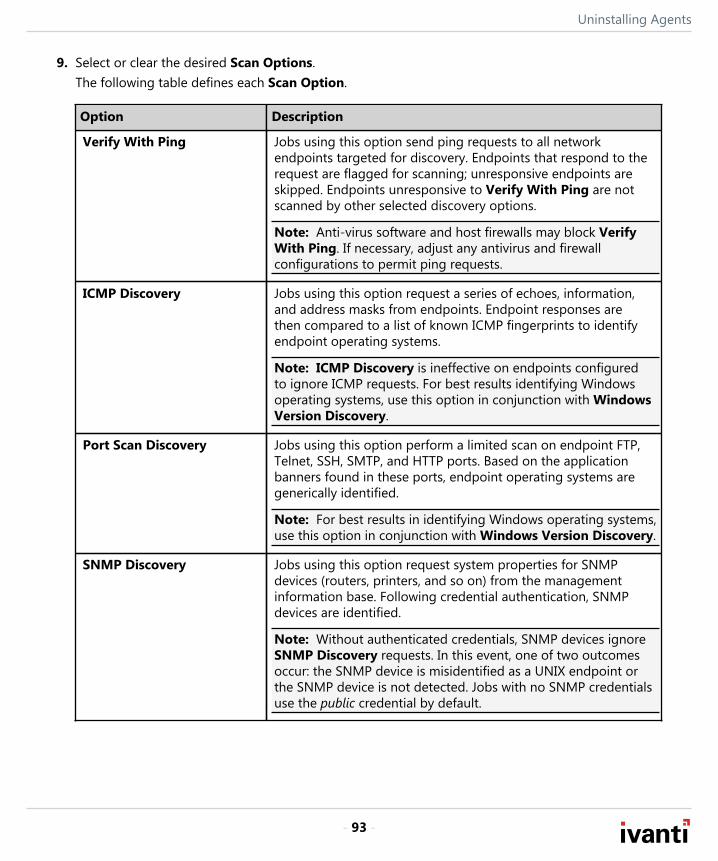
Uninstalling Agents
- 93 -
9. Select or clear the desired Scan Options.The following table defines each Scan Option.
Option Description
Verify With Ping Jobs using this option send ping requests to all networkendpoints targeted for discovery. Endpoints that respond to therequest are flagged for scanning; unresponsive endpoints areskipped. Endpoints unresponsive to Verify With Ping are notscanned by other selected discovery options.
Note: Anti-virus software and host firewalls may block VerifyWith Ping. If necessary, adjust any antivirus and firewallconfigurations to permit ping requests.
ICMP Discovery Jobs using this option request a series of echoes, information,and address masks from endpoints. Endpoint responses arethen compared to a list of known ICMP fingerprints to identifyendpoint operating systems.
Note: ICMP Discovery is ineffective on endpoints configuredto ignore ICMP requests. For best results identifying Windowsoperating systems, use this option in conjunction with WindowsVersion Discovery.
Port Scan Discovery Jobs using this option perform a limited scan on endpoint FTP,Telnet, SSH, SMTP, and HTTP ports. Based on the applicationbanners found in these ports, endpoint operating systems aregenerically identified.
Note: For best results in identifying Windows operating systems,use this option in conjunction with Windows Version Discovery.
SNMP Discovery Jobs using this option request system properties for SNMPdevices (routers, printers, and so on) from the managementinformation base. Following credential authentication, SNMPdevices are identified.
Note: Without authenticated credentials, SNMP devices ignoreSNMP Discovery requests. In this event, one of two outcomesoccur: the SNMP device is misidentified as a UNIX endpoint orthe SNMP device is not detected. Jobs with no SNMP credentialsuse the public credential by default.
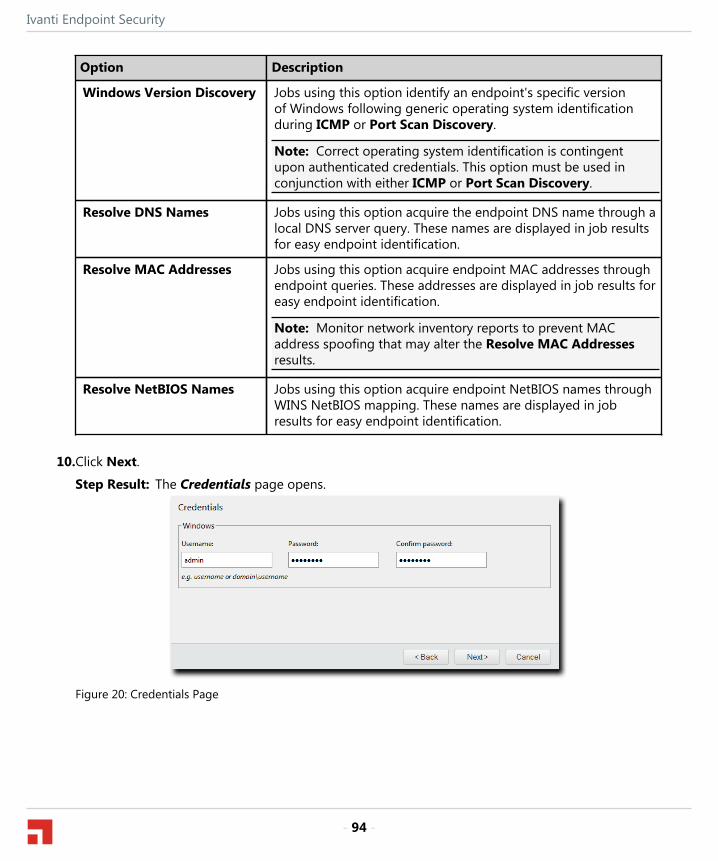
Ivanti Endpoint Security
- 94 -
Option Description
Windows Version Discovery Jobs using this option identify an endpoint's specific versionof Windows following generic operating system identificationduring ICMP or Port Scan Discovery.
Note: Correct operating system identification is contingentupon authenticated credentials. This option must be used inconjunction with either ICMP or Port Scan Discovery.
Resolve DNS Names Jobs using this option acquire the endpoint DNS name through alocal DNS server query. These names are displayed in job resultsfor easy endpoint identification.
Resolve MAC Addresses Jobs using this option acquire endpoint MAC addresses throughendpoint queries. These addresses are displayed in job results foreasy endpoint identification.
Note: Monitor network inventory reports to prevent MACaddress spoofing that may alter the Resolve MAC Addressesresults.
Resolve NetBIOS Names Jobs using this option acquire endpoint NetBIOS names throughWINS NetBIOS mapping. These names are displayed in jobresults for easy endpoint identification.
10.Click Next.
Step Result: The Credentials page opens.
Figure 20: Credentials Page
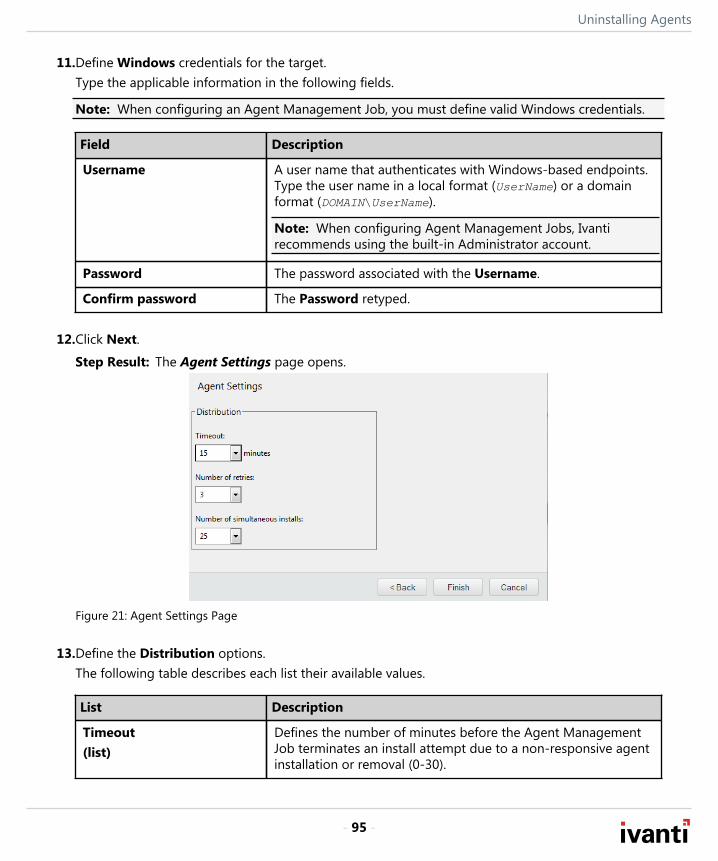
Uninstalling Agents
- 95 -
11.Define Windows credentials for the target.Type the applicable information in the following fields.
Note: When configuring an Agent Management Job, you must define valid Windows credentials.
Field Description
Username A user name that authenticates with Windows-based endpoints.Type the user name in a local format (UserName) or a domainformat (DOMAIN\UserName).
Note: When configuring Agent Management Jobs, Ivantirecommends using the built-in Administrator account.
Password The password associated with the Username.
Confirm password The Password retyped.
12.Click Next.
Step Result: The Agent Settings page opens.
Figure 21: Agent Settings Page
13.Define the Distribution options.The following table describes each list their available values.
List Description
Timeout(list)
Defines the number of minutes before the Agent ManagementJob terminates an install attempt due to a non-responsive agentinstallation or removal (0-30).
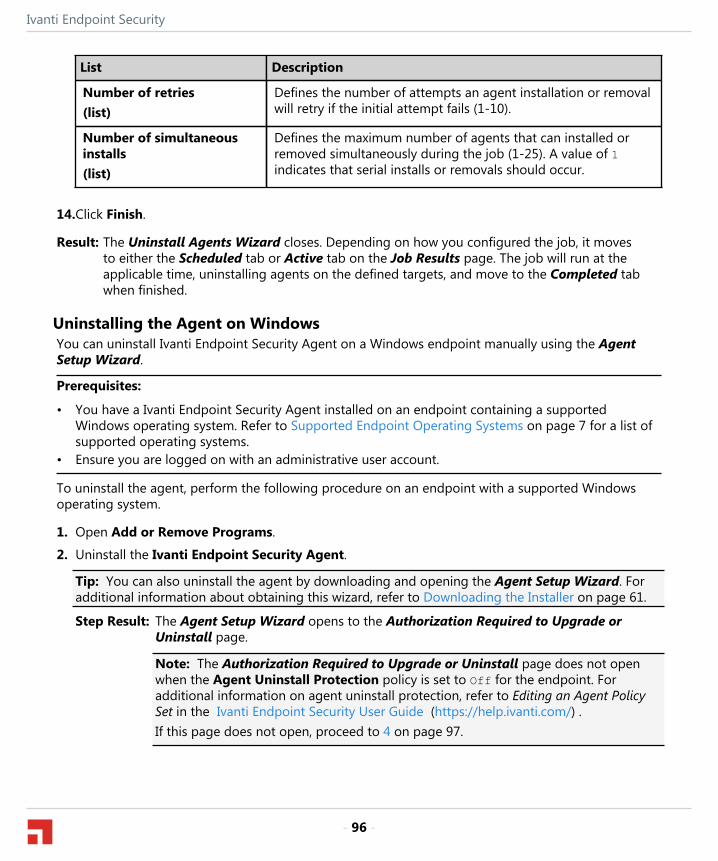
Ivanti Endpoint Security
- 96 -
List Description
Number of retries(list)
Defines the number of attempts an agent installation or removalwill retry if the initial attempt fails (1-10).
Number of simultaneousinstalls(list)
Defines the maximum number of agents that can installed orremoved simultaneously during the job (1-25). A value of 1indicates that serial installs or removals should occur.
14.Click Finish.
Result: The Uninstall Agents Wizard closes. Depending on how you configured the job, it movesto either the Scheduled tab or Active tab on the Job Results page. The job will run at theapplicable time, uninstalling agents on the defined targets, and move to the Completed tabwhen finished.
Uninstalling the Agent on WindowsYou can uninstall Ivanti Endpoint Security Agent on a Windows endpoint manually using the AgentSetup Wizard.
Prerequisites:
• You have a Ivanti Endpoint Security Agent installed on an endpoint containing a supportedWindows operating system. Refer to Supported Endpoint Operating Systems on page 7 for a list ofsupported operating systems.
• Ensure you are logged on with an administrative user account.
To uninstall the agent, perform the following procedure on an endpoint with a supported Windowsoperating system.
1. Open Add or Remove Programs.
2. Uninstall the Ivanti Endpoint Security Agent.
Tip: You can also uninstall the agent by downloading and opening the Agent Setup Wizard. Foradditional information about obtaining this wizard, refer to Downloading the Installer on page 61.
Step Result: The Agent Setup Wizard opens to the Authorization Required to Upgrade orUninstall page.
Note: The Authorization Required to Upgrade or Uninstall page does not openwhen the Agent Uninstall Protection policy is set to Off for the endpoint. Foradditional information on agent uninstall protection, refer to Editing an Agent PolicySet in the Ivanti Endpoint Security User Guide (https://help.ivanti.com/) .If this page does not open, proceed to 4 on page 97.
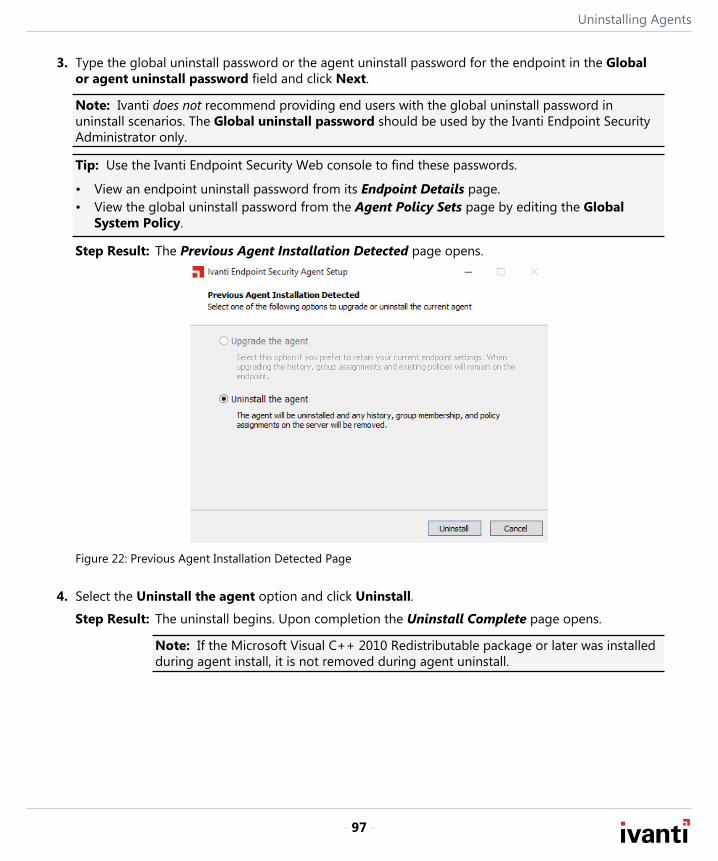
Uninstalling Agents
- 97 -
3. Type the global uninstall password or the agent uninstall password for the endpoint in the Globalor agent uninstall password field and click Next.
Note: Ivanti does not recommend providing end users with the global uninstall password inuninstall scenarios. The Global uninstall password should be used by the Ivanti Endpoint SecurityAdministrator only.
Tip: Use the Ivanti Endpoint Security Web console to find these passwords.
• View an endpoint uninstall password from its Endpoint Details page.• View the global uninstall password from the Agent Policy Sets page by editing the Global
System Policy.
Step Result: The Previous Agent Installation Detected page opens.
Figure 22: Previous Agent Installation Detected Page
4. Select the Uninstall the agent option and click Uninstall.
Step Result: The uninstall begins. Upon completion the Uninstall Complete page opens.
Note: If the Microsoft Visual C++ 2010 Redistributable package or later was installedduring agent install, it is not removed during agent uninstall.
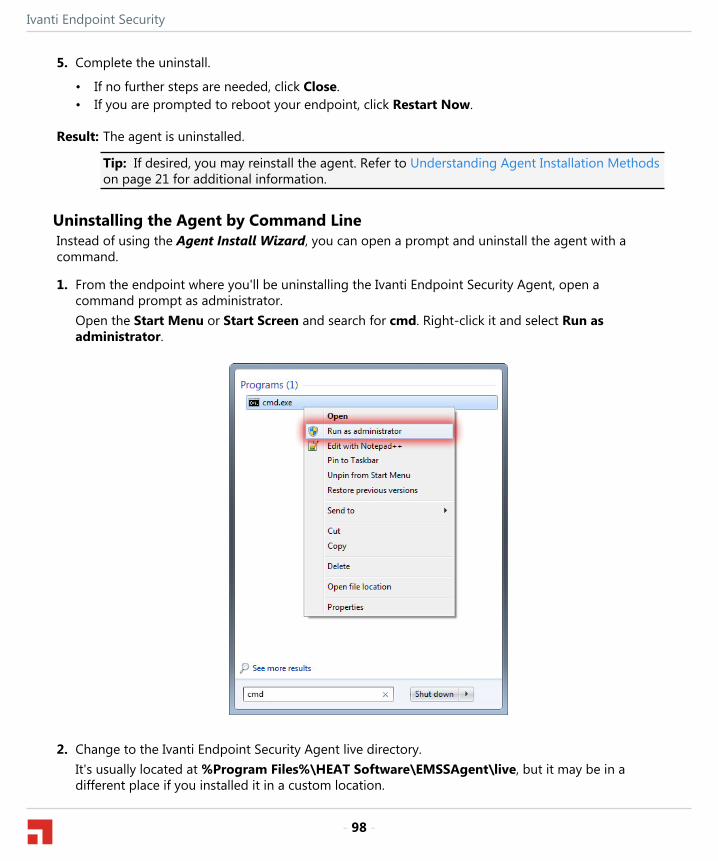
Ivanti Endpoint Security
- 98 -
5. Complete the uninstall.
• If no further steps are needed, click Close.• If you are prompted to reboot your endpoint, click Restart Now.
Result: The agent is uninstalled.
Tip: If desired, you may reinstall the agent. Refer to Understanding Agent Installation Methodson page 21 for additional information.
Uninstalling the Agent by Command LineInstead of using the Agent Install Wizard, you can open a prompt and uninstall the agent with acommand.
1. From the endpoint where you'll be uninstalling the Ivanti Endpoint Security Agent, open acommand prompt as administrator.Open the Start Menu or Start Screen and search for cmd. Right-click it and select Run asadministrator.
2. Change to the Ivanti Endpoint Security Agent live directory.It's usually located at %Program Files%\HEAT Software\EMSSAgent\live, but it may be in adifferent place if you installed it in a custom location.
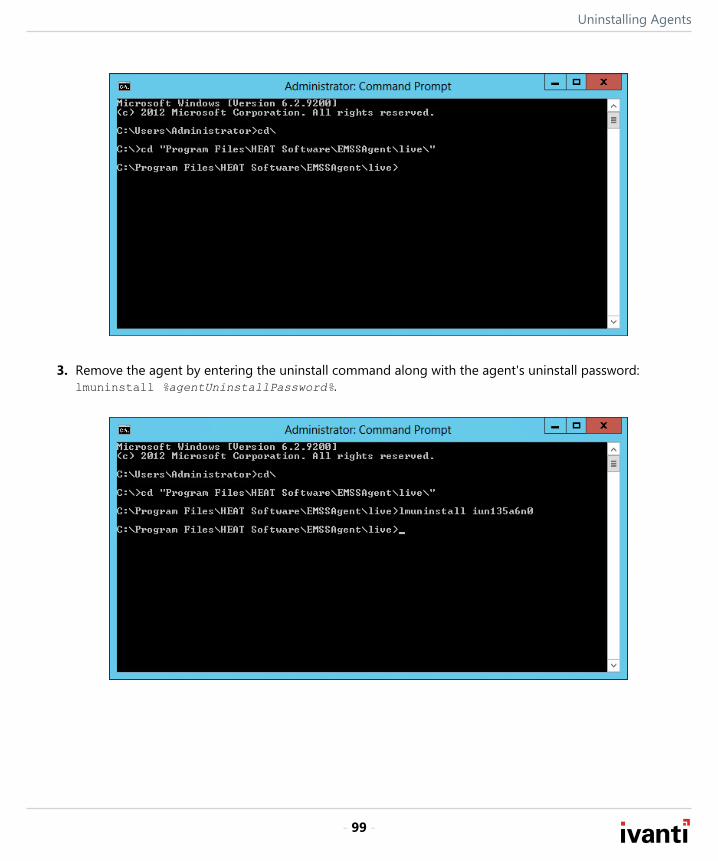
Uninstalling Agents
- 99 -
3. Remove the agent by entering the uninstall command along with the agent's uninstall password:lmuninstall %agentUninstallPassword%.
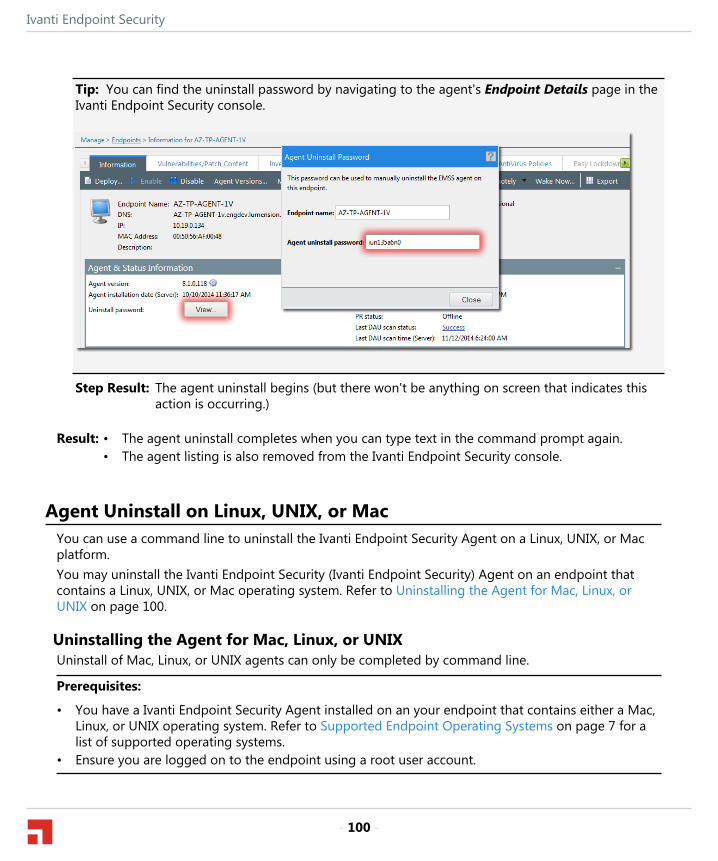
Ivanti Endpoint Security
- 100 -
Tip: You can find the uninstall password by navigating to the agent's Endpoint Details page in theIvanti Endpoint Security console.
Step Result: The agent uninstall begins (but there won't be anything on screen that indicates thisaction is occurring.)
Result: • The agent uninstall completes when you can type text in the command prompt again.• The agent listing is also removed from the Ivanti Endpoint Security console.
Agent Uninstall on Linux, UNIX, or MacYou can use a command line to uninstall the Ivanti Endpoint Security Agent on a Linux, UNIX, or Macplatform.You may uninstall the Ivanti Endpoint Security (Ivanti Endpoint Security) Agent on an endpoint thatcontains a Linux, UNIX, or Mac operating system. Refer to Uninstalling the Agent for Mac, Linux, orUNIX on page 100.
Uninstalling the Agent for Mac, Linux, or UNIXUninstall of Mac, Linux, or UNIX agents can only be completed by command line.
Prerequisites:
• You have a Ivanti Endpoint Security Agent installed on an your endpoint that contains either a Mac,Linux, or UNIX operating system. Refer to Supported Endpoint Operating Systems on page 7 for alist of supported operating systems.
• Ensure you are logged on to the endpoint using a root user account.
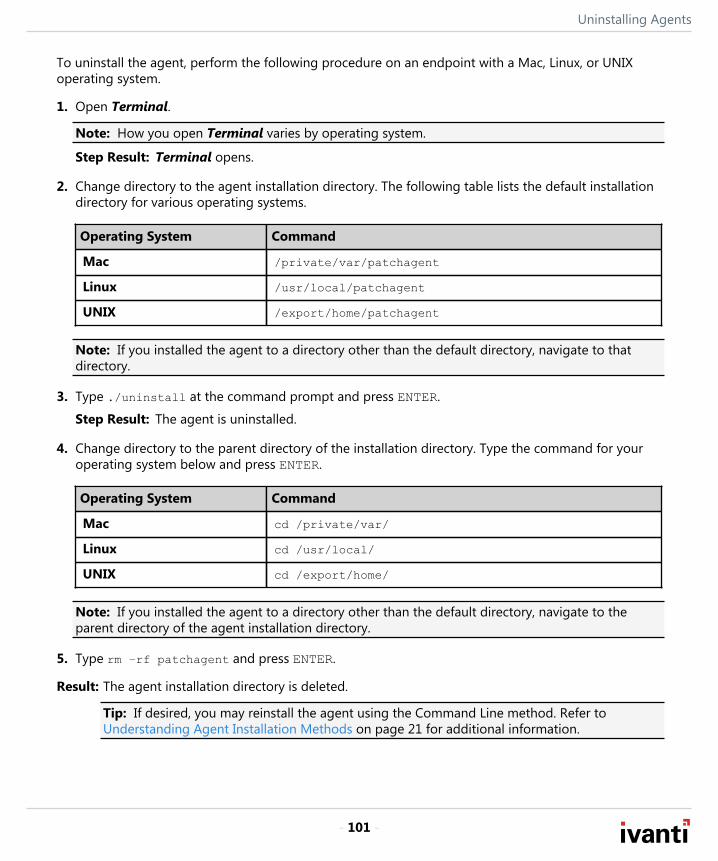
Uninstalling Agents
- 101 -
To uninstall the agent, perform the following procedure on an endpoint with a Mac, Linux, or UNIXoperating system.
1. Open Terminal.
Note: How you open Terminal varies by operating system.
Step Result: Terminal opens.
2. Change directory to the agent installation directory. The following table lists the default installationdirectory for various operating systems.
Operating System Command
Mac /private/var/patchagent
Linux /usr/local/patchagent
UNIX /export/home/patchagent
Note: If you installed the agent to a directory other than the default directory, navigate to thatdirectory.
3. Type ./uninstall at the command prompt and press ENTER.
Step Result: The agent is uninstalled.
4. Change directory to the parent directory of the installation directory. Type the command for youroperating system below and press ENTER.
Operating System Command
Mac cd /private/var/
Linux cd /usr/local/
UNIX cd /export/home/
Note: If you installed the agent to a directory other than the default directory, navigate to theparent directory of the agent installation directory.
5. Type rm –rf patchagent and press ENTER.
Result: The agent installation directory is deleted.
Tip: If desired, you may reinstall the agent using the Command Line method. Refer toUnderstanding Agent Installation Methods on page 21 for additional information.

Uninstalling Agents
- 102 -