sendsuite receipted mail tracking system...
TRANSCRIPT

SENDSUITE RECEIPTED MAIL TRACKING
SYSTEM
Customer Tutorial
ISD Mail Services Section
Updated 6/26/17

Table of Contents
Log in Screen .................................................................................................................. 1
Create Label Screen ........................................................................................................ 2
Verification Screen ......................................................................................................... 5
Print Preview Screen ...................................................................................................... 7
Print Screen .................................................................................................................... 8
Label Look Up Screen ..................................................................................................... 9
Packages Screen ........................................................................................................... 11
Sign Out ........................................................................................................................ 14
Questions ..................................................................................................................... 14

1 | P a g e
LOG IN SCREEN
1. To access the Mail Tracking System for inter-office mails delivered by Internal Services Department, type in the link http://mailtrak.co.la.ca.us/dems using your web browser then press enter key. This takes you to the Home Screen.
2. Type in the User ID and Password, used to log-in to Windows in your computer, then click the Login.
Figure 1: Login screen
3. The Home screen displays Home, Create Label, Packages, Help, and Sign Out options.
Figure 1a: Home Screen

2 | P a g e
CREATE LABEL SCREEN
1. Click the Create Label tab to create a new label for a package.
Figure 2: Create Label Screen
Field Name Description
Date: This field is pre-populated with the current date.
To: Select the department name from the drop down list where the package is being delivered to. Then to the right, select the department address from the drop down list where the package is being delivered to. The Mail Stop/Route Details box is pre-populated which contains the details for the selected address.
Recipient Name List:
Select the name of person who will receive the package from the dropdown list.

3 | P a g e
CREATE LABEL SCREEN
Field Name Description
Recipient Name List: (Continued)
If you are sending the package to the department and not a specific person, select the “Mailroom” option at the top of the list and the word “Mailroom” will be pre-populated in the Recipient’s Name text box. Note: The Recipient Name List drop down box only contains the list of names at the selected address (Mail Stop). If the person you are sending the package to is not a part of a Mail Stop you can enter the name and email for the person into the Recipient’s Name and Recipient’s Email text boxes.
Recipient Name: Type in the name of the person who will receive the package. If the recipient’s info is listed in the Recipient Name List drop down, this field will be pre-populated.
Recipient’s Email: Type in the email of the person who will receive the package. If the recipient’s info is listed in the Recipient Name List drop down, this field will be pre-populated.
Remarks: Type additional Comments for the package. A maximum of 100 characters can be selected. If you type more than 100 characters the remaining characters will be truncated from the remarks.
From: The department name is pre-populated when you login. Unless you choose to change it. You can select from the address list on the right and choose the address you are sending it from.
Sender Name: The Sender Name is pre-populated when you login. You can edit this and change the Sender’s email below for sender email notification as well.
Sender Email: The Sender Email is pre-populated when you login. If not, type in the email of the person who is sending the package.
Mail Type: Select from the drop down list whether: Small Envelope, Large Envelope, Box, Package, Locked Pouch, Unlocked Pouch, or Other.
The data fields listed below must be selected and populated as required; otherwise, an error message will appear as: * Required.
To (Department and Address)
Recipient’s Name
From (Department and Address)
Sender Name
Mail Type

4 | P a g e
CREATE LABEL SCREEN
Figure 2a: Create Label Screen with Errors Found
2. Click The Submit button to initiate a new label.
Figure 2b: Completed Create Label Screen

5 | P a g e
VERIFICATION SCREEN
1. The Verification Screen ensures all data has been entered and allows you to review the data that will appear on the finished label.
2. Click the Edit button to make corrections if needed.
Figure 3: Verification Screen

6 | P a g e
VERIFICATION SCREEN
3. If errors, revise the information, then click the Submit button to re-initiate the label and return to the Verification screen.
Figure 3a: Edit Screen for Corrections
4. Once accurate, click Print.
Figure 3b: Verification Screen (after correction)

7 | P a g e
PRINT PREVIEW SCREEN
1. After clicking Print from the Verification screen, another window will open with a ‘print
preview’ of your finished label which consists of two (2) sections. The print preview screen
displays exactly how it will be printed on the letter size paper.
Note: This is your last chance to return to edit your label by selecting the Close tab which
returns to the Verification screen.
2. If correct, select Print.
Figure 4: Print Preview Screen
8 | P a g e
PRINT SCREEN
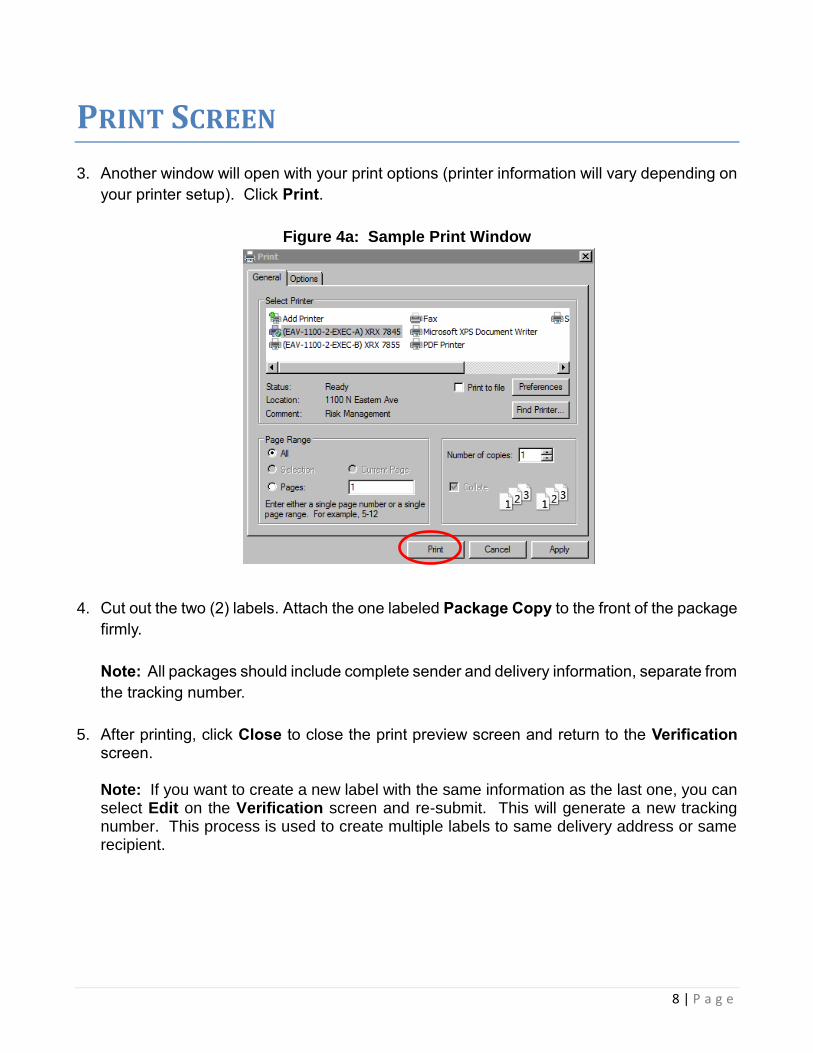
3. Another window will open with your print options (printer information will vary depending on
your printer setup). Click Print.
Figure 4a: Sample Print Window
4. Cut out the two (2) labels. Attach the one labeled Package Copy to the front of the package
firmly.
Note: All packages should include complete sender and delivery information, separate from
the tracking number.
5. After printing, click Close to close the print preview screen and return to the Verification screen. Note: If you want to create a new label with the same information as the last one, you can select Edit on the Verification screen and re-submit. This will generate a new tracking number. This process is used to create multiple labels to same delivery address or same recipient.
9 | P a g e
LABEL LOOK UP SCREEN
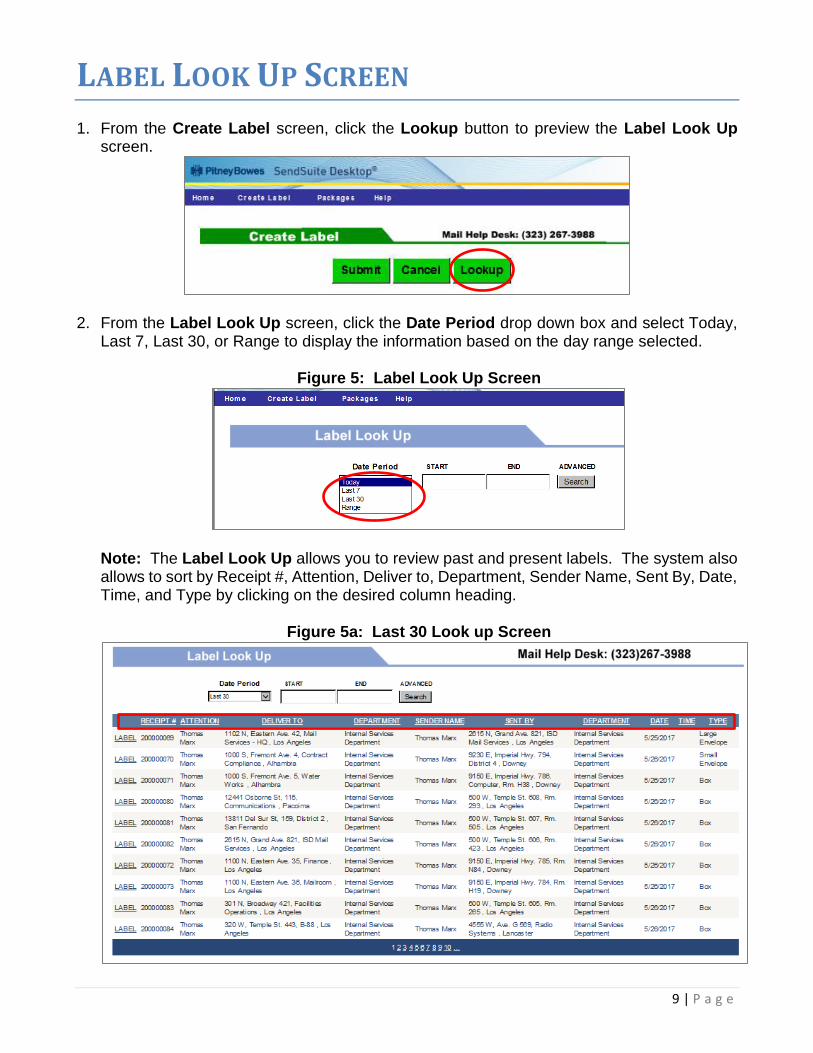
1. From the Create Label screen, click the Lookup button to preview the Label Look Up screen.
2. From the Label Look Up screen, click the Date Period drop down box and select Today, Last 7, Last 30, or Range to display the information based on the day range selected.
Figure 5: Label Look Up Screen
Note: The Label Look Up allows you to review past and present labels. The system also allows to sort by Receipt #, Attention, Deliver to, Department, Sender Name, Sent By, Date, Time, and Type by clicking on the desired column heading.
Figure 5a: Last 30 Look up Screen

10 | P a g e
LABEL LOOK UP SCREEN
3. For searches of more than 30 days, use the date range option to retrieve past label information. Select range by clicking START then select the start date from the drop down calendar. Click END, select the end date from the drop down calendar, and then click Search button.
Figure 5b: Range Look Up Screen

11 | P a g e
PACKAGES SCREEN 1. From the Home screen, click Packages option to check for the status of your package.
2. From the Packages screen, select the Package Group from the drop down list:
My Packages – Does not work.
Dept Packages – Displays all packages that were sent to your department.
All Packages – Displays all packages.
Figure 6: Packages Screen

12 | P a g e
PACKAGES SCREEN
3. Enter the Tracking#/ID (optional), select the Date Period from the drop down list then click Search button.
Figure 6a: Packages Date Period Screen
4. Click on the Details link to see more information about the package.
Figure 6b: Packages Last 30 days Screen

13 | P a g e
PACKAGES SCREEN 5. The Package Details screen lets you view the detailed status. Click on the Back button to
return to the lists of packages. Click on the Signature box to view the customer signature screen on a separate window.
Figure 6c: Package Details Screen
Figure 6d: Signature Screen

14 | P a g e
SIGN OUT Users are able to sign out of the system any time at any screen by clicking on the Sign Out button.
QUESTIONS
For questions, please contact:
ISD Mail Services Help Desk at (323) 267-3988; or
Email at [email protected]
For further information on Mail Services, please visit http://isd.lacounty.gov/purchasing-and-
contract-services/contract-admin/county-mail-services/ .