selenioflex file manager
TRANSCRIPT

SelenioFlex™ File
Version 2.10.0
August 2015
Users Guide

SelenioFlex™ File Users Guide
© 2015 Imagine Communications Corp. Proprietary and Confidential. Version 2.10.0 | Page 2
Publication Information © 2015 Imagine Communications Corp. Proprietary and Confidential.
Imagine Communications considers this document and its contents to be proprietary and confidential. Except for making a reasonable number of copies for your own internal use, you may not reproduce this publication, or any part thereof, in any form, by any method, for any purpose, or in any language other than English without the written consent of Imagine Communications. All others uses are illegal.
This publication is designed to assist in the use of the product as it exists on the date of publication of this manual, and may not reflect the product at the current time or an unknown time in the future. This publication does not in any way warrant description accuracy or guarantee the use for the product to which it refers. Imagine Communications reserves the right, without notice to make such changes in equipment, design, specifications, components, or documentation as progress may warrant to improve the performance of the product.
Trademarks SelenioFlex, SelenioFlex File, SelenioFlex Live Manager and Zenium are trademarks or trade names of Imagine Communications or its subsidiaries.
Microsoft® and Windows® are registered trademarks of Microsoft Corporation. All other trademarks and trade names are the property of their respective companies.
Contact Information Imagine Communications has office locations around the world. For domestic and international location and contact information, visit our Contact page (http://www.imaginecommunications.com/company/contact-us.aspx).
Support Contact Information For domestic and international support contact information see:
• Support Contacts (http://www.imaginecommunications.com/services/customer-care.aspx) • eCustomer Portal (http://support.imaginecommunications.com) • Academy Training (http://www.imaginecommunicationsacademy.com)

SelenioFlex™ File Users Guide Contents
© 2015 Imagine Communications Corp. Proprietary and Confidential. Version 2.10.0 | Page 3
Contents SelenioFlex File Overview ...................................................................................... 8
Features .................................................................................................................................................... 8 SelenioFlex File System ............................................................................................................................. 8
Installation ........................................................................................................... 10 System Requirements ............................................................................................................................. 10 Installation Overview .............................................................................................................................. 11
SFX-File Manager Setup with No Backup Manager ............................................................................ 11 SFX-File Manager Setup with a Backup Manager .............................................................................. 11 Before Running the SFX-File Installer ................................................................................................. 12 Before Installing the Management or Agent Software ...................................................................... 12 License Server Installation for a Redundant Setup ............................................................................ 13 Additional Instructions for a Redundant License Server Setup .......................................................... 16 The License Server Console ................................................................................................................ 16
The SelenioFlex File Installer (Windows OS) .......................................................................................... 17 Manager Install ................................................................................................................................... 17 Console Install .................................................................................................................................... 18 Transcode Host System for Stream Engines ....................................................................................... 19 Transcode Host System for Zenium Engines ...................................................................................... 19
Configuration Wizard.............................................................................................................................. 19 License Server ..................................................................................................................................... 20 System Address .................................................................................................................................. 21 SelenioFlex File Domain Name ........................................................................................................... 21 SelenioFlex File Manager Security ...................................................................................................... 21 Discovery Method .............................................................................................................................. 22 Database ............................................................................................................................................. 22 Backup Manager ................................................................................................................................. 24 SelenioFlex File Manager.................................................................................................................... 24 SNMP Monitoring ............................................................................................................................... 25 Stream Server ..................................................................................................................................... 25 Zenium Server .................................................................................................................................... 25 Zenium Plugins ................................................................................................................................... 25 Installation Information ..................................................................................................................... 26

SelenioFlex™ File Users Guide Contents
© 2015 Imagine Communications Corp. Proprietary and Confidential. Version 2.10.0 | Page 4
Managing the Services ............................................................................................................................ 27 Licensing ................................................................................................................................................. 32
Licensing for Zenium Engines ............................................................................................................. 33 Licensing for Stream Engines.............................................................................................................. 33
Additional Installation Notes .................................................................................................................. 34 Networking ......................................................................................................................................... 34 Firewalls and Network Ports .............................................................................................................. 34 Paths and Permissions for Output and Watch Folders ...................................................................... 34
Upgrading SelenioFlex File Software ...................................................................................................... 35 The License Server as of Version 2.6 .................................................................................................. 35 Installing New Builds on the SFX-File System ..................................................................................... 35 Installing New Builds on Transcode Host Systems ............................................................................. 35
Getting Started .................................................................................................... 36 Create the Zenium Blueprint or Stream Project ..................................................................................... 36 Launch the SFX-File Console ................................................................................................................... 36
Resources and Groups ........................................................................................................................ 36 Creating a Watch Folder ..................................................................................................................... 37 Output Files and Assets ...................................................................................................................... 38 Monitoring Transcode Tasks .............................................................................................................. 38
Zenium Transcode Blueprints .............................................................................. 39 Transcode Blueprint Creation Overview ................................................................................................ 39 Launch Zenium Designer ........................................................................................................................ 40 Zenium Blueprint, Graph and Component Basics .................................................................................. 41
Blueprint Properties ........................................................................................................................... 43 Expression Editor ................................................................................................................................ 46 Exposing Component Properties ........................................................................................................ 46 Exposing Entire Property Groups ....................................................................................................... 47
Set the Input ........................................................................................................................................... 47 Single Source Files .............................................................................................................................. 47 Transcode Requests ........................................................................................................................... 49 Clip Lists (Multiple Input Files) ........................................................................................................... 49 Create a Clip List XML file ................................................................................................................... 50 Primary Source File ............................................................................................................................. 52 Extended Clip List ............................................................................................................................... 52
Create the Processing Portion of the Graph .......................................................................................... 53 Set the Output ........................................................................................................................................ 54
Assets.................................................................................................................................................. 56 File Metadata ..................................................................................................................................... 58
SelenioFlex™ File Users Guide Contents
© 2015 Imagine Communications Corp. Proprietary and Confidential. Version 2.10.0 | Page 5
Save the Blueprint .................................................................................................................................. 58 Submitting Directly to SelenioFlex File ................................................................................................... 58 Additional Information ........................................................................................................................... 59
Stream Projects for SelenioFlex File ..................................................................... 60 Creating a Stream Project ....................................................................................................................... 60
Create or Add Codec Profile(s) ........................................................................................................... 60 Select Input Type ................................................................................................................................ 61 Add Plugins ......................................................................................................................................... 61 Select Output Settings ........................................................................................................................ 61 Save the Project .................................................................................................................................. 62
More Information about Stream Software ............................................................................................ 62
Using SelenioFlex File ........................................................................................... 63 Connect to the SFX-File Manager ........................................................................................................... 63 Zenium Plugins Repository ..................................................................................................................... 63
Adding or Sync'ing Plugins .................................................................................................................. 64 Summary ................................................................................................................................................. 66 Agents ..................................................................................................................................................... 67
For Agent Systems with Zenium Engines ........................................................................................... 67 For Agent Systems with Stream Engines ............................................................................................ 68 For All Agent Systems ......................................................................................................................... 69
Agent System Monitor ............................................................................................................................ 69 Resources ............................................................................................................................................... 69 Groups .................................................................................................................................................... 72
Groups Running Engines in a 32-bit Environment ............................................................................. 73 Stream Transcode Groups and Licensing ........................................................................................... 73 Using the Schedule to Move Resources ............................................................................................. 73 Groups and Watch Folders ................................................................................................................. 74
Watch Folders ......................................................................................................................................... 74 Standard Features for Watch Folders ................................................................................................ 75 Advanced Options for Zenium Watch Folders ................................................................................... 76 Advanced Options for Stream Watch Folders .................................................................................... 76
Submitting Clip Lists to Watch Folders ................................................................................................... 78 Transcode Tasks ...................................................................................................................................... 79
Queues ............................................................................................................................................... 79 Tasks ................................................................................................................................................... 80 Purging Transcode Tasks from the Database ..................................................................................... 80
Managed Files ......................................................................................................................................... 80 Alerts....................................................................................................................................................... 81

SelenioFlex™ File Users Guide Contents
© 2015 Imagine Communications Corp. Proprietary and Confidential. Version 2.10.0 | Page 6
Licenses ................................................................................................................................................... 82 Schedule ................................................................................................................................................. 83 Network Monitor .................................................................................................................................... 83 Jobs ......................................................................................................................................................... 84 Using Quality Control Servers ................................................................................................................. 85
Setting Up the QC Server .................................................................................................................... 85 Adding a QC Server to a Watch Folder ............................................................................................... 86
Testing Your Setup .................................................................................................................................. 86 Remote Software Upgrades ................................................................................................................... 86
SNMP Monitoring ................................................................................................ 88
Advanced User Security ....................................................................................... 89
SelenioFlex File Feature Chart .............................................................................. 93
Installing and Configuring Third Party Databases ................................................. 95 PostgreSQL 8 ........................................................................................................................................... 95
Install PostgreSQL 8 ............................................................................................................................ 95 Configure PostgreSQL 8 ...................................................................................................................... 96 Configure the Server .......................................................................................................................... 97 Confirm Connectivity to the Database ............................................................................................... 97 Automatic Index Creation .................................................................................................................. 98 Backup the Database .......................................................................................................................... 98
Oracle 10g ............................................................................................................................................... 98 Oracle Requirements .......................................................................................................................... 98 Configure SFX-File Manager ............................................................................................................... 99 Automatic Index Creation .................................................................................................................. 99 Backup the Database .......................................................................................................................... 99
Microsoft SQL Server 2005 ..................................................................................................................... 99 SQL Server 2005 Requirements ........................................................................................................ 100 Configure SFX-File Manager ............................................................................................................. 100 Automatic Index Creation ................................................................................................................ 100 Backup the Database ........................................................................................................................ 100
Troubleshooting ................................................................................................. 101 SelenioFlex File Manager ...................................................................................................................... 101 Network Issues ..................................................................................................................................... 102 Remote Software Upgrade Issues ........................................................................................................ 103 Additional Operating System Considerations....................................................................................... 103 Log Files ................................................................................................................................................ 104

SelenioFlex™ File Users Guide Contents
© 2015 Imagine Communications Corp. Proprietary and Confidential. Version 2.10.0 | Page 7
Network Ports .................................................................................................... 105

SelenioFlex™ File Users Guide SelenioFlex File Overview
© 2015 Imagine Communications Corp. Proprietary and Confidential. Version 2.10.0 | Page 8
SelenioFlex File Overview
Features SelenioFlex File (SFX-File) allows you to manage transcoding tasks across a network of transcoding host systems. Each transcoding host system includes a SFX-File Agent, which is in constant communication with the SFX-File Manager system. When a transcode task is submitted to SFX-File, the Manager uses the information from the Agents to find a suitable resource to run the task. It then dispatches the task to the Agent host system. The Agent communicates the state of the task and of the resource back to the Manager.
SelenioFlex File features:
• automatically assigns tasks to Agent host systems • monitors the status of all transcoding tasks • provides detailed information for each transcode task • automatically fails-over a transcode task if a system fails • generates alerts based on user defined criteria • provides access to the SFX-File Manager system from Console software. Console software can be
installed on any system on the network. • optional security feature, with 4 pre-defined roles
SelenioFlex File System
The SFX-File system consists of:
• SFX-File Manager: The Manager controls management functions such as distributing tasks, receiving task notifications, and managing resources, projects and groups. The Manager stores information for management functions and historical task information in the assigned database.

SelenioFlex™ File Users Guide SelenioFlex File Overview
© 2015 Imagine Communications Corp. Proprietary and Confidential. Version 2.10.0 | Page 9
• Transcode Engines: An engine is the software which runs transcoding tasks on the Transcoding host systems. Each transcode task is defined using either a Stream project or a Zenium Transcode Blueprint. SFX-File can use both Zenium and Stream engines. A Zenium engine is a running instance of Zenium. Each Zenium engine is started by the Zenium Server Service only when it receives a Zenium transcode task. Multiple Zenium engines can be running on one host. Unlike Zenium engines, Stream engines are constantly running. When the Stream Server Service receives a Stream transcode task, it sends the task to the running Stream engine for processing. Multiple Stream engines can be running on one host. Transcode engines should not be installed on the SFX-File Manager system (for performance reasons).
• SFX-File Agent: The Agent is installed on the transcode hosts, and acts as a communication conduit between the Stream or Zenium service and the SFX-File Manager. The Agent is constantly in communication with the Manager, reporting on the state of the engines.
• SFX-File Console: The Console is the user interface for the SFX-File Manager. It is used to create resource groups and watch folders, and to monitor the state of tasks and resources. The Console software can be installed on any system in the network, and is unlicensed software. The Console can also be used to launch the Zenium Designer, pulling the required plugins from the Zenium Repository Server. Note that the Zenium Designer is licensed software.
• Zenium Repository Server: Zenium plugin packages are stored in Zenium Repositories. The plugin packages contain the Zenium components used in transcoding tasks as well as the Zenium Designer and Zenium Framework plugins. Transcode host systems include a Zenium Server service. This service communicates with the Zenium Repository Server to acquire the plugin packages needed by the Zenium engine's transcode tasks. When the Console application is used to launch the Zenium Designer, the Console can also communicate with the Zenium Repo to pull the required plugins. The Zenium Repository Server is normally installed on the same host system as the SFX-File Manager. If a Primary and a Backup SFX-File Manager are installed, then normally a Repo would also be installed on the Primary and Backup SFX-File Manager systems.
• Imagine Communications License Server: The License Server controls the authorization of the SFX-File Manager, Zenium Server, Zenium Designer, and the Zenium components contained in Zenium plugin packages. Stream engines are not licensed through the Imagine Communications License Server. Transcode Host systems which will be running Stream Engines will require a license per host system to authorize the Stream engines.

SelenioFlex™ File Users Guide Installation
© 2015 Imagine Communications Corp. Proprietary and Confidential. Version 2.10.0 | Page 10
Installation
System Requirements Operating system: Windows 7, Windows 2008 Server, or Windows Server 2012, 64-bit versions ONLY (the 32-bit version of the OS is not supported).
If you are installing on system that is running Windows Server 2012 please see the Server 2012 section below.
For systems which will run Zenium Engines or the Zenium Designer:
• For Zenium plugins a 64-bit OS with a minimum of 6 GB of RAM is required (8 GB of RAM or more is recommended).
• For Windows Server 2008 or 2012 the Desktop Experience must be installed on systems which will run the Zenium Designer.
• For Windows Server 2008 or 2012 set the Processor Scheduling to "Programs" for good encoding performance.
SFX-File Manager system: The Transcode Manager server is used for messaging beteween Transcode Engines (resources) and to access the database. A multi-core CPU and/or faster CPU is recommended for SFX-File Manager when you expect a high throughput of files (more than 4 source files per minute), or with many Transcode Engines (resources) to manage (more than 10).
For normal operation do not install Transcode Engine software on the same system as the SFX-File Manager system (for performance issues)
Transcode host systems: The speed of the transcode tasks will be directly affected by the speed/number of the host system's CPUs. The faster your Transcode Engine’s CPU, the faster your transcode times will be. Note that some encoders can use multiple cores efficiently, while others cannot. Encoders are updated on a regular basis, so check with Imagine Communications Support if you have a question about a specific encoder and its ability to use multiple cores.
Windows UAC (user account control)
Disable the Windows UAC (user account control) before installing the software. Keep the UAC off when using the software. There is a Disable_UAC.zip file to assist with this, available for download in the same location as the SelenioFlex File software download.
Installing on a system running Windows Server 2012
The software will only install for a local/domain admin user. In order to run the installer the user must explicitly right click on the installer msi file and choose "Install as administrator".
If the right click "Install as administrator" option is not available you must enable a registry setting on your system. To do this, download the Enable_MSI_Run_As_administrator.zip file from Imagine Communications, unzip the reg file to the system, and then double click on the reg file.
SelenioFlex™ File Users Guide Installation
© 2015 Imagine Communications Corp. Proprietary and Confidential. Version 2.10.0 | Page 11
On a Server 2012 system the SelenioFlex Console and Configuration Wizard also need to be run as administrator for full functionality. In particular, if not run as admin:
• Console: log files will not be created. • Config Wizard: the config wizard will not be able to set the services. Reading the HASP will also not
work.
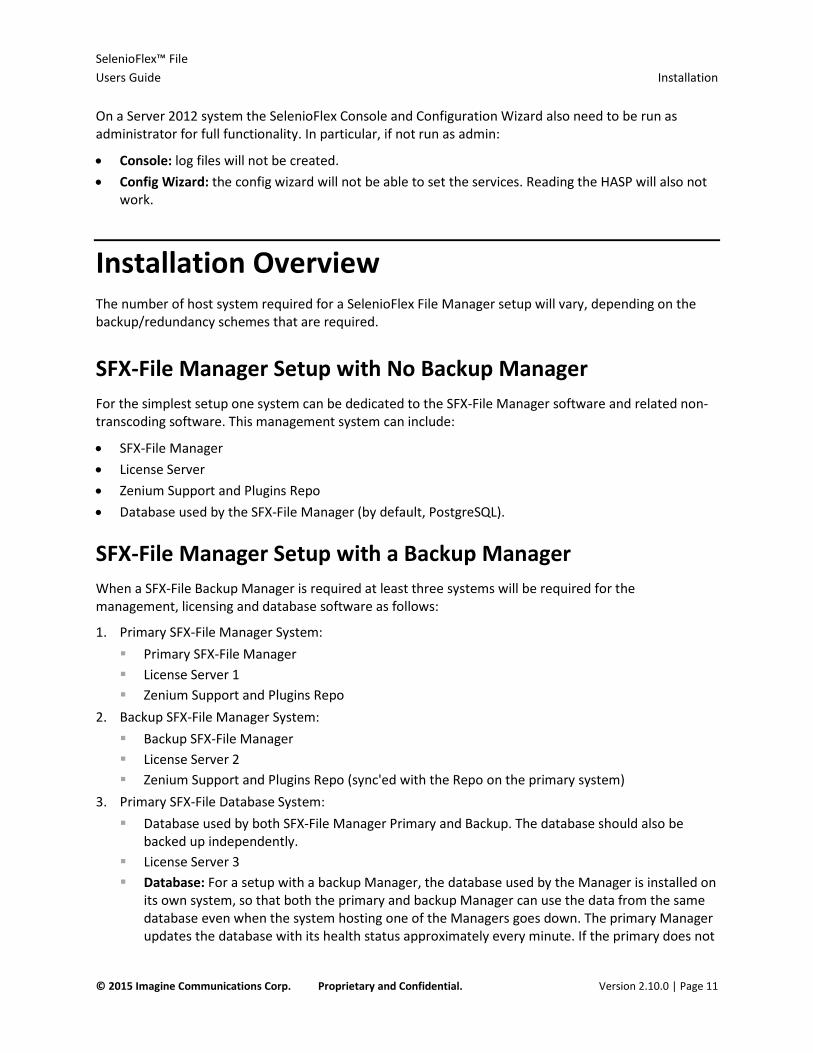
Installation Overview The number of host system required for a SelenioFlex File Manager setup will vary, depending on the backup/redundancy schemes that are required.
SFX-File Manager Setup with No Backup Manager For the simplest setup one system can be dedicated to the SFX-File Manager software and related non-transcoding software. This management system can include:
• SFX-File Manager • License Server • Zenium Support and Plugins Repo • Database used by the SFX-File Manager (by default, PostgreSQL).
SFX-File Manager Setup with a Backup Manager When a SFX-File Backup Manager is required at least three systems will be required for the management, licensing and database software as follows:
1. Primary SFX-File Manager System: Primary SFX-File Manager License Server 1 Zenium Support and Plugins Repo
2. Backup SFX-File Manager System: Backup SFX-File Manager License Server 2 Zenium Support and Plugins Repo (sync'ed with the Repo on the primary system)
3. Primary SFX-File Database System: Database used by both SFX-File Manager Primary and Backup. The database should also be
backed up independently. License Server 3 Database: For a setup with a backup Manager, the database used by the Manager is installed on
its own system, so that both the primary and backup Manager can use the data from the same database even when the system hosting one of the Managers goes down. The primary Manager updates the database with its health status approximately every minute. If the primary does not

SelenioFlex™ File Users Guide Installation
© 2015 Imagine Communications Corp. Proprietary and Confidential. Version 2.10.0 | Page 12
update its status, then the backup Manager will take over until the primary Manager comes online again and updates its status.
Zenium Repo: When setting up a primary and backup Manager each system requires its own Zenium Repo Server installed on the same system as the Manager, and each Repo should have the same partitions with the same versions of the plugins available. The Repo will need to be manually sync'ed each time the primary Repo is updated, so that both Repos have the same versions of the plugins available.
License Server: The redundant License Server setup requires three systems, each with its own Hasp. Two of the three systems must be up and running for an active License Server to be enabled. There is no "primary" license server, instead one is considered "active" and the other two are on standby.
Engines: Transcode Engine host systems should be installed on separate systems from the Management systems. This is for performance reasons, as a transcoding job will attempt to use all of the system's CPU resources for the fastest transcoding results.
Before Running the SFX-File Installer • If you are upgrading from Version 2.5 or earlier then you must uninstall the previously installed
Imagine Communications License Server before installing the new version. • If you are updating from a previous installation that used PostgreSQL 8, and you do plan to use the
default PostgreSQL 9 database that is included with the SFX-File installer, then first change the port that is being used by PostgreSQL 8 from the default port (5432) to a different port. That way the PostgreSQL 9 database that will be installed can use the default port, making setup and subsequent upgrades simpler. The port that is being used can be changed by editing the postgresql.conf file (found in the PostgreSQL data folder). After changing the port number in the config file the Postgres service must be restarted. If you install PostgreSQL 9 without changing the PostgreSQL 8 port, then it will be installed using a different port (normally by incrementing the default port number by 1). If that occurs it is possible to use the non-default port by specifying it in the JDBC URL when using the SFX-File Config Wizard, for example if port 5433 was used, jdbc:postgresql://localhost:5433/SFX.
• If you will be using Zenium Engines you will be able to import the required Zenium Plugins from the Imagine Communications Public Repo or from a zip file. If you plan to use a zip file then download the Zenium Plugins to a drive which is accessible from the system where you will be installing the Zenium Repository Server (normally the same system as the SFX-File Manager).
• If you will be using Stream Engines then use the Stream installer to install the software on the Transcode host systems. Note that a Stream install includes 2 msi files: a side-by-side installer and a Stream application installer.
Before Installing the Management or Agent Software For a SFX-File Manager setup with a Backup Manager and a Redundant License Server you will need to install some components before others. This does not apply to an installation that will not use a Backup Manager or Redundant License server. In that case you can use the standard buttons found on the Installer to install the Management software (which will include the License Sever and Database), then the Agent software, and then the Console software.

SelenioFlex™ File Users Guide Installation
© 2015 Imagine Communications Corp. Proprietary and Confidential. Version 2.10.0 | Page 13
For a SFX-File Manager Setup with a Backup Manager and a Redundant License Server:
• Install the default PostgreSQL database on a different system from the SFX-File Manager. Run the SFX-File installer with the Custom Setup option to install just the default PostgreSQL 9 database before you install the other SFX-File components. In this case the default username and password will be the PostgreSQL default of postgres. Do not change the default username and password set by the installer. When you later install the SFX-File Manager, and run the SFX-File Configuration Wizard on the Manager system, the Config Wizard will configure the remote PostgreSQL 9 database for use with SFX-File, and it will set the username and password to SFX for the SFX-File database. If you are using another supported database, configure it according to the instructions on page .
• Use the SFX-File installer to install the license server on 3 systems. Obtain the license package and load the redundant license package before installing the Management or Agent software.
License Server Installation for a Redundant Setup Obtain the three required Imagine Communications License Server HASPs before you begin the installation. You can also register your product using the "main" HASP ID before you begin the installation, or as a step during the installation, using the Configuration Wizard.
When you use the SelenioFlex File installer to install the "Manager" you will automatically install a License Server as well. For a Redundant Setup you will also have to use the SelenioFlex File installer to install a License Server on a third system (normally the system that also hosts the database).
Once the software has been installed the Configuration Wizard will open to the License Server page. If you have not finished installing all 3 license servers you can close this Wizard. You will be able to re-open it after all 3 license servers have been installed.

SelenioFlex™ File Users Guide Installation
© 2015 Imagine Communications Corp. Proprietary and Confidential. Version 2.10.0 | Page 14
To obtain your license package using the Config Wizard
Click the Read HASP ID button and then click the "Click here to register" link to go to the Product Registration page with your HASP ID filled in. Enter the required information and then click the Submit Registration button. Your license package will be emailed to the email address you specified on the registration form.
If the system you are using cannot connect to the internet, you can use this URL http://bos.digitalrapids.com:13080/regsys/Support_Registration.php to register your product.
Loading the License Package
Click the "Click here to launch the License Server Console" link. You will be asked to provide a password. The default password is "password".
The main page of the License Server Console will be shown with the License Package tab enabled. In the left navigation bar the "Load" option will be selected. In the lower half of the window, in the License Package Load section, you will see a Browse button. Click the browse button, browse to the license package file, and click Open. The license package file name will appear in the box. Click the Load button to load the license package.

SelenioFlex™ File Users Guide Installation
© 2015 Imagine Communications Corp. Proprietary and Confidential. Version 2.10.0 | Page 15
While the package is uploading the status will change to "Load Status: In Progress". Once the package has been loaded the message will change to "License package loaded successfully".

SelenioFlex™ File Users Guide Installation
© 2015 Imagine Communications Corp. Proprietary and Confidential. Version 2.10.0 | Page 16
Additional Instructions for a Redundant License Server Setup When you load a license package for a redundant license server setup, you will see a message telling you that "Backup License Servers must be configured". A "Configure Backup Servers" button will also appear below the "Load" button. Click the "Configure Backup Servers" button.
Enter the IP addresses or host name of all three systems which are hosting the license servers, then click the Update Servers button. The license package will then be pushed to the other two license server systems, and information about all three license servers will be pushed to the applications which contact the active license server.
One of the three license servers will be the currently "active" license server. If the active license server can no longer be contacted, then one of the remaining two license servers will become the active license server. That is, there is no "primary/backup" role as there is with the SFX-File Manager, all of the license servers have equal status, and any of them can take over the "active" server role. At least two of the three license servers must be online in order for one of them to be an "active" license server.
Once the three license servers have come on line you can use the License Server Console to access the Backup Servers page to check the status of the three license servers.
The License Server Console After the license server has loaded the package you can select "Features List" in the left navigation bar to see what has been uploaded to the license server, to verify your license package.

SelenioFlex™ File Users Guide Installation
© 2015 Imagine Communications Corp. Proprietary and Confidential. Version 2.10.0 | Page 17
Note that the "License Server" has been installed as a Windows service running on your system. Should you ever need to restart this service you can launch the "License Server Console" and click on the "Restart Server" button. You can also start and stop this service by launching the Windows Control Panel (Start > Settings > Control Panel), double clicking on Administrative Tools, double clicking on Services, then scrolling down the list of services to the DRC License Server service.
The SelenioFlex File Installer (Windows OS) The installer has different options depending on which component you are currently installing.
Manager Install This option installs the services necessary to run the SFX-File Manager. It also installs the default PostgreSQL database, the Zenium Plugins Repo Server and the License Server. If you do not want to install all of these applications on the same system then use the Custom option instead of the Manager option.
Normally Transcode Engines will not be hosted on the same system as the SFX-File Manager due to potential performance issues. Therefore, normally the Agent software will not be installed on the system hosting the Manager.
If you are using the Custom Setup option for a Manager install, select the following:
• Console (optional, but recommended) • The Agent option will normally be disabled for a Manager install

SelenioFlex™ File Users Guide Installation
© 2015 Imagine Communications Corp. Proprietary and Confidential. Version 2.10.0 | Page 18
• SelenioFlex File Manager • PostgreSQL (only for a non-redundant setup) • Zenium Support (required if you plan to use Zenium Engines) • Zenium Plugins Repo Server (required if you plan to use Zenium Engines) • License Server • Documentation (optional, but recommended)
Console Install This option installs the application which provides the user interface for communicating with the SFX-File Manager to setup and monitor jobs. It can be installed on any system which will be used to access the Manager.
The Console can also be used to launch the Zenium Designer. When the Zenium Designer is launched from the Console it will communicate with the Zenium Plugins Repo Server installed on the Manager system and it will pull the required plugins to the system running the Console.
The Console does not require a license to run, however the Zenium Designer does require a license to run.
To install the console run the installer and select the Console option or select the Custom option and select the following in the Custom Setup:
• Console • Documentation (optional, but recommended)

SelenioFlex™ File Users Guide Installation
© 2015 Imagine Communications Corp. Proprietary and Confidential. Version 2.10.0 | Page 19
Transcode Host System for Stream Engines This option installs the services used by the Transcoding host systems to communicate with the SFX-File Manager and the local engines. Note that for Stream Engines, the Stream Server service is installed with the Stream software install, not with the SelenioFlex File Agent install.
• Install the Side-by-Side (named DRHwAPISharedSxs_version.msi) before installing the Stream software.
• Install the Stream software before installing the Agent. The Stream software installer will also install the Stream Server service.
• Install any media players required by Stream for your codecs. (for example, the QuickTime player is required when using QuickTime source files or output codecs).
Run the SFX-File Installer and either select the Agent option, or select the Custom option. For the Custom Setup select the following:
• Agent
The Agent install will also install the Agent Monitor application. This application can be used to show the status of the Resources on the local host system.
Transcode Host System for Zenium Engines This option installs the services used by the Transcoding host systems to communicate with the SFX-File Manager and the local engines. It also installs a local Zenium Plugins Repo Server and a Zenium Server which is used to communicate with the Manager’s Zenium Plugins Repo Server in order to acquire plugins for the local Zenium Engines.
Run the installer and either select the Agent option, or select the Custom option. For the Custom Setup select the following:
• Agent • Zenium Support • Zenium Plugins Repo
The Agent install will also install the Agent Monitor application. This application can be used to show the status of the Resources on the local host system.
You must also install any media players required by Zenium for your codecs. For example, the QuickTime player is required when using QuickTime source files or some mov outputs.
Configuration Wizard When you are running the installer, after you have selected the components, you will be given the option to "Run config wizard after install." This is recommended. You can also run the Configuration Wizard any time after the installation, in case you need to reconfigure your software. It will be available in the Windows Start menu in the Imagine Communications > SelenioFlex File folder.

SelenioFlex™ File Users Guide Installation
© 2015 Imagine Communications Corp. Proprietary and Confidential. Version 2.10.0 | Page 20
The Configuration Wizard has several steps. Different steps will be shown depending on which components you installed.
License Server If this is a new install you will need to register your product using your HASP ID. You can use the "Click here to register" to take you to the product registration page. Once you have received your license package you can use the "click here to launch the License Server Console" link. You will be asked to provide a password. The default password is password. Use the License Server Console to browse to your license package, and then to load the license package.
For a Redundant License Server setup please see additional instruction in Additional Instructions for a Redundant License Server Setup (on page 16).

SelenioFlex™ File Users Guide Installation
© 2015 Imagine Communications Corp. Proprietary and Confidential. Version 2.10.0 | Page 21
Enter the License Server IP address. Do not use "localhost" even if your license server is on the same system as the SFX-File Manager, as your remote Transcode Host systems will not be able to find the License Server without the IP address.
Enter the License Server Port. Normally you will not change this from the default value of 15000. If you need to change this port then your license package will also need to be modified by Imagine Communications Support.
Click the Test button to verify the connection to the License Server before moving on.
System Address The System Address is the address used to identify the system during SFX-File communications. SFX-File uses the RMI (Remote Method Invocation) address. The options are:
• IP Address. This can be used for systems with a single IP address (e.g., systems with a single network card). If you have more than one IP address assigned to the system (for example, if you have more than one network adapter active in the system) you should not use this option, since any of the active addresses could be picked up, even if they are not the appropriate address.
• Local hostname. This can be used if your network is configured so that machines can be contacted by name.
• Specify a hostname or IP address. Note that if you choose this option and you do specify the hostname/IP address, and at a later date the machine’s address is changed, then SFX-File will not be able to communicate with that system until the Config Wizard is re-run, and the new address is supplied.
• Specify network interface. Select your network interface, and whether or not to use IPv6.
SelenioFlex File Domain Name This Domain name setting is not related to the Windows domain name.
Managers that use a particular SFX-File Domain setting will only be able to control Transcode Resources whose Agent uses the same SFX-File Domain name. This will be useful if you intend to set up more than one SFX-File Manager, each with their own Transcode Resources under their exclusive control. For example, you may want to set up one domain for testing, and a second domain for your day-to-day operations. By giving each Manager/resources group its own domain, they will be isolated from each other.
SelenioFlex File Manager Security SFX-File includes optional Manager security which requires users who attempt to connect to the Manager using the Console to log on with a user name and password. There are 4 pre-defined roles that limit the amount of access that each user has to the Manager. Users with Administrative rights can assign each user a role.
If you do not enable security in this step, then users will be able to connect to the Manager using the Console without providing any authentication.

SelenioFlex™ File Users Guide Installation
© 2015 Imagine Communications Corp. Proprietary and Confidential. Version 2.10.0 | Page 22
Discovery Method The Agents, Consoles and backup Managers use a discovery mechanism to find the SFX-File Managers on the network. By default a multicast method is used.
If the multicast method is not supported on your network, you may specify a unicast list of the SFX-File Managers that can communicate with this system.
Database The settings at the top of the Database page provides the information that the SFX-File Manager needs to communicate with the database.
The default database that is installed by the SFX-File installer is PostgreSQL 9. If you installed this database on the same system as your SFX-File Manager then you can use the defaults provided and the Config Wizard will automatically configure the database.
New Installation: If this is a new installation, then you should click the Test button. This Test will fail, but it will also give you a new "Create New Database" button.

SelenioFlex™ File Users Guide Installation
© 2015 Imagine Communications Corp. Proprietary and Confidential. Version 2.10.0 | Page 23
Click the "Create New Database" button to create a new database using the credentials in the Configuration Wizard (by default: Username and Password are SFXF). After a few seconds you will see a message: Successfully created new database SFXF. If you click the Test button again after this step the test should succeed.
Database on a different system: If you installed the database on a different system than the SFX-File Manager, then you will need to modify the JDBC URL to point to the host system (that is, change localhost to the address of the system hosting the PostgreSQL server, and if the port is not the default port of 5432 then also specify the port, for example, jdbc:postgresql://192.168.0.155:5433/SFXF).
Different Database: If you installed a different database, then you have to install and configure it before you can use the SFX-File Configuration Wizard. Select the type of database from the drop-down list and provide the JBDC URL, the Username and the Password.
Once you have selected your Database and provided the JDBC URL and credentials you can click the Test button to verify that you can connect to the database.
SelenioFlex™ File Users Guide Installation
© 2015 Imagine Communications Corp. Proprietary and Confidential. Version 2.10.0 | Page 24
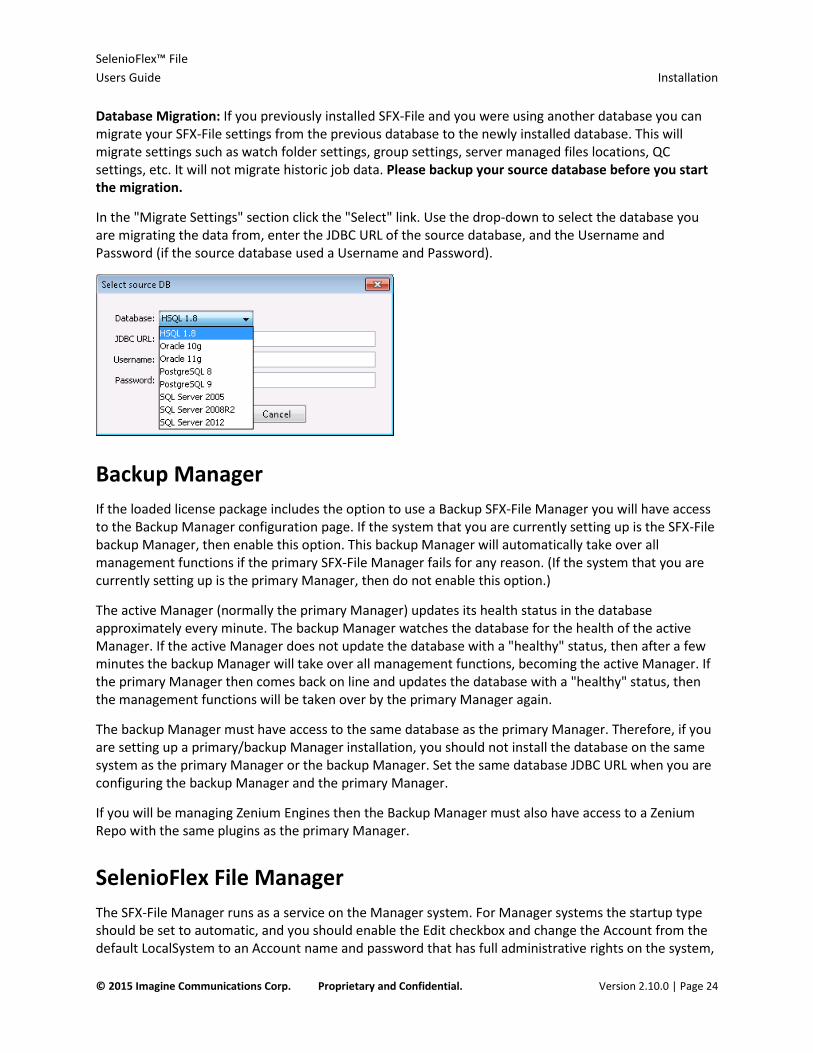
Database Migration: If you previously installed SFX-File and you were using another database you can migrate your SFX-File settings from the previous database to the newly installed database. This will migrate settings such as watch folder settings, group settings, server managed files locations, QC settings, etc. It will not migrate historic job data. Please backup your source database before you start the migration.
In the "Migrate Settings" section click the "Select" link. Use the drop-down to select the database you are migrating the data from, enter the JDBC URL of the source database, and the Username and Password (if the source database used a Username and Password).
Backup Manager If the loaded license package includes the option to use a Backup SFX-File Manager you will have access to the Backup Manager configuration page. If the system that you are currently setting up is the SFX-File backup Manager, then enable this option. This backup Manager will automatically take over all management functions if the primary SFX-File Manager fails for any reason. (If the system that you are currently setting up is the primary Manager, then do not enable this option.)
The active Manager (normally the primary Manager) updates its health status in the database approximately every minute. The backup Manager watches the database for the health of the active Manager. If the active Manager does not update the database with a "healthy" status, then after a few minutes the backup Manager will take over all management functions, becoming the active Manager. If the primary Manager then comes back on line and updates the database with a "healthy" status, then the management functions will be taken over by the primary Manager again.
The backup Manager must have access to the same database as the primary Manager. Therefore, if you are setting up a primary/backup Manager installation, you should not install the database on the same system as the primary Manager or the backup Manager. Set the same database JDBC URL when you are configuring the backup Manager and the primary Manager.
If you will be managing Zenium Engines then the Backup Manager must also have access to a Zenium Repo with the same plugins as the primary Manager.
SelenioFlex File Manager The SFX-File Manager runs as a service on the Manager system. For Manager systems the startup type should be set to automatic, and you should enable the Edit checkbox and change the Account from the default LocalSystem to an Account name and password that has full administrative rights on the system,

SelenioFlex™ File Users Guide Installation
© 2015 Imagine Communications Corp. Proprietary and Confidential. Version 2.10.0 | Page 25
with read/write access to any network file shares to be used as watch folders or for other required files, such as projects, source media or output directories.
SNMP Monitoring If you plan to use SNMP (Simple Network Management Protocol) to monitor your SFX-File Manager system, then you will need to enable and configure this component.
If you would like to use an HTML Adaptor to use an html browser to monitor SNMP variables, then you can enable this component and set a port.
Stream Server The Stream Server runs as a service on the Agent Host systems which have Stream resources. For resource systems the startup type should be set to automatic, and you should enable the Edit checkbox and change the Account from the default LocalSystem to an Account name and password that has full administrative rights on the system, with read/write access to any network file shares to be used as watch folders or for other required files, such as projects, source media or output directories.
Zenium Server The Zenium Server runs as a service on the Agent Host systems which have Zenium resources. For resource systems the startup type should be set to automatic, and you should enable the Edit checkbox and change the Account from the default LocalSystem to an Account name and password that has full administrative rights on the system, with read/write access to any network file shares to be used as watch folders or for other required files, such as blueprints, source media or output directories.
Zenium Plugins Zenium Plugins are required by Agent Host systems which will have Zenium resources, and also by systems which will run the Zenium Designer to create Transcode Blueprints.
The SFX-File installer does not include any Zenium Plugins. The Configuration Wizard provides two methods of importing plugins.
Import from Repo:
You can import plugins from another repository. By default the URL that is displayed will be the Imagine Communications public repo: http://resources.myimagine.com:42100.
SelenioFlex™ File Users Guide Installation
© 2015 Imagine Communications Corp. Proprietary and Confidential. Version 2.10.0 | Page 26
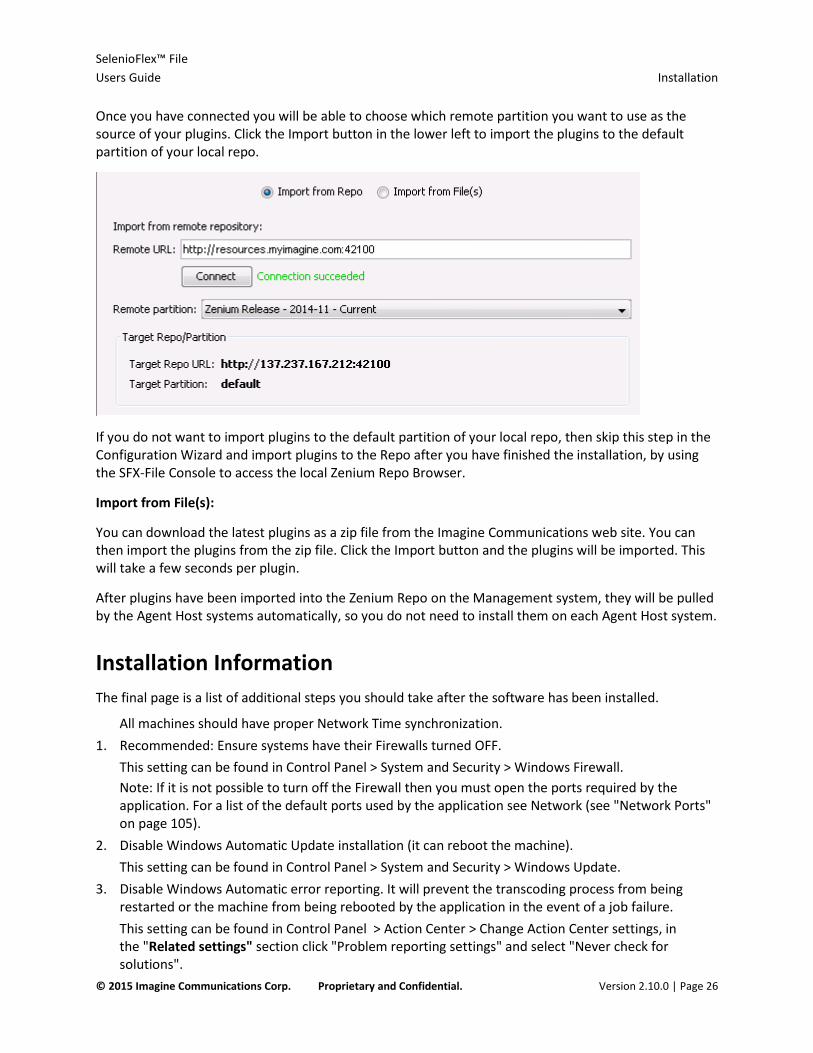
Once you have connected you will be able to choose which remote partition you want to use as the source of your plugins. Click the Import button in the lower left to import the plugins to the default partition of your local repo.
If you do not want to import plugins to the default partition of your local repo, then skip this step in the Configuration Wizard and import plugins to the Repo after you have finished the installation, by using the SFX-File Console to access the local Zenium Repo Browser.
Import from File(s):
You can download the latest plugins as a zip file from the Imagine Communications web site. You can then import the plugins from the zip file. Click the Import button and the plugins will be imported. This will take a few seconds per plugin.
After plugins have been imported into the Zenium Repo on the Management system, they will be pulled by the Agent Host systems automatically, so you do not need to install them on each Agent Host system.
Installation Information The final page is a list of additional steps you should take after the software has been installed.
All machines should have proper Network Time synchronization. 1. Recommended: Ensure systems have their Firewalls turned OFF.
This setting can be found in Control Panel > System and Security > Windows Firewall. Note: If it is not possible to turn off the Firewall then you must open the ports required by the application. For a list of the default ports used by the application see Network (see "Network Ports" on page 105).
2. Disable Windows Automatic Update installation (it can reboot the machine). This setting can be found in Control Panel > System and Security > Windows Update.
3. Disable Windows Automatic error reporting. It will prevent the transcoding process from being restarted or the machine from being rebooted by the application in the event of a job failure. This setting can be found in Control Panel > Action Center > Change Action Center settings, in the "Related settings" section click "Problem reporting settings" and select "Never check for solutions".

SelenioFlex™ File Users Guide Installation
© 2015 Imagine Communications Corp. Proprietary and Confidential. Version 2.10.0 | Page 27
4. Disable Windows User Account Control (UAC). This setting can be found in Control Panel > System and Security > Action Center > Change User Account Control settings. Move the slider to "Never notify". Use UNC paths (e.g., \\hostname\dir\file) for watch folders and output files.
When you finish the final step, if you changed any of the service settings (e.g., username and password) you will be asked if you want to start/restart the services that changed. This is necessary in order to use the new settings, so select Yes.
On Agent systems the Imagine Communications Agent Monitor will also be installed. Until you finish configuring the services the Monitor will not be able to contact the Agent, but once you have set up the services correctly the Agent Monitor should automatically detect your resources and show their status. (Zenium resources will also have to be added to each Agent system using the SFX-File Console before they will be shown by the Agent Monitor.)
Managing the Services Normally you will set up the required services using the Configuration Wizard as part of the installation process. This section describes how to check on the installed services, and manually change them if needed.
Open the Control Panel, click on Administrative Tools and double click on Services.

SelenioFlex™ File Users Guide Installation
© 2015 Imagine Communications Corp. Proprietary and Confidential. Version 2.10.0 | Page 28
If the SFX-File Manager is installed and configured you will see the following Services with their status set to "started" and startup type set to "automatic":
DRC Kayak Server DRC RMI Registry Jini Services SelenioFlex File Manager postgresql-9.2 – PostgreSQL Server (if you installed the default database on the system)
If you installed the Imagine Communications License Server on this system, then you will also see:
DRC License Server
If you installed the Zenium Plugins Repo Server on this system, then you will also see:
DRC Kayak Plugins Repo Server (required if Zenium Engines will be used)
If the Agent and Transcode software is installed and configured on the transcode host system you will see the following Services with the status set to "started" and startup type set to "automatic":
SelenioFlex File Agent DRC RMI Registry DRC Kayak Server (required if Zenium Engines will be used) DRC Stream Server (required if Stream Engines will be used) DRC Hypersonic (required if Stream Engines will be used)
In the "Log On As" column, these services must use an account that has administrator privileges on the local system and appropriate network privileges (not Local System) with the exception of the PostgreSQL Server service. The PostgreSQL Server service should NOT be set to use an administrator account, it should use either a non-admin account or the Network Service account.

SelenioFlex™ File Users Guide Installation
© 2015 Imagine Communications Corp. Proprietary and Confidential. Version 2.10.0 | Page 29
If you need to change the Log On information, you can run the SFX-File Configuration Wizard again at any time. Alternatively, you can find the service entry and double click on it to open the Properties panel for that service.
On the Log On tab, Select "This account". For all services except the PostgreSQL service enter a username and password that has administrator privileges on the local system and appropriate network privileges. This account will need to have Read and Write permission on the Network Shares where your watch folders and other required files used by the transcode tasks (for example, graphics, source files, etc.) will be located.

SelenioFlex™ File Users Guide Installation
© 2015 Imagine Communications Corp. Proprietary and Confidential. Version 2.10.0 | Page 30
For the PostgreSQL service use a non-admin account or the Network Service account.
If your computer is connected to the Network as part of a Domain, then you will need to enter your domain\username. If your computer is connected to the Network as part of a Workgroup, then you will need to enter hostname\username.
Note that if you are connected as part of a Workgroup, it is possible that the "Full Name" being used by your computer was changed after it was set up. In order to start and stop services, you will have to Log On using the original Name. To see the original user name, right click on My Computer and choose Manage. Expand Local Users and Groups, and click on the Users folder. This will show you the user Name and the Full Name (or alias) on this local system.

SelenioFlex™ File Users Guide Installation
© 2015 Imagine Communications Corp. Proprietary and Confidential. Version 2.10.0 | Page 31
If you have administrator privileges, you can also right click on the user, and use the "Rename" option to make the Name match the Full Name.
If you make any changes to the services, you will need to restart the service for the changes to take effect. If you are manually stopping and starting services on the SFX-File Manager system, please note that the DRC RMI Registry service must be started before the SelenioFlex File Manager service.
You can also configure and start/stop the DRC Kayak Server service and the DRC Stream Server service remotely, using the SFX-File Console software.
Launch the SFX-File Console software. When you launch the software you will be able to select your Manager from a list of the "Found Managers", and then click the Connect button. Once the Console software has successfully connected to the Manager, you will see a tabbed interface. Select the Agents tab, or if it is not showing use the main menu and select Manager > Agents. This will show you a list of all of the systems with Agents that the Manager can detect. Click on an Agent system to select it (or multi-select many Agent systems to change them all at once). The buttons used to access the services are found to the right of the window.

SelenioFlex™ File Users Guide Installation
© 2015 Imagine Communications Corp. Proprietary and Confidential. Version 2.10.0 | Page 32
Click the Configure Stream Service or Configure Zenium Service.
• For the Startup type choose Automatic. • Enable the Edit box • For Account enter a username (e.g., domain\username if you are part of a network domain, or
hostname\username if you are part of a workgroup) and password that has administrator privileges on this machine. For SFX-File this account will also need to have Read and Write permission on Network Shares where the required files will be located.
• Click the Save button. The service will be restarted automatically as a background task. It may take a few seconds for the changes to be made.
Licensing The SFX-File Manager and Transcode Hosts which use Zenium engines use the Imagine Communications License Sever. The License Server requires a USB HASP. The HASP ID is used in the corresponding License Package file.
The License Package file includes the following SFX-File Manager features:
• SelenioFlex File – Authorizes the SFX-File Manager service to run. • Backup Manager Enabled – Enables a SFX-File Backup Manager to run. • Zenium Enabled – Enables the Zenium Transcode Resource role. When this is not enabled you
cannot create a Zenium transcode group. • Zenium Server – The service used to monitor and control Zenium Engines. This service can also be
used by the SFX-File Manager when making any required modifications to a Blueprint before running a transcode task.
• Zenium Run Designer SFXF – This feature allows the Zenium Designer to be launched from the SFX-File Console. A standard SFX-File license includes one instance of this feature. Note that this feature allows you to create and save Zenium Transcode Blueprints. In order to run the Blueprint additional features are required.
SelenioFlex™ File Users Guide Installation
© 2015 Imagine Communications Corp. Proprietary and Confidential. Version 2.10.0 | Page 33
• Stream Transcode Resource – When a Stream resource is brought online it will acquire this feature (and a Stream resource which is taken offline will release this feature). The maximum number of instances of this feature is the maximum number of simultaneous Stream Transcode Resources that can be managed by TS.
• Note that the maximum number of Zenium Resources that can be running a job is licensed in the Zenium Engine. (See next section)
Licensing for Zenium Engines The License Package file includes the following Transcode Host system features for systems with Zenium Engines:
• Zenium Server – Authorizes the service that communicates with the SFX-File Agent and the Zenium Repo Server. This service is also used to monitor and control Zenium Engines.
• Zenium Framework – The core Zenium Blueprint/graph execution libraries. • SFXF Zenium Transcode Job – This feature is only acquired by a Zenium Engine when SFX-File
attempts to start a transcode job. The Zenium Engine also must acquire a Zenium Run Graph feature to authorize a graph or blueprint to run. The maximum number of instances of this feature is the maximum number of simultaneous Zenium Transcode Tasks that can run.
• Zenium Components – Many Zenium components require a license to be acquired before a graph or blueprint which includes the component can be run. (e.g., encoders, decoders, muxers, processors, etc.)
Licensing for Stream Engines Transcode Hosts which use Stream engines each require either their own license file (a system registry key) or a dedicated hasp per system.
If the Transcode Hosts for Stream engines use a license key rather than a hasp, you must know the system ID for each system. You can obtain the system ID for all installed host systems using the SFX-File Console application.
To obtain the system ID launch the SFX-File Console Software. Select your Manager from the list of the "Found Managers", and then click the Connect button. If you set up SFX-File Manager Security you will have to enter your username and password.
Once the Console software has successfully connected to the Manager, you will see a tabbed interface. Use the main menu and select Manager > Agents. This will show you a list of all of the detected systems with Agents. Click on an Agent system to select it (or multi-select many Agent systems to change them all at once). Click the "Copy System ID" button found to the right of the window. This will copy the system IDs to the system clipboard. Move your cursor to a text editor or email, and press Ctrl V to paste the list. Email the list to Imagine Communications Support, indicating that this is for a Stream Transcode Engine. This information can then be used to create a license for each Stream Transcode Engine.
When you contact Imagine Communications Support for Stream Engine licenses be sure to indicate how many instances of the Stream Transcode Engine software will be run on each system. You must run at least one instance, but you can license more instances to run on one system. Depending on the codecs you plan to use, one or two Transcode Engines per Agent system will generally be sufficient to achieve maximum efficiency.

SelenioFlex™ File Users Guide Installation
© 2015 Imagine Communications Corp. Proprietary and Confidential. Version 2.10.0 | Page 34
Once you receive the license key, you will need to copy the file to the system with the matching system ID, rename it from *.txt to *.reg, and then double click on the *.reg file. You will then need to reboot the Transcode Host system to restart all the DRC services.
Additional Installation Notes Networking The Agent and Console locate the Manager using a Multicast discovery mechanism by default. If the machines are on different subnets, then the networking equipment in between will need to propagate multicast traffic in order for the automatic discovery to work. If this is not an option, you should use the Configuration Wizard to configure the system for unicast communication. See Discovery Method (on page 22).
Note after installing the software you can run the Configuration Wizard again without running the installer using the shortcut found at Start > All Programs > Imagine Communications > SFX-File > SFX-File Config Wizard.
Firewalls and Network Ports The Zenium Plugins Repo Service acquires and delivers plugins using HTTP, even when the import is from a local folder to a local Repository. If a firewall is on then it will block this plugin delivery. If the connection is blocked for more than 30 seconds then you will see an error in the Repo Browser indicating that the "Download failed" and the "Read timed out". If the Repo cannot acquire plugins then you will not be able to launch the Zenium Designer or be able to run Zenium Engines.
SFX-File uses a number of ports for communication between other components as well. If all of the systems in a SFX-File installation are installed on a LAN with unrestricted communication between systems (no firewall, or firewall turned off), then you will not need to worry about which ports are being used.
However, if you cannot turn off the firewall then some ports will need to be opened for communication. Depending on which components have been installed, and which functionality is desired, different ports will need to be opened. See Network (see "Network Ports" on page 105) for detailed information on the ports used for each service component.
Paths and Permissions for Output and Watch Folders • Use of UNC paths is strongly recommend (e.g. \\host\dir\file) for folders and output files. That is, do
not use Mapped Network Drive letters when specifying a path. • If watch folder files are not "seen" by the Manager (shown by moving the files to a Processing
subfolder), ensure that the Manager can see the watch folder (the path is valid and accessible). Also ensure that the DRC services are running as an appropriate network enabled user on the SFX-File Manager system and that the DRC services are running as an appropriate network enabled user on the Transcode Host systems.
SelenioFlex™ File Users Guide Installation
© 2015 Imagine Communications Corp. Proprietary and Confidential. Version 2.10.0 | Page 35
• If the files that you place in the watch folder are "seen" by the Manager (shown by moving the files to a Processing subfolder inside the watch folder), but the projects fail immediately, check that the output file paths are valid (e.g., UNC paths that are accessible).
Upgrading SelenioFlex File Software Before you upgrade to a new build please read the Readme file for the build’s release notes. There may be instructions about incompatibilities between builds, or instructions for migrating data, or other critical information.
The License Server as of Version 2.6 The license server is included in the SelenioFlex File installer as of version 2.6. If you are upgrading from an earlier version you must uninstall any previously installed License Server which was installed using the stand alone License Server installer.
Note that uninstalling the License Server will not delete any previously loaded license package. It will still be available after you have installed the new version.
Installing New Builds on the SFX-File System Before installing a new build you must uninstall the old build and reboot your system. Do not skip the reboot step. You must reboot, as some services will only be fully uninstalled the next time you reboot. If you do not reboot, this "uninstall on next reboot" command will still be present, and the new installation will have critical files removed the next time you reboot.
To uninstall the software when using Windows 7, use the Control Panel’s "Programs and Features" function to uninstall the Imagine Communications SFX-File software.
Uninstalling the Imagine Communications SFX-File software will not remove your settings or database. If you plan to migrate data from a previous database to a new database, you should not uninstall your database software until the data migration step has completed. The SFX-File Configuration Wizard includes a "Migrate Data" function, to allow you to migrate data from an existing SFX-File database to a new database.
Note: Using an embedded Hypersonic database is no longer supported, so if you were using the Hypersonic database you must update your database in order to use SelenioFlex File.
Installing New Builds on Transcode Host Systems Once you have upgraded the SFX-File Manager to version 2, and at least one Console to 2, you will be able to manage remote upgrades of Transcode Host systems running on a Windows OS from the Console.
Note that after installing the Zenium Server services you must still configure the service on each host system.
See Remote Software Upgrades (on page 86) for more information.

SelenioFlex™ File Users Guide Getting Started
© 2015 Imagine Communications Corp. Proprietary and Confidential. Version 2.10.0 | Page 36
Getting Started After installing the required software follow these basic steps to get started. For a more complete Getting Started guide please see the SelenioFlex File: Getting Started guide (available from the SFX-File's Console's Help menu).
You must load Zenium Plugins into the Zenium Repo before you can use Zenium Resources. If you did not load plugins during the install, you can load them using the Zenium Repo Browser.
Create the Zenium Blueprint or Stream Project SFX-File tasks use Zenium blueprints or Stream projects to define the transcoding task.
You create Zenium blueprints using the Zenium Designer. This can be launched from the SFX-File Console using the Transcode > Zenium Designer menu item. A SFX-File purchase includes a license for one instance of the Zenium Designer. See Zenium Transcode Blueprints (on page 39) for a basic guide to creating a Zenium blueprint, or the Zenium Designer User's Guide for more details.
You can create a Stream project by running a licensed version of the Stream software. See Stream Projects for SelenioFlex File (on page 60) for a basic guide to creating a Stream project, or the Stream Software User’s Guide for more details.
Once you have created a blueprint or a project, save it to a shared location that can be accessed by all of the Transcode Engine systems and by the SFX-File Manager.
Make sure that all of the source files required by the transcode task are also in a shared location that can be accessed by all of the Transcode host systems and by the SFX-File Manager.
Launch the SFX-File Console Launch the SFX-File Console software. When you launch the software you will be shown a list of the "Found Managers". (There may only be one Manager for your organization, or there may be many, depending on your setup.) Select your Manager and then click the Connect button.
Once you are connected you will see a tabbed interface that gives you access to all of the management features of the SFX-File Manager. If the tabs you need are not displayed in your SFX-File Console, right click on the tab bar, unlock the tab bar and add the tabs.
Resources and Groups Each host can have one or more instances of a Stream or Zenium engine.

SelenioFlex™ File Users Guide Getting Started
© 2015 Imagine Communications Corp. Proprietary and Confidential. Version 2.10.0 | Page 37
Stream Resources
Each Stream resource is a running instance of a Stream engine that will process all the Stream projects that are assigned to it. If a licensed Stream resource is listed as offline or missing an encoder, right click on the resource and select "bring online".
Zenium Resources
The number of resources that can run on a host is configured through the Console's Agents tab. In the Agents tab select the host system you wish to configure and click on "Add Zenium Resources..." in the right hand menu. Add the desired number of Zenium resources and save. These resources will be added to the existing number of Zenium resources on the host.
The total number of Zenium resources that can be running a job at one time in the SFX-File farm is limited by the number of Zenium licenses available in the license pool.
Resource Groups
Resources are organized into groups. A group consists of only Zenium or only Stream resources.
To create a new group, go to the Groups tab in the SFX-File Console. In the right hand menu, select "New Group..." Provide a name and a role for the group, either Zenium Transcode role or Stream Transcode role (depending on the type of resources in the group).
Zenium Resources also have a field where you can specify the "Zenium Repository Partition". If this is left blank then the default partition will be used.
Once you have created your resource groups, drag and drop unassigned resources into the appropriate group. Each resource can only belong to one group. A resource can be removed from a group by dragging it back into the unassigned resources area.
Creating a Watch Folder Create a watch folder by going to the SFX-File Console’s Watch Folders tab and selecting "New" from the bottom left-hand menu to create a new watch folder template.
In the watch folder template panel (the right-hand panel):
• Use the Add Folder button to specify the location of the watch folder. • Use the Resources drop-down menu to specify whether the watch folder will use Zenium or Stream
resources. • Use the drop-down Groups menu to select a group. • Add a Stream project or a Zenium blueprint to associate it with your watch folder. If projects or
Blueprints were previously loaded in SFX-File they will be available in the drop-down list.

SelenioFlex™ File Users Guide Getting Started
© 2015 Imagine Communications Corp. Proprietary and Confidential. Version 2.10.0 | Page 38
Input to a Watch Folder
Media files used as input to a Stream project or Zenium blueprint can be dropped into a watch folder. Watch folders also accept xml files that contain either Clip Lists (for Stream) or transcode requests (for Zenium or Stream).
When a file is dropped in a watch folder, SFX-File will move the file to the Processing subdirectory. SFX-File will then move the input file to the Complete, Failed or Cancelled sub-directory as appropriate.
If the input file is invalid then SFX-File will not create a transcode task, but will instead generate an alert which can be viewed in the Alerts tab in the SFX-File Console.
Output Files and Assets Zenium transcode tasks outputs are assets. Each asset can consist of several files that are managed as a single associated set of files by SFX-File.
Zenium blueprints and Stream projects define the location of a transcode task’s output file or files. The watch folder also has options to set a Move-To or a Write-To location. If these are specified they will overwrite the blueprint or project's output location.
Monitoring Transcode Tasks Tasks can be monitored using the SFX-File Console's Transcode Tasks tab. Tasks are shown in the left-hand pane, while details of the selected task are shown in the right-hand pane.

SelenioFlex™ File Users Guide Zenium Transcode Blueprints
© 2015 Imagine Communications Corp. Proprietary and Confidential. Version 2.10.0 | Page 39
Zenium Transcode Blueprints Transcode tasks that run on Zenium Engines are configured using Zenium blueprints. Zenium Transcode Blueprints are created using the Zenium Designer.
• The Zenium Designer uses Zenium Plugins which are downloaded automatically from the main Zenium Repository. If your Zenium Designer will not launch verify that the Zenium Repository does include Zenium Plugins by selecting Manager > Zenium Repo Browser from the Console menu. If the plugins have not been loaded you can do so in the Plugins Repository Browser selecting Plugin > Add Plugins from the menu. See Zenium Plugins Repository (on page 63) for more information.
• When you launch Zenium Designer from the SFX-File Console a new "Transcode Blueprint" will be opened by default. You must use a "Transcode Blueprint" to configure SFX-File tasks. You cannot use a standard blueprint for this purpose.
• A standard SFX-File license includes one Zenium Designer license. If someone else is already running the application you will not be able to launch it (unless you purchase additional Zenium Designer licenses). To see which system is currently running the Zenium Designer go to the Licenses tab and hover your mouse over the "Zenium_Run_Designer" feature. A tooltip will show you the host name of the system that is using the feature.
When you are using Zenium Designer to create a blueprint for use with SelenioFlex File, you must use the "Transcode Blueprint" option. Transcode Blueprints include properties, inputs, and outputs that allow them to fully integrate with SelenioFlex File.
Transcode Blueprint Creation Overview Each step is described in the following sections.
1. Open a new Transcode Blueprint in the Zenium Designer. 2. Configure the blueprint properties:
a. Set the Primary Source File property (does not apply when using the Extended Clip List schema). This should be a representative file as it will be used to populate the output pins for the source.
b. Set the Output Folder Variable property. This value can be used by other components to set the output write directory.
3. Add an input component:

SelenioFlex™ File Users Guide Zenium Transcode Blueprints
© 2015 Imagine Communications Corp. Proprietary and Confidential. Version 2.10.0 | Page 40
a. If the input will always only be one file, add the Media File Input component. Connect the blueprint’s Primary Source File pin to the Media File Input component’s Filename input pin.
b. If the input may be a Clip List, add the Clip List Source component. Connect the blueprint’s Clip List XML pin to the Clip List Source component’s Clip List XML input pin.
4. Create the graph using the output of either the Media File Input or Clip List Source component. For each output file created, add an output component. The type of output component added will depend on the type of output files that will be created, for example, this could be a File Output component for a single mp4 file output, or an HLS Coordinator for HLS outputs, or a Smooth Streaming Coordinator for Smooth Streaming outputs. Set each output component’s output file path using a UNC path.
5. If only one output asset will be created by the blueprint, connect the output of each File Output component’s Write Complete pin to the blueprint’s Output File/Asset pin. "Assets" are used to track information about the output files in the SelenioFlex File database. They are not the actual output files. If more than one output asset will be created, add Asset Piece Builder and Asset Builder components: a. Add one Asset Builder component for each asset that will be created. b. Add one Asset Piece Builder for each File Output Component. c. Configure each Asset Builder’s Asset Name property. d. Connect each File Output component to an Asset Piece Builder component and configure the
Asset Piece Builder’s Asset Type and Asset Piece Name properties. e. Connect each Asset Piece Builder component’s output to the appropriate Asset Builder
component. f. Connect the output of each Asset Builder component to the blueprint’s Output File/Asset pin.
6. Save the blueprint.
Launch Zenium Designer Launch the SFX-File Console and select Transcode > Zenium Designer from the main menu. The Zenium Designer will open with a new Transcode Blueprint.

SelenioFlex™ File Users Guide Zenium Transcode Blueprints
© 2015 Imagine Communications Corp. Proprietary and Confidential. Version 2.10.0 | Page 41
To open a new Transcode Blueprint in the Zenium Designer SE, under the File menu select New Workspace, then select Transcode Blueprint.
Saved blueprints and graphs can be opened using the Blueprints and Graphs menu in the left hand side of the Zenium Designer. Double clicking or dragging a blueprint (a .zenium file) to the workspace will open it in a new workspace. Double clicking on a graph (a .graph file) will open it in a new workspace, while clicking and dragging it to an existing workspace will add it to that workspace. You can also add a graph to an open blueprint by right-clicking on the blueprint and selecting Import Graph. New, empty subgraphs can be added to the blueprint by right-clicking on the blueprint and selecting Add Container, followed by Zenium Graph.
Zenium Blueprint, Graph and Component Basics Zenium blueprints provide a way to decompose problems into their core elements. Each core element is represented by a component. A collection of components is shipped with Zenium. Additional components can be purchased from Imagine Communications.
Components are added to the blueprint by dragging and dropping them from the Repository menu in the left hand side of the Zenium Designer to the Workflow area in the center of the interface.

SelenioFlex™ File Users Guide Zenium Transcode Blueprints
© 2015 Imagine Communications Corp. Proprietary and Confidential. Version 2.10.0 | Page 42
Components are connected through their input and output pins to create Zenium graphs that represent workflows. Graphs are created within blueprints. Blueprints are saved to .zenium files and used by applications such as SelenioFlex File.
Data passes between connected components in the form of raw data and metadata describing the raw data.
Component, graph, and blueprint configuration is performed through properties. Properties modify component, graph, and blueprint behavior, such as how data is processed and saved. Component properties can be exposed at the graph or blueprint level to help with configuration. Exposing properties this way clarifies which properties are needed for the proper execution of the workflow. Selecting the component, graph, or blueprint will display its properties in the right side panel of the Zenium Designer. Clicking the blue "i" button or double-clicking on a component, graph, or blueprint displays its properties in a pop-up window.
A property value is saved with a blueprint unless the property is defined as transient. Normally transient values are read-only values for such things as status, or values that are derived from other components, for example, type of frame currently being encoded during an MPEG encode. To determine whether a property is transient, click on the square next to the property and select View Definition to open the property definition. If the property is transient, the Transient attribute box will be checked.

SelenioFlex™ File Users Guide Zenium Transcode Blueprints
© 2015 Imagine Communications Corp. Proprietary and Confidential. Version 2.10.0 | Page 43
Blueprint Properties Transcode Blueprints have the following exposed properties:
Property
Description
Name Blueprint name. The blueprint can be referred to by this name in property paths. This name will also appear at the top of the blueprint window.
Transcode Request XML Transcode request, in xml. The Clip List XML and/or Primary Source File properties are populated using the Transcode Request XML property value. An xml transcode request is generated when a media file or Clip List is dropped into the blueprint’s watch folder, or when a transcode request is submitted to the blueprint using the Transcode WSDL API.

SelenioFlex™ File Users Guide Zenium Transcode Blueprints
© 2015 Imagine Communications Corp. Proprietary and Confidential. Version 2.10.0 | Page 44
Primary Source File Source file used for configuration. When designing the blueprint, setting the source file generates a Clip List. The Primary Source File and the generated Clip List are used to configure the Media File Input and Clip List Source components, respectively. When a transcode task is submitted the Primary Source File is extracted from a transcode request. Primary source file does not apply when using the Extended Clip List schema.
Clip List XML Transient The Clip List, in xml format. A simple Clip List is automatically generated when a Primary Source File is set. This is to assist when designing the blueprint. (Note that setting the Clip List in the blueprint will not populate the Primary Source File property.) When a Clip List file is submitted as a transcode task the Clip List XML in the blueprint will automatically be replaced by the Transcode Request in the Clip List.
Output Folder Variable A UNC path to a directory that can be used for output files. A default value can be set and saved in the blueprint. It can be overwritten by values set in the transcode request xml. This value will not be used automatically by the File Output component. The File Output component can use the following expression to get the value from the blueprint: ${ROOT_outputWriteDirectory}
Default Asset Name The name of the output asset that is created when output files are sent directly to the blueprint’s output pin. Set to DEFAULT by default. This property is overwritten by values set in the transcode request xml.
Monitor Progress
Flag indicating whether the blueprint’s progress will be monitored by SelenioFlex File. Set by default.
Inactive Timeout Only applies if the Monitor Progress property is set. If the blueprint has not progressed within the timeout, it will be considered hung and terminated. An error will be generated. Duration is in seconds. Set to 60s by default.
Blueprint Base Name Transient The base name of the blueprint file name. Automatically extracted from the blueprint’s file name.
Blueprint Start Date Transient The start date of the blueprint. Automatically populated when the blueprint starts running.
Blueprint Start Time Transient The start time of the blueprint. Automatically populated when the blueprint starts running.

SelenioFlex™ File Users Guide Zenium Transcode Blueprints
© 2015 Imagine Communications Corp. Proprietary and Confidential. Version 2.10.0 | Page 45
Source File Base Name Transient The base name of the primary source file. Automatically extracted from the Primary Source File.
Source File Filename Transient The full filename, including path, of the primary source file. Automatically extracted from the Primary Source File.
Source File Directory Transient The directory path of the primary source file. Automatically extracted from the Primary Source File.
Source File Extension Transient The extension of the primary source file. Automatically extracted from the Primary Source File.
SFX-File Host The SelenioFlex File Manager server host to use when submitting a transcode request when submitting from the Zenium Designer. This value is saved and can be accessed from a drop-down menu in subsequent uses of the Zenium Designer. See .
SFX-File Port The port to use when connecting to the SelenioFlex File Manager server. Defaults to 44000. This value is saved with the SFX-File Host value, and can be accessed from a drop-down menu in subsequent uses of the Zenium Designer.
Group The Transcode Group to use to process the submitted transcode request. This value is saved with the SFX-File Host value, and can be accessed from a drop-down menu in subsequent uses of the Zenium Designer.
Write To A UNC path to a directory that will be used to write output files when the transcode request is submitted through the Zenium Designer. Output files are written to this directory only when submitting the transcode request to SelenioFlex File through the Zenium Designer. This value is saved with the SFX-File Host value, and can be accessed from a drop-down menu in subsequent uses of the Zenium Designer.
Move To A UNC path to a directory to which output files will be moved. Output files are moved to this directory only when submitting the transcode request to SelenioFlex File through the Zenium Designer. This value is saved with the SFX-FILE Host value, and can be accessed from a drop-down menu in subsequent uses of the Zenium Designer.
Priority Task priority to use when submitting the transcode request

SelenioFlex™ File Users Guide Zenium Transcode Blueprints
© 2015 Imagine Communications Corp. Proprietary and Confidential. Version 2.10.0 | Page 46
to SelenioFlex File through the Zenium Designer. This value is saved with the SFX-FILE Host value, and can be accessed from a drop-down menu in subsequent uses of the Zenium Designer.
Expression Editor Properties can be used to set other properties using the Expression Editor. The Expression Editor is accessible through the property menu.
To set a property’s value using another property, click on the square next to the property input box and select the Expression option to bring up the Expression Editor.
Typing "$" into the Expression Editor will bring up a menu of all accessible properties. Select a property to use its value in an expression.
The expression will be evaluated using the values of the properties referenced in it. If a property used in an expression is not set, an error will occur and the blueprint will not run.
Exposing Component Properties Components and graphs within a blueprint can be configured through their properties. When a graph or component property is not expected to change from one execution of the blueprint to the next, it can be set and saved with the blueprint.
Component and graph properties can be modified in a transcode request by providing the component path to the property. A component or graph property that is expected to be modified by a user can be exposed at the blueprint level.
To expose a property at the blueprint level, click on the square next to the property to bring up the property menu and select Publish.
Select the level where the property will be exposed. The "Root Graph" refers to the blueprint level.

SelenioFlex™ File Users Guide Zenium Transcode Blueprints
© 2015 Imagine Communications Corp. Proprietary and Confidential. Version 2.10.0 | Page 47
Select a group for the property or enter a new group name for this property. Placing published property in a separate group differentiates them from the blueprint’s own properties.
The property’s published name is used to reference the property in a transcode request. Changing a property’s published name is useful when there is more than one property with the same name published to the same level.
Once the property has been published, it will be displayed at the blueprint level. Changing the published property at the blueprint level will automatically change it in its component, and vice versa.
In the example below, the Channel Preset and Chanel 1 Speaker properties have been published from the Speaker Position Assigner to the root of the blueprint. Changing these properties using the published properties exposed at the root of the blueprint also changes them in the Speaker Position Assigner component.
Exposing Entire Property Groups In addition to exposing individual properties, entire property groups can be published to the blueprint level.
To publish a property group, click on the square next to any property within the group. In the menu, select Publish Group. The Published name and Display name boxes will not be modifiable if there is more than one property in the group.
Set the Input Single Source Files If single source files will be used to trigger a transcode task, there are two components that can be used.
• Media File Input: This component will dynamically populate output pins when a file is selected. This can be useful for inspecting the contents of a file, or managing multi-track audio workflow.

SelenioFlex™ File Users Guide Zenium Transcode Blueprints
© 2015 Imagine Communications Corp. Proprietary and Confidential. Version 2.10.0 | Page 48
Connect the blueprint’s Primary Source File pin to the Media File Input component’s input pin.
Click the blueprint background or title bar to show the blueprint properties in the right hand panel. Set the Primary Source File property by clicking on the Browse button and browsing to a representative file. The file selected will be used to populate the output pins on the Media File Input component, so select a Primary Source File that includes all of the output data types that you will need to connect your graph.
• Media Source (recommended): this component allows you to specify which output pins to use. The
default pins are Uncompressed Audio, and Uncompressed Video. You can add additional output pins, such as compressed audio, timecode, or captions by selecting the ‘Outputs: Configure Pins’ button under Media Source properties. In addition to allowing you to specify output pins, the Media Source provides the following additional functionality: Support for heterogeneous source files (can be of different formats with different types of
tracks, etc.) Automatic black/silence/empty captions generation for missing data Rule-based selection of timecode and captions sources Support for Extended Clip List

SelenioFlex™ File Users Guide Zenium Transcode Blueprints
© 2015 Imagine Communications Corp. Proprietary and Confidential. Version 2.10.0 | Page 49
Connect either the Primary Source File pin OR the Clip List XML pin to the Source File/Clip List pin of the Media Source component. Both pins will work with a single-file input source, but connecting using the Clip List XML has the added benefit of permitting Clip List XML inputs to also be used without requiring a change to the blueprint configuration.
The specific source file that you use at this stage will not be used to run the transcode task, it is strictly for the purpose of setting up the blueprint. The source file used for a transcode task will be the one you drop into the SFX-File watch folder.
Transcode Requests Transcode requests are created by SelenioFlex File and passed to the Zenium blueprint when a media file or a Clip List XML file is dropped in a watch folder. A transcode request can also be created in an application and submitted to SelenioFlex File programmatically, by using the SelenioFlex File WSDL API.
A transcode request is an xml file that contains information about the transcode blueprint, resource group, source files, and destination directory. It is also used to populate the blueprint’s Clip List, primary source file, output write directory, and asset name overwriting any of the property values saved in the blueprint.
A transcode request can optionally also set other blueprint properties.
Clip Lists (Multiple Input Files) Clip Lists allow for concatenation (stitching) and trimming of input files. To use the Clip List as an input to the blueprint, connect the blueprint’s Clip List XML pin to the Media Source component’s input pin. The Media Source component stitches the audio and video files in the Clip List into uncompressed audio and video outputs, respectively.
Click the blueprint background or title bar to show the blueprint properties in the right hand panel. Set the Primary Source File property by clicking on the Browse button and browsing to a representative file. The file selected will be used to generate a basic Clip List XML.
The specific source file that you use at this stage will not be used to run the transcode task, it is strictly for the purpose of setting up the blueprint. The Clip List used for a transcode task will be the one you drop into the SFX-File watch folder.
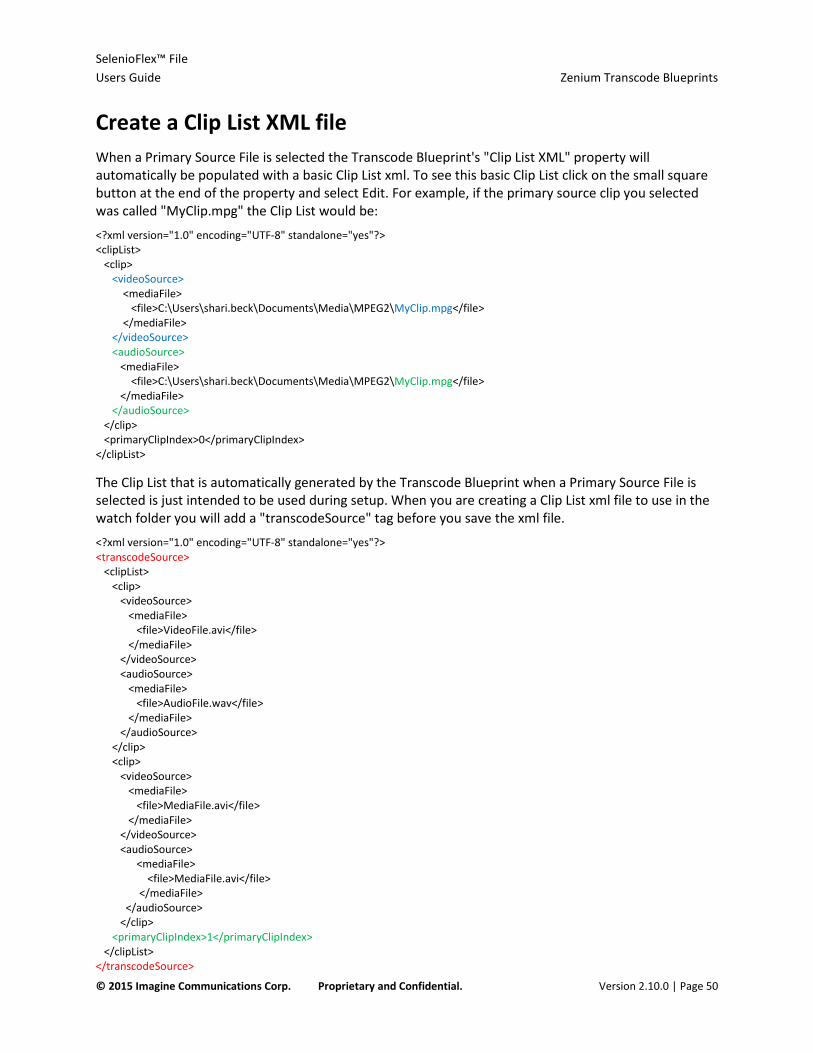
SelenioFlex™ File Users Guide Zenium Transcode Blueprints
© 2015 Imagine Communications Corp. Proprietary and Confidential. Version 2.10.0 | Page 50
Create a Clip List XML file When a Primary Source File is selected the Transcode Blueprint's "Clip List XML" property will automatically be populated with a basic Clip List xml. To see this basic Clip List click on the small square button at the end of the property and select Edit. For example, if the primary source clip you selected was called "MyClip.mpg" the Clip List would be:
<?xml version="1.0" encoding="UTF-8" standalone="yes"?> <clipList> <clip> <videoSource> <mediaFile> <file>C:\Users\shari.beck\Documents\Media\MPEG2\MyClip.mpg</file> </mediaFile> </videoSource> <audioSource> <mediaFile> <file>C:\Users\shari.beck\Documents\Media\MPEG2\MyClip.mpg</file> </mediaFile> </audioSource> </clip> <primaryClipIndex>0</primaryClipIndex> </clipList>
The Clip List that is automatically generated by the Transcode Blueprint when a Primary Source File is selected is just intended to be used during setup. When you are creating a Clip List xml file to use in the watch folder you will add a "transcodeSource" tag before you save the xml file.
<?xml version="1.0" encoding="UTF-8" standalone="yes"?> <transcodeSource> <clipList> <clip> <videoSource> <mediaFile> <file>VideoFile.avi</file> </mediaFile> </videoSource> <audioSource> <mediaFile> <file>AudioFile.wav</file> </mediaFile> </audioSource> </clip> <clip> <videoSource> <mediaFile> <file>MediaFile.avi</file> </mediaFile> </videoSource> <audioSource> <mediaFile> <file>MediaFile.avi</file> </mediaFile> </audioSource> </clip> <primaryClipIndex>1</primaryClipIndex> </clipList> </transcodeSource>

SelenioFlex™ File Users Guide Zenium Transcode Blueprints
© 2015 Imagine Communications Corp. Proprietary and Confidential. Version 2.10.0 | Page 51
Note that in the example above the primaryClipIndex is set to 1, so counting up from 0 this means that the second clip has been set as the primary clip.
videoSource Required The clip’s video source. audioSource Required The clip’s audio source.
A video file that includes both video and audio elementary streams can be used as an audio source. Clips can include more than one audio source, for example, two mono files could be used instead of one interleaved stereo file.
file Required The UNC file path name of the media file.
When you are creating a Clip List the following restrictions apply to the media files added:
• Video: All video files in the Clip List must use the same video compression type and the same frame rate. (The clips can use different bit rates or frame sizes.)
• Audio: All audio files in the Clip List must use the same sample rate and the same number of channels. (The clips can use different bit rates or bit depth.)
• Clips must include a file with video (a video/audio file or a video only file)
The Clip List generated by a Transcode Blueprint is extracted from the input transcode request. Each clip within a clip list consists of one video source and at least one audio source. A video file that includes both video and audio elementary streams can be used as an audio source.
Trimming using Clip Lists
The Clip List supports trimming of media clips based on a start and end time per clip. Each source file can include a trim in point and out point. The framerate must be specified, and the ; or : convention is used to determine if drop-frame or non drop-frame timecode should be used.
<videoSource> <trim> <inPoint fps="29.97">00:00:05;00</inPoint> <outPoint fps="29.97">00:00:25;00</outPoint> </trim> <mediaFile> <file>\\media-server\SourceFiles\MyMedia.mxf</file> </mediaFile> </videoSource>
It is also possible to specify the trim points using the start time and the duration in seconds.
<videoSource> <trim> <start>00:00:05;00</start> <duration>10</duration> </trim> <mediaFile> <file>\\media-server\SourceFiles\MyMedia.mxf</file> </mediaFile> </videoSource>

SelenioFlex™ File Users Guide Zenium Transcode Blueprints
© 2015 Imagine Communications Corp. Proprietary and Confidential. Version 2.10.0 | Page 52
Changing Properties in a Clip List (Zenium Only)
It is also possible to set a property for a specific Zenium Component using a Clip List. In the Clip List example below a Language Code Updater component is used in the Blueprint, and the language_code property will be set to English (en) by the Clip List, overriding the setting in the blueprint. Note that if the component is a subcomponent (that is, included inside another component) then the full path to the component must be used.
In this Clip List example there is a transcodeSource section and a setRuntimeProperties section, both contained within a transcodeRequest.
<?xml version="1.0" encoding="UTF-8"?> <transcodeRequest> <transcodeSource> <clipList> <clip> <videoSource> <mediaFile> <file>\\media-server\SourceFiles\MyMedia.mpg</file> </mediaFile> </videoSource> <audioSource> <mediaFile> <file>\\media-server\SourceFiles\MyMedia.mpg</file> </mediaFile> </audioSource> </clip> </clipList> </transcodeSource> <setRuntimeProperties> <property propertyPath="Language Code Updater/language_code" value="en"/> </setRuntimeProperties> </transcodeRequest>
Primary Source File The video source in the first clip in the Clip List is referred to as the primary source file by default. This file is used to calculate the duration and progress of a Transcode Blueprint. The clip with the longest video source should be used as the primary clip. If that is not the first clip then it can be set to use another clip.
If a transcode request is submitted using Extended Clip List, either through the web service API or by dropping the transcode request xml into the watch folder, then there is no concept of primary source file in the Extended Clip List.
Extended Clip List The Extended Clip List is a variant of the legacy Clip List, which permits the use of compressed video and audio inputs and dynamic instantiation of components. A blueprint will either use Extended Clip List or legacy Clip List.
When using the Extended Clip List schema the following Media Source features will be available:

SelenioFlex™ File Users Guide Zenium Transcode Blueprints
© 2015 Imagine Communications Corp. Proprietary and Confidential. Version 2.10.0 | Page 53
• Rule-based selection of timecode and captions sources. • Each clip in an Extended Clip List can be defined by an "unlimited" number of source files (not just
one file for video and one for audio). For example, you can use eight WAV files to generate an 8-channel audio track. Or you can use one file for video, one file for audio and one file for captions.
To create an Extended Clip list, your Transcode blueprint needs to include a Media Source component. If the Clip List button is greyed out, you will need to disconnect the Clip List XML pin from the Source File/Clip List pin of the Media Source.
Click the square button at the end of the Clips field and select Edit to see the generated Extended Clip List.
This will open a dialog that shows the full Clip List xml. You can copy this to a text editor and then save it as a Clip List xml file for submission to a watch folder.
For best results, use the Media Source component to create Extended Clip Lists. For more information about this, refer to the Media Source component's help file.
Unlike legacy Clip Lists, Extended Clip Lists do not use the concept of a "Primary Clip". This means that when using Extended Clip Lists you cannot use Expressions that include the Primary Source File variable (for example, to set the output file name using ${primarySourceFile} or ${sourceFileBaseName}), without declaring the value explicitly. To explicitly declare a value for the primarySourceFile variable when using the Extended Clip List, but you must specify the set runtime property element in the transcode request:
<setRuntimeProperties> <property propertyPath="primarySourceFile" value="\\networkShare\myfile.mp4"/>
</setRuntimeProperties>
Create the Processing Portion of the Graph Create the graph, connecting the outputs of either the Media File Input or Clip List Source component to the other components in your graph.
The Zenium Designer includes templates to help create graphs. Each template is a building block that includes a group of components designed to work together to do a particular type of processing. See the Zenium Designer User's Guide for more information.

SelenioFlex™ File Users Guide Zenium Transcode Blueprints
© 2015 Imagine Communications Corp. Proprietary and Confidential. Version 2.10.0 | Page 54
Set the Output For each output file that will be created by the blueprint, add a File Output component.
The most common type of output will be a single asset, where each asset may consist of a single file or of multiple related files. By storing the information about the output as an asset the files can be handled as a group. For example, moving the files in an asset will move all of the related files, preserving the directory structure that was used when the output files were created.
When one asset will be created by the blueprint, connect the output of each File Output component to the blueprint’s Output File/Asset pin.
For specific workflows, such as HLS or AS02, there are other components which can be used instead of the File Output component to produce file outputs.
The blueprint’s Output File/Asset pin passes information about the blueprint’s output file (or files) to SelenioFlex File. If the Output File/Asset pin is not used the outputs will still be created, but SelenioFlex File will not receive any information about the blueprint’s output files.
Output files are tracked as assets within SelenioFlex File. Assets are created by either by connecting the File Output component directly to the Output File/Asset pin, or by connecting File Output components, Asset Piece Builders and Asset Builder components. Only the output of File Output and Asset Builder components can be passed to the Output File/Asset pin.

SelenioFlex™ File Users Guide Zenium Transcode Blueprints
© 2015 Imagine Communications Corp. Proprietary and Confidential. Version 2.10.0 | Page 55
The Output File/Asset pin can accept more than one input. When the output of one or more Output File components is passed to the Output File/Asset pin, those files are automatically grouped in an asset. This default asset will use the value of the Default Asset Name property as its name.
You must set the output path and output file name in each individual File Output component. The File Output component is used to write the transcode output to a file. The File Output component is connected to either an Asset Piece Builder component, or directly to the blueprint’s Output File/Asset pin.
If the File Output component is not connected to anything further, it will still write an output file.
Normally you will want to use a file name that changes each time the blueprint is run, so that files from subsequent tasks do not overwrite files from earlier tasks. To accomplish this you can enter an expression rather than a simple text name.
1. Click the small square button at the end of the property field and select Expression from the menu. This will open the Expression Editor.
2. Enter a $ to bring up a list of available expressions. 3. Double click on the one you want to insert at your current cursor location.
Some expressions which are commonly used for file outputs are: ROOT_sourceFileBaseName (the primary source file name without the file extension) ROOT_blueprintStartDateYYYYMMDD (the task start date) ROOT_blueprintStartTimeFilenameSafe (the task start time)
You must set the output file directory in the File Output component. You can use an expression to get the file directory from the Transcode Blueprint's Output Folder Variable, specifically:
• ROOT_outputWriteDirectory

SelenioFlex™ File Users Guide Zenium Transcode Blueprints
© 2015 Imagine Communications Corp. Proprietary and Confidential. Version 2.10.0 | Page 56
Normally you should use UNC Paths when you specify the file output directory. The full UNC path to the output file must be set in the File Output component. The blueprint’s Output Folder Variable property can be referred to in an expression in the File Output component (with the expression ${ROOT_outputWriteDirectory}, where ROOT is the root of the blueprint), but it is not used automatically by the File Output component. Failing to provide a full output path will lead to errors.
The Blueprint's Output Folder Variable will be overwritten by the SFX-File watch folder's setting for the Write-To Path, if that was specified when you set up your watch folder. So if you do plan to set the Write-To Path in the watch folder, then you can leave the Blueprint's Output Folder Variable blank when you set up your blueprint.
Asset Builder components should be used when the blueprint will generate more than one asset. Each Asset Builder component accepts one or more asset pieces generated using the Asset Piece Builder component. Each Asset Piece Builder component uses the output of one File Output component to generate one asset piece. Each Asset Builder component is connected to the blueprint’s Output File/Asset pin.
Assets An asset is a grouping of related output files. The directory structure of files in an asset is preserved when the group is moved. An asset is generated automatically when a File Output component is connected to the Transcode Blueprint’s Output File/Asset pin. Note that more than one File Output component can be connected to a Transcode Blueprint’s Output File/Asset pin, a an asset can include many output files.
An asset can also be created using the Asset Builder and Asset Piece Builder components. Only use the Asset Piece Builder and Asset Builder components when more than one asset needs to be created in a single blueprint.
Default Asset
An asset is automatically created when the output of a File Output component is connected directly to the blueprint’s Output File/Asset pin. The Default Asset Name set at the blueprint level is used as the name of the asset.
Multiple File Output components can be connected to the Output File/Asset pin. These files will be grouped together into one asset named using the Default Asset Name property.

SelenioFlex™ File Users Guide Zenium Transcode Blueprints
© 2015 Imagine Communications Corp. Proprietary and Confidential. Version 2.10.0 | Page 57
Asset Piece Builder Component
Each Asset Piece Builder component takes one output file generated by the File Output component and generates one asset piece for that file. The asset piece type and asset piece name are set through properties on the Asset Piece Builder component. These properties help to easily distinguish multiple files in one asset in the transcode task’s output in the SelenioFlex File Console.
Asset Builder Component
Asset Builder components accept one or more asset pieces to generate an asset. Each asset is named using the Asset Builder’s Asset Name property. Asset Names help distinguish multiple output assets when viewing a transcode task in the SelenioFlex File Console. If the Asset Name is not set, it will be blank in the SelenioFlex File Console.

SelenioFlex™ File Users Guide Zenium Transcode Blueprints
© 2015 Imagine Communications Corp. Proprietary and Confidential. Version 2.10.0 | Page 58
File Metadata The file metadata associated with each file in an asset is passed to SelenioFlex File. The metadata associated with the file is generated by Zenium. It is a set of key/value pairs that describe the features of the file, such as frame rate, size, and format.
Save the Blueprint Save the blueprint to a directory that can be accessed by the SFX-File Manager.
Submitting Directly to SelenioFlex File The Transcode Blueprint provides the option to submit a transcode directly to SelenioFlex File through the Zenium Designer.
The SFX-File Submission properties provide information to the Zenium Designer about the SelenioFlex File server to use (SFX-File Host property), as well as its connection port (TS Port property). The SFX-File Host and SFX-File Port properties are saved with the blueprint. Additionally, any hosts and ports specified previously will appear in a drop-down menu when a new blueprint is created.
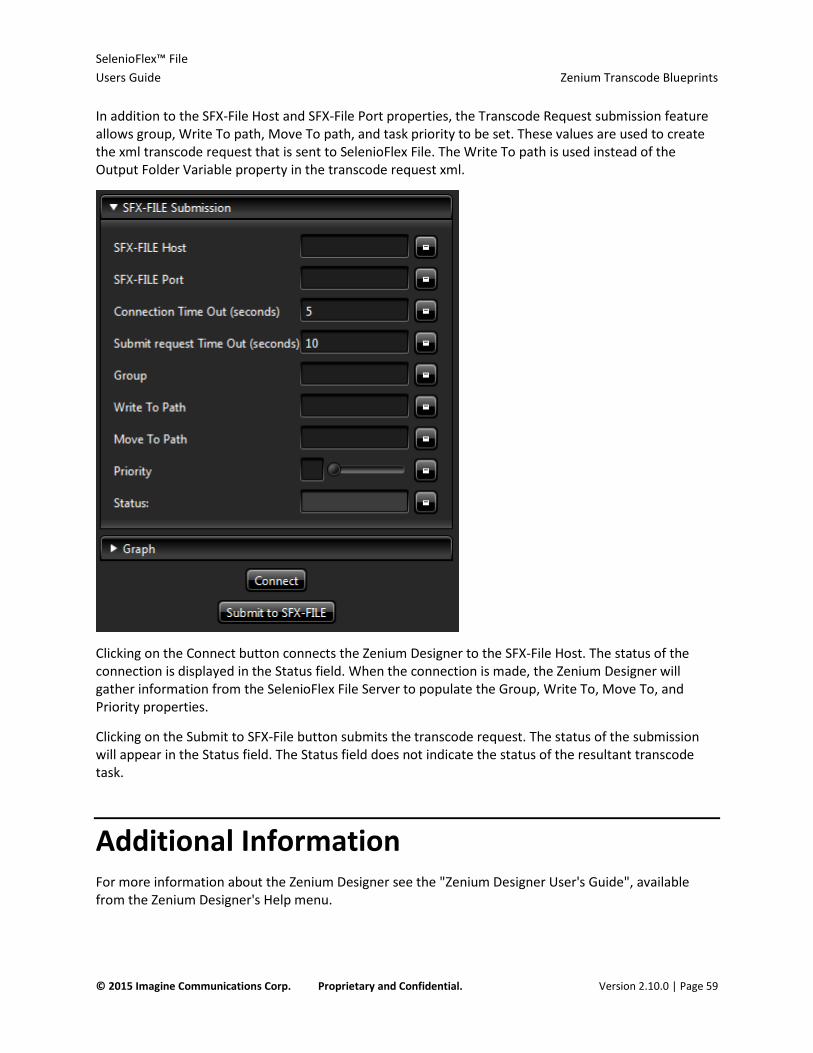
SelenioFlex™ File Users Guide Zenium Transcode Blueprints
© 2015 Imagine Communications Corp. Proprietary and Confidential. Version 2.10.0 | Page 59
In addition to the SFX-File Host and SFX-File Port properties, the Transcode Request submission feature allows group, Write To path, Move To path, and task priority to be set. These values are used to create the xml transcode request that is sent to SelenioFlex File. The Write To path is used instead of the Output Folder Variable property in the transcode request xml.
Clicking on the Connect button connects the Zenium Designer to the SFX-File Host. The status of the connection is displayed in the Status field. When the connection is made, the Zenium Designer will gather information from the SelenioFlex File Server to populate the Group, Write To, Move To, and Priority properties.
Clicking on the Submit to SFX-File button submits the transcode request. The status of the submission will appear in the Status field. The Status field does not indicate the status of the resultant transcode task.
Additional Information For more information about the Zenium Designer see the "Zenium Designer User's Guide", available from the Zenium Designer's Help menu.

SelenioFlex™ File Users Guide Stream Projects for SelenioFlex File
© 2015 Imagine Communications Corp. Proprietary and Confidential. Version 2.10.0 | Page 60
Stream Projects for SelenioFlex File SFX-File assigns settings to transcode tasks that will be run by Stream engines by assigning Stream projects to SFX-File watch folders. The projects contain the settings that will be used to transcode the files that are dropped into the watch folder.
Note that you must use a licensed copy of Stream to create a project.
Creating a Stream Project There are 5 basic steps for creating a Stream project for use with SFX-File.
Create or Add Codec Profile(s) The codec profiles tell Stream what format to use for the output files.
There are a number of pre-created codec profiles installed when you install Stream. You can access them by clicking on the Add button (the blue + button). You can also create your own codec profiles by clicking on the Codec Profile menu at the top of the interface.

SelenioFlex™ File Users Guide Stream Projects for SelenioFlex File
© 2015 Imagine Communications Corp. Proprietary and Confidential. Version 2.10.0 | Page 61
There are also some pre-created projects installed when you install Stream. You can load them using the File menu. These pre-created projects include codec profiles and output settings which are required for a specific type of encoding job.
Select Input Type Projects created for use with SFX-File should use the Media Files input type. Leave the Video and Audio file name fields blank. The settings for Video media type selection (shown as Auto below) and Audio media type selection and settings will be used by SFX-File. Also, any Trimming settings you enter will be used by SFX-File.
If your input file has a separate video and audio file (rather than one file that contains both) then you can create a Clip List xml file to submit to your watch folder that points to the source files instead of to an individual file. You can also submit Clip Lists using this same method. See Submitting Clip Lists (see "Submitting Clip Lists to Watch Folders" on page 78) for more information.
Add Plugins Stream has a number of video and audio processing plugins that you can add to your project. If you add a processing plugin, it will be used by SFX-File when transcoding the media.
Select Output Settings Stream’s output options are used by SFX-File. At a minimum supply an output file name by clicking the Archive button, and assigning a file name. Normally one project will be used to output many files, so be sure to use system tags when specifying your archive file name.
Some common system tags for this task (for a full list, please see the Stream Software Manual):
%VID.SRC.FILENAME.FILE% Name portion of video source file.
%T_% Time
%D_% Date
%PROF.BIT% Encoder bit rate

SelenioFlex™ File Users Guide Stream Projects for SelenioFlex File
© 2015 Imagine Communications Corp. Proprietary and Confidential. Version 2.10.0 | Page 62
When specifying the Archive file name, remember to use UNC paths (e.g. \\host\directory\file).
Any other enabled output options will also be used when SFX-File runs the project.
Save the Project Once you have finished setting up the project, save it to a directory that can be accessed by the SFX-File Manager and by all of the Stream Engine resources.
More Information about Stream Software For more information about the Stream Software please refer to the Stream Software User's Guide.

SelenioFlex™ File Users Guide Using SelenioFlex File
© 2015 Imagine Communications Corp. Proprietary and Confidential. Version 2.10.0 | Page 63
Using SelenioFlex File
Connect to the SFX-File Manager Launch the SFX-File Console software from the shortcut installed on your desktop. The Console will search the network for systems running the DRC SFX-File Manager and list them.
By default, the "Auto Connect to:" option will be enabled, and after a short time-out, the Console will automatically connect to the same Manager you connected to during your last session. If you quickly uncheck this option you will be able to choose any of the Found Managers in the list and then click the Connect button to connect to the selected Manager.
If you do not see your Manager, you can also search for it using a specific Host or IP Address.
If you set up a username/password authentication for the Manager, you will have to supply valid credentials before the Console will connect to the Manager.
If the Advanced Security options are being used, each user will be assigned a role. When you log in your role will be shown on the Console. There are 4 roles, with the Administrator role being unrestricted, the Configuration and Operator roles having some restrictions, and the Viewer role having the most restrictions.
Once you have connected to a Manager, if you want to connect to a different SFX-File Manager you can use the Console’s main menu to select File > Connect to SFX-File and then you can pick another Manager.
Zenium Plugins Repository If you will be using Zenium Engines then the Zenium Plugins Repository will be installed. To access the Repository from the SFX-File Console use the main menu to select Manager > Zenium Repo Browser.

SelenioFlex™ File Users Guide Using SelenioFlex File
© 2015 Imagine Communications Corp. Proprietary and Confidential. Version 2.10.0 | Page 64
Note that the Repo Browser has a "Read Only" setting enabled by default, to prevent accidental additions and deletions. You can disable this using the checkbox found to the right of the Synchronize button (at the top of the Repo Browser dialog).
If you installed plugins during the installation, while using the SFX-File Configuration Wizard, then the default partition of the Repo will already be populated with Plugins. If you skipped this step you can add partitions (if desired) and add plugins to the Repo using the Zenium Repo Browser.
To add a partition disable the "Read Only" setting then use the menu to select Partition > Add Partition to add a new partition. Partitions allow you to keep different collections of plugins for different uses. For example, you may want to have one partition for your production work, and another partition for testing new versions of plugins before releasing them to production. Another example of a use for a partition would be to segregate specific versions of plugins for a particular type of job or a particular client.
If you will be using Mac resources then you will need to create a separate Mac partition containing just the plugins that can be used by the Mac resources.
Adding or Sync'ing Plugins To add plugins to a partition first select the desired plugin using the drop-down box at the top of the dialog (in the example above, the "August-2014" partition has been selected).

SelenioFlex™ File Users Guide Using SelenioFlex File
© 2015 Imagine Communications Corp. Proprietary and Confidential. Version 2.10.0 | Page 65
To Add Plugins
From the menu select Plugin > Add Plugins or Plugin > Add Plugins (Zip bundle). If the plugins you want to import are already on your system unzipped, you can multi-select the plugin folders and import all of the selected plugins by clicking the Open button.
If you select a Zip bundle, then all of the plugins in that zip file will be imported.
To Sync Plugins
If you have access to more than one Repo you will be able to use the Synchronize function to contact the other Repo and to choose which plugins to pull from the other Repo. The plugins on the remote Repo can be filtered using the options to the right of the plugins list.
SelenioFlex™ File Users Guide Using SelenioFlex File
© 2015 Imagine Communications Corp. Proprietary and Confidential. Version 2.10.0 | Page 66
If you need to update an individual component, you should also right click on that component and choose "Select Dependencies". That will also highlight other components that the selected component depends upon, so that they can be synchronized at the same time.
You can synchronize your plugins using the Imagine Communications Public Repository. The repository URL is: http://resources.myimagine.com/zeniumrepo
Once you have connected to the Imagine Communications Public Repository you will be asked to supply a username and password. The current username and password can be obtained by customers from the SFX-File readme, available from the Imagine Communications web site.
Using the Repo
Once you have imported plugins they will be shown in the Browser. The columns that are shown can be changed by right clicking the column header. Only the latest version of the plugins will be shown unless you enable the "Show All Versions" option to the right of the plugins list.
Basic information about a plugin can be shown by selecting a plugin from the list, right clicking, and selecting "View Plugin Info". As well as the plugin version number you will see a list of all of the components that are included in the plugin.
Summary Once your Console has successfully connected to a Manager, a tabbed interface will open. The information on the Summary tab allows you to see an overall picture the status of your Manager, Resources, and recent Alerts.
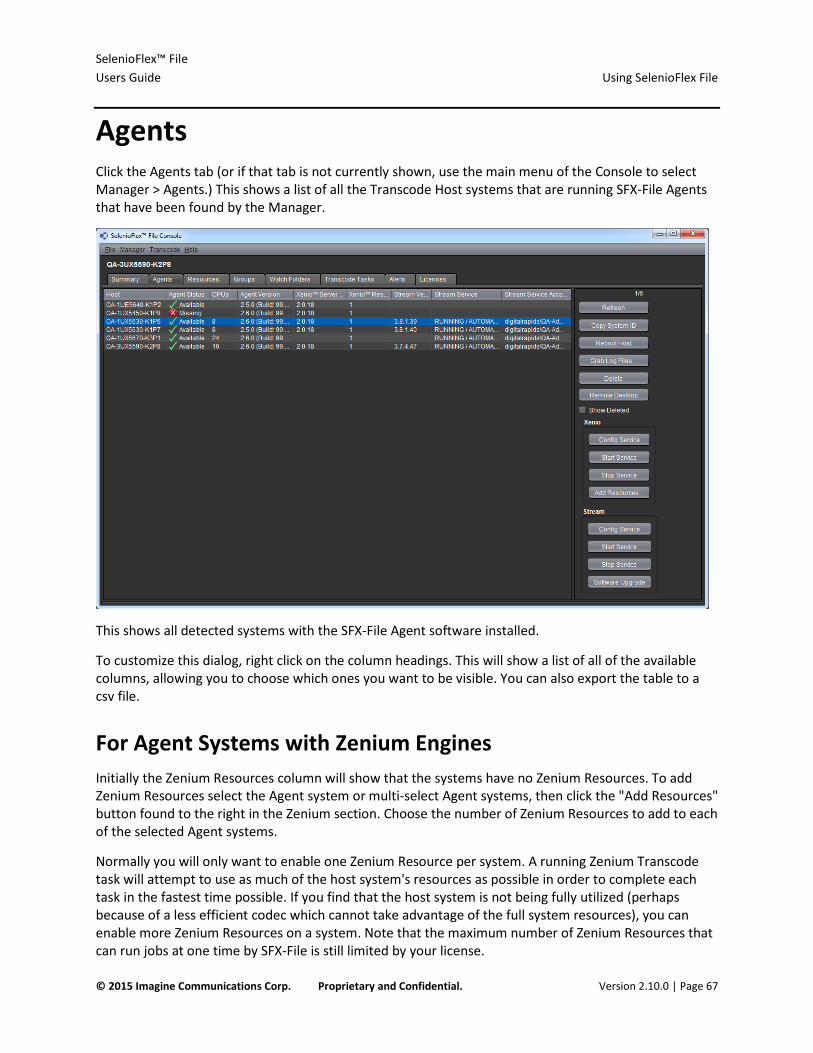
SelenioFlex™ File Users Guide Using SelenioFlex File
© 2015 Imagine Communications Corp. Proprietary and Confidential. Version 2.10.0 | Page 67
Agents Click the Agents tab (or if that tab is not currently shown, use the main menu of the Console to select Manager > Agents.) This shows a list of all the Transcode Host systems that are running SFX-File Agents that have been found by the Manager.
This shows all detected systems with the SFX-File Agent software installed.
To customize this dialog, right click on the column headings. This will show a list of all of the available columns, allowing you to choose which ones you want to be visible. You can also export the table to a csv file.
For Agent Systems with Zenium Engines Initially the Zenium Resources column will show that the systems have no Zenium Resources. To add Zenium Resources select the Agent system or multi-select Agent systems, then click the "Add Resources" button found to the right in the Zenium section. Choose the number of Zenium Resources to add to each of the selected Agent systems.
Normally you will only want to enable one Zenium Resource per system. A running Zenium Transcode task will attempt to use as much of the host system's resources as possible in order to complete each task in the fastest time possible. If you find that the host system is not being fully utilized (perhaps because of a less efficient codec which cannot take advantage of the full system resources), you can enable more Zenium Resources on a system. Note that the maximum number of Zenium Resources that can run jobs at one time by SFX-File is still limited by your license.
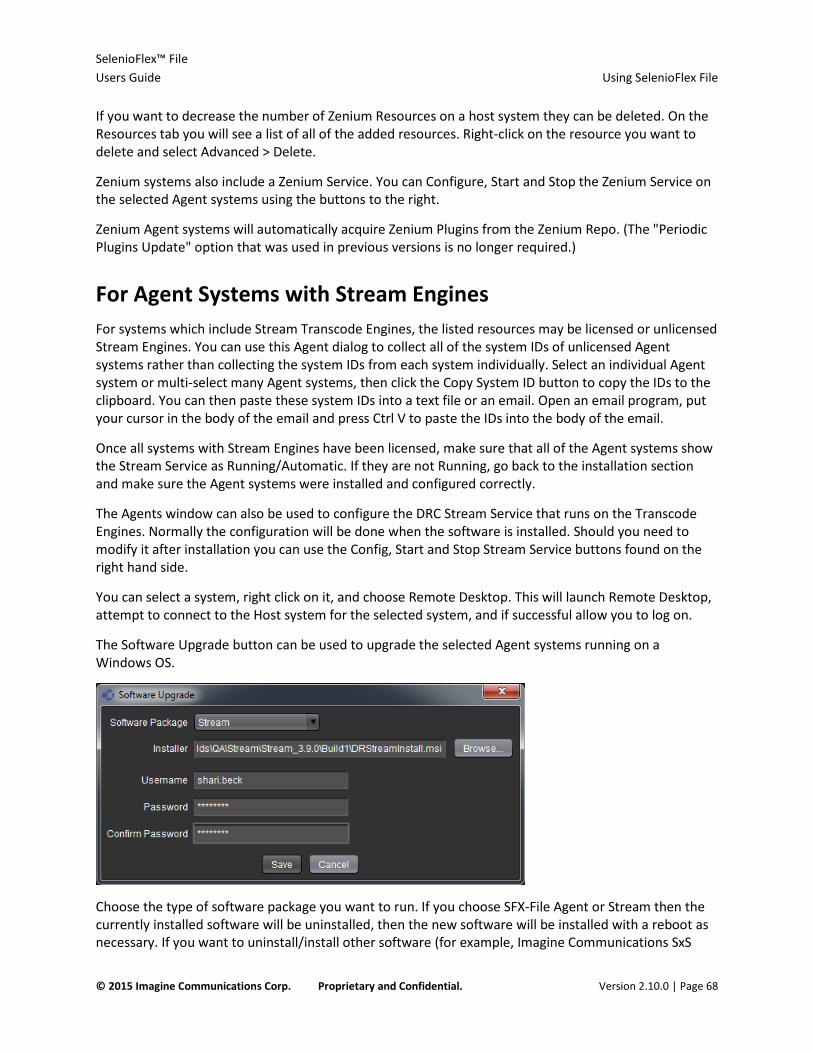
SelenioFlex™ File Users Guide Using SelenioFlex File
© 2015 Imagine Communications Corp. Proprietary and Confidential. Version 2.10.0 | Page 68
If you want to decrease the number of Zenium Resources on a host system they can be deleted. On the Resources tab you will see a list of all of the added resources. Right-click on the resource you want to delete and select Advanced > Delete.
Zenium systems also include a Zenium Service. You can Configure, Start and Stop the Zenium Service on the selected Agent systems using the buttons to the right.
Zenium Agent systems will automatically acquire Zenium Plugins from the Zenium Repo. (The "Periodic Plugins Update" option that was used in previous versions is no longer required.)
For Agent Systems with Stream Engines For systems which include Stream Transcode Engines, the listed resources may be licensed or unlicensed Stream Engines. You can use this Agent dialog to collect all of the system IDs of unlicensed Agent systems rather than collecting the system IDs from each system individually. Select an individual Agent system or multi-select many Agent systems, then click the Copy System ID button to copy the IDs to the clipboard. You can then paste these system IDs into a text file or an email. Open an email program, put your cursor in the body of the email and press Ctrl V to paste the IDs into the body of the email.
Once all systems with Stream Engines have been licensed, make sure that all of the Agent systems show the Stream Service as Running/Automatic. If they are not Running, go back to the installation section and make sure the Agent systems were installed and configured correctly.
The Agents window can also be used to configure the DRC Stream Service that runs on the Transcode Engines. Normally the configuration will be done when the software is installed. Should you need to modify it after installation you can use the Config, Start and Stop Stream Service buttons found on the right hand side.
You can select a system, right click on it, and choose Remote Desktop. This will launch Remote Desktop, attempt to connect to the Host system for the selected system, and if successful allow you to log on.
The Software Upgrade button can be used to upgrade the selected Agent systems running on a Windows OS.
Choose the type of software package you want to run. If you choose SFX-File Agent or Stream then the currently installed software will be uninstalled, then the new software will be installed with a reboot as necessary. If you want to uninstall/install other software (for example, Imagine Communications SxS

SelenioFlex™ File Users Guide Using SelenioFlex File
© 2015 Imagine Communications Corp. Proprietary and Confidential. Version 2.10.0 | Page 69
components) then you can use the Other Uninstall and Other Install options. Fill in a Username and Password with permission to install/uninstall software on the systems.
For All Agent Systems For troubleshooting purposes, there is a Grab Log Files button. This will collect all of the log files from the selected Agent system, and copy them all to a specified location. These log files can be used by Imagine Communications Support to help analyze problems.
Once the SFX-File Manager has detected an Agent, it will continue to list that system even if it is no longer available (for example, if it has been shut down). The Agent status will show as "Missing". If you know that a particular system has been permanently removed, then you may want to delete that system from the list. The Delete button in the bottom right hand corner has been provided for that purpose. If you later need to see the information for the deleted system, you can enable the "Show Deleted" checkbox.
You can also use the Reboot Host button to reboot the system with the selected Agent. This may be useful if you have updated the Stream software or license key.
Agent System Monitor Each Transcode Engine that has an Agent installed and running will also have a local Agent Monitor installed. This monitor shows you some information about the resources installed on that local system. The Agent Monitor runs automatically when you log in to the system, and you will see a SFX-File icon in your system tray. If you double click on the Agent Monitor icon it will open the monitoring window.
Resources The Resources tab is used to monitor and control individual resources (where Stream Resources are Stream Engines, and Zenium Resources are potential Zenium Engines). Resources are automatically found by the SFX-File Manager on systems that have a SFX-File Agent installed and running. Stream Resources also require the DRC Stream Server Service to be installed and running. Zenium Resources also require the Zenium Server Service to be installed and running.

SelenioFlex™ File Users Guide Using SelenioFlex File
© 2015 Imagine Communications Corp. Proprietary and Confidential. Version 2.10.0 | Page 70
Click on the Resources tab. You will see a list of all of the Transcode Resources that have been found by your Manager. Look in the Status column.
Initially your resources will all be Offline. Multi-select all of the resources you want to use, and then right click on the group and select Bring Online. It will take a few seconds for each resource to come online.
Once a resource has been brought online and it is available, you can right click the resource and click Properties to see the properties for that resource, including licensing information and software version information for that resource.
The available right-click choices for Zenium and Stream Resources:
Bring Online The Manager will be able to control the resource. For Zenium resources bringing a resource online does not require a license feature. However, the maximum number of simultaneous jobs that can be run is limited by the availability of the "TS Zenium Transcode Job" feature.For Stream resources: Bringing a resource online starts encoder.exe (if it was not already started).
Take Offline The Manager will not be able to control the resource. For Stream resources this does not kill encoder.exe if it was already started.
Edit Resource Name, Role, Group, Logo, and Reboot settings.
Advanced The Advanced menu provides additional choices, primarily used during testing or troubleshooting.
Stop Resource For Zenium Resources: If the resource was Available it will stop the resource, all licenses that were checked out will be checked back in, and then SFX-File will attempt to restart the resource. If the resource was Busy then the current task will be cancelled. For Stream resources: For use when offline. This kills the encoder.exe process.

SelenioFlex™ File Users Guide Using SelenioFlex File
© 2015 Imagine Communications Corp. Proprietary and Confidential. Version 2.10.0 | Page 71
Fail Resource For use when testing; simulates a failure. For Zenium resources the status will change to Failed and SFX-File will attempt to restart the resource. If the resource was Busy then the current task will be failed and SFX-File will attempt to failover the task to an available resource.
Delete For Zenium resources this will decrease the number or resources available on the host system. For Stream resources this will remove a missing resource from the list of resources.
Remote Desktop This will launch Remote Desktop, attempt to connect to the Host system for the selected resource, and if successful allow you to log on.
Reboot Host Reboot the host system
Properties Info about the system, including license and version information
Additional Advanced options available for Stream Resources:
Start Resource For use when offline: Start encoder.exe
Restart Resource For use when offline: Kill and then restart encoder.exe
The Resources tab will also show you the status of each host system, including the current CPU usage, video time stamp, audio time stamp, the current encode rate (in number of times realtime, where a value of 1.0 indicates real time encoding) and the number of dropped frames (if any) for the active project.
To add a logo to a resource, to provide a visual aid to identify the resource, right click on the resource, select Edit Resource, and select an image file. Normally you will want to choose a logo that will display well at a small size, since it will be used in the Resources list and in the Groups lists. It will also be used on the Network Monitor tab at a slightly larger size. (Logo height: 16 to 24 pixels; logo will be automatically rescaled to fit the available space, with aspect ratio maintained.)
Note that there are several additional column options available to you on the Resources window which are not enabled by default. To show or hide any column, right click on the column header.
• Resource ID • Device ID • Running Project • Priority • Reboot Enabled

SelenioFlex™ File Users Guide Using SelenioFlex File
© 2015 Imagine Communications Corp. Proprietary and Confidential. Version 2.10.0 | Page 72
Groups Groups are the basic management unit used to organize resources when assigning jobs. In order to use your transcoding resources, you must first create one or more groups, assign resources to the group, and assign one or more watch folders to use each group.
To create a group, click on the Groups tab and then click on the New Group button (found on the right hand side). Assign a group Name and choose a Role, based on the type of resources you plan to include in your group. For groups which will contain Zenium Resources choose Zenium Transcode, for groups which will contain Stream resources choose Stream Transcode.
When creating a group which uses Stream resources there is also an option to Publish. If you enable this option the window will expand to allow you to select a template file to use to publish an output file report. The template file typically includes "system tags", which are a pre-defined set of characters that will be replaced by metadata generated at the end of a job. For a description of the Publish feature and the available system tags, please refer to the Stream User’s Guide.
When creating a group which uses Zenium resources there is a drop-down box used to select the "Zenium Plugins Repo Partition". If your Repo only has one default partition, then you can select "default". If you created additional partitions, you can use the drop-down to select the one that will be used by the resources in this group. Note that all resources on a single host system must use the same Repo partition. For example, if you have 2 resources on one host system, and you assign those resources to different groups, then both groups must use the same Repo partition.
A saved group will be shown as new sub-folder in the Group tree.
At the bottom of the window you will see a list of your unassigned resources. Select a resource (or multi-select more than one resource) and drag it to a group to assign the resource to the group. Resources

SelenioFlex™ File Users Guide Using SelenioFlex File
© 2015 Imagine Communications Corp. Proprietary and Confidential. Version 2.10.0 | Page 73
cannot be assigned to more than one group. Each group must include just one type of resource, either Zenium resources or Stream resources.
Groups Running Engines in a 32-bit Environment By default SFX-File Engines will run in a 64-bit environment. This is particularly beneficial when using Zenium Engines. However, if you need to run your Engine in a 32-bit environment (for backwards compatibility or troubleshooting purposes) then you can set all resources in the group to run in a 32-bit environment.
To enable this option use the main menu to select Manager > Options. On the Console Prefs tab check the "Enable Runtime Environment Selection". Once this has been enabled you will see a Runtime Environment drop-down selection when you create a new group or edit an existing group.
When the "Enable Runtime Environment Selection" is enabled you will also see the Runtime Environment drop-down selection when you launch Zenium Designer from the Console.
Stream Transcode Groups and Licensing SFX-File does not know which Stream Transcode resources are licensed for which specific codecs. So if you have licensed an additional optional codec for just some of your Stream resources, you should consider making a separate group for just those resources. That way you will be able to assign watch folders that use projects that use that specific codec to the group that contains resources which are authorized to use that codec. If all of your resources are authorized to use the same codecs, then this will not apply.
Because Zenium uses networked licensing with a shared pool of features, this does not apply to Zenium resources.
Using the Schedule to Move Resources You also have access to the Schedule tab, which will allow you to reassign resources to different groups on a schedule. (See Schedule (on page 83) for more information.)
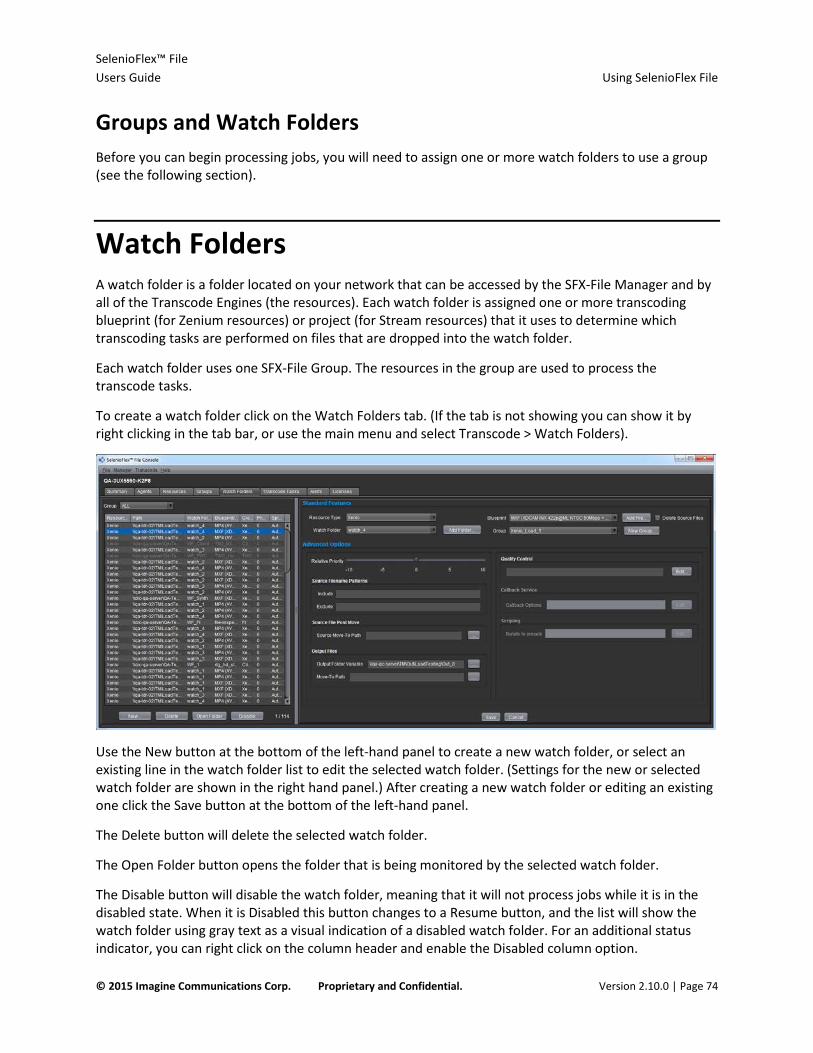
SelenioFlex™ File Users Guide Using SelenioFlex File
© 2015 Imagine Communications Corp. Proprietary and Confidential. Version 2.10.0 | Page 74
Groups and Watch Folders Before you can begin processing jobs, you will need to assign one or more watch folders to use a group (see the following section).
Watch Folders A watch folder is a folder located on your network that can be accessed by the SFX-File Manager and by all of the Transcode Engines (the resources). Each watch folder is assigned one or more transcoding blueprint (for Zenium resources) or project (for Stream resources) that it uses to determine which transcoding tasks are performed on files that are dropped into the watch folder.
Each watch folder uses one SFX-File Group. The resources in the group are used to process the transcode tasks.
To create a watch folder click on the Watch Folders tab. (If the tab is not showing you can show it by right clicking in the tab bar, or use the main menu and select Transcode > Watch Folders).
Use the New button at the bottom of the left-hand panel to create a new watch folder, or select an existing line in the watch folder list to edit the selected watch folder. (Settings for the new or selected watch folder are shown in the right hand panel.) After creating a new watch folder or editing an existing one click the Save button at the bottom of the left-hand panel.
The Delete button will delete the selected watch folder.
The Open Folder button opens the folder that is being monitored by the selected watch folder.
The Disable button will disable the watch folder, meaning that it will not process jobs while it is in the disabled state. When it is Disabled this button changes to a Resume button, and the list will show the watch folder using gray text as a visual indication of a disabled watch folder. For an additional status indicator, you can right click on the column header and enable the Disabled column option.

SelenioFlex™ File Users Guide Using SelenioFlex File
© 2015 Imagine Communications Corp. Proprietary and Confidential. Version 2.10.0 | Page 75
There are several additional column options available to you that are not enabled by default, which you can enable by right clicking on the column header:
• Include • Exclude • Head • Tail • Source - Post Move • Output Files - Post Move • Disabled
Standard Features for Watch Folders • Select the Resource Type, Zenium or Stream. Different options will be shown, depending on which
resource type is selected. • Select a Watch Folder (or use the Add Folder button to browse the network for the folder).
Remember to use UNC paths (e.g. \\host\directory\file) not a mapped network drive letter. • Select a Zenium Blueprint or a Stream Project (or use the Add File button to browse the network for
the file). Remember to use UNC paths (e.g. \\host\directory\file).
You can choose to "Copy and reference a network shared file", in which case the file will be updated if the file on the network share is changed, or the "Copy file to Manager" in which case there will be no link to the original file. If you have not yet created a blueprint or project, return to the previous section in this guide for more information about creating a blueprint or project for SFX-File.
• Select a group (you will only see more than one if you set up more than one group). If you have not yet created a group, you can use the New Group button to create one now. This does not add resources to the new group, so you will have to remember to do that later. Note that a group can be used by more than one watch folder.
• Enable Delete Source Files if you want the source files to be deleted from the watch folder after the job has completed.

SelenioFlex™ File Users Guide Using SelenioFlex File
© 2015 Imagine Communications Corp. Proprietary and Confidential. Version 2.10.0 | Page 76
Advanced Options for Zenium Watch Folders • Relative Priority: Watch Folders with higher priorities will create tasks with higher priorities, and
those tasks will generally be processed ahead of tasks with lower priorities. Tasks with lower priorities will be processed eventually, sometimes even ahead of newer higher priority tasks, as the length of time that tasks have been waiting to be processed will also be taken into consideration when deciding which task to do next. If you would like to override this prioritization scheme, and instead use a "first in first out" (FIFO) scheme, then you can use the main menu’s Manager > Options > Manager Prefs dialog to change the Transcode Priority setting from Default to FIFO Queue.
• Source Filename Patterns: This function allows you to set filters, to include or exclude filenames that match your filters. They can include wild cards. For example, you can look for a client’s name in a file name (*client* for all files with the string) or files with a certain file extension (*.wmv).
• Source File Post Move: If you have decided not to delete your source files, then you can use this function to move source files to a new location after the transcode task has completed successfully.
• Output Files: Write-to Path will write the output of the blueprint to the path specified, overriding what is specified in the blueprint. Move-to Path will write the output file to the path specified in the blueprint, and then move the output files of successful jobs to the path specified.
• Quality Control: If you have purchased a QC server that is compatible with SFX-File (either Tektronix Cerify or Interra Systems Baton) then you will be able to automatically submit files to the QC server as soon as the transcode has completed. Please see Using Quality Control Servers (on page 85) for more information about setting up this option.
• Callback Service: This allows SDK users to have SFX-File report the status of tasks that have been submitted through the watch folder, and to have that notification sent to the URL that they specify. The Callback Service option is also available via the SFX-File Web service. Please see the SDK documentation for more information. (This function will be disabled unless you enable it in the main menu’s Manager > Options > Console Prefs dialog.)
• Scripting: This option allows you to run a user-created script after the transcode is complete. This advanced feature is intended for users with development experience who have created their own scripts. Pre-made scripts are not provided. (This function will be disabled unless you enable it in the main menu’s Manager > Options > Console Prefs dialog.)
Advanced Options for Stream Watch Folders • Relative Priority: Watch Folders with higher priorities will create tasks with higher priorities, and
those tasks will generally be processed ahead of tasks with lower priorities. Tasks with lower priorities will be processed eventually, sometimes even ahead of newer higher priority tasks, as the length of time that tasks have been waiting to be processed will also be taken into consideration when deciding which task to do next. If you would like to override this prioritization scheme, and instead use a "first in first out" (FIFO) scheme, then you can use the main menu’s Manager > Options > Manager Prefs dialog to change the Transcode Priority setting from Default to FIFO Queue.
• Source Filename Patterns: This function allows you to set filters, to include or exclude filenames that match your filters. They can include wild cards. For example, you can look for a client’s name in a file name (*client* for all files with the string) or files with a certain file extension (*.wmv).
SelenioFlex™ File Users Guide Using SelenioFlex File
© 2015 Imagine Communications Corp. Proprietary and Confidential. Version 2.10.0 | Page 77
• Source File Post Move: If you have decided not to delete your source files, then you can use this function to move source files to a new location after the transcode task has completed successfully.
• Output Files: Write-to Path will write the output of the task to the path specified, overriding what is specified in the project. Move-to Path will write the output file to the path specified in the project, and then move the output files of successfully completed tasks to the path specified.
• Split Multiple Profiles: If the project you have selected has multiple codec profiles (to produce multiple output files for each input file) you may select whether or not you want the SFX-File Manager to split up the project into a task per codec profile (Automatic or Always), or if you want to handle all of the codec profiles in a single project as a single job assigned to a single resource (Never). If you choose to "Split multiple profiles", then projects which include multiple codecs will be split into multiple tasks, and each task can be assigned to different resources in the same group, which could give you increased performance. If you choose to "never" split multiple profiles, then the multiple codecs that exist in a single project will be processed as one task, with all of the codec outputs being output concurrently. You will need to choose the potentially slower "never split multiple profiles" option if you are using a project where all of the output files need to be available at the same time at the end of the job. For example, if you are transcoding an uncompressed AVI into an MPEG2 video elementary stream and an AC-3 audio stream, which will then be muxed into one MPEG2 transport stream file, then you will need to disable the split multiple profiles option, so that the video and audio outputs are all available to the post-encode option (in this case the muxer) at the same time from a common output folder.
• Source Media Readers: Normally SFX-File attempts to read the source media using a pre-defined decoder based on the detected file type. There may be times when you need to override the automatically selected media decoder, and specify which type of reader to use for your files.
• Quality Control: If you have purchased a QC server that is compatible with SFX-File (either Tektronix Cerify or Interra Systems Baton) then you will be able to automatically submit files to the QC server as soon as the transcode has completed. Please see Using Quality Control Servers (on page 85) for more information about setting up this option.
• Callback Service: This allows SDK users to have SFX-File report the status of tasks that have been submitted through the watch folder, and to have that notification sent to the URL that they specify. The Callback Service option is also available via the SFX-File Web service. Please see the SDK documentation for more information. (This function will be disabled unless you enable it in the main menu’s Manager > Options > Console Prefs dialog.)
• Scripting: This option allows you to run a user-created script after the transcode is complete. This advanced feature is intended for users with development experience who have created their own scripts. Pre-made scripts are not provided. (This function will be disabled unless you enable it in the main menu’s Manager > Options > Console Prefs dialog.)
• Video Processing: There are three video processing options. Crop black borders automatically detects black borders in the source file and crops them out of
the output file. You may select which edges the automatic detection will use when looking for black borders.
Auto adjust aspect ratio will correct the aspect ratio of the output file based on the aspect ratio information detected in the source file or the output frame size (based on the option selected).

SelenioFlex™ File Users Guide Using SelenioFlex File
© 2015 Imagine Communications Corp. Proprietary and Confidential. Version 2.10.0 | Page 78
Commercial Black Removal will remove the black sections that are present in clips as "place-holders" for commercials. Commercial Black detection options are available from the main menu’s Manager > Options > Manager Prefs dialog.
• Media Clips: Select a clip to be added before (head) and after (tail) each clip you drop into the watch folder. These clips will be transcoded into the same format as the "content" clip you drop into the watch folder, and the final output will be one seamless clip that includes all 3 segments. If you have more than 3 segments, then you can use the "Clip list xml" submission method. Please refer to the following section for more information on this xml submission method.
After you have finished entering your settings click Save at the bottom of the left-hand panel.
Once your watch folder has been set up, any file you drop into the folder you specified will be first moved to a Processing sub-folder inside the watch folder, then moved to a Completed sub-folder once the transcode is complete (unless you specified Delete Source Files, in which case the file will be deleted instead of moved to the Completed sub-folder). If the job is cancelled then the source file will be moved to the Cancelled folder. If the job fails then SFX-File will attempt to run the task on another resource, and if it continues to fail then it will move the source file to a Failed sub-folder.
If your files are not being moved from the root of the watch folder into the Processing sub-folder, then check the following:
• The watch folder is not currently disabled • All required services are running, and the log on permissions are correct • The watch folder is in a location that can be read and written by SFX-File • If you updated your Stream software recently, that you correctly re-applied the keys and rebooted
your systems • UNC paths are being used throughout
If tasks do not leave the queued state, check the following:
• You have assigned resources to the group that is monitoring the watch folder. The resources are available and online.
If tasks are starting, then failing, check the following:
• The project you specified has an Output file location that can be written to by the Transcode Engine system.
• For Stream Engines: you have permission to use the codec profile specified by your project.
Note that SFX-File keeps a history of the time taken to complete transcode tasks on each Transcode Engine, and it uses this information to assign specific tasks to the resources that have the best speed history for a specific type of transcode whenever possible.
Submitting Clip Lists to Watch Folders SFX-File watch folders can process Clip Lists when they are submitted as specially formatted xml files. Each clip in the list can optionally include trimming information.

SelenioFlex™ File Users Guide Using SelenioFlex File
© 2015 Imagine Communications Corp. Proprietary and Confidential. Version 2.10.0 | Page 79
The Clip List xml files can include one or more clip, and for each clip the video and audio can come from the same clip or from different clips. If the video and audio come from different clips, and if they have different durations, then the duration of the video will determine the duration of that segment.
For each clip you can specify more than one audio source file. For example, 6 mono audio files can be used to create a surround sound file.
For Stream Engines audio clip channel masking is supported. That is, if the source file includes more than one audio channel then you can specify which channels to use in the output file. For example, if the source is a surround Dolby Digital (AC-3) audio file and you want to make a stereo audio output then you can specify only channels 1 and 3 (left front and right front) as the source for the stereo output.
Sample Clip List xml files are included in the SFX-File documents folder (by default, C:\Program Files\Imagine Communications\SFX-File\docs).
Transcode Tasks The Transcode Tasks tab is used to monitor the status of the files you have dropped into watch folders. If this tab is not showing you can right click in the tabs area to show it, or you can use the main menu to select Transcode > Transcode Tasks.
Queues When you drop files into the watch folder they will be queued up until they can be assigned to a resource and a job can be started. Queued tasks can be canceled.
While the tasks are in the queue, they can be re-prioritized. Right click a task and use the Set Priority option to change the priority.

SelenioFlex™ File Users Guide Using SelenioFlex File
© 2015 Imagine Communications Corp. Proprietary and Confidential. Version 2.10.0 | Page 80
Tasks Tasks can have the following states: Pre Process, Queued, In Progress, Post Process, Completed, Failed, Cancelled.
Details about the selected task will be shown in the right hand panel. If the task status is "Complete" then it will show the date/time that the task completed. If the task failed then the Status panel will show the reason for the failure. There is also be a link to the source file, and a button that allows you to "Get Project" for the selected task.
If you used a QC Server to analyze the output file you will be able to click the Q.C. link to access the QC report for the file.
SFX-File keeps a record of the output file or files in the database in the form of an "asset". The asset contains a link to the output file or files, as well as metadata about the files. For completed tasks the bottom panel shows the files in the output asset. Each type of file in the output will be listed on its own tab. If you select a file then metadata about that file will be shown to the right.
Once the task has completed, you can also select an output file and click the "Open" button to open it in a player (assuming that you have a compatible player installed), or you can click the "Open Folder" button to open the containing file for the selected file.
Purging Transcode Tasks from the Database Transcode Task records are only kept in theSFX-Filedatabase for the number of days you have set in Manager > Options > Manager Prefs before the oldest records are purged. If you would like to keep older historical records then you should periodically save the database records.
Managed Files The SFX-File Manager keeps track of the files it needs in order to monitor watch folders and assign tasks. To see a complete list of all of the files that are being managed by the Server, click on the Managed Files tab. If the tab is not showing you can right click on the tabs bar and show the tab, or choose Manager > Managed Files from the main menu.
You can edit, delete and add files and folders using this window.

SelenioFlex™ File Users Guide Using SelenioFlex File
© 2015 Imagine Communications Corp. Proprietary and Confidential. Version 2.10.0 | Page 81
Alerts All SFX-File Manager activity is automatically logged, stored in theSFX-Filedatabase for 35 days, and shown on the Alerts tab.
Note that Alerts are considered to be "temporary" data, and you cannot store them for more than 35 days. However, if you want to decrease the number of days that Alerts are stored before being purged, you can use the main menu to select Manager > Options, and on the Manager Prefs tab you can enter the number of days you want to store data for before it is purged. (This setting also affects how long Transcode Task information is stored before being purged.)
You can use the Alerts functions to set up recognized activities into categories, and to set up rules that define which person should be emailed a message each time the activities in a selected category have occurred.
On the Alerts tab, click the Categories button, then on the Alert Categories window click on the New button. This will open the Edit Category window.
Give the category a name, and then choose the types of events you want to be in this category from the Available Alert Types list, and use the ">" button to move them to the Selected Alert Types. Then click the Save button to create your new category.
Once you have created a category, you can set up message rules to send an email to a designated person whenever an event in that category is detected.
To use the email notification feature, you must setup the email server that will be used, and set up email addresses. Click on the Servers button, and then enter in your email server information. Save the email server information.
Return to the Alerts tab, click on the Address Book button and enter the email addresses you would like to use when you send out notifications.

SelenioFlex™ File Users Guide Using SelenioFlex File
© 2015 Imagine Communications Corp. Proprietary and Confidential. Version 2.10.0 | Page 82
Return to the Alerts tab and click on the Rules button. Use this to set messaging rules to assign which people in your address book will receive notification of which categories of alerts. To create a new messaging rule, click on the New button.
Give the messaging rule a name. On the Filter tab you will see a list of all of the alerts categories you created previously. Pick the ones that you want to use for this messaging rule. On the Notify tab you will see a list of all of the email addresses you previously added to your Address Book. Pick the Addresses that you want to use when messages are sent. Once you have saved the new rule, emails will be sent out to the appropriate people based on the settings.
As you use SFX-File, alerts will be generated, and items will be entered into the database whether or not they are emailed to an individual using a messaging rule. You can filter the alerts that are displayed using the criteria at the top of the window.
You may also see a "Bulk Alert" displayed in the Alerts list. This type of alert will be generated if the same alert is generated over and over. Instead of displaying (and emailing) the same alert repeatedly, the individual alerts will be accumulated into a bulk alert, and displayed (or sent) after 10 minutes and then every 30 minutes after that if the alert keeps repeating.
If you highlight an item in the Alerts list, then additional information about that alert will be displayed in the bottom panel of the window, including a record of whom the alert was emailed to (if it was selected in a messaging rule).
As with all tables displayed in the Console, you can export the items shown in the Alerts table by right clicking on the column headings and choosing Export. Alternatively, you can click on the Export button found above and to the right of the table.
Licenses The Licenses tab shows you the licensed features that are managed by the Imagine Communications License Server, including the SFX-File features and the Zenium Resource features. It will not show you the licenses that are used by a Stream Engine.

SelenioFlex™ File Users Guide Using SelenioFlex File
© 2015 Imagine Communications Corp. Proprietary and Confidential. Version 2.10.0 | Page 83
Schedule The Schedule tab is not shown by default. To show this tab right click in the tabs bar, unlock the tab bar if it is locked, and select the Schedule option.
Click the New button to create a new scheduled task, or pick an existing task and click the Edit button to modify an existing task. There are 3 types of tasks that you can schedule.
• Reboot Host: schedule a resource to reboot for maintenance purposes, for example after a software update or after applying a new Stream license key
• Run Project: schedule a project to run (this is normally only used for live encoding, but can also be used to schedule a transcode task)
• Configure Resource: Allows you to bring the resource Online or Offline on a schedule, and optionally to change which group the resource is assigned to. For example, you may want to bring a resource (or a group of resources, as selected on the Targets tab) offline, then move the resources to another group, and then bring the resources back online in the new group. This will allow you to assign more resources to a particular project on a managed basis.
Each task has a Task Name, a Description and an "Auto Purge" option. Normally you will leave the scheduled task's "Auto Purge" option selected. This will automatically delete the task schedule from the database 10 days after it has completed. Note that this will not delete the record of the completed Job, or other recorded task information from the database.
Targets: This tab provides options to choose what to do if the targeted resource is busy.
Task: This tab allows you to enter information specific to the type of task you selected.
Schedule: This tab allows you to set when the task takes place (time/date, once, repeatedly, etc.).
Scripts: If you enabled the Scripting option, then you will be able to provide a script that will run before or after a scheduled task.
On the main interface’s Schedule tab, all scheduled tasks will be shown. If a task is in progress, you will have a Pause button to allow you to temporarily suspend the task. If the task is currently paused, then you will see a Resume button. You can also delete tasks you no longer need.
If you click on a task, you will see a list of Selected Task Events in the lower pane. This log shows you a record of the task, and any messages associated with the task (e.g., Success, Missed allowable run window, etc.). As with all lists, you can right click on the column header and export the list as a CSV file.
Network Monitor The Network tab gives you a quick overview of the status of all of the resources that can be accessed by SFX-File. The Network Monitor tab is not shown by default. To show this tab right click in the tabs bar, unlock the tab bar if it is locked, and select the Network Monitor option.
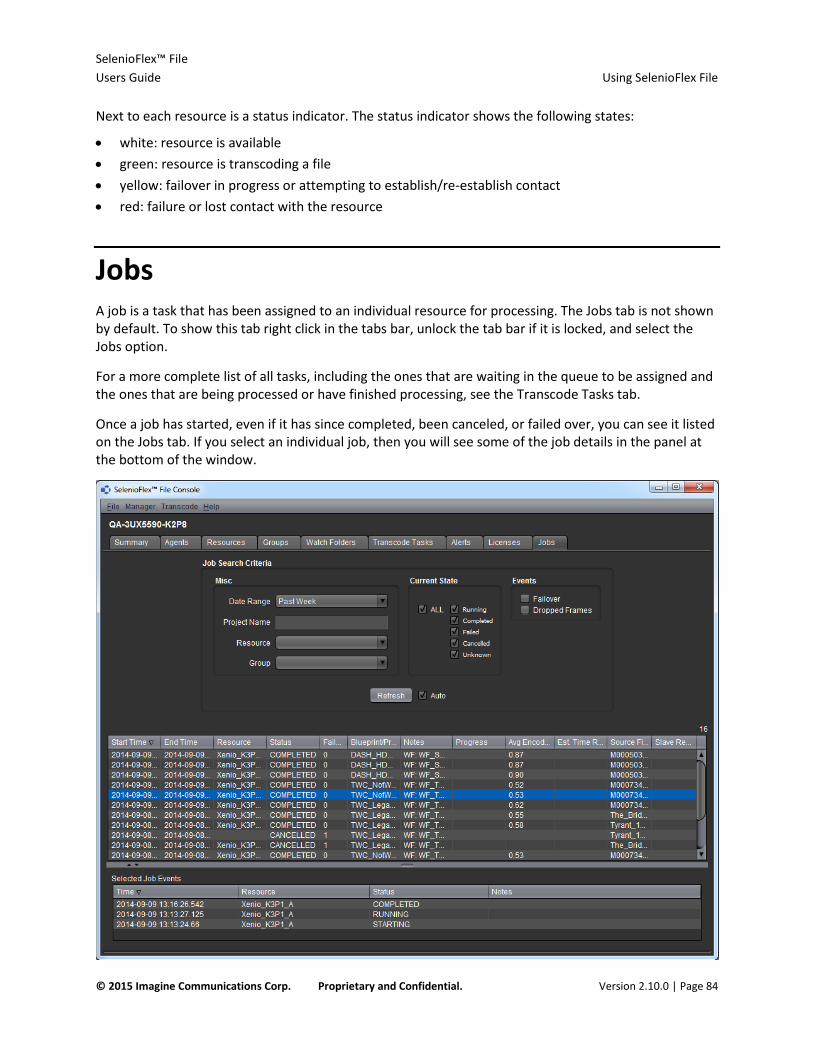
SelenioFlex™ File Users Guide Using SelenioFlex File
© 2015 Imagine Communications Corp. Proprietary and Confidential. Version 2.10.0 | Page 84
Next to each resource is a status indicator. The status indicator shows the following states:
• white: resource is available • green: resource is transcoding a file • yellow: failover in progress or attempting to establish/re-establish contact • red: failure or lost contact with the resource
Jobs A job is a task that has been assigned to an individual resource for processing. The Jobs tab is not shown by default. To show this tab right click in the tabs bar, unlock the tab bar if it is locked, and select the Jobs option.
For a more complete list of all tasks, including the ones that are waiting in the queue to be assigned and the ones that are being processed or have finished processing, see the Transcode Tasks tab.
Once a job has started, even if it has since completed, been canceled, or failed over, you can see it listed on the Jobs tab. If you select an individual job, then you will see some of the job details in the panel at the bottom of the window.
SelenioFlex™ File Users Guide Using SelenioFlex File
© 2015 Imagine Communications Corp. Proprietary and Confidential. Version 2.10.0 | Page 85
If you select a job and then right click on the selected job, you will see 3 options: Cancel Job, Transcode Task and Get Project. Selecting Transcode Task will bring up a window that gives you more details on that specific task, and will give you access to the final output if the task has completed. This information is also available on the Transcode Tasks tab.
You can filter which jobs are shown in the Jobs list using the categories at the top of the Jobs tab. In the Misc. section, if you leave the date range set to All and the other fields blank, then you will be shown all the job records in the database that meet the other criteria. Note that job records are only kept in the database for the number of days you have set in Manager > Options > Manager Prefs before the oldest records are purged.
If you want to just see the job records for a specific project (as shown in the Project column) you can type in the specific project you are interested in. The Resource and Group categories have drop down boxes that show you the resources and groups that SFX-File has a record of, even if that resource or group doesn’t currently have job record.
In the Current State section, you can choose all possible states, or just the job states you are interested in. Leaving them all blank is the same as selecting All.
If you would like to see job events instead of the current state, you can choose to filter by Failover or Dropped Frames (normally dropped frames is only a concern when using Live Stream Manager, not SFX-File). You cannot see job events and current jobs at the same time.
While a job is running, a progress bar will be shown in the Progress column.
If you want to export the table shown on the Jobs tab, right click on the columns heading, and choose Export.
Using Quality Control Servers If you have purchased a QC server that is compatible with SFX-File (either Tektronix Cerify or Vidchecker or Interra Systems Baton) then you will be able to automatically submit files to the QC server as soon as the task has completed. The QC server will analyze the file using the test that you have selected. The Transcode Task details includes a link which gives you access to the QC report. You can also choose whether or not to fail the task based on the results returned from the QC server.
Setting Up the QC Server From the main Console menu select Transcode > QC Servers.
To add a new QC Server, first select the Server Type, selecting the QC Server you intend to use. Then click the green + button to add a new QC Server to the list. This will activate the area on the General tab so that you can enter a Service Name and a Service location. The location is normally the URL such as http://hostname:port/path. If you have selected a Baton QC Service they you will also have to use the Advanced tab to enter the Username and Password for the Baton service. Click Save to save your settings and to add the service to the QC Server drop-down list.

SelenioFlex™ File Users Guide Using SelenioFlex File
© 2015 Imagine Communications Corp. Proprietary and Confidential. Version 2.10.0 | Page 86
Once you have added a service, should you need to modify it click the Edit button (the button with the pencil icon). You will then be able to modify your settings in the General and Advanced tabs, saving or cancelling your changes as needed.
Adding a QC Server to a Watch Folder Select Transcode > Watch Folders and then click the New or Edit button to open the Watch Folder window. In the Advanced Options there is a Quality Control section. Click the Edit button to open the QC Options window.
At the top of the QC Options window is a drop-down box to allow you to pick the QC Service you set up previously.
You must then select which QC status will cause the transcoded file to fail. If you do not want the transcode to fail because of a QC status, then you can choose the "Never fail transcode because of QC result" option.
There is also an option to Bypass QC in case of service unavailability. This will prevent jobs from being stalled in case the QC server is offline for some reason, which may or may not be desirable, depending on your workflow.
The "Service specific options" shown at the bottom of this window will change, depending on which type of QC Server you have selected.
If you select a Cerify QC Sever you will be prompted to select a Test Profile Name (which you will need to have set up previously on the Cerify system), a Media Location name (matching what is set in the Cerify system using Administration > Modify Media Location), and the priority that will be used by the Cerify system when running the analysis on the file.
If you selected a Baton QC Server you will be prompted to select a Test Plan (which you will need to have set up previously on the Baton system) and the priority that will be used by the Baton system when running the analysis on the file. The media location drives are set using the Baton/Setup/ContentLocations page in the Baton software.
Testing Your Setup It is generally useful to test your failover scheme, and to verify that alerts are being logged and notifications are being sent out. There are many ways to simulate an encoder failure from pulling the network cable on an individual encoder to rebooting the system manually.
You can also simulate a failure by going to the Resources tab, right clicking on a resource, and selecting Advanced > Fail Resource.
Remote Software Upgrades This section applies to Agent and Encoding resources installed on a Windows OS only.

SelenioFlex™ File Users Guide Using SelenioFlex File
© 2015 Imagine Communications Corp. Proprietary and Confidential. Version 2.10.0 | Page 87
Once you have upgraded the SFX-File Manager to version 2, and at least one Console to 2, you will be able to manage remote upgrades of SFX-File Agent and Encoding Resources from the Console. You will be able to upgrade the SFX-File Agent software, The Zenium Server software and the Stream Transcoding software. If you plan to upgrade the Stream software it is recommended that you apply any new key upgrades before you do the upgrade. That way you will not need to reboot the host system after applying the new license.
Note that Zenium Plugins are not updated using this function. Instead, Zenium Plugins are managed using the Zenium Repo Server. Each Zenium Server service can contact the Repo to update the plugins that are used by the Zenium resources on the local system.
To use the Software Upgrade function, go to the Agents tab. Select the host system or systems that you would like to upgrade. Click the Software Upgrade button.
• Choose the Software Package you would like to upgrade: SFX-File Agent, Stream software, Other
Install or Other Uninstall. • Browse to the Installer to use for the software install/uninstall. • Enter a username and password for the system that will be upgraded. The user you specify needs to
have administrative privileges on the Host system(s).
While the software is being upgraded you can select Manager > Software Upgrades to see a Software Upgrade Status window. Note that as part of the software upgrade the host system that is being upgraded will be rebooted as required by the update.
If you are getting an error when you try to use this feature then you may need to modify your network access sharing and security settings. Please see the Troubleshooting section for details.

SelenioFlex™ File Users Guide SNMP Monitoring
© 2015 Imagine Communications Corp. Proprietary and Confidential. Version 2.10.0 | Page 88
SNMP Monitoring Simple Network Management Protocol (SNMP) exposes management data in the form of variables on managed systems, which describe the system configuration. These variables can then be queried by managing applications.
A software component called an agent runs on each managed system and reports information via SNMP to the managing systems. SNMP agents expose management data on the managed systems as variables (such as "free memory", "system name", "number of running processes", "default route"). The variables accessible via SNMP are organized in hierarchies. These hierarchies, and other metadata (such as type and description of the variable), are described by Management Information Bases (MIBs).
When you install the SFX-File Manager one of the Configuration Wizard options is "Use SNMP Adapter". If you enable this option an SNMP extension agent will be registered with the Windows SNMP service, and traps will be set in response to SFX-File alert events.
You can also choose to enable the "Use HTML Adapter" option. This will allow you to use a simple, browser based view of the Manager’s management parameters. To view this page, open your browser and enter http://<hostname>:port or http://<ip address>:port.
For more information see the SelenioFlex_SNMP_Monitoring.pdf file installed by default in C:\Program Files\Digital Rapids\Transcode Manager\docs.

SelenioFlex™ File Users Guide Advanced User Security
© 2015 Imagine Communications Corp. Proprietary and Confidential. Version 2.10.0 | Page 89
Advanced User Security If you enabled basic SFX-File Manager security during installation, providing an Admin Username and Password, you will also be able to access the Advanced user security options. From the main Console menu select Server > Security. (If this is grayed out you can enable it by running the SFX-File Configuration Wizard, selecting it from the Windows Start menu.)
There are two options for managing your user lists. You may set up a user list using your SFX-File database using the Local Users tab. Alternatively you can use External Authentication Providers to select an LDAP server to manage your users.
When managing your "Local Users" list you can click the New button to add a user or Edit to modify an existing user.
Type in the Username and Password that users will enter when they launch the SFX-File Console.
There are 4 available Roles for users:
• Viewer - see information, search for information (e.g., jobs, alerts), grab log files • Operator - all privileges of Viewer plus: schedule tasks, run tasks, pause/resume/delete tasks, set
priority on tasks • Configuration - all privileges of Operator plus: create groups and assign resources, configure watch
folders, configure QC servers, configure Agents, setup alerts • Administrator - all privileges of Configuration role plus: set up security roles for users, update
software on Agents
Features permitted based on role (Viewer, Operator, Configuration, Administrator)
Feature V O C A
Network Monitor: switch between "Show Status" and "Monitor Streams" Y Y Y Y
Network Monitor: Monitor Streams: change Group, Layout, Page, Auto Cycle
Y Y Y Y
Groups: Can see groups, expand tree Y Y Y Y
Groups: Add, Edit or Delete group x Y Y Y
Groups: drag-and-drop to move resources x Y Y Y
Resources: right click: can only select Properties Y Y Y Y
Resources: right click: can select all options x Y Y Y
Schedule: can view, change view Y Y Y Y

SelenioFlex™ File Users Guide Advanced User Security
© 2015 Imagine Communications Corp. Proprietary and Confidential. Version 2.10.0 | Page 90
Schedule: add, copy, delete, disable task x Y Y Y
Schedule: Can select Edit to see details of task, but cannot save changes Y Y Y Y
Schedule: Can select Edit to see details of task, can save changes x Y Y Y
Jobs: Can view jobs, search jobs Y Y Y Y
Jobs: right click options: see Transcode Task window Y Y Y Y
Jobs: right click options: Get Project Y Y Y Y
Jobs: right click options: Cancel Job x Y Y Y
Alerts: Can view alerts, search alerts Y Y Y Y
Alerts: set up Email Servers, Address Book, Categories, Rules x x Y Y
Server > Agents: can see Agents, copy system ID, nothing else Y Y Y Y
Server > Agents: Can Grab Log Files Y Y Y Y
Server > Agents: Can Reboot Host x Y Y Y
Server > Agents: Software Upgrade x x x Y
Server > Agents: can Start, Stop Stream Service x Y Y Y
Server > Agents: Delete and config service x x Y Y
Server > Server Managed Files: Can see and search, nothing else Y Y Y Y
Server > Security x x x Y
Server > Software Upgrades x x x Y
Server > Options: can view, but cannot Save Y Y Y Y
Server > Options: can view and Save x x Y Y
Transcode > Watch Folders: Can use Edit to view setup Y Y Y Y
Transcode > Watch Folders: Can "open folder" and "Disable/Resume" x Y Y Y

SelenioFlex™ File Users Guide Advanced User Security
© 2015 Imagine Communications Corp. Proprietary and Confidential. Version 2.10.0 | Page 91
Transcode > Watch Folders: Can use New, Edit and Delete to configure watch folders
x x Y Y
Transcode > QC Servers: allow viewing but not changing Y Y Y Y
Transcode > QC Servers: configure x x Y Y
Transcode > Transcode Tasks > Tasks: view all Y Y Y Y
Transcode > Transcode Tasks > Tasks: Get Project Y Y Y Y
Transcode > Transcode Tasks > Tasks: full permission x Y Y Y
Transcode > Transcode Tasks > Work Queues: Can see list Y Y Y Y
Transcode > Transcode Tasks: Can set Priority or Cancel Tasks x Y Y Y
Transcode > Statistics: can select Resource, Project and Refresh Y Y Y Y
Transcode > Statistics: can Delete x x Y Y
If you want to manage your users with an LDAP server, you can access the settings using the External Authentication Providers tab

SelenioFlex™ File Users Guide Advanced User Security
© 2015 Imagine Communications Corp. Proprietary and Confidential. Version 2.10.0 | Page 92
The administrator of the LDAP server will also have to add the SFX-File Roles, and add members (users) to the roles.

SelenioFlex™ File Users Guide SelenioFlex File Feature Chart
© 2015 Imagine Communications Corp. Proprietary and Confidential. Version 2.10.0 | Page 93
SelenioFlex File Feature Chart SFX-File Manager
Maximum Transcode Engines supported unlimited*
Maximum simultaneous Consoles accessing server unlimited
Multiple watch folders assigned to Transcode Engines
Pause/Resume a watch folder
Intelligent load balancing
SFX-File Manager failover ᴑ
Job failover (failed jobs resubmitted automatically)
Alerts/notifications: Failures
Alerts/notifications: extended types
Monitoring of queued tasks
Monitoring and reporting on all job status
Manual job prioritization
Customizable report publishing: tasks, jobs, alerts, etc.
Clip lists based on xml file submission
Third party database integration support (Oracle, Microsoft SQL Server, PostgresSQL)
Support for scripts that are executed before/after a task
Basic Server/Console security option
Advanced security with permission levels
Server managed software upgrade for resources

SelenioFlex™ File Users Guide SelenioFlex File Feature Chart
© 2015 Imagine Communications Corp. Proprietary and Confidential. Version 2.10.0 | Page 94
SNMP monitoring of MM Server
HTML Adaptor for SNMP interface
Quality Control Tools integration (Tektronix Cerify, Interra Systems Baton or Vidchecker)
* Transcode Engines sold separately
= standard feature ᴑ = optional feature
Features are subject to change without notice.

SelenioFlex™ File Users Guide Installing and Configuring Third Party Databases
© 2015 Imagine Communications Corp. Proprietary and Confidential. Version 2.10.0 | Page 95
Installing and Configuring Third Party Databases The default SFX-File database is PostgreSQL 9. This database is included in the SFX-File installer and if you choose to install it using the installer the database will be configured for you by the SFX-File Configuration Wizard.
The following databases can be used by SFX-File:
• Oracle 10g • Oracle 11g • PostgreSQL 8 • PostgreSQL 9 (default database, included in the SFX-File installer) • SQL Server 2005 • SQL Server 2008R2 • SQL Server 2012
Notes:
• The database integration with SFX-File is what is supported. The other supported databases have their own installers and may require licenses with their own associated license fees.
• Job records and transcode task records are only kept in the database for the number of days you have set in Server > Options > Server Pref. Alert records are only kept in the database for 35 days before they are purged.
PostgreSQL 8 The following instructions are for SFX-File and PostgreSQL 8.1.8.
Install PostgreSQL 8 Run postgresql-8.1.msi to install PostgreSQL. This database may be installed on the system where the SFX-File Manager will be running, or it may be installed on another system on the LAN. Note that if you intend to set up a backup SFX-File server, then you should install the database on its own system, not on one of the systems running the primary or backup SFX-File server, so that the database is available to the backup server if the primary server fails.
All the installer's defaults can be used except for the "Initialize database cluster screen". Change the Encoding to UTF-8 and select a Password for the postgres user. If security is not a concern on this machine, use postgres as the password for simplicity.

SelenioFlex™ File Users Guide Installing and Configuring Third Party Databases
© 2015 Imagine Communications Corp. Proprietary and Confidential. Version 2.10.0 | Page 96
By default the database will only accept connections locally, from the system it has been installed on. If you have installed the database on a different system than the SFX-File server, you will need to change this default by enabling the Adresses checkbox.
Configure PostgreSQL 8 Use the Windows Start Menu, to select Start > Programs > PostgreSQL 8.1 > pgAdmin III.
Right click on the PostgreSQL Database Server and choose "Connect". You will be asked to for your password. Use the password for postgres that you entered when you installed the database.

SelenioFlex™ File Users Guide Installing and Configuring Third Party Databases
© 2015 Imagine Communications Corp. Proprietary and Confidential. Version 2.10.0 | Page 97
Once you have connected, right click on the Databases (1) icon. choose "New Database", and create a new database named "TS".
Configure the Server Install SFX-File Manager, or if already installed, run the SFX-File Config Wizard from the Start menu. Go to the Database step.
• Choose PostgreSQL 8 from the list of databases • In the JDBC URL, change to jdbc:postgresql://hostname/TS, where hostname is the host name of the
system running PostgreSQL • Change the Username / Password to the values you set when you installed the database, normally
SFXF / SFXF. (For older installations TM/TM was used as the default). • Finish the Config Wizard and allow it to restart the SFX-File Manager.
When the SFX-File Manager successfully connects to the Postgres database, it will create the database tables required.
Confirm Connectivity to the Database Launch the pgAdmin III tool (if it is not already running), right click on the PostgreSQL Database Server and choose "Connect", and log in with your username and password.
Right click on the SFX-File database in the pgAdmin III tool and select Refresh.
You should now see approximately 30 tables listed under TS/Schemas/public/Tables.

SelenioFlex™ File Users Guide Installing and Configuring Third Party Databases
© 2015 Imagine Communications Corp. Proprietary and Confidential. Version 2.10.0 | Page 98
Automatic Index Creation The SFX-File Manager creates the database indexes automatically, so there is no required index creation step.
Backup the Database The SFX-File Console includes an option to manually export your database settings. From the Console's main menu select Server > Export Settings.
Select the Database, the JDBC URL, Username and Password. Select the folder for the exported data. The exported data can also be imported later using the Console's main menu to select Server > Import Settings.
Please refer to the Postgres documentation for more information about setting up Postgres to automatically back up or to mirror the database.
Oracle 10g The following instructions are for SFX-File and Oracle 10g.
Oracle Requirements It is generally recommended that the Oracle DB Administrator creates a User dedicated to SFX-File. The User must have ‘Connect’ and ‘Resource’ roles since the SFX-File Manager will connect to the Database with this user and it will create and alter its own tables. JDBC is the connection technology used.
For Example:
SelenioFlex™ File Users Guide Installing and Configuring Third Party Databases
© 2015 Imagine Communications Corp. Proprietary and Confidential. Version 2.10.0 | Page 99
CREATE USER "TM" PROFILE "DEFAULT" IDENTIFIED BY "TM" ACCOUNT UNLOCK;
GRANT "CONNECT" TO "TM";
GRANT "RESOURCE" TO "TM";
Configure SFX-File Manager Install SFX-File Manager, or if it is already installed, run the SFX-File Config Wizard from the Start menu. Go to the Database step.
• Choose Oracle 10g from the list of databases • In the JDBC URL, change to jdbc:oracle:thin://hostname:1521:TS, where hostname is the host name
of the system running Oracle and SFX-File is the name of the database • change Username / Password to the values you use to connect to the database
When SFX-File successfully connects to Oracle for the first time, it will create the database tables required. This will confirm the connection parameters are correct. If the SFX-File Manager does not startup properly, you will need to review the mm-server.log file.
Automatic Index Creation The SFX-File Manager creates database indexes automatically, so there is no required index creation step.
Backup the Database The SFX-File Console includes an option to manually export your database settings. From the Console's main menu select Server > Export Settings.
Select the Database, the JDBC URL, Username and Password. Select the folder for the exported data. The exported data can also be imported later using the Console's main menu to select Server > Import Settings.
Please refer to the Oracle documentation for more information about setting up Oracle to automatically back up or to mirror the database.
Microsoft SQL Server 2005 The following instructions are for SFX-File and SQL Server 2005 SP1.

SelenioFlex™ File Users Guide Installing and Configuring Third Party Databases
© 2015 Imagine Communications Corp. Proprietary and Confidential. Version 2.10.0 | Page 100
SQL Server 2005 Requirements It is generally recommended that the SQL Server 2005 Server provides a Database dedicated to SFX-File. The SFX-File Manager will require a User to connect to this Database that has permission to create and alter tables. JDBC is the connection technology used.
The SQL Server database must be configured to allow snapshot isolation. If not already configured, execute the following SQL against the SFX-File Database:
ALTER DATABASE SFXF SET ALLOW_SNAPSHOT_ISOLATION ON;
Configure SFX-File Manager Install SFX-File Manager, or if it is already installed, run the SFX-File Config Wizard from the Start menu. Go to the Database step.
• Choose SQL Server 2005 from the list of databases • In the JDBC URL, change to jdbc:sqlserver://hostname;databaseName=TS where hostname is the
host name of the system running the database and SFX-File is the name of the database • change Username / Password to the values you use to connect to the database
When SFX-File successfully connects to the database for the first time, it will create the database tables required. This will confirm the connection parameters are correct. If the SFX-File Manager does not startup properly, you will need to review the mm-server.log file. If you have problems, the most common causes will be that SQL Server is not configured to allow connections from remote hosts, or that SQL Server’s Network Configuration has not enabled TCP/IP connections.
Automatic Index Creation The SFX-File Manager creates database indexes automatically, so there is no required index creation step.
Backup the Database The SFX-File Console includes an option to manually export your database settings. From the Console's main menu select Server > Export Settings.
Select the Database, the JDBC URL, Username and Password. Select the folder for the exported data. The exported data can also be imported later using the Console's main menu to select Server > Import Settings.
Please refer to the SQL Server documentation for more information about setting up Microsoft SQL to automatically back up or to mirror the database.

SelenioFlex™ File Users Guide Troubleshooting
© 2015 Imagine Communications Corp. Proprietary and Confidential. Version 2.10.0 | Page 101
Troubleshooting
SelenioFlex File Manager When the console is launched, the server does not appear in the list of found servers, even after waiting a minute or more.
Make sure the DRC SFX-File Manager service is running and set to automatic. Refer to Managing the (see "Managing the Services" on page 27) on page for more information.
The Server cannot connect to the Agent system
Did you manually upgrade your Agent system? If so, did you reboot after the uninstall phase, before moving on to the new install phase? You must reboot, as some services will only be fully uninstalled the next time you reboot. If you do not reboot, this "uninstall on next reboot" command will still be present, and the new installation will have critical files removed the next time you reboot.
All Resources are not showing up on the Server > Agents window, or the Agent Host field cycles back and forth between more than one system
Other possible symptoms of the same problem: Resources will not display properties (an error is shown instead) Failover does not work correctly (the backup system does not pick up the job, instead the primary is restarted)
This problem is caused by more than one system having the same unique Agent ID. The Agent ID is created on each system when the DRC SFX-File Agent service is run for the first time.
This problem will occur if a disk image is created after an Agent has been installed and the Agent service has been started, thereby generating an ID which is saved as part of the disk image. If that image is then used to setup other systems then the ID will not be renewed.
To correct this issue delete the registry setting found at:
[HKEY_LOCAL_MACHINE\SOFTWARE\JavaSoft\Prefs\ca\digitalrapids\mediamanager\agent]
"uuid"="1a06b24b-9700-4c46-89d9-b1d5bba87141"
(Note the uuid shown above is just an example.) Then restart the DRC SFX-File Agent service and it will generate a new UUID.
Stream Resources show a Status of "Missing" after an upgrade
Did you upgrade your Stream license key?
If so, you must reboot in order to restart the necessary services (on the Agent system both the DRC SFX-File Agent and DRC Stream Server services, on the Server system the DRC SFX-File Manager service).
Did you upgrade the Stream software?

SelenioFlex™ File Users Guide Troubleshooting
© 2015 Imagine Communications Corp. Proprietary and Confidential. Version 2.10.0 | Page 102
When you upgrade Stream the settings for the DC Stream Server service get set back to manual start and the service does not run. You can change this using the SFX-File Config Wizard or using the Windows Services. Set the startup type to auto and to assign a user account login that has permissions for yourSFX-Fileshares and then start the service.
Stream transcode jobs are not starting
If you updated your software recently, make sure you correctly re-apply the keys and rebooted your systems.
Tasks are starting, then failing
Make sure that the Outputs (as specified in the Zenium Blueprint or Stream project) exist and that they are accessible to the encoder.
For Stream resources check to make sure that you have permission to use the codec profile specified by your project.
After modifying a Stream project, changes are not being used
When assigning a project to a scheduled task there are two options: Copy file to server, or Copy and reference a network shared file. If you choose the first option, and you later modify the project, you will have to update the copy of the file that is stored on the SFX-File Manager before changes will take effect. If you choose the second option, then changes to the project in the network shared location will be saved in a project file that is already accessible to the SFX-File Manager, and the modified project will automatically be used by the Server.
Stream Project error: Can’t encode: check codec profile
If you see this error then run the project on a licensed version of the Stream software.
When you can’t encode you will normally see a red X next to the codec profile. Double click the profile to open an error window or hover your mouse over the codec profile to see the message as a tool tip. Common problems are no archive file name or other output modes selected, or trying to encode only video with a codec that is expecting video and audio.
Network Issues If the Server cannot communicate with the Agents (they do not appear in the Agents list, or they are always missing or offline), then you may have a network issue.
More than one network adapter
If you are using a system that has more than one network adapter, for example both a wireless network connection and a wired network connection, you may have problems establishing a connection between the Server and the Agent. Both types of connections will appear to be valid IP Addresses, and the first one detected by the SFX-File software will be used to attempt communication. If this is not the one that you are actually using for communication, then your Server and Agent systems will not be able to communicate.

SelenioFlex™ File Users Guide Troubleshooting
© 2015 Imagine Communications Corp. Proprietary and Confidential. Version 2.10.0 | Page 103
Use the SFX-File Configuration Wizard to either use the hostname, or to specify a hostname/IP address.
Different Subnets
The Agent and Console locate the Server using a Multicast discovery mechanism by default. If the systems are on different subnets, then the networking equipment in between will need to propagate multicast traffic in order for the automatic discovery to work. If this is not an option, you should use the Configuration Wizard to configure the system for unicast communication. See Discovery Method (on page 22).
Remote Software Upgrade Issues When a SFX-File software upgrade is attempted the following error may occur: "Test remote commands Error - exit code: 1326, Logon Failure".
This is an "unknown user name or bad password" error code as determined by the application that is used in the background to perform the upgrade (PsTools > PsExec). If the username and password are correct then most likely this is because a network access sharing and security setting must be changed.
Follow these steps to correct this error:
1. On the host system that you are attempting to upgrade, go to the following location from the windows desktop: Control Panel > Administrative Tools > Local Security Policy
2. Expand "local policies" and select "security options". 3. In the right hand pane scroll down and find the following policy:
"Network access: Sharing and security model for local accounts" 4. Change the setting to "Classic – local users authenticate as themselves" then click Apply and OK.
Additional Operating System Considerations • All systems should have proper Network Time synchronization • Recommended: Ensure systems have their Firewalls turned OFF.
This setting can be found in Control Panel > System and Security > Windows Firewall. Note: If it is not possible to turn off the Firewall then you must open the ports required by the application. For a list of the default ports used by the application see Network Ports (on page 105).
• Disable Windows Automatic Update installation (it can reboot the machine). This setting can be found in Control Panel > System and Security > Windows Update.
• Disable Windows Automatic error reporting. It will prevent the encoding process from being restarted or the machine from being rebooted by SFX-File in the event of a job failure. This setting can be found in Control Panel > Action Center > Change Action Center settings, in the "Related settings" section click "Problem reporting settings" and select "Never check for solutions".
• Disable Windows User Account Control (UAC).

SelenioFlex™ File Users Guide Troubleshooting
© 2015 Imagine Communications Corp. Proprietary and Confidential. Version 2.10.0 | Page 104
This setting can be found in Control Panel > System and Security > Action Center > Change User Account Control settings. Move the slider to "Never notify".
• Use UNC paths (e.g., \\hostname\dir\file) for watch folders and output files.
Server 2008 Encoding Performance
To improve performance change the following settings for Server 2008:
1. Right click on "My Computer" and select Properties. 2. Click on "Advanced system settings". 3. In the Performance section click the Settings button. 4. Click the Advanced tab. 5. In "Processor scheduling" set "Adjust for best performance of" to "Programs".
When using systems that use different versions of the OS on different resources
UNC Shortcuts to media files that are created on a Windows XP system are not compatible on a Windows Server 2008 or 2012 system.
Log Files If you require troubleshooting help from Imagine Communications Support, you may be asked to send some log files.
You can get the log files from any connected system using the Console. From the Console’s main menu choose Server > Agents. Choose the agent system you are trying to troubleshoot. Click the "Grab Log Files" button. This will collect the log files and copy them to a location you specify.
For reference, the default locations for log files are:
SFX-File Manager:
C:\ProgramData\Digital Rapids\Transcode Manager\logs
Zenium Server:
C:\Program Files\Common Files\Digital Rapids\KayakPluginsRepoServer\logs
Stream Server:
64-bit OS: C:\Program Files (x86)\Digital Rapids\Stream\stream-server-service.log 32-bit OS: C:\Program Files\Digital Rapids\Stream\stream-server-service.log

SelenioFlex™ File Users Guide Network Ports
© 2015 Imagine Communications Corp. Proprietary and Confidential. Version 2.10.0 | Page 105
Network Ports The following tables show which ports should be open on a machine running the given Service Component. SFX-File will function when all but the following ports are blocked.
Most of these ports can be changed from their default values by manually changing the appropriate Config Property in the conf\mm-server.conf file. The exceptions are the default port numbers used for RMI registry and Jini lookup (ports 1099 and 4160).
Service Component: DRC SFX-File Manager
Function Needed by Default Port
Proto Config Property
ServerRemote RMI Agent & Console 44010 TCP mm.server.rmi.port
Server JERI Agent & Console 44011 TCP mm.server.jeri.port
Web Services API clients to MM Server
44000 TCP mm.server.webservice.port
SNMP Agent 44050 UDP mm.server.management.snmp.port
JMX HTML Adaptor 44051 TCP mm.server.management.html.port
JMX RMI 44052 TCP mm.server.management.jmxrmi.port
Jini Multicast Discovery
Agent & Console 4160 UDP cannot be configured
Service Component: DRC JINI Services
Function Needed by Default Port
Proto Config Property
Multicast Discovery 4160 UDP cannot be configured
Unicast Discovery 4160 TCP cannot be configured
Jini Support Services (reggie, fiddler…)
44080 TCP mm.jini.jeri.port
Jini Codebase Server 44081 TCP mm.jini.classserver.port

SelenioFlex™ File Users Guide Network Ports
© 2015 Imagine Communications Corp. Proprietary and Confidential. Version 2.10.0 | Page 106
Service Component: DRC SFX-File Agent
Function Needed by Default Port
Proto Config Property
AgentRemote JERI Agent & Server 44012 TCP mm.agent.jeri.port
Service Component: DRC RMI Registry Service
Function Needed by Default Port
Proto Config Property
RMI Name server Agent local comms, Console (with secured server)
1099 TCP cannot be configured
Service Component: DRC Zenium Plugins Repo Server
Function Needed by Default Port
Proto Config Property
Zenium Plugins Agent & Server 42100 TCP mm.kayak.plugins.repo.port (also see mm.kayak.plugins.repo.url)
Service Component: DRC Zenium Server
Function Needed by Default Port
Proto Config Property
Zenium Communication between SFX-File Manager and Agents
Agent & Server 42000 TCP cannot be configured
Service Component: DRC Stream Server
Function Needed by Default Port
Proto Notes
Communication between Agents and Stream resources
Agent & Stream Engines
43778 TCP Normally Agent and Stream Engines will be on the same system, so the port does not need to be opened

SelenioFlex™ File Users Guide Network Ports
© 2015 Imagine Communications Corp. Proprietary and Confidential. Version 2.10.0 | Page 107
Service Component: DRC License Server Service
Function Needed by Default Port
Proto Notes
License feature delivery
TS Server, XWD, Zenium Engines
15000 TCP If this port needs to be changed the license package must also be modified by Tech Support
License Server Console License Sever (for admin)
15080 TCP Used when opening the License Server Console in a browser