science activityscience activity & video series& video series · science activityscience...
TRANSCRIPT
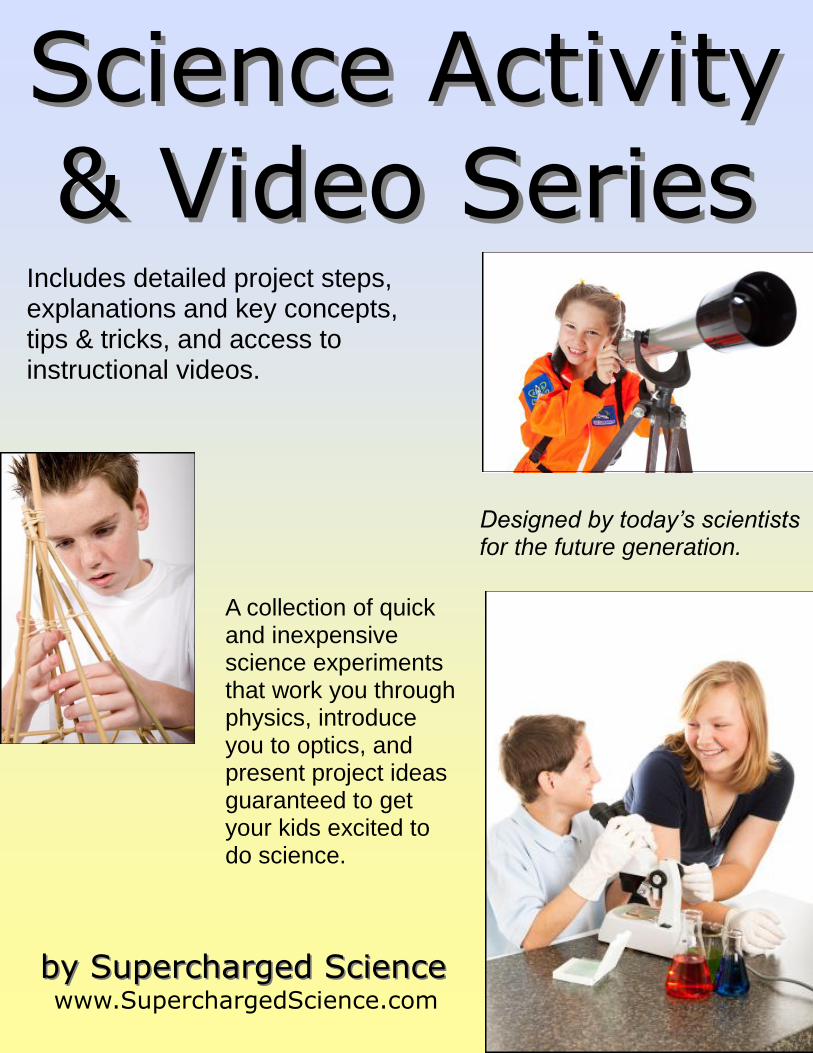
Science ActivityScience Activity
& Video Series& Video Series
A collection of quick and inexpensive science experiments that work you through physics, introduce you to optics, and present project ideas guaranteed to get your kids excited to do science.
Includes detailed project steps, explanations and key concepts, tips & tricks, and access to instructional videos.
by Supercharged Scienceby Supercharged Science www.SuperchargedScience.com
Designed by today’s scientists for the future generation.

Thank You for
purchasing the
Homeschool
Science Activity
Video Series. I
hope you will
find it to be both
helpful and
insightful in
sparking young
minds in the
field of science!
Supercharged Science SuperchargedScience.com 2
Did you ever have a
teacher that made a
real impact on you? They took a
subject you previously
thought was dull and boring and somehow
made it jump alive?
Special teachers can
touch our lives in small
ways that make big changes later in life by
phrasing a topic into just
the right words so it really clicks for you, or
simply just believing in
you when no one else around you did. These
types of teachers are
pretty amazing when it comes to inspiring
children. As a
homeschool parent,
you‘re one of those
special teachers for your child.
First, let me thank you for caring enough
about your child to be a
homeschool parent. As you know, this is a huge
commitment. While, you
may not always get the credit you deserve,
never doubt that it really
does make a difference.
This book has free
videos that go with it
to show you step-by-step how to do each
experiment. You can
view the videos at: SuperchargedScience.com/savs.htm
Access code: SAV1
Go to this page now so
you can get a preview of
the videos.
Think of this activity
book as the ―Idea Book‖, meaning that
when you see an
experiment you really like, just take it and run
(along with all its
variations).
As a homeschool parent,
you may have struggled with how to teach
science to your child.
This book can help you bring the science
concepts alive in a way
that makes sense to both you and your child.
Are you ready? Then let’s begin...
IINTRODUCTIONNTRODUCTION

Supercharged Science SuperchargedScience.com 3
TTABLEABLE OFOF CCONTENTSONTENTS Introduction…………….. ………….2
Pop Rockets….……………………..4
Simple Hovercraft…………….……6
Fast Catapult…………………….….8
Buzzing Hornet…………...………..10
Microscopes & Telescopes………....12
Teaching Science Right..…………...14
“The future belongs to those that believe in the beauty of their dreams.”
~Eleanor Roosevelt

Supercharged Science SuperchargedScience.com 4
Activity We're going to launch a
rocket by building up pressure using a chemical
reaction.
I really like this activity because it challenges kids
to think outside the box. Most kids initially see the
water and tablets as ‗fuel‘
and assume that the more they use, the higher it will
go (which is actually the opposite of what really
happens). Kids get to hone their observation skills as
they try different variations to get their
rocket to land on the roof.
I also really like this
experiment because it combines chemistry, gas
pressure, and Newton‘s laws of physical motion all
in one cool experiment.
Here‘s what it‘s all about:
Rockets shoot skyward
with massive amounts of thrust, produced by
chemical reaction or air pressure. Scientists create
the thrust force by shoving a lot of gas (either air
itself, or the gas left over from the combustion of a
propellant) out small exit nozzles.
According to the universal laws of motion, for every
action, there is equal and opposite reaction. If
flames shoot out of the rocket downwards, the
rocket itself will soar upwards. It‘s the same
thing if you blow up a balloon and let it go—the
air inside the balloon goes to the left, and the balloon
zips off to the right (at least initially).
A rocket has a few parts different from an airplane.
One of the main differences is the absence
of wings. Rockets utilize fins, which help steer the
rocket, while airplanes use wings to generate lift.
Rocket fins are more like the rudder of an airplane
than the wings.
Another difference is the how rockets get their
speed. Airplanes generate
thrust from a rotating blade, whereas rockets get
their movement by squeezing down a high-
energy gaseous flow and squeezing it out a tiny exit
hole.
If you‘ve ever used a garden hose, you already
know how to make the water stream out faster by
placing your thumb over the end of the hose. You‘re
decreasing the amount of
area the water has to exit the hose, but there‘s still
the same amount of water flowing out, so the water
compensates by increasing its velocity.
This is the secret to
converging rocket nozzles—squeeze the flow
down and out a small exit hole to increase velocity.
Materials
Water
Alka-seltzer tablets
Fuji film canister (or bottle
with a cork or snap-on lid)
Experiment To start with, watch the video for this experiment
at:
SuperchargedScience.com
/savs.htm
Access code: SAV1
PPOPOP RROCKETSOCKETS

Supercharged Science SuperchargedScience.com 5 Be careful with this!!
These rockets can wind up on your roof, so do this
activity outside and away from structures!
1. Fill your container
partway with water
2. Drop in a tablet
3. Working quickly, cap the container and invert
it so the film canister is bottom-side up. If
you‘re using a cork and bottle, stand the bottle
right-side up so that
the cork is the thing that flies off.
Experiment with different amounts of water and
tablets to see how high your rocket can go. You
can add a nose and fins using hot glue later.
What’s Going On?
For every action, there is equal and opposite
reaction. If flames shoot out of the rocket
downwards, the rocket
itself will soar upwards. It's the same thing if you
blow up a balloon and let it go-the air inside the
balloon goes to the left, and the balloon zips off to
the right (at least, initially).
Your rocket generates a
high pressure through a chemical reaction. The
alka seltzer and water combine to form carbon
dioxide gas (CO2) which builds until it pops the lid
off your film canister. The lid flies one way and the
tube goes the other. Newton's Third Law in
action!
You don't have to just use
alka seltzer and water... what about baking soda
and vinegar? The
combination of those two also produces carbon
dioxide gas.
What other chemicals do
you have around that also produces a gas during the
chemical reaction? Chalk and vinegar, baking soda,
baking powder, hydrogen peroxide, isopropyl
alcohol, lemon juice, orange juice...?
You can also modify your rocket body design. Add
foam fins and a foam nose
(try a hobby or craft shop), hot glued into
place. Foam doesn't mind getting wet, but paper
does.
Put the fins on at an angle
and watch the seltzer rocket spin as it flies
skyward. You can also tip the rocket on its side and
add wheels for a rocket car,
stack rockets, for a multi-staging project, or strap three
rockets together with tape and launch them at the same
time! You can also try different containers using
corks instead of lids.
This experiment is a prime
example of Newton‘s Third Law of Motion: for every
action there‘s an equal and opposite reaction. When the
film top flies off in one direction (usually held into
place by the floor), the rocket
body shoots in the opposite direction.
Questions to Ask
1. Does water temperature matter?
2. Do crushed tablets work better than whole pieces?
3. How many tablets can you add at once?
4. What if you use vinegar instead of water? Soda
water?
5. Does more water, tablets, or air space give you a
higher flight?
6. What happens if you strap
this rocket to a matchbox car? Which way does the
lid go, and which way does the car move?
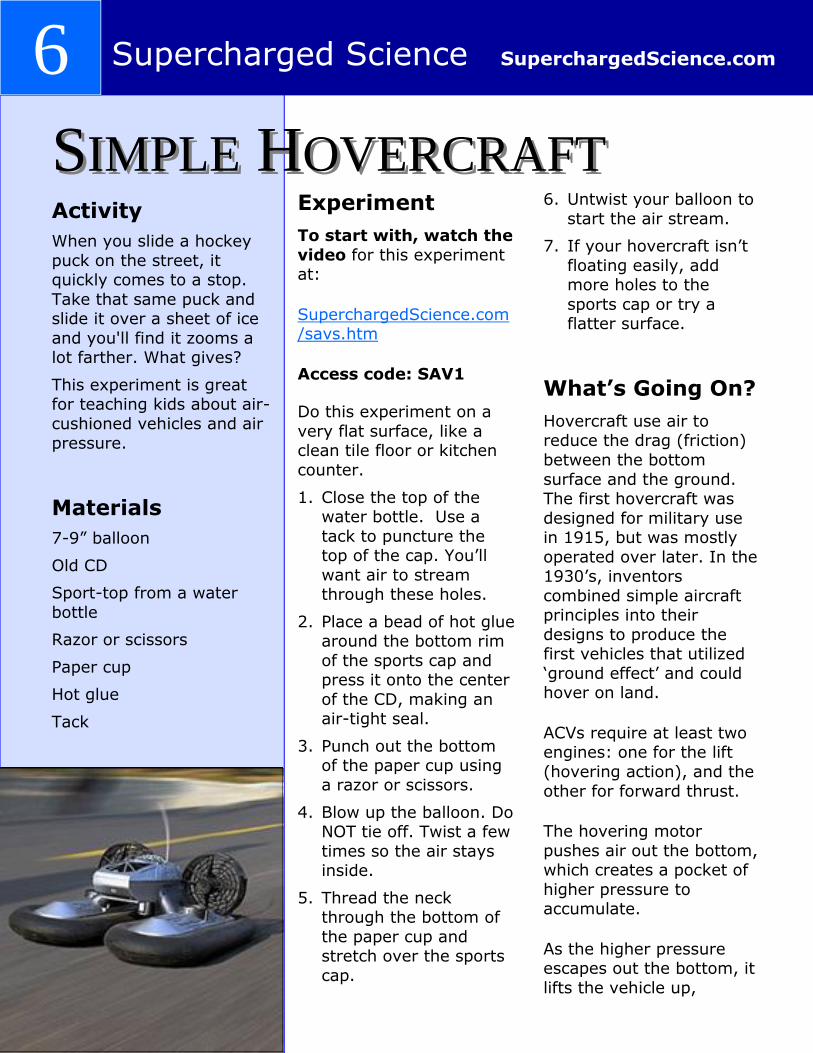
Supercharged Science SuperchargedScience.com 6
Activity
When you slide a hockey
puck on the street, it quickly comes to a stop.
Take that same puck and slide it over a sheet of ice
and you'll find it zooms a lot farther. What gives?
This experiment is great for teaching kids about air-
cushioned vehicles and air
pressure.
Materials
7-9‖ balloon
Old CD
Sport-top from a water
bottle
Razor or scissors
Paper cup
Hot glue
Tack
Experiment
To start with, watch the
video for this experiment at:
SuperchargedScience.com/savs.htm
Access code: SAV1
Do this experiment on a
very flat surface, like a clean tile floor or kitchen
counter.
1. Close the top of the water bottle. Use a
tack to puncture the top of the cap. You‘ll
want air to stream through these holes.
2. Place a bead of hot glue around the bottom rim
of the sports cap and press it onto the center
of the CD, making an air-tight seal.
3. Punch out the bottom of the paper cup using
a razor or scissors.
4. Blow up the balloon. Do NOT tie off. Twist a few
times so the air stays inside.
5. Thread the neck through the bottom of
the paper cup and stretch over the sports
cap.
6. Untwist your balloon to
start the air stream.
7. If your hovercraft isn‘t
floating easily, add more holes to the
sports cap or try a flatter surface.
What’s Going On?
Hovercraft use air to reduce the drag (friction)
between the bottom
surface and the ground. The first hovercraft was
designed for military use in 1915, but was mostly
operated over later. In the 1930‘s, inventors
combined simple aircraft principles into their
designs to produce the first vehicles that utilized
‗ground effect‘ and could hover on land.
ACVs require at least two engines: one for the lift
(hovering action), and the
other for forward thrust.
The hovering motor
pushes air out the bottom, which creates a pocket of
higher pressure to accumulate.
As the higher pressure escapes out the bottom, it
lifts the vehicle up,
SSIMPLEIMPLE HHOVERCRAFTOVERCRAFT

Supercharged Science SuperchargedScience.com 7 creating the ‗hovering‘
effect. Although some hovercraft utilize air ducts
to use one engine for both jobs (thrust and hover),
most require two or more. In addition to small
vehicles, two hover trains are currently in operation
(one in Japan, the other in Austria) since 1985, using
an underground cushion of air to reduce track friction
and increase speed.
The balloon is shoving air
through the tiny holes in
the cap, which escapes out the sides of the CD. Make
sure your CD and table are both pretty flat, or you'll
have drag issues. The air is a lubricating layer
between the CD and table that allows the hovercraft
to slide a lot easier by reducing the friction
between the CD and the table.
Friction is the force between two objects in
contact with one another.
Friction is dependent on the materials that are in
contact with one another: how much pressure is put
on the materials, whether the materials are wet or
dry, hot or cold. In other words, it's quite
complicated! The friction between the puck and the
street are a lot higher than with ice.
Friction happens due to
the electro-magnetic forces between two
objects. Friction is not necessarily due to the
roughness of the objects but rather to chemical
bonds "sticking and slipping" over one another.
Questions to Ask
1. Does the shape of the balloon matter?
2. Why bother using the paper cup?
3. What happens if you
open the cap of the bottle to allow greater
airflow from the balloon?
4. Is there higher pressure inside or outside the
balloon?
5. What else can you use
besides a CD?
6. Does it matter if the air
is heated or chilled?
7. How (and where) can
you add a thruster to your design?
8. What is the longest
hover time your hovercraft can do?
9. What happens if you poke more (or less)
holes in the sport top?
The Secret to Teaching Science
What is learning really all about? Kids are naturally curious about their world. When we feed that curiosity, their minds thrive. Science is all about understanding the world around is. It’s NOT about memorizing facts that don’t seem to relate to the real world.
Why learn science? Studying science helps kids better understand their world, provides them with logical and critical thinking skills as they learn a systematic approach to solving problems, and helps them be better prepared for life. Or course, it’s fun, too!
What’s the most important factor in determining how well kids learn? Motivation. Motivation comes first, learning comes second. When kids are fired up about a topic, they do whatever it takes to learn it. Scale the depth you go into according to your kid’s age. Don’t worry if this seems like too much work… there’s a shortcut! (See page 14...)

Supercharged Science SuperchargedScience.com 8
Activity
The higher you pitch a ball
upwards, the more energy you store in it. Instead of
breaking our arms trying to toss balls into the air,
let's make a simple machine that will do it for
us.
I really like this
experiment because
there‘s so much room for creativity and new ideas.
After you‘ve done this activity once, hand the
kids extra supplies to see how they can improve this
design to launch objects even farther.
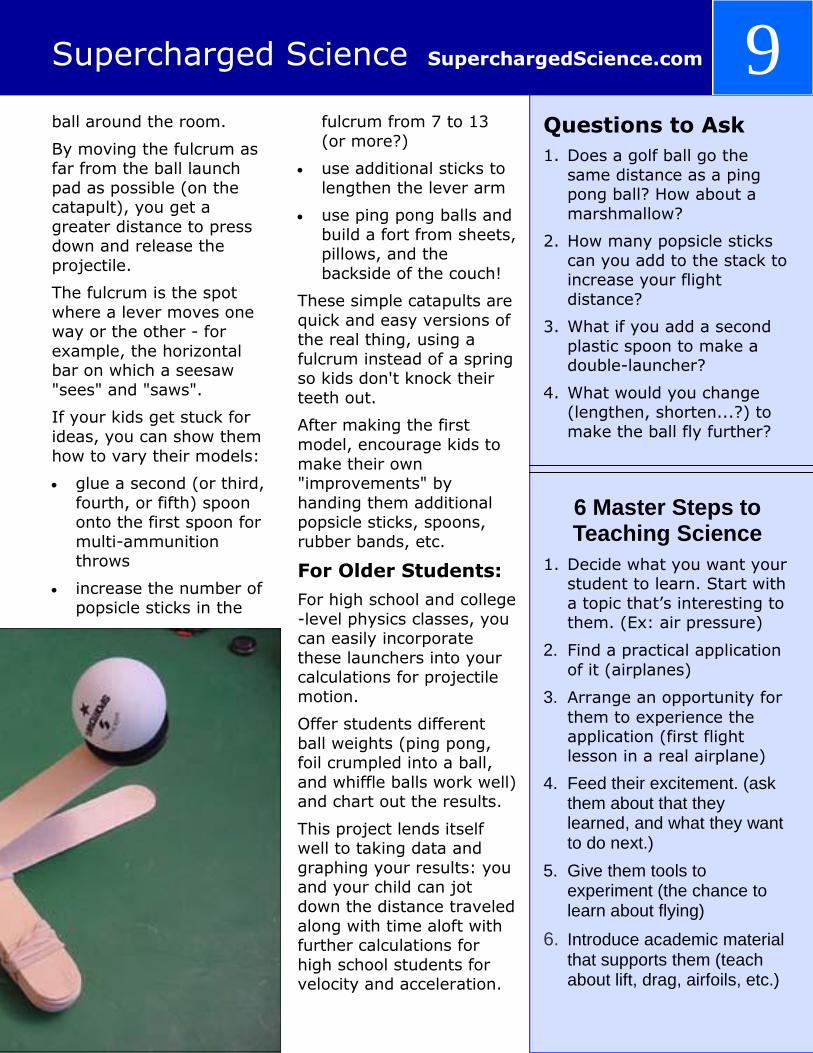
Materials 9 tongue-depressor-size
popsicle sticks
Four rubber bands
Milk jug cap OR plastic spoon
Something to toss around,
like a ping pong ball, marshmallow, or ball of
crumpled up aluminum foil
Experiment
To start with, watch the
video for this experiment at:
SuperchargedScience.com/savs.htm
Access code: SAV1
Watch out for the hot glue
gun—help your kids as they need it when adding
the spoon launcher.
1. Stack 7 popsicle sticks together. Wrap a rubber
band around each end to keep the stack together.
2. Stack 2 popsicle sticks together, and secure only
one of the ends with a rubber band.
3. Open up the two-stack (like the jaws of an
alligator) and slide the stack of seven in between
to form a T-shape (see image).
4. Secure three sides (as
shown in image) with a rubber band, binding it
together.
5. Hot glue a film can lid
or plastic spoon to the top popsicle stick.
6. Add your ball to the spoon, grab the cross0bar
handle, and launch!
What’s Going On?
Catapults store energy
until you hit the trigger. You store energy in a
rubber band every time you stretch it out - the pull
you feel from the rubber band is called potential
energy.
Catapults store potential
energy by stretching ropes and rubber bands, and
even by bending and flexing the wooden lever.
The more energy you pack
in, the higher your ball will go.
This catapult uses elastic kinetic energy stored in
the rubber band to launch the ball skyward.
We're utilizing the "springiness" in the
popsicle stick to fling the
FFASTAST CCATAPULTATAPULT
Supercharged Science SuperchargedScience.com 9 ball around the room.
By moving the fulcrum as far from the ball launch
pad as possible (on the catapult), you get a
greater distance to press down and release the
projectile.
The fulcrum is the spot
where a lever moves one way or the other - for
example, the horizontal bar on which a seesaw
"sees" and "saws".
If your kids get stuck for
ideas, you can show them
how to vary their models:
glue a second (or third,
fourth, or fifth) spoon onto the first spoon for
multi-ammunition throws
increase the number of popsicle sticks in the
fulcrum from 7 to 13
(or more?)
use additional sticks to
lengthen the lever arm
use ping pong balls and
build a fort from sheets, pillows, and the
backside of the couch!
These simple catapults are
quick and easy versions of the real thing, using a
fulcrum instead of a spring so kids don't knock their
teeth out.
After making the first
model, encourage kids to
make their own "improvements" by
handing them additional popsicle sticks, spoons,
rubber bands, etc.
For Older Students:
For high school and college
-level physics classes, you can easily incorporate
these launchers into your calculations for projectile
motion.
Offer students different
ball weights (ping pong, foil crumpled into a ball,
and whiffle balls work well) and chart out the results.
This project lends itself well to taking data and
graphing your results: you and your child can jot
down the distance traveled
along with time aloft with further calculations for
high school students for velocity and acceleration.
Questions to Ask
1. Does a golf ball go the
same distance as a ping pong ball? How about a
marshmallow?
2. How many popsicle sticks
can you add to the stack to increase your flight
distance?
3. What if you add a second
plastic spoon to make a double-launcher?
4. What would you change (lengthen, shorten...?) to
make the ball fly further?
6 Master Steps to Teaching Science
1. Decide what you want your student to learn. Start with
a topic that‘s interesting to them. (Ex: air pressure)
2. Find a practical application
of it (airplanes)
3. Arrange an opportunity for
them to experience the application (first flight
lesson in a real airplane)
4. Feed their excitement. (ask them about that they learned, and what they want to do next.)
5. Give them tools to experiment (the chance to learn about flying)
6. Introduce academic material
that supports them (teach about lift, drag, airfoils, etc.)
Supercharged Science SuperchargedScience.com 10
Activity
Did you know that you can
make a very LOUD parent-annoyer using simple
household materials and a quick lesson in resonance?
This activity is a great example of how tiny
vibrations can be amplified into something incredibly
loud using a sound
chamber. I especially like this one because it looks
like a piece of junk... until you play it.
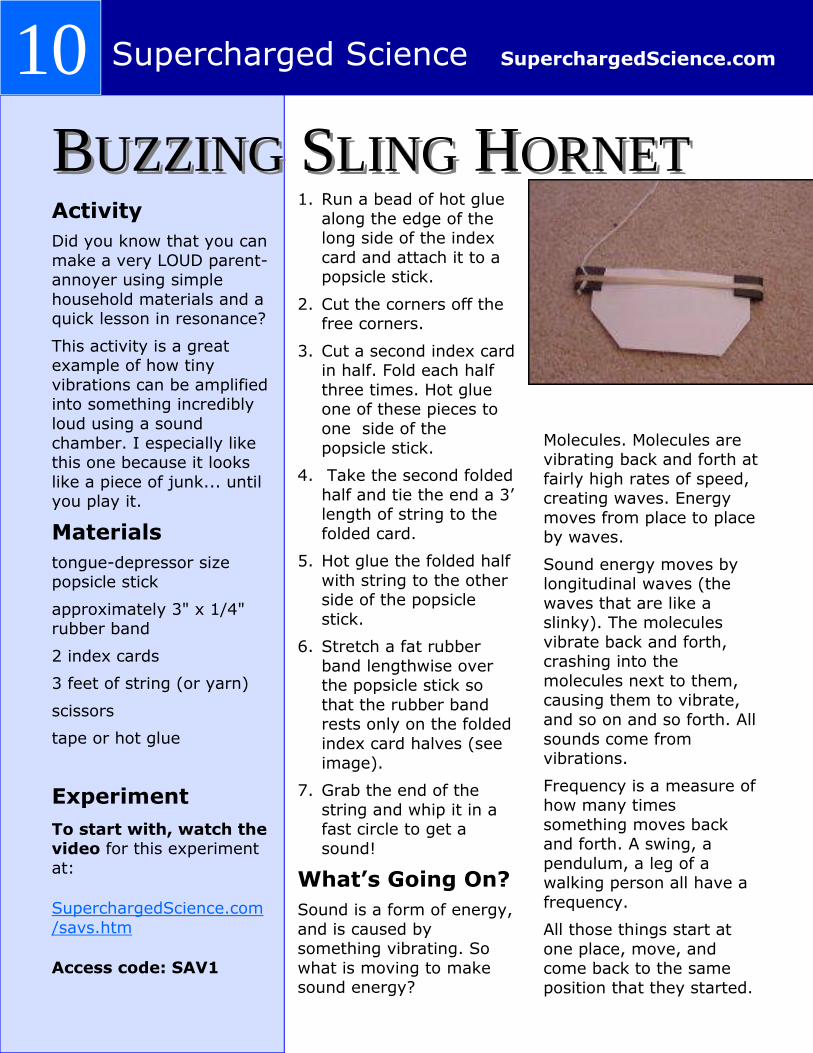
Materials
tongue-depressor size popsicle stick
approximately 3" x 1/4" rubber band
2 index cards
3 feet of string (or yarn)
scissors
tape or hot glue
Experiment
To start with, watch the video for this experiment
at:
SuperchargedScience.com
/savs.htm
Access code: SAV1
1. Run a bead of hot glue
along the edge of the long side of the index
card and attach it to a popsicle stick.
2. Cut the corners off the free corners.
3. Cut a second index card in half. Fold each half
three times. Hot glue one of these pieces to
one side of the
popsicle stick.
4. Take the second folded
half and tie the end a 3‘ length of string to the
folded card.
5. Hot glue the folded half
with string to the other side of the popsicle
stick.
6. Stretch a fat rubber
band lengthwise over the popsicle stick so
that the rubber band rests only on the folded
index card halves (see
image).
7. Grab the end of the
string and whip it in a fast circle to get a
sound!
What’s Going On?
Sound is a form of energy,
and is caused by something vibrating. So
what is moving to make sound energy?
Molecules. Molecules are vibrating back and forth at
fairly high rates of speed, creating waves. Energy
moves from place to place by waves.
Sound energy moves by longitudinal waves (the
waves that are like a slinky). The molecules
vibrate back and forth, crashing into the
molecules next to them, causing them to vibrate,
and so on and so forth. All
sounds come from vibrations.
Frequency is a measure of how many times
something moves back and forth. A swing, a
pendulum, a leg of a walking person all have a
frequency.
All those things start at
one place, move, and come back to the same
position that they started.
BBUZZINGUZZING SSLINGLING HHORNETORNET

Supercharged Science SuperchargedScience.com 11 This moving and coming
back is one vibration. The faster something vibrates,
the more frequency that something has. Frequency
is measured in Hertz (Hz).
Waves are the way energy
moves from place to place. Sound moves from a
mouth to an ear by waves. Light moves from a light
bulb to a book page to your eyes by waves.
Waves are everywhere. As you sit there reading this,
you are surrounded by
radio waves, television waves, cell phone waves,
light waves, sound waves and more. (If you happen
to be reading this in a boat or a bathtub, you're
surrounded by water waves as well.) There are
waves everywhere!
Our ears are very good
antennas. They are very effective at picking up
quiet, loud, high-pitched and low-pitched sounds. It
is difficult for people to
make microphones that are as sensitive as our
ears.
Our ears can pick up and
tell the difference between sounds as low-pitched as
20 Hz and as high-pitched as 20,000 Hz. Some
animals can hear things that are even higher or
lower pitched than that. Our ears and brain are
also very good at picking
out the direction a sound
is coming from.
Do you remember where
all waves come from? Vibrating particles. Waves
come from vibrating particles and are made up
of vibrating particles.
Here's rule one when it
comes to waves.... the waves move, the particles
don't. The wave moves from place to place. The
wave carries the energy from place to place. The
particles however, stay
put. Here's a couple of examples to keep in mind.
If you've ever seen a crowd of people do the
―wave‖ in the stands of a sporting event you may
have noticed that the people only ―vibrated‖ up
and down. They did not move along the wave. The
wave, however, moved through the stands.
Another example would be a duck floating on a wavy
lake. The duck is moving
up and down (vibrating) just like the water
particles but he is not moving with the waves.
The waves move but the particles don't. When I talk
to you, the vibrating air molecules that made the
sound in my mouth do not travel across the room into
your ears. (Which is especially handy if I've
just eaten an onion
sandwich!) The energy from my mouth is moved, by
waves, across the room.
Questions to Ask
1. Does the shape of the index card matter?
2. What happens if you change the number of
rubber bands?
3. What if you use a different
thickness rubber band?
4. What happens if you make
the string longer or
shorter?
5. can you make a double by
stacking two together?
6. Can you get a second or
third harmonic by swinging it around faster?
7. Why do you need the index card at all?
“All our knowledge has its origins in our
perceptions.”
~Leonardo da Vinci

Supercharged Science SuperchargedScience.com 12
Activity
Kids will build a
microscope and telescope to help them understand
how lenses bend light to make things appear larger
and smaller.
Things like lenses and
mirrors can bend and bounce light to make
interesting things, like
compound microscopes and reflector telescopes.
What I like best about this activity is how easily we
can break down the basic ideas of something that
seems much more complex and intimidating,
like a telescope or microscope in a way that
kids really understand.
Materials A window
Dollar bill Penny
Two hand held magnifying
lenses
Experiment
To start with, watch the
video for this experiment at:
SuperchargedScience.com/savs.htm
Access code: SAV1
Did you know you can
create a compound microscope and telescope
using the same materials? It's all in how you use
them to bend the light.
These two experiments
cover the fundamental basics of how two double-
convex lenses can be used to make objects appear
larger when right up close
or farther away.
1. Place a penny on the
table.
2. Hold one magnifier
above the penny and look through it.
3. Bring the second magnifying lens above
the first so now you‘re looking through both.
Move the second lens closer and/or further
from the penny until the penny
comes into
sharp focus. You‘ve just
made a compound
microscope!
4. Who‘s inside the
building on the penny?
5. Try finding the owl on
the dollar bill. (Hint: it‘s in a corner!)
6. Keeping the distance between the magnifiers
about the
same, slowly lift
up the magnifiers
until you‘re now
looking through
both to a window.
7. Adjust the distance
until your image comes into sharp (and upside-
down) focus. You‘ve just made a refractor
telescope!
What’s Going On?
When a beam of light hits
a different substance (like a window pane or a lens),
the speed that the light travels at changes. (Sound
waves do this, too!) In some cases, this change
turns into a change in the
direction of the beam.
For example, if you stick a
pencil is a glass of water and look through the side
of the glass, you'll notice that the pencil appears
shifted. The speed of light is slower in the water
(140,000 miles per second) than in the air
(186,000 miles per second), called optical
density, and the result is
MMICROSCOPEICROSCOPE & T& TELESCOPEELESCOPE
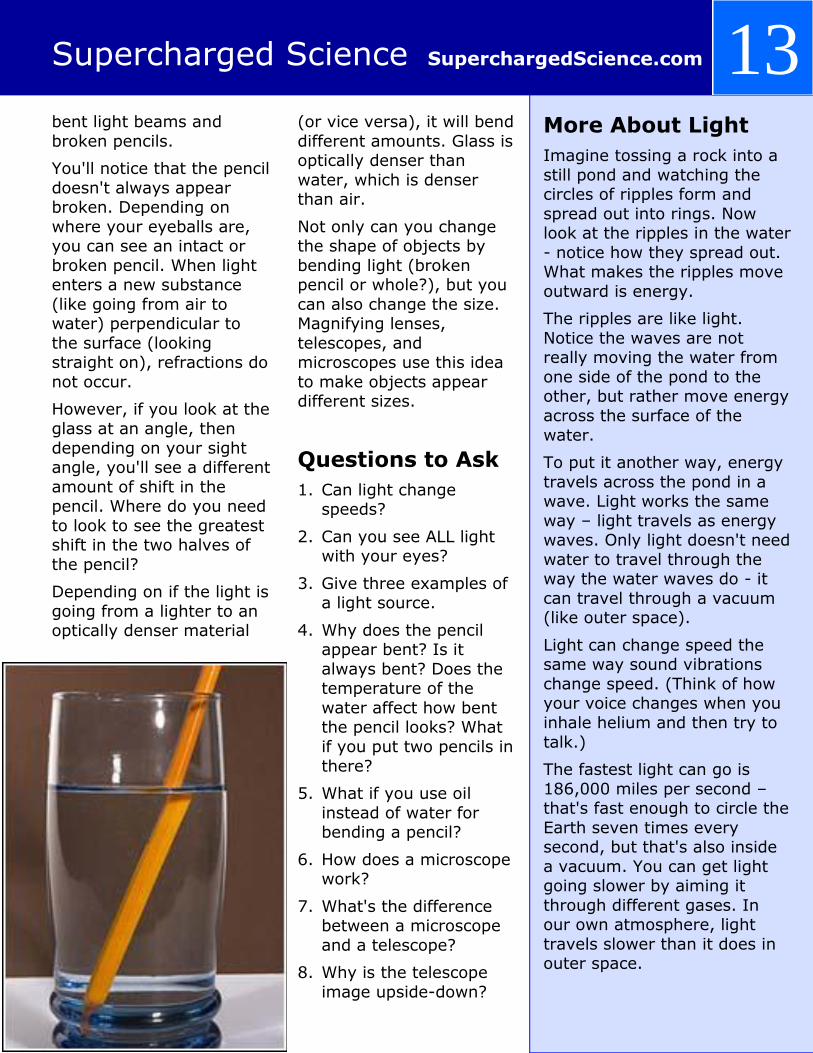
Supercharged Science SuperchargedScience.com 13 bent light beams and
broken pencils.
You'll notice that the pencil
doesn't always appear broken. Depending on
where your eyeballs are, you can see an intact or
broken pencil. When light enters a new substance
(like going from air to water) perpendicular to
the surface (looking straight on), refractions do
not occur.
However, if you look at the
glass at an angle, then
depending on your sight angle, you'll see a different
amount of shift in the pencil. Where do you need
to look to see the greatest shift in the two halves of
the pencil?
Depending on if the light is
going from a lighter to an optically denser material
(or vice versa), it will bend
different amounts. Glass is optically denser than
water, which is denser than air.
Not only can you change the shape of objects by
bending light (broken pencil or whole?), but you
can also change the size. Magnifying lenses,
telescopes, and microscopes use this idea
to make objects appear different sizes.
Questions to Ask
1. Can light change speeds?
2. Can you see ALL light with your eyes?
3. Give three examples of a light source.
4. Why does the pencil appear bent? Is it
always bent? Does the temperature of the
water affect how bent the pencil looks? What
if you put two pencils in
there?
5. What if you use oil
instead of water for bending a pencil?
6. How does a microscope work?
7. What's the difference between a microscope
and a telescope?
8. Why is the telescope
image upside-down?
More About Light
Imagine tossing a rock into a
still pond and watching the circles of ripples form and
spread out into rings. Now look at the ripples in the water
- notice how they spread out. What makes the ripples move
outward is energy.
The ripples are like light.
Notice the waves are not really moving the water from
one side of the pond to the other, but rather move energy
across the surface of the
water.
To put it another way, energy
travels across the pond in a wave. Light works the same
way – light travels as energy waves. Only light doesn't need
water to travel through the way the water waves do - it
can travel through a vacuum (like outer space).
Light can change speed the same way sound vibrations
change speed. (Think of how your voice changes when you
inhale helium and then try to
talk.)
The fastest light can go is
186,000 miles per second – that's fast enough to circle the
Earth seven times every second, but that's also inside
a vacuum. You can get light going slower by aiming it
through different gases. In our own atmosphere, light
travels slower than it does in outer space.

Supercharged Science SuperchargedScience.com 14
Hopefully these activities
have given you a small taste of how science can
be totally cool AND educational.
But teaching homeschool science isn’t always easy. You see, there‘s a lot more
to it than most traditional science books and
programs accomplish. If your kid doesn‘t remember
the science they learned last year, you have a
problem.
What do kids really need to know when it comes to science?
Kids who have a solid science and technology
background are better
equipped to go to college,
and will have many more
choices once they get out into the real world.
Learning science isn’t
just a matter of memorizing facts and
theories. On the contrary, it‘s developing a
deep curiosity about the world around us, AND
having a set of tools that
let kids explore that curiosity to answer their
questions.
Teaching science in this kind of way isn't just a
matter of putting together a textbook with a few
science experiments and kits.
Science education is a
three-step process (and I mean teaching science in
a way that your kids will
really understand and remember). Here are the
steps:
1. Get kids genuinely interested and excited
about a topic.
2. Give them hands-on
activities and experiments to make
the topic meaningful.
3. Teach the supporting
academics and theory.
Most science books and
programs just focus on the third step and may throw
in some experiments as an afterthought. This just
isn‘t how kids learn.
There is a better way. When you provide your
kids with these three keys (in order), you can give
your kids the kind of
science education that not only excites them, but that
they remember for many years to come.
Don’t let this happen to
you... you buy science books that were never
really used and now your kids are filling out college
applications and realizing they‘re missing a piece of
their education—a REALLY big piece. Now that's a
setback.
So what do you do? First, don‘t worry. It‘s not something that takes
years and years to do. It just takes commitment.
What if you don’t have time? What I‘m about to
describe can take a bit of time as a parent, but it
doesn‘t have to. There is a way to shortcut the
process and get the same
TTEACHINGEACHING SSCIENCECIENCE RRIGHTIGHT

Supercharged Science SuperchargedScience.com 15 results! But I‘ll tell you
more about that later.
Putting It Into Action
Step one: Get kids
genuinely interested and
excited about a topic.
Start by deciding what
topic you want your kids to learn. Then, you‘re
going to get them really interested in it.
For example, suppose I
want my 10-year old son to learn about
aerodynamics. I‘ll arrange for him to go up in a small
plane with a friend who is
a pilot. This is the kind of experience that will really
excite him.
Step two: Give them
hands-on activities and
experiments to make the
topic meaningful.
This is where I take that excitement and let him
explore it. I have him ask my friend for other
chances to go flying. I‘ll also have my friend show
him how he plans for a flight. My son will learn
about navigation, figuring out how much fuel is
needed for the flight, how the weight the plane
carries affects the
aerodynamics of it, and so much more.
I‘ll use pilot training videos
to help us figure this out (short of a live demo,
video is incredibly powerful for learning).
My son is incredibly
excited at this point about anything that has to do
with airplanes and flying. He‘s sure he wants to be a
pilot someday and is
already wanting flying lessons (he‘s only 10
now).
Step three: Teach the
supporting academics and
theory.
Now it‘s time to introduce academics. Honestly, I
have my pick of so many topics, because flying
includes so many different fields. I mean he‘s using
angles and math in flight planning, mechanics and
energy in how the engine works, electricity in all the
equipment on board the plane, and of course,
aerodynamics in keeping the plane in the air (to
name just a few).
I’m going to use this as
the foundation to teach the academic side of all
the topics that are appropriate.
We start with aerodynamics.
He learns about lift and drag, makes his own balsa-wood
gliders and experiments by changing different parts. He
calculates how big the wings need to be to carry more
weight and then tries his model with bigger wings. (By
the way, I got a video on model planes so I could
understand this well enough to work with him on it).
Then we move on to the
geometry used in navigation.
Instead of drawing angles on a blank sheet of paper, our
workspace is made of airplane maps.
We‘re actually planning part of
the next flight my son and my pilot buddy will take. Suddenly
angles are a lot more interesting. In fact, it turns
out that we need a bit of trigonometry to figure out
some things.
Of course, a 10-year old
can’t do trigonometry, right? Wrong! He has no idea
that it‘s usually for high school and learns about cosines and
tangents.
Throughout this, I‘m giving him chances to get together
with my pilot friend, share what he‘s learned, and even
use it on real flights. How cool is that to a kid?!

Supercharged Science SuperchargedScience.com 16 You get the idea. The
key is to focus on building interest and excitement
first, then the academics are easy to get a kid to
learn.
Try starting with the academics and...well,
we‘ve all had the experience of trying to get
kids do something they don‘t really want to do.
The Shortcut Okay, so this might sound like it‘s time-intensive. If
you‘re thinking ―I just don‘t have the time to do
this!‖ or maybe ―I just don‘t understand science
well enough myself to teach it to my kid.‖ If this
is you, you‘re not alone.
The good news is, you
don‘t have to. The shortcut is to find
someone who already specializes in the area you
want your kids to learn about and expose them to
the excitement that persons gets from the
field.
Then, instead of you being the one to take them
through the hands-on part
and the academics, use a solid video-based
homeschool science
program or curriculum (live videos, not cartoons).
This will provide them with
both the hands-on experiments and the
academic background they need. If you use a
program that is self-guided (that is, it guides
your kinds through it step-by-step), you don‘t need
to be involved unless you
want to be.
I‘m partial to the ―e-Science‖ program from
SuperchargedScience.com (after all, I‘m in it), but
honestly, as long as a program uses these
components and matches your educational goals, it
should be fine.
Your next Step should be to take a look at how you‘re
teaching science now and simply ask ―Is my kid getting
the results I want from his or her science education?‖
After this, consider how you
can implement the three key steps we just talked about.
Either go through the steps yourself, or use a program
that does this for you.
My hope is that you have
some new tools in your homeschool parent toolbox to
give your kids the best start you can in life.
Again, I want to thank you for
taking the kind of interest in your child that it takes to
homeschool. I know it‘s like a wild roller coaster ride some
days, but I also know it‘s worth it. Have no doubt that
that the caring and attention you give to your child‘s
education today will pay off
many fold in the future.
My best wishes to you and your family.
Warmly,
Aurora
www.SuperchargedScience.com

Focusing on wonder, discovery, and exploration.
SSUPERCHARGEDUPERCHARGED SSCIENCECIENCE
Since 1999, our team has sparked the minds of thousands of K-12 students in physics, chemistry, and engineering. Supercharged Science offers exciting hands-on science workshops, science kits, online science programs and com-
plete learning programs for families everywhere.
(805) 617-1789
www.SuperchargedScience.com