schedule and bill t-code services · pdf [email protected] | 877.796.9883 schedule and...
TRANSCRIPT

[email protected] | 877.796.9883
Schedule and Bill T-Code Services
This document will show the user how to use the Bundled T-Code Services Feature to set up new bundled services, schedule bundled service appointments, and generate claims for bundled service. If you have existing T-Code Services and you would like to use this feature, please contact your Support Account Manager to assist with the migration process. Please note, an existing T-Code service can only be included in one bundled service. If the user has multiple T-Code service names for the same type of service and they have been assigned inconsistently to client services, then it may not be possible to migrate those existing services to a bundle T-Code Service. If this occurs, the user will need to wait until a new contract is received for the client and then set up with the appropriate bundled service.
1. Beginning on your NPAWorks main screen, click on Services located on the left side of the window.
2. With your Services list displayed, click on the add button to create a new service. a. Please note, this should be done per office that the user would like to use the Bundled T-
code feature for.

[email protected] | 877.796.9883
Page 2 of 16
3. The new service window will pop up. For users who have not entered T-Codes before a new service will need to be entered for each 1st 30 service, additional service and its new bundled service. Please enter the following for each service.
a. Service name b. Display Code Name c. For Bundled Services, we recommend keeping the service name as is and adding
“Bundled” at the end. This helps with easy identification. i. The following is an example of our recommended naming convention.
Service: BCBA Direct Intervention Bundled Service name: BCBA Direct Intervention Bundled Initial Service name: BCBA Direct Intervention 1st 30 Additional Service name: BCBA Direct Intervention Cont.
d. Click OK
4. Once you have entered the bundled service name and display code, click OK to save.
5. Repeat these steps for each bundled service you wish to create.

[email protected] | 877.796.9883
Page 3 of 16
Once all of the new bundled services have been entered per office, return to the NPAWorks main screen. The newly created services will need to be selected in the staff member’s record who provide the service.
6. Click on Staff, located on the left of the NPAWorks main screen. The list of staff members in that office will be displayed.
7. Select the staff member’s name whose record you wish to edit. a. To enter the record, simply hit enter or double click on the staff member’s name.

[email protected] | 877.796.9883
Page 4 of 16
8. On the general tab of the staff record, a. Select the new bundled service from the services listed in the Services Provided section of
the tab. b. Click OK to save your changes and to close the staff record.

[email protected] | 877.796.9883
Page 5 of 16
Next, let’s set up the Bundled Services within the funding source. Note, this will need to be done for each funding source that will use the new bundled service.
9. Click on Funding Sources, located on the left of the NPAWorks main screen. The list of funding sources in that office will be displayed.
10. Select the funding source name whose record you wish to edit. a. To enter the record, simply hit enter or double click on the funding source’s name.

[email protected] | 877.796.9883
Page 6 of 16
11. With the funding source record open, click on the Services tab.
a. If you have followed our recommended naming convention, sort the funding source services by Service Name.
b. Review each individual service to ensure they have the exact same information. i. It is important to do this before selecting the bundled service. Otherwise, the
bundle service may not link properly. c. Select the Bundled Service you would like to enable. d. Scroll to the right and enter the bundled CPT Code (e.g., “0362T, 0363T’ or “0364T,
0365T”). i. Note, do not enter and/or select any other fields in the service line as the values
from the bundled service will automatically apply. 1. The system will automatically enter data in the other fields as long as the
1st 30mins service and additional service contain the exact same information.
e. Please be sure to update the credential requirements for the newly linked bundled service. Assign all credential requirements in either T-Code service to the bundled service.
[email protected] | 877.796.9883
Page 7 of 16
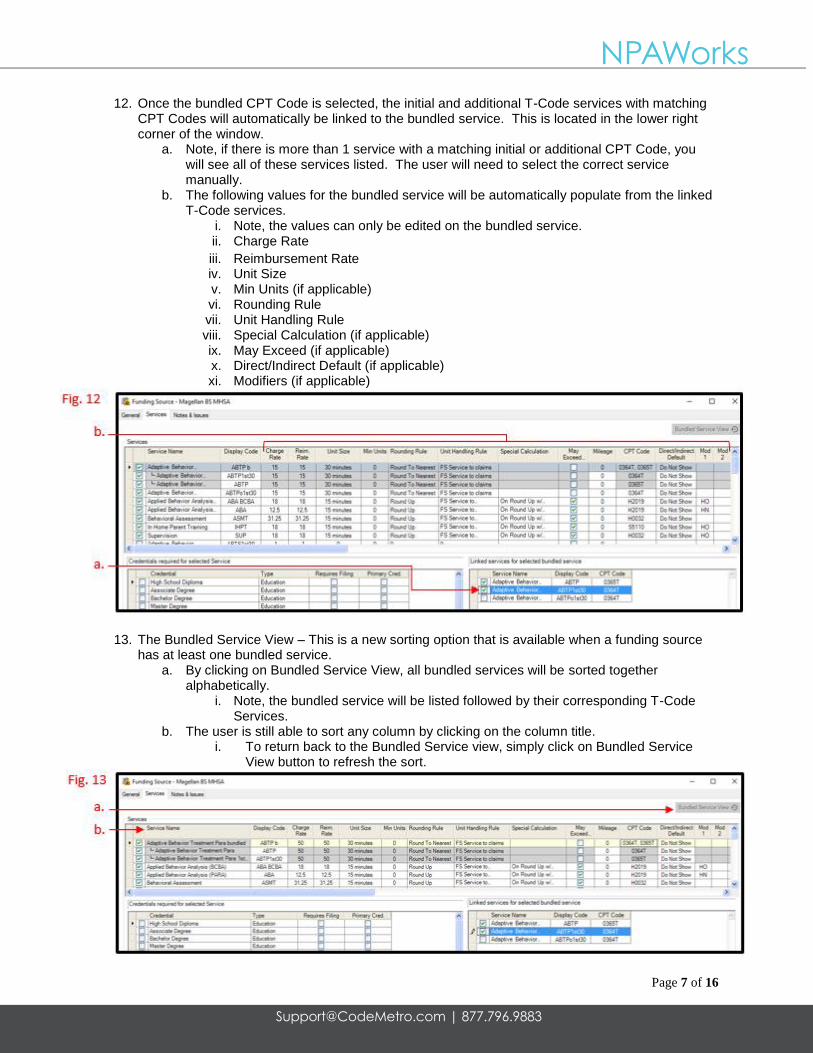
12. Once the bundled CPT Code is selected, the initial and additional T-Code services with matching CPT Codes will automatically be linked to the bundled service. This is located in the lower right corner of the window.
a. Note, if there is more than 1 service with a matching initial or additional CPT Code, you will see all of these services listed. The user will need to select the correct service manually.
b. The following values for the bundled service will be automatically populate from the linked T-Code services.
i. Note, the values can only be edited on the bundled service. ii. Charge Rate
iii. Reimbursement Rate iv. Unit Size v. Min Units (if applicable) vi. Rounding Rule vii. Unit Handling Rule viii. Special Calculation (if applicable) ix. May Exceed (if applicable) x. Direct/Indirect Default (if applicable) xi. Modifiers (if applicable)
13. The Bundled Service View – This is a new sorting option that is available when a funding source has at least one bundled service.
a. By clicking on Bundled Service View, all bundled services will be sorted together alphabetically.
i. Note, the bundled service will be listed followed by their corresponding T-Code Services.
b. The user is still able to sort any column by clicking on the column title. i. To return back to the Bundled Service view, simply click on Bundled Service
View button to refresh the sort.
[email protected] | 877.796.9883
Page 8 of 16
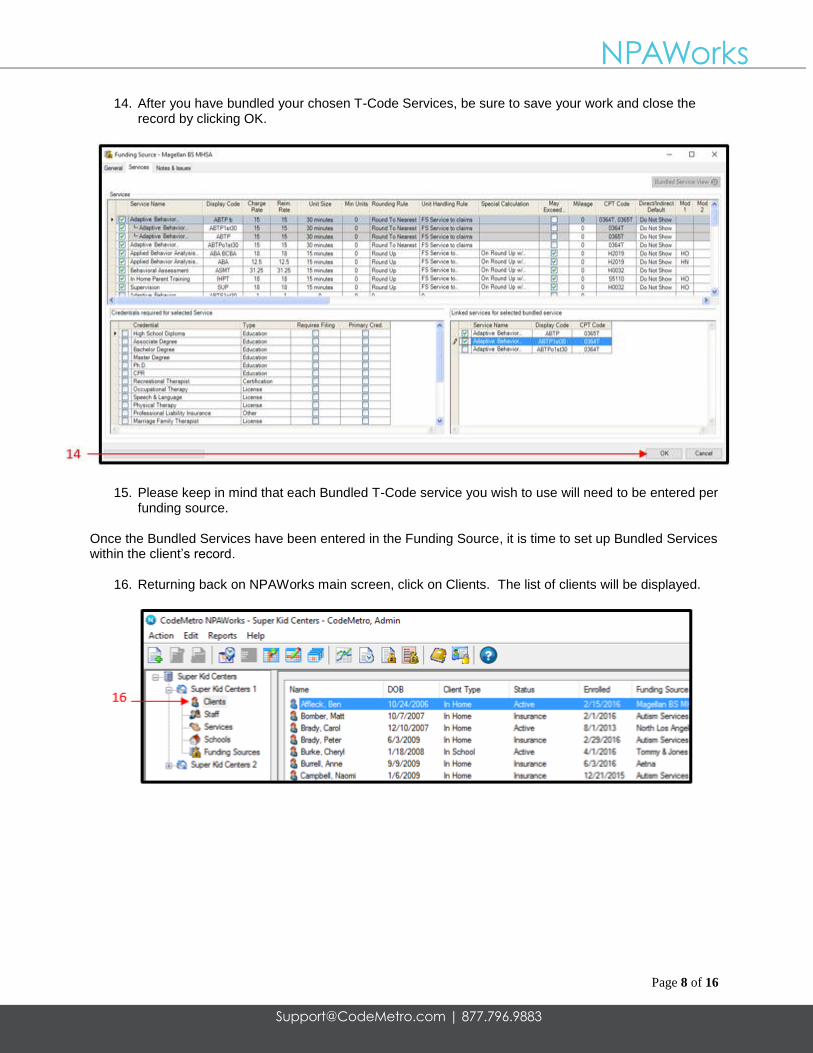
14. After you have bundled your chosen T-Code Services, be sure to save your work and close the record by clicking OK.
15. Please keep in mind that each Bundled T-Code service you wish to use will need to be entered per funding source.
Once the Bundled Services have been entered in the Funding Source, it is time to set up Bundled Services within the client’s record.
16. Returning back on NPAWorks main screen, click on Clients. The list of clients will be displayed.

[email protected] | 877.796.9883
Page 9 of 16
17. Select the client’s name whose record you wish to edit. a. To enter the record, simply hit enter or double click on the funding source’s name.
18. With the client record open, click on the Services tab, then click the add button to add a service.
19. Select the bundled service from the dropdown menu.
20. When a bundled service is selected, the T-Code services will be linked to the bundled service as they were set up within the Funding Source.
a. The individual services will display below the bundled service.
[email protected] | 877.796.9883
Page 10 of 16
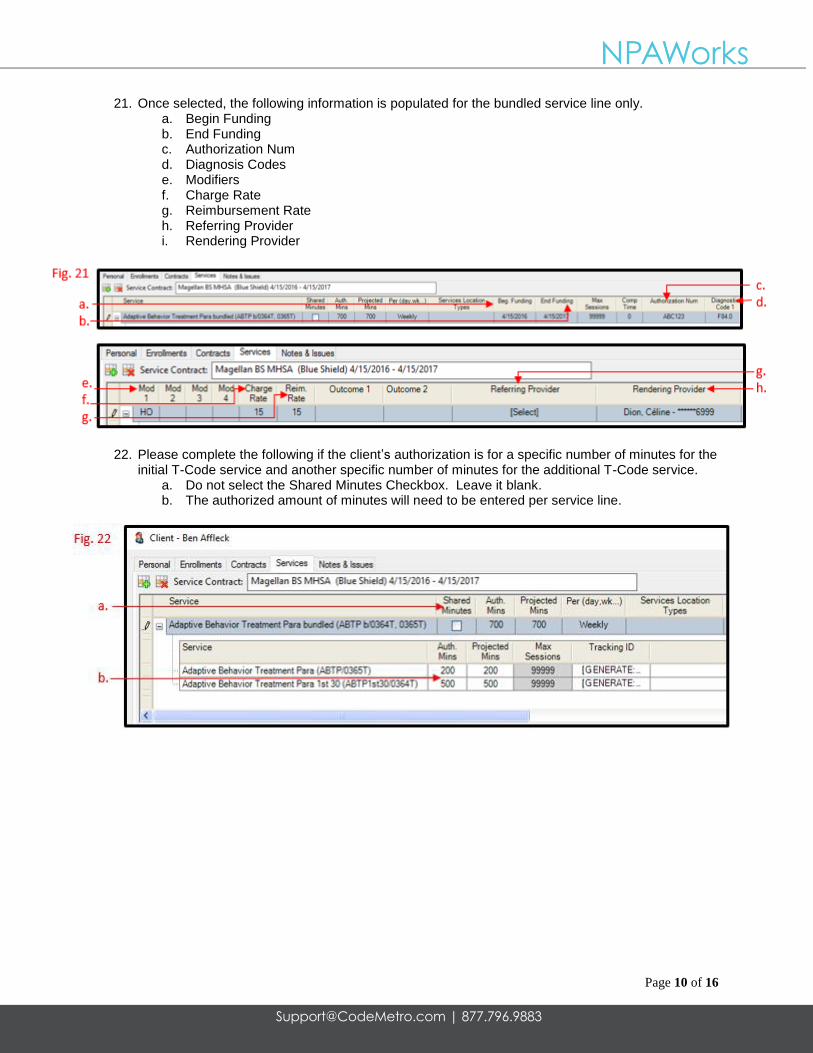
21. Once selected, the following information is populated for the bundled service line only. a. Begin Funding b. End Funding c. Authorization Num d. Diagnosis Codes e. Modifiers f. Charge Rate g. Reimbursement Rate h. Referring Provider i. Rendering Provider
22. Please complete the following if the client’s authorization is for a specific number of minutes for the initial T-Code service and another specific number of minutes for the additional T-Code service.
a. Do not select the Shared Minutes Checkbox. Leave it blank. b. The authorized amount of minutes will need to be entered per service line.
[email protected] | 877.796.9883
Page 11 of 16
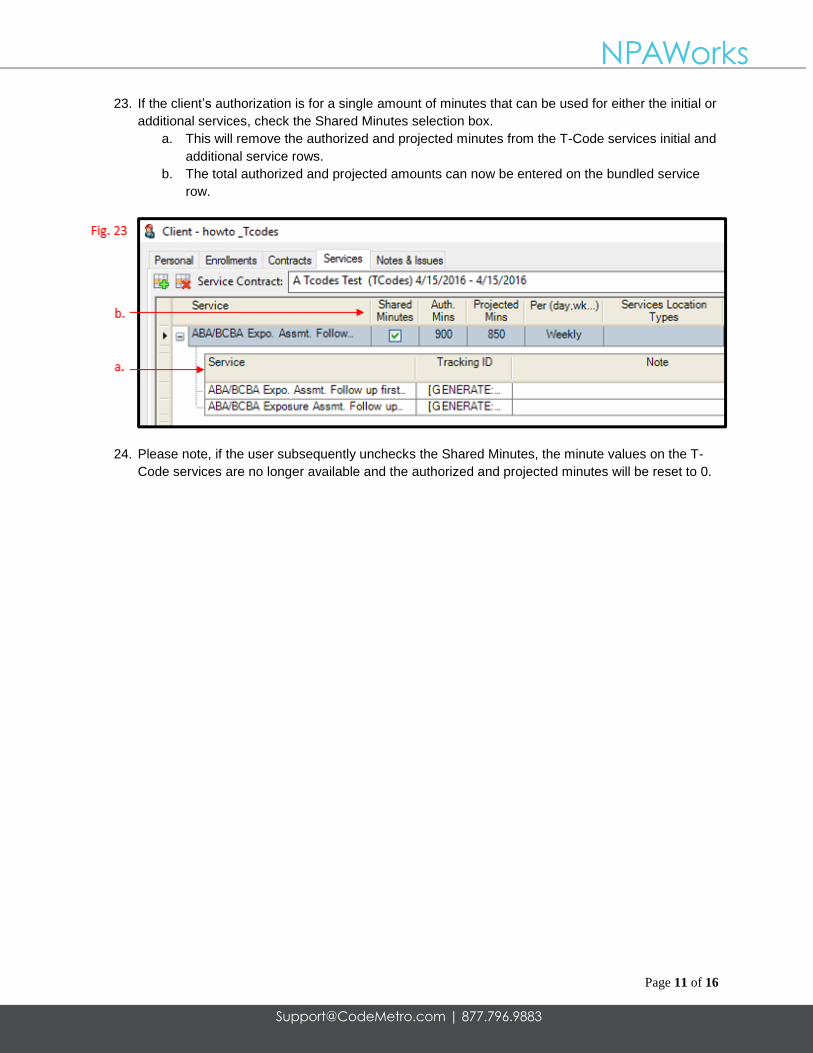
23. If the client’s authorization is for a single amount of minutes that can be used for either the initial or
additional services, check the Shared Minutes selection box.
a. This will remove the authorized and projected minutes from the T-Code services initial and
additional service rows.
b. The total authorized and projected amounts can now be entered on the bundled service
row.
24. Please note, if the user subsequently unchecks the Shared Minutes, the minute values on the T-
Code services are no longer available and the authorized and projected minutes will be reset to 0.

[email protected] | 877.796.9883
Page 12 of 16
25. Once your bundled services have been selected, be sure to save your work by clicking on the
save button on the lower right corner of the window.
26. Click OK to close the client record.

[email protected] | 877.796.9883
Page 13 of 16
Finally, we will review using the Claims Wizard with the new bundled services.
27. When claims for bundled services are generated, the Claims Wizard will complete the following, a. Apply rounding if indicated by the unit handling rules. b. Summarize the Service Time for all bundled service appointment in a given day. c. Create a charge line for the initial service based on the CPT Code.
i. This will be done by subtracting the initial service unit size from the total Service Time for the day’s bundled appointments
ii. The initial service line will be created between Step 2 and Step 3.
28. Beginning back on the main screen of NPAWorks, click on the Claims Manager button.
29. Then click on the Claims Wizard button located on the top left corner of the window.

[email protected] | 877.796.9883
Page 14 of 16
30. Select the appointments as you normally would in Step 1.
31. In Step 2, each of the “Appointment to Claim Line Item Grouping” options must be selected. This is to ensure the charge lines set to be split properly. The “Appointment to Claim Line Item Grouping” options include the following.
a. Service Date b. Place of Service c. CPT Code d. Modifiers e. Diagnosis Codes f. Rendering Provider NPI g. Contracts

[email protected] | 877.796.9883
Page 15 of 16
32. Click “Next”, once you have reviewed the appointments and have selected all of the needed settings. This button is located in the lower right corner.
33. In Step 3, the following settings must be used in order for the charge lines to be split properly. Again, these are located at the top of the window.
a. Service Date b. Place of Service c. Contracts

[email protected] | 877.796.9883
Page 16 of 16
34. Click Prepare Claims to proceed to the next step. This button is located in the lower right corner.
35. Note, in order to ensure the T-Code service charge lines can be reconciled back to the bundled appointments, the following data cannot be edited in Step 3 of Claims Wizard or in Claims Manager’s Edit Claims window.
a. Service Date b. Place of Service c. CPT Code d. Modifiers e. Diagnosis Codes & Pointers f. Rendering Provider g. If any of these fields need to edited, the user will have to release the claim and correct the
information either in the funding source record, client record, or on the appointment level.
36. Please note, in the Claims Manager Edit Claims window, it is not possible to delete only one of the T-Code service charge lines. If one line needs to be removed, please delete both charge lines.
37. Once you have made your selections in the Claims Manager, you can proceed with your normal billing process.