sceis imaging: kodak i1220 scanner installation and ... · kodak i1220 scanner installation and...
TRANSCRIPT
Kodak i1220 Scanner Installation and Configuration Guide Version: 4/3/2012
Page | 1
SCEIS Imaging: Kodak i1220 Scanner Installation and Configuration Guide
If your scanner is already installed, go to the CONFIGURATION section on page 3.
Configuration will set the scanner to ignore blank pages.
INSTALLATION
TWAIN Driver Installation
1. Install the Kodak twain driver from the installation disk or download the most current driver version from:
http://graphics.kodak.com/docimaging/US/en/Products/Document_Scanners/Desktop/i1220_Scanner/Support/
Drivers_And_Downloads/i1200_Plus_Series_Scanner_Drivers/index.htm
The serial number of the scanner is required for the driver download. The serial number is located on the bottom of
the scanner.
Enable Citrix Access to the Scanner
2. Log in to Citrix (sceisgateway.sc.gov) and log in to either SAP or OnBase, it does not matter which one.
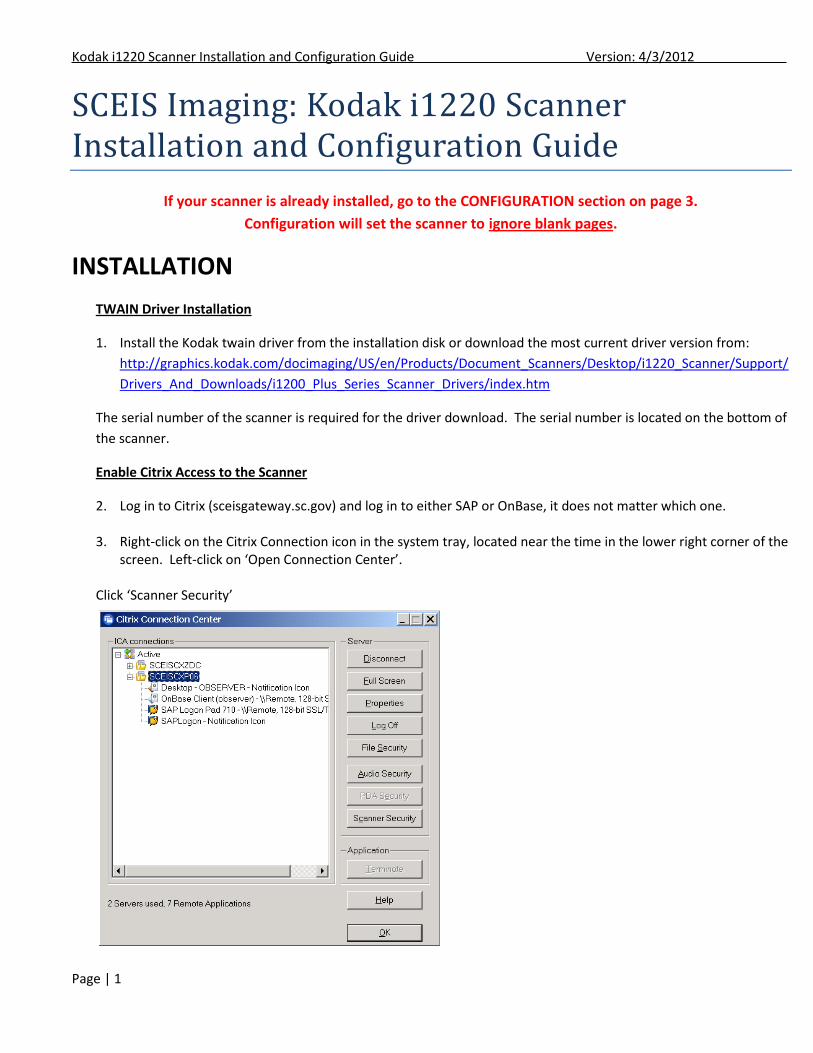
3. Right-click on the Citrix Connection icon in the system tray, located near the time in the lower right corner of the screen. Left-click on ‘Open Connection Center’.
Click ‘Scanner Security’
Kodak i1220 Scanner Installation and Configuration Guide Version: 4/3/2012
Page | 2
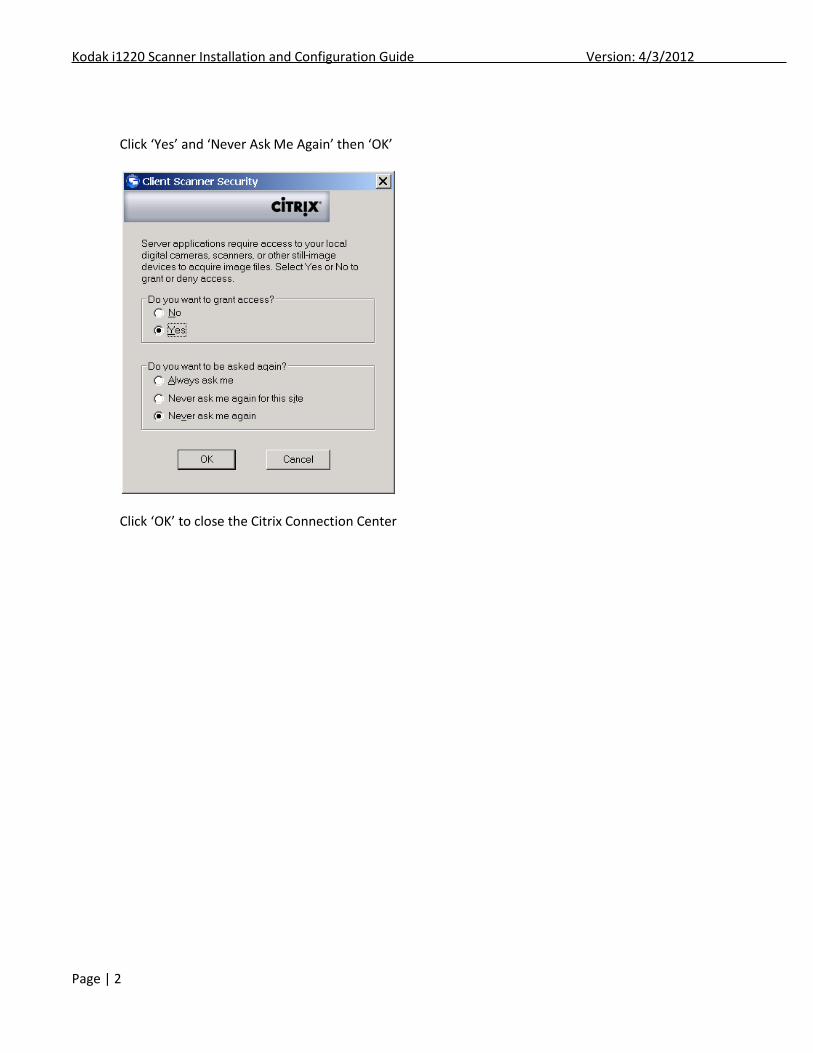
Click ‘Yes’ and ‘Never Ask Me Again’ then ‘OK’
Click ‘OK’ to close the Citrix Connection Center
Kodak i1220 Scanner Installation and Configuration Guide Version: 4/3/2012
Page | 3
CONFIGURATION
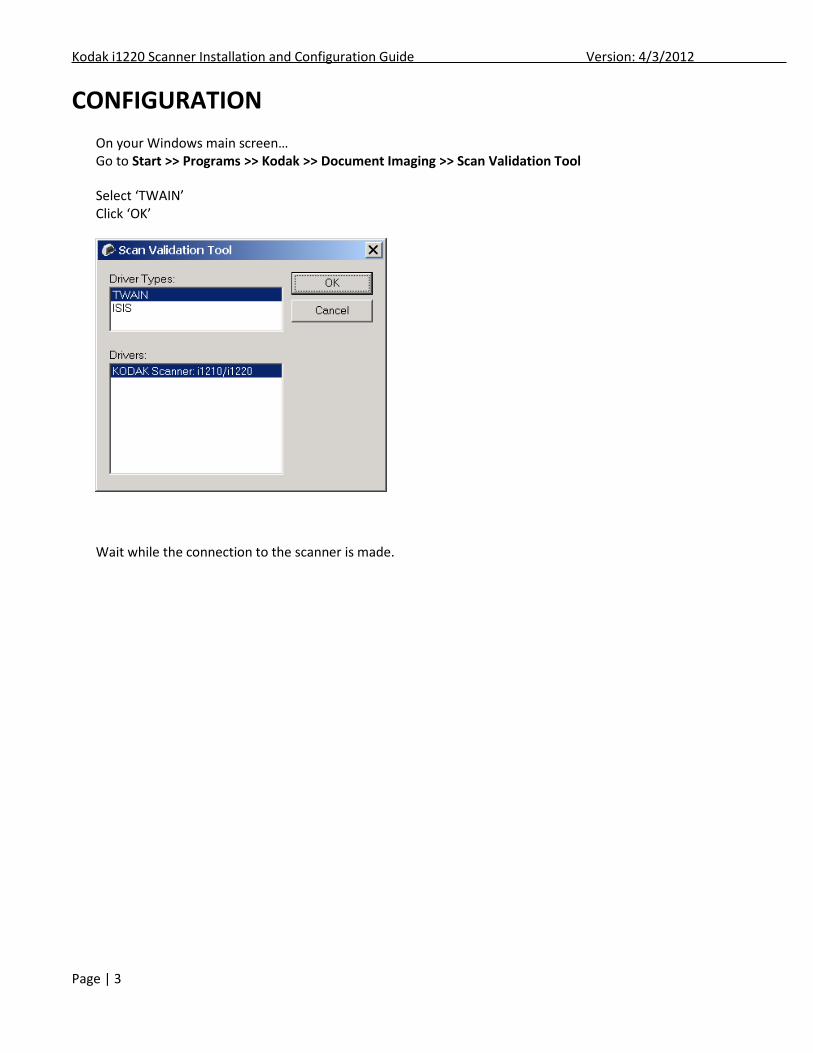
On your Windows main screen… Go to Start >> Programs >> Kodak >> Document Imaging >> Scan Validation Tool
Select ‘TWAIN’ Click ‘OK’
Wait while the connection to the scanner is made.
Kodak i1220 Scanner Installation and Configuration Guide Version: 4/3/2012
Page | 4
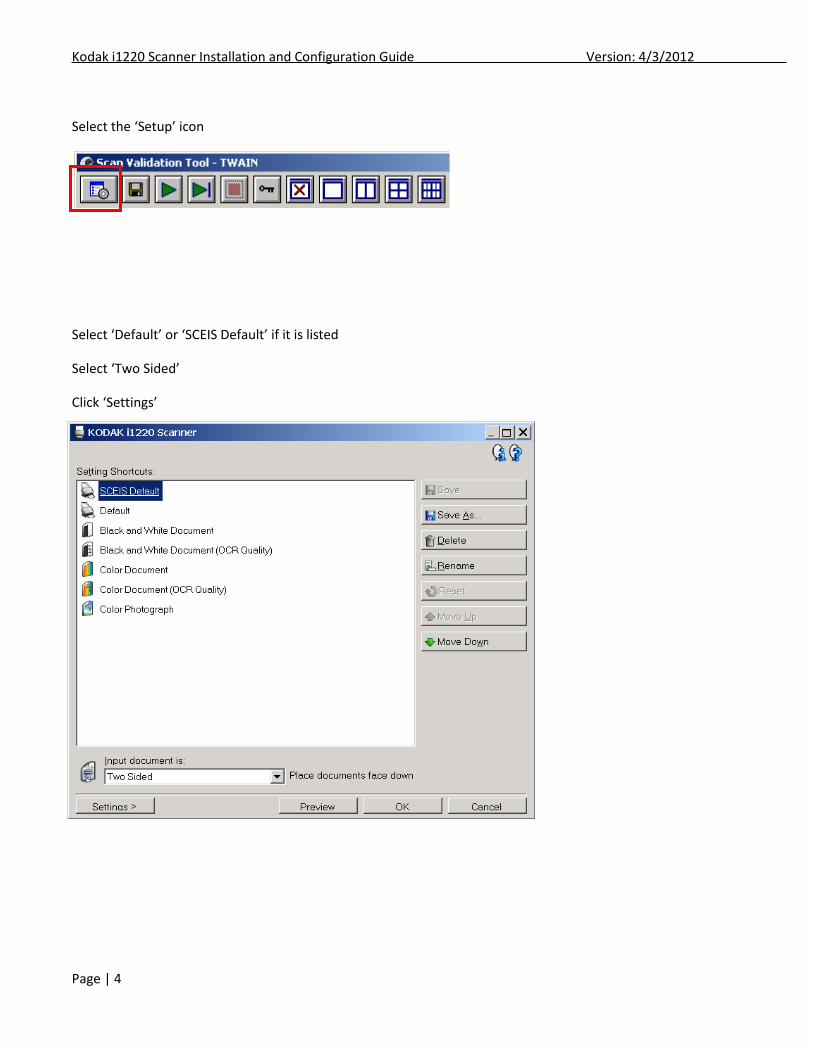
Select the ‘Setup’ icon
Select ‘Default’ or ‘SCEIS Default’ if it is listed
Select ‘Two Sided’
Click ‘Settings’
Kodak i1220 Scanner Installation and Configuration Guide Version: 4/3/2012
Page | 5
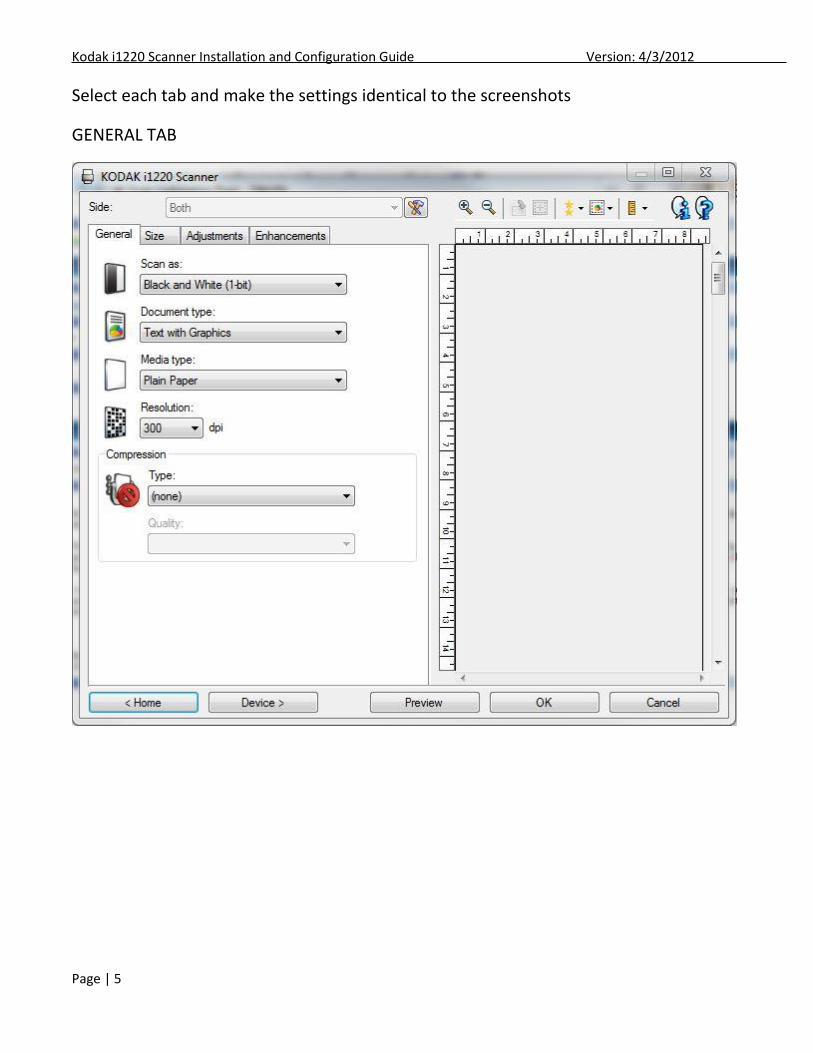
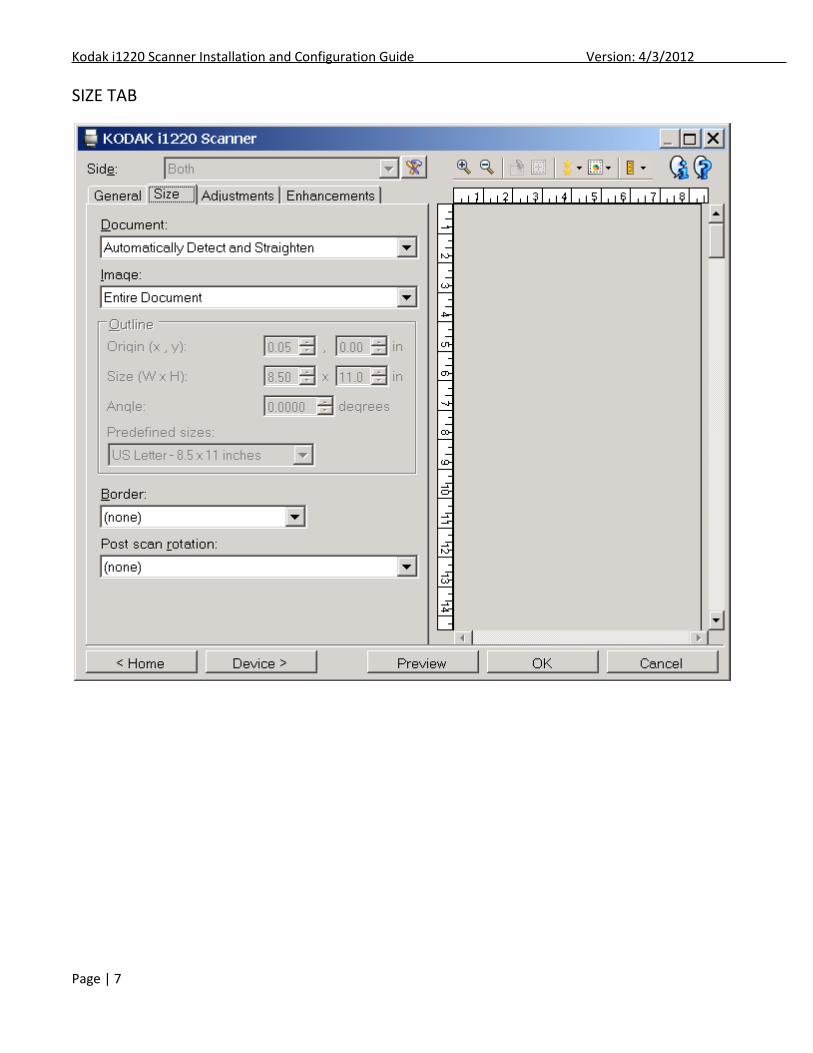
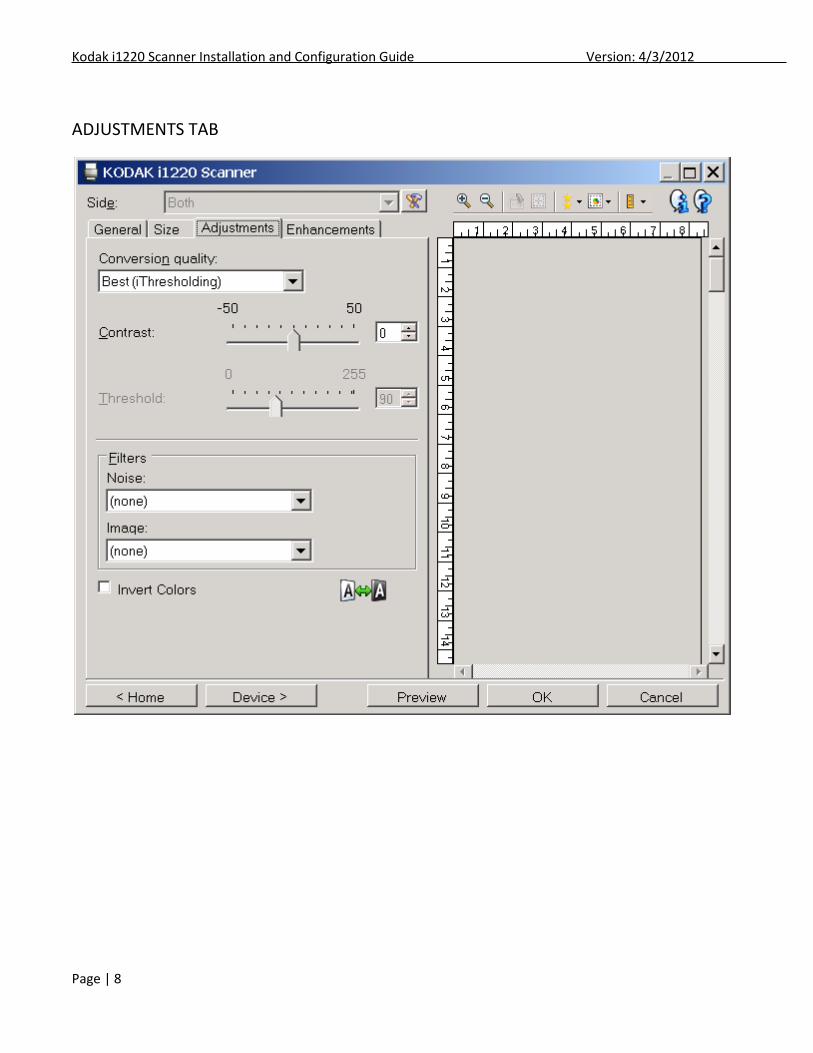
Select each tab and make the settings identical to the screenshots
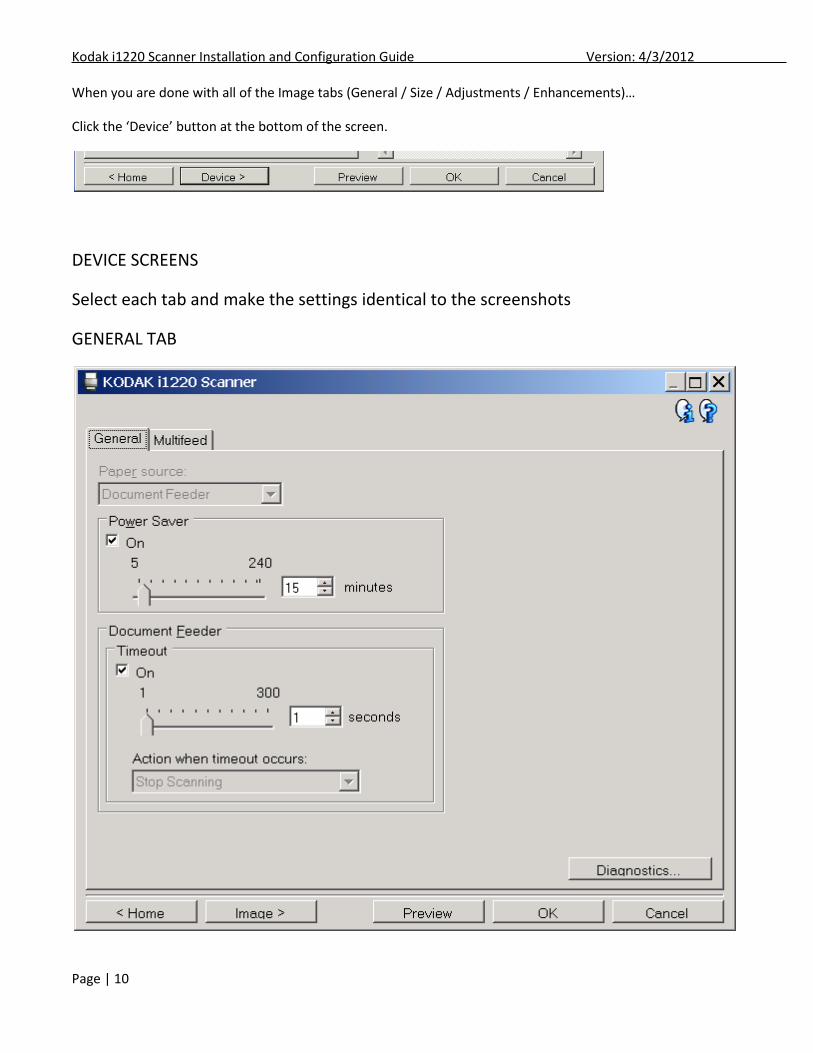
GENERAL TAB
Kodak i1220 Scanner Installation and Configuration Guide Version: 4/3/2012
Page | 6
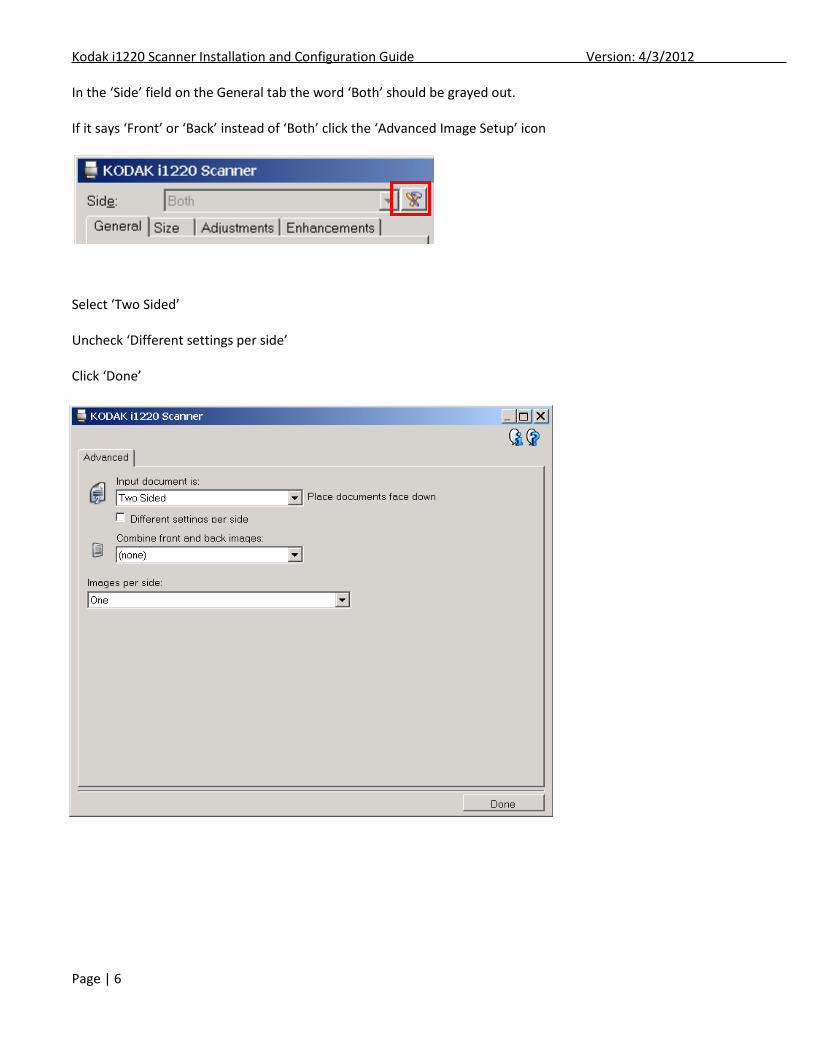
In the ‘Side’ field on the General tab the word ‘Both’ should be grayed out. If it says ‘Front’ or ‘Back’ instead of ‘Both’ click the ‘Advanced Image Setup’ icon
Select ‘Two Sided’ Uncheck ‘Different settings per side’ Click ‘Done’
Kodak i1220 Scanner Installation and Configuration Guide Version: 4/3/2012
Page | 7
SIZE TAB
Kodak i1220 Scanner Installation and Configuration Guide Version: 4/3/2012
Page | 8
ADJUSTMENTS TAB

Kodak i1220 Scanner Installation and Configuration Guide Version: 4/3/2012
Page | 9
ENHANCEMENTS TAB
Important
Kodak i1220 Scanner Installation and Configuration Guide Version: 4/3/2012
Page | 10
When you are done with all of the Image tabs (General / Size / Adjustments / Enhancements)…
Click the ‘Device’ button at the bottom of the screen.
DEVICE SCREENS
Select each tab and make the settings identical to the screenshots
GENERAL TAB

Kodak i1220 Scanner Installation and Configuration Guide Version: 4/3/2012
Page | 11
MULTIFEED TAB
Important
Kodak i1220 Scanner Installation and Configuration Guide Version: 4/3/2012
Page | 12
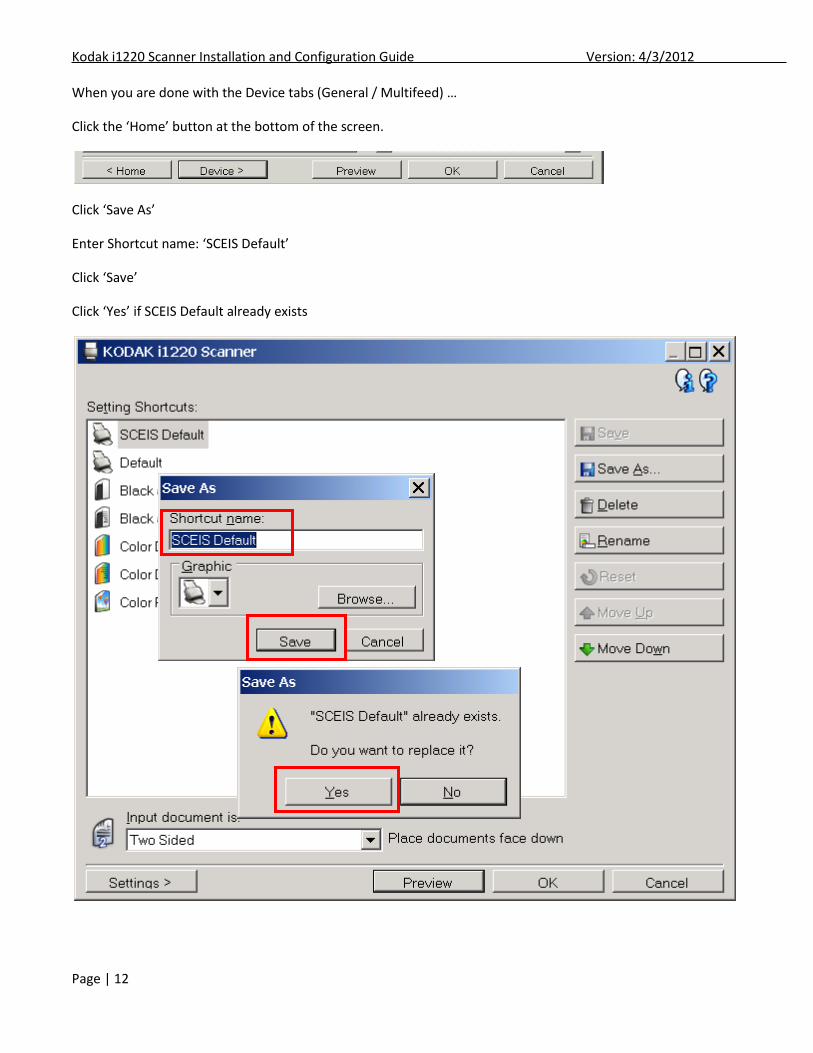
When you are done with the Device tabs (General / Multifeed) …
Click the ‘Home’ button at the bottom of the screen.
Click ‘Save As’
Enter Shortcut name: ‘SCEIS Default’
Click ‘Save’
Click ‘Yes’ if SCEIS Default already exists

Kodak i1220 Scanner Installation and Configuration Guide Version: 4/3/2012
Page | 13
Important If ‘SCEIS Default’ is not at the top of the list, highlight ‘SCEIS Default’ and click ‘Move Up’ to put it at the
top.
Click ‘OK’ at the bottom of the screen.
Close the Scan Validation Tool window.
The Kodak scanner is now ready for SCEIS imaging.
If the scanner does not perform as follows contact the SCEIS Help Desk.
Scan in black and white
Scan front side of pages
Ignore back side of pages if backside is blank
Scan back side of pages if there is information on the back side
Scan page lengths from small pieces of paper (bank slips) to legal size paper (8.5 x 15)
Stop scanning if paper length is longer than legal size
Stop scanning if multiple pages get pulled through the scanner at once by mistake (multifeed detection)
Kodak i1220 Scanner Installation and Configuration Guide Version: 4/3/2012
Page | 14
LOCK THE SCANNER CONFIGURATION TO ‘SCEIS DEFAULT’
The following steps lock the ‘SCEIS Default’ settings when scanning in OnBase and also allow you to use the scanner for other applications on your workstation. You should perform the steps below even if you do not use other scanning applications. This will prevent the SCEIS Default configuration from being changed in the background by software that you use that may connect to the twain drivers even when you do not scan. 1) Be sure that the Configuration instructions (pages 3 – 13) have been completed to create a ‘SCEIS Default’ profile
and move it to the top of the Settings Shortcuts list (page 13).
2) Go to the following directory on your workstation. a. Windows XP and earlier
C:\Documents and Settings\All Users\Application Data\kds_kodak\kds_i1200\twain b. Vista and later
C:\Users\All Users\kds_kodak\kds_i1200\twain If these directories are not visible to you when you to try to browse to them it means they are hidden. Type them into the address field of My Computer or Desktop Explorer.
3) Open the file ‘setup001.ini’ with Notepad and be sure there is a line that says ‘Current_1220 = SCEIS Default’. Close the file without making any changes.
4) Make the file ‘setup001.ini’ a Read Only file as follows. Right click on the file…Properties…Read Only…Apply…OK
5) From that directory double-click on the subdirectory called ‘profiles’ then the subdirectory ‘i1220’. You should now be in the directory:
a. Windows XP and earlier C:\Documents and Settings\All Users\Application Data\kds_kodak\kds_i1200\twain\profiles\i1220
b. Vista and later C:\Users\All Users\kds_kodak\kds_i1200\twain\profiles\i1220
6) Double-click to open the file ‘profileorder.xml’ and see the first line that looks as follows.
<id>#################</id>, where ################# is a 17 digit number. Write down the number. Close the file.
7) In the same directory find two files that have that number. One will be an ‘.xml’ file and one will be a ‘.profile’ file.
Make both files Read Only files as follows: Right click on the file…Properties…Read Only…Apply...OK
8) Close all of the windows and files if any are still open. Your scanner is now configured for SCEIS (e.g. black and white, ignore blank pages, detect paper size, etc). You should also be able to use the Kodak scanner with other scanning software that your agency uses, without affecting the SCEIS settings.