scanning for atlantis® atlantis® scan upload...this user guide for atlantis scan upload is valid...
TRANSCRIPT

Atlantis®
Scanning for Atlantis®
Atlantis® Scan Upload– User guide

2

All trademarks and company names are the property of their respective owners.
All products may not be regulatory released in all markets. Please contact the local Dentsply Sirona Implants sales office for current product assortment and availability.
To improve readability for our customers, Dentsply Sirona Implants does not use ® or ™ in body copy. However, Dentsply Sirona Implants does not waive any right to the trademark and nothing herein shall be interpreted to the contrary.
Product illustrations are not to scale.
This user guide for Atlantis Scan Upload is valid for any scanning system that can provide STL files. Installation and configuration sections include instructions for both Atlantis abutments and Atlantis suprastructures, but Atlantis FLO and order instructions are separate (refer to the corresponding instructional pages for Atlantis abutments and Atlantis suprastructures.)
Downloading and installing Atlantis® Scan Upload 4
Configuring Atlantis® Scan Upload 5
Atlantis® abutmentsCreating an order – Performing the scans 6
– Entering order information 7
– Adding scan files to the order 8
– Reviewing the scans 9
Atlantis® suprastructuresCreating an order – Performing the scans 10
– Entering order information 1 1
– Adding scan files to the order 12
– Reviewing the scans 13
Submitting the Atlantis® order 14
Appendix A: Rescanning requests 15
Appendix B: Creating an order – alternative workflow 16
Appendix C: Updating the Atlantis® Scan Upload version 18
Appendix D: Manual FLO Detection 19
Appendix E: Atlantis® WebOrder statuses
for Atlantis® Scan Upload orders 20
CONTENTS
Atlantis®
3
Downloading and installing Atlantis® Scan Upload
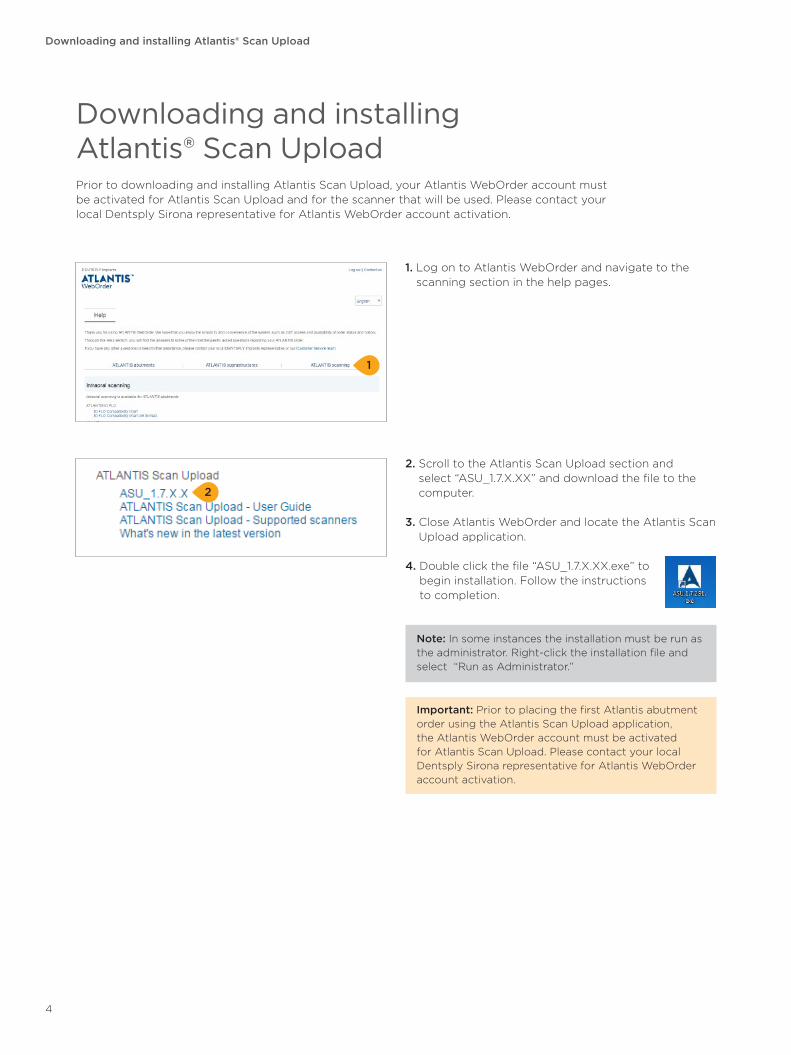
1. Log on to Atlantis WebOrder and navigate to the scanning section in the help pages.
Downloading and installing Atlantis® Scan UploadPrior to downloading and installing Atlantis Scan Upload, your Atlantis WebOrder account must be activated for Atlantis Scan Upload and for the scanner that will be used. Please contact your local Dentsply Sirona representative for Atlantis WebOrder account activation.
2. Scroll to the Atlantis Scan Upload section and select “ASU_1.7.X.XX” and download the file to the computer.
3. Close Atlantis WebOrder and locate the Atlantis Scan Upload application.
4. Double click the file “ASU_1.7.X.XX.exe” to begin installation. Follow the instructions to completion.
Note: In some instances the installation must be run as the administrator. Right-click the installation file and select “Run as Administrator.”
Important: Prior to placing the first Atlantis abutment order using the Atlantis Scan Upload application, the Atlantis WebOrder account must be activated for Atlantis Scan Upload. Please contact your local Dentsply Sirona representative for Atlantis WebOrder account activation.
2
1
4
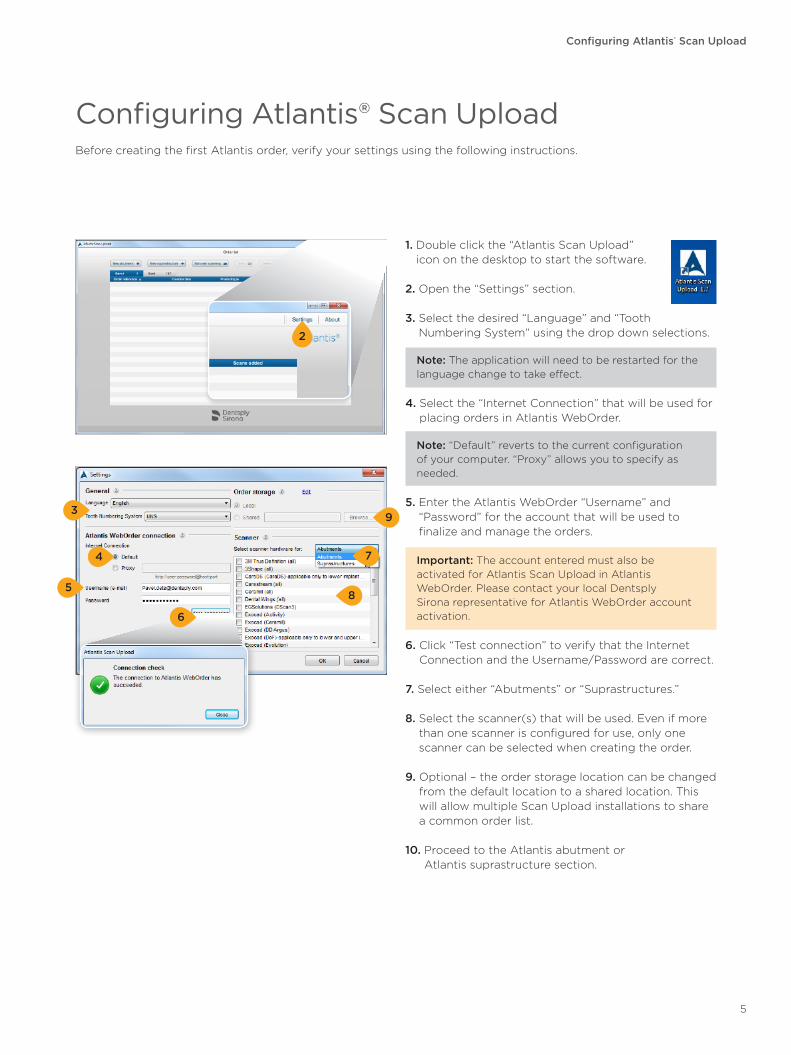
1. Double click the “Atlantis Scan Upload” icon on the desktop to start the software.
2. Open the “Settings” section.
3. Select the desired “Language” and “Tooth Numbering System” using the drop down selections.
Note: The application will need to be restarted for the language change to take effect.
4. Select the “Internet Connection” that will be used for placing orders in Atlantis WebOrder.
Note: “Default” reverts to the current configuration of your computer. “Proxy” allows you to specify as needed.
5. Enter the Atlantis WebOrder “Username” and “Password” for the account that will be used to finalize and manage the orders.
Important: The account entered must also be activated for Atlantis Scan Upload in Atlantis WebOrder. Please contact your local Dentsply Sirona representative for Atlantis WebOrder account activation.
6. Click “Test connection” to verify that the Internet Connection and the Username/Password are correct.
7. Select either “Abutments” or “Suprastructures.”
8. Select the scanner(s) that will be used. Even if more than one scanner is configured for use, only one scanner can be selected when creating the order.
9. Optional – the order storage location can be changed from the default location to a shared location. This will allow multiple Scan Upload installations to share a common order list.
10. Proceed to the Atlantis abutment or Atlantis suprastructure section.
Configuring Atlantis® Scan UploadBefore creating the first Atlantis order, verify your settings using the following instructions.
Configuring Atlantis® Scan Upload
8
7
93
5
6
4
2
5
Atlantis® abutments | Creating an order – Performing the scans
Atlantis® abutments
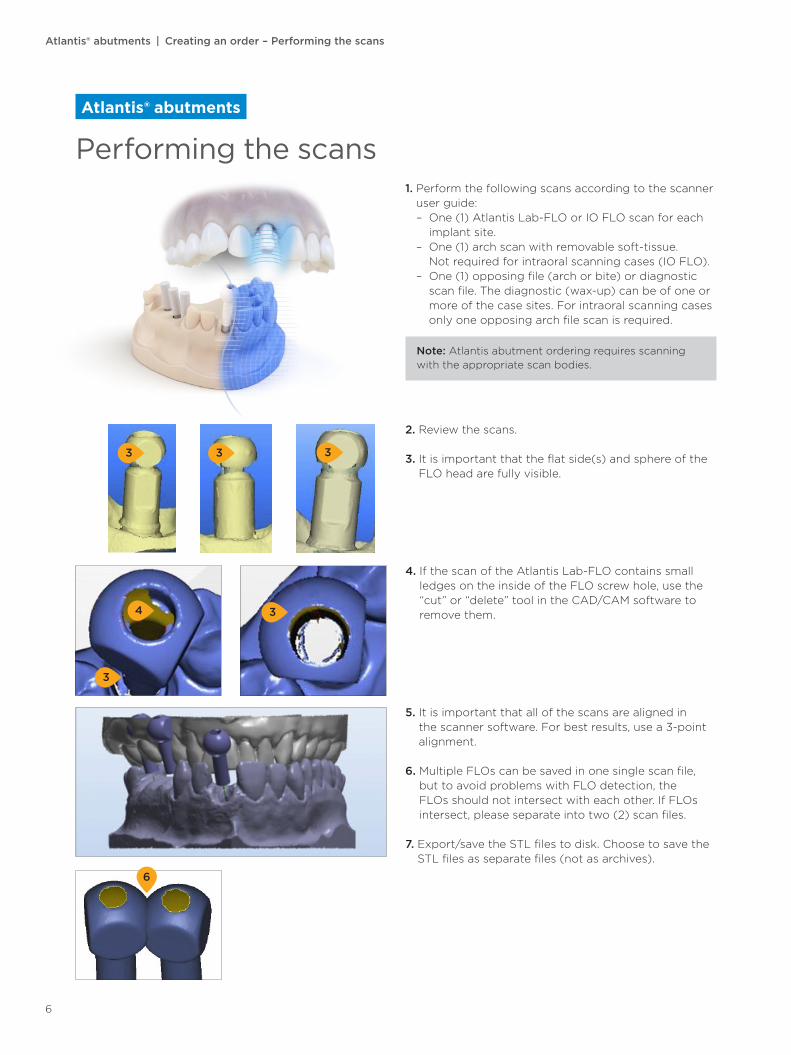
Performing the scans1. Perform the following scans according to the scanner
user guide: – One (1) Atlantis Lab-FLO or IO FLO scan for each
implant site. – One (1) arch scan with removable soft-tissue.
Not required for intraoral scanning cases (IO FLO). – One (1) opposing file (arch or bite) or diagnostic
scan file. The diagnostic (wax-up) can be of one or more of the case sites. For intraoral scanning cases only one opposing arch file scan is required.
Note: Atlantis abutment ordering requires scanning with the appropriate scan bodies.
4. If the scan of the Atlantis Lab-FLO contains small ledges on the inside of the FLO screw hole, use the “cut” or “delete” tool in the CAD/CAM software to remove them.
2. Review the scans.
3. It is important that the flat side(s) and sphere of the FLO head are fully visible.
5. It is important that all of the scans are aligned in the scanner software. For best results, use a 3-point alignment.
6. Multiple FLOs can be saved in one single scan file, but to avoid problems with FLO detection, the FLOs should not intersect with each other. If FLOs intersect, please separate into two (2) scan files.
7. Export/save the STL files to disk. Choose to save the STL files as separate files (not as archives).
34
3
33 3
6
6
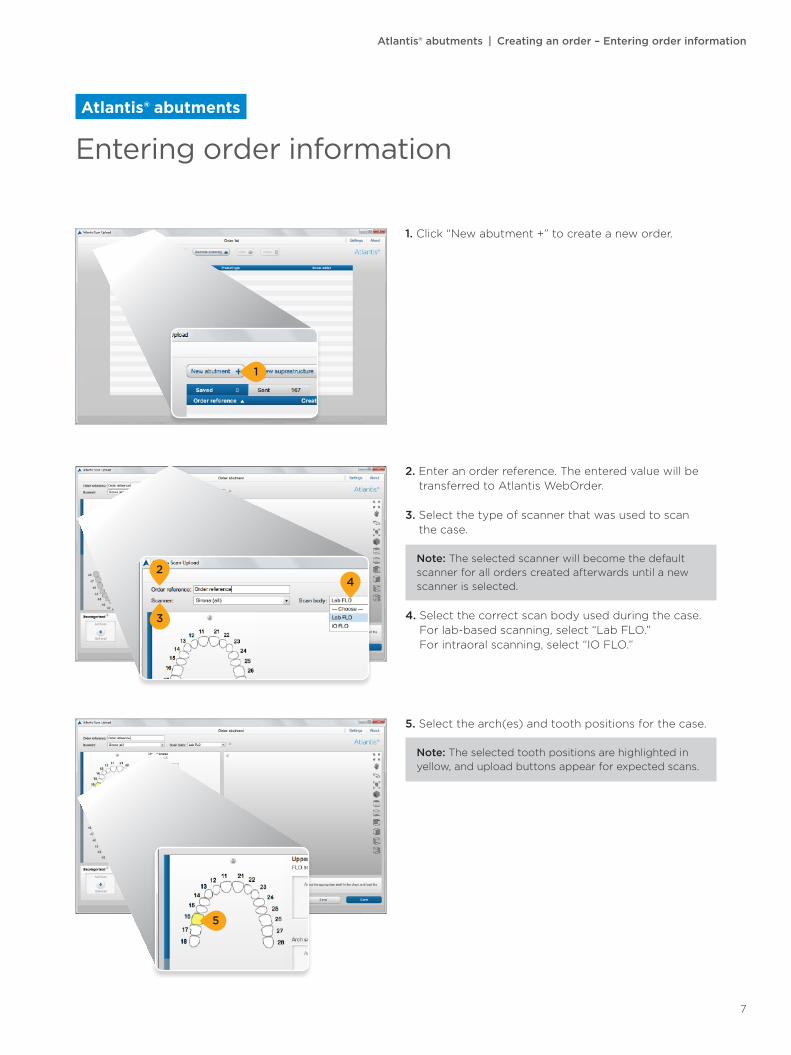
1. Click “New abutment +” to create a new order.
2. Enter an order reference. The entered value will be transferred to Atlantis WebOrder.
3. Select the type of scanner that was used to scan the case.
Note: The selected scanner will become the default scanner for all orders created afterwards until a new scanner is selected.
4. Select the correct scan body used during the case. For lab-based scanning, select “Lab FLO.” For intraoral scanning, select “IO FLO.”
5. Select the arch(es) and tooth positions for the case.
Note: The selected tooth positions are highlighted in yellow, and upload buttons appear for expected scans.
Atlantis® abutments | Creating an order – Entering order information
Atlantis® abutments
Entering order information
3
24
5
1
7

Atlantis® abutments | Creating an order – Adding scan files to the order
6. Click on an “Add Scan” box to browse the computer and load the correct scan file or simply drag all scan files from the folder to any area in the Atlantis Scan Upload window and it will be placed in the “Uncategorized” area. Only one file can be selected for each box. Files can be dragged from one box to another.
7. The “Uncategorized” area can be used to load several files at a time. Once the files have been loaded into this area, the files can be dragged to the correct boxes above.
Note: Any files left in the “Uncategorized” section will not be included in the final order.
8. Multiple FLOs can be combined in one scan, whether it is IO FLO or Lab-FLO. Click on the “tooth” in the box to assign tooth numbers. This can be done one at a time (by clicking on the specific tooth), all at once (by selecting the green check), or, if needed, all may be simultaneously deleted (by clicking on the red x).
Important: If there are four or more adjacent edentulous spaces, a diagnostic scan is recommended (refer to the Atlantis design guide).
Note: When a diagnostic scan file is added, additional boxes will be added to allow for more files to be loaded.
7
8
6
Atlantis® abutments
Adding scan files to the order
8

1. Review the scans for missing surfaces or incorrect alignment.
2. For different views and functions, click the symbols in the toolbar. You can also use the mouse buttons to rotate, pan and zoom your scans.
3. Individual scan files can be hidden/shown in the preview pane by clicking the “eye” icon in the scan box.
4. For lab-based scanning cases, review to ensure that the gingival masks and diagnostic wax-ups appear properly seated on the model.
5. Review to ensure that the flat side(s) of the FLO is/are visible.
6. If there is anything within the scan that is incorrect, delete the scan by clicking the “X” and then add a new scan file.
7. When satisfied, select “Send” to save the order and send it to Atlantis WebOrder. The order will be saved locally and moved to the “Sent” tab after it is successfully created on Atlantis WebOrder.
Note: The manual detection option will be provided for lab-based scanning cases when the automatic FLO detection fails. Refer to Appendix E: Manual FLO Detection for futher information.
Atlantis® abutments | Creating an order – Reviewing the scans
Atlantis® abutments
Reviewing the scansIt is important to review all the scans before exporting them to Atlantis WebOrder. Any issues left uncorrected can result in a rescan request or an unsatisfactory abutment design.
4
7
3
5
6
2
1
9

Atlantis® suprastructure | Creating an order – Performing the scans
Atlantis® suprastructure
Performing the scans
1. Perform the following scans according to the scanner user guide:
– One (1) Atlantis FLO-S scan
– One (1) arch scan with removable soft tissue
– One (1) diagnostic scan (removable soft tissue and diagnostic wax-up).
Note: Atlantis suprastructure ordering requires scanning with the appropriate Atlantis FLO-S.
2. Review the scans.
3. It is important that all of the scans—Atlantis FLO-S, arch and diagnostic scans—are aligned in the scanner software. For best results, use a 3-point alignment.
4. Export/save the STL files to disk. Choose to save the STL files as separate files (not as archives).
10

1. Click “New suprastructure +” to create a new order.
2. Enter an order reference. The entered value will be transferred to Atlantis WebOrder.
3. Select the type of scanner that was used to scan the case.
Note: The selected scanner will become the default scanner for all orders created afterwards until a new scanner is selected.
4. Select “Product type.”
5. Select the arch and tooth positions for the case.
Note: The selected tooth positions are highlighted in yellow, and upload buttons are added for the selected arch.
Atlantis® suprastructure | Creating an order – Entering order information
Atlantis® suprastructure
Entering order information
5
1
3 42
11

Atlantis® suprastructure | Creating an order – Adding scan files to the order
6. Click on an “Add scan” box to browse the computer and load the correct scan file or simply drag all scan files from the folder any area in the Atlantis Scan Upload window and it will be placed in the “Uncategorized” area. Only one file can be selected for each box. Files can be dragged from one box to another.
7. The “Uncategorized” area can be used to load several files at a time. Once the files have been loaded into this area, the files can be dragged to the correct boxes above.
Note: For suprastastructure orders additional support files can be added: TXT, JPEG, JPG, PNG, XML, implantreference. They can be added only to “Additional files” area.
Note: Any files left in the “Uncategorized” section will not be included in the final order.
7
6
Atlantis® suprastructure
Adding scan files to the order
12
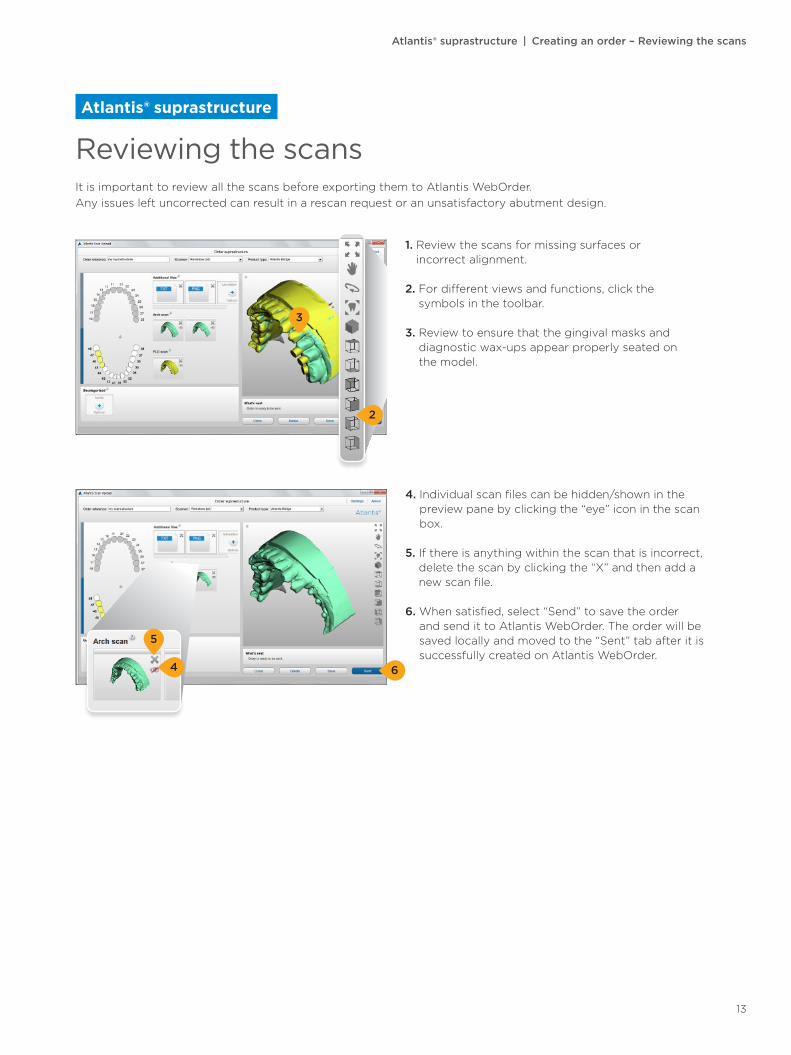
1. Review the scans for missing surfaces or incorrect alignment.
2. For different views and functions, click the symbols in the toolbar.
3. Review to ensure that the gingival masks and diagnostic wax-ups appear properly seated on the model.
4. Individual scan files can be hidden/shown in the preview pane by clicking the “eye” icon in the scan box.
5. If there is anything within the scan that is incorrect, delete the scan by clicking the “X” and then add a new scan file.
6. When satisfied, select “Send” to save the order and send it to Atlantis WebOrder. The order will be saved locally and moved to the “Sent” tab after it is successfully created on Atlantis WebOrder.
Atlantis® suprastructure | Creating an order – Reviewing the scans
Atlantis® suprastructure
Reviewing the scansIt is important to review all the scans before exporting them to Atlantis WebOrder.Any issues left uncorrected can result in a rescan request or an unsatisfactory abutment design.
6
2
4
5
3
13

Submitting the Atlantis® order
1. When the order is received in Atlantis WebOrder, it will be displayed in the default browser.
2. Log on to Atlantis WebOrder at http://www.Atlantisweborder.com.
3. The newly uploaded order will open automatically. The order name entered in Atlantis Scan Upload will be the order reference in Atlantis WebOrder.
4. Begin editing the remaining order options. When the order is submitted, it will be designed and manufactured at the Atlantis production facility at Dentsply Sirona.
Important: Refer to the Atlantis WebOrder user guides for more informaiton:Atlantis abutments, 32670167-USX Atlantis suprastructures, 32670464-USX. https://www.Atlantisweborder.com/help
Submitting the Atlantis® orderDepending on the network and server load, it may take a few minutes before the orders show up in Atlantis WebOrder. Enter Atlantis WebOrder and specify the options. Complete and submit the order in Atlantis WebOrder by following the instructions in this section.
14

Atlantis® abutments | Appendix A
1. When the status is changed to “Rescan requested,” the order is moved from the Sent tab to the Saved tab.
2. Click the “Rescan requested” link to open Atlantis WebOrder and find the reason for the rescan request.
3. Rescan the case with the scanner. (Refer to “Creating an order – performing the scans.”)
4. Open the order and remove the requested scans from the order by clicking the “X.”
5. Then upload the new scans instead. (Refer to “Creating an order-adding scan files to the order.”)
6. Review the scans and send to Atlantis WebOrder. (Refer to “Creating an order – reviewing the scans.”)
Note: No additional steps in Atlantis WebOrder will be required once the scans are submitted.
Atlantis® abutments
Rescanning requestsIf an Atlantis abutment order cannot be designed or manufactured by the Atlantis production facility, a “rescan requested” message will be sent, and the status of the order in Atlantis Scan Upload will be changed to “Rescan requested.”
2
4
15

Atlantis® abutments | Appendix B
1. Enter Atlantis WebOrder and create a new Atlantis order.
2. Select “Atlantis Scan Upload.”
3. Complete and submit the order.
4. Take note of the barcode number and write it down for later use in this process. In this example “AWO0000071892.”
Atlantis® abutments
Creating an order – alternative workflow
2
4
16

Atlantis® abutments | Appendix B
Atlantis® abutments
Creating an order – alternative workflow
5. Open Atlantis Scan Upload and click “Barcode scanning.”
6. Enter the order barcode.
7. Click “OK” to retrieve the order information submitted in Atlantis WebOrder.
8. Perform the scan. (Refer to “Creating an order – performing the scan.”)
9. Upload the scan files to Atlantis Scan Upload. (Refer to “Creating an order – adding scan files to the order.”)
10. Review the scans and send to Atlantis WebOrder. (Refer to “Creating an order – reviewing the scans.”)
Note: No additional steps in Atlantis WebOrder will be required once the scans are submitted.
5
67
17

Appendix C
1. Choose “What’s new?” to open a PDF document with a list of new features in the latest Atlantis Scan Upload version.
2. Choose “Update now” to download and install the update. All work should be saved and/or sent before installing the newer version.
3. Choose “Update later” to be reminded of the update the next time you start the application.
Updating the Atlantis® Scan Upload versionWhen a new version of Atlantis Scan Upload is released, a notification will appear at the bottom of the screen.
1 2 3
18
Appendix D
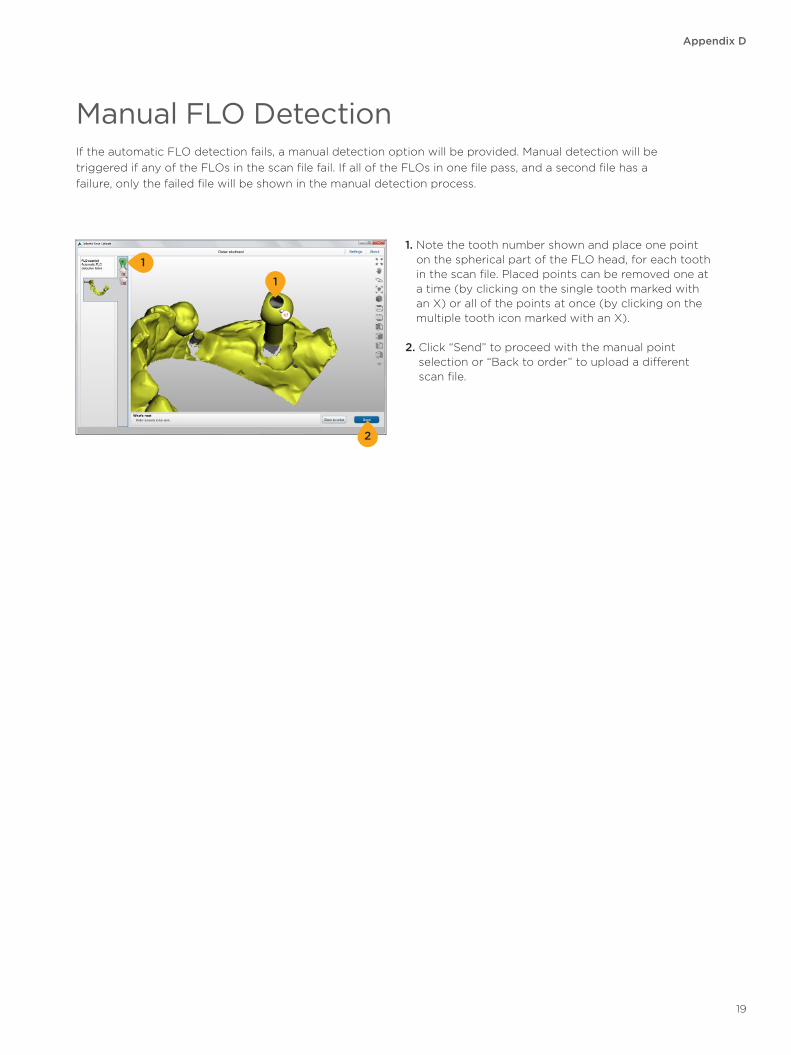
1. Note the tooth number shown and place one point on the spherical part of the FLO head, for each tooth in the scan file. Placed points can be removed one at a time (by clicking on the single tooth marked with an X) or all of the points at once (by clicking on the multiple tooth icon marked with an X).
2. Click “Send” to proceed with the manual point selection or “Back to order” to upload a different scan file.
Manual FLO DetectionIf the automatic FLO detection fails, a manual detection option will be provided. Manual detection will be triggered if any of the FLOs in the scan file fail. If all of the FLOs in one file pass, and a second file has a failure, only the failed file will be shown in the manual detection process.
1
1
2
19
Appendix E
PARTIAL – Your action is required. This order has been exported from the Atlantis Scan Upload application, but has not yet been submitted to Atlantis WebOrder. You must log on to your Atlantis WebOrder account and edit and submit this order before Dentsply Sirona will begin processing the order.
SCANNED – Immediately after you submit your order by clicking the submit button, the status of your order will briefly be displayed as SCANNED before being assigned an Atlantis order number and changed to an IN PROCESS status. Your order should not have a status of SCANNED for more than a few minutes.
IN PROCESS – The order is in production.
HOLD for design approval – Your action is required. Per your request, the order has been placed on hold pending your review and approval of the abutment design. You must log on to your Atlantis WebOrder account and view the order in question. You can then approve (or edit and approve) the design, at which point your order will automatically be processed for manufacturing.
RESCAN REQUESTED – Your action is required. The scans you provided are not suitable for abutment design and will be deleted. You must rescan as needed and recreate the order in Atlantis Scan Upload. A new order in Atlantis WebOrder will also be required.
SHIPPED – Production of your order is complete and the order has been shipped. The shipment date will be displayed.
Atlantis® WebOrder statuses for Atlantis® Scan Upload orders Certain order statuses in Atlantis WebOrder indicate that an action is required. Order statuses highlighted in orange require immediate action in order to proceed.
20

21

Den
tsp
ly S
iro
na d
oes
no
t w
aive
any
rig
ht t
o it
s tr
adem
arks
by
not
usin
g t
he s
ymb
ols
® o
r ™
. 32
670
86
5-U
SX-1
610
© 2
016
Den
tsp
ly S
iro
na. A
ll ri
ght
s re
serv
ed.
About Dentsply Sirona Implants
Dentsply Sirona Implants offers comprehensive solutions for all phases of implant therapy, including Ankylos®, Astra Tech Implant System® and Xive® implant lines, digital technologies, such as Atlantis® patient-specific solutions and Simplant® guided surgery, Symbios® regenerative solutions, and professional and business development programs, such as STEPPS™. Dentsply Sirona Implants creates value for dental professionals and allows for predictable and lasting implant treatment outcomes, resulting in enhanced quality of life for patients.
About Dentsply Sirona
Dentsply Sirona is the world’s largest manufacturer of professional dental products and technologies, with a 130-year history of innovation and service to the dental industry and patients worldwide. Dentsply Sirona develops, manufactures, and markets a comprehensive solutions offering including dental and oral health products as well as other consumable medical devices under a strong portfolio of world class brands. As The Dental Solutions Company™, Dentsply Sirona’s products provide innovative, high-quality and effective solutions to advance patient care and deliver better, safer and faster dentistry. Dentsply Sirona’s global headquarters is located in York, Pennsylvania, and the international headquarters is based in Salzburg, Austria. The company’s shares are listed in the United States on NASDAQ under the symbol XRAY.
Visit www.dentsplysirona.com for more information about Dentsply Sirona and its products.
THE DENTAL SOLUTIONS COMPANY™