xerox scanning issue: device default for scan settings
TRANSCRIPT
14 August 2013 702P01847
Xerox® WorkCentre® Xerox® ColorQube® Appendix B: Setting Default “Quality / File Size” via Xerox® CentreWare® Internet Services


©2013 Xerox Corporation. All rights reserved. Xerox®, Xerox and Design®, WorkCentre®, CentreWare®, and ColorQube® are trademarks of the Xerox Corporation in the United States and/or other countries.
Other company trademarks are also acknowledged.
Document Version: 1.4 (14 August 2013)
BR7350


Table of Contents
Introduction ............................................................................... 2 Impacted Products ......................................................................................... 2
Setting “Quality / File Size” ....................................................... 3 Workflow Scanning ........................................................................................ 3 Network Scanning.......................................................................................... 5 Scan to E-Mail ............................................................................................. 14 Internet Fax ................................................................................................. 16 Scan To ....................................................................................................... 20 Scan To Home ............................................................................................. 22 Scan To USB ............................................................................................... 24 Scan To Mailbox .......................................................................................... 26
i Appendix B

Introduction
This document provides the Xerox® CentreWare® Internet Services instructions for setting the “Quality / File Size” to factory default value. It is organized by scan workflow and lists the products that utilize the pathway described. The scan workflows covered may not be present or utilized on every device.
Impacted Products Product Model Xerox® ColorQube® 87XX/89XX ColorQube 92XX/93XX Xerox® WorkCentre® 5030/5050 WorkCentre 51XX WorkCentre 56XX WorkCentre 57XX WorkCentre 58XX WorkCentre 6400 WorkCentre 7220/7225 WorkCentre 75XX WorkCentre 77XX WorkCentre 78XX WorkCentre 76XX WorkCentre Pro 2XX/BookMark 40/55
2 Appendix B

Setting “Quality / File Size”
Workflow Scanning This procedure applies only to the following products:
Product Model Xerox® ColorQube® 8700/8900 ColorQube 9201/9202/9203 ColorQube 9301/9302/9303 Xerox® WorkCentre® 5735/5740/5745/5755/5765/5775/5790 WorkCentre 5840/5845/5855/5865/5875/5890 WorkCentre 6400 WorkCentre 7220/7225 WorkCentre 7525/7530/7535/7545/7556 WorkCentre 7755/7765/7775 WorkCentre 7830/7835/7845/7855
Appendix B 3

Setting the Default Template
Xerox® CentreWare® Internet Services Method 1. Login to CentreWare Internet Services.
2. Select Properties on the top navigation bar.
3. On the left navigation tree, select Services > Workflow Scanning > Default Template.
4. Once on the Defaults screen, scroll down to the Advanced Settings box and select Edit.
5. Scroll down to the Quality / File Size box.
6. Move the slider to the middle position, so the description reads Quality: Higher / File Size: Larger.
7. Select Apply.
4 Appendix B
Resetting Existing Templates
This procedure only applies to templates stored on the device.
Xerox® CentreWare® Internet Services Method 1. Login to CentreWare Internet Services.
2. Select Scan on the top navigation bar.
3. On the left navigation tree, select the Templates radio button. Select the Template to edit.
4. Once on the Templates screen, scroll down to the Advanced Settings box and select Edit.
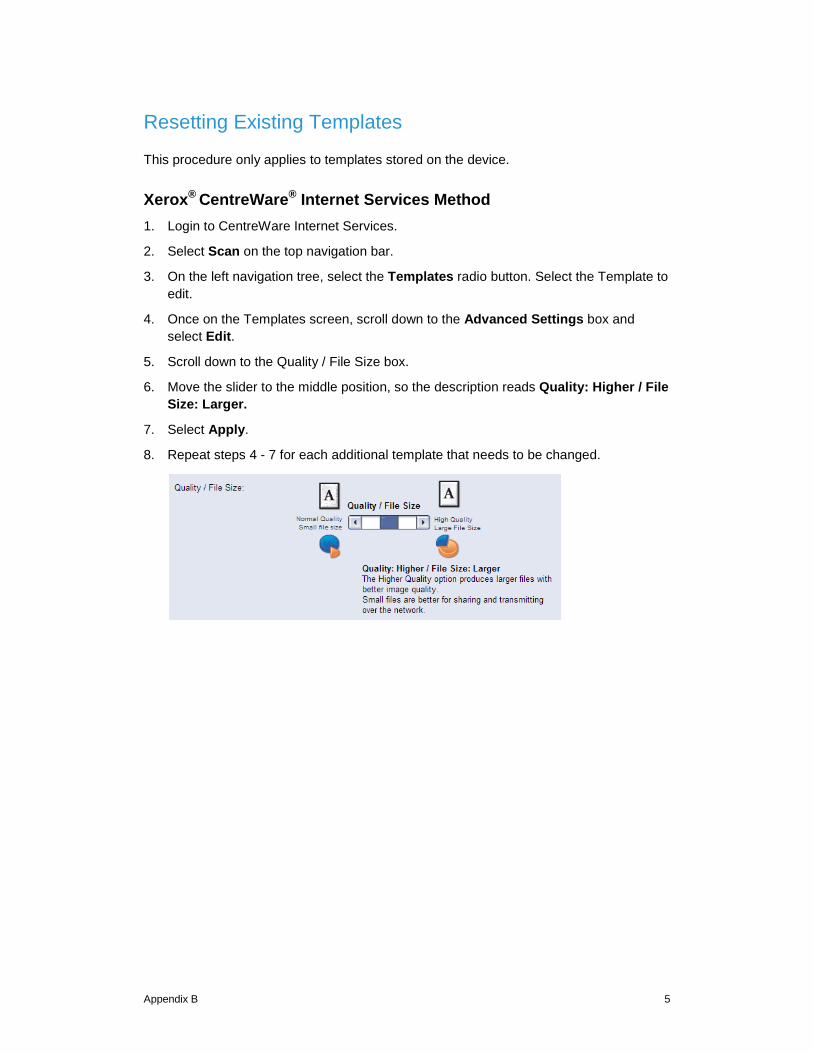
5. Scroll down to the Quality / File Size box.
6. Move the slider to the middle position, so the description reads Quality: Higher / File Size: Larger.
7. Select Apply.
8. Repeat steps 4 - 7 for each additional template that needs to be changed.
Appendix B 5

Network Scanning This procedure applies only to the following products:
Product Model Xerox® WorkCentre® 5030/5050 WorkCentre 5135/5150 WorkCentre 5632/5638/5645/5655/5665/5675/5687 WorkCentre 7655/7665/7675
6 Appendix B

Setting the Default Template
Xerox® CentreWare® Internet Services Method 1. Login to CentreWare Internet Services.
2. Select Properties on the top navigation bar.
3. On the left navigation tree, select Services > Network Scanning > Default Template.
4. Once on the Defaults screen, scroll down to the Advanced Settings box and select Edit.
5. Scroll down to the Quality / File Size box.
6. Move the slider to the middle position, so the description reads Quality: Higher / File Size: Larger.
7. Select Apply.
8. Repeat steps 4 - 7 for each additional template that needs to be changed.
Appendix B 7

Resetting Existing Templates
This procedure only applies to templates stored on the device.
Xerox® CentreWare® Internet Services Method 1. Login to CentreWare Internet Services.
2. Select Scan on the top navigation bar.
3. On the left navigation tree, select the Templates radio button. Select the Template to edit.
4. Once on the Templates screen, scroll down to the Advanced Settings box and select Edit.
5. Scroll down to the Quality / File Size box.
6. Move the slider to the middle position, so the description reads Quality: Higher / File Size: Larger.
7. Select Apply.
8 Appendix B

Network Scanning This procedure applies only to the following products:
Product Model Xerox® WorkCentre® Pro 232/238/245/255/265/275 WorkCentre BookMark 40/55
Appendix B 9

Setting the Default Template
Xerox® CentreWare® Internet Services Method 1. Login to CentreWare® Internet Services.
2. Select Properties on the top navigation bar.
3. On the left navigation tree, select Services > Network Scanning > Default Template.
4. Once on the Defaults screen, scroll down to the Scan Options box and select Edit.
5. Scroll down to the Quality / File Size box.
6. Select the drop down box and set it to Higher Quality / Larger File Size.
7. Select Apply.
10 Appendix B

Resetting Existing Templates
This procedure only applies to templates stored on the device.
Xerox® CentreWare® Internet Services Method 1. Login to CentreWare® Internet Services.
2. Select Scan on the top navigation bar.
3. On the left navigation tree, select Templates. Select the Template to edit.
4. Once on the Templates screen, scroll down to the Scan Options box and select Edit.
5. Scroll down to the Quality / File Size box.
6. Select the drop down box and set it to Higher Quality / Larger File Size.
7. Select Apply.
Appendix B 11

Scan to E-Mail
This procedure applies only to the following products:
Product Model Xerox® ColorQube® 8700/8900 ColorQube 9301/9302/9303 Xerox® WorkCentre® 5735/5740/5745/5755/5765/5775/5790 WorkCentre 5840/5845/5855/5865/5875/5890 WorkCentre 7220/7225 WorkCentre 7525/7530/7535/7545/7556 WorkCentre 7830/7835/7845/7855
12 Appendix B
Setting E-Mail Defaults
Xerox® CentreWare® Internet Services Method 1. Login to CentreWare Internet Services.
2. Select Properties on the top navigation bar.
3. On the left navigation tree, select Services > E-Mail > Setup. Select Defaults.
4. Once on the Defaults screen, scroll down to the Advanced Settings box and select Edit.
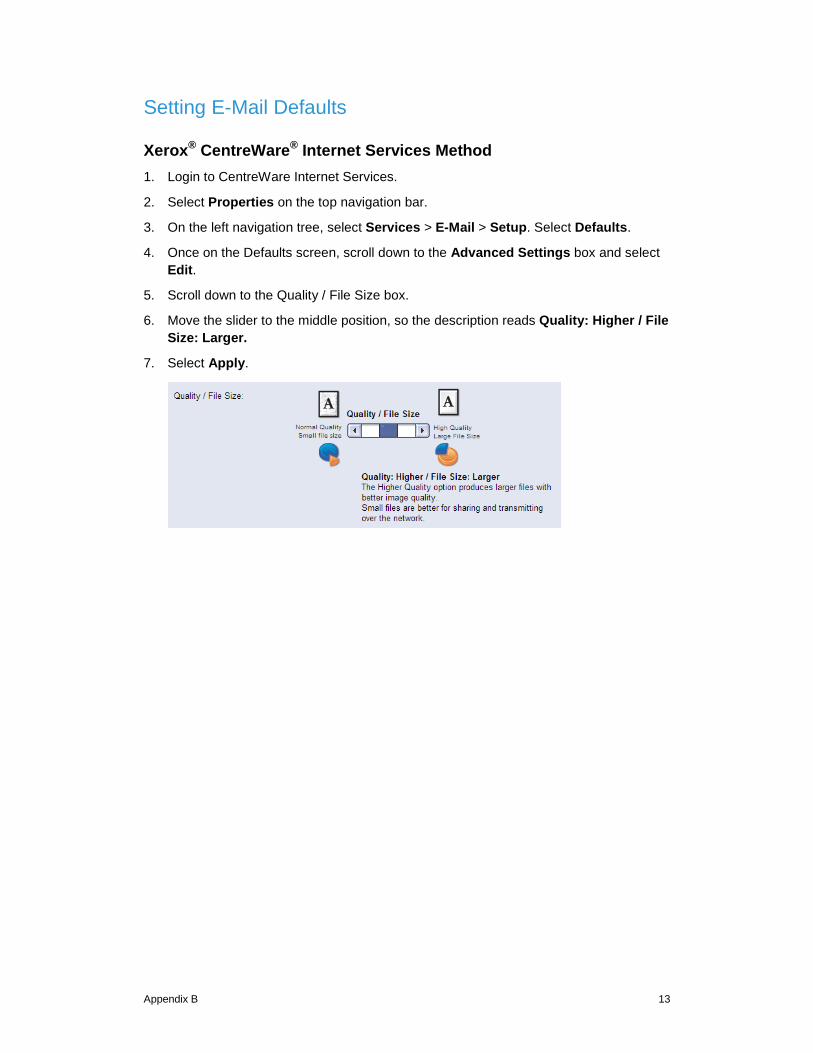
5. Scroll down to the Quality / File Size box.
6. Move the slider to the middle position, so the description reads Quality: Higher / File Size: Larger.
7. Select Apply.
Appendix B 13

Scan to E-Mail This procedure applies only to the following products:
Product Model Xerox® ColorQube® 9201/9202/9203 Xerox® WorkCentre® 6400 WorkCentre 5030/5050 WorkCentre 5135/5150 WorkCentre 5632/5638/5645/5655/5665/5675/5687 WorkCentre 7655/7665/7675 WorkCentre 7755/7765/7775
14 Appendix B

Setting E-Mail Defaults
Xerox® CentreWare® Internet Services Method 1. Login to CentreWare Internet Services.
2. Select Properties on the top navigation bar.
3. On the left navigation tree, select Services > E-Mail > Defaults.
4. Once on the Defaults screen, scroll down to the Advanced Settings box and select Edit.
5. Scroll down to the Quality / File Size box.
6. Move the slider to the middle position, so the description reads Quality: Higher / File Size: Larger.
7. Select Apply.
Appendix B 15

Internet Fax This procedure applies only to the following products:
Product Model Xerox® ColorQube® 8700/8900 ColorQube 9301/9302/9303 Xerox® WorkCentre® 5735/5740/5745/5755/5765/5775/5790 WorkCentre 5840/5845/5855/5865/5875/5890 WorkCentre 7220/7225 WorkCentre 7525/7530/7535/7545/7556 WorkCentre 7830/7835/7845/7855
16 Appendix B

Setting Internet Fax Defaults
Xerox® CentreWare® Internet Services Method 1. Login to CentreWare Internet Services.
2. Select Properties on the top navigation bar.
3. On the left navigation tree, select Services > Internet Fax > Setup. Select Defaults.
4. Once on the Defaults screen, scroll down to the Advanced Settings box and select Edit.
5. Scroll down to the Quality / File Size box.
6. Move the slider to the middle position, so the description reads Quality: Higher / File Size: Larger.
7. Select Apply.
Appendix B 17

Internet Fax This procedure applies only to the following products:
Product Model Xerox® ColorQube® 9201/9202/9203 Xerox® WorkCentre® 5030/5050 WorkCentre 5135/5150 WorkCentre 5632/5638/5645/5655/5665/5675/5687 WorkCentre 6400 WorkCentre 7655/7665/7675 WorkCentre 7755/7765/7775
18 Appendix B

Setting Internet Fax Defaults
Xerox® CentreWare® Internet Services Method 1. Login to CentreWare Internet Services.
2. Select Properties on the top navigation bar.
3. On the left navigation tree, select Services > Internet Fax > Defaults.
4. Once on the Defaults screen, scroll down to the Advanced Settings box and select Edit.
5. Scroll down to the Quality / File Size box.
6. Move the slider to the middle position, so the description reads Quality: Higher / File Size: Larger.
7. Select Apply.
Appendix B 19

Scan To This procedure applies only to the following products:
Product Model Xerox® ColorQube® 8700/8900 ColorQube 9301/9302/9303 Xerox® WorkCentre® 5840/5845/5855/5865/5875/5890 WorkCentre 7220/7225 WorkCentre 7830/7835/7845/7855
20 Appendix B

Setting Scan To Defaults
Xerox® CentreWare® Internet Services Method 1. Login to CentreWare Internet Services.
2. Select Properties on the top navigation bar.
3. On the left navigation tree, select Services > Scan To > Setup. Select Defaults.
4. Once on the Defaults screen, scroll down to the Advanced Settings box and select Edit.
5. Scroll down to the Quality / File Size box.
6. Move the slider to the middle position, so the description reads Quality: Higher / File Size: Larger.
7. Select Apply.
Appendix B 21

Scan To Home This procedure applies only to the following products:
Product Model Xerox® ColorQube® 8700/8900 ColorQube 9301/9302/9303 Xerox® WorkCentre® 5840/5845/5855/5865/5875/5890 WorkCentre 7220/7225 WorkCentre 7525/7530/7535/7545/7556 WorkCentre 7755/7765/7775 WorkCentre 7830/7835/7845/7855
22 Appendix B

Setting Scan To Home Defaults
Xerox® CentreWare® Internet Services Method 1. Login to CentreWare Internet Services.
2. Select Properties on the top navigation bar.
3. On the left navigation tree, select Services > Scan To Home > General.
4. Select Modify Settings option at top of the page.
5. Once on the Defaults screen, scroll down to the Advanced Settings box and select Edit.
6. Scroll down to the Quality / File Size box.
7. Move the slider to the middle position, so the description reads Quality: Higher / File Size: Larger.
8. Select Apply.
Appendix B 23

Scan To USB This procedure applies only to the following products:
Product Model Xerox® ColorQube® 8700/8900 ColorQube 9301/9302/9303 Xerox® WorkCentre® 5840/5845/5855/5865/5875/5890 WorkCentre 7220/7225 WorkCentre 7525/7530/7535/7545/7556 WorkCentre 7830/7835/7845/7855
24 Appendix B

Setting Scan To USB Defaults
Xerox® CentreWare® Internet Services Method 1. Login to CentreWare Internet Services.
2. Select Properties on the top navigation bar.
3. On the left navigation tree, select Services > Scan To USB > General
4. Select Modify Settings option at top of the page.
5. Once on the Defaults screen, scroll down to the Advanced Settings box and select Edit.
6. Scroll down to the Quality / File Size box.
7. Move the slider to the middle position, so the description reads Quality: Higher / File Size: Larger.
8. Select Apply.
Appendix B 25

Scan To Mailbox This procedure applies only to the following products:
Product Model Xerox® ColorQube® 8700/8900 ColorQube 9201/9202/9203 ColorQube 9301/9302/9303 Xerox® WorkCentre® 5135/5150 WorkCentre 5632/5638/5645/5655/5665/5675/5687 WorkCentre 5735/5740/5745/5755/5765/5775/5790 WorkCentre 5840/5845/5855/5865/5875/5890 WorkCentre 6400 WorkCentre 7220/7225 WorkCentre 7525/7530/7535/7545/7556 WorkCentre 7655/7665/7675 WorkCentre 7755/7765/7775 WorkCentre 7830/7835/7845/7855 WorkCentre Pro 232/238/245/255/265/275
26 Appendix B

Setting Scan To Mailbox Defaults
Xerox® CentreWare® Internet Services Method 1. Login to CentreWare Internet Services.
2. Select Scan on the top navigation bar.
3. On the left navigation tree, select the Mailboxes radio button.
4. Select Modify Settings.
5. Once on the Defaults screen, scroll down to the Advanced Settings box and select Edit.
6. Scroll down to the Quality / File Size box.
7. Move the slider to the middle position, so the description reads Quality: Higher / File Size: Larger.
8. Select Apply.
Appendix B 27