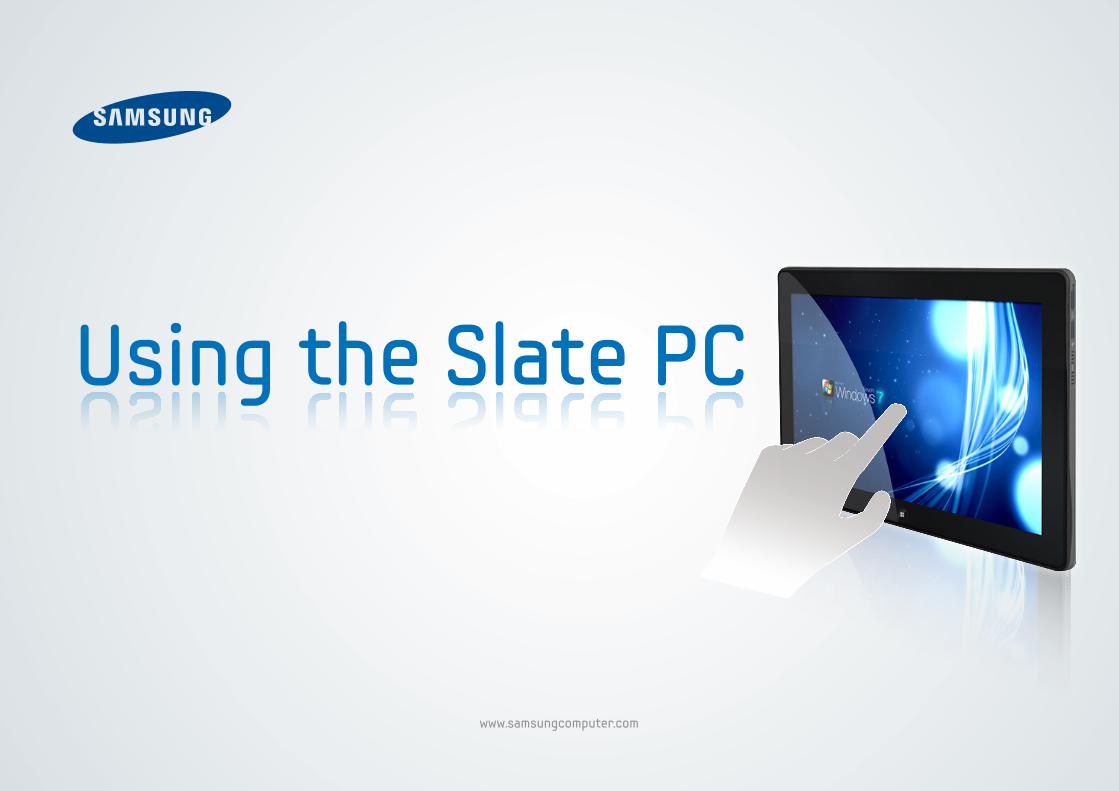
samsung xe700t1a-a03us series 7 slate tablet pc manual
TRANSCRIPT
1Getting Started
www.samsungcomputer.com
Using the Slate PCUsing the Slate PC

2Getting StartedBefore Reading This Guide
Before Reading This Guide
• Thisguidedescribesthegeneral functionsprovidedwithSamsungSlatePC.Somefunctionsanddevicesmaynotbeprovidedortheversionmaydifferdependingontheproduct.
Pleasenote that thedescriptions in thisguidemaynotmatchyourcomputer’senvironmentexactly.
• TheimagesonthecoverandthemaincontentofthisguideareimagesofrepresentativeSamsungSlatePCmodelsandmaydifferfromyouractualproduct.
Copyright
©2011SamsungElectronicsCo.,Ltd.
ThisguideisthepropertyofSamsungElectronicsCo.,Ltd.andisprotectedbycopyright.
NoinformationcontainedhereinmaybedistributedorcopiedinanyformwhatsoeverwithoutthepriorwrittenconsentofSamsungElectronicsCo.,Ltd.
Informationinthisguideissubjecttochangeduetofunctionalenhancementsoftheproductandotherreasonswithoutpriornotice.
2Getting Started
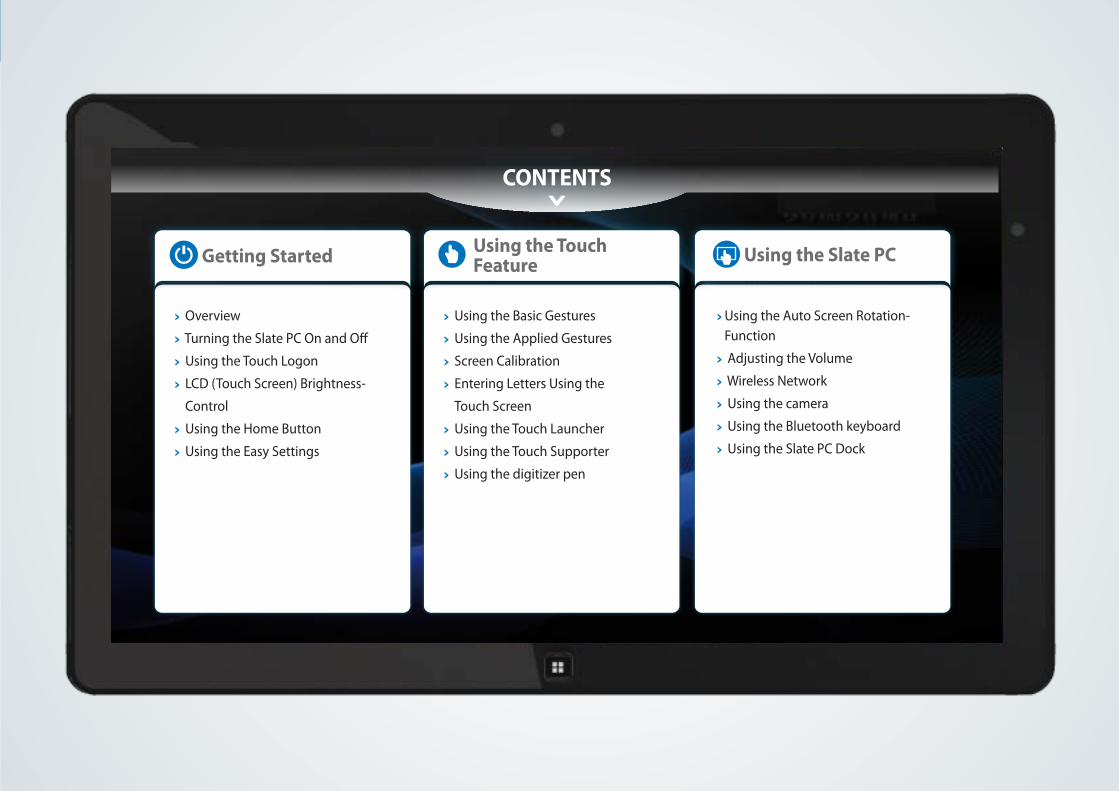
Overview
Turning the Slate PC On and Off
Using the Touch Logon
LCD (Touch Screen) Brightness-
Control
Using the Home Button
Using the Easy Settings
Using the Basic Gestures
Using the Applied Gestures
Screen Calibration
Entering Letters Using the
Touch Screen
Using the Touch Launcher
Using the Touch Supporter
Using the digitizer pen
Using the Auto Screen Rotation-Function
Adjusting the Volume
Wireless Network
Using the camera
Using the Bluetooth keyboard
Using the Slate PC Dock
Getting Started Using the Touch Feature Using the Slate PC
CONTENTS

4Getting Started
Overview
Turning the Slate PC On and Off
Using the Touch Logon
LCD (Touch Screen) Brightness Control
Using the Home Button
Using the Easy Settings
Getting Started

5Getting StartedOverview
Camera
Power Button
Rotation Lock
SIM Card Slot (Optional)
Slate PC Dock Port
Home button Touch Screen
speaker
Micro SD Card Slot
Microphone
Ear-set / headset Jack
USB Port
Volume Control Button
Micro HDMI Port
DC Jack
Illumination Sensor
Battery Emergency
Hole
CameraFront View
Bottom View Rear View
Left View
Top View
Right View

6Getting StartedTurning the Slate PC On and Off
Turning the computer on
1 Connect the AC adapter.
2 Press the Power button to turn the computer on.
3 Power button LED is lit while the computer is turned on.
LED
Setting up the Windows
When you use the computer for the first time, you have to Set up the Windows.Turn the computer on and follow the Setting up the procedures according to the instructions on the Windows screen.
1 Turn the computer on.
2 Confirm your country and region, the time and currency, the keyboard type and click Next.
3 Follow the activation procedures according to the instructions on the screen.

7Getting Started
4 OncetheWindowsset-upiscomplete,youcanusethecomputer.
Entering Sleep mode
Whenthecomputeristurnedon,pressthecomputer’spowerbuttononcebriefly.Towakethecomputerup,brieflypressthePowerbuttonofthecomputeragain.
Turning the computer off
ClickStart >Shut down mode toshutdownthecomputer.
1 2
Turning the Slate PC On and Off
8Getting Started
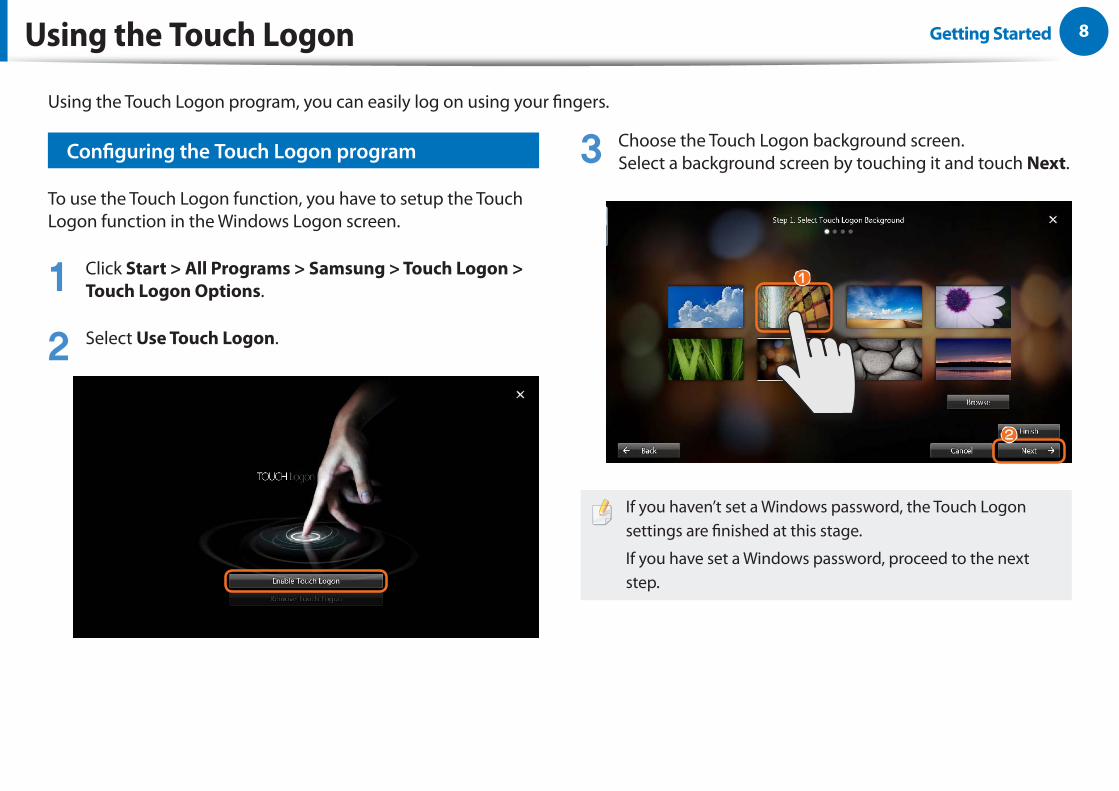
Configuring the Touch Logon program
To use the Touch Logon function, you have to setup the Touch Logon function in the Windows Logon screen.
1 Click Start > All Programs > Samsung > Touch Logon > Touch Logon Options.
2 Select Use Touch Logon.
3 Choose the Touch Logon background screen.Select a background screen by touching it and touch Next.
z
x
If you haven’t set a Windows password, the Touch Logon settings are finished at this stage.
If you have set a Windows password, proceed to the next step.
Using the Touch Logon program, you can easily log on using your fingers.
Using the Touch Logon
9Getting StartedUsing the Touch Logon
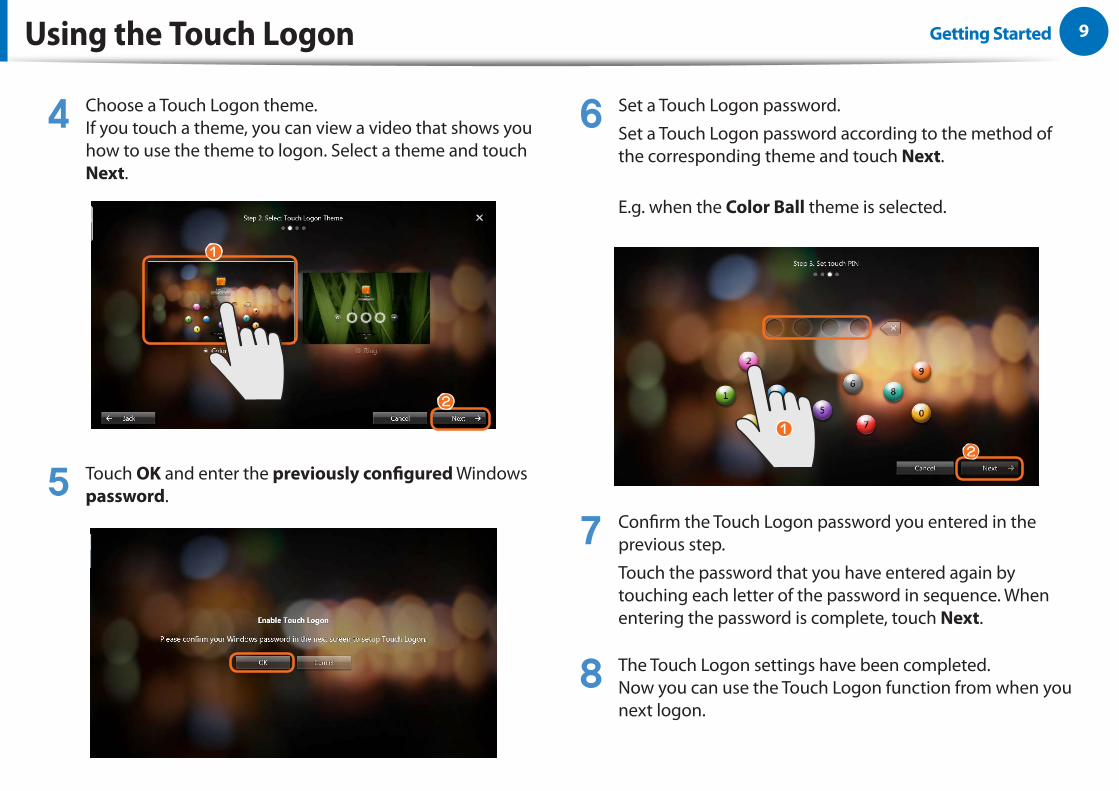
4 Choose a Touch Logon theme.If you touch a theme, you can view a video that shows you how to use the theme to logon. Select a theme and touch Next.
z
x
5 Touch OK and enter the previously configured Windows password.
6 Set a Touch Logon password.
Set a Touch Logon password according to the method of the corresponding theme and touch Next.
E.g. when the Color Ball theme is selected.
x
z
7 Confirm the Touch Logon password you entered in the previous step.
Touch the password that you have entered again by touching each letter of the password in sequence. When entering the password is complete, touch Next.
8 The Touch Logon settings have been completed. Now you can use the Touch Logon function from when you next logon.

10Getting Started
Using the Touch Logon function
To logon by touch in the Windows logon screen
1 Press the Power button to turn the computer on.
2 When the Windows logon screen appears, touch your account to log on.
3 When the following screen appears, touch the at the bottom of the screen and drag it to the top while your finger maintains contact.
4 Touch each letter of the configured Touch Logon password in sequence.
E.g. when the Color Ball theme is set
If there is no configured Windows account password, it is immediately Unlocked without requiring the password.
Using the Touch Logon

11Getting Started
Changing the Touch Logon Settings /Removing Touch Logon
1 Click Start > All Programs > Samsung > Touch Logon > Touch Logon Options.
2 You can change the Touch Logon settings or remove the Touch Logon function according to the instructions on the screen.
If you change the Windows password in the Control Panel > User Accounts, the Touch Logon function is deactivated.
Change Touch LogonRemove Touch
Using the Touch Logon

12Getting StartedLCD (Touch Screen) Brightness Control
1 LaunchtheEasy Settings.
2 ClickDisplay > Screen Brightnessandsetthebrightnesslevel.
z
x
● Maintaining the changed LCD brightness even after turning the computer on again
TomaintaintheLCDbrightnesssetbyusingthebrightnesscontrolkeysorthroughthePowerOptions,followtheproceduresbelow.
► For Windows 7 1.ClickControl Panel > Hardware and Sound >
Power Options. 2.ClickChange the settingsofthecurrently
configuredmode.
3.AdjustthedisplaybrightnessadjustmentmenubarandclicktheSave the changesbutton.
When the computer runs on battery power, the touch screen is dark.Thescreenbrightnessissettodarkwhenthecomputerisrunningonbatterypowertoextendthebatteryusetime.IntheEasySettings,setthelevelofthescreenbrightness.
TheLCDbrightnessisautomaticallycontrolledusingtheilluminationsensor.YoucanmanuallycontroltheLCDbrightnessasfollows.
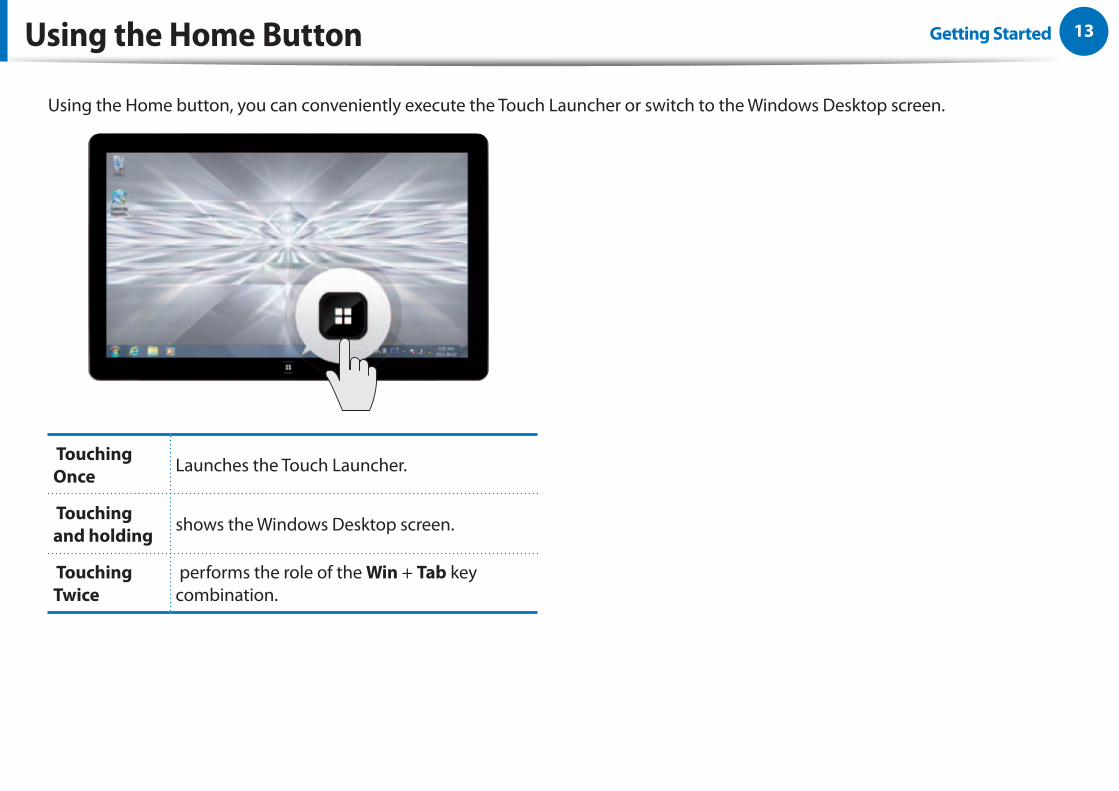
13Getting StartedUsing the Home Button
Using the Home button, you can conveniently execute the Touch Launcher or switch to the Windows Desktop screen.
Touching Once Launches the Touch Launcher.
Touching and holding shows the Windows Desktop screen.
Touching Twice
performs the role of the Win + Tab key combination.

14Getting StartedUsing the Easy Settings
1 Click Start > All Programs > Samsung > Easy Settings.
2 To configure a function, select the corresponding item.
The functions of the Easy Settings
Touch calibration
The Touch Logon setting and the screen text font size setting.
GeneralFast Start setting, silent mode and user account.
Power
You can configure the Power Plan (high-performance, power-saving, Samsung optimal mode), the power-saving settings and the display settings.
Wireless Network
You can configure whether to use the Airplane mode and Wi-Fi options.
DisplayYou can configure external display devices, and the screen brightness/color.
Desktop Background
/ Screen Saver
You can configure the Desktop background and the screen saver.
Sound AliveYou can configure the sound mode (Music, Movie, Speech, Silver Mode etc.).
The functions of the Easy Settings
Advanced Settings screen for each functions
Easy Settings is the integrated Samsung software control program

15Using the Touch Feature
Using the Basic Gestures
Using the Applied Gestures
Screen Calibration
Entering Letters Using the Touch Screen
Using the Touch Launcher
Using the Touch Supporter
Using the digitizer pen
Using the Touch Feature

16Using the Touch FeatureUsing the Basic Gestures
Learning basic touch screen operations
Touch Operation Function
Single-tap (click)To select an item, tap over the item with your finger. This is the same as left-clicking once with a mouse.
Double-tap (double-click)
To run an item, quickly tap the item twice with your finger. This is the same as double-clicking once.
Moving (drag)To drag an item, place your finger over the item and drag it to the new location. This is the same as dragging using a mouse.
Press and take off (mouse right-click)
If you press and hold the screen for approximately 3 seconds, the pop-up menu appears. This is the same as right-clicking with the mouse.
Tapping two fingers in succession
(mouse right-click)
Tap with one finger and then tap with another finger while holding down the first finger. A pop-up menu appears.
This is equivalent to right-clicking a mouse.
Moving finger (scroll)
Move your finger up and down, left or right to move on the screen accordingly.
This is the scroll function of the mouse.
This operation may perform a different function depending on the application program.

17Using the Touch FeatureUsing the Applied Gestures
Touch Operation Function
Drag two fingers apart / together (zoom-in/zoom-out)
Drag apart or together two fingers to zoom-in or -out of a picture or image.
Flick one finger fast (page move)
Flick one finger quickly to the left or right in order to move to the previous or
next page.
Quickly draw with two fingers (this runs the Touch Launcher)
By quickly drawing a line from top to bottom with two fingers, the Touch
Launcher program is launched.
Tapping three fingers
(Launching the Touch
Supporter)
Tapping three fingers simultaneously launches the touch supporter program.
Tapping five fingers
(Launching the keyboard
program)
Tapping fi ve fingers simultaneously launches the keyboard program.
Learning about touch operationsSelect Start > Control Panel > Hardware and Sound > Pen and Touch > Flicks tab and select Practice using flicks to learn about
the various touch operations.
18Using the Touch FeatureScreen Calibration
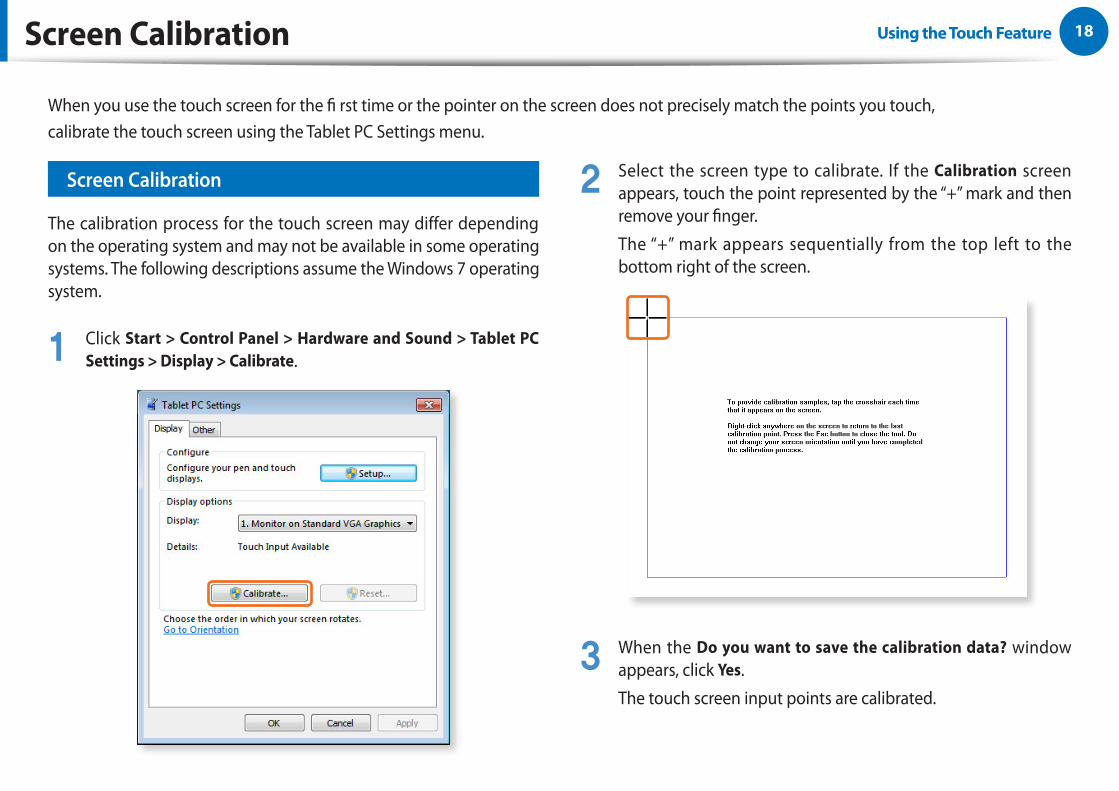
Screen Calibration
The calibration process for the touch screen may differ depending on the operating system and may not be available in some operating systems. The following descriptions assume the Windows 7 operating system.
1 Click Start > Control Panel > Hardware and Sound > Tablet PC Settings > Display > Calibrate.
2 Select the screen type to calibrate. If the Calibration screen appears, touch the point represented by the “+” mark and then remove your finger.
The “+” mark appears sequentially from the top left to the bottom right of the screen.
3 When the Do you want to save the calibration data? window appears, click Yes.
The touch screen input points are calibrated.
When you use the touch screen for the fi rst time or the pointer on the screen does not precisely match the points you touch,calibrate the touch screen using the Tablet PC Settings menu.

19Using the Touch FeatureEntering Letters Using the Touch Screen
Launching the Tablet PC Input Panel
If you touch the touch screen with your finger, the Tablet PC Input Panel tab appears with the cursor at the bottom left on the Desktop.
If you touch the Tablet PC Input Panel tab, the Tablet PC Input Panel appears.
Are you unable to find the Tablet PC Input Panel tab ?
click start > Control Panel > Hardware and Sound > Tablet PC Settings > Other tab and select [Go to Input Panel Settings], select the “Use the Input Panel tab” in the Options window and then click OK.
Let’s learn how to enter letters in Notepad.
1 Launching Notepad.
2 If you touch the Notepad screen with your finger, the appears on the Notepad with the cursor.
3 If you touch the with your finger, the Tablet PC Input Panel appears.
Tools Close
Writing Pad Mode
Touch keyboard
You can enter letters using either the Tablet PC input panel.

20Using the Touch FeatureEntering Letters Using the Touch Screen
Entering Letters Using the Touch Screen
Using the touch keyboard, you can enter letters by touching the corresponding keys on the keyboard that is displayed on the screen as you do with a normal keyboard.
1 In the Tablet PC input panel, touch the touch keyboard icon .
2 Enter letters by touching the corresponding keys on the screen.
Entering letters with the writing pad(hand-writing input mode)
In the touch screen, you can enter letters by directly writing letters with your finger on the writing pad input panel.
1 In the Tablet PC input panel, touch the writing pad icon .
2 Write a letter in the input area of the writing pad in the touch screen and wait for a moment. Then the letter is converted to the most likely letter.
3 If you touch the Insert button, the converted letter is entered.
Modifying a letterOver-write a new letter over an incorrectly recognized letter or touch the above the letter and select a letter.

21Using the Touch FeatureUsing the Touch Launcher
Touch Launcher Functions
On the touch screen, drag two fingers from top to bottom quickly. Alternatively, Click Start > All Programs > Samsung > Play Touch and select Touch Launcher to launch it.
1
23
4
65 7
To exit the Touch Launcher, touch .
No. Function Description
1 Power OptionShows the remaining battery charge andthe currently confi gured battery mode.
2 WiFiShows the Wi-Fi connection status. Ifthe computer is connected to Wi-Fi, theconnected AP name is displayed.
3ToDo
(Things to do)Creates/Displays the ToDo listYou can create a list of things to do.
4 Clock / WeatherShows the time and weather informationfor the confi gured region.
5 Edit ModeYou can move the program icons, addgroups, add/remove programs as well aschange the Desktop background.
6 Page IndicatorShows the position of the current page. Tonavigate the pages, click the Page Indicatoror drag the screen to the left or the right.
7 Program areaShows the program list. To launch aprogram, click the program icon.
Touching the Launcher program enables you to easily play music and video files and operate downloaded applications by touching the screen with your finger on models with a touch screen.

22Using the Touch FeatureUsing the Touch Launcher
Launching a Program
To launch a program added to the Touch Launcher, quickly touch a program icon twice.
Navigating Pages
To navigate pages in the Touch Launcher (1), touch the page icon or (2) flick one finger to the left or right.
(1)
(2)
23Using the Touch Feature
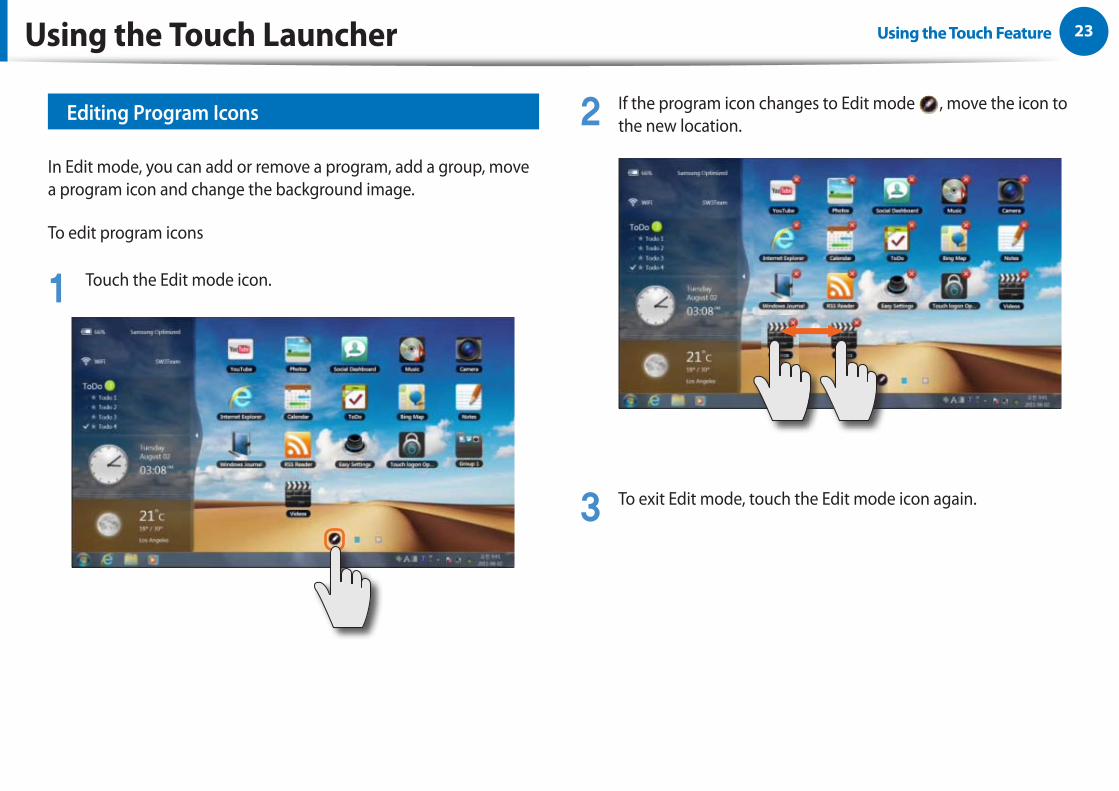
Editing Program Icons
In Edit mode, you can add or remove a program, add a group, move a program icon and change the background image.
To edit program icons
1 Touch the Edit mode icon.
2 If the program icon changes to Edit mode , move the icon to the new location.
3 To exit Edit mode, touch the Edit mode icon again.
Using the Touch Launcher기

24Using the Touch FeatureUsing the Touch Supporter
Using the Touch Supporter
If you touch the screen with three fingers simultaneously the touch support program is launched.
Ctrl+C
Ctrl Ctrl+X Del Magnifier Settings
Show/Hide Hotkeys
Ctrl+V Ctrl+Z Numeric Keypad
To exit the Touch Supporter, click or touch the screen with three fingers again.
What does the Ctrl key do (multiple selection mode)?The icon performs the same function as the Ctrl key on the keyboard. If you touch the Ctrl button, the button indicator is turned on. While the Ctrl (multiple selection mode) icon is selected and you touch various files with your finger sequentially, all the touched files are selected.
Using the Numeric Keypad
The Numeric Keypad is to use numeric and direction keys only.
1 Touch the Numeric Keypad . The Numeric Keypad appears on the screen.
2 If you touch the buttons on the Numeric Keypad, the corresponding number or symbol is entered on the screen.
Switches the mode between the numeric and the direction key
input modes
To select direction key input mode, touch .
To select numeric key input mode, touch .
This program helps you to use functions that cannot be easily used with touch operations more easily.

25Using the Touch Feature
If a digitizer pen is supplied with the product, you can operate the computer with the pen instead of your fi ngers. You can use the digitizer pen as you would use your fi ngers.
Using the digitizer pen
Digitizer pen structure and functions
Pen eraser
Pen button
Pen tip Pen tip
Ring
Pen tip This performs the function of your finger tip when you touch the screen.
Pen button
If you press the pen button when the digitizer pen tip is on the screen, circles appear around the pointer on the screen. Touch the screen with the digitizer pen while holding down the pen button.
This performs the right-click function.
Pen eraser
Erases letters with the top end of the digitizer Pen.
This performs the function of an eraser.

26Using the Touch FeatureUsing the digitizer pen
Replacing the pen tip
If the pen tip is damaged, you can replace the pen tip as follows:
1 Hold the pen tip by inserting it into the hole of the ring and remove the tip by pulling it out. 2 Insert the new pen tip into the digitizer pen.
Take care so that the pen tip does not spring out when taking
it out.

27Using the Slate PC
Using the Auto Screen Rotation Function
Adjusting the Volume
Wireless Network
Using the camera
Using the Bluetooth keyboard
Using the Slate PC Dock
Using the Slate PC

28Using the Slate PCUsing the Auto Screen Rotation Function
To disable the Auto Screen Rotation function
Press the Orientation Lock button. If the Orientation Lock function is activated, the screen orientation does not change regardless of the rotation of the computer.To release the Orientation Lock function so that the screen orientation is automatically changed, press the Orientation Lock button again.
If the Auto Screen Rotation function is activated, the screen orientation automatically changes as the computer is rotated.

29Using the Slate PCAdjusting the Volume
Method 1 Adjusting the volume with the buttons
You can control the volume by pressing the volume control button on the left side of the computer.
Method 2 Adjusting the Volume using the Volume Adjustment Program
Click the Volume icon on the taskbar and slide the volume control bar to adjust the volume.
Mute
+
_
You can control the volume using the volume control buttons or the volume control program.
30Using the Slate PCWireless Network
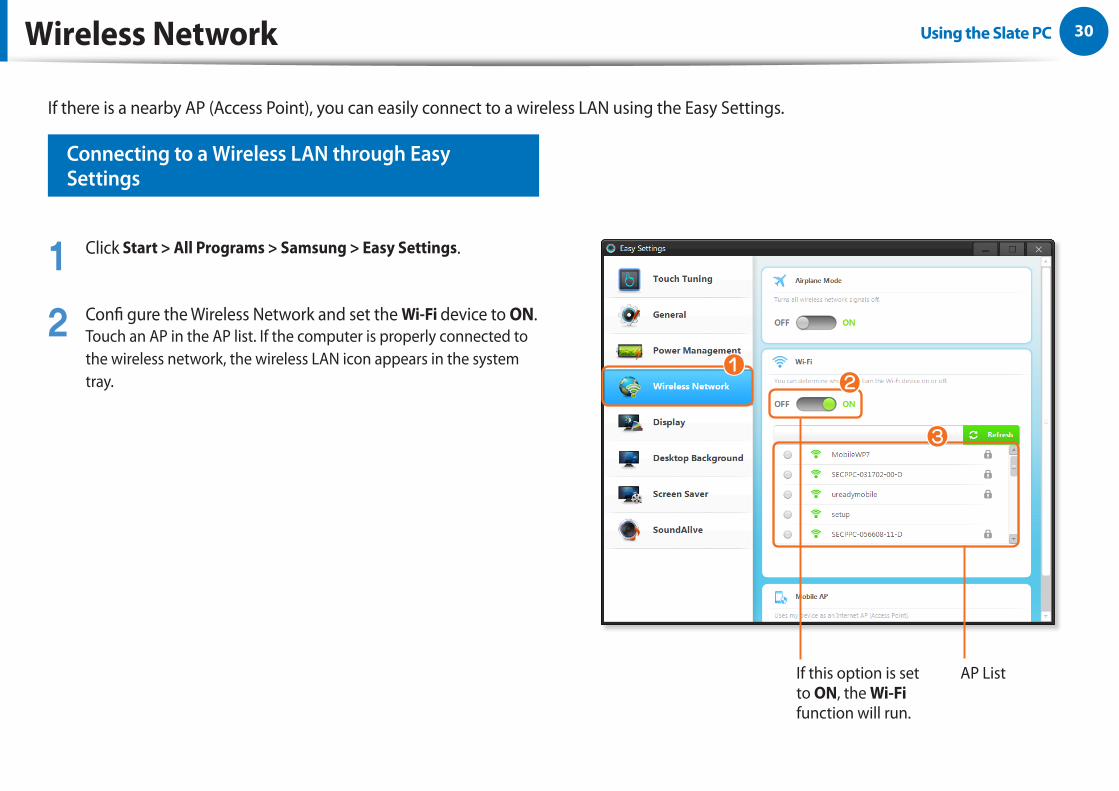
Connecting to a Wireless LAN through EasySettings
1 Click Start > All Programs > Samsung > Easy Settings.
2 Confi gure the Wireless Network and set the Wi-Fi device to ON.Touch an AP in the AP list. If the computer is properly connected to the wireless network, the wireless LAN icon appears in the system tray.
zx
c
If there is a nearby AP (Access Point), you can easily connect to a wireless LAN using the Easy Settings.
If this option is set to ON, the Wi-Fi function will run.
AP List

31Using the Slate PCUsing the camera
Using the Camera program
Click the Touch Launcher and launch the Camera.
Select the front or rear camera ExitMinimize
Select camera mode ( camera , video )
Select the resolution. View the captured picture or video.
Take a picture or make a recording
Open the folder to save the file with Explorer.
zx
c
1 Touch the Select Front/Rear Camera to select either the front or the rear camera that you will use.
2 To take a picture, select camera mode. To record a video, select video mode.
3 Touch the Take a Picture /Record to take a picture or record a video.
4 You can view the picture or recorded video through the Preview function or the Open the saved folder with Explorer .
This product has 2 cameras(Optional). One is at the front and the other is at the back. Using the touch camera program,you can conveniently take a picture or record a video using touch operations.

32Using the Slate PCUsing the Bluetooth keyboard
You can connect and use an external type keyboard. Now let’s look at how to connect the Bluetooth wireless keyboard (optional) provided by Samsung Electronics.
What is Bluetooth?Bluetooth is wireless communications technology that allows access to nearby devices such as another computer, a cell phone, printer, keyboard, mouse, etc. without a cable connection.
Using the Bluetooth Wireless Keyboard
1 Remove the battery compartment cover at the back of thecomputer.
2 Install the battery and close the cover.
Power Button

33Using the Slate PC
3 If you press and hold the keyboard power button for 3 seconds after starting the computer, the Bluetooth LED will blink in blue.
4 Click > Bluetooth Devices > Add a Device.
5 Select the keyboard to be connected and click Next.
6 Enter the number displayed on the screen and press Enter. This will connect the keyboard.
When the keyboard is connected, the blue Bluetooth LED of the keyboard is turned off.
Now you can use the keyboard.
Using the Bluetooth keyboard

34Using the Slate PCUsing the Slate PC Dock
Installing/Removing the Dock
Before installing a computer to the docking station, makesure to disconnect all the cables connected to the computer.Installing and separating the Slate PC Dock after turning thecomputer off is recommended.
Installing the Slate PC onto the Dock
1 Insert your fi nger into the groove on the side of the Slate PCDock to open the top cover of the Slate PC Dock.
2 Align the computer connector of the Slate PC Dock and the Slate PC Dock port at the bottom of the computer and connect them.
Computer Connector
By connecting the computer to the Slate PC Dock, you can use various types of ports.
35Using the Slate PCUsing the Slate PC Dock
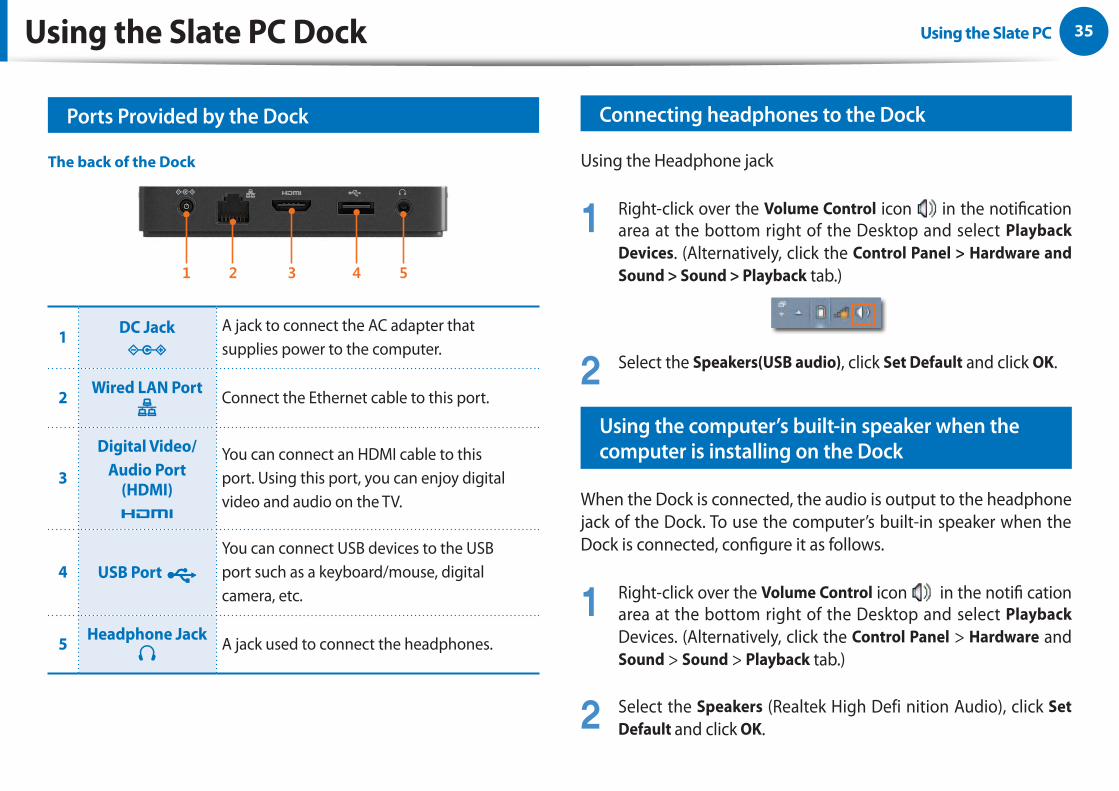
Ports Provided by the Dock
The back of the Dock
1 2 3 4 5
1 DC Jack A jack to connect the AC adapter thatsupplies power to the computer.
2 Wired LAN Port Connect the Ethernet cable to this port.
3
Digital Video/Audio Port
(HDMI)
You can connect an HDMI cable to thisport. Using this port, you can enjoy digitalvideo and audio on the TV.
4 USB Port You can connect USB devices to the USBport such as a keyboard/mouse, digitalcamera, etc.
5 Headphone Jack A jack used to connect the headphones.
Connecting headphones to the Dock
Using the Headphone jack
1 Right-click over the Volume Control icon in the notification area at the bottom right of the Desktop and select Playback Devices. (Alternatively, click the Control Panel > Hardware and Sound > Sound > Playback tab.)
2 Select the Speakers(USB audio), click Set Default and click OK.
Using the computer’s built-in speaker when the computer is installing on the Dock
When the Dock is connected, the audio is output to the headphone jack of the Dock. To use the computer’s built-in speaker when the Dock is connected, configure it as follows.
1 Right-click over the Volume Control icon in the notifi cation area at the bottom right of the Desktop and select Playback Devices. (Alternatively, click the Control Panel > Hardware and Sound > Sound > Playback tab.)
2 Select the Speakers (Realtek High Defi nition Audio), click Set Default and click OK.

Rev 1.00