s1 mobile mapper - blm.gov · download the app or request the app via the maas360 catalog. google...
TRANSCRIPT

S1 MOBILE MAPPER USER GUIDE 4.1
User Guide for those with ArcGIS Online Organization credentials

S 1 M o b i l e M a p p e r U s e r G u i d e 4 . 1
Contents Document Version Control .......................................................................................................... 1
About....................................................................................................................................... 2
Application Specifications ........................................................................................................... 3
Technical Specifications........................................................................................................... 3
Supported Hardware .............................................................................................................. 3
Known Hardware Limitations ................................................................................................... 3
Installation................................................................................................................................ 4
Google Play Store ................................................................................................................... 4
USFS Employees - How to create a Google account .................................................................. 5
BLM employees- Maas360 App Catalog ..................................................................................... 6
BLM Employees - Upgrade app via Maas360 App Catalog ................................................................ 7
Uninstalling S1 Mobile Mapper .................................................................................................... 9
Google Play Store ................................................................................................................... 9
Launching the application ..........................................................................................................10
Welcome Screen and Public Mode ...........................................................................................10
Logging into the Application....................................................................................................11
BLM User - Mobile Editor Account........................................................................................12
BLM User - SAML Account ...................................................................................................13
USFS and other AGOL organization users...............................................................................15
GeoPlatform Cooperators ...................................................................................................15
Application Interface .................................................................................................................17
Application Toolbar ...................................................................................................................17
Activate GPS .........................................................................................................................17
Collect Features ....................................................................................................................19
Manage Map Layers ..............................................................................................................20
Tools/Options Menu ..............................................................................................................21
About S1 Menu .....................................................................................................................21
Downloading Content................................................................................................................23
Base Maps............................................................................................................................23
ESRI Base Maps .................................................................................................................23
Agency Base Map ..............................................................................................................27

S 1 M o b i l e M a p p e r U s e r G u i d e 4 . 1
User Reference Map ..............................................................................................................30
Download via AGOL ...........................................................................................................30
Copy to device via Side-Loading ...........................................................................................32
Edit Geodatabase (GDB) .........................................................................................................33
Hosted Feature Layers ........................................................................................................33
On-Premise Feature Services ...............................................................................................34
Web Maps ........................................................................................................................34
Download Edit GDB to Device ..............................................................................................34
Sync Data Edits to Server ....................................................................................................38
Sync and Submit Version Edits to Server (BLM Only) ...............................................................40
Managing Downloaded Content..................................................................................................45
Edit GDB Layer Visibility & Symbology Details ............................................................................45
Switch Current Content in Map View........................................................................................47
Remove Layer from Map and Delete Data from Device ...............................................................48
Switch or Delete Base Map..................................................................................................48
Remove or Delete User Ref Maps and Edit GDBs ....................................................................49
Collecting New Features ............................................................................................................50
Create Point Feature via GPS...................................................................................................51
Create Point Feature via Digitizing on Screen.............................................................................52
Create New Line or Polygon Feature via GPS .............................................................................53
GPS Streaming...................................................................................................................53
GPS Average Vertex ...........................................................................................................54
Toggle between Streaming and Average GPS .........................................................................55
Create New Line/Area Feature via Digitizing ..........................................................................56
Repeat Attributes ..................................................................................................................57
Turn On/Off Repeat Attributes.............................................................................................58
Related Records Data Entry ....................................................................................................59
Select Mode Toolbar .................................................................................................................60
Edit Mode Toolbar ....................................................................................................................62
Editing Feature Geometry.......................................................................................................62
Editing Point Geometry.......................................................................................................62
Via GPS .........................................................................................................................62

S 1 M o b i l e M a p p e r U s e r G u i d e 4 . 1
Via Digitizing Manually on Screen......................................................................................62
Editing Line or Polygon Geometry ........................................................................................71
Editing via GPS ...............................................................................................................71
Editing via Digitizing on Screen .........................................................................................72
Editing Feature Attributes.......................................................................................................73
Collecting Photo Attachments.....................................................................................................74
Photo Attachment Enabled Feature .........................................................................................74
Managing Existing Photo Attachments .....................................................................................76
Delete Photo Attachment ...................................................................................................77
Share Photo Attachment.....................................................................................................78
S1GeoTag Photos......................................................................................................................79
Collecting S1GeoTag Photos....................................................................................................80
GeoTag Photo Layer Visibility ..................................................................................................82
Navigate to a GeoTag photo....................................................................................................83
Configuring S1 GeoTag Photos & Photo Attachments Options ......................................................84
Configure File Name ...........................................................................................................84
Share Location ..................................................................................................................84
Photo Options ...................................................................................................................85
Full List of Photo Options .................................................................................................85
Override Measurements..................................................................................................87
How to Calibrate Device Sensors.......................................................................................88
Managing S1 GeoTag Photos ...................................................................................................88
Access GeoTag Photos in Manage Map Layers........................................................................88
Sort GeoTag Photos: .......................................................................................................90
Delete GeoTag Photos: ....................................................................................................91
Access Photos in My Files Application ................................................................................92
Access Photos in Mobile Device Gallery .............................................................................92
Copy GeoTag Photos from device to desktop computer...........................................................93
Viewing XY Coordinates in GeoTag Photo Metadata (EXIF): ......................................................95
Convert GeoTag Photos to Point Features using ArcMap .........................................................96
S1Waypoints ............................................................................................................................98
Collecting S1 Waypoint ..........................................................................................................98

S 1 M o b i l e M a p p e r U s e r G u i d e 4 . 1
Managing S1 Waypoint Data ................................................................................................. 100
Share S1 Waypoints ......................................................................................................... 100
Copy Waypoint JSON File to Computer via USB connection .................................................... 101
Import JSON File into GIS .................................................................................................. 102
Deleting Waypoints on Device ........................................................................................... 103
GPS Tracklog .......................................................................................................................... 104
Enabling GPS Tracklog .......................................................................................................... 104
Archive & Manage GPS Tracklogs........................................................................................... 105
Rename and Delete Archived Tracklogs............................................................................... 106
Exporting GPS Tracklogs ....................................................................................................... 107
Share S1 Tracklog via email or upload to Google Drive........................................................... 107
Copy Archived Tracklog JSON File to Computer .................................................................... 107
Import GPS Tracklog JSON File into GIS ............................................................................... 108
Advanced Data Collection Tools ................................................................................................ 109
Nesting a Feature while Collecting another Feature.................................................................. 109
Offset ................................................................................................................................ 111
Obtaining Offset Measurements via Hardware Sensors ......................................................... 112
Manually Entering Offset Values or Overriding Sensor Values................................................. 113
Data Collection Settings ....................................................................................................... 115
Copy Geometry ................................................................................................................... 115
Auto-Populate Feature-Level Metadata Fields............................................................................. 116
Accessing Auto-Populate Fields Management Window ............................................................. 117
Managing Auto-Populate Field Categories............................................................................... 119
Add New Auto-Populate Field ............................................................................................... 119
Navigation Capabilities ............................................................................................................ 120
Navigate to a Map Location .................................................................................................. 120
Navigate to Selected Map Feature (Point, Line or Polygon Feature) ............................................ 123
Get Directions ........................................................................................................................ 124
Get Directions to a selected location ...................................................................................... 124
Tools..................................................................................................................................... 126
Measure Tool ..................................................................................................................... 126
Measure Distance or Area in Map View............................................................................... 126
S 1 M o b i l e M a p p e r U s e r G u i d e 4 . 1
Determine Length or Area of Selected Feature ..................................................................... 128
Query Attributes Tool .......................................................................................................... 130
Creating a Query - No Filter ............................................................................................... 131
Creating a Simple Query – Single Attribute Field Filter ........................................................... 132
Creating a Complex Query – Multiple Attribute Field Filters ................................................... 134
Query Tips ...................................................................................................................... 135
Multiple Values from Same Attribute Field ....................................................................... 135
Filtering a Range of Date Values...................................................................................... 137
Filtering Using the LIKE Operator .................................................................................... 137
Enter Coordinates Tool......................................................................................................... 138
Navigate to Entered Coordinates........................................................................................ 140
Get Directions to Entered Coordinates ................................................................................ 141
Create Feature Using Entered Coordinates .......................................................................... 142
Find Nearby Existing Edit Features...................................................................................... 143
Application Themes................................................................................................................. 144
S1 Application Options ............................................................................................................ 145
Creating & Sharing User Reference Maps ................................................................................... 147
Creating a Tile Package in ArcMap ......................................................................................... 147
Preparing the Map Document............................................................................................ 148
Set Data Frame Coordinate System & Datum Transformation ............................................. 149
Set Full Extent Command and Clip to Shape...................................................................... 150
Set Map Document Properties........................................................................................ 152
Create Tile Package .......................................................................................................... 153
Creating Geo-referenced Image File ....................................................................................... 154
Preparing the Map Document............................................................................................ 154
Set Data Frame Coordinate System & Datum Transformation ............................................. 155
Set Export Extent & Export Image ................................................................................... 156
Upload & Share Reference Maps to AG4O............................................................................... 157
Creating & Sharing Hosted Feature Layers .................................................................................. 159
ArcMap Set-Up ................................................................................................................... 159
Sign into AGOL Organizational Account to Publish a Hosted Feature Service ................................ 164
Share Feature Layer with a AGOL Group ................................................................................. 169

S 1 M o b i l e M a p p e r U s e r G u i d e 4 . 1
Interacting with Hosted Feature Service Content in ArcMap ...................................................... 170
Adding Hosted Feature Service to ArcMap........................................................................... 170
Create a Local GDB Copy for Editing.................................................................................... 171
External Bluetooth GPS Receiver Support ................................................................................... 173
Configure Location Settings .................................................................................................. 173
Android Operating Systems ............................................................................................... 173
Configure Date and Time Settings .......................................................................................... 176
Enable Developer Options and Mock Locations........................................................................ 176
Enable Developer Options................................................................................................. 176
Pairing Trimble R1 Receiver .................................................................................................. 179
Pairing Device for First Time .............................................................................................. 179
Enable Real-time Correction (WAAS/RTK) Settings ................................................................ 182
Enable NMEA Output Settings ........................................................................................... 184
Pairing Juniper Geode Bluetooth Receiver............................................................................... 185
Pairing Device for First Time .............................................................................................. 186
Configure Geode NMEA Export via Geode Connect App......................................................... 188
Pairing Eos Arrow 100 Receiver ............................................................................................. 191
Pairing Device for First Time .............................................................................................. 191
Configure Arrow NMEA Export via Desktop Eos Setup Utility .................................................. 193
Pairing Garmin GLO Bluetooth Receiver.................................................................................. 195
Pairing Device for First Time .............................................................................................. 195
Connecting to Paired Bluetooth Receiver in S1 Mobile Mapper .................................................. 198
Disconnect Bluetooth Receiver/Return to Internal GPS ............................................................. 200
(Beta Function) Connect TruePulse 360B Laser Rangefinder to capture attributes......................... 200

S 1 M o b i l e M a p p e r U s e r G u i d e 4 . 1
Page 1
Document Version Control Date Doc Version
Number Changes
8/10/15 1.00.00 Document Created, 1.0 application release 3/14/16 2.00.00 Updated to reflect 2.0 version changes 2/10/17 3.00.00 Updated to reflect 3.0 version changes 8/4/17 3.10.00 Updated to reflect 3.1 version changes 1/15/17 3.20.00 Updated to reflect 3.2 version changes 7/10/18 3.30.00 Updated to reflect 3.3 version. Removed functional specifications
from Application capabilities. Moved application specifications and installation sections to front of user guide.
9/12/18 3.30.093 Updated pages 9, 25, 63, 64, 69, and 70 to reflect changes made to supported devices, Auto pan and GPS Active button, and verbiage within GeoTag Photo settings.
03/22/2019 4.00.114 Updated to reflect changes in branding and look and feel for version 4.0 of S1. Added section on Themes, Google Maps Navigation function and updated screenshots for redesign. Removed the publishing on-premise feature services section and added section describing how to publish hosted services.
7/01/2019 4.0.150 Updated Side-Loading, Manage GeoTag Photos, Web Maps, and connecting to Juniper Geode sections. Minor text edits throughout guide for clarity and brevity.
7/30/2019 4.1.009 Updated document title to match version 4.1 of the S1 app. Added in link to documentation for (Beta) laser rangefinder functionality help.
9/26/2019 4.1.009 Updated section on converting GeoTag Photos to point features, now instructed to use ESRI tool. Updated pairing to Trimble R1 receiver section. Revised order of text in the installation and logging into app sections. Minor updates to format and page numbering.

About
The S1 Mobile Mapper is a custom application built by the Service First (S1) Mobile GIS team, sponsored by Oregon State Office Bureau of Land Management (BLM) and Region 6 U.S. Forest Service (USFS). The application is designed to extend offline mobile field data collection capabilities not available using commercial ESRI mapping applications and to meet the specific data collection needs of the federal agencies served by the OR/WA Service First Mobile GIS program. It is currently built to run on a mobile device running Android operating system, using the ESRI Runtime Software Development Kit (SDK) framework. It leverages each agency’s ArcGIS for Organization site as well as their internal ArcGIS Server deployments to distribute and collect enterprise geographic information systems (GIS) information via agency field personnel.
Given that agency field personnel operate most commonly in remote areas with no network access, this application’s emphasis is on the display, collection and update of geospatial data and attributes with no network availability. Data is downloaded and cached on the device and edits can be uploaded to servers when network connectivity is available.
For additional information about the application, visit the S1 Mobile website:
https://www.blm.gov/or/gis/mobile/s1mobile/
S 1 M o b i l e M a p p e r U s e r G u i d e 4 . 1
Page 3
Application Specifications
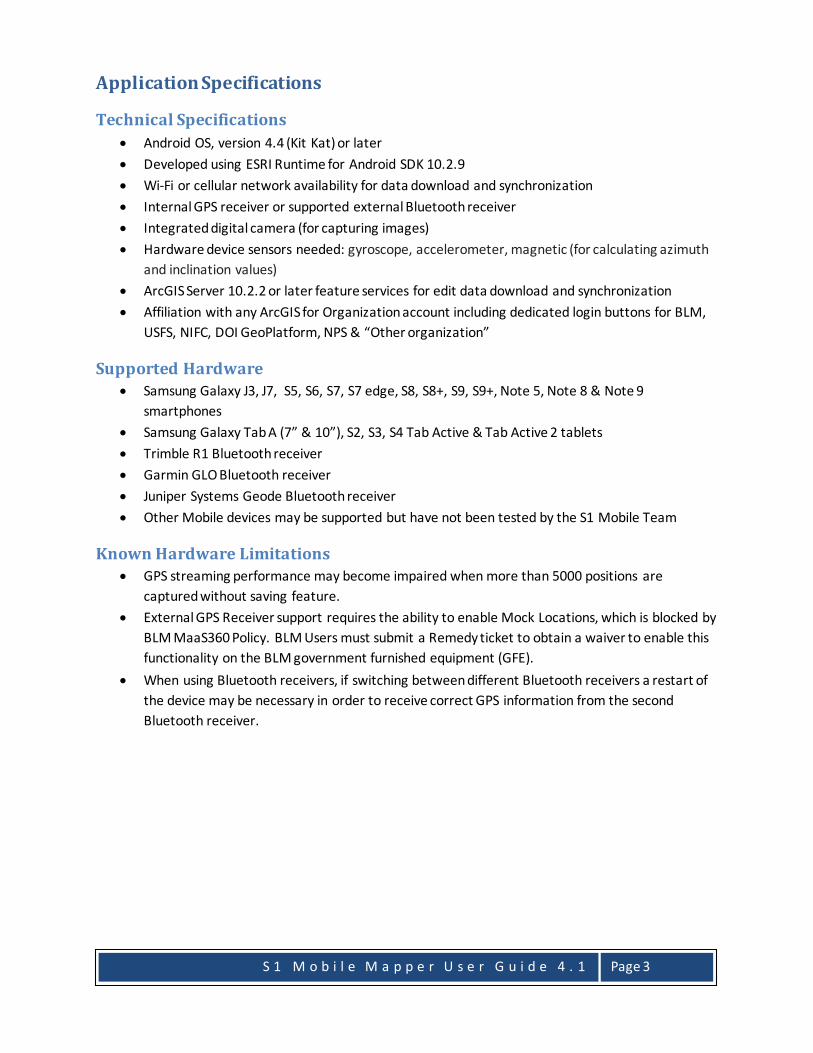
Technical Specifications • Android OS, version 4.4 (Kit Kat) or later • Developed using ESRI Runtime for Android SDK 10.2.9 • Wi-Fi or cellular network availability for data download and synchronization • Internal GPS receiver or supported external Bluetooth receiver • Integrated digital camera (for capturing images) • Hardware device sensors needed: gyroscope, accelerometer, magnetic (for calculating azimuth
and inclination values) • ArcGIS Server 10.2.2 or later feature services for edit data download and synchronization • Affiliation with any ArcGIS for Organization account including dedicated login buttons for BLM,
USFS, NIFC, DOI GeoPlatform, NPS & “Other organization”
Supported Hardware • Samsung Galaxy J3, J7, S5, S6, S7, S7 edge, S8, S8+, S9, S9+, Note 5, Note 8 & Note 9
smartphones • Samsung Galaxy Tab A (7” & 10”), S2, S3, S4 Tab Active & Tab Active 2 tablets • Trimble R1 Bluetooth receiver • Garmin GLO Bluetooth receiver • Juniper Systems Geode Bluetooth receiver • Other Mobile devices may be supported but have not been tested by the S1 Mobile Team
Known Hardware Limitations • GPS streaming performance may become impaired when more than 5000 positions are
captured without saving feature. • External GPS Receiver support requires the ability to enable Mock Locations, which is blocked by
BLM MaaS360 Policy. BLM Users must submit a Remedy ticket to obtain a waiver to enable this functionality on the BLM government furnished equipment (GFE).
• When using Bluetooth receivers, if switching between different Bluetooth receivers a restart of the device may be necessary in order to receive correct GPS information from the second Bluetooth receiver.

S 1 M o b i l e M a p p e r U s e r G u i d e 4 . 1
Page 4
Installation If you are working for the USFS or another agency, installation via the Google Play Store is the recommended way to obtain and receive updates to the application. See the instructions following this section on how to set-up a Google Account with a USFS email.
If you are working for the BLM, the GFE mobile device must have Maas360 installed and utilize S-VIP. Once S-VIP is set up successfully, you can use your BLM credentials to log into the Google Play Store and download the app or request the app via the Maas360 Catalog.
Google Play Store • Open Google Play Store on mobile device.
• Type S1 Mobile Mapper in search bar and tap on S1 Mobile Mapper in the list.
• Tap on Install to begin the installation process.
• Tap Open to start the application.

S 1 M o b i l e M a p p e r U s e r G u i d e 4 . 1
Page 5
USFS Employees - How to create a Google account Users are required to provide a Google Account login and password when accessing the Google Play Store. It is recommended that US Forest Service employees create a new Google account connected to their US Forest Service email.
• To set up your FS connected Google account, navigate to the Google webpage www.gmail.com • Select the Sign In button at the top left of the screen. • You may see a list of existing Google accounts; at the bottom of the sign in window select Use
another Account. • Select More Options and Create Account. • Under the Choose your username box, select I prefer to use my current email address.
• Enter your US Forest Service email account and the remaining required information to create your google account

S 1 M o b i l e M a p p e r U s e r G u i d e 4 . 1
Page 6
• Select Next Step • Review the Privacy Policy and select I Agree
A notification email will be sent to your US Forest Service email account to let you know that your new google account has been created. Follow instructions listed in the email to confirm your new account. This account can now be used to log in to the Google Play Store on your mobile device.
BLM employees- Maas360 App Catalog BLM staff using a government furnished mobile devices must enroll the device in Maas360 mobile device management software. If the user intends to get their BLM email on the mobile device, Symantec Validation and ID Protection (S-VIP) access is also required. To setup a new mobile device with Maas360 and S-VIP follow the directions here.
Once S-VIP and Maas360 are setup on the device, S1 Mobile Mapper app can be installed via the Maas360 App Catalog or the Google Play Store. If the mobile device is setup to use S-VIP, it is recommended you follow the instructions above to install the app via the Google Play Store. Note: Shared mobile devices should not install S-VIP or add a Google account to the device; however, the device must be set up with Maas360. Once the device is enrolled in Maas360, S1 Mobile Mapper will be installed and updated via the Maas360 App catalog.
• On the mobile device, select MaaS360 from the application list.
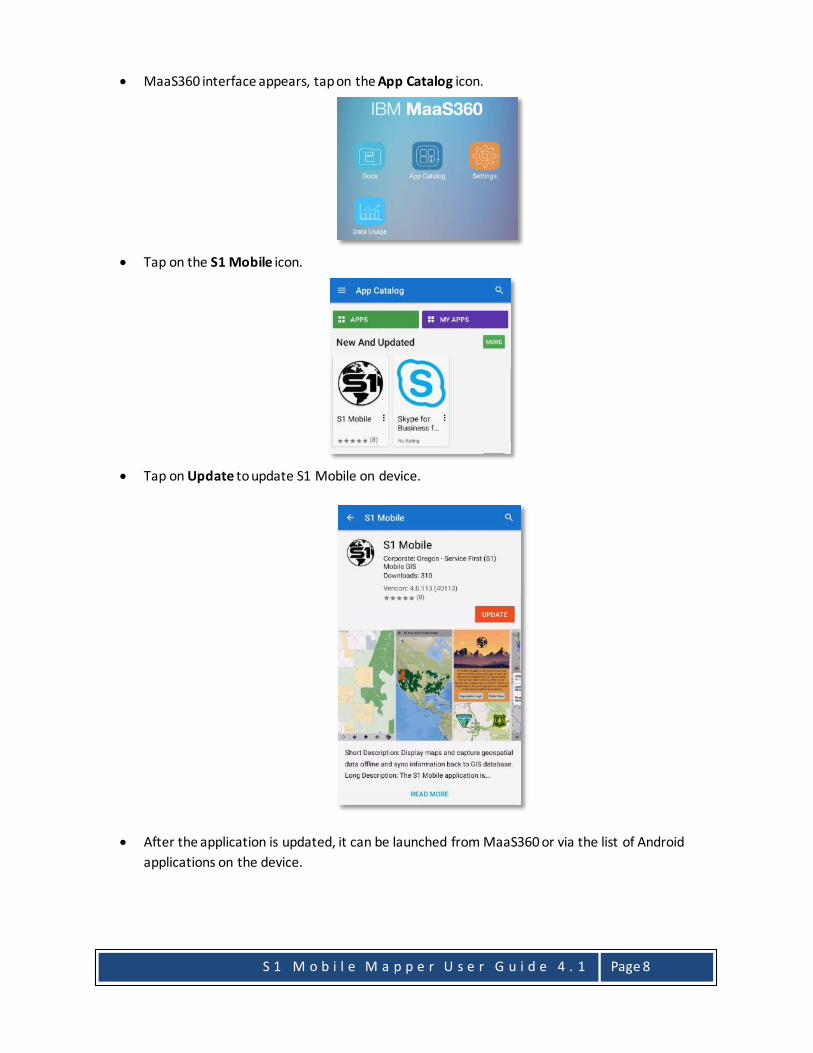
• MaaS360 interface appears, tap on the App Catalog icon.

S 1 M o b i l e M a p p e r U s e r G u i d e 4 . 1
Page 7
• Tap on the S1 Mobile icon.
• Tap on Install to install S1 Mobile on device
• After the application is installed, it can be launched from MaaS360 or via the list of Android applications on the device.
BLM Employees - Upgrade app via Maas360 App Catalog • On the mobile device, select MaaS360 from the application list.
S 1 M o b i l e M a p p e r U s e r G u i d e 4 . 1
Page 8
• MaaS360 interface appears, tap on the App Catalog icon.
• Tap on the S1 Mobile icon.
• Tap on Update to update S1 Mobile on device.
• After the application is updated, it can be launched from MaaS360 or via the list of Android applications on the device.

S 1 M o b i l e M a p p e r U s e r G u i d e 4 . 1
Page 9
Uninstalling S1 Mobile Mapper Be aware that uninstalling the application on devices running Android Operating System (OS) 7.0 and earlier will delete the contents of the S1 Mobile Mapper application directory including files located on both the internal storage and the SD card storage location, if applicable. Data deleted includes S1 Waypoints, S1 GeoTag Photos, downloaded maps, and any data that has not been synced. Mobile devices running Android OS 8.0 will find that Waypoints, GeoTag Photos and Tracklogs are not deleted from the device after uninstalling.
Before uninstalling the application, consider backing up to a local computer any downloaded application content (base maps, user reference maps, and offline geodatabases) from the following directories:
…\Card\Android\data\gov.s1.s1mobile
…\<Device>\ Android\data\gov.s1.s1mobile
Google Play Store • Open Google Play Store on mobile device.
• Type S1 Mobile Mapper in search bar and tap on S1 Mobile Mapper in the list.
• Tap on Uninstall to remove the app from the device.
• Tap OK to uninstall the app.

S 1 M o b i l e M a p p e r U s e r G u i d e 4 . 1
Page 10
Launching the application The application is launched by tapping on the application icon found on the device application list.
Welcome Screen and Public Mode The application opens to the welcome screen with a brief description of the application. The user can either log in to the full version of the application by selecting the Organization Login button or select Public Maps. BLM and USFS will need to select the Organization login button to log on with their ArcGIS Online for Organization (AG4O) account, to access the full suite of capabilities and functions in the S1 Mobile Mapper. The public viewer option allows anyone to download map products published by the BLM and USFS, capture S1 Waypoints and Geotag Photos, and deploy a few of the apps tools. For more information on the S1 for Android Public Viewer, see the S1 Mobile Application for Android 4.0 Public Viewer user guide.

S 1 M o b i l e M a p p e r U s e r G u i d e 4 . 1
Page 11
Logging into the Application The mobile device must have a network connection (Wi-Fi or cellular) prior to logging into the application. Once logged in, the ArcGIS Online for Organizations credentials are stored on the device. It is only necessary to be in a connected environment when uploading, downloading or synchronizing data, or re-authenticating the application with AGOL.
• Tap the Organization Login button on the splash screen
• To Log in and authenticate the application, choose your Agency if listed, or Other Organizations
if not listed.

S 1 M o b i l e M a p p e r U s e r G u i d e 4 . 1
Page 12
BLM User - Mobile Editor Account • After selecting Bureau of Land Management from the list of agencies, the Mobile Editor login
page window will open. • Select ARCGIS
• Type in mobile editor username and password and select SIGN IN

S 1 M o b i l e M a p p e r U s e r G u i d e 4 . 1
Page 13
BLM User - SAML Account Assumptions:
• You have installed and have access to Symantec Validation and ID Protection (S-VIP) software installed on your desktop computer.
• The Credential ID displayed in the S-VIP software is associated with your AD account (if not, submit IT Helpdesk ticket -> Mobile Device Support).
• If you are logging into your device using Multi Factor S-VIP, after selecting BLM from the list of agencies, select DOI Account.
• Enter your BLM Active Directory username and password, and tap SIGN IN.

S 1 M o b i l e M a p p e r U s e r G u i d e 4 . 1
Page 14
• Select VIP Authentication Provider at the bottom of the page.
On your desktop computer open up VIP Access by going to Start -> All Programs -> VIP Access
Type the Security Code displayed in the VIP Access software on your desktop computer into the Security Code box on your mobile device. Select Continue. Note: The Security Code is only viable for 30 seconds. There have also been reports of this taking several attempts to work.
Desktop Mobile Device

S 1 M o b i l e M a p p e r U s e r G u i d e 4 . 1
Page 15
USFS and other AGOL organization users • Tap the applicable agency from the list to be directed to the agency’s AGOL login page. If your
agency or organization is not listed, tap Other Organizations to specify the portal URL. • On the login screen, enter your agency ArcGIS for Organization (AGOL) user name and password
and tap Sign In. Note: This username and password is AGOL specific and different from your Agency Active Directory (AD) username and password.
GeoPlatform Cooperators • After selecting GeoPlatform Cooperators from the list of agencies, the login page window will
open. • Select GEOPLATFORM.GOV
• The GeoPlatform.gov login page will open.
S 1 M o b i l e M a p p e r U s e r G u i d e 4 . 1
Page 16
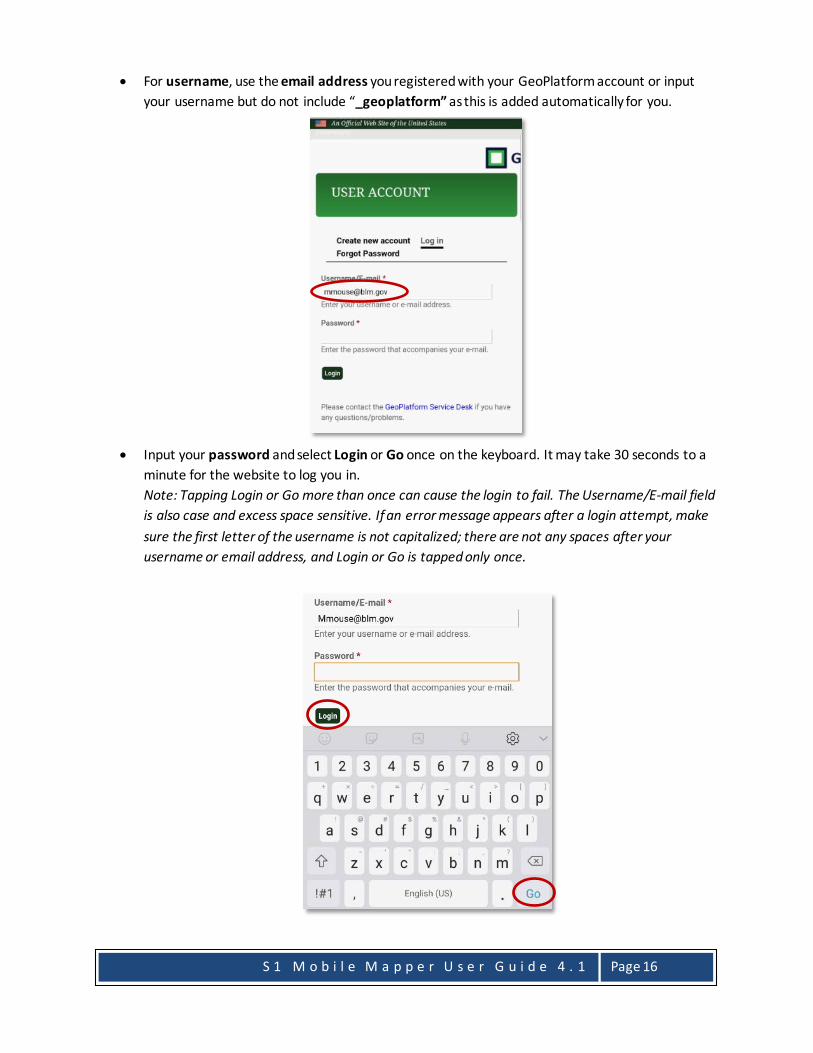
• For username, use the email address you registered with your GeoPlatform account or input your username but do not include “_geoplatform” as this is added automatically for you.
• Input your password and select Login or Go once on the keyboard. It may take 30 seconds to a
minute for the website to log you in. Note: Tapping Login or Go more than once can cause the login to fail. The Username/E-mail field is also case and excess space sensitive. If an error message appears after a login attempt, make sure the first letter of the username is not capitalized; there are not any spaces after your username or email address, and Login or Go is tapped only once.

S 1 M o b i l e M a p p e r U s e r G u i d e 4 . 1
Page 17
Application Interface
Application Toolbar
Activate GPS
GPS and Auto Pan On GPS On, Auto Pan Off GPS and Auto Pan Off
• Tap GPS Icon to turn on GPS and to activate Auto Pan • If you pan on the map, Auto Pan turns off but GPS remains on • Tapping the GPS icon again will turn Auto Pan back on • Tap the GPS icon when both GPS and Auto Pan on will turn GPS and Auto Pan off • Once GPS position fix is obtained, your current location will display on map as a blue dot • When GPS is turned on, the GPS Position Toolbar appears at top of screen, which displays:
Current GPS Location Coordinates
= Number of satellites used in position fix

S 1 M o b i l e M a p p e r U s e r G u i d e 4 . 1
Page 18
+ = Estimated accuracy of location (in meters or feet)
= Estimated elevation of location (in meters or feet) GPS Source/Quality will be displayed as one of the following:
o No Fix – No satellite fix o GPS – Global Position System o DGPS - Differential Global Positioning Systems o RTK - Real-time kinematic
• GPS location Coordinates are displayed in World Geodetic System 1984 Decimal Degrees (WGS84 DD) by default. To change the coordinate system displayed, tap the GPS Position Toolbar and select another coordinate system. Alternatively, change this in the S1 Options menu.
• Estimated Accuracy is displayed to a 68% confidence interval by default. The display value can be changed to a 95% confidence interval in S1 Options. The default accuracy units are displayed in meters but this can also be changed in S1 Options.
Note: This function only affects the display value on the device. All data collected with GPS uses the 95% confidence interval.

S 1 M o b i l e M a p p e r U s e r G u i d e 4 . 1
Page 19
• For the highest possible location accuracy, it is advised to set your device’s Location setting to GPS only in the mobile device settings. Once GPS is activated, the app will alert users if the device is set to any other Android Location setting such as High Accuracy mode.
• It is possible to connect an external, high accuracy GPS receiver to provide location information to the app instead of using the device’s internal GPS. For more information on this topic, see External Bluetooth GPS Receiver Support section.
Collect Features
• Tap the Create Features button to capture new map features. • Choose the feature to create or enable:
a. Enable Tracklog b. S1GeoTag Photo c. S1Waypoints d. Any other Edit Geodatabase (GDB) downloaded to device and currently displayed in the
map. Below shows a series of features as part of a Park Features Edit GDB.
• See GPS Tracklog for more information on enabling GPS Tracklog functionality. • See S1GeoTag Photos section for full description of GeoTag Photos & capabilities. • See Collecting New Features section for detailed information about capturing new map
features and attributes.

S 1 M o b i l e M a p p e r U s e r G u i d e 4 . 1
Page 20
Manage Map Layers
• Tap the Manage Map Layers button to manage Base Maps, User Ref Maps, and Edit GDB layers that have been downloaded to the device. Data always on the device, such as Tracklogs, S1GeoTag Photos, S1Waypoints, are also managed in this menu.
• See links below for more information about each type of data source: o Base Map o User Ref Map o Edit Geodatabase o GPS Tracklog o S1GeoTag Photos o S1Waypoints
• Displays layers that have been downloaded to device and currently active in the map. • Change the layers loaded currently to the map view. • Control layer visibility by toggling the on/off switch. • Review symbology for Edit GDBs. • Delete content from device. Note: Deleting an Edit GDB requires network connectivity.
See Managing Downloaded Content for more information.

S 1 M o b i l e M a p p e r U s e r G u i d e 4 . 1
Page 21
Tools/Options Menu
• Tap the Tool/Options button to access the app options menu, to sync data, sync and submit data, download data, connect to Bluetooth GPS devices, and access the app’s tools.
• To learn more about S1 Application Options, see Application Options • To learn more about synchronizing edit data, see Sync Data Edits to Server • To learn more about downloading data to the device, see Downloading Content to S1 Mobile • To learn more about Connecting to Bluetooth GPS, see External Bluetooth GPS Receiver • To learn more about the application’s various tools, see Tools • To learn more about Themes, see Apply Agency Themes
About S1 Menu
• Tapping the button above produces the following menu:
• Tapping Quick Help opens a Quick Reference PDF guide. • Tapping Help opens this document in PDF form on the mobile device.

S 1 M o b i l e M a p p e r U s e r G u i d e 4 . 1
Page 22
• Tapping Feedback opens a form to report S1 Mobile Mapper bugs and make enhancement requests. Note: Must have network connection to submit feedback.
• Tapping About provides information on the current version of the app installed, the app description, the Privacy Policy and End-User License Agreement.
• Tapping Log Off will log the current user out of the application. The users will be placed in Public Mode, with limited functionality. To log back in, select Log On, and choose the appropriate organization.
Note: Logging on/off is only available while device is connected to a network. I.e. do not log out of application and then go out to the field where there is no network access and expect to log back into application.

S 1 M o b i l e M a p p e r U s e r G u i d e 4 . 1
Page 23
Downloading Content The S1 Mobile Mapper application can download and store base maps, user reference maps and edit geodatabases (Edit GDB) to the mobile device for offline use. Downloading data to the device allows the user to interact with maps and collect data when in areas of limited or no network connectivity.
Base Maps Base Maps are the foundational map layer in the application. These are multi-scale tiled image tile packages (.tpk), which quickly display image tiles appropriate for the current map scale. These maps are downloaded to the mobile device when connected to Wi-Fi or cellular network or can be manually copied (“side-loaded”) to the mobile device via USB connection to a desktop computer.
Base Maps are typically authoritative reference maps, and can be sourced commercially (ESRI ArcGIS.com) or produced and distributed by an agency such as the BLM or USFS. The application can store many Base Maps on the device, allowing users to switch between Base Maps most appropriate for their current viewing needs.
Upon first opening the S1 Mobile Mapper, a high level “wire frame” Default Base Map is displayed. Unlike other user-downloaded Base Maps, the Default Base Map cannot be deleted from the device.
ESRI Base Maps Prior to attempting to download a base map, ensure the device is connected to a cellular or WIFI network.
• Tap Tools/Options button
• Tap Download Data

S 1 M o b i l e M a p p e r U s e r G u i d e 4 . 1
Page 24
• Tap ESRI Base Map
• Choose a Base Map from the list of available ESRI Base Maps.
• You are prompted to enter a unique name for this map. Type a name and tap OK. This will enable you to download multiple versions of the same ESRI Base Map with different extents and zoom levels.

S 1 M o b i l e M a p p e r U s e r G u i d e 4 . 1
Page 25
• In the map view that opens, the top map view will set the maximum map extent, pinch and pull to set a map extent. Note: Very large map extents may constrain your ability to choose and download a high level of detail.
• The bottom map view and slider sets the maximum level of detail (LOD) of the map. As you adjust the LOD slider, the application will adjust and report the estimated download size for the map. The larger the download size, the longer it will take to download
LOD Slider
• When satisfied with the extent and LOD, tap Download Data button to initiate download.

S 1 M o b i l e M a p p e r U s e r G u i d e 4 . 1
Page 26
• A progress spinner will appear in the application toolbar with the percent complete for the download in the center of the spinner, allowing you to track the download progress.
• When download is complete, the map is automatically added to the map view as the current
Base Map.

S 1 M o b i l e M a p p e r U s e r G u i d e 4 . 1
Page 27
Agency Base Map • Tap Tools/Options button
• Tap Download Data
• Tap Agency Base Map
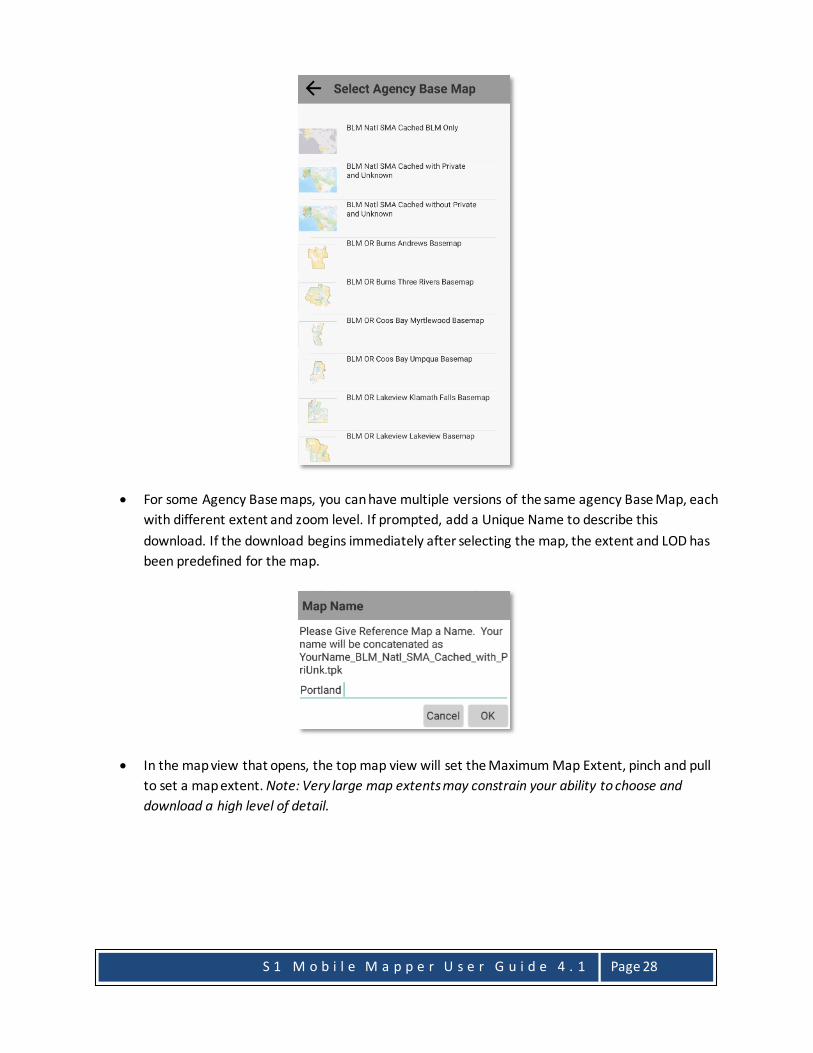
• Choose a Base Map from the list of available Agency Base Maps. If the selected content is a pre-configured Base Map in tile package (.tpk) format, the download will begin immediately. If the selected content is a tiled mapping service Base Map, continue with instructions below to set the extent and zoom level.
S 1 M o b i l e M a p p e r U s e r G u i d e 4 . 1
Page 28
• For some Agency Base maps, you can have multiple versions of the same agency Base Map, each with different extent and zoom level. If prompted, add a Unique Name to describe this download. If the download begins immediately after selecting the map, the extent and LOD has been predefined for the map.
• In the map view that opens, the top map view will set the Maximum Map Extent, pinch and pull to set a map extent. Note: Very large map extents may constrain your ability to choose and download a high level of detail.
S 1 M o b i l e M a p p e r U s e r G u i d e 4 . 1
Page 29
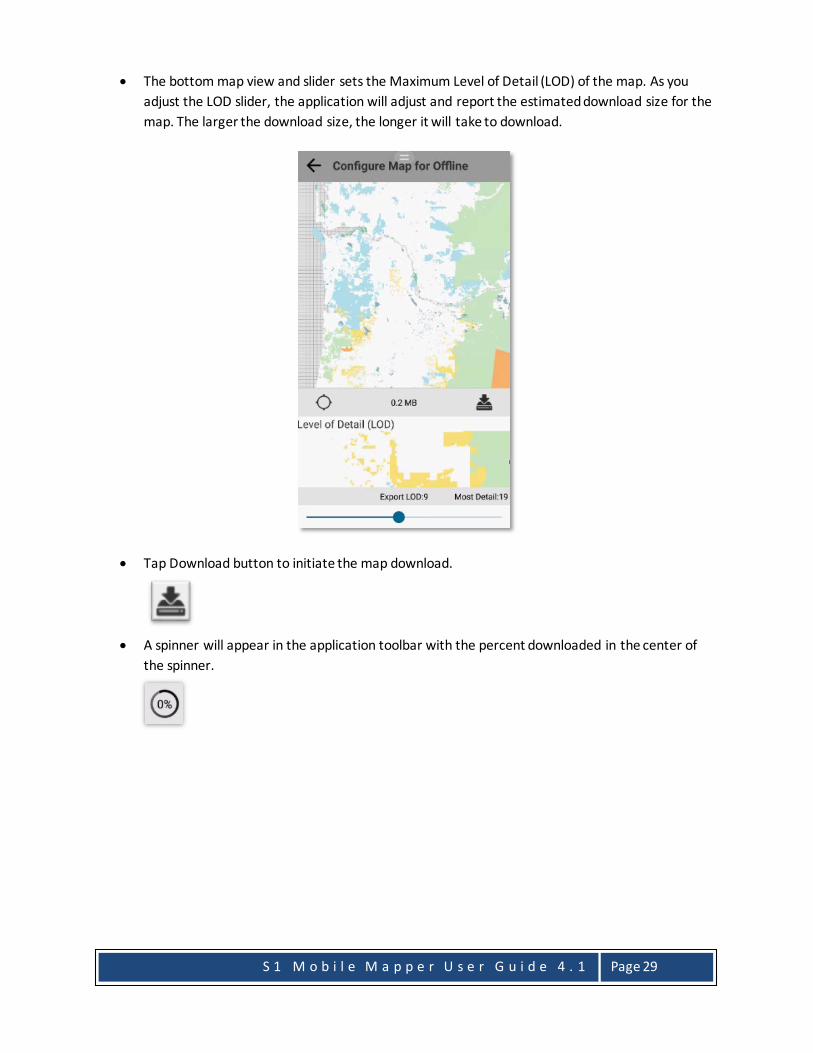
• The bottom map view and slider sets the Maximum Level of Detail (LOD) of the map. As you adjust the LOD slider, the application will adjust and report the estimated download size for the map. The larger the download size, the longer it will take to download.
• Tap Download button to initiate the map download.
• A spinner will appear in the application toolbar with the percent downloaded in the center of the spinner.

S 1 M o b i l e M a p p e r U s e r G u i d e 4 . 1
Page 30
• Track the download progress in the device notification panel. When download is complete, map is automatically added to map view as the current Base Map.
User Reference Map The User Reference Map can be a multi-scale ESRI tile package (.tpk) or a single geo-referenced GeoTIFF image file that is displayed on top of the base map. User reference maps can be shared via an AGOL group and downloaded to the mobile device when connected to Wi-Fi or cellular network or can be manually copied (“side-loaded”) to the mobile device via USB connection to a desktop computer.
Download via AGOL Assumptions:
• User Reference Maps has been uploaded to your Organization’s AGOL and shared with a group in which you are a member.
• Tap Tools/Options button

S 1 M o b i l e M a p p e r U s e r G u i d e 4 . 1
Page 31
• Tap Download Data
• Tap Download User Reference Map
• A list of AGOL groups that you are currently a member will appear. Tap on the group that contains the desired User Reference Map.

S 1 M o b i l e M a p p e r U s e r G u i d e 4 . 1
Page 32
• A list of User Reference Map(s) in the group will appear. Tap on the User Reference Map that you wish to download.
• A spinner will appear in the application toolbar with the percent downloaded in the center of the spinner
• The download will begin. When download reaches 100%, the layer is added to the map view as the current User Reference Map. The User Reference Map will be displayed on top of any ESRI or Agency Base Map.
Copy to device via Side-Loading While sharing reference maps via AGOL is often the easiest way to distribute user-generated reference data to multiple devices, if the map content is very large or network connectivity is unreliable, it can take a long time to download to a device. An alternative is to connect the device to a desktop computer via USB cable and use Windows Explorer to side-load the User Ref map(s) directly onto the device.
Assumptions: • Android Device with available storage space on the SD card or internal memory if no SD card
present • S1 Mobile Mapper application installed on mobile device • USB cable connected and mobile device set as media storage/not charging only • User Ref Map already created
• Using Windows Explorer, navigate to the network location where the tile package or geo-
referenced GeoTIFF resides. Right click on the file and choose Copy. • Connect mobile device to computer via USB cable.

S 1 M o b i l e M a p p e r U s e r G u i d e 4 . 1
Page 33
• Using Windows Explorer, navigate to one of the following directories on your connected Android device.
Devices with SD Card: …\Card\Android\data\gov.s1.s1mobile\Reference_Data
Devices without SD Card: …\Phone\Android\data\gov.s1.s1mobile\Reference_Data
• Double click on the folder Local_Ref_Maps to open it. This is the directory where all downloaded and side-loaded User Reference Maps must reside.
• Right click -> Paste to paste the file into this directory.
Note: When downloading from AGOL, the User Reference Map is automatically added to the map view when the download is complete. If the map is side-loaded, one must manually add it to the map view via the Manage Map Layers menu. See Managing Downloaded Content for more information.
Edit Geodatabase (GDB) The main function of S1 Mobile Mapper is to collect data in an offline environment and sync that data back to a web based feature service when connected to a 4G or Wi-Fi network. The Edit GDB is the dataset that captures the data collected via GPS or from digitizing on the map screen. Edit GDBs may include a single feature layer (hosted or on-premise) or a collection of feature layers saved in a web map. In order to download an Edit GDB, the layer or web map must be shared to an AGOL group that the user is a member.
Hosted Feature Layers Hosted feature layers are those that have been published to or created from ArcGIS Online/Portal for ArcGIS. Only those who have an ArcGIS Online account user role that allows content to be shared and published can accomplish publishing and creation of content on AGOL. Hosted layers must be sync-enabled in order for data to be collected in an offline environment and downloaded to S1 Mobile Mapper. For more information on hosted feature layers, see the ESRI help document, here: https://doc.arcgis.com/en/arcgis-online/manage-data/publish-features.htm#ESRI_SECTION1_94021BE7D875474681DAD20D05A90AF6

S 1 M o b i l e M a p p e r U s e r G u i d e 4 . 1
Page 34
On-Premise Feature Services On-premise feature services are services that have been published to ArcGIS Server by a state or organization server administrator. These layers may be versioned or non-versioned. For more information on on-premise feature services, see the ESRI help document, here: https://enterprise.arcgis.com/en/server/10.5/publish-services/windows/what-is-a-feature-service-.htm
On-Premise services may be set up to use a mobile QA/QC process that sends field collected data to a corporate versioned database (BLM Only). See the section on Sync and Submit for more information.
Web Maps Users may wish to collect and/or view multiple feature services together. This may be done by adding all layers to a web map. The services may be a collection of editable and non-editable hosted services, on-premise services, or ESRI hosted services. From AGOL, add the layers to the same web map, save it, and share with an AGOL group. Feature services contained in the web map are downloaded to the mobile device as a single Edit GDB. When working with web maps in Mobile Mapper, a basemap is not needed and will not be included in the Edit GDB. This is because Mobile Mapper allows users to specify their own basemap by downloading and changing out the Base Map and/or User Ref Map. Base maps are required when working with web maps in ESRI Collector app.
For help on creating a web map for offline use, see the ESRI help document, here: https://doc.arcgis.com/en/arcgis-online/manage-data/take-maps-offline.htm
Note: Only one on-premise service that utilizes Sync and Submit may be loaded to a web map at a time. The service must be tagged appropriately to continue to leverage the Sync and Submit workflow. Users will need to Sync and Submit the web map in order to submit the on-premise service data, even though not all datasets utilize the workflow. After Sync and Submit, the web map will be deleted from the device.
Assumptions: • S1 Mobile Mapper application open on device • 4G or WIFI network connection • Published Feature Service or AGOL Web Map with Sync capability enabled for all feature
services • Feature Service or Web Map is shared to a AGOL Group the user belongs • For secured services, user knows their Active Directory username and password • If web map contains a Sync and Submit service, the AGOL Web Map contains the Tag
VersionTracking=<Sync and Submit service name> (ex. VersionTracking=HAZ_TRES)
Download Edit GDB to Device • Tap Tools/Options button

S 1 M o b i l e M a p p e r U s e r G u i d e 4 . 1
Page 35
• Tap Download Data
• Tap Edit Geodatabase
• A list of AGOL groups that the user is currently a member will appear. Tap on the Group that contains the feature service to be downloaded.
S 1 M o b i l e M a p p e r U s e r G u i d e 4 . 1
Page 36
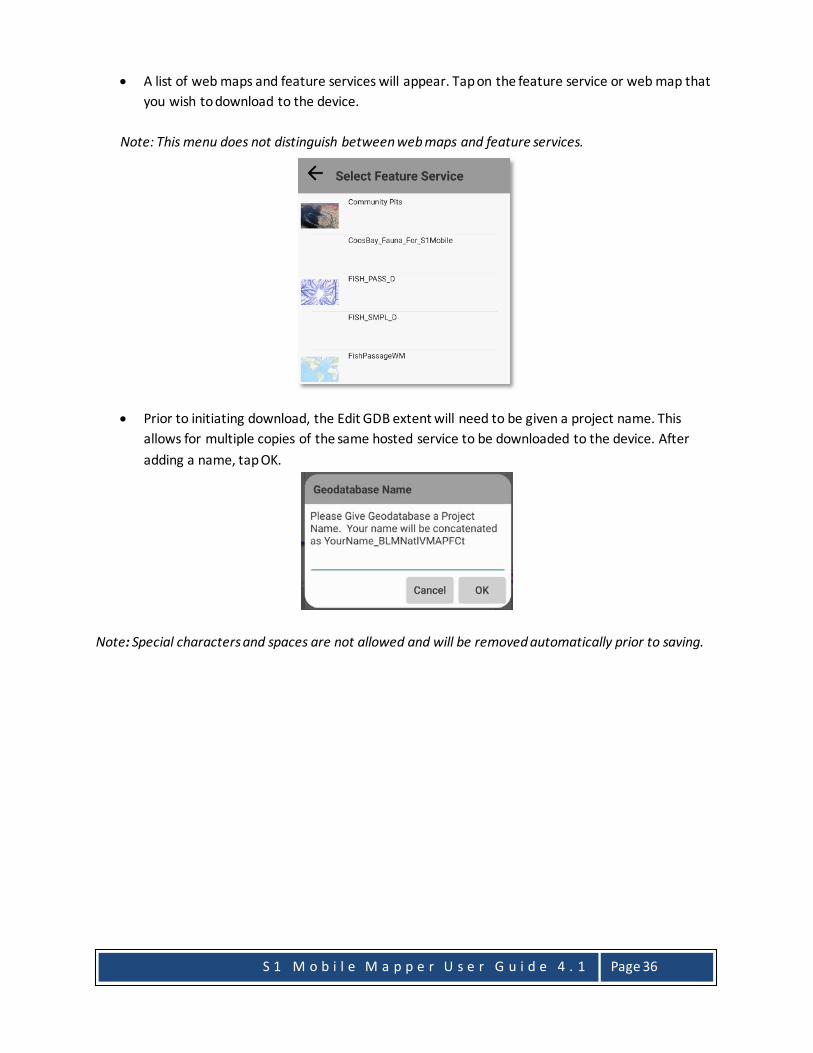
• A list of web maps and feature services will appear. Tap on the feature service or web map that you wish to download to the device.
Note: This menu does not distinguish between web maps and feature services.
• Prior to initiating download, the Edit GDB extent will need to be given a project name. This allows for multiple copies of the same hosted service to be downloaded to the device. After adding a name, tap OK.
Note: Special characters and spaces are not allowed and will be removed automatically prior to saving.

S 1 M o b i l e M a p p e r U s e r G u i d e 4 . 1
Page 37
• If a feature service, be it in a web map or not, is a secured on-premise service, users will be prompted to enter their Agency Active Directory credentials before the download will initiate. After typing the username and password, tap Login. If the feature service is an ESRI hosted Feature Service, the user will not be presented with this menu.
• Set the extent of the Edit GDB by pinching and pulling to zoom and pan the map view. The extent displayed in the map must include the area you intend to collect data.
• At the bottom of the display is a pull down menu with two options: o Data (All Features) – Default choice. Downloads all existing features that fall within the
extent of the current map view to the device.

S 1 M o b i l e M a p p e r U s e r G u i d e 4 . 1
Page 38
o Schema (No Features) – None of the existing features in the current map extent will be downloaded to the device, only new data will be created.
• When extent and download options are set, tap the Download button
• While the download is underway, a progress circle will display on the toolbar with the current download percentage displayed in the center.
Note: The time it takes to download depends on the size of the extent downloaded and the number of features present in the download area extent, as well as the speed of the network connection.
• When the download is complete, a pink rectangle will indicate the maximum extent of the Edit GDB. Data cannot be collected outside this extent.
Sync Data Edits to Server After features have been collected or modified, data should be synced back to the server when the device has network connectivity. Synchronization requires either a 4G or a WIFI connection; 3G or slower connections cannot support synchronization. It is strongly advised syncing occur on a reliable WIFI connection whenever possible.
Prior to syncing data, review the sync settings in the S1 Options menu. The options menu has a setting that allows Sync to be Bi-directional or Upload Only. The Bidirectional setting will upload data from your device and download any new data within the Edit GDB extent from other users. Upload Only will only sync the data on the device; no data will be downloaded from other users.
S 1 M o b i l e M a p p e r U s e r G u i d e 4 . 1
Page 39
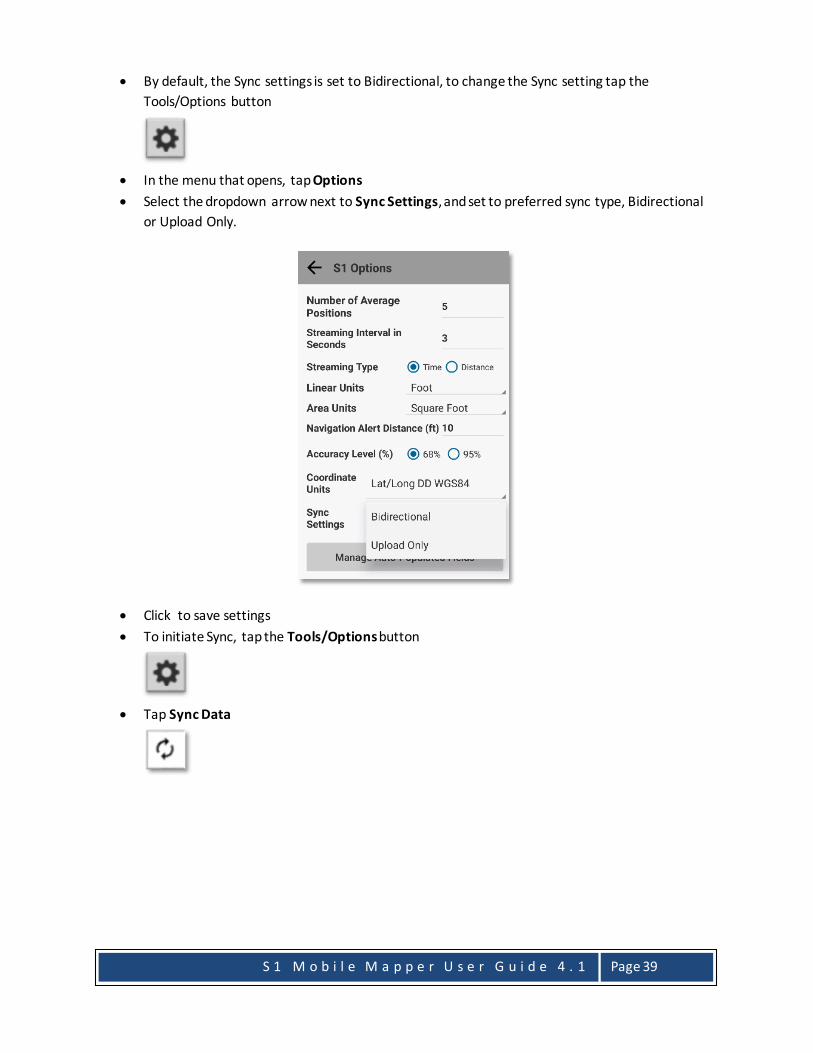
• By default, the Sync settings is set to Bidirectional, to change the Sync setting tap the Tools/Options button
• In the menu that opens, tap Options • Select the dropdown arrow next to Sync Settings, and set to preferred sync type, Bidirectional
or Upload Only.
• Click to save settings • To initiate Sync, tap the Tools/Options button
• Tap Sync Data

S 1 M o b i l e M a p p e r U s e r G u i d e 4 . 1
Page 40
• The duration of the sync process will be determined by network connectivity and the number of records that are being synchronized. A message will appear at the bottom of the map view letting you know the sync has started. While the synchronization process is underway, a progress spinner will display on the toolbar.
• When Sync is complete, the progress spinner will disappear and a message box appears
indicating the number of features and photos synchronized. Tap OK to return to the map view.
Sync and Submit Version Edits to Server (BLM Only) If a feature service has been configured to support the BLM version tracking workflow, there is a second option to be used to sync data called Sync and Submit. The first option, Sync, is described in the previous section. Sync and Submit associates the Edit GDB replica downloaded to the device with a version created from the corporate database, once Sync and Submit is successful, the associated Edit GDB is deleted from the device. In order to collect more data, the user must download the Edit GDB again.
S 1 M o b i l e M a p p e r U s e r G u i d e 4 . 1
Page 41
Sync Data can also be used with services utilizing Sync and Submit, for example, data will be collected over a longer period and there is no need to post the data to corporate quickly. To ensure data is not lost and to reduce the amount of data submitted at Sync and Submit, the user may sync data edits on a daily basis and once data collection is complete, the user selects the Sync and Submit Version function to submit the data into the corporate database. Note: Sync and Submit only appears in the Tools/Option menu if the feature service has been configured to support this workflow. Sync and Submit requires either a 4G or a Wi-Fi connection; 3G or slower connections cannot support synchronization. It is strongly advised that sync occur while connected to a reliable and quick Wi-Fi network over 4G. Important: Users should never use the same AD credentials to download the same Sync and Submit service to multiple mobile devices.
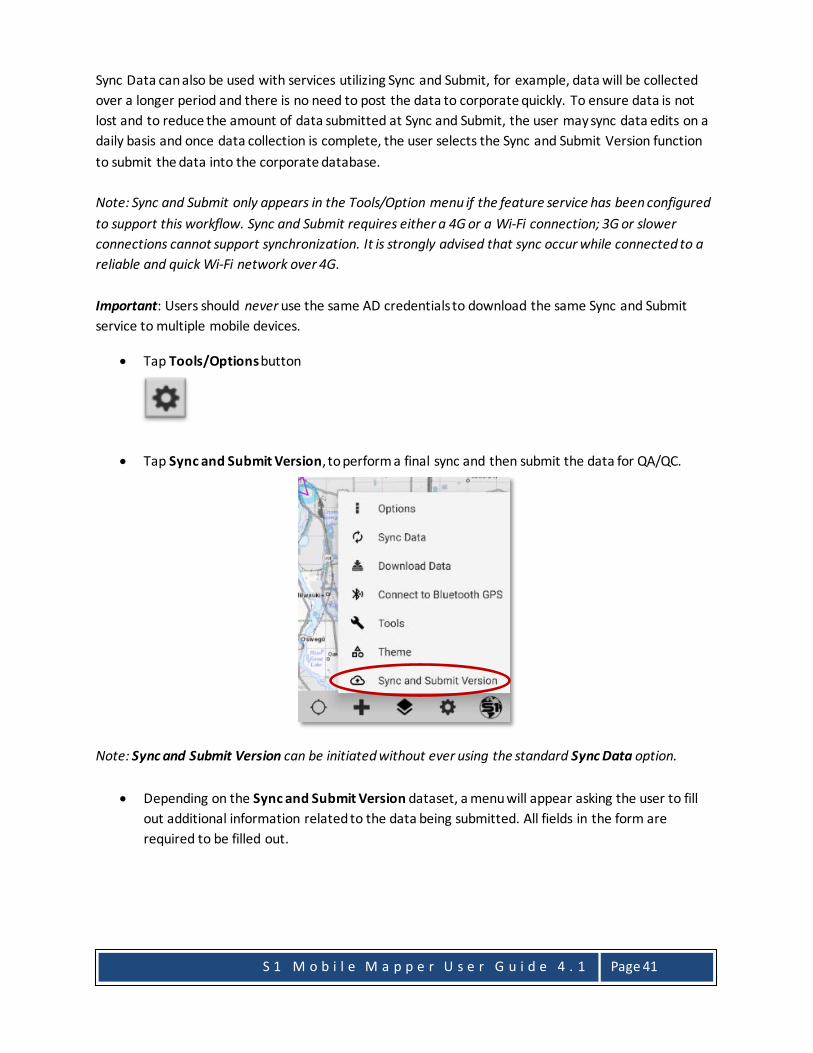
• Tap Tools/Options button
• Tap Sync and Submit Version, to perform a final sync and then submit the data for QA/QC.
Note: Sync and Submit Version can be initiated without ever using the standard Sync Data option.
• Depending on the Sync and Submit Version dataset, a menu will appear asking the user to fill out additional information related to the data being submitted. All fields in the form are required to be filled out.

S 1 M o b i l e M a p p e r U s e r G u i d e 4 . 1
Page 42
Oregon/Washington Datasets: National Datasets:
• The Administrative Unit is the unit where the data was collected. The <Search> option can be
utilized to type in the admin unit and pare down the list, tap the dropdown arrow to find <Search>.
• Choose Geodatabase, should automatically select the geodatabase, however, if there are more than one SDE versioned database downloaded to the device select the one you wish to submit.
• Type a Brief Description of the version being submitted to aid the GIS editor importing the data to identify what data is contained in the mobile version.
• Some datasets, particularly national datasets may ask for a QAQC Editor Email address. This is the person that will review and submit the data. Type only the username (@blm.gov will be added automatically) of the BLM staff member that will review the data. An email will be generated to this user to notify them that data is available for review.
• Tap the Sync and Submit Version button. • A message will appear stating that sync and submit version process has begun and a progress
circle will appear in the application toolbar.

S 1 M o b i l e M a p p e r U s e r G u i d e 4 . 1
Page 43
• The progress circle will disappear when Sync and Submit is complete and the following message will appear indicating a successful sync and submit. Tap OK to close out the message and initiate the deletion of the Sync and Submit service from the mobile device.
Note: Please follow instructions that state the user must wait at least five minutes before attempting to download the same service again.
• A message will appear indicating that the Edit GDB is being deleted from the mobile device.
• A confirmation message appears once the data has been successfully deleted from the device.

S 1 M o b i l e M a p p e r U s e r G u i d e 4 . 1
Page 44
Oregon/Washington Datasets: • Once the mobile version has been submitted successfully, the user and any editors in the user’s
administrative unit who have rights to edit the SDE feature class will get an email notification from [email protected] that there is a mobile version that needs to be reviewed.
• Editors in Oregon/Washington can follow instructions on Import BLM Mobile at the link below. ORWA SDE Edit Guide (Internal BLM link)
National Datasets: • Once the mobile version has been submitted successfully, the QAQC Editor specified in the Sync
and Submit Version form will get an email notification that there is a mobile version that needs to be reviewed. The QAQC Editor should follow the link in the accompanying email to review the data in the appropriate web application.
S 1 M o b i l e M a p p e r U s e r G u i d e 4 . 1
Page 45
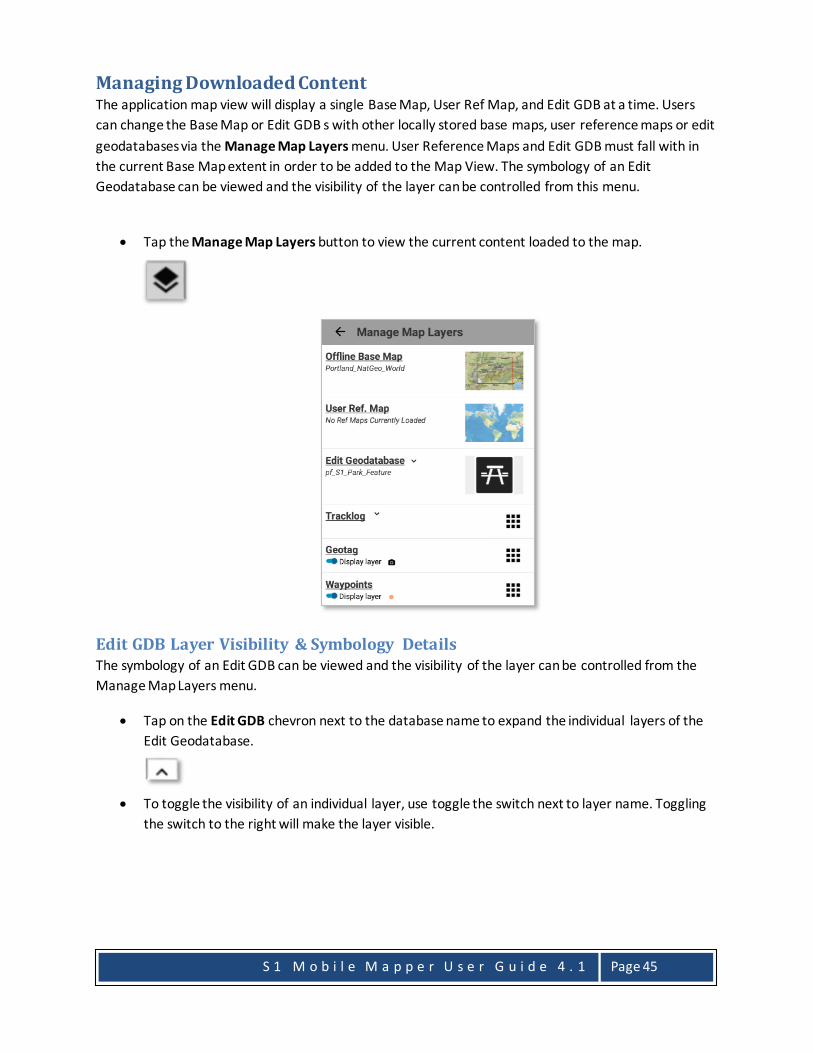
Managing Downloaded Content The application map view will display a single Base Map, User Ref Map, and Edit GDB at a time. Users can change the Base Map or Edit GDB s with other locally stored base maps, user reference maps or edit geodatabases via the Manage Map Layers menu. User Reference Maps and Edit GDB must fall with in the current Base Map extent in order to be added to the Map View. The symbology of an Edit Geodatabase can be viewed and the visibility of the layer can be controlled from this menu.
• Tap the Manage Map Layers button to view the current content loaded to the map.
Edit GDB Layer Visibility & Symbology Details The symbology of an Edit GDB can be viewed and the visibility of the layer can be controlled from the Manage Map Layers menu.
• Tap on the Edit GDB chevron next to the database name to expand the individual layers of the Edit Geodatabase.
• To toggle the visibility of an individual layer, use toggle the switch next to layer name. Toggling the switch to the right will make the layer visible.

S 1 M o b i l e M a p p e r U s e r G u i d e 4 . 1
Page 46
Note: Layers with visibility turned off will not show up in Create Features menu.
• When a layer is symbolized based on an attribute value, tapping the chevron next to the layer’s
symbol icon will display a full description of each symbol in a new menu.
S 1 M o b i l e M a p p e r U s e r G u i d e 4 . 1
Page 47
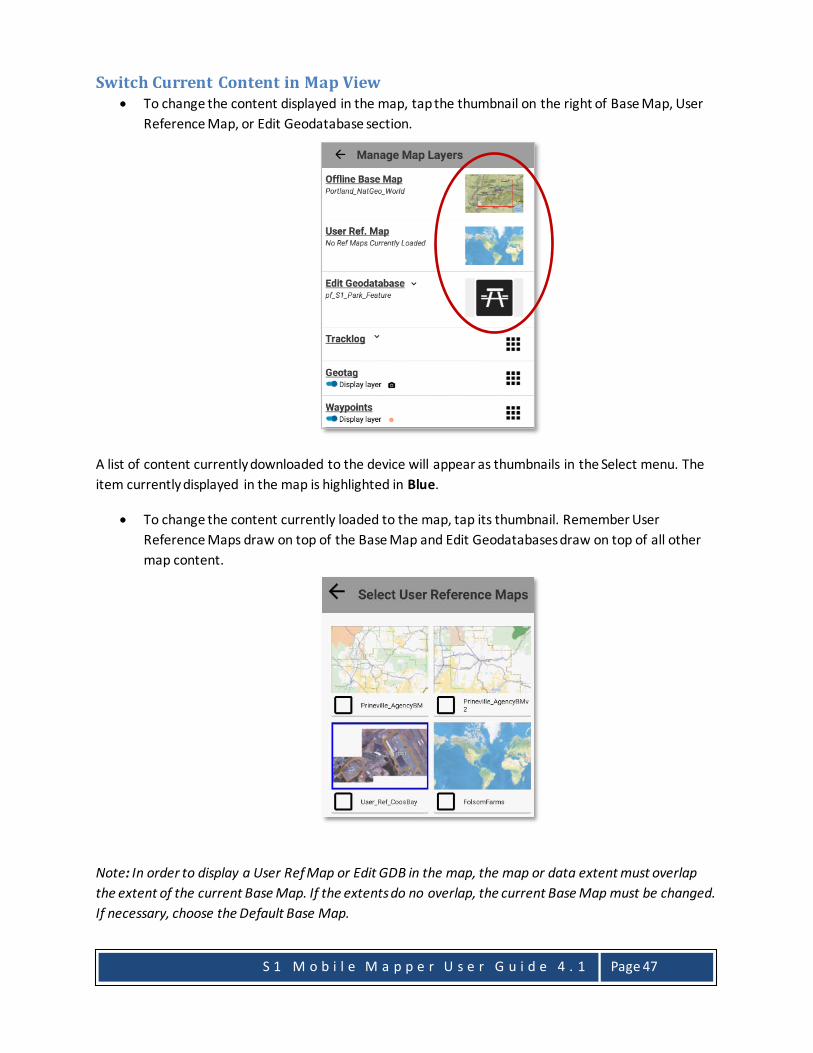
Switch Current Content in Map View • To change the content displayed in the map, tap the thumbnail on the right of Base Map, User
Reference Map, or Edit Geodatabase section.
A list of content currently downloaded to the device will appear as thumbnails in the Select menu. The item currently displayed in the map is highlighted in Blue.
• To change the content currently loaded to the map, tap its thumbnail. Remember User Reference Maps draw on top of the Base Map and Edit Geodatabases draw on top of all other map content.
Note: In order to display a User Ref Map or Edit GDB in the map, the map or data extent must overlap the extent of the current Base Map. If the extents do no overlap, the current Base Map must be changed. If necessary, choose the Default Base Map.

S 1 M o b i l e M a p p e r U s e r G u i d e 4 . 1
Page 48
Remove Layer from Map and Delete Data from Device
Switch or Delete Base Map • To change the Base Map displayed or delete it from the device, tap on the thumbnail next to
Offline Base Map
• The base map currently displayed in the map view is highlighted blue. To view a different base map, tap it in the Select Base Map menu and it will load to the map view.

S 1 M o b i l e M a p p e r U s e r G u i d e 4 . 1
Page 49
• Tap the checkbox to select the map to be deleted. Once selected, tap Delete.
Remove or Delete User Ref Maps and Edit GDBs • To remove a User Ref Map or Edit GDB from the current map view, tap on the thumbnail next to
content type. • Check the box next to the layer name and tap Remove. This removes the map from the current
map view and does not delete it from the device. This allows the map to be added back to the map view later.
• To delete a Map or Edit GDB from the device, tap Delete. This will remove it from the map view (if currently active) and delete the layer files from the device.
Note: If deleting an Edit GDB, you must have network connectivity prior to attempting delete. Be sure all edits have been synced prior to initiating delete or edits will be lost.

S 1 M o b i l e M a p p e r U s e r G u i d e 4 . 1
Page 50
Collecting New Features Assumptions:
• Edit GDB has been downloaded to device covering the desired data collection extent. • Edit GDB is set as the current Edit Geodatabase in Manage Map Layers. • Layer visibility for desired edit layer is turned on in Manage Map Layers.
To start collecting new map features:
• Tap the Collect Features button.
• Choose the layer to collect a new feature. The data collection workflow will be dictated by geometry type of the layer chosen.
S 1 M o b i l e M a p p e r U s e r G u i d e 4 . 1
Page 51
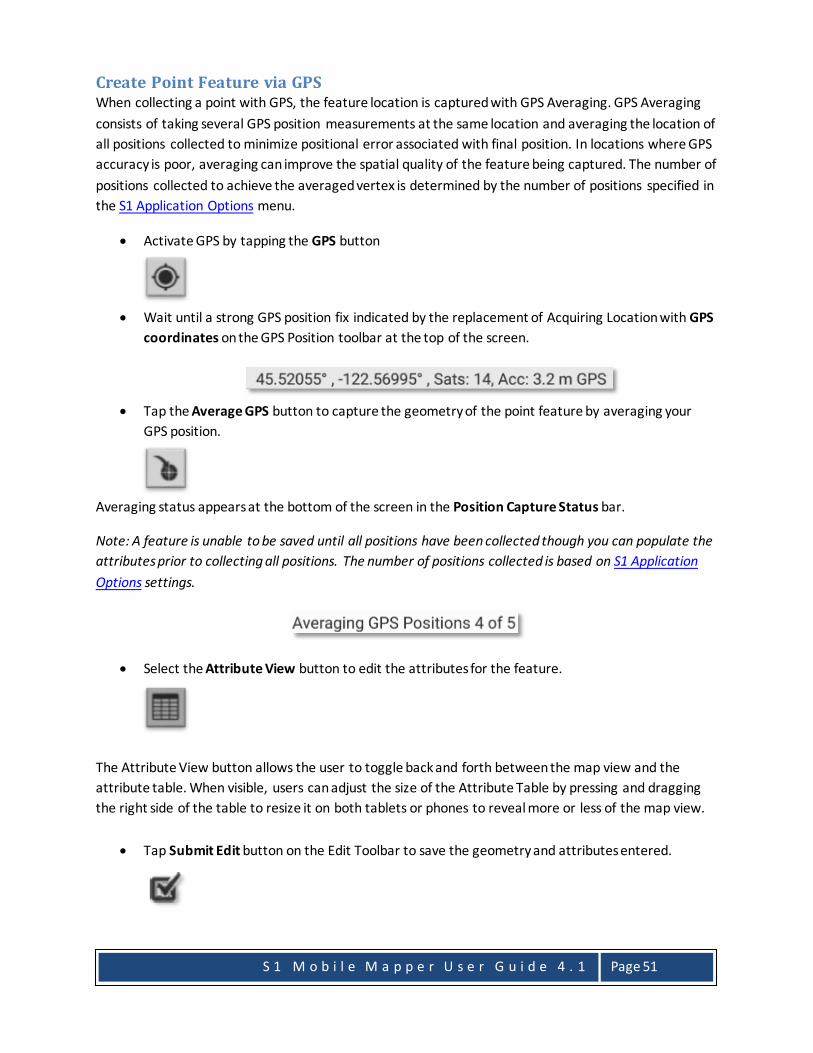
Create Point Feature via GPS When collecting a point with GPS, the feature location is captured with GPS Averaging. GPS Averaging consists of taking several GPS position measurements at the same location and averaging the location of all positions collected to minimize positional error associated with final position. In locations where GPS accuracy is poor, averaging can improve the spatial quality of the feature being captured. The number of positions collected to achieve the averaged vertex is determined by the number of positions specified in the S1 Application Options menu.
• Activate GPS by tapping the GPS button
• Wait until a strong GPS position fix indicated by the replacement of Acquiring Location with GPS coordinates on the GPS Position toolbar at the top of the screen.
• Tap the Average GPS button to capture the geometry of the point feature by averaging your
GPS position.
Averaging status appears at the bottom of the screen in the Position Capture Status bar.
Note: A feature is unable to be saved until all positions have been collected though you can populate the attributes prior to collecting all positions. The number of positions collected is based on S1 Application Options settings.
• Select the Attribute View button to edit the attributes for the feature.
The Attribute View button allows the user to toggle back and forth between the map view and the attribute table. When visible, users can adjust the size of the Attribute Table by pressing and dragging the right side of the table to resize it on both tablets or phones to reveal more or less of the map view.
• Tap Submit Edit button on the Edit Toolbar to save the geometry and attributes entered.

S 1 M o b i l e M a p p e r U s e r G u i d e 4 . 1
Page 52
Create Point Feature via Digitizing on Screen • If GPS is activated, turn off GPS by tapping GPS button
• Tap the Collect Features button
• Tap on screen at the location where the point geometry is to be created. A Blue Dot will appear on the map for the feature.
• Select the Attribute View button to edit the attributes for the feature.
The Attribute View button allows the user to toggle back and forth between the map view and the attribute table. When visible, users can adjust the size of the Attribute Table by pressing and dragging the right side of the table to resize it on both tablets or phones to reveal more or less of the map view.
S 1 M o b i l e M a p p e r U s e r G u i d e 4 . 1
Page 53
• Tap Submit Edit button on Edit Toolbar to save the geometry and attributes entered.
Create New Line or Polygon Feature via GPS Assumptions:
• GPS is Active
• Device has a position fix
GPS Streaming GPS Streaming is the capture of the geometry of a line or polygon feature by automatically recording GPS positions or vertices at a user-defined interval. Once initiated, the application will continue to collect these measurements until GPS streaming is Paused or the feature is Saved. GPS Feature vertices will be captured based on interval settings (time or distance) specified in S1 Application Options.
• Tap the Collect Features button
• Tap the Begin Streaming button to start recording GPS positions for your feature and start
moving.
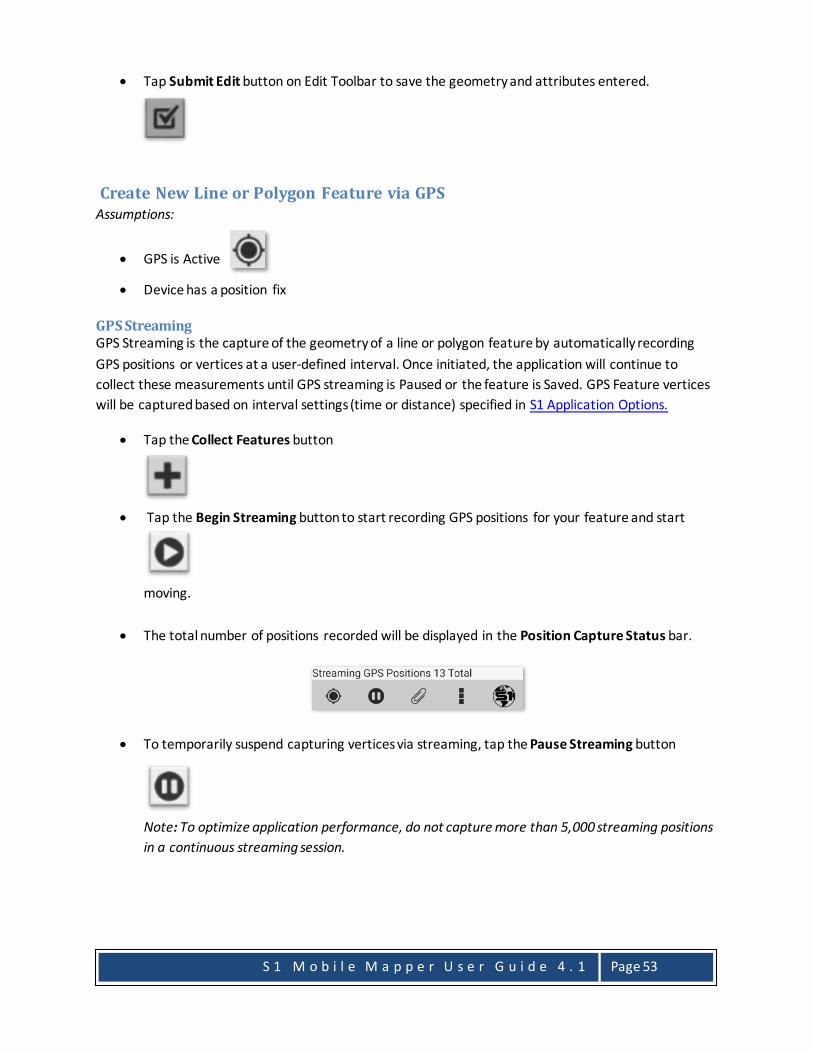
• The total number of positions recorded will be displayed in the Position Capture Status bar.
• To temporarily suspend capturing vertices via streaming, tap the Pause Streaming button
Note: To optimize application performance, do not capture more than 5,000 streaming positions in a continuous streaming session.

S 1 M o b i l e M a p p e r U s e r G u i d e 4 . 1
Page 54
• Select the Attribute View button to edit the attributes for the feature.
The Attribute View button allows the user to toggle back and forth between the map view and the attribute table. When visible, users can adjust the size of the Attribute Table by pressing and dragging the right side of the table to resize it on both tablets or phones to reveal more or less of the map view.
• Tap Submit Edit button on Edit Toolbar to save the geometry and attributes entered.
GPS Average Vertex GPS Averaging consists of taking several GPS position measurements at the same location and averaging the location of all positions collected to minimize positional error associated with final position. In locations where GPS accuracy is poor, averaging can improve the spatial quality of the feature being captured. In terms of a line or polygon, you are averaging the location for a single vertex that makes up the final feature. If collecting a line, a minimum of two vertices must be collected, for a polygon a minimum of three vertices must be collected. The number of positions collected to achieve the averaged vertex is determined by the number of positions specified in the S1 Application Options menu.
• Tap the Collect Features button
• Stand at the start of the line feature or polygon. Tap Average GPS button to capture the first vertex.
The averaging status appears at the bottom of the screen in the Position Capture Status bar.
• When averaging is complete for the first vertex, move to the next location where the line or area vertex will be collected. Tap Average Vertex button to capture another vertex at this location.

S 1 M o b i l e M a p p e r U s e r G u i d e 4 . 1
Page 55
• Repeat moving to the next location and tapping Average GPS buttonuntil the feature has been captured.
• Select the Attribute View button to edit the attributes for the feature.
The Attribute View button allows the user to toggle back and forth between the map view and the attribute table. When visible, users can adjust the size of the Attribute Table by pressing and dragging the right side of the table to resize it on both tablets or phones to reveal more or less of the map view.
• Tap Submit Edit button on Edit Toolbar to save the feature.
Toggle between Streaming and Average GPS It is possible to toggle data collection methods between GPS Streaming and Average GPS when collecting lines or polygons. As an example workflow:
• Tap the Collect Features button and select a line or polygon layer.
• Start streaming the line or polygon by tapping the GPS Stream button.
• To switch into Average GPS, tap the Pause GPS Stream button, move locations to collect the next vertex.
• Tap Average Vertex button and collect position(s).

S 1 M o b i l e M a p p e r U s e r G u i d e 4 . 1
Page 56
• To return to GPS Streaming, tap Begin GPS Stream button again.
• Select the Attribute View button to edit the attributes for the feature.
• Tap Submit Edit button to save the feature.
Create New Line/Area Feature via Digitizing Digitizing is the act of manually drawing the feature on the map view rather than using GPS to collect the location.
• If GPS is activated, turn off GPS by tapping GPS button.
• Tap the Collect Features button.
• Tap on screen at location where line or area is to begin, a blue dot will appear.
• Tap again on screen to place second vertex location, second dot will appear and line connects the two vertices.
• Continue tapping on screen to create the line or polygon.
Note: Lines need a minimum of two vertices to be saved, while polygons need a minimum or three vertices.

S 1 M o b i l e M a p p e r U s e r G u i d e 4 . 1
Page 57
Line Feature: Polygon feature:
• Select the Attribute View button to edit the attributes for the feature.
The Attribute View button allows the user to toggle back and forth between the map view and the attribute table. When visible, users can adjust the size of the Attribute Table by pressing and dragging the right side of the table to resize it on both tablets or phones to reveal more or less of the map view.
• Tap Submit Edit button on the Edit Toolbar to save the geometry and attributes entered.
Repeat Attributes When collecting many features that share the same set of attribute values, it may be beneficial to enable the Repeat Attributes option. Once the Repeat Attribute box is checked in the attribute table for a feature layer, each subsequent layer created will have the attribute form populated with the same attributes as the previously created feature. Repeat Attributes will persist even after terminating an app session. To disable Repeat Attributes create a feature, uncheck the Repeat Attributes box and save the feature. If the feature is not saved, Repeat Attributes will not change from disabled to enabled or vice versa. Repeat Attributes is turned off by default.

S 1 M o b i l e M a p p e r U s e r G u i d e 4 . 1
Page 58
Note 1: Unique attribute value fields (primary keys, GUID values, editor tracking fields, etc.) are never repeated.
Note 2: Some Edit GDBs utilizing custom attribute forms (such as VMAP) may have additional restrictions set for which fields are repeated or how fields are repeated.
Turn On/Off Repeat Attributes • To turn Repeat Attributes on, create or edit a feature and tap the Attribute View button
• Scroll to bottom of attribute table and tap the checkbox to enable Repeat Attributes. The
feature must be saved with the Repeat Attributes box checked in order for the attributes to be remembered, if the feature is canceled the attributes will not be saved.
• To turn off Repeat Attributes, create a new feature in the same layer and tap to un-checked the Repeat Attributes prior to saving the feature.

S 1 M o b i l e M a p p e r U s e r G u i d e 4 . 1
Page 59
Related Records Data Entry The application supports the following related table relationship types: feature to feature, feature to table, table to table and relates of relates. Relationships must be constructed using both a GLOBALID or GUID field as the primary key field type and a GUID field as the foreign key field.
When a relationship exists, a list box will appear in the parent feature attribute form for each relationship class. The name of the relationship class appears as a title above the list box. Existing related records appear inside the list box.
• New related records may be created by tapping Add in the Attribute Table.
• Existing related records can be reviewed or edited by selecting the related record (selected
record will turn red) and tapping Edit.
• Existing related records can deleted by selecting the related record and tapping Delete.
• Existing related records can be copied or duplicated by long tapping on the record to be
duplicated and choosing Copy record. Selecting Copy record will create a duplicate record in the related table with the same attributes as the original. The attributes can be modified from the original on the duplicated record prior to saving the new record.

S 1 M o b i l e M a p p e r U s e r G u i d e 4 . 1
Page 60
Select Mode Toolbar The Select Mode toolbar appears once a feature in the map view is selected. The toolbar includes a variety of tools, which are contextual and the toolbar can be expanded and collapsed to reveal tools. Only tools that are applicable for the selected feature layer will display on the toolbar. If there is more than one row of buttons available, swipe down on the gray toolbar area to expand it.
Assumptions: • Edit GDB has been downloaded to device covering desired data collection area • Edit GDB is set as the current Edit Geodatabase in Manage Map Layers • There are existing features in this Edit GDB
• To select a feature, in the map view tap the feature symbol. When selected, it is highlighted in
blue in the map view.
• Once selected, the Select Mode toolbar appears and a blue Feature Info bar will appear listing the name of the selected feature.
The following tools are included on the toolbar, however, the tools that are available (such as Edit Feature) appear depending upon the settings of the given feature layer.
Edit Feature Copy Feature Delete Feature Attachments
Navigation Google Maps Navigation Directions
• If multiple features are close in proximity all will be selected. Select the arrow button on the
blue feature bar to scroll left or right until the desired feature is displayed.

S 1 M o b i l e M a p p e r U s e r G u i d e 4 . 1
Page 61
• Tap the feature’s name in the Feature Info bar to display the Feature Info popup window.
• The feature Info pop up can be closed using the back arrow at the top of the popup. Feature remains selected even after popup is closed.
• With a feature selected, tap the Edit Feature button on the Select Mode Toolbar to begin editing. The Edit Mode toolbar will appear in place of the Select Mode toolbar.

S 1 M o b i l e M a p p e r U s e r G u i d e 4 . 1
Page 62
Edit Mode Toolbar The Edit Mode toolbar is only accessible when a feature service has Update and Delete enabled.
The Edit Mode toolbar includes the following functions:
Submit Edit Attribute View Toggle Cancel Edit
Editing Feature Geometry Geometry edits are made on a single selected feature at a time. All edits must be saved via Submit Edit button in order to be made permanent; prior to saving changes edits can be rolled back using the Cancel Edit button
Editing Point Geometry The feature will be automatically selected on screen as a red dot while in Edit Mode.
Via GPS • If not already activated, turn on GPS
• To change its location to the current GPS location, tap the Average GPS button
• The red dot will move to the current GPS location after averaging its position. • To edits any attributes, follow instructions below on Editing Feature Attributes. • To commit the change and stop editing the feature, tap the Submit Edit button.
Via Digitizing Manually on Screen • Turn off GPS if not already off.

S 1 M o b i l e U s e r G u i d e 4 . 1
Page 71
• To move the feature’s location, tap the desired location on the map and the red dot will move to that location.
• To commit the change and stop editing the feature, tap the Submit Edit button.
Editing Line or Polygon Geometry The feature will be automatically selected on screen and the individual vertices are displayed as large black dots. In edit mode, users can reshape the feature using GPS or by dragging vertices around the map using a finger.
Editing via GPS • If not already activated, turn on GPS
• In order to reshape the line or polygon feature using GPS, first tap the desired vertex where the
reshaping is to be initiated from, a red dot will appear where editing will initiate.
Edits to lines or poly’s can be accomplished using either position averaging or streaming.

S 1 M o b i l e U s e r G u i d e 4 . 1
Page 72
• To use streaming capture to reshape the line or polygon, tap the Begin Streaming button to start recording updated GPS positions and start moving. As you move, the existing feature will adjust to match the updated GPS positions.
• To use position averaging, tap the Average Positions button to move the selected vertex to the
new averaged position. Continue averaging points until finished or mix and match between streaming and position averaging. See Collect New Line or Area via GPS for options.
• To end reshaping the feature and commit the changes, tap the Submit Edit button
• If reshaping is occurring in the middle of a feature, the end of the reshape line will snap back to the next closest vertex in the feature being edited.
Editing via Digitizing on Screen • The existing vertices will be shown on screen as large black dots. To move a vertex, touch it to
activate and it will turn red. Hold it to drag it to a new location on the map.
• The feature will automatically reshape itself after you lift your finger.
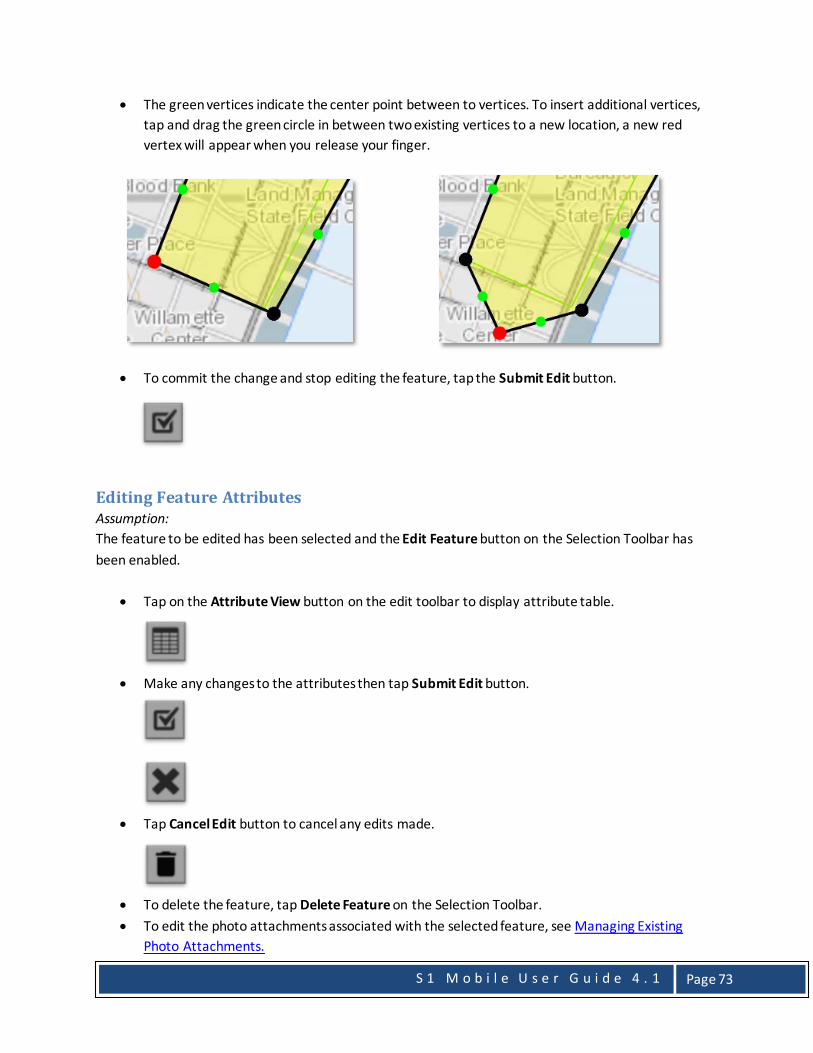
S 1 M o b i l e U s e r G u i d e 4 . 1
Page 73
• The green vertices indicate the center point between to vertices. To insert additional vertices, tap and drag the green circle in between two existing vertices to a new location, a new red vertex will appear when you release your finger.
• To commit the change and stop editing the feature, tap the Submit Edit button.
Editing Feature Attributes Assumption: The feature to be edited has been selected and the Edit Feature button on the Selection Toolbar has been enabled.
• Tap on the Attribute View button on the edit toolbar to display attribute table.
• Make any changes to the attributes then tap Submit Edit button.
• Tap Cancel Edit button to cancel any edits made.
• To delete the feature, tap Delete Feature on the Selection Toolbar. • To edit the photo attachments associated with the selected feature, see Managing Existing
Photo Attachments.

S 1 M o b i l e U s e r G u i d e 4 . 1
Page 74
Collecting Photo Attachments Photos can be attached to features of any edit geodatabase that supports feature attachments. Photos can be taken by the device camera and inserted as an attachment or an existing JPEG image on the device can be used to create the attachment. There is no limit to the number of photo attachments that can be associated with any one feature, but the more photos taken, the longer uploads will take to process back to the database at synchronization time.
Note: The publisher of a service can limit the number of photo or other attachments per feature by adding a simple tag to the feature service with the format: attachment=1 This example would allow only 1 attachment per feature, user can use whatever number they choose in that format to limit the number of attachments.
Photo Attachment Enabled Feature • To capture a photo attachment while collecting a new feature, tap the Attachment button.
Note: Attachments must have been enabled on the feature service to attach a photo.
• Tap the blue Camera button to initiate the camera tool.
• Tap the yellow Folder button to search for existing images on device to attach.
• If using the Camera, frame subject, tap Camera icon to take a photo.

S 1 M o b i l e U s e r G u i d e 4 . 1
Page 75
• Once the photo has been captured, tap the Save button.
• If browsing the device, choose an image from the Image Gallery shown on screen. • Repeat process to add as many photo attachments as required.

S 1 M o b i l e U s e r G u i d e 4 . 1
Page 76
• Thumbnails of the associated photo attachments will display on screen.
• Select the green Submit button to save pending photo attachments.
To learn more about advanced settings within the camera view see the Configuring S1 GeoTag Photos & Options
Managing Existing Photo Attachments • To review existing attachments of a feature, tap the feature to Select it. • On the Select Mode toolbar, tap the Attachment button.
• The Manage Attachments Form window opens and displays a list of all attachments currently associated with the feature.
• To view the photo attachment in full screen view, tap on the Thumbnail.
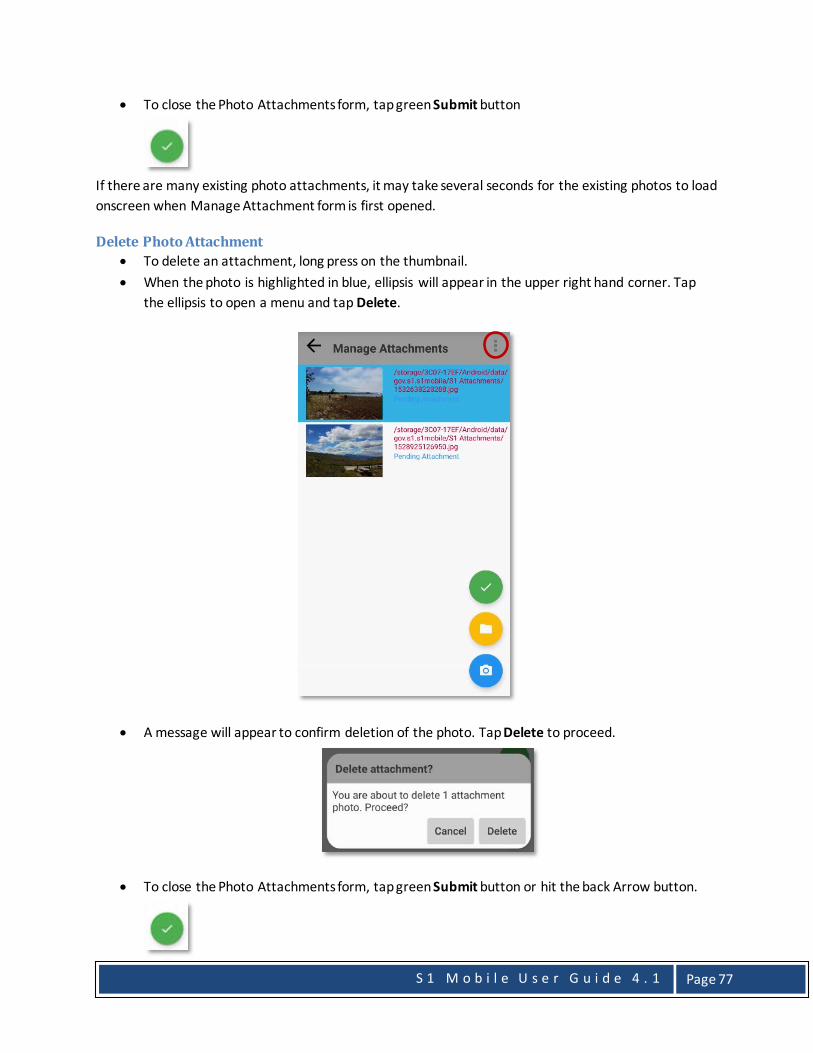
S 1 M o b i l e U s e r G u i d e 4 . 1
Page 77
• To close the Photo Attachments form, tap green Submit button
If there are many existing photo attachments, it may take several seconds for the existing photos to load onscreen when Manage Attachment form is first opened.
Delete Photo Attachment • To delete an attachment, long press on the thumbnail. • When the photo is highlighted in blue, ellipsis will appear in the upper right hand corner. Tap
the ellipsis to open a menu and tap Delete.
• A message will appear to confirm deletion of the photo. Tap Delete to proceed.
• To close the Photo Attachments form, tap green Submit button or hit the back Arrow button.
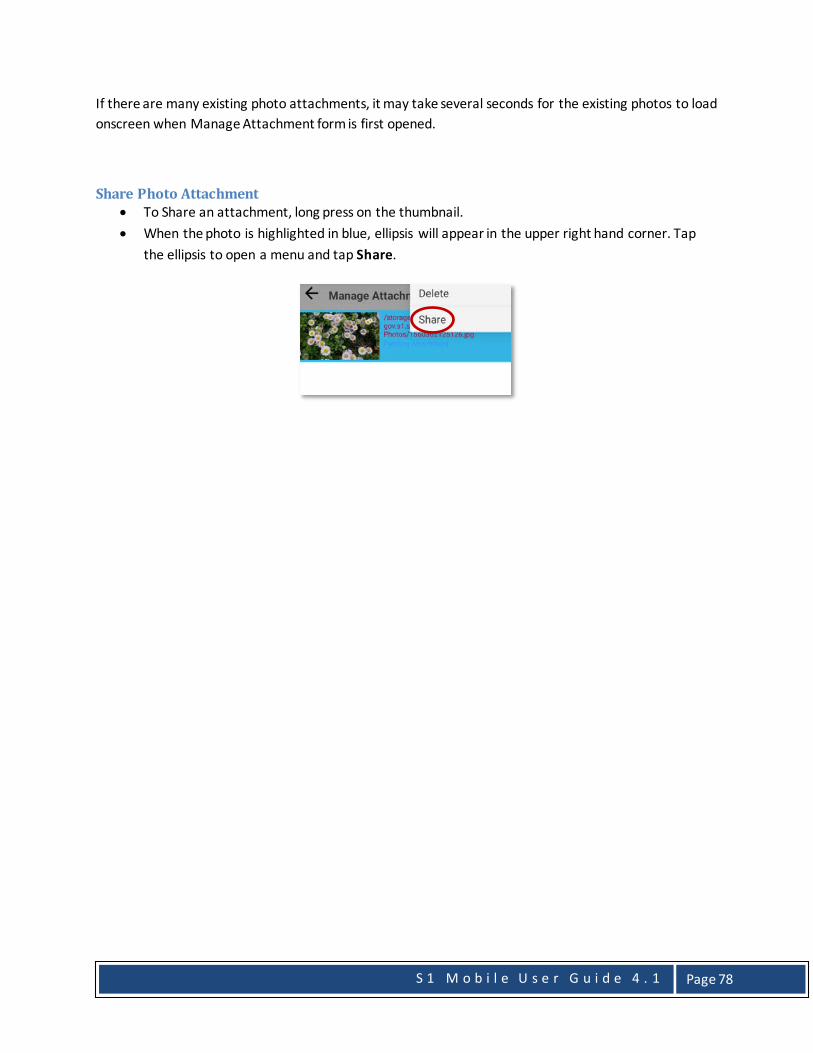
S 1 M o b i l e U s e r G u i d e 4 . 1
Page 78
If there are many existing photo attachments, it may take several seconds for the existing photos to load onscreen when Manage Attachment form is first opened.
Share Photo Attachment • To Share an attachment, long press on the thumbnail. • When the photo is highlighted in blue, ellipsis will appear in the upper right hand corner. Tap
the ellipsis to open a menu and tap Share.

S 1 M o b i l e U s e r G u i d e 4 . 1
Page 79
S1GeoTag Photos The S1GeoTag Photo layer allows users to capture a photo with the location coordinates embedded into the photo’s metadata (EXIF) header. Captured S1GeoTag Photos are displayed as a camera icon in the map view. The photo may be watermarked with azimuth/bearing, pitch/roll, XY location, elevation, date/time, brand icon, and a configurable file name. Placement of these watermark elements in the camera view may be changed to where the user feels appropriate. Watermark settings are configured in the GeoTag Photo Settings menu.
The location the GeoTag Photo is being captured may be shared using the Share Location tool. This tool allows the user to share their location via the mobile device’s mail app or text. If email is used to share the location, the recipient is provided with the information watermarked in the photo as well as links to maps available on the web.
The graphic below provides an overview of the tools/options available while taking GeoTag photos.

S 1 M o b i l e U s e r G u i d e 4 . 1
Page 80
Collecting S1GeoTag Photos • Tap Create Features button
• Tap S1GeoTag Photo
• The camera view opens and the GPS is activated if it was not already on.

S 1 M o b i l e U s e r G u i d e 4 . 1
Page 81
• The XY location and altitude display once the GPS has a position. • Tap Zoom In/Zoom Out to bring subject of photo in view (pinch to zoom also works).
• Tap Capture GeoTag Photo button
• A message box appears showing the progress of capturing and then saving the photo.
• Tap Cancel if you are not satisfied with the photo
• Tap Save to commit the GeoTag photo to the S1Photos folder on the device. Photos will be stored in the S1 Photos folder on device’s internal memory if no SD Card is present, see more details in the Accessing and Viewing GeoTag Photos section below.
• A GeoTag Photo icon is displayed in the map view at the location of where the photo was
captured.
• To delete a single geotag photo, first tap on the GeoTag Photo icon to select a photo. • Tap Delete Feature button to delete the selected photo.

S 1 M o b i l e U s e r G u i d e 4 . 1
Page 82
• Tap No if you do not wish to delete the photo.
• Tap Yes if you wish to delete the photo from the map view and remove thumbnail from Manage
Map Layer (photo is completely deleted from device).
GeoTag Photo Layer Visibility Visibility of S1GeoTag Photos in the map view may be toggled ON/OFF in Manage Map Layers.
• Tap Manage Map Layers button • Check/Uncheck box to toggle GeoTag photo map visibility ON/OFF.

S 1 M o b i l e U s e r G u i d e 4 . 1
Page 83
Navigate to a GeoTag photo GeoTag photos also can be set as navigation targets.
• Tap on the GeoTag Photo icon in the map to select it.
• Tap Navigate to Feature button to begin navigation to the selected photo.

S 1 M o b i l e U s e r G u i d e 4 . 1
Page 84
• Tap Back button to clear the navigation target.
Configuring S1 GeoTag Photos & Photo Attachments Options GeoTag Photos and photo attachments are highly configurable. There are a number of settings and options available to the user. Settings are configured before a photo is captured. See the GeoTag Options section for more details.
Configure File Name • The Configure File Name button allows the photo to be given a unique name that is
watermarked on the photo when the photo is stored.
• Take note of the user configured file name for the photo.
Share Location • The Share Location button allows users to share their location using various methods such as
email, Google Maps, memo apps, and Bluetooth.
• Sharing your location by email provides the recipient with web links to Google Maps. • Each web link provides a map at the location of where the photo was captured.

S 1 M o b i l e U s e r G u i d e 4 . 1
Page 85
Photo Options • From within the Photo viewfinder, tap Photo Settings button to view the entire available photo
setting options.
Full List of Photo Options This section describes options that allow the user to configure units of measure, visual interface, and output format of a photo.
UNITS
Auto Adjust Declination: Report True North if location is available (checkbox)
Manual Declination: Adjust local declination (activate by unchecking Auto Adjust Declination)
Override Measurements: Override sensor measurements by entering your own values
Sensor Calibration: Calibrate device sensors to increase accuracy
VISUAL
Stabilize: Stabilize values by ignoring small changes (checkbox)
Unlock: Make features movable in the camera view (checkbox)
Reset: Reset features in the camera view to their original positions
Text Size: Change the size of text values
Text Color: Change the color of text values
Elevation: Use metes instead of foot (checkbox)
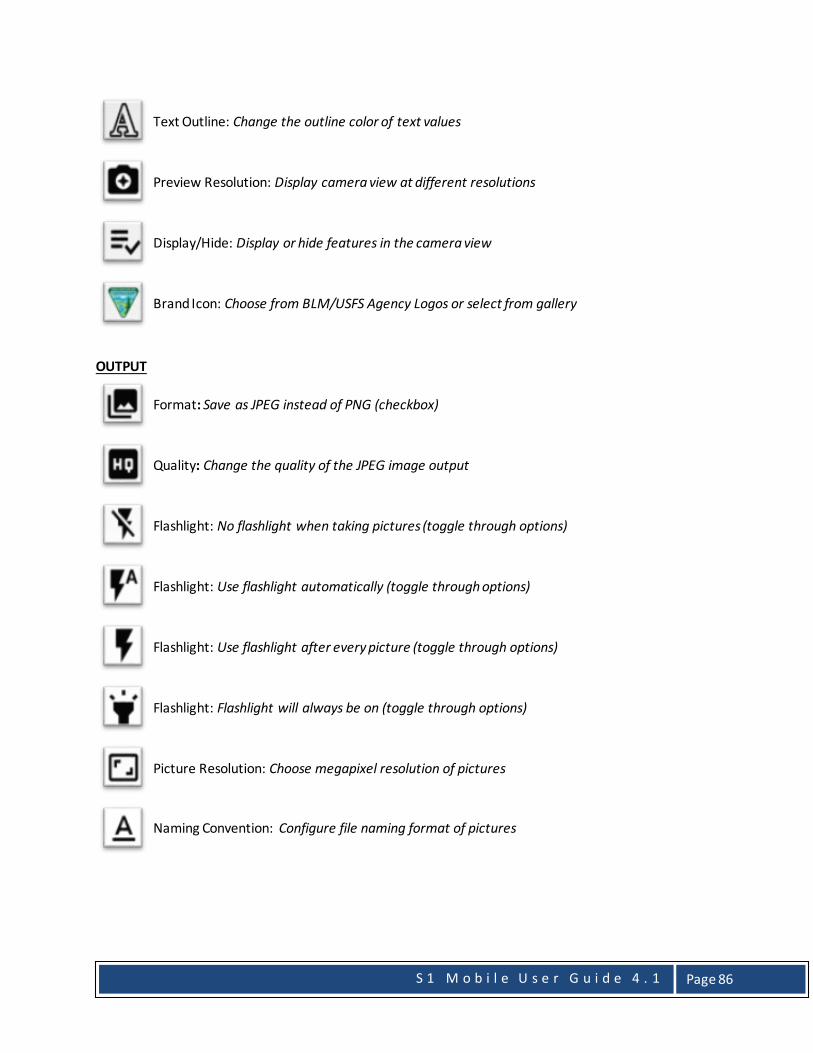
S 1 M o b i l e U s e r G u i d e 4 . 1
Page 86
Text Outline: Change the outline color of text values
Preview Resolution: Display camera view at different resolutions
Display/Hide: Display or hide features in the camera view
Brand Icon: Choose from BLM/USFS Agency Logos or select from gallery
OUTPUT
Format: Save as JPEG instead of PNG (checkbox)
Quality: Change the quality of the JPEG image output
Flashlight: No flashlight when taking pictures (toggle through options)
Flashlight: Use flashlight automatically (toggle through options)
Flashlight: Use flashlight after every picture (toggle through options)
Flashlight: Flashlight will always be on (toggle through options)
Picture Resolution: Choose megapixel resolution of pictures
Naming Convention: Configure file naming format of pictures

S 1 M o b i l e U s e r G u i d e 4 . 1
Page 87
Override Measurements • If device does not have necessary hardware sensors to calculate azimuth/bearing/pitch/roll, or if
you wish to override sensor measurements, they can be manually entered by tapping Override Measurements button in GeoTag Settings.
• Below is the menu for the sensor measurements that can be overridden as well as the option to clear values that have been entered.
• Check boxes that apply and tap OK to clear some or all of the override measurement values.

S 1 M o b i l e U s e r G u i d e 4 . 1
Page 88
How to Calibrate Device Sensors • Sensors can be calibrated from GeoTag Settings by tapping Calibrate Sensor button.
Wave the phone in a figure eight motion as indicated by the graphic until all sensors are reporting full calibration, indicated by blue bar. Sensors that need calibration will appear with red bars; however, devices without certain sensors will always appear red no matter how many figure eights you complete.
Managing S1 GeoTag Photos There are several options for accessing and viewing collected S1 GeoTag Photos. The next section describes how to access and view GeoTag Photos captured with the S1 Mobile Mapper. Assumptions: The user has collected at least one GeoTag Photo with the app. Capture of a GeoTag Photo initiates creation of the Manage GeoTag Photo folder described below.
Access GeoTag Photos in Manage Map Layers The Manage GeoTag Photo menu provides access to geotagged photos that have been captured with S1 Mobile Mapper. A user has the ability to sort photos based on name and date. Photos can also be deleted from the S1 Mobile Mapper application and device.

S 1 M o b i l e U s e r G u i d e 4 . 1
Page 89
• Tap Manage Map Layers button to access GeoTag photos.
• Tap Action button to display Manage GeoTag Photos menu.
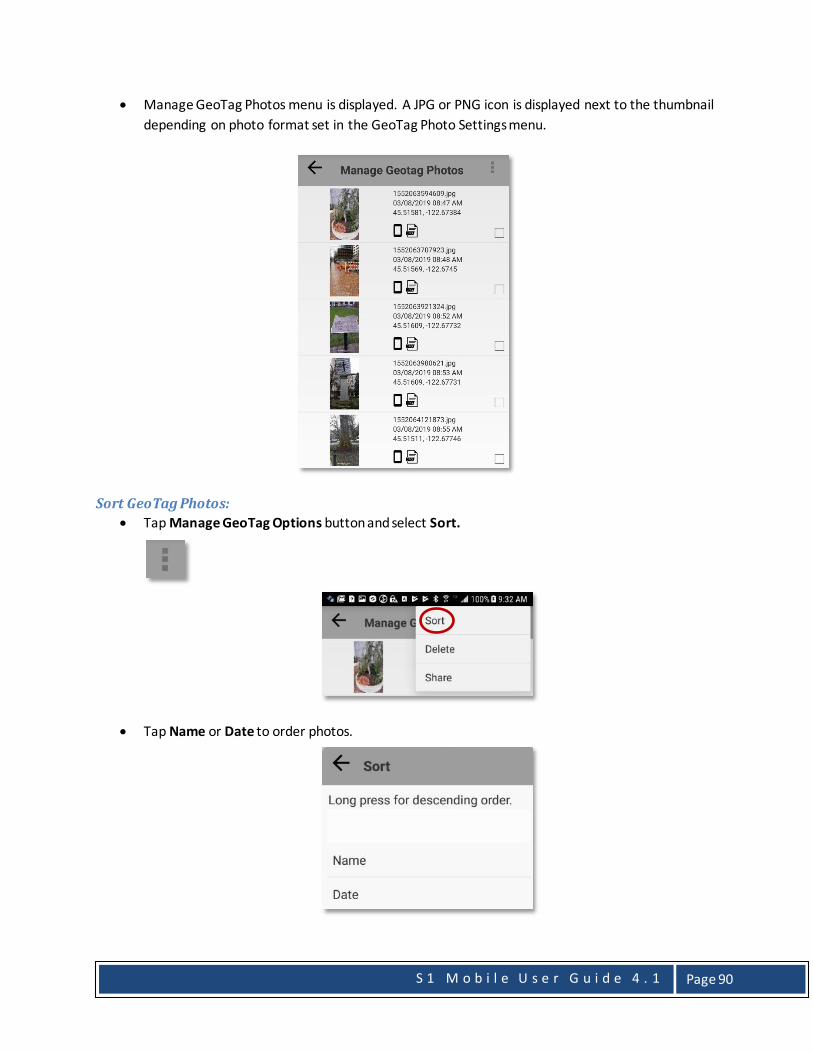
S 1 M o b i l e U s e r G u i d e 4 . 1
Page 90
• Manage GeoTag Photos menu is displayed. A JPG or PNG icon is displayed next to the thumbnail depending on photo format set in the GeoTag Photo Settings menu.
Sort GeoTag Photos: • Tap Manage GeoTag Options button and select Sort.
• Tap Name or Date to order photos.

S 1 M o b i l e U s e r G u i d e 4 . 1
Page 91
Delete GeoTag Photos: • Tap the box to add a Checkmark next to the photo thumbnail(s) to be deleted.
• Tap GeoTag Manage Options button and select Delete.
• Select Delete to delete the photo(s) or Cancel to not delete the photo(s).
• Manage GeoTag Photo menu opens again after photos are deleted.
Note: Deleted GeoTag photos are completely removed from the device.

S 1 M o b i l e U s e r G u i d e 4 . 1
Page 92
Access Photos in My Files Application Below is the folder location where GeoTag photos are stored on the device. Photos are stored on the device’s SD Card if the external storage card exists, if not, photos will be stored on the device’s internal memory.
• SD Card: [Device Name]\Card\Android\data\gov.s1.s1mobile\Manage Geotag Photos • No SD Card: [Device Name]\Internal storage\Android\data\gov.s1.s1mobile\Manage Geotag
Photos
• The above file locations may be accessed on the mobile device via the My Files app. Tap the icon to open the app, and navigate to the appropriate location to find the Manage GeoTag Photos folder.
Access Photos in Mobile Device Gallery Photos created via S1 Mobile Mapper are also saved in the device’s Photo Gallery or a default photo-viewing app, depending on device manufacturer.
• On Home screen tap Gallery button
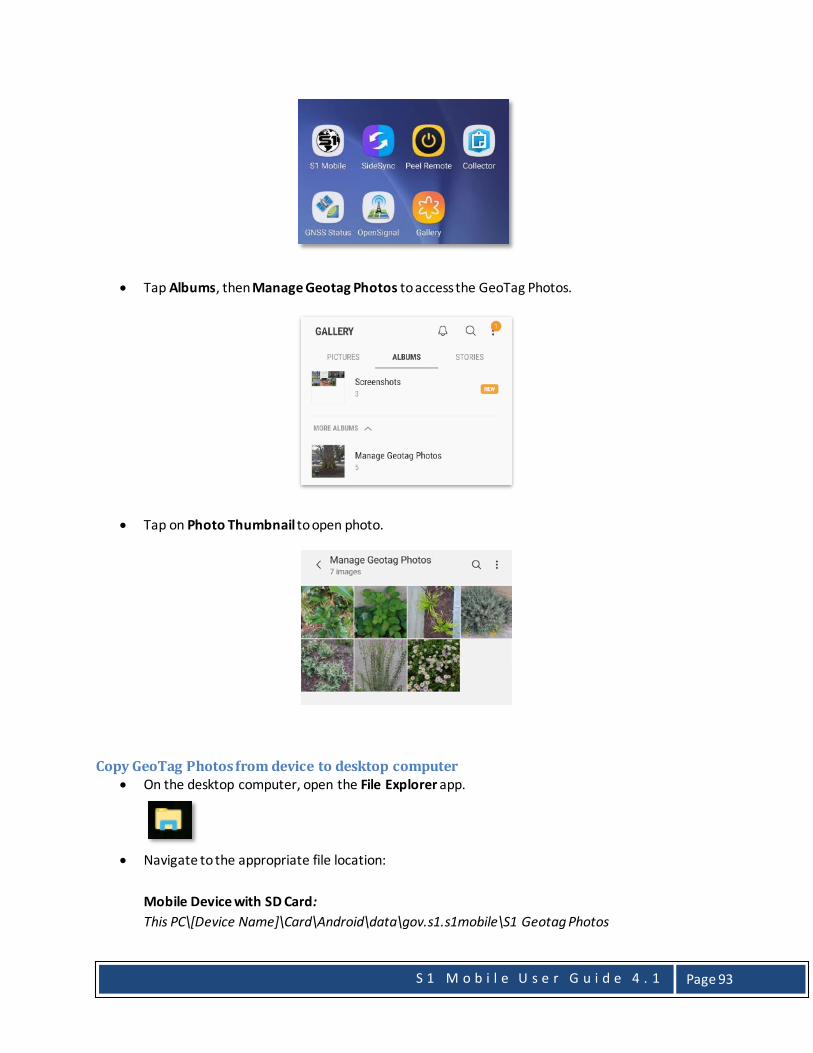
S 1 M o b i l e U s e r G u i d e 4 . 1
Page 93
• Tap Albums, then Manage Geotag Photos to access the GeoTag Photos.
• Tap on Photo Thumbnail to open photo.
Copy GeoTag Photos from device to desktop computer • On the desktop computer, open the File Explorer app.
• Navigate to the appropriate file location:
Mobile Device with SD Card: This PC\[Device Name]\Card\Android\data\gov.s1.s1mobile\S1 Geotag Photos

S 1 M o b i l e U s e r G u i d e 4 . 1
Page 94
Mobile device without SD Card: This PC\[Device Name]\[Device Type]\Android\data\gov.s1.s1mobile\S1 Geotag Photos
• Select the photos to be copied from the mobile device to the desktop computer. Right click and select Copy.
• Navigate to a network drive location or local workspace. Right-click in the window where the photos will be saved, and select Paste.

S 1 M o b i l e U s e r G u i d e 4 . 1
Page 95
Viewing XY Coordinates in GeoTag Photo Metadata (EXIF): To view the XY coordinates (Latitude/Longitude) in the photo’s metadata (EXIF), the photos must first be copied off the device and onto a computer. Once the photos are copied to a desktop computer, the image properties can be viewed.
Assumptions:
GeoTag photos have been copied from the mobile device to a Windows desktop computer.
• In Windows Explorer, right-click on the photo of interest and tap Properties.

S 1 M o b i l e U s e r G u i d e 4 . 1
Page 96
• In the Properties window, tap the Details tab and Scroll down to the GPS section to view the XY coordinates.
Note: The coordinate system of the XY location is using Degrees, Minutes, Seconds (DMS) in WGS84.
Convert GeoTag Photos to Point Features using ArcMap GeoTag Photos contain embedded spatial coordinates; however, the photo images are not tied to a spatial dataset. After the photos have been copied from the mobile device to the computer, use the ArcMap tool GeoTagged Photos to Points to create a spatial dataset for the photos. For instructions on how to use the GeoTagged Photos to Points tool, refer to the instructions at the link below.
https://www.esri.com/news/arcwatch/0912/import-geotagged-photographs-into-arcmap.html
• Once the point feature has been created, the photo attachments may be viewed by selecting the Identity button on the Tools toolbar in ArcMap.

S 1 M o b i l e U s e r G u i d e 4 . 1
Page 97
• Select a feature in the map and the Identify window appears.
• Tap the Lightenining Bolt icon next to the location of the where the photo attachements are stored and the attachment appears in a separate window.
Note: There are additional methods to view the attachments. See this ESRI help website for more information: http://desktop.arcgis.com/en/arcmap/10.5/manage-data/editing-attributes/viewing-files-attached-to-features.htm

S 1 M o b i l e U s e r G u i d e 4 . 1
Page 98
S1Waypoints S1 Mobile Mapper allows users to capture simple point locations on the device using a layer called S1Waypoints. The app will store the spatial location of the Waypoint, along with a basic description field, if assigned by the user, when the point is created. While no substitute for an Edit Geodatabase, it is an easy way to capture a feature on the map. Waypoints use the WGS 1984 Web Mercator Auxiliary Sphere coordinate system. Visibility of the S1 Waypoints layer, like all other layers in the map view, is controlled via Manage Map Layers.
Collecting S1 Waypoint • To collect, tap Collect Features button
• Choose S1 Waypoint from list.
• Waypoint location can be captured by digitizing/drawing on screen or using the Average GPS function, in the same manner as collecting a point feature, described above.
• Select the Attribute View button to edit the attributes for the feature.

S 1 M o b i l e U s e r G u i d e 4 . 1
Page 99
• Tap Submit Edit button on Edit Toolbar to save the geometry and attributes entered.
• Waypoint location is recorded on the map as an orange dot. It can be selected, edited or deleted.
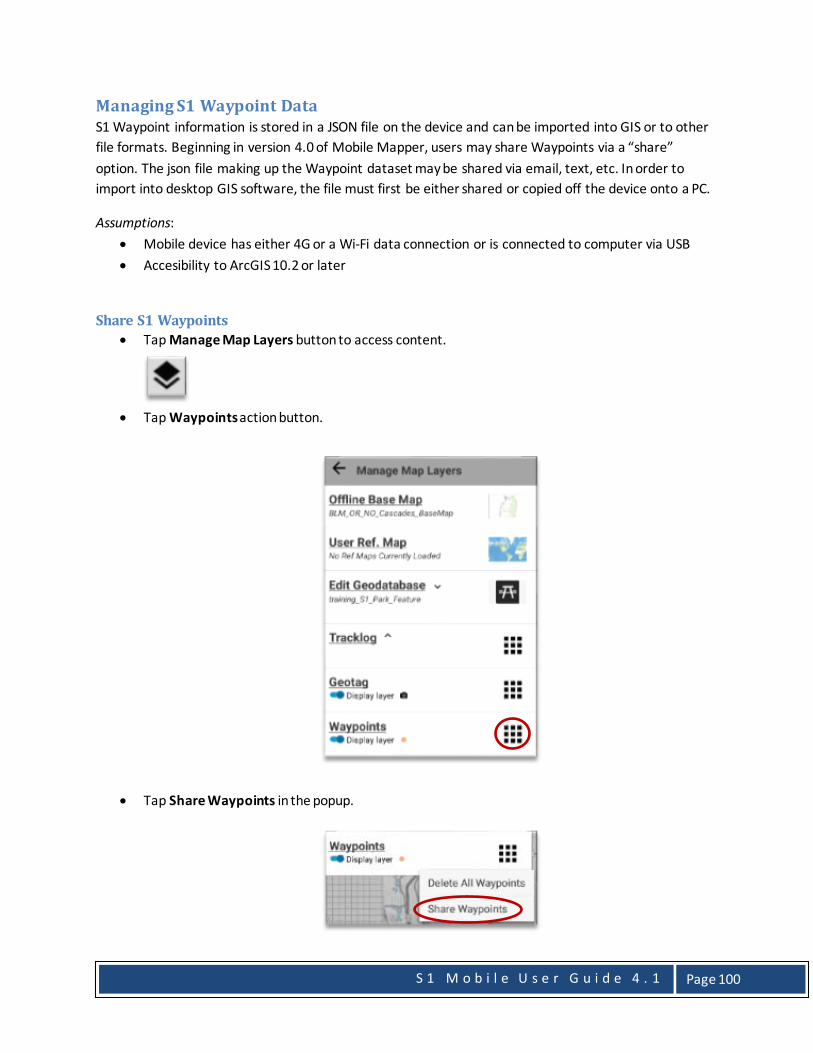
S 1 M o b i l e U s e r G u i d e 4 . 1
Page 100
Managing S1 Waypoint Data S1 Waypoint information is stored in a JSON file on the device and can be imported into GIS or to other file formats. Beginning in version 4.0 of Mobile Mapper, users may share Waypoints via a “share” option. The json file making up the Waypoint dataset may be shared via email, text, etc. In order to import into desktop GIS software, the file must first be either shared or copied off the device onto a PC.
Assumptions: • Mobile device has either 4G or a Wi-Fi data connection or is connected to computer via USB • Accesibility to ArcGIS 10.2 or later
Share S1 Waypoints • Tap Manage Map Layers button to access content.
• Tap Waypoints action button.
• Tap Share Waypoints in the popup.

S 1 M o b i l e U s e r G u i d e 4 . 1
Page 101
• Tap the app to be used to share the S1Waypoints. Note: The list of apps available to share the waypoint file will depend on the apps installed on the mobile device. If using Google Drive, it may be necessary to add “.json” to the file name prior to running the Conversion tool in ArcMap.
Copy Waypoint JSON File to Computer via USB connection • Using Windows Explorer, navigate to one of the following directories on your connected mobile
device.
Devices with SD Card: …\Card\Android\data\gov.s1.s1mobile\Edit_Data\Waypoints
Devices without SD Card: …\Device Name\Android\data\gov.s1.s1mobile\Edit_Data\Waypoints

S 1 M o b i l e U s e r G u i d e 4 . 1
Page 102
• Right-click on the file waypoints.json and choose Copy from the menu.
• Using Windows Explorer, navigate to a network location accessible to ArcGIS.
• Right click and select Paste to add the file to the current directory.
Import JSON File into GIS • Launch ArcMap 10.2 or later • Choose Geoprocessing Menu -> ArcToolbox -> Conversion Tools -> JSON -> JSON to Features
o Input JSON = the path to the file copied from the device o Output Feature Class = name of new feature class to be created (in an existing file
geodatabase)
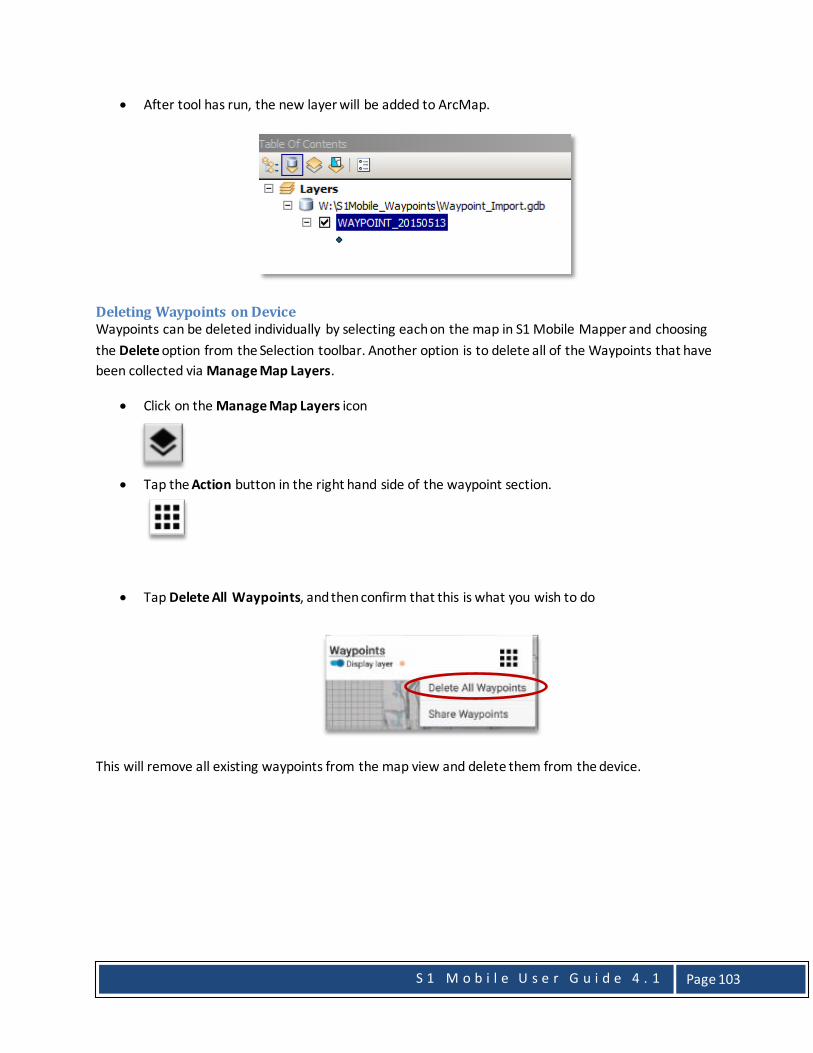
S 1 M o b i l e U s e r G u i d e 4 . 1
Page 103
• After tool has run, the new layer will be added to ArcMap.
Deleting Waypoints on Device Waypoints can be deleted individually by selecting each on the map in S1 Mobile Mapper and choosing the Delete option from the Selection toolbar. Another option is to delete all of the Waypoints that have been collected via Manage Map Layers.
• Click on the Manage Map Layers icon
• Tap the Action button in the right hand side of the waypoint section.
• Tap Delete All Waypoints, and then confirm that this is what you wish to do
This will remove all existing waypoints from the map view and delete them from the device.

S 1 M o b i l e U s e r G u i d e 4 . 1
Page 104
GPS Tracklog A Tracklog includes a series of points that are logged automatically every 5 meters traveled. Travel is logged continuously in the background for as long as the Tracklog feature is enabled. The same Tracklog can be turned on and off as needed or saved and archived to create a new sepearte Tracklog. Tracklog positions are stored as JSON files in the coordinate system WGS 1984 Web Mercator Auxiliary Sphere. Tracklogs files can be shared or exported into GIS using ArcGIS tools.
To improve map performance and reduce memory usage, GPS Tracklog positions only display on screen when the map is zoomed into at least 1:18,000 map scale. They do not draw out beyond this map scale.
Enabling GPS Tracklog • To enable, tap Collect Features button. • Choose Enable Tracklog from list.
• Tracklog positions will begin logging and will display on the map. Tracklog appears as a series of
blue dots when zoomed in closer than 1:18,000.

S 1 M o b i l e U s e r G u i d e 4 . 1
Page 105
• To suspend capture of a Tracklog, from the Create Features menu, select Disable Tracklog.
Archive & Manage GPS Tracklogs The Current Tracklog may be archived anytime, at which point the archived file is saved and given a unique name. Once a Tracklog has been archived, it can be renamed, exported from the device into GIS and/or deleted.
To archive the current GPS Tracklog, use Manage Map Layers.
• Click on the Manage Map Layers button.
• Tap the Action button in the right hand side of the Tracklog section.
• Choose Archive from the list of actions.

S 1 M o b i l e U s e r G u i d e 4 . 1
Page 106
• Give the file a descriptive name, then tap Archive button.
The Tracklog is now archived on the device. It will be listed in Manage Map Layers, where its visibility can be toggled on/off as any other Edit GDB layer loaded to the map. Both the Current Tracklog and any archived Tracklog(s) may be displayed in map view at the same time, however, only the current track can log new positions.
Rename and Delete Archived Tracklogs • Tap the Manage Map Layers button
• Tap the Action button next to the listing for Tracklog.
• Choose Manage from the list of available actions.
• Tap the Tracklog to select it, and then choose either Rename or Delete.
The Current Tracklog can be deleted, but never renamed. If the current Tracklog is deleted, existing Tracklog points are cleared from the app; a new current Tracklog will be generated when the Tracklog capability is next enabled.

S 1 M o b i l e U s e r G u i d e 4 . 1
Page 107
Exporting GPS Tracklogs Archived Tracklog information is stored in a JSON file on the device, and can be imported into GIS or to other file formats. Prior to importing to ArcGIS, the Tracklog file must be shared via the Share Tracklog option within Mobile Mapper or copied off the device to a network location known to ArcGIS.
Assumptions: • Mobile device has a 4G or Wi-Fi data connection or is connected to computer via USB. • ArcGIS 10.2 or later installed on a PC or Citrix
Share S1 Tracklog via email or upload to Google Drive Tracklogs can be shared from the app, provided the device has a network connection. The Share function for Tracklogs is the same as Waypoints. See the Share S1 Waypoints via email or upload to Google Drive section for instructions.
Copy Archived Tracklog JSON File to Computer • Connect mobile device to a desktop computer. • On the desktop computer, open File Explorer app.
• Navigate to the appropriate file location:
Mobile Device with SD Card: This PC\[Device Name]\Card\Android\data\gov.s1.s1mobile\Edit_Data\Tracklog Mobile device without SD Card: This PC\[Device Name]\Tablet\Android\data\gov.s1.s1mobile\Edit_Data\Tracklogs
• Right-click on the archived Tracklog(s) .json file and select Copy
• Navigate to a network drive location or local workspace. Right-click in the window where the Tracklog(s) will be copied, and select Paste.

S 1 M o b i l e U s e r G u i d e 4 . 1
Page 108
Import GPS Tracklog JSON File into GIS • Launch ArcMap 10.2 or later on the desktop computer or via Citrix • Choose Geoprocessing Menu -> ArcToolbox -> Conversion Tools -> JSON -> JSON to Features
o Input JSON = the path to the file copied from the device o Output Feature Class = name of new feature class to be created (in an existing file
geodatabase)
• After tool has run successfully, the new layer will be added to ArcMap.

S 1 M o b i l e U s e r G u i d e 4 . 1
Page 109
Advanced Data Collection Tools To access the advanced data collection tools you must first Create or Edit a feature. Depending on the feature type being created, you will be presented with a number of advanced data collection options.
• Once in Edit Mode, tap the Edit Options button on the lower Toolbar.
Nesting a Feature while Collecting another Feature While collecting a line or area feature, it may be desirable to “nest” another feature contained in the Edit GDB or an Always on Device layer like S1 Waypoint or S1 GeoTag Photo. Nesting will pause the data collection of the current feature to allow capture of another feature type, rather than causing the user to prematurely save the current feature, capture and save an encountered feature, and then resume editing of the original feature.
Assumptions: An Edit GDB that contains a line and/or polygon feature is downloaded to the mobile device.
• If using GPS Stream mode to capture the feature, tap the Pause GPS Stream button.
• Tap the Edit Options button.
• Choose Nest Feature.

S 1 M o b i l e U s e r G u i d e 4 . 1
Page 110
• You will be presented with the Create Features menu. Select the feature type you would like to nest.
• Capture the geometry of the nested feature using GPS or Digitize (turn off GPS to digitize) and
populate the attributes.
• Tap Submit Edit button to save the nested feature.
• A message box will appear to notify you that you are saving the Nested Feature and returning to
editing the previous feature. Tap Ok.
• Resume capturing the original line or area feature by tapping either GPS Stream or Averaged
Vertex button.
• Repeat process as necessary to capture additional “nested” features before saving the geometry and attributes of the original line or polygon feature.

S 1 M o b i l e U s e r G u i d e 4 . 1
Page 111
Offset Feature offsets can be an effective way to capture a point location that you cannot physically reach or if standing near the feature would degrade GPS signal significantly. Offset involves capturing a reference location either via GPS or via digitizing on screen, then providing the application with a slope distance, direction (azimuth), and inclination from that reference point to the target location. The measurement values can be obtained using the mobile device’s internal sensors (when available) or by manual entry by the user. The app will calculate the spatial location of the target feature using the values calculated or provided and will place a point on the map accordingly. Currently, only point features can only utilize the offset option.
Assumptions:
• An Edit GDB that contains a point feature is downloaded to the mobile device.
• Tap the Collect Feature button and select a point feature.
• Capture the reference point location of the offset point via GPS Average (GPS on) or by Digitizing (GPS off).
• On Edit Toolbar, tap the Edit Options button
• Choose Offset option. On phones, the offset interface will fill the entire screen, while on tablets it will appear as a pane to the left of the map.

S 1 M o b i l e U s e r G u i d e 4 . 1
Page 112
Obtaining Offset Measurements via Hardware Sensors If the device has the necessary hardware sensors, the azimuth and slope inclination from the current location to the offset target will display in the upper left corner of the offset interface. The user will align the viewfinder with the target and lock in the sensor values, calibrating hardware sensors if needed.
• Pinch the screen to zoom or use the +/- buttons in the offset viewfinder to place the offset target in the crosshair.
• Align the offset viewfinder so that the offset target is directly in the center the Camera Crosshair. The offset measurements will update in real time in the upper left corner of the interface from the hardware sensors as the device is moved and a new feature is placed in focus.
• If sensors are providing unreliable measurements, they can be calibrated from the Offset
Viewfinder by Shaking the Device for several seconds to bring up the Calibrate Sensor tool.

S 1 M o b i l e U s e r G u i d e 4 . 1
Page 113
• To calibrate, follow the directions as indicated on screen to wave device around until all sensors are fully calibrated & reflecting maximum accuracy.
• Once calibrated, press the device’s back button to return to the Offset viewfinder.
• When target is aligned in the Crosshair, press the Lock Offset Sensor button, being careful to maintain the target in the crosshair.
• Once the Lock Offset Sensor button is pressed, the offset values will no longer update from hardware sensor reading unless the Lock Offset Sensor button is tapped again to unlock it.
• To commit the offset measurements, tap Apply Offset button, this will close offset interface and return to map view.
Manually Entering Offset Values or Overriding Sensor Values If the device does not have the necessary sensors to calculate azimuth or slope inclination, no offset values will be automatically populated on screen; the user will have to manually enter all offset values. No Lock Offset Sensor button will appear on interface. Locked in sensor values can also be overridden with user supplied values via Manage Offset interface.

S 1 M o b i l e U s e r G u i d e 4 . 1
Page 114
Slope distance values from the current location to the offset target are also to be entered manually via Manage Offset.
• Set slope distance and slope distance units from your current location to the offset target by tapping on Manage Offset button in upper right of the offset interface and entering values.
T h e The application will convert from slope distance to horizontal map distance using the supplied inclination value, and will display this value onscreen. This is the value ultimately used to determine offset location.
• If sensor values for azimuth and inclination were not populated by the hardware sensors, or you wish to override them, enter them now
• If any sensor values are manually overridden, the application will continue to use those manual settings on all future offsets until the override is cleared. To clear manual overrides and return to using sensor measurements, tap Unlock button next to each value.
• To close Manage Offset and return to offset viewfinder interface, tap OK button.
• To commit the offset measurements, tap Apply Offset button, this will close offset interface and return to map view.
• Location of point feature will be adjusted on map to reflect the offset measurements from the previous captured location.

S 1 M o b i l e U s e r G u i d e 4 . 1
Page 115
Data Collection Settings Selecting the Edit Options menu opens the S1 Options form, where users can change some S1 settings related to data capture including the number of positions averaged and Vertex Interval settings.
• While capturing a new feature, tap the Edit Options button on the lower Toolbar.
• Select Options from the menu
• There is the option to adjust the Number of Average Positions, Streaming Interval Distance, and Streaming Type. To learn more about S1 Application Options, see the section on Application Options.
Copy Geometry Selecting Copy Geometry allows the user to copy the geometry and attributes of a selected feature into a new, separate record into the same layer or into a different layer found in the same Edit GDB.
• Tap to select the feature to be copied.
• The Select Mode Toolbar will appear. Tap the Copy Geometry button.
• The Create Feature menu will open. Select the layer the record is to be copied. • Select the Attribute View button to review and/or edit the attributes for the new feature.
• Wherever the attributes fields match between the copied feature and the new target layer, the existing attribute values will also be copied to the new feature.
• Tap the Submit Edit button.

S 1 M o b i l e U s e r G u i d e 4 . 1
Page 116
Auto-Populate Feature-Level Metadata Fields
The S1 Mobile Mapper application can auto-populate several categories of common feature-level metadata field attributes when data is collected via GPS, including: Estimated Accuracy ft/m, Coordinate Source, XY Coordinates, GIS Miles, GIS Acres, Date, and Number of Satellites. The app supports several default attribute field values in each category. Alternatively, users can add their own attribute fields to each category or further manage the feature-level metadata categories via S1 Options.
If one or more of the auto-populate attribute fields exist in a layer’s schema, each time a new feature is collected or an existing feature is updated, the value in the field will be automatically populated by the application. See the table below to review all of the categories that auto-populate, the default field names, and a brief description of the category.
Note to OR/WA BLM users: There is an ArcMap tool available in the ORTOOLS toolbox that makes it easy to add S1 Auto-populate fields to a dataset. Run the tool prior to publishing the service.
Category Field Name (Default) Requirements: (Data Type) Description Estimated Accuracy (ft)* Accuracy_FT, Acc_FT,
Accuracy_Feet (Double) Field calculates estimated GPS accuracy (in feet) to the 95% confidence interval to meet the National Standard for Spatial Data Accuracy (NSSDA) requirements.
Estimated Accuracy (M)* Accuracy_M, Acc_M, Accuracy_Meters
(Double) Field calculates estimated GPS accuracy (in feet) to the 95% confidence interval to meet the National Standard for Spatial Data Accuracy (NSSDA) requirements.
Coordinate Source* COORD_SRC, COORDINATE_SOURCE, COORD_SOURCE
(Text, field length 7) Field captures the quality of the GPS coordinate source used: MAP, UNK, GPS, DPGS, RTK
Point X POINT_X, X, LONG, LONGITUDE, ESRIGNSS_LONGITUDE
(Double) Field captures the longitude value of a point feature.
Point Y POINT_Y, Y, LAT, LATITUDE, ESRIGNSS_LATITUDE
(Double) Field captures the Latitude value of a point feature.
GIS Miles GIS_Miles, Miles (Double) Field is calculated when linear features are created or updated, calculation is made using Contiguous USA Albers Equal Area Projection.
GIS Acres GIS_Acres, Acres (Double) Field is calculated when area features are created or updated, calculation is made using Contiguous USA Alber Equal Area Projection.
Date Date_ (Date) Field displays a pre-defined date. ESRIGNSS NUMSATS ESRIGNSS_NUMSATS (Short, Range 0-99) Number of satellites
connected when feature is created.
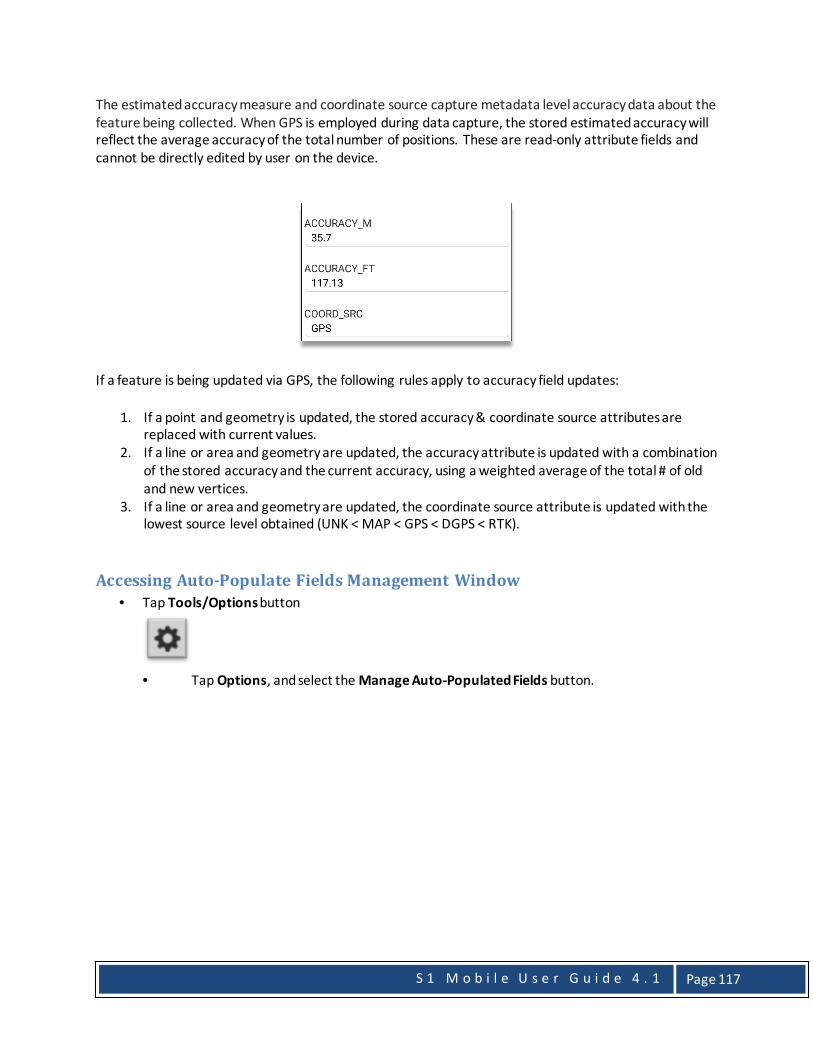
S 1 M o b i l e U s e r G u i d e 4 . 1
Page 117
The estimated accuracy measure and coordinate source capture metadata level accuracy data about the feature being collected. When GPS is employed during data capture, the stored estimated accuracy will reflect the average accuracy of the total number of positions. These are read-only attribute fields and cannot be directly edited by user on the device.
If a feature is being updated via GPS, the following rules apply to accuracy field updates:
1. If a point and geometry is updated, the stored accuracy & coordinate source attributes are replaced with current values.
2. If a line or area and geometry are updated, the accuracy attribute is updated with a combination of the stored accuracy and the current accuracy, using a weighted average of the total # of old and new vertices.
3. If a line or area and geometry are updated, the coordinate source attribute is updated with the lowest source level obtained (UNK < MAP < GPS < DGPS < RTK).
Accessing Auto-Populate Fields Management Window • Tap Tools/Options button
• Tap Options, and select the Manage Auto-Populated Fields button.
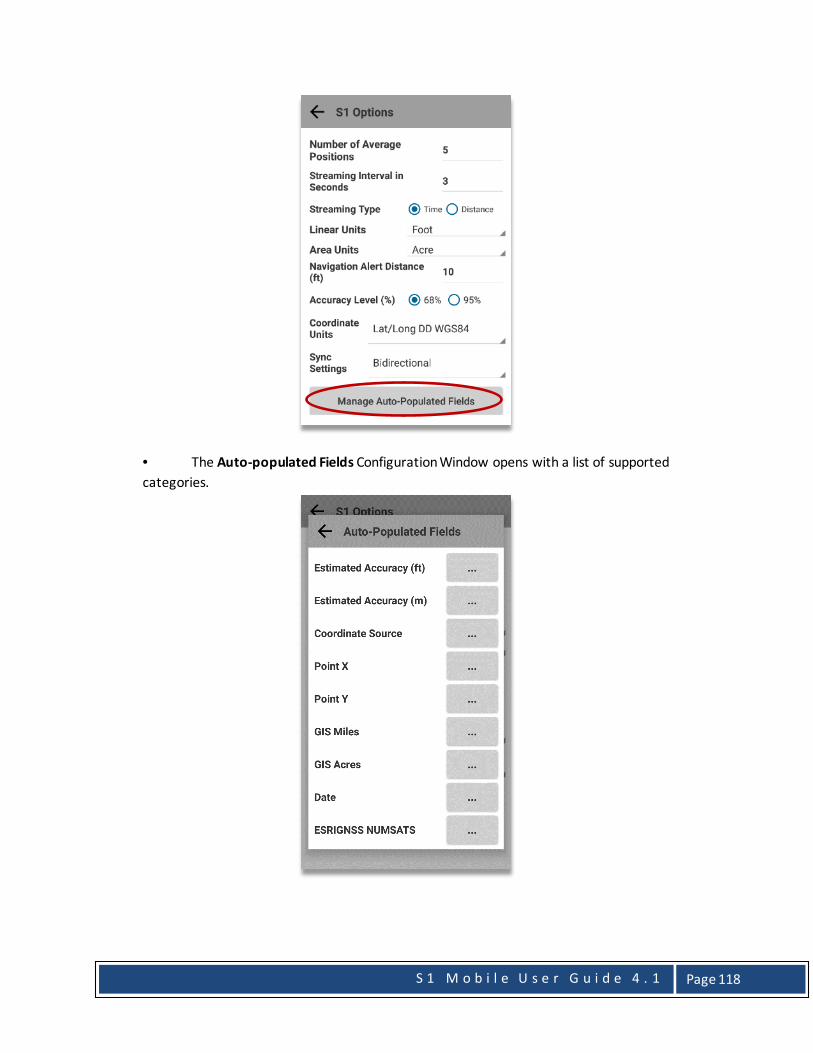
S 1 M o b i l e U s e r G u i d e 4 . 1
Page 118
• The Auto-populated Fields Configuration Window opens with a list of supported categories.

S 1 M o b i l e U s e r G u i d e 4 . 1
Page 119
Managing Auto-Populate Field Categories • To configure a category, tap the ellipse next to that category
• A window opens with a list of auto-populate fields. All of the fields listed are selected to auto-populate by default.
• To turn off one of the default auto-populate field values, simply uncheck the box to the left of
the field name and select Update.
• To completely disable this category from auto-populating, uncheck all values in this category.
Add New Auto-Populate Field • To add a new attribute field name to a category, tap New, type the field name into the window,
and select Add.

S 1 M o b i l e U s e r G u i d e 4 . 1
Page 120
• The new field name will be added to the existing list. Click the Update bottom to confirm changes.
• Select the Back Arrow at the top of the Auto-Populate Fields windows and S1 Options window
to return to the map view.
Any attribute field name can be added to a category as long as the underlying data type and parameters matches those outlined in the description field in the table above. If the new field does not match, the field will not auto-populate when creating or updating a feature. For example if you attempting to ass Estimated Accuracy category (field type Double) to a field that used a field type of Date, the field will not auto-populate as there is a field type mismatch.
Navigation Capabilities When the GPS has a position fix, users can set a navigation target at a designated location in the map view or a selected feature. While in navigation mode, the application provides updated distance, direction and bearing information to the user (depending on device capabilities), and alerts user when arriving near target destination.
Navigate to a Map Location • Long tap on the map to set a Navigation Target (GPS will automatically activate if it is not
already enabled). • A Blue Icon is placed at the location of the Navigation Target.
• The Navigation Pane displays at the top of the map view. This pane provides distance and bearing values to the navigation target and a compass rosette with arrow pointing to navigation target (if device hardware supports compass).
o Bearing value to target is displayed in degrees.
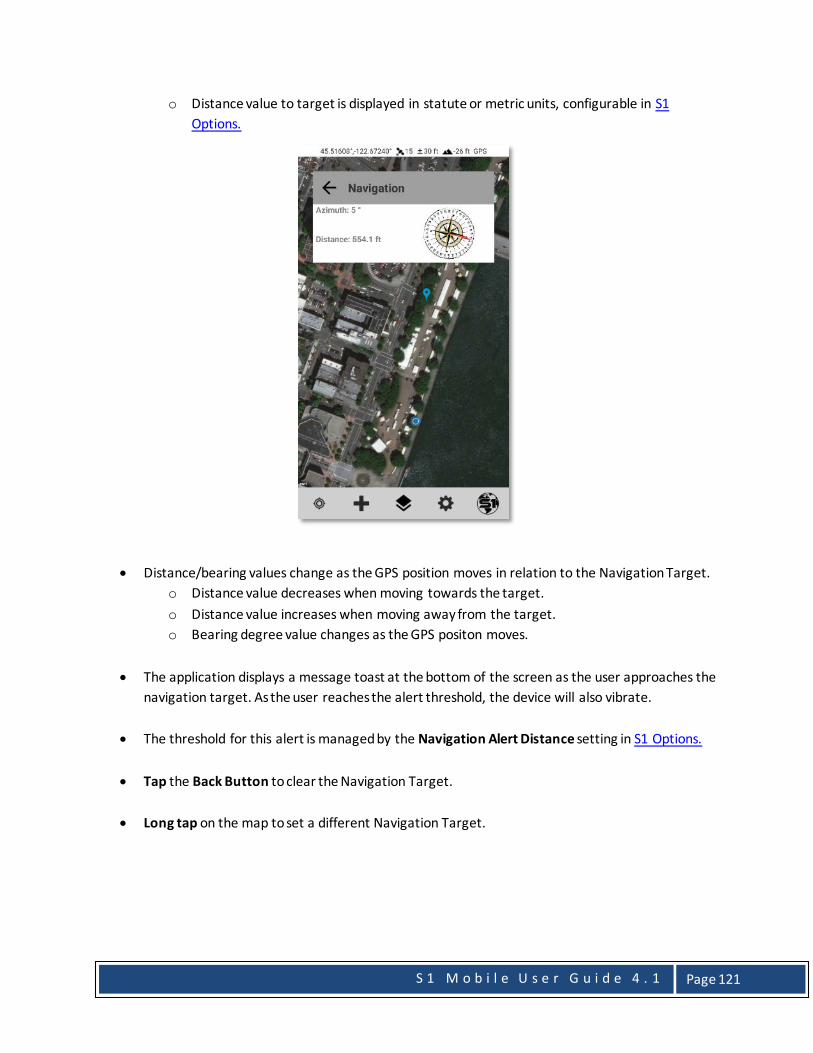
S 1 M o b i l e U s e r G u i d e 4 . 1
Page 121
o Distance value to target is displayed in statute or metric units, configurable in S1 Options.
• Distance/bearing values change as the GPS position moves in relation to the Navigation Target. o Distance value decreases when moving towards the target. o Distance value increases when moving away from the target. o Bearing degree value changes as the GPS positon moves.
• The application displays a message toast at the bottom of the screen as the user approaches the navigation target. As the user reaches the alert threshold, the device will also vibrate.
• The threshold for this alert is managed by the Navigation Alert Distance setting in S1 Options.
• Tap the Back Button to clear the Navigation Target.
• Long tap on the map to set a different Navigation Target.

S 1 M o b i l e U s e r G u i d e 4 . 1
Page 122
• To view a full screen compass while navigating, tap the Navigation Pane. A full screen window with the compass will appear. The red arrow points toward the direction of the navigation target relative to the orientation of the device.
• Tap the Back Button to return to the map view.
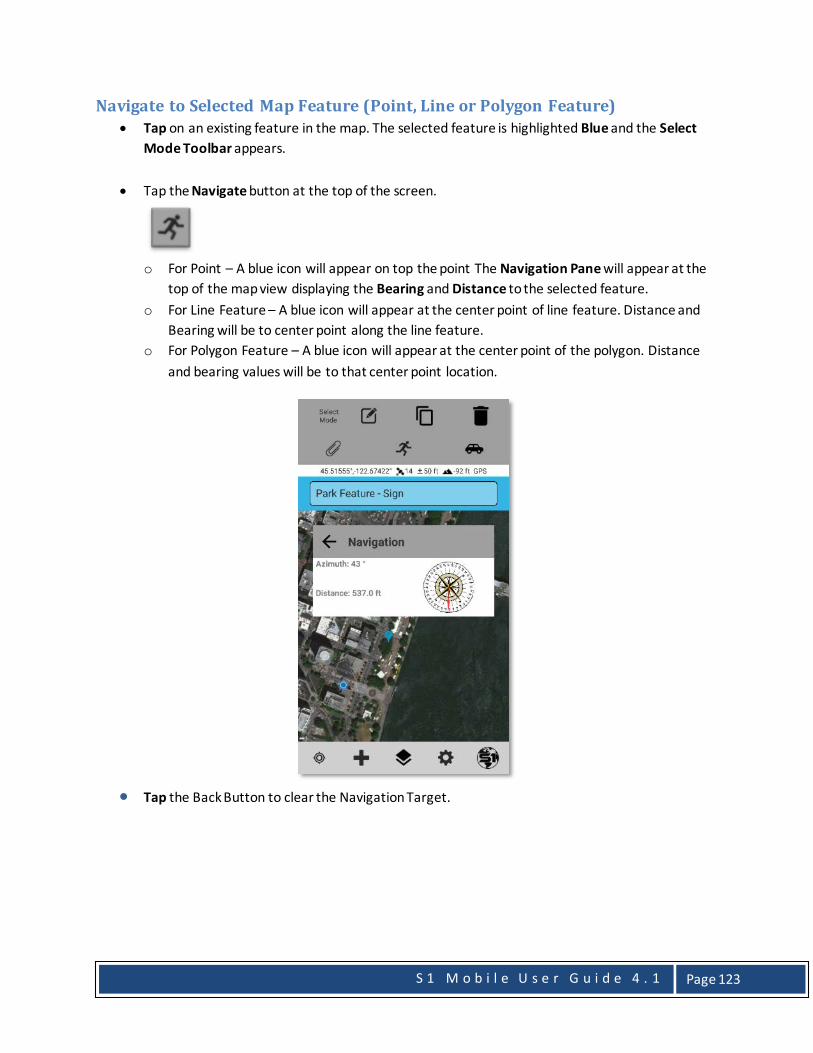
S 1 M o b i l e U s e r G u i d e 4 . 1
Page 123
Navigate to Selected Map Feature (Point, Line or Polygon Feature) • Tap on an existing feature in the map. The selected feature is highlighted Blue and the Select
Mode Toolbar appears.
• Tap the Navigate button at the top of the screen.
o For Point – A blue icon will appear on top the point The Navigation Pane will appear at the
top of the map view displaying the Bearing and Distance to the selected feature. o For Line Feature – A blue icon will appear at the center point of line feature. Distance and
Bearing will be to center point along the line feature. o For Polygon Feature – A blue icon will appear at the center point of the polygon. Distance
and bearing values will be to that center point location.
• Tap the Back Button to clear the Navigation Target.

S 1 M o b i l e U s e r G u i d e 4 . 1
Page 124
Get Directions Users can get directions to a selected feature or an X, Y location via the enter coordinates tool using the Get Directions function. Users can launch the application and select a Map Routing application, like Google Maps, to get directions to the desired location. Users will need to initiate this function while they have a Wireless or 4G connection. See the Enter Coordinates section on getting directions via the enter coordinates tool.
Get Directions to a selected location • Tap on an existing feature in the map. • The selected feature is highlighted Blue and the Select Mode Toolbar appears.
• Tap the Get Directions button at the top of the screen.
Google Maps will open and load the selected location displaying the locations X, Y coordinates a map location pin in the map view.

S 1 M o b i l e U s e r G u i d e 4 . 1
Page 125
• Select Directions at the bottom of the screen to get a street route from your current location or a specific location to the selected feature.
Note: If going to areas where there is no data connection, the google map can be cached to the mobile device to allow turn-by-turn navigation when offline. User must first cache the map area they need by following the instructions here: https://support.google.com/maps/answer/6291838?co=GENIE.Platform%3DAndroid&hl=en

S 1 M o b i l e U s e r G u i d e 4 . 1
Page 126
Tools General application tools can be accessed via the S1 Tools/Options button
Measure Tool The measure tool provides the capability to measure Distance or Area by sketching in the Map View or by selecting an existing line or area feature.
Measure Distance or Area in Map View • To measure a distance or area in the Map View tap on Tools/Options button on the Application
Toolbar.
• Select Tools from the list.
• Select Measure to open tool.
• Tap on screen where measurement will begin (similar to digitizing a line or polygon). • Continue to tap on screen until satisfied with measurement. The length or distance
measurement is reported at top of screen on the Measure Toolbar. • Tap on Undo Vertex button to remove last vertex in the sketch measurement.

S 1 M o b i l e U s e r G u i d e 4 . 1
Page 127
• In the upper menu, tap on Distance Mode to expose the option to change the tool from Distance to Area.
Distance Mode: Area Mode:
Display units can be changed based on user preference in the S1 Options menu under Tools/Options
• For the Linear units options: o Distance is displayed in either kilometers, meters, feet or miles.
• For the Area units include: o Area is displayed in acres, square feet, square meters or hectares
• Tap on Cancel button to exit Measure Tool.

S 1 M o b i l e U s e r G u i d e 4 . 1
Page 128
Determine Length or Area of Selected Feature If a line or polygon feature is currently selected on screen, its length and area can be reported directly in the feature info window.
• Tap to select a feature • In the blue select features bar, tap the feature name to open the feature info window. The
distance or area of the feature are reported.
The measure tool can be also used to report length or area of an existing feature.
• Tap to select a feature • Tap on Tools/Options button on the Application Toolbar.
• Select Tools from the list.

S 1 M o b i l e U s e r G u i d e 4 . 1
Page 129
• Select Measure to open tool.
The selected feature’s length or area will be reported at the top of the screen on the Measure toolbar.
Display units can be changed to the user’s preference in the S1 Options menu under Tools/Options on the Application Toolbar.
• For the Linear units options: o Distance is displayed in either kilometers, meters, feet or miles.
• For the Area units include: o Area is displayed in acres, square feet, square meters or hectares
• Tap on Cancel button to exit Measure Tool.

S 1 M o b i l e U s e r G u i d e 4 . 1
Page 130
Query Attributes Tool The S1 Mobile Mapper application allows users to find and return a subset of geodatabase features that meet a defined set of attribute filters. Once a query is applied, the users can toggle between the selected features, view a feature’s detailed attribute information and zoom to its location in the map view.
• To start an attribute query, tap Tools/Options button.
• Tap Tools and select Query.
• The Query features pane will open on the screen.
A query can be created with no attribute filter, a single attribute filter or several attribute filters.
• Set the desired query target Geodatabase from the list of GDB currently loaded in the map view, if there is only one GDB in map view it will be pre-chosen by default.

S 1 M o b i l e U s e r G u i d e 4 . 1
Page 131
• Set the query target Layer using the available drop down list.
Creating a Query - No Filter A No Filter Query is an easy way to return a list of all records in the current edit GDB layer.
• To execute a No Filter Query, tap the Apply Query button with no specified filter.
• All records from the chosen layer will be listed in the query window.

S 1 M o b i l e U s e r G u i d e 4 . 1
Page 132
Creating a Simple Query – Single Attribute Field Filter A Single Attribute Query is constructed using the following format:
<Attribute Field Name> + <Query Operator> + <Pick List Value, Attribute Field or Unique Value>
Example: Feature Type = Bench
• Tap the drop down on the left side of the screen to select the query layer’s Attribute Field name.

S 1 M o b i l e U s e r G u i d e 4 . 1
Page 133
• Tap the next drop down to select from a list of Query Operators.
• Finally, tap the last box to select from a picklist of values if the field has a defined coded value
domain/pick list or to manually enter a Value.
• Tap the Apply Query button to initiate the query. A message will appear at the bottom of the screen telling you how many records were selected.
Features for which the filter = true are selected and listed individually at the bottom of the pane in a scrollable list. Each feature is described by its ObjectID –Layer Display Field-Queried Attribute Value.
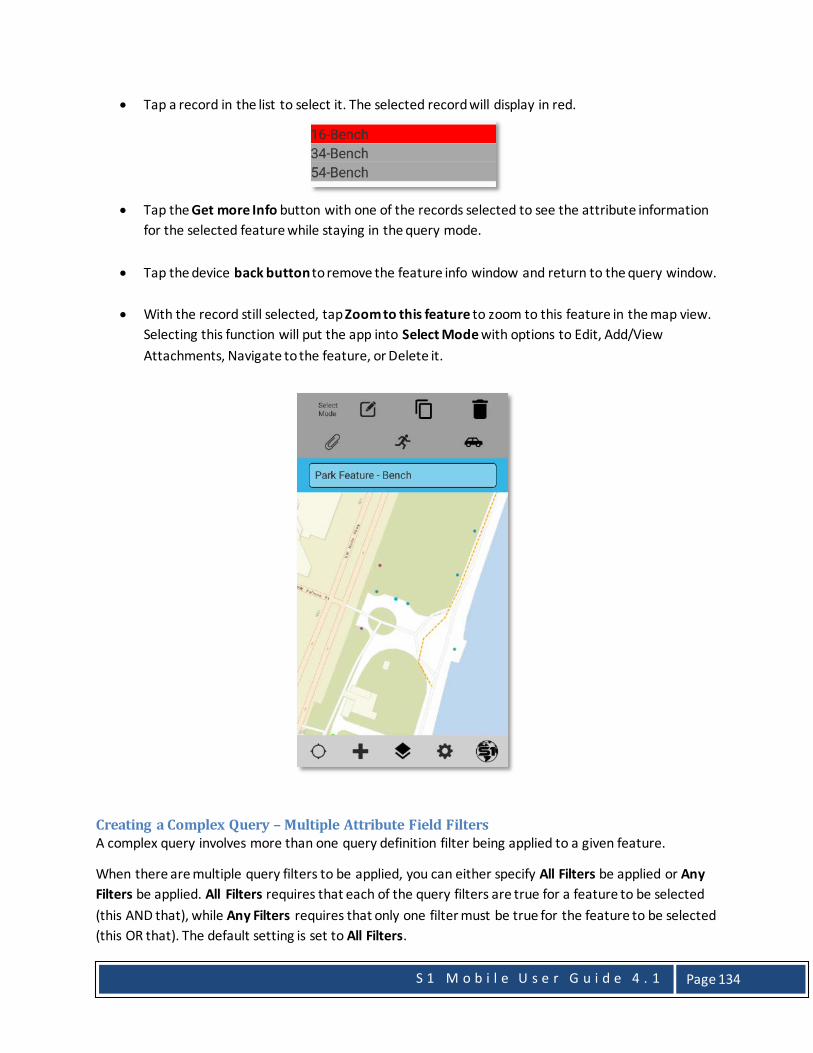
S 1 M o b i l e U s e r G u i d e 4 . 1
Page 134
• Tap a record in the list to select it. The selected record will display in red.
• Tap the Get more Info button with one of the records selected to see the attribute information
for the selected feature while staying in the query mode.
• Tap the device back button to remove the feature info window and return to the query window.
• With the record still selected, tap Zoom to this feature to zoom to this feature in the map view. Selecting this function will put the app into Select Mode with options to Edit, Add/View Attachments, Navigate to the feature, or Delete it.
Creating a Complex Query – Multiple Attribute Field Filters A complex query involves more than one query definition filter being applied to a given feature.
When there are multiple query filters to be applied, you can either specify All Filters be applied or Any Filters be applied. All Filters requires that each of the query filters are true for a feature to be selected (this AND that), while Any Filters requires that only one filter must be true for the feature to be selected (this OR that). The default setting is set to All Filters.

S 1 M o b i l e U s e r G u i d e 4 . 1
Page 135
• To add additional query filters, tap the Add Query Filter button
• Choose a second attribute field name, operator and field or Value to select the desired features and click Apply Query. A new message appears at the bottom of the screen with the total number of selected records.
Features for which the filter is true are selected and individually listed at the bottom of the pane in a scrollable list, each described by its ObjectID –Layer Display Field-Queried Attribute Value. When selecting a feature from the list, it will turn red.
• Tap the Clear all button to remove the setting of the existing query filter. Select the Cancel or
the device’s back button to close the query pane and return to the full map view.
Query Tips Multiple Values from Same Attribute Field Complex queries can be built using Any Filters to return a list of values from any one attribute field, for example:
Filter 1: CONDITION = GOOD

S 1 M o b i l e U s e r G u i d e 4 . 1
Page 136
Filter 2: CONDITION = POOR
A similar query can be executed using Not Equals operator, which will return all values from the layer except the Value supplied, for example:
Filter 1: CONDITION != Excellent
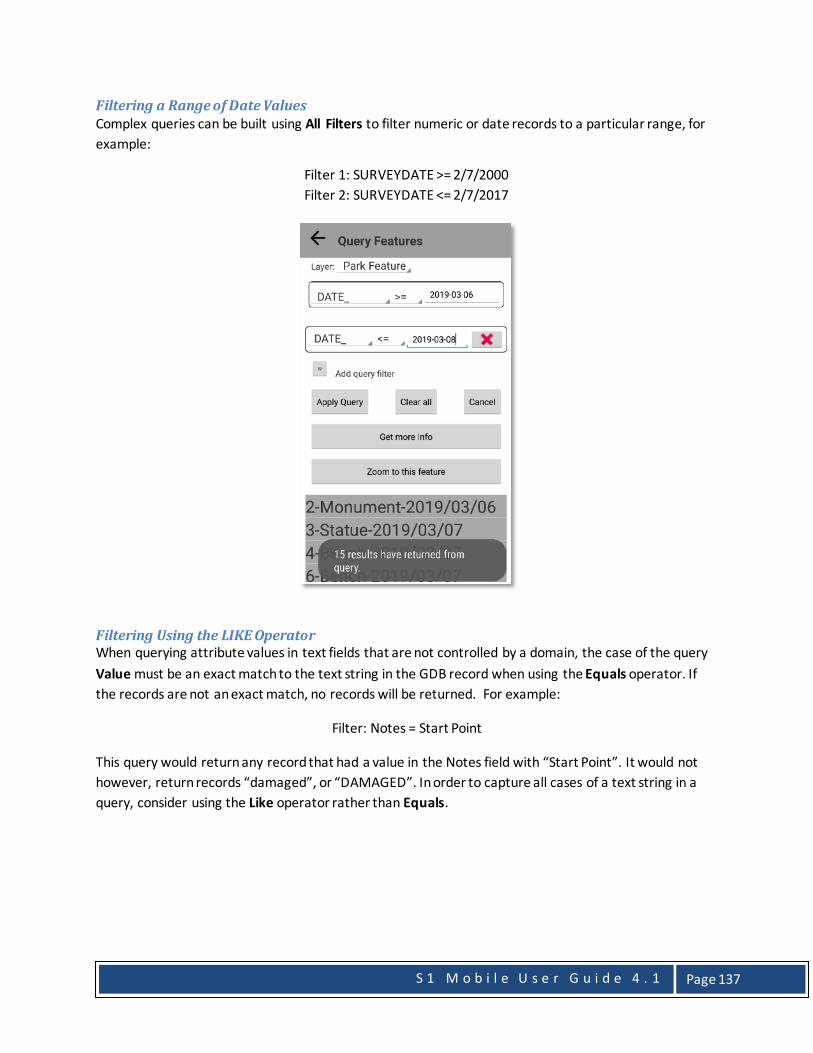
S 1 M o b i l e U s e r G u i d e 4 . 1
Page 137
Filtering a Range of Date Values Complex queries can be built using All Filters to filter numeric or date records to a particular range, for example:
Filter 1: SURVEYDATE >= 2/7/2000 Filter 2: SURVEYDATE <= 2/7/2017
Filtering Using the LIKE Operator When querying attribute values in text fields that are not controlled by a domain, the case of the query Value must be an exact match to the text string in the GDB record when using the Equals operator. If the records are not an exact match, no records will be returned. For example:
Filter: Notes = Start Point
This query would return any record that had a value in the Notes field with “Start Point”. It would not however, return records “damaged”, or “DAMAGED”. In order to capture all cases of a text string in a query, consider using the Like operator rather than Equals.
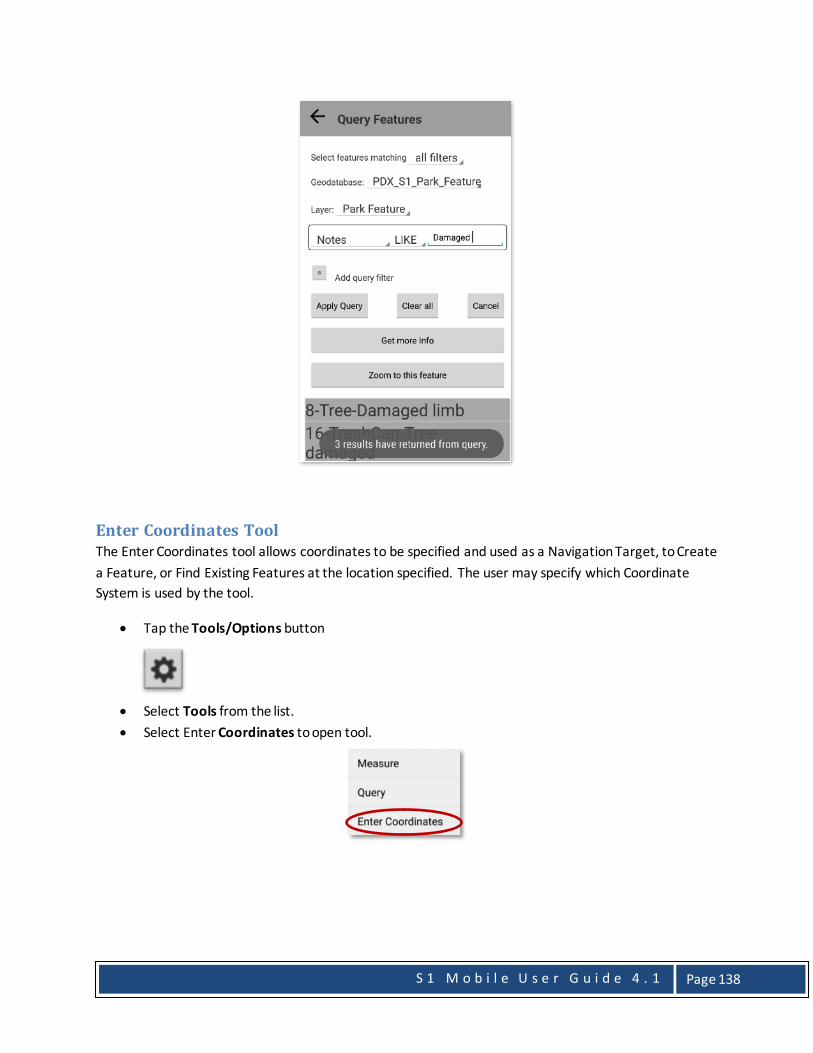
S 1 M o b i l e U s e r G u i d e 4 . 1
Page 138
Enter Coordinates Tool The Enter Coordinates tool allows coordinates to be specified and used as a Navigation Target, to Create a Feature, or Find Existing Features at the location specified. The user may specify which Coordinate System is used by the tool.
• Tap the Tools/Options button
• Select Tools from the list. • Select Enter Coordinates to open tool.

S 1 M o b i l e U s e r G u i d e 4 . 1
Page 139
• If necessary, modify the Coordinate System via the drop down list.
• Enter the X and Y coordinates in the appropriate text box
• Once the location has been specified, there are four options for using the coordinates, Navigate, Get Directions, Create feature, and Find nearby features.

S 1 M o b i l e U s e r G u i d e 4 . 1
Page 140
Navigate to Entered Coordinates • Tap the Navigation icon once coordinates are entered. • A navigation target at the desired location is set and the compass rose, bearing and distance
information is displayed. See the Navigation section above for more information on feature navigation.
• Tap the back button to remove the target and exit navigation mode.

S 1 M o b i l e U s e r G u i d e 4 . 1
Page 141
Get Directions to Entered Coordinates • Tap the Get Directions icon once coordinates are entered.
• The Google Maps app will open and drop a pin at the location specified.
• Select Directions at the bottom of the screen to get a street route to the map pin from your current location or another specified location.
• Tap the back button on the device to return to the S1 Mobile Mapper application. • To exit the Enter Coordinates tool, tap the device back button.
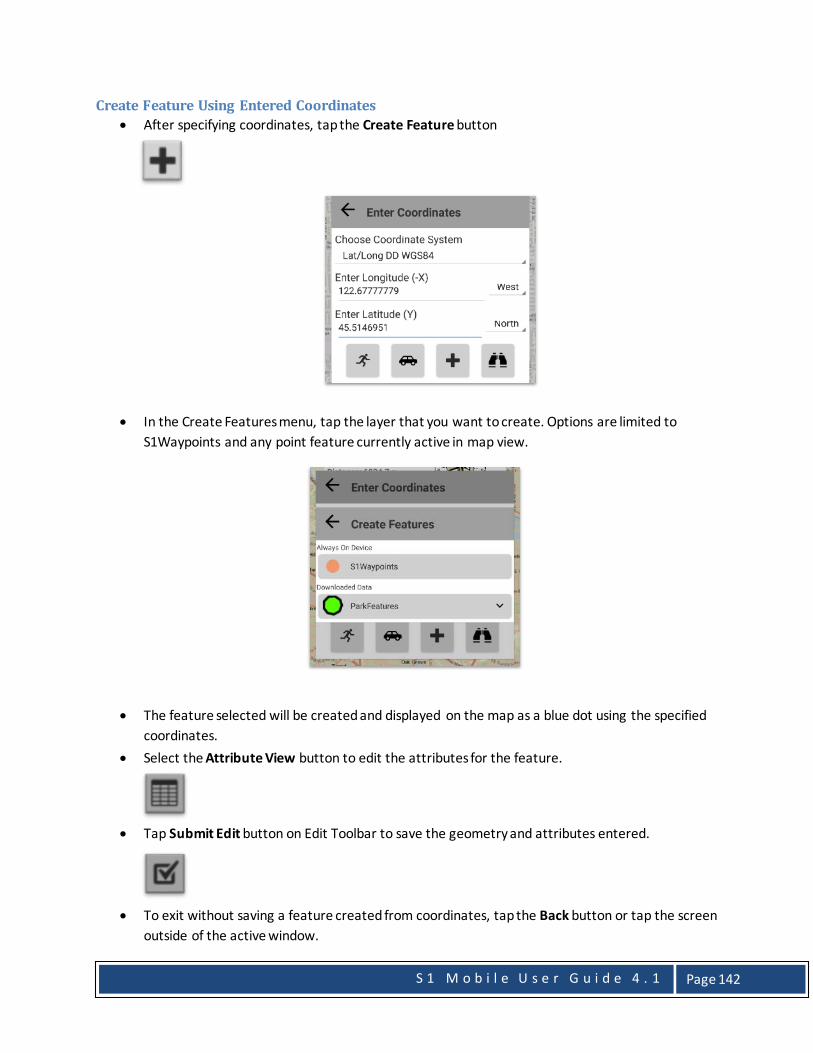
S 1 M o b i l e U s e r G u i d e 4 . 1
Page 142
Create Feature Using Entered Coordinates • After specifying coordinates, tap the Create Feature button
• In the Create Features menu, tap the layer that you want to create. Options are limited to
S1Waypoints and any point feature currently active in map view.
• The feature selected will be created and displayed on the map as a blue dot using the specified coordinates.
• Select the Attribute View button to edit the attributes for the feature.
• Tap Submit Edit button on Edit Toolbar to save the geometry and attributes entered.
• To exit without saving a feature created from coordinates, tap the Back button or tap the screen outside of the active window.
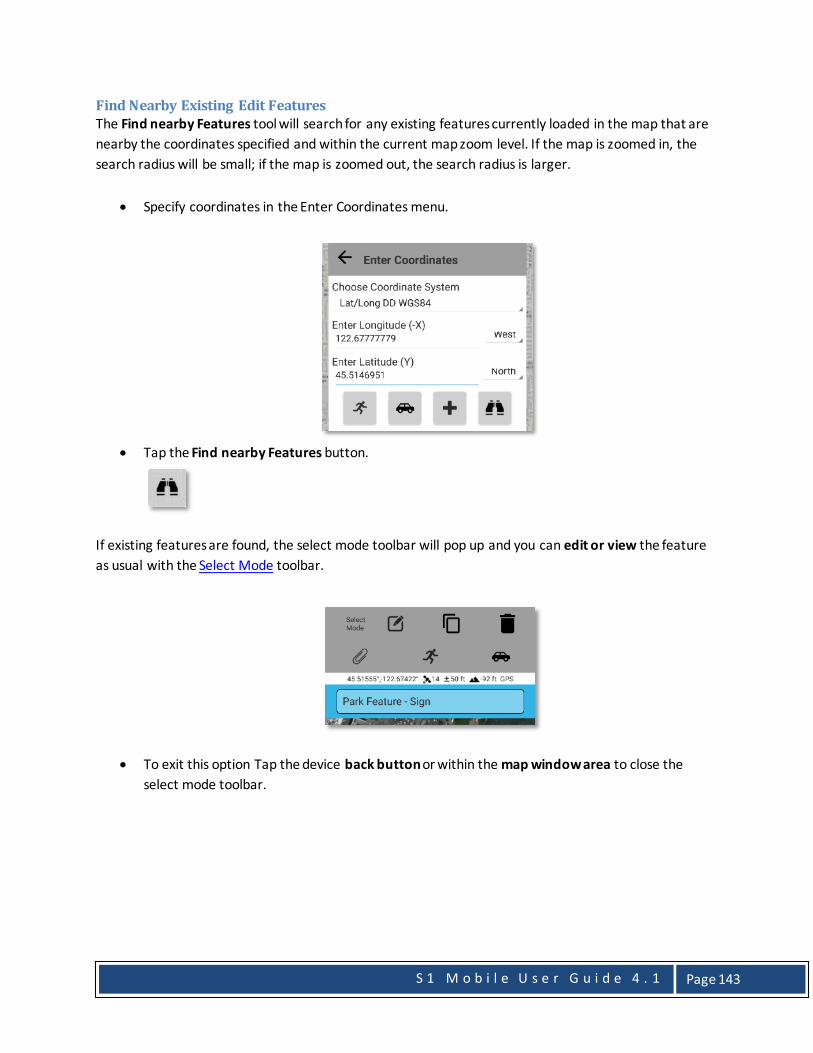
S 1 M o b i l e U s e r G u i d e 4 . 1
Page 143
Find Nearby Existing Edit Features The Find nearby Features tool will search for any existing features currently loaded in the map that are nearby the coordinates specified and within the current map zoom level. If the map is zoomed in, the search radius will be small; if the map is zoomed out, the search radius is larger.
• Specify coordinates in the Enter Coordinates menu.
• Tap the Find nearby Features button.
If existing features are found, the select mode toolbar will pop up and you can edit or view the feature as usual with the Select Mode toolbar.
• To exit this option Tap the device back button or within the map window area to close the
select mode toolbar.

S 1 M o b i l e U s e r G u i d e 4 . 1
Page 144
Application Themes The Themes settings allows users to select from two agency specific themes (BLM or Forest Service) and the Classic View. The agency themes will apply a custom agency theme, applying different colors throughout the application. The classic view maintains the standard grey scale color theme.
• Tap on Tools/Options button on the Application Toolbar.
• Select Theme from the list.
• In the popup that appears, select the desired theme from the options.
BLM Theme FS Theme Classic Theme

S 1 M o b i l e U s e r G u i d e 4 . 1
Page 145
• Applying a new theme requires the app to restart, once the user selects the theme above, you will be prompted with a toast asking permission to restart app. Tap OK.
S1 Application Options The S1 Options menu allows user to configure common settings across the application.
• Tap on Tools/Options button on the Application Toolbar.
• Select Options from the list.
Number of Average Positions: Sets the default number of GPS positions that are collected to create an averaged point feature or averaged vertex of a line or area feature when using the Average GPS button.

S 1 M o b i l e U s e r G u i d e 4 . 1
Page 146
Streaming Interval: The interval at which the application captures GPS vertices while in streaming mode. The value can be set to either the number of seconds or distance traveled depending on the Streaming Type specified.
Streaming Type: Specifies the value of the streaming interval as either Time or Distance.
Display Units: Sets the display units of linear and area measurements throughout the app.
• For Linear units: o Distance may be displayed in either kilometers, meters, feet or miles.
• For Area units: o Area may be displayed in acres, square feet, square meters or hectares.
Navigation Alert Distance: Threshold distance for alerting user that they are approaching a destination target. Units for the alert are set by Display Units options above.
Accuracy Level: Value displayed for the estimated accuracy on the GPS Position Toolbar. Can display either 68% (default) or 95% confidence interval. While most GPS receivers and data collection software display estimated accuracy statements only to a 50-68% confidence interval, the National Standard for Spatial Data Accuracy (NSSDA) requirements state reporting of estimated accuracy to a 95% confidence interval. This setting only affects the display value and not the actual estimated accuracy.
Coordinate Units: The coordinate system displayed by the application not the coordinate system to be used to collect data. Impacts the format of XY values displayed on the GPS Toolbar as well as the XY information displayed in a selected feature information menu.
Sync Settings: After selecting Sync in the Options/Tools menu, data will sync and data from other users contained in feature service or web map will be downloaded to the device if Bidirectional is selected. When set to Upload Only, data from other users will not be downloaded when the feature service or web map is synced.
Manage Auto-Populated Fields: The S1 application can auto-populate a variety of categories of feature-level metadata attributes whenever features with the app are created or edited. These categories and attribute fields are managed via this option. For more information on managing feature-level metadata fields, see section on Managing Auto-Populate Field Categories.

S 1 M o b i l e U s e r G u i d e 4 . 1
Page 147
Creating & Sharing User Reference Maps User Reference Maps are displayed on top of the base map, providing additional detail for a smaller geographic area. The User Reference Map may be either a multi-scale ESRI tile package (.tpk) or a single geo-referenced GeoTIFF image file. User Reference Maps can be shared to AGOL and downloaded to mobile devices connected to WiFi or cellular network or connected to a PC and side-loaded to the mobile device.
Assumptions: • Access to ArcGIS 10.2 or later
Creating a Tile Package in ArcMap Tile packages (.tpk) are a bundle of pre-rendered image tiles, generated for a specific area at several different scales that are wrapped into a single file. Unlike a paper map or a single digital image file, which presents a map at a single scale, a tile package can present a map at multiple scales to the user, providing appropriate layer representations for a variety of map scales.
Below is an example of a tile package presenting tiles at different scales, images were borrowed from ArcGIS Resource Center.
Once they have been created, the tile package can be used to quickly render lightweight image files to applications. They can take consider time and resources to create however, so it is important to fine-tune the map document (.mxd) prior to publishing the TPK.
For additional information tile packages, see this ESRI help article here: http://desktop.arcgis.com/en/arcmap/10.5/map/working-with-arcmap/tips-for-creating-tile-packages.htm

S 1 M o b i l e U s e r G u i d e 4 . 1
Page 148
Preparing the Map Document • It is recommended that you start using a New Map Document, rather than an existing one. • Add all the needed layers to the map. • Set the minimum and maximum Scales Range for each layer and label visibility for each dataset
under Layer Properties. • ArcGIS Runtime Tools must be enabled before creating a TPK. Click Customize -> ArcMap
Options… -> Sharing tab and the check box to Enable ArcGIS Runtime Tools, then click OK.

S 1 M o b i l e U s e r G u i d e 4 . 1
Page 149
Set Data Frame Coordinate System & Datum Transformation • Select View -> Data Frame Properties -> Coordinate System tab • In the search bar type: WGS 1984 Web Mercator and hit Enter or the search icon • Select WGS 1984 Web Mercator (auxiliary sphere) • Click Transformations… button.

S 1 M o b i l e U s e r G u i d e 4 . 1
Page 150
• Set applicable transformation. In screenshot below, data is in GCS NAD 83 and using the NAD 1983 To WGS 1984_5 transformation.
• Click OK to close the transformations window and OK to save changes and close Data Frame Properties menu.
Set Full Extent Command and Clip to Shape • Zoom and pan map to the maximum extent desired in the output tile package. The larger the
extent, the larger the output file. If a large extent is needed, consider making multiple TPKs to reduce the file size.
• Select View -> Data Frame Properties… -> Data Frame Tab • In the Extent Used By Full Extent Command, click Specify Extent button.

S 1 M o b i l e U s e r G u i d e 4 . 1
Page 151
• Select Choose Current Visible Extent and click OK.
• Under Clip Options, choose Clip to Shape and click Specify Shape.
• Choose Current Visible Extent to clip to the current view, and then click OK.
Alternatively, if you wanted to clip to a specific area (ex: District or Forest boundary), rather than Current Visible Extent, specify Outline of Features. Then choose the Layer and specify which features in the layer (All or Visible).

S 1 M o b i l e U s e r G u i d e 4 . 1
Page 152
Set Map Document Properties • Select File -> Map Document Properties • Fill in the Summary, Description, Author, Credits, and Tags sections. • Click Make Thumbnail and then OK
• Save the map document.

S 1 M o b i l e U s e r G u i d e 4 . 1
Page 153
Create Tile Package • Select File -> Share As -> Tile Package…
• Under Tile Package, specify the location on the network to save the tile package file.
• Select the Tile Format tab.
• Set the Tiling Scheme to ArcGIS Online/Bing Maps/ Google Maps • Set the Tiling Format to PNG8 • Set Level of Detail by moving the slider bar. The greater level of detail, the larger the tile
package size and the longer it will take to generate the package. It is recommended that a package be no more than 100MB in size if uploading and sharing via AGOL. Larger files impact download times.

S 1 M o b i l e U s e r G u i d e 4 . 1
Page 154
• Select the Item Description tab.
• Populate any fields missing Required information in the form • Click Analyze. • A table will appear displaying any Errors or Warnings about your map document.
• Fix all Errors before proceeding.
• Click Share to create the tile package. Depending on the level of detail you chose, this tool will run for several minute to several hours to complete.
Creating Geo-referenced Image File Unlike tile packages, which present a map at multiple scales, a geo-referenced image is a single image at a single map scale. These are very quick and easy to generate, however, they may not be appropriate for viewing on the mobile device at all map scales (blurry upon zooming in). The supported geo-referenced image file format is the GeoTIFF file format.
Preparing the Map Document A Map Document’s Data Frame properties must:
• Set the Coordinate System to WGS 1984 Web Mercator (auxiliary sphere) • Apply a datum Transformation if map contains data using another Coordinate Source (ex.
NAD83 data). • Set the Frame Background color set to No Color
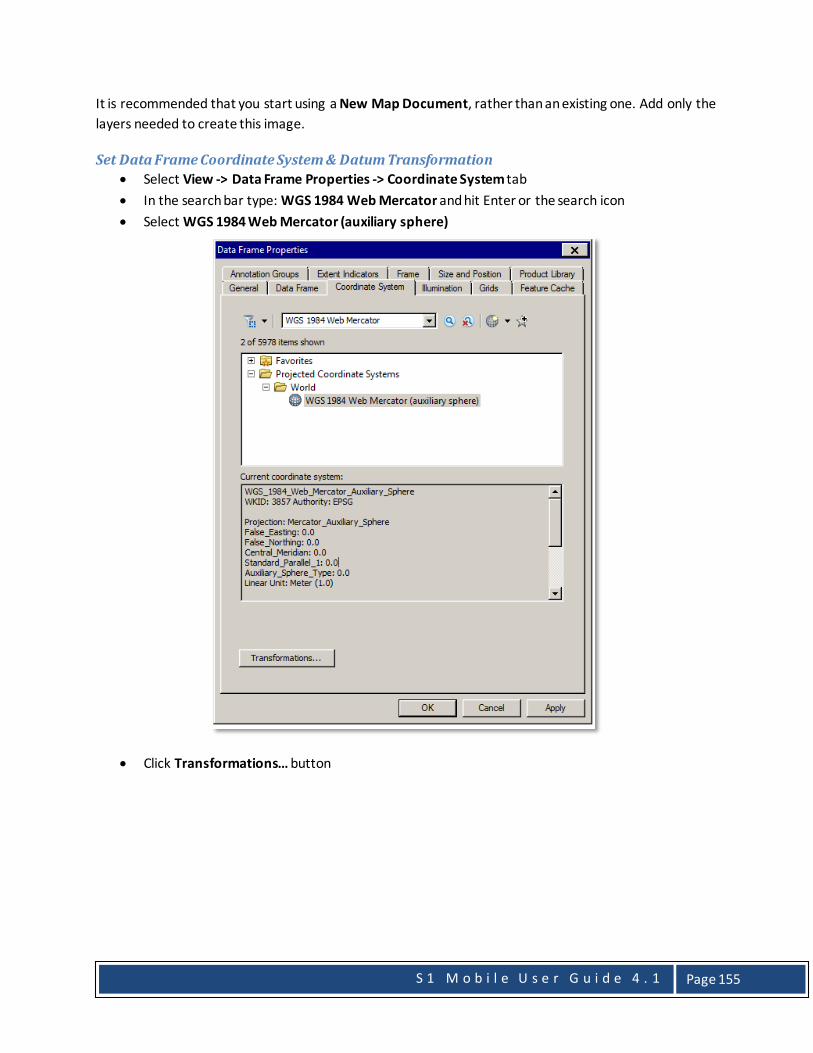
S 1 M o b i l e U s e r G u i d e 4 . 1
Page 155
It is recommended that you start using a New Map Document, rather than an existing one. Add only the layers needed to create this image.
Set Data Frame Coordinate System & Datum Transformation • Select View -> Data Frame Properties -> Coordinate System tab • In the search bar type: WGS 1984 Web Mercator and hit Enter or the search icon • Select WGS 1984 Web Mercator (auxiliary sphere)
• Click Transformations… button

S 1 M o b i l e U s e r G u i d e 4 . 1
Page 156
• Set applicable transformation. In screenshot below, data is in GCS NAD 83 and using the NAD 1983 To WGS 1984_5 transformation.
• Click OK to close the transformations window and OK to save changes and close Data Frame Properties menu.
Set Export Extent & Export Image • Zoom or pan map to the desired extent to be included in export. Do not have a map scale
greater than 1:500,000 when exporting geo-referenced maps. In fact, it is recommended to have a map scale of 1:100,000 or better (1:50,000, 1:24,000, 1:10,000) to achieve a readable image file.
• Select File -> Export Map… • Give the output file a name • Set the Save as Type to TIFF • On the General tab, set the Resolution = 150 dpi

S 1 M o b i l e U s e r G u i d e 4 . 1
Page 157
• On the Format tab, set the Color Mode to 24-bit True Color, Compression to None, Background Color to No Color, and check the box next to Write GeoTIFF Tags.
• Click Save to export the current map view to a geo-referenced map.
Upload & Share Reference Maps to AG4O • Log into your ArcGIS for Organization account, by going to:
https://www.arcgis.com/home/signin.html
• Click My Content at top of web page.
• Click Add Item -> from my computer
• Click Choose File and browse to the location of the geo-referenced image or tile package you wish to upload.
• Enter at least one Tag to identify your layer.
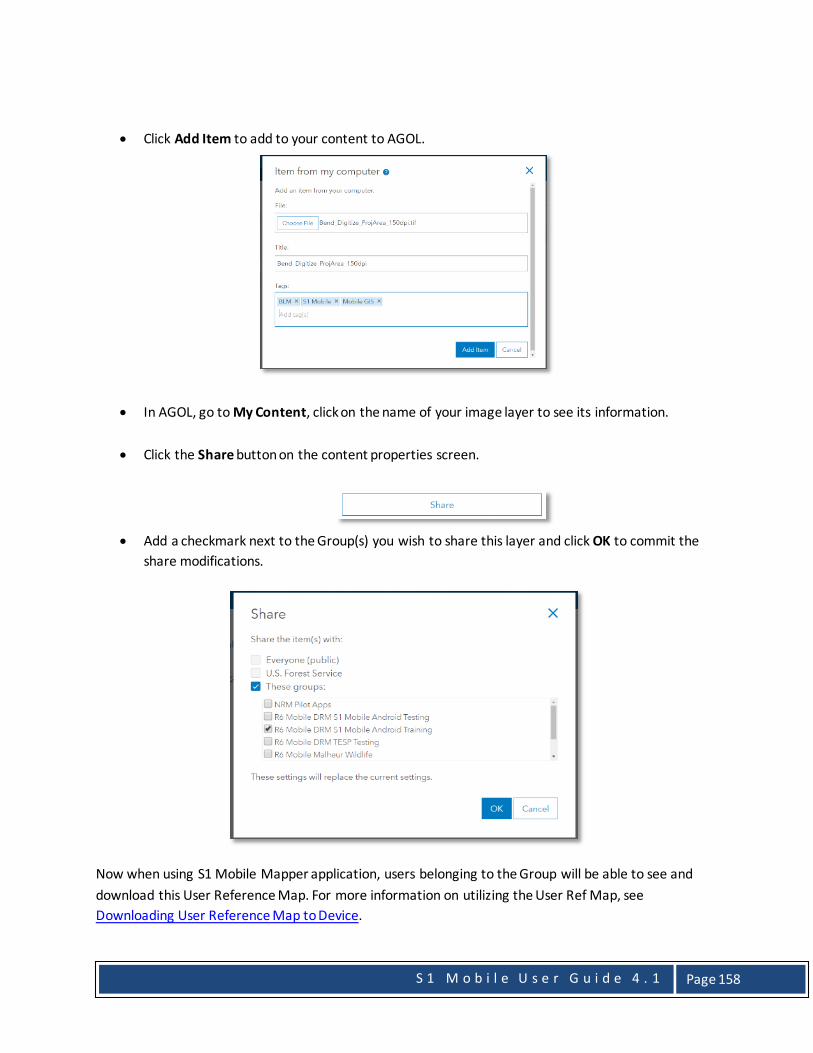
S 1 M o b i l e U s e r G u i d e 4 . 1
Page 158
• Click Add Item to add to your content to AGOL.
• In AGOL, go to My Content, click on the name of your image layer to see its information.
• Click the Share button on the content properties screen.
• Add a checkmark next to the Group(s) you wish to share this layer and click OK to commit the
share modifications.
Now when using S1 Mobile Mapper application, users belonging to the Group will be able to see and download this User Reference Map. For more information on utilizing the User Ref Map, see Downloading User Reference Map to Device.
S 1 M o b i l e U s e r G u i d e 4 . 1
Page 159
Creating & Sharing Hosted Feature Layers Hosted feature layers can be published via ArcMap or ArcPro and hosted on AGOL. Hosted feature layers are best suited for short-term project data. In ArcGIS desktop environment, these datasets would typically be local geodatabases or shapefiles.
Only users with an AGOL account role that allows content to be published and shared may publish hosted layers.
For general guidance on how to publish a hosted feature layer, see the following ESRI help documentation: http://doc.arcgis.com/en/arcgis-online/manage-data/publish-features.htm#ESRI_SECTION1_94021BE7D875474681DAD20D05A90AF6
To ensure the feature layer is set-up correctly, several ArcMap settings must be configured before publishing.
ArcMap Set-Up • Create file geodatabase and feature classes
o Set coded value domains o Set default values for fields o Set required values for fields o Use Global ID as primary key if working with related tables
• Add feature classes from file geodatabase to blank MXD
o Name and save map o Related Tables must be added to MXD when publishing
• Right-click on Layer > Properties to set the Data Frame Coordinate System of MXD

S 1 M o b i l e U s e r G u i d e 4 . 1
Page 160
• Activate Coordinate Systems tab in the Data Frame Properties.
• Set data frame Coordinate System to WGS 1984 Web Mercator (auxiliary sphere).

S 1 M o b i l e U s e r G u i d e 4 . 1
Page 161
• If data is not in WGS 1984, tap Transformations… to access menu for datum transformations.
• Choose NAD_1983_To_WGS_1984_5 and tap OK.

S 1 M o b i l e U s e r G u i d e 4 . 1
Page 162
• Next right-click on Layer > Properties to set the Max Extent of the data frame (this will be the max area where data can be collected with the service).
• Activate Data Frame tab in the Data Frame Properties.

S 1 M o b i l e U s e r G u i d e 4 . 1
Page 163
• Choose Other and tap Specify Extent…
• Set extent to Current Visible Extent (make sure this area encompasses the whole area where data collection may be needed) and tap OK

S 1 M o b i l e U s e r G u i d e 4 . 1
Page 164
• Next, apply additional recommended ArcMap settings: o Remove all layers from map that are not a part of the editable feature service o Keep symbology simple for points, lines and polygons o Make sure a feature template has been created prior to publishing o Set point to a symbology to a size of 16-20 o Set line/polygon symbology to an outline width of 2-4 o Set Maximum and Minimum Scale Ranges o Turn off non-essential fields not needed for data collection o Save MXD
ArcMap and the feature classes in the MXD are now properly configured and are ready to be published to AGOL. The user needs to log into their AGOL Organizational account so the data can be published as a hosted feature service.
Sign into AGOL Organizational Account to Publish a Hosted Feature Service • Start ArcMap and open the map you want to publish, unless the map is already open after going
through the last steps.
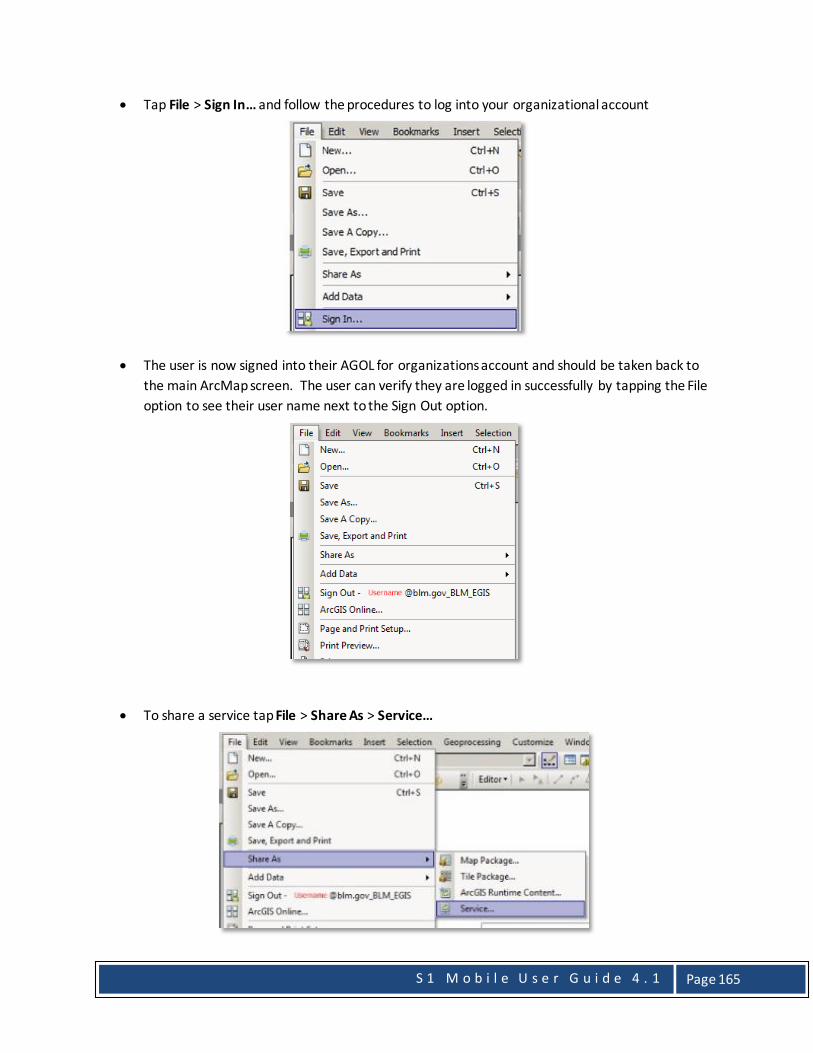
S 1 M o b i l e U s e r G u i d e 4 . 1
Page 165
• Tap File > Sign In… and follow the procedures to log into your organizational account
• The user is now signed into their AGOL for organizations account and should be taken back to the main ArcMap screen. The user can verify they are logged in successfully by tapping the File option to see their user name next to the Sign Out option.
• To share a service tap File > Share As > Service…

S 1 M o b i l e U s e r G u i d e 4 . 1
Page 166
• Choose Publish a service and tap Next
• In the drop-down list under Choose a connection, pick My Hosted Services o This list will be unique for individual users depending on their AGOL organizational
account and settings in ArcMap desktop
• Enter a Service Name and tap Continue o The default service name is the same as the MXD name o Remember to use agency naming conventions and guidelines

S 1 M o b i l e U s e r G u i d e 4 . 1
Page 167
• Do not change any default settings for Parameters
• Activate Capabilities o Turn ON Feature Access by checking box o Turn OFF Tiled Mapping by unchecking box
• Activate Feature Access o At a minimum, Sync must be checked for the service to be downloaded to the mobile
device. Create, Delete, Query and Update are optional operations that can all be checked or not depending on how the mobile user is to interact with the service.

S 1 M o b i l e U s e r G u i d e 4 . 1
Page 168
• Fill out all required fields for Item Description
• Activate Sharing o Set what groups you want to Share your service with (must be a member to be able to
share with a group):
• Tap Analyze to see if there are any problems with service setup
• Any Errors must be fixed in the Prepare window before the service can be published o It is optional to fix Warnings and Messages, but recommended (mobile performance of
the service may be decreased by some warnings)

S 1 M o b i l e U s e r G u i d e 4 . 1
Page 169
• The user can double click the rows with errors to go to the part of the setup that needs to be fixed.
• Tap Analyze again after fixing errors to recheck for any additional errors, warnings, and messages.
• The user can also preview what the service would look like in a browser window by tapping the Preview button. This may be useful prior to publishing to find any glaring visibility or symbology issues.
• Tap Publish when ready to publish the service.
• A message appears when the service has been published successfully.
Share Feature Layer with a AGOL Group In AG4O, select the My Content tab and click on the name of your feature service to see its information. If it is a secured feature service, you will be prompted to enter your AD username and password.
• Click the Share button on the content properties screen
• Place a checkmark next to the groups you wish to share this layer with and then click OK to commit the share modifications.
Now when using S1 Mobile Mapper application, users in the shared group will be able to see and download an edit geodatabase for this feature service. For more info on this process, see Download Edit GDB.

S 1 M o b i l e U s e r G u i d e 4 . 1
Page 170
Interacting with Hosted Feature Service Content in ArcMap Once records are synchronized back to the feature service, the service can be viewed in AGOL via a web browser, or the data can be viewed or edited in ArcMap.
Adding Hosted Feature Service to ArcMap
• If not already signed into AGOL in ArcMap, select File -> Sign In…
• Enter your AG4O credentials and click Sign In
• Select File -> ArcGIS Online… • Select My Groups • Click on Group name where service you would like to add to ArcMap is shared • Find the Service or Web Map, click Add to add the Service or Open to add a Web Map to
ArcMap
Once the data is added to a map document, it can be used like any other layer in the map with one exception: it cannot be directly edited, yet. To edit the records of a hosted feature service, follow the instructions in the next section.

S 1 M o b i l e U s e r G u i d e 4 . 1
Page 171
Create a Local GDB Copy for Editing Assumptions:
• The service(s) to be downloaded is editable. Local copies of non-editable services cannot be created following these steps and instead must be downloaded directly from AGOL.
Note: Some on-premise services cannot utilize these instructions to be edited locally in ArcMap.
• Ensure the Table of Contents is using List by Drawing Order
• Ensure you include all data to be edited in the current map view. Data that falls outside the
current map view will not be visible when you create a local copy.
• Right click on the Feature Service Name in ArcMap Table of Contents and select Edit Features -> Create Local Copy for Editing.
• A local file GDB edit replica is created in your Roaming Profile on the C: drive (or another specified location) and added to map.
• The ArcMap editing tools can be utilized to edit the service. Make edit as normal by starting an Editing Session and saving any edits.
After Editing is complete, you will want to synchronize the Edits back with the service.
• Ensure the Table of Contents is using List by Drawing Order

S 1 M o b i l e U s e r G u i d e 4 . 1
Page 172
• Right click on the Feature Service Name in ArcMap Table of Contents and select Edit Features -> -> Synchronize Local Edits with Server. The map layers switch back to the AGOL feature service after synchronization.
S 1 M o b i l e U s e r G u i d e 4 . 1
Page 173
External Bluetooth GPS Receiver Support The S1 Mobile Mapper application can feed GPS measurements from supported external GPS receivers via Bluetooth to provide high accuracy location information to the application’s map view. This may be desirable if the estimated accuracy of the device’s internal GPS does not meet data accuracy requirements or if the Android device does not possess its own internal GPS receiver.
Generally, to use external receivers with Android devices, the following steps must be performed:
1. Turn on Bluetooth on Android device and on external receiver. 2. Pair external receiver with device via Bluetooth. 3. Enable Mock Location setting in Android Developer options. 4. Activate external GPS within application.
Application supported external GPS receivers include:
• Trimble R1 Bluetooth receiver • Trimble R2 Bluetooth receiver • Trimble Geo 7x handheld receiver • Garmin GLO Bluetooth receiver • Juniper Systems Geode Bluetooth receiver • Eos Arrow 100 Bluetooth receiver
Other models may also function with the application but steps to pair may be different than what is described below.
Configure Location Settings In order to ensure that you are only receiving measurements from the device’s GPS receiver and not from Android network location services, set the Android Location setting to GPS Only. The Improve accuracy setting also needs to be disabled to prevent the device from attempting to improve accuracy by using Wi-Fi and Bluetooth scanning.
Use the appropriate method below depending on the operating system of the device.
Android Operating Systems • If you do not know where the location settings are at on your device, go to Android Settings ->
then use the search option at the top to search “Location”
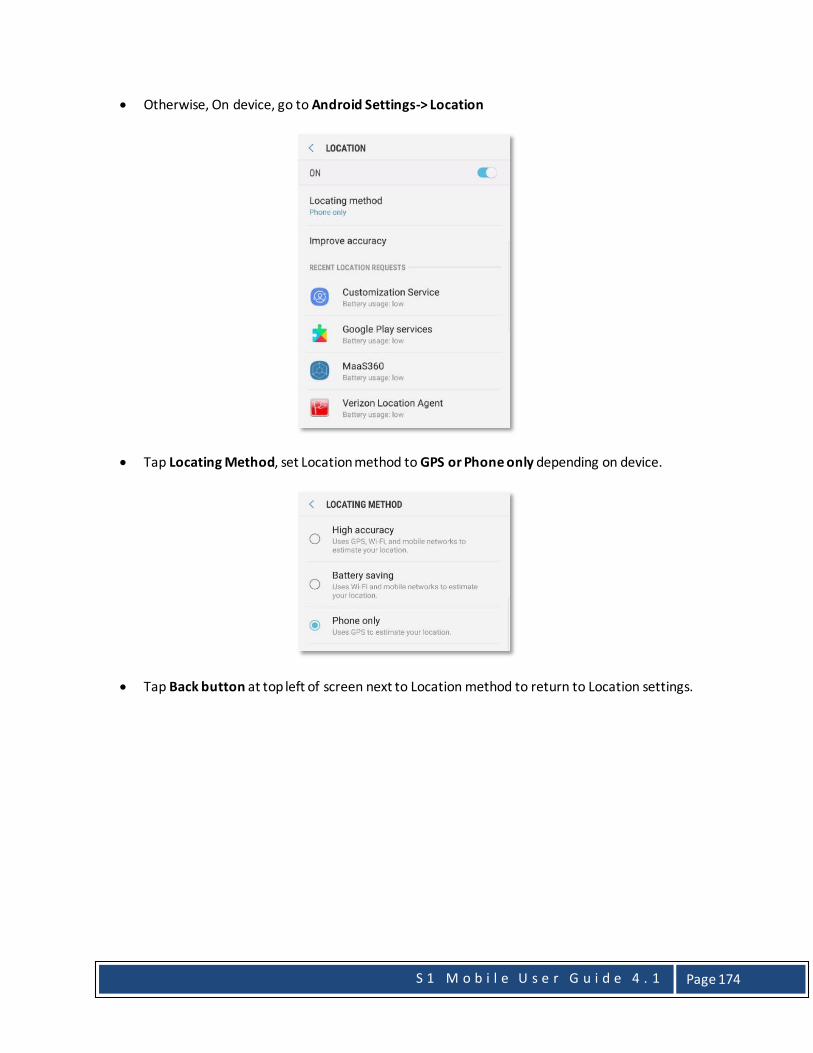
S 1 M o b i l e U s e r G u i d e 4 . 1
Page 174
• Otherwise, On device, go to Android Settings-> Location
• Tap Locating Method, set Location method to GPS or Phone only depending on device.
• Tap Back button at top left of screen next to Location method to return to Location settings.

S 1 M o b i l e U s e r G u i d e 4 . 1
Page 175
• Tap Improve accuracy
• Verify both Wi-Fi scanning and Bluetooth scanning are toggled OFF

S 1 M o b i l e U s e r G u i d e 4 . 1
Page 176
Configure Date and Time Settings The S1 Mobile Mapper checks the location time stamp against the Android system time to determine if the position being provided is an old or new location. The time stamp and system time must be in sync for the Bluetooth GPS to work correctly. Check the box next to Automatic date and time as well as Automatic time zone to enable this functionality. These settings enforce the device’s date, time, and time zone to be provided automatically by the network.
You must be connected to a Wi-Fi or 4G network before proceeding to ensure the device time is automatically set based on the Wi-Fi or 4G network.
• On device, go to Android Settings -> General Management -> Date and Time • On devices running older android OS’s, go to Android Settings-> Date and Time
Enable Developer Options and Mock Locations To use the Bluetooth GPS capability, a few settings must be configured so the device can communicate with the Bluetooth GPS receiver. The first step is to Enable Developer Options on the device. Enabling this option allows the device to use Mock Locations. Mock Locations is necessary in order for the Bluetooth GPS receiver location to be used instead of the device’s internal GPS location.
Note to BLM users: If you are unable to enable Mock Locations due to a Maas360 policy restriction, you must submit an IT Help Desk ticket to submit for a waiver, which will allow this setting to be enabled.
Select a Mobile Device Support ticket type. What do you need help with? - Select Plans (Maas360 Setup) Do you need to change the device setup plan (Maas360)? - Yes Plan Change - Enable Mock Locations (for Android devices Only)
Enable Developer Options Android operating systems vary slightly in how you get to this option. However, in most cases going to the settings and searching for “Build number” will get you to the right location.
• On the device, go to Android Settings-> Type “Build Number” into the search option at the top by the magnifying glass.

S 1 M o b i l e U s e r G u i d e 4 . 1
Page 177
• The search should find the location of where the build number is located on this device.
• Tap the resulting build number item under software information.

S 1 M o b i l e U s e r G u i d e 4 . 1
Page 178
• Tap on Build number repeatedly until a prompt appears indicating Developer options has been enabled. (It should be about 6-7 times)
• Tap Back button at top left of screen next to Software Information to return to Settings.
• Scroll all the way to the bottom and Tap Developer options
• By default developer options should be turned on, but if not, toggle the option “On”
• Developer options are now turned On.
• Scroll down and tap Mock location app.

S 1 M o b i l e U s e r G u i d e 4 . 1
Page 179
• Tap S1 Mobile to select app.
• Mock location app is now set to S1 Mobile
Pairing Trimble R1 Receiver The Trimble R1 Receiver is a GNSS receiver that can improve a paired device GPS accuracy to sub-meter (in open canopy). It is capable of tracking GPS and GLONASS satellites and receiving WAAS and RTK corrections.
Trimble R1 documentation: http://www.trimble.com/globalTRL.asp?nav=Collection-109386
• Activate GPS should be turned off in S1 Mobile Mapper application • Turn on power to Trimble R1
Pairing Device for First Time • Beginning with firmware 5.08, the device is discoverable over Bluetooth whenever it is switched
on. Firmware version 5.04 and earlier requires the user to press and hold the power button until a rapidly flashing blue light appears indicating device is visible to other devices for paring for about 60 seconds. To download the latest R1 firmware, visit the website here: https://www.trimble.com/globalTRL.asp?nav=Collection-109385

S 1 M o b i l e U s e r G u i d e 4 . 1
Page 180
• In S1 Mobile Mapper app, tap Tools/Options button
• Tap Connect to Bluetooth GPS
• If Allow Mock Locations is not enabled on Android device, user will be prompted to turn on. Use the appropriate method depending on Android OS to enable Mock Locations.
• If Android Bluetooth is off, respond Yes to turn on Bluetooth.
• Tap the Tools/Options button and Connect to Bluetooth GPS to continue.
• Tap Allow

S 1 M o b i l e U s e r G u i d e 4 . 1
Page 181
• Tap Pair a Device
• In the Android Bluetooth Settings menu, tap Scan if device is not listed under Available Devices.
If the device is not visible after scanning, hold the power button down on the receiver for several seconds until blue light flashes rapidly, which indicates the device is discoverable for 60 seconds. You will then need to re-initiate the scan for the device. The default name of Trimble R1 receivers is GNSS:<last5digitsofserial#> (ex – GNSS:54735).
• If device is listed under Available Devices, tap it to pair with Android device.

S 1 M o b i l e U s e r G u i d e 4 . 1
Page 182
• When pairing is successful, the device name will be listed under Paired Devices. Tap the device’s Back button to return to S1 Mobile.
Enable Real-time Correction (WAAS/RTK) Settings By default, the R1 is set to only use autonomous, uncorrected GPS positions to obtain a position fix. It may be desirable however to enable the device’s ability to use Real Time Corrections in the position fix. These corrections could come from WAAS (free) or RTK (paid subscription) signals. The device is configured using a separate application, called GNSS Status.
• In S1 Mobile app, tap Setup Trimble Realtime.

S 1 M o b i l e U s e r G u i d e 4 . 1
Page 183
• Google Play Store Opens, if app is not already installed, tap Install to install the app on the mobile device, otherwise tap Open.
• At bottom of screen, choose Select Location services.
• Tap Position Source and select Bluetooth
• Choose the R1 from the list (ex – GNSS:54735), Select.
• Once the app connects to the device, tap Menu in upper left corner, then choose Corrections
• Select SBAS, this is WAAS in the United States.
• Exit GNSS Status app.

S 1 M o b i l e U s e r G u i d e 4 . 1
Page 184
Enable NMEA Output Settings By default, the R1 does not output the necessary NMEA strings required for other applications to receive estimated accuracy values from the receiver. These NMEA strings can be enabled via the GNSS Status application. In order to enable NMEA output on R1 receiver, the receiver must have firmware version 5.03 or higher and GNSS Status app must be version 2.0.7 or higher.
It is assumed this application is still open from the previous step and that receiver is paired with device, if not launch the application and pair the device as shown in previous section.
• Tap Menu in upper left corner, then choose NMEA

S 1 M o b i l e U s e r G u i d e 4 . 1
Page 185
• Under Available, tap GGA, GST & RMC to send them to the selected side of screen, no other strings should be enabled.
• Tap Apply
• Under Select Port, tap Bluetooth SPP1
• Tap Save
• Close GNSS Status application.
• Restart the device to clear connection with GNSS Status app and allow S1 to be the mock locations application.
Pairing Juniper Geode Bluetooth Receiver The Juniper Geode is a sub-meter (in open canopy) receiver, capable of tracking GPS and GLONASS satellites, and able to receive WAAS and RTK corrections.
Juniper Systems Geode documentation: http://www.junipersys.com/Juniper-Systems-Rugged-Handheld-Computers/products/Geode-Sub-Meter-GPS-Receiver
• Activate GPS should be turned off in S1 Mobile Mapper • Turn on power to Juniper Systems Geode receiver
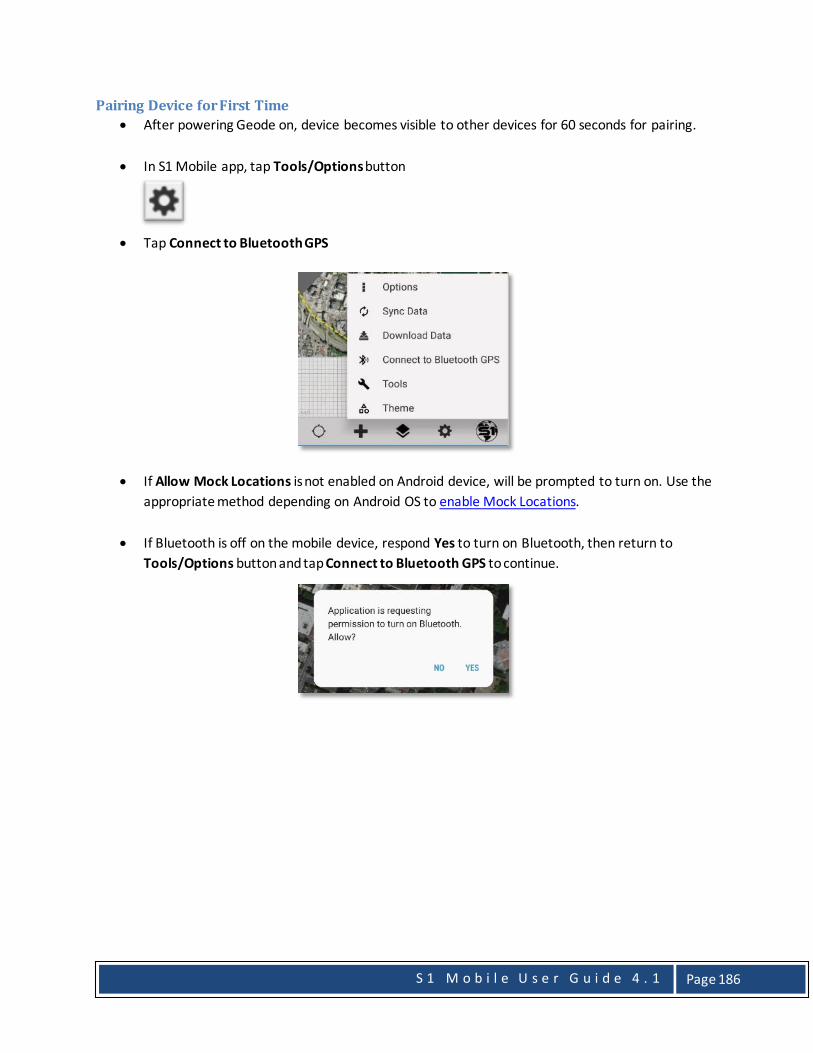
S 1 M o b i l e U s e r G u i d e 4 . 1
Page 186
Pairing Device for First Time • After powering Geode on, device becomes visible to other devices for 60 seconds for pairing.
• In S1 Mobile app, tap Tools/Options button
• Tap Connect to Bluetooth GPS
• If Allow Mock Locations is not enabled on Android device, will be prompted to turn on. Use the appropriate method depending on Android OS to enable Mock Locations.
• If Bluetooth is off on the mobile device, respond Yes to turn on Bluetooth, then return to Tools/Options button and tap Connect to Bluetooth GPS to continue.

S 1 M o b i l e U s e r G u i d e 4 . 1
Page 187
• Tap Pair a Device
• In the Android Bluetooth Settings menu, tap Scan if device is not listed under Available Devices.
If the device is not visible after scanning, hold the power button down on the receiver for several seconds until blue light flashes rapidly, which indicates the device is discoverable for 60 seconds. You will then need to re-initiate the scan for the device. The default name of Juniper Systems Geode receivers is Geode :<digitsofserial#> (ex – Geode 187878).
• If device is listed under Available Devices, tap it to pair with the mobile device.

S 1 M o b i l e U s e r G u i d e 4 . 1
Page 188
• When pairing is successful, the device name will be listed under Paired Devices. Tap the device’s Back button to return to S1 Mobile Mapper application.
Configure Geode NMEA Export via Geode Connect App By default, the Geode is set to only use autonomous, uncorrected GPS positions to obtain a position fix. It may be desirable however to enable the device’s ability to use real time corrections in the position fix. These corrections could come from WAAS (free) or RTK (paid subscription) signals. The device is configured using a separate application, called Geode Connect. This same app will be used to configure the necessary NMEA strings for export that are required for use with S1 Mobile for Android application.
• In S1 Mobile app, tap Setup Juniper Receiver
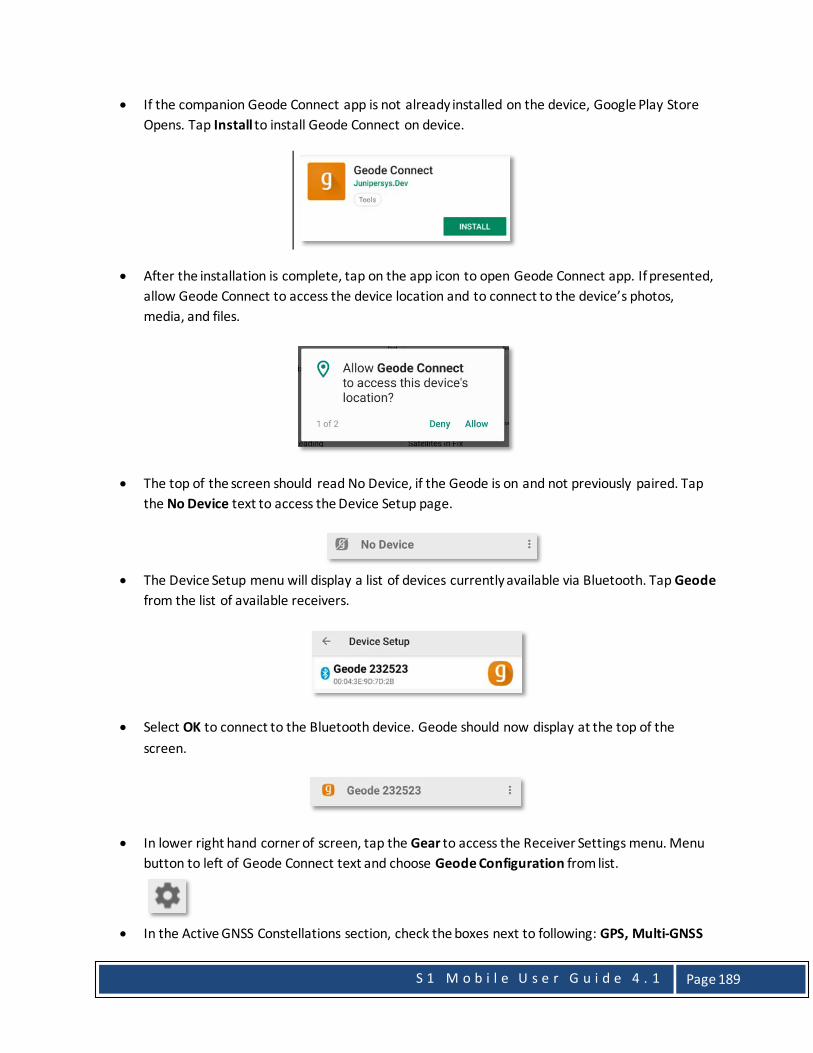
S 1 M o b i l e U s e r G u i d e 4 . 1
Page 189
• If the companion Geode Connect app is not already installed on the device, Google Play Store Opens. Tap Install to install Geode Connect on device.
• After the installation is complete, tap on the app icon to open Geode Connect app. If presented, allow Geode Connect to access the device location and to connect to the device’s photos, media, and files.
• The top of the screen should read No Device, if the Geode is on and not previously paired. Tap the No Device text to access the Device Setup page.
• The Device Setup menu will display a list of devices currently available via Bluetooth. Tap Geode
from the list of available receivers.
• Select OK to connect to the Bluetooth device. Geode should now display at the top of the screen.
• In lower right hand corner of screen, tap the Gear to access the Receiver Settings menu. Menu button to left of Geode Connect text and choose Geode Configuration from list.
• In the Active GNSS Constellations section, check the boxes next to following: GPS, Multi-GNSS

S 1 M o b i l e U s e r G u i d e 4 . 1
Page 190
• In the NMEA Sentences section, check the boxes next to the following: RMC, GST, GGA • Tap the floating Save button in lower right corner of app.
• Scroll to the bottom of the Receiver Settings menu and tap Advanced to expand the section.

S 1 M o b i l e U s e r G u i d e 4 . 1
Page 191
• Ensure that under SBAS the Auto box is selected in orange.
• Tap the Save button in lower right corner of app if it is orange. If the save button is Grey, no changes were made so save is unnecessary.
• Tap the Back button to return to the Geode Connect main menu and then close the application. The Geode is now ready for use with S1 Mobile Mapper.
Pairing Eos Arrow 100 Receiver The Eos Arrow is a sub-foot grade (in open canopy with DGPS correction) receiver, capable of tracking GPS & GLONASS satellites, and can receiver WAAS and RTK corrections.
Eos Arrow documentation: http://www.eos-gnss.com/wp-content/uploads/2015/10/Arrow-Series-Quick-Start-Guide_Rev1.1.pdf
• Activate GPS should be turned off in S1 Mobile Mapper application • Turn on power to Eos Arrow 100 • User must have installed Eos Setup Utility on PC (elevated permissions needed to install), which
can be downloaded from this website: http://www.eos-gnss.com/softwares/Eos Utility Desktop Setup_v3.5.26.0s.zip.
Pairing Device for First Time • Power Eos Arrow 100 device on, device should be visible to your mobile device

S 1 M o b i l e U s e r G u i d e 4 . 1
Page 192
• In S1 Mobile app, tap Tools/Options button
• Tap Connect to Bluetooth GPS
• If Allow Mock Locations is not enabled on Android device, will be prompted to turn on. Use the appropriate method depending on Android OS to enable Mock Locations.
• If Android Bluetooth is off, respond Yes to turn on Bluetooth, then return to Tools/Options button and tap Connect to Bluetooth GPS to continue
• Tap Pair a Device.
• In the Android Bluetooth Settings menu, tap Scan if device is not listed under Available Devices. If the device is not visible after scanning, hold the power button down on the receiver for several seconds until blue light flashes rapidly, which indicates the device is discoverable for 60 seconds. You will then need to re-initiate the scan for the device. The default name of Eos Arrow 100 receivers is Arrow 100 GNSS < digitsofserial#>: (ex – Arrow 100 GNSS 18301246).
• If device is listed under Available Devices, tap it to pair with the mobile device.

S 1 M o b i l e U s e r G u i d e 4 . 1
Page 193
• When pairing is completed successfully, the device name will be listed under Paired Devices. Tap
the device’s Back button to return to S1 Mobile Mapper.
Configure Arrow NMEA Export via Desktop Eos Setup Utility By default, the Arrow 100 is already configured to utilize SBAS corrections. It is still necessary however to configure the device to export the NMEA strings necessary for field data collection. You must follow the steps below to configure the receiver by connecting to it to a PC via USB and configuring the device via a desktop setup utility provided by Eos. Other device settings can also be adjusted using this desktop utility.
Instructions below assume that the Desktop utility has already been downloaded and installed. If not, it can be downloaded http://www.eos-gnss.com/softwares/Eos Utility Desktop Setup_v3.5.26.0s.zip.
• Turn the Eos Arrow on and connect it to a PC via a USB cable.
If the PC does not recognize the device, it may be necessary to install device drivers, which can be found here: http://www.eos-gnss.com/wp-content/uploads/2016/07/Eos-GNSS-USB-Drivers_v2.12.16s.zip.
• Once the device is recognized by PC, go to Start -> Control Panel -> View devices and Printers
• Right click on the device Eos GNSS Receiver and choose Properties.
• Select the Hardware tab and make a note of the COM Port listed next to Eos GNSS USB Serial Port.
• Click OK to close the Device Properties.
• Start Eos Setup Utility via Start -> All Programs -> Eos GNSS -> Eos Utility -> Eos Utility

S 1 M o b i l e U s e r G u i d e 4 . 1
Page 194
• Set COM Port value to match port number obtained in earlier step and click Search.
• After a connection is established, click Quick Config button.
• Click the tab BT [PORTA]

S 1 M o b i l e U s e r G u i d e 4 . 1
Page 195
• Highlight each of the following parameters, changing each from Off to 1 Hz at the bottom of the screen: $GPGGA, $GPGST, $GPRMC
• Select File -> Exit
• Choose option Save Settings + Disconnect
• Close the Eos Utility app by clicking X in upper right hand corner of the app window
• Unplug device from PC
Pairing Garmin GLO Bluetooth Receiver The Garmin GLO is a 2-5 meter (in open canopy) receiver, capable of tracking GPS and GLONASS satellites, and can receive WAAS corrections.
Garmin GLO Documentation: http://static.garmin.com/pumac//GLO_Instruc_Web_ML.pdf
• Activate GPS should be turned off in S1 Mobile Mapper
• Turn On power to GLO
Pairing Device for First Time • After powering device on LED will slow flash blue, this means searching for mobile devices, if no
pairing occurs after several minutes, Bluetooth will turn off automatically. Users should turn device off and on to turn Bluetooth back on if this occurs.
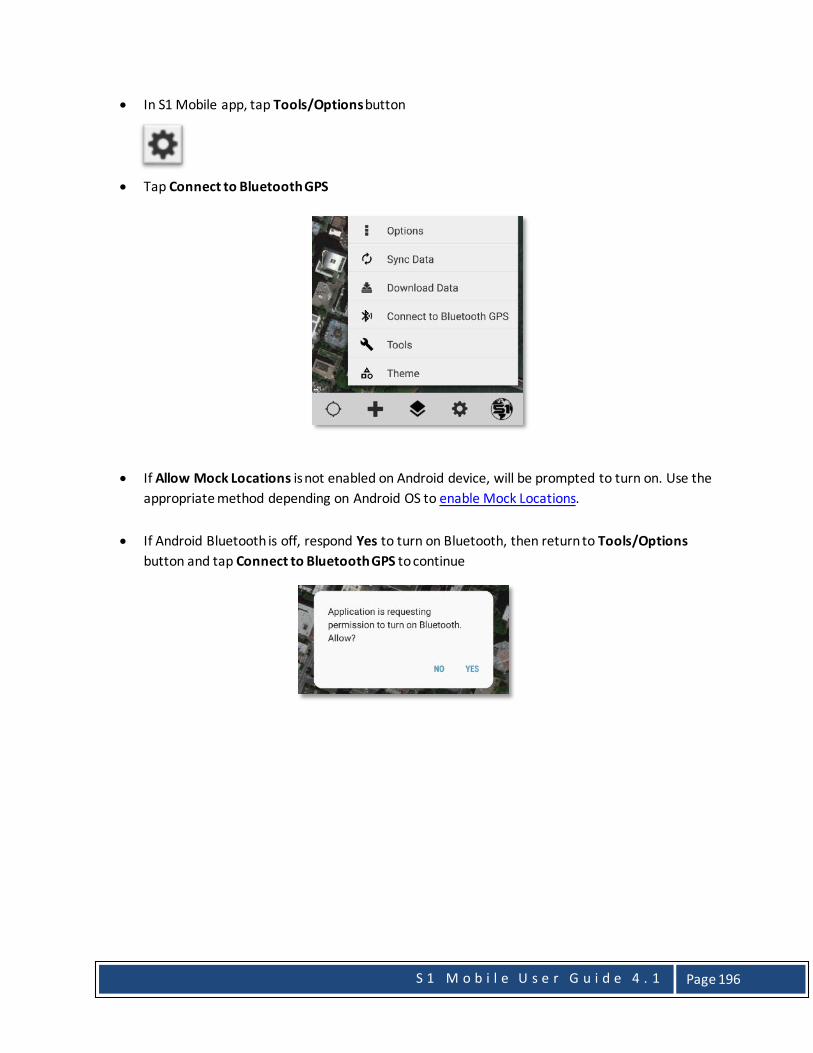
S 1 M o b i l e U s e r G u i d e 4 . 1
Page 196
• In S1 Mobile app, tap Tools/Options button
• Tap Connect to Bluetooth GPS
• If Allow Mock Locations is not enabled on Android device, will be prompted to turn on. Use the appropriate method depending on Android OS to enable Mock Locations.
• If Android Bluetooth is off, respond Yes to turn on Bluetooth, then return to Tools/Options button and tap Connect to Bluetooth GPS to continue

S 1 M o b i l e U s e r G u i d e 4 . 1
Page 197
• Tap Pair a Device
• In the mobile device Bluetooth Settings menu, tap Scan if device is not listed under Available Devices. If the device is not visible after scanning, hold the power button down on the receiver for several seconds until blue light flashes rapidly, which indicates the device is discoverable for 60 seconds. You will then need to re-initiate the scan for the device.
• If device is listed under Available Devices, tap it to pair with Android device.

S 1 M o b i l e U s e r G u i d e 4 . 1
Page 198
• When pairing is successful, the device name will be listed under Paired Devices. Tap the device’s Back button to return to S1 Mobile Mapper.
Connecting to Paired Bluetooth Receiver in S1 Mobile Mapper It is assumed that the both devices (Android & GPS receiver) are powered on & have Bluetooth turned on, Mock Location has been enabled on the Android device and both devices have been previously paired.
• Launch S1 Mobile Mapper, if not already open.
• Tap Tools/Options button
• Tap Connect to Bluetooth GPS
• Tap List Paired Devices
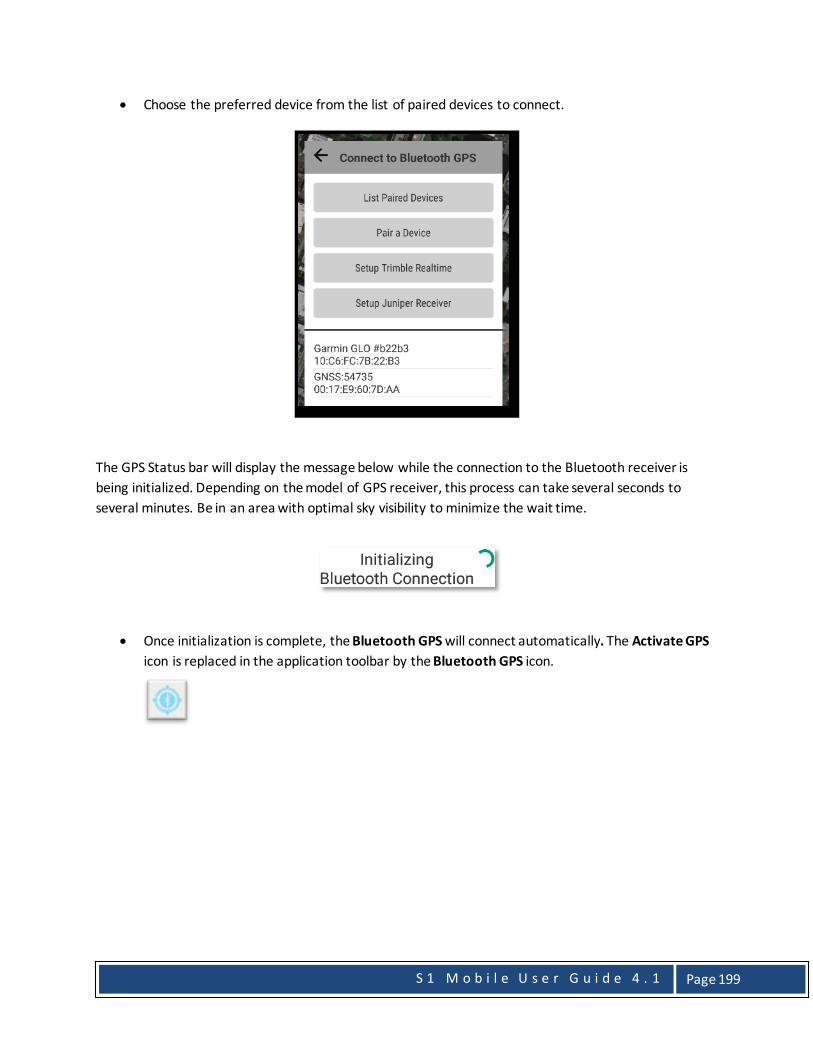
S 1 M o b i l e U s e r G u i d e 4 . 1
Page 199
• Choose the preferred device from the list of paired devices to connect.
The GPS Status bar will display the message below while the connection to the Bluetooth receiver is being initialized. Depending on the model of GPS receiver, this process can take several seconds to several minutes. Be in an area with optimal sky visibility to minimize the wait time.
• Once initialization is complete, the Bluetooth GPS will connect automatically. The Activate GPS icon is replaced in the application toolbar by the Bluetooth GPS icon.

S 1 M o b i l e U s e r G u i d e 4 . 1
Page 200
Disconnect Bluetooth Receiver/Return to Internal GPS • Tap Bluetooth GPS to disconnect the Bluetooth GPS receiver.
• The Bluetooth GPS icon will become inactive.
• Next tap Tools/Options then tap Disconnect Bluetooth GPS
• If Activate GPS button is pushed once disconnected from Bluetooth GPS, the application will use internal GPS instead of Bluetooth GPS.
(Beta Function) Connect TruePulse 360B Laser Rangefinder to capture attributes https://www.blm.gov/sites/blm.gov/files/s1-laser-rangefinder.pdf

S 1 M o b i l e U s e r G u i d e 4 . 1
Page 201
For more information on the S1 Mobile Mapper application, visit: https://www.blm.gov/services/mobile-gis/s1mobile
To submit applications bugs or app enhancement requests, use the online form at the location below.
https://arcg.is/1CGS8O
Service First Mobile GIS
U.S. Department of the Interior, Bureau of Land Management, Oregon/Washington State Office, Information Resource Management
U.S. Department of Agriculture, Forest Service, Pacific Northwest Region, Data Resources Management