rotomartillo - urreamedios.urrea.com/catalogo/manuales/rm838b.pdfen otra tarea. • use la...
TRANSCRIPT

RotomartilloHammer Drill
RM838BManual de Usuario y Garantía.
User’s Manual and Warranty.
ATENCIÓN: Lea, entienda y siga las instrucciones de seguridad contenidas en este manual, antes de operar esta herramienta.WARNING: Read, understand and follow the safety rules in this manual, before operating this tool.
RM838B manual.indd 1 01/07/15 12:34

E N G L I S H E S P A Ñ O L
General safety rules
Electric safety
Personal safety
Tool use and care
Specific safety rules for angle grinders
Features
Operation instructions
Maintenance
Troubleshooting
Technical data
Notes
Warranty policy
Normas generales de seguridad
Seguridad eléctrica
Seguridad personal
Utilización y cuidados de las herramientas eléctricas
Advertencias de seguridad para rotomartillos
Características
Instrucciones de operación
Mantenimiento
Solucionador de problemas
Especificaciones técnicas
Notas
Garantía
9
9
9
10
10
11
12
13
13
13
14
16
3
3
3
4
5
5
7
8
8
8
14
16
CONTENIDO CONTENT
SIMBOLOS SYMBOLS
PELIGRO, ADVERTENCIA, PRECAUCIÓN: Indica un riesgo personal o la posibilidad de un daño.
Herramientas tipo II: Doble aislamiento, protege las herramientas eléctricas.
DANGER, CAUTION, WARNING: Indicates risk of personal injury and/or the possibility of damage.
Type II power tools: Indicates double insulation.
2
RM838B manual.indd 2 01/07/15 12:34
NORMAS GENERALES DE SEGURIDADEste ROTOMARTILLO tiene características que harán su trabajo más rápido y fácil. Seguridad, comodidad y confiabilidad fueron previstos como prioridad para el diseño del mismo, ha-ciendo más fácil su operación.
ADVERTENCIA: Lea todas las advertencias de seguridad y todas las instrucciones. La omi-sión de alguna de las advertencias e instruccio-nes que se enlistan a continuación puede dar como resultado un choque eléctrico, fuego y/o un serio daño.
CONSERVE TODAS LAS ADVERTENCIAS Y TODAS LAS INSTRUCCIONES.
SEGURIDAD EN EL ÁREA DE TRABAJOMantenga el área de trabajo limpia y bien ilu-minada. Las áreas desordenadas y oscuras pro-vocan accidentes.No maneje herramientas eléctricas en atmós-feras explosivas, tales como en presencia de líquidos inflamables, gases o polvo. Las herra-mientas eléctricas crean chispas que pueden encender el polvo o los humos.Mantenga alejados a los niños y curiosos mientras maneja una herramienta eléctrica. Las distracciones pueden causarle la pérdida del control.
SEGURIDAD ELÉCTRICALa clavija de la herramienta eléctrica debe coincidir con receptáculo. No modificar nunca la clavija de ninguna manera. No usar ningún adaptador de clavijas con herramientas eléctri-cas puestas a tierra. Clavijas no modificadas y bases coincidentes reducirán el riesgo de cho-que eléctrico.Evite el contacto del cuerpo con superficies puestas a tierra como tuberías, radiadores, co-cinas eléctricas y refrigeradores. Hay un riesgo aumentado de choque eléctrico si su cuerpo está puesto a tierra.No exponga las herramientas eléctricas a la llu-via o a condiciones de humedad. El agua que entre en la herramienta aumentará el riesgo de choque eléctrico.No abuse del cable. No usar nunca el cable para llevar, levantar o desenchufar la herramienta
eléctrica. Mantenga el cable lejos del calor, aceite, cantos vivos o piezas en movimiento. Los cables dañados o enredados aumentan el riesgo de choque eléctrico.Cuando maneje una herramienta eléctrica en el exterior, use una prolongación de cable ade-cuada para uso en el exterior. El uso de una prolongación de cable adecuada para uso en el exterior reduce el riesgo de choque eléctrico.“ESTA HERRAMIENTA CUENTA CON UN SUJETACABLE TIPO “Y“, EN CASO DE DAÑAR-SE EL CORDÓN DE ALIMENTACIÓN, ÉSTE DE-BERÁ SER REEMPLAZADO POR EL FABRICANTE, SUS CENTROS DE SERVICIO AUTORIZADOS, O PERSONAL CALIFICADO A FIN DE EVITAR RIES-GOS.”
EXTENSIONES DE CABLENOTA: El uso de cables dañados incrementa el riesgo de descargas eléctricas o quemaduras.Si es necesario un cable de extensión, debe ser usado un cable con el tamaño adecuado de los conductores. La tabla de la siguiente página, muestra el tamaño correcto para usar depen-diendo en la longitud del cable y el rango de amperaje especificado en la etiqueta de valo-res nominales del producto. Si está en duda, use el rango próximo más grande. Siempre use cables de extensión listados en UL, CSA ó NOM.TAMAÑOS RECOMENDADOS DE EXTENSIONES DE CABLE:
Cuando esté usando el producto afuera, use una extensión para exteriores marcadas con lo siguiente: “WA” o “W”. Estas extensiones están pensadas para trabajar en exteriores y reducen el riesgo de descarga eléctrica.
SEGURIDAD PERSONALEsté alerta, vigile lo que está haciendo y use el sentido común cuando maneje una herramien-ta eléctrica. No use una herramienta eléctrica cuando esté cansado o bajo la influencia de
3
E S P A Ñ O L • Manual de Usuario
RM838B manual.indd 3 01/07/15 12:34

drogas, alcohol o medicamentos. Un momento de distracción mientras maneja herramientas eléctricas puede causar un daño personal serio.Use equipo de seguridad. Lleve siempre pro-tección para los ojos. La utilización para las condiciones apropiadas de un equipo de segu-ridad tal como mascarilla antipolvo, zapatos no resbaladizos, gorro duro, o protección para los oídos reducirá los daños personales.Evite un arranque accidental. Asegúrese de que el interruptor está en posición apagado antes de conectar a la red y/o a la batería, co-ger o transportar la herramienta. Transportar herramientas eléctricas con el dedo sobre el interruptor o enchufar herramientas eléctricas que tienen en interruptor en posición encendi-do invita a accidentes.Retire llaves o herramienta antes de arrancar la herramienta eléctrica. Una llave o herra-mienta dejada unida a una pieza rotativa de una herramienta eléctrica puede causar un daño personal.No se sobrepase. Mantenga los pies bien asen-tados sobre el suelo y conserve el equilibrio en todo momento. Esto permite un mejor control de la herramienta eléctrica en situaciones in-esperadas.Vista adecuadamente. No vista ropa suelta o joyas. Mantenga su pelo, su ropa y guantes alejados de las piezas en movimiento. La ropa suelta, las joyas o el pelo largo pueden ser co-gidos en las piezas en movimiento.Si hay dispositivos para la conexión de medios de extracción y recolección de polvo, asegúre-se de que éstos estén conectados y se usen co-rrectamente. El uso de estos dispositivos puede reducir los peligros relacionados con el polvo.
IMPORTANTE: Este aparato no se destina para utilizarse por personas (incluyendo niños) cuyas capacidades físicas, sensoriales o menta-les sean diferentes o estén reducidas, o carez-can de experiencia o conocimiento, a menos que dichas personas reciban una supervisión o capacitación para el funcionamiento del apa-rato por una persona responsable de su segu-ridad. Los niños deben supervisarse para ase-gurar que ellos no empleen los aparatos como juguete.
UTILIZACIÓN Y CUIDADOS DE LAS HERRAMIENTAS ELÉCTRICAS
No fuerce la herramienta eléctrica. Use la he-rramienta eléctrica correcta para su aplicación. La herramienta eléctrica correcta hará el tra-bajo mejor y más seguro al ritmo para la que fue concebida.No use la herramienta eléctrica si el interrup-tor no gira “encendido” y “apagado”. Cual-quier herramienta eléctrica que no pueda con-trolarse con el interruptor es peligrosa y debe repararse.Desenchufe la clavija de la fuente de alimen-tación y/o de la batería antes de efectuar cualquier ajuste, cambio de accesorios, o de almacenar las herramientas eléctricas. Tales medidas preventivas de seguridad reducen el riesgo de arrancar la herramienta accidental-mente.Almacene las herramientas eléctricas inactivas fuera del alcance de los niños y no permita el manejo de la herramienta eléctrica a personas no familiarizadas con las herramientas o con estas instrucciones. Las herramientas eléctricas son peligrosas en manos de usuarios no entre-nados.Mantenga las herramientas eléctricas. Com-pruebe que las partes móviles no estén des-alineadas o trabadas, que no haya piezas ro-tas u otras condiciones que puedan afectar la operación de las herramientas eléctricas. Las herramientas eléctricas se reparan antes de su uso, cuando están dañadas. Muchos acciden-tes son causados por herramientas eléctricas pobremente mantenidas.Mantenga las herramientas de corte afiladas y limpias. Las herramientas de corte mantenidas correctamente con los bordes de corte afilados son menos probables de trabarse y más fáciles de controlar.Use la herramienta eléctrica, accesorios y pun-tas de herramienta, etc. de acuerdo con estas instrucciones y de la manera prevista para el tipo particular de herramienta eléctrica, te-niendo en cuenta las condiciones de trabajo y el trabajo a desarrollar. El uso de la herra-mienta eléctrica para aplicaciones diferentes de las previstas podría causar una situación de peligro.
4
RM838B manual.indd 4 01/07/15 12:34

SERVICIOHaga revisar su herramienta eléctrica por un servicio de reparación calificado usando sola-mente piezas de reemplazo idénticas. Esto ga-rantizará que la seguridad de la herramienta eléctrica se mantiene.
ADVERTENCIAS DE SEGURIDAD PARA ROTOMARTILLOS
• No haga presión en la herramienta de tal forma que disminuya la fuerza del motor. Para obtener mejores resultados, y para alargar la vida de la broca, permita que realice el corte sin presión.• Solamente utilice accesorios que estén en buenas condiciones.• Sostenga la herramienta por las partes aisla-das cuando realice cualquier operación donde la herramienta tenga contacto con cables es-condidos o el de la misma máquina. El contacto con cualquier cable “vivo“ harán que las partes metálicas de la herramienta se electrifiquen.• Compruebe que hay suficiente espacio para la broca en la pieza de trabajo ante de iniciar a perforar.• Antes de conectar la herramienta, revise que el botón de traba se encuentre desactivado.• Cuando encienda el rotomartillo, permita que la broca gire en vacío unos segundos antes de realizar la perforación. Observe si hay vibra-ción o movimiento lo que podría indicar una deficiente instalación del accesorio.• No se distraiga durante la operación, apague su herramienta antes de enfocar su atención en otra tarea.• Use la empuñadura auxiliar que se incluye con la herramienta. Una perdida de control puede causar lesiones personales.• Verifique periodicamente que no haya torni-llos o partes sueltas en el rotomartillo.• Siempre utilice abrazaderas o un tornillo de banco para sostener la pieza de trabajo.• Siempre apague el rotomartillo antes de de-jarlo o dejar de utilizarlo.• Asegúrese que tenga una luz adecuada para tener una buena observación de la operación.• Mantenga el área de trabajo libre de riesgos de tropiezos.• Asegure el material que será perforado. Nunca lo sostenga con las manos o contra al-guna parte de su cuerpo.
• No use brocas encorvadas o dañadas.• Mantenga las manos lejos de las partes mó-viles.• Siempre utilice lentes de seguridad y una máscara anti-polvo cuando perfore, especial-mente cuando realice perforaciones sobre el nivel de su cabeza.• Tenga cuidado con la chispas. Sostenga la herramienta para que ninguna chispa pueda volar al operador u otras personas. Mantenga los materiales flamables lejos cuando este utili-zando el rotomartillo.• No toque la pieza de trabajo inmediatamen-te después de la operación. Esta puede estar extremadamente caliente y podría quemarlo.
CARACTERÍSTICAS
CONOZCA SU HERRAMIENTAAntes de intentar usar este producto, familiarí-cese con todas sus características de operación y requerimientos de seguridad.
PRECAUCIÓN: No permita que la familia-ridad con el rotomartillo ocasione descuidos. Recuerde que una fracción de segundo de descuido es suficiente para ocasionar severas lesiones.
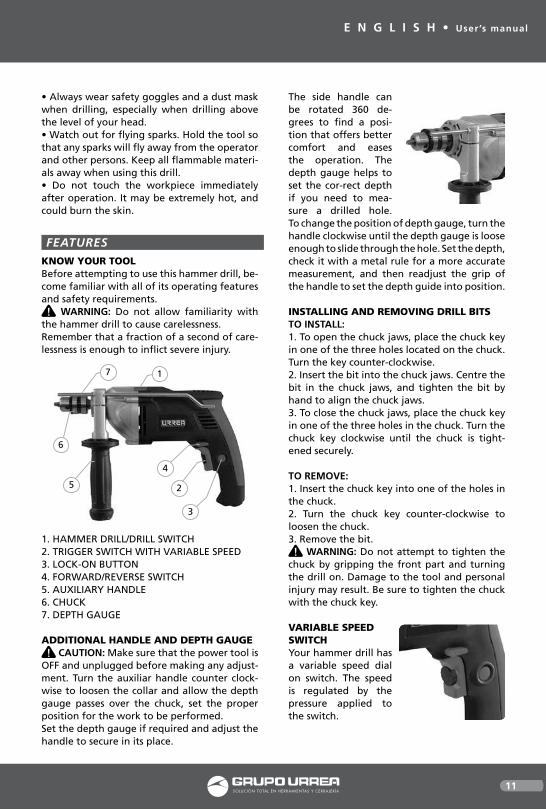
1. SELECTOR DE FUNCIÓN: ROTOMARTILLO/TALADRO2. INTERRUPTOR CON VELOCIDAD VARIABLE3. BOTÓN DE TRABA4. SELECTOR DE GIRO5. EMPUÑADURA AUXILIAR6. BROQUERO7. TOPE DE PROFUNDIDAD
2
3
4
5
6
7 1
5
E S P A Ñ O L • Manual de Usuario
RM838B manual.indd 5 01/07/15 12:34

EMPUÑADURA AUXILIAR Y TOPE DE PRO-FUNDIDAD
PRECAUCION: Asegúrese que el taladro se encuentre apagado y desconectado de la fuen-te de poder antes de realizar cualquier ajuste.Gire el mango auxiliar en sentido contrario a las manijas del reloj para aflojar el collar y per-mitir que el tope pase por el broquero, ajuste-lo a la posicion adecuada para el trabajo que vaya a realizar. Coloque el tope de profundidad si lo re-quiere y ajuste el mango para asegurar-lo en su lugar. La empu-ñadura auxiliar puede ser rotada 360º para encontrar la posici-ón que ofrezca mejor confort y facilite la ope-racion. El tope de profundidad ayuda a en-contrar la profundidad correcta si se necesita poner una medida a un orificio taladrado.Para cambiar la posición del tope de profundi-dad, gire el mango hacia la izquierda hasta que el tope de profundidad este flojo lo suficiente para deslizarlo por el orificio. Fije la profundi-dad, verifique la misma con una regla metálica para una medición mas precisa, y luego reajus-te el agarre de la manija para ajustar la guía de profundidad en posición.
INSTALANDO Y REMOVIENDO LAS BROCASPARA INSTALAR:1. Para abrir la mandíbula del broquero, colo-que la llave de mandril en uno de los tres orifi-cios localizados en el broquero. Gire la llave en sentido contrario a las manecillas del reloj. 2. Inserte la broca dentro de las mandíbulas del broquero; centrela y apriete la broca con la mano para alinear las mandíbulas.3. Para cerrar el broquero, coloque la llave de mandril en uno de los tres hoyos localizados en el broquero. Gire la llave en sentido a las ma-necillas del reloj.
PARA REMOVER:1. Inserte la llave de mandril en uno de los tres hoyos del broquero.2. Gire la llave en sentido contrario a las mane-cillas del reloj, para aflojar el broquero.3. Remueva la broca.
PRECAUCIÓN: No intente apretar el bro-quero tomándolo por la parte delantera en-cendiendo el Rotomartillo. Puede resultar en daños a la herramienta o personales. Asegúre-se de apretar el broquero con la llave de man-dril.
INTERRUPTOR DE VELOCIDAD VARIABLEEsta herramienta tiene un regulador de velocidad (envía alta velocidad y torque in-crementando la pre-sión en el gatillo). La velocidad es regulada por la presión aplica-da al gatillo.La cualidad de velocidad variable es particular-mente util cuando se comienza el taladrado. También le permite seleccionar la mejor velo-cidad para distintos tipos de trabajo. Para limitar la velocidad máxima de la herra-mienta, rote la perilla que se encuentra en el gatillo y seleccione la velocidad deseada.
SELECTOR DE GIROEl selector de giro determina la dirección de ro-tación de la herramienta.Para seleccionar la rotación de avance, suelte el gatillo y presione el interruptor al costado de-recho de la herramienta. Para seleccionar la ro-tación en reversa, suelte el gatillo y presionelo al costado izquierda de la herramienta.
ADVERTENCIA: Cuando intercambie las ve-locidades, asegurese de soltar el gatillo y que el motor del rotomartillo se detenga.NOTA: Cuando utilice la herramienta en rota-ción contraria a las manecillas de reloj, el inte-rruptor solamente podra ser presionado hasta la mitad y la herramienta girara a la mitad de su velocidad normal. De igual manera el botón de traba no funcionará en esta modalidad.
INTERRUPTOR DE ENCENDIDO Y BOTÓN DE OPERACIONES CONTINUASPARA INICIAR LA OPERACIÓN:1. Para encender la herramienta (ON) presione el interruptor de encendido. Incrementando la presión puede incrementar la velocidad.2. Para apagar la herramienta, suelte el inte-rruptor de operación.
6
RM838B manual.indd 6 01/07/15 12:34

PRECAUCIÓN: Permita que el motor se de-tenga completamente antes de almacenarlo.TRABA PARA OPERACIONES CONTINUAS:El interruptor esta equipado con un botón de traba.1. Para activar el botón de traba, apriete el in-terruptor para encender la herramienta, ense-guida presione el botón de traba. El interrup-tor ahora esta “trabado”.2. Para deshabilitar el botón de traba y apagar la herramienta, presione de nuevo el interrup-tor. El botón de traba se desenganchará. Afloje el interruptor para apagar la herramienta.
SELECTOR DE FUNCIÓNPara seleccionar la accion percutora del taladro, ubique el selector de funcion completamente hacia la izquierda marcado con el simbolo .Para seleccionar la funcion de taladro para ta-ladrar madera y metal, ubique el selector de funcion completamente hacia la derecha mar-cado por el simbolo .
INSTRUCCIONES DE OPERACIÓN
PERFORACIÓNSostenga el rotomartillo confortablemente con el dedo en el interruptor. Utilice la empuñadura auxiliar siempre que sea posible en orden de obtener un mejor control y prevenir la fatiga.
NOTA: Utilice solo brocas afiladas• Para Madera; utilice brocas tipo gusano, tipo plana (manita), broca escalonada (barreno de poder) o sierra corta círculos.• Para Metal; utilice brocas de acero alta velo-cidad (HSS), brocas de hacer trenzado o sierras corta círculos.• Para Mampostería (ladrillo, cemento, bloque de ceniza etc.); utilice brocas con punta de car-buro.Asegúrese que el material a ser taladrado este anclado firmemente.Si taladra un material delgado, utilice un res-paldo para prevenir daños al material.
PARA INICIAR EL PERFORADO:1. Cuando inicie un hoyo, haga una marca en la superficie de la pieza de trabajo y en seguida perfore un pequeño hoyo.2. Sostenga firmemente el rotormartillo con ambas manos.3. Presione el interruptor para iniciar la perfo-ración, gradualmente incremente la velocidad. Para operaciones continuas o extensas, sosten-ga el botón de traba mientras jala el gatillo in-terruptor.4. Haga presión en línea con la broca. Use sufi-ciente presión para mantener la broca cortan-do, pero no tanto que detenga el motor.NOTA: Si el rotomartillo comienza a detenerse, reduzca la presión ligeramente para permitir que la broca retome velocidad. Si la broca se atasca, reverse el motor para liberar la broca de la pieza de trabajo.5. Después de completar la operación de tala-drado, afloje la presion del interruptor y per-mita que la broca se detenga completamente antes de almacenar la herramienta.6. Cuando haya terminado e el trabajo, limpie el rotomartillo para permitir el buen funciona-miento.
PRECAUCION: Para reducir el riesgo de le-siones, nunca toque la broca para limpiar dese-chos hasta que el Rotomartillo pare completa-mente de girar y la broca se ha enfriado.
PERFORANDO EN VARIOS MATERIALES:1. Elija la función de Rotomartillo cuando per-fore en mampostería dura (concreto, ladrillo duro, piedra, cemento o mármol.)2. Elija la función de Taladro cuando perfore en mampostería suave (azulejos, suelo, ladrillo suave, cemento, cal o bloque ceniza).3. Cuando perfore una superficie lisa, ponga cinta de papel donde va a realizar el perfora-do, esto para prevenir que la broca se resbale.
PERFORANDO EN MADERA O PLÁSTICO1. Inicie lentamente e incremente la velocidad gradualmente.2. Cuando utilice brocas torcidas, jale la broca fuera del hoy frecuentemente para limpiar los pedacitos de material de la flauta de la broca.3. Utilice la velocidad baja para plásticos que tengan un punto bajo de fusión.
7
E S P A Ñ O L • Manual de Usuario
RM838B manual.indd 7 01/07/15 12:34

PERFORANDO EN METAL1. Lubrique las brocas con aceite para cortar cuando perfore hierro o acero.2. No use lubricante cuando perfore metales NO FERROSOS, como cobre, latón o aluminio.
MANTENIMIENTO
PRECAUCIÓN: Antes de cada uso, inspeccio-ne el rotomartillo, el interruptor de encendi-do/apagado y el cable de alimentación, estos no deben estar dañados, faltantes o con partes desgastadas. Revise que no haya tornillos flojos, desalinea-cion en la unión de partes en movimiento o cualquier otra condición que pueda afectar la operación. Si ocurre una vibración o ruidos anormales, apague el rotomartillo inmediata-mente. El problema debe ser corregido antes de volver a usarse, se recomienda llevar la he-rramienta a un centro de servicio autorizado.
PRECAUCIÓN: Antes de limpiar o realizar cualquier tipo de mantenimiento, desconecte la herramienta de la fuente de poder. El uso de aire comprimido puede ser el más efectivo método de limpieza. Siempre utilice lentes de seguridad cuando limpie herramientas con aire comprimido.
PRECAUCIÓN: Sostenga las herramientas con cuidado. Mantenga las brocas afiladas y limpias. El adecuado mantenimiento en las he-rramientas con brocas afiladas las hace menos probable que se atasquen y más fáciles de con-trolar.
PRECAUCIÓN: Revise los cables antes de cada uso. Si están dañados reemplácelos in-mediatamente. Nunca utilice una herramienta con el cable dañado.
PRECAUCIÓN: Para garantizar la seguridad y la fiabilidad de todas las reparaciones, estas deben ser realizadas por un centro de servicio calificado.
SOLUCIONADOR DE PROBLEMAS
EL MOTOR NO ENCIENDELa herramienta no esta conectada: Revise que este conectado el cable de alimentación.Fusible: Comprobar el tiempo de demora en el fusible o circuito disyuntor.
VOLTAJE-FRECUENCIA
VELOCIDAD
CAPACIDAD DE BROQUERO
POTENCIA
PESO
120 V ~ 60 Hz
(0 - 2 700) r/min
3/8" (10 mm)
850 W
2,1 kg (4,6 lb)
ESPECIFICACIONES TÉCNICAS
8
SE DIFICULTA LA PERFORACIÓNLa broca está dañada: Reemplace la broca.Broca Incorrecta: Utilice la broca adecuada (vea las instrucciones de operación).
EL BROQUERO NO GIRA O HACE UN RUIDO CUANDO SE REALIZA EL AJUSTE MECÁNI-CO DE LAS VELOCIDADESEl clutch no encaja adecuadamente en el en-grane: Gire el mecanismo de ajuste de veloci-dad aproximadamente 30 grados en dirección a la flecha. Esto permitirá que el clutch encaje mejor en la caja de engranes.El lubricante de la caja de engranes es muy es-peso: Encienda la herramienta por varios mi-nutos para diluir el lubricante de la caja de en-granes.
RM838B manual.indd 8 01/07/15 12:34

GENERAL SAFETY RULESYour HAMMER DRILL has many features that will make your job faster and easier. Safety, performance and reliability have been given top priority in the design of this tool, qualities to make easy to maintain and to operate.
WARNING: Read and understand all in-structions. Failure to follow all indications list-ed below, may result in electric shock, fire and/or serious personal injury.
SAVE THESE INSTRUCTIONS.
SAFETY IN WORKING AREAKeep your work area clean and well lit. Clut-tered benches and dark areas may cause acci-dents.Do not operate power tools in explosive atmo-spheres, such as in the presence of flammable liquids, gases or dust. Some power tools create sparks which may provoke fire.Keep away observers, children and visitors while operating a power tool. Distractions can cause you to lose control.
ELECTRIC SAFETYDouble insulation eliminates the need for the three wire grounded power cord and ground-ed power supply system.Avoid the body contact with grounded surfac-es such as pipes, radiators and refrigerators. There is an increased risk of electric shock if your body is grounded.Don’t expose power tools to rain or wet condi-tions. The precense of water into power tools will increase the risk of electric shock.Do not abuse of the power cord. Never use the power cord to carry the tool and do not pull the plug off the outlet. Keep the cable away of heat, oil, sharp edges or moving parts. Replace damaged cords immediately. Damaged cords increase the risk of electric shock.When operating a power tool outside, use an outdoor extension cord marked “W-A” or “W”. These cords are rated for outdoor use and re-duce the risk of electric shock.
EXTENSION CORDSReplace damaged cords immediately. The use
of damaged cords can shock, burn or electric shock. If an extension cord is necessary, a cord with adequate size conductors should be used to prevent excessive voltage drop, loss of pow-er or overheating. The table below shows the correct size to use, depending on cord length and nameplate amperage rating of tools. In case of doubt use the next heavier gauge. Al-ways use UL listed extension cords.
SIZE RECOMMEND EXTENSION CABLES
PERSONAL SAFETYStay alert, watch what you are doing and use common sense when operating a power tool.Don’t use the tool if you are tired or under the influence of drugs, alcohol or medication. A moment of unattention while operating pow-er tools may cause a serious personal injury.Dress properly. Do not wear loose clothing or jewellery. Contain long hair. Keep your hair, clothing and gloves away of moving parts. Loose clothes, jewellery or long hair can be caught in moving parts.Avoid an accidental starting. Be sure that the switch is OFF before plugging in. Carrying tools with the finger on the switch or plug in the tool switch in ON may cause accidents.Remove the adjusting keys or wrenches be-fore turning the tool on. A wrench or a key that is left close to a rotating part of the tool may provoke a personal injury.Do not overreach. Keep proper footing and balance at all times. Proper footing and bal-ance enables better control of the tools on un-expected situations.Use safety equipment. Always wear eye pro-tection. Dust mask, nonskid safety shoes, hard hat, or hearing protection must be used for ap-propriate conditions.Before connecting the tool to a power source (receptacle, outlet, etc.) be sure that the volt-age supplied is the same as that one specified on the nameplate of the tool. To use a not
9
E N G L I S H • User’s manual
RM838B manual.indd 9 01/07/15 12:34

specified voltage may cause a serious injury to the user as well as damage the tool.
IMPORTANT: This appliance is not intended for use by persons (including children) with re-duced physical, sensory or mental capabilities may be different or reduced, or lack of experi-ence or knowledge, unless such persons are su-pervised or trained to operate the product by a person responsible for their safety. Children should be supervised to ensure they do not use the devices as toys.
TOOL USE AND CAREDo not force the power tool. Use the correct tool for the application. The correct tool will do the job better and more safely at the rate that it was designed to work at.Do not use tools if switch does not turn it on or off. Any tool that cannot be controlled whith the switch is dangerous and must be repaired.Disconnect the plug from the power source before making any adjustments, changing ac-cessories or storing the tool. This preventive safety measures reduce the risk of accidental starting of the tool.When the power tool is not in use, store it out of the reach of children, and do not allow in-dividuals who are not familiar with the power tool or these instructions to operate it. Power tools are dangerous in the hands on untrained users.Maintain the power tool. Check for misalign-ment or binding of moving parts, broken parts, and any other condition that may affect the operation of the power tool. If it is damaged, have it repaired before using. Many accidents are caused by poorly maintained power tools.Check for misalignment or bonding of moving parts, breakage parts, and any other condition that may affect the tools operation. If you find a damaged tool, take it to service before use it. Use only accessories that are recommended by the manufacturer of your model. Suitable ac-cessories for one tool, may become hazardous when are used on another tool.Keep cutting tools, sharpened and clean. Cut-ting tools in good condition with sharpened edges, are less likely to stuck in workpieces or easier to control.
Is recommendable to use a safety device suit-able, such a thermal and diferential switch when you are using an electric equipment.
SERVICETool service must be perfomed only by quali-fied repair personnel. Service or maintenance performed by unqualified personnel could re-sult in a risk of injury.
SPECIFIC SAFETY RULES FOR HAMMER DRILLS
• Do not put pressure on the drill to the extent that it slows down the motor. For better re-sults, and to lengthen the life of the drill, allow the drill bit to cut without pressure.• Only use accessories that are in optimal con-dition.• Hold the tool by its insulated gripping sur-faces when performing any operation where the tool may contact hidden wiring or its own cord. Contact with a “live” wire will make ex-posed metal parts of the tool “live”, and shock the operator.• Check that there is sufficient clearance for the drill bit under the workpiece before drilling.• Before plugging the tool in, check that the trigger lock-on button is “OFF”.• When starting the hammer drill, let the drill run for a few seconds before using it on a workpiece. Watch for vibration or wobbling that could indicate poor installation of an ac-cessory.• Don’t get distracted while operating, stop the hammer drill before turning your attention to other tasks.• Use the auxiliary handle that is included with the tool. Loss of control can cause personal injury.• If possible, always use clamps or a vise to hold the work.• Always switch the drill OFF before putting it down.• Ensure that the lighting is adequate to see the operation.• Keep the work area free of tripping hazards.• Secure the material that is being drilled. Nev-er hold it in your hand or across your hand or across your legs.• Do not use damaged or bowed drill bits.• Keep hands away from rotating parts.
10
RM838B manual.indd 10 01/07/15 12:34
• Always wear safety goggles and a dust mask when drilling, especially when drilling above the level of your head.• Watch out for flying sparks. Hold the tool so that any sparks will fly away from the operator and other persons. Keep all flammable materi-als away when using this drill.• Do not touch the workpiece immediately after operation. It may be extremely hot, and could burn the skin.
FEATURES
KNOW YOUR TOOLBefore attempting to use this hammer drill, be-come familiar with all of its operating features and safety requirements.
WARNING: Do not allow familiarity with the hammer drill to cause carelessness.Remember that a fraction of a second of care-lessness is enough to inflict severe injury.
1. HAMMER DRILL/DRILL SWITCH2. TRIGGER SWITCH WITH VARIABLE SPEED3. LOCK-ON BUTTON4. FORWARD/REVERSE SWITCH5. AUXILIARY HANDLE6. CHUCK7. DEPTH GAUGE
ADDITIONAL HANDLE AND DEPTH GAUGE CAUTION: Make sure that the power tool is
OFF and unplugged before making any adjust-ment. Turn the auxiliar handle counter clock-wise to loosen the collar and allow the depth gauge passes over the chuck, set the proper position for the work to be performed.Set the depth gauge if required and adjust the handle to secure in its place.
The side handle can be rotated 360 de-grees to find a posi-tion that offers better comfort and eases the operation. The depth gauge helps to set the cor-rect depth if you need to mea-sure a drilled hole. To change the position of depth gauge, turn the handle clockwise until the depth gauge is loose enough to slide through the hole. Set the depth, check it with a metal rule for a more accurate measurement, and then readjust the grip of the handle to set the depth guide into position.
INSTALLING AND REMOVING DRILL BITSTO INSTALL:1. To open the chuck jaws, place the chuck key in one of the three holes located on the chuck. Turn the key counter-clockwise.2. Insert the bit into the chuck jaws. Centre the bit in the chuck jaws, and tighten the bit by hand to align the chuck jaws.3. To close the chuck jaws, place the chuck key in one of the three holes in the chuck. Turn the chuck key clockwise until the chuck is tight-ened securely.
TO REMOVE:1. Insert the chuck key into one of the holes in the chuck.2. Turn the chuck key counter-clockwise to loosen the chuck.3. Remove the bit.
WARNING: Do not attempt to tighten the chuck by gripping the front part and turning the drill on. Damage to the tool and personal injury may result. Be sure to tighten the chuck with the chuck key.
VARIABLE SPEED SWITCHYour hammer drill has a variable speed dial on switch. The speed is regulated by the pressure applied to the switch.
11
E N G L I S H • User’s manual
2
3
4
5
6
7 1
RM838B manual.indd 11 01/07/15 12:34

Variable speed is particularly useful when starting the hammer drill. Also allows you to set an optimal speed for any kind of job.
FORWARD/REVERSE SWITCH.The forward/reverse switch determines the running direction of the tool.1. To select “forward” motion, release the trigger switch, and push the forward/reverse switch to the right side of the tool.2. To select “reverse” motion, release the trigger switch, and push the forward/reverse switch to the left side of the tool.
WARNING: When switching speeds, make sure to release the trigger and wait for the hammer drill to stop.NOTE: When you operate the tool in counter-clockwise rotation, the switch trigger is pulled only halfway and the tool runs at half speed. For counterclockwise rotation, you cannot push in the lock button.
ON/OFF SWITCH AND LOCK-ON BUTTONTO START THE DRILL:1. To turn the tool “ON”, depress the trigger switch. Increased pressure increases the speed.2. To turn the tool “OFF”, release the trigger switch.
CAUTION: Allow the motor to come to a complete stop before setting the drill down.
LOCK-ON FOR CONTINUOUS OPERATION:The trigger switch is equipped with a lock-on button.1. To activate the lock-on feature, squeeze the trigger switch to turn the tool “ON”, and then depress the lock-on button. The trigger switch is locked “ON”.2. To disable the lock-on button and turn the tool OFF, squeeze the trigger switch again. The lock-on button will disengage. Release the trigger switch to turn the tool “OFF”.
FUNCTION SELECTORTo select the percus-sion function, place the selector to the left indicated with the
symbol.To select the hammer drill function for wood
and metal drilling, place the selector to the right with the symbol.
OPERATION INSTRUCTIONS
DRILLING OPERATIONHold the drill comfortably, with your finger on the trigger switch. Use the auxiliary handle whenever possible in order to gain extra con-trol and to prevent fatigue.NOTE:• Use sharp drill bits only.• For wood, use twist-drill bits, spade bits, power-auger bits, or hole saws.• For metal, use high-speed, steel-twist drill bits or hole saws.• For masonry (brick, cement, cinder block, etc.) use carbide-tipped drill bits.• Be sure that the material to be drilled is an-chored or clamped firmly.• If drilling thin material, use a “back-up” block in order to prevent damage to the material.
TO BEGIN DRILLING1. When starting a hole, make a mark on the surface of the workpiece, and then drill a small hole.2. Hold the drill firmly with both hands.3. Depress the trigger switch to start the drill, gradually increasing speed. For continuous or extended operation, hold the lock-On button while pulling the trigger switch.4. Apply pressure in line with the bit. Use enough pressure to keep the drill biting, but do not push hard enough to stall the motor.
NOTE: If the drill begins to stall, reduce pres-sure slightly in order to allow the bit to regain speed. If the bit binds, reverse the motor to free the bit from the workpiece.5. After completing the drilling operation, release the trigger switch, and allow the bit to come to a complete stop before setting the drill down.6. When work has been completed, clean the drill in order to allow for smooth operation of the drill over time.
WARNING: To reduce the risk of injury, ne-ver touch the bit in order to clean the debris until the drill has stopped rotating and the bit has cooled down.
12
RM838B manual.indd 12 01/07/15 12:34
DRILLING IN VARIOUS MATERIALS1. Choose the hammer-drilling function when drilling in hard masonry (concrete, hard brick, stone, cement, or marble).2. Choose the drilling function when drilling in soft masonry (tile, flooring, soft brick, lime cement, or cinder block),.3. When drilling in a smooth surface, attach adhesive paper at the drilling location in order to prevent the bit from gliding.
DRILLING IN WOOD AND PLASTIC1. Start the drill slowly, and increase speed gradually.2. When using twist drill bits, pull the bit out of the hole frequently in order to clear chips from the bit flutes.3. Use low speeds for plastic that has a low melting point.
DRILLING IN METAL1. Lubricate drill bits with cutting oil when drilling in iron or steel.2. Do not use a lubricant when when drilling in nonferrous metals, such as copper, brass or aluminium.
MAINTENANCE WARNING: Before each use, inspect the
hammer drill, ON/OFF trigger switch, and cord for any damaged, missing, or worn parts. Check for loose screws, misalignment or binding of moving parts, or any other condition that may affect the operation. If abnormal vibration or noise occurs, turn the tool off immediately, and have the problem corrected before further use.
WARNING: Before cleaning or perform-ing any maintenance, the tool should be unplugged from the power supply. Using com-pressed air may be the most effective cleaning method. Always wear safety goggles when cleaning tools with compressed air.
WARNING: Do not let brake fluid, gasoline, petroleum-based products, penetrating oil, etc., come in contact with plastic parts. These substances contain chemicals that can damage, weaken or destroy plastic.
WARNING: When servicing, use only identi-cal replacement parts. Use of any other parts may create a hazard or cause product damage.
WARNING: Use only accessories that are recommended for the specific model by the manufacturer. Accessories that may be suitable for one tool may become hazardous when used with another tool.
WARNING: Check extension cords before each use. If damaged, replace immediately. Never use tool with a damaged cord.
WARNING: To ensure safety and reliability, all repairs should be performed by a qualified service technician.
TROUBLESHOOTINGMOTOR DOES NOT STARTTools is not plugged in: Check that all cords are plugged in.Fuse: Check the time-delayed fuse or circuit breaker.
DRILLING IS DIFFICULTBit’s damaged: Replace the bit.Wrong bit: Use the proper bit.
THE CHUCK DOES NOT ROTATE OR MAKES A SNAPPING SOUND WHEN THE MECHANICAL SPEED ADJUSTMENT SWITCH IS ADJUSTEDThe clutch does not fit into the gear properly: Turn the mechanical speed-adjustment switch approximately 30 degrees in the direction of the arrow. This will allow the clutch to fit into the gear better.The lubricant in the gear box is too thick: Turn the tool on for several minutes in order to di-lute the lubricant in the gear box.
VOLTAGE-FREQUENCY
SPEED
CHUCK CAPACITY
POWER
WEIGHT
120 V ~ 60 Hz
(0 - 2 700) r/min
3/8” (10 mm)
850 W
2,1 kg (4,6 lb)
13
E N G L I S H • User’s manual
TECHNICAL DATA
RM838B manual.indd 13 01/07/15 12:34

14
Notas / Notes
RM838B manual.indd 14 01/07/15 12:34

15
Manual de usuar io / User ’s manua l
Notas / Notes
RM838B manual.indd 15 01/07/15 12:34

RM838B
Urrea Herramientas Profesionales S.A. de C.V. Warranties this product for a period of 3 years in its parts, components and manual labour against any manufacture defect from the purchasing date.
Purchase date: ____/____/____Product:____________________Brand:______________________Model:______________________
______________________________Distributor seal and signature
Sold and Imported by:Urrea Herramientas Profesionales S.A. de C.V. km 11,5 Carretera A El Castillo, El Salto, Jalis-co, México. C. P. 45680, Tel. (33) 3208 7900, RFC UHP900402Q29
Terms:In order to make warranty effective you must pres-ent the product along with the warranty properly fillled and signed to an authorized distributor or service center.
Urrea Herramientas Profesionales S.A. de C.V. will cover the transportation cost related to the warranty.
This warranty is not applicable in the follow-ing cases:· When the product has not been used according to normal conditions or natural wear of its parts. · When the product has not been used according with this user’s manual instructions. · When the product has been fixed or modified by unauthorized or unqualified person.
Urrea Herramientas Profesionales S.A. de C.V. garantiza este producto por el termino de 3 años en sus piezas, componentes y mano de obra con-tra cualquier defecto de fabricación a partir de la fecha de entrega.
Fecha de venta: ____/____/____Producto: ___________________Marca: ______________________Modelo: ____________________
______________________________Sello y firma de distribuidor
Comercializado e Importado por:Urrea Herramientas Profesionales S.A. de C.V. km 11,5 Carretera A El Castillo, El Salto, Ja-lisco, México. C. P. 45680, Tel. (33) 3208 7900, RFC UHP900402Q29
Condiciones:Para hacer efectiva la garantía deberá presentar el producto junto con la poliza de garantia debi-damente firmada y sellada por el establecimiento donde la adquirio, en cualquiera de los centros de servicio autorizados. Los gastos de transportación que se deriven del cumplimiento de la garantía seran cubiertos por:Urrea Herramientas Profesionales S.A. de C.V.
Esta garantía no será valida en los siguientes casos:· Cuando el producto haya sido utilizado en condi-ciones distintas a las normales o al desgaste natu-ral de sus partes. · Cuando el producto no haya sido operado de acuerdo al instructivo de uso que lo acompaña. · Cuando el producto haya sido alterado o repara-do por personas no autorizadas.
E S P A Ñ O LPOLIZA DE GARANTÍA
E N G L I S HWARRANT POLICY
16
RM838B manual.indd 16 01/07/15 12:34