room thermostats with lcd for wall mounting rdg100 ... · rdg100, rdg100t, rdg110, rdg160t,...
TRANSCRIPT
s
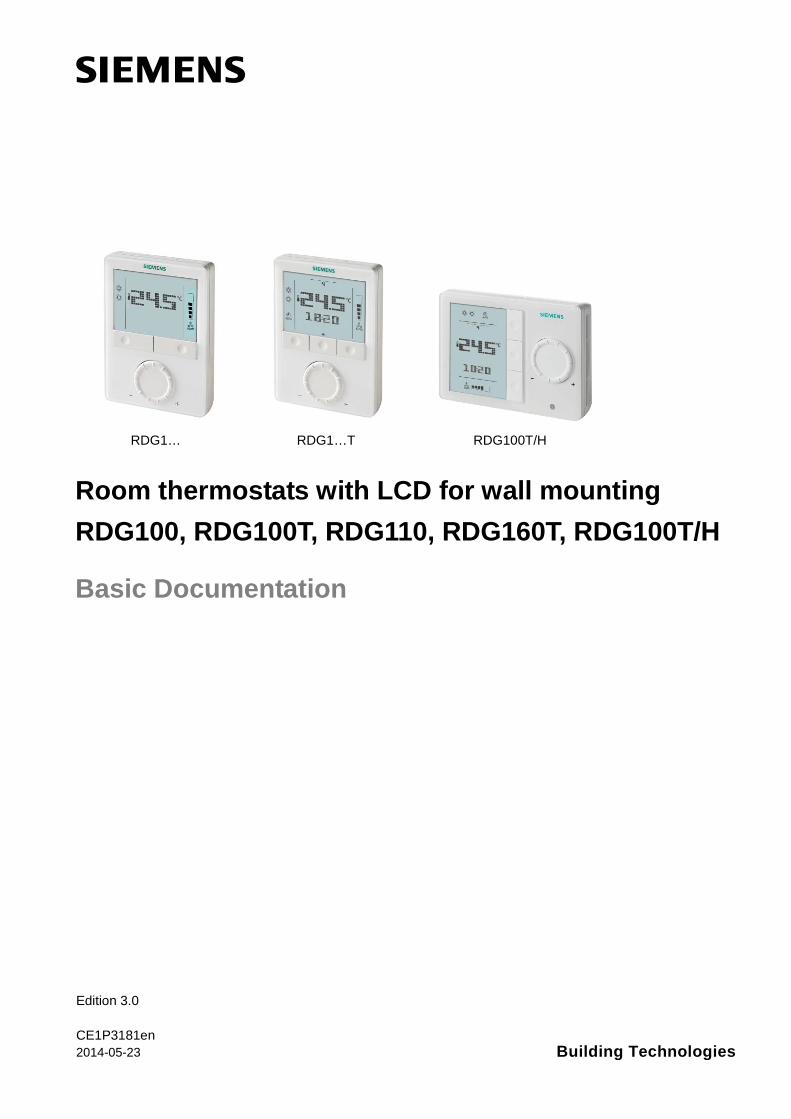
RDG1… RDG1…T RDG100T/H
Room thermostats with LCD for wall mounting RDG100, RDG100T, RDG110, RDG160T, RDG100T/H
Basic Documentation
Edition 3.0 CE1P3181en 2014-05-23
Building Technologies

Contents
1 About this document .............................................................................. 4 1.1 Revision history ......................................................................................... 4 1.2 Reference documents ............................................................................... 4 1.3 Before you start ......................................................................................... 4 1.3.1 Copyright ................................................................................................... 4 1.3.2 Quality assurance ..................................................................................... 4 1.3.3 Document use / request to the reader ...................................................... 5
2 Summary .................................................................................................. 6 2.1 Brief description ........................................................................................ 6 2.2 Types and features .................................................................................... 7 2.3 Equipment combinations ........................................................................... 8 2.4 Accessories ............................................................................................. 10 2.5 Ordering .................................................................................................. 10
3 Use .......................................................................................................... 11
4 Functions ............................................................................................... 12 4.1 Temperature control ................................................................................ 12 4.2 Operating modes ..................................................................................... 13 4.3 Room temperature setpoints ................................................................... 14 4.4 Setpoints and sequences ........................................................................ 15 4.4.1 2-pipe and 2-stage applications .............................................................. 15 4.4.2 4-pipe applications .................................................................................. 17 4.5 Applications overview .............................................................................. 18 4.5.1 Applications for fan coil systems ............................................................. 18 4.5.2 Applications for Universal systems ......................................................... 19 4.5.3 Applications for heat pump systems (RDG110, RDG160T) .................... 20 4.6 Additional features .................................................................................. 21 4.6.1 Qx- relay switching functions (RDG160T only) ....................................... 26 4.7 Control sequences .................................................................................. 27 4.7.1 Sequences overview (setting via parameter P01) .................................. 27 4.7.2 Control outputs configuration (setting via DIP switches 4 / 5 and
parameters .............................................................................................. 28 4.7.3 2-pipe fan coil unit ................................................................................... 29 4.7.4 2-pipe fan coil unit with electric heater .................................................... 30 4.7.5 2-pipe fan coil unit with radiator or floor heating ..................................... 32 4.7.6 4-pipe fan coil unit ................................................................................... 34 4.7.7 4-pipe fan coil unit with electric heater (RDG100…) ............................... 36 4.7.8 2-stage heating or cooling ....................................................................... 38 4.7.9 Chilled / heated ceiling and radiator applications ................................... 40 4.7.10 Compressor applications (general) ......................................................... 40 4.7.11 1-stage heating or cooling with reversing valve (RDG110) ..................... 41 4.8 Control outputs ........................................................................................ 42 4.9 Fan control .............................................................................................. 45 4.10 Multifunctional input, digital input ............................................................ 50 4.11 Auto timer (RDG100T, RDG100T/H, RDG160T only) ............................ 51 4.12 Handling faults......................................................................................... 54 4.13 Infrared remote control ............................................................................ 54 4.14 DIP switches ............................................................................................ 54
2 / 76
Siemens RDG100, RDG100T, RDG110, RDG160T Basic Documentation CE1P3181en Building Technologies Contents 2014-05-23
4.15 Control parameters ................................................................................. 55 4.15.1 Parameters of the "Service level" ........................................................... 56 4.15.2 Parameters of the "Expert level with diagnostics and test"..................... 57
5 Handling ................................................................................................. 60 5.1 Mounting and installation ........................................................................ 60 5.2 Operation ................................................................................................ 61 5.3 Disposal .................................................................................................. 64
6 Engineering ........................................................................................... 65 6.1 Connection terminals .............................................................................. 65 6.2 Connection diagrams .............................................................................. 66
7 Mechanical design ................................................................................ 69 7.1 General ................................................................................................... 69 7.2 Dimensions ............................................................................................. 70
8 Technical data........................................................................................ 71
Index ................................................................................................................ 75
3/76 Siemens RDG100, RDG100T, RDG110, RDG160T Basic Documentation CE1P3181en Building Technologies Contents 2014-05-23

1 About this document 1.1 Revision history
Edition
Date Changes Section Pages
3.0 April 2014 • Protection via circuit breaker • Combination control outputs with relay function • New product RDG160T • Removed RDG140, RDG160 • Doc valid for RDG100… SW > = V7.2 • Removed remarks for RDG100 SW < V7.2 (info in Doc V2.0) • RoHS-II adaptations • Several corrections
5.1, 6.2, 8 All
2.0 Dec 2011 Amendments concerning RDG100T/H Adaptive temperature adaption (el. heater) Function specifications for units with SW < V7.2
All 4.8, 4.15
1.1 June 2009 Several small corrections All 1.0 May 2009 First edition
1.2 Reference documents
Ref. Document title Type of document Document no. [1] Wall-mounted room thermostats with LCD Data Sheet N3181 [2] RDG1… Operating Instructions B3181.1 [3] RDG100T Operating Instructions B3181.2 [4] RDG100, RDG100T Mounting Instructions M3181.1 [5] RDG110 Mounting Instructions M3181.2 [6] RDG160T Mounting Instructions M3181.5 [7] RDG100T/H Mounting Instructions M3181.4 [8] RDG100T/H Operating Instructions B3181.4
1.3 Before you start 1.3.1 Copyright
This document may be duplicated and distributed only with the express permission of Siemens, and may be passed only to authorized persons or companies with the required technical knowledge. 1.3.2 Quality assurance
This document was prepared with great care. • The contents of this document is checked at regular intervals • Any corrections necessary are included in subsequent versions • Documents are automatically amended as a consequence of modifications and
corrections to the products described Please make sure that you are aware of the latest document revision date. If you find lack of clarity while using this document, or if you have any criticisms or suggestions, please contact the Product Manager in your nearest branch office. The addresses of the Siemens Regional Companies are available at www.siemens.com/sbt.
4 / 76
Siemens RDG100, RDG100T, RDG110, RDG160T Basic Documentation CE1P3181en Building Technologies About this document 2014-05-23
1.3.3 Document use / request to the reader
Before using our products, it is important that you read the documents supplied with or ordered at the same time as the products (equipment, applications, tools, etc.) carefully and in full. We assume that persons using our products and documents are authorized and trained appropriately and have the technical knowledge required to use our products as intended. More information on the products and applications is available: • On the intranet (Siemens employees only) at
https://workspace.sbt.siemens.com/content/00001123/default.aspx • From the Siemens branch office near you www.buildingtechnologies.siemens.com
or from your system supplier • From the support team at headquarters [email protected] if
there is no local point of contact Siemens assumes no liability to the extent allowed under the law for any losses resulting from a failure to comply with the aforementioned points or for the improper compliance of the same.
5 / 76
Siemens RDG100, RDG100T, RDG110, RDG160T Basic Documentation CE1P3181en Building Technologies About this document 2014-05-23
2 Summary 2.1 Brief description
• 2-pipe fan coil units, 2-pipe with electric heater,
2-pipe with radiator / floor heating • 4-pipe fan coil units, 4-pipe with electric heater • 2-stage heating or cooling application • Compressors in dx type equipment • Universal heating and/or cooling • 2 multifunctional inputs and 1 digital input for keycard contact, external sensor, etc. • Operating modes: Comfort, Economy and Protection • Automatic or manual heating / cooling changeover • Adjustable commissioning and control parameters • Minimum and maximum setpoint limitation • Backlit LCD • Selection of fan stage in the dead zone via P15 RDG100, RDG100T…: • On/Off, PWM or 3-position control outputs (triac) • Output for 3-speed or 1-speed fan • AC 230 V operating voltage RDG110: • On/Off control outputs (relay, SPDT) • Output for 3-speed or 1-speed fan • AC 230 V operating voltage RDG160T: • DC 0...10 V or On/Off control outputs for actuators • DC 0...10 V or relay outputs for fan (ECM or 1- / 3- speed) • AC 24 V operating voltage RDG100T, RDG160T, RDG100T/H: • Infrared remote control receiver • Auto Timer mode with 8 programmable timers • Auto timer can be disabled via P02 • Auto timer can be disabled via DIP switches (only RDG160T) • Landscape design (only RDG100T/H) • Maintenance of room temperature via built-in temperature sensor or external room
temperature / return air temperature sensor • Automatic or manual changeover between heating and cooling mode • Selection of applications via DIP switches • Selection of operating mode via the operating mode button on the thermostat • 1-speed, 3-speed or DC…10 V fan control (automatic or manual) • Display of current room temperature or setpoint in °C and/or °F • Minimum and maximum setpoint limitation • Button lock (automatic or manual) • 1 digital input, freely selectable for:
– Operating mode switchover contact (keycard) – Automatic heating / cooling changeover contact – Electric heater enable – Dewpoint sensor – Fault input
Applications
Features
Additional features
Functions
6 / 76
Siemens RDG100, RDG100T, RDG110, RDG160T Basic Documentation CE1P3181en Building Technologies Summary 2014-05-23
• 2 multifunctional inputs, freely selectable for: – Operating mode switchover contact (keycard) – Automatic heating / cooling changeover sensor – External room temperature or return air temperature – Dewpoint sensor – Electric heater enable – Fault input – Supply air temperature sensor (RDG160T)
• Advanced fan control function, i.e. fan kick, fan start, selectable fan operation (enable, disable or depending on heating or cooling mode)
• Purge function together with 2-port valve in a 2-pipe changeover system • Reminder to clean filters • Floor heating temperature limit • Minimum and maximum supply air temperature limitation (RDG160T) • Reloading factory settings for commissioning and control parameters • 7-day time program: 8 programmable timers to switch over between Comfort and
Economy mode (RDG100T, RDG160T, RDG100T/H) • Infrared remote control (RDG100T, RDG160T, RDG100T/H) • Selectable relay function (RDG160T)
– for switching OFF external equipment OFF during PROTECTION mode – for switching ON external equipment (e.g. pump) during H/C demand – output heating / cooling sequence
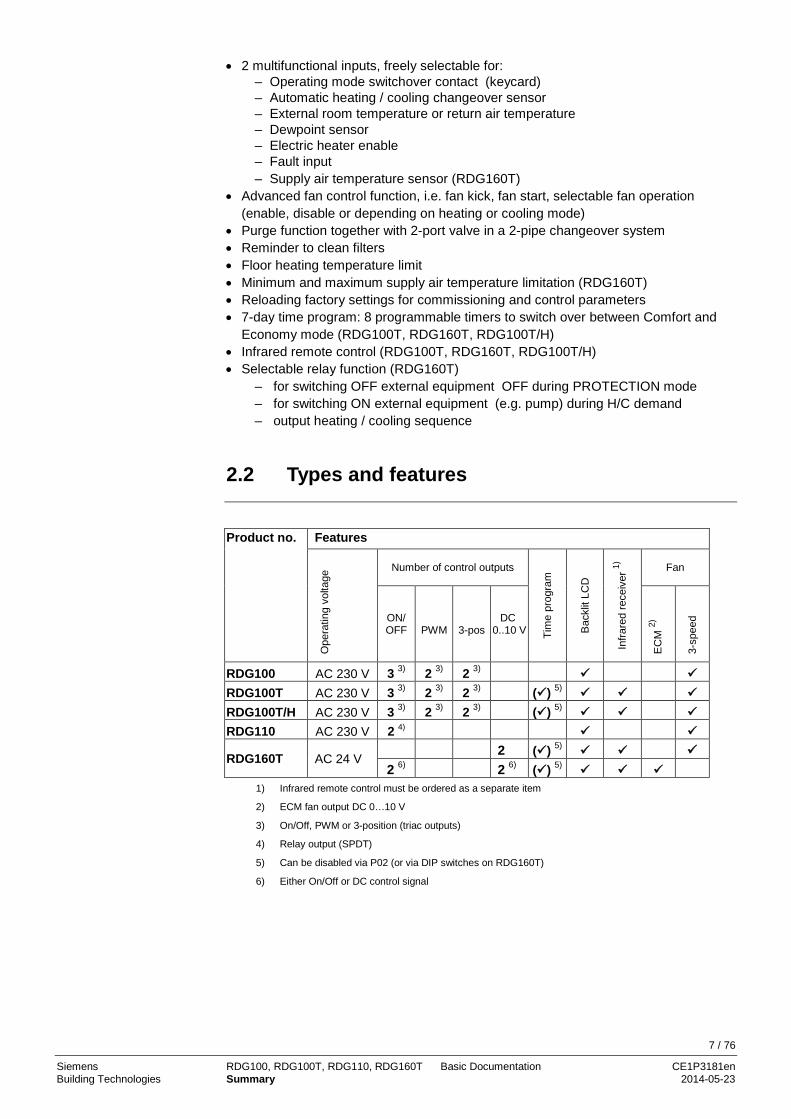
2.2 Types and features
Product no. Features
Ope
ratin
g vo
ltage
Number of control outputs Ti
me
prog
ram
Bac
klit
LCD
Infra
red
rece
iver
1)
Fan
ON/ OFF
PWM
3-pos
DC 0..10 V
EC
M 2)
3-sp
eed
RDG100 AC 230 V 3 3) 2 3) 2 3) RDG100T AC 230 V 3 3) 2 3) 2 3) () 5) RDG100T/H AC 230 V 3 3) 2 3) 2 3) () 5) RDG110 AC 230 V 2 4)
RDG160T AC 24 V 2 () 5) 2 6) 2 6) () 5)
1) Infrared remote control must be ordered as a separate item
2) ECM fan output DC 0…10 V
3) On/Off, PWM or 3-position (triac outputs)
4) Relay output (SPDT)
5) Can be disabled via P02 (or via DIP switches on RDG160T)
6) Either On/Off or DC control signal
7 / 76
Siemens RDG100, RDG100T, RDG110, RDG160T Basic Documentation CE1P3181en Building Technologies Summary 2014-05-23
2.3 Equipment combinations Description Product no. Data Sheet
Infrared remote control
IRA211 3059
Cable temperature or changeover sensor QAH11.1 1840
Room temperature sensor QAA32 1747
Condensation motion
QXA2601 / QXA2602 / QXA2603 / QXA2604
3302
Electromotoric On/Off valve and actuator (only available in AP, UAE, SA and IN)
MVI…/MXI… 4867
Electromotoric On/Off actuator SFA21... 4863
Zone valve actuators (only available in AP, UAE, SA and IN) SUA… 4830
Thermal actuator (for radiator valves) AC 230 V, NO
STA23... 4884
Thermal actuator (for radiator valves) AC 24 V, NO
STA73... *) 4884 *)
Thermal actuator AC 230 V (for small valves 2.5 mm), NC
STP23… 4884
Thermal actuator AC 24 V (for small valves 2.5 mm), NC
STP73... *) 4884 *)
Electrical actuator, 3-position (for radiator valves)
SSA31... 4893
Electrical actuator, 3-position (for 2- and 3-port valves / V…P45) SSC31… 4895
Electrical actuator, 3-position (for small valves 2.5 mm) SSP31… 4864
Electrical actuator, 3-position (for small valves 5.5 mm)
SSB31... 4891
Electrical actuator, 3-position (for CombiValves VPI45) SSD31... 4861
Electromotoric actuator, 3-position (for valves 5.5 mm) SQS35… 4573
Electrical actuator, DC 0...10 V (for radiator valves)
SSA61... 4893
Electrical actuator, DC 0...10 V (for 2- and 3-port valves / V…P45) SSC61… 4895
Electrical actuator, DC 0...10 V (for small valves 2.5 mm) SSP61… 4864
Electrical actuator, DC 0...10 V (for small valves 5.5 mm)
SSB61... 4891
Electrical actuator, DC 0...10 V (for CombiValves VPI45) SSD61... 4861
On / off actuators
On / off and PWM actuators *)
3-position actuators
DC 0…10 V actuators
8 / 76
Siemens RDG100, RDG100T, RDG110, RDG160T Basic Documentation CE1P3181en Building Technologies Summary 2014-05-23
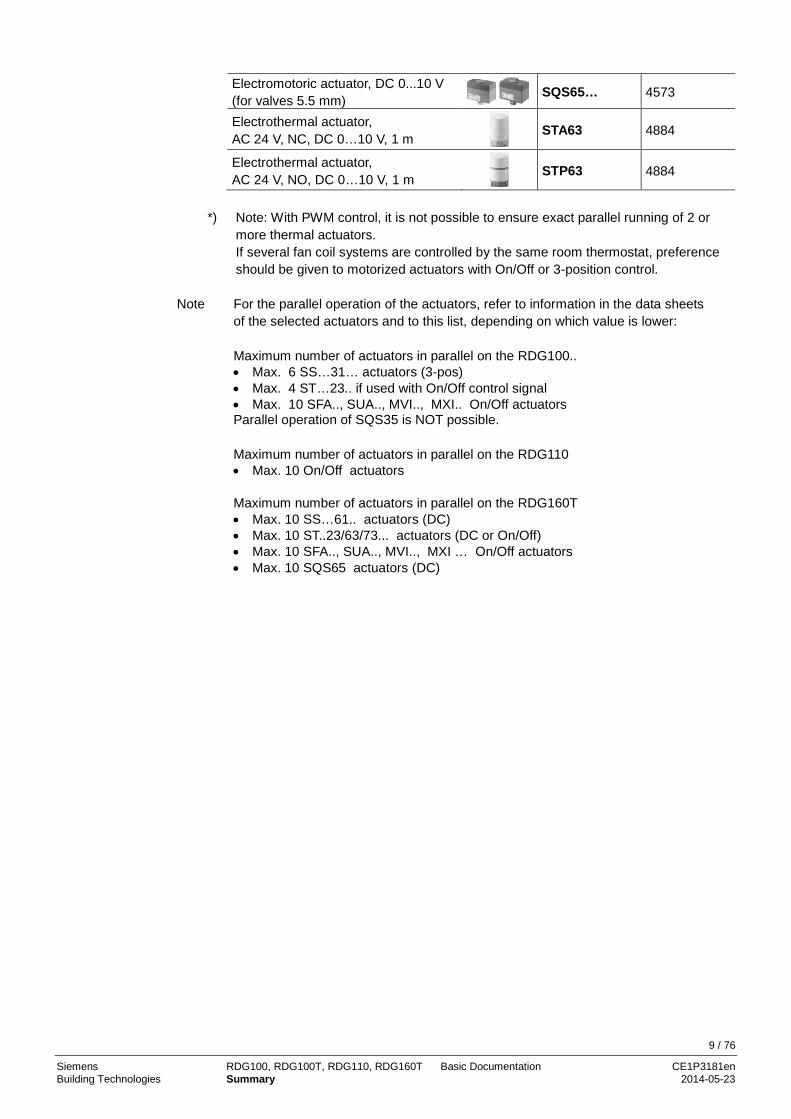
Electromotoric actuator, DC 0...10 V (for valves 5.5 mm) SQS65… 4573
Electrothermal actuator, AC 24 V, NC, DC 0…10 V, 1 m
STA63 4884
Electrothermal actuator, AC 24 V, NO, DC 0…10 V, 1 m
STP63 4884
*) Note: With PWM control, it is not possible to ensure exact parallel running of 2 or
more thermal actuators. If several fan coil systems are controlled by the same room thermostat, preference should be given to motorized actuators with On/Off or 3-position control.
Note
For the parallel operation of the actuators, refer to information in the data sheets of the selected actuators and to this list, depending on which value is lower: Maximum number of actuators in parallel on the RDG100.. • Max. 6 SS…31… actuators (3-pos) • Max. 4 ST…23.. if used with On/Off control signal • Max. 10 SFA.., SUA.., MVI.., MXI.. On/Off actuators Parallel operation of SQS35 is NOT possible. Maximum number of actuators in parallel on the RDG110 • Max. 10 On/Off actuators
Maximum number of actuators in parallel on the RDG160T • Max. 10 SS…61.. actuators (DC) • Max. 10 ST..23/63/73... actuators (DC or On/Off) • Max. 10 SFA.., SUA.., MVI.., MXI … On/Off actuators • Max. 10 SQS65 actuators (DC)
9 / 76
Siemens RDG100, RDG100T, RDG110, RDG160T Basic Documentation CE1P3181en Building Technologies Summary 2014-05-23

2.4 Accessories Description Product no. Data Sheet Changeover mounting kit (50 pcs / package) ARG86.3 3009
2.5 Ordering Product no. Stock number Designation RDG100 S55770-T158 Room thermostat RDG100T S55770-T159 Room thermostat, with timer RDG100T/H S55770-T235 Room thermostat, with timer, landscape housing RDG110 S55770-T160 Room thermostat with relay outputs RDG160T S55770-T343 Room thermostat with timer and DC output for valve
and fan Order the IRA211 infrared remote control separately.
Order valve actuators separately.
10 / 76
Siemens RDG100, RDG100T, RDG110, RDG160T Basic Documentation CE1P3181en Building Technologies Summary 2014-05-23
3 Use
The RDG1… room thermostats are designed for use with the following types of system: Fan coil units via On/Off or modulating control outputs: • 2-pipe system • 2-pipe system with electric heater • 2-pipe system and radiator / floor heating • 4-pipe system • 4-pipe system with electric heater • 2-stage heating or cooling system Chilled / heated ceilings (or radiators) via On/Off or modulating control outputs: • Chilled / heated ceiling • Chilled / heated ceiling with electric heater • Chilled / heated ceiling and radiator / floor heating • Chilled / heated ceiling, 2-stage cooling or heating Heat pumps with dx type equipment: • 1-stage compressor for heating or cooling • 1-stage compressor for heating or cooling with electric heater • 1-stage compressor for heating or cooling and radiator / floor heating • stage compressor for heating and cooling • 1-stage compressor for heating and cooling with reversing valve • 2-stage compressor for heating or cooling
11 / 76
Siemens RDG100, RDG100T, RDG110, RDG160T Basic Documentation CE1P3181en Building Technologies Use 2014-05-23
4 Functions 4.1 Temperature control
Setting of the control parameters (P01, etc., mentioned throughout the document) is described in section 4.15. The thermostat acquires the room temperature via built-in sensor, external room temperature sensor (QAA32), or external return air temperature sensor (QAH11.1), and maintains the setpoint by delivering actuator control commands to heating and/or cooling equipment. The following control outputs are available depending on the thermostat type:
1- / 3-speed fan: • On/Off control on RDG100, RDG100T, RDG100T/H, RDG110 • Modulating PI / P control with 3-position control output on RDG100, RDG100T,
RDG100T/H • Modulating PI / P control with PWM output on RDG100, RDG100T, RDG100T/H • Modulating PI / P control with DC 0…10 V control output on RDG160T ECM fan: • On/Off control on RDG160T • Modulating PI / P control with DC 0…10 V control output on RDG160T The switching differential or proportional band is 2 K for heating mode and 1 K for cooling mode (adjustable via parameters P30 and P31). The integral action time for modulating PI control is adjustable via parameter P35. The display shows the acquired room temperature or the Comfort setpoint, selectable via parameter P06. The factory setting displays the current room temperature. Use parameter P04 to display the room temperature or setpoint in °F rather than °C as needed. If the thermostat is used in a system with manual heating / cooling changeover (P01 = 2), the heating and cooling symbols on the display show the fan coil or terminal unit's status. Thus, the symbols are displayed even when the thermostat operates in the neutral zone. For all other cases, the heating and cooling symbols are displayed when the heating or cooling output is activated.
Concurrent display of the current temperature or setpoint in °C and °F (parameter P07) is possible on the thermostats without 7-day time program.
General note
Display
/
Concurrent display of °C and °F
12 / 76
Siemens RDG100, RDG100T, RDG110, RDG160T Basic Documentation CE1P3181en Building Technologies Functions 2014-05-23

4.2 Operating modes
Select the thermostat's operating mode via the operating mode button on the unit or operating mode input (e.g. keycard occupancy sensor), when X1, X2, or D1 is set to 3 (P38, P40, P42). A corresponding setpoint is used to maintain the room temperature at the desired level depending on the active operating mode. The following operating modes are available: In Comfort mode, the thermostat maintains the room temperature setpoint which can be adjusted via the rotary knob. The fan can be set to automatic or manual fan speed: Low, medium or high. Economy mode helps save energy. Select it by pressing the operating mode button if parameter P02 is set accordingly, or if the external operating mode switchover contact is active (e.g. window contact). If the external operating mode switchover contact is active, user operations are ineffective and OFF is displayed. Control will then be according to Economy setpoints (P11 and P12). In Protection mode, the system is – protected against frost (factory setting 8 °C, can be disabled or changed via P65) – protected against overheating (factory setting OFF, can be enabled or changed via
P66). In Auto Timer mode
AUTO, the thermostat automatically changes from Comfort to
Economy mode according to the 8 preprogrammed timers. The display shows the Auto Timer mode symbol AUTO along with the symbol for the current operating mode (Comfort or Economy ). Automatic is the default fan speed in Auto Timer mode. Auto Timer function can be disabled with parameter P02 = 3, 4 or via DIP switch 5 on RDG160T. The behavior of the operating mode button can be selected via parameter P02:
# Without time program
With time program (RDG100T, RDG100T/H, RDG160T only)
Remark
1 Factory setting 2 3 4
Comfort mode
Economy mode
Note
Protection mode
Auto Timer mode AUTO
(with RDG100T, RDG100T/H, RDG160T only)
Operating mode button
13 / 76
Siemens RDG100, RDG100T, RDG110, RDG160T Basic Documentation CE1P3181en Building Technologies Functions 2014-05-23

4.3 Room temperature setpoints
The factory setting for the Comfort basic setpoint is 21 °C and can be changed via parameter P08.
The setpoint in Comfort mode can be adjusted via the rotary knob.
If the "Temporary setpoint function" is enabled via parameter P69, the setpoint adjusted via the rotary knob is set back to the Comfort basic setpoint when the operating mode changes.
For comfort or energy saving purposes, the setpoint setting range can be limited to minimum (P09) and maximum (P10). • If the minimum limit P09 is set lower than the maximum limit P10, both heating and
cooling are adjustable between these 2 limits. • The customer adjusts the desired setpoint and the thermostat controls the room
temperature accordingly. • For 4-pipe applications *), the selected comfort setpoint is in the middle of the
dead zone (P33). The unit stops to energize the heating / cooling outputs as soon as the room temperature reaches the dead zone.
Example
5°C 40°C25°C18°CP10P09
Cooling setpoint adjustable 18…25 °C Heating setpoint adjustable 18…25 °C
• If the minimum limit P09 is set higher than the limit P10, then – The setting range of cooling setpoint is from P09…40 °C in place of 5…40 °C – The setting range of heating setpoint is from 5…P10 °C in place of 5…40 °C This allows the user to limit the maximum heating setpoint and the minimum cooling setpoint. This concept helps to save energy costs.
• For 4-pipe applications: – The thermostat runs with the setpoint of the active sequence:
In heating mode, the heating setpoint is active and adjustable via rotary knob. In cooling mode, the cooling setpoint is active and adjustable via rotary knob.
– Switching from the heating setpoint to the cooling setpoint and vice-versa occurs when the room temperature reaches the adjusted limitation (P09 or P10) of the inactive sequence. E.g. the thermostat is in heating sequence and runs with the heating setpoint. When the room temperature reaches P09, the thermostat switches to cooling mode and runs with the cooling setpoint, as long as the room temperature does not drop below P10.
Example
5°C 40°C25°C21°CP09P10
Cooling setpoint adjustable 25…40 °C Heating setpoint adjustable 5…21 °C
Comfort mode
Temporary setpoint
Setpoint limitation
P09 < P10 (comfort concept)
P09 ≥ P10 (energy saving concept)
14 / 76
Siemens RDG100, RDG100T, RDG110, RDG160T Basic Documentation CE1P3181en Building Technologies Functions 2014-05-23
Use control parameters P11 and P12 to adjust the Economy mode setpoints. The heating setpoint is factory-set to 15 °C, and the cooling setpoint to 30 °C. Use control parameters P65 and P66 to adjust the Protection mode setpoints. The heating setpoint is factory-set to 8 °C (frost protection) and to OFF for cooling. If a setpoint is set to OFF (P65, P66), the thermostat does not maintain the setpoint in the corresponding mode (heating or cooling). This means no protective heating or cooling function and thus risk of frost in the heating mode or risk of overtemperature in cooling mode!
The Economy setpoints are accessible at the service level (P11, P12); the Protection setpoints at the expert level (P65, P66). 4.4 Setpoints and sequences 4.4.1 2-pipe and 2-stage applications
On changeover applications, the Comfort setpoints for heating and cooling sequence are the same (w).
On 2-pipe applications with electric heater, the Comfort setpoint is either at the first heating sequence (in heating mode) or at the cooling sequence (in cooling mode).
On 2-pipe applications with radiator, the Comfort setpoint is either at the radiator sequence (in heating mode) or at the cooling sequence (in cooling mode).
The setpoints for Economy and Protection mode are below the Comfort setpoints (heating) and above the Comfort setpoints (cooling). They can be set via parameters P11, P12 (Economy mode) and P65, P66 (Protection mode).
Economy mode
Protection mode
Caution
15 / 76
Siemens RDG100, RDG100T, RDG110, RDG160T Basic Documentation CE1P3181en Building Technologies Functions 2014-05-23
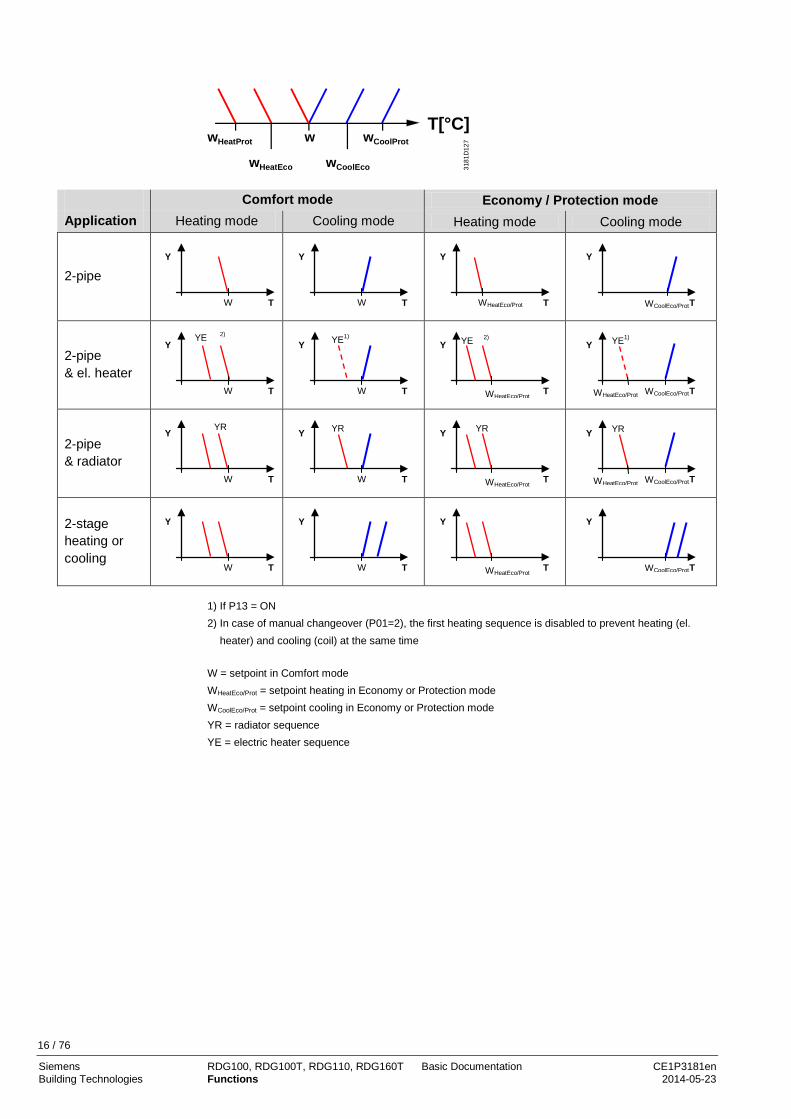
w
3181
D12
7
T[°C]wHeatProt wCoolProt
wHeatEco wCoolEco
Comfort mode Economy / Protection mode Application Heating mode Cooling mode Heating mode Cooling mode
2-pipe
2-pipe & el. heater
2-pipe & radiator
2-stage heating or cooling
1) If P13 = ON 2) In case of manual changeover (P01=2), the first heating sequence is disabled to prevent heating (el.
heater) and cooling (coil) at the same time W = setpoint in Comfort mode WHeatEco/Prot = setpoint heating in Economy or Protection mode WCoolEco/Prot = setpoint cooling in Economy or Protection mode YR = radiator sequence YE = electric heater sequence
Y
T WCoolEco/Prot
Y
T WHeatEco/Prot
Y
T W
Y
T W
Y
T WHeatEco/Prot WCoolEco/Prot
YR Y
T WHeatEco/Prot
YR Y
T W
YR Y
T W
YR
Y
T WHeatEco/Prot WCoolEco/Prot
YE1) Y
T WHeatEco/Prot
YE 2)
Y
T W
YE1) Y
T W
YE 2)
Y
T WCoolEco/Prot
Y
T WHeatEco/Prot
Y
T W
Y
T W
16 / 76
Siemens RDG100, RDG100T, RDG110, RDG160T Basic Documentation CE1P3181en Building Technologies Functions 2014-05-23

4.4.2 4-pipe applications
On 4-pipe applications, the Comfort setpoint (w) is in the middle of the dead zone, between the heating and cooling sequence.
The dead zone can be adjusted via parameter P33.
If manual changeover is selected, then either the cooling sequence or the heating sequence is released. In this case, the Comfort setpoint is at the selected heating or cooling sequence.
Comfort mode Economy / Protection mode
Application Heating and Cooling Heating mode1) Cooling mode1) Heating and/or cooling
4-pipe 4-pipe & el.
heater
1) Manual changeover, P01=2 W = setpoint in Comfort mode WHeatEco/Prot = heating setpoint for Economy or Protection mode WCoolEco/Prot = cooling setpoint for Economy or Protection mode YE = electric heater sequence
Y
T W
Y
T W
Y
T W
YE Y
T WHeatEco/Prot WCoolEco/Prot
YE Y
T W
YE
Y
T WHeatEco/Prot WCoolEco/Prot
Y
T W
Y
T W
17 / 76
Siemens RDG100, RDG100T, RDG110, RDG160T Basic Documentation CE1P3181en Building Technologies Functions 2014-05-23

4.5 Applications overview
The thermostats support the following applications, which can be configured via DIP switches at the rear of the unit. Depending on the type of thermostat, On/Off or modulating control outputs are available.
4.5.1 Applications for fan coil systems
Applications, DIP setting, Control outputs
• 2-pipe fan coil unit 1 2 3 4 5
ON
OFF
• 2-pipe fan coil unit and electric heater
1 2 3 4 5
ON
OFF
• 2-pipe fan coil unit and radiator / floor heating
1 2 3 4 5
ON
OFF
(B1)
M1
Y1
TB2
T
T
(B1)
Y1
M130
76S
02_0
1
T
YE
T(B1)
T
(B1)
B2
(B1)
M1
Y1
TB2
T
T
(B1)
YR
Using RDG100.., RDG110, RDG160T
Using RDG100.., RDG110, RDG160T
Using RDG100.., RDG110, RDG160T
• 2-pipe / 2-stage fan coil unit
1 2 3 4 5
ON
OFF
• 4-pipe fan coil unit
1 2 3 4 5
ON
OFF
• 4-pipe fan coil unit and electric heater
1 2 3 4 5
ON
OFF
Y1
M1
TB2
T(B1)
T
(B1)
Y2
T
Y2
Y1
M1
(B1)
T
(B1)
T
Y2
Y1M1
3076
S05
_01
(B1)
T
(B1)
YE
B2
Using RDG100.., RDG110, RDG160T
Using RDG100.., RDG110, RDG160T
Using RDG100..
Product no. Control outputs Fan RDG100 On/Off, PWM, 3-position 3-speed, 1-speed RDG110 On/Off (SPDT) 3-speed, 1-speed RDG160T DC 0...10 V 3-speed, 1-speed RDG160T On/Off, DC 0...10 V DC 0...10 V ECM
18 / 76
Siemens RDG100, RDG100T, RDG110, RDG160T Basic Documentation CE1P3181en Building Technologies Functions 2014-05-23

4.5.2 Applications for Universal systems
Applications, DIP setting, Control outputs
• Chilled / heated ceiling
1 2 3 4 5
ON
OFF
• Chilled / heated ceiling and electric heater
1 2 3 4 5
ON
OFF
• Chilled / heated ceiling and radiator / floor heating
1 2 3 4 5
ON
OFF
3191
S11
N1T
B1T
B2
T
D3
Y1
3191
S12
N1TYE
B1T
B2
T
D3
Y1
3191
S14
N1T
B1T
B2
T
D3
Y1
YR
Using RDG100.., RDG110, RDG160T
Using RDG100.., RDG110, RDG160T
Using RDG100.., RDG110, RDG160T
• 2-stage chilled / heated ceiling
1 2 3 4 5
ON
OFF
• Chilled ceiling and radiator
1 2 3 4 5
ON
OFF
Y1
Y2
3191
S13
N1T
B1T
D3
Y1
YR
Using RDG100.., RDG110, RDG160T
Using RDG100.., RDG110, RDG160T
Product no. Control outputs RDG100 On/Off, PWM, 3-position RDG110 On/Off (SPDT) RDG160T On/Off, DC 0...10 V
For more detailed information, refer to subsection 4.7.9.
19 / 76
Siemens RDG100, RDG100T, RDG110, RDG160T Basic Documentation CE1P3181en Building Technologies Functions 2014-05-23
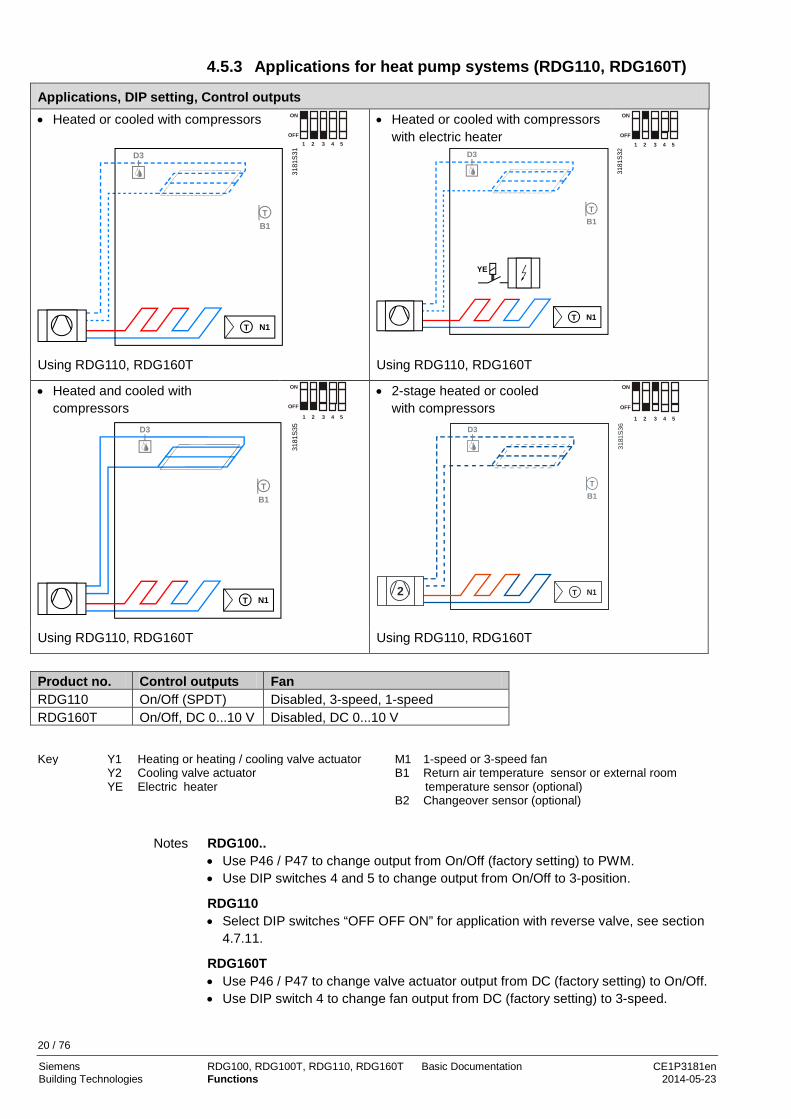
4.5.3 Applications for heat pump systems (RDG110, RDG160T)
Applications, DIP setting, Control outputs
• Heated or cooled with compressors
1 2 3 4 5
ON
OFF
• Heated or cooled with compressors with electric heater
1 2 3 4 5
ON
OFF
3181
S31
N1T
B1T
D3
3181
S32
N1T
YE
B1T
D3
Using RDG110, RDG160T Using RDG110, RDG160T
• Heated and cooled with compressors
1 2 3 4 5
ON
OFF
• 2-stage heated or cooled with compressors
1 2 3 4 5
ON
OFF
3181
S35
N1T
B1T
D3
31
81S
36
N1T
B1T
D3
2
Using RDG110, RDG160T Using RDG110, RDG160T
Product no. Control outputs Fan RDG110 On/Off (SPDT) Disabled, 3-speed, 1-speed RDG160T On/Off, DC 0...10 V Disabled, DC 0...10 V
Key Y1 Heating or heating / cooling valve actuator M1 1-speed or 3-speed fan Y2 Cooling valve actuator
YE Electric heater B1 Return air temperature sensor or external room
temperature sensor (optional) B2 Changeover sensor (optional)
RDG100.. • Use P46 / P47 to change output from On/Off (factory setting) to PWM. • Use DIP switches 4 and 5 to change output from On/Off to 3-position.
RDG110 • Select DIP switches “OFF OFF ON” for application with reverse valve, see section
4.7.11.
RDG160T • Use P46 / P47 to change valve actuator output from DC (factory setting) to On/Off. • Use DIP switch 4 to change fan output from DC (factory setting) to 3-speed.
Notes
20 / 76
Siemens RDG100, RDG100T, RDG110, RDG160T Basic Documentation CE1P3181en Building Technologies Functions 2014-05-23
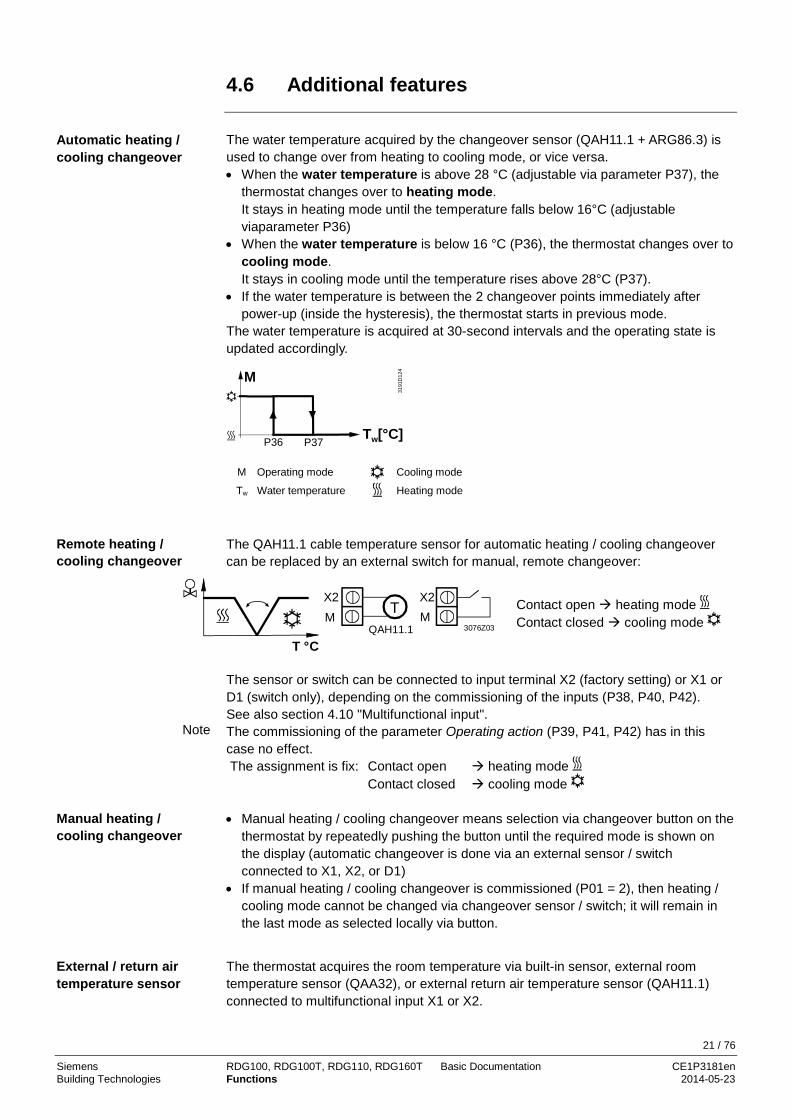
4.6 Additional features
The water temperature acquired by the changeover sensor (QAH11.1 + ARG86.3) is used to change over from heating to cooling mode, or vice versa. • When the water temperature is above 28 °C (adjustable via parameter P37), the
thermostat changes over to heating mode. It stays in heating mode until the temperature falls below 16°C (adjustable viaparameter P36)
• When the water temperature is below 16 °C (P36), the thermostat changes over to cooling mode. It stays in cooling mode until the temperature rises above 28°C (P37).
• If the water temperature is between the 2 changeover points immediately after power-up (inside the hysteresis), the thermostat starts in previous mode.
The water temperature is acquired at 30-second intervals and the operating state is updated accordingly.
P36
M
Tw[°C]P37
3191
D12
4
M Operating mode Cooling mode
Tw Water temperature Heating mode
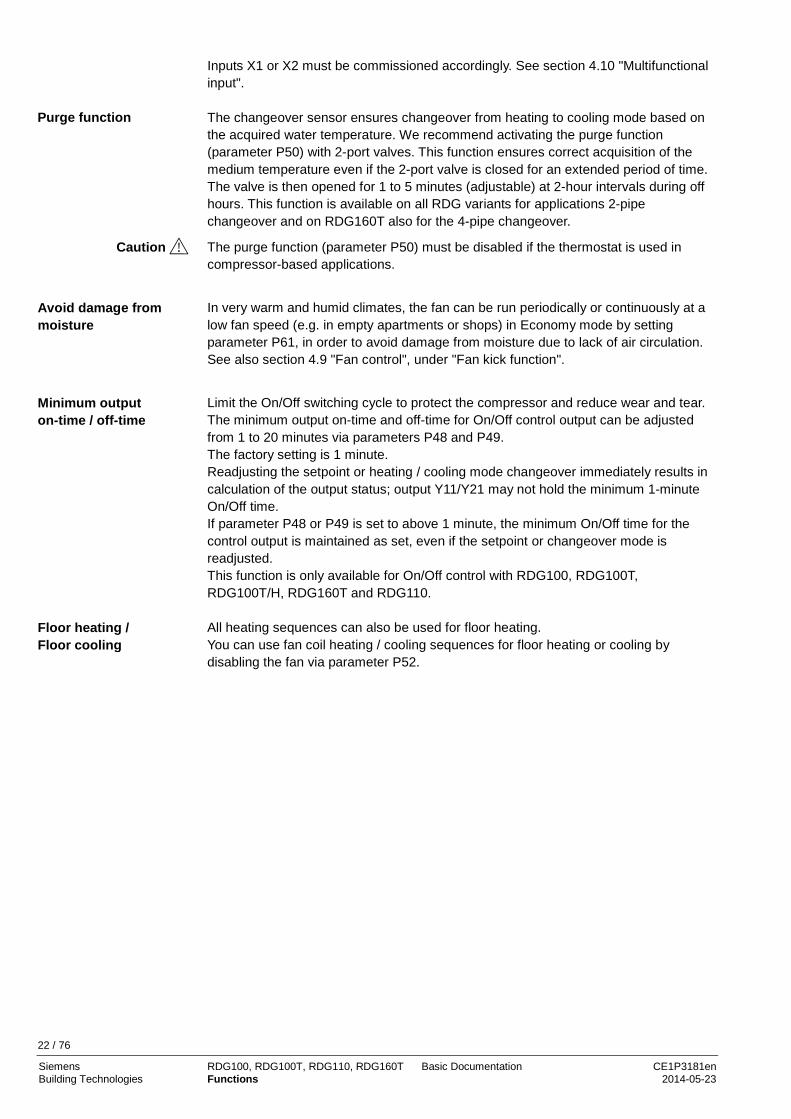
The QAH11.1 cable temperature sensor for automatic heating / cooling changeover can be replaced by an external switch for manual, remote changeover:
3076Z03
X2M
TX2M
QAH11.1T °C
Contact open heating mode Contact closed cooling mode
The sensor or switch can be connected to input terminal X2 (factory setting) or X1 or D1 (switch only), depending on the commissioning of the inputs (P38, P40, P42). See also section 4.10 "Multifunctional input". The commissioning of the parameter Operating action (P39, P41, P42) has in this case no effect. The assignment is fix: Contact open heating mode Contact closed cooling mode • Manual heating / cooling changeover means selection via changeover button on the
thermostat by repeatedly pushing the button until the required mode is shown on the display (automatic changeover is done via an external sensor / switch connected to X1, X2, or D1)
• If manual heating / cooling changeover is commissioned (P01 = 2), then heating / cooling mode cannot be changed via changeover sensor / switch; it will remain in the last mode as selected locally via button.
The thermostat acquires the room temperature via built-in sensor, external room temperature sensor (QAA32), or external return air temperature sensor (QAH11.1) connected to multifunctional input X1 or X2.
Automatic heating / cooling changeover
Remote heating / cooling changeover
Note
Manual heating / cooling changeover
External / return air temperature sensor
21 / 76
Siemens RDG100, RDG100T, RDG110, RDG160T Basic Documentation CE1P3181en Building Technologies Functions 2014-05-23
Inputs X1 or X2 must be commissioned accordingly. See section 4.10 "Multifunctional input". The changeover sensor ensures changeover from heating to cooling mode based on the acquired water temperature. We recommend activating the purge function (parameter P50) with 2-port valves. This function ensures correct acquisition of the medium temperature even if the 2-port valve is closed for an extended period of time. The valve is then opened for 1 to 5 minutes (adjustable) at 2-hour intervals during off hours. This function is available on all RDG variants for applications 2-pipe changeover and on RDG160T also for the 4-pipe changeover.
The purge function (parameter P50) must be disabled if the thermostat is used in compressor-based applications.
In very warm and humid climates, the fan can be run periodically or continuously at a low fan speed (e.g. in empty apartments or shops) in Economy mode by setting parameter P61, in order to avoid damage from moisture due to lack of air circulation. See also section 4.9 "Fan control", under "Fan kick function".
Limit the On/Off switching cycle to protect the compressor and reduce wear and tear. The minimum output on-time and off-time for On/Off control output can be adjusted from 1 to 20 minutes via parameters P48 and P49. The factory setting is 1 minute. Readjusting the setpoint or heating / cooling mode changeover immediately results in calculation of the output status; output Y11/Y21 may not hold the minimum 1-minute On/Off time. If parameter P48 or P49 is set to above 1 minute, the minimum On/Off time for the control output is maintained as set, even if the setpoint or changeover mode is readjusted. This function is only available for On/Off control with RDG100, RDG100T, RDG100T/H, RDG160T and RDG110. All heating sequences can also be used for floor heating. You can use fan coil heating / cooling sequences for floor heating or cooling by disabling the fan via parameter P52.
Purge function
Caution
Avoid damage from moisture
Minimum output on-time / off-time
Floor heating / Floor cooling
22 / 76
Siemens RDG100, RDG100T, RDG110, RDG160T Basic Documentation CE1P3181en Building Technologies Functions 2014-05-23
The temperature should be limited for 2 reasons: comfort and protection of the floor.
The floor temperature sensor, connected to multifunctional input X1 or X2, acquires the floor temperature. If the temperature exceeds the parameterized limit (parameter P51), the heating valve is fully closed until the floor temperature drops to a level 2 K below the parameterized limit. This function is factory-set to OFF (disabled). Input X1 or X2 must be commissioned accordingly (P38 or P40 = 1). See section 4.10 "Multifunctional input".
Living rooms: Up to 26 °C for long-term presence, up to 28 °C for short-time presence. Bath rooms: Up to 28 °C for long-term presence, up to 30 °C for short-time presence. The table below shows the relation between parameter, temperature source and temperature display:
Parameter P51 External temp. sensor available
Source for display of room temperature
Output control according to
Floor temp. limit function
OFF No Built-in sensor Built-in sensor Not active
OFF Yes External temp. sensor External temp. sensor Not active
10...50˚C No Built-in sensor Built-in sensor Not active
10…50˚C Yes Built-in sensor Built-in sensor + limit by external sensor Active
The floor temperature limitation function influences the outputs listed in the table below:
*) If P13 = ON --> el. heater in cooling mode
Either floor temperature sensor or external room temperature sensor can be used. This function increases the comfort in the room by keeping the supply air temperature of the fan coil unit between the selected minimum and maximum temperature limits. If the supply air temperature exceeds a limit, the thermostat reduces the corresponding valve position until the supply air temperature is back in the limits.
In case the air flow is too low (especially with DC 0...10 V fans), this prevents cold air from dumping into the room / warm air from bubbling straight up instead of circulating.
To enable this function, the multifunctional input, to which the supply air sensor is connected, needs to be set to "Supply air sensor" (e.g. P38=9). Then the parameters for the limits are visible (P63: minimum supply air temperature, P64: maximum supply air temperature).
Floor temperature limitation function
Recommended values for P51:
Floor temp. limit function has influence on t t
Application Output Y1 Output Y2 Output Y3 Heat. mode (P01=0/2/3)
Cool. mode (P01=1/2/3)
Heat. & cool. mode (P01=4) Remark
2-pipe H/C valve Y1 N/A
2-pipe & el heater H/C valve El. heater Y2 Y2 *) Only el. heater
2-pipe & radiator H/C valve Radiator Y2 Y2 Only radiator
4-pipe Heating valve Cooling valve Y1 N/A Y1
4-pipe & el heater Heating valve Cooling valve El. heater Y3 N/A Y3 Only el. heater
2-stage 1st H/C 2nd H/C Y1, Y2 N/A
Note
Supply air temperature limitation (RDG160T)
23 / 76
Siemens RDG100, RDG100T, RDG110, RDG160T Basic Documentation CE1P3181en Building Technologies Functions 2014-05-23
This function is only active in Comfort mode and can only be used with DC 0...10 V actuators.
For applications with electric heater and radiator, this function is available only on the cooling valve (in cooling mode). Dewpoint monitoring is essential to prevent condensation on the chilled ceiling (cooling with fan disabled, parameter P52). It helps avoid associated damage to the building. A dewpoint sensor with a potential-free contact is connected to multifunctional input X1, X2 or D1. If there is condensation, the cooling valve is fully closed until no more condensation is detected, and the cooling output is disabled temporarily. The condensation symbol is displayed during temporary override. The input must be commissioned accordingly (P38, P40, P42). See section 4.10 "Multifunctional input".
If the button lock function is enabled by parameter P14, the buttons will be locked or unlocked by pressing the right button for 3 seconds. If "Auto lock" is configured, the thermostat will automatically lock the buttons 10 seconds after the last adjustment.
The thermostat can be forced into Economy mode (e.g. when a window is opened). The window contact can be connected to digital input D1 (or multifunctional input X1, X2). Set parameter P42 (P38, P40) to 3.
The left button switches the operating mode from Economy to Comfort for the period preset in P68, if the following conditions are fulfilled: • The operating mode switchover contact is closed (connected to input X1, X2, D1,
parameter P38, P40, P42 set to 3) • Parameter P68 (extend Comfort period) is greater than 0 During the temporary Comfort mode extension, sandglass symbol appears.
If parameter P68 (extend Comfort period) = 0, extended Comfort cannot be activated; pressing the left button will show "OFF" (blinking 3 times).
The current operating mode can be forced temporarily into Comfort or Economy / Protection mode. The time period is adjusted via the rotary knob: • Extend presence: Set the device to Comfort mode for the selected time period • Extend absence: Set the device to Economy / Protection mode for the selected time
period To activate the function, keep the left button pressed and, within 3 seconds, turn the rotary knob … • clockwise for extended presence • counterclockwise for extended absence The rotary knob adjusts the time period: • Extend presence: 0.00…+9:30 in steps of 30 minutes; symbol appears • Extend absence: 0.00…–9:30 in steps of 30 minutes; symbol or appears During the extended presence / absence period, sandglass symbol appears.
Note
Dewpoint monitoring
Button lock
Operating mode switchover contact (window contact)
Extended Comfort mode (operating mode switchover contact closed)
Temporary timer for extension of presence / absence
24 / 76
Siemens RDG100, RDG100T, RDG110, RDG160T Basic Documentation CE1P3181en Building Technologies Functions 2014-05-23
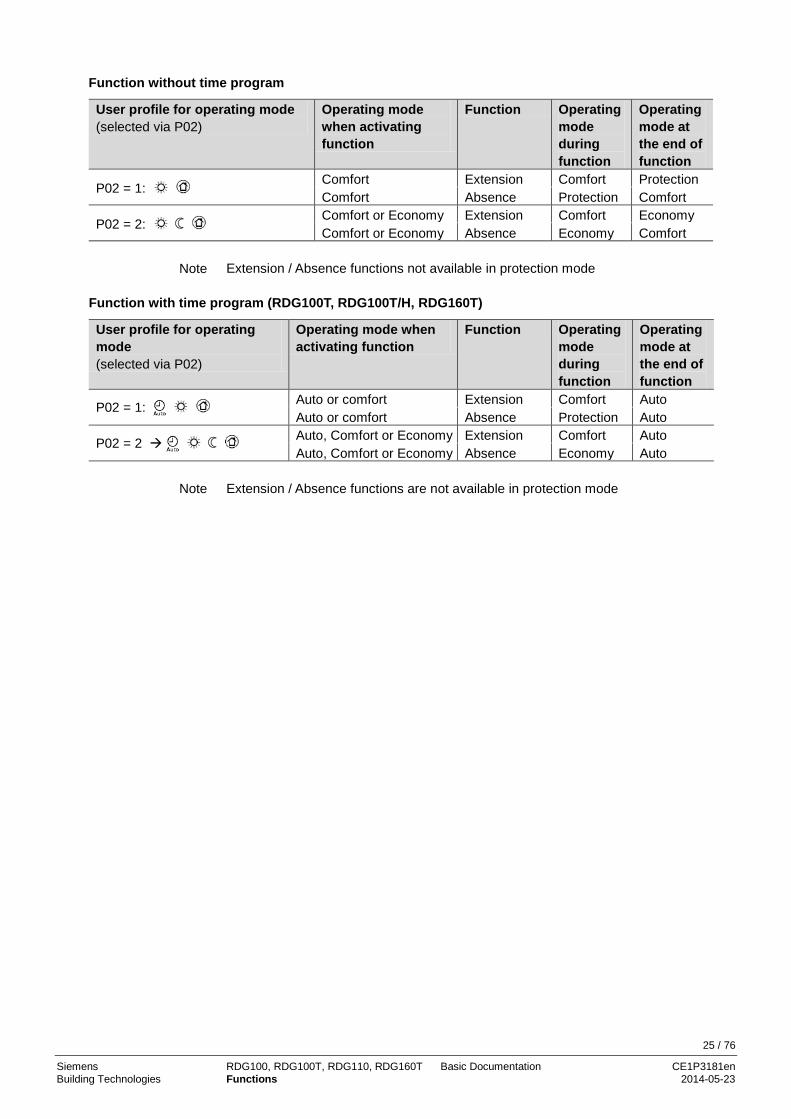
Function without time program
User profile for operating mode (selected via P02)
Operating mode when activating function
Function Operating mode during function
Operating mode at the end of function
P02 = 1: Comfort Extension Comfort Protection Comfort Absence Protection Comfort
P02 = 2: Comfort or Economy Extension Comfort Economy Comfort or Economy Absence Economy Comfort
Extension / Absence functions not available in protection mode
Function with time program (RDG100T, RDG100T/H, RDG160T)
User profile for operating mode (selected via P02)
Operating mode when activating function
Function Operating mode during function
Operating mode at the end of function
P02 = 1: Auto or comfort Extension Comfort Auto Auto or comfort Absence Protection Auto
P02 = 2 Auto, Comfort or Economy Extension Comfort Auto Auto, Comfort or Economy Absence Economy Auto
Extension / Absence functions are not available in protection mode
Note
Note
25 / 76
Siemens RDG100, RDG100T, RDG110, RDG160T Basic Documentation CE1P3181en Building Technologies Functions 2014-05-23
4.6.1 Qx- relay switching functions (RDG160T only) The following special functions are available on the RDG160T and allow the control of external equipment connected to the Q1, Q2 and Q3 relay outputs. • Switch OFF external equipment when the thermostat is in Protection Mode • Switch ON external equipment during heating / cooling demand • Output heating / cooling sequence
The relay output corresponding parameters need to be set to enable the function. • Function on Q1, set parameter P72. Test relay function via diagnostic d08. • Function on Q2, set parameter P73. Test relay function via diagnostic d09. • Function on Q3, set parameter P74. Test relay function via diagnostic d10.
• Those functions are available when DIP4 is set to OFF (EC fan). • It is not suggested to use those functions in combination with the On/Off valve
control (P46/P47=1) to guarantee the temperature accuracy. If this combination is requested, the total maximum current on the relay outputs (Q1+Q2+Q3) should not exceed 2A.
The external equipment (e.g. fan coil unit) can be switched OFF via relay output, in order to reduce energy consumption when the thermostat is in Protection mode and no temperature control is requested.
The function can be enabled by setting the corresponding Qx- parameter to 1. Relay contact is open when the thermostat is in protection mode. During the heating or cooling demand, the relay contact can be energized to control an external equipment, for example to run the pump of a water system (fan coil).
To reduce the wear and tear of the HVAC equipment, the minimum output on-time and off-time of the Qx- relay output can be adjusted from 1 to 20 minutes via parameters P48 and P49. The factory setting is 1 minute. The relay output remains OFF if the heating is provided ONLY by electric heater (application 2-pipe electrical heater, heating by electrical heater, cooling by fan coil) or radiator.
2-pipe water system (with one pump): • Enable the function by selecting the corresponding output parameter to 2 • Connect the external equipment to selected relay output • In case of heating / cooling demand, the output contact is energized
4-pipe water system (with two pumps): • The function can be enabled by selecting the correspondent output parameters
> set one parameter to 3. The output is energized during heating demand > set one other parameter to 4. The output is energized during cooling demand
• Connect the external equipment to the selected relay outputs This function switches the relay output depending on the sequence, either heating or cooling. The output can be used for the release of a heat pump compressor.
• When the thermostat is in heating mode (even in dead zone): > the correspondent Qx- output contact is closed.
• When the thermostat is in cooling mode (even in dead zone): > the correspondent Qx- output contact is open.
The function can be enabled by setting the corresponding Qx- parameter to 5.
Notes
Switch OFF external equipment in Protection mode
Switch ON contact during Heat / Cool demand
Note
Output heating / cooling sequence
26 / 76
Siemens RDG100, RDG100T, RDG110, RDG160T Basic Documentation CE1P3181en Building Technologies Functions 2014-05-23

4.7 Control sequences 4.7.1 Sequences overview (setting via parameter P01)
The sequence can be set via parameter P01. The thermostats can be used in systems featuring: • Heating only (P01 = 0) • Cooling only (P01 = 1) • Manual heating / cooling changeover (P01 = 2) • Automatic heating / cooling changeover (P01 = 3) • Heating and cooling mode (e.g. 4-pipe system) (P01 = 4) The available modes depend on the application (selected via DIP switch, see section 4.5).
Parameter P01 = 0 P01 = 1 P01 = 2 P01 = 3 P01 = 4
Sequence
T °C
T °C T °C
T °C
T
T °C
Mode
Available for basic application 1) :
Heating mode Cooling
= heating sequence for el. heater / radiator
Manually select heating or cooling sequence (using the button on the thermostat)
Automatic heating/cooling changeover via external water temperature sensor or remote switch
Heating and cooling mode, i.e. 4-pipe
2-pipe, 2-pipe & el. heater 2-pipe & radiator
4-pipe 4-pipe & el. heater 2) 2)
2-stage heating or cooling
1) Chilled / heated ceiling and radiator applications: see section 4.7.9;
Compressor applications: see section 4.7.10. 2) Manual and automatic changeover for 4-pipe applications, see section 4.7.6:
– 4-pipe manual changeover (P01 = 2) means activating either cooling or heating outputs
– 4-pipe automatic changeover (P01 = 3) means swapping the control outputs according to a heating / cooling sensor or remote switch (main and secondary application), see section 4.7.6
Notes
27 / 76
Siemens RDG100, RDG100T, RDG110, RDG160T Basic Documentation CE1P3181en Building Technologies Functions 2014-05-23
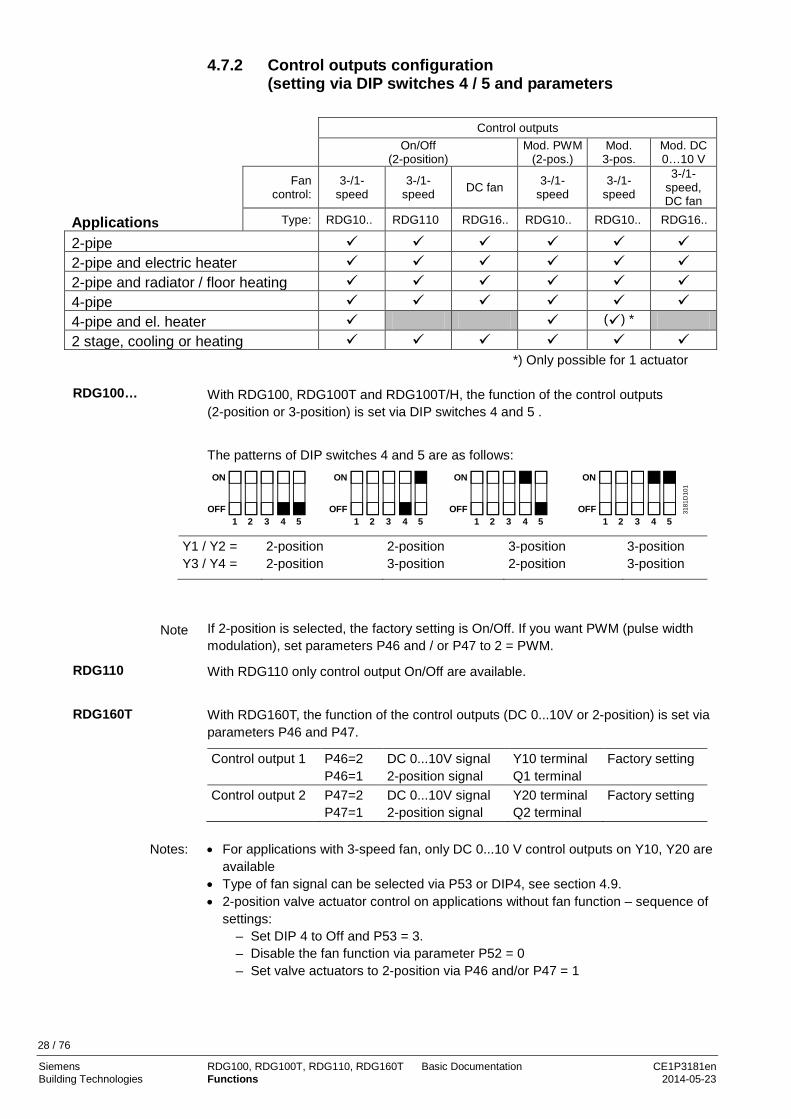
4.7.2 Control outputs configuration (setting via DIP switches 4 / 5 and parameters
Control outputs
On/Off (2-position)
Mod. PWM (2-pos.)
Mod. 3-pos.
Mod. DC 0…10 V
Fan
control: 3-/1-
speed 3-/1-
speed DC fan 3-/1-speed
3-/1-speed
3-/1-speed, DC fan
Applications Type: RDG10.. RDG110 RDG16.. RDG10.. RDG10.. RDG16..
2-pipe 2-pipe and electric heater 2-pipe and radiator / floor heating 4-pipe 4-pipe and el. heater () * 2 stage, cooling or heating
*) Only possible for 1 actuator With RDG100, RDG100T and RDG100T/H, the function of the control outputs (2-position or 3-position) is set via DIP switches 4 and 5 .
The patterns of DIP switches 4 and 5 are as follows: ON
OFF1 2 3 4 5
ON
OFF1 2 3 4 5
ON
OFF1 2 3 4 5
ON
OFF1 2 3 4 5
3181
D10
1
Y1 / Y2 = 2-position 2-position 3-position 3-position Y3 / Y4 = 2-position 3-position 2-position 3-position
If 2-position is selected, the factory setting is On/Off. If you want PWM (pulse width modulation), set parameters P46 and / or P47 to 2 = PWM.
With RDG110 only control output On/Off are available.
With RDG160T, the function of the control outputs (DC 0...10V or 2-position) is set via parameters P46 and P47.
Control output 1 P46=2 DC 0...10V signal Y10 terminal Factory setting P46=1 2-position signal Q1 terminal Control output 2 P47=2 DC 0...10V signal Y20 terminal Factory setting P47=1 2-position signal Q2 terminal
• For applications with 3-speed fan, only DC 0...10 V control outputs on Y10, Y20 are
available • Type of fan signal can be selected via P53 or DIP4, see section 4.9. • 2-position valve actuator control on applications without fan function – sequence of
settings: – Set DIP 4 to Off and P53 = 3. – Disable the fan function via parameter P52 = 0 – Set valve actuators to 2-position via P46 and/or P47 = 1
RDG100…
Note
RDG110
RDG160T
Notes:
28 / 76
Siemens RDG100, RDG100T, RDG110, RDG160T Basic Documentation CE1P3181en Building Technologies Functions 2014-05-23

For details concerning connection of peripheral devices and setting of the DIP switches, refer to the Mounting Instructions: – [4] M3181.1 (RDG100, RDG100T) – [5] M3181.2 (RDG110) – [6] M3181.5 (RDG160T) – [7] M3181.4 (RDG100T/H) 4.7.3 2-pipe fan coil unit
On 2-pipe applications, the thermostat controls a valve in heating / cooling mode with changeover (automatic or manual), heating only, or cooling only. Cooling only is factory set (P01 = 1).
On/Off control The diagrams below shows the control sequence for 2-position control.
Heating mode Cooling mode
½ SDH
1
0
½ SDH
w
Y
3191
D01
T[°C]
YHC
Y
½ SDC
1
0
½ SDC
w
3191
D02
T[°C]
YHC
T[°C] Room temperature SDH Switching differential "Heating" (P30) w Room temperature setpoint SDC Switching differential "Cooling" (P31) YHC Control command "Valve" or "Compressor"
Modulating control: 3-position, PWM or DC 0…10 V The diagrams below show the control sequence for modulating PI control.
Heating mode Cooling mode
XpH
100
0 w
Y [%]
3191
D03
T[°C]
YHC
XpC
Y [%]
100
0 w
3191
D04
T[°C]
YHC
T[°C] Room temperature XpH Proportional band "Heating" (P30) w Room temperature setpoint XpC Proportional band "Cooling" (P31) YHC Control command "Valve" The diagrams only show the PI controller’s proportional part.
Setting the sequence and the control outputs Refer to sections 4.5 ("Applications"), 4.7.1 ("Sequences") and 4.7.2 ("Outputs").
Control sequence On/Off output
Control sequence modulating output
Note
29 / 76
Siemens RDG100, RDG100T, RDG110, RDG160T Basic Documentation CE1P3181en Building Technologies Functions 2014-05-23
4.7.4 2-pipe fan coil unit with electric heater
On 2-pipe applications with electric heater, the thermostat controls a valve in heating / cooling mode with changeover, heating only, or cooling only plus an electric heater. Cooling only is factory set (P01=1) with enabled electric heater (P13).
In cooling mode, the valve receives an OPEN command if the acquired temperature is above the setpoint. The electric heater receives an ON command if the acquired room temperature drops below "setpoint" minus "dead zone" (= setpoint for electric heater) while the electric heater is enabled (parameter P13 = on).
Note: "Setpoint for electric heater" is limited by parameter "Maximum setpoint for Comfort mode" (P10).
In heating mode, the valve receives an OPEN command if the acquired temperature is below the setpoint. The electric heater is used as an additional heating source when the heating energy controlled by the valve is insufficient. The electric heater receives an ON command, if the temperature is below "setpoint" minus "setpoint differential" (= setpoint for electric heater).
The electric heater is active in heating mode only and the control output for the valve is permanently disabled when manual changeover is selected (P01=2).
Remote enabling / disabling of the electric heater is possible via input X1, X2 or D1 for tariff regulations, energy savings, etc. Input X1, X2, or D1 must be commissioned accordingly (parameters P38, P40, P42). See section 4.10 "Multifunctional input".
An electric heater must always be protected by a safety thermostat!
• With a DC 0...10 V (ECM) fan it is possible to select On/Off control for the electric heater by setting parameter P47 = 1. The electric heater has to be connected to output Q2.
• The electric heater starts with a delay of 15 s, to make sure the fan delivers sufficient air flow to dissipate the heat.
• To avoid overheating of the electrical heater, the thermostat guarantee at least a fan speed II (middle value between Vmin (P56) – Vmax (P55)) when the electrical heater need to be energized.
• Adaptive temperature compensation P45 need to be set accordingly (Refer to section 4.8).
Heating or cooling with auxiliary heater
Electric heating, active in cooling mode
Electric heating in heating mode
Electric heating and manual changeover
Digital input "Enable electric heater"
Caution
On/Off electric heater on RDG160T with ECM fan
30 / 76
Siemens RDG100, RDG100T, RDG110, RDG160T Basic Documentation CE1P3181en Building Technologies Functions 2014-05-23

On/Off control The diagrams below show the control sequence for 2-position. Heating mode (automatic changeover = heating or heating only)
Cooling mode (man. / auto. changeover = cooling or cooling only)
Y
½ SDH
1
0½ SDH
w
3191
D06
T[°C]
YHC
½ SDH ½ SDH
YEwD
Y
½ SDC
1
0½ SDC
w
3191
D05
T[°C]
YHC
½ SDH ½ SDH
YExdz
Heating mode with manual changeover (P01=2) ) on RDG100… and RDG110 (manual changeover = heating)
½ SDH
1
0
½ SDH
w
Y
3076
D07
T[°C]
YE
T[°C] Room temperature W Room temperature setpoint YHC Control command "Valve" or "Compressor" YE Control command "Electric heater" SDH Switching differential "Heating" (P30) SDC Switching differential "Cooling" (P31) Xdz Dead zone (P33) wD Setpoint differential (P34)
• RDG160T with manual changeover works in the same way as for automatic changeover, with 2-stage heating.
Modulating control 3-position, PWM or DC 0…10 V
The diagrams below show the control sequence for modulating control.
Heating mode (automatic changeover = heating or heating only)
Cooling mode (man. /auto. changeover = cooling or cooling only)
Y [%]
100
0 w
3191
D09
T[°C]
YHC
XpH
YEwD
XpH
Y [%]
100
0 w
3191
D08
T[°C]
YHC
XpH
YExdz
XpC Heating mode with manual changeover (P01=2) on RDG100… and RDG110 (manual changeover = heating)
XpH
100
0 w
Y [%]
3076
D10
T[°C]
YE
T[°C] Room temperature W Room temperature setpoint YHC Control command "Valve" YE Control command "Electric heater" XpH Proportional band "Heating" (P30) XpC Proportional band "Cooling" (P31) Xdz Dead zone (P33) wD Setpoint differential (P34)
• The diagrams only show the PI controller’s proportional part. • RDG160T with manual changeover works in the same way as for automatic
changeover, with 2-stage heating.
Setting the sequence and the control outputs Refer to sections 4.5 ("Applications"), 4.7.1 ("Sequences") and 4.7.2 ("Outputs").
Control sequence On/Off output
Note
Control sequence modulating output
Note
31 / 76
Siemens RDG100, RDG100T, RDG110, RDG160T Basic Documentation CE1P3181en Building Technologies Functions 2014-05-23
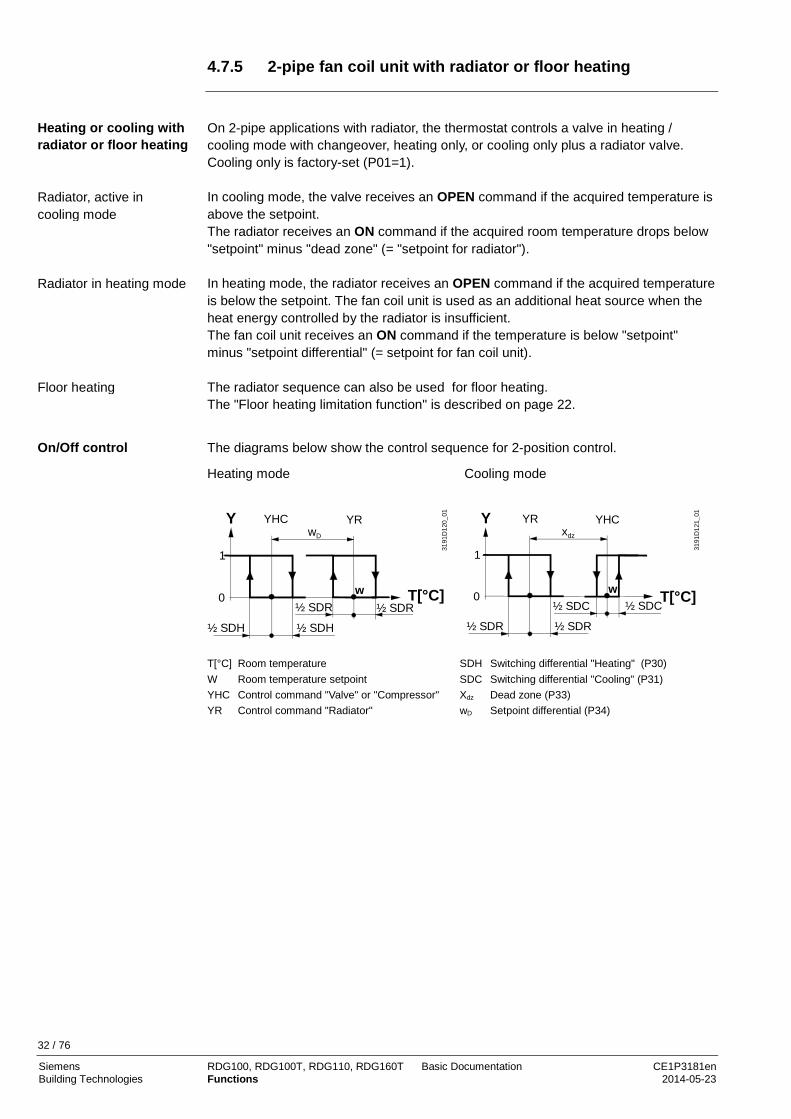
4.7.5 2-pipe fan coil unit with radiator or floor heating
On 2-pipe applications with radiator, the thermostat controls a valve in heating / cooling mode with changeover, heating only, or cooling only plus a radiator valve. Cooling only is factory-set (P01=1). In cooling mode, the valve receives an OPEN command if the acquired temperature is above the setpoint. The radiator receives an ON command if the acquired room temperature drops below "setpoint" minus "dead zone" (= "setpoint for radiator"). In heating mode, the radiator receives an OPEN command if the acquired temperature is below the setpoint. The fan coil unit is used as an additional heat source when the heat energy controlled by the radiator is insufficient. The fan coil unit receives an ON command if the temperature is below "setpoint" minus "setpoint differential" (= setpoint for fan coil unit). The radiator sequence can also be used for floor heating. The "Floor heating limitation function" is described on page 22.
The diagrams below show the control sequence for 2-position control. Heating mode Cooling mode
Y
½ SDR
1
0½ SDR
w
3191
D12
0_01
T[°C]
YR
½ SDH ½ SDH
YHCwD
Y
½ SDC
1
0½ SDC
w
3191
D12
1_01
T[°C]
YHC
½ SDR ½ SDR
YRxdz
T[°C] Room temperature SDH Switching differential "Heating" (P30) W Room temperature setpoint SDC Switching differential "Cooling" (P31) YHC Control command "Valve" or "Compressor" Xdz Dead zone (P33) YR Control command "Radiator" wD Setpoint differential (P34)
Heating or cooling with radiator or floor heating
Radiator, active in cooling mode
Radiator in heating mode
Floor heating
On/Off control
32 / 76
Siemens RDG100, RDG100T, RDG110, RDG160T Basic Documentation CE1P3181en Building Technologies Functions 2014-05-23
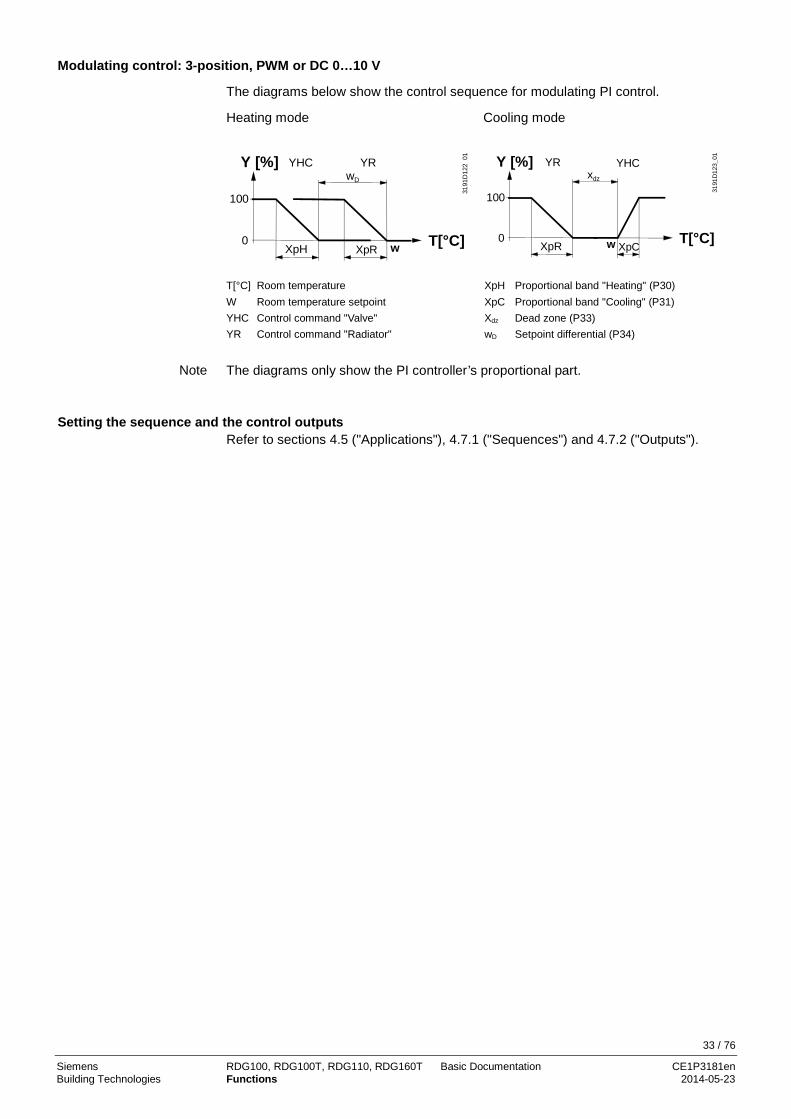
Modulating control: 3-position, PWM or DC 0…10 V The diagrams below show the control sequence for modulating PI control. Heating mode Cooling mode
Y [%]
100
0 w
3191
D12
2_01
T[°C]
YR
XpH
YHCwD
XpR
Y [%]
100
0 w
3191
D12
3_01
T[°C]
YHC
XpR
YRxdz
XpC T[°C] Room temperature XpH Proportional band "Heating" (P30) W Room temperature setpoint XpC Proportional band "Cooling" (P31) YHC Control command "Valve" Xdz Dead zone (P33) YR Control command "Radiator" wD Setpoint differential (P34)
The diagrams only show the PI controller’s proportional part.
Setting the sequence and the control outputs Refer to sections 4.5 ("Applications"), 4.7.1 ("Sequences") and 4.7.2 ("Outputs").
Note
33 / 76
Siemens RDG100, RDG100T, RDG110, RDG160T Basic Documentation CE1P3181en Building Technologies Functions 2014-05-23
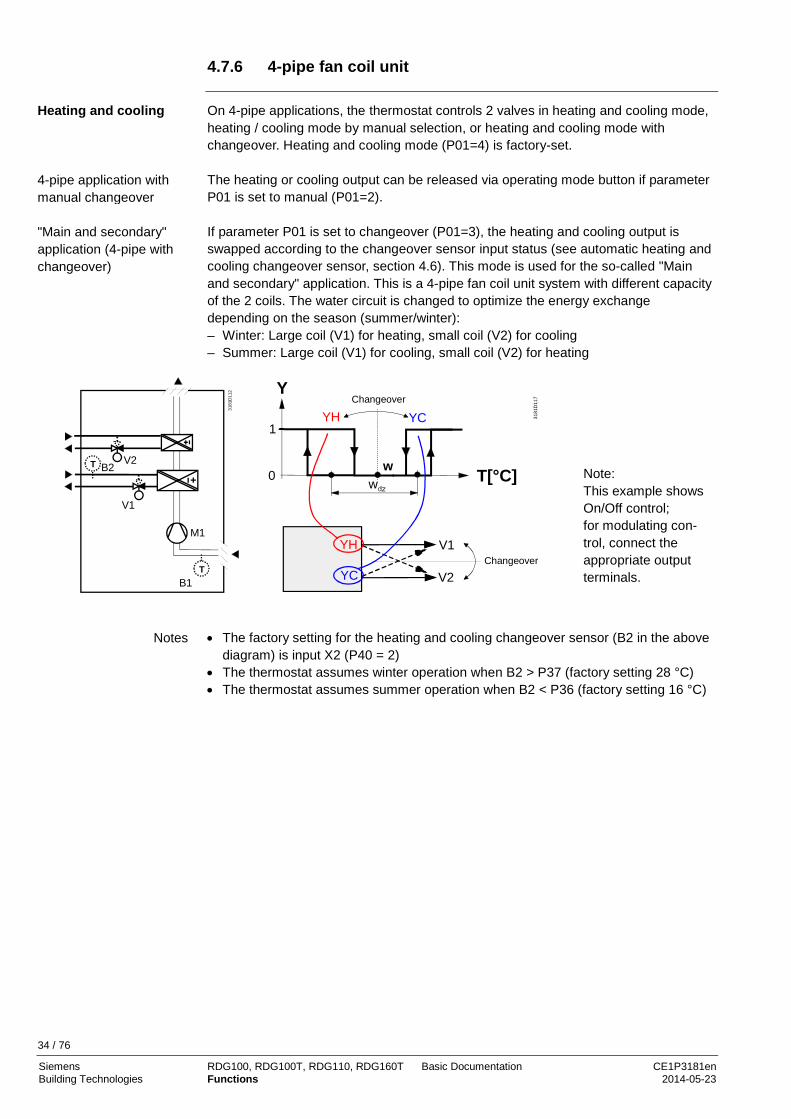
4.7.6 4-pipe fan coil unit
On 4-pipe applications, the thermostat controls 2 valves in heating and cooling mode, heating / cooling mode by manual selection, or heating and cooling mode with changeover. Heating and cooling mode (P01=4) is factory-set. The heating or cooling output can be released via operating mode button if parameter P01 is set to manual (P01=2). If parameter P01 is set to changeover (P01=3), the heating and cooling output is swapped according to the changeover sensor input status (see automatic heating and cooling changeover sensor, section 4.6). This mode is used for the so-called "Main and secondary" application. This is a 4-pipe fan coil unit system with different capacity of the 2 coils. The water circuit is changed to optimize the energy exchange depending on the season (summer/winter): – Winter: Large coil (V1) for heating, small coil (V2) for cooling – Summer: Large coil (V1) for cooling, small coil (V2) for heating
TB1
V2
V1
M1
3181
D11
2
T B2
Y
1
0 ww
3181
D11
7
T[°C]
YCYHChangeover
YH
YC
V1
V2Changeover
Note: This example shows On/Off control; for modulating con-trol, connect the appropriate output terminals.
• The factory setting for the heating and cooling changeover sensor (B2 in the above
diagram) is input X2 (P40 = 2) • The thermostat assumes winter operation when B2 > P37 (factory setting 28 °C) • The thermostat assumes summer operation when B2 < P36 (factory setting 16 °C)
Heating and cooling
4-pipe application with manual changeover
"Main and secondary" application (4-pipe with changeover)
Notes
34 / 76
Siemens RDG100, RDG100T, RDG110, RDG160T Basic Documentation CE1P3181en Building Technologies Functions 2014-05-23
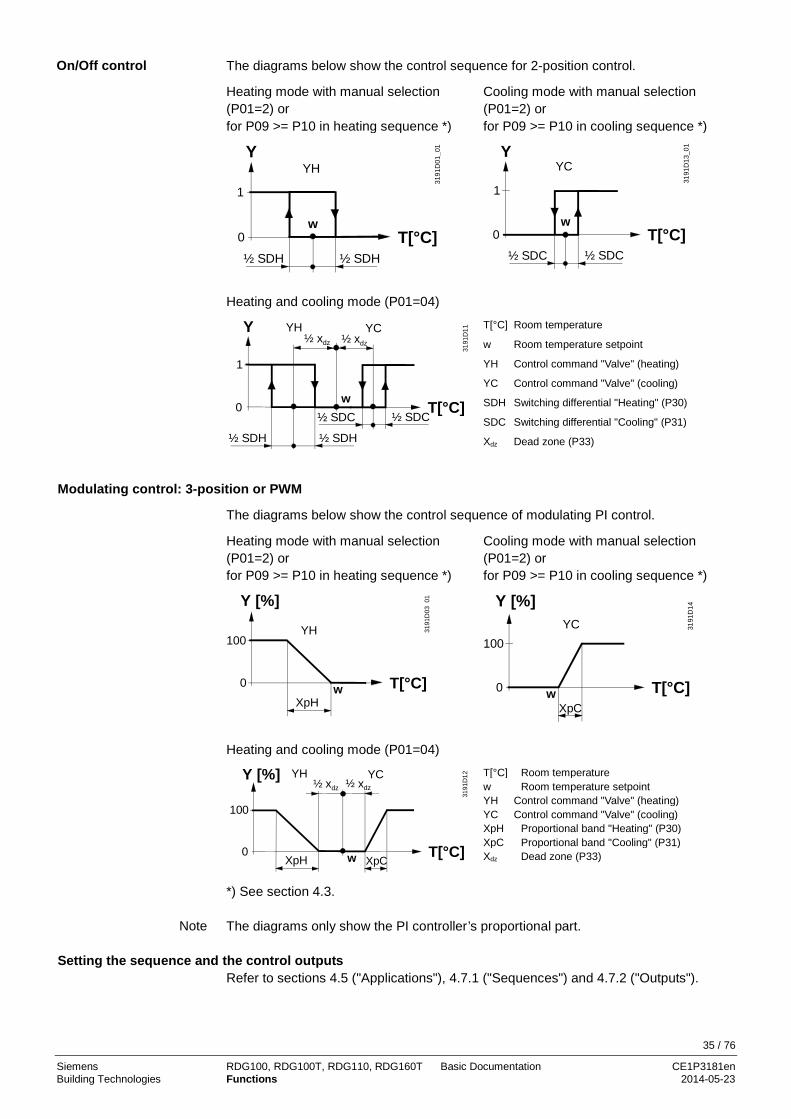
The diagrams below show the control sequence for 2-position control. Heating mode with manual selection (P01=2) or for P09 >= P10 in heating sequence *)
Cooling mode with manual selection (P01=2) or for P09 >= P10 in cooling sequence *)
½ SDH
1
0
½ SDH
w
Y
3191
D01
_01
T[°C]
YH
Y
½ SDC
1
0
½ SDC
w
3191
D13
_01
T[°C]
YC
Heating and cooling mode (P01=04)
Y
½ SDC
1
0½ SDC
w
3191
D11
T[°C]
YC
½ SDH ½ SDH
YH½ xdz ½ xdz
T[°C] Room temperature
w Room temperature setpoint
YH Control command "Valve" (heating)
YC Control command "Valve" (cooling)
SDH Switching differential "Heating" (P30)
SDC Switching differential "Cooling" (P31)
Xdz Dead zone (P33)
Modulating control: 3-position or PWM The diagrams below show the control sequence of modulating PI control. Heating mode with manual selection (P01=2) or for P09 >= P10 in heating sequence *)
Cooling mode with manual selection (P01=2) or for P09 >= P10 in cooling sequence *)
XpH
100
0 w
Y [%]
3191
D03
_01
T[°C]
YH
XpC
Y [%]
100
0 w31
91D
14T[°C]
YC
Heating and cooling mode (P01=04)
Y [%]
100
0 w
3191
D12
T[°C]
YC
XpH
YH
XpC
½ xdz ½ xdz
T[°C] Room temperature w Room temperature setpoint YH Control command "Valve" (heating) YC Control command "Valve" (cooling) XpH Proportional band "Heating" (P30) XpC Proportional band "Cooling" (P31) Xdz Dead zone (P33)
*) See section 4.3. The diagrams only show the PI controller’s proportional part.
Setting the sequence and the control outputs Refer to sections 4.5 ("Applications"), 4.7.1 ("Sequences") and 4.7.2 ("Outputs").
On/Off control
Note
35 / 76
Siemens RDG100, RDG100T, RDG110, RDG160T Basic Documentation CE1P3181en Building Technologies Functions 2014-05-23

4.7.7 4-pipe fan coil unit with electric heater (RDG100…)
On 4-pipe applications with electric heater, the thermostat controls 2 valves in heating and cooling mode by manual selection, heating and cooling mode with automatic changeover, heating only, or cooling only plus an electric heater. Heating and cooling is factory-set (P01=4).
The electric heater is used as an additional heat source when the heating energy controlled by the valve is insufficient. The electric heater receives an ON command when the temperature is below "setpoint" minus "1/2 "dead zone" minus "setpoint differential" (= "setpoint for electric heater").
Remote enabling / disabling of the electric heater is possible via input X1, X2, or D1 for tariff regulations, energy saving, etc. Input X1, X2, or D1 must be commissioned accordingly (parameters P38, P40, P42). See section 4.10 "Multifunctional input".
An electric heater must always be protected by a safety thermostat! The heating or cooling output can be released via operating mode button if parameter P01 is set to manual (P01=2). See section 4.7.6. The diagrams below show the control sequence for 2-position control.
Heating mode with manual selection (P01=2) Cooling mode with manual selection P01=2)
Y
1
0w
3181
D12
5b
T[°C]
½ SDH ½ SDH
YH
½ SDH ½ SDH
WD
YE
Y
½ SDC
1
0½ SDC
w
3181
D12
6b
T[°C]
YC
Heating and cooling mode (P01=4)
Y
½ SDC
1
0½ SDC
w
3181
D11
3b
T[°C]
YC
½ SDH ½ SDH
YH½ xdz ½ xdz
½ SDH ½ SDH
WD
YE
T[°C] Room temperature
w Room temperature setpoint
YE Control command "El. heater"
YH Control command "Valve" or "Comp." (H)
YC Control command "Valve" or "Comp." (C)
SDH Switching differential "Heating" (P30)
SDC Switching differential "Cooling" (P31)
Xdz Dead zone (P33) wD Setpoint differential (P34)
Heating and cooling with auxiliary heater
Electric heating in heating mode
Digital input "Enable electric heater"
Caution
4-pipe application with manual changeover
"Main and secondary" application
On/Off control
36 / 76
Siemens RDG100, RDG100T, RDG110, RDG160T Basic Documentation CE1P3181en Building Technologies Functions 2014-05-23
Modulating control: 3-position or PWM The diagrams below show the control sequence of modulating PI control.
Heating mode with manual selection (P01=2) Cooling mode with manual selection P01=2)
Y [%]
100
0w
3181
D11
24b
T[°C]XpH
YHYE
wD
½ SDH ½ SDH
3181
D10
5bY [%]
100
0w
T[°C]
YC
XpC
Heating and cooling mode (P01=4)
Y [%]
100
0 w
3181
D11
4b
T[°C]
YC
XpH
YH
XpC
½ xdz ½ xdz
YE
wD
½ SDH ½ SDH
T[°C] Room temperature
w Room temperature setpoint
YE Control. command "El. heater" (only on/off) YH Control command "Valve" or "Comp." (H) (only PWM, not 3-position) YC Control command "Valve" or "Comp." (C)
XpH Proportional band "Heating" (P30)
XpC Proportional band "Cooling" (P31)
Xdz Dead zone (P33)
wD Setpoint differential (P34)
The diagrams only show the PI controller’s proportional part.
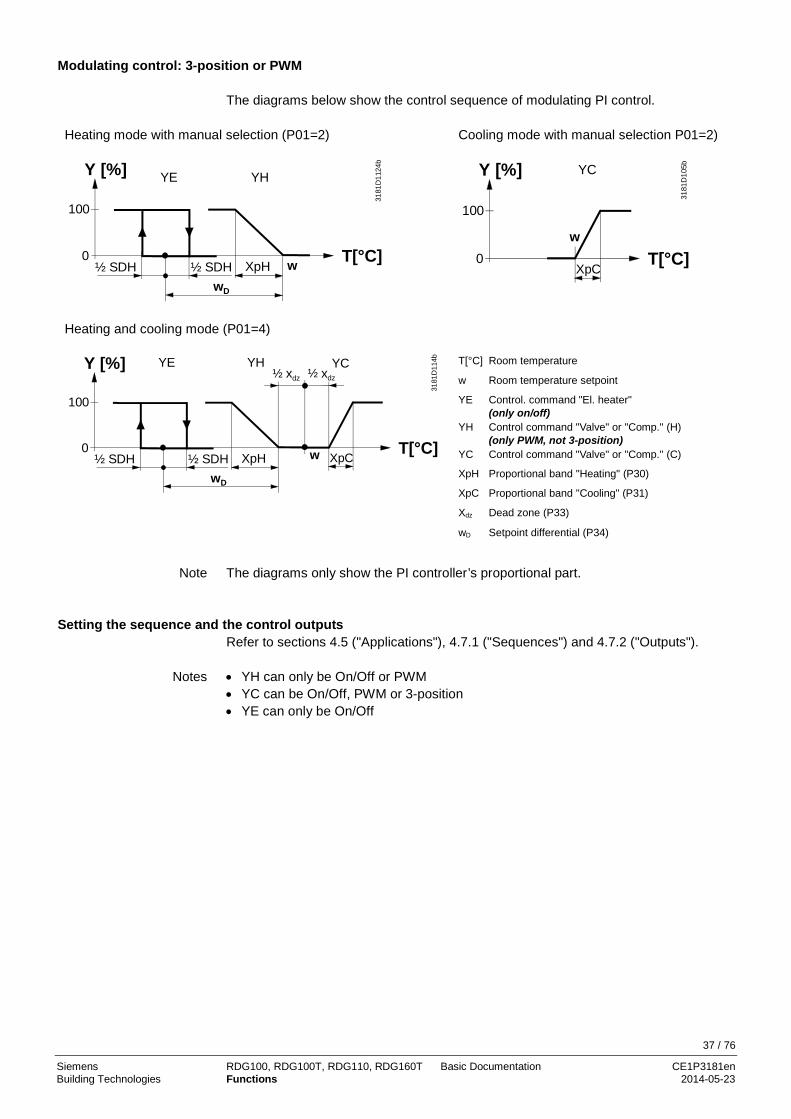
Setting the sequence and the control outputs Refer to sections 4.5 ("Applications"), 4.7.1 ("Sequences") and 4.7.2 ("Outputs"). • YH can only be On/Off or PWM • YC can be On/Off, PWM or 3-position • YE can only be On/Off
Note
Notes
37 / 76
Siemens RDG100, RDG100T, RDG110, RDG160T Basic Documentation CE1P3181en Building Technologies Functions 2014-05-23

4.7.8 2-stage heating or cooling
On 2-stage applications, the thermostat controls 2 valves or compressors in heating or cooling mode or changeover (automatic or manual). "Cooling only" is factory-set (P01=1).
In heating mode, the 1st stage is activated if the acquired temperature is below the setpoint. The 2nd stage is activated if the acquired room temperature drops below "setpoint" minus "setpoint differential".
In cooling mode, the 1st stage is activated if the acquired temperature is above the setpoint. The 2nd stage is activated if the acquired room temperature rises above "setpoint" plus "setpoint differential". The diagrams below show the control sequence for 2-position control.
Heating mode (P01=0) Cooling mode P01=1)
Y
TR [°C]
1
0w
SDHSDH
wD
YH
C2
YH
C1
3181
D15
Y
TR [°C]
SDCSDC
YHC1
YHC2
3181
D16
w
wD
1
0
Changeover (P01=2 or P01= 3)
Y
TR [°C]
SDHSDH SDC
SDC
Changeover
YH
C2
YH
C1
YHC2
3181
D17
wwD wD
1
0
T[°C] Room temperature
w Room temperature setpoint
YHC1 Control command "Stage 1"
YHC2 Control command "Stage 2"
SDH Switching differential "Heating" (P30)
SDC Switching differential "Cooling" (P31)
Xdz Dead zone (P33) wD Setpoint differential (P34)
2-stage heating or cooling
Heating mode
Cooling mode
On/Off control
38 / 76
Siemens RDG100, RDG100T, RDG110, RDG160T Basic Documentation CE1P3181en Building Technologies Functions 2014-05-23

Modulating control: 3-position, PWM or DC 0…10 V The diagrams below show the control sequence of modulating PI control.
Heating mode (P01=0) Cooling mode P01=1)
w
XpHY
YHC1
TR [°C]
XpH
YHC2
0%
100% 3181
D18
wD
Y
0%
100%
TR [°C]
XpC
YHC2
XpC
YHC1
3181
D19
wwD
Changeover (P01=2 or P01= 3)
XpHY
TR [°C]
XpH XpCXpC
Changeover
0%
100%
YHC1YHC2 YHC1 YHC2
3181
D20
w
wD wD
T[°C] Room temperature
w Room temperature setpoint
YHC1 Control command "Stage 1"
YHC2 Control command "Stage 2"
XpH Proportional band "Heating" (P30)
XpC Proportional band "Cooling" (P31)
Xdz Dead zone (P33)
wD Setpoint differential (P34)
The diagrams only show the PI controller’s proportional part.
Setting the sequence and the control outputs Refer to sections 4.5 ("Applications"), 4.7.1 ("Sequences") and 4.7.2 ("Outputs").
Note
39 / 76
Siemens RDG100, RDG100T, RDG110, RDG160T Basic Documentation CE1P3181en Building Technologies Functions 2014-05-23

4.7.9 Chilled / heated ceiling and radiator applications
For chilled / heated ceiling and radiator, • set the corresponding basic application • disable the fan (P52) The following applications are available:
Refer to section 4.5.2 for details about the product type and control outputs. 4.7.10 Compressor applications (general)
For compressor applications, • set the corresponding basic application • disable the fan (P52) or set the fan speed (P53) The following applications are available:
• Minimum On/Off time: P48 / P49 • Fan operation: P52 (0 = disabled, 1 = enabled) • Fan speed: P53 (1 = 1-speed, 2 = 3-speed)
Refer to section 4.5.3 for details about the product type and control outputs.
Application for chilled / heated ceiling, radiator
Set basic application See section
Sequences
Chilled / heated ceiling with changeover
2-pipe 4.7.3 H ( \ ) C ( / )
Chilled / heated ceiling & el. heater (cooling only: disable el. heater via P13)
2-pipe & electric heater 4.7.4 El. H + H ( \ \ ) El. H + C ( \ / ) C ( / )
Chilled / heated ceiling & radiator 2-pipe & radiator 4.7.5 H + rad ( \ r\ ) Rad + C ( r\ / )
Chilled ceiling and radiator 4-pipe 4.7.6 H + C ( \ / ) Chilled / heated ceiling, 2-stage 2-stage heating or cooling 4.7.8 H + H ( \ \ )
C + C ( / / )
Application for chilled / heated ceiling, radiator
Set basic application See section
Sequences
RD
G11
0
RD
G16
0T
1-stage compressor 2-pipe 4.7.3 H ( \ ) C ( / )
1-stage compressor & el. heater
(cooling only: disable el. heater via P13)
2-pipe & electric heater
4.7.4 El. H + H ( \ \ ) El. H + C ( \ / ) C ( / )
1-stage compressor for heating and cooling
4-pipe 4.7.6 H + C ( \ / )
1-stage compressor with reversing valve (for details, see below)
4-pipe 4.7.6 H + C ( \ / ) –
2-stage compressor 2-stage heating or cooling
4.7.8 H + H ( \ \ ) C + C ( / / )
Notes
40 / 76
Siemens RDG100, RDG100T, RDG110, RDG160T Basic Documentation CE1P3181en Building Technologies Functions 2014-05-23
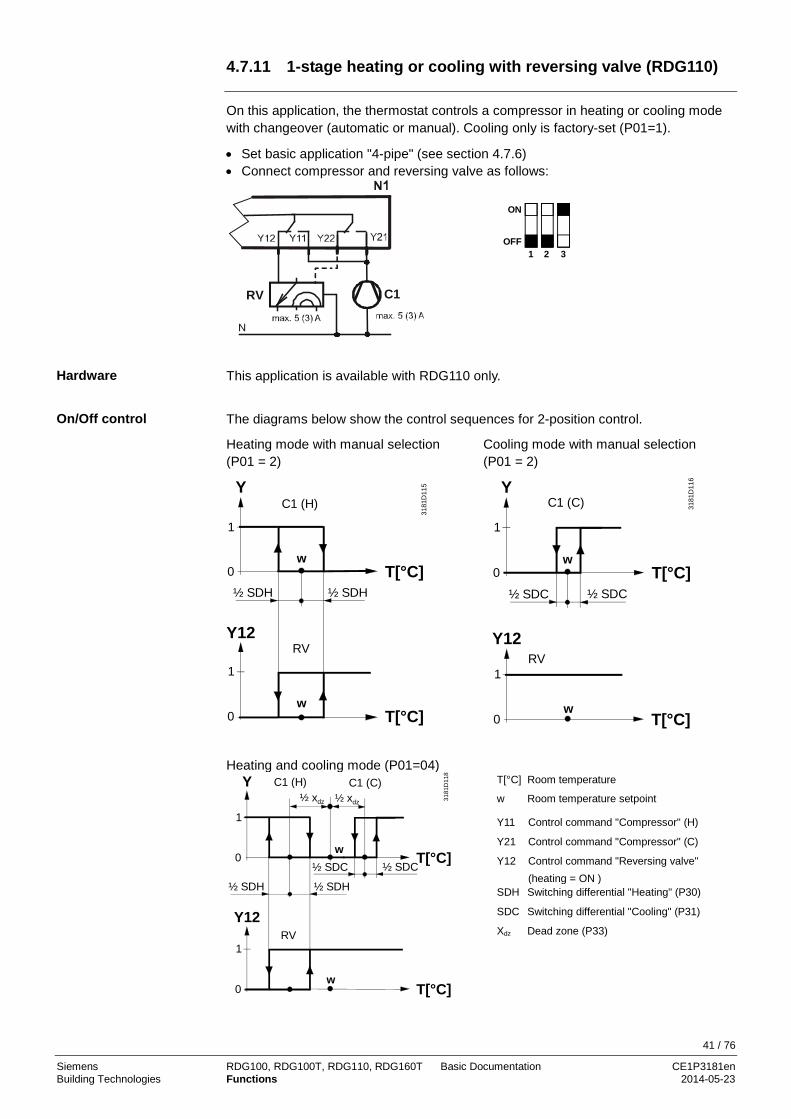
4.7.11 1-stage heating or cooling with reversing valve (RDG110)
On this application, the thermostat controls a compressor in heating or cooling mode with changeover (automatic or manual). Cooling only is factory-set (P01=1).
• Set basic application "4-pipe" (see section 4.7.6) • Connect compressor and reversing valve as follows:
C1 RV
ON
OFF1 2 3
This application is available with RDG110 only.
The diagrams below show the control sequences for 2-position control.
Heating mode with manual selection (P01 = 2)
Cooling mode with manual selection (P01 = 2)
½ SDH
1
0
½ SDH
w
Y
3181
D11
5
T[°C]
C1 (H)
0w
Y12
T[°C]
RV
1
Y
½ SDC
1
0
½ SDC
wT[°C]
C1 (C) 3181
D11
6
Y12
1
0w
T[°C]
RV
Heating and cooling mode (P01=04) Y
½ SDC
1
0½ SDC
w T[°C]
C1 (C)
½ SDH ½ SDH
C1 (H)½ xdz ½ xdz
Y12
1
0w
T[°C]
RV
3181
D11
8
T[°C] Room temperature
w Room temperature setpoint
Y11 Control command "Compressor" (H)
Y21 Control command "Compressor" (C)
Y12 Control command "Reversing valve" (heating = ON )
SDH Switching differential "Heating" (P30)
SDC Switching differential "Cooling" (P31)
Xdz Dead zone (P33)
Hardware
On/Off control
41 / 76
Siemens RDG100, RDG100T, RDG110, RDG160T Basic Documentation CE1P3181en Building Technologies Functions 2014-05-23

4.8 Control outputs
Different control output signals are available depending on the thermostat type, the position of DIP switches 4 and 5, and parameters P46 and P47 (see section 4.7.2).
Control output
Product no.
On/Off
PWM 3-position DC 0…10 V
RDG100, RDG100T RDG100T/H
Y1, Y2, Y3 (3 x N.O.)
Y1, Y3, (2 x PWM)
Y1/Y2, Y3/Y4 (2 x / )
RDG110 Y11/Y12, Y21/Y22 (2 x SPDT)
RDG160T Q1, Q2 (2 x N.O.)
Y10, Y20 (2 x DC 0…10 V)
The valve or compressor receives the OPEN/ON command via control output Y1 or Y3 (RDG110: Y11 / Y21, RDG160T: Q1 / Q2) when 1. the acquired room temperature is below the setpoint (heating mode) or above the
setpoint (cooling mode). 2. the control outputs have been inactive for more than the "Minimum output off-time"
(factory setting 1 minute, adjustable via parameter P48). OFF command when 1. the acquired room temperature is above the setpoint (heating mode) or below the
setpoint (cooling mode). 2. the valve has been active for more than the "Minimum output on-time" (factory
setting 1 minute, adjustable via parameter P49).
The electric heater receives an ON command via the auxiliary heating control output (Y…, see Mounting Instructions) when 1. the acquired room temperature is below "Setpoint for electric heater" 2. the electric heater has been switched off for at least 1 minute
The OFF command for the electric heater is output when 1. the acquired room temperature is above the setpoint (electric heater) 2. the electric heater has been switched on for at least 1 minute
A safety thermostat (to prevent overtemperatures) must be provided externally. On RDG160T the electrical heater can be controlled via the 2-position output (Q2) by setting P47 = 1.
Overview of control outputs
On/Off control signal (2-position)
Electric heater control signal (On/Off)
Caution
Note!
42 / 76
Siemens RDG100, RDG100T, RDG110, RDG160T Basic Documentation CE1P3181en Building Technologies Functions 2014-05-23
When an electric heater is connected directly to the On/Off output (RDG160T: Q2, RDG110:Y21), the current causes the relay contact to heat up. This falsifies the reading of the internal temperature sensor. The thermostat compensates the temperature if the rated current/power of the electric heating is entered in the parameters.
RDG160T: P45 (power el. heater). Factory setting: 0.0 kW, setting range: 0.0 …1.2 kW.
RDG110: P46 (load current el.heater): Factory setting: 1A, setting range: 1…5A. This function is available with RDG100, RDG100T and RDG100T/H only.
Heating: Output Y1 provides the OPEN command, and Y2 the CLOSE command to the 3-position actuator. Relay function Y1/Y2 and wiring can be tested via diagnostic parameter d05. Cooling: Idem with Y3 and Y4. Relay function Y3/Y4 and wiring can be tested via diagnostic parameter d06. The factory setting for the actuator's running time is 150 seconds. It can be adjusted via parameters P44 (Y1 and Y2) or P45 (Y3 and Y4). The parameters are only visible if 3-position is selected via DIP switches 4 and 5.
1. When the thermostat is powered up, a closing command for the actuator running time + 150% is provided to ensure that the actuator fully closes and synchronizes to the control algorithm.
2. When the thermostat calculates the positions "fully close" or "fully open", the actuator's running time is extended + 150% to ensure the right actuator position is synchronized to the control algorithm.
3. After the actuator reaches the position calculated by the thermostat, a waiting time of 30 seconds is applied to stabilize the outputs.
This function is available with RDG100, RDG100T and RDG100T/H only.
The demand calculated by PI control from the current room temperature and setpoint is provided via Y1 and Y3 to the valve actuator as a PWM signal (pulse width modulation) for thermal actuators. The output is activated for a period proportional to the heating / cooling demand and then switched off for the rest of the PWM interval.
The interval is 150 seconds (factory setting). It can be adjusted via parameters P44 (Y1) or P45 (Y3). These parameters are only visible if 2-position is selected via DIP switches 4 and 5 and if PWM is selected via P46 and P47.
For PWM, the integral time (P35) must be set to 0. For thermal valve actuators, set the running time to 240 seconds. • Never apply PWM to an electromotoric actuator • It is not possible to ensure exact parallel running of 2 or more thermal valve
actuator. If several fan coil units are driven by the same thermostat, preference should be given to electromotoric actuators with On/Off or 3-position position control.
For electric heaters, set the running time to 90 seconds. To avoid burn-off of mechanical contacts by frequent switching, use a current valve in place of a relay or contactor.
For PWM, the integral time (P35) must be set to 0.
Adaptive temperature compensation for electric heater (RDG160T, RDG110)
3-position control signal
Synchronization
PWM control
Note!
PWM for thermal valve actuators
Note!
PWM for electric heaters
Note!
43 / 76
Siemens RDG100, RDG100T, RDG110, RDG160T Basic Documentation CE1P3181en Building Technologies Functions 2014-05-23

This function is available with RDG160T only. The demand calculated by PI control from the current room temperature and setpoint is provided via Y10 and Y20 to the valve actuator as a continuous DC 0...10 V signal. For applications with 3-speed fan, the electrical heater can be controlled only via DC output. • The demand calculated by PI control from the current room temperature and
setpoint is provided via Y20 as a continuous DC 0...10 V signal. • The signal converter (SEM61.4) converts the DC 0...10 V signal to AC 24 V PDM
pulses for the current valve. • The current valve (SEA45.1) supplies the electric heater with AC 50…660 V pulsed
current. For applications with ECM fan (DC signal) on RDG160T, the electrical heater can be controlled via the On/Off output (Q2) by setting P47 = 1. Adaptive temperature compensation: see 4.7.4.
Y E
DC 0 ... 10 V
Y1 G
L
N
Y1 L
Q
5.7 kWmax.
N1 U1
FF
F...
Y1
K...
G0
G
G
3181
D21
G
G0
Y PWMAC 24 V
N1 RDG160T U1 Signal converter SEM61.4 (see Data Sheet N5102) Y1 Current valve SEA45.1 (see Data Sheet N4937) K… Safety loop (e.g. safety thermostat and high-
temperature cutout) FF Very fast-acting fuse F… Overcurrent trip
DC 0...10 V control
DC 0...10 V for valve actuators
DC 0...10 V for electric heaters
Note!
44 / 76
Siemens RDG100, RDG100T, RDG110, RDG160T Basic Documentation CE1P3181en Building Technologies Functions 2014-05-23
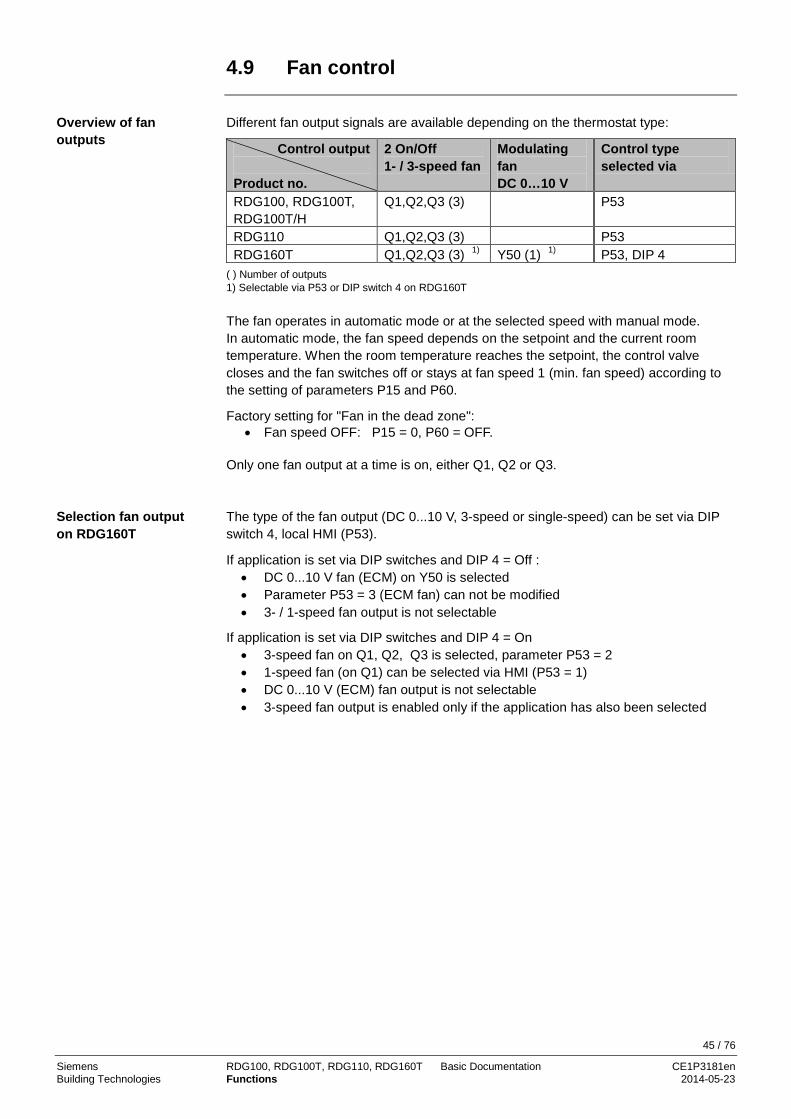
4.9 Fan control
Different fan output signals are available depending on the thermostat type:
Control output Product no.
2 On/Off 1- / 3-speed fan
Modulating fan DC 0…10 V
Control type selected via
RDG100, RDG100T, RDG100T/H
Q1,Q2,Q3 (3) P53
RDG110 Q1,Q2,Q3 (3) P53 RDG160T Q1,Q2,Q3 (3) 1) Y50 (1) 1) P53, DIP 4
( ) Number of outputs 1) Selectable via P53 or DIP switch 4 on RDG160T The fan operates in automatic mode or at the selected speed with manual mode. In automatic mode, the fan speed depends on the setpoint and the current room temperature. When the room temperature reaches the setpoint, the control valve closes and the fan switches off or stays at fan speed 1 (min. fan speed) according to the setting of parameters P15 and P60.
Factory setting for "Fan in the dead zone": • Fan speed OFF: P15 = 0, P60 = OFF.
Only one fan output at a time is on, either Q1, Q2 or Q3. The type of the fan output (DC 0...10 V, 3-speed or single-speed) can be set via DIP switch 4, local HMI (P53).
If application is set via DIP switches and DIP 4 = Off : • DC 0...10 V fan (ECM) on Y50 is selected • Parameter P53 = 3 (ECM fan) can not be modified • 3- / 1-speed fan output is not selectable
If application is set via DIP switches and DIP 4 = On • 3-speed fan on Q1, Q2, Q3 is selected, parameter P53 = 2 • 1-speed fan (on Q1) can be selected via HMI (P53 = 1) • DC 0...10 V (ECM) fan output is not selectable • 3-speed fan output is enabled only if the application has also been selected
Overview of fan outputs
Selection fan output on RDG160T
45 / 76
Siemens RDG100, RDG100T, RDG110, RDG160T Basic Documentation CE1P3181en Building Technologies Functions 2014-05-23

The individual switching points for ON of each fan stage can be adjusted via control parameters P55…P57. The fan speed switch off point is 20% below the switch on point. The diagrams below show fan speed control for modulating PI control.
Heating / Cooling
1- or 3-speed fan
Y
Q3
Q2
Q1
Off
w Room temperature setpoint Q Fan speed YH Control demand "Heating" YC Control demand "Cooling" XpH Proportional band "Heating" (P30) XpC Proportional band "Cooling" (P31) Xdz Dead zone (P33) Fan speed switching point high (P55) Fan speed switching point med (P56) Fan speed switching point low (P57)
The diagram only shows the PI control's proportional part.
On applications with 2-position control: 1) The switching point for low fan speed is synchronized to the heating / cooling
output. Parameter "Switching point fan speed low" P57 is not relevant. 2) The maximum switching range of the fan (XpHFan / XpCFan) is defined by the
switching differential (SDH/SDC) via a look-up table.
Heating / Cooling
1- or 3-speed fan ECM fan
Y
Q3
Q2
Q1
T [°C] Room temperature w Room temperature setpoint Q Fan speed Y Control command "Valve" SDH Switching differential "Heating" (P30) SDC Switching differential "Cooling" (P31) Xdz Dead zone (P33)
XpHFan Switching range for fan "Heating" (Table)
XpCFan Switching range for fan "Cooling" (Table)
Fan 3-speed switching point high (P55) Fan 3-speed switching point med (P56) Fan_max Max. ECM fan speed (P55) Fan_min Min. ECM fan speed (P56)
SDH/SDC [K] 0.5 1.0 1.5 2.0 2.5 3.0 3.5 4.0 >4.5 XpHFan/XpCFan [K] 2 3 4 5 6 7 8 9 10
3-speed fan control with modulating heating / cooling control (PWM, 3-pos or DC 0...10 V)
Note:
3-speed / ECM fan control with On/Off heating / cooling control
Look-up table with On/Off control
46 / 76
Siemens RDG100, RDG100T, RDG110, RDG160T Basic Documentation CE1P3181en Building Technologies Functions 2014-05-23
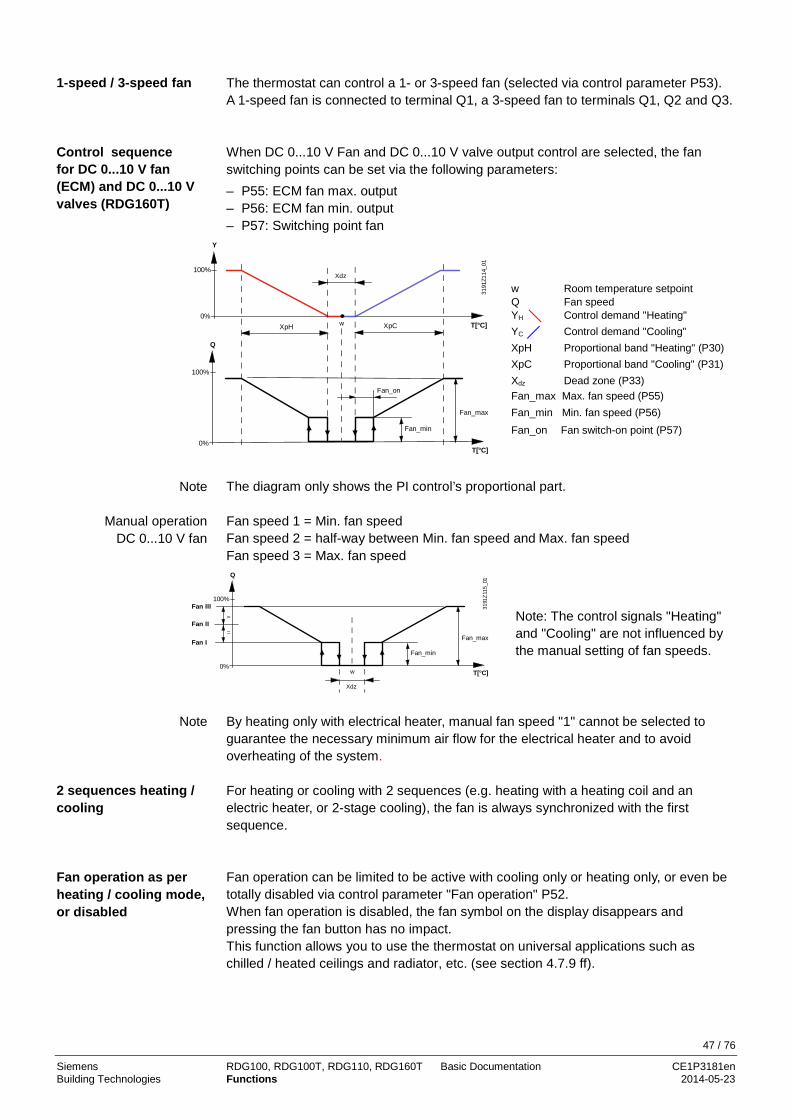
The thermostat can control a 1- or 3-speed fan (selected via control parameter P53). A 1-speed fan is connected to terminal Q1, a 3-speed fan to terminals Q1, Q2 and Q3. When DC 0...10 V Fan and DC 0...10 V valve output control are selected, the fan switching points can be set via the following parameters: – P55: ECM fan max. output – P56: ECM fan min. output – P57: Switching point fan
Xdz
3191
Z114
_01
T[°C]
Y
100%
0%w
T[°C]
Q
XpH XpC
Fan_min
Fan_max
Fan_on
100%
0%
w Room temperature setpoint Q Fan speed YH Control demand "Heating" YC Control demand "Cooling" XpH Proportional band "Heating" (P30) XpC Proportional band "Cooling" (P31) Xdz Dead zone (P33) Fan_max Max. fan speed (P55) Fan_min Min. fan speed (P56) Fan_on Fan switch-on point (P57)
The diagram only shows the PI control’s proportional part. Fan speed 1 = Min. fan speed Fan speed 2 = half-way between Min. fan speed and Max. fan speed Fan speed 3 = Max. fan speed
Xdz
w T[°C]
Q
3191
Z115
_01
Fan_min
Fan_max
100%
0%
Fan III
Fan II
Fan I
=
=
Note: The control signals "Heating" and "Cooling" are not influenced by the manual setting of fan speeds.
By heating only with electrical heater, manual fan speed "1" cannot be selected to guarantee the necessary minimum air flow for the electrical heater and to avoid overheating of the system.
For heating or cooling with 2 sequences (e.g. heating with a heating coil and an electric heater, or 2-stage cooling), the fan is always synchronized with the first sequence. Fan operation can be limited to be active with cooling only or heating only, or even be totally disabled via control parameter "Fan operation" P52. When fan operation is disabled, the fan symbol on the display disappears and pressing the fan button has no impact. This function allows you to use the thermostat on universal applications such as chilled / heated ceilings and radiator, etc. (see section 4.7.9 ff).
1-speed / 3-speed fan
Control sequence for DC 0...10 V fan (ECM) and DC 0...10 V valves (RDG160T)
Note
Manual operation DC 0...10 V fan
Note
2 sequences heating / cooling
Fan operation as per heating / cooling mode, or disabled
47 / 76
Siemens RDG100, RDG100T, RDG110, RDG160T Basic Documentation CE1P3181en Building Technologies Functions 2014-05-23

In automatic mode, a dwelling time of 2 minutes (factory setting) is active. The fan maintains each speed for at least 2 minutes before it changes to the next speed. his minimum on-time can be adjusted from 1…6 minutes via parameter P59.
In automatic fan mode and with the room temperature in the dead zone, the control valve is normally closed and the fan disabled. With the "Fan kick" function, the fan can be released from time to time at low speed for minimum on-time (see above) even if the valve is closed.
This function can be used to avoid damage from moisture due to a lack of air circu-lation, or to allow a return air temperature sensor to acquire the correct room temperature.
Y
t [h:mm]
Q1
0
Periodic fan kick Minimum
on-time Periodic fan kick Minimum
on-time The periodic fan kick time can be selected individually for Comfort mode via parameter P60, and for Economy mode via parameter P61. Note: Fan kick value "0" means the fan runs continuously in the dead zone. Fan kick value 1 and higher: value in minutes Fan kick value "OFF" means the fan does not run in the dead zone. Via parameter P15 in "Service Level", the fan speed in the dead zone (in Comfort mode) can be set according to customer preference. The following options are available: • Fan does not run in the dead zone (P15=0) • Fan runs at low speed in Heating and Cooling mode (P15=1) • Fan runs at low speed in Cooling mode only (P15=2) The functions "Fan in dead zone" (P15) and "Fan kick" (P60) are combined as follows: • P60 = 0 Fan runs continuously in the dead zone, P15 has no influence • P60 = OFF Fan operation in dead zone according to P15 When the fan starts from standstill, it starts at speed 3 for 1 second to ensure safe fan motor start by overcoming inertia and friction (selected via parameter P58).
Q
Q3
Q2
Q1
0T
1 sec
3181
D22
When the electric heater is switched off, the fan overruns for 60 seconds (parameter P54) to avoid overtemperature of the electric heater or prevent the thermal cutout from responding.
Fan minimum on- time
Fan kick P60, P61
Fan operation in dead zone P15
Fan start
Fan overrun for electric heater
48 / 76
Siemens RDG100, RDG100T, RDG110, RDG160T Basic Documentation CE1P3181en Building Technologies Functions 2014-05-23

In case of fan failure, the thermostat cannot protect the electric heater against overtemperature. For this reason, the electric heater must feature a separate safety device (thermal cutout). The "Clean fan filter reminder" function counts the fan operating hours and displays message "FIL " to remind the user to change / clean the fan filter as soon as the threshold is reached. This does not impact the thermostat's operation, which continues to run normally. The function is set via parameter P62 (default = Off (0)). The "Clean filter reminder" is reset when the operating mode is manually set to Protection and back. In Auto Timer mode , the default fan mode is automatic. The fan mode can be changed to Manual by pressing the FAN button. The fan returns to the automatic default mode after each switchover from Comfort to Economy mode, and vice versa. To let the heating / cooling coil reach its temperature, the fan start can be delayed by a time period set via parameter P67.
Function available with: RDG100..: On/Off control outputs RDG110: On/Off control outputs RDG160T: On/Off and DC control outputs, 3-speed and DC fan
Y
0 T
P67
1 3181
D23
Q
T
Fan failure
Clean fan filter reminder
Fan in Auto Timer mode (RDG1…T)
Fan start delay
49 / 76
Siemens RDG100, RDG100T, RDG110, RDG160T Basic Documentation CE1P3181en Building Technologies Functions 2014-05-23
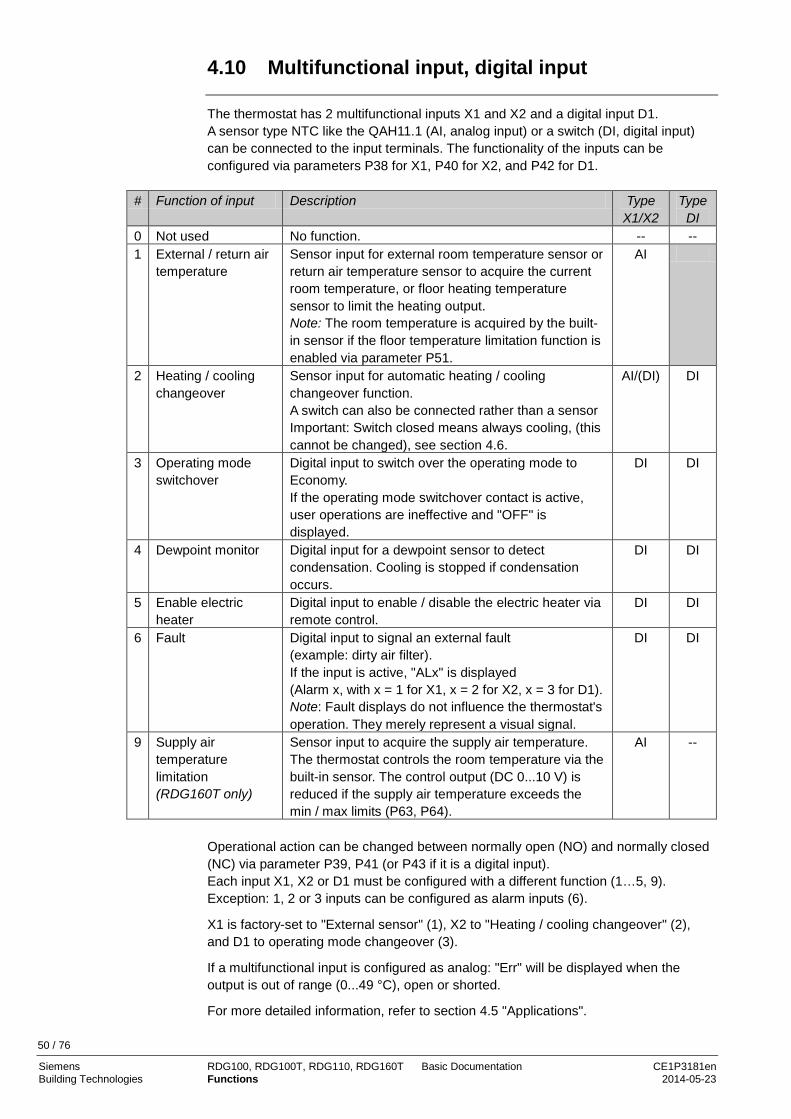
4.10 Multifunctional input, digital input
The thermostat has 2 multifunctional inputs X1 and X2 and a digital input D1. A sensor type NTC like the QAH11.1 (AI, analog input) or a switch (DI, digital input) can be connected to the input terminals. The functionality of the inputs can be configured via parameters P38 for X1, P40 for X2, and P42 for D1.
# Function of input Description Type X1/X2
Type DI
0 Not used No function. -- -- 1 External / return air
temperature Sensor input for external room temperature sensor or return air temperature sensor to acquire the current room temperature, or floor heating temperature sensor to limit the heating output. Note: The room temperature is acquired by the built-in sensor if the floor temperature limitation function is enabled via parameter P51.
AI
2 Heating / cooling changeover
Sensor input for automatic heating / cooling changeover function. A switch can also be connected rather than a sensor Important: Switch closed means always cooling, (this cannot be changed), see section 4.6.
AI/(DI) DI
3 Operating mode switchover
Digital input to switch over the operating mode to Economy. If the operating mode switchover contact is active, user operations are ineffective and "OFF" is displayed.
DI DI
4 Dewpoint monitor Digital input for a dewpoint sensor to detect condensation. Cooling is stopped if condensation occurs.
DI DI
5 Enable electric heater
Digital input to enable / disable the electric heater via remote control.
DI DI
6 Fault Digital input to signal an external fault (example: dirty air filter). If the input is active, "ALx" is displayed (Alarm x, with x = 1 for X1, x = 2 for X2, x = 3 for D1). Note: Fault displays do not influence the thermostat's operation. They merely represent a visual signal.
DI DI
9 Supply air temperature limitation (RDG160T only)
Sensor input to acquire the supply air temperature. The thermostat controls the room temperature via the built-in sensor. The control output (DC 0...10 V) is reduced if the supply air temperature exceeds the min / max limits (P63, P64).
AI --
Operational action can be changed between normally open (NO) and normally closed (NC) via parameter P39, P41 (or P43 if it is a digital input). Each input X1, X2 or D1 must be configured with a different function (1…5, 9). Exception: 1, 2 or 3 inputs can be configured as alarm inputs (6). X1 is factory-set to "External sensor" (1), X2 to "Heating / cooling changeover" (2), and D1 to operating mode changeover (3). If a multifunctional input is configured as analog: "Err" will be displayed when the output is out of range (0...49 °C), open or shorted. For more detailed information, refer to section 4.5 "Applications".
50 / 76
Siemens RDG100, RDG100T, RDG110, RDG160T Basic Documentation CE1P3181en Building Technologies Functions 2014-05-23
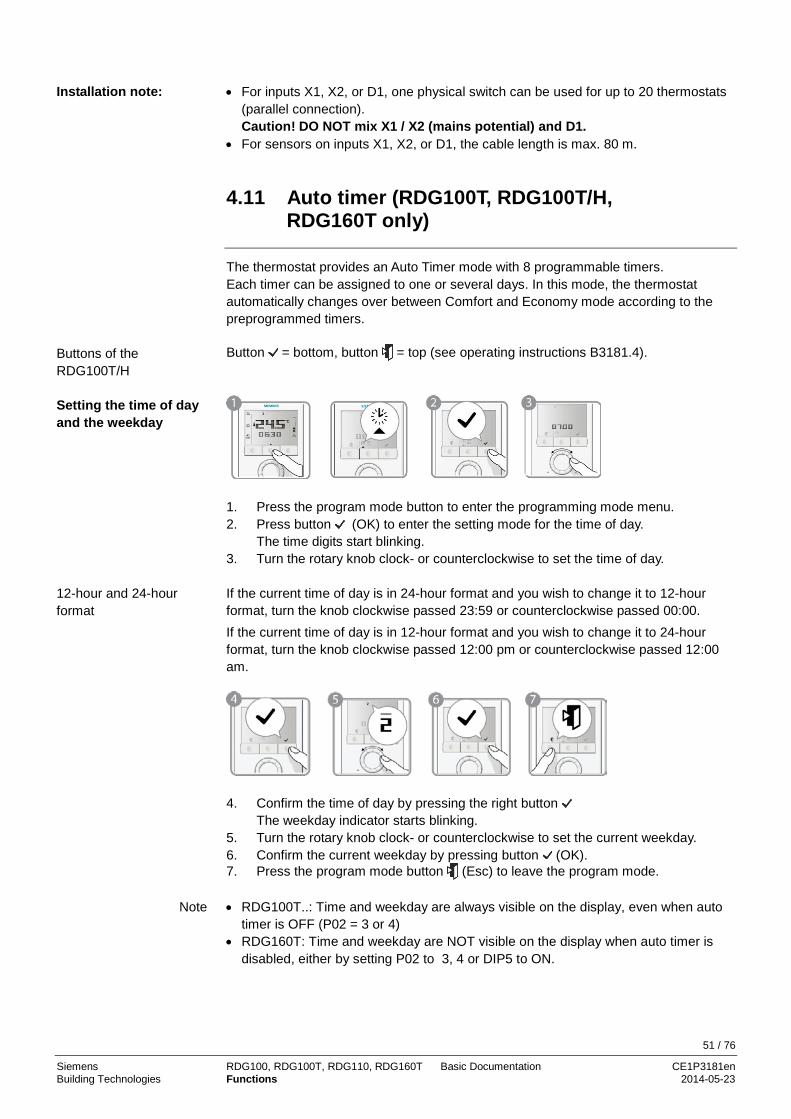
• For inputs X1, X2, or D1, one physical switch can be used for up to 20 thermostats
(parallel connection). Caution! DO NOT mix X1 / X2 (mains potential) and D1.
• For sensors on inputs X1, X2, or D1, the cable length is max. 80 m. 4.11 Auto timer (RDG100T, RDG100T/H,
RDG160T only)
The thermostat provides an Auto Timer mode with 8 programmable timers. Each timer can be assigned to one or several days. In this mode, the thermostat automatically changes over between Comfort and Economy mode according to the preprogrammed timers. Button = bottom, button = top (see operating instructions B3181.4).
1. Press the program mode button to enter the programming mode menu. 2. Press button (OK) to enter the setting mode for the time of day.
The time digits start blinking. 3. Turn the rotary knob clock- or counterclockwise to set the time of day. If the current time of day is in 24-hour format and you wish to change it to 12-hour format, turn the knob clockwise passed 23:59 or counterclockwise passed 00:00. If the current time of day is in 12-hour format and you wish to change it to 24-hour format, turn the knob clockwise passed 12:00 pm or counterclockwise passed 12:00 am.
4. Confirm the time of day by pressing the right button
The weekday indicator starts blinking. 5. Turn the rotary knob clock- or counterclockwise to set the current weekday. 6. Confirm the current weekday by pressing button (OK). 7. Press the program mode button (Esc) to leave the program mode. • RDG100T..: Time and weekday are always visible on the display, even when auto
timer is OFF (P02 = 3 or 4) • RDG160T: Time and weekday are NOT visible on the display when auto timer is
disabled, either by setting P02 to 3, 4 or DIP5 to ON.
Installation note:
Buttons of the RDG100T/H
Setting the time of day and the weekday
12-hour and 24-hour format
Note
51 / 76
Siemens RDG100, RDG100T, RDG110, RDG160T Basic Documentation CE1P3181en Building Technologies Functions 2014-05-23

After a power failure, the time of day will blink to indicate power was lost. However the auto timer will continue to run with the time before the power loss occurred. Enter the setting mode to adjust the time of day if needed. The RDG100T / RDG100T/H / RDG160T provide 8 programmable timers A1 … A8. Each timer has a Comfort mode start and end time that can be applied to one or several weekdays. To set an auto timer, proceed as follows:
1. Press the program mode button twice to select "Auto timer setting" on the
"Programming mode" menu. 2. Turn the rotary knob to the desired timer A1…A8 that you wish to adjust and
press button (OK). 3. Turn the rotary knob to adjust the Comfort mode start time and confirm by
pressing button (OK). 4. Turn the rotary knob to adjust the Comfort mode end time or Economy start time
respectively and confirm by pressing button (OK) 5. Weekday , and blink. Press button (OK) to select or button (Esc) to
deselect each day and advance to the next day. 6. After the 7th day is adjusted, all selected weekdays blink.
Confirm setting for actual timer by pressing button (OK) and advance to the next timer. To adjust the next timer, repeat step 3…6 or press button (Esc) to leave the setting mode.
• To save your adjustments, remember to press button (OK) in step 6 above before
pressing button (Esc) to leave the programmable timer setting mode. • Auto timer can be disabled via parameter P02 (=3 or 4), (RDG1…T..) or via DIP5 =
ON on RDG160T. • RDG100T..: Time and weekday are always visible on the display, even when auto
timer is OFF (P02 = 3 or 4). • RDG160T: Time and weekday are NOT visible on the display when auto timer is
disabled, either by setting P02 to 3, 4 or DIP5 to ON. You can view the 8 timers in sequence:
1. Press the program mode button twice to select the "Auto timer setting" in
programming mode. 2. Turn the rotary knob to review the 8 auto timers. 3. Press button (Esc) to return to normal operation.
Power failure
Setting the timers (RDG1x0T.. only)
Notes
View the programmable settings
52 / 76
Siemens RDG100, RDG100T, RDG110, RDG160T Basic Documentation CE1P3181en Building Technologies Functions 2014-05-23
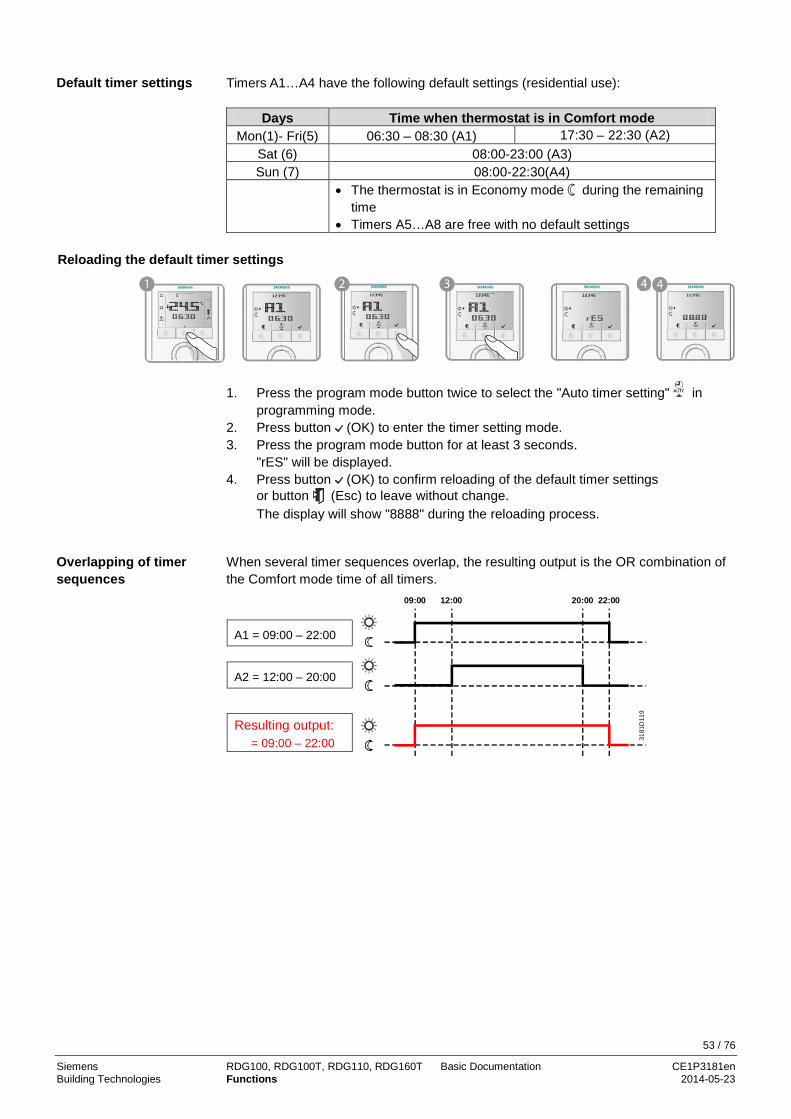
Timers A1…A4 have the following default settings (residential use):
Days Time when thermostat is in Comfort mode Mon(1)- Fri(5) 06:30 – 08:30 (A1) 17:30 – 22:30 (A2)
Sat (6) 08:00-23:00 (A3) Sun (7) 08:00-22:30(A4)
• The thermostat is in Economy mode during the remaining time
• Timers A5…A8 are free with no default settings Reloading the default timer settings
1. Press the program mode button twice to select the "Auto timer setting" in
programming mode. 2. Press button (OK) to enter the timer setting mode. 3. Press the program mode button for at least 3 seconds.
"rES" will be displayed. 4. Press button (OK) to confirm reloading of the default timer settings
or button (Esc) to leave without change. The display will show "8888" during the reloading process.
When several timer sequences overlap, the resulting output is the OR combination of the Comfort mode time of all timers.
31
81D
119
09:00 12:00 20:00 22:00
A1 = 09:00 – 22:00
A2 = 12:00 – 20:00
Resulting output: = 09:00 – 22:00
Default timer settings
Overlapping of timer sequences
53 / 76
Siemens RDG100, RDG100T, RDG110, RDG160T Basic Documentation CE1P3181en Building Technologies Functions 2014-05-23

4.12 Handling faults
When the room temperature is outside the measuring range, i.e. above 49 °C or below 0 °C, the limiting temperatures blink, e.g. "0 °C" or "49 °C". In addition, the heating output is activated if the current setpoint is not set to "OFF", the thermostat is in heating mode and the temperature is below 0 °C. For all other cases, no output is activated.
The thermostat resumes Comfort mode after the temperature returns to within the measuring range. When the built-in sensor fails and no external sensor is connected, the thermostat shows the fault message "Er1" on the display. The thermostat needs to be replaces if the room temperature needs to be measured with the built-in sensor. 4.13 Infrared remote control
Use the IRA211 infrared remote control to operate a thermostat with built-in infrared receiver. The following operations can be carried out remotely: • Select Protection, Comfort or Auto Timer mode • Adjust setpoint in Comfort mode • Select fan mode "Automatic" or "Manual" A buzzer in the thermostat indicates remote control command reception. Infrared remote control can be disabled via parameter P70.
4.14 DIP switches
Use the DIP switches at the rear of the thermostat to commission the thermostat's basic application prior to snapping it to the base. – The application is set via DIP switches 1…3 – The function of the control outputs (2-position or 3-position) is set via DIP switches
4 and 5 for RDG 100, RDG100T and RDG100T/H. – For RDG160T (DC 0…10 V), DIP switches 4 select either DC fan (DIP4=OFF) or 3-
speed fan (DIP4=ON). DIP5 set to ON disables the time program functions and the time is not visible anymore on the display.
For details concerning connection of peripheral devices and setting of the DIP switches, refer to the Mounting Instructions: – [4] M3181.1 (RDG100, RDG100T) – [5] M3181.2 (RDG110) – [6] M3181.5 (RDG160T) – [7] M3181.4 (RDG100T/H)
During startup, the thermostat reloads the control parameter factory settings after each change of DIP switch setting.
Temperature out of range
Fault "Er1" on display
1 2 3 4 5
ON
OFF
Note
54 / 76
Siemens RDG100, RDG100T, RDG110, RDG160T Basic Documentation CE1P3181en Building Technologies Functions 2014-05-23

4.15 Control parameters
A number of control parameters can be readjusted to optimize control performance. These parameters can also be set during operation without opening the unit. In the event of a power failure, all control parameter settings are retained.
The control parameters are assigned to 2 levels: • "Service level", and • "Expert level" with "Diagnostics and test" The "Service level" contains a small set of parameters to set up the thermostat for the HVAC system and to adjust the user interface. These parameters can usually be adjusted any time. Change parameters at the "Expert level" carefully, as they impact control performance and functionality of the thermostat.
Change the parameters as follows:
1. Press left and right button simultaneously for 4 seconds. Release and press the right button again within 2 seconds until the display shows "P01". Continue with step 2.
1. Press left button and right button simultaneously for 4 seconds.
Release and press the left button again within 2 seconds until the temperature disappears. Turn the rotary knob counterclockwise min. ½ rotation. The display shows "Pxx". Continue with step 2.
2. Select the required parameter by turning the rotary knob. 3. Press button (OK); the current value of the selected parameter starts blinking
and can be changed by turning the rotary knob. 4. Press button (OK) to confirm the adjusted value or press button (Esc) to
cancel the change. 5. If you wish to adjust additional parameters, repeat steps 2…4. 6. Press button (Esc) to leave the parameter setting mode.
The factory setting for the control parameters can be reloaded via parameter P71, by changing the value to "ON". Confirm by pressing the right button. The display shows "8888" during reloading. Button = bottom, button = top (see operating instructions B3181.4).
Parameter setting
Enter only "Service level"
Enter "Expert level" and "Diagnostics and test"
Adjusting parameters
Resetting parameters
Buttons of the RDG100T/H
55 / 76
Siemens RDG100, RDG100T, RDG110, RDG160T Basic Documentation CE1P3181en Building Technologies Functions 2014-05-23
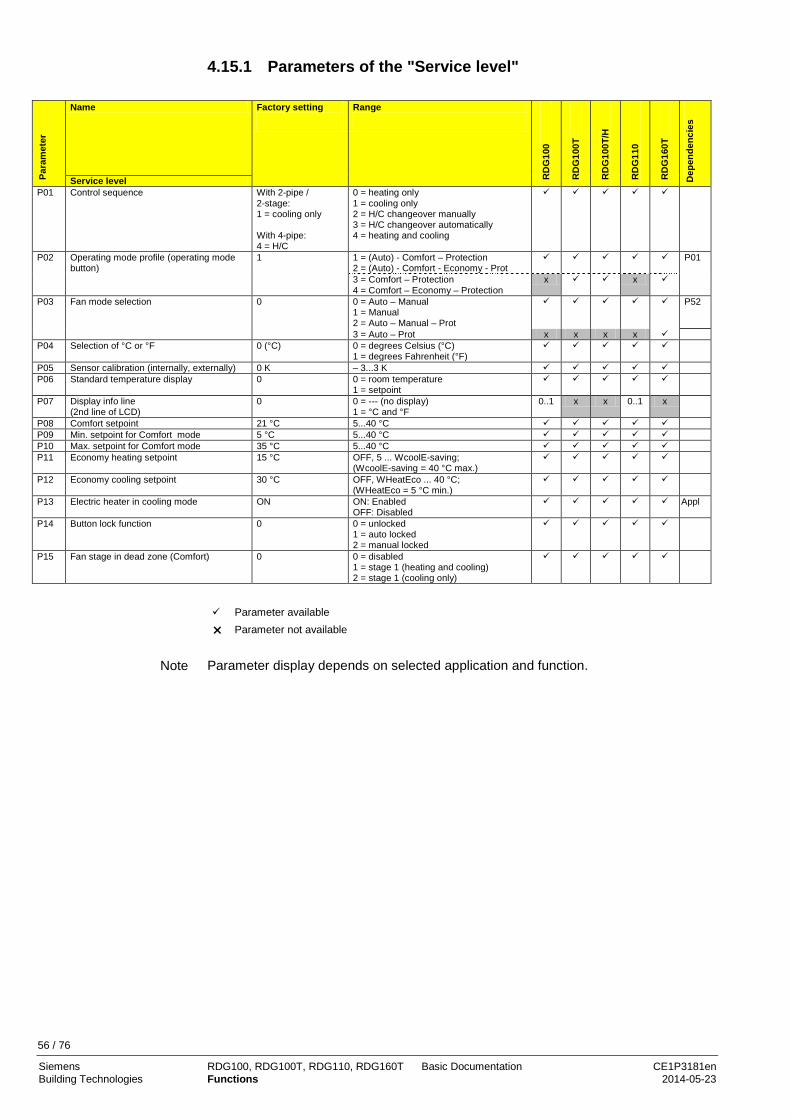
4.15.1 Parameters of the "Service level"
Par
amet
er
Name Factory setting
Range
RD
G10
0
RD
G10
0T
RD
G10
0T/H
RD
G11
0
RD
G16
0T
Dep
ende
ncie
s
Service level P01 Control sequence With 2-pipe /
2-stage: 1 = cooling only With 4-pipe: 4 = H/C
0 = heating only 1 = cooling only 2 = H/C changeover manually 3 = H/C changeover automatically 4 = heating and cooling
P02 Operating mode profile (operating mode button)
1 1 = (Auto) - Comfort – Protection 2 = (Auto) - Comfort - Economy - Prot
P01
3 = Comfort – Protection 4 = Comfort – Economy – Protection
x x
P03 Fan mode selection 0 0 = Auto – Manual 1 = Manual 2 = Auto – Manual – Prot
P52
3 = Auto – Prot x x x x P04 Selection of °C or °F 0 (°C) 0 = degrees Celsius (°C)
1 = degrees Fahrenheit (°F)
P05 Sensor calibration (internally, externally) 0 K – 3...3 K P06 Standard temperature display 0 0 = room temperature
1 = setpoint
P07 Display info line (2nd line of LCD)
0 0 = --- (no display) 1 = °C and °F
0..1 x x 0..1 x
P08 Comfort setpoint 21 °C 5...40 °C P09 Min. setpoint for Comfort mode 5 °C 5...40 °C P10 Max. setpoint for Comfort mode 35 °C 5...40 °C P11 Economy heating setpoint 15 °C OFF, 5 ... WcoolE-saving;
(WcoolE-saving = 40 °C max.)
P12 Economy cooling setpoint 30 °C OFF, WHeatEco ... 40 °C; (WHeatEco = 5 °C min.)
P13 Electric heater in cooling mode ON ON: Enabled OFF: Disabled
Appl
P14 Button lock function 0 0 = unlocked 1 = auto locked 2 = manual locked
P15 Fan stage in dead zone (Comfort)
0 0 = disabled 1 = stage 1 (heating and cooling) 2 = stage 1 (cooling only)
Parameter available Parameter not available
Parameter display depends on selected application and function.
Note
56 / 76
Siemens RDG100, RDG100T, RDG110, RDG160T Basic Documentation CE1P3181en Building Technologies Functions 2014-05-23
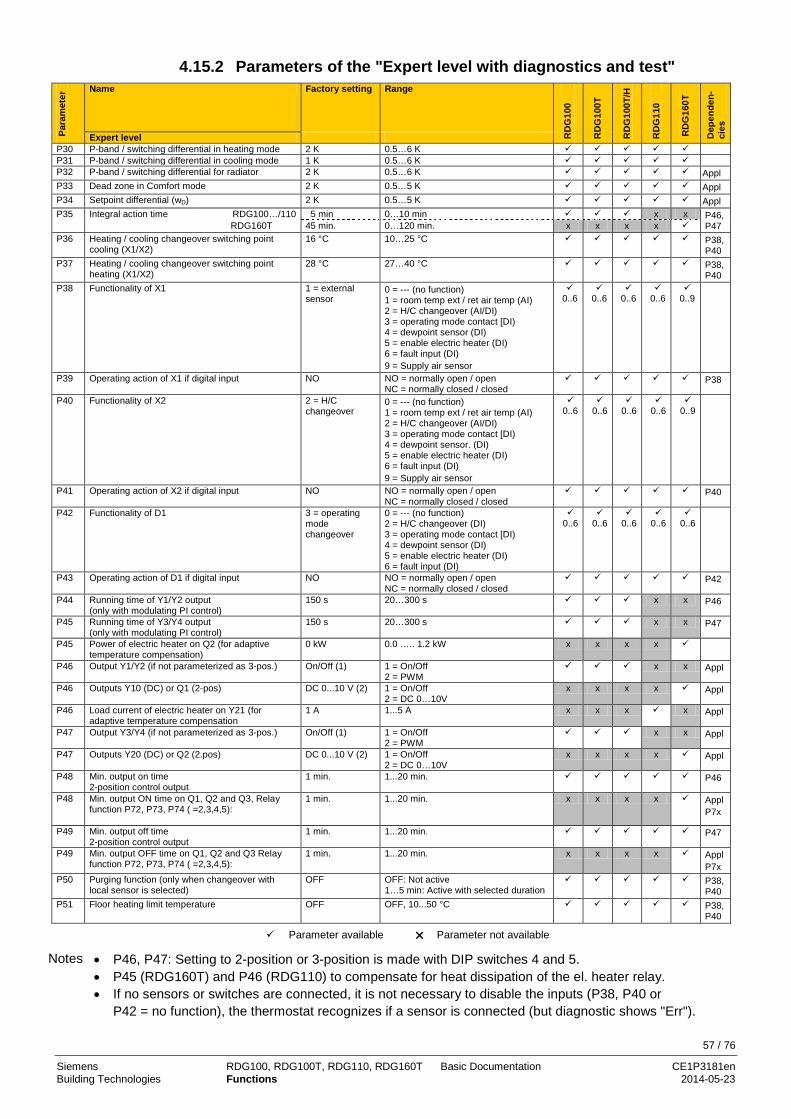
4.15.2 Parameters of the "Expert level with diagnostics and test" P
aram
eter
Name Factory setting Range
RD
G10
0
RD
G10
0T
RD
G10
0T/H
RD
G11
0
RD
G16
0T
Dep
ende
n-ci
es
Expert level P30 P-band / switching differential in heating mode 2 K 0.5…6 K P31 P-band / switching differential in cooling mode 1 K 0.5…6 K P32 P-band / switching differential for radiator 2 K 0.5…6 K Appl P33 Dead zone in Comfort mode 2 K 0.5…5 K Appl P34 Setpoint differential (wD) 2 K 0.5…5 K Appl P35 Integral action time RDG100…/110 5 min 0…10 min x x P46,
P47 RDG160T 45 min. 0…120 min. x x x x
P36 Heating / cooling changeover switching point cooling (X1/X2)
16 °C 10…25 °C P38, P40
P37 Heating / cooling changeover switching point heating (X1/X2)
28 °C 27…40 °C P38, P40
P38 Functionality of X1 1 = external sensor
0 = --- (no function) 1 = room temp ext / ret air temp (AI) 2 = H/C changeover (AI/DI) 3 = operating mode contact [DI) 4 = dewpoint sensor (DI) 5 = enable electric heater (DI) 6 = fault input (DI) 9 = Supply air sensor
0..6
0..6
0..6
0..6
0..9
P39 Operating action of X1 if digital input NO NO = normally open / open NC = normally closed / closed
P38
P40 Functionality of X2 2 = H/C changeover
0 = --- (no function) 1 = room temp ext / ret air temp (AI) 2 = H/C changeover (AI/DI) 3 = operating mode contact [DI) 4 = dewpoint sensor. (DI) 5 = enable electric heater (DI) 6 = fault input (DI) 9 = Supply air sensor
0..6
0..6
0..6
0..6
0..9
P41 Operating action of X2 if digital input NO NO = normally open / open NC = normally closed / closed
P40
P42 Functionality of D1 3 = operating mode changeover
0 = --- (no function) 2 = H/C changeover (DI) 3 = operating mode contact [DI) 4 = dewpoint sensor (DI) 5 = enable electric heater (DI) 6 = fault input (DI)
0..6
0..6
0..6
0..6
0..6
P43 Operating action of D1 if digital input NO NO = normally open / open NC = normally closed / closed
P42
P44 Running time of Y1/Y2 output (only with modulating PI control)
150 s 20…300 s x x P46
P45 Running time of Y3/Y4 output (only with modulating PI control)
150 s 20…300 s x x P47
P45 Power of electric heater on Q2 (for adaptive temperature compensation)
0 kW 0.0 ….. 1.2 kW x x x x
P46 Output Y1/Y2 (if not parameterized as 3-pos.) On/Off (1) 1 = On/Off 2 = PWM
x x Appl
P46 Outputs Y10 (DC) or Q1 (2-pos) DC 0...10 V (2) 1 = On/Off 2 = DC 0…10V
x x x x Appl
P46 Load current of electric heater on Y21 (for adaptive temperature compensation
1 A 1...5 A x x x x Appl
P47 Output Y3/Y4 (if not parameterized as 3-pos.) On/Off (1) 1 = On/Off 2 = PWM
x x Appl
P47 Outputs Y20 (DC) or Q2 (2.pos) DC 0...10 V (2) 1 = On/Off 2 = DC 0…10V
x x x x Appl
P48 Min. output on time 2-position control output
1 min. 1...20 min. P46
P48 Min. output ON time on Q1, Q2 and Q3, Relay function P72, P73, P74 ( =2,3,4,5):
1 min. 1...20 min. x x x x Appl P7x
P49 Min. output off time 2-position control output
1 min. 1...20 min. P47
P49 Min. output OFF time on Q1, Q2 and Q3 Relay function P72, P73, P74 ( =2,3,4,5):
1 min. 1...20 min. x x x x Appl P7x
P50 Purging function (only when changeover with local sensor is selected)
OFF OFF: Not active 1…5 min: Active with selected duration
P38, P40
P51 Floor heating limit temperature OFF OFF, 10...50 °C P38, P40
Parameter available Parameter not available
• P46, P47: Setting to 2-position or 3-position is made with DIP switches 4 and 5. • P45 (RDG160T) and P46 (RDG110) to compensate for heat dissipation of the el. heater relay. • If no sensors or switches are connected, it is not necessary to disable the inputs (P38, P40 or
P42 = no function), the thermostat recognizes if a sensor is connected (but diagnostic shows "Err").
Notes
57 / 76
Siemens RDG100, RDG100T, RDG110, RDG160T Basic Documentation CE1P3181en Building Technologies Functions 2014-05-23
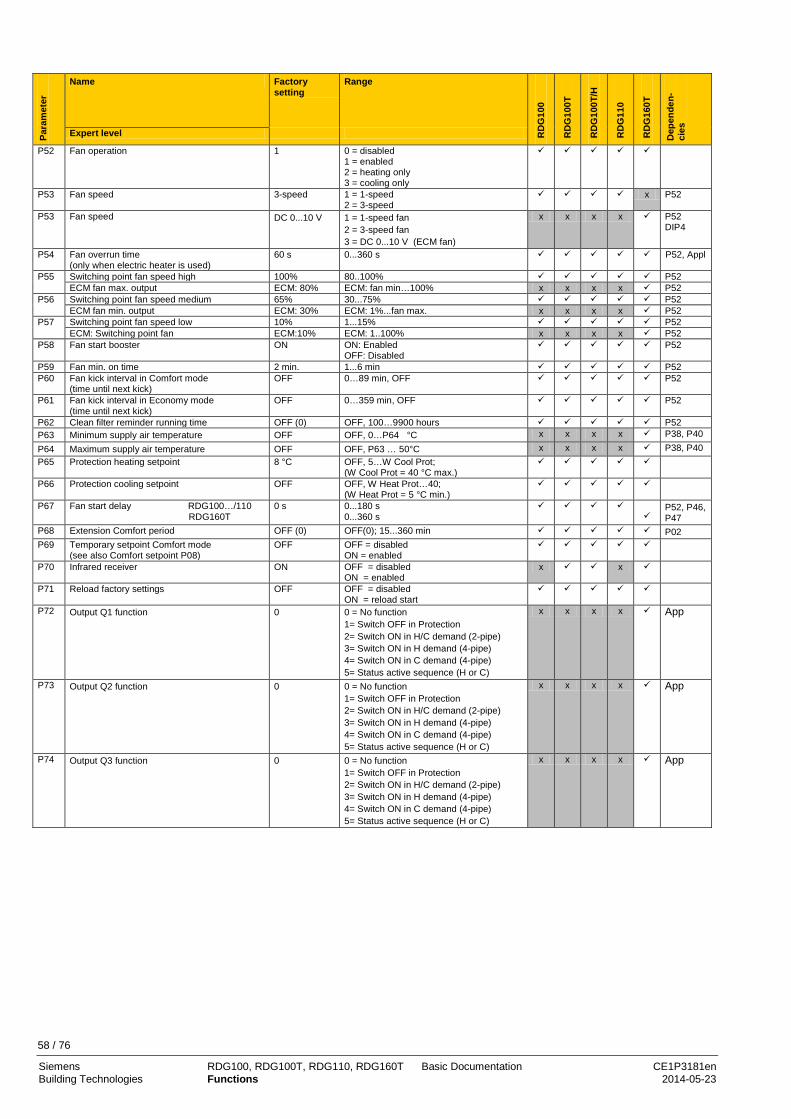
Para
met
er
Name Factory setting
Range
RD
G10
0
RD
G10
0T
RD
G10
0T/H
RD
G11
0
RD
G16
0T
Dep
ende
n-
cies
Expert level
P52 Fan operation 1 0 = disabled 1 = enabled 2 = heating only 3 = cooling only
P53 Fan speed 3-speed 1 = 1-speed 2 = 3-speed
x P52
P53 Fan speed DC 0...10 V 1 = 1-speed fan 2 = 3-speed fan 3 = DC 0...10 V (ECM fan)
x x x x P52 DIP4
P54 Fan overrun time (only when electric heater is used)
60 s 0...360 s P52, Appl
P55 Switching point fan speed high 100% 80..100% P52 P55 ECM fan max. output ECM: 80% ECM: fan min…100% x x x x P52 P56 Switching point fan speed medium 65% 30...75% P52 P56 ECM fan min. output ECM: 30% ECM: 1%...fan max. x x x x P52 P57 Switching point fan speed low 10% 1...15% P52 P57 ECM: Switching point fan ECM:10% ECM: 1..100% x x x x P52 P58 Fan start booster ON ON: Enabled
OFF: Disabled P52
P59 Fan min. on time 2 min. 1...6 min P52 P60 Fan kick interval in Comfort mode
(time until next kick) OFF 0…89 min, OFF P52
P61 Fan kick interval in Economy mode (time until next kick)
OFF 0…359 min, OFF P52
P62 Clean filter reminder running time OFF (0) OFF, 100…9900 hours P52 P63 Minimum supply air temperature OFF OFF, 0…P64 °C x x x x P38, P40 P64 Maximum supply air temperature OFF OFF, P63 … 50°C x x x x P38, P40 P65 Protection heating setpoint 8 °C OFF, 5…W Cool Prot;
(W Cool Prot = 40 °C max.)
P66 Protection cooling setpoint OFF OFF, W Heat Prot…40; (W Heat Prot = 5 °C min.)
P67 Fan start delay RDG100…/110 RDG160T
0 s 0...180 s 0...360 s
P52, P46, P47
P68 Extension Comfort period OFF (0) OFF(0); 15...360 min P02 P69 Temporary setpoint Comfort mode
(see also Comfort setpoint P08) OFF OFF = disabled
ON = enabled
P70 Infrared receiver ON OFF = disabled ON = enabled
x x
P71 Reload factory settings OFF OFF = disabled ON = reload start
P72 Output Q1 function 0 0 = No function 1= Switch OFF in Protection 2= Switch ON in H/C demand (2-pipe) 3= Switch ON in H demand (4-pipe) 4= Switch ON in C demand (4-pipe) 5= Status active sequence (H or C)
x x x x App
P73 Output Q2 function 0 0 = No function 1= Switch OFF in Protection 2= Switch ON in H/C demand (2-pipe) 3= Switch ON in H demand (4-pipe) 4= Switch ON in C demand (4-pipe) 5= Status active sequence (H or C)
x x x x App
P74 Output Q3 function 0 0 = No function 1= Switch OFF in Protection 2= Switch ON in H/C demand (2-pipe) 3= Switch ON in H demand (4-pipe) 4= Switch ON in C demand (4-pipe) 5= Status active sequence (H or C)
x x x x App
58 / 76
Siemens RDG100, RDG100T, RDG110, RDG160T Basic Documentation CE1P3181en Building Technologies Functions 2014-05-23

P
aram
eter
Name Factory setting Range
RD
G10
0
RD
G10
0T
RD
G10
0T/H
RD
G11
0
RD
G16
0T
Dep
ende
n-
cies
Diagnostics and test
d01 Application type Diagnostics 0 = (no application) 1 = 2-pipe 2 = 2-pipe with electric heater 3 = 2-pipe with radiator 4 = 4-pipe 5 = 2 stage heating or cooling 6 = 4-pipe with electric heater
d02 X1 status Diagnostics "---" = function not selected 0 = not activated (for DI) 1 = Activated (DI) 0…49 °C = Curr. temp. value (for AI) Err *) 00 = H/C input closed 100 = H/C input open
d03 X2 status Diagnostics "---" = function not selected 0 = not activated (for DI) 1 = Activated (DI) 0…49 °C = Curr. temp. value (for AI) Err *) 00 = H/C input closed 100 = H/C input open
d04 D1 status Diagnostics "---" = function not selected 0 = not activated (for DI) 1 = Activated (DI) 00 = H/C input closed 100 = H/C input open
d05 Test mode for checking actuator direction Y1/Y2 (press left button to escape)
--- "---" = no signal at outputs Y1 and Y2 OPE = output Y1 forced opening CLO = output Y2 forced closing
x x P46
d06 Test mode for checking actuator direction Y3/Y4 (press left button to escape)
--- "---" = no signal at outputs Y3 and Y4 OPE = output Y3 forced opening CLO = output Y4 forced closing
x x P47
d07 Software version --- Ux.xx is displayed
d08 Test mode for checking Q1 output --- "---" = no signal at output Q1 OPE = output Q1 forced opening CLO = output Q1 forced closing
x x x x P72, App
d09 Test mode for checking Q2 output --- "---" = no signal at output Q2 OPE = output Q2 forced opening CLO = output Q2 forced closing
x x x x P73, App
d10 Test mode for checking Q3 output --- "---" = no signal at output Q3 OPE = output Q3 forced opening CLO = output Q3 forced closing
x x x x P74, App
Parameter available Parameter not available *) If input is parameterized as analog (P38 or P40 = 1) or set to "0": "Err" on the diagnostic parameter is displayed when input is
out of range (0...49 °C), open or shorted (on RDG100.., RDG110).
59 / 76
Siemens RDG100, RDG100T, RDG110, RDG160T Basic Documentation CE1P3181en Building Technologies Functions 2014-05-23

5 Handling 5.1 Mounting and installation
Do not mount on a wall in niches or book-shelves, behind curtains, above or near heat sources, or exposed to direct solar radiation. Mount about 1.5 m above the floor.
• The room thermostat must be mounted in a clean, dry indoor place and must not be
exposed to drip or splash water.
See Mounting Instructions (M3181) enclosed with the thermostat.
• Comply with local regulations to wire, protection and earth the thermostat. • The device has no internal fuse for supply lines to fan and actuators. To avoid risk
of fire and injury due to short-circuits, the AC 230 V mains supply line must have a circuit breaker with a rated current of no more than 10 A.
• Properly size the cables to the thermostat, fan and valve actuators for AC 230 V mains voltage.
• Use only valve actuators rated for AC 230 V on RDG100…, RDG110 and on RDG160T if AC 230V is connected to the "L" terminal.
• The wiring cross section used for power supply (L, N), fan (Q1, Q2, Q3, N) and 230 V outputs (Yx - N) must be adapted to the preceding overload protection elements (10A) under all circumstances. Comply under all circumstances with local regulations.
• Isolate the cables of inputs X1-M / X2-M and D1-GND if the conduit box carries AC 230 V mains voltage.
• On the RDG100.. and RDG110, inputs X1-M and X2-M carry mains potential. If the sensor’s cables are extended, they must be suited for mains voltage.
• Inputs X1-M, X2-M or D1-GND of different units (e.g. summer / winter switch) may be connected in parallel with an external switch. Consider overall maximum contact sensing current for switch rating.
• Selectable relay function (RDG160T). Consider overall maximum current thought the relays.
• Disconnect power supply before removing the thermostat from the mounting plate!
Select the application and the type of control output via the DIP switches before fitting the thermostat to the mounting plate. After power is applied, the thermostat carries out a reset during which all LCD segments blink, indicating that the reset was correct. After the reset, which takes about 3 seconds, the thermostat is ready for commissioning by qualified HVAC staff. The control parameters of the thermostat can be set to ensure optimum performance of the entire system (see section 4.15, control parameters).
• The control sequence may need to be set via parameter P01 depending on the application. The factory setting for the 2-pipe application is "Cooling only"; and "Heating and cooling" for the 4-pipe application.
• When the thermostat is used in connection with a compressor, the minimum output on-time (parameter P48) and off-time (parameter P49) for Y11/Y21 must be adjusted to avoid damage to the compressor and shortening its life.
Mounting
Wiring
Commissioning
Control sequence
Compressor-based application
60 / 76
Siemens RDG100, RDG100T, RDG110, RDG160T Basic Documentation CE1P3181en Building Technologies Handling 2014-05-23

• Recalibrate the temperature sensor if the room temperature displayed on the thermostat does not match the room temperature measured. To do this, change parameter P05.
• When an electric heater is connected directly to output Y21, the rated current of the
electric heating should be entered in parameter 46 (RDG110 only, device index D and higher), see section 4.8. Default setting: 1 A for loads ≤ 1 A.
• We recommend to review the setpoints and setpoint setting ranges (parameters P08…P12) and change them as needed to achieve maximum comfort and save energy.
5.2 Operation
See also Operating Instructions B3181 enclosed with the thermostat.
Layout
RDG100 RDG110
RDG100T RDG160T
RDG100T/H
1 Operating mode button / Esc 2 Button to enter the time and to set the timers 3 Fan mode button / OK 4 Rotary knob for setpoint and parameter adjustment
• When the thermostat is in normal operation, the actual operating mode and status
are indicated by symbols • When a button is pressed, the thermostat goes into mode selection.
The backlit LCD will turn on, all possible mode selection options (symbols) will turn on, indicator element (arrow) will appear on the current mode/status
• When the button is pressed again, the indicator element will change to the next mode symbol and so on.
• After the last press and a timeout of 3 seconds, the newly selected mode is confirmed, the other elements disappear
• After a timeout of 20 seconds, the LCD backlight will turn off
Calibrate sensor
Adaptive temperature compensation for el. heater
Setpoint and setpoint setting range limitation
Button operation
2
1 3
4
1
2
4
3
61 / 76
Siemens RDG100, RDG100T, RDG110, RDG160T Basic Documentation CE1P3181en Building Technologies Handling 2014-05-23

User action Effect, description Press left button Go into Operating mode selection Press left button >3 seconds Set thermostat to Protection mode Keep left button depressed and turn rotary knob clockwise
Activate temporary timer "Extend presence" and set the time (for details, see page 24)
Keep left button depressed and turn rotary knob counterclockwise
Activate temporary timer "Extend absence" and set the time (for details, see page 24)
Press left button while "Operating mode switchover" is activated
Activate "Extend Comfort mode" (for details, see page 24)
Press right button >3 seconds Activate / deactivate button lock Press right button for fan coil unit Change fan mode Press right button for chilled ceiling (P52=0) Set thermostat to Protection mode Turn rotary knob Adjust the room temperature setpoint Press left and right button >3 seconds, release, then press right button >3 seconds
Go to parameter setting mode Service level"
Press left and right button for 3 seconds, release, press left button for 3 seconds, then turn rotary knob counterclockwise min. ½ rotation
Go to parameter setting mode Expert level, diagnostics and test
Only on RDG100T, RDG100T/H and RDG160T:
Press center button Go to timer settings Press center button Switch ON backlight if timer settings is
disable (RDG160T)
Button = bottom, button = top (see operating instructions B3181.4).
Buttons of the RDG100T/H
62 / 76
Siemens RDG100, RDG100T, RDG110, RDG160T Basic Documentation CE1P3181en Building Technologies Handling 2014-05-23
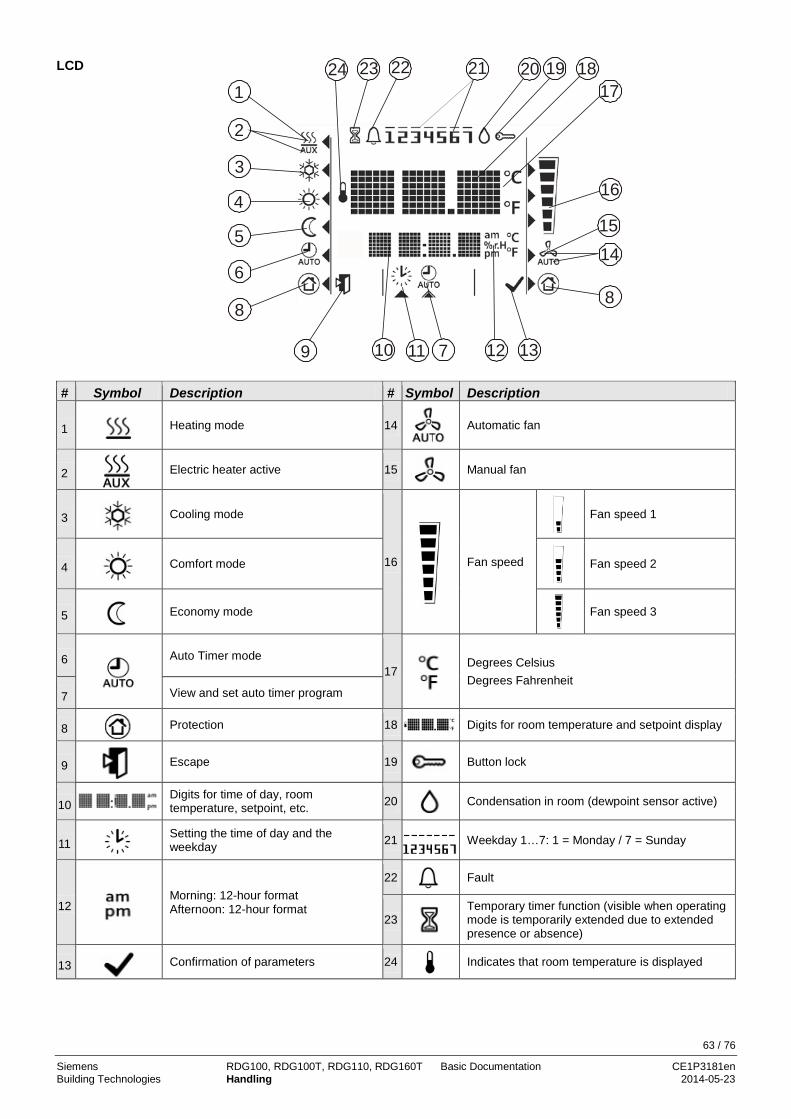
1
2
4
5
6
7
88
9 10 11 12 13
14
15
16
171819202123
3
2224
# Symbol Description # Symbol Description
1 Heating mode 14
Automatic fan
2
Electric heater active 15
Manual fan
3
Cooling mode
16
Fan speed
Fan speed 1
4
Comfort mode
Fan speed 2
5 Economy mode
Fan speed 3
6
Auto Timer mode 17
Degrees Celsius Degrees Fahrenheit
7 View and set auto timer program
8
Protection 18 Digits for room temperature and setpoint display
9
Escape 19 Button lock
10 Digits for time of day, room temperature, setpoint, etc. 20
Condensation in room (dewpoint sensor active)
11
Setting the time of day and the weekday 21
Weekday 1…7: 1 = Monday / 7 = Sunday
12
Morning: 12-hour format Afternoon: 12-hour format
22
Fault
23
Temporary timer function (visible when operating mode is temporarily extended due to extended presence or absence)
13
Confirmation of parameters 24
Indicates that room temperature is displayed
LCD
63 / 76
Siemens RDG100, RDG100T, RDG110, RDG160T Basic Documentation CE1P3181en Building Technologies Handling 2014-05-23

5.3 Disposal
The devices are considered electronics devices for disposal in terms of European Directive 2012/19/EU and may not be disposed of as domestic waste.
• Dispose of the device via the channels provided for this purpose. • Comply with all local and currently applicable laws and regulations.
64 / 76
Siemens RDG100, RDG100T, RDG110, RDG160T Basic Documentation CE1P3181en Building Technologies Handling 2014-05-23

6 Engineering 6.1 Connection terminals
RDG100, RDG100T, RDG100T/H
L X1 M X2 D1 GND
N Q1 Q2 Q3
SELV
L, N Operating voltage AC 230 V X1, X2 Multifunctional input for temperature sensor
(e.g. QAH11.1) or potential-free switch Factory setting : - X1 = external room temperature sensor - X2 = sensor or switch for heating / cooling changeover Change of setting: Parameters P38, P40
M Measuring neutral for sensor and switch D1, GND Multifunctional input for potential-free switch.
Factory setting: Operating mode switchover contact Change of setting: Parameter P42
Q1 Control output fan speed "low" AC 230 V Q2 Control output fan speed "medium" AC 230 V Q3 Control output fan speed "high" AC 230 V Y1…Y4 Control output "Valve" AC 230 V
(NO, for normally closed valves), output for electric heater via external relay
Y11, Y21 Control output "Valve" AC 230 V (NO, for normally closed valves), output for compressor or electric heater
Y12, Y22 Control output "Valve" AC 230 V (NC, for normally open valves)
G, G0 Operating voltage AC / DC 24 V Note: For DC24 V: G0 = –; G = + L (-N) Power supply relay output AC 24…230 V Y10, Y20 Control output for DC 0…10 V actuator Y50 Control output "Fan" DC 0...10 V Q1. .3 Control output fan, valve, el. heater or ex. equipment
RDG110
SELVL X1 M X2 D1 GND
N Q1 Q2 Q3
RDG160T
L
G X1 M
G0 Q1 Q2 Q3 Y50
SELVX2
3181
A11
D1 GND
Y10 Y20
65 / 76
Siemens RDG100, RDG100T, RDG110, RDG160T Basic Documentation CE1P3181en Building Technologies Engineering 2014-05-23
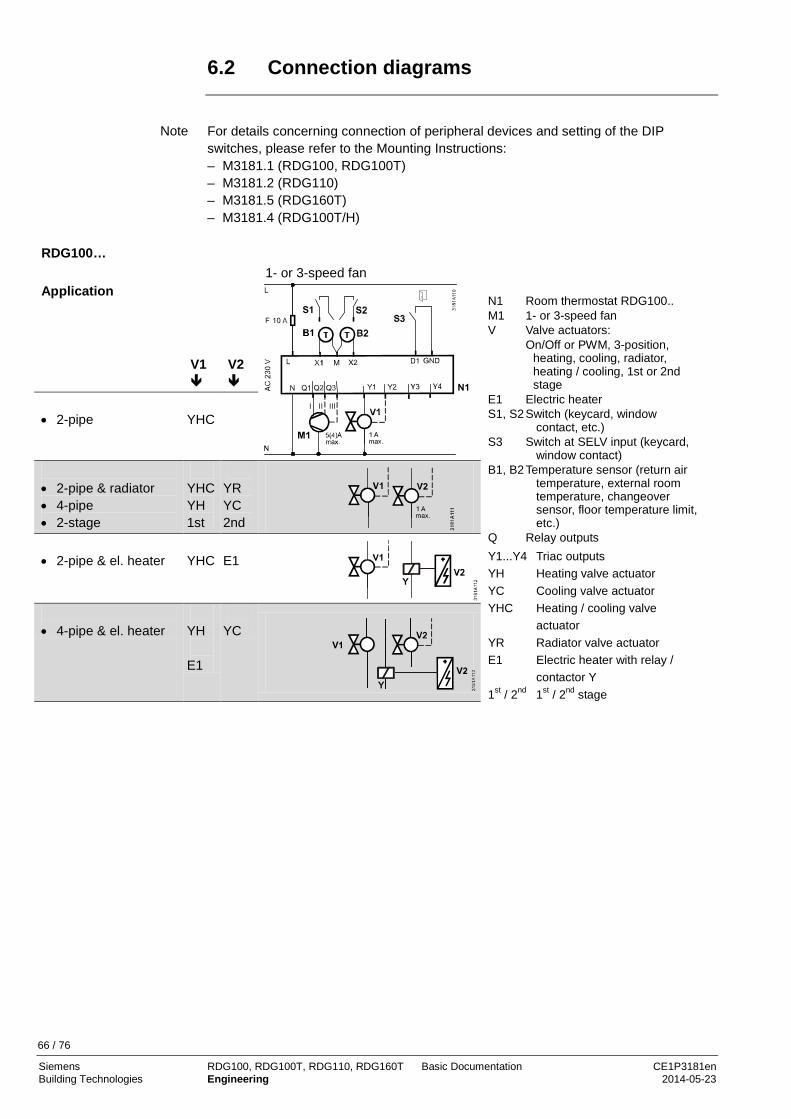
6.2 Connection diagrams
For details concerning connection of peripheral devices and setting of the DIP switches, please refer to the Mounting Instructions: – M3181.1 (RDG100, RDG100T) – M3181.2 (RDG110) – M3181.5 (RDG160T) – M3181.4 (RDG100T/H)
RDG100… N1 Room thermostat RDG100.. M1 1- or 3-speed fan V Valve actuators: On/Off or PWM, 3-position,
heating, cooling, radiator, heating / cooling, 1st or 2nd stage
E1 Electric heater S1, S2 Switch (keycard, window
contact, etc.) S3 Switch at SELV input (keycard,
window contact) B1, B2 Temperature sensor (return air
temperature, external room temperature, changeover sensor, floor temperature limit, etc.)
Q Relay outputs Y1...Y4 Triac outputs YH Heating valve actuator YC Cooling valve actuator YHC Heating / cooling valve
actuator YR Radiator valve actuator E1 Electric heater with relay /
contactor Y 1st / 2nd 1st / 2nd stage
1- or 3-speed fan Application
V1
V2
• 2-pipe
YHC
• 2-pipe & radiator • 4-pipe • 2-stage
YHC YH 1st
YR YC 2nd
• 2-pipe & el. heater
YHC
E1
• 4-pipe & el. heater
YH E1
YC
Note
66 / 76
Siemens RDG100, RDG100T, RDG110, RDG160T Basic Documentation CE1P3181en Building Technologies Engineering 2014-05-23
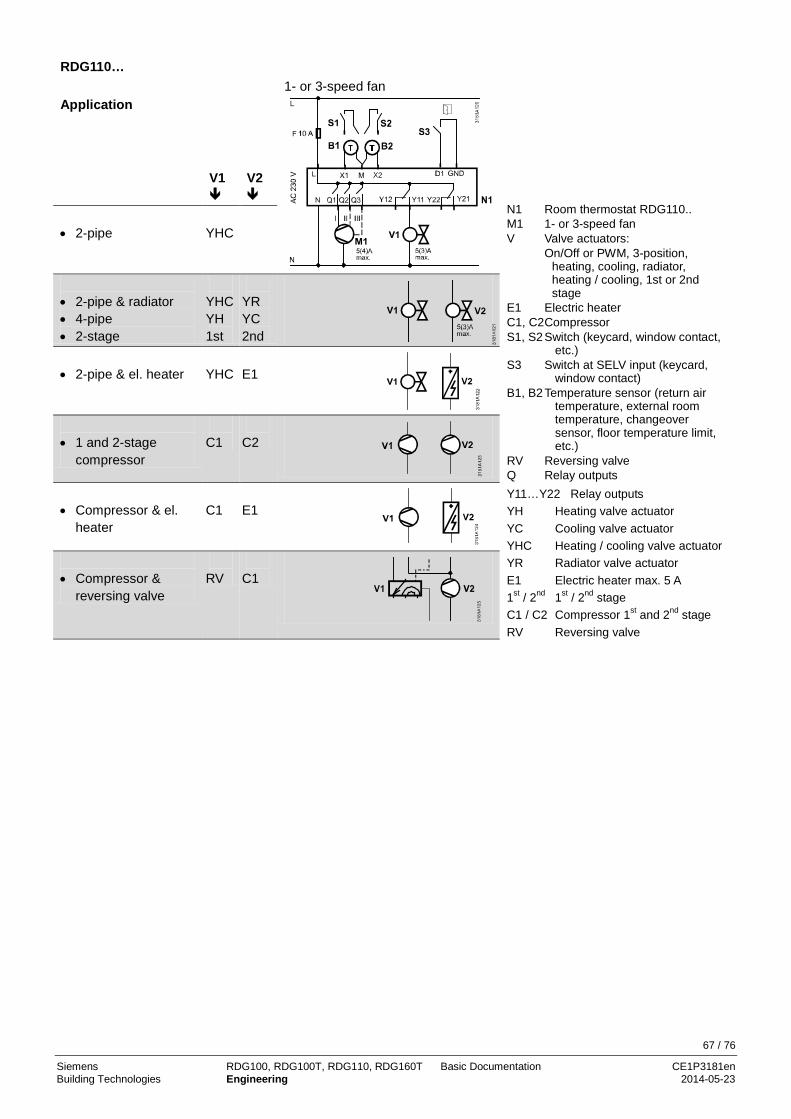
RDG110…
N1 Room thermostat RDG110.. M1 1- or 3-speed fan V Valve actuators: On/Off or PWM, 3-position,
heating, cooling, radiator, heating / cooling, 1st or 2nd stage
E1 Electric heater C1, C2 Compressor S1, S2 Switch (keycard, window contact,
etc.) S3 Switch at SELV input (keycard,
window contact) B1, B2 Temperature sensor (return air
temperature, external room temperature, changeover sensor, floor temperature limit, etc.)
RV Reversing valve Q Relay outputs Y11…Y22 Relay outputs YH Heating valve actuator YC Cooling valve actuator YHC Heating / cooling valve actuator YR Radiator valve actuator E1 Electric heater max. 5 A 1st / 2nd 1st / 2nd stage C1 / C2 Compressor 1st and 2nd stage RV Reversing valve
1- or 3-speed fan Application
V1
V2
• 2-pipe
YHC
• 2-pipe & radiator • 4-pipe • 2-stage
YHC YH 1st
YR YC 2nd
• 2-pipe & el. heater
YHC
E1
• 1 and 2-stage
compressor
C1
C2
• Compressor & el.
heater
C1
E1
• Compressor &
reversing valve
RV
C1
67 / 76
Siemens RDG100, RDG100T, RDG110, RDG160T Basic Documentation CE1P3181en Building Technologies Engineering 2014-05-23
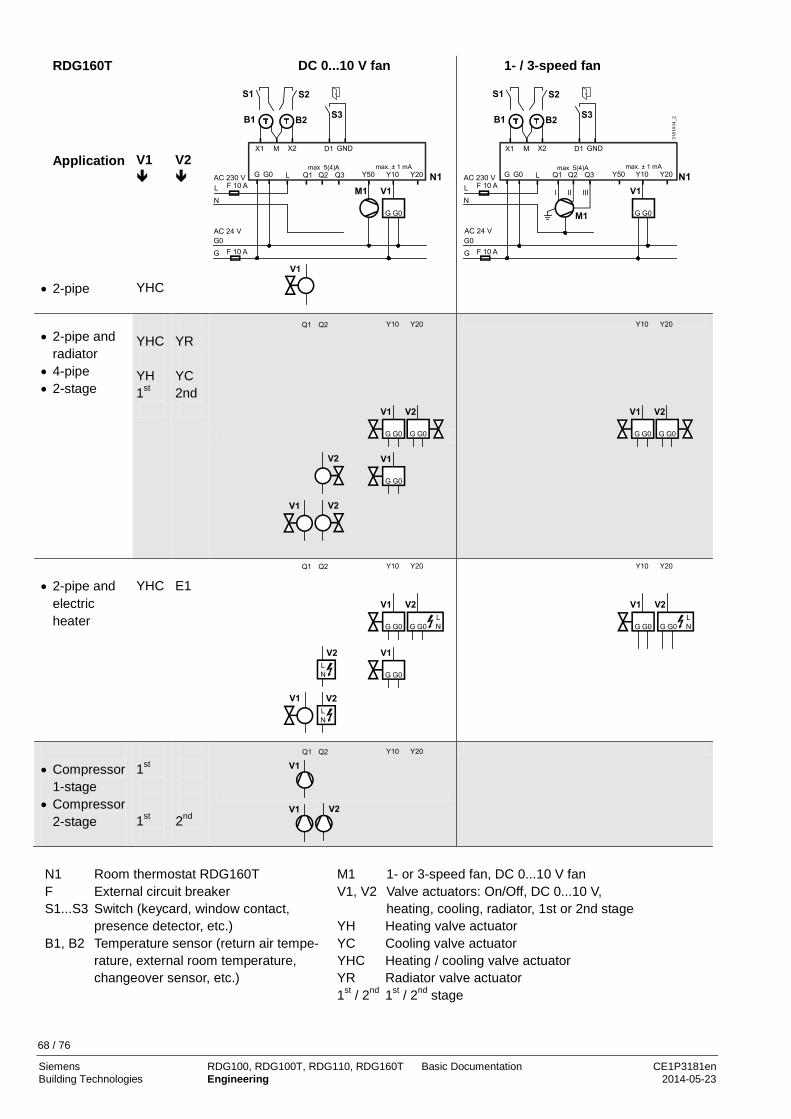
RDG160T DC 0...10 V fan 1- / 3-speed fan
Application
V1
V2
• 2-pipe
YHC
• 2-pipe and
radiator • 4-pipe • 2-stage
YHC YH 1st
YR YC 2nd
• 2-pipe and
electric heater
YHC
E1
• Compressor
1-stage • Compressor
2-stage
1st 1st
2nd
N1 Room thermostat RDG160T F External circuit breaker S1...S3 Switch (keycard, window contact,
presence detector, etc.) B1, B2 Temperature sensor (return air tempe-
rature, external room temperature, changeover sensor, etc.)
M1 1- or 3-speed fan, DC 0...10 V fan V1, V2 Valve actuators: On/Off, DC 0...10 V,
heating, cooling, radiator, 1st or 2nd stage YH Heating valve actuator YC Cooling valve actuator YHC Heating / cooling valve actuator YR Radiator valve actuator 1st / 2nd 1st / 2nd stage
68 / 76
Siemens RDG100, RDG100T, RDG110, RDG160T Basic Documentation CE1P3181en Building Technologies Engineering 2014-05-23
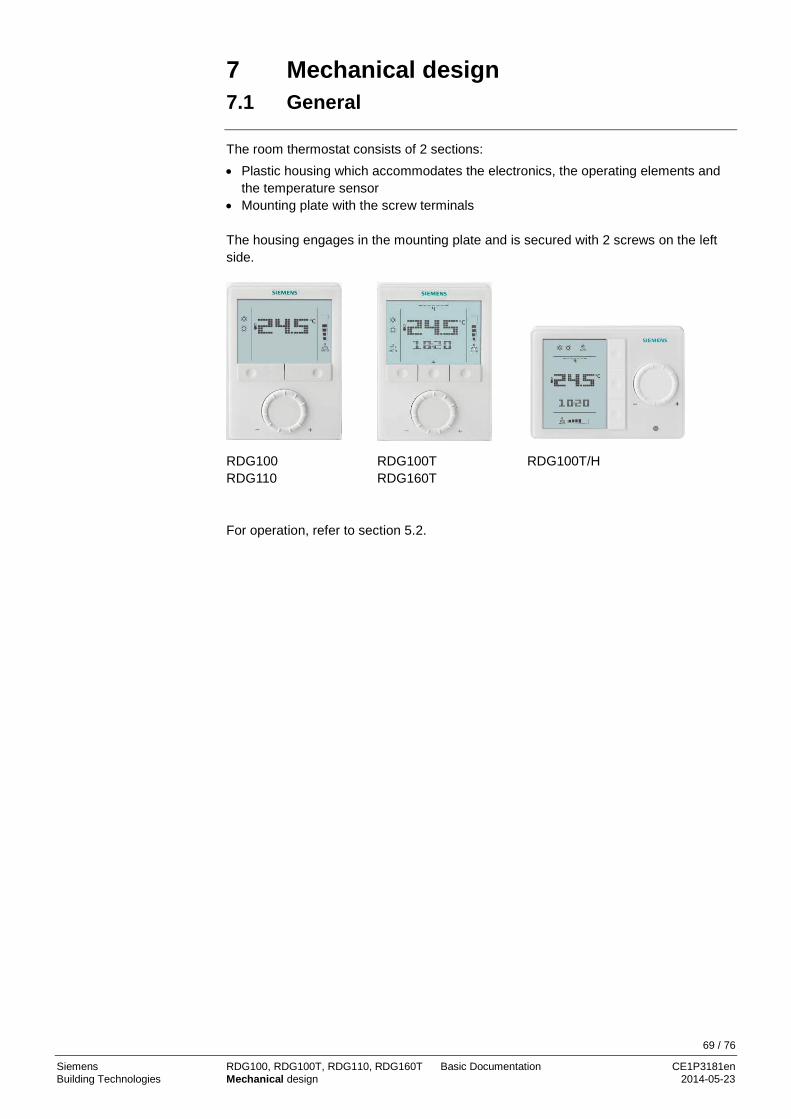
7 Mechanical design 7.1 General
The room thermostat consists of 2 sections: • Plastic housing which accommodates the electronics, the operating elements and
the temperature sensor • Mounting plate with the screw terminals The housing engages in the mounting plate and is secured with 2 screws on the left side.
RDG100 RDG110
RDG100T RDG160T
RDG100T/H
For operation, refer to section 5.2.
69 / 76
Siemens RDG100, RDG100T, RDG110, RDG160T Basic Documentation CE1P3181en Building Technologies Mechanical design 2014-05-23
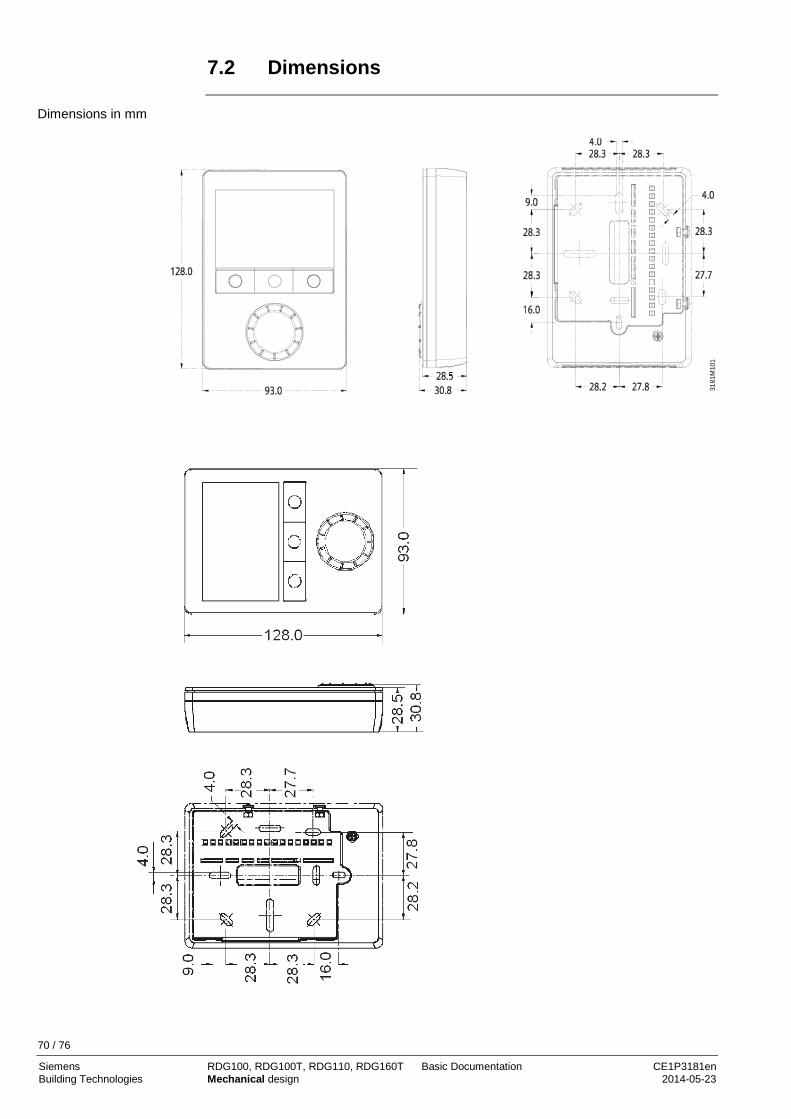
7.2 Dimensions
3181
M10
1
Dimensions in mm
70 / 76
Siemens RDG100, RDG100T, RDG110, RDG160T Basic Documentation CE1P3181en Building Technologies Mechanical design 2014-05-23
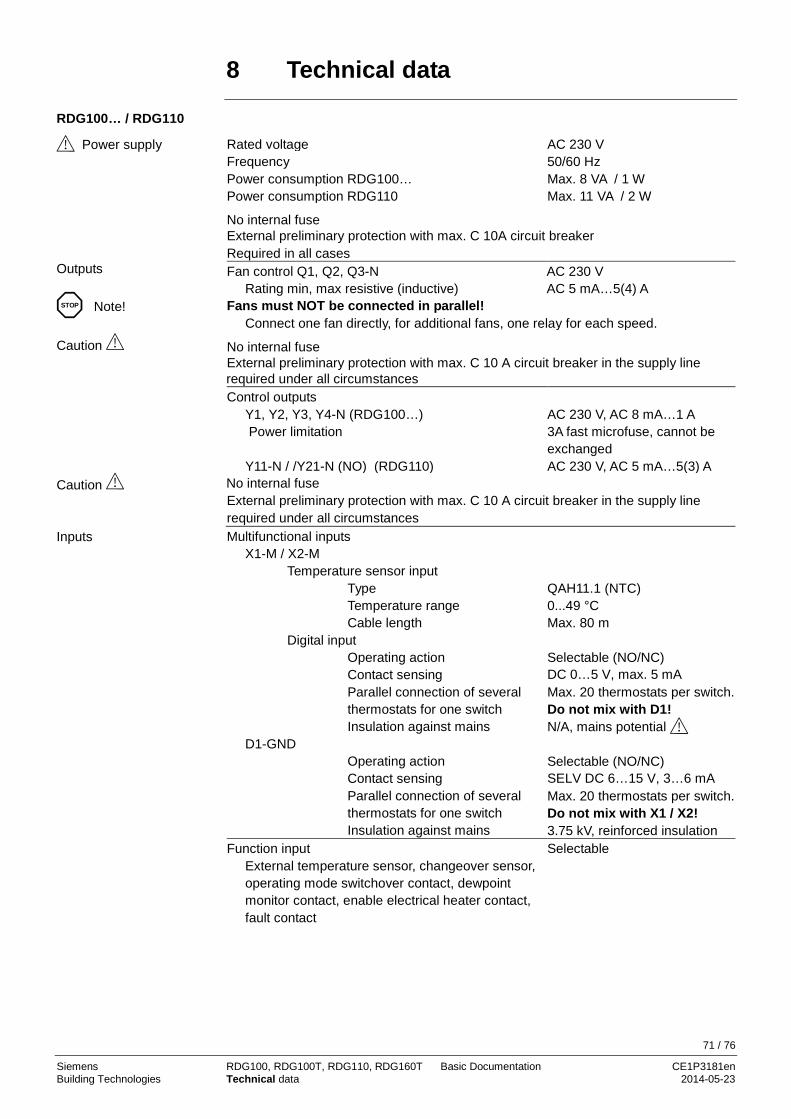
8 Technical data
Rated voltage AC 230 V Frequency 50/60 Hz Power consumption RDG100… Power consumption RDG110
Max. 8 VA / 1 W Max. 11 VA / 2 W
No internal fuse External preliminary protection with max. C 10A circuit breaker Required in all cases Fan control Q1, Q2, Q3-N
Rating min, max resistive (inductive) AC 230 V AC 5 mA…5(4) A
Fans must NOT be connected in parallel! Connect one fan directly, for additional fans, one relay for each speed.
No internal fuse External preliminary protection with max. C 10 A circuit breaker in the supply line required under all circumstances Control outputs Y1, Y2, Y3, Y4-N (RDG100…)
Power limitation
AC 230 V, AC 8 mA…1 A 3A fast microfuse, cannot be exchanged
Y11-N / /Y21-N (NO) (RDG110) AC 230 V, AC 5 mA…5(3) A No internal fuse External preliminary protection with max. C 10 A circuit breaker in the supply line required under all circumstances Multifunctional inputs
X1-M / X2-M Temperature sensor input Type Temperature range Cable length Digital input Operating action Contact sensing Parallel connection of several thermostats for one switch Insulation against mains
D1-GND Operating action Contact sensing Parallel connection of several thermostats for one switch Insulation against mains
QAH11.1 (NTC) 0...49 °C Max. 80 m Selectable (NO/NC) DC 0…5 V, max. 5 mA Max. 20 thermostats per switch. Do not mix with D1! N/A, mains potential Selectable (NO/NC) SELV DC 6…15 V, 3…6 mA Max. 20 thermostats per switch. Do not mix with X1 / X2! 3.75 kV, reinforced insulation
Function input External temperature sensor, changeover sensor, operating mode switchover contact, dewpoint monitor contact, enable electrical heater contact, fault contact
Selectable
RDG100… / RDG110
Power supply
Outputs
STOP Note!
Caution
Caution
Inputs
71 / 76
Siemens RDG100, RDG100T, RDG110, RDG160T Basic Documentation CE1P3181en Building Technologies Technical data 2014-05-23
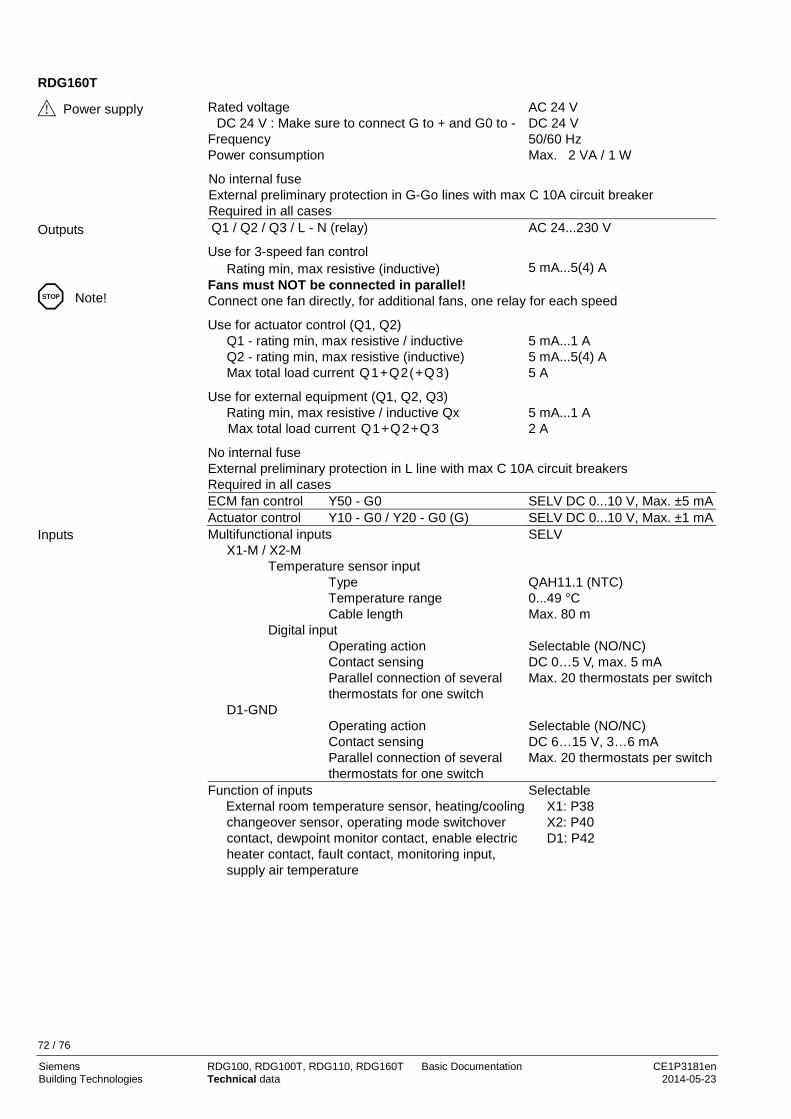
Rated voltage DC 24 V : Make sure to connect G to + and G0 to -
AC 24 V DC 24 V
Frequency 50/60 Hz Power consumption Max. 2 VA / 1 W
No internal fuse External preliminary protection in G-Go lines with max C 10A circuit breaker Required in all cases
Q1 / Q2 / Q3 / L - N (relay)
Use for 3-speed fan control Rating min, max resistive (inductive)
AC 24...230 V
5 mA...5(4) A Fans must NOT be connected in parallel! Connect one fan directly, for additional fans, one relay for each speed
Use for actuator control (Q1, Q2) Q1 - rating min, max resistive / inductive Q2 - rating min, max resistive (inductive) Max total load current Q1+Q2(+Q3)
5 mA...1 A 5 mA...5(4) A 5 A
Use for external equipment (Q1, Q2, Q3) Rating min, max resistive / inductive Qx
Max total load current Q1+Q2+Q3
5 mA...1 A 2 A
No internal fuse External preliminary protection in L line with max C 10A circuit breakers Required in all cases ECM fan control Y50 - G0 SELV DC 0...10 V, Max. ±5 mA Actuator control Y10 - G0 / Y20 - G0 (G) SELV DC 0...10 V, Max. ±1 mA Multifunctional inputs
X1-M / X2-M Temperature sensor input Type Temperature range Cable length Digital input Operating action Contact sensing Parallel connection of several thermostats for one switch
D1-GND Operating action
Contact sensing Parallel connection of several thermostats for one switch
SELV QAH11.1 (NTC) 0...49 °C Max. 80 m Selectable (NO/NC) DC 0…5 V, max. 5 mA Max. 20 thermostats per switch Selectable (NO/NC) DC 6…15 V, 3…6 mA Max. 20 thermostats per switch
Function of inputs External room temperature sensor, heating/cooling changeover sensor, operating mode switchover contact, dewpoint monitor contact, enable electric heater contact, fault contact, monitoring input, supply air temperature
Selectable X1: P38 X2: P40 D1: P42
RDG160T
Power supply
Outputs
STOP Note!
Inputs
72 / 76
Siemens RDG100, RDG100T, RDG110, RDG160T Basic Documentation CE1P3181en Building Technologies Technical data 2014-05-23

Switching differential, adjustable
Heating mode (P30) Cooling mode (P31)
2 K (0.5…6 K) 1 K (0.5…6 K)
Setpoint setting and setpoint range Comfort mode (P08)
Economy mode (P11-P12) Protection (P65-P66)
21 °C (5…40 °C) 15 °C/30 °C (OFF, 5…40 °C) 8 °C/OFF (OFF, 5…40 °C)
Multifunctional inputs X1 / X2 / D1 Input X1
Input X2 Input D1
Selectable Ext. temperature sensor (P38=1) Changeover sensor (P40=2) Operating mode switchover (P42=3)
Built-in room temperature sensor Measuring range Accuracy at 25 °C Temperature calibration range
0…49 °C < ± 0.5 K ± 3.0 K
Settings and display resolution Setpoints Current temperature value displayed
0.5 °C 0.5 °C
Operation Climatic conditions Temperature Humidity
As per IEC 721-3-3 Class 3K5 0…50 °C <95% r.h.
Transport Climatic conditions Temperature Humidity Mechanical conditions
As per IEC 721-3-2 Class 2K3 −25…65 °C <95% r.h. Class 2M2
Storage Climatic conditions Temperature Humidity
As per IEC 721-3-1 Class 1K3 −25…65 °C <95% r.h.
EU conformity (CE) Product standards
Automatic electric controls for household and similar use
Special requirements for temperature-dependent controls Electronic control type
EN60730–1 EN60730–2-9 2.B (micro-disconnection on operation)
Electromagnetic compatibility Emissions Immunity
2004/108/EC EN60730–1, EN50491-5-2 EN60730–1, EN50491-5-2 EN50491-5-3
Low-voltage directive Electrical safety
2006/95/EC EN60730–1, EN50491-3
RCM Mark conformity (Emission) AS/NZS 61000-6-3
Reduction of hazardous substances
2011/65/EU EN50581
Safety class II as per EN60730 Pollution class Normal Degree of protection of housing IP30 to EN60529
Operational data, all types
Environmental conditions
Standards and directives
73 / 76
Siemens RDG100, RDG100T, RDG110, RDG160T Basic Documentation CE1P3181en Building Technologies Technical data 2014-05-23

The product environmental declaration CE1E3181*) contains data on environmentally compatible product design and assessments (RoHS compliance, materials composition, packaging, environmental benefit, disposal). Connection terminals Solid wires or prepared
stranded wires 1 x 0.4…2.5 mm2 or 2 x 0.4…1.5 mm2
Note: For sensors on inputs X1, X2, or D1, the cable length is max. 80 m
Minimal wiring cross section on L, N, Q1, Q2, Q3, Y1, Y2, Y3, Y4, Y11, Y21
min 1.5 mm2
Housing front color RAL 9003 white Weight RDG100… / RDG110 RDG160T
0.30 kg 0.32 kg
*) The documents can be downloaded from http://siemens.com/bt/download.
Environmental Compatibility
General
74 / 76
Siemens RDG100, RDG100T, RDG110, RDG160T Basic Documentation CE1P3181en Building Technologies Technical data 2014-05-23
Index
0 0…10 V DC 0…10 V .......................................... 45
1 1- / 3-speed fan ...................................................... 45 12-hour and 24-hour format ................................... 51 1-speed fan ............................................................. 47
3 3-position control signal .......................................... 42 3-speed fan ............................................................. 47
A Absence .................................................................. 24 Adaptive temperature compensation...................... 43 Applications overview ............................................. 18 Auto Timer mode .............................................. 13, 51 Automatic heating / cooling changeover .......... 21, 27
B Backlit LCD ............................................................... 7 Basic application..................................................... 40 Button lock .............................................................. 24
C Cable length for sensors ........................................ 51 Chilled / heated ceiling applications ....................... 40 Clean fan filter reminder ......................................... 49 Comfort mode ......................................................... 13 Comfort setpoint ..................................................... 14 Compressor applications ........................................ 40 Control outputs ......................................................... 7 Control outputs overview ........................................ 28 Control parameters ................................................. 55 Control sequences ................................................. 27 Cooling sequence ................................................... 27
D DC 0...10 V fan ....................................................... 47 DC 0...10 V valves .................................................. 47 DC 0…10 V ............................................................ 45 DC 0…10 V control signal ...................................... 42 DC 0…10 V for electric heaters .............................. 44 DC 0…10 V for valve actuators .............................. 44 Default timer settings .............................................. 53 Dewpoint monitor.................................................... 50 Dewpoint monitoring ............................................... 24 Diagnostics and test ............................................... 55 Digital input ............................................................. 50 DIP switches ........................................................... 54
Disposal.................................................................. 64
E ECM fan ................................................................. 47 ECM-Ventilator ......................................................... 7 Economy mode ...................................................... 13 Electric heater ........................................................ 30 Enable / disable electric heater .................. 30, 36, 50 Expert level parameters ......................................... 55 Extend Comfort mode ............................................ 24 Extension of presence / absence ........................... 24 External / return air temperature ............................ 50 External / return air temperature sensor ................ 21
F Fan in Auto Timer mode ......................................... 49 Fan in dead zone ................................................... 56 Fan kick .................................................................. 48 Fan kick function .................................................... 48 Fan minimum on-time ............................................ 48 Fan operation as per heating / cooling mode, or
disabled .............................................................. 47 Fan operation in dead zone ................................... 48 Fan overrun ............................................................ 48 Fan start ................................................................. 48 Fan start delay ...................................................... 49 Fault ....................................................................... 50 Fault, handling ........................................................ 54 Floor cooling ........................................................... 22 Floor heating .......................................................... 22 Floor temperature limitation function ...................... 23
H Heating / cooling changeover........................... 21, 50 Heating and cooling mode ..................................... 27 Heating mode ......................................................... 27
I Infrared receiver ....................................................... 7 Infrared remote control ........................................... 54 Integral action time ................................................. 12
L LCD ........................................................................ 63 LCD, backlit .............................................................. 7
M Main and secondary ............................................... 34 Manual heating / cooling changeover .................... 21 Manually select heating or cooling sequence ........ 27 Minimum output ...................................................... 22
75 / 76
Siemens RDG100, RDG100T, RDG110, RDG160T Basic Documentation CE1P3181en Building Technologies Index 2014-05-23
Moisture .................................................................. 22 Mounting and installation ........................................ 60 Multifunctional inputs .............................................. 50
O On/off control signal ................................................ 42 Operating mode button ........................................... 13 Operating mode input ............................................. 13 Operating mode switchover .................................... 50 Operating voltage ..................................................... 7 Overlapping of timer sequences ............................. 53
P Parallel connection of switches .............................. 51 Parameter setting ................................................... 55 Power failure ........................................................... 52 Presence................................................................. 24 Programmable timers ............................................. 51 Proportional band ................................................... 12 Protection mode / Standby ..................................... 13 Purge function ........................................................ 22 PWM ....................................................................... 42 PWM for electric heater .......................................... 43
R Radiator .................................................................. 32 Radiator applications .............................................. 40 Reloading default timer settings ............................. 53 Remote heating / cooling changeover ................... 21
Resetting parameters ............................................. 55 Reversing valve ...................................................... 41
S Sensor input ........................................................... 50 Setpoint Comfort mode .......................................... 15 Setpoint Economy mode ........................................ 15 Setpoint limitation ................................................... 14 Setpoint Protection mode ....................................... 15 Setpoints and sequences ....................................... 15 Setting the time of day and the weekday ............... 51 Setting the timers ................................................... 52 Standby / Protection mode ..................................... 13 Supply air temperature limitation ............................ 23 Switch off external equipment ................................ 26 Switching differential .............................................. 12 Synchronization ...................................................... 43
T Temperature out of range ....................................... 54 Temporary setpoint ................................................. 14 Time program ........................................................... 7
V View programmable settings .................................. 52
W Window contact ..................................................... 24
Siemens Switzerland Ltd Infrastructure & Cities Sector Building Technologies Division Gubelstrasse 22 6301 Zug Switzerland Tel. +41 41-724 24 24 www.siemens.com/sbt
© 2009 - 2014 Siemens Switzerland Ltd Subject to change
Siemens RDG100, RDG100T, RDG110, RDG160T Basic Documentation CE1P3181en Building Technologies Technical data 2014-05-23