role model icebreakers & activities model... · ways to play with object and/or incorporate it...
TRANSCRIPT

1
Role Model Icebreakers & Activities
Icebreaker Page Simple Toys & Games................................................................................................................................. 2 Name That Tool! ......................................................................................................................................... 3 Put Yourself On The Line ......................................................................................................................... 4 Truth, Truth, Lie ........................................................................................................................................ 5 Peanut Butter & Jelly Robot .................................................................................................................... 6 Be the Machine ........................................................................................................................................... 7
Activity Page LED Butterfly ............................................................................................................................................. 8 Fun with Polymers .................................................................................................................................... 12 Bubble Design Challenge ......................................................................................................................... 16 Spaghetti Tallest Tower ......................................................................................................................... 19 Snap Circuits ............................................................................................................................................. 20 Gumdrop Dome .......................................................................................................................................... 23 Radioactive Golf Balls .............................................................................................................................. 25 Hairdryer Reverse Engineering ............................................................................................................. 26

2
Simple Toys & Games
Objective: To experience the fun and creative power of brainstorming
Materials: (Note: keep the objects you pick as simple as possible; preferably with no additional and/or moving parts)
1) Ball
2) String
3) Rope
4) Paper
5) Pencil or pen
6) Washable markers
7) Paper
Directions:
1. Divide students into no more than 4 groups.
2. Discuss the “TECH” rules of brainstorming: T���� Think of many ideas E���� Everyone’s ideas are good C���� Creativity H���� Have an open mind
3. Have the group designate a recorder. This person will jot down all the ideas as they are called out. Give them markers and paper.
4. Distribute one object (ball, string, rope, pen or paper) to each group.
5. Tell the group that they have 5 minutes to call out as many ideas of ways to play with object and/or incorporate it into a toy or game.
6. Stop the group after 5 minutes. Ask the recorder to read the 5 favorite ideas from the list her group came up with.
7. Lead a discussion about why brainstorming effectively is a powerful tool. Did they feel that their ideas were being heard? Did they feel comfortable elaborating on somebody else’s idea?
Grade Level: Grades 5 – 12 Activity Time: 20 minutes Preparation Time: 5 minutes Grouping: 4 – 5 students per group Recommendations:
This icebreaker can be adapted to brainstorm things related to the role model’s career.
3
Name That Tool!
Objectives:
• To learn names • To build community
Materials: None Directions:
1. Have students sit in a circle and ask for a volunteer to start. 2. Tell the student to state her first name and then a tool that starts
with the first letter of her name. 3. Then the student on the right will do the same and then say the name
and tool of all the students to the left that have gone before. If a student is having trouble coming up with a tool, ask the group for suggestions. Examples are Lyn Lawnmower, Doyea Drill, Jessica Jackhammer, etc.
Grade Level: Grades 5 – 12 Activity Time: 15 minutes Preparation Time: None Grouping: The whole group

4
Put Yourself On The Line
Objectives:
• To gain practice expressing opinions • To get to know one another • To get moving before starting the session
Materials: None Directions: 1. Ask students to stand up and introduce themselves (name, grade,
school) 2. Describe an imaginary line down the center of the room. State that
one end of the line is “strongly agree” and the opposite end is “strongly disagree.” The middle of the line is for those who are “moderates.”
3. Tell students to move to places on the line that express their opinions on the statement that you call out.
4. When students move to their place on the line have them talk to others that are near them to find out if they feel more strongly than their neighbor.
Examples:
o It’s fun to build with your hands. o Math is fun. o Pickles are delicious. o I think I know what I want to be when I grow up. o I get along with my brothers/sisters/family. o I like using tools. o I like to learn new things. o I like spicy food.
Grade Level: Grades 5 – 12 Activity Time: 10 minutes Preparation Time: None Grouping: The whole group

5
Truth, Truth, Lie
Objective: To learn new and interesting things about the role model and break down stereotypes.
Materials: None Directions: 1. Have all the students sit in circle. 2. Each role model tells two interesting facts about herself and one false
fact. They can be in any order. 3. After each role model has given her three facts the class must figure
out which one was false. This activity is a great way for students to get to know the role models while having fun at the same time.
Grade Level: Grades 5 – 12 Activity Time: 20 minutes Preparation Time: None Grouping: The whole group Recommendations:
This icebreaker works well if you have multiple role models.

6
Peanut Butter & Jelly Robot
Objective: To build community
Materials: 1) 2 jars of peanut butter 2) 2 jars of jelly 3) 4 slices of bread 4) 2 butter knives Directions: 1. Break the class into 2 groups. 2. Instruct the students to write instructions to “program” a robot to
make a peanut butter and jelly sandwich. 3. Once the students are done, hand over their instructions to the other
group to read aloud. 4. You, the facilitator, may play the robot. Follow the directions EXACTLY
as read aloud. (If the student reads “spread jelly on bread” use your fingers to spread the jelly on the bread as there was no mention of a knife!)
5. A variation of this activity is to ask the class to verbally give directions to you. A robot may not be able to clarify directions given to it, but you may note that if you are able to clarify directions, you would do just that. This activity is a good introduction to writing or giving step-by-step instructions.
Grade Level: Grades 5 – 12 Activity Time: 20 minutes Preparation Time: 10 minutes Grouping: Divide the class into two groups
*Adapted from
Educator’s
Cheapbook, Museum
of Science, Boston

7
Be the Machine Objective: Think about the way things work
Materials:
None Directions:
1. Have students mingling in a group, it could be to music, just so long
as they are moving around.
2. The role model yells out a number and a machine. Ex: 3, toaster.
The students need to get into sets of three and act out a toaster.
The role model(s) should join a set.
3. Once everyone has made a machine have them mingle again till the
role model yells out the next combination.
4. If you cannot find partners, then you are out for this round. When
the next number and machine is called out, the students that were
“out” may rejoin the game.
5. TIP: If you have a small group (less than 8), instead of yelling out a
number and a machine, just yell out the machine name. Then the
whole group must work together to act it out and no one will be
“out”.
Example machines to act out:
Toaster, DVD player, washing machine, microwave, dishwasher, telephone,
car, piano, blender, curling iron.
Grade Level: Grades 5 – 12 Activity Time: 10 minutes Preparation Time: None Grouping: Whole group

8
LED Butterfly
Objective: Students will construct and design an LED Butterfly using 2 simple circuits. Materials:
1) One 3-volt battery (CR2032) 2) One CR2032 battery holder 3) One 6” guitar string 4) Two pipe cleaners 5) Scissors 6) Tissue paper 7) Hot glue & glue 8) Two red LED’s 9) LED Butterfly Assembly Instructions 10) Electrical tape Materials Sources:
Directions:
1. Though each student gets to work on their own butterfly, pair the students together and encourage them to help each other.
2. Hand each student their materials and the LED Butterfly handout. Follow each step as a class.
Item Source Item # Price
3-V CR2032 Coin Battery
www.jameco.com 14162 $1.25 each
CR2032 Battery Holder www.jameco.com 355434 $0.63 each
Red LED www.jameco.com 333973 $0.10 each
Guitar String (.009) Pack of Ten
www.samash.com P1009XXXX $4.99
Electrical Tape Any hardware store
Glue Guns + Glue Sticks Any craft store
Colorful Pipe Cleaners Any craft store
Art Supplies Any craft store
Grade Level: Grades 5 - 12 Activity Time: 50 minutes
Preparation Time: 10 minuetes Grouping: Individual
Skills:
LED Butterflies are a great illustration of how a simple circuit works.

9
LED Butterfly Assembly Instructions
1) Bend each negative LED leg (the shorter leg) 90º.
2) Bend each positive LED leg (the longer leg) up.
3) Tape both negative LED legs with electrical tape to the negative side of the battery.
4) Curl the ends of the positive LED Legs.
5) Bend the guitar string into a V shape and tape the bottom to the positive side of the battery.
Guitar
string
Electrical
tape
Battery
10
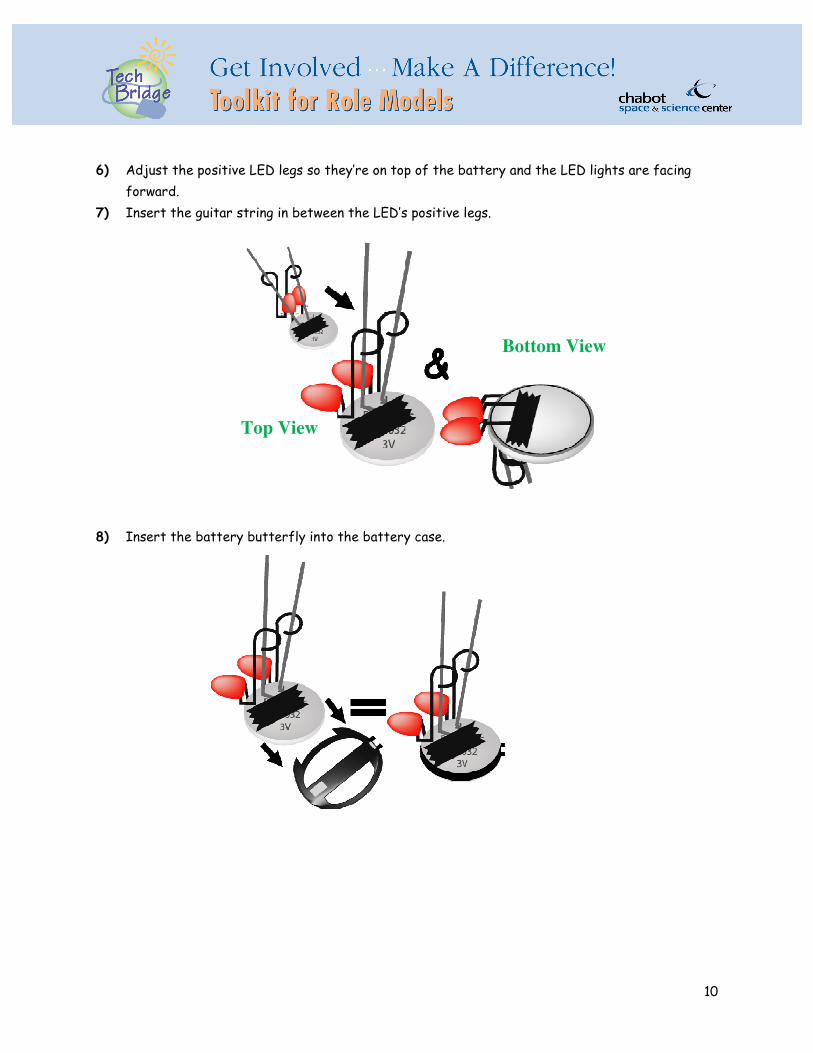
6) Adjust the positive LED legs so they’re on top of the battery and the LED lights are facing
forward.
7) Insert the guitar string in between the LED’s positive legs.
8) Insert the battery butterfly into the battery case.
Bottom View
Top View

11
9) Create the wings with pipe cleaners and fill them in with tissue paper.
10) Glue the wings to the battery case.
Shake your
butterfly and
watch it
blink!!!!
12
Fun with Polymers
Objective: Students will experiment with different formulas to develop the highest bouncing ball. Materials:
1) Zip–loc® Bags
2) Warm water
3) Elmer’s White Glue
4) Borax
5) Corn starch
6) Measuring cups and spoons
7) 2 glass jars with lids
8) Food coloring
9) Permanent markers
Directions: 1. Give each student the polymer handout and have them read the
directions.
2. Have each group complete all the recipes and fill in the observation
and physical properties section for each experiment.
3. Based on the experiments have each group create the ultimate
bouncing ball. Test each ball and compare it with the rest of the
class to find the ultimate ball.
Grade Level: Grades 5 - 12 Activity Time: 1 ½ hours
Preparation Time: 30 minutes Grouping: Pairs
Skills:
Ability to take critical notes and follow directions

13
Fun with Polymers Handout Procedure:
1. Combine 1 cup of glue and 1 cup of warm water in glass jar. Shake until no gooey clumps
remain. Label this jar “Glue Solution.”
2. Combine 2 Tsp Borax and 1 cup of warm water in a second glass jar. Shake until no Borax is
visible. Label this jar “Borax Solution.”
3. Add a few drops of food coloring to 3 zip-lock bags. Label each bag
“Recipe #1,” “Recipe #2,” & “Recipe #3.”
4. Use the recipes below to construct three different experiments. Write your observations and
physical properties in the appropriate boxes.
Glue Borax
Solution Solution Cornstarch
Recipes Observation Physical Properties
Recipe #1 • 1 Tbsp Glue Solution • 3 Tbsp Borax Solution • Squish for 1 min
Recipe #2 • 2 Tbsp Glue Solution • 2 Tbsp Borax Solution • Squish for 1 min
Recipe #3 • 3 Tbsp Glue Solution • 1 Tbsp Borax Solution • Squish for 1 min
5. Add ¼ tsp of cornstarch to each experiment. Write down your observations.

14
Recipe Observations Physical Properties
Recipe #1 with ¼ tsp of Cornstarch
Recipe #2 with ¼ tsp of Cornstarch
Recipe #3 with ¼ tsp of Cornstarch
6. Based on your observations from the previous experiments, try to develop a formula for the
ultimate bouncing ball. Experiment by mixing different amounts and combinations to see what
happens. Use the table below to write down all your observations.
Recipes: Observation Physical Properties
Test #1 • _______ Glue Solution • _______ Borax Solution • _______ Cornstarch • Squish for _____ minutes
Test #2 • _______ Glue Solution • _______ Borax Solution • _______ Cornstarch • Squish for _____ minutes
Test #3 • _______ Glue Solution • _______ Borax Solution • _______ Cornstarch • Squish for _____ minutes
Test #4 • _______ Glue Solution • _______ Borax Solution • _______ Cornstarch • Squish for _____ minutes

15
Ultimate Bouncing Ball Formula
• _______ Glue Solution
• _______ Borax Solution
• _______ Cornstarch
• Squish for _____ minutes

16
Bubble Design Challenge
Objectives:
• To learn and role play different careers • To learn about designing and marketing a product • To work effectively with a team Materials:
For Bubbles: 1) Measuring
spoons and cups 2) Stirrers
3) Dishwashing liquid (Ivory or Joy) 4) Cups for mixing 5) Water 6) Glycerin
For Wand: Random assortment of:
1) Coat hangers 2) Tin can with
ends cut off 3) Straws 4) Tubing 5) Wire
6) Pipe cleaners 7) Scissors 8) Tape 9) Glue 10) Misc. stuff
For Packaging: Random assortment of:
1) Construction paper
2) Tape 3) Scissors 4) Glue 5) Markers
6) Ribbons 7) Containers 8) Stickers 9) Cardboard 10) Misc. stuff
Directions:
1. Organize students into groups of 4.
2. Assign roles and tasks:
a) Materials Engineer: Design and build the best bubble wand. b) Chemical Engineer: Formulate and test the best bubble solution. c) QC (Quality Control) Engineer: Test the quality of your product.
Develop a systematic procedure for the testing and sampling of your product.
d) Marketing Specialist: Design and implement the best way to sell your product. (Think about the look and the feel of the label, the
packaging, the name, etc.)
Grade Level:
Grades 5 - 8 Activity Time: 2 hours
Preparation Time: 30 minutes
Grouping:
4 students to a group
Skills:
Teamwork Marketing Reworking design

17
3. Once the students have performed their assigned roles, have them present their “product” to
the class in a mini advertisement and explain how they got to their end results.
18
Bubble Design Handout
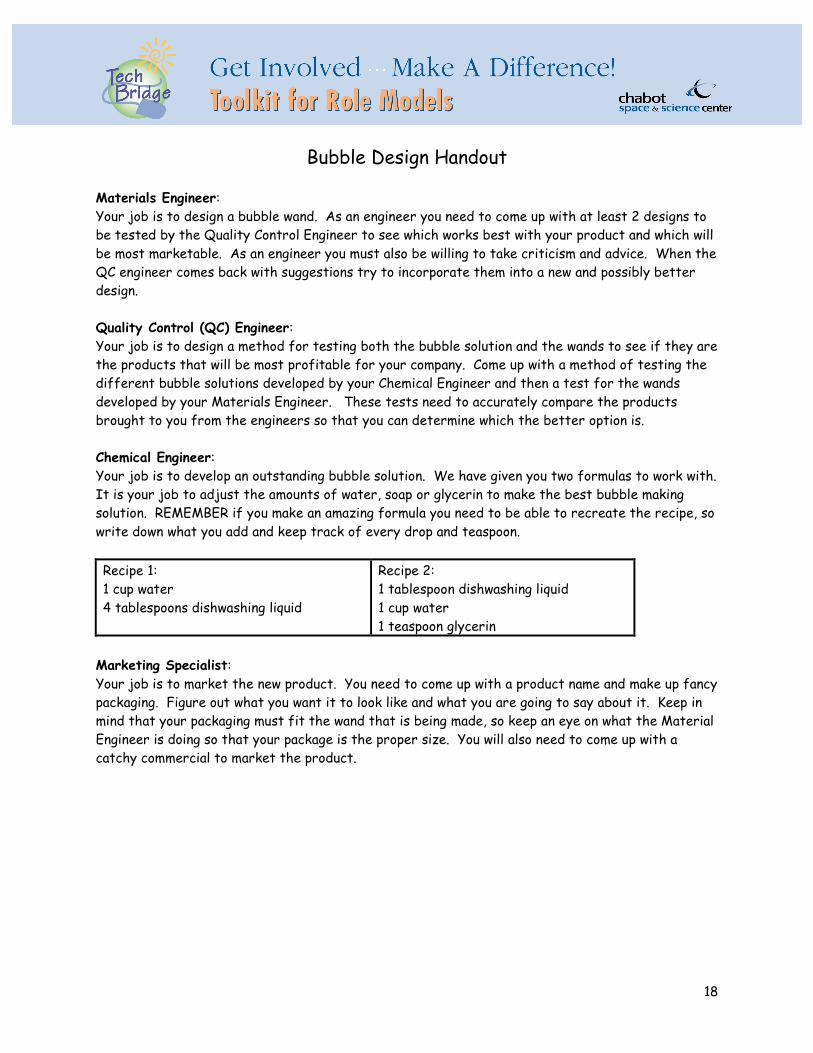
Materials Engineer: Your job is to design a bubble wand. As an engineer you need to come up with at least 2 designs to be tested by the Quality Control Engineer to see which works best with your product and which will be most marketable. As an engineer you must also be willing to take criticism and advice. When the QC engineer comes back with suggestions try to incorporate them into a new and possibly better design. Quality Control (QC) Engineer: Your job is to design a method for testing both the bubble solution and the wands to see if they are the products that will be most profitable for your company. Come up with a method of testing the different bubble solutions developed by your Chemical Engineer and then a test for the wands developed by your Materials Engineer. These tests need to accurately compare the products brought to you from the engineers so that you can determine which the better option is. Chemical Engineer: Your job is to develop an outstanding bubble solution. We have given you two formulas to work with. It is your job to adjust the amounts of water, soap or glycerin to make the best bubble making solution. REMEMBER if you make an amazing formula you need to be able to recreate the recipe, so write down what you add and keep track of every drop and teaspoon.
Recipe 1: 1 cup water 4 tablespoons dishwashing liquid
Recipe 2: 1 tablespoon dishwashing liquid 1 cup water 1 teaspoon glycerin
Marketing Specialist: Your job is to market the new product. You need to come up with a product name and make up fancy packaging. Figure out what you want it to look like and what you are going to say about it. Keep in mind that your packaging must fit the wand that is being made, so keep an eye on what the Material Engineer is doing so that your package is the proper size. You will also need to come up with a catchy commercial to market the product.
19
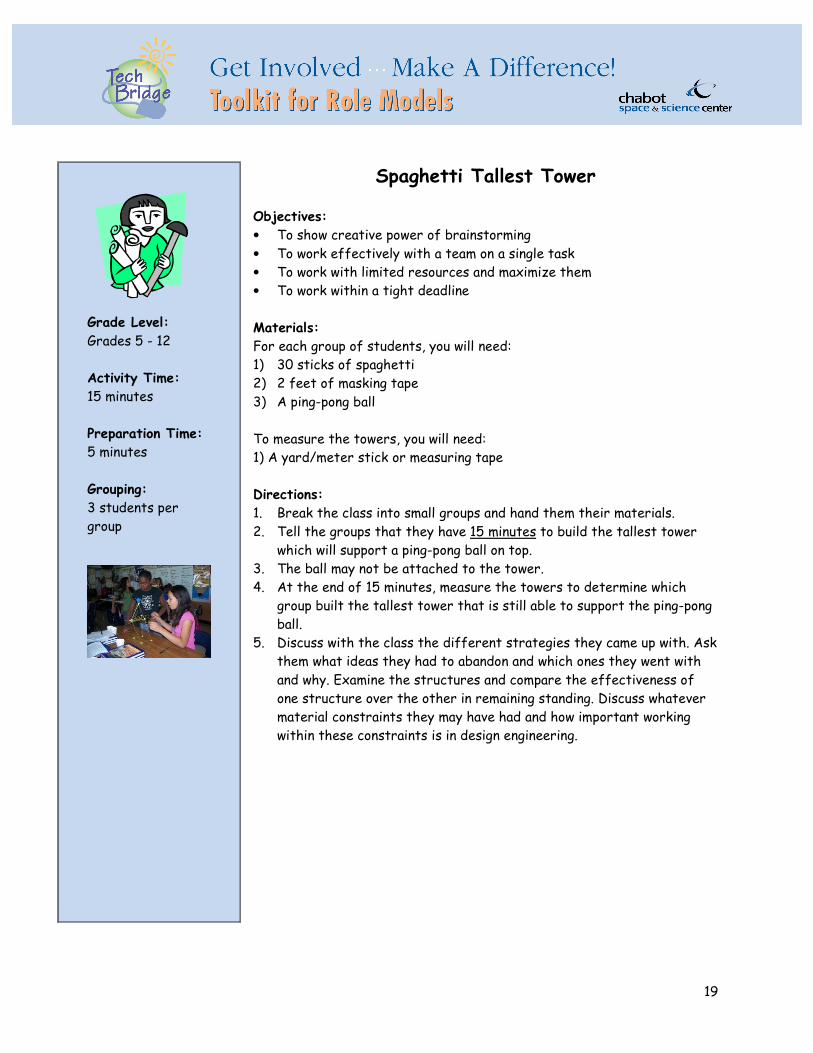
Spaghetti Tallest Tower Objectives: • To show creative power of brainstorming • To work effectively with a team on a single task • To work with limited resources and maximize them • To work within a tight deadline Materials: For each group of students, you will need: 1) 30 sticks of spaghetti 2) 2 feet of masking tape 3) A ping-pong ball To measure the towers, you will need: 1) A yard/meter stick or measuring tape Directions:
1. Break the class into small groups and hand them their materials. 2. Tell the groups that they have 15 minutes to build the tallest tower
which will support a ping-pong ball on top. 3. The ball may not be attached to the tower. 4. At the end of 15 minutes, measure the towers to determine which
group built the tallest tower that is still able to support the ping-pong ball.
5. Discuss with the class the different strategies they came up with. Ask them what ideas they had to abandon and which ones they went with and why. Examine the structures and compare the effectiveness of one structure over the other in remaining standing. Discuss whatever material constraints they may have had and how important working within these constraints is in design engineering.
Grade Level: Grades 5 - 12 Activity Time: 15 minutes
Preparation Time: 5 minutes Grouping: 3 students per group

20
Snap Circuits
Objective: To build a variety of electrical circuits using a Snap Circuits® kit. Materials:
1) Snap Circuits Jr. kit (one for every two students) 2) 2 AA batteries
Material Source:
Directions:
1. Hand out one Electronic Snap Circuit® kit to each group. 2. Review all warning labels and parts list and read out loud the “How
to use it” section on page 3. Make sure that each student understands the proper way to use this kit.
3. Each page consists of two projects that highlight a specific electrical component. Have the class go through the projects one page at a time. Stop after each activity and discuss what they learned. Below is a recommended project order for the instructor to guide the students through.
4. If one group completes their projects early have them assist other students who might be having a difficult time.
Item Source Item #
Snap Circuits Jr. 100-in-1 kit www.elenco.com SC-100
Grade Level: Grades 5 - 12 Activity Time: 60 minutes
Preparation Time: 20 minutes Grouping: In pairs
21
Recommended Activities
Electrical vs. Mechanical Energy
Project #1 shows how a current flows from the battery, through the switch, to the light bulb to complete a simple circuit. Ask the students if they can figure out how the switch works? Project #2 illustrates how the same simple circuit in project #1 can be used to change electrical power into mechanical power by using a motor instead of a light. Make sure the students observe polarity (the positive side of the motor is noted in the picture). Project #11 shows what happens when you reverse the polarity of the motor. When you reverse the polarity of a motor, the motor spins in the opposite direction. The way the fan blades are oriented on the motor causes the fan to catch the air and lift off of the motor when the switch is turned off.
Series and Parallel
Project #5 illustrates the lamp and the motor in a series circuit. Both components are running off the same current. Part of the voltage is used up by the light and the rest goes to the motor. The motor may need a little push to get going because it is receiving so little voltage. Have the students note the brightness of the light. Project #6 illustrates the lamp and the motor in a parallel circuit. Each component is running off of a separate current. The motor and lamp are both receiving the full 3 volts from the battery. Have them note the speed of the fan and the brightness of the lamp. This is an important concept that will come up in later circuitry activities. Sound Switch and Resistor
Project #3 shows students how other electrical components such a sound sensor can be used to close a circuit. The whistle chip is used to show how air vibrations can cause a switch to activate. It has two thin metal plates that can detect noise (like blowing into the chip or clapping) which will make the song play again once it has already finished. Have the students note how loud the sound is. Project #4 shows students how a resistor changes the amount of current that travels through the circuit. As a result, the speaker’s volume decreases.
Polarity
Project #7 illustrates how a resistor and an LED are wired to emit light. Make sure they notice the polarity of the LED (it has a positive sign on one side). Project #8 illustrates how electricity can only flow in one direction, from positive to negative. It is important that electrical components with polarity are placed correctly in the circuit in order for it to work. Extra Activity
Project #66 allows students to create a game similar to Battleship using circuitry. Have scratch paper for the students to hold up so the players can’t see the other’s side. The shorting bar is a 2 snap connector piece that is used to complete the circuit. Player 1 places it in one of three

22
locations. Player 2 cannot see which location Player 1 put her bar, and must guess by placing her bar on the opposite side of the paper in the opposite of one of those locations. If a noise is made, then Player 2 found the right location.

23
Gumdrop Dome Objective: To introduce students to structural engineering and encourage goal-oriented building. Materials:
1) Sample domes for display
2) 50 toothpicks
3) 30 gumdrops
4) Gumdrop Dome handout
5) 1 paper plate
6) Weight set to test the dome structures (can be weights, books, etc.) Directions:
1. Explain how forces can act differently on different shapes. You can have various shapes made in gumdrops, or you can have the students make them themselves. Put force on the different shapes and see which can stand more pressure. The students should see that the triangle is the strongest. You can find information about shapes and forces at http://www.pbs.org/wgbh/buildingbig/lab/shapes.html.
2. Explain how and why dome structures are built the way they are. Show some real life examples of dome buildings. This information can be found at http://www.pbs.org/wgbh/buildingbig/dome/index.html.
3. Introduce the design challenge to the students. Tell them they must try to build the dome that can hold the most weight.
4. Pass out materials. 5. If the students seem stuck, pass out the Gumdrop Dome handout from
ZOOM into Engineering (handout from http://pbskids.org/zoom/pdf/gumdropdome.pdfcan be found below). Let students use this handout as a resource guide.
6. Allow 30 minutes for students to design and build their domes. 7. Once finished, students can test the strength of their dome design by
adding weights until their structure fails (collapses). 8. After all students have tested their domes, discuss the activity and
the lessons learned.
Grade Level: Grades 5 - 12 Activity Time: 30 minutes
Preparation Time:
10 minutes Grouping: Pairs
*Adapted from http://pbskids.org/zoom/activities/sci/gumdropdome.html

24

25
Radioactive Golf Balls Objectives: • To work in teams to solve a problem • To work within a very tight deadline Materials:
For each group of students, you will need: 1) 2 brown paper
lunch bags 2) 5 golf balls
(placed inside one of the paper bags)
3) 4 4” pieces of string
4) 4 drinking straws 5) 2 skewers 6) 4 paper clips 7) 4 rubber bands 8) 5 Post-It notes 9) 3 push pins 10) 1 pencil 11) 1’ tape
To test the devices, you will need: 1) Tape measure 2) Stopwatch Directions:
1. Break the class into teams of 2 and hand them their materials. 2. Tell the group that the golf balls are radioactive and the object of
the game is to move all the golf balls from one paper bag to the other without touching the golf balls or tilting their bag.
3. Each group has 20 minutes to construct a device that can transport 1 golf ball at a time using only the supplies provided. The teams may alter the supplies in any way necessary.
4. Place both bag #1 and bag #2 on the floor approximately 8 feet apart. The bags are to sit on the ground with the opening toward the ceiling. To ensure that the bags do not move tape both bags to the floor.
5. No part of a person’s body or clothing may touch the golf balls. If a person touches a ball, or if a ball gets dropped, there is a contamination leak! The leader (you) must return the contaminated ball back to bag #1.
6. The team that moves all their balls in the shortest amount of time wins.
7. Have a discussion on the differences of each team’s device. Which device was successful? Which ones weren’t, and why? Did having a time limit affect their end product? At the end, make sure to point out that there is no single way to get the task done – there are many methods that will work.
Grade Level: Grades 5 - 12 Activity Time: 30 minutes
Preparation Time: 15 minutes Grouping: Pairs
*Adapted from
http://www.eweek.
org/2002/discover
e/activities/archive
.shtml

26
Hairdryer Reverse Engineering
Objective: To understand the parts of a hairdryer and how these parts work to make a hairdryer functional
Materials: 1) Hairdryers (we get ours relatively inexpensively at thrift shops) 2) Tools (screwdrivers, scissors, and pliers) 3) Plastic bins (1 for each pair so they may place screws and other parts
while they’re working) Directions: 1. Check the different screws in each hairdryer to figure out which ones
are holding the hairdryers together and to make sure you have the right size and types of screwdrivers needed for disassembling the hair dryers. Also, cut off the electrical plug of each hair dryer.
2. Time permitting, take apart the hairdryers ahead of time to assess what tools the students will need when they take apart the inside parts of their hairdryers.
3. Hand out the hairdryers and tool sets. This is an opportunity for students to experiment. You will not be giving them step-by-step instructions on how to take apart the hairdryers. Instead, tell them that they have 3 basic goals:
a) Take apart the hairdryer while trying not to break too many
pieces. They will need to put them back together again. b) Investigate: As they tear open the hairdryer they should examine
and discuss each component they see. What material is the component made out of? How is that component connected to other components? What purpose does it serve? What is the component called?
c) Draw: Have each student draw the inside of their hairdryer and label the parts. It’s okay if they don’t know the actual names, they can write down what they think the part’s function is.
4. Let the students start disassembling their hairdryers. Walk around the classroom and ask students questions to get them thinking about how and why their hairdryer was engineered in such a way. Here are some questions to help you get them started:
• How does your hairdryer work? • What features does your hairdryer have? (i.e., on/off switch,
low/medium/high heat selection, etc.)
Grade Level: Grades 5 – 12
Activity Time: 2 hours 30 minutes Preparation Time: This varies depending on the availability of hair dryers at thrift shops and the ease of loosening the screws on the hair dryers. Grouping: 2 students to a hairdryer

27
• Do you like the design of your hairdryer? Would you buy this hairdryer for yourself if you saw it at the store?
• What can you guess about the consumer that would buy the type of hairdryer you are looking at?
• Count how many parts make up the hairdryer. What materials are they made out of? Why did the engineer choose those materials?
• Follow the electrical path of your hairdryer. Electricity comes from an electrical outlet through the hairdryer’s electrical cord and onto the on/off switch on the hairdryer and then where?
• Does the hairdryer have any safety features? If so, what are they? How important was safety to the engineer who designed this hair dryer?
• Can you identify all of the parts of the hairdryer and what they do? • If you could re-design this hairdryer what would you do differently and why?
5. If time permits, ask students to put the hairdryer back together again. 6. We have found that there is always an enormous value in having students report back on their
experiences. It is a way for us to verify they have learned something valuable from the lesson without a formal exam. It is also a wonderful way to allow students to practice public speaking.
7. Ask each group of students to bring its hairdryer to the front of the class. Have them describe: • How their hairdryer works • Any challenges they faced while taking it apart • If they could re-engineer the hair dryer, what would they do differently and why?
8. Students will not understand all of the details of how a hairdryer works, so it is helpful to summarize the knowledge that each group gained. On easel paper draw the basic shape of a modern hairdryer. Ask the students to help you fill-in the drawing with all of the parts that the hairdryers had in common: on/off switch, a cord to connect to the electrical outlet, a motor, and heating coils. There are also some optional features: air flow switch with low/medium/high selections, air heat switch for cool/warm/hot, etc. Once you’ve diagramed a basic hairdryer, you can describe how hairdryers work. An excellent description can be found at http://home.howstuffworks.com/hair-dryer.htm. In fact, we encourage students to follow-up by visiting the page. If your students do not have Internet access you may want to print the pages and use them as a handout.