rocking baby cradle plan - craftsmanspace · project: baby cradle page 1 of 22 rocking baby cradle...
TRANSCRIPT

Project: Baby Cradle Page 1 of 22
Rocking Baby Cradle Plan
Expecting the birth of a new family member is an exceptional period for each family. During this
period each one of the family members is trying to prepare some gift that will be original and
beautiful. Future father or grandfather now have the opportunity to make a baby cradle – one of
the nicest and most enduring gifts that a baby can get.
In the first weeks of their lives babies sleep in average 16 to 18 hours a day. Because of that,
putting baby to sleep and the quality of sleep are very important. That is why you should provide
your baby with quality and safe cradle, that has always been and still remains a symbol of the
early childhood.
When choosing a plan, by which the cradle should be made, at first you should think about its
safety and functionality, and of course the key element is also its appearance. The plan has to be
perfect, because during the cradle manufacture mistakes are not allowed.
This wooden rocking cradle has a classic, old-fashioned, romantic design, made to meet the
highest standards of safety and comfort. The size is adjusted so you can approach to it easily, and
it can fit easily into the parents’ bedroom. Its design allows the parents to see what the baby is
doing without going out of the bed or approaching the cradle.
Rockers are designed to make a motion that allows gentle rocking of a baby, and their ends have
bumpers that stop rocking motions under the safe angle. If you wish to stop the cradle moving,
you can do that by simply putting the foot under the rockers. With a little idea, you can make the
stoppers out of wood (cube of 70mm (2 3/4in) height). The stoppers should be placed from each
side of the cradle. It is very important to know that the cradle should be used until the period when
baby starts to come up on their hands and knees (3-4 months of age). From that period baby has
to sleep in the baby bed, and the cradle can be used to put away baby toys, dolls, pillows and
blankets and to wait for the next new family member. And so on for the next generations.
Project from www.craftsmanspace.com/

Project: Baby Cradle Page 2 of 22
Rocking Baby Cradle Parts list
Project from www.craftsmanspace.com/

Project: Baby Cradle Page 3 of 22
Rocking Baby Cradle assembly 2D drawing
Project from www.craftsmanspace.com/

Project: Baby Cradle Page 4 of 22
Project from www.craftsmanspace.com/

Project: Baby Cradle Page 5 of 22
Project from www.craftsmanspace.com/
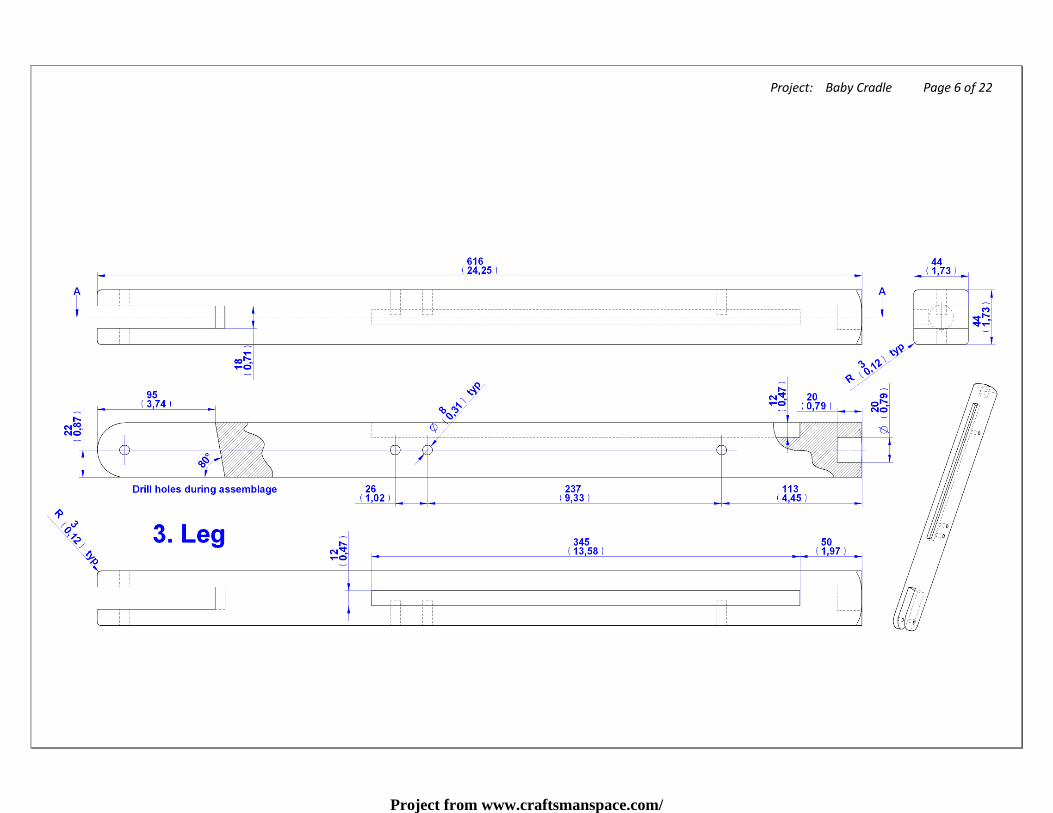
Project: Baby Cradle Page 6 of 22
Project from www.craftsmanspace.com/

Project: Baby Cradle Page 7 of 22
Project from www.craftsmanspace.com/

Project: Baby Cradle Page 8 of 22
Project from www.craftsmanspace.com/
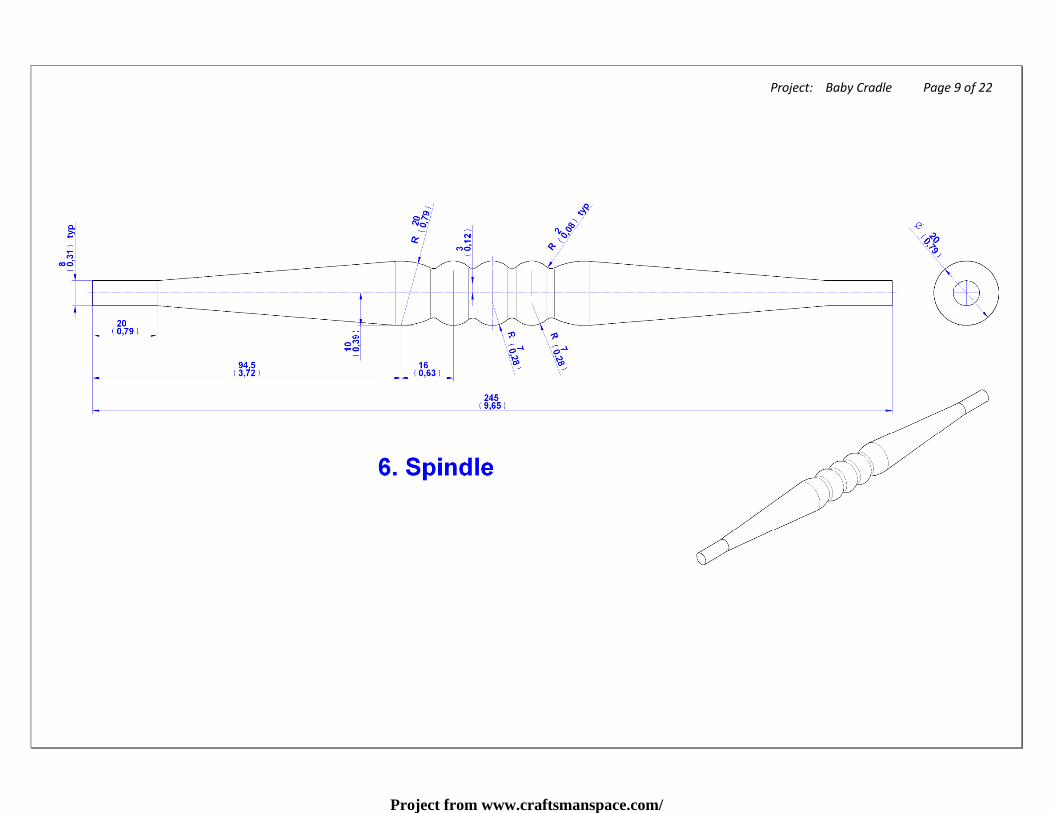
Project: Baby Cradle Page 9 of 22
Project from www.craftsmanspace.com/

Project: Baby Cradle Page 10 of 22
Project from www.craftsmanspace.com/

Project: Baby Cradle Page 11 of 22
Project from www.craftsmanspace.com/

Project: Baby Cradle Page 12 of 22
Project from www.craftsmanspace.com/

Project: Baby Cradle Page 13 of 22
Project from www.craftsmanspace.com/

Project: Baby Cradle Page 14 of 22
Project from www.craftsmanspace.com/

Project: Baby Cradle Page 15 of 22
Project from www.craftsmanspace.com/
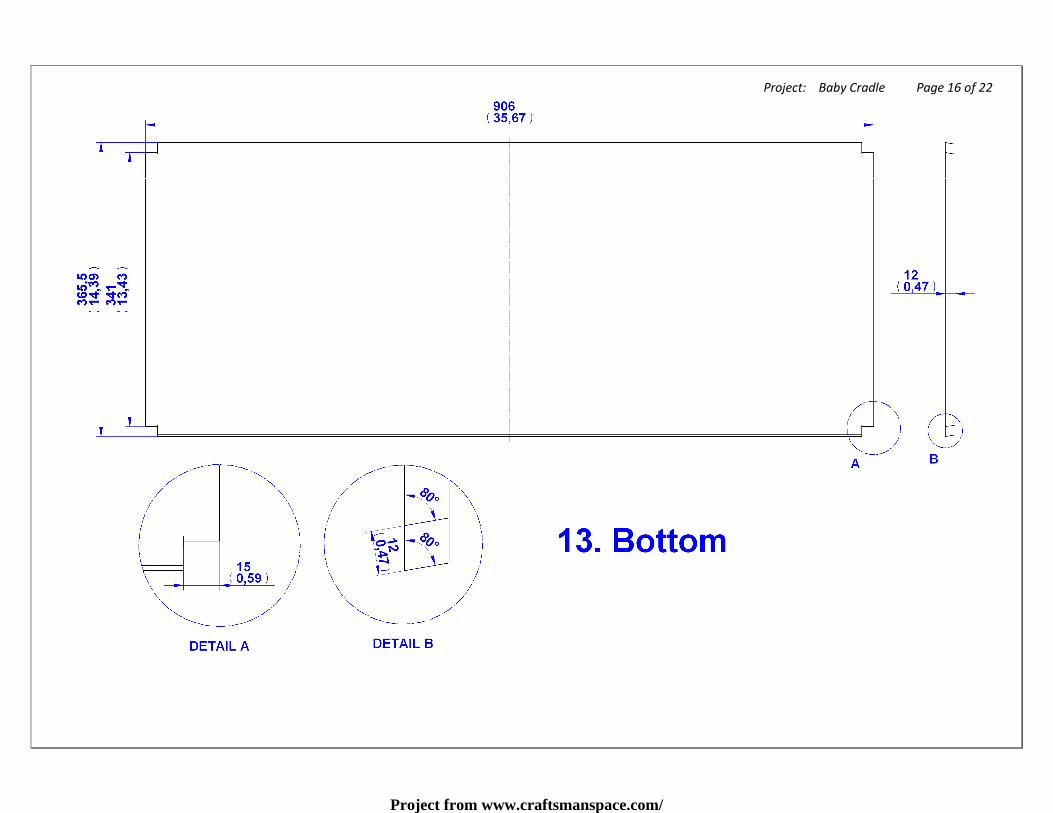
Project: Baby Cradle Page 16 of 22
Project from www.craftsmanspace.com/
Project: Baby Cradle Page 17 of 22
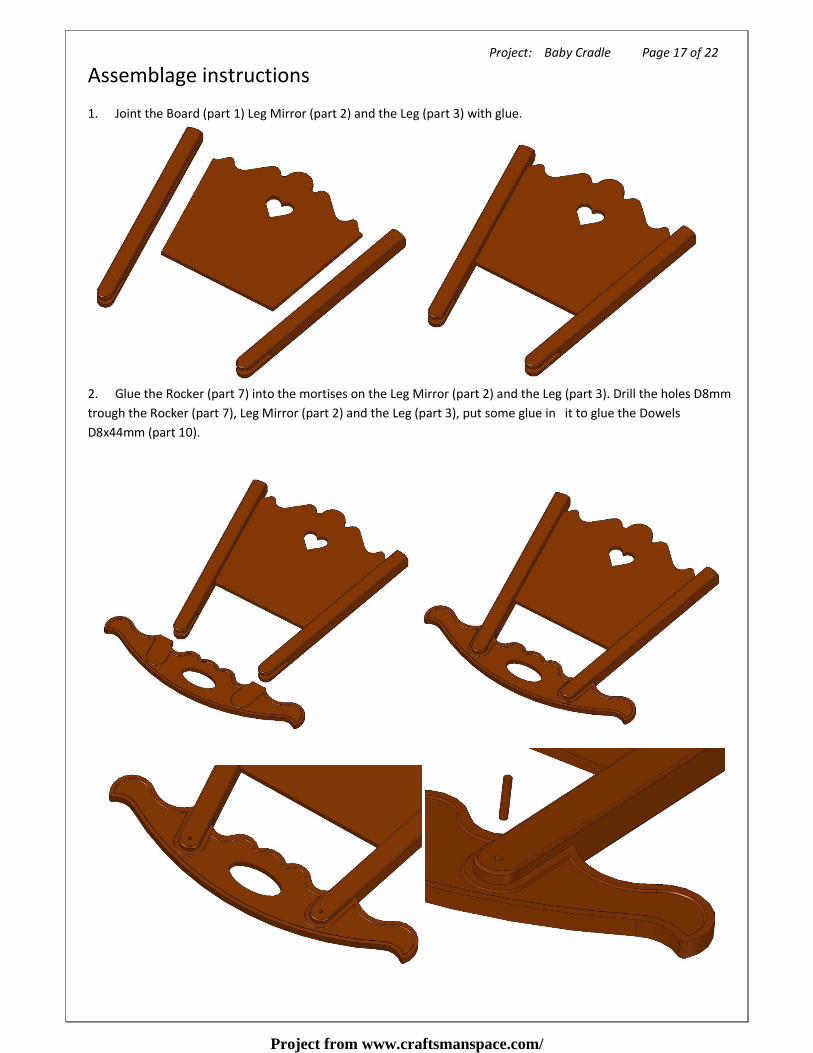
Assemblage instructions
1. Joint the Board (part 1) Leg Mirror (part 2) and the Leg (part 3) with glue.
2. Glue the Rocker (part 7) into the mortises on the Leg Mirror (part 2) and the Leg (part 3). Drill the holes D8mm
trough the Rocker (part 7), Leg Mirror (part 2) and the Leg (part 3), put some glue in it to glue the Dowels
D8x44mm (part 10).
Project from www.craftsmanspace.com/

Project: Baby Cradle Page 18 of 22
3. Glue Decorative Balls (part 8) to the subassembly made in the previous step.
Project from www.craftsmanspace.com/

Project: Baby Cradle Page 19 of 22
4. Make two if these subassemblies.
5. Lean the Support Lath (part 11) on the Lower Rail (part 5), fasten this subassembly with clamps and drill the
D8mm holes by following 2D documentation. After that, put some glue on Dowels D8x27mm (Parts 12) and push
them slowly into those holes with mallet.
Project from www.craftsmanspace.com/

Project: Baby Cradle Page 20 of 22
6. Join the subassebmly made in the previous step with Spindles (part 6) and the Upper Rail (part 4) with glue.
7. Make two of these subassemblies.
Project from www.craftsmanspace.com/

Project: Baby Cradle Page 21 of 22
8. Drill holes D8mm on one of the subassemblies made in the previous step by following the instructions in 2D
documentation. Put Dowel Centers into those holes. Now, lean this subassembly against one of the subassemblies
made in the step 4, so you could mark and drill precise position of holes on the Leg Mirror (part 2) and the Leg (part
3).
9. Mark and drill holes in the same way on the subassemblies made in steps 4 and 7. Then join all of them with
glue and Dowels D8x39mm (part 9).
Project from www.craftsmanspace.com/

Project: Baby Cradle Page 22 of 22
10. At the end put the Bottom (part 13) on its position.
Project from www.craftsmanspace.com/