ricoh smart integration
TRANSCRIPT
Aaz\
RICOH
Smart Integration
Administrator Guide

VERSION 3.0 (OCTBER, 2020) P A G E | 2 RICOH EUROPE PLC
Contents 1. Preface............................................................................................................................................. 3
2. Getting started (Step 1 – Step 3) .................................................................................................... 4
Receiving On boarding email (Step 1) ...................................................................................................... 4
Registering User (Step 2) .......................................................................................................................... 5
Cloud Service Configuration (Step 3) ...................................................................................................... 11
‘Need admin approval’ for Office 365 configuration ............................................................................. 14
Login Management (Step 3) ................................................................................................................... 15
Configuring Application (Step 3) ............................................................................................................. 17
3. Installation on MFP using an operation panel (Step 4) ............................................................... 21
Setup of Control+ Package ..................................................................................................................... 25
License Management.............................................................................................................................. 27
4. Customize application (Step 5) ..................................................................................................... 28
Add/Edit/Delete/Move/Duplicate Application ....................................................................................... 28
5. Product Limitation ........................................................................................................................ 30
Other remarks......................................................................................................................................... 32
6. Delete tenant information from the MFP .................................................................................... 34

VERSION 3.0 (OCTBER, 2020) P A G E | 3 RICOH EUROPE PLC
1. Preface
This guide provides the details on how to set up and configure RICOH Smart Integration Package.
This setup needs to be completed by administrator before each user in your tenant starts using
apps on Ricoh MFPs.
The below illustration is a high-level flow chart for all the required process for the administrator in
order.
About This Guide
This guide is divided into following primary sections:
o Getting started (Step 1 – Step 3)
This section provides the basic configuration required by administrator.
o Installation on MFP using an operation panel (Step 4)
This section describes how to setup on MFP using its operation panel (Ricoh Smart Operation Panel).
o Customize Application (Step 5)
This section describes how to add/remove applications from each package.
o Product limitation
o Delete tenant information from the MFP
Note: The operation panel screen shot images and User Site images provided in this document are
for illustrative purposes only. These images may not reflect the exact image you experience on your
multtfunction printer (MFP device).
Receiving onboarding
email (as admin)
Registering users for Ricoh
Smart Integration
Seting up coordination with external services, login
management & configuring applications
Setting up MFP and initial logging-in
Customizing applications
*Optional
Step 1 Step 2 Step 3 Step 4 Step 5

VERSION 3.0 (OCTBER, 2020) P A G E | 4 RICOH EUROPE PLC
2. Getting started (Step 1 – Step 3)
Receiving On boarding email (Step 1) After you sign up with RICOH Smart Integration, you will receive a notification email sent by
[email protected] as the first step.
In this email, you will find your ID (which is usually your email address registered at the purchase),
the URL links to set your password and to the portal page
(https://eu.accounts.ricoh.com/portal/login.html) where you can create new users in your tenant
and configure application settings.
Please click the link and set your password.

VERSION 3.0 (OCTBER, 2020) P A G E | 5 RICOH EUROPE PLC
You will also receive other email(s) that are to inform you of your subscription. In this email you will
find the name, the term, start date of your subscription.
Registering User (Step 2) You can create users for the RICOH Smart Integration package applications using the portal.
User Site URL (same URL in the on boarding email)
https://eu.accounts.ricoh.com/portal/login.html
Login to above site using your credentials that you set in the previous step.

VERSION 3.0 (OCTBER, 2020) P A G E | 6 RICOH EUROPE PLC
The portal is where you add new users and edit your application settings.
Click on the gear button on the top right, then User Management.
You will see your existing admin user account.
To add new users to your applications, there are a couple of ways to do so.
- Manually adding users one by one
- Importing users using csv file
- User self-registration sending URL link

VERSION 3.0 (OCTBER, 2020) P A G E | 7 RICOH EUROPE PLC
<Adding users manually>
Click “+Register” on the “User Management” page. On the ‘Add User’ page enter the required
details and click ‘Save’.
A notification email is sent automatically to the user by the same system address. [email protected]
integration.ricoh.com
Category Item Option
User ID * 1 – 128 characters. Half-width alpha-numerical characters, hyphen ‘-‘, period ‘.’, underscore ‘_’. Hyphen can’t be used at the beginning. Using only Period is not allowed.
Email Address * 1 – 128 characters. Same email address used in the system can’t be used even when user belongs to different tenants.
Given Name * 1 – 128 characters.
Last Name * 1 – 128 characters.
Reply Email Language Japanese, English, German, Italian, Dutch, Spanish, French, Brazilian Portuguese, Thai, Simplified Chinese, Traditional Chinese, Catalan, Czech, Danish, Finnish, Hungarian, Norwegian, Polish, Portuguese, Swedish
Role System Admin/User
Device Account Link – Account ID To setup coordination between the user accounts in the system and login accounts of MFP devices.
* means mandatory field

VERSION 3.0 (OCTBER, 2020) P A G E | 8 RICOH EUROPE PLC
<Adding users using csv import>
Click “Import” on the “User Management” page. There are two options to import users by CSV
1. Download and use the format provided by the system
2. Use csv file exported from Active Directory
3. Link users from Azure AD
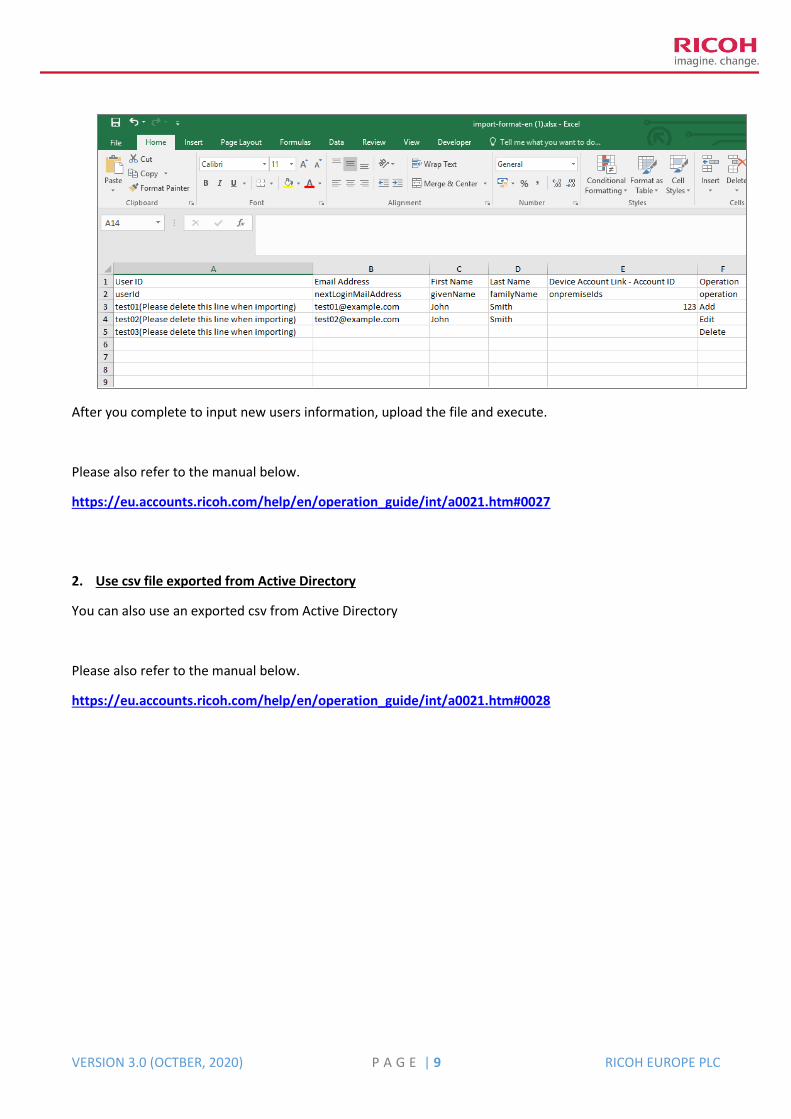
1. Click “Download” and use the format to fill in user information to add.
VERSION 3.0 (OCTBER, 2020) P A G E | 9 RICOH EUROPE PLC
After you complete to input new users information, upload the file and execute.
Please also refer to the manual below.
https://eu.accounts.ricoh.com/help/en/operation_guide/int/a0021.htm#0027
2. Use csv file exported from Active Directory
You can also use an exported csv from Active Directory
Please also refer to the manual below.
https://eu.accounts.ricoh.com/help/en/operation_guide/int/a0021.htm#0028

VERSION 3.0 (OCTBER, 2020) P A G E | 10 RICOH EUROPE PLC
3. Link users from Azure AD
By clicking ‘Add User’ you can import users from Azure AD.
Please also refer to the manual below.
https://eu.accounts.ricoh.com/help/eu/en/operation_guide/int/a0012.htm

VERSION 3.0 (OCTBER, 2020) P A G E | 11 RICOH EUROPE PLC
Cloud Service Configuration (Step 3) Before using RICOH Smart Integration Package, administrator needs to establish coordination with
external services such as cloud services. This is required for users in your tenant to access services
such as Scan to/Print from shared repository.
In case users access services such as Scan to/Print from “My xxxx” (= his or her personal
repository) each user needs to follow the same procedure using his or her credentials of each
external service.
On the section of ‘My Page’ click the link “External Service Configuration”, then the ‘Configure’
button next to the service you want to connect to. In this case the procedure in screenshots below
is for Google. This procedure slightly differs depending on each external service.
Select the check box if you want the connected service to be available to all other users in your
tenant. Click ‘Confirm’ and the system will direct you to the selected external service in order to
grant permissions for RICOH Smart Integration to access it.
VERSION 3.0 (OCTBER, 2020) P A G E | 12 RICOH EUROPE PLC
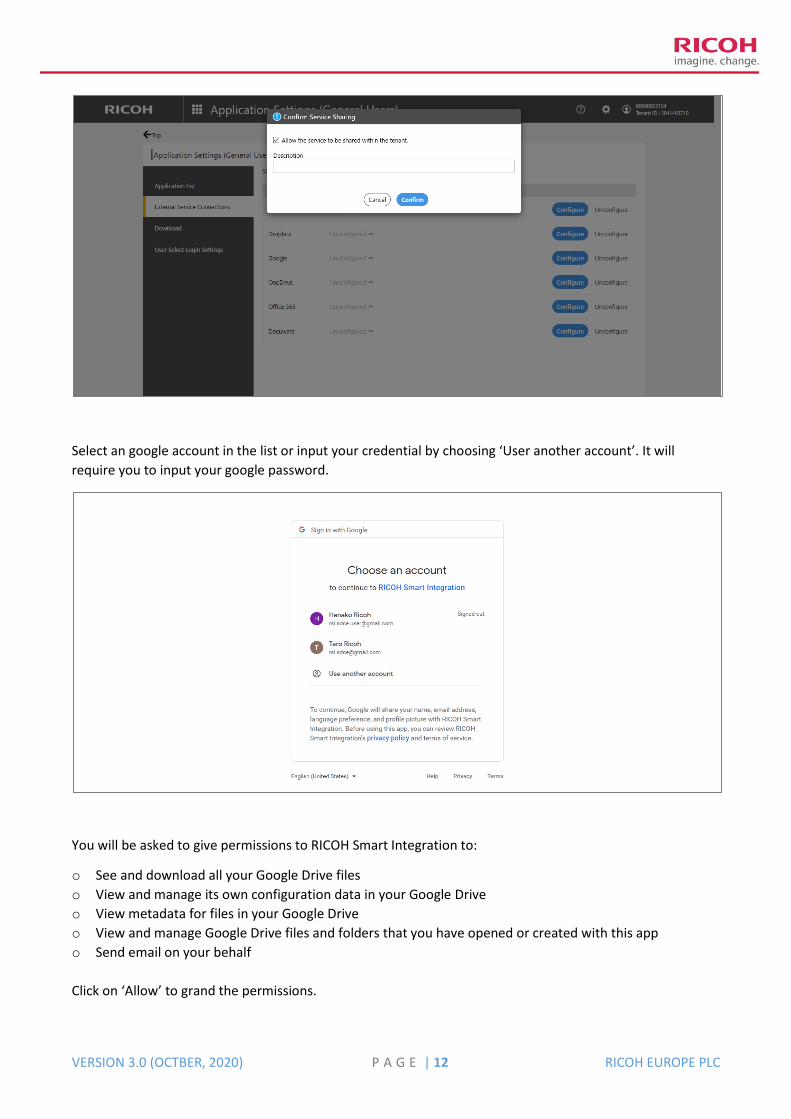
Select an google account in the list or input your credential by choosing ‘User another account’. It will
require you to input your google password.
You will be asked to give permissions to RICOH Smart Integration to:
o See and download all your Google Drive files
o View and manage its own configuration data in your Google Drive
o View metadata for files in your Google Drive
o View and manage Google Drive files and folders that you have opened or created with this app
o Send email on your behalf
Click on ‘Allow’ to grand the permissions.

VERSION 3.0 (OCTBER, 2020) P A G E | 13 RICOH EUROPE PLC

VERSION 3.0 (OCTBER, 2020) P A G E | 14 RICOH EUROPE PLC
Configuration with Office365 (MS365)
‘Need admin approval’ for Office 365 configuration
In case you see a message like below, you can not proceed to make a configuration with your Office 365
account until your administrator makes some changes in settings in Office 365.
Please contact the administrator to make the necessary change in Office 365, or you are the administrator of
Offic365 please refer to the following information.
‘Need admin approval’ message comes up in case the following option #1 or #2 is selected in Consent and
permissions setting in Office 365.
In order for general users to proceed to make configuration between RSI and Office 365, the administrator of
Office 365 needs to do one of the followings.
1) To make a configuration between RSI and Office 365 first (then general users will become able to
proceed to configure it afterwards)
2) To select Option #3 in Consent and permission setting in Office 365.
Option #1 Option #2
Option #3

VERSION 3.0 (OCTBER, 2020) P A G E | 15 RICOH EUROPE PLC
Login Management (Step 3) To select and enable ways to login on MFP, click ‘Tenant Information’ on your portal.
Click ‘Device login information’ to configure login methods.
VERSION 3.0 (OCTBER, 2020) P A G E | 16 RICOH EUROPE PLC
Category Item Option
Login Method IC Card/Device Account Inactive/Active
PIN Inactive/Active
- PIN Digits 4-16 digits
- Generation Method Auto/User Entry
External Service Inactive/Active
User Select Inactive/Active
Default Login Screen Email Address/Password, Tenant ID/User ID/Password, PIN Code External Service (when enabled) User Select
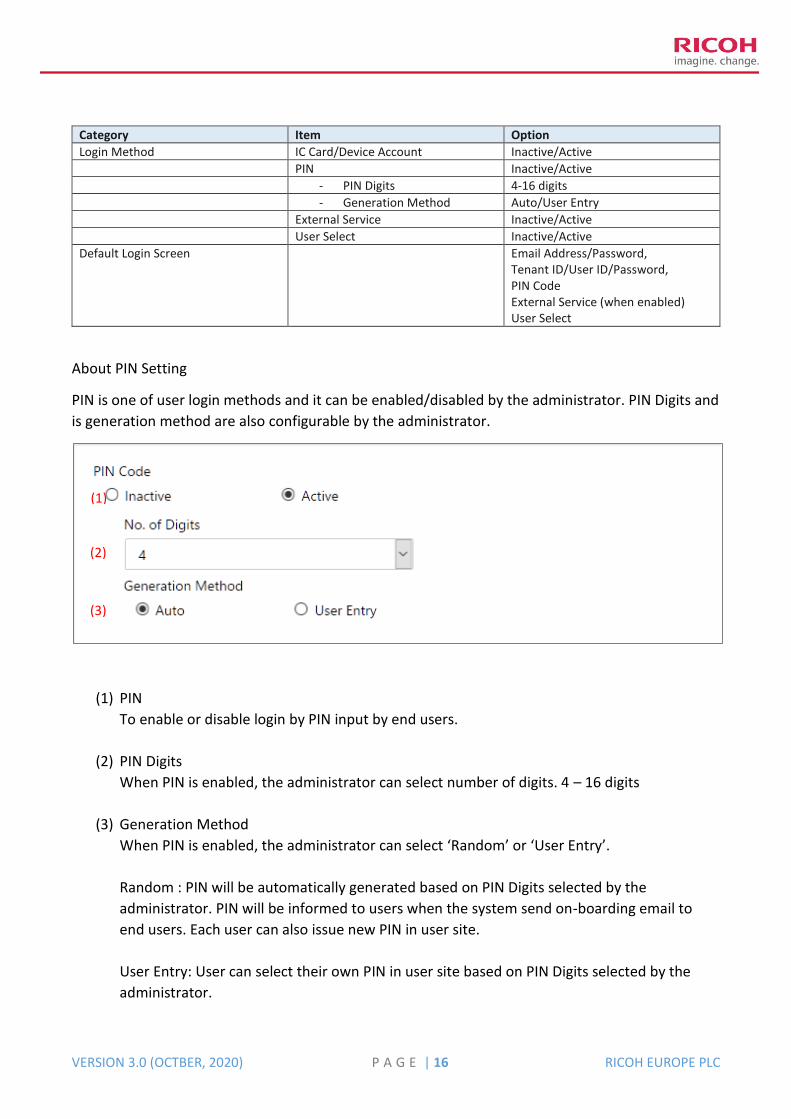
About PIN Setting
PIN is one of user login methods and it can be enabled/disabled by the administrator. PIN Digits and
is generation method are also configurable by the administrator.
(1) PIN
To enable or disable login by PIN input by end users.
(2) PIN Digits
When PIN is enabled, the administrator can select number of digits. 4 – 16 digits
(3) Generation Method
When PIN is enabled, the administrator can select ‘Random’ or ‘User Entry’.
Random : PIN will be automatically generated based on PIN Digits selected by the
administrator. PIN will be informed to users when the system send on-boarding email to
end users. Each user can also issue new PIN in user site.
User Entry: User can select their own PIN in user site based on PIN Digits selected by the
administrator.
(1)
(2)
(3)

VERSION 3.0 (OCTBER, 2020) P A G E | 17 RICOH EUROPE PLC
In ‘Tenant Information’ you can also check/configure the following items.
Setting
Basic Settings You can check the Tenant information including your Tenant ID and Tenant Name. Reply Email Language can be configured.
Login Settings You can select login method to the web portal.
Device login information Refer to the previous page
Owned License – Application List You can check license information such as package name, Usage Start/End Date and its status. (Activated, Expired)
Header Customization Settings You can change the title, theme color and logo image of the portal.
Configuring Application (Step 3) Click ‘Application Settings (Administrators)’ in the portal in Admin Menu. The administrator needs
to configure shared applications before user starts using them.
General user (non-administrator) can configure personal applications by themselves if they need
to change default parameter in ‘Application List’ in User Menu. (Please refer to user manual)
Note: Personal applications will usually contain ‘My’ in the application name.

VERSION 3.0 (OCTBER, 2020) P A G E | 18 RICOH EUROPE PLC
In the application List click on individual apps to edit the settings.
In the setting of each application, there are various setting menu. It is mandatory for administrator
to set up “Service Account” for each shared type application otherwise it will not be available for all
users under your tenant.

VERSION 3.0 (OCTBER, 2020) P A G E | 19 RICOH EUROPE PLC

VERSION 3.0 (OCTBER, 2020) P A G E | 20 RICOH EUROPE PLC
In case of ‘Scan to Google Drive’ following setting items are available in the application
management. Each application has the similar setting menu applicable to the individual application.
Category Item Option
Service Settings Service Account * Select the user whose service will be used for all tenant's user
Select Folder *
Common Settings Default Screen of Folder Browsing List Screen, Search Screen
Default Layout of Folder Browsing List of Tow Columns, List of One Column
Default Parameter Settings Failure notice email address *
Failure notice Email Subject
OCR language None, Catalan, Czech, Danish, Dutch, English, Finnish, French, German, Greek, Hungarian, Italian, Japanese, Norwegian, Polish, Portuguese, Spanish, Swedish, Russia, Turkish
File type PDF, PDF/A, Word, Excel, PowerPoint
Remove Blank Page Yes, No
Create one file per page Yes, No
File name File name
Date Label
Date Delimiter
Date Format YYYY-MM-DD, YYYY/MM/DD, YYYYMMDD, MM-DD-YYYY, MM/DD/YYYY, MMDDYYYY, DD-MM-YYYY, DD/MM/YYYY, DDMMYYYY
Dictionary Label
Dictionary Delimiter
Dictionary
Dictionary Column Width Wide, Standard, Narrow
Default Scanning Setting Scan Color Mode Auto Color Select, B&W Text, B&W Text/Photo, B&W Text/Line Art, B&W Photo, Gray Scale, Full Color Test/Photo, Full Color Photo
Original Sides 1 Sided, 2 Sided (Open to Right/Left), 2 Sided (Open to Top), Spread
Document Orientation Readable Direction, Unreadable Direction
Scan Resolution 100 dpi, 150 dpi, 200 dpi, 300 dpi, 400 dpi, 600 dpi
Document Size Auto, A3, A3 (Horizontal), A4, A4 (Horizontal), 8 ½ x 11, 8 ½ x 11 (Horizontal), 11 x 17, 11 x17 (Horizontal)
Manual Density 3, 2, 1, 0, -1, -2, -3
Scan Method Normal, Batch
Preview On, Off
* means mandatory field

VERSION 3.0 (OCTBER, 2020) P A G E | 21 RICOH EUROPE PLC
3. Installation on MFP using an operation panel (Step 4)
You can install RICOH Smart Integration by one of the following methods:
1. Installation from the Ricoh Application Site
2. Installation from Web Browser NX
1. Installation from the Ricoh Application Site
Select the Ricoh Application Site on your screen. You may need to log in to the device as an
administrator to access this site.
Select one of RICOH Smart Integration packages on the site then push ‘install’.
After installation completes, you will see a shortcut icon on your home screen.
Please note in order to use the application, you need to order your license by contacting your local
Ricoh representative.

VERSION 3.0 (OCTBER, 2020) P A G E | 22 RICOH EUROPE PLC
2. Installation from Web Browser NX
In order to use Web Browser NX at the first time, you may need to log in to the device as an
administrator as it is not in your home screen. After logging in please hit the button on middle right
on your screen.
Press and hold ‘Web Browser NX’ and you can move he application icon to your home screen.
After opening the ‘Web Browser NX’ and select the stack or gear icon on the bottom, then select ‘Open URL’.

VERSION 3.0 (OCTBER, 2020) P A G E | 23 RICOH EUROPE PLC
Enter the RICOH Smart Integration Apps page URL:
https://www.eu.smart-integration.ricoh.com/si-apps/pub/index.htm
You will see the following screens. Please proceed by pushing ‘OK’ and ‘Login’ button.

VERSION 3.0 (OCTBER, 2020) P A G E | 24 RICOH EUROPE PLC
In the following page, please select the stack icon again and select ‘Add Shortcut to Home’.
Confirm your shortcut name and URL, then press ‘OK’.
Your shortcut to the Apps page will now be loaded on to your device’s homepage.
It is recommended to enable the ‘Application cache’ and ‘Save Cookie’ options. This can be done in
the Security Settings option of Web Browser NX.
RICOH Smart Integration Initial Login Very first time, administrator need to login to the site either using Tenant ID, User ID and Password
or Email address and password.

VERSION 3.0 (OCTBER, 2020) P A G E | 25 RICOH EUROPE PLC
Setup of Control+ Package If you do not use ‘Control+’ package, please skip this procedure.
Select ‘RSI Control+ Setup’ on the Application site then push ‘install’.
After the installation has been successfully finished, ‘Cloud Settings’ button will appear on the
home screen.
Open the ‘Cloud Settings’. Then press ‘Setting’ and follow the instruction on the screen.
*You may be required to enter your RICOH Smart Integration admin credential.
After the setting has been successfully finished, it shows the message and the device will restart.
*You may be required to enter the device admin credential. Please note this is not a credential for
your account in RICOH Smart Integration, but it is for your device.

VERSION 3.0 (OCTBER, 2020) P A G E | 26 RICOH EUROPE PLC
After the restart, the device is locked by the authentication module of ‘Control+’.
Users can log in to the device with RICOH Smart Integration credential.

VERSION 3.0 (OCTBER, 2020) P A G E | 27 RICOH EUROPE PLC
License Management If you need to remove the RICOH Smart Integration applications from a device, select the ‘App
Usage Permission Management’ on the portal.
Select Subscription then untick device(s) from which you want to remove the subscription.
The same operation can be conducted on MFP. Please refer to section 6.

VERSION 3.0 (OCTBER, 2020) P A G E | 28 RICOH EUROPE PLC
4. Customize application (Step 5)
Add/Edit/Delete/Move/Duplicate Application The administrator can Add/Edit/Delete an application in a package as follows:
Select the ‘Add an Application’ button from the top right of the page.
Adding an application to the package makes the application available for the users. The Add
Application screen will pop up. Select the application to be added, then click the Next.

VERSION 3.0 (OCTBER, 2020) P A G E | 29 RICOH EUROPE PLC
By clicking the 3 dots in the bottom right of each application a menu with
Edit/Delete/Move/Duplicate will be displayed.
The administrator can also edit the name and icon for the application.

VERSION 3.0 (OCTBER, 2020) P A G E | 30 RICOH EUROPE PLC
5. Product Limitation Known limitation of OCR
Category Phenomenon Description
Upside-down image rotation Sometimes misrecognized We identify the top and bottom from the image as pre-processing of OCR. We use information such as the direction of arrangement of letters, letter / picture / chart layout, ruled line position, etc. to infer which is upper. In the case of the following manuscripts, the OCR may also fail because the top / bottom discrimination fails. · Manuscript with only few letters · Manuscript with characters written diagonally · Documents with a dark background / background such as photos
OCR Unusual fonts cannot be recognized
In OCR, it is based on standardly used fonts such as Arial / Verdana / Times New Roman for foreign languages, MS Ming Dynasty / MS Gothic / MS UI Gothic for Japanese. Therefore, recognition may fail in the following cases. · Using a special font · Using extremely large / small font size
Input image is not clear Although 200 dpi to 600 dpi is recommended, if the recognition rate is bad at 200 dpi, please raise the resolution and scan again. Also, if the input images are blurred or are not enough contrast, the recognition rate will not improve. Please use clear images.
PDF output Output size is different Due to the limitation of the current engine, the size of the output PDF page may increase by about 0.3 to 1.7 mm.

VERSION 3.0 (OCTBER, 2020) P A G E | 31 RICOH EUROPE PLC
Sometimes impossible to print PDF with Japanese OCR.
When you print PDF with Japanese OCR, if alternative font is not installed in MFP, it may not be printed correctly.
Word output Layout collapse The OCR engine writes the character string of the recognition result as Word text and uses the font size / font type / line spacing / text width etc. to try to make it as close to the original as possible, but it is difficult to match with the original perfectly. Therefore, the following phenomena may occur. · Although the manuscript was 2 pages, it became 3 pages / 1 page · Margins increase or decrease
The number of blank pages increases
If you input multiple pages and try to output them in Word, blank pages sometimes increase.
Sometimes the footer's page number is incorrect
When outputting a document with a page number in the footer section as an input, Word automatically counts the page count and may be out of alignment with the page number of the original document. Example: Manuscript: 2 pages of 3/8, 4/8 Word output result: 2 pages of 1/2, 2/2 (Since there are only 2 pages, Word automatically judges 2 pages, 8 replaces 2 and redoes the page)
Doc format, that is created by OCR, cannot be displayed in iOS UIWebView
It is said that iOS does not officially support doc / xls etc., it may not be displayed normally on iOS devices. This is because the OCR function creates data in RTF format and then outputs it to doc format. Please use docx / xlsx.

VERSION 3.0 (OCTBER, 2020) P A G E | 32 RICOH EUROPE PLC
Sometimes blank page is removed
In decision of the current OCR engine, blank page is sometimes removed. So, for example, 4 pages sometimes become 3 pages.
Cell colour/ Frame border are lost
For Word output, the colour of the cell or the frame border of the table are lost during the transfer.
Excel output Colour / figure / photo are lost For Excel output, the colour of characters and cells is not reflected. Also, figures and photographs are not reflected. With regard to the part recognized as table, OCR engine uses the cell ruled line / cell combination to create table.
Other remarks
• Folder Name length and File Name length depends on each cloud service.
o In case of “Scan to Email” the file name is limited to 120 characters.
• Maximum file size for “Scan to Email”/”Scan to Cloud application” is 40MB.
o In case of “Scan via Outlook” it is 4MB
o In case of “Scan via Gmail” it is 35MB.
If the file size exceeds the limit, your operation may fail and you will receive an error
notification email from the system.
• "Print from Cloud applications" support these file types: pdf, doc, docx, xls, xlxs, ppt, pptx,
jpeg, jpg, png, gif, htm, html, tif, tiff, jpe.
.txt files are not supported
• Supported Browsers for User Site are:
o Internet Explorer: 11 or later
o Edge: Latest Version
o Chrome: Latest Version
o Firefox: Latest Version
• Limitations for Home Screen/Applications
o Home: Maximum 20 for each profile, Max 32 characters for the name.
o Applications: Maximum 18 for each home screen, Max 32 characters for the name
• User Management
o Email address is unique in the system; same Email address cannot be used even if
user belongs to different Tenants
o Users belong to same tenant cannot set different time zones
o User cannot change their login Email address, need admins assistance to change
email address
VERSION 3.0 (OCTBER, 2020) P A G E | 33 RICOH EUROPE PLC
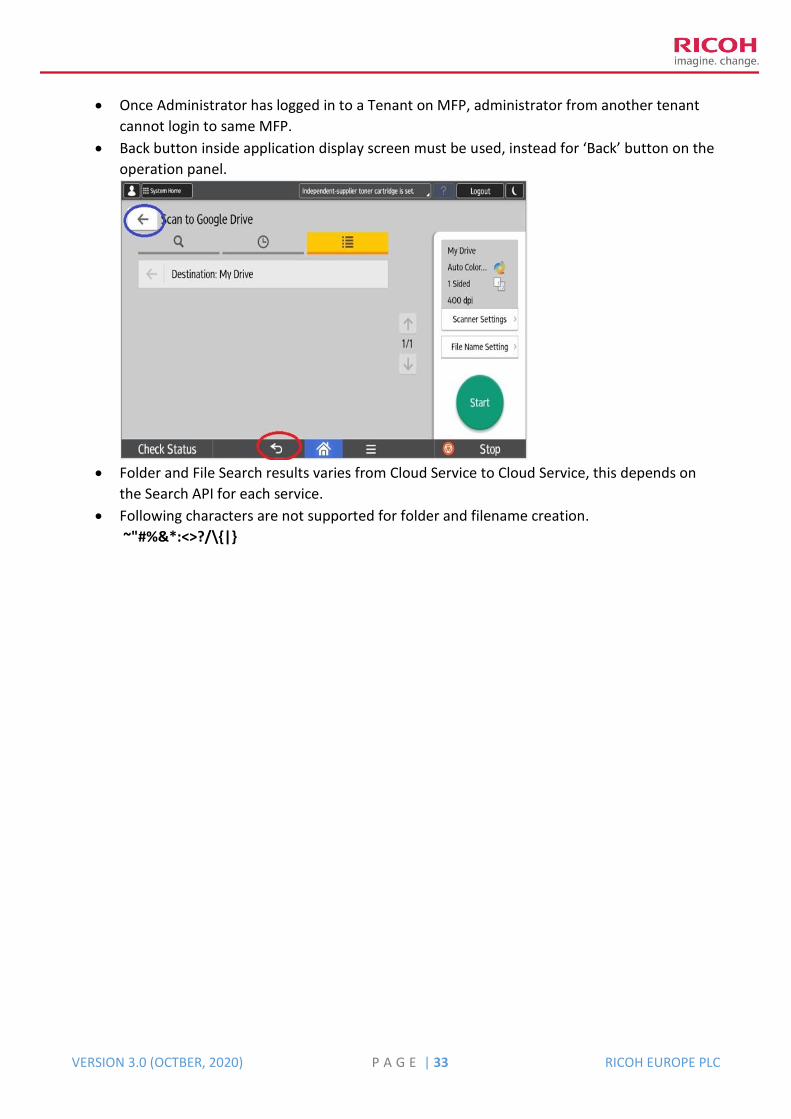
• Once Administrator has logged in to a Tenant on MFP, administrator from another tenant
cannot login to same MFP.
• Back button inside application display screen must be used, instead for ‘Back’ button on the
operation panel.
• Folder and File Search results varies from Cloud Service to Cloud Service, this depends on
the Search API for each service.
• Following characters are not supported for folder and filename creation.
~"#%&*:<>?/\{|}
VERSION 3.0 (OCTBER, 2020) P A G E | 34 RICOH EUROPE PLC
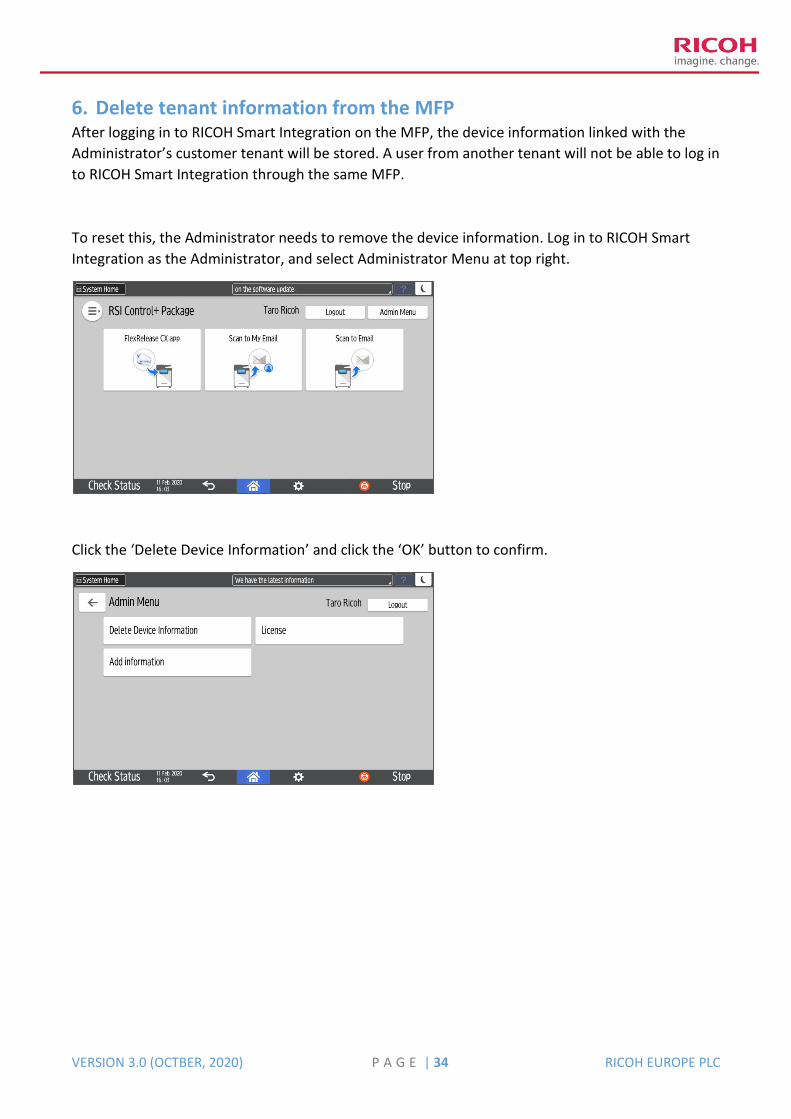
6. Delete tenant information from the MFP After logging in to RICOH Smart Integration on the MFP, the device information linked with the
Administrator’s customer tenant will be stored. A user from another tenant will not be able to log in
to RICOH Smart Integration through the same MFP.
To reset this, the Administrator needs to remove the device information. Log in to RICOH Smart
Integration as the Administrator, and select Administrator Menu at top right.
Click the ‘Delete Device Information’ and click the ‘OK’ button to confirm.

VERSION 3.0 (OCTBER, 2020) P A G E | 35 RICOH EUROPE PLC
Troubleshooting
When a device is linked with an unknow RICOH Smart Integration account,
A) If application list is displayed, click and hold any application for more than 4 seconds then
the tenant ID information will be displayed. Log in to RICOH Smart Integration as the
Administrator and follow the procedure in the beginning of this section.
B) If application list is not displayed, or admin credential of the tenant known in A) is unknown,
please contact Ricoh with your device serial information.