rfg-elearning getting started...
TRANSCRIPT

rfg008747
RFG-eLearning
GETTING STARTED GUIDE VERSION 2.0

2
TABLE OF CONTENTS To begin your online learning experience… START HERE! ............................... 3 Self-Registering on RFG-eSource ....................................................................... 5 Downloading Course Documentation................................................................... 7 Taking the Course .............................................................................................. 13 Taking the Course .............................................................................................. 14 Taking the Certification Exam ............................................................................ 16 Taking the Certification Exam ............................................................................ 17 Working Directly with RFG-eSource .................................................................. 19 Features Quick Reference ................................................................................. 20
Home Page 20 Catalog 21 SEARCH-and-LEARN 22 My Plan 23 My Favorites 24 My Report 24

3
To begin your online learning experience… START HERE! This Getting Started Guide explains the steps required to take an RFG-eLearning Course and challenge the Certification Exam. You have taken the first step by accessing the Catalog link in RFG-eLearning, selecting the desired training course to view its "Learning Path," and opening this document, which is the first item in the Learning Path. In the Learning Path you will also see all the items that are related to your course. If you are taking a technical course you will see documentation links for the mainframe and any applicable accessories, the link for mainframe training, and the link for accessories training (if applicable). If you are taking a Sales course you will see the main topic and other sub topics that may pertain to that to that course. We recommended that you progress through this path in the order presented. Please print and read this document before proceeding.
1. Self-register on RFG-eSource, Ricoh’s web-accessed content management system at http://www.rfg-esource.com. This step enables you to download the documentation required for the course. See page 5 for instructions. (Later, we’ll explain how you can acquire documentation from RFG-eSource without having to first access Ricoh eLearning.)
2. Download your documentation from RFG-eSource. See page 6 for instructions.
3. Begin the eLearning course and progress through each "Learning Object" or module. Although you may
complete each learning object in any order you choose, we recommend that you complete them in the order presented because the information in later learning objects often builds on information presented in earlier learning objects. Each Learning Object has several "pages" which conclude with a series of review questions. Your activity during each session is passed back to our Learning Management System, which records your progress and score of the review questions. Please note that these review questions do not count toward your certification exam. However, they are representative of what will be included in the exam, so be sure to observe any feedback from questions that you have answered incorrectly. See page 9 for details.
4. Take the Certification Exam. If you have not previously registered for RFG-eTesting, which is a separate
system from RFG-eLearning, you will need to complete a one-time registration. See page 12 for details.
4
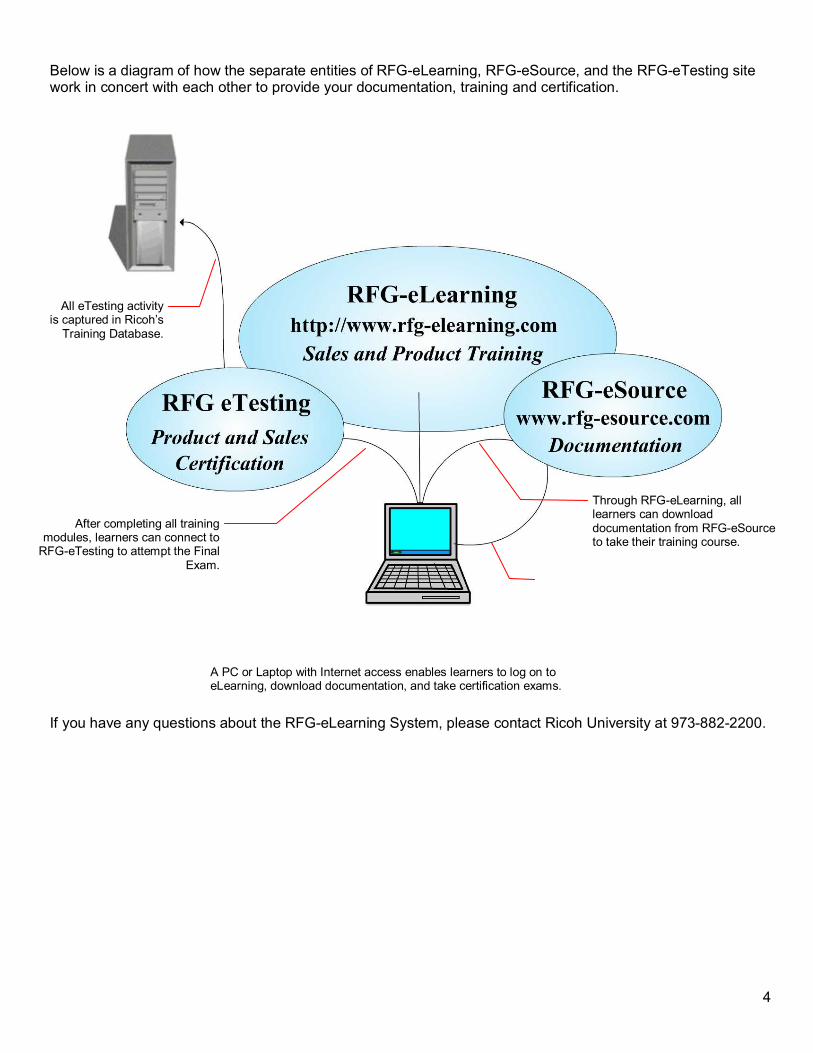
Below is a diagram of how the separate entities of RFG-eLearning, RFG-eSource, and the RFG-eTesting site work in concert with each other to provide your documentation, training and certification.
If you have any questions about the RFG-eLearning System, please contact Ricoh University at 973-882-2200.
Through RFG-eLearning, all learners can download documentation from RFG-eSource to take their training course.
After completing all training modules, learners can connect to
RFG-eTesting to attempt the Final Exam.
All eTesting activity is captured in Ricoh’s
Training Database.
A PC or Laptop with Internet access enables learners to log on to eLearning, download documentation, and take certification exams.

5
Self-Registering on RFG-eSource This procedure assumes that you are using Acrobat Reader 6.0 or later to view and print PDF (Portable Document Format) files, and that Acrobat Reader is set up on your system as a browser plug-in, which causes PDF documents to open in the same browser window as web pages. If you do not have Acrobat Reader, please visit http://www.adobe.com/products/acrobat/readermain.html to download a copy.
1. In your web browser, go to www.rfg-esource.com, and then click Self-Registration in the left panel.
2. Enter your personal information. NOTE: User Name must be your Ricoh ID# (also known as Tech ID#).
3. Wait 5 to 10 minutes before attempting to log on to RFG-eSource. During that time, we recommend that you continue reading this Guide.
Important Note for Ricoh US Employees: This self-registration process is for the RFG-eSource Internet site, which exists outside the corporate firewall. The Internet site is different from the RFG-eSource intranet site, which exists behind the firewall. Although you may already have an intranet-based eSource account, all documentation links in Ricoh eLearning point to the Internet version of eSource. Therefore, to access content on RFG-eSource from links in Ricoh eLearning, all Ricoh US employees must create a separate Internet account using the steps provided above.

6

7
Log In to RFG eLearning and Retrieve Documentation This procedure will demonstrate how to log into RFG eLearning and download documentation for a selected course.
1. In your web browser, go to www.ricohuniversity.com and in the RFG eLearning section, click on the ‘Login’ link.
2. From the RFG eLearning page, enter your Username and Password to log in.

8
3. After logging in, the eLearning home page will open. Select ‘Course Catalog’ to display the courses available.
9
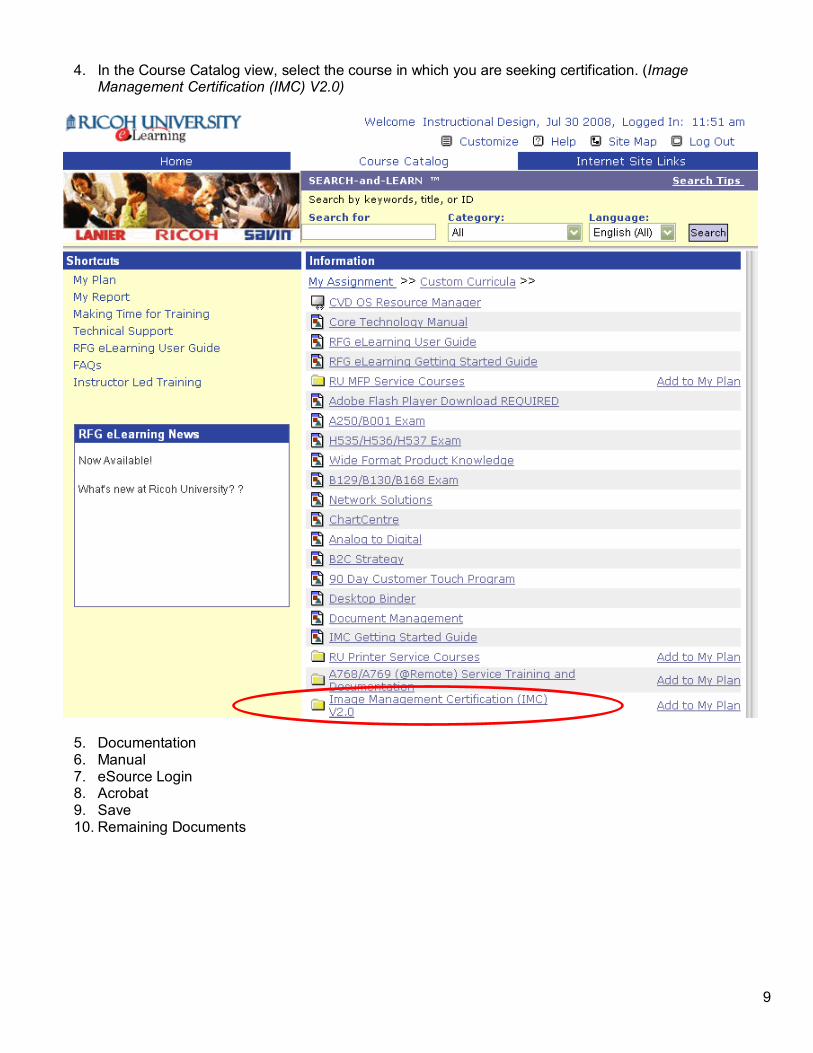
4. In the Course Catalog view, select the course in which you are seeking certification. (Image Management Certification (IMC) V2.0)
5. Documentation 6. Manual 7. eSource Login 8. Acrobat 9. Save 10. Remaining Documents
10
Taking the Course This procedure will demonstrate how to take the selected course
1. Learning Path 2. Selected Course 3. Play Course 4. Module map 5. First page/section

11
Downloading Course Documentation This procedure assumes that you are using Acrobat Reader 6.0 or later to view and print PDF (Portable Document Format) files, and that Acrobat Reader is set up on your system as a browser plug-in, which causes PDF documents to open in the same browser window as web pages. If you do not have Acrobat Reader, please visit http://www.adobe.com/products/acrobat/readermain.html to download a copy.
1. In the Catalog view,
click to enter the learning path for the product or course on which you’re seeking certification. (B051/B052 Service Training and Documentation)
2. To display all Documentation for your
course, click for your course’s documentation (B051/B052 Service Documentation).
3. Click for the first item in the list of document (B051/B052 Service Manual).
Learners will always access the most up-to-date Service Documentation from these links, made possible by RFG-eSource, Ricoh University’s content management system.

12
4. Enter your User Name (your Ricoh ID#) and Password that you created on page 5 to log on to RFG-eSource, and then click OK.
5. In the resulting Acrobat Reader window, click the Save a Copy icon.
6. In the Save a Copy dialogue box, select the destination folder of your choice. (See suggested folder structure in blue-bordered inset.) Before clicking Save, we recommend that you modify the default RFG-eSource file name (i.e. rfg007298) to include the product code and document type that you are downloading, such as B051-B052 Service Manual.
NOTE: You will need to have established your RFG-eSource account prior to this step. Otherwise you will not be able to download the documentation for the course. See page 5 for instructions.
Modify the default RFG-eSource file name to a file name you will more easily recognize in the future.

13
7. Close the Acrobat Reader window.
8. Repeat steps 3 through 8 to download the remaining documents.
NOTE: If you are taking a technical course, the Accessory Parts Catalogs are not specifically required to complete the training. Therefore, you may choose to download these files from here now, or you may download them in the future directly from RFG-eSource.
14
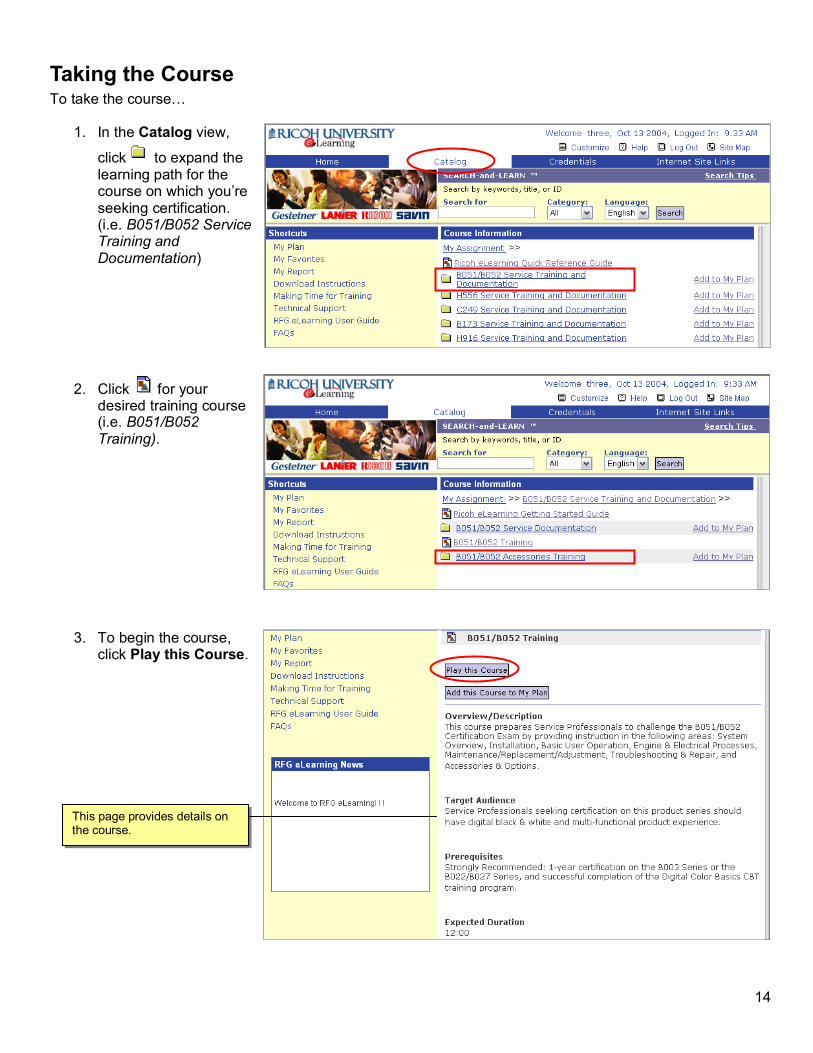
Taking the Course To take the course…
1. In the Catalog view,
click to expand the learning path for the course on which you’re seeking certification. (i.e. B051/B052 Service Training and Documentation)
2. Click for your desired training course (i.e. B051/B052 Training).
3. To begin the course, click Play this Course.
This page provides details on the course.

15
4. In the Module Map
click .
5. The first page of the Course Introduction opens in a separate browser window. Use
in the lower right-hand corner to advance to successive pages.
The Module Map lists the modules or Learning Objects of the course. You also have the option to select any one of the available Learning Objects by clicking on its corresponding link. This page also shows your progression through the course (% complete) as well as your test scores.
16
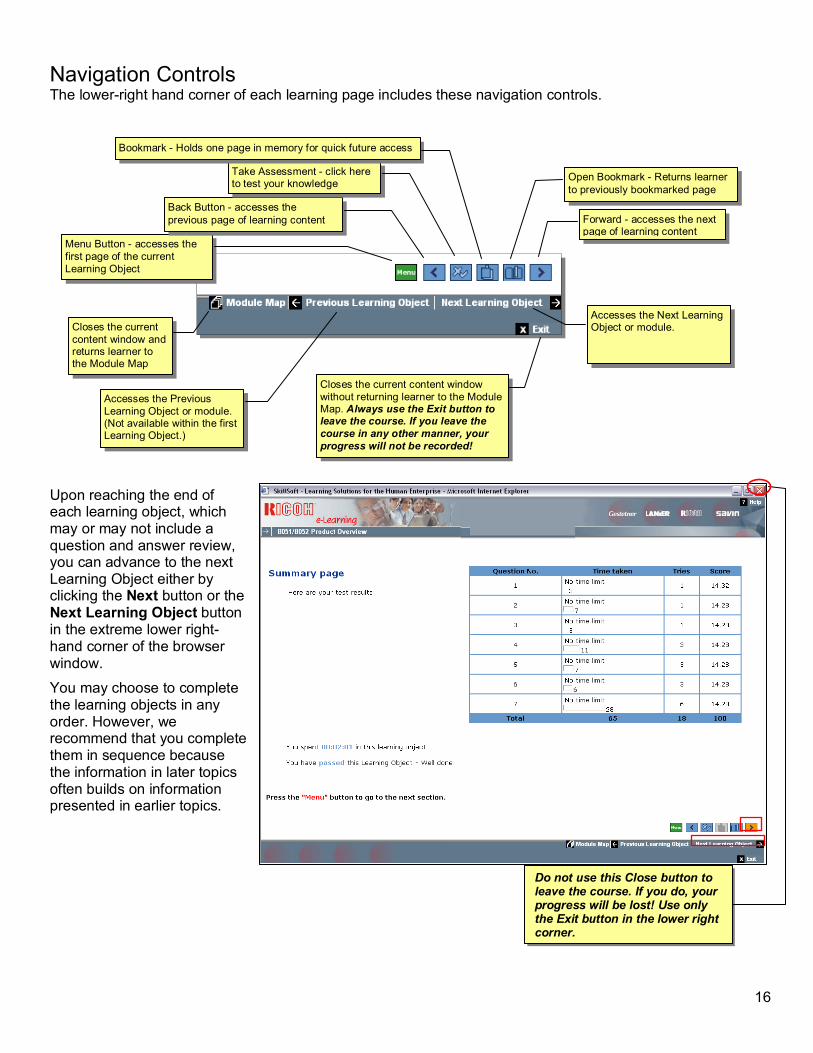
Navigation Controls The lower-right hand corner of each learning page includes these navigation controls.
Upon reaching the end of each learning object, which may or may not include a question and answer review, you can advance to the next Learning Object either by clicking the Next button or the Next Learning Object button in the extreme lower right-hand corner of the browser window.
You may choose to complete the learning objects in any order. However, we recommend that you complete them in sequence because the information in later topics often builds on information presented in earlier topics.
Menu Button - accesses the first page of the current Learning Object
Back Button - accesses the previous page of learning content
Take Assessment - click here to test your knowledge
Bookmark - Holds one page in memory for quick future access
Open Bookmark - Returns learner to previously bookmarked page
Forward - accesses the next page of learning content
Accesses the Previous Learning Object or module. (Not available within the first Learning Object.)
Accesses the Next Learning Object or module. Closes the current
content window and returns learner to the Module Map
Closes the current content window without returning learner to the Module Map. Always use the Exit button to leave the course. If you leave the course in any other manner, your progress will not be recorded!
Do not use this Close button to leave the course. If you do, your progress will be lost! Use only the Exit button in the lower right corner.

17
Taking the Certification Exam All eLearning courses feature eTesting, an online timed examination system consisting of randomly generated questions. To take the Certification Exam:
1. In the Learning Program, click the link for course or product certification (G060/G570/G082 Self Pace Training Certification Exam - 0387)
2. Click Play to launch the exam.
3. Follow the on-screen messages to complete your Certification Exam.

18
After answering the last question, you will be presented with a Test Results page. Print two copies of this page, one for your records and one for your Manager’s records. (The results of the exam are automatically recorded into your personal training transcript in the Ricoh Learning Management System within 24 hours.) If you attained a passing score and the course is awarded a certificate, Ricoh University will send your Certificate of Achievement within two weeks. If you failed the exam, you may attempt to take the exam a second time after one calendar day. Before doing so we recommend you review the exam results displayed in section 3, and re-study the areas indicated. If you fail a second time, you will not be able to take the exam a third time until you contact Ricoh University at [email protected]. At which time your request will be reviewed and you will be notified if and when you can retake the exam.

19
Working Directly with RFG-eSource As mentioned on page 3, it is possible to acquire documentation from RFG-eSource without having to first access Ricoh eLearning. RFG-eSource is your one source for Service Manuals, Parts Catalogs, Operating Instructions Manuals, Point-to-Point Diagrams, Technical Bulletins, and much more. Most document-based files on eSource are available in Adobe PDF format for downloading, viewing, and printing using Adobe Acrobat Reader.
To learn more about this exciting new system, please visit www.rfg-esource.com and click the First Time Users Click Here button to access the RFG-eSource User Guide.

20
Features Quick Reference
Home Page The Home page appears when you first login. It presents summary information to help you develop your individualized learning plan and track your progress. You can access all of the various features and learning resources from this page. Along the left side is a Shortcuts menu that provides access to the features and informational pages related to your e-learning program. The SEARCH-and-LEARNTM feature is located at the top of the screen. The My Plan section contains links to the learning events that have been added to your formal learning plan, either by you or by your training administrator. The My Favorites area is where you can store links to certain types of learning event, such as SkillBriefs, Job Aids, and books, for quick access. The My Report section contains information regarding the number of courses you have started and completed. The eLearning News scrolling list displays links to various topics relating to news and learning events. Below is an example of the Home page.

21
Catalog SkillPort presents learning events in an expandable catalog. Depending upon the size of your course library, the SkillPort catalog may contain thousands of learning events, including:
Courses Job Aids Mentoring objects SkillBriefs TestPrep exams Express Guides Simulations Custom content Course evaluations
Note: SkillBriefs and Job Aids are available from the Course summary page. Mentoring objects, if available for your organization, appear in the Certification View. Learning events are organized into curricula that keep related subjects together. The curricula are organized by subject matter, represented by folder icons that contain additional sub-categories or the actual learning events. As you select a category, the contents of the selected item are displayed in the catalog. To view the contents of the catalog, click through the catalog hierarchy. A breadcrumb trail at the top of the course information panel will show you where you are. You can also click the View Expanded Catalog link to see the entire catalog, however, this may take some time to display, depending on the amount of content you have access to.
To access a learning event, click the hyperlink title text next to the icon. To quickly search for a specific learning event, you can also use SEARCH-and-LEARN

22
SEARCH-and-LEARN Use SEARCH-and-LEARN™ to quickly find information on a specific subject using keyword searches. You can search for all the different learning event types available on SkillPort, including courses, individual topics, simulations, books, SkillBriefs, and Job Aids. To use SEARCH-and-LEARN…
1. In the SEARCH-and-LEARN panel, type a keyword or phrase in the Search for field.
2. Select a learning event category from the Category drop-down list. Alternatively, you can search all content categories.
3. If content in more than one language is available to you, choose a language from the Language drop-down list.
4. Click Search.
5. The search results appear below the SEARCH-and-LEARN panel. If you searched for all categories, the results will be grouped by category. The results will be ordered according to relevance, as indicated by a thermometer icon .
Refining your search You can refine your search by
clicking a learning event title to display a summary page for that event.
clicking the View more ... link to display more search results for a particular category
Do a related search 1. After doing an initial
search in SEARCH-and-LEARN, click a learning event title in the search results.
6. The learning event summary page appears in the main pane on the right and the other search results are shown as a list on the left.
7. Click the Related Search button to display a list of learning events that relate to the event you have selected.
For example, if you do a search on the word "programming", SEARCH-and-LEARN will likely return a list of events relating to a number of different programming languages. If you select one of those learning events, say a course on Java, and then do a related search, only learning events about Java will be returned. Note: Once you have performed a related search, the Related Search button will not reappear until you have opened the summary page of another learning event.

23
My Plan My Plan contains items that are part of your formal learning program. You, your training administrator, or your manager can add learning events to your My Plan and assign them a goal and a completion date. The My Plan Display can appear empty - with a user prompt to click and get help assigning courses to your plan. My Plan contains only items that have scores tracked by SkillPort, such as courses,
simulations, Test Prep exams, and custom courses. The My Plan Display lists items by: "Learning Event" title, "Due" date, "Assigned" check (appears when an administrator or manager assigned the course to you) You can click the button beside the learning event name to launch it directly. You can click the title to access a summary page where you can view details about the learning event. Learning events that your administrator assigned to a user group to which you belong are displayed separately from events that were assigned to you directly and from events that you assigned to yourself.
Adding learning events to My Plan 1. Find a learning event by browsing the Catalog or by specifying a word or phrase using SEARCH-and-
LEARN.
2. Click the name of the learning event that you want to add to your plan.
3. In the learning event summary page, click Add this Course to My Plan. You will be presented with a Details dialog that permits you to enter Due Date, Goal, and Reminder information.
4. Click the Submit button. The learning event is now listed under My Plan.
Adding folders to My Plan You can add folders to My Plan in which you can store related learning events.
1. In My Plan, click the Add New Folder to My Plan button.
2. In the Add to My Plan page, type a name in the Folder field.
3. Enter a goal and select a due date for the folder.
4. Select the appropriate email reminder option.
5. Click the Submit button. The new folder should now be listed under My Plan.

24
Adding learning events to a folder 1. Find the summary page for the learning event, either by browsing the Catalog or by using SEARCH-
and-LEARN.
2. Click Add to My Plan.
3. In the Select Folder page, click the Select this Folder link next to the name of the folder.
4. Enter the goal, due date, and email reminder.
5. Click Submit.
My Favorites My Favorites is an area where you can store links to certain types of learning event for quick access. It supports SkillBriefs, Job Aids, and books - learning events that are considered part of your informal learning and do not have scores tracked by SkillPort. You can click the button to launch the learning event directly, or click the title of the event to view its summary page.
Adding an item to My Favorites
1. Select a learning event by going to the Catalog tab or by specifying a word or phrase using SEARCH-and-LEARN.
2. Select the learning event you wish to add to your favorites by clicking on the underlined name of the event.
3. Click Add to My Favorites.
4. Click the Close this Window button.
5. Click the Home page tab. The learning event now appears under My Favorites.
My Report My Report displays a record of all your learning event activity. Your Learner Records Progress Report indicates your status with items currently in your learning plan, as well as those completed in the past and no longer part of your plan. A summary of your report is shown in the My Report panel on the Home page. Click the Take me to detailed reports ... button or the My Report shortcut to view the full report.