review pfaff creative icon first impression of chrissie weber...the full manual which includes 234...
TRANSCRIPT

Review Pfaff Creative Icon First impression of Chrissie Weber
For me it´s the first time i´m allowed to take part in a test campaign (18th) from Naehpark). A great pleasure altough i knew this would be a huge piece of work. But I was aware of this fact because I´ve read a few other reviews from previous test campaigns.
What I love sewing the most are quilts. In general, I prefer sewing handy things and most of all things you can use regularly and which are long lasting. Whenever possible I buy fabric from producers participate in a fairtrade texile programm. My current project: a pair of denim jeans.
Since three years I sew on a regular basis. My first sewing-machine was a Bernina 730 record, an heirloom of my dear grandmother. Soon the Bernina 730 record couldn´t satisfy my requirements anymore and so i switched to a Brother Innov-is 1250. Because of the small bed space to the right of the needle i bought a Janome 9400 QCP, which has lots of space for my quilts and lots of features especially for quilters. My latest purchases are a Bernina 460L and an Elna EasyCover. I´m perfectly happy with all those machines now and I´ve got lots of opportunities to achieve all my sewing-goals I´m aiming for.
In the Pfaff creative icon TM I was looking forward to test the quilting stitches and the embroidery device. Also I will check out the exclusive techniques from Pfaff such as the ribbon stitches and the radiant stitches.
Picking up "my" Pfaff creative icon
I collected the Pfaff creative icon TM from Tanja (g.macht). So she gave me a quick introduction too!
Unpacking - first impressions
At home in Switzerland the fun is about to begin – after unpacking the Pfaff creative icon TM. The huge handle comes in pretty handy as the machine is heavy.
The zipper of the embroidery-unit-bag pinched a little bit. The bag in off-white is provided with an embroidered white lettering from Pfaff which looks very classy! The embroidery hoop clips (if needed) are hidden in a small compartment in the embroidery bag.
Personal precaution
As I was travelling with my Pfaff creative icon TM I wait 24 hours after unpacking the sewing and embroidery machine until the temperature of icon has adapted to my room temperatur. Since it is a high precision electronic device it will be treaten as such. Only after those 24 hours I will attach the power cable into the socket and switch the ON/OFF-button.
Important first action
First I checked, as with any new device, if all the parts are included. In the manual all pieces and bits are listed. All things checked! Awesome, nothing is missing!
Manual
The Quick Start Guide has 54 pages. The full manual which includes 234 pages from Pfaff creative iconTM is available on the website of Pfaff to download. Best advice to transfer the whole manual straight to a portable device. Now the manual is at your fingertips at all times.
Foot control
You can already tell it´s high quality in checking out the foot control. The cord is very easy to handly and can be arranged perfectly within the foot control. Please be aware: For the USA and Canada there are additional informations about the power cord and how to attach it.
Embroidery Unit
The embroidery unit is very large. I also like the huge embroidery hoop which is included and measure 360 x 260 mm (14 x 10"). With my Brother Innov-is 1250 I was only able to embroider an area of the size 130 x 180mm (5 x 7"). With such a large hoop I will have tons of new opportunities and designs to explore and I´m already looking forward to embroider.
The exact measurements of the different embroidery hoops can be found on the frames, which I found rather convenient.
( If I´d own a Pfaff creative icon TM I´d buy the "creative Endless Hoop".)

Wi-Fi Connection
Since the Pfaff creative icon TM has its own application for Android Phones and Apple iPhone my first step was to connect my machine with my own network at home. A personal account on mySewnet TM is needed, and for free. It was very easy to connect the icon with my network. The touchscreen is rather intuitive, I didn´t even need to sneak a peek.
If the device is connected with your own network check if your Pfaff creative icon gets detected after you have started the application on your mobile phone. If not, just close the application and hit it again. I had to do this two times, then my sewing and embroidery machine was showed.
Winding the bobbin
The speed for winding a bobbin is absolutely incredible and amazing! I was so excited that I even had to film it just for my personal joy and to remember.
Automatic needle threader
The automatic neelde threader is very reliable and works every time if you make sure the thread is correctly inserted under the hook, between the disks and pulled from the back to the front into the thread cutter.
Embroidery on toweling (terry cloth)
Normally I would start to sew some decorative stitches but as I already have sewn a bathrobe (which you can wear from both sides) during a sewing-meeting in Burgebrach, Germany, I will decorate its pockets with some embroidery (Sewing Pattern from Burda 2662, size 98 (2t)).
Let´s get started!

I found the duck rather cute. You´ll find the design under "children" in the Embroidery-Mode. The embroidery files are well organized and divided into various categories.
For the duck-embroidery I´ve used Tear-Away Embroidery-Stabilizer Wash Away Stabilizer (AVALON PLUS) Needle Inspira, provided embroidery needle Thread Madeira Rayon 40 (from Nähpark assorted colors in a plastic-box) Bobbinfil Madeira 100% Viscose, 70 Brother 100% Polyester, 60 Madeira 100% cotton, 80

First try
The first attempt was with the bobbinfil Madeira, 100% Viscose (70) but there have been two spots where the bobbinfil was showing. Apart from that the stitchout was nice. I´m delighted about the incredible speed the Pfaff creative icon is embroidering.
For every test i used tear-away-stabilizer underneath and a water-soluble stabilizer on top.
Each piece terry cloth in the photographs was washed twice, before and after the embroidery was done. Afterwards the fabric was hung up to dry and was then ironed.

I can not recommend the bobbinfil from Brother which is made of 100% polyester, thickness says 60 on the bobbin. The results were not unflattering. I had lots of slipnots.
For perfect embroidery results the straight stitch needle plate is highly recommended. I've probably skiped this advice while reading the manual. However, I must point out that even when I used the straight stitch needle plate I had the issue of slipnots which seemed rather strange to me.

Changing the needle plate
Changing the needle plate requires a bit more sensibility with the icon than with the Janome 9400 QCP. While the Janome needle plate can be released by just pressing a handle you have to grab a screwdriver to change it on the Pfaff creative iconTM. You have to place the screwdriver under the needle plate and gently push it towards you in order to make the needle plate popping off. To insert another needle plate a bit of strength is asked to push it back in.
Much better results with Madeira bobbinfil 100% cotton
On Facebook January Smith from the group "Pfaff creative iconTM and Sensation Pro» gave the advice to use bobbinfil made from 100% cotton. Just be aware oft he fact that threads made from cotton are not as durable and strong as they are when made from polyester. When they are washed frequently it could slightly affect the seams or in our case the embroidery. But since I had no other idea on how to achieve a better result I tried it with bobbinfil made from cotton.

And who would have thought, this worked. There were no more huge slipnots. This time I also used two layers of tear-away stabilizer to achieve more stability.
But not all unevenness had disappeared despite the fact that I was using the straight stitch needle plate and a bobbinfil from cotton.
But at last it is time now to apply the pockets onto the bathing gown.

Cleaning the area under the bobbin case
After four days embroidering I had to clean the area under the bobbin case.
The result shows that it is highly recommended to do this on a regular basis.

Patchwork
After so many tests and also failures it was time to put my mind at ease. That´s why I decided to continue with patchwork.
For sewing fabric pieces together I have chosen the straight stitch needle plate which is recommended. The "Active-Stitch-System" is enabled, as well as the IDTTM SYSTEM. For sewing
the fabric pieces together I have used the ¼″ Quilting Foot for the IDT™ System.

(The beginning of a "Checkered Dresden" is made after a YouTube tutorial by our beloved Jenny Doan from Missouri Star Quilt Company.) I am delighted about the precision from Pfaff creative icon TM while piecing the fabric together. Only once I had to unravel two seams because they didn´t match exactly.
Speed control lever
On the right side below you´ll find the speed control lever. I had to check this out in the manual because on the Janome 9400 QCP this lever will be found on the front of the sewing machine.

Stippling stitches
I absolutly had to try out some of the stippling stitches.
The stitches were sewn onto a quilt sandwich. Here you see a small selection of those I liked the most. (Stitches Number: 4, 6, 7, and 20 (from top to bottom).
Radiant stitches

I decided shortly before the Sewing-Meeting "Sew" in May 2018 in Pliening, Germany, took place to decorate a t-shirt i have already sewn with radiant stitches. I wanted to attach the neckline facing in order to prevent it from bunching up. At the event itself others realized the radiant stitch with the little flowers and I got a few compliments which made me very happy, obviously.
This special decorative stitch was sewn with Madeira Decora thread no. 12 (nice color gradient). Fort he stabilizer I used AVALON PLUS (wash-away) underneath. I was sewing with an INSPIRA-stretch-needle, thickness 90. I cut the neckline facing after sewing very narrow to he radiant stitch with appliqué scissors and washed away the stabilizer.
Radiant stitches belong to one of the special sewing techniques which PFAFF provides. After sewing the first couple of stitches the machine stops and gives you the opportunity to turn the fabric in a 90-degree-angle. The sewing foot is lifted automatically and the needle stays in the fabric. To precisely complete the whole round at the end I switched briefly to the straight stitch, so that the first and the last flower had a decent distance to each other. Slow down and make sure the seam is matching at the very end.
For the first try I´m very satisfied with the result because the stitches are looking very delicate and elegant. With the first test I'm satisfied because my t-shirt has an exclusive touch now. Sometimes the first seam is not exactly on top oft he second seam but to find out the reason for this issue I would have to do more tests. (Afterwards Tanja told me this can be fixed when adjusting the stitch-balance. I haven´t tried this out though.)

Update the firmware
I haven´t updated the firmware right away but I did this on purpose. But now there is time for the update!
The update can be performed in two different ways according to the manual: you can download the firmware update directly from Pfaff on their website onto a USB stick or you hit the selection menu at the right corner and the choose the wi-fi icon on the left side. You can always check there which version is currently installed on your machine or whether there is a new update available. The download endured about three hours from the Pfaff creative icon itself. This can vary of course, it depends on your download-rate which, in my case, was 100 Mbit/s. I do not have a fiber optic link. With the downloaded update from their website I wasn´t able to update my icon. The unzipped file on my USB stick was saying "unknown" on the icon.
To cut a long story short if one is planning an update of the firmware she or he should dispose over a fair amount of time and patience.
Embroidery and binding on terry cloth (for a bib)
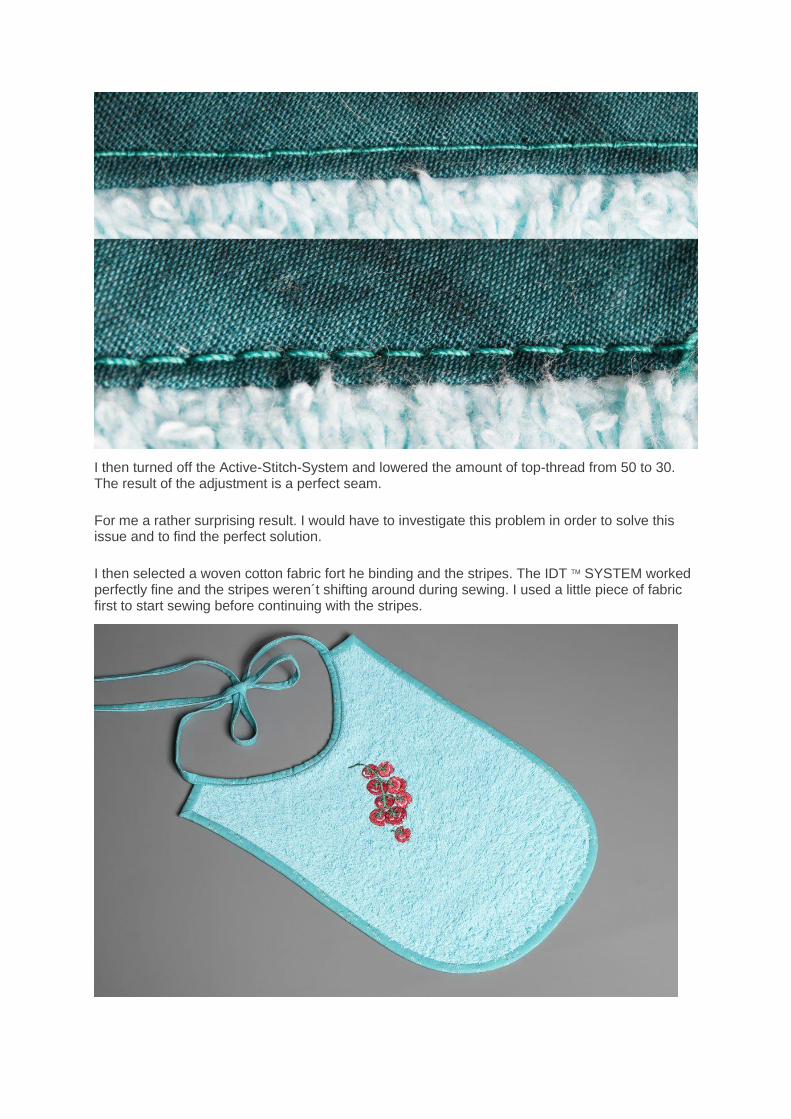
The closing date for my first report was near and I decided to embroider a bib with a tomatoe-design as my godchild loves tomatoes.
I just wanted to exclude that my issues while embroidering on terry cloth had to do with this specific fabric. And because I´m no quitter. Unfortunately the tomatoes too don´t look so perfect, rather like free embroidered work. I still have slipnots although i updated the firmware and used the straight stitch plate and bobbinfil made of 100% cotton. Needless to say, that I´ve used the recommended stabilizer every time.
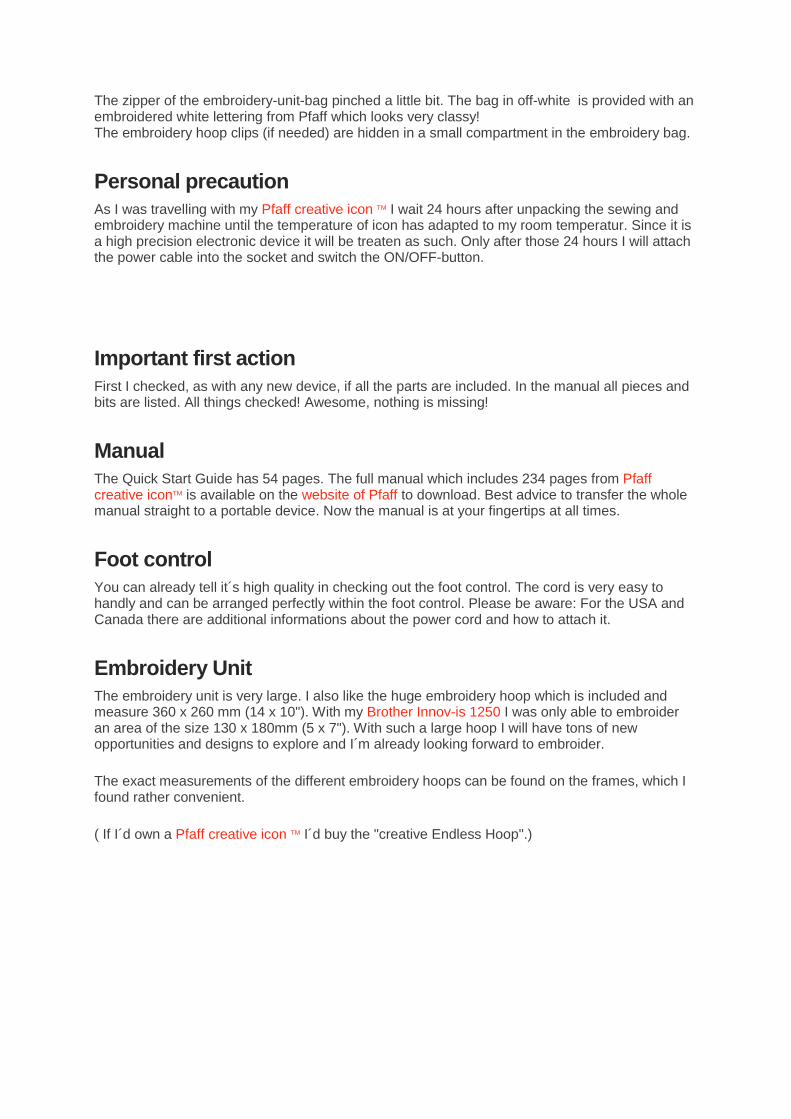
When sewing the bias tape with a straight stitch onto the bib the stitches looked rather strange, not what I´ve expected. The bobbinfil was showing. The seam was sewed without changing any settings and with support of the IDT TM -SYSTEMS.
I then turned off the Active-Stitch-System and lowered the amount of top-thread from 50 to 30. The result of the adjustment is a perfect seam.
For me a rather surprising result. I would have to investigate this problem in order to solve this issue and to find the perfect solution.
I then selected a woven cotton fabric fort he binding and the stripes. The IDT TM SYSTEM worked perfectly fine and the stripes weren´t shifting around during sewing. I used a little piece of fabric first to start sewing before continuing with the stripes.

Embroidering on thin cotton
A sneak peek of my next project, which will be found in my detailed review:
The butterfly will be added onto a cushion. But not everything will be revealed at this point. The design is by Pfaff, I´ve used Madeira Rayon No. 40 for the embroidery. I would use another stabilizer next time though, because I had some wrinkles going on at the left top of the wing. This problem occured because of the combination wrong stabilizer / thin cotton fabric and the high stitch density of the design. This can easily be solved by using a proper stabilizer and/or another fabric.

Conclusion of my first impression
The Pfaff creative icon TM offers many functions and stitches. Including exclusive techniques such as the ribbon stitches and the radiant stitches which I already introduced.
The touch screen from the Pfaff creative icon TM in my opinion is very intuitive. For the special techniques I consider the manual or I take a look at some tutorials which are directly included in the Pfaff creative icon. That is a big plus and very handy. For a final conclusion I have to sew many hours more with the icon, to learn and to practice more.
At this point, I still haven´t decided whether the Active Stitch System is useful or rather irritating for me at this point. A slight disappointment remains because of my embroidery-results on toweling. In my opinion this wasn´t was I expected like at all and there is still missing some accuracy at this point and that is the reason I can not mention the word "perfection" as for now.