resizing compute instances on oracle cloud infrastructure · 2 | resizing compute instances on...
TRANSCRIPT
Resizing Compute Instances on Oracle Cloud Infrastructure O R A C L E W H I T E P A P E R | J A N U A R Y 2 0 1 9
2 | RESIZING COMPUTE INSTANCES ON ORACLE CLOUD INFRASTRUCTURE
Disclaimer The following is intended to outline our general product direction It is intended for information purposes only and may not be incorporated into any contract It is not a commitment to deliver any material code or functionality and should not be relied upon in making purchasing decisions The development release and timing of any features or functionality described for Oraclersquos products remains at the sole discretion of Oracle
Revision History The following revisions have been made to this white paper since its initial publication
Date Revision
January 4 2019 Initial version
You can find the most recent versions of the Oracle Cloud Infrastructure white papers at httpscloudoraclecomiaastechnical-resources
3 | RESIZING COMPUTE INSTANCES ON ORACLE CLOUD INFRASTRUCTURE
Table of Contents Overview 4
Instance Resizing Process 4
Resizing a Windows Server 2012 R2 Instance 5
Sample Environment Details 5
Shut Down Applications and Disconnect and Detach Block Volumes 9
Clone the Boot Volume or Terminate the Instance 12
Create an Instance from an Existing Boot Volume 13
Conclusion 16
4 | RESIZING COMPUTE INSTANCES ON ORACLE CLOUD INFRASTRUCTURE
Overview Oracle Cloud Infrastructure offers the choice flexibility control and performance that your applications and workloads need Oracle Cloud Infrastructure Compute instances are the building blocks for applications from small websites to the largest enterprise applications You can launch instances based on bare metal or virtual machine shapes A shape is a template that determines the number of CPUs amount of memory and other resources allocated to a newly created instance like local NVMe disks network bandwidth and the maximum number of VNICs
After you launch an instance you might encounter new compute requirements to accommodate new demand For example an increasing in number of users might require more CPU power to support their applications or an application might need to move from a development environment to test and production environments
This paper outlines the process and best practices for resizing standard compute resources in Oracle Cloud Infrastructure The process is illustrated by resizing a Windows 2012 R2 Server instance that is deployed and running a domain controller and Active Directory
Instance Resizing Process You can think of resizing an instance as assigning a new compute shape to an existing boot volume Unlike other cloud providers Oracle Cloud Infrastructure lets you to terminate your instance and keep the boot volume for a new instance All the data installed on the volume is automatically available on the new instance If you donrsquot want to terminate the instance you can clone the boot volume or generate a new custom image from the same volume
To avoid any data or file corruption we recommend that you first gracefully shut down all your running applications and then disconnect any block volumes attached to the instance After that you launch a new instance by selecting the boot volume After the instance is created you can add secondary IP addresses and attach block volumes
Following are some best practices for managing your instances and applications to avoid reinstalling your applications during this process
bull If possible add a secondary IP address to a VNIC that is attached to the instance Then map the secondary IP address (rather than the primary IP address) to your applications endpoints or services This gives you the flexibility to detach a secondary IP address from one instance and attach it to another within the same subnet as part of a failover process
In the example scenario presented here when creating a DNS server clients should point to the secondary IP address of the server
5 | RESIZING COMPUTE INSTANCES ON ORACLE CLOUD INFRASTRUCTURE
bull Create a custom image every time you change the OS or boot volume
bull Back up all your storage volumes regularly
bull Local attached NVMe disks available on DenseIO compute shapes are not protected in any way Protect your data by replicating it to a separate instance or backing it up This process is outside the scope of this white paper and is covered in the service documentation
Note Secondary IP addresses must be statically assigned at the OS level
Resizing a Windows Server 2012 R2 Instance Before describing the resizing process this section shows the infrastructure and OS resources set up in this paper to illustrate the process The example uses a Windows Server 2012 R2 instance that contains a DNS server and a domain controller and Active Directory with one additional attached block volume that contains some files
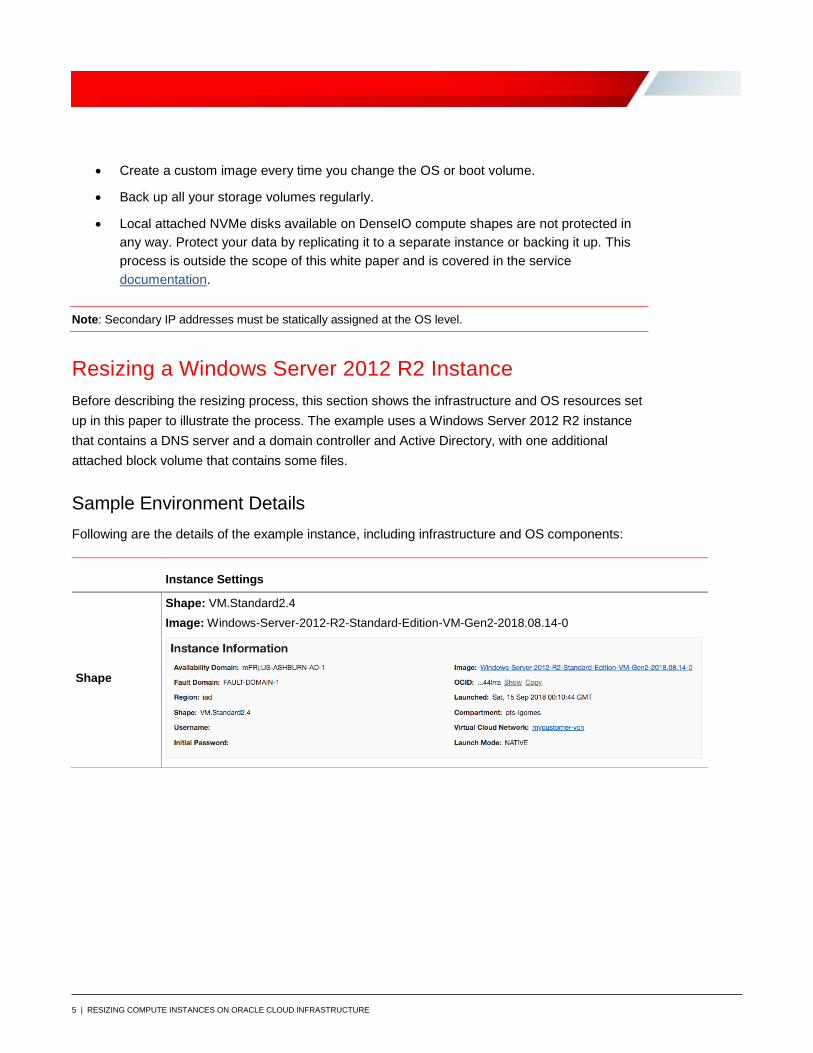
Sample Environment Details Following are the details of the example instance including infrastructure and OS components
Instance Settings
Shape
Shape VMStandard24 Image Windows-Server-2012-R2-Standard-Edition-VM-Gen2-20180814-0
6 | RESIZING COMPUTE INSTANCES ON ORACLE CLOUD INFRASTRUCTURE
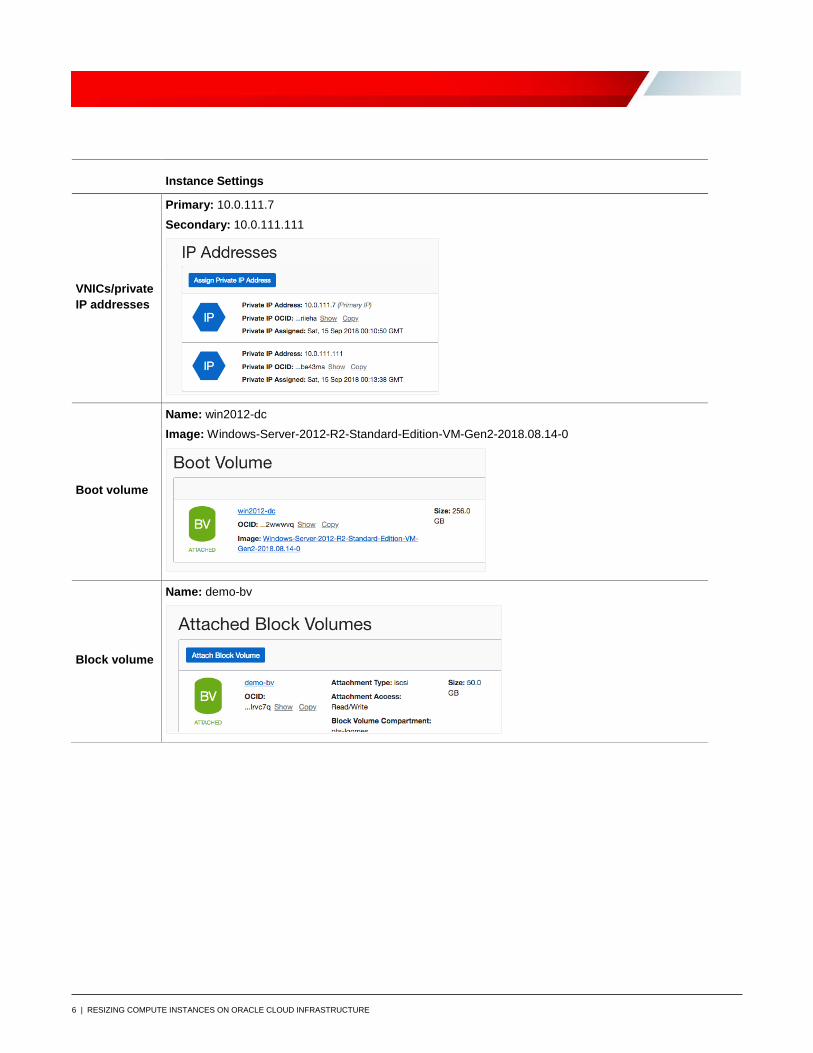
Instance Settings
VNICsprivate IP addresses
Primary 1001117 Secondary 100111111
Boot volume
Name win2012-dc Image Windows-Server-2012-R2-Standard-Edition-VM-Gen2-20180814-0
Block volume
Name demo-bv
7 | RESIZING COMPUTE INSTANCES ON ORACLE CLOUD INFRASTRUCTURE
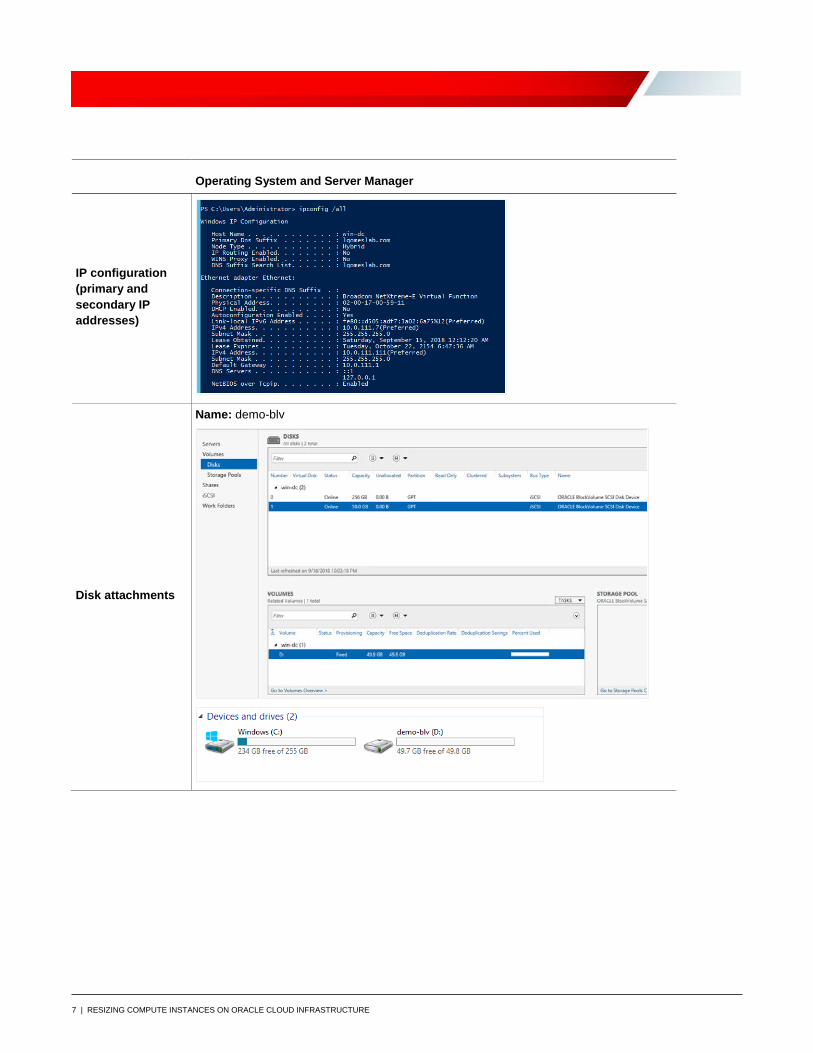
Operating System and Server Manager
IP configuration (primary and secondary IP addresses)
Disk attachments
Name demo-blv
8 | RESIZING COMPUTE INSTANCES ON ORACLE CLOUD INFRASTRUCTURE
Operating System and Server Manager
Active Directory
Active Directory WIN-DC 100111111 and 1001117
DNS server listening secondary IP address
DNS WIN-DC 100111111 and 1001117
Domain name lgomeslabcom
Windows client network configuration
DHCP Server 169254169254
9 | RESIZING COMPUTE INSTANCES ON ORACLE CLOUD INFRASTRUCTURE
Shut Down Applications and Disconnect and Detach Block Volumes To avoid data corruption gracefully shut down your applications and then use the following steps to disconnect any block volumes that are attached to your instance
1 Log in to your Windows instance and open Disk Management
2 In the Disks section of the Server Manager window right-click the volume that you want to disconnect and select Take Offline
3 Confirm that you want to take the volume offline
The status is now shown as Offline
The following steps describe how to disconnect the iSCSI target
10 | RESIZING COMPUTE INSTANCES ON ORACLE CLOUD INFRASTRUCTURE
4 In the Server Manager window select Tools and then select iSCSI Initiator
5 In the iSCSI Initiator Properties dialog box go to the Targets tab select the target and then click Disconnect
11 | RESIZING COMPUTE INSTANCES ON ORACLE CLOUD INFRASTRUCTURE
6 Confirm the session termination
The status is now shown as Inactive
7 In the iSCSI Initiator Properties dialog box go to the Favorite Targets tab select the target that you are disconnecting and then click Remove
8 In the iSCSI Initiator Properties dialog box go to the Volumes and Devices tab select the volume from the Volume List and then click Remove
Note When you took the disk offline it might have automatically been removed from the list
9 In the Oracle Cloud Infrastructure Console go to the Instance Details page for the instance
10 Under Resources click Attached Block Volumes
12 | RESIZING COMPUTE INSTANCES ON ORACLE CLOUD INFRASTRUCTURE
11 Select the block volume click the actions icon (three dots) and select Detach
12 In the Detach Block Volume dialog box click Continue Detachment to complete the operation
Clone the Boot Volume or Terminate the Instance At this point you can use two different methods to achieve your goal depending on your situation
bull If you donrsquot have any applications that depend on the primary IP address or fully qualified domain name (FQDN) of your VNICs you can clone the boot volume stop your existing instance and then create a new instance based on the cloned volume
bull If you need to ensure that all the VNICs follow exactly the same configuration defined on the original instance we recommend that you terminate your instance and create a new instance based on the original boot volume
Clone the Boot Volume
If you choose to work on a cloned version (snapshot) of your boot volume rather than the original disk perform the following steps
1 In the Oracle Cloud Infrastructure Console go to the Instance Details page for the instance
2 Under Resources click Boot Volume and then click the boot volume
13 | RESIZING COMPUTE INSTANCES ON ORACLE CLOUD INFRASTRUCTURE
3 Under Resources on the Boot Volume details page click Clones click Create Clone and then provide the necessary information to create the clone
4 When the cloning process is complete go back to the Instance Details page and click Stop to stop the instance
The boot volume file is available from the Compute page under Boot Volumes
Terminate the Instance
If you want to reuse the original disk you can terminate the instance without deleting the boot volume
1 On Instance Details page click Terminate
2 In the confirmation window do not select the check box
The instance is eventually shown in the Terminated state but the boot volume is still available from the from the Compute page under Boot Volumes
Create an Instance from an Existing Boot Volume Now you can create an instance from the existing boot volume (original or cloned) This instance should be based on a different compute shape
1 Select the volume that you want to use to create the instance
Note that the Attached Instance field should have the value None in this compartment
14 | RESIZING COMPUTE INSTANCES ON ORACLE CLOUD INFRASTRUCTURE
2 Click the actions icon (three dots) and select Create Instance
3 Create an instance from the existing boot volume selecting a larger (or smaller) compute shape To avoid driver incompatibility you canrsquot select a compute shape from a different family
15 | RESIZING COMPUTE INSTANCES ON ORACLE CLOUD INFRASTRUCTURE
4 Provide values based on your network settings and Create Instance
The new instance is provisioned based on the existing boot volume
5 Attach the secondary IP addresses to your VNICs Be sure to add the same IP addresses that you entered before to avoid any rework
A On the Instance Details page under Resources click Attached VNICs
B Select the VNIC that hosts the server IP address (for example DNS) and under Resources click IP Addresses
C Click Assign Private IP Address
D Enter the private IP address of the secondary IP address (in this example 100111111) and select the Unassign If Already Assigned to Another VNIC check box
16 | RESIZING COMPUTE INSTANCES ON ORACLE CLOUD INFRASTRUCTURE
6 Attach the block volume to the new instance
A On the Instance Details page under Resources click Attached Block Volumes
B Click Attach Block Volume
C Select the block volume that was attached to the old instance and click Attach
D When a message appears about attaching the disk at the OS level click Close to continue
7 From the Instance Details page reboot your instance
When the instance reboots you can use Remote Desktop Protocol (RDP) to access your instance again
8 Log in to your server All clients should authenticate against the domain controller if therersquos no dependency on the block volumes
9 Attach all the block volumes at the OS level and start your applications
Conclusion Oracle Cloud Infrastructure gives you the ability to manage a boot volume independently of the life cycle of an instance This ability is the key for resizing your workloads When you terminate an instance you can keep the associated boot volume and use it to launch a new instance using a different compute shape
Oracle Corporation World Headquarters Worldwide Inquiries 500 Oracle Parkway Phone +16505067000 Redwood Shores CA 94065 USA Fax +16505067200
Copyright copy 2018 Oracle andor its affiliates All rights reserved This document is provided for information purposes only and the contents hereof are subject to change without notice This document is not warranted to be error-free nor subject to any other warranties or conditions whether expressed orally or implied in law including implied warranties and conditions of merchantability or fitness for a particular purpose We specifically disclaim any liability with respect to this document and no contractual obligations are formed either directly or indirectly by this document This document may not be reproduced or transmitted in any form or by any means electronic or mechanical for any purpose without our prior written permission Oracle and Java are registered trademarks of Oracle andor its affiliates Other names may be trademarks of their respective owners Intel and Intel Xeon are trademarks or registered trademarks of Intel Corporation All SPARC trademarks are used under license and are trademarks or registered trademarks of SPARC International Inc AMD Opteron the AMD logo and the AMD Opteron logo are trademarks or registered trademarks of Advanced Micro Devices UNIX is a registered trademark of The Open Group 0119 Resizing Compute Instances on Oracle Cloud Infrastructure January 2019 Author Lucas Gomes
C O N N E C T W I T H U S
blogsoraclecomoracle
facebookcomoracle
twittercomoracle
oraclecom
- Disclaimer
- Revision History
- Overview 4
- Instance Resizing Process 4
- Resizing a Windows Server 2012 R2 Instance 5
- Sample Environment Details 5
- Shut Down Applications and Disconnect and Detach Block Volumes 9
- Clone the Boot Volume or Terminate the Instance 12
- Create an Instance from an Existing Boot Volume 13
- Conclusion 16
- Overview
- Instance Resizing Process
- Resizing a Windows Server 2012 R2 Instance
-
- Sample Environment Details
- Shut Down Applications and Disconnect and Detach Block Volumes
- Clone the Boot Volume or Terminate the Instance
-
- Clone the Boot Volume
- Terminate the Instance
-
- Create an Instance from an Existing Boot Volume
-
- Conclusion
-
2 | RESIZING COMPUTE INSTANCES ON ORACLE CLOUD INFRASTRUCTURE
Disclaimer The following is intended to outline our general product direction It is intended for information purposes only and may not be incorporated into any contract It is not a commitment to deliver any material code or functionality and should not be relied upon in making purchasing decisions The development release and timing of any features or functionality described for Oraclersquos products remains at the sole discretion of Oracle
Revision History The following revisions have been made to this white paper since its initial publication
Date Revision
January 4 2019 Initial version
You can find the most recent versions of the Oracle Cloud Infrastructure white papers at httpscloudoraclecomiaastechnical-resources
3 | RESIZING COMPUTE INSTANCES ON ORACLE CLOUD INFRASTRUCTURE
Table of Contents Overview 4
Instance Resizing Process 4
Resizing a Windows Server 2012 R2 Instance 5
Sample Environment Details 5
Shut Down Applications and Disconnect and Detach Block Volumes 9
Clone the Boot Volume or Terminate the Instance 12
Create an Instance from an Existing Boot Volume 13
Conclusion 16
4 | RESIZING COMPUTE INSTANCES ON ORACLE CLOUD INFRASTRUCTURE
Overview Oracle Cloud Infrastructure offers the choice flexibility control and performance that your applications and workloads need Oracle Cloud Infrastructure Compute instances are the building blocks for applications from small websites to the largest enterprise applications You can launch instances based on bare metal or virtual machine shapes A shape is a template that determines the number of CPUs amount of memory and other resources allocated to a newly created instance like local NVMe disks network bandwidth and the maximum number of VNICs
After you launch an instance you might encounter new compute requirements to accommodate new demand For example an increasing in number of users might require more CPU power to support their applications or an application might need to move from a development environment to test and production environments
This paper outlines the process and best practices for resizing standard compute resources in Oracle Cloud Infrastructure The process is illustrated by resizing a Windows 2012 R2 Server instance that is deployed and running a domain controller and Active Directory
Instance Resizing Process You can think of resizing an instance as assigning a new compute shape to an existing boot volume Unlike other cloud providers Oracle Cloud Infrastructure lets you to terminate your instance and keep the boot volume for a new instance All the data installed on the volume is automatically available on the new instance If you donrsquot want to terminate the instance you can clone the boot volume or generate a new custom image from the same volume
To avoid any data or file corruption we recommend that you first gracefully shut down all your running applications and then disconnect any block volumes attached to the instance After that you launch a new instance by selecting the boot volume After the instance is created you can add secondary IP addresses and attach block volumes
Following are some best practices for managing your instances and applications to avoid reinstalling your applications during this process
bull If possible add a secondary IP address to a VNIC that is attached to the instance Then map the secondary IP address (rather than the primary IP address) to your applications endpoints or services This gives you the flexibility to detach a secondary IP address from one instance and attach it to another within the same subnet as part of a failover process
In the example scenario presented here when creating a DNS server clients should point to the secondary IP address of the server
5 | RESIZING COMPUTE INSTANCES ON ORACLE CLOUD INFRASTRUCTURE
bull Create a custom image every time you change the OS or boot volume
bull Back up all your storage volumes regularly
bull Local attached NVMe disks available on DenseIO compute shapes are not protected in any way Protect your data by replicating it to a separate instance or backing it up This process is outside the scope of this white paper and is covered in the service documentation
Note Secondary IP addresses must be statically assigned at the OS level
Resizing a Windows Server 2012 R2 Instance Before describing the resizing process this section shows the infrastructure and OS resources set up in this paper to illustrate the process The example uses a Windows Server 2012 R2 instance that contains a DNS server and a domain controller and Active Directory with one additional attached block volume that contains some files
Sample Environment Details Following are the details of the example instance including infrastructure and OS components
Instance Settings
Shape
Shape VMStandard24 Image Windows-Server-2012-R2-Standard-Edition-VM-Gen2-20180814-0
6 | RESIZING COMPUTE INSTANCES ON ORACLE CLOUD INFRASTRUCTURE
Instance Settings
VNICsprivate IP addresses
Primary 1001117 Secondary 100111111
Boot volume
Name win2012-dc Image Windows-Server-2012-R2-Standard-Edition-VM-Gen2-20180814-0
Block volume
Name demo-bv
7 | RESIZING COMPUTE INSTANCES ON ORACLE CLOUD INFRASTRUCTURE
Operating System and Server Manager
IP configuration (primary and secondary IP addresses)
Disk attachments
Name demo-blv
8 | RESIZING COMPUTE INSTANCES ON ORACLE CLOUD INFRASTRUCTURE
Operating System and Server Manager
Active Directory
Active Directory WIN-DC 100111111 and 1001117
DNS server listening secondary IP address
DNS WIN-DC 100111111 and 1001117
Domain name lgomeslabcom
Windows client network configuration
DHCP Server 169254169254
9 | RESIZING COMPUTE INSTANCES ON ORACLE CLOUD INFRASTRUCTURE
Shut Down Applications and Disconnect and Detach Block Volumes To avoid data corruption gracefully shut down your applications and then use the following steps to disconnect any block volumes that are attached to your instance
1 Log in to your Windows instance and open Disk Management
2 In the Disks section of the Server Manager window right-click the volume that you want to disconnect and select Take Offline
3 Confirm that you want to take the volume offline
The status is now shown as Offline
The following steps describe how to disconnect the iSCSI target
10 | RESIZING COMPUTE INSTANCES ON ORACLE CLOUD INFRASTRUCTURE
4 In the Server Manager window select Tools and then select iSCSI Initiator
5 In the iSCSI Initiator Properties dialog box go to the Targets tab select the target and then click Disconnect
11 | RESIZING COMPUTE INSTANCES ON ORACLE CLOUD INFRASTRUCTURE
6 Confirm the session termination
The status is now shown as Inactive
7 In the iSCSI Initiator Properties dialog box go to the Favorite Targets tab select the target that you are disconnecting and then click Remove
8 In the iSCSI Initiator Properties dialog box go to the Volumes and Devices tab select the volume from the Volume List and then click Remove
Note When you took the disk offline it might have automatically been removed from the list
9 In the Oracle Cloud Infrastructure Console go to the Instance Details page for the instance
10 Under Resources click Attached Block Volumes
12 | RESIZING COMPUTE INSTANCES ON ORACLE CLOUD INFRASTRUCTURE
11 Select the block volume click the actions icon (three dots) and select Detach
12 In the Detach Block Volume dialog box click Continue Detachment to complete the operation
Clone the Boot Volume or Terminate the Instance At this point you can use two different methods to achieve your goal depending on your situation
bull If you donrsquot have any applications that depend on the primary IP address or fully qualified domain name (FQDN) of your VNICs you can clone the boot volume stop your existing instance and then create a new instance based on the cloned volume
bull If you need to ensure that all the VNICs follow exactly the same configuration defined on the original instance we recommend that you terminate your instance and create a new instance based on the original boot volume
Clone the Boot Volume
If you choose to work on a cloned version (snapshot) of your boot volume rather than the original disk perform the following steps
1 In the Oracle Cloud Infrastructure Console go to the Instance Details page for the instance
2 Under Resources click Boot Volume and then click the boot volume
13 | RESIZING COMPUTE INSTANCES ON ORACLE CLOUD INFRASTRUCTURE
3 Under Resources on the Boot Volume details page click Clones click Create Clone and then provide the necessary information to create the clone
4 When the cloning process is complete go back to the Instance Details page and click Stop to stop the instance
The boot volume file is available from the Compute page under Boot Volumes
Terminate the Instance
If you want to reuse the original disk you can terminate the instance without deleting the boot volume
1 On Instance Details page click Terminate
2 In the confirmation window do not select the check box
The instance is eventually shown in the Terminated state but the boot volume is still available from the from the Compute page under Boot Volumes
Create an Instance from an Existing Boot Volume Now you can create an instance from the existing boot volume (original or cloned) This instance should be based on a different compute shape
1 Select the volume that you want to use to create the instance
Note that the Attached Instance field should have the value None in this compartment
14 | RESIZING COMPUTE INSTANCES ON ORACLE CLOUD INFRASTRUCTURE
2 Click the actions icon (three dots) and select Create Instance
3 Create an instance from the existing boot volume selecting a larger (or smaller) compute shape To avoid driver incompatibility you canrsquot select a compute shape from a different family
15 | RESIZING COMPUTE INSTANCES ON ORACLE CLOUD INFRASTRUCTURE
4 Provide values based on your network settings and Create Instance
The new instance is provisioned based on the existing boot volume
5 Attach the secondary IP addresses to your VNICs Be sure to add the same IP addresses that you entered before to avoid any rework
A On the Instance Details page under Resources click Attached VNICs
B Select the VNIC that hosts the server IP address (for example DNS) and under Resources click IP Addresses
C Click Assign Private IP Address
D Enter the private IP address of the secondary IP address (in this example 100111111) and select the Unassign If Already Assigned to Another VNIC check box
16 | RESIZING COMPUTE INSTANCES ON ORACLE CLOUD INFRASTRUCTURE
6 Attach the block volume to the new instance
A On the Instance Details page under Resources click Attached Block Volumes
B Click Attach Block Volume
C Select the block volume that was attached to the old instance and click Attach
D When a message appears about attaching the disk at the OS level click Close to continue
7 From the Instance Details page reboot your instance
When the instance reboots you can use Remote Desktop Protocol (RDP) to access your instance again
8 Log in to your server All clients should authenticate against the domain controller if therersquos no dependency on the block volumes
9 Attach all the block volumes at the OS level and start your applications
Conclusion Oracle Cloud Infrastructure gives you the ability to manage a boot volume independently of the life cycle of an instance This ability is the key for resizing your workloads When you terminate an instance you can keep the associated boot volume and use it to launch a new instance using a different compute shape
Oracle Corporation World Headquarters Worldwide Inquiries 500 Oracle Parkway Phone +16505067000 Redwood Shores CA 94065 USA Fax +16505067200
Copyright copy 2018 Oracle andor its affiliates All rights reserved This document is provided for information purposes only and the contents hereof are subject to change without notice This document is not warranted to be error-free nor subject to any other warranties or conditions whether expressed orally or implied in law including implied warranties and conditions of merchantability or fitness for a particular purpose We specifically disclaim any liability with respect to this document and no contractual obligations are formed either directly or indirectly by this document This document may not be reproduced or transmitted in any form or by any means electronic or mechanical for any purpose without our prior written permission Oracle and Java are registered trademarks of Oracle andor its affiliates Other names may be trademarks of their respective owners Intel and Intel Xeon are trademarks or registered trademarks of Intel Corporation All SPARC trademarks are used under license and are trademarks or registered trademarks of SPARC International Inc AMD Opteron the AMD logo and the AMD Opteron logo are trademarks or registered trademarks of Advanced Micro Devices UNIX is a registered trademark of The Open Group 0119 Resizing Compute Instances on Oracle Cloud Infrastructure January 2019 Author Lucas Gomes
C O N N E C T W I T H U S
blogsoraclecomoracle
facebookcomoracle
twittercomoracle
oraclecom
- Disclaimer
- Revision History
- Overview 4
- Instance Resizing Process 4
- Resizing a Windows Server 2012 R2 Instance 5
- Sample Environment Details 5
- Shut Down Applications and Disconnect and Detach Block Volumes 9
- Clone the Boot Volume or Terminate the Instance 12
- Create an Instance from an Existing Boot Volume 13
- Conclusion 16
- Overview
- Instance Resizing Process
- Resizing a Windows Server 2012 R2 Instance
-
- Sample Environment Details
- Shut Down Applications and Disconnect and Detach Block Volumes
- Clone the Boot Volume or Terminate the Instance
-
- Clone the Boot Volume
- Terminate the Instance
-
- Create an Instance from an Existing Boot Volume
-
- Conclusion
-
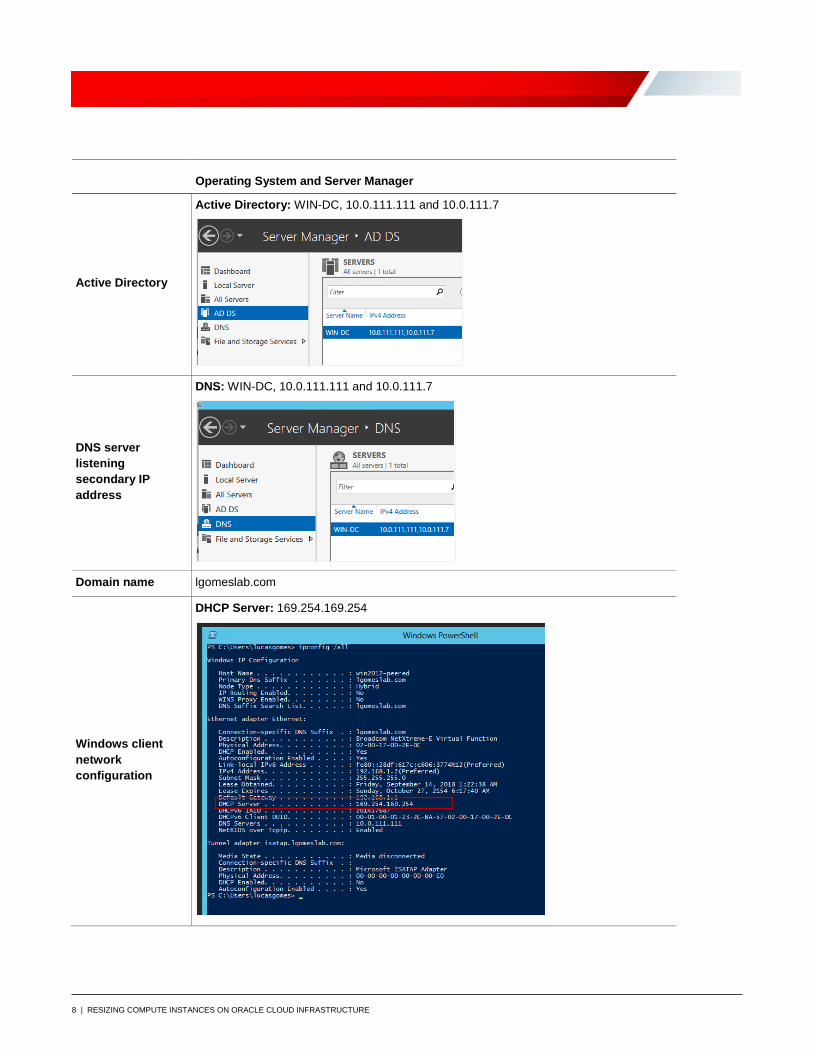
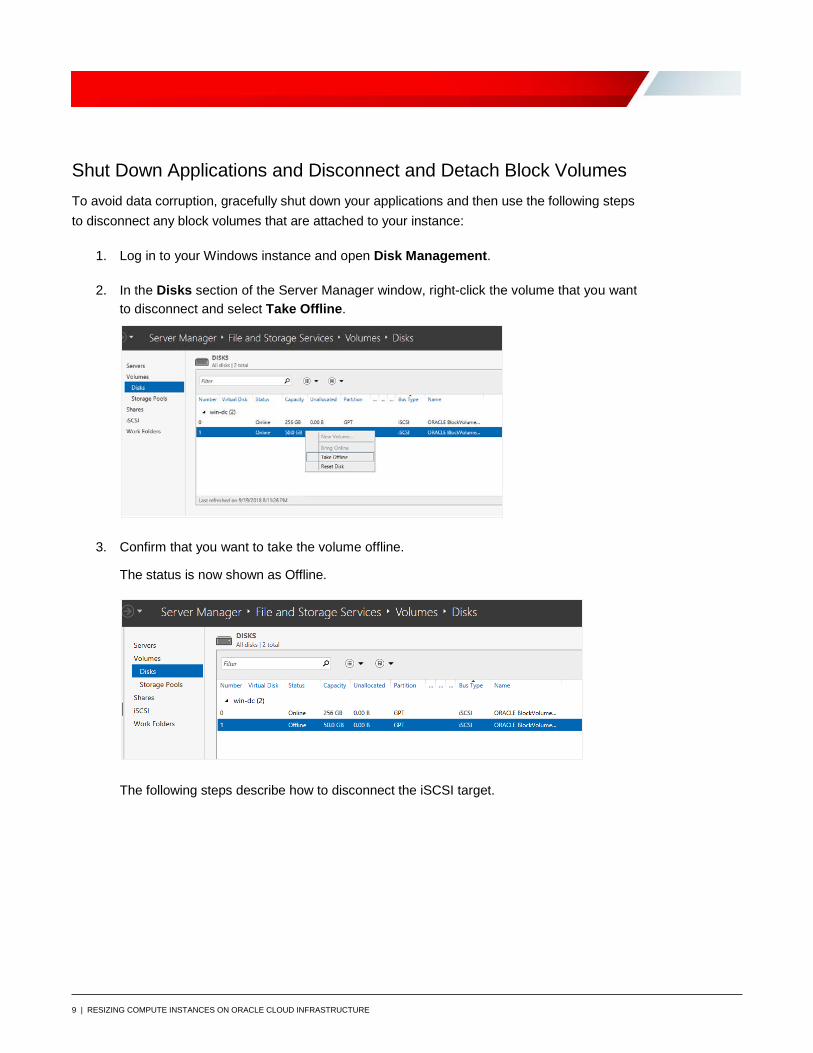
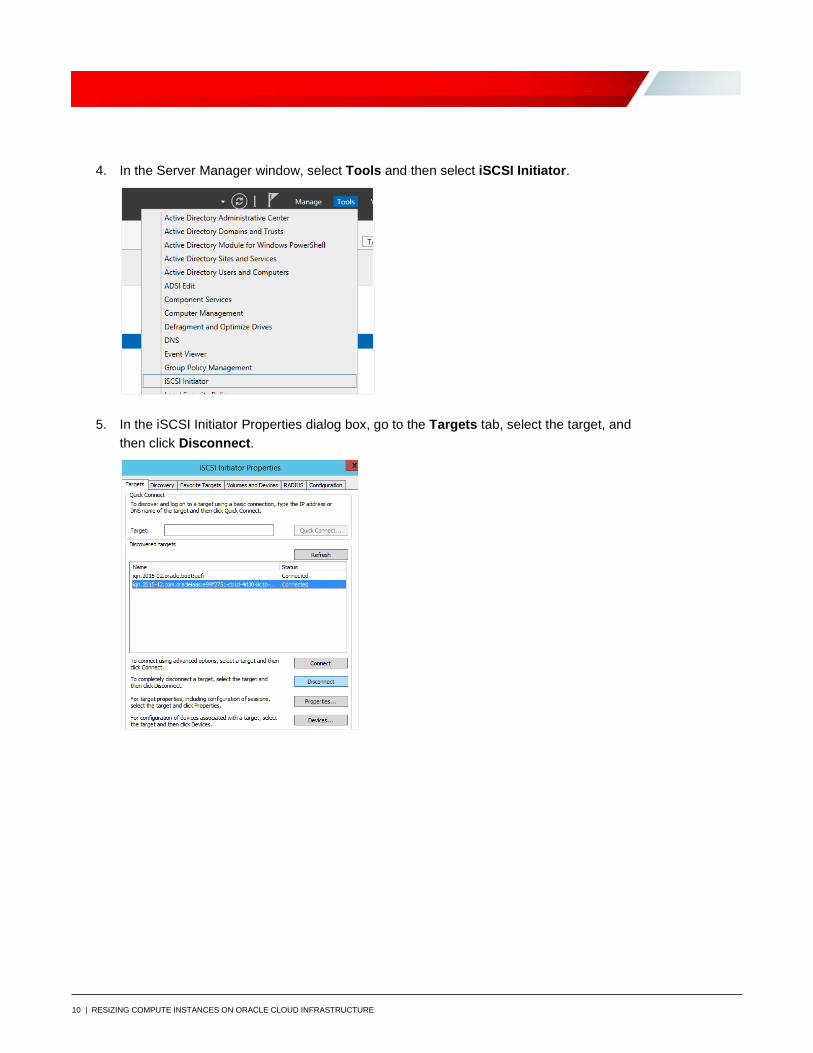
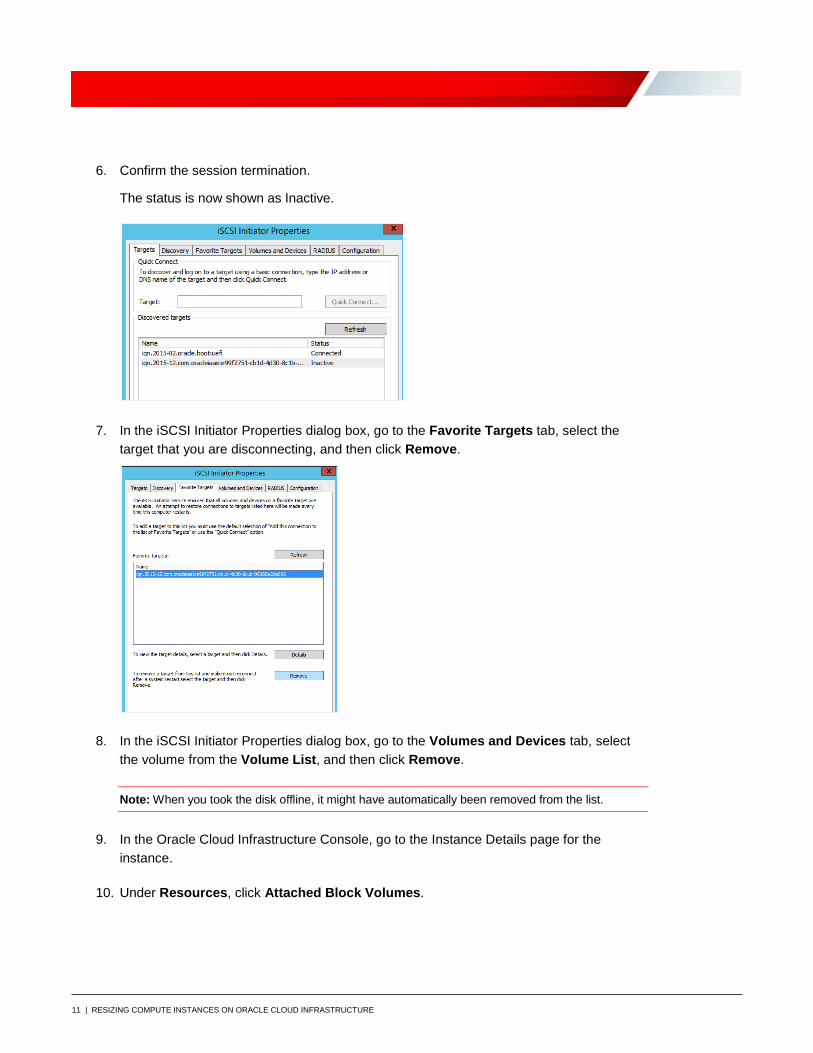
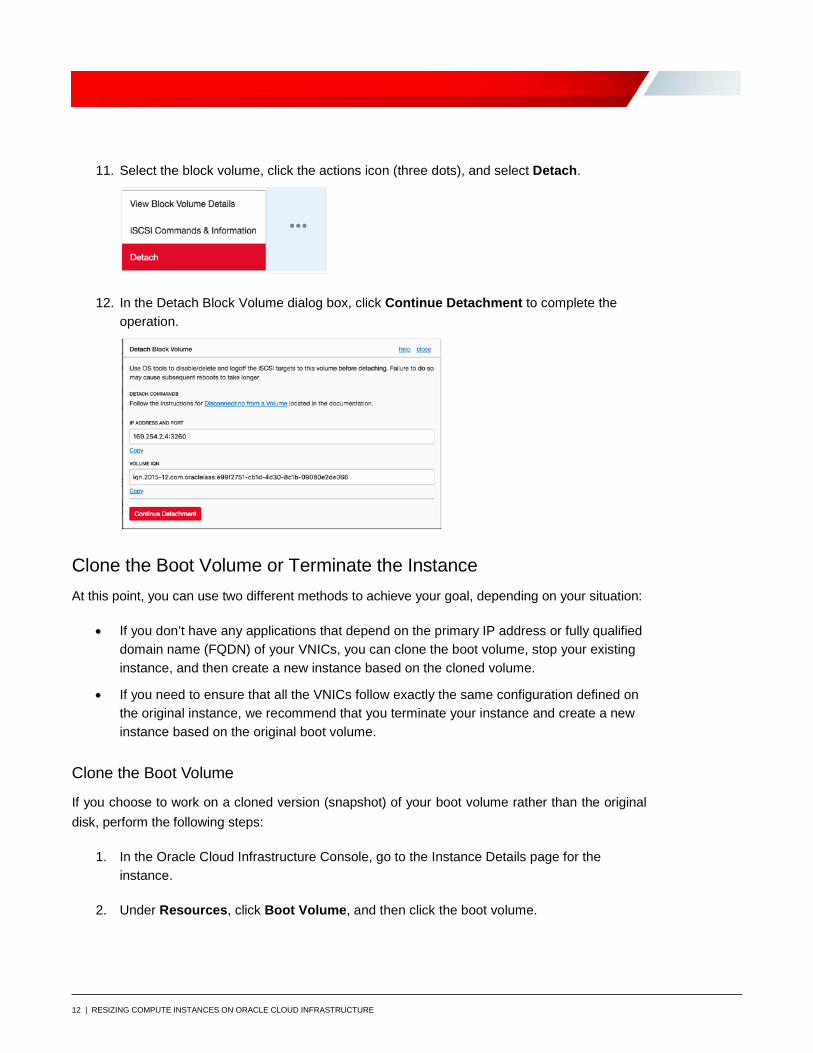
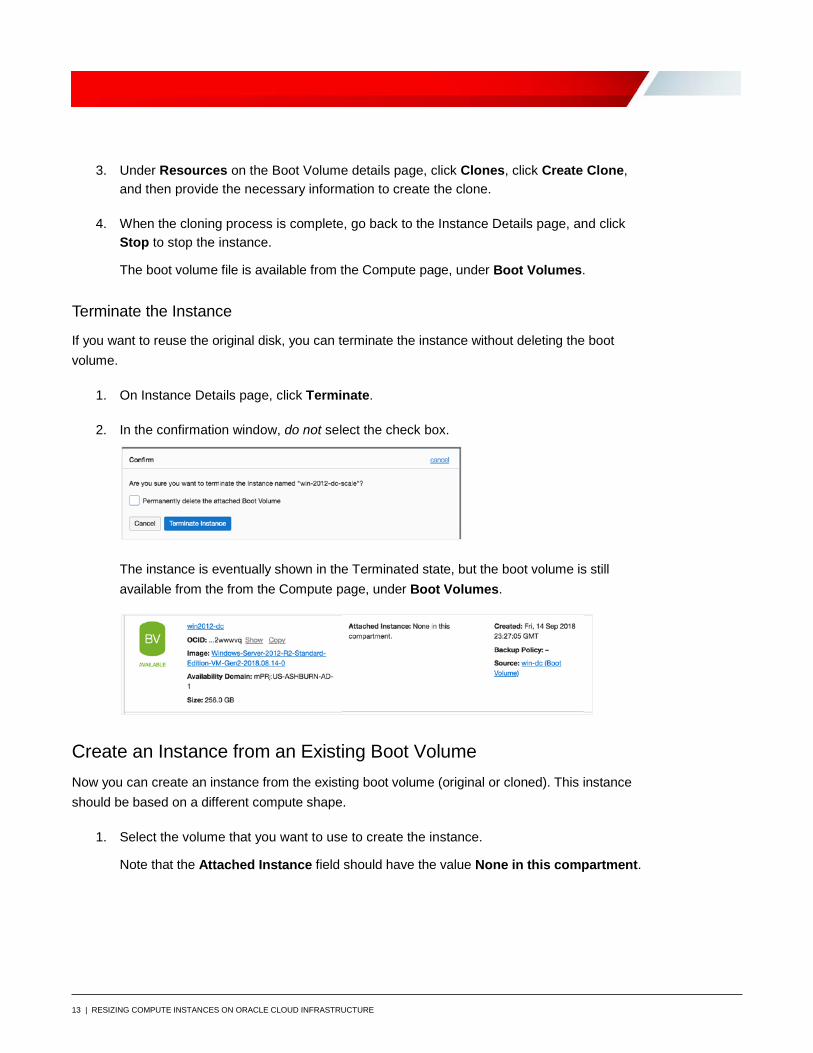
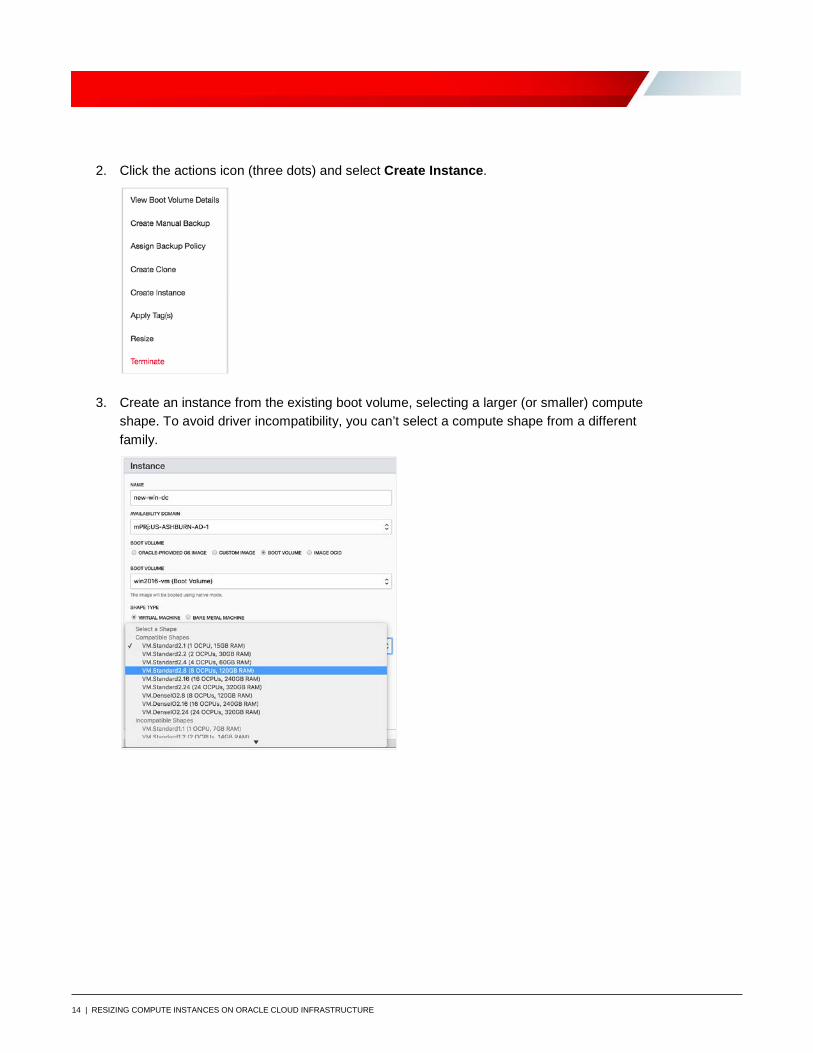
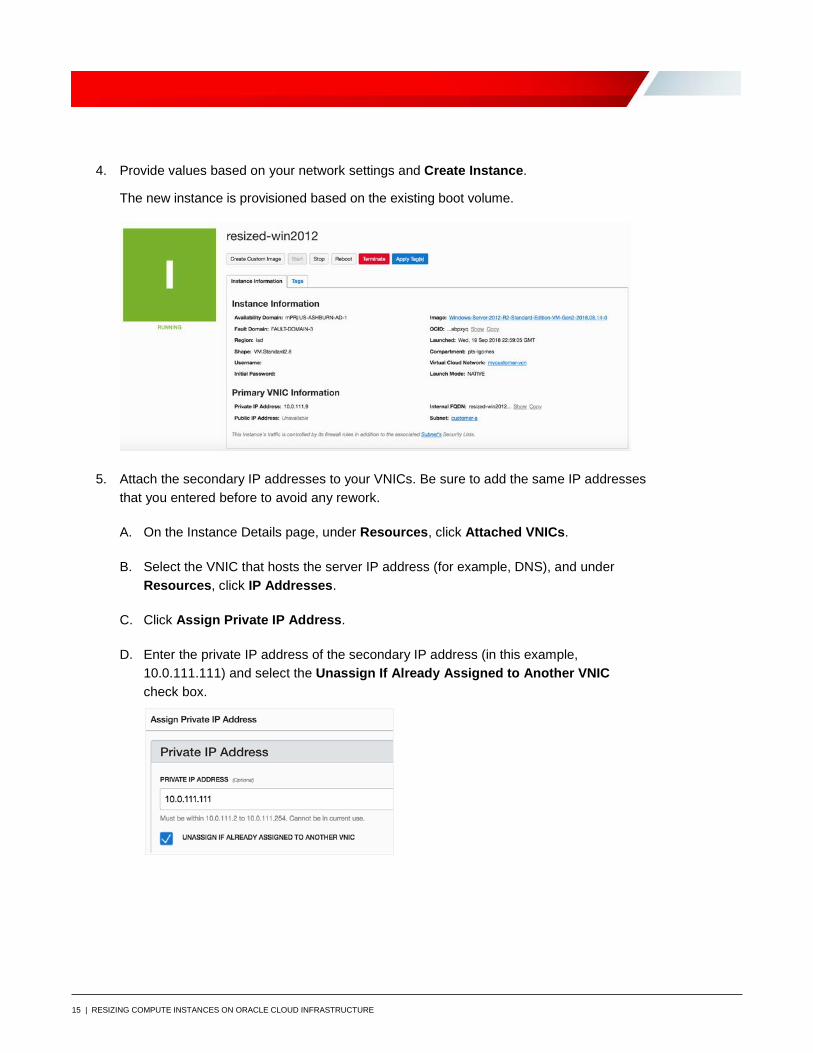
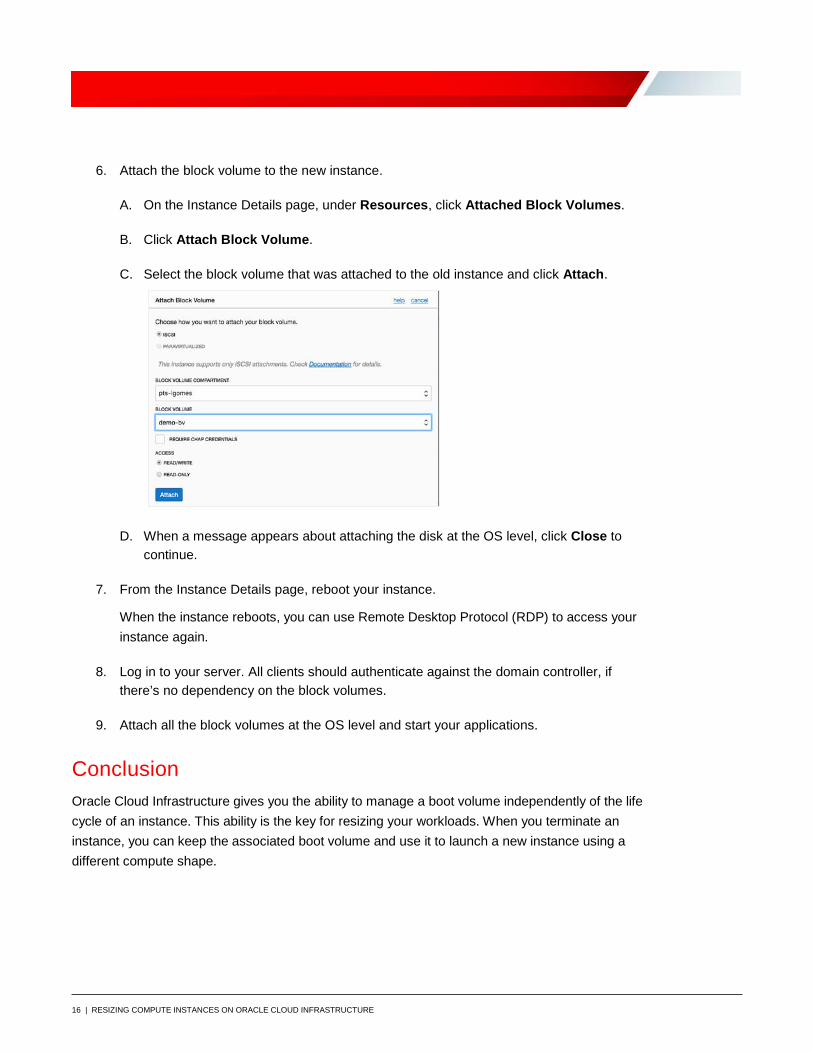