required tools metal forked panel removal tool # 30 torx ... · required tools metal forked panel...
TRANSCRIPT

REQUIRED TOOLS
Metal forked panel removal tool # 30 torx 7MM SOCKET AND RATCHET 10MM SOCKET AND EXTENSION
Black electrical tape Pliers
Remove the 2 #30 torx screws located on the bottom of the
doorpanel. There is one at the front and one at the back.
Remove the door release button on the drivers side and
remove the 10mm bolt behind this switch.
Look for this cover below the door pull and remove it. Re-
move the 10 mm bolt behind this cover.
That’s all that holds the door panel in via bolts. The rest is Push
pins. On the bottom of the doors towards the rear T-30 bolt there
is a small indentation in the door panel. Use the panel removal
tool to pry back the door panel. This takes allot of force and it will
sound like something is snapping or breaking as the pins release.
Work your way around the panel prying the panel off. Once all
the pins are release you can pull the door panel straight up and
off. Disconnect the 2 wire harnesses and set panel aside.
This is the metal
panel removal tool
necessary for panel
removal.
Also remove the door switch on the passenger side.
The 10mm bolt on the top is deeply recessed.
This shows the 2nd bolt location on the passenger
side under the door pull.

Remove the 4 7mm bolts holding the speakers in and pry the
speakers off the door. Disconnect the connector and set aside.
At the bottom of the speaker opening you will see the
large harness you will need to tap into for the wiring. Pry
the retainers out so you can pull the wiring up for access
Using a razor blade carefully open up the harness and find
the red w/blue stripe wire. Place this wire in the metal clip
of the supplied connector and snap connector shut. Find
the gray wire and attach the other connector to it.
Remove the rear rubber plug from the bottom of the door.
Using a sharp tool or razor blade, make a slit just large
enough for the led wire to pass through the plug.
Route the wire into the door and up to the large harness.
Re-install the rubber plug and mount the led strip in the
desired location cleaning the surface with the prep pad.
Strip about 3/8” insulation off the wires, fold in half to dou-
ble the wire thickness. Insert wire into connector and tight-
ly crimp the connector.
Plug the red led wire into the red/blue factory wire and
the black led wire into the gray wire. Leds should now
lite. Make sure the lights haven't timed out.
Wrap harness with black electrical tape and re-install
harness clips into the door. Check to be sure wires are
clear of all moving parts. Re-install the speakers.
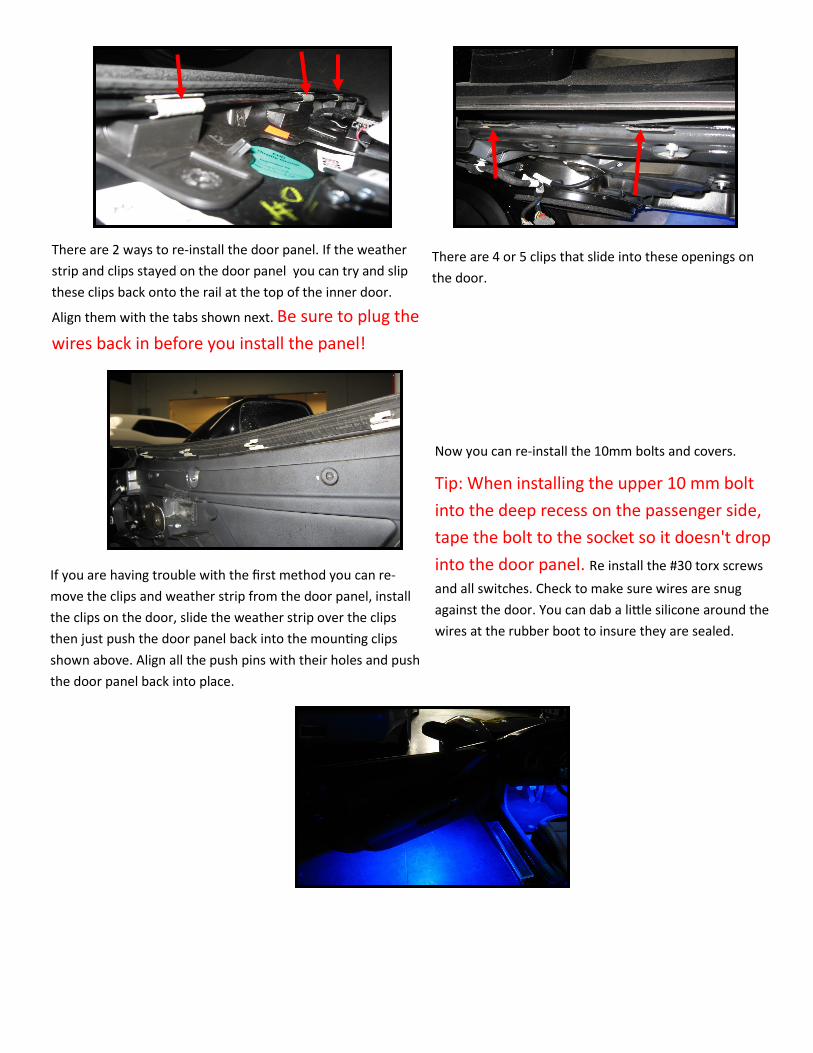
There are 2 ways to re-install the door panel. If the weather
strip and clips stayed on the door panel you can try and slip
these clips back onto the rail at the top of the inner door.
Align them with the tabs shown next. Be sure to plug the
wires back in before you install the panel!
There are 4 or 5 clips that slide into these openings on
the door.
If you are having trouble with the first method you can re-
move the clips and weather strip from the door panel, install
the clips on the door, slide the weather strip over the clips
then just push the door panel back into the mounting clips
shown above. Align all the push pins with their holes and push
the door panel back into place.
Now you can re-install the 10mm bolts and covers.
Tip: When installing the upper 10 mm bolt
into the deep recess on the passenger side,
tape the bolt to the socket so it doesn't drop
into the door panel. Re install the #30 torx screws
and all switches. Check to make sure wires are snug
against the door. You can dab a little silicone around the
wires at the rubber boot to insure they are sealed.