95ci, 93c, 90c, c9i, c7 upright exercise bikes · t ools required for assembly...phillips...
TRANSCRIPT

95Ci, 93C, 90C, C9i, C7Upright Exercise Bikes
Assembly Instructions

Congratulations...
and welcome to the world of
The following Parts Identification Listing and the step by step assemblyprocedures have been assembled to make the set-up of the Exercise Bikes asquick and easy as possible.
Please take special note of the following important points prior to choosing alocation and beginning assembly of the Exercise Bikes.

IMPORTANT SAFETY INSTRUCTIONS! ⇒ DO NOT locate the Exercise Bike outdoors, near swimming pools, or in areas of high humidity. ⇒ DO NOT operate your Exercise Bike if it has been dropped, damaged, or even partially immersed
in water. Contact Life Fitness Customer Support Services at the number in the Operation Manual. ⇒ DO NOT locate the Exercise Bike any closer than 30 inches ( 76 cm ) to a television set. ⇒ DO NOT locate additional Exercise Bike any closer than a minimum of 42 inches (107 cm) from
center to center to avoid interference (cross talk) between Heart Rate monitors. ⇒ DO keep the area around your Exercise Bike clear of any obstructions, including walls and furniture. ⇒ DO verify the contents of the delivery carton against the accompanying Parts Listing prior to setting
the cartons and shipping material aside. If any parts are missing, contact Life Fitness CustomerSupport Services at the number listed in the Operation Manual. Save the shipping cartons in case ofreturn.
⇒ DO read the entire Operation Manual prior to attempting to operate this machine as this is essential
for proper use.
⇒ NE PAS placer le vélo d’exercice allongé Lifecycle à l’extérieur, près d’une piscine ou dans unendroit très humide.
⇒ NE PAS faire fonctionner le vélo d’exercice allongé Lifecycle s’il est tombé, s’il a été endommagé ou
s’il a été partiellement plongé dans l’eau. Téléphoner au service après-vente de Life Fitness dont lenuméro figure sur la couverture arrière du guide d’installation.
⇒ NE PAS placer le vélo d’exercice allongé Lifecycle à moins de 76 cm (30 po) d’un poste de
télévision. ⇒ MAINTENIR la zone autour du vélo d’exercice allongé Lifecycle libre de toute obstruction, y compris
murs et meubles.
⇒ VÉRIFIER si l’emballage contient toutes les pièces de la liste jointe avant de le mettre de côté. Si despièces manquent, téléphoner au service après-vente de Life Fitness dont le numéro figure sur lacouverture arrière du guide d’installation. Conserver l’emballage au cas où l’appareil devrait êtrerenvoyé.
⇒ LIRE le manuel de l’utilisateur tout entier avant d’essayer de faire fonctionner cet appareil. Ceci est
indispensable à son utilisation correcte.

TOOLS REQUIRED FOR ASSEMBLY...Phillips screwdriver, T-45 Torx Driver, T-20 Torx Driver
PARTS DESCRIPTION
1 Torx Button Mounting Bolt Qty: 83/8-16 x 3/4”
2 Phillips Pan Head Screw (Model 95Ci / 93C / C9i ) Qty: 128-18 x 5/8” (Model 90C / C7 ) Qty: 8
3 Accessory Tray Qty: 1 4 Console Assembly Qty: 1
5 Top Polar Cover Qty: 1 6 Bottom Polar Cover Qty: 1
7 Left Seat Post Shroud Qty: 1(Model 95Ci / 93C / 90C)
8 Right Seat Post Shroud Qty: 1(Model 95Ci / 93C / 90C)
9 Left Pedal Strap Qty: 1 10 Right Pedal Strap Qty: 1
11 Handlebar Qty: 1 12 9 Volt Alkaline Battery Qty: 1(Model 90C / C7)
13 Polar Receiver Qty: 1(Model 95Ci / 93C / C9i / C7 / International 90C)
14 Polar Receiver Sleeve Qty: 1(Model 95Ci / 93C / C9i / C7 / International 90C)
15 Torx / Standard Screw Qty: 1#8-18 x 3/4”(Model 95Ci / 93C / 90C)
1” 2” 3” 4” 5”
1 2
15

5
11
6
3
7
8
2
4
15
1
1
12
22

1. Locate the BOTTOM POLAR COVER (#6). Position the coveras shown with the notch of the center hole facing downward.Slide the BOTTOM POLAR COVER down over the UPPERCONSOLE SUPPORT TUBE (A) until it rests against theFRONT TUBE EXTENSION (B).
2. Position the HANDLEBAR (#11) as shown near the UPPERCONSOLE SUPPORT TUBE (A).
3. Models 95Ci and C9i OnlyConnect the 2-PIN HEART RATE CONNECTOR (2P) leadingfrom the HANDLEBAR (#11) center to the 2-PIN HEARTRATE CONNECTOR (2P) leading from the UPPERCONSOLE SUPPORT TUBE (A).
4. Carefully slide the HANDLEBAR MOUNTING FLANGES (C)into the UPPER CONSOLE SUPPORT TUBE (A).NOTE: BE CAREFUL NOT TO PINCH THE HEART RATECABLE WHEN INSERTING THE HANDLEBAR FLANGES(C) INTO THE UPPER CONSOLE SUPPORT TUBE (A).
5. Secure the HANDLEBAR (#11) to the UPPER CONSOLESUPPORT TUBE (A) using four MOUNTING BOLTS (#1).Tighten the SCREWS to 15-20 ft. lbs.
6. Models 95Ci, 93C, C9i, and C7 OnlyInsert the POLAR RECEIVER (#13) into the polar receiverreceptacle located at the center of the UPPER CONSOLESUPPORT TUBE (A). Slide the POLAR RECEIVER SLEEVE(#14) over the POLAR RECEIVER covering the entire POLARRECEIVER.
7. Locate the TOP POLAR COVER (#5). Slide the BOTTOMPOLAR COVER (#6) upward toward the HANDLEBAR (#11)until it contacts the HANDLEBAR. Position the TOP POLARCOVER over the POLAR RECEIVER (#13) and HANDLEBARand align it to the BOTTOM POLAR COVER. Secure the TOPPOLAR COVER to the BOTTOM POLAR COVER using fourPHILLIPS SCREWS (#2) as shown.
8. Models 95Ci, 93C, and C9i OnlyAlign the ACCESSORY TRAY (#3) to the bottom of theDISPLAY CONSOLE (#4) as shown. Secure theACCESSORY TRAY to the DISPLAY CONSOLE using fourPHILLIPS SCREWS (#2).
9. Models 90C and C7 OnlyRemove the BATTERY DOOR located on the back of theDISPLAY CONSOLE (#4). Locate the supplied 9-VOLTBATTERY (#12) and connect it to the battery lead. Place theBATTERY into the DISPLAY CONSOLE and replace theBATTERY DOOR.
10. Position the DISPLAY CONSOLE (#4) above the MOUNTINGBRACKET (D) as shown. Attach all CONNECTORS (E)leading from the DISPLAY CONSOLE MOUNTING BRACKETto the corresponding CONNECTORS located on the back ofthe DISPLAY CONSOLE.
11. Attach the DISPLAY CONSOLE (#4) to the DISPLAYCONSOLE MOUNTING BRACKET (D) using four SCREWS(#2).
NOTE: BE CAREFUL NOT TO PINCH ANY CABLES WHENSECURING THE DISPLAY CONSOLE (#4) TO THEDISPLAY CONSOLE MOUNTING BRACKET (D).Tighten the screws securely.
2
3
4
2
14
6
C
5
13
A
2P
2P
D
E
11
B
11
12
2
7
15
8
F

12. Models 95Ci, 93C, and 90C OnlyLocate the USER LEFT AND RIGHT SEAT POST COVERS(#7 & #8). Position the USER LEFT SEAT POST COVER (#7)below the seat covering the ADJUSTMENT LEVER (F) asshown. Interlock the two tabs of the USER RIGHT SEATPOST COVER (#8) to the corresponding slots of the USERLEFT SEAT POST COVER and pivot it forward to meet theUSER LEFT SEAT POST COVER enclosing the SEATADJUSTMENT LEVER. Secure the SEAT POST COVERStogether using one SCREW (#15).
13. Locate the RIGHT PEDAL STRAP (#10) marked with an “R”.Attach the RIGHT PEDAL STRAP to the RIGHT PEDAL (G)with the double slot on the inward pedal strap tab loopingupward and attaching to the outward pedal strap tab. Repeatfor the LEFT PEDAL STRAP (#9) marked with an “L”.
PRE-OPERATION CHECKLIST
Ensure that the console support screws are tight.
Make sure the Exercise Bike is properly leveled and stable.
Ensure that the Leveler Jam Nuts are tight.
Read the entire Operation Manual before using the Exercise Bike.
Before attempting to operate your Exercise Bike, it is imperative that you familiarize yourself with thecontents of the Operation Manual. If your Exercise Bike does not respond as described in the OPERATIONMANUAL, contact the nearest Life Fitness service center as listed in the Operation Manual.
10
G

©2003 Life Fitness, a division of Brunswick Corporation. All rights reserved. Life Fitness is trademark of Brunswick Corporation.Polar is a registered trademark of Polar Electro, Inc. MO51-00K63-A081 06.03
95Ci Upright Exercise Bikeoperat ion manual

1
LIFE FITNESS ASIA PACIFIC LTDRoom 2610, Miramar Tower132 Nathan RoadTsimshatsui, KowloonHONG KONGTelephone: (+852) 2891.6677FAX: (+852) 2575.6001
LIFE FITNESS ATLANTIC BVLIFE FITNESS BENELUXBijdorpplein 25-312992 LB BarendrechtTHE NETHERLANDSTelephone: (+31) 180.646.666FAX: (+31) 180.646.699Telephone: (+32) 87.300.942FAX: (+32) 87.300.943
LIFE FITNESS DO BRAZILAv. Dr. Dib Sauaia Neto 1478 Alphaville, Barueri, SP06465-140 BRAZILTelephone (+55) 11.4193.8282FAX: (+55) 11.4193.8283
LIFE FITNESS VERTRIEBS GMBH Dückegasse 7-9/3/361220 ViennaAUSTRIATelephone: (+43) 1.61 57 198FAX: (+43) 1.61 57 198.20
LIFE FITNESS IBERIAPol. Ind. Molí dels Frares. c/C, nº 1208620 Sant Vicenç dels Horts (Barcelona)SPAINTelephone: (+34) 93.672.4660FAX: (+34) 93.672.4670
LIFE FITNESS EUROPE GMBHSiemensstrasse 385716 UnterschleissheimGERMANYTelephone: (+49) 89.31 77 51.0FAX: (+49) 89.31 77 51.99
LIFE FITNESS ITALIA S.R.L.Via Vittorio Veneto, 57/A39042 Bressanone (Bolzano)ITALYTelephone: (+39) 0472.835 470FAX: (+39) 0472.833 150
LIFE FITNESS LATIN AMERICAand CARIBBEAN10601 West Belmont AvenueFranklin Park, Illinois 60131U.S.A.Telephone: (+1) 847.288.3300FAX:(+1) 847.288.3886
LIFE FITNESS UK LTDQueen AdelaideEly, Cambs CB7 4UBUNITED KINGDOMTelephone: (+44) 1353.666017FAX: (+44) 1353.666018
LIFE FITNESS JAPANNippon Brunswick Bldg., #8F5-27-7 SendagayaShibuya-Ku, TokyoJAPAN 151-0051Telephone: (+81) 3.3359.4309FAX: (+81) 3.3359.4307
M051-00K63-A06406.03
CORPORATE HEADQUARTERS10601 West Belmont Avenue
Franklin Park, Illinois 60131 • U.S.A.847.288.3300 • FAX: 847.288.3703
800.735.3867 (Toll-free within U.S.A., Canada)
www.lifefitness.com
INTERNATIONAL OFFICES

Before using this product, it is essential to read thisENTIRE operation manual and ALL installation instructions.
This will help in setting up the equipment quickly and in instructing others on how to use it correctly and safely.
Avant toute utilisation de ce produit, il est indispensable de lire ce manuel d'utilisationdans son INTÉGRALITÉ, ainsi que TOUTES les instructions d'installations.
Ce manuel explique comment installer l'équipement et commentl'utiliser correctement et sans danger.
FCC Warning - Possible Radio / Television Interference
NOTE: This equipment has been tested and found to comply with the limits for a Class A digitaldevice, pursuant to part 15 of the FCC rules. These limits are designed to provide reasonableprotection against harmful interference when the equipment is operated in a commercial environ-ment. This equipment generates, uses and can radiate radio frequency energy, and if notinstalled and used in accordance with the operation manual, may cause harmful interference toradio communications. Operation of this equipment in a residential area is likely to cause harmfulinterference in which case the user will be required to correct the interference at his ownexpense.
Class S (Studio): Professional and / or commercial use.
CAUTION: Any changes or modifications to this equipment could void the product warranty.
MISE EN GARDE: Tout changement et toute modification de ce matériel peutannuler la garantie du produit.
Any service, other than cleaning or user maintenance, must be performed by an authorized ser-vice representative. There are no user-serviceable parts.
2

3
TABLE OF CONTENTSSection Description . . . . . . . . . . . . . . . . . . . . . . . . . . . . . . . . . . . . . . . . . . . . . . . . . .Page1. Getting Started . . . . . . . . . . . . . . . . . . . . . . . . . . . . . . . . . . . . . . . . . . . . . . . . . . . . . . . .51.1 Important Safety Instructions . . . . . . . . . . . . . . . . . . . . . . . . . . . . . . . . . . . . . . . . . . . . . .51.2 Setup . . . . . . . . . . . . . . . . . . . . . . . . . . . . . . . . . . . . . . . . . . . . . . . . . . . . . . . . . . . . . . .7
Where to Place the Lifecycle® Exercise Bike // How to Stabilize the Lifecycle Exercise Bike // How to Adjust the Seat // How to Adjust the Pedal Straps // Starting Up the Bike Console // Using the Power Assist Option // Fitness and Entertainment Networking
2. The Display Console . . . . . . . . . . . . . . . . . . . . . . . . . . . . . . . . . . . . . . . . . . . . . . . . . . .102.1 The Display Console Overview . . . . . . . . . . . . . . . . . . . . . . . . . . . . . . . . . . . . . . . . . . . .102.2 Display Console Descriptions . . . . . . . . . . . . . . . . . . . . . . . . . . . . . . . . . . . . . . . . . . . . .112.3 The Accessory Tray . . . . . . . . . . . . . . . . . . . . . . . . . . . . . . . . . . . . . . . . . . . . . . . . . . . .143. Heart Rate Zone Training Exercise . . . . . . . . . . . . . . . . . . . . . . . . . . . . . . . . . . . . . . . . .153.1 Why Heart Rate Zone Training Exercise? . . . . . . . . . . . . . . . . . . . . . . . . . . . . . . . . . . . .153.2 Heart Rate Monitoring . . . . . . . . . . . . . . . . . . . . . . . . . . . . . . . . . . . . . . . . . . . . . . . . . .16
The LifepulseTM Digital Heart Rate Monitoring System // The Polar® Telemetry Heart Rate Monitoring Chest Strap
4. The Workouts . . . . . . . . . . . . . . . . . . . . . . . . . . . . . . . . . . . . . . . . . . . . . . . . . . . . . . . .184.1 Workout Overviews . . . . . . . . . . . . . . . . . . . . . . . . . . . . . . . . . . . . . . . . . . . . . . . . . . . .184.2 Using the Workouts . . . . . . . . . . . . . . . . . . . . . . . . . . . . . . . . . . . . . . . . . . . . . . . . . . . .19
To Begin Any Workout // Selecting Quick Start // Selecting a Workout // Lifecycle Exercise Bike Workout Setup Steps (chart) // Entering Age // Entering Time // Selecting and Adjusting the Intensity Level // Selecting a Goal Type // Selecting a Workout Mode // Switching Workouts “On-the-Fly” // Pausing Workouts // Ending Workouts Early
4.3 Workout Descriptions . . . . . . . . . . . . . . . . . . . . . . . . . . . . . . . . . . . . . . . . . . . . . . . . . . .24Quick Start // Fat Burn // Cardio // Hill // Random // Manual // Heart Rate HillTM Workout // Heart Rate IntervalTM Workout // Extreme Heart RateTM Workout // Watts // METs // . .Aerobics Trainer // Personal Trainer Workout // Six Pre-Set Workouts // Fit Test // Military Fitness Test (when enabled)
5. Optional Settings . . . . . . . . . . . . . . . . . . . . . . . . . . . . . . . . . . . . . . . . . . . . . . . . . . . . . .345.1 Entering and Using The Optional Settings Feature . . . . . . . . . . . . . . . . . . . . . . . . . . . . .345.2 About Personal Trainer Workouts . . . . . . . . . . . . . . . . . . . . . . . . . . . . . . . . . . . . . . . . . .35
To Create a Personal Trainer Workout6. Service and Technical Data . . . . . . . . . . . . . . . . . . . . . . . . . . . . . . . . . . . . . . . . . . . . . .366.1 Preventative Maintenance Tips . . . . . . . . . . . . . . . . . . . . . . . . . . . . . . . . . . . . . . . . . . . .366.2 Preventative Maintenance Schedule . . . . . . . . . . . . . . . . . . . . . . . . . . . . . . . . . . . . . . . .376.3 Troubleshooting the Polar Heart Rate Chest Strap . . . . . . . . . . . . . . . . . . . . . . . . . . . . .37
Heart Rate Reading is Erratic or Absent Entirely // Heart Rate Reading is Erratic or Extremely High
6.4 Troubleshooting the Lifepulse System Sensors . . . . . . . . . . . . . . . . . . . . . . . . . . . . . . . .376.5 Recycling the Battery . . . . . . . . . . . . . . . . . . . . . . . . . . . . . . . . . . . . . . . . . . . . . . . . . . .386.6 How to Obtain Product Service . . . . . . . . . . . . . . . . . . . . . . . . . . . . . . . . . . . . . . . . . . . .387. Specifications . . . . . . . . . . . . . . . . . . . . . . . . . . . . . . . . . . . . . . . . . . . . . . . . . . . . . . . . .397.1 95Ci Lifecycle Exercise Bike Specifications . . . . . . . . . . . . . . . . . . . . . . . . . . . . . . . . . .39© 2003 Life Fitness®, a division of Brunswick Corporation. All rights reserved. Life Fitness, Life Cycle, and Zone Trainingare registered trademarks of Brunswick Corporation. Zone Training+, Heart Rate Hill, Heart Rate Interval, Extreme HeartRate, and Lifepulse are trademarks of Brunswick Corporation. Polar is a registered trademark of Polar Electro, Inc.Cardio Theater is a registered trademark of the Cardio Theater Holdings. FitLinxx is a registered trademark of theIntegrated Fitness Corp. Any use of these trademarks, without the express written consent of Life Fitness or the corre-sponding companies is forbidden.

This Operation Manual describes the functions of the following products:
Life Fitness Lifecycle® exercise bike:
95CiSee Section 7, titled Specifications, in this manual
for product-specific features.
Statement of Purpose: The Life Fitness Lifecycle exercise bike is a machine that simulates themovements of riding a bicycle at various speeds and levels of resistance.
Health-related injuries may result from incorrect or excessive use of exercise equip-ment. Life Fitness STRONGLY recommends seeing a physician for a complete medicalexam before undertaking an exercise program, particularly if the user has a family histo-ry of high blood pressure or heart disease; or is over the age of 45; or smokes, has highcholesterol, is obese, or has not exercised regularly in the past year. Life Fitness alsorecommends consulting a fitness professional on the correct use of this product.
If, at any time while exercising, the user experiences faintness, dizziness, pain, or short-ness of breath, he or she must stop immediately.
Des problèmes de santé peuvent être causés par une utilisation incorrecte ou excessivede l'équipement. Life Fitness conseille VIVEMENT de consulter un médecin pour subirun examen médical complet avant de commencer tout programme d'exercice, et toutparticulièrement si l'utilisateur a des antécédents familiaux d'hypertension ou de trou-bles cardiaques, ou s'il a plus de 45 ans, s'il fume, s'il a du cholestérol, s'il est obèse oun'a pas fait d'exercice régulièrement depuis un an. Life Fitness recommande égalementde consulter un professionnel du conditionnement physique pour savoir comment utilis-er correctement ce produit.
Si, pendant l'utilisation de l'appareil, l'utilisateur ressent un malaise, des vertiges, desdouleurs ou des difficultés à respirer, il doit s'arrêter immédiatement.
4

5
1 GETTING STARTED
1.1 IMPORTANT SAFETY INSTRUCTIONS
SAFETY WARNING: The safety of the product can be maintained only if it is examined regularly for damage and wear. See Preventative Maintenance section for details.
• Use the Life Fitness Lifecycle exercise bike only as directed in this manual.• If a Lifecycle exercise bike does not function properly after it has been dropped, damaged,
or even partially immersed in water, contact Life Fitness Customer Support Services forassistance.
• Do not allow other people to interfere in any way with the user or equipment during a workout.
• Always follow the console instructions for proper operation.• Supervise closely any children or disabled persons using the Lifecycle exercise bike. • Do not use the Lifecycle exercise bike outdoors, near swimming pools, or in areas of high
humidity.• Never insert objects into any opening of the Lifecycle exercise bike. If an object should drop
inside, carefully retrieve it while the unit is not in use. If the object cannot be reached, con-tact Life Fitness Customer Support Services.
• Never place containers filled with liquids directly on the unit, except in the accessory traywater bottle holder. Containers should be covered with lids.
• Wear shoes with rubber or high-traction soles. Do not use shoes with heels, leather soles,cleats, or spikes. Make sure no stones are embedded in the soles.
• Do not use the Lifecycle exercise bike with bare feet.• Keep all loose clothing, shoelaces, and towels away from moving parts.• Do not reach into, or underneath, the unit; and do not tip the unit on its side during
operation.• Keep the area around the Lifecycle exercise bike clear of any obstructions, including walls
and furniture. Provide at least three feet of clearance behind the unit. • Use caution when stepping on or off of the Lifecycle exercise bike.• Never face backward while using the Lifecycle exercise bike.
SAVE THESE INSTRUCTIONS FOR FUTURE REFERENCE.

1 POINT DE DÉPART
1.1 CONSIGNES DE SÉCURITÉ IMPORTANTES
CONSIGNE DE SÉCURITÉ : pour un emploi sûr, le produit doit être inspectérégulièrement afin de s'assurer qu'il n'est pas usé ni endommagé. Consultez lasection de Maintenance préventive pour obtenir de plus amples informations.
• Si un vélo d'exercice Life Cycle ne fonctionne pas correctement après avoir subi une chute,des dommages ou une immersion même partielle dans l'eau, contactez le service d'assis-tance clientèle de Life Fitness.
• Pour un fonctionnement correct, suivez toujours les instructions de la console.• Une surveillance étroite est nécessaire en cas d'utilisation par des enfants, des personnes
invalides ou handicapées.• N'utilisez pas ce produit à l'extérieur, près d'une piscine ou dans endroits très humides.• Ne faites jamais fonctionner de produit Life Fitness dont les bouches d'aération seraient blo-
quées. Maintenez-les exemptes de peluches, de cheveux ou de toute obstruction.• N'insérez jamais d'objet dans les ouvertures de cet appareil. Si un objet tombe dedans,
coupez l'alimentation électrique, débranchez le cordon de la prise et récupérez-le avec pré-caution. Si vous ne pouvez pas l'atteindre, consultez le service après-vente de Life Fitness.
• Ne placez jamais de liquides d'aucune sorte directement sur l'appareil, sauf si vous disposezd'un support ou d'un plateau pour accessoires. Il est recommandé d'utiliser des conteneursmunis d'un couvercle.
• Portez des chaussures avec semelles en caoutchouc ou antidérapantes. N'utilisez pas dechaussures à talons, de semelles en cuir ou à crampons. Assurez-vous qu'aucun caillou nes'est incrusté dans les semelles.
• Maintenez les vêtements lâches, les lacets et les serviettes à l'écart des pièces en mouvement.• N'utilisez pas cet appareil sans chaussures.• Ne faites pas basculer l'appareil sur le côté tandis qu'il fonctionne.• Maintenez la zone autour du produit Life Fitness exempte d'obstructions, y compris de murs
et de meubles. Veillez à laisser au moins 30 cm d'espace autour du Lifecycle exercise bike.• Procédez avec précaution lors du montage ou du démontage de la machine. Utilisez la barre
fixe pour renforcer votre stabilité. Pendant les exercices, saisissez les bras mobiles.• N'utilisez jamais cet appareil en vous tournant vers l'arrière.
CONSERVEZ CES INSTRUCTIONS POUR USAGE ULTÉRIEUR.
6

7
1.2 SETUP
Read the entire Operation Manual before setting up the Lifecycle exercise bike.
WHERE TO PLACE THE LIFECYCLE® EXERCISE BIKE
Following all safety instructions in Section 1.1, move the bike to the location in which it will beused. See Section 7, titled Specifications, for the dimensions of the footprint. Allow a distance of8 to 12 inches, or 21 to 30 centimeters, between the bike and other objects or surfaces on eitherside. Allow a distance of 3 feet, or 1 meter, from the front or rear of the bike to any other objector surface.
HOW TO STABILIZE THE LIFECYCLE EXERCISE BIKE
After placing the bike in position, check the unit’s stability by attempting to rock it from side to side.Any slight rocking indicates that the unit must be leveled. Determine which foot is not resting com-pletely on the floor. Loosen the jam nut with an open-end 9/16-inch wrench, and rotate the stabilizingfoot to lower it. Verify that the bike is stable, and repeat the adjustment as necessary until the unit nolonger rocks. Lock the adjustment by tightening the jam nut against the stabilizer bar.
HOW TO ADJUST THE SEAT
It is important to adjust the seat to an optimal height for pedaling on the Lifecycle exercise bike.Pedaling with the seat too low can place excessive strain on the knees and quadriceps muscles.Pedaling with the seat too high can irritate the feet, ankles, hips, and knees. To determinewhether or not the seat requires adjustment, sit on it and place the balls of the feet on the ped-als. The knee should bend slightly when the pedal is at the lowest point of its rotation. It shouldbe possible to pedal without locking the knees or shifting in the seat.
The bike features a vertical ratchet seat adjustment system, which makes it easy and safe tochange the height of the seat quickly. To raise the seat, either lift the body so that there is noweight on the seat, or get off the bike. Then, simply pull the seat upward to the desired height,and let it lock into place. Test and re-adjust the seat height as necessary.
To lower the seat, first get off the bike. Holding the seat, pull up the adjustment lever in front ofthe seat post to unlock the post, let the seat slide down to the desired height, and release thelever to lock the post into place. Test and re-adjust the seat height as necessary.
CAUTION: When using the height adjustment mechanism to change the height ofa partially raised seat, hold the seat to prevent it from falling on the hand.
MISE EN GARDE - Lorsque vous utilisez le mécanisme de réglage de la hauteurpour monter une selle déjà partiellement surélevée, maintenez cette dernière afinqu'elle ne vous tombe pas sur la main.

The bike’s seat post can be adjusted in half-inch increments within a 13-inch range. A total of 26height settings are possible.
HOW TO ADJUST THE PEDAL STRAPS
The bike pedal straps keep the user’s shoes on the pedals during a workout. The straps should fitcomfortably, but they also should be tight enough to prevent shoes from slipping at any point in thepedaling rotation. Before working out, a user should test and adjust the tightness of the straps.
The safety straps on the foot pedals of the Lifecycle exercise bike can be adjusted to fit a varietyof shoe sizes. The straps are held in place by two knobs that extend from either side of eachpedal. The “inner” knob extends sideways, that is, toward the bike. The “outer” knob extendsdownward. The ends of each strap are perforated with slots that fit tightly over the knobs. The“inner” end of each strap is perforated with two slots, and the “outer” segment of the strap is per-forated with a row of slots.
To tighten or loosen a strap, grasp the outer end, and pull it back, away from the knob, until thestrap slides off. Pull the strap out through the outer loop on the pedal. Rest the foot on the pedal,and wrap the strap over the foot to determine the desired length. Thread the strap through theouter loop on the pedal, tuck it under the pedal, select the appropriate slot, and pull that slotdown over the knob, until the top of the knob pops through the slot. A click indicates that thestrap is locked into place.
8

9
STARTING UP THE BIKE CONSOLE
When a user begins pedaling on the Lifecycle exercise bike, the unit’s Auto-Start feature powers up the console, causing the console display to light up and the MESSAGE CENTER toflash a prompt: “SELECT WORKOUT OR PRESS QUICK START.” If the user does not make aselection in 20 seconds, the console automatically starts a MANUAL workout. For information onsetting up a workout, see Section 4.2, titled Using the Workouts. If the user stops pedaling for morethan 15 seconds, the console shuts down.
Alternately, the user may begin pedaling at a predetermined rate and press the START key topower up the console.
USING THE POWER ASSIST OPTION
The Lifecycle exercise bike’s optional Power Assist feature makes it possible for the console tobe powered by an external electrical source, eliminating the need to pedal at a minimum speedto supply constant power to the console. With this option, users who wish to ride the bike forrehabilitative exercise may pedal at a rate below the minimum without losing console power.
Enabling the Power Assist option requires a an optional kit. To order the kit, contact Life FitnessCustomer Service. See section 6.5, titled How to Obtain Product Service, for more information.
The connector plugs into the bike at the front of the frame, near the base.
FITNESS AND ENTERTAINMENT NETWORKING
Two interchangeable network ports allow the Lifecycle exercise bike to be connected to a fitnessentertainment system and/or a network, such as FitLinxx® interactive fitness network.
• Fitness network: The network connection enables the console to upload user workoutstatistics to a fitness network database or to download remotely stored information, sucha pre-set workout program. See Section 4.2, titled Using the Workouts, for informationon logging onto a network.
• Entertainment: The network connection enables the console to power a third-partyreceiver for use with a service such as the Cardio Theater® entertainment system or theBroadcastVisionTM entertainment system.
These ports are located on the back of the bike console and are enclosed by a removable cover.Any use of the ports for other than their intended purpose could void the product warranty.

2 THE DISPLAY CONSOLE
2.1 DISPLAY CONSOLE OVERVIEW
The computerized display console on the Lifecycle exercise bike allows the user to tailor a work-out to personal fitness abilities and goals and to monitor progress. With this easy-to-use console, the user can track fitness improvement from one workout to the next.
10

11
2.2 DISPLAY CONSOLE DESCRIPTIONS
This section lists and describes the functions for the keys and display windows on the Lifecycleexercise bike console. See Section 4, titled The Workouts, for detailed information on using theconsole to set up workouts.
A START: Press this key to activate the console for programming a new workout. The activatedconsole lights up and displays SELECT WORKOUT OR PRESS QUICK START. If no key ispressed for 15 seconds, the console shuts down again.
NOTE: The bike’s AutoStart feature also activates the console when the user steps on the pedals. See the topic titled Starting Up the Bike Console, which appears in Section 1.
B ENTER: Press this key after entering each value, such as weight or workout time, whenprompted by console display messages.
C NUMERIC keypad: Use these keys to enter values, such as length of workout, weight, age,target heart rate, and intensity level. While a workout is in progress, numeric keys can beused to set new intensity levels or change the target heart rate in a FAT BURN, CARDIO,HEART RATE HILL, HEART RATE INTERVAL, and EXTREME HEART RATE workout. TheARROW keys have a similar function, except that they change workout parameters by singleincrements.
D ARROW keys: A pair of UP and DOWN arrows is located on either side of the TIME/LEVELWINDOW. Use either set of arrows, when setting up a workout, to change workout parame-ters displayed on the console, such as length of workout, weight, age, target heart rate, andintensity level. During a workout, pressing the arrows on the LEVEL side of display changesintensity levels. Pressing the arrows on the TIME side lengthens or decreases the workoutduration.
E QUICK START: Press this key to begin a manual workout immediately, without having toselect a workout program. Once the workout is in progress, use the ARROW keys or theNUMERIC keypad to change the intensity level or workout duration as desired.
F CLEAR: Press this key, when programming a workout, to clear incorrect data, such asweight or age, before pressing the ENTER key. Pressing CLEAR during a workout stops itimmediately, at which point, the MESSAGE CENTER displays a summary of the workout,including total time elapsed, total distance traveled, and total calories burned. PressingCLEAR a second time causes the MESSAGE CENTER to prompt the user for a new workout setup.
G FAT BURN: Press this key to select the FAT BURN program, which is a low-intensity work-out for burning fat.
H CARDIO: Press this key to select the CARDIO program, which is a higher intensity workoutfor more fit users, emphasizing cardiovascular benefits and maximum fat burning.
I RANDOM: Press this key to select the RANDOM program, which is a workout of constantlychanging intensity levels that occur in no regular pattern or progression.
J MANUAL: Press this key to select the MANUAL program, in which the intensity levelremains the same unless it is manually changed.

K ZONE TRAINING+: Press this key to select one of the workouts that target specific ranges,or zones, for maintaining a heart rate to achieve maximum exercise results. The followingoptions may be accessed with this key:
• HEART RATE HILL • TIME IN ZONE GOAL• HEART RATE INTERVAL • FAT BURN (also accessible with FAT BURN key)
• EXTREME HEART RATE • CARDIO (also accessible with CARDIO key)
L PERSONAL TRAINER: Press this key for additional workout options, including customizedworkouts designed by a fitness club trainer or staff member. See Section 5, titled OptionalSettings for information on designing PERSONAL TRAINER custom workouts. The followingworkouts and goals may be accessed with this key:
• METS (when enabled) • PERSONAL TRAINER WORKOUTS• WATTS (when enabled) • CALORIE GOAL• AEROBICS TRAINER • DISTANCE GOAL• FIT TEST • AIR FORCE PRT (when enabled)
M HILL PLUS: Press this key to select HILL PLUS workouts, in which intensity levels increaseand decrease in set patterns. The following workouts may be accessed with this key:
• HILL • CASCADES• AROUND THE WORLD • SPEED TRAINING• KILIMANJARO • FOOT HILLS• INTERVAL
N COOL DOWN: Workout programs end automatically in a Cool Down mode, which lowers theintensity level. In this phase of a workout the body begins to remove lactic acid and otheraccumulated by-products of exercise, which build up in muscles during a workout and con-tribute to muscle soreness. Press the COOL DOWN key at any desired point during a work-out to go immediately into Cool Down mode. The console automatically adjusts each work-out’s Cool Down level according to the individual user’s performance.
O WORKOUT PROFILE window: This window displays shapes, made of columns of lights, thatrepresent the levels of intensity in a workout-in-progress. The height of the column furthestto the left is proportional to the current level of the intensity.
During a FAT BURN, CARDIO, HEART RATE HILL, HEART RATE INTERVAL, orEXTREME HEART RATE workout, which requires the use of a Polar heart rate chest strap orthe Lifepulse system sensors, the WORKOUT PROFILE window displays a flashing heart shapeto request the user’s heart rate signal. If the console does not detect a signal, the MESSAGECENTER displays the prompt, “NEED HEART RATE - PLACE HANDS ON SENSORS OR USETELEMETRY STRAP”. If the console does not receive the signal within three minutes, the work-out automatically is converted to a MANUAL program.
12

13
P MESSAGE CENTER: This window displays step-by-step instructions for setting up a work-out. During a workout, it displays statistics about the progress of the workout:
• Heart Rate: the detected heart rate if the user is wearing the Polar heart rate chest strapor grasping the Lifepulse system sensors.
• Distance: the total distance traveled.
• RPM (Revolutions Per Minute): the pedaling speed or rate.
• Calories: the number of calories burned since beginning the workout.
If programmed to do so, the MESSAGE CENTER displays other values each time the intensitylevel changes during the workout:
• Calories per Hour: the rate of calories burned per hour.
OR
• Watts: effort level in Watts. The Watt is a unit of power output or the expression of themechanical rate of work.
• METs: effort level in METs. The MET is an expression of the rate of work for the humanbody at rest, or a metabolic equivalent; one MET is approximately equal to the metabo-lism of a person at rest.
See Section 5, titled Optional Settings for information about enabling the MESSAGE CENTER todisplay these additional settings.
Q LEVEL/TIME WINDOW: This window displays the programmed intensity level and the timeelapsed since the start of the program.
R BIKE MODE: Press this key to activate the Bike workout mode in which the rate of caloriesburned and the total distance travelled increase automatically as the user increases the pedaling speed.
S CONSTANT CAL./HOUR: Press this key to activate this alternate workout mode, whichenables a user to maintain a consistent rate of calories burned per hour.
For more information about Bike Mode and Constant Calories Per Hour Mode, see the topicSelecting a Workout Mode in Section 4.2, titled, the Using the Workouts.

2.3 THE ACCESSORY TRAY
The accessory tray (A), which is mounted near the base of the console, provides dual storage trayswith space for items such as water bottles, personal stereos, and cell phones. Additionally, an integrated reading rack for supporting a book or magazine (B) is located at the base of the uppperpanel of the console.
14

15
3 HEART RATE ZONE TRAINING EXERCISE
3.1 WHY HEART RATE ZONE TRAINING EXERCISE?Research shows that maintaining a specific heart rate while exercising is the optimal way tomonitor the intensity of a workout and to achieve maximum results. That is the idea behind theLife Fitness heart rate zone training approach to exercise.
Zone Training identifies an exerciser's ideal heart rate range, or zone, for burning fat or increasing cardiovascular fitness. The values within the zone depend on the workout.
NOTE: Consulting a fitness trainer is recommended for defining specific fitness goals anddesigning a workout program.
The Lifecycle exercise bike features five exclusive workouts designed to take full advantage ofthe benefits of heart rate zone training exercise: FAT BURN, CARDIO, HEART RATE HILL,HEART RATE INTERVAL, and EXTREME HEART RATE. The Time in Zone Goal option, anotherfeature of heart rate zone training, enhances these workouts by setting a certain duration within thetarget zone as a workout goal. For detailed information about the workouts, as well as the Time InZone Goal option, see Section 4, titled The Workouts.
During one of these workouts, grasp the Lifepulse system sensors, or wear the Polar heart ratechest strap to enable the bike’s on-board computer to monitor the heart rate. The computer automat-ically adjusts the resistance level to maintain the target heart rate based on the actual heart rate. Tochange the target heart rate during a workout, switch between these programs, or simply enter a newtarget heart rate, using the NUMERIC keypad.
16
3.2 HEART RATE MONITORING
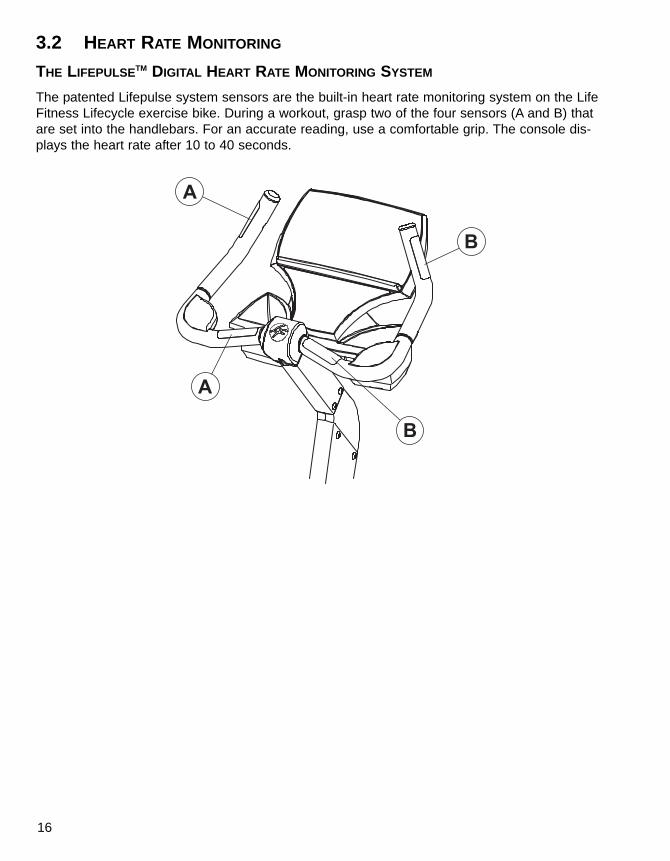
THE LIFEPULSETM DIGITAL HEART RATE MONITORING SYSTEM
The patented Lifepulse system sensors are the built-in heart rate monitoring system on the LifeFitness Lifecycle exercise bike. During a workout, grasp two of the four sensors (A and B) thatare set into the handlebars. For an accurate reading, use a comfortable grip. The console dis-plays the heart rate after 10 to 40 seconds.
A
A
B
B

17
THE POLAR® TELEMETRY HEART RATE MONITORING CHEST STRAP
The Lifecycle exercise bike is equipped with Polar telemetry, a heart rate monitoring system in whichelectrodes, pressed against the skin, transfer heart rate signals to the bike console. These elec-trodes are attached to a chest strap that the user wears during the workout. The chest strap isoptional. To order it, call Life Fitness Customer Support Services. See Section 6.5, titled How toObtain Product Service.
See the diagram below for correct positioning of the strap. The electrodes (A), which are the twogrooved surfaces on the underside of the strap, must remain wet to transmit accurately the elec-trical impulses of the heart back to the receiver. Moisten the electrodes. Then, secure the strapas high under the chest muscles as possible. The strap should be snug, but comfortable enoughto allow for normal breathing.
The transmitter strap delivers an optimal heart rate reading when the electrodes are in directcontact with skin. However, it also functions properly through a thin layer of wet clothing.
If it becomes necessary to re-moisten the chest strap electrodes, grasp the center of the strap,pull it away from the chest to expose the two electrodes, and moisten them.
A A

18
4 THE WORKOUTS
4.1 WORKOUT OVERVIEWS
This section lists the Lifecycle exercise bike’s pre-programmed workouts. For more detailed informa-tion, see Section 4.2, titled Using the Workouts.
QUICK START is the fastest way to begin exercising, and it bypasses the steps involved in selectinga specific workout program. After the QUICK START key is pressed, a constant-level workout begins.The intensity level does not change automatically.
RANDOM is an interval training workout of constantly changing intensity levels that occur in no regu-lar pattern or progression.
MANUAL is a workout in which the intensity level does not change automatically.
FAT BURN is a low-intensity workout for burning the body’s fat reserves. The user must wear a Polar heart rate chest strap, or grasp the Lifepulse system sensors continuously. The workout pro-gram automaticaly adjusts the intensity level, based on the actual heart rate, to maintain the rate at 65percent of the theoretical maximum†.
CARDIO is a higher intensity workout for more fit users, emphasizing cardiovascular benefits and maxi-mum fat burning. The user must wear a Polar heart rate chest strap, or grasp the Lifepulse system sensorscontinuously. The workout program automatically adjusts the intensity level, based on the actual heart rate,to maintain the rate at 80 percent of the theoretical maximum.
The following three workouts are accessed by pressing the ZONE TRAINING+ key :
HEART RATE HILLTM takes the user through three different hills based on the target heart rate*. Theuser wears a heart rate chest strap, or grasps the LifepulseTM sensors continuously.
HEART RATE INTERVALTM alternates between a hill and a valley based on the target heart rate*. Theuser wears a heart rate chest strap, or grasps the LifepulseTM sensors continuously.
EXTREME HEART RATE TM is an intense workout for more experienced users. It is designed to getthe heart rate up and down as quickly as possible. The user wears a heart rate chest strap, or graspsthe LifepulseTM sensors continuously.
The following seven workouts are accessed by pressing the HILL PLUS key :
HILL is an interval-training workout combining “hills” and “valleys” of different intensity levels, which isproven to provide effective, time-efficient cardiovascular results.
AROUND THE WORLD is an interval-training workout in which the hills resemble scenes of various geographical areas.
FOOT HILLS is a rolling hill workout with low intensity levels.
† Defined by the American College of Sports Medicine's "Guidelines for Exercise Testing and Prescription" as equal to 220 minus an individual’s age.* Target Heart Rate (THR) is a percentage of the theoretical maximum. For example, a 40-year-old user's THR for the HEARTRATE HILL workout is 144. This workout targets 80 percent of the maximum, so the equation would be (220-40)*.80=144.

19
KILIMANJARO is a Hill workout in which the intensity levels gradually incline toward one ultimatepeak and then gradually decline.
INTERVAL is a Hill workout in which intensity levels rise and fall. The higher levels gradually inclinetoward a peak and then gradually decline.
CASCADES is a two-peak workout in which intensity levels gradually increase and decrease.
SPEED TRAINING is a Hill workout in which the intensity level alternates between high and low lev-els very quickly to simulate a typical speed-training workout.
The following workouts are accessed by pressing the PERSONAL TRAINER key :
PERSONAL TRAINER WORKOUTS can be created by authorized personal. See Section 5.2, titledAbout Personal Trainer Workouts.
FIT TEST measures cardiovascular fitness compared to other people of the same age and gender.
MILITARY FITNESS TEST is similar to the FIT TEST workout, except that this program is based upona specific predefined protocol. The available test is:
• AIR FORCE PHYSICAL READINESS TEST (PRT) - (U.S. MILITARY)
WATTS targets a rate of effort equal to a certain number of Watts. By default, this workout is turned off. Forinformation on making it available, see Section 5, titled Optional Settings.
METs targets a rate of effort equal to a certain number of METs. By default, this workout is turned off. Forinformation on making it available, see Section 5, titled Optional Settings.
AEROBICS TRAINER is a workout in which the MESSAGE CENTER prompts the user to switch continu-ously between a high and low pedaling speeds. The speed intervals alternate in a pattern that promotes abuild-up in the intensity of the workout, followed by a build-down in intensity.
4.2 USING THE WORKOUTS
Different bike workouts require different setup steps. See the chart, titled Lifecycle Exercise BikeWorkout Set-up Steps for a quick glance at the steps for setting up any workout program. This sectionprovides details on the steps themselves.
TO BEGIN ANY WORKOUT
Without networking, start pedaling and press START, or simply start pedaling to activate the con-sole. The MESSAGE CENTER displays the prompt: “SELECT WORKOUT OR PRESS QUICKSTART”. If it displays a different message, press the CLEAR key twice rapidly.
With optional networking enabled, start pedaling, and press START or simply start pedaling to activatethe console. The MESSAGE CENTER displays the prompt: “SELECT WORKOUT OR ENTER ID USINGENTER KEY”. Select a workout, or log on to the networked exercise database, download the presetworkout.
To log onto the network, press ENTER, and key in the user ID number with the NUMERIC KEYPAD.
SELECTING AND USING QUICK START
QUICK START is the fastest way to begin exercising, and it bypasses the steps of selecting a specificworkout program. At the MESSAGE CENTER prompt to select a workout, press the QUICK STARTkey. The workout begins at an intensity level that remains the same unless manually changed.

20
SELECTING A WORKOUT
For MANUAL, FAT BURN, CARDIO, and RANDOM: When prompted to select a workout, pressthe key labeled with the name of the desired workout.
For HEART RATE HILL, HEART RATE INTERVAL, and EXTREME HEART RATE: When prompt-ed by the MESSAGE CENTER to select a workout, press the ZONE TRAINING+ key. The MES-SAGE CENTER then displays the name of one of these workouts. Press ENTER to select the dis-played workout; or continue to press the ZONE TRAINING+ key to display each of the other options,and then press ENTER to select the desired workout.
QUICK STARTPress QUICK STARTBegin workout
RANDOMPress RANDOMEnter timeSelect levelBegin workout
MANUALPress MANUALEnter timeSelect levelBegin workout
HILLPress HILL PLUS; when
HILL appears, pressENTER
Enter timeSelect levelBegin workout
FAT BURN*Press FAT BURNEnter timeEnter ageAccept THR**Begin workout
CARDIO*Press CARDIOEnter timeEnter ageAccept THRBegin workout
HEART RATE HILL*Press ZONE TRAINING+
repeatedly until HR HILLappears; press ENTER
Enter timeEnter ageAccept THRBegin workout
HEART RATE INTERVAL*Press ZONE TRAINING+
repeatedly until HRINTERVAL appears;press ENTER
Enter timeEnter ageAccept THRBegin workout
EXTREME HEART RATE*Press ZONE TRAINING+
repeatedly untilEXTREME HR appears;press ENTER
Enter timeEnter ageAccept THRBegin workout
WATTS Press PERSONAL
TRAINER repeatedlyuntil WATTS appears;press ENTER
Enter timeEnter Watts goal valueBegin workout
METSPress PERSONAL
TRAINER repeatedlyuntil METS appears;press ENTER
Enter timeEnter METs goal valueBegin workout
AROUND THE WORLDPress HILL PLUS repeat-
edly until AROUND THEWORLD Appears; pressENTER
Enter timeSelect levelBegin workout
KILIMANJAROPress HILL PLUS repeat-
edly until KILIMAN-JARO appears; pressENTER
Enter timeSelect levelBegin workout
INTERVALPress HILL PLUS repeat-
edly until INTERVALappears; press ENTER
Enter timeSelect levelBegin workout
CASCADESPress HILL PLUS repeat-
edly until CASCADES appears;press ENTER
Enter timeSelect levelBegin workout
SPEED TRAININGPress HILL PLUS repeat-
edly until SPEEDTRAINING appears;press ENTER
Enter timeSelect levelBegin workout
FOOT HILLSPress HILL PLUS repeat-
edly until FOOT HILLSappears; press ENTER
Enter timeSelect levelBegin workout
PERSONAL TRAINERWORKOUTS
Press PERSONALTRAINER repeatedlyuntil PERSONALTRAINER appears;press ENTER
Select the desired workout number, from1 to 6; press ENTER
Begin workoutAEROBICS TRAINER
Press PERSONALTRAINER repeatedlyuntil AEROBICSTRAINER appears;press ENTER
Enter timeSelect levelBegin workout
FIT TEST** Press PERSONAL
TRAINER repeatedlyuntil FIT TESTappears;press ENTER
Enter weightEnter ageEnter genderEnter levelBegin workout
AIR FORCE PRT Press PERSONAL
TRAINER repeatedlyuntil AIR FORCE PRTappears; press ENTER
Enter weightEnter heightEnter ageEnter genderAnswer promptBegin workout
* This workout requires the user to wear the polar heart rate chest strap or to grip the Life pulse sensors.** Target Heart Rate (THR) is a percentage of the theoretical maximum. A 40-year-old user's THR for the FAT BURNworkout is 117. This workout targets 65 percent of the maximum, so the equation would be (220-40)*.65=117.
LIFECYCLE EXERCISE BIKE WORKOUT SETUP STEPS

21
For WATTS, METS, CALORIE GOAL, DISTANCE GOAL, AEROBICS TRAINER, FIT TEST,MILITARY FITNESS TEST, and PERSONAL TRAINER WORKOUTS: When prompted by the MES-SAGE CENTER to select a workout, press the PERSONAL TRAINER key. The MESSAGE CENTERdisplays the name of a workout. Press ENTER to select the displayed workout; or continue to pressthe PERSONAL TRAINER key to display each of the other options. Press ENTER to select thedesired workout.
For HILL, AROUND THE WORLD, KILIMANJARO, INTERVAL, CASCADES, SPEEDTRAINING, and FOOT HILLS: When prompted by the MESSAGE CENTER to select a workout,press the HILL PLUS key. The MESSAGE CENTER then displays the name of the one of theseworkouts. Press ENTER to select the displayed workout; or continue to press the HILL PLUSkey to display each of the other options, and then press ENTER to select the desired program.
ENTERING AGE
When prompted by the MESSAGE CENTER to enter age, use the ARROW KEYS to increase ordecrease the displayed age to the correct value, or key in the correct value with the NUMERICKEYPAD, and press ENTER.
Lifecycle exercise bike workout programs that set a target heart rate zone first calculate theuser’s theoretical maximum heart rate† by subtracting the user’s age from the number 220. Theprograms then calculate the target zone as a percentage of the theoretical maximum.
ENTERING TIME
When prompted by the MESSAGE CENTER to enter a time, use the ARROW KEYS to increaseor decrease the displayed time to the desired value, or key in the desired value with theNUMERIC KEYPAD, and press ENTER.
SELECTING AND ADJUSTING THE INTENSITY LEVEL
When prompted by the MESSAGE CENTER, use the ARROW keys to increase or decrease thedisplayed intensity level or target heart rate* to the desired value, or key in the desired value with theNUMERIC KEYPAD, and press ENTER. Adjust the level as needed or desired during the workout.
• Intensity level: The Lifecycle exercise bike provides a selection of 25 intensity levels. Theintensity level appears in the WORKOUT PROFILE window as rows of lights arranged incolumns. Selecting a low intensity level at first is recommended. As physical conditioningimproves, the levels can increase.
• Target heart rate: Programs that calculate a target heart rate base this number on the age ofthe user and the type of workout. The user accepts or adjusts the rate when setting up theworkout. During the workout itself, the program reads the heart rate, which is transmitted viathe Polar heart rate chest strap or the Lifepulse system sensors; and it uses this data toadjust the resistance. Manually raising the rate increases the intensity of the cardiovascularexercise.
† Defined by the American College of Sports Medicine's "Guidelines for Exercise Testing and Prescription" as equal to 220 minus an individual’s age.* Target Heart Rate (THR) is a percentage of the theoretical maximum. For example, a 40-year-old user's THR for the CARDIOworkout is 144. This workout targets 80 percent of the maximum, so the equation would be (220-40)*.80=144.

22
SELECTING A GOAL TYPE
Workouts can be programmed to target certain type of goals:
• Calories
• Distance
• Time in zone
The Calories Goal feature is designed to promote weight loss and weight control. The user setsa calorie goal during the workout setup. Once the goal is met, the workout automatically goesinto a cool-down phase and ends afterward.To use this feature:
1. Press the the PERSONAL TRAINER key when prompted to select a workout.2. Continue to press the PERSONAL TRAINER key until the MESSAGE CENTER displays
“CALORIES GOAL”. 3. Press ENTER. 4. Enter the desired calorie goal value. 5. Select either the RANDOM, MANUAL, or HILL workout.
6. Run through the set-up steps for the selected workout.
7. Begin the workout.
The Distance Goal feature is designed to build endurance. The user sets a distance goal duringthe workout setup. Once the goal is met, the workout automatically goes into a cool-down phaseand ends afterward. To use this feature:
1. Press the the PERSONAL TRAINER key when prompted to select a workout.2. Continue to press the PERSONAL TRAINER key until the MESSAGE CENTER displays
“DISTANCE GOAL”. 3. Press ENTER. 4. Enter the desired distance goal value. 5. Select either the RANDOM, MANUAL, or HILL workout.
6. Run through the setup steps for the selected workout.
7. Begin the workout.
The Time in Zone Goal program enhances FAT BURN, CARDIO, HEART RATE HILL, HEARTRATE INTERVAL, and EXTREME HEART RATE workouts by setting a certain duration withinthe target zone* as a workout goal. The program automatically alters the resistance to maintain apace that will meet that objective within that duration. Once the objective is met, the workoutautomatically goes into a cool-down phase. To use the Time In Zone Goal feature:
1. Press the ZONE TRAINING+ key when prompted to select a workout2. Continue to press the ZONE TRAINING+ key until the MESSAGE CENTER displays “TIME
IN ZONE GOAL”. 3. Press ENTER. 4. Select the duration for staying within the zone.
22
* Target Heart Rate (THR) is a percentage of the theoretical maximum. For example, a 40-year-old user's THR for the FAT BURN workout is 117. This workout targets 65 percent of the maximum, so the equation would be (220-40)*.65=117.

23
5. Select a FAT BURN, CARDIO, HEART RATE HILL, HEART RATE INTERVAL, orEXTREME HEART RATE workout.
6. Enter age.
7. Accept or change the target heart rate* displayed by the MESSAGE CENTER.
8. Begin the workout.
SELECTING A WORKOUT MODE
Two workout mode options on the Lifecycle exercise bike feature alternate ways to vary workouts.
• Bike Mode: This workout mode simulates the experience of riding a real bicycle. Therate of calories burned and total distance travelled increase automatically as the userincreases the pedaling speed. This mode can be used with all workouts, except for FATBURN, CARDIO, HEART RATE HILL, HEART RATE INTERVAL, and EXTREMEHEART RATE. To select Bike mode, press BIKE MODE key.
• Constant-Calories-Per-Hour Mode: This workout mode enables a user to maintain aconsistent rate of calories burned per hour. As the pedaling speed increases, the resis-tance level automatically decreases. As the pedaling speed decreases, the resistancelevel automatically increases. This mode can be used with all workouts. To select it,press the CONSTANT CAL./HR. key.
If the user selects a FAT BURN, CARDIO, HEART RATE HILL, HEART RATE INTERVAL, orEXTREME HEART RATE workout during the setup, the default mode is Constant-Calories-Per-Hour. For all other workouts, the default mode is Bike. The user may select or change a modeduring a workout setup or during a workout.
SWITCHING WORKOUTS “ON-THE-FLY”It is possible, during a workout, to switch to another workout program. After a switch, the consoleretains all the progress information about the workout since its beginning. To change workouts“on the fly,” simply press the key for the desired new workout.
PAUSING WORKOUTS
To pause a workout, simply stop pedaling. To continue the workout, resume pedaling. The pauseduration lasts 60 seconds, after which, the console automatically shuts down.
ENDING WORKOUTS EARLY
To end a workout before the pre-set duration expires, press CLEAR once. The MESSAGE CENTERthen displays a workout summary, which includes the distance travelled, the total calories burned, andother statistics. Press CLEAR a second time, and the MESSAGE CENTER displays “SELECTWORKOUT OR PRESS QUICK START” for a new workout.

4.3 WORKOUT DESCRIPTIONS
QUICK START
QUICK START is the fastest way to begin exercising, and it bypasses the steps of selecting a specificworkout program. The intensity level for the workout is set automatically and remains the same unlessmanually changed. To change the level, press the UP or DOWN ARROW keys or use the NUMERICkeypad to enter a higher or lower level number. If the METS display is enabled, the MESSAGECENTER displays “ENTER WEIGHT”, which is required to calculate this value. Using the ARROWKEYS, increase or decrease the displayed weight to the correct value, or enter the weight using theNUMERIC keypad.
FAT BURN
The FAT BURN workout is designed to maintain a user’s heart rate at 65 percent of the theoreticalmaximum† for optimal results. Throughout the workout, the user wears a Polar heart rate chest strapor grips the Lifepulse system sensors. If the user is not wearing a chest strap, the WORKOUT PRO-FILE window displays a heart shape, and the MESSAGE CENTER displays a prompt to grip the sen-sors. The console continuously monitors and displays the heart rate, adjusting the intensity level ofthe Lifecycle exercise bike to reach and maintain the target*. This system eliminates over- andunder-training, and it maximizes the aerobic benefits of exercise by using the body's fat stores for fuel.
CARDIO
The CARDIO workout is virtually identical to FAT BURN; however the target heart rate is calcu-lated at 80 percent of the theoretical maximum. The user wears a chest strap or grips theLifepulse system sensors.The higher target promotes cardiovascular improvement by placing aheavier workload on the heart muscle.
HILL
The Life Fitness-patented HILL workout offers a variety of configurations for interval training.Intervals are periods of intense aerobic exercise separated by regular periods of lower-intensityexercise. The WORKOUT PROFILE window represents these high and low intervals as columns oflight, which together have the appearance of hills and valleys. The computerized interval trainingworkout has been scientifically demonstrated to promote greater cardio-respiratory improvementthan steady-pace training.
Each HILL workout goes through four phases, each marked by different intensity levels. TheWORKOUT PROFILE window displays the progress of these phases, as seen in the chart followingthese descriptions below. As noted in the descriptions, the heart rate should be measured at twostages in the workout to gauge its effectiveness. To do so, wear the Polar heart rate chest strap orcontinuously grip the Lifepulse system sensors. Note that the MESSAGE CENTER does not displaya request for a heart rate measurement during a HILL workout.
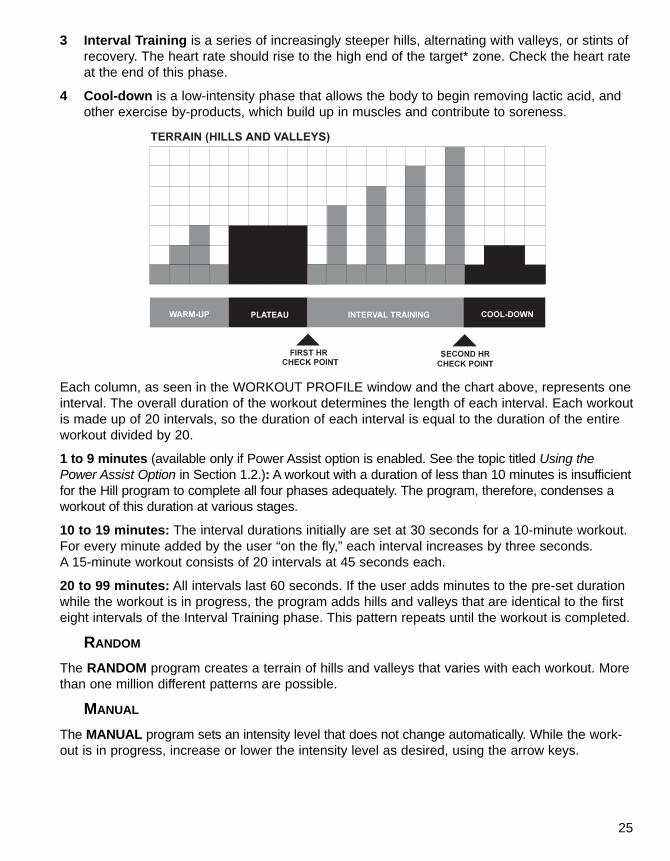
1 Warm-up is a phase of low, gradually rising resistance, which brings the heart rate into thelower end of the target zone and increases respiration and blood flow to working muscles.
2 Plateau increases the intensity slightly, and keeps it steady, to bring the heart rate to the lowend of the target zone. Check the heart rate at the end of this phase.
24
* Target Heart Rate (THR) is a percentage of the theoretical maximum. For example, a 40-year-old user's THR for the FAT BURN workout is 117. This workout targets 65 percent of the maximum, so the equation would be (220-40)*.65=117.
25
3 Interval Training is a series of increasingly steeper hills, alternating with valleys, or stints ofrecovery. The heart rate should rise to the high end of the target* zone. Check the heart rateat the end of this phase.
4 Cool-down is a low-intensity phase that allows the body to begin removing lactic acid, andother exercise by-products, which build up in muscles and contribute to soreness.
Each column, as seen in the WORKOUT PROFILE window and the chart above, represents oneinterval. The overall duration of the workout determines the length of each interval. Each workoutis made up of 20 intervals, so the duration of each interval is equal to the duration of the entireworkout divided by 20.
1 to 9 minutes (available only if Power Assist option is enabled. See the topic titled Using thePower Assist Option in Section 1.2.): A workout with a duration of less than 10 minutes is insufficientfor the Hill program to complete all four phases adequately. The program, therefore, condenses aworkout of this duration at various stages.
10 to 19 minutes: The interval durations initially are set at 30 seconds for a 10-minute workout.For every minute added by the user “on the fly,” each interval increases by three seconds. A 15-minute workout consists of 20 intervals at 45 seconds each.
20 to 99 minutes: All intervals last 60 seconds. If the user adds minutes to the pre-set durationwhile the workout is in progress, the program adds hills and valleys that are identical to the firsteight intervals of the Interval Training phase. This pattern repeats until the workout is completed.
RANDOM
The RANDOM program creates a terrain of hills and valleys that varies with each workout. Morethan one million different patterns are possible.
MANUAL
The MANUAL program sets an intensity level that does not change automatically. While the work-out is in progress, increase or lower the intensity level as desired, using the arrow keys.

26
HEART RATE HILLTM
This program combines the standard HILL workout profile with the concept of Heart Rate ZoneTraining. The default target heart rate* is calculated as 80 percent of the theoretical maximum†
(HRmax), but the user can adjust the target rate during the workout setup. All hills and valleysare percentages of HRmax. The workout consists of three hills that target three heart rate goals:The first hill brings the heart rate to 70 percent of HRmax. The second hill increases the rate to75 percent of HRmax. The third hill matches the Target Heart Rate brining the heart rate to 80percent of HRmax. The valley always is defined as 65 percent of HRmax.
After a standard three-minute warm-up, the workout progresses toward the first hill and heart rategoal. Once the user reaches 70 percent of HRmax, the hill continues for one minute. When theminute expires, the level decreases into a valley. Once the user's heart rate falls to 65 percent ofHRmax, the valley continues for one minute. Then, the next hill begins with its corresponding heartrate goal. After the user completes the third hill/valley pair, the program returns to the first hill andrepeats the cycle as long as the duration allows. At the end of the duration, the workout goes into acool-down phase. If the heart rate goes above the theoretical maximum for more then 45 seconds,the exercise bike automatically goes into pause mode. The program does not proceed to a newheart rate goal until the user reaches the current goal.
117 BPM
85% THR65% HRmax
70% HRmax
75% HRmax
HEART RATE HILL Workout Profile
80% HRmax
Hill
Hill
Hill
Valley Valley Valley
65% HRmax 65% HRmax65% HRmax
117 BPM 117 BPM 117 BPM
127 BPM
135 BPM
User Example: 80 (40 year old / 144 recommended BPM)percent of theoretical maximum (HR )max
144 BPM
† Defined by the American College of Sports Medicine's "Guidelines for Exercise Testing and Prescription" as equal to220 minus an individual’s age.* Target Heart Rate (THR) is a percentage of the theoretical maximum (HRmax). A 40-year-old user's recommended THRfor the HEART RATE HILL workout is 144, or 80 percent of the maximum; so the equation would be (220-40)*.80 = 144.
27
HEART RATE INTERVALTM
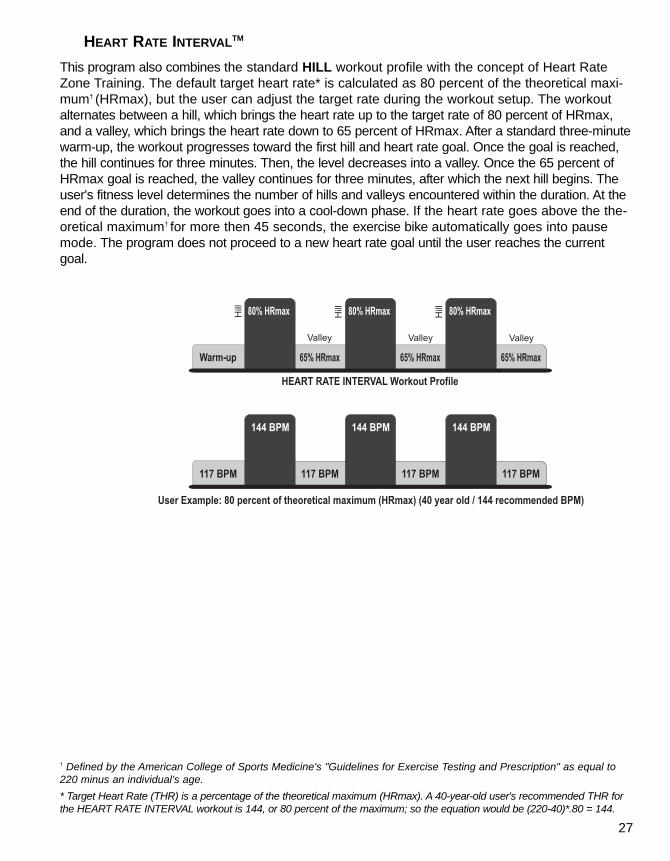
This program also combines the standard HILL workout profile with the concept of Heart RateZone Training. The default target heart rate* is calculated as 80 percent of the theoretical maxi-mum† (HRmax), but the user can adjust the target rate during the workout setup. The workoutalternates between a hill, which brings the heart rate up to the target rate of 80 percent of HRmax,and a valley, which brings the heart rate down to 65 percent of HRmax. After a standard three-minutewarm-up, the workout progresses toward the first hill and heart rate goal. Once the goal is reached,the hill continues for three minutes. Then, the level decreases into a valley. Once the 65 percent ofHRmax goal is reached, the valley continues for three minutes, after which the next hill begins. Theuser's fitness level determines the number of hills and valleys encountered within the duration. At theend of the duration, the workout goes into a cool-down phase. If the heart rate goes above the the-oretical maximum† for more then 45 seconds, the exercise bike automatically goes into pausemode. The program does not proceed to a new heart rate goal until the user reaches the currentgoal.
Warm-up 65% HRmax
HEART RATE INTERVAL Workout Profile
80% HRmaxHill
Hill
Valley Valley Valley
Hill
65% HRmax
80% HRmax
65% HRmax
80% HRmax
117 BPM 117 BPM 117 BPM
User Example: 80 (40 year old / 144 recommended BPM)percent of theoretical maximum (HR )max
144 BPM144 BPM144 BPM
117 BPM
† Defined by the American College of Sports Medicine's "Guidelines for Exercise Testing and Prescription" as equal to220 minus an individual’s age.* Target Heart Rate (THR) is a percentage of the theoretical maximum (HRmax). A 40-year-old user's recommended THR forthe HEART RATE INTERVAL workout is 144, or 80 percent of the maximum; so the equation would be (220-40)*.80 = 144.
28
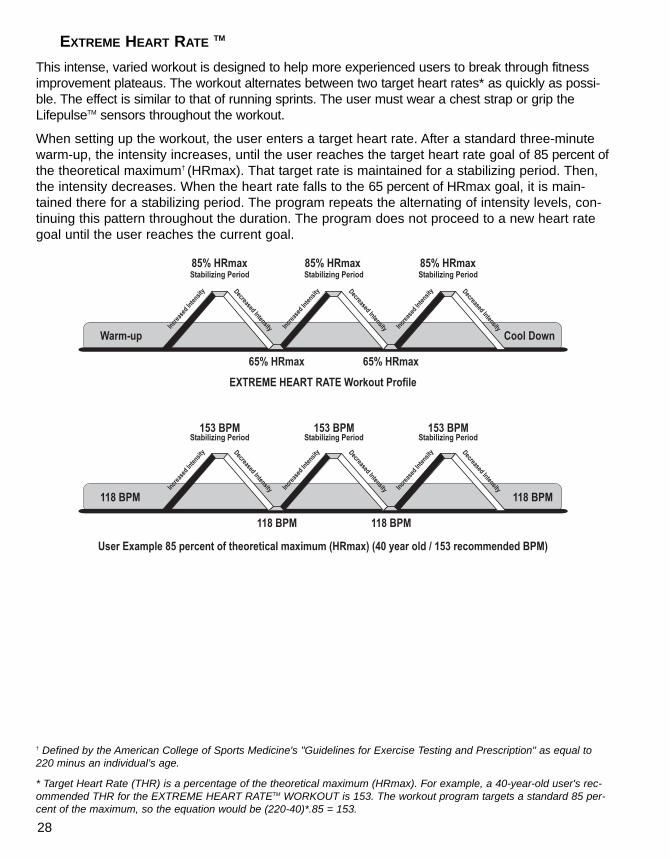
EXTREME HEART RATE TM
This intense, varied workout is designed to help more experienced users to break through fitnessimprovement plateaus. The workout alternates between two target heart rates* as quickly as possi-ble. The effect is similar to that of running sprints. The user must wear a chest strap or grip theLifepulseTM sensors throughout the workout.
When setting up the workout, the user enters a target heart rate. After a standard three-minutewarm-up, the intensity increases, until the user reaches the target heart rate goal of 85 percent ofthe theoretical maximum† (HRmax). That target rate is maintained for a stabilizing period. Then,the intensity decreases. When the heart rate falls to the 65 percent of HRmax goal, it is main-tained there for a stabilizing period. The program repeats the alternating of intensity levels, con-tinuing this pattern throughout the duration. The program does not proceed to a new heart rategoal until the user reaches the current goal.
† Defined by the American College of Sports Medicine's "Guidelines for Exercise Testing and Prescription" as equal to220 minus an individual’s age.
* Target Heart Rate (THR) is a percentage of the theoretical maximum (HRmax). For example, a 40-year-old user's rec-ommended THR for the EXTREME HEART RATETM WORKOUT is 153. The workout program targets a standard 85 per-cent of the maximum, so the equation would be (220-40)*.85 = 153.

29
WATTS
This workout targets a rate of effort equal to a certain number of Watts. A Watt is a unit of powerthat measures the amount of mechanical work required to operate a device, such as a Lifecycleexercise bike. It is roughly equal to .25 calories per hour. The workout program automaticallyalters the intensity level to maintain the appropriate rate of effort. By default, this workout is turnedoff. For information on making it available, see Section 5, titled Optional Settings.
METSThis workout targets a rate of effort equal to a certain number of METs. A MET is a unit of measurementused to express the metabolic rate of work (oxygen consumption per unit of body weight) required to per-form a task. One MET is approximately equal to a person’s metabolism when seated and relaxed. Bydefault, this workout is turned off. For information on making it available, see Section 5, titled OptionalSettings.
AEROBICS TRAINER
In this workout, the MESSAGE CENTER continuously prompts the user to switch between a high pedalingspeed and a low pedaling speed. These speed intervals alternate in a pattern that promotes a “build-up” inthe intensity of the workout, followed by a “build-down” in intensity.
The workout consists of 32 intervals, which are divided into groups of four. In the first group, the userencounters one fast interval followed by three slow intervals. The second group features two fast intervalsfollowed by two slow intervals. The third group features three fast intervals followed by one slow interval.The fourth group, which is the most intense point of the workout, features four fast intervals. Afterward, theworkout decreases in intensity, concluding with a group of four, conscutive, slow intervals. See the chartbelow:
The length of the intervals depends on the workout duration selected by the user.
PERSONAL TRAINER WORKOUTS
Custom interval heart rate and hill workouts may be created by fitness club managers or other authorizedpersonnel. For information about these workouts, consult a fitness club staff member. To select these work-outs, press the PERSONAL TRAINER key. When prompted by the MESSAGE CENTER, press the num-ber corresponding to the desired workout, using the NUMERIC keypad. Then, press ENTER and begin theworkout. See section 5.2, titled About Personal Trainer Workouts.
Group 1 Group 2 Group 3 Group 4 Group 5 Group 6 Group 7 Group 8
Fast Slow
Build-Up Build-Down
Interval 1
Interval 2
Interval 3
Interval 4
Workout Begin

30
FIT TEST
The Lifecycle exercise bike Fit Test program is another exclusive feature of this versatile exercise bike. TheFit Test workout measures cardiovascular fitness and can be used to monitor improvements in enduranceevery four to six weeks. The user must grasp the hand sensors when prompted or wear a heart rate cheststrap, as the test score calculation is based on a heart rate reading. The workout duration will be five min-utes at the chosen resistance level. Immediately afterward, the console will take the user's heart rate read-ing, calculate a fitness score, and display the score in the MESSAGE CENTER.
The Fit Test is considered to be a submax VO2 (volume of oxygen) test. It gauges how well the heart sup-plies oxygenated blood to the exercising muscles, and how efficiently those muscles receive oxygen fromthe blood. Physicians and exercise physiologists generally regard this test as a good measure of aerobiccapacity. Please note that the estimated VO2 max scores achieved will be 10 percent to15 percent loweron stationary exercise bikes than those achieved on other Life Fitness cardiovascular equipment. Stationarycycling has a higher rate of isolated muscle fatigue of the quadriceps when compared to walking/running ona treadmill, climbing on a stairclimber, or utilizing a cross-trainer. This higher rate of fatigue corresponds tolower levels of estimated VO2 max scores.
To set up the Fit Test:
Begin pedaling.
Press the PERSONAL TRAINER button repeatedly until the FIT TEST option appears in the mes-sage center. Press ENTER to select the FIT TEST option.
The message center will prompt for a user weight (ENTER WEIGHT). Use the NUMERIC KEYS orUP/DOWN ARROW KEYS to input your weight. Press ENTER to accept the weight.
The message center will next prompt for a user age (ENTER AGE). Use the NUMERIC KEYS orUP/DOWN ARROW KEYS to input your age. Press ENTER to accept the age.
The message center will next prompt for a user gender (SELECT GENDER). Using the UP/DOWNARROW KEYS, select a gender. Press ENTER to accept the gender selection.
The message center will next prompt for a workout level (ENTER LEVEL). Consult the following rec-ommended fit test level chart for an appropriate effort level based on your age, gender and activitylevel. Use the NUMERIC KEYS or UP/DOWN ARROW KEYS to enter the corresponding level.
After the five-minute FIT TEST is completed, a FIT TEST score will be displayed.
FIT TEST PROGRAM SUGGESTED EXERTION LEVELS
Inactive Active Very Active
Bike Fit Test Level L4-6 men L5-10 men L8-14 men
L2-4 women L3-7 women L6-10 women
Suggested exertion levels should be used as a guideline for setting up the Fit Test program. The goal is toelevate the user's heart rate to a level that is between 60%-85% of their theoretical maximum heart rate(220-age).

31
Within each suggested range, these additional guidelines can be used:
Lower Half of Range Upper Half of Range
higher age lower age
lower weight higher weight*
shorter taller
* in cases of excessive weight, use lower half of range
The computer will not accept:
heart rates less than 52 or greater than 200 beats per minute
body weights less than 75 pounds (34 kg) or greater than 400 pounds (182 kg)
ages below 10 or over 99 years
data input that exceeds human potential
If you make an error when entering any Fit Test data, you can correct it by pressing CLEAR, inputting thecorrect information, and pressing ENTER.
It is important for you to take the Fit Test under similar circumstances each time. Your heart rate is depen-dent on many factors, including:
amount of sleep the previous night (at least seven hours is recommended)
time of day
time you last ate (two to four hours after the last meal is recommended)
time since you last drank a liquid containing caffeine or alcohol, or smoked a cigarette (at least fourhours is recommended)
time since you last exercised (at least six hours is recommended)
For the most accurate Fit Test results, you should perform the Fit Test on three consecutive days and aver-age the three scores.
NOTE: To receive a proper Fit Test score, the work done must be within a training heart rate zone that is60 percent to 85 percent of the theoretical maximum heart rate. This rate is defined by the AmericanCollege of Sports Medicine's "Guidelines for Exercise Testing and Prescription" as equal to 220 minus an

32
individual's age.
The tables below list fit test results.
RELATIVE FITNESS CLASSIFICATION FOR MEN
Men Estimated VO2 Max (ml/kg/min) Per Age Category
Rating 20-29 30-39 40-49 50-59 60+
Elite 52+ 51+ 48+ 45+ 42+
Excellent 50-51 48-50 46-47 42-44 39-41
Very Good 47-49 45-47 43-45 40-41 36-38
Above Average 44-46 42-44 40-42 37-39 33-35
Average 41-43 39-41 37-39 34-36 30-32
Below Average 38-40 36-38 34-36 31-33 27-29
Low 35-37 33-35 31-33 28-30 24-26
Very Low <35 <33 <31 <28 <24
RELATIVE FITNESS CLASSIFICATION FOR WOMEN
Women Estimated VO2 Max (ml/kg/min) Per Age Category
Rating 20-29 30-39 40-49 50-59 60+
Elite 44+ 42+ 39+ 35+ 34+
Excellent 42-43 40-41 37-38 33-34 32-33
Very Good 39-41 37-39 35-36 31-32 30-31
Above Average 37-38 35-36 32-34 29-30 28-29
Average 34-36 32-34 30-31 27-28 25-27
Below Average 31-33 29-31 27-29 25-26 23-24
Low 28-30 27-28 25-26 22-24 20-22
Very Low <28 <27 <25 <22 <20
Life Fitness developed this rating scale based on VO2 max percentile distributions referenced in AmericanCollege of Sports Medicine's "Guidelines for Exercise Testing and Prescription" (6th Ed. 2000). It isdesigned to provide a qualitative description of a user's VO2 max estimation, and a means of assessing ini-tial fitness level and tracking improvement.
32

33
MILITARY FITNESS TEST
The 95Ci exercise bike features an Air Force Physical Readiness Tests (PRT). This test is similar to the fittest workout, except that it does not have a preset time goal. The Air Force PRT is located in the PersonalTrainer Workouts.
To begin an Air Force PRT:
Press the Personal Trainer button repeatedly until the Air Force PRT appears in the message centerand press ENTER to select the Air Force PRT option.
The message center will prompt for a user weight (ENTER WEIGHT). Enter a weight between 75 -400 pounds using the NUMERIC KEYS. Press ENTER to accept the weight.
The message center will next prompt for a user height (ENTER HEIGHT). Enter a height between 36- 90 inches using the NUMERIC KEYS. Press ENTER to accept the height.
The message center will next prompt for a user age (ENTER AGE). Enter an age between 17 - 70years using the NUMERIC KEYS. Press ENTER to accept the age.
The message center will next prompt for a user gender (SELECT GENDER). Using the UP/DOWNARROW KEYS, select a gender. Press ENTER to accept the gender selection.
The message center will next prompt for a user Fitness Level ("Do you participate in Aerobic Activityat least 20 minutes per session 3+ times per week"). Using the UP/DOWN ARROW KEYS, select'YES' or 'NO'. Press ENTER to accept the selection.
The Air Force PRT begins after the user selects their Fitness Level and presses ENTER. During the PRTthe user must maintain 50-80 RPM. If the user pedals outside this range, a warning message is displayed.If the user continues to pedal outside this range for more than 10 seconds, the test is terminated. If theuser's heart rate exceeds 85% of their theoretical maximum heart rate, the test is also terminated. The AirForce PRT requires a user's heart rate throughout the test. Heart rate is recorded every minute, and if it isnot detected, the test will terminate. The PRT starts with a 2 minute warm-up. After this warm-up, an initialwattage setting is determined from the user's input data. The PRT then monitors a user's heart rate anddetermines if more resistance is needed. After 6 minutes at a constant wattage, the exercise bike will try tocalculate a score.
SIX PRE-SET WORKOUTS
AROUND THE WORLD, CASCADES, FOOT HILLS, INTERVAL, KILIMANJARO, and SPEEDTRAINING are variations of the HILL workout. These workouts cannot be changed "on the fly."
AROUND THE WORLD is an interval-training workout in which the hills resemble scenes of various geographical areas.
CASCADES is a two-peak workout in which intensity levels gradually increase and decrease.
FOOT HILLS is a rolling hill workout with low intensity levels.
INTERVAL is a Hill workout in which intensity levels rise and fall. The higher levels gradually inclinetoward a peak and then gradually decline.
KILIMANJARO is a Hill workout in which the intensity levels gradually incline toward one ultimatepeak and then gradually decline.
SPEED TRAINING is a Hill workout in which the intensity level alternates between high and low lev-els very quickly to simulate a typical speed-training workout.

34
5 OPTIONAL SETTINGS
5.1 ENTERING AND USING THE OPTIONAL SETTINGS FEATURE
Fitness club managers and other authorized personnel can use the Optional Settings feature to change default settings, or to enable or disable certain programs or displays on the bike console.
To enter the Optional Settings, while the unit is on, hold down the “5” key on the NUMERIC keypad, press CLEAR twice and press ENTER. The MESSAGE CENTER displays OPTIONALSETTINGS, and then, the first configuration option. Scroll forward through the options using theENTER key, or backward, using the CLEAR key. For each feature or setting option, the MES-SAGE CENTER displays the default setting. To change the default, press an ARROW key for thedesired value, or use the NUMERIC keypad. Press ENTER to select the new value or setting.
To exit Optional Settings, press the CLEAR key repeatedly until the MESSAGE CENTER displays “SELECT WORKOUT OR PRESS QUICK START”.
Setting Default Value DescriptionMAX WORKOUT 60 minutes This is the maximum possible duration for a
DURATION workout. The value can range from 1 to 99.ENGLISH/METRIC ENGLISH This option determines the units of weight
UNITS measurement used by workout programs.WATTS DISPLAY ENABLED If this option is enabled, the MESSAGE CENTER
ENABLE/ displays the Watts equivalent of the pedal rate.DISABLE
METS DISPLAY DISABLED If this option is enabled, the MESSAGE CENTER ENABLE/ displays the METs equivalent of the pedal rate. DISABLE
WATTS PROGRAM DISABLED If this option is enabled, the Watts program becomes ENABLE/ an available workout on the bike.DISABLE
METS PROGRAM DISABLED If this option is enabled, the METs program becomes ENABLE/ an available workout on the bike. DISABLE
CAL/HR DISPLAY DISABLED If this option is enabled, the MESSAGE CENTER ENABLE/ displays the number of calories burned per hour DISABLE during the workout.
AIR FORCE PRT ENABLED If this option is enabled, the FITNESS TEST: AIR ENABLE/ FORCE PRT program becomes an available workout DISABLE on the bike.
OPTIONAL SETTINGS

5.2 ABOUT PERSONAL TRAINER WORKOUTS
Fitness club managers and other authorized personnel can create up to six custom workouts forthe Lifecycle exercise bike, using the display console. Options include custom interval heart rateand hill workouts.
Interval heart rate: The trainer can design a workout that sets a different target heart rate foreach interval and adjusts the resistance to the user's heart rate.
Hill: The trainer can create a custom hill workout that sets a different intensity level for eachinterval.
Once PERSONAL TRAINER workouts are created, users can access them with the PERSON-AL TRAINER key. Each workout is identified by a numeral, from 1 to 6. See Section 4, titled TheWorkouts.
TO CREATE A PERSONAL TRAINER WORKOUT
When the console is activated, hold down the COOL DOWN button, and press the PERSONALTRAINER button simultaneously.
Using the ARROW keys, scroll to, and select, the “PERSONAL TRAINER WORKOUT ENTRY”option, and press ENTER. (If the alternate option, “ERASE PERSONAL TRAINER WORK-OUTS”, is selected, the computer deletes setup information for all PERSONAL TRAINER work-outs, and the MESSAGE CENTER displays "PERSONAL TRAINER WORKOUTS ERASED".Then, the MESSAGE CENTER displays "PERSONAL TRAINER WORKOUT ENTRY").
Select a number, from 1 to 6, to identify the new workout. Use the NUMERIC keypad or theARROW keys. Then, press ENTER.
If a PERSONAL TRAINER workout already has been created for that number, the MESSAGECENTER displays a prompt to either modify the workout or proceed to another number. Pressingthe CLEAR key overwrites the previously created workout, making it possible to create a new work-out for that number. Pressing ENTER bypasses the number and proceeds to another number.
If a PERSONAL TRAINER workout has not been created for a selected number, the MESSAGECENTER displays the prompt, "BEGIN PERSONAL TRAINER WORKOUT CREATION".
The MESSAGE CENTER displays a prompt to enter a duration time for the entire workout.Using the NUMERIC keypad, enter a duration and press ENTER.
The MESSAGE CENTER displays a prompt to select the workout type. Options are “TARGETHEART RATE PERCENTAGE” or “LEVEL”. The latter type is for custom hill workouts. Use theARROW keys to toggle between the options, and press ENTER to select one of them.
The MESSAGE CENTER displays a prompt to select a target heart rate or an intensity level forthe first interval, depending on the type of workout chosen in an earlier step. Use the ARROWkeys or the NUMERIC keypad. A PERSONAL TRAINER workout consists of 30 intervals, so thelength of each interval is equal to the workout duration value divided by 30. After entering thevalue, press ENTER. Repeat this set of steps for each of the following 29 intervals. To keep thepreceding value for the current interval, simply press ENTER.
At the end of this setup, the MESSAGE CENTER displays “PERSONAL TRAINER WORKOUTCOMPLETED”. Afterward, the MESSAGE CENTER displays “SELECT WORKOUT OR PRESSQUICK START”. The new PERSONAL TRAINER workout is ready to use.
35
6 SERVICE AND TECHNICAL DATA
6.1 PREVENTATIVE MAINTENANCE TIPS
The Lifecycle Exercise Bike is backed by the engineering excellence of Life Fitness and is one ofthe most rugged and trouble-free pieces of exercise equipment on the market today. CommercialLife Fitness products have proven to be durable in health clubs, colleges, and military facilitiesthe world over. This same technology, engineering expertise, and reliability have gone into theLifecycle Exercise Bike.
NOTE: The safety of the equipment can be maintained only if the equipment is examined regu-larly for damage or wear. Keep the equipment out of use until defective parts are repaired orreplaced. Pay special attention to parts that are subject to wear as outlined in the PreventiveMaintenance Schedule.
The following preventive maintenance tips will keep the Lifecycle exercise bike operating at peakperformance:
• Locate the bike in a cool, dry place.
• Keep the pedal straps fastened securely when using the bike.
• Keep the display console free of fingerprints and salt build-up caused by sweat.
• Use a 100% cotton cloth, lightly moistened with water and mild liquid detergent, toclean the bike. Other fabrics, including paper towels, may scratch the surface. Do not use ammonia or acid-based cleaners.
• Long fingernails may damage or scratch the surface of the console; use the pad of thefinger to press the selection buttons on the console.
• Clean the housing thoroughly on a regular basis.
NOTE: A non-abrasive cleaner and soft cotton cloth are strongly recommended for cleaning theexterior of the unit. At no time should cleaner be applied directly to any part of the equipment;apply the non-abrasive cleaner on a soft cloth, and then wipe the unit.
36

6.2 PREVENTATIVE MAINTENANCE SCHEDULE
Follow the schedule below to ensure proper operation of the product.
6.3 TROUBLESHOOTING THE POLAR HEART RATE CHEST STRAP
HEART RATE READING IS ERRATIC OR ABSENT ENTIRELY
• Repeat the electrode moistening procedure. See Section 3.2, titled Heart RateMonitoring for details. The electrodes must remain wet to pick up and transmit accurateheart rate eadings.
• Make sure the electrodes are flat against the skin.• Wash the belt transmitter regularly with mild soap and water.• Make sure the chest strap transmitter is within three feet, or one meter, of the heart rate
receiver.• The chest strap is battery-operated and will stop functioning when the battery runs out.
Contact Life Fitness Customer Support Services for instructions on how to have thechest strap replaced. See section 6.5, titled How to Obtain Product Service.
HEART RATE READING IS ERRATIC OR EXTREMELY HIGH
If the chest strap is worn near sources of electromagnetic signals, these signals may be strongenough to affect heart rate readings. Possible sources include:
• Television sets and/or antennas, cell phones, computers, cars, high voltage power linesand motor driven exercise equipment.
• Another heart rate transmitter within three feet, or one meter, may also cause abnormalheart rate readings.
6.4 TROUBLESHOOTING THE LIFEPULSE SYSTEM SENSORS
If the heart rate reading is erratic or missing, do the following:• Dry moist hands to prevent slipping.• Apply hands to both sensors, one in each hand.• Grasp the sensors firmly.
• Apply constant pressure around the sensors.
37
Follow the schedule below to ensure proper operation of the product.ITEM WEEKLY MONTHLY BI-ANNUALLY ANNUALLYDisplay Console C IConsole Mounting Bolts IAccessory Tray C IFrame C IPlastic Covers C IPedals and Straps C IKEY: C=Clean; I=Inspect

38
6.5 RECYCLING THE BATTERY
When this Life Fitness product is about to be discarded at the end of its useful life, the rechargeablebattery must first be removed and recycled. If an optional external power supply is present, it mustbe disconnected before the battery is removed. To access the battery, remove the right-side pedalcrank and shroud. To remove the battery, disconnect the cable, and remove the two screws holdingthe battery to the bracket.
6.6 HOW TO OBTAIN PRODUCT SERVICE
1. Verify the symptom and review the operating instructions. The problem may be unfamil-iarity with the product and its features and workouts.
2. Locate and document the serial number of the unit. This number consists of three letters followed by six numbers. The serial number plate is located on the front stabilizer at the bottom of the unit.
3. Contact Life Fitness Customer Support Services via the Web at: www.lifefitness.com, orcall the nearest Life Fitness Customer Support Services group:
For Product Service within the United States and Canada:
Telephone: (+1) 847.451.0036FAX: (+1) 847.288.3702Toll-free telephone: 800.351.3737
For Product Service Internationally:Life Fitness Europe GmbHTelephone: (+49) 089.317.751.66FAX: (+49) 089.317.751.38 Life Fitness (UK) LTDTelephone: (+44) 1353.665507FAX: (+44) 1353.666018 Life Fitness Atlantic BVLife Fitness BeneluxTelephone: (+32) 03.644.44.88FAX: (+32) 03.644.24.80Telephone: (+32) 87.300.942FAX: (+32) 87.300.943Life Fitness Italia S.R.L.Telephone: (+39) 0472.835.470FAX: (+39) 0472.833.150 Toll-free telephone: 800.438836 Life Fitness Vertriebs GmbHTelephone: (+43) 1615.7198FAX: (+43) 1615.7198.20
Life Fitness Asia Pacific LtdTelephone: (+852) 2891.6677FAX: (+852) 2575.6001Life Fitness Latin America
and CaribbeanTelephone: (+1) 847.288.3964FAX: (+1) 847 288.3886Life Fitness BrazilTelephone: (+55) 11.7295.2217FAX: (+55) 11.7295.2218Life Fitness JapanTelephone: (+81) 3.3359.4306FAX: (+81) 3.3359.4307Life Fitness Iberia Telephone : (+34) 93 672 4660FAX : (+34) 93 672 4670

7 SPECIFICATIONS
7.1 95CI LIFECYCLE EXERCISE BIKE SPECIFICATIONS
Designed use: Heavy/CommercialMaximum user weight: 400 pounds / 181 kilogramsCONSOLE:Type: Numeric keypad and arrow keysDisplays: MESSAGE CENTER with heart rate, distance, Revolutions Per Minute (RPM),
calories, calories per hour (when enabled), Watts (when enabled), and METs (when enabled)WORKOUT PROFILETIME/LEVEL WINDOW
Summaries: Total elapsed time of workout, total calories burned, total distanceCharacter size: 0.54 inchesWorkouts: Quick Start, Fat Burn, Cardio, Manual, Random, Hill, Heart Rate Hill,
Heart Rate Interval, Heart Rate Extreme, Watts (when enabled), METS (when enabled), Around the World, Foothills, Kilimanjaro, Interval,Cascades, Speed Training, Fit Test, Military Fitness Test (when enabled)
Heart rate monitor: Polar telemetry heart rate monitoring systemLifepulse system sensorsPolar heart rate chest strap (optional)
Intensity levels: 25Pedal size 5 inches x 5.5 inches / 127 millimeters x 140 millimetersDrive type: Belt/alternatorAccessory Tray: Standard Color: Gray / SilverASSEMBLED DIMENSIONS:
Length 48 inches / 122 centimetersWidth 24 inches / 61 centimetersHeight 54 inches / 137 centimetersWeight 107 pounds / 49 kilograms
SHIPPING DIMENSIONS:Length 48 inches / 122 centimetersWidth 22 inches / 56 centimetersHeight 37 inches / 94 centimetersWeight 134 pounds / 61 kilograms
39

M051-00K63-A064