removing memory and network options
TRANSCRIPT

Removing memory and network options
Using color
Maintenance
Troubleshooting
Administration
1Printing
Index
www.lexmark.com
Lexmark C910
Paper handling
Previously installed memory and interface options can easily be removed by using the procedures on the following pages.
1 Turn the printer off.
2 Unplug the power cord.
3 Disconnect the parallel or Ethernet cable from the printer.
If you have any other devices connected to the printer, turn them off as well and unplug any cables going to the printer.
Removing the system board access coverYou must remove the system board access cover to install memory cards, a firmware card, a hard disk, or an option card.
CAUTION! This printer weighs 69.9 kg (154 Ib) and requires four people to lift. Anytime you move or lift the printer make sure you have enough people to help. Use the handholds located on the sides to lift the printer.
1 Move the printer or place it in an area that will be convenient for removing the cover and components.
You need a number 2 Phillips screwdriver to remove the cover and system board.

Removing memory and network options
Using color
Maintenance
Troubleshooting
Administration
2Printing
Index
www.lexmark.com
Lexmark C910
Paper handling
2 Loosen the eight screws on the cover. Do not remove the screws completely.
3 Slide the cover up and away from the printer.
Warning: The system board access cover must be replaced before operating the printer.
Screws
Screws
Removing memory and network options
Using color
Maintenance
Troubleshooting
Administration
3Printing
Index
www.lexmark.com
Lexmark C910
Paper handling
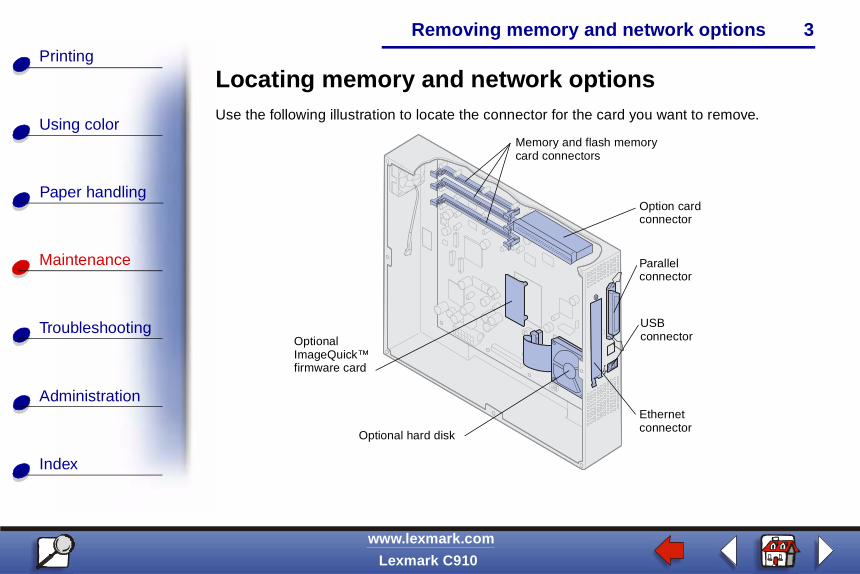
Locating memory and network optionsUse the following illustration to locate the connector for the card you want to remove.
Memory and flash memory card connectors
Option card connector
Parallel connector
USB connector
Ethernet connector
Optional hard disk
Optional ImageQuick™ firmware card

Removing memory and network options
Using color
Maintenance
Troubleshooting
Administration
4Printing
Index
www.lexmark.com
Lexmark C910
Paper handling
Removing a memory cardComplete the following steps if you need to remove a memory card. Otherwise, go to Installing the system board access cover.
1 Make sure the printer is turned off and the power cord is unplugged.
2 Follow the steps for Removing the system board access cover if it is still installed.
Warning: Memory cards are easily damaged by static electricity. Touch something metal such as the printer frame before you touch a memory card.

Removing memory and network options
Using color
Maintenance
Troubleshooting
Administration
5Printing
Index
www.lexmark.com
Lexmark C910
Paper handling
3 Push the latches at each end of the connector away from the card.
The memory card moves out of the connector as the latches open.
4 Gently pull the card out.

Removing memory and network options
Using color
Maintenance
Troubleshooting
Administration
6Printing
Index
www.lexmark.com
Lexmark C910
Paper handling
5 Place the card into the original packaging.
If you do not have the original packaging, wrap the card in paper and store it in a box.
6 Close both latches.
7 Repeat steps 3 through 6 to remove additional memory cards.

Removing memory and network options
Using color
Maintenance
Troubleshooting
Administration
7Printing
Index
www.lexmark.com
Lexmark C910
Paper handling
Removing an option cardYou need a number 2 Phillips screwdriver to remove an option card.
1 Make sure the printer is turned off and the power cord is unplugged.
2 Complete the steps for Removing the system board access cover if it is still installed.
Warning: Option cards are easily damaged by static electricity. Touch something metal such as the printer frame before you touch an option card.

Removing memory and network options
Using color
Maintenance
Troubleshooting
Administration
8Printing
Index
www.lexmark.com
Lexmark C910
Paper handling
3 Remove the screws securing the option card to the cover.

Removing memory and network options
Using color
Maintenance
Troubleshooting
Administration
9Printing
Index
www.lexmark.com
Lexmark C910
Paper handling
4 Gently pull the option card completely out.

Removing memory and network options
Using color
Maintenance
Troubleshooting
Administration
10Printing
Index
www.lexmark.com
Lexmark C910
Paper handling
5 Place the option card in its original packaging.
If you do not have the original packaging, wrap the option card in paper and store it in a box.
6 If you are not installing another option card in the connector, cover the opening with a blank internal print server cover.
Cover the opening to ensure proper airflow around the system board. If you do not have a blank cover, contact your service representative and request one.
Removing a firmware card1 Make sure the printer is turned off and the power cord is unplugged.
2 Complete the steps for Removing the system board access cover if it is still installed.
Warning: Firmware cards are easily damaged by static electricity. Touch something metal such as the printer frame before you touch a firmware card.
If an option card has been installed, you need to remove the option card before removing the firmware card.
Removing memory and network options
Using color
Maintenance
Troubleshooting
Administration
11Printing
Index
www.lexmark.com
Lexmark C910
Paper handling
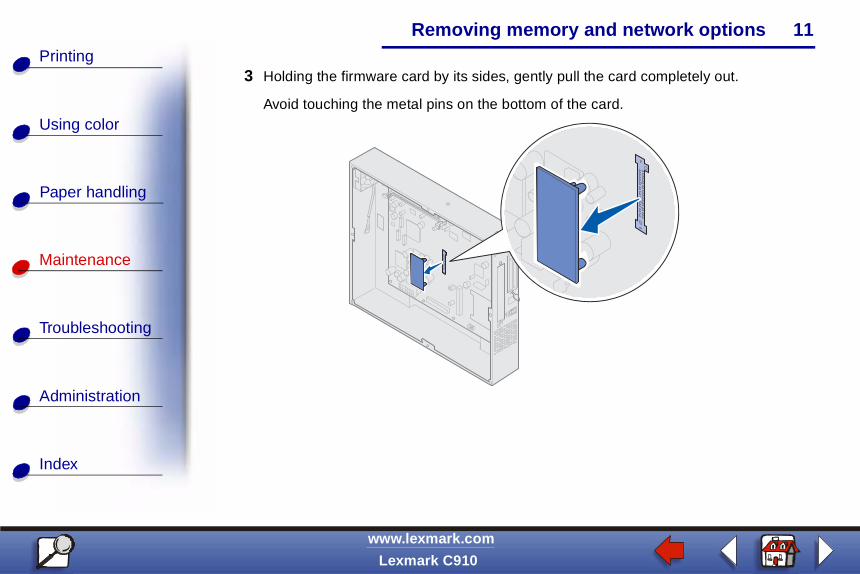
3 Holding the firmware card by its sides, gently pull the card completely out.
Avoid touching the metal pins on the bottom of the card.

Removing memory and network options
Using color
Maintenance
Troubleshooting
Administration
12Printing
Index
www.lexmark.com
Lexmark C910
Paper handling
4 Place the firmware card in its original packaging.
If you do not have the original packaging, wrap the firmware card in paper and store it in a box.
5 If you removed an option card to access the firmware card, reinstall the option card.
Removing memory and network options
Using color
Maintenance
Troubleshooting
Administration
13Printing
Index
www.lexmark.com
Lexmark C910
Paper handling
Removing a hard disk1 Make sure the printer is turned off and the power cord is unplugged.
2 Complete the steps for Removing the system board access cover if it is still installed.
Warning: Hard disks are easily damaged by static electricity. Touch something metal such as the printer frame before you touch a hard disk.
If an option card has been installed, you need to remove the option card before removing the hard disk.
Removing memory and network options
Using color
Maintenance
Troubleshooting
Administration
14Printing
Index
www.lexmark.com
Lexmark C910
Paper handling
3 Pull the hard disk out of the holes on the system board. It is attached by three posts on the mounting plate.

Removing memory and network options
Using color
Maintenance
Troubleshooting
Administration
15Printing
Index
www.lexmark.com
Lexmark C910
Paper handling
4 Flip the hard disk over, and then unplug the ribbon cable connector from the connector on the system board.
Removing memory and network options
Using color
Maintenance
Troubleshooting
Administration
16Printing
Index
www.lexmark.com
Lexmark C910
Paper handling
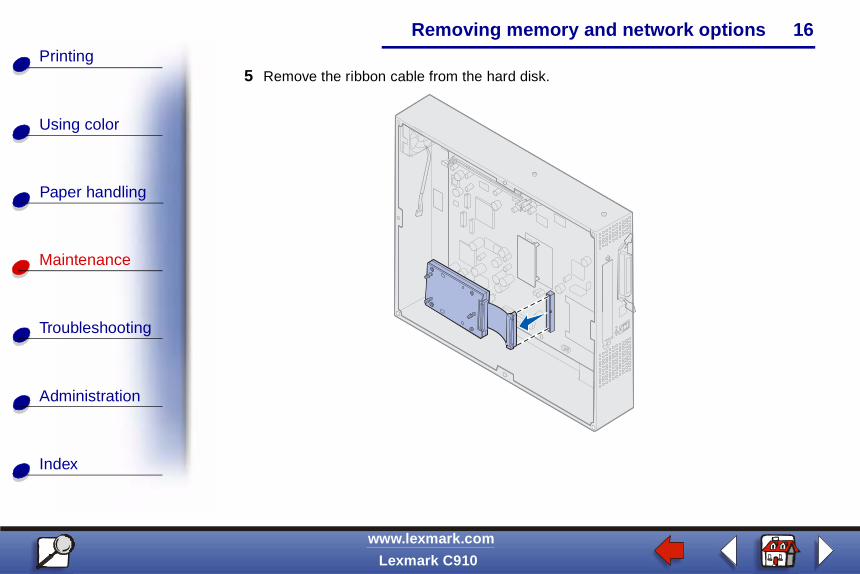
5 Remove the ribbon cable from the hard disk.

Removing memory and network options
Using color
Maintenance
Troubleshooting
Administration
17Printing
Index
www.lexmark.com
Lexmark C910
Paper handling
6 Place the hard disk in the original packaging.
If you do not have the original packaging, wrap the parts in paper and store them in a box.
Installing the system board access coverAfter you have removed the options, complete the following steps to install the cover and system board.
You need a number 2 Phillips screwdriver to install the cover.
1 Make sure the printer is off and unplugged.

Removing memory and network options
Using color
Maintenance
Troubleshooting
Administration
18Printing
Index
www.lexmark.com
Lexmark C910
Paper handling
2 Align the holes on the access cover with the screws.

Removing memory and network options
Using color
Maintenance
Troubleshooting
Administration
19Printing
Index
www.lexmark.com
Lexmark C910
Paper handling
3 Place the cover against the printer and slide it down.
4 Tighten the eight screws.
Removing memory and network options
Using color
Maintenance
Troubleshooting
Administration
20Printing
Index
www.lexmark.com
Lexmark C910
Paper handling
5 Connect the printer cables and power cord, and turn the printer on.
Note: To prevent an electrical overload, plug your printer into a well-grounded outlet on a non-ground fault interrupter (GFI) circuit. ▲